Easy Tawa Chicken Recipe with step by step pictures. In this recipe chicken pieces are cooked on an iron Tawa using pav bhaji masala. Try this delicious recipe with naan and paratha. Tawa Chicken Ever since I made a batch of pav bhaji masala, I have been looking for recipe to use them up. I...
Veg Manchurian is a really popular Indo Chinese dish thats ready in 35 minutes, where fried vegetable balls are dunked and simmered in Manchurian sauce. The result is a sweet, sour, spicy dish thats saucy and full of umami!
Veg Manchurian or Veg balls in Manchurian sauce is probably on every Indian restaurants menu! And for good reason! Deep fried vegetable balls that are crunchy and packed with flavour are simmered in an intense, spicy, sour, tangy, umami rich, aromatic sauce till they soak up all that flavour and become even better!
Traditionally, manchurian balls are deep fried. But in this recipe, I am showing you how to make this dish healthier manchurian balls in the air fryer, so they’re healthier and lighter, but still as crispy and delicious as it’s deep fried counterpart.
Jump to section: Veg Manchurian | Air fried & deep fried
Like a lot of Indian Chinese dishes, manchurian originated in Kolkata in the 1970’s and was born in Indo Chinese restaurants there. It is inspired by dishes in Manchuria, which is a region in North East China. Originally it was made with chicken in manchurian sauce, but since India has so many vegetarians, this vegetarian manchurian was born!
Manchurian is heavy on soy sauce and usually has a deep brown colour. The Indian influence added things like green chillies and coriander, which weren’t originally added to the dish. But we aren’t complaining because this Indianised version is so so good!
Now we have a ton of variations to this recipe like gobi manchurian, soya manchurian, paneer manchurian and even mushroom manchurian.
Veg Manchurian dry which is usually served as an appetizer: To make veg manchurian dry, follow all the steps in this recipe as mentioned, but only add 1/4 cup water while making the sauce. The result will be a sauce that just coats the veg balls and you’ll have a tasty veg manchurian dry
Ingredients for Manchurian Balls
Here’s what you’ll need for the veg balls:
Finely chopped vegetables: Finely chopped vegetables such as cabbage, carrots, onions, celery, spring onions are used to make the balls. Use a food processor or chopper for best results. I do not like to use vegetables like capsicum because they leave too much water and make the mixture too wet and gluggy
Ginger Garlic Paste: Ginger garlic paste is simple, ginger and garlic minced together or ground into a paste. Add flavour and a punch. You can also grate equal amounts of each and use
Green Chillies: Not traditional, but adds a nice heat and flavour to the balls. If living outside India, use serrano peppers. Skip if you don’t want extra heat
All Purpose Flour and Cornflour: Binding agents mixed with vegetables to form the balls and keep the shape intact as they fry
Ingredients for Manchurian Gravy
Here’s what you’ll need for the manchurian gravy or sauce:
Aromatics: The sauce starts with stir frying all the aromatics – garlic, ginger, green chillies, celery and onions on high heat. All finely chopped to add punchiness and spiciness to the gravy
Sauces: Only dark soy sauce and vinegar. The gravy for this manchurian is soy sauce heavy but has a perfect balance of sweet, sour, spicy and umami when all the other ingredients
Cornflour: For thickening. You can replace it with potato starch.
Herbs: Non traditional again, but herbs such as spring onions (white and green part) and coriander bring freshness and flavour. Add them right towards the end.
How to Make Manchurian Balls – Deep Fried
Add all the ingredients for the veg balls to a bowl
Mix them together till it comes together. Don’t knead or overmix or the balls can become dense and gluggy. There is not need to add water either as the vegetables will release enough water
Shape them into gooseberry sized balls. You can add a little oil or water to your palm to help you shape them
Deep fry in medium hot oil. It’s important that the oil is not too hot or the balls will only become golden from outside and will not cook from the inside
Once evenly golden brown on all sides, remove them with a perforated or slotted spoon on a tissue lined plate to absorb any extra oil. Set these aside
How to Make Manchurian in Air Fryer
Preheat the airfryer at 180C and brush the airfryer basket with oil.
Place the manchurian balls and brush some oil over them. Avoid overcrowding and make sure that there is some gap between the balls.
Air fry the balls for 7 minutes at 180C, brush with oil and air fry for 7 more minutes.
Air fry for 2 minutes at 200 C for them to turn golden and crisp. They need to cool a bit before they can be removed from the airfryer as they stick to the basket & break, if forced out. Transfer them to a plate and set aside. Repeat the same for all the remaining balls.
How to Make Manchurian Sauce
Once you’re done frying the manchurian balls, it’s time to make the manchurian sauce and finish the gravy. Don’t forget to keep all the ingredients prepped and ready because all the cooking will be done on high heat, and the dish comes together in a few minutes.
To start making the manchurian sauce, saute ginger, garlic, celery and green chillies in hot oil in a wok
Add onions and saute on high heat again till onions are translucent
Add all the sauces and give this a quick mix
Once the sauce starts bubbling, add cornflour slurry to thicken the sauce
5. Add manchurian balls to the sauce
6. Simmer for 2-3 minutes to help the manchurian balls absorb the sauce
7. Finally add herbs like spring onions (green and white) and chopped coriander and give it a mix
8. Serve immediately with fried rice or noodles
Richa’s Top Tips & Notes
Prep ahead and keep all your ingredients ready to go because once you start cooking, the recipe for the sauce comes together in minutes
Use a chopper or food processor to chop all your vegetables for fast, even prep
Don’t add any water while making the manchurian balls or the mixture will becomes too wet. The vegetables will leave enough water as you mix
If using frozen veggies, make sure to thaw them and squeeze out any excess water before using
Always deep fry the balls on medium high heat. This ensures they cook evenly from inside as well as outside
For the same smoky, restaurant style flavour, use a cast iron or carbon steel wok. Cook the manchurian gravy on high heat
To make veg manchurian dry, only add 1/4 cup water while making the sauce. All the other steps remain the same
To make this recipe gluten free, replace the all purpose flour with rice flour or besan, and the corn flour with tapioca starch or potato starch
If you don’t want to take the extra effort, just serve it with steamed rice because the flavours in the gravy are big and bold and the rice will just soak them all up!
This veg manchurian gravy is the true essence of the Indo-Chinese cuisine. It’s one of those recipes that look complicated but are actually quite easy to make. And now thanks to the air fryer, you can also make it a whole lot healthier!
If you do try this recipe, don’t forget to DM the pictures over on my Instagram @my_foodstory. I love seeing your recreations!
Veg Manchurian is an easy indo chinese recipe that's saucy, spicy, sour, tangy and full of umami. It's a popular indo chinese recipe that goes really well with fried rice or hakka noodles.
1TeaspoonGreen Chilli Pastegreen chillies ground to a paste
½ – ¾TeaspoonSalt
3TablespoonsCorn Flour
3TablespoonsAll Purpose Flour
1/4cupOilfor frying
Manchurian Gravy
2TablespoonsOil
1 ½Tablespoonsfinely chopped Gingeror minced
3Tablespoonsfinely chopped Garlicor minced
1 ½Tablespoonsfinely chopped Celery
¼Cupfinely chopped Onion
2-3Green Chilliesfinely chopped
2 ½ – 3CupsVegetable Stock or Waterhot
1 ½TablespoonsSoy Sauce
1 ½TeaspoonsVinegar
1 – 1 ½TeaspoonsSalt
2TablespoonsCorn Flour
3TablespoonsWater
2TablespoonsChopped Coriander
2TablespoonsChopped Spring Onionwhite and green parts
Instructions
Vegetable Balls
Add all the ingredients into a bowl. Mix to combine all the ingredients, being careful to mix just enough to bring them together. Don't add any extra water – the vegetables will release enough water. Shape into small balls (approx 1-1 ½ tablespoons per ball). Keep aside.
Heat 1.5 inches oil in a kadai or a deep frying pan. Once the oil is hot, carefully add the balls into it one at a time. Fry on medium high heat for 4-5 minutes or until golden brown.
Remove the vegetable balls using a skimmer and transfer to a kitchen towel lined plate. Keep aside.
Manchurian Gravy
Heat oil in a wok. Add chopped garlic and ginger and sauté until fragrant. Add celery, onions and green chilli and sauté for 1 – 2 minutes on high flame.
Add water/stock, soy sauce, vinegar and salt. Mix well to combine. Allow to simmer.
Combine corn flour and water in a small bowl and add it to the wok. Stir continuously to ensure the sauce does not become lumpy. Simmer till the sauce thickens and has a glossy look
Once thickened, add the fried vegetable balls and stir to combine. Add chopped coriander, spring onion greens and whites. Serve hot along with fried rice or hakka noodles.
Video
Notes
Prep ahead and keep all your ingredients ready to go because once you start cooking, the recipe for the sauce comes together in minutes
Use a chopper or food processor to chop all your vegetables for fast, even chopping. If the vegetables are too big in size, the balls will not hold shape well and can also take longer to cook
Don’t add any water while making the manchurian balls or the mixture will becomes too wet. The vegetables will leave enough water as you mix
If using frozen veggies, make sure to thaw them and squeeze out any excess water before using
Always deep fry the balls on medium high heat. This ensures they cook evenly from inside as well as outside
For the same smoky, restaurant style flavour, use a cast iron or carbon steel wok. Cook the manchurian gravy on high heat
To make veg manchurian dry, only add 1/4 cup water while making the sauce. All the other steps remain the same
To make this recipe gluten free, replace the all purpose flour with rice flour or besan, and the corn flour with tapioca starch or potato starch
Bun Maska also known as makkhan bun or brun maska is an Iranian (Persian) cafés special recipe made with bun, and sweetened butter. It is popular in the Irani cafes around Mumbai and Hyderabad. Soft sweet bun slathered with whipped butter is the iconic look of bun maska. Dip maska bun in hot Irani chai...
Paneer Pav Bhaji Dip is the ultimate party starter! This cheesy, spicy, fusion-style dip packs all the bold, buttery, street-food flavors of classic Indian Pav Bhaji-now transformed into a creamy, scoopable appetizer everyone will devour. This Pav Bhaji Dip is perfect for game nights, potlucks, holiday spreads, or anytime you need a quick, crowd-pleasing vegetarian […]
Make street style momos at home with this super easy recipe! Learn how to make the dough for momos, pleat them and make a vegetarian and chicken stuffing. Trust me, you’ll never call for takeaway again!
Making momos at home is easier than you’d think! And this recipe makes really juicy and delicious momos, just like the one from your favorite street-side momo place!
Momos is the kind of dish that looks complicated, but is actually really quick & easy. And this recipe is also super versatile, because you can stuff it with just about anything – vegetables, paneer, cheese and mushrooms, chicken or pork. In this recipe, I am sharing instructions for steamed momos, but you can shallow or deep fry them just as easily.
This street-style momo recipe makes for a really hearty and filling snack or appetizer. But tbh, sometimes these even double up as dinner with some sweet corn soup or thukpa, and no one complains!
Flour: All purpose flour or maida forms the base of the dough. You can use whole wheat flour but the wrapper will be really dense and chewy. All purpose flour or maida also adds more gluten and makes the wrapper easier to roll and pleat.
Oil: Helps make the dough moist and pliable. I have used sunflower oil, but any neutral-flavored oil like canola or rice bran will also work.
Lukewarm water: This is important to make the dough soft, pliable, and easy to work with. Hot water can make the dough tough and stringy, while cold water can make the wrappers dense, chewy and difficult to roll out.
Salt: For seasoning
Corn flour: For dusting (if needed)
Chicken filling
Chicken: Boneless chicken thigh pieces or minced chicken. Thigh chicken works best here as it’s juicer, and stays tender throughout the cooking process.
Other ingredients:Onion, celery, spring onion greens, ginger, and garlic, salt, pepper, and oyster sauce for flavor, aroma, and texture. Sesame oil helps make the filling moist and adds a nice nutty flavor, while corianderleaves add freshness.
Veg filling
Veggies: Finely chopped carrots, mushrooms, onions, cabbage, and celery form the base of the filling.
Soya granules: Add texture and a boost of protein.
Soy sauce: For umami and saltiness
Other ingredients:Salt, sugar, pepper, ginger, and garlic for flavor, aroma, and balance.
Making the Dough
The dough is a simple mix of all purpose flour, sunflower oil, salt, and lukewarm water. Kneading with lukewarm water creates some steam and a really pliable dough which is perfect for making momos. Once you finish kneading the dough, cover it with a damp towel and allow it to rest for 10 minutes before cutting it into small pieces – each piece should be approx 7 grams.
Filling – Veg and Chicken
The chicken filling is made simply by mixing all the ingredients together and is raw. It cooks along with the momos as they steam
For the vegetarian filling, we stir fry all the ingredients together. When steamed, veggies release a lot of water. So if they’re not precooked, you’ll end up with soggy, unappetizing momos.
How to Wrap Momos
Once the dough has rested, divide the dough into 2 parts & roll one portion into a cylinder roll on the counter top. Cut out small pieces of dough, each weighing 9 grams. This is about ½ tablespoon of dough.
Prepare a greased plate or parchment paper and damp towel.
Take each piece of dough and roll it into a ball. Using the fleshy part of your palm, flatten each ball of dough into a disc. Using a rolling pin, roll out each individual piece into a very thin round wrapper. They need to be thin enough such that they appear to be slightly translucent. Thicker wrappers tend to taste very doughy so make it as thin as you can.
Place about a tablespoon of the prepared filling in the centre of the rolled out wrapper. Shape and seal the wrappers as shown in the video. In order to ensure that it is properly sealed, apply a little bit of water along the edges with your fingertip.
Place the stuffed momo on the greased plate and cover with the damp cloth.
How to Freeze Momos
Don’t get overwhelmed by the number of steps in this recipe; everything is really straightforward. I usually make a large batch and freeze the rest for later to save so much prep time. Frozen momos can easily last for up to a month without going bad. Here’s what you need to do:
Step 1: Make your filling, roll out the wrappers and stuff them.
Step 2: Place the stuffed momos on a silicone lined baking sheet in rows, making sure none of the pieces touch each other. Cover the tray with a clean, wet towel as you prep to prevent them from drying out.
Step 03: Once all your momos are ready, place the tray straight into the freezer and freeze for 1-2 hours.
Step 04: Transfer the frozen momos to a ziplock bag after divding them to into smaller portion. This why you can pull out only one bag at a time to prevent the rest from going bad.
Step 05: When you are ready to cook, just place the frozen momos straight into the steamer and steam for an extra minute or two. There is no need to defrost them first.
Richa’s Top Tips
Make sure to roll the dough thin to prevent thick and chewy momos.
Feel free to customise the stuffing based on what you like and have available. Just avoid adding really water-y veggies like cucumber and tomatoes as those will break the momos during the steaming process.
Do not overcrowd the pan when steaming the momos. These tend to expand on steaming and overcrowding the pan will make the momos stick to each other.
To check for doneness, check the skin. It should be transparent-ish and non-sticky. If it feels sticky, steam for another minute or two.
Storage Tips
Fridge: If the momos are cooked, allow them to come to room temperature and store in an air-tight box and refrigerate for up to a day. Cooked momos tend to dry out fast, so it’s best to eat them as quickly as possible.
Reheat: Steam for 3–5 minutes to soften and refresh. Avoid microwaving as they can turn chewy.
I bet everyones going to get super excited when you set the table with these homemade momos that taste street style!!
I love serving these with an assortment of dips to keep each bite interesting. Some of my favourite dips to serve these with include my homemade schezwan sauce and thai sweet chilli sauce. I recently drizzled a bit of chilli oil over my momos, and I don’t think I am ever have it any other way!
Make momos at home with this easy recipe for momo wrappers, veg and chicken filling. The result are momos that have a thin wrapper and are stuffed to the brim with the most amazing fillings
2teaspoonssunflower oilor any neutral flavoured oil like canola or rice bran
¼cup+ 4 teaspoons lukewarm waterwe’ve measured this accurately so please stick to this water measurement
1-2tablespoonscornflour for dustingif needed
Chicken Filling
200gramsboneless chicken thigh or chicken minceground chicken
¼cupfinely chopped onion
2tablespoonsfinely chopped celery
½cupfinely chopped spring onion greens
½teaspoonfinely chopped ginger
½teaspoonfinely chopped garlic
1tablespoonoyster sauce
1teaspooncornflour
¼teaspoonsalt
¼teaspoonpepper
1tablespoonsesame oil
2tablespoonsfinely chopped coriander leaves
Vegetarian Filling
1tablespoonoil
2teaspoonsfinely chopped garlic
1teaspoonfinely chopped ginger
2tablespoonsfinely chopped celery
½cupfinely chopped onion
½cupfinely chopped cabbage
½cupfinely chopped carrot
¼cupfinely chopped mushrooms
½cuphydrated soya granulessee note 1
1teaspoonsoy sauce
¼teaspoonsugar
½teaspoonsalt
¼teaspoonpepper
Instructions
Momo Wrapper
Add the flour, salt and oil to a mixing bowl. And lukewarm water and stir using a wooden spoon or your hands to combine. Do not over knead at the stage, just bring the dough together till you don’t see any dry spots & set aside for 5 minutes covered with a damp towel.
After 5 minutes, remove and place the dough on a counter and knead for 2 to 3 minutes to a smooth dough. You do not need to dust the surface with flour unless the dough is very sticky. The dough is supposed to be slightly tacky, but not sticky.
Place the dough back into the bowl and cover with a damp towel to rest for 10 minutes.
Chicken Filling
To make chicken mince: Cut chicken thighs into large cubes and pulse in a chopper or mixer to get coarse mince. Do not grind it too fine as it will turn very dry when cooked.
Combine all the ingredients for the chicken filling in a bowl. If the filling is very loose, you can add some extra cornflour. Cling wrap or cover with a lid and store in the refrigerator until the momo wrappers are ready.
Vegetarian Filling
Heat oil in a wok or heavy bottomed pan on a high flame. Add ginger, garlic, celery, onions and sauté till onions turn translucent. Add cabbage, carrot and mushrooms, reduce flame to medium high and sauté for 3 minutes. Add soya granules and saute for a minute. Add soy sauce and sugar and stir to combine. Season with salt and pepper. Remove from flame and keep aside to cool before placing it inside the wrapper.
Chicken & vegetarian combo filling
Take 1 cup of chicken filling, 1 cup of vegetarian filling in a bowl, mix them well and use as a filling in the momo
Wrapping and Pleating Momo
Once the dough has rested, divide the dough into 2 parts & roll one portion into a cylinder roll on the counter top. Cut out small pieces of dough, each weighing 9 grams. This is about ½ tablespoon of dough.
Prepare a greased plate or parchment paper and damp towel.
Take each piece of dough and roll it into a ball. Using the fleshy part of your palm, flatten each ball of dough into a disc. Using a rolling pin, roll out each individual piece into a very thin round wrapper. They need to be thin enough such that they appear to be slightly translucent. Thicker wrappers tend to taste very doughy so make it as thin as you can.
Place about a tablespoon of the prepared filling in the centre of the rolled out wrapper. Shape and seal the wrappers as shown in the video. In order to ensure that it is properly sealed, apply a little bit of water along the edges with your fingertip.
Place the stuffed momo on the greased plate and cover with the damp cloth.
Steaming Momo
Bring the water in the steamer to a boil and grease the steamer plate. Place the stuffed momo on the greased steamer plate. Ensure that they are not sticking to each other. Brush each momo with oil so they cook to be soft. Cover the lid of the steamer and cook for 14 minutes on medium flame. Rest for 5 minutes, remove from the steamer and serve immediately.
Video
Notes
To hydrate soya granules: Soak the soya granules in 1 cup of boiling water for 10-15 minutes, drain & squeeze out water & use.
Let the dough rest for 10 minutes for best results.
It’s best to roll each momo wrapper, stuff them with the filling & roll the next momo wrapper.
If you roll all the wrapper at once, they dry out very fast, and it will not be possible to shape momo.
Wrapped momo (uncooked) can be kept frozen for up to 2 weeks in an airtight container, separated by parchment paper.
Imagine a snack that marries the bold flavors of dabeli with the comfort of pizza - that's exactly what this Dabeli Pizza brings to your table. It's loaded with mashed potatoes infused with dabeli masala, spiced peanuts, pomegranate arils, sev, and cheese (or your favorite vegan cheese), all nestled on mini pita breads. Add this […]
Craving a snack that's bold, vibrant, and guaranteed to lift your mood? Try this irresistible Samosa Chaat - one of Delhi's most famous Indian street food recipes. Ready in just 45 minutes, this layered vegetarian snack is easy to make at home and guaranteed to wow your family or guests. Save this street-style samosa chaat […]
Peas Mango Sundal (Pattani Sundal, also known as Thengai Mangai Pattani Sundal) is one of the most popular sundal varieties, especially enjoyed along the buzzing beaches of Chennai. Made with perfectly cooked dry green peas sautéed in a simple mustard, curry leaves, and red chili tempering, this dish gets a delicious lift from tangy raw mango and freshly grated coconut. The sourness of mango, the subtle sweetness of coconut, and the earthy richness of peas come together to create a healthy, flavorful, and protein-packed salad. While it’s a festive favorite, this sundal is also perfect as a wholesome snack or as the protein portion of a regular lunch box.
Peas Mango Sundal – a healthy, tangy, and protein-rich sundal made with peas, raw mango, and coconut.
[feast_advanced_jump_to]
Ingredients
Each ingredient in this sundal plays a distinct role in creating its signature flavour, texture, and nutritional profile. Green peas provide a firm, protein-rich base with a gentle sweetness. Raw mango adds a tangy brightness, cutting through the richness and giving a refreshing contrast. Grated coconut lends a mild sweetness and creaminess, making the sundal more textured and satisfying. The tempering ingredients—mustard seeds, red chili, curry leaves, and asafoetida (hing)—bring warmth, aroma, and a slight heat; while sundal powder builds extra spice & earthy depth. Together, these ingredients deliver a dish that’s colorful, balanced, healthy, and very moreish.
Wash and soak the pattani/peas overnight in plenty of water.
The next day, drain the soaked water, add fresh water, add salt and take it to pressure cooker
pressure cook the soaked peas with salt for about 3 whistles, or until soft but not mushy.
Check if the peas are cooked until soft. If there is excess water, drain it out.
Heat oil in a pan. Add mustard seeds and let them splutter. Then add a pinch of hing, curry leaves, and broken red chili. Sauté for 5 seconds.
Add the cooked peas to the pan, and mix everything well.
Add Sundal powder and gently mix with peas
Add finely chopped mango
Stir in the grated coconut. Mix thoroughly so the flavors blend.
Keep the sundal on low flame for 2 minutes, stirring gently. Remove from heat. Your delicious Peas Mango Sundal is ready! Perfect for neivedhyam during festivals or as a healthy snack.
Hint: Always soak the peas overnight for best results—this helps them cook evenly and become soft without turning mushy. If you’re short on time, you can also do a quick soak by adding the peas to hot water for 3–4 hours.
Substitutions
Vegan: This sundal is naturally vegan—no substitutions needed.
Gluten-Free: Already gluten-free, making it a great option for those avoiding gluten.
Low-Oil / Whole-Food Plant-Based: Reduce the oil in the tempering or use a quick dry-roast tempering method to make it lighter.
Low-Sodium: Cook the peas without salt and add a squeeze of lemon instead of raw mango for flavor balance.
Even if you don’t personally follow these diets, chances are some of your friends or family do—and this recipe is versatile enough to accommodate them.
Variations
Spicy: Add chili flakes or finely chopped green chilies while tempering to give the sundal a lively kick.
Deluxe: Toss in extra grated coconut, roasted nuts, or crispy fried onions for richness and crunch.
Kid-Friendly: Mix in soft mashed potato or lightly crushed plain crackers for added texture that kids will enjoy.
Optional Additions: While this recipe is traditionally made without onion (perfect for neivedhyam/prasadam), you can add finely chopped onions or sautéed garlic for a regular everyday version if not preparing it as an offering.
This way, you can cater to different tastes, dietary preferences, or occasions while still honoring the traditional preparation.
Storage
Store the sundal in an airtight container in the fridge. It stays fresh for 2–3 days. Because of the raw mango and grated coconut, this sundal does not freeze well, as freezing can change the texture and flavor of both the peas and mango. For best taste, always prepare fresh or consume within a few days.
Top Tip
If you're going to make this recipe, make sure to follow this top tip!
Don’t overcook the peas! They should be soft but still hold their shape to give the sundal a nice texture. Overcooked peas can turn mushy and make the dish less appealing. Also, add the raw mango and coconut at the end to preserve their freshness and flavor.
Peas Mango Sundal is a traditional South Indian snack made with protein-rich peas, tangy raw mango, and fresh grated coconut. Lightly tempered with mustard seeds, curry leaves, and red chili, this sundal is perfect for festivals, prasadam, or a healthy protein-rich lunchbox addition. It’s naturally vegan, gluten-free, and packed with flavor.
Soak the peas – Wash and soak the pattani/peas overnight in plenty of water.
1 Cup Dry Whole Green Peas
Cook the peas – The next day, drain the soaked water, add fresh water, salt and pressure cook the peas with salt for about 3 whistles or until soft but not mushy. Drain excess water if needed.
1 teaspoon Salt
Prepare tempering – Heat oil in a pan. Add mustard seeds and let them splutter. Then add a pinch of hing, curry leaves, and broken red chili. Sauté for 5 seconds.
Indian Chaat meets Tostadas! Cilantro mint lime chutney marinated beans on crunchy tostadas with sweet maple lime sauce and cooling yogurt, are an Indian fusion dish that’s a perfect starter, snack, or even entree! No cook (Options for soy-free nut-free gluten-free)
These no-cook tostadas use canned beans, prepared tostadas, and lots of delicious sauces – no cooking needed! The only cooking you’d need to do is if you are making your tostadas from tortillas. Prepared tostadas are readily available in most grocery stores.
I wanted to make a fun dish with beans, and I took inspiration from chaat, which is a family of Indian snacks or street food characterized by these awesome combinations of different textures and flavors. Especially papri chaat which has crisp crackers paired with mashed potatoes or chickpeas or both and chutneys, sauces and yogurt for a fantastic salad like hearty nachos if you will. Many chaat recipes have crispy, spicy, sweet, and tangy all together. They’re great as snacks or can be a refreshing meal.
I took inspiration from those flavors and textures. Usually, I make this chickpea potato chaat with small crackers, where you take some cooked chickpeas and cooked potatoes, toss them with some spices and chutneys, and layer them with yogurt, more chutneys, and some chopped crunchy veggies.
I turned that dish into this tostada, where we take crispy tostadas and make marinated beans that are soaked in a delicious green chutney, instead of chickpeas, along with cucumber and onion. We top the tostadas with these beans and then add a good drizzle of seasoned non-dairy yogurt and this sweet, tangy, maple-lime sauce to bring all of those flavors together. It’s absolutely fantastic and delicious! The maple lime sauce is a sub for tamarind date chutney. If you have tamarind chutney, use that for more Indian chaat flavor. Try more Indian salads- Mango Zucchini chickpea Indian spiced oil salad and my Kachumber Salad !
This recipe is very versatile. If you want to control the heat, use less of the green chili, and choose a milder chili. If you don’t have tostadas, you can make your own! Those instructions are in the recipe notes. If you don’t like cilantro, you can make a mint chutney with more mint leaves instead of the cilantro.
Chutney bean tostadas are just fabulously crispy, zesty, refreshing, and hearty. They are a perfect summer meal!
Why You’ll Love Chutney Bean Tostadas
perfect warm weather meal or snack – no cooking required!
incredible combination of flavors and textures! marinated beans, sweet and savory chutneys, creamy cooling cumin yogurt drizzle, on crunchy tostadas
soy-free and nut-free with easy gluten-free option
Bombay Sandwich is a classic Indian vegan street food recipe! This grilled plant-based snack is stuffed with aloo masala, veggies & cheese, making it the best vegan sandwich ever! Plus, it can be made in 15 minutes!
It’s another month, and another Bread Baking Babes bread post. You might have noticed that we’ve recently been baking once every two months rather than every month. We decided to do this as it was easier for us. This month it was my turn to pick a bread and chose Jamaican Coco Bread/ Coconut Milk Bread.
Jamaican Coco Bread are soft, fluffy and slightly sweet half mooned shaped coconut buns from Jamaica. They’re common across other countries in the Caribbean too. Jamaican Coco Bread supposedly gets its name from the generous amount of coconut milk in the dough. Its folded shape can be pulled open easily making it perfect for sandwiches. Jamaicans like these buns best stuffed with creamy cheddar cheese or a beef patty. Jamaican beef patties are flaky pastry pockets with spicy beef filling.
Jamaican Coco Bread are somewhat like the Chinese Baozi or steamed Bao buns to look at. These can be eaten on their own or sandwiched with vegetable or meat fillings. I would also suggest a filling of mild cheddar cheese and thin slices of apple or apple-ginger jam.
These Coconut Milk Breads are a staple, sold everywhere on the islands and make for a filling meal-on-the-go. No quite knows the origin of this slightly sweet little breads. It is thought to have been invented by the local population of slaves and indentured labourers who worked on Caribbean sugar plantations. They were poor and had to make the most of whatever little they had. It’s not surprising that some of the best things come out of adversity.
Coco Bread is made from a slightly sweet, yeasted enriched soft and elastic dough. The dough is proofed and then portioned and shaped into balls. These are rolled out into about 6-inch circles that about 1/4-inch thick. A mixture of melted butter and coconut oil is brushed over the dough circles, and they are folded over in half. This keeps the flaps of dough a little separation, making it easy to open them for sandwiches. A little more of the butter-oil mixture is brushed on top and they’re allowed to rise a little. After proofing, we portion the dough into balls, and roll the balls into rounds. Then they’re baked till golden brown.
In any recipe that requires coconut milk, freshly squeezed coconut milk gives you the best flavor. However, canned or packed full fat coconut milk works just fine. You can use reconstituted coconut milk powder as well. What you need is thick coconut milk but not coconut cream which tends to be much thicker.
The breads are typically large enough to make a sandwich, so the recipe below should make 8 Coco Breads about 6-inches in diameter. Make 6 of them if you want slightly larger ones. Some people roll the dough quite thin (about 1/8-inch thick or so) while others roll it out a little thicker. I prefer mine rolled out about 1/4-inch thick so they puff up a little more on baking.
Soft, fluffy and slightly sweet folded half moon shaped yeasted coconut sandwich buns from Jamaica.
Course breads
Cuisine Jamaican
Prep Time 30 minutesminutes
Cook Time 15 minutesminutes
Resting Time 2 hourshours40 minutesminutes
Total Time 3 hourshours25 minutesminutes
Servings 6Jamaican Coco Buns
Ingredients
For the Dough:
1cuplukewarm thick coconut milk
1tspinstant yeast
3tbspsugar
50gm unsalted buttermelted
3cupsall-purpose flour
1tspsalt
For Brushing on the Dough:
25gm unsalted buttermelted
2tbspcoconut oil
Instructions
Pour the lukewarm coconut milk, melted butter, sugar and yeast into the bowl of your stand mixer. Mix and leave for about 5 minutes. Add the egg, and the flour and salt.
Knead until you have a soft, smooth and elastic dough that is no longer sticky. Add a spoonsful of flour, if and as necessary to achieve this consistency. The dough should spring back slightly when you press it down gently.
Shape the dough into a ball and place in an oiled bowl, turning the dough to coat well. Loosely cover the bowl with a damp kitchen towel and let it double in size. This should take about 2 hours or so depending on ambient temperature.
Mix together melted butter and coconut oil in a small bowl.
Lightly dust your countertop with flour and lightly knead the dough. Divide the dough into 8 equal portions. Shape each into a smooth ball and then roll out to 1/4-inch thick circles (bout 6-inches in diameter), or thinner if you prefer. Brush the surface of the dough circles with the butter-oil mixture. Fold over exactly in half into half-moon shapes.
Place the folded dough on a lightly greased or parchment lined baking sheet. Brush the tops of the folded dough with some more of the butter-oil mixture. You can also brush the tops of the folded dough with just melted butter or coconut milk, if you prefer.
Loosely cover them and allow to rise for about 30 to 40 minutes. Bake in a pre-heated oven at 180C (350F) for about 15 minutes or till they’re golden brown and done. Let them cool on a wire rack. Serve slightly warm, plain or as a sandwich,
Chinese Bhel is a delicious Indo-Chinese vegan snack made with crispy fried noodles, colorful stir-fried veggies, and bold, tangy sauces. This quick and easy Indian-Chinese crispy noodles salad comes together in just 45 minutes - perfect for a fun appetizer, potluck, or party snack. This fusion recipe shows you exactly how to make crispy noodles […]
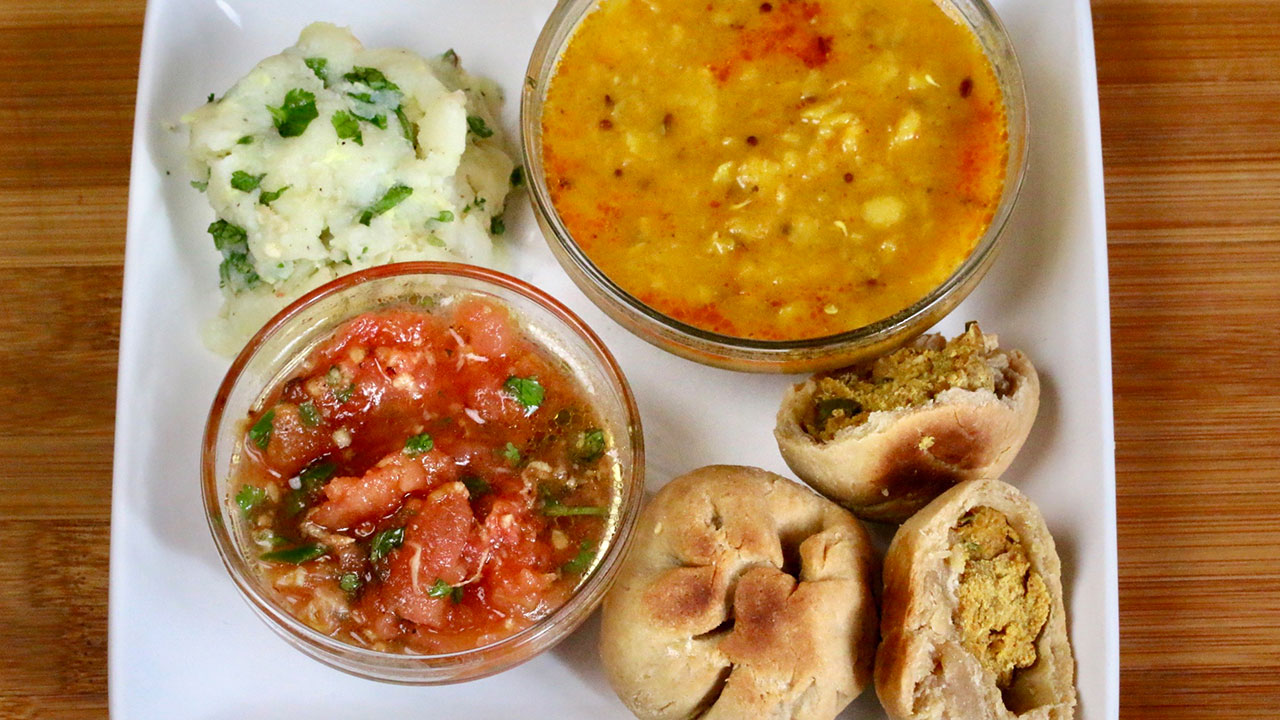
Litti Chokha is a delicacy from the state of Bihar made with stuffed whole wheat dough balls with roasted chana dal and spices inside. These stuffed balls are known as Litties are usually roasted over charcoal but can also be baked. Litties are served with Chokha. Chokha is a dip prepared with mashing potato, tomato or eggplant with spices, but at my home it was always served with Dal Tadka.This recipe will make 8 litties.
Course Main Course
Cuisine Indian
Prep Time 10minutes
Cook Time 30minutes
Total Time 40minutes
Servings 4people
Ingredients
Dough
1cupwhole wheat flourchapatti atta
2Tbspgheeclarified butter
1/2tspsalt
cupAbout 1/3 lukewarm water
Filling
3/4cupsattuflour of roasted chana dal, available in Indian grocery stores
1/2tspsaltadjust to taste
1/8tspasafetidahing
1/8tspturmerichaldi
1/2tspred chili powder
1tspmango powderamchoor
1tspgrated ginger
1Tbspgreen chilifinely chopped, adjust to taste
1tspgheeclarified butter
1/4cupwaterapproximately
Potato, and Tomato Chokha
1cupmedium size potatoboiled peeled and roughly mashed
2medium size tomatoroasted peeled and mashed, I have roasted them over the skillet
1tspsalt
Spices we will use half and half to make both Potato and Tomato Chokha
1/4tspblack pepper
1tsplemon juicejust for Potato Chokha
2tspgrated ginger
2Tbspfinely chopped green chilies
2Tbspfinely chopped cilantro
2Tbspolive oil or mustard oilI prefer olive oil
2Tbspghee or clarified butter for serving the Litties.
Instructions
For Tomato Chokha
To prepare the Tomato Chokha add the spices to mashed tomatoes about 1/2 tsp salt, pinch of black pepper, 1/2 tsp ginger, 1 Tbsp green chili. 1 Tbsp cilantro and 1 Tbsp of oil mix it together. Tomato Chokha is ready set aside.
For Potato Chokha
Add all the remaining spices with mashed potatoes, salt, pinch of black pepper, lemon juice, ginger, cilantro and oil, mix it well. Potato Chokha is ready, set aside.
To Make Dough
Mix the flour, salt and ghee. Add water slowly to make dough. Dough should be firm but do not knead the dough. Cover the dough and let it sit for at least fifteen minutes.
Filling
Mix all the ingredients together except water, sattu, salt, asafetida, turmeric, red chili powder, mango powder, ginger, green chili, and ghee, now add little water to make firm dough, dough will be little crumbly.
Making Litti
Pre-heat the oven at 400 degree Fahrenheit. I am using a toaster oven or you can also use oven.
Divide the dough into 8 equal parts and roll them into balls. They will not be very smooth dough ball. Also, divide the filling in 8 parts filling should be little smaller then dough balls.
Roll the dough balls into 3-inch circle. Place one part of the filling in the center of each rolled dough, and pull the edges of the dough to wrap the filling. Proceed to make all 8 balls. Grease your palms and roll the filled balls gently between your palms.
Arrange the litties over greased baking sheet about one inch apart and place in toaster oven, for 10-12 minutes, turn them over and bake again for 10-12 minutes. Litties should be golden brown all around.
Serving
need about 2 Tbsp ghee or clarified butter for serving the Litties.
Notes
I like to eat these Litties with Dal Tadka and Potato or Tomato Chokha.
Ras Omelette is a popular street food from Goa. Traditionally this is a meat based dish but this is a vegetarian version. So, instead of serving the omelette with xacuti gravy, it uses a spicy tomato gravy. Ross omelette is a favorite with Goan locals as a nighttime fuel after their dancing sessions. But this...
Here we are in lockdown and its getting hard to get by each day without going out and interacting personally with loved ones.. Thank God we are still getting supply of essentials.
It is such a heartache to watch the news with casualties spiking up at insane rate.
Masala Puri - Bangalore Delight!
So Food comes to my rescue. Lately am indulging in preparing and dishing out many chatpata meaning tangy, sweet, spicy street food from India. Along with fond memories it brings in the much needed warmth and comfort around the house. And it definitely makes for a hot topic that tops the list during video meets and chats with family and friends.
Many are enjoying baking, cooking a feast for their families and some getting out of their comfort zone and trying out new things. Me am stuck with fast food and comfort food for now :)
Masala Puri is a street food from south India. Hailed as Bangalore's delight, is loved by millions across the country and is now becoming an international fare. It is a famous south Indian fast food loaded with spicy, tangy, tart and thick sweet flavors all bundled up in one plate.
I say its Indian Nachos :) where a plateful of crushed puris is drenched in desi goodness like hot dried white peas curry followed by onion, tomatoes, green chutney, sweet chutney, sev etc ..innumerable toppings of your choice! Wait there is more, if any curry is left use it as a side dish to enjoy with your rotis.
Actually my kid pours all the deliciousness over his plate of spicy Doritos(No Kidding:)) It tastes great. Try it.
Doritos Masala :)
I have always been a Ragada pattis girl which is a street food from Mumbai. And I am actually surprised that I have not registered it on my blog yet! Point mentally noted. Have been enjoying this Masala Poori treat every now and then during our get togethers and festival meets. Finally thought of putting it up on my blog. Btw you may also check out Pav Bhaji, Vada Pav,Missal Pav too.
I am always looking for a quick, easy recipe that wont compromise on the taste and flavors. So after scanning through few recipes and trying out couple of times, came up with this combo of ingredients which screams less is more and gives out great flavors and swad that is sure to make your soul happy!
Lets get to the recipe:
Please be kind to leave message in the feedback box if you like this recipe: Ingredients:
Curry:
1 cup dried white or green peas (vatana) soaked overnight or 4-6 hours atleast
1 med size potato peeled and cut into big 3-4 pieces
1 bay leaf
3 tbsp oil
1 med size onion sliced
1 tomato chopped chunkily
1/2 tsp cumin seeds
1 inch cinnamon stick
3 cloves
3-4 pods garlic chopped roughly
1 inch ginger piece chopped roughly
4 green chillies chopped roughly [adjust as per your spice level]
handful mint leaves [ 4-5 leaves will do too if you can]
handful cilantro leaves along with stem will do
big pinch turmeric pwd
1 tsp garam masala pwd
1/2 tsp chat masala pwd
1 tsp coriander pwd
1/2 tsp tamarind pulp [optional -[ if you feel your tomatoes are not sour enough]
1/2 tsp jaggery/sugar [optional]
salt to taste
Toppings:
finely chopped onion
finely chopped tomato
finely chopped cilantro
date tamarind chutney [store bought]
sev [store bought]
Puris [store bought] - can use Doritos spicy Chips as a substitute :)
Preparation:
Use Instant pot(IP) to pressure cook the soaked dried peas. Add 3 cups of water with peas, potato, bay leaf. Pressure cook on high manual - 22 min. QPR release after 15 min or let it NPR. If using pressure Cooker, let it blow 3 whistles. Let the cooker cool down and allow pressure to release. Take out the peas and mash gently. Keep aside.
In the mean time, take a pan, heat oil, add cumin seeds, cinnamon, cloves, add onion and saute for few minutes, once its translucent add ginger, garlic, green chillies, saute further for couple more minutes, add tomatoes and cook for 2-3 minutes more till tomatoes soften.
Transfer this cooled mixture in mixer along with mint and cilantro leaves. Grind to a paste- you get nice green color.
Now in the same pan, add little oil and on low medium add turmeric, garam masala, chat masala, coriander pwd and quickly stir. Pour the ground paste and mix everything.
Now add the cooked dried peas give it a nice stir, add water as required consistency then add salt.
This curry thickens as we have potato in it. Consistency should be on the med thinner side- pourable consistency over the puris.
Serving:
First lay out roughly crushed puris on a plate. Pour the warm vatana (peas) curry over it. Then add tbsp chopped onions, 1 tbsp tomatoes, 1 tbsp sev, little cilantro, date chutney[sweet], cilantro chutney and start relishing it! I promise you will wipe out in no time... :)
Please add any amount and kind of topping of your choice!! You are the King of your own tastebuds :)
India's very own street side vegetable burger! You cannot go to Mumbai and NOT have VADA PAV- its a mortal sin if you do that ...lol
VADA PAV
This snack is synonymous with the city of Mumbai, with almost every resident, from factory workers to college students to Bollywood stars, to Visitors are unabashed in declaring their love for it.This street side business has given life to hundreds and thousands of families. A Vada Pav cart owner may be a millionaire for all we know. It is a meal of a poor and snack of the rich. Fills every one's tummy with yumminess!
Vada Pav is a crispy, flavorful sandwich that is consumed in millions across India’s financial capital and largest metropolis every single day. It's made with potato as filling for the vada which is dipped in chickpea flour batter and deep fried. It is then kept in between pav[bread roll] and served with various spicy and tangy dry/wet chutney and fried green chillies. There was a time when I used to ask for extra dry chutney from the vendor. I then brought the leftover chutney home and ate with my roti... its super yummy!
I lived with my aunt in Mumbai for a couple of years when I started work. There used to be a cart by the gate outside the colony which was taken care by a lady who was a widow. She made such excellent Vadas- the taste still lingers on my tongue. To relish hot Vadas which is made in front of you has its own bliss.
Now when I think of it, during shopping breaks I preferred to have Pav Bhaji , Chatpata mumbai special sandwiches or Cheese loaded Sandwiches :) wonder why?
One will find a thela of Vada Pav outside every train station - I am sure thats the hottest spot that is there for a great business! Tired commuters who are always in a hurry to reach somewhere take a quick break indulging in a flavorful Vada Pav which will keep them full till next pang of hunger :)
Mumbai and Vada Pav are inseparable!
Thanks to my aunt who happens to be a great cook and my goto chef :) Its her recipe that I am sharing here.
So without any further delay lets check the recipe:
We will need following: please dont lose interest looking at the ingredients, :) it just has few steps but can be done in fairly good amount of time.
Ingredients:
Dipping Batter
1/2 cup besan / chickpea flour
1 tbsp rice flour [for crispness]
big pinch turmeric powder
1 tsp chili pwd
salt to taste
A pinch baking soda
water
In a mixing bowl, add all the above ingredients except water.
give it a toss - let everything mix.
Add water slowly taking breaks while you whisk the batter together. Let there be no lumps and get medium consistency batter. I dont like it too thick. Now let the batter rest for 15 plus minutes atleast while you get other things lined up.
For Dry Red Chutney
4-5 cloves garlic fried in oil
1 tbsp red chili powder [adjust as you like]
1/2 cup peanuts slow roasted
1/2 cup boondi [ either store bought or while you make vadas, try to do some boondi with besan batter and use that]
Salt to taste
Grind coarsely all the above ingredients and your red dry chutney is ready!! Can be made before and kept. Also this can be used as a condiment and can reside happily in your kitchen pantry for other purposes :)
Red Dry Chutney
Vada Stuffing and Frying
3 med size boiled and mashed potatoes
1 tbsp oil
1/2 tsp mustard seeds
pinch asafoetida (hing)
10 curry leaves
1 tbsp of green paste [For me this is the USP of any Vada: 1/2 inch ginger, 3-4 garlic, 2-3 green chili , 1 cup cilantro ground to paste]
1 small onion finely chopped
1/4 th tsp turmeric powder
salt to taste
1/2 tsp lemon juice
1 tbsp chopped Coriander leaves for garnish
oil for frying
Preparation:
Heat oil in a pan on a medium heat.
Add mustard seeds, as it splutters- add asafoetida, curry leaves
Add onion and saute for 2-3 minutes till translucent. And turmeric pwd, green paste. Stir for a minute.
Add salt, then boiled potatoes. Mix every everything nicely.
Add lemon juice, coriander leaves and mix well. Try not to add water, if need be add very little so that potatoes gets nicely mixed with the seasoning. Stuffing is ready.
Let it cool a little.
Take small portion of stuffing and roll it in the shape of ball [makes around 8 balls] - as seen in the pic
For Frying
Heat the oil and always fry the Vadas on medium heat.
Stir the dipping batter that has been resting well.
Dip the potato ball (Vada) in the batter. Coat the batter from all sides hold it on top of the batter bowl till excess batter drops down then slowly slide it in the oil and fry it from all the sides until you see nice fried orange color on it probably couple of minutes on each sides.
Using a slotted spoon take out the Vadas and place on paper towel to drain out excess oil
Serving:
Take a Pav, slice it in the center, slather dry red chutney, place your Vada and couple fried chillies with it.
Street food, it's the best way to experience a local culture by eating the everyday food that the common man eats and relishes. And it's usually always hot and fresh and has taste that hits the spot sending you to the ecstacy land, if you know what I mean :) Another important fact being it usually cost less avoiding making a hole in your wallet😀. Most of us try so hard to recreate that magic by cooking at home and fail miserably... I can imagine you nodding head with me:) We have our days, and it is a journey of trial and error to get the exact taste like that of a street vendor.
My aunt is an expert (according to me) when it comes to making few chaat/street food dishes. This is her recipe and we love it at home. I did not have mix chiwda(farsan) for topping so just added plain sev on it.
This particular Missal Pav is a famous Maharashtrian chaat food where it has a 2 part preparation. One is Matki(moth beans) usal (dry sabji) and other is thin spicy red gravy Kat (coconut based). Then you can garnish it with the toppings of your choice. It is accompanied with Pav or Bread.
Dunk the pav in slurrpy kat with moth beans usal and toppings! You tend to soak the Kat using pav and finish eating very soon so they always provide you with extra kat in a katori on your plate.
It is very very yum dish!
Let us check out the recipe:
Ingredients:
For Matki Usal
2 cups boiled sprouted matki (moth beans)
2 tbsp oil
1 tsp mustard seeds
1/4th tsp asafoetida (hing)
1/2 tsp turmeric (haldi)
1/2 tsp chilli powder
1 tsp goda masala ( or garam masala)
salt to taste
For Kat (wet gravy)
<A>
8 peppercorns
6 cloves
1 tsp jeera
1 tsp coriander seeds
4-5 dry red chillies
1/2 tsp turmeric (haldi)
1/4 inch cinnamon stick
1/2 tsp sesame seeds
1/th tsp fennel seeds
1/4th cup grated coconut
2 tsp oil
<B>
4 big garlic pods
1/2 inch ginger
1 onion chopped
2 tomatoes chopped
2 tbsp oil
<C>
1 tsp chilli powder
1 tsp goda masala ( or garam masala)
salt as per taste
For Toppings:
1 onion finely chopped
1 cup cilantro chopped
1 cup sev (or mix dry farsan)
2 lemon cut in wedges
Preparation:
Mataki Usal:
In a pan heat some oil, add mustard seeds, after it splutters add all the ingredients under Mataki usal except matki (moth beans) and saute quickly.
Now add the cooked* sprouted matki, salt and mix everything together. Cook for about 5 minutes and switch off the gas.
Keep aside.
Kat (wet curry):
In a frying pan, heat oil and ingredients under <A> except coconut.
Saute lightly till it starts leaving aroma for about a minute or 2. Add this to a blender.
Now in the same pan, roast coconut and add it to the blender as well. Make a paste and keep aside.
In a cooking utensil, heat oil and add other ingredients under bullet <B> in the order of ginger, garlic, onions saute till brown and add tomatoes.
Fry everything till it becomes one mushy mixture. Switch off the gas as oil starts leaving from the sides.
Let this mixture cool. Add to the blender and make a paste.
In the same pan, add some oil, add <B> paste and bring to a quick boil. Add coconut paste <A> and cook for about 10 minutes.
Now you can adjust the taste by adding more chilli powder and goda masala under bullet <C>. Adjust salt too.
Add 3-4 cups of more water and bring to a boil.
Simmer the Kat on low flame till you see oil floating on top!
Now this is how you serve, take a soup bowl, add 3-4 tbsp mataki usal, then pour the kat generously over it, add chopped onions, squeeze lemon juice, add chiwda or sev on top and dunk your pav/bread in it and savor all the goodness!
You can see in my plate I have kat more as I like it that way :)
njoY!! happY cookinG!!
notes*: How to cook sprouted matki (moth beans)-Soak 1 & 1/2 cups of moth beans in 5 cups of water overnight or for 6 hours. Drain all the water and keep in a warm spot for another 6 hours or so for it to generate sprouts. You can also tie it in a muslin cloth and leave overnight. Boil it in 3-4 cups of water for about 25 minutes or till done.
Health Benefits:
Moth Bean seeds are a good source of proteins and other essential minerals and vitamins. It can make an excellent protein supplement to Vegetarian diet. Maximum benefits can be reaped when it is soaked and sprouted. The coconut base thin spicy curry has all the masala ingredients that provides adequate minerals and nutrients to our body. If we use the oil sparingly (if you are making this dish often) it will prove to be a more healthier dish.
Getting back to blogging after a short break, feels so good to be back in my comfort zone :)
It was Monday, Presidents day a long weekend in USA. Had a busy rest of the weekend having too much fun! Thought of lazying around while cleaning up the house and at sharp 11:08am had a craving to eat pav bhaji after my eyes wandered on the potato bag in the pantry :) Got lucky as I had all the ingredients in the fridge except pav (Indian bread). After begging for 5 minutes to my Pati-dev who thinks weekends are his right to be a couch potato, sent him off to the store to get the pav while I geared myself to make some YUMM-O street food.
This dish is a big hit at my house and relished amongst my friends. I got this recipe from a Juhu beach vendor in Mumbai on Youtube some years back. Can't go wrong, right? I have customized the recipe just a little bit as per my convenience. I was actually surprised to see couple of ingredients that went into it like kasoori methi and hing. Well, it only adds more great flavors to say the least.
Another huge USP of this dish, can add as many variety of vegetables you want and kids will not even know :) because potatoes overpowers the rest of the clan :)- So yes, Moms can go YAY!!
Pav Bhaji was invented as a midnight dish by street food vendors, made with all the leftover vegetables from the day, mashed up together, with loads of added spice, and butter. Bhaji is the Marathi word for a vegetable dish, and pav probably comes from the Portuguese word for bread.
All I can say is try it and see if you like it.
Ingredients: For the Bhaji:
2 big potatoes boiled, peeled and mashed lightly
4-5 ripe tomatoes chopped ( if not sour enough, add extra tbsp of tomato paste)
1 capsicum chopped
10 flowerets of cauliflower (roughly chopped)
1 small carrot chopped (optional)
1/2 cup peas boiled
1 1/2 tsp ginger garlic paste
1 tsp Kashmiri chili pwd (to give more color than spiciness)
2 tbsp butter
1/4th tsp turmeric pwd
1- 2 tbsp pav bhaji masala (everest or mtr)
handful chopped cilantro leaves
1 tbsp fenugreek leaves
pinch asafetida
2 tbsp of oil
food color orange 1 pinch ( if you want that gorgeous color :))
To Fry the Pav:
Butter
Cilantro leaves
Prepared Pav Bhaji
Garnish Ingredients:
Chopped onion
Sev
Lemon pieces
Dallop of butter on it
6 Pav (store bought for now) Minimum 2 Pav each person to relish all that goodness of buttery bhaji :)
Preparation:
In a non stick pan, heat oil, add capsicum, cauliflower, (carrots if using it) and quickly saute it for 2 to 3 minutes.
Add ginger garlic paste and let it cook for little bit more till the raw smell goes away. Add asafetida, kasoori methi and cook for a minute.
Now add chopped tomatoes and saute it for couple of minutes. You can add 1 tbsp butter now and let it cook till you see some oil coming out from the corners. Stir in between.
Add masalas - turmeric pwd, chilli pwd and pav bhaji masala, salt mix everything together quickly.
Add boiled potatoes and with a masher, start mashing everything together. Add water little by little till you get the consistency of thickness/thinness you want. It is always semi thick. Potatoes basically absorb water.
Taste it and see if it needs adjustment, if your tomatoes are not sour enough, add lemon juice.
Add food color if you want.
Let it cook on sim flame for about 7-8 minutes. Keep stirring in between and add water as you like. Add another tbsp of butter :)
Garnish it with Cilantro and switch off the gas.
How to fry the Pav just before serving:
Cut the Pav in the centre and semi open it.
On a frying pan, add butter, as it sizzles add bhaji, cilantro and place the pav face down and cook for few sec. Drizzle some butter or oil on top and serve hot.
How to Serve Pav Bhaji:
Serve good amount of bhaji in a compartmented plate, chopped onion, cilantro and lemon slices on one end, you can add onions, sev and butter on top of the hot bhaji, and masala fresh pav on the other side.
Trust me, eating is much easier than writing how to serve Pav Bhaji :):) (joke)
Due to the increased interest in foods that are low-carb or low-glycemic index, the potato has unjustly earned a bad reputation. Potatoes consumed in simple roasted, grilled, boiled, steamed manner with little or no oil/butter is very healthy and nutritious for health.
It is loaded with calcium, phosphorus, zinc, magnesium, iron that helps in having strong bones.
It has vitamin B6 which supports heart health.
Choline is a very important and versatile nutrient in potatoes that helps with sleep, muscle movement, learning and memory.
Aloo tikki chaat is a tongue tingling, mouthwatering delight which is served hot with a combination of red, green and brown chutneys and condiments such as thinly sliced onions, julienned radish and ginger. It is a very popular street food in India which is enjoyed by everyone. This is a typical Delhi style aloo tikki...


