Chocolate Walnut Pudding ...Chocolate Walnut Pudding ... with just 4 simple ingredients to make a deep, delicious, most satisfying pudding, this gluten free and eggless recipe uses pantry staples and comes together in minutes!
Grilled sausages are a regular dinner at my house during the warmer months. They’re already packed with flavor, so all you really need to do is get them on the grill and make sure they cook evenly without drying out or bursting open. This is my go-to for easy weeknight meals, backyard cookouts, tailgate parties, […]
Wheat porridge is a healthy and filling baby food made using wheat porridge mix cooked with water and jaggery syrup. It is usually given to babies once they start solid foods and need something filling and nourishing. The taste is mild and very comforting for small tummies. It is easy to digest and keeps babies full for longer time.
This wheat porridge is little different as it is made using a homemade porridge mix which can be prepared earlier and stored. It saves lot of time on busy days and makes feeding much easier. The texture comes smooth and thick, almost like a soft pudding. Babies usually like this taste and it suits well for morning or afternoon feeding time.
[feast_advanced_jump_to]
About Wheat Porridge
Wheat Porridge is a traditional baby food that has been made in many homes since a long time. Earlier it was prepared by soaking wheat and extracting the milk from it. That whole process takes lot of time and effort. This version uses wheat porridge mix which helps to make the same porridge quickly without much work.
The porridge mix is made with wheat flour, almonds, moong dal and fried gram dal. All these ingredients are roasted and powdered which makes them easy to digest. When cooked with water, it turns into a smooth and soft porridge. Jaggery syrup is added for mild sweetness which is better option than sugar.
It has a soft and creamy texture. It should be neither too thick nor too thin. It coats the spoon well when cooked right and also feels light on stomach. It has a gentle taste and not too strong, suitable for babies who are slowly trying new foods. It is one of those baby foods I feel comfortable giving often.
I usually prepare this porridge mix once and keep it stored. It helps a lot later and makes feeding time much easier. I just cook small quantity fresh for feed each time.
Wheat Porridge Ingredients
Wheat flour - I have used this as the main base for the porridge mix. I usually take good quality wheat flour as it gives better texture.
Almonds - I have added almonds mainly for nutrition and little richness. It gives mild nutty taste to the porridge. You can reduce or skip if baby is new to nuts.
Moong dal - I used to make this more filling and healthy. It is light and easy to digest for babies. You can use split yellow moong dal.
Fried gram dal - I have added this for thickness and smooth body. You can skip if not available.
Jaggery syrup - I have added for the sweetness. It gives nice taste without overpowering.
How to make Wheat Porridge Step by Step
1.Measure all the ingredients and get ready. First dry roast fried gram dal till it is golden. Set aside.
2.Rinse moong dal, dry roast it until golden brown. Set aside.
3.Roast almonds until brown spots appear here and there. Set aside to cool.
4.Transfer roasted almonds and moong dal to a mixer jar. Grind it to a coarse mixture then add roasted fried gram dal.
5.Grind to a semi fine powder, set aside. Dry roast wheat flour for at least 5 minutes in low flame or until the color slightly changes.Set aside to cool.
Store in a clean dry container.
Wheat Porridge for Babies Step by Step
1.In a sauce pan - Add 2 tablespoon wheat porridge powder, add water to it
3.well and heat it up.Keep cooking in low flame. Keep stirring to avoid lumps
4.It will start to thicken and coat the ladle, it will be more like pudding in consistency. This is the right stage.Switch off. Feed warm.
Feed when it is warm with a drizzle of ghee if desired.
Expert Tips
Roasting ingredients - I roast all the ingredients well in low flame. This helps remove raw smell and makes digestion easy. Try not to rush this step.
Grinding carefully - I usually grind almonds and dals gently. If you grind for long time it may turn oily and sticky.
Consistency check - I always keep stirring while cooking the porridge. It thickens very fast so do not leave it unattended.
Nuts - You can use any nuts of your choice or what suits your baby. You can totally skip nuts if you don't want.
Fresh feeding - I prefer making fresh porridge every time for baby. I try not to store cooked porridge for long time.
Serving and Storage
Serve this wheat porridge warm to babies. Make sure it is not hot before feeding. This goes well as morning or afternoon meal. Store leftover porridge mix in a clean dry container. Keep it away from moisture and use dry spoon always. The mix stays good for few weeks.
FAQS
1.Can I give this porridge daily?
Yes you can give it often, but try to rotate with other foods also for variety.
2.Can I skip jaggery?
Yes you can skip jaggery and give plain porridge if baby prefers it that way.
3.Can I add ghee while feeding?
Yes you can add little ghee while feeding for taste and extra nutrition.
4.Can I give this to babies?
Yes, it can be given to babies from around 8 months age.
5.How to avoid lumps?
You just have to keep stirring continuously and the porridge, this helps to avoid lumps.
If you have any more questions about this Wheat Porridge for Babies Recipe do mail me at sharmispassions@gmail.com. In addition, follow me on Instagram, Facebook, Pinterest, Youtube and Twitter .
Tried this Wheat Porridge for Babies Recipe ? Do let me know how you liked it. Also tag us on Instagram @sharmispassions and hash tag it on #sharmispassions.
Wheat Porridge is a healthy, tasty and filling baby food made by cooking wheat porridge mix with water &jaggery syrup to a porridge. Wheat Porridge recipe traditionally is made by extracting milk of wheat & then simmered to a porridge consistency. Wheat Porridge presented here is made instantly with Wheat Porridge Mix & liked by babies for its taste.
Measure all the ingredients and get ready.First dry roast fried gram dal till it is golden.Set aside.
Rinse moong dal, dry roast it until golden brown.Set aside.
Roast almonds until brown spots appear here and there.Set aside to cool.
Transfer roasted almonds and moong dal to a mixer jar.Grind it to a coarse mixture then add roasted fried gram dal.
Grind to a semi fine powder,set aside.Dry roast wheat flour for atleast 5 mins in low flame or until the color slightly changes.Set aside to cool.
Now mix wheat flour with almond mixture.Mix it well.I used my sieve with big holes and sieved it twice for even mixing.
Store in a clean dry container.
To prepare wheat porridge
In a sauce pan - Add 2 tablespoon porridge mix powder, add water to it.
Whisk well then add jaggery syrupto it.
Mix well and heat it up. Keep cooking in low flame. Keep stirring to avoid lumps.
It will start to thicken and coat the ladle, it will be more like pudding in consistency. This is the right stage. Switch off. Feed wheat porridge warm.
Notes
Do not grind almonds for more time as it may release oil and make the mixture moist.
Use a big holed sieve as we sieve only for even mixing, do not discard the coarse mixture.
You can store this mix at least for a month. Keep away from moisture. Use a clean spoon every time.
The measurement can be varied as per your baby's needs and liking. I used a nicely heaped ⅛ cup of moong dal and fried gram dal each.
The porridge will thicken fast so add more water and cook at least for 3-5mins.
Keep stirring continuously to avoid lumps.
If you want you can add ½ teaspoon ghee while feeding.
This porridge can be given to babies from 8 months.
Food poisoning is never a fun experience. Sometimes, if you’re lucky, you’ll bite into something bad and realize soon enough to spit it out. Other times, you’ll only realize your mistake much later. Once the tainted food gets far enough into the digestive system, it’s too late. Your only option is to strap in for the ride as the body voids the toxins or pathogens by every means available, perhaps for several consecutive days.
Food poisoning cases tend to boil down to two categories—those involving toxins, and those involving bacterial pathogens. In either case, affected food must be destroyed. Particularly in the latter case, as bacteria reproduce—even the tiniest contamination will quickly spiral in size.
The concept involves creating microneedle arrays loaded with bacteriophages which target common foodborne pathogens. Credit: research paper
However, new research published in Scientific Advances may have a solution to the problem of bacterial-based food poisoning. It involves using patches to deliver specially-crafted viruses to fight and kill the bacteria that would otherwise infect and sicken a human who eats the food. The patches are to be applied to the food itself—attacking and killing the bacteria before the food is eaten.
The viruses in question are bacteriophages—specifically, viruses that can infect bacteria and reproduce within them from its own genetic material. When a bacteriaphage virus comes into contact with certain bacteria, it breaches the cell’s wall, typically with a syringe-like motion in which the viral genetic material is injected into the cell. Once inside, the genetic material is processed by the bacteria and reproduces more phages that can then go on to infect further bacteria. In the specific case of lytic phages, the bacterial cells are quickly destroyed as the virus reproduces inside, spreading the new phages quickly and killing the original host.
Two bacteriophages were used in this research. The T7 phage was chosen for its ability to infect and kill Escherichia coli bacteria, which are a common foodborne pathogen. The S.enterica phage was in turn chosen as it readily infects and kills Salmonella enterica bacteria, which are similarly a common cause of food poisoning.
The bacteriophages quickly destroy the infected bacteria while reproducing en masse within the cell. Credit: research paper
To get the phages into food items, the research team developed a novel “patch” delivery system. This involved creating patches out of food-compatible polymers that were covered in tiny microneedles that could penetrate the surface of common foods. Once the microneedles penetrate the food, passing bacteria would interact with the bacteriophages, producing more phages as they burst open and die. This has the effect of propagating phages further to other bacteria in the food. The most successful microneedle patches were crafted out of PMMA polymer, after researchers investigated a wide range of other materials including PVA, PDMS, and gelatin. The microneedles are dosed with bacteriophages by simply incorporating the bacteriophage solution with a PMMA solution prior to casting in molds.
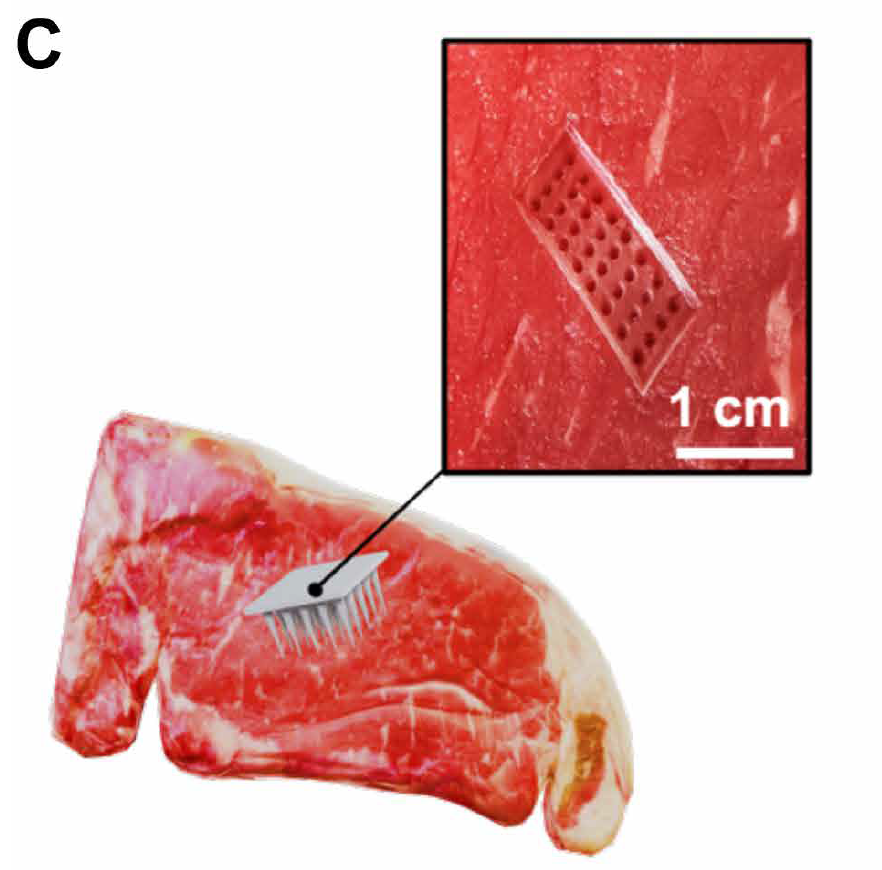
The patches proved effective in testing. One test involving contaminated cooked chicken saw 99.9% of E. coli bacteria wiped out in the sample. A similar test on raw beef saw a similar reduction of E.coli by 99%. These samples could effectively be considered decontaminated from the bacterial threat. The use of microneedles is key to the technique’s effectiveness. By penetrating up to a centimeter into the meat, it allows the bacteriophages to best get into contact with pathogens inside the food. In comparison, flat patches without needles performed less well, only reducing bacteria levels by three-quarters.
A beef sample with a microneedle array applied. Credit: research paper
The research around using patches to deliver bacteriophages to food was only just published in October this year. However, the use of phages as a food safety measure actually goes back quite some time. The FDA first approved the use of bacteriophage products in 2006, initially for killing bacteria in ready-to-eat poultry and meat products. The same techniques can be applied to all sorts of foods, though use thus far has been limited. The US has actually been a leader in approving these food treatment methods; as a contrast, the European Union is yet to approve any use of bacteriophage products for food use.
As to whether these patches could enter wider use, that remains to be seen. There are some limitations with the technique. For one, it involves punching many small holes in food, which isn’t super attractive to those going to eat it later. There are also concerns about the effectiveness of phages in real-world use, and whether it would be practical to dose patches with a wide range of phages to counter the many strains of foodborne pathogens out there. It also depends on the perception of the tecnnology—we’d all rather eat food free of bacteria, but whether we want to eat food that is full of viruses is another thing entirely.
Researchers have contemplated the use of large microneedle arrays as a normal part of packaging to keep food safe. Credit: research paper
It will be a while before this technology reaches the mainstream food processing world, if it does at all. Regardless, the researchers can see a future where food packaging regularly includes a microneedle pad or membrane to take out any nasty bacteria before the product reaches the customer. That could promise to land better, safer food on our tables even if a few nasty bacteria did try to get involved in the action.
Easy Tawa Chicken Recipe with step by step pictures. In this recipe chicken pieces are cooked on an iron Tawa using pav bhaji masala. Try this delicious recipe with naan and paratha. Tawa Chicken Ever since I made a batch of pav bhaji masala, I have been looking for recipe to use them up. I...
The Rebellyous Foods team running the Mock 3 production system, from left: Founder and CEO Christie Lagally Bradburn, mechanical design engineer Cruz Philippe, and inventory and logistics manager David Miller. (Rebellyous Foods Photo)
Seattle-based food technology startup Rebellyous Foods ended 2025 on a high note with the commercial launch of a new production system for its plant-based faux meat.
Last week, Rebellyous successfully ran its Mock 3 over two days, demonstrating the ability to continuously produce its plant-based chicken products such as nuggets, patties and tenders, across multiple shifts while scaling up and down as needed in real time.
Rebellyous founder and CEO Christie Lagally Bradburn called it a “momentous final week” of the year as the startup proved that production of its plant-based meat can be automated in high volumes and with considerably reduced labor compared to conventional methods.
The company says the Mock 3 is capable of producing over 5,000 pounds of its faux chicken per hour.
The Mock 3 also marks a return to Washington state for Rebellyous, which had been partnering on a Mock 2 system with RMS Foods at a state-of-the-art facility in New Mexico.
Lagally Bradburn told GeekWire that the system “needed some upgrades” to reach full commercialization, and Rebellyous decided to build its own mini-facility inside an existing food processing site in Stanwood, Wash., north of Seattle.
“Thanks to the extra time and money we invested in the Washington state facility, the Mock 3 system now works perfectly,” Lagally Bradburn said, adding that Rebellyous remains committed to RMS Foods as a co-manufacturing partner, especially amid the rapid expansion of customers in the southeastern U.S.
Rebellyous Foods’ Spicy Kick’n (fake chicken) Patties roll off the production line in Stanwood, Wash. (Rebellyous Foods Photo)
A former Boeing engineer, Lagally Bradburn started Rebellyous as Seattle Food Tech, Inc. in 2017 in a bid to make plant-based meat faster, better and less expensive to produce.
The startup’s customers include school districts across the U.S. who feed children through the National School Lunch Program, as well as hospitals, restaurants, and others.
Rebellyous saw 30% year-over-year growth in 2025, and raised $3.5 million in November to support its plans for 2026. Lagally Bradburn said the startup, which has raised $38.5 million in its 8 1/2 years, is at “break-even.”
“Some months we are cash flow positive, so we are creeping over the ‘profitability’ finish line right now,” she said. “Commercialization of the Mock 3 is a key piece to our mantra of ‘price-parity and profitability’ for Rebellyous and we continue to grow rapidly.”
That growth flies against the investor pullback that some alternative protein companies experienced in 2025, as Bloomberg reported Monday.
Lagally Bradburn said investors are wary of a “marketing-first approach” to alt-proteins, but Rebellyous’ investors are seeing results with its “price- and quality-first approach.” She said Rebellyous has the highest margins in the plant-based meat industry. The company has eight full-time and two part-time employees.
Veg Manchurian is a really popular Indo Chinese dish thats ready in 35 minutes, where fried vegetable balls are dunked and simmered in Manchurian sauce. The result is a sweet, sour, spicy dish thats saucy and full of umami!
Veg Manchurian or Veg balls in Manchurian sauce is probably on every Indian restaurants menu! And for good reason! Deep fried vegetable balls that are crunchy and packed with flavour are simmered in an intense, spicy, sour, tangy, umami rich, aromatic sauce till they soak up all that flavour and become even better!
Traditionally, manchurian balls are deep fried. But in this recipe, I am showing you how to make this dish healthier manchurian balls in the air fryer, so they’re healthier and lighter, but still as crispy and delicious as it’s deep fried counterpart.
Jump to section: Veg Manchurian | Air fried & deep fried
Like a lot of Indian Chinese dishes, manchurian originated in Kolkata in the 1970’s and was born in Indo Chinese restaurants there. It is inspired by dishes in Manchuria, which is a region in North East China. Originally it was made with chicken in manchurian sauce, but since India has so many vegetarians, this vegetarian manchurian was born!
Manchurian is heavy on soy sauce and usually has a deep brown colour. The Indian influence added things like green chillies and coriander, which weren’t originally added to the dish. But we aren’t complaining because this Indianised version is so so good!
Now we have a ton of variations to this recipe like gobi manchurian, soya manchurian, paneer manchurian and even mushroom manchurian.
Veg Manchurian dry which is usually served as an appetizer: To make veg manchurian dry, follow all the steps in this recipe as mentioned, but only add 1/4 cup water while making the sauce. The result will be a sauce that just coats the veg balls and you’ll have a tasty veg manchurian dry
Ingredients for Manchurian Balls
Here’s what you’ll need for the veg balls:
Finely chopped vegetables: Finely chopped vegetables such as cabbage, carrots, onions, celery, spring onions are used to make the balls. Use a food processor or chopper for best results. I do not like to use vegetables like capsicum because they leave too much water and make the mixture too wet and gluggy
Ginger Garlic Paste: Ginger garlic paste is simple, ginger and garlic minced together or ground into a paste. Add flavour and a punch. You can also grate equal amounts of each and use
Green Chillies: Not traditional, but adds a nice heat and flavour to the balls. If living outside India, use serrano peppers. Skip if you don’t want extra heat
All Purpose Flour and Cornflour: Binding agents mixed with vegetables to form the balls and keep the shape intact as they fry
Ingredients for Manchurian Gravy
Here’s what you’ll need for the manchurian gravy or sauce:
Aromatics: The sauce starts with stir frying all the aromatics – garlic, ginger, green chillies, celery and onions on high heat. All finely chopped to add punchiness and spiciness to the gravy
Sauces: Only dark soy sauce and vinegar. The gravy for this manchurian is soy sauce heavy but has a perfect balance of sweet, sour, spicy and umami when all the other ingredients
Cornflour: For thickening. You can replace it with potato starch.
Herbs: Non traditional again, but herbs such as spring onions (white and green part) and coriander bring freshness and flavour. Add them right towards the end.
How to Make Manchurian Balls – Deep Fried
Add all the ingredients for the veg balls to a bowl
Mix them together till it comes together. Don’t knead or overmix or the balls can become dense and gluggy. There is not need to add water either as the vegetables will release enough water
Shape them into gooseberry sized balls. You can add a little oil or water to your palm to help you shape them
Deep fry in medium hot oil. It’s important that the oil is not too hot or the balls will only become golden from outside and will not cook from the inside
Once evenly golden brown on all sides, remove them with a perforated or slotted spoon on a tissue lined plate to absorb any extra oil. Set these aside
How to Make Manchurian in Air Fryer
Preheat the airfryer at 180C and brush the airfryer basket with oil.
Place the manchurian balls and brush some oil over them. Avoid overcrowding and make sure that there is some gap between the balls.
Air fry the balls for 7 minutes at 180C, brush with oil and air fry for 7 more minutes.
Air fry for 2 minutes at 200 C for them to turn golden and crisp. They need to cool a bit before they can be removed from the airfryer as they stick to the basket & break, if forced out. Transfer them to a plate and set aside. Repeat the same for all the remaining balls.
How to Make Manchurian Sauce
Once you’re done frying the manchurian balls, it’s time to make the manchurian sauce and finish the gravy. Don’t forget to keep all the ingredients prepped and ready because all the cooking will be done on high heat, and the dish comes together in a few minutes.
To start making the manchurian sauce, saute ginger, garlic, celery and green chillies in hot oil in a wok
Add onions and saute on high heat again till onions are translucent
Add all the sauces and give this a quick mix
Once the sauce starts bubbling, add cornflour slurry to thicken the sauce
5. Add manchurian balls to the sauce
6. Simmer for 2-3 minutes to help the manchurian balls absorb the sauce
7. Finally add herbs like spring onions (green and white) and chopped coriander and give it a mix
8. Serve immediately with fried rice or noodles
Richa’s Top Tips & Notes
Prep ahead and keep all your ingredients ready to go because once you start cooking, the recipe for the sauce comes together in minutes
Use a chopper or food processor to chop all your vegetables for fast, even prep
Don’t add any water while making the manchurian balls or the mixture will becomes too wet. The vegetables will leave enough water as you mix
If using frozen veggies, make sure to thaw them and squeeze out any excess water before using
Always deep fry the balls on medium high heat. This ensures they cook evenly from inside as well as outside
For the same smoky, restaurant style flavour, use a cast iron or carbon steel wok. Cook the manchurian gravy on high heat
To make veg manchurian dry, only add 1/4 cup water while making the sauce. All the other steps remain the same
To make this recipe gluten free, replace the all purpose flour with rice flour or besan, and the corn flour with tapioca starch or potato starch
If you don’t want to take the extra effort, just serve it with steamed rice because the flavours in the gravy are big and bold and the rice will just soak them all up!
This veg manchurian gravy is the true essence of the Indo-Chinese cuisine. It’s one of those recipes that look complicated but are actually quite easy to make. And now thanks to the air fryer, you can also make it a whole lot healthier!
If you do try this recipe, don’t forget to DM the pictures over on my Instagram @my_foodstory. I love seeing your recreations!
Veg Manchurian is an easy indo chinese recipe that's saucy, spicy, sour, tangy and full of umami. It's a popular indo chinese recipe that goes really well with fried rice or hakka noodles.
1TeaspoonGreen Chilli Pastegreen chillies ground to a paste
½ – ¾TeaspoonSalt
3TablespoonsCorn Flour
3TablespoonsAll Purpose Flour
1/4cupOilfor frying
Manchurian Gravy
2TablespoonsOil
1 ½Tablespoonsfinely chopped Gingeror minced
3Tablespoonsfinely chopped Garlicor minced
1 ½Tablespoonsfinely chopped Celery
¼Cupfinely chopped Onion
2-3Green Chilliesfinely chopped
2 ½ – 3CupsVegetable Stock or Waterhot
1 ½TablespoonsSoy Sauce
1 ½TeaspoonsVinegar
1 – 1 ½TeaspoonsSalt
2TablespoonsCorn Flour
3TablespoonsWater
2TablespoonsChopped Coriander
2TablespoonsChopped Spring Onionwhite and green parts
Instructions
Vegetable Balls
Add all the ingredients into a bowl. Mix to combine all the ingredients, being careful to mix just enough to bring them together. Don't add any extra water – the vegetables will release enough water. Shape into small balls (approx 1-1 ½ tablespoons per ball). Keep aside.
Heat 1.5 inches oil in a kadai or a deep frying pan. Once the oil is hot, carefully add the balls into it one at a time. Fry on medium high heat for 4-5 minutes or until golden brown.
Remove the vegetable balls using a skimmer and transfer to a kitchen towel lined plate. Keep aside.
Manchurian Gravy
Heat oil in a wok. Add chopped garlic and ginger and sauté until fragrant. Add celery, onions and green chilli and sauté for 1 – 2 minutes on high flame.
Add water/stock, soy sauce, vinegar and salt. Mix well to combine. Allow to simmer.
Combine corn flour and water in a small bowl and add it to the wok. Stir continuously to ensure the sauce does not become lumpy. Simmer till the sauce thickens and has a glossy look
Once thickened, add the fried vegetable balls and stir to combine. Add chopped coriander, spring onion greens and whites. Serve hot along with fried rice or hakka noodles.
Video
Notes
Prep ahead and keep all your ingredients ready to go because once you start cooking, the recipe for the sauce comes together in minutes
Use a chopper or food processor to chop all your vegetables for fast, even chopping. If the vegetables are too big in size, the balls will not hold shape well and can also take longer to cook
Don’t add any water while making the manchurian balls or the mixture will becomes too wet. The vegetables will leave enough water as you mix
If using frozen veggies, make sure to thaw them and squeeze out any excess water before using
Always deep fry the balls on medium high heat. This ensures they cook evenly from inside as well as outside
For the same smoky, restaurant style flavour, use a cast iron or carbon steel wok. Cook the manchurian gravy on high heat
To make veg manchurian dry, only add 1/4 cup water while making the sauce. All the other steps remain the same
To make this recipe gluten free, replace the all purpose flour with rice flour or besan, and the corn flour with tapioca starch or potato starch
Bun Maska also known as makkhan bun or brun maska is an Iranian (Persian) cafés special recipe made with bun, and sweetened butter. It is popular in the Irani cafes around Mumbai and Hyderabad. Soft sweet bun slathered with whipped butter is the iconic look of bun maska. Dip maska bun in hot Irani chai...
Favourite Holiday Vegan Eggnog ... Creamy, festive, refreshing and ever so simple, this eggfree eggnog is a winner this holiday season, actually all year round. This eggless recipe is gentle & addictive, uses a clutch of basic ingredients and is ready before you know it.
Eggless Chocolate Raspberry Trifles ... simple & delicious, pretty too. How can you go wrong with chocolate and raspberries, how can you go wrong with desserts as pretty and as delicious as these! They hold the promise of being addictive good in every bite, moist, bursting with berry berry goodness and so satisfying.
Holiday Shortbread Cookies ... Sugar and spice AND everything nice, these are the most addictive cookies ever. Light, buttery, delicately spiced, the cut out holiday shortbread cookies are quick to make and perfect for the festive platter.
Vada Pav is one of Mumbai’s most loved street food snacks and a daily staple for the city. It consists of a spiced potato fritter coated in gram flour batter, deep fried until crisp, and served inside soft pav with chutneys. For readers unfamiliar with Indian street food, it is often described as India’s vegetarian...
This retro prawn cocktail is straight from the 80’s, but is a must on the Holiday food table even today! Plump, juicy prawns tossed in a pink rose marie sauce; this classic dish is easy to make and tastes 10/10!
This prawn cocktail is one of those dishes that instantly feels a little special, even though it’s incredibly easy to put together. It’s cool, creamy, fresh, and quietly indulgent and the kind of recipe I reach for when I want something elegant without spending too much time in the kitchen.
I love how adaptable it is. You can make it for a casual lunch, a dinner party starter, or even a festive spread when you want something light before the mains. Crisp lettuce, sweet prawns, creamy avocado, and that nostalgic rose marie sauce, simple ingredients, but they come together beautifully.
Prawns – I have used raw jumbo prawns as this size works best for this recipe. You can use pre-cooked prawns as well
Olive oil – to cook the prawns
Lettuceand cucumber – make for a fresh and crunchy base for the prawn cocktail
Avocado – adds richness and a buttery texture
Rose Marie sauce
Mayonnaise – forms the creamy backbone of the sauce.
Ketchup – adds sweetness and colour.
Worcestershire sauce – brings depth and umami.
Cayenne pepper or red chilli powder – adds gentle heat.
Lime juice – brightens and balances the richness.
Frequently Asked Questions
Can I use frozen prawns?
Yes. Thaw completely, pat dry, and cook or chill before assembling.
Is this recipe spicy?
No. The heat is very mild and can be adjusted or skipped entirely.
Can I make this ahead for a party?
You can prep the prawns and sauce ahead, but assemble only at serving time.
What can I use instead of Worcestershire sauce?
A few drops of soy sauce can work in a pinch, though the flavour will differ slightly.
Richa’s Top Tips
Don’t overcook the prawns. Prawns cook very quickly and overcooked prawns taste chewy and rubbery. Cook them until they’re just pink and and tender.
Chill the prawns and sauce before assembling for the best flavour and texture.
Pat prawns dry if using pre-cooked ones to avoid a watery cocktail.
Assemble just before serving to keep everything crisp and fresh.
Customisation Ideas
Add a little finely chopped celery for extra crunch.
Replace lime juice with lemon juice for a sharper finish.
Stir in a spoon of Greek yogurt to lighten the sauce slightly.
Add a pinch of smoked paprika for a subtle smoky note.
Storage Ideas
Avoid storing assembled cocktails as they tend to become watery and lose freshness.
Prawns: Cooked prawns can be stored in an airtight container in the refrigerator for up to 24 hours.
Sauce: The rose marie sauce keeps well refrigerated for 2–3 days when stored separately in an airtight jar.
Vegetables: Chop lettuce, cucumber, and avocado just before serving for best texture.
This prawn cocktail is proof that simple food can still feel thoughtful and elegant. With fresh ingredients and a well-balanced sauce, it’s the kind of dish that never really goes out of style.
This prawn cocktail recipe is straight from the 80’s. Crisp lettuce, plump, juicy prawns and an addictive cocktail sauce that’s perfect as a dipping sauce. Its an appetizer that will take everyone back in time!
900gramsRaw Jumbo Prawnstails on (Or freshly cooked prawns)
1teaspoonOlive Oilif using raw prawns
3cupsLettuceroughly chopped
2Avocadosdiced
1Cucumberdiced
Rose Marie Sauce
3/4cupMayonnaise
2tablespoonsKetchup
1tablespoonWorcestershire Sauce
1/2teaspoonCayenne Pepperor Red Chilli Powder
1teaspoonLime Juice
Instructions
If using raw prawns, heat olive oil in a skillet and cook the prawns for 3-4 minutes on each side till they turn pink. Sprinkle lightly with salt and refrigerate for 15-20 minutes.
In a bowl, whisk together all the ingredients for sauce and refrigerate.
When ready to assemble, add lettuce to the bottom of a glass, top with a few pieces of cucumber, avocado and finally prawns. Drizzle with the sauce and serve immediately.
Notes
Poaching prawns: If you prefer poaching prawns instead of cooking them, add salted boiling water to prawns in a bowl and let them sit for 5-6 minutes, till the prawns turn pink.
Fresh vs. Frozen Prawns: If you happen to stay by the sea, please buy your prawns as fresh as possible and peel them at home if you can. If you don’t, then buy your prawns frozen because they will be better than the prawns that are sold seemingly fresh. Frozen prawns are frozen within a few hours of catching them. Thaw them completely before cooking.
Refrigerating: I prefer serving these cold, but its best to chill each element separately rather than assembling them and then chilling, because the sauce can pool at the bottom. The sauce can be made 4-5 days ahead and refrigerated, and the prawns stay well refrigerated once cooked for a day.
Mayonnaise: I can’t stress how important it is to use good quality mayonnaise for this recipe, and no, you can’t substitute it with greek yogurt. Either make your own at home – it’s really easy, I promise and I have anInstagram video that shows you how to make mayo, or buy mayonnaise made with whole eggs.
Anchovies- Netholi Peera, cooked with coconut, Kerala recipe… Kerala Peera is a traditional South Indian dish from the state of Kerala, known for its unique and rich flavours. It’s a coconut-based dry dish typically made with seafood, and it’s often flavoured with spices like turmeric, cumin, and green chilies. The word “Peera” refers to the …
Raw Banana Powder for Babies with step by step pictures. This recipe helps to ease constipation and may also helps in weight gain. Raw Banana Powder for Babies I am really glad that the baby food series in yummy tummy is really helpful for many of you. Daily i am getting tons and tons of...