Grilled sausages are a regular dinner at my house during the warmer months. They’re already packed with flavor, so all you really need to do is get them on the grill and make sure they cook evenly without drying out or bursting open. This is my go-to for easy weeknight meals, backyard cookouts, tailgate parties, […]
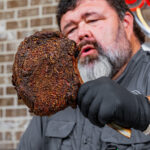
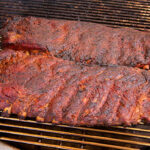
Smoked pork butt is the king of backyard BBQ. This recipe walks you through how to create tender, juicy pulled pork with deep smoky flavor, a perfect bark, and melt-in-your-mouth texture. Whether you’re using a pellet grill, offset smoker, or charcoal setup, this guide covers everything from prep to shredding. Smoked low and slow, pork shoulder is the way to go if you’re looking for something that’s easy to make and hits your tastebuds perfectly no matter how it’s served.
How to Choose The Best Pork Shoulder for Smoking
What’s the most commonly ordered meal when you hit a barbeque restaurant? You bet, the pulled pork. What makes it so good?
Quality Cut Matters.
Aside from a proper smoke time and temperature, it’s the fat.
Consider purchasing your pork shoulder from your local butcher. The fresher the better.
When purchasing your pork shoulder, look for one that is pink in color and has some marbling (that marbling is the fat that gives the pork so much flavor). Another purchasing tip: consider using a bone-in shoulder. It’ll give you the perfect “fall off the bone” roast you’re looking for.
Is There a Difference Between a Pork Shoulder and a Pork Butt?
No, there isn’t, both come from the shoulder of the pig—if your cut is labeled a pork butt, it’s higher up on the foreleg.
How to Make Smoked Pork Shoulder
The secret to making the best smoked pork shoulder is to keep it moist. Dry pork ends up being tossed in barbeque sauces and doesn’t get the attention it truly deserves.
In order to create a moist smoked shoulder, we recommend a pork injection using a meat injector. This is done the night prior to smoking. It’s easy to do, in fact, you can pick up a cheap injector at your local grocery store. Just toss the injection ingredients together, inject it into the pork shoulder, and let it take in all the juices for the evening.
Ingredients for Pork Butt Injection
Pork Shoulder Temperature
After you’ve let your pork shoulder sit overnight, you’ll want to preheat your smoker. Preheat your smoker to 225°F. Smoking at the correct temperature gives the pork the best texture and the best flavor.
A Pork Butt Recipe Secret: The Rub Down
While you wait for your smoker to preheat, rub down your pork butt with spices to really enhance the flavor.
Spice rubs are all the rage for meats that are smoked, grilled, roasted, etc. But there’s a secret to the perfect rub: mustard.
The acidity in the mustard will tenderize the meat.
Rub down your pork butt with mustard
After you’ve coated your pork shoulder in the mustard, you can add your favorite rub to all sides of the pork. My favorite ingredients to add to a pork rub include:
Smoked pork shoulder requires patience. Not because it’s difficult to do, but because the smoking process can take anywhere between 15-20 hours.
For every pound of meat, you’ll want to leave in it the smoker for 120 minutes. The time may vary based on the consistency of your smoker and the size of the pork shoulder.
Once your pork shoulder has reached an internal temperature of 190-201°F, it’s ready to be taken out of the smoker.
But don’t start shredding yet.
To lock in all the flavors, wrap the pork butt in foil and let it rest for at least an hour.
When should you shred your Pulled Pork?
Finally, you can begin shredding your pork butt has rested for at least 1 hour and is cool enough to handle.
I usually prefer to use my hands, but you can also use two forks to shred the meat apart.
Make sure you remove any bones and excess fat from the pan and add juices or additional seasoning for that extra added flavor.
What do you serve with Pulled Pork Sandwiches?
You can always serve a traditional coleslaw, potato salad, or french fries, but the sky is the limit when it comes to the variety of BBQ side dishes that could pair nicely with pulled pork sandwiches.
Smoked pork shoulder (pork butt) is one of those recipes that is a masterpiece of its own. Smoked low and slow, pork shoulder is the way to go if you’re looking for something that’s easy to make and hits your tastebuds perfectly no matter how it’s served.
Course Smoked Recipes
Cuisine Smoked Meats
Keyword Smoked Pork Butt
Prep Time 20 minutesminutes
Cook Time 12 hourshours
Additional Time 3 hourshours
Total Time 15 hourshours20 minutesminutes
Servings 1person per ½ pound
Calories 4035kcal
Author Mark Rogers
Ingredients
8-10poundbone-in pork shoulderpork butt
Yellow Mustardenough to coat exterior
Spice Rub
¼CupSweet Paprika
2TablespoonsGround Black Pepper
2TablespoonsDry Mustard
½TeaspoonChili Powder
½TeaspoonGarlic Powder
½TeaspoonCayenne Powder
Pork Injection
1cupApple Juice
2tablespoonsKosher Salt
½cupWater
½cupBrown sugar
1teaspoonCayenne pepper
⅛teaspoonof paprika
⅛teaspoonof garlic powder
2tablespoonsSoy sauce
¼cupApple cider vinegar
¼cupAmesphos phosphates
Instructions
Prepare and season your pork shoulder a day before you are planning to smoke your pork shoulder.
Remove your roast from the packaging and wipe it down on all sides with paper towels, allow to rest for an hour.
Coat the entire exterior of the pork shoulder with the yellow mustard.
Season your pork shoulder on all sides, top, and bottom, with the spice rub.
Preheat your smoker to 225 degrees F for indirect smoking.
Place your seasoned pork butt on the smoker fat side up.
Close the lid and smoke the pork until it reaches an internal temperature of at least 195 degrees F. You can cook to 201 degrees F if you like softer pork. This process can take anywhere between 15-20 hours, depending on the consistency of heat in your smoker and the size of your pork shoulder.
Remove the pork shoulder from the smoker and wrap tightly in foil. Allow the roast to rest for at least an hour before shredding.
Pull apart the shoulder, discarding any chunks of fat or gristle. Sprinkle the roast with an additional tablespoon or so of the spice rub.
Notes
If you wish to speed the cook process up, you can pull the pork butt at 165 and wrap it in foil and put it back on the smoker in order for it to cook faster and get through the stall.
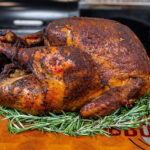
I fired up my stick burner for this one — real wood, real smoke, and a Cajun kick that just works on turkey. This recipe’s got a bunch of solid tips for cooking a juicy bird, no matter what flavors you like to use. If you’re after that true smoked turkey look and taste, this is how you do it.
Simple Cajun smoked turkey cooked over real wood and charcoal — full of smoke, spice, and tips for a juicy bird every time.
Ingredients
1 whole turkey, thawed
1 bottle Malcom’s Bird Brine
1 bottle Malcom’s King Craw Cajun Seasoning
Meat Bag (optional)
Water (enough to completely submerge turkey)
1 stick butter
1 cup chicken broth
1 stalk celery, cut into chunks
1 medium onion, quartered
1 head garlic, smashed
Cooking spray or oil (for coating the skin)
Chicken Rack (optional)
Instructions
Brine the Bird
Start with a completely thawed turkey. In a large Meat Bag or food-safe container, mix Malcom’s Bird Brine with 1 gallon of water. (For turkeys 12-14lbs or less, use 1/2 bottle. For turkeys over 14lbs, use entire bottle).
Submerge the turkey and add more water as needed to cover it completely. Tie the bag up tight and refrigerate for 24 hours.
Brining helps the meat stay juicy and pull flavor deep inside — it’s one step you don’t want to skip.
Prep the Turkey
After at least 24 hours, remove the turkey from the brine and pat it completely dry with paper towels.
Stuff the cavity with celery, onion, and garlic.
Tuck the wings and tie the legs so everything cooks evenly and the tips don’t burn.
Make the Injection (optional)
Mix 1 stick of butter, 1 cup chicken broth and about 2 tablespoons Malcom’s King Craw Cajun Seasoning.
Stir to combine. Inject the mixture into the breast, thighs, and wings, distributing evenly. Season the Skin
Spray or rub the outside of the turkey with cooking spray or oil — this helps crisp the skin and gives the seasoning something to stick to.
Generously coat the bird with Malcom’s King Craw Cajun Seasoning (or your fave turkey seasoning).
Smoke the Turkey
Fire up your smoker for indirect cooking and add your favorite wood (hickory and pecan work great). Run the pit around 275°F. Place the turkey on the smoker breast side up.
Protect the Turkey
When the skin has the color you want — that deep golden-brown Cajun look — spray the outside again with cooking spray and loosely tent with foil to prevent over-darkening.
Continue cooking until the breast hits 160°F internal and the dark meat reaches about 175°F.
Rest and Serve
Remove the turkey from the pit and let it rest for at least 20-30 minutes before carving. This lets the juices redistribute and keeps the meat tender.
Notes
Don’t skip the dry step. The drier the skin, the better it browns and crisps up.
Use a meat thermometer. It’s the only way to nail that perfect doneness.
Color control: On a stick burner, smoke runs heavy — so tent the turkey once the color looks good. You want mahogany, not black.
Flavor variations: Swap Malcom’s King Craw Cajun Seasoning for your favorite turkey seasoning — classic poultry blends, garlic and herb, or a buttery savory rub all work great with this same process.
Every turkey cooks a little different, but if you take your time and let the smoke do the work, you’ll end up with one you’re proud to carve. That’s the kind of bird everyone remembers.
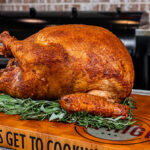
This smoked turkey is all about big flavor and perfect texture — juicy meat with crispy, bite-through skin. The secret isn’t complicated: a simple brine, a good dry, and steady heat on the pit.
Once the bird soaks up that flavor, I let the skin dry out, season it from top to bottom, and smoke it low and slow over pecan wood. The result is golden skin that crackles when you slice and meat so tender it practically drips juice.
Serve it hot off the board for Thanksgiving dinner and show off what a real smoked turkey should taste like.
Juicy, smoky, and crisped to perfection — this smoked turkey is everything a holiday bird should be. Tender, flavorful, and kissed with just the right amount of smoke — it’s turkey done right.
Ingredients
1 whole turkey (12–18 lbs), thawed
HowToBBQRight Ultimate Brine Kit
OR
1 bottle Malcom’s Bird Brine
1 bottle Killer Hogs AP Seasoning
1 bottle Malcom’s King Craw Cajun Seasoning
Meat Bag
Water (enough to completely submerge turkey)
1 stalk celery, cut into chunks
1 medium onion, quartered
1 apple, quartered
3 cloves garlic, smashed
Cooking spray or oil (for coating the skin)
Chicken Rack (optional)
Instructions
Brine the Turkey
Mix one bottle of Bird Brine with 1 gallon of water until dissolved. Place the turkey in a large brining bag or container and pour the brine mixture over the bird. Add enough cold water to completely submerge.
Seal the bag (or cover the container) and refrigerate for 24 hours. For larger turkeys (over 16 lbs), brine up to 48 hours.
Dry and Prep
Remove the turkey from the brine and discard the liquid. Pat the skin completely dry with paper towels—this is key to getting crispy skin.
Stuff the Cavity
Place the celery, onion, apple and garlic (use whatever aromatics you like) inside the cavity.
Tie the legs together and tuck the wing tips underneath so the turkey cooks evenly.
Oil and Season
Lightly coat the entire surface of the turkey with cooking spray or oil.
Season the backside first with a medium coat of Killer Hogs AP Seasoning, followed by a medium coat of Malcom’s King Craw Cajun Seasoning.
Flip the turkey onto a rack and repeat on the top side with the same layers of seasoning.
Smoke the Turkey
Preheat your smoker or grill to 275°F using pecan pellets (or your preferred wood).
Place the turkey on the pit, centered for even airflow, and cook until the internal temperature in the deepest part of the breast reaches 160°F.
Rest and Serve
Remove the turkey from the smoker and rest for 20 minutes. The internal temperature will carry over to about 165°F in the breast and 175°F in the dark meat.
That’s how you smoke a turkey that comes out juicy every single time — with golden, crispy skin and that rich, smoky flavor you can only get from cooking it low and slow. Keep it simple, trust the process, and you’ll carve into the best turkey you’ve ever put on the table.
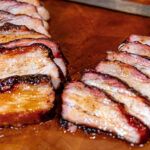
Smoked Hot Honey Pork Belly is the ultimate combo of rich smoke, sweet heat, and sticky glaze. I start with thick-cut slabs of pork belly, smoke them low and slow at 275°F, then finish with a buttery hot honey-vinegar BBQ glaze that caramelizes perfectly.
The result? Tender, glossy bites that melt in your mouth. Great for appetizers, tailgates, or any time you want bold BBQ flavor straight from the pit.
Smoked pork belly finished with a buttery hot-honey glaze – sweet heat, rich smoke, snack-worthy flavor.
Ingredients
1 whole pork belly (4–5 lbs total), split into two smaller slabs
Killer Hogs Hot BBQ Rub, for coating the pork belly
1 stick (½ cup) unsalted butter
¼ cup hot honey
½ cup Killer Hogs Vinegar Sauce
Instructions
Pit Temp: 275°F indirect
Final Internal Temp: 202°F
Prep the Pork Belly
Trim any thin edges or loose fat so both slabs cook evenly. Split the pork belly in half for easier handling and appetizer-sized portions.
Season
Apply a generous coat of Killer Hogs Hot BBQ Rub to all sides — top, bottom, and edges. Pat the rub in gently so it sticks.
Fire Up the Grill
Set your pit to cook at 275°F. – For charcoal, build a two-zone fire (coals on one side, cool zone on the other). – For pellet grills, hold a steady 275°F. Cook the pork belly on the indirect side of the pit.
Smoke
Place both slabs on the cool side of the grill. Let them cook about 1½ hours until the surface turns a deep mahogany color.
Check Internal Temperature
Continue cooking until the pork belly reaches 202°F internal. At that point, the fat will be fully rendered and the meat tender and jiggly.
Make the Hot Honey Glaze
In a small saucepan or foil pan, combine: – 1 stick butter – ¼ cup hot honey – ½ cup Killer Hogs Vinegar Sauce Warm until smooth
Glaze and Finish
Place each slab in a small foil “boat” to catch drips. Brush on a heavy coat of the hot honey glaze every 20–30 minutes until it caramelizes into a sticky layer. (Optional: a light dusting of rub over the glaze at the very end can deepen the bark, but it’s not required.)
Rest and Slice
Let the pork belly rest 10–15 minutes before slicing so it holds together. Cut into thick slices or bite-size cubes and serve right off the board.
That’s it — pork belly turned into a show-stopper: slow smoked until the fat’s silky, then glazed with sticky hot honey and butter for sweet-heat perfection. Slice it, serve it, and watch it disappear.
This 3-pound tomahawk ribeye went straight on the pellet grill—no reverse sear, no cast iron finish. Just steady smoke and low heat all the way through. I figured it might miss that crust, but the right layer of seasoning and patience built up the perfect color. The result? Juicy, tender, medium-rare perfection with a buttery jus from the rest. Proof you can cook a tomahawk start to finish on a pellet grill and still pull off a true steakhouse-quality ribeye.
Smoked tomahawk ribeye cooked start-to-finish on the pellet grill. No sear, just low heat, rich smoke, and juicy medium-rare steakhouse flavor every time.
Ingredients
1 Tomahawk Ribeye Steak (about 3 lbs)
2 Tbsp Worcestershire sauce
2 Tbsp Willingham’s W’ham Original Mild Seasoning
1–2 Tbsp Killer Hogs AP Seasoning (salt, pepper, garlic)
Trim the Steak Lightly trim any big pockets of fat around the edges and clean up the bone for presentation.
Season Generously
Rub the steak all over with Worcestershire sauce as a binder.
Apply a medium coat of W’ham Original Mild Seasoning for color and base flavor.
Add a layer of Killer Hogs AP Seasoning to build that salt, pepper, garlic profile.
Finish with a layer of Killer Hogs Steak Rub for texture and crust.
Rest & Fire Up the Grill
Let the steak sit out while you fire up your pellet grill to 250°F. This gives the seasonings time to melt in and lets the steak come up to room temperature before cooking.
Smoke the Tomahawk
Place the steak on the pellet grill and insert a probe thermometer into the thickest part.
Set your first target internal temp to 120°F.
Once it hits 120, reset your probe to 128°F and monitor closely.
Rest with Butter
Place pats of butter and a light sprinkle of Steak Rub on a platter.
Remove the steak from the grill at 128°F and place it directly on butter.
Tent loosely with foil and rest for 10 minutes.
Slice & Serve
Remove the steak from the bone, then slice across the grain. The melted butter and drippings combine to make a rich, flavorful sauce—spoon that over the slices before serving.
That’s how you nail a tomahawk on the pellet grill—low heat, good smoke, and plenty of patience. Slice it up, drizzle that buttery rest over the top, and you’ve got steakhouse flavor right in your backyard.
September is the perfect time to gather family and friends, fire up the coals, and savor the flavors that bridge summer and fall. From smoky salmon and spicy chili to Santa Maria tri-tip and bacon-wrapped onion rings, these recipes bring big flavor to your holiday table and beyond.
From Alaska to Nova Scotia to Norway, smoked salmon is a constant on the world’s barbecue trail. Here on Barbecue Bible, smoked salmon gets a New England twist. Maple syrup isn’t simply sweet like sugar. It has this incredible aromatic flavor, and it goes great with the richness of salmon.
Pro Tip: Use real maple syrup, not pancake syrup. The flavor is deeper and balances the richness of the salmon.
This chili takes an ecumenical approach, featuring both beef and pork—meats both diced and ground—two kinds of beans, plus plenty of chile powder, poblano pepper, and jalapeño to crank up the heat. Don’t be deterred by the long ingredient list—you probably have most of the aromatics in your kitchen already. And despite the lengthy instructions, you can make it from start to finish in 1 hour.
Pro Tip: Make it a day ahead—chili always tastes better the next day as the flavors meld.
Barbecue in southern California means tri-tip, and in the Santa Maria Valley, about three hours north of Los Angeles, this slab of bottom sirloin turns up at all manner of public celebrations and backyard cookouts, seasoned with garlic and spiced pepper, then oak grilled, and thinly sliced. Unlike Texas brisket, the meat is tender enough to serve rare or medium-rare, so it combines the smoke flavor of true slow-cooked barbecue with the sanguine succulence of steak. In Santa Maria, tri-tip is usually served with salsa, toasted French bread, and pinquito beans—distinctive, small, pink-red beans that are unique to these parts.
Pro Tip: Always slice tri-tip against the grain. The cut has two different grain directions, so adjust halfway through slicing.
These tangy chicken rolls come from Rio’s legendary Porcão restaurant chain, where they’re cooked on a spit. I like to think of them as Brazilian rollatini. For the sake of authenticity, I should note that the mayonnaise and cornichons are my contribution to the recipe. Their flavors contrast perfectly with the richness of the Gruyère.
Pro Tip: Secure the rolls with toothpicks or skewers before grilling to keep the cheese from spilling out.
Coffee is a traditional ingredient in at least one classic Southern pork dish: country ham with redeye gravy, a dish I last enjoyed in Louisville. Kentucky ham isn’t quite as well-known as that from Virginia, but it’s every bit as tasty and it gave me the idea for this coffee-crusted pork tenderloin served with a coffee barbecue sauce.
Pro Tip: Let the tenderloin rest for 5–10 minutes after grilling to keep the juices inside.
Take your comfort food to the next level with this Grilled Smoked Mac and Cheese, a smoky, cheesy, flavor-packed twist on the classic dish. Loaded with flame-charred peppers, grilled onion, and smoky ham, this mac and cheese is cooked in a cast iron skillet and finished with wood-fired smoke for irresistible depth. Perfect as a hearty main or a standout side at your next cookout, this recipe brings bold barbecue flavor to a backyard favorite. Whether you’re firing up a gas, charcoal, or pellet grill, this dish is your new go-to for crowd-pleasing, smoky indulgence.
Pro Tip: Use a cast-iron skillet to get that smoky flavor infused deep into the pasta and cheese.
Though originally deep-fried in the taco shacks of the Baja Peninsula, grilled fish is superior in terms of taste, and healthier, too. Serve with a chilled Mexican beer or a margarita.
Pro Tip: Use a grill basket or fish spatula to keep delicate fillets from breaking apart on the grill.
Here’s one of our favorite side dishes. Yes, everything tastes better with bacon, including onion rings! But why fry them in batter when you can smoke them with bacon? They’re delicious and super simple to make at home.
Pro Tip: Par-cook the bacon slightly before wrapping—it crisps faster and avoids overcooking the onion.
Here’s a dish with deep Yankee roots, but I’ll wager no one has ever tasted it like before. The break with tradition is stuffing the apples with pork sausage and smoke roasting them on the grill.
Pro Tip: Choose firm apples like Honeycrisp or Granny Smith so they hold their shape on the grill.
Whether you’re feeding a crowd at a backyard bash or keeping it cozy with family, these recipes capture the spirit of the season—bold, smoky, and satisfying. Labor Day may signal summer’s close, but with dishes like these, barbecue season is far from over.
Slow-smoked wings get seared for crispy skin, then tossed in a tang-forward Mississippi white BBQ sauce—juicy, smoky, and done right.
Ingredients
1 family pack whole chicken wings (about 12–14 whole wings)
Spicy ranch seasoning (generous coating)
Killer Hogs AP Seasoning (generous coating)
Killer Hogs Mississippi White Sauce (or your favorite white BBQ sauce)
Instructions
Season the Wings
Trim and separate wings if desired, or leave them whole.
Season all sides generously with spicy ranch seasoning and AP seasoning. Let them sit while you fire up the grill.
Set Up the Grill
Prepare a 2-zone fire on your grill (one side hot, one side cool).
Target grill temperature: 375–400°F.
Pellet grill works too — just hold temps steady in that same range.
Smoke the Wings
Place seasoned wings on the cool side of the grill.
Close the lid and cook about 30 minutes.
Flip the wings and cook another 15–20 minutes, until they reach 180–185°F internal.
Crisp Over the Hot Zone
Working in batches, move wings directly over the hot side of the grill.
Sear for 2–3 minutes per side until skin is golden and lightly charred.
Use the cool side as a holding zone if wings start cooking too fast.
Final target internal temp: 195°F — this ensures fat is rendered and the meat pulls clean from the bone.
Sauce & Serve
Remove wings from the grill and toss in Killer Hogs Mississippi White Sauce (or your favorite tangy white BBQ sauce).
Serve hot and enjoy with extra sauce on the side.
Here’s the deal—bone-in wings get a liberal rub of spicy ranch and AP seasoning, then they smoke low and slow on the cool side of your grill until they hit about 180–185°F. Next stop: the hot zone, where I give them a quick sear until the skin’s golden and laced with char. Final move? Dunk ’em in that killer Mississippi White Sauce—tangy, creamy, and absolutely mouthwatering. These wings—smoky, juicy, and loaded with tangy white BBQ flavor—hit different.
Grill salmon hot to lock in moisture, then brush on a honey-balsamic glaze that caramelizes into a tangy-sweet crust—restaurant flavor in just 15 minutes.
This honey-balsamic salmon gets seared on a blazing hot grill for a perfect crust, then finished with a tangy-sweet glaze that caramelizes beautifully in just minutes.
Ingredients
4 salmon fillets (6-8oz fillets)
Olive oil
King Craw Seasoning (or your favorite Cajun-style blend)
For the Honey Balsamic Glaze:
2 green onions (separate the whites and the greens), thinly sliced
2 cloves garlic, minced
1/4 cup balsamic vinegar
2 tablespoons honey
Salt & black pepper to taste (I used TX Brisket Rub)
Instructions
Preheat your pellet grill to 400°F.
You want those high temps to help build a crust and lock in the moisture.
Prep the salmon:
Lightly oil each fillet and season generously with King Craw seasoning on tops and sides. Let it sit while the grill heats up.
Make the glaze:
In a small saucepan, sauté the green onion whites and garlic in a little oil until softened (1–2 minutes). Add the balsamic, honey, salt, and pepper. Let it simmer until slightly reduced and syrupy — about 5–7 minutes. Set aside.
Grill the salmon:
Place the fillets directly on the grates. Cook for about 13 minutes, or until the internal temp hits 125°F. The outside should have a nice crust at this point.
Glaze it:
Brush the salmon with the honey balsamic glaze and let it cook another 1–2 minutes until the glaze sets and your salmon reaches 135°F internal.
Serve it up:
Pull it off the grill and let it rest for a few minutes before serving. Pairs great with roasted veggies, rice, or even a fresh salad.
Oil up salmon fillets, season them heavy with King Craw—or your favorite Cajun rub—then throw them on a 400°F pellet or hot grill to build that craveable crust. While the salmon’s cooking, whisk together green onion, garlic, balsamic vinegar, honey, salt & pepper until it reduces into a syrupy glaze. Brush it on during the last couple of minutes so it caramelizes and locks in that sweet-tangy shine. Juicy, quick, and restaurant-worthy in just 15 minutes.
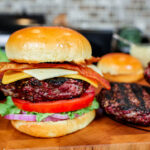
This Big Dill Smash Burger is my take on Sonic’s classic—crispy-edged beef patties, plenty of pickle flavor, and a tangy Dilly Ranch mayo that brings it all together.
Ingredients
For the Smash Burgers:
2 lbs 80/20 ground beef (roll into 3oz balls)
Killer Hogs Steak Rub (or your favorite burger seasoning)
Slices of American cheese
Grilling oil
Hamburger buns
Shredded lettuce
Thick-cut dill pickles (we used Grillo’s Classic Dill Pickle Chips)
Fried pickle chips (we used Fresh Gourmet Crispy Dillies)
For the Dilly Ranch Mayo:
1 cup Blue Plate mayo
3 tsp Ranch seasoning (about ½ a packet)
1–2 tsp fresh chopped dill
2 Tbsp dill pickle juice (from the pickle chip jar)
Instructions
Make the Dilly Ranch Mayo
Mix mayo, Ranch seasoning, fresh dill, and pickle juice in a small bowl. Stir until smooth and let chill in the fridge for a few hours to let the flavors come together.
Prep the Beef
Form the ground beef into 3oz balls. Don’t pack them tight—keep them loose for a better smash.
Smash and Sear
Heat a flat-top griddle or cast iron over medium-high heat. Lightly oil the surface.
Place the beef balls on the hot griddle and let them sit for about 1 minute—just long enough to form a light crust.
Flip the balls over and smash them hard with a spatula or burger press.
Season with Killer Hogs Steak Rub.
Cook for 2–3 minutes, then flip again.
Season the other side, add a slice of American cheese, and cook for another 1–2 minutes until the cheese is fully melted.
Build the Stack
Stack two patties for each burger.
Toast the Buns
Place your buns cut-side-down on the griddle for about 30 seconds until toasted and golden.
Assemble the Burger
Bottom bun → double smash patties – Top with fried pickle chips – Add shredded lettuce and thick-cut pickles – Spread Dilly Ranch Mayo on the top bun – Close it up and serve
This Big Dill Smash Burger recipe is my take on the Sonic favorite—seasoned ground beef smashed on a hot griddle until the edges get crispy, then layered with melted cheese, tangy pickles, and a homemade dill ranch mayo. It’s the ultimate copycat Sonic smash burger, loaded with bold pickle flavor and perfect for anyone who loves a juicy grilled burger with a twist.
I’m not trimming… I want to keep all the fat on this Tri Tip for flavor. Smother it in TX Brisket Rub (or classic salt & pepper), drop it straight over glowing coals on a Santa Maria grill—press it into the grate to carve a deep sear. Flip every few minutes. Then lift it to indirect heat until the probe reads 125–130°F. Twenty-minute rest, slice against the grain; simplicity and smoke rule.
Cook tri-tip Santa Maria-style right over the coals for big flavor and a smoky crust. This open-fire tri-tip recipe keeps it simple—just bold seasoning, live fire, and a juicy medium-rare finish.
Ingredients
1 whole Tri-Tip roast (untrimmed)
Killer Hogs TX Brisket Rub (or salt and coarse black pepper)
Instructions
Don’t Trim a Thing
Leave all the fat and sinew on that big, beautiful tri-tip. That’s how Mr. Al Frugoni—the king of live fire—does it, and we’re sticking to it.
Season Heavy
Hit it generously with TX Brisket Rub (or your favorite salt & pepper blend). Don’t be shy—we want a big crust.
Build the Fire
Start a fire using wood splits and lump charcoal. Once you’ve got a solid coal bed, rake the coals under your cooking grate and let it heat up.
Sear Over High Heat
Place the tri-tip directly over the hot coals and press it into the grate for good contact. Flip every 3–4 minutes to build a deep sear and bark on both sides.
Finish Over Medium Heat
Once seared, move it a bit higher above the coals or to indirect heat. Keep flipping every few minutes until the internal temp hits 125–130°F for medium-rare.
Rest and Slice
Let it rest for 20 minutes. Then slice it against the grain—split it down the middle crook first, since the grain runs different ways.
This tri-tip is all about cooking beef the old-school way—over a live fire. Season it heavy with salt and pepper, then drop it straight over hot coals on a Santa Maria grill to build that smoky crust. Flip it often, ease it up off the heat, and cook to a juicy medium-rare. Rest it, slice it thin against the grain, and you’ve got bold flavor, tender beef, and a recipe built for the backyard fire pit or grill.
This ain’t your average backyard burger. We’re talking real deal, smoked low and slow, ground brisket mixed with bacon fat flavor bombs. Stack it high with cheese and toppings — and don’t forget a toasted bun to soak up all that juice.
Ground brisket WITH raw bacon to make the best smoked burgers. These brisket bacon burgers are rich, smoky, and packed with flavor. The brisket gives you that beefy bite and the bacon brings in a smoky saltiness that puts ’em over the top. You might wanna wear a bib — these burgers are juicy!
Ingredients
16 lb whole packer brisket (untrimmed)
2–3 lbs bacon ends & pieces (or thick-cut bacon)
Killer Hogs Steak Rub (or salt, pepper, garlic)
Burger buns (toasted)
Sliced cheese
Pickles
Red onion slices
Lettuce
Tomato slices
Big Malc’s Burger Sauce (or your favorite burger sauce)
Big Malc’s Burger Sauce
½ cup Blue Plate mayonnaise (or your favorite mayo)
1 tablespoon yellow mustard
¼ cup sweet pickle relish (juice and all)
1 tablespoon freshly grated onion (with juice)
½ teaspoon Killer Hogs TX Rub (or a mix of coarse salt & black pepper)
½ teaspoon paprika (for color)
1–2 teaspoons red wine vinegar (just a drizzle)
Instructions
Prep the Brisket and Bacon
Cut the brisket into 1½ to 2-inch chunks, separating the flat from the point if needed.
Keep the fat on — you want a good lean-to-fat ratio for juicy burgers.
Cut bacon into similar-sized pieces so it runs through the grinder easily.
Chill the meat in the freezer for 20 minutes before grinding.
Grind the Meat
Alternate brisket and bacon as you feed it through the grinder to evenly mix.
Grind the meat with the large plate first then if you want a finer grind, repeat the grind process
Chill the ground brisket-bacon mix in the refrigerator until ready to form patties.
Form the Burger Patties
Weigh out about 8 oz portions and loosely form into balls.
Use a burger press or hand-form into patties. Use parchment or a Ziploc bag for easy cleanup.
Make a slight dimple in the center to prevent the patties from puffing up too much.
Season the Burgers
Season the outside of each patty with Killer Hogs Steak Rub or your favorite burger seasoning.
Remember the bacon adds salt, so don’t overdo it.
Fire Up the Smoker
Set your pit to 275°F using Royal Oak briquettes for a coal bed then add wood splits for heat.
Place burgers directly on the grates and smoke for about 45 minutes, flipping after 30.
Cook to an internal temp of 145°F for a juicy medium finish.
Build Your Burger
Toast your buns and spread Big Malc’s Burger Sauce on both sides.
Layer on: Pickles, Red onion, Lettuce, Tomato, Double cheese (cheddar + Swiss), Smoked brisket bacon patty
Crown it with the top bun and get ready to lean in.
You could fry up a burger in a pan… or you could do it right and smoke a brisket bacon burger that hits like a steakhouse sandwich on steroids. Get you a cold drink, grab two hands, and get ready to lean in — it’s a juicy one.
I took a regular spiral ham and gave it the double-smoke treatment. Then I hit it with a hot honey glaze that gives it that sticky-sweet heat. Not too hot for the family… just a little kick.
And really, smoked ham is about the easiest thing you can cook… and you can use whatever glaze you want. Just make sure you smoke one for your Easter dinner cause left-over holiday ham from a ziplock in the fridge is one of the small joys of life!
Ground brisket WITH raw bacon to make the best smoked burgers. These brisket bacon burgers are rich, smoky, and packed with flavor. The brisket gives you that beefy bite and the bacon brings in a smoky saltiness that puts ’em over the top. You might wanna wear a bib — these burgers are juicy!
Ingredients
16 lb whole packer brisket (untrimmed)
2–3 lbs bacon ends & pieces (or thick-cut bacon)
Killer Hogs Steak Rub (or salt, pepper, garlic)
Burger buns (toasted)
Sliced cheese
Pickles
Red onion slices
Lettuce
Tomato slices
Big Malc’s Burger Sauce (or your favorite burger sauce)
Big Malc’s Burger Sauce
½ cup Blue Plate mayonnaise (or your favorite mayo)
1 tablespoon yellow mustard
¼ cup sweet pickle relish (juice and all)
1 tablespoon freshly grated onion (with juice)
½ teaspoon Killer Hogs TX Rub (or a mix of coarse salt & black pepper)
½ teaspoon paprika (for color)
1–2 teaspoons red wine vinegar (just a drizzle)
Instructions
Prep the Brisket and Bacon
Cut the brisket into 1½ to 2-inch chunks, separating the flat from the point if needed.
Keep the fat on — you want a good lean-to-fat ratio for juicy burgers.
Cut bacon into similar-sized pieces so it runs through the grinder easily.
Chill the meat in the freezer for 20 minutes before grinding.
Grind the Meat
Alternate brisket and bacon as you feed it through the grinder to evenly mix.
Grind the meat with the large plate first then if you want a finer grind, repeat the grind process
Chill the ground brisket-bacon mix in the refrigerator until ready to form patties.
Form the Burger Patties
Weigh out about 8 oz portions and loosely form into balls.
Use a burger press or hand-form into patties. Use parchment or a Ziploc bag for easy cleanup.
Make a slight dimple in the center to prevent the patties from puffing up too much.
Season the Burgers
Season the outside of each patty with Killer Hogs Steak Rub or your favorite burger seasoning.
Remember the bacon adds salt, so don’t overdo it.
Fire Up the Smoker
Set your pit to 275°F using Royal Oak briquettes for a coal bed then add wood splits for heat.
Place burgers directly on the grates and smoke for about 45 minutes, flipping after 30.
Cook to an internal temp of 145°F for a juicy medium finish.
Build Your Burger
Toast your buns and spread Big Malc’s Burger Sauce on both sides.
Layer on: Pickles, Red onion, Lettuce, Tomato, Double cheese (cheddar + Swiss), Smoked brisket bacon patty
Crown it with the top bun and get ready to lean in.
I’ve cooked pork belly a lot of different ways… pork belly burnt ends… sweet and pulled… deep fried… but this method is savory, smokey and melt in yo’ mouth! It has a real pit smoked flavor and it’s nothing short of delicious!
I love bold, smoky, melt-in-your-mouth pork belly… and this one does not disappoint. It’s fatty and delicious and tastes like real pit-smoked pork belly.
Ingredients
5 lb pork belly, cut in half
2 tbsp Killer Hogs Hot Sauce
2 tbsp yellow mustard
Killer Hogs Hot Rub (to taste)
Killer Hogs TX Brisket Rub (to taste)
1/4 cup apple cider vinegar
1/4 cup water
Instructions
Prepare the Pork Belly: Pat the pork belly dry with paper towels and cut it in half for more even cooking.
Apply the Binder: Coat each piece of pork belly with Killer Hogs Hot Sauce and yellow mustard to help the seasoning stick.
Season Generously: First, apply a good layer of Killer Hogs Hot Rub, then follow with a layer of Killer Hogs TX Rub for extra depth of flavor.
Preheat the Smoker: Set up your smoker for indirect heat and bring the temperature to 275-300°F.
Smoke the Pork Belly: Place the pork belly pieces on the smoker and cook for about 2 hours.
Prepare the Spritz: Mix 1/4 cup apple cider vinegar and 1/4 cup water in a spray bottle.
Spritz Regularly: After the first 30 minutes, begin spritzing the pork belly every 30 minutes to keep it moist and enhance the bark.
Check the Internal Temperature: Continue smoking until the internal temperature reaches 202-208°F.
Rest the Pork Belly: Remove the pork belly from the smoker and let it rest for at least 20-30 minutes. For even better results, rest it in a dry cooler for an hour.
Slice and Serve: Slice the pork belly to your preferred thickness and enjoy!
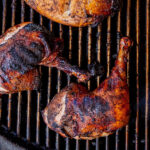
To me, jerk chicken is something special. It’s smoky, spicy, sweet and packed with flavor. And it makes your whole backyard smell amazing when your cooking it!
Now, I’m no Jamaican pitmaster, but I did my best to stay true to the authentic Jerk Chicken I’ve had in the Caribbean. I started with a killer marinade, added just the right amount of char and even made a fiery dipping sauce to serve with it.
This spicy jerk chicken recipe is smoky, juicy, and packed with bold Caribbean flavors! Whether you’re grilling or smoking, I’ll show you how to make the BEST jerk chicken with the perfect balance of heat and sweetness.
Ingredients
For the Chicken & Marinade:
1 whole chicken, cut into quarters
1 bottle Walkerswood Jerk Marinade
1 tablespoon Malcom’s Jammin’ Jerk Seasoning
1 cup dark brown sugar
1 Scotch Bonnet or Habanero pepper, thinly sliced
1 bunch green onions, chopped (green parts for marinade, white parts for sauce)
4–5 cloves garlic, minced
Juice from 1/2 lemon
4 oz pineapple juice
1 tablespoon Scotch Bonnet pepper sauce
1 tablespoon Worcestershire sauce
For the Jerk Dipping Sauce:
1/2 stick butter
White parts of the green onion, finely chopped
4 cloves garlic, minced
1 Scotch Bonnet or Habanero pepper, finely chopped
1 tablespoon Scotch Bonnet pepper sauce
4–5 dashes Worcestershire sauce
1 teaspoon Malcom’s Jammin’ Jerk Seasoning
1/4 cup brown sugar
1/4 cup honey
Juice from 1/2 lemon
Instructions
Marinate the Chicken:
Cut the whole chicken into quarters, separating white and dark meat. Score the chicken breasts with shallow slits to help with even cooking and better flavor absorption.
Place the chicken quarters in a large ziplock bag. Pour in the jerk marinade and add Malcom’s Jammin’ Jerk seasoning.
In a separate bowl, whisk together the remaining marinade ingredients, then pour into the ziplock bag.
Squeeze out excess air, seal the bag, and gently massage the marinade into the chicken. Refrigerate overnight (or at least 8 hours).
2. Prepare the Grill:
Remove the chicken from the marinade and lightly season with a little more Jerk seasoning.
Set up a charcoal grill for two-zone cooking at 350°F. (I used my Primo ceramic grill, but any grill works.)
3. Cook the Chicken:
Place the chicken on the indirect side of the grill. Cook for about 45 minutes, or until the internal temperature reaches 160°F for white meat and 175°F for dark meat.
4. Make the Jerk Dipping Sauce:
Place a heavy-bottomed pot directly over the hot coals.
Add butter, white parts of the green onion, garlic, and peppers. Sauté for 2-3 minutes until softened.
Stir in the remaining sauce ingredients and bring to a gentle boil. Remove from heat and pour into a small dish to cool.
5. Char & Serve:
Move the chicken quarters to the direct heat side of the grill.
Sear for 1-2 minutes per side, just until you get that perfect jerk char.
Remove from the grill and let rest for 5 minutes before serving.
Serve hot with the jerk dipping sauce on the side.
Enjoy the bold, smoky, and spicy goodness of this Jerk Chicken!
This is how I grill a ribeye steak. Sometimes I change out the flavors and seasonings… and you can too… but this is my tried and true technique I use for getting a perfectly juicy ribeye – with all the flavor!
A good ribeye steak deserves the right treatment, and I’m showing you exactly how to grill it up right! We’re seasoning it with a bold rub, cooking it over red-hot coals for a killer crust, and making sure it’s perfectly juicy from edge to edge.
Whether you like it medium-rare or a little more done, this method locks in all the flavor and gives you steakhouse-quality results every time!
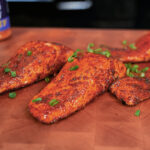
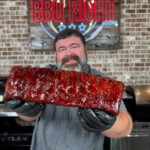
These Smoked Hot Honey Ribs are next-level BBQ! The spare ribs are coated with hot sauce and hot rub, then smoked low and slow over hickory wood and wrapped with a buttery, sweet & Hot Honey Sauce for an irresistible bite. If you love your bbq sweet with a little heat, these ribs will make do the rib dance!
Trim ribs and remove membrane. Apply light coat of hot sauce for a binder and season well with Killer Hogs Hot Rub.
Prepare pit for smoking at 275°F using hickory wood for smoke flavor. I used my Outlaw stick burner pit but any smoker/indirect grilll will work just keep the temp steady at 275°F.
Place the ribs on the pit and smoke for 2 hours. Spritz with water if the outside starts to look dry after an hour in the smoke.
Make the rib wrap liquid – combine brown sugar, apple juice, hot honey, and vinegar sauce in a glass measuring cup. Microwave for 3 1/2 minutes and allow to cool at room temp.
To wrap the ribs remove each slab from the pit; use a double layer of aluminum foil; place the ribs meat side down on the foil, add 1/2 cup of wrap liquid to each slab; place 1 stick of the butter over the top; and close the foil around the ribs.
Place the ribs back on the pit and cook for 1 1/2 hours or until tender. Internal temp should be around 202-205°F.
Rest the ribs in a dry cooler for 1 hour before glazing.
To glaze: place each rack on a foil covered raised cooling rack meat side down; dust with a little Hot Rub and place back on the pit for 5 minutes; brush with The BBQ Sauce and cook for 7 additional minutes. Flip the ribs over and dust the meat side with Hot Rub and return to the pit for 5 minutes. Brush the meat side with The BBQ Sauce and drizzle with Hot Honey; blend the honey in with the bbq sauce and return to the pit for 7 additional minutes to set.
Cut the slabs into individual bone pieces and serve.
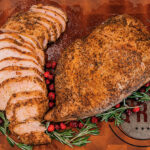
This smoked turkey breast recipe is about as good as it gets for Thanksgiving. I brined two big turkey breasts, seasoned them up, and smoked them over hickory wood until perfectly tender. With a little butter wrap to finish it off, you’ll have a turkey breast that’s juicy, smoky, and packed with flavor…
Ingredients
2 boneless, skinless Turkey breast
1/2 bottle Malcom’s Bird Brine
1 gallon water
cooking spray
1/4 cup Malcom’s King Craw Cajun Seasoning
1/4 cup Killer Hogs TX Brisket Rub
2 sticks butter
1/2 cup chicken broth
Instructions
Place the turkey breasts into a large container. Combine 1/2 bottle of bird brine with 1 gallon of water and pour the mixture over the turkey breasts. Place in the refrigerator for 12 hours.
Remove the turkey breasts from the brine and pat dry. Spray the outer surface with cooking spray and season with King Craw Cajun and TX Brisket Seasonings.
Place on a 275°F pit and smoke for 1 hour or until seasonings are set on the outside and it begins to brown.
Remove the breasts from the smoker and wrap. I use a double layer of aluminum foil, 1 stick of butter, and 1/4 cup chicken broth for each breast. It’s also a good idea to place a wired meat probe in the breast for monitoring internal temperature.
Place the wrapped turkey breasts back on the pit and continue to cook until the internal temperature reaches 160° in each breast.
Remove the turkey breast from the pit, rest for 15-20 minutes and slice for serving.
The best Thanksgiving Turkeys take a little effort, a little planning and some time. For this bird, I did a 48 hour brine, then I pulled it out and let the skin “air dry” in the fridge overnight. A little light seasoning and some steady smoke is all you need after that.
This bird is packed full of juice, packed full of flavor and the skin turned out better than any turkey I’ve ever smoked before. The results were something I’d be more than proud to serve on Thanksgiving…
This smoked turkey breast recipe is about as good as it gets for Thanksgiving. I brined two big turkey breasts, seasoned them up, and smoked them over hickory wood until perfectly tender. With a little butter wrap to finish it off, you’ll have a turkey breast that’s juicy, smoky, and packed with flavor…
Ingredients
2 boneless, skinless Turkey breast
1/2 bottle Malcom’s Bird Brine
1 gallon water
cooking spray
1/4 cup Malcom’s King Craw Cajun Seasoning
1/4 cup Killer Hogs TX Brisket Rub
2 sticks butter
1/2 cup chicken broth
Instructions
Place the turkey breasts into a large container. Combine 1/2 bottle of bird brine with 1 gallon of water and pour the mixture over the turkey breasts. Place in the refrigerator for 12 hours.
Remove the turkey breasts from the brine and pat dry. Spray the outer surface with cooking spray and season with King Craw Cajun and TX Brisket Seasonings.
Place on a 275°F pit and smoke for 1 hour or until seasonings are set on the outside and it begins to brown.
Remove the breasts from the smoker and wrap. I use a double layer of aluminum foil, 1 stick of butter, and 1/4 cup chicken broth for each breast. It’s also a good idea to place a wired meat probe in the breast for monitoring internal temperature.
Place the wrapped turkey breasts back on the pit and continue to cook until the internal temperature reaches 160° in each breast.
Remove the turkey breast from the pit, rest for 15-20 minutes and slice for serving.
If you love your ribs to have a grill flavor – this is the recipe for you! They cook fast, they stay juicy and the flavor is better than the best grilled pork chop you’ve ever had. Plus you can get creative with this one – use whatever rubs you like, use whatever mop you like and just get to burning and turning some ribs!
This method cooks some FIRE ribs really fast. We use the charcoal and the grill to impart some serious flavor – and we baste the ribs the entire cook so they come out juicy, tender and oh so delicious!
Ingredients
2 slabs St. Louis Cut Spare Ribs
1/4 cup Killer Hogs Hot Rub
28oz apple cider vinegar
1/4 cup fine sea salt (feel free to add less salt to suite your taste)
1/4 cup ground cayenne pepper
juice from one lemon
Instructions
Trim the excess fat and remove the membrane from each slab of ribs.
Season the ribs on both sides with a light coat of Killer Hogs Hot Rub.
Prepare a charcoal grill for 2 zone cooking at 300°F.
Place the ribs over the direct heat side of the grill – the cool zone is just in case you need to get them away from the fire. These ribs cook over the direct heat side the entire cook.
Combine the vinegar, salt, cayenne pepper, and lemon juice in a quart mason jar. Shake it well.
Flip the ribs every ten minutes keeping the grilll temperature steady at 300°F.
Once the outside begins to dry out start mopping with the basting liquid using a bbq mop.
Continue to flip and mop until the internal temperature reaches 198-200°F.
Move the ribs over to the indirect heat side for 5-10 minutes.
Cut the ribs into individual bone pieces and serve with additional mopping sauce for dabbing.