This is a very simple, yet flavorful potato dish made with just a few ingredients, lots of fresh cilantro, ginger, and a little spice. It’s one of those everyday recipes I make often in my kitchen. You can enjoy it as a side dish, have it as a snack, or even roll it up in a roti for a quick and satisfying meal. Easy home cooking doesn’t have to be complicated, just fresh ingredients and comforting flavors. Simple ingredients, easy cooking, and so much flavor.
Prep Time 15 minutesminutes
Cook Time 18 minutesminutes
Servings 4
Ingredients
2cupsboiled, peeled potatoes (aloo), sliced lengthwise(Potatoes should be firm—do not overcook)
2tbspoil
1tbspcumin seeds (jeera)
¼tbspasafetida (hing)
2tbspthinly sliced ginger (adrak)
2green chilies, thinly sliced lengthwise
1tbspsalt
1tbsplemon juice
½cupchopped fresh cilantro (hara dhania)
Instructions
Heat the oil in a wide, flat frying pan over medium heat.
Add the cumin seeds; they should crackle right away.
Add the asafetida and stir briefly.
Add the potatoes and spread them out evenly in the pan. Sprinkle the salt
over the potatoes.
Roast the potatoes until they start picking up a light golden color.
Add the ginger and green chilies, spreading them evenly. Cook for a few
more minutes, gently turning the potatoes so they don’t break.
Once the potatoes look slightly crispy, add the cilantro and mix gently. Cook
for 2–3 minutes, until the cilantro softens and coats the potatoes.
Finally, sprinkle the lemon juice and give it a gentle mix.
Notes
Potatoes should be boiled just until tender and still firm. Overcooked potatoes may break while stirring.
Use a wide, flat pan so the potatoes roast evenly and get a light golden color.
Adjust green chilies according to your spice preference.
Fresh cilantro and ginger are key to the flavor-do not skip or reduce them.
This dish pairs well with roti, paratha, or can be enjoyed as a light snack.
Frequently Asked Questions (FAQs)
1. Can I use leftover boiled potatoes for this recipe?
Yes, leftover boiled potatoes work well as long as they are firm and not mushy. Slice them gently before cooking.
2. Can I skip asafetida (hing)?
You can skip hing if needed, but it adds a subtle flavor. If you are gluten-sensitive, make sure to use gluten-free hing or omit it.
3. How spicy is this dish?
This dish is mildly spicy. You can reduce or increase the number of green chilies based on your taste.
4. Can I make this dish ahead of time?
It tastes best when served fresh, but you can prepare it a few hours ahead and gently reheat it in a pan before serving.
5. Can I use dried cilantro instead of fresh?
Fresh cilantro is highly recommended for the best flavor. Dried cilantro will not give the same freshness.
6. How can I serve this dish?
You can serve it as a side dish, enjoy it as a snack, or roll it into a roti for a quick and satisfying meal.
Quick & Easy Creamy Ricotta Pie (Indian Mithai Style)
Sometimes you want to make a dessert that feels special but doesn’t take hours in the kitchen. This creamy ricotta pie is one of those recipes. I am making this pie with a store-bought pie crust and simple ingredients; it has a soft, lightly grainy texture that reminds me of Indian mithai. My granddaughter says it reminds me of Kulfi. The gentle flavor of cardamom and the crunch of nuts on top make it both comforting and festive at the same time. Best of all, it’s a no-fuss recipe—mix, fill, bake, and chill.I am using Store bought pie crest use shallow pie crest not deep crest.
Prep Time 10 minutesminutes
Total Time 45 minutesminutes
Ingredients
1Store-bought pie crust
16 oz2 cupswhole milk ricotta
1/2cupsugar (adjust to taste)
1/4tspcardamom powder
1tbspcornstarch (important for setting)
2tspchopped pistachios and almonds
Instructions
Mix ricotta, sugar, cardamom, and cornstarch
Fill the pie crust evenly
Bake at 350°F (190°C) for 30–35 minutes
Cool completely before slicing
After baking for 20 minutes sprinkle the nuts and bake again.
Pie should have a light brown color on the top
Slice the pie after it is chill Served chillTexture: soft, lightly grainy, like kalakand Indian mithaiThis creamy ricotta pie looks amazingly delicious, and my kitchen is filled with the sweet aroma of cardamom. I hope you enjoy making it as much as I did. Stay healthy and stay safe.
Notes
Use a shallow store-bought pie crust, not a deep-dish crust, for best results.
Cornstarch is essential—it helps the pie set properly while keeping the texture soft and creamy.
Sprinkle chopped nuts after 20 minutes of baking to prevent them from burning.
Best served chilled for a rich, dessert-like experience
Cook at 320–330°F (160–165°C) for 15–20 minutes, checking halfway through. The pie should be set but still slightly wobbly in the center.
If the top starts browning too quickly, loosely cover it with foil.
Frequently Asked Questions (FAQs)
1. Can I use low-fat ricotta instead of whole milk ricotta?
Whole milk ricotta is recommended for a creamy, rich texture. Low-fat ricotta can make the pie drier and less smooth.
2. Can I reduce the sugar?
Yes, you can adjust the sugar to your taste. If you prefer a mildly sweet dessert, start with 1/3 cup and increase if needed.
3. Why is my pie still slightly wobbly in the center?
This is completely normal. The pie continues to set as it cools and will firm up fully after chilling in the refrigerator.
4. Can I make this pie ahead of time?
Yes. This pie actually tastes better the next day. You can make it in advance and store it covered in the refrigerator for up to 3 days.
5. Can I skip the nuts on top?
Yes, the nuts are optional and mainly add texture. You can replace them with raisins or skip the topping altogether.
6. How do I air-fry the pie safely?
Place the pie in the air fryer basket and cook at 320–330°F (160–165°C) for 15–20 minutes, checking halfway through. If the top browns too quickly, loosely cover it with foil.
Stuffed Parathas Made Easy Aloo Potato Gobhi Cauliflower
I am truly excited! Stuffed parathas sound difficult to make and time consuming andhonestly, they are. They’re one of the most loved Indian breads, but making the doughand rolling the parathas is the part that creates the most work, the most mess, and themost cleanup.That’s why I’ve been experimenting with easier ways to make them while keeping thetaste true to the original. You can even call it semi-homemade because I’m using store-bought uncooked rotis. I was so happy and surprised when I came up with this quick,simple method. In the end, your own finishing touch makes all the difference!Today, I am sharing recipes for two different parathas:Aloo (Potato) Paratha — my favorite classicGobhi (Cauliflower) Paratha — my husband’s favoriteThis recipe will make 2 parathas — one of each.
Prep Time 15 minutesminutes
Cook Time 15 minutesminutes
Servings 2parathas
Ingredients
Aloo Paratha
Ingredients
2 Uncooked Rotis (available at Indian stores)
For filling
½cupboiled and mashed potatoes
¼teaspooncumin seeds
1/2teaspooncoriander powder
¼teaspoondry mango powder
A pinch of asafetida
¼teaspoonsalt
¼teaspoonfinely grated ginger
½teaspoonfinely chopped green chili (adjust to taste),or ¼ teaspoon red chili powder
1tablespoonfinely chopped cilantro
2teaspoonsoil to cook the paratha
Gobhi (cauliflower) Paratha
Ingredients
2UncookedRotis (available at Indian stores)
½cupgrated cauliflower (Gobhi)
2tablespoonsof boiled mashed potatoes (to help hold the filling)
½teaspooncumin seeds
1teaspooncoriander powder
¼teaspoondry mango powder
A pinch of asafetida
¼teaspoonsalt
¼teaspoonfinely chopped ginger
½teaspoonfinely chopped green chili (adjust to taste),or ¼ teaspoon red chili powder
1tablespoonfinely chopped cilantro
2teaspoonsoil
Instructions
Prepare the filling:
Mix all the ingredients together. Taste and adjust the salt. If filling seems too dry add 1spoon of water.
Lightly cook the rotis:
Heat a flat skillet over medium heat. Cook each roti on one side only for about 30 seconds.Place them on a plate.
Assemble the paratha:
On one roti (cooked side up), spread the potato filling evenly. The filling should not be too thick. Place the second roti on top with the cooked side facing down.
Cook the paratha:
Heat the skillet to medium-high. Transfer the prepared paratha to the skillet. Cook on both sides using about 1 teaspoon oil per side.Press gently with a spatula and cook until golden brown and crispy. These come out looking just like traditional aloo parathas — crispy, hot, and delicious.They taste best when served hot!
Gobhi (cauliflower) Paratha
Prepare the filling:
Grate the cauliflower finely. Add the mashed potatoes and mix well, this helps bind the loose cauliflower.
Mix in all remaining ingredients. Taste and adjust the salt.
If filling seems too dry add 1 spoon of water
Lightly cook the rotis:
Heat a flat skillet over medium heat. Cook each roti on one side only for about 30 seconds.Remove and set aside.
Assemble the paratha:
Place one roti on a plate with the cooked side facing up.Spread the cauliflower-potato filling evenly in a thin layer.Place the second roti on top with the cooked side facing down.
Cook the paratha:
Heat the skillet on medium high. Gently place the stuffed paratha on the skillet.
Cook both sides using about 1 teaspoon oil per side.
Press lightly with a spatula and cook until both sides are golden brown and crisp.
These semi-homemade Gobhi Parathas turn out wonderfully — flavorful, easy to handle, and so much simpler to prepare than the traditional method. Serve hot for the best taste!
Notes
Keep the filling layer thin to prevent tearing.
Prick the paratha lightly while cooking to avoid puffing and separation.
Always cook on medium to medium-high heat for even browning.
These parathas stay crisp and reheat well on a skillet.
I like to serve paratha spiced yogurt or pickle or just enjoy, with hot cup of tea. Thank you! Enjoy!
Frequently Asked Questions (FAQs)
1. Can I use frozen rotis?
Yes. Thaw them completely before cooking to ensure even heating and proper texture.
2. Why add potatoes to gobhi filling?
Cauliflower releases moisture while cooking. Adding potatoes helps bind the filling and prevents the paratha from separating.
3. Can I make these ahead of time?
Yes. Cook them slightly less if you plan to reheat later on a skillet.
4. Can I make them oil-free?
A small amount of oil helps create a crisp texture, but you can reduce the quantity if needed.
5. What can I serve with parathas?
Parathas pair well with spiced yogurt, pickle, butter, or simply enjoy them with a hot cup of tea.
Gond ke Laddu, a cozy and nourishing treat, is a traditional winter staple in a lot of Indian homes. These wholesome and delicious laddoos are loaded with immunity boosting and warming properties.
There’s something special and nostalgic about making Gond ke Laddu at home. Growing up, my mum and granny would make it and now I make it for my kids. For those of you who don’t know, gond ke laddu is a traditional Indian winter sweet made using gond (edible gum), jaggery, nuts, and whole wheat flour. It’s a simple little treat but one that’s packed with a lot of benefits.
These laddoos are called by a lot of names – gond ke laddu, pinni, dinkache laddu, etc. – depending on the state. This gond laddu recipe is from North India, and it’s the one I have grown up eating. And it’s an absolute must-have winter recipe for me right along with gajar halwa and methi matar malai.
Gond is one of the oldest natural superfoods in Indian cooking. It’s extracted from the sap of the babool tree and is amazing for generating warmth in the body, boosting stamina, and supporting postpartum recovery. Traditional Indian households have relied on gond for centuries during winter because it helps keep joints strong, improves immunity, and provides slow, steady energy when the weather gets cold.
Ingredients for Gond Ke Laddu
Gond (Edible Gum): The star ingredient that gives these laddoos their signature crunch and strength-boosting benefits.
Ghee: Used for frying the gond and roasting the flour. It adds warmth, flavour, and richness to the laddus.
Nuts & Seeds: A mix of cashews, almonds, melon seeds, and khus khus for crunch, nutrition, and that classic laddoo texture.
Copra (Dried Coconut): Adds sweetness and a lovely nutty aroma when lightly roasted.
Atta (Whole Wheat Flour): Gives the laddus body and helps bind everything together once roasted.
Jaggery: The natural sweetener that melts into a sticky syrup and brings all the ingredients together.
Richa’s Top Tips
Fry gond on low heat: It should puff up slowly, not brown too fast. This keeps it light and crunchy instead of hard and chewy.
Roast everything separately: Nuts, atta, and copra all roast at different speeds. Doing them one by one keeps each ingredient perfectly golden and prevents burning.
Jaggery just needs to melt: No string consistency needed. As soon as it melts, turn off the heat so the laddoos stay soft and easy to shape.
Shape the laddus while warm: Once the mixture cools too much, it becomes harder to bind. If that happens, warm it slightly to loosen it again.
Use good-quality ghee: Since ghee is the main flavour here, I prefer to use fresh, homemade ghee as it makes a huge difference to the flavor and texture..
Frequently Asked Questions
What is the difference between pinni and gond laddu?
Pinni and Gond Laddu are both winter sweets from North India made with ghee, gond, nuts, and flour from North India.
Why do my gond ke laddu turn hard, and how can I fix that?
They usually turn hard if the atta or gond gets over-roasted, or if the jaggery cooks for too long. To fix the mixture, warm it gently and add a spoon of melted ghee, then reshape.
I’m vegan. Can I make these laddus without ghee?
Yes! Replace ghee with coconut oil. The flavour will be slightly different, but the laddus will still bind well and taste delicious.
Storage Tips
Room Temperature: Store in an airtight container for 2 to 3 weeks as we roast everything well so it stays fresh quite easily.
Fridge: Not necessary, but you can refrigerate them in very warm climates. Bring to room temperature before eating so the ghee softens.
Freezer: They freeze well for up to 2 months. Thaw a few laddus overnight on the counter and they’ll taste just as good.
Avoid Moisture: Always use a dry spoon or dry hands to pick them up. Any moisture shortens shelf life.
Serving Ideas
These laddus pair beautifully with other warming winter dishes. Here are some great serving combinations:
Alongside Halwa: Perfect for a cozy, old-school Indian sweet platter.
After a bowl of Sarson Ka Saag & Roti: The ideal finishing touch to a winter Punjabi meal.
Here are some fun, actually useful ways to switch things up:
Add edible gum varieties: If you find Babul gond or Mahua gond, mix a small portion with the regular gond for added texture and different health benefits.
Make a chocolate version: Add 1 tablespoon unsweetened cocoa powder to the roasted atta for a kid-friendly twist.
Spice it up: A pinch of nutmeg or dry ginger powder makes these laddus even more warming during winter.
Add seeds for crunch: Toss in toasted flaxseeds, sunflower seeds, or chia to make the laddus even more nutritious.
Make mini laddus: Roll bite-sized ones for gifting or festive platters. They stay neater and are great for portion control.
Gond ke Laddu is like winter wrapped up in a small bite. It’s warm, nutty, wholesome, and familiar in the best way. Whether you’re making them for the season, for someone who needs the extra strength, or simply because you love homemade sweets, this recipe will always hit the spot.
If you end up making a batch, tag me on Instagram @my_foodstory, I’d love to see your winter kitchen magic!
Take 3 tablespoons of ghee in a kadai, add gond in small batches & fry on low till they puff up. Transfer to a plate.
½ cup +1 tsp ghee, ⅔ cup gond
To the same kadai, add cashews and fry on low for 2-3 minutes till they turn light golden and transfer to the plate. Add melon seeds and fry for 1-2 minutes till they turn light golden. Add almonds and fry for a few seconds till golden and transfer to the plate. Crush the fried gond lightly with hand or using a pestle.
½ cup + 2 tablespoons chopped cashews, ¼ cup + 1 tablespoon chopped almonds, ¼ cup + 2 tablespoons melon seeds
Add the remaining 1 tablespoon of ghee, atta and fry on low for 3-4 minutes till it’s well roasted and golden brown. Fry khuskhus, khopra, mix well and roast for a minute. Add to the plate and give it a good toss to mix with fried dry fruits, gond etc.
1 cup atta / wheat flour, 1 tablespoon khus khus, ¼ cup grated khopra
Add 1 teaspoon of ghee to the kadai, add jaggery with 2 tablespoons of water and once it melts, add to the rest of the ingredients. Mix, make lemon size laddoos and serve. This will yield approx. 16-18 laddoos.
1 cup jaggery, 2 tablespoons water
Video
Notes
The nutrition information below does not include the caloric count for gond and melon seeds, but it will be approximately 30-50 kcal.
This drumstick soup is light, nourishing, and deeply comforting. Made from a mix of drumstick and lentils, it’s the kind of recipe that feels both restorative and familiar, and will make even a non-drumstick person reach for seconds.
I have a tried a lot of variations of this drumstick soup, but somehow most of them fell short of that beautiful, earthy flavors of drumstick. They were either too watery or too garlick-y; almost like those soups were trying hard to eliminate any drumstick flavor. But this one’s different – it’s warming, nourishing, incredibly delicious, while still holding onto the flavor of it’s main ingredient – drumsticks or moringa, or Murungakkai.
What I love most about this soup is how gently it comes together. You cook everything down, extract all the goodness from the drumsticks, strain it smooth, and suddenly you have this beautiful, peppery broth that tastes far more thoughtful than the effort it takes. It’s the kind of food I’d make for a friend who’s under the weather, or for myself on a quiet evening when I want something simple, wholesome, and comforting in a bowl.
Drumstick: The star ingredient; cooked and ground to extract the nutrients and flavour
Moong dal: Adds body, creaminess, and an added layer of nutrition and flavor to the moringa soup
Aromatics: Garlic, curry leaves, onions, and tomatoes build flavor, aroma, and make the foundation of this soup
Spices and seasonings: This soup that’s lightly tempered with jeera, and seasoned with salt and pepper powder to keep it light and hearty
Coriander leaves: Used as a garnish to add a little freshness
Frequently Asked Questions
Can I make this without a pressure cooker?
Yes. Cook everything covered on low heat until the drumsticks and dal are very soft, then proceed as usual.
Is this soup vegan?
Yes, the recipe is naturally vegan
Can I skip straining the soup?
Straining is recommended for a smooth texture, but you can skip it if you don’t mind some fibre.
How long does it keep?
It keeps well in the fridge for up to 24 hours. Reheat gently before serving.
Can I add other veggies to this?
Yes, why not! Diced potato, carrots, sweet corn, broccoli, mushrooms, zucchini, are some veggies that taste incredible and add extra texture and nutrition.
Richa’s Top Tips
Soak the moong dal to ensure it cooks soft and blends smoothly into the soup.
Cook drumsticks till just tender as overcooking can dull the flavour.
Strain thoroughly after grinding to get a smooth, fibre-free soup.
Let the soup rest covered for a few minutes before serving so flavours settle.
Storage Ideas
Refrigeration: This flavors of this murungakkai soup stay fresh in the fridge for up to a day when stored in an airtight container.
Separate the garnish: If possible, store the cooked drumstick pieces for garnish separately and add them only while serving.
Reheating: Reheat gently on low heat, stirring occasionally. Avoid a rolling boil to preserve the delicate flavour.
Consistency adjustment: The soup may thicken slightly as it rests. If that happens, adding a little hot water while reheating will help bring it back to the desired consistency.
Serving Ideas
Serve hot as a light meal or starter, especially during cooler weather.
Pair with steamed rice and a drizzle of ghee for a simple, nourishing lunch.
Crusty garlic bread also makes for an excellent side with this drumstick soup.
Customisation Ideas
Add a pinch of turmeric while cooking for extra warmth and colour.
Swap pepper with crushed black peppercorns for a more rustic texture.
Stir in a little coconut milk for a richer, creamier version.
Make it thinner and sip-able by adding more hot water while reheating.
This drumstick soup is simple, thoughtful cooking featuring minimal ingredients, gentle spices, and maximum comfort. It’s the kind of recipe you return to when your body asks for warmth and nourishment, without fuss or heaviness.
You need to try this recipe at least once this winter, and then I promise you will keep coming back to it. If you make this, don’t forget to DM me pictures of your recreations over on my IG @my_foodstory. It’s always so nice to see you guys trying my recipes.
Gently spiced, naturally thick, yet super light and nourishing, this drumstick soup is deeply comforting and feels both restorative and familiar at once.
4drumstickscut into 2 ½ inch long pieces, 230 grams
2tablespoonsmoong dalsoaked for 30 minutes
3 ½cupswater
½teaspoonpepperground
1drumstickcut into 2 ½ inch long pieces, for garnish (optional)
2sprigs of coriander leaves
Instructions
Heat oil in a pressure cooker, add jeera & once it crackles, add garlic cloves and saute on medium for a few seconds till fragrant.
2 teaspoons groundnut or any neutral flavored oil, ½ teaspoon jeera, 4 garlic cloves
Add curry leaves, sliced onions & saute for 2 minutes on low till fragrant.
½ cup curry leaves, ½ cup sliced onions
Add tomatoes, salt and cook for 2-3 minutes on low till they soften a bit. Add drumsticks and saute for a few seconds. Add soaked moong dal, 2 ½ cups of water and close the lid of the pressure cooker. After the first whistle, cook for 10 minutes and let it depressurise by itself.
½ cup sliced tomatoes, ½ teaspoon salt, 4 drumsticks, 2 tablespoons moong dal, 3 ½ cups water
Add 1 cup of water to a pot, add the drumstick pieces for garnish and cook for 3-4 minutes just until tender and set aside.
3 ½ cups water, 1 drumstick
Open the cooker. Add the drumsticks & aromatics to a mixer grinder and grind to extract the pulp. Pour in a strainer and separate the fibre & other solids from the pulp. Transfer the drumstick pulp to a pot, add pepper powder and boil for 1-2 minutes. Take off the heat, add 2 sprigs of coriander leaves and keep covered until serving.
½ teaspoon pepper, 2 sprigs of coriander leaves
To serve, add 2-3 cooked drumstick pieces to a bowl, add the soup & serve hot.
Make restaurant-style Palak Paneer easily at home with a few secret tips and tricks. It’s quicker and easier than you’d think but has the same richness and flavor like the one from your favorite restaurant!
Palak paneer is a house favourite and I’ve been improving my recipe for years. I’m talking about a creamy, mildly flavoured herby green gravy that doesn’t have any bitterness from spinach or is heavy on spices. This is an easy recipe which means that there are no complicated steps, no long list of masalas, no major prep work. And the flavors are so restaurant style that I might almost stop ordering palak paneer outside.
This right here is a gem! Every bite will make you close your eyes and want more. Dip some garlic naan or scoop it up with some jeera rice, either way this palak paneer recipe is a winner!
Greens and fresh herbs: I have used a mix of fresh spinach and coriander leaves for vibrant, herby flavors. Spinach delivers an earthy flavor and that bright green color while coriander adds freshness and helps reduce any bitterness.
Paneer: I have used homemade paneer as it delivers the softest, creamiest results for this recipe. Even though store-bought paneer works, I would highly recommend making paneer from scratch if you have 15 extra minutes. It really enhances this already amazing recipe.
Aromatics and base flavors: onion, garlic, green chillies, and tomatoes form the base of this paneer and spinach curry.
Whole spices: a gentle tempering of bayleaf, green cardamom, and cloves infuses the gravy with aroma and depth
Powdered spices: coriander powder, jeera (cumin) powder, garam masala for warmth, flavor, and balance
Cream: helps make the gravy richer and creamier. You can replace it with soaked cashew paste for a vegan version
Kasuri methi: just a pinch right at the end adds a hint of smokiness and that restaurant-style aroma. a little goes a long way.
For the tadka/tempering: This step truly elevates your palak paneer. Ghee (replace with oil if you’re vegan), garlic (smashed with skin on), whole dried red chillies, jeera, and a sprinkle of red chilli powder for that final garlicky kick and color contrast.
Frequently Asked Questions
Why does my palak paneer turn dark instead of bright green?
This usually happens when spinach is overcooked or boiled for too long. To keep the color vibrant, cook the spinach just till wilted and blend it right away. You can also blanch it briefly and transfer to ice-cold water before blending.
Can I use frozen spinach instead of fresh?
Frozen spinach works great, just thaw it completely and squeeze out extra water before blending. The flavor stays almost the same, and it’s a great time-saver.
How do I fix a bitter palak gravy?
Bitterness can occur if the spinach is overcooked or if mature leaves were used. Stir in a spoon of cream, milk, or even a pinch of sugar or honey to balance out the bitterness.
My paneer turns rubber. What am I doing wrong?
Paneer becomes rubbery when it’s overcooked. Make sure to add it only at the end, after turning off the heat, and let it gently soak in the hot gravy instead of boiling.
Richa’s Top Tips
Preparing Spinach: If you want a truly creamy gravy, remove the hardy stems of spinach and only use the leaves. The stems are nutritious but make the gravy more fibrous
Use only Green Chillies: For a natural bright green colour in palak paneer, use only green chillies for heat. Don’t add any red chilli powder because that’s one sure shot way of making the gravy brownish. Plus we have more chilli powder in the tadka that goes on top but doesn’t affect the colour in any way
Mild Spices: Stick to the recipe and don’t go heavy on the spices. This recipe really doesn’t need it. Let the beautiful flavour of palak or spinach really shine
Coriander: Don’t skip the coriander in the recipe because it helps keep that green intact and also cuts the bitterness out of the dish
Don’t overcook: Palak paneer becomes brownish when you over cook the spinach puree. At both times – first when sauteeing the spinach with onions, and later after you add the pureed spinach to the pan, cook for only 1-2 minutes. Bring the puree to a gentle boil and turn off the flame, because the longer you cook, the more oxidisation will take place and you’ll leave that naturally beautiful bright green colour.
Don’t skip the cream: We are not using much – just 2 tablespoons of cream in the entire recipe which serves four. It adds volume to the gravy and makes it rich and luxurious.
Vegan Palak Paneer: Palak paneer is easily made into a vegan recipe. Swap the paneer for tofu, the cream for coconut cream and the ghee for oil.
Serving Ideas
There are so many easy ways to enjoy Palak Paneer, and it fits beautifully into both weekday meals and special menus.
Classic Indian style: Soak up that creamy, spinach gravy with roti, naan, or paratha
Combo meal ideas: Pair with dal tadka or dal fry, a small bowl of raita, and papad for a comforting, balanced meal.
Creative twist: Use leftovers as a filling for wraps or stuffed in puff pastry for a clever breakfast or snack idea.
Customisation Tips
Make it vegan: Swap out ghee and cream for vegetable oil and coconut cream or cashew cream to keep it creamy without dairy
Play with spice: Add more green chillies or red chilli powder for heat, or balance with a dash of lime juice if you prefer a lighter, tangier flavor
Protein boost: Crumble up tofu instead of paneer for a vegan-friendly, protein-rich version.
Spinach + bonus greens: Mix in a handful of methi (fenugreek leaves), amaranth, or kale with the spinach for extra depth and nutrients.
Texture upgrade: Add a few roasted cashews or a spoon of almond paste while blending for a richer, nutty base.
Storage Tips
Reheating: Warm it gently on the stovetop or in the microwave. Add a splash of milk or water if the gravy has thickened to make it come back to its creamy best.
Refrigeration: Store any leftovers in an airtight container in the fridge for up to 3 days. The flavors actually deepen with time, making next-day palak paneer even better.
Freezing: You can freeze the spinach gravy (without paneer) for up to 2 months. Just thaw and reheat before adding fresh paneer to maintain the texture.
Palak paneer hits that perfect balance between wholesome and indulgent with it’s creamy, mildly spiced, and full of earthy flavor. It’s one of those dishes that reminds you how simple making restaurant-style dishes at home can be.
If you make this recipe, don’t forget to tag me on your stories or DM me in your pictures @my_foodstory.
This is the easiest recipe you'll find for Palak Paneer. No blanching spinach, no heavy spices and the result is a luxurious, creamy restaurant style dish that takes only 30 minutes to make.
150gramschopped Palak(spinach), stems and roots removed – approximately one bunch
10gramsfresh Corianderstems and roots removed – approximately 1/4 cup
1Bayleaf
2Cardamom Pods
2Cloves
1large Tomato, approx 1/2 cupfinely chopped
½teaspoonJeera Powder
½teaspoonCoriander Powder
¼teaspoonGaram Masala Powder
1teaspoonSalt
1/2 cupwater
1teaspoonKasuri Methiroasted and crushed into a powder
2tablespoonCream
200gramsPaneercut into cubes
For the Tadka/Tempering
1.5tablespoonsGhee
5Garlic Clovessmashed with skin on
2-3whole dried Red Chillies
1teaspoonJeera
1teaspoonRed Chilli Powder
Instructions
Heat a tablespoon of ghee in a pan and saute garlic for 30 seconds. Add sliced onions and green chillies and saute till the onion is just starting to become light brown. Add the palak (spinach) and coriander leaves and saute for a minute. Then turn off the heat and cover and let the leaves wilt for another 2-3 minutes. Set this aside to cool and then blend to a paste.
In a bowl, add paneer and cover this with hot water. Let this sit for 10 minutes. This step is optional, but it helps soften the paneer.
200 grams Paneer
In the same pan, heat ghee and saute bayleaf, cardamom and cloves for a minute. Add ginger, sautee for a few seconds, add tomatoes, jeera powder, coriander powder and salt and cook the tomatoes for 4-5 minutes till soft. Add kasuri methi and garam masala and cook for another minute.
1/2 inch Ginger, 1 Bayleaf, 2 Cardamom Pods, 2 Cloves, 1 large Tomato, approx 1/2 cup, ½ teaspoon Jeera Powder, ½ teaspoon Coriander Powder, ¼ teaspoon Garam Masala Powder, 1 teaspoon Salt, 1 teaspoon Kasuri Methi
Add the pureed spinach, water, and bring this to a gentle boil. Then turn off the heat, add the cream and paneer and let the paneer warm up in the hot gravy. If you haven’t soaked your paneer in hot water earlier, then let the paneer simmer in the gravy for a minute.
1/2 cup water, 2 tablespoon Cream
Finally make the tadka by add ghee and garlic to a small pan. Cook the garlic till its a golden brown. Then add whole red chillies and jeera. Once the jeera starts spluttering, turn off the flame and add chilli powder.
1.5 tablespoons Ghee, 5 Garlic Cloves, 2-3 whole dried Red Chillies, 1 teaspoon Jeera, 1 teaspoon Red Chilli Powder
Pour this tadka on the palak paneer for an extra garlicky kick! Serve hot.
Video
Notes
Use fresh tender spinach leaves. You can discard the stems or use them for any other dish. Tender stems however, can be used.
I only use paneer for this dish. However, it is super versatile. You can add your favouritevegetables like mushrooms, bell peppers, potato etc., or even proteins like shrimp, chicken or mutton. The cook time will vary accordingly.
To make this dish vegan, you can substitute fresh cream with coconut cream. You can also skip the cream if required.
If the spinach tastes bitter, you can add half a teaspoon of sugar and adjust it to your liking.
I bet you’ve never had chole this way before! It combines the comfort of chole with the goodness of spinach to make this delicious Spinach and Chickpea Curry or Chole Palak that will make you want to lick your bowl clean!
Eating your winter greens has never been this delicious and this Spinach and Chickpea Curry aka chole palak is so delicious that it will make even non palak lovers fall in love! I was so excited when testing this recipe, because believe me, it’s amazing how much flavor this curry packs in just 25 minutes!
Save this for when you’re too tired to think, meal prep for the week ahead, or even when you want to feel like you’re eating something nourishing without sacrificing taste. If you love the classic Pindi Chole, it’s time you give this variation a shot.
Chickpeas (Chana): The star of the dish. Soaked overnight or at least 8 hours
Oil: Any neutral oil works; sunflower, canola, or vegetable oil
Whole Spices: Jeera (cumin seeds), bay leaf, black and green cardamoms, cinnamon, and cloves bring warmth and depth to the base.
Aromatics: Finely chopped ginger, garlic, onions, and green chilli add layers of flavour and that essential punch.
Spice Powders: Coriander powder, cumin powder, turmeric, red chilli powder, chole masala, and salt create the masala base that makes this curry so deeply flavourful.
Tomatoes: Finely chopped and cooked down until mushy, they add tanginess and body to the gravy.
Spinach (Palak) and Coriander Leaves: Blanched and blended into a bright green puree that keeps the curry fresh, vibrant, and packed with nutrients.
Finishing Touches: Garam masala and roasted kasuri methi (dried fenugreek leaves) go in at the end for an extra layer of aroma.
Richa’s Top Tips
Soak your chickpeas properly: Overnight soaking is best, but if you’re short on time, at least give them 8 hours. Well-soaked chickpeas cook evenly and turn soft without falling apart.
Don’t skip the ice bath for spinach: Blanching the spinach and immediately dunking it in ice water locks in that bright green colour. It’s the difference between a dull, brownish curry and one that looks as good as it tastes.
Cook the masala well: Let the tomatoes break down completely and until the oil starts to separate from the spices before adding the chickpeas. This step builds the flavour base, so don’t rush it.
Adjust the consistency at the end: The curry thickens as it sits, so add a splash of water if it looks too thick. You want a gravy that coats the back of a spoon but still flows nicely.
Frequently Asked Questions
Can I use frozen spinach instead of fresh?
Yes, you can! Thaw it completely, squeeze out the excess water, and blend it into a puree. Fresh spinach gives you a brighter colour and flavour, but frozen works in a pinch and saves you the blanching step.
Why does my spinach turn dark when cooking?
Spinach turns dark when it’s overcooked or not cooled quickly enough after blanching. The ice bath is key, it stops the cooking process immediately and locks in that vibrant green colour. Skip it, and you’ll end up with a dull, olive-toned curry.
Can I substitute spinach with other greens like methi or kale?
Absolutely! Methi (fenugreek leaves) will give you a slightly bitter, earthy flavour that’s delicious with chole. Kale works too, though it’s a bit tougher, so blanch it a little longer. Amaranth leaves or mustard greens are also great options if you want to switch things up.
How do I prevent the curry from becoming too watery?
Cook the spinach puree for a good 3-4 minutes after adding it so it absorbs all the masala and thickens up. If it’s still too thin, let it simmer uncovered for a bit longer. The curry should have a thick, coating consistency, not a soupy one.
Storage Tips
Fridge: Store leftover chickpea spinach curry in an airtight container for up to 3 days. The flavours actually deepen over time, so day-two chole palak often tastes even better than freshly made.
Freezer: This curry freezes beautifully for up to 2 weeks. Let it cool completely before transferring to freezer-safe containers. Thaw overnight in the fridge before reheating.
Reheating: Warm it gently on the stovetop with a splash of water to loosen the gravy. You can also microwave it, but stovetop reheating keeps the texture better and lets you adjust the consistency as needed.
Serving Ideas
This chickpea and spinach curry is delicious on its own, but it really shines when you pair it with the right sides. Here are some easy combinations that work beautifully:
With Jeera Rice: The mild, aromatic rice lets the curry take center stage and soaks up all that delicious gravy.
With Rotis or Parathas: Perfect for mopping up every last bit of that spinach gravy. Nothing beats tearing off a piece of warm roti and scooping up the chole.
With Naan: Soft, pillowy naan is great if you want something a little richer to go with the curry.
With Pulao: A lightly spiced pulao complements the earthy, spiced flavours of the chole palak without overwhelming it.
With Raita: A cooling cucumber or boondi raita on the side balances out the warmth of the spices.
With Pickles and Papad: Add some pickles and crispy papad for that full Indian meal experience.
Customisation Ideas
Add paneer for extra protein: Toss in some cubed paneer at the end for a richer, more filling curry. It soaks up the gravy beautifully and adds a creamy texture.
Make it creamier: Stir in a tablespoon or two of cream or coconut milk right before serving for a silkier, more indulgent gravy.
Dial down the heat: Skip the green chilli or use less red chilli powder if you prefer a milder curry. You’ll still get all the flavour without the fire.
Try it with other greens: Swap spinach for methi (fenugreek), amaranth, or even a mix of greens for a different flavour profile that’s just as delicious.
Why You’ll Love This Curry
Spinach and chickpeas are a powerhouse combination when it comes to nutrition. Spinach is packed with iron, and chickpeas are loaded with protein and fiber, making this curry a complete, balanced meal in one bowl. The best part? The vitamin C from the tomatoes actually helps your body absorb the iron from the spinach more effectively. So not only does this chole palak taste comforting, it’s also working behind the scenes to nourish you in all the right ways.
This chole palak is comfort food at its best, and I hope it becomes a regular in your kitchen. If you make it, I’d love to see how it turns out, tag me on Instagram @my_foodstory!
The comfort of chole along with goodness of spinach come together to make this delicious and heartwarming, winter special Spinach and Chickpea Curry that tastes delicious with garlic naan!
Heat oil in a pressure cooker, add jeera and once it crackles, add bay leaf, black & green cardamoms, cinnamon, cloves & saute for 8-10 seconds.
3 tablespoons oil, 1 teaspoon jeera, 1 bay leaf, 1 black cardamom, 1 inch cinnamon, 2 cloves, 2 green cardamoms
Add ginger, garlic and saute on high for a few seconds till fragrant. Add onions & fry till they turn golden brown.
2 teaspoons finely chopped ginger, 1 tablespoon finely chopped garlic, ¾ cup finely chopped onions, 1 green chilli
Add spice powders – coriander, cumin, turmeric, red chilli, chole masala, salt, tomatoes and cook on low for 3-4 minutes till the tomatoes are mushy.
1 tablespoon coriander powder, 1 teaspoon cumin powder, ½ teaspoon turmeric powder, 1 teaspoon chole masala, 1 teaspoon red chilli powder, 1 teaspoon salt, ½ cup + 2 tablespoons finely chopped tomatoes
Add soaked chick peas, give a good mix, add 1 ¼ cups of water, cover the lid of the pressure cooker and cook on high till the first whistle, on low for 20 minutes or 4-5 whistles till the chick peas are cooked well.
½ cup white chick peas, 3 ¼ cups + 2 tablespoons water
Making palak puree:
Heat a pot with 2 cups of water, bring to a boil, add palak, coriander leaves. Immediately switch off the flame, and cover the pot. Let this sit for 2 minutes. In the meanwhile, prepare a bowl with water and ice cubes in it. Strain the palak & coriander leaves and dump them in the ice water. The leaves will immediately get a bright green color. Let them sit for half a minute, strain, and grind to a fine paste.
3 cups tightly packed palak, ½ cup coriander leaves & stems
Making chole palak:
Open the pressure cooker, Add garam masala, kasuri methi, mix and cook for 2-3 minutes.
½ teaspoon garam masala, ½ teaspoon roasted & crushed kasuri methi
Add palak puree and cook for 3-4 minutes till the puree absorbs all the masalas. You may add 1-2 tablespoons of water to adjust the consistency to a thick gravy and serve.
Video
Notes
½ cup of soaked chick peas yields approx. 1 ⅓ cups.
Leftovers will stay good for 2-3 days when refrigerated in an airtight container.
In our families Milagu Adai also one of the neyvedhyam for Thirukarthigai. As per the mythological story a princes has to leave an elephant which she considered as her brother when she gets married and move to her husbands place. So for every Thirukarthigai/Karthigai deepam occasion, elephant lamp(Gajalakshmi vilaku) and she will prepare tender coconut, elephant leg size milagu Adai, and few more dishes and keep them as neivedhyam for this festival.
We can make this Adai in normal occasions for breakfast or for dinner.Serve with Chutney or Jaggery.
Milagu Adai | Thirukarthigai Adai is an offering to God we make on the auspicious occasion of Thirukarthigai Deepam.
Course Breakfast, Evening Tiffen
Cuisine Indian, South Indian, Tamilnadu
Prep Time 10 minutesminutes
Cook Time 30 minutesminutes
Soaking Time 2 hourshours
Total Time 40 minutesminutes
Servings 4Adai
Calories 197kcal
Author Sowmya Venkatachalam
Ingredients
1CupRaw Rice
¼CupWhole Urad Dal
¼CupToor Dal (Pigeon pea)
¼CupSplit Bengal Gram (Channa Dal / Kadalaparuppu)
1teaspoonPeppercorns
1teaspoonSaltAs Needed
aPinchAsafoetida (Asafetida / Hing)
2tablespoonGrated Coconut
FewCurry Leaves
Instructions
Soak the rice with all the dhals in water for 2 hours to 3 hours.
Drain the rice and dhals and grind it in mixer to a coarse paste. The adai flour should not be very smooth. ransfer this to a bowl and mix the pepper salt, hing, curry leaves and grated coconut.
The consistency should be slightly thicker than our normal dosa batter.
Heat the thawa and pour 1 ladle of flour and spread evenly and cook the adai on both the sides till the adai is crisp
Serve the tasty adai along with Jaggery.
Video
Notes
If you make this on normal days, we can add onion.
For Festivals, we need to use Raw Rice, for normal occasions, we can use parboiled rice
Soak the rice with all the dhals in water for 2 hours to 3 hours. Drain the rice and dhals and grind it in mixer to a coarse paste. The adai flour should not be very smooth. ransfer this to a bowl and mix the pepper salt, hing, curry leaves and grated coconut. The consistency should be slightly thicker than our normal dosa batter.
Heat the thawa and pour 1 ladle of flour and spread evenly and cook the adai on both the sides till the adai is crisp
If you love idlis and dosas but want to make them a little more nourishing, this Ragi Idli Dosa Batter is the perfect place to start; simple, healthy, and absolutely delicious.
Starting your day with a plate of soft idlis or crispy dosas fresh off the pan is 100% guarantee of a wonderful day ahead. This Ragi Idli Dosa Batter recipe will only add a lil more to the same joy. It’s packed with all the wholesome goodness of finger millet that gives the idlis and dosas a little health and flavor boost.
If you’ve loved our Idli Dosa Batter recipe before, this version will feel like the healthier cousin that’s just as easy to make. Ragi, or finger millet, is rich in calcium, iron, and fibre, making every bite nourishing and satisfying.
This Ragi Idli Dosa batter recipe calls for simple, pantry-staple ingredients. Here’s everything you’ll need:
Ragi (Finger Millet): The star of this recipe. Gives the batter its earthy flavour and a big nutritional boost with calcium, iron, and fibre.
Idli Rice: The base of the batter. I have used idli rice, basically parboiled short grain rice, as its higher starch content delivers great results. But any short grain rice variety such as sona masoori or kollam will work in a pinch too.
Urad Dal: Makes the batter light, creamy, and airy.
Poha (Flattened Rice): Keeps the batter light and helps make crisp dosas.
Fenugreek Seeds (Methi): Aids the fermentation process and adds to the taste too. A little goes a long way.
Ice cubes/Ice cold water: To prevent the batter from heating up when grinding.
What is Ragi & What Are The Benefits of Ragi?
Ragi is also known as finger millet and it is a nutritious gluten-free cereal grain rich in fiber, protein, calcium, and iron. Because of its high fibre content and low glycaemic index, benefits of ragi include aiding digestion, promoting bone health, managing weight and blood sugar, and improving your skin and hair.
How to Make Idli Dosa Batter
The process of making idli dosa batter takes about 20 minutes over a day. Yes thats all!! Here’s the timeline that you can follow.
DAY 1 (Morning) – Washing and Soaking
In the morning, you need to wash and soak the ragi, rice and lentils. While it’s a pretty straightforward process, here are some tips I find helpful:
When washing the ragi, rice and lentils, rub them between your fingers as you wash, and rinse in clean water 3-4 times till the water starts running almost clean. Doing so helps get rid of dust, impurities, and excess starch from the rice.
Soak the ragi, rice and lentils in clean water. They should be completely submerged and have at least an inch of water over them. Soaking the lentils makes it easy to grind and makes the batter nice and fluffy which is very essential for the texture.
DAY 1 (Evening) – Grinding, Fermenting
In the evening, it’s time to grind the ragi, rice and lentils to make the batter. To do so:
Drain the excess water, transfer to a mixer jar, and grind. Using a mixer grinder can heat up the batter, which affects the flavour. Use ice cold water to prevent overheating and maintain the desired temperature.
The consistency should be such that it leaves a thick coat on the back of a spoon and falls in a ribbon like consistency when poured with a ladle. The ground batter should feel very slightly gritty between your fingers.
Pour the batter into a bowl that’s large enough so that there is room for the batter to rise. Mix the batter with clean hands as shown in the video – this is an important step as it helps in the fermentation so please don’t skip it.
Cover the bowl and set aside to ferment. Leave it in a warm, dry place away from direct sunlight to ferment. Fermentation takes anywhere between 12-24 hours depending on the humidity and temperature at your place. The warmer it is, the faster it’ll ferment.
DAY 2 (Morning) – Using or Storing
The next morning or after, the batter should have increased by almost 1.5 times, and that’s how you know it’s fermented and ready for use. If you follow the exact measurements of this recipe, you should have approx 1.75 litres (6-7 cups) of idli and dosa batter -1 cup batter makes 6-7 idlis or 4-6 dosas depending on the size.
How To Tell If The Batter Is Fermented
The batter will expand and almost double in size as it ferments.
When you mix the batter, you should be able to see tiny air bubbles in the batter (watch the video to see how fermented batter looks). It should look and feel frothy and airy
The batter should smell mildly yeasty or sour
If the batter smells very sour or smells bad, then it may have over fermented or gone bad. Unfortunately, there’s no coming back from this, so make sure the batter doesn’t get over fermented!
Which is The Best Blender to Grind Ragi Dosa Batter
If you make idlis and dosas frequently, I highly recommend using an electrical wet grinder which produces a light, fluffy batter without heating it up. The disadvantage is that they take up more counter space and are quite big and bulky.
Richa Recommends
I use a blender and mixer grinder at home and my favourite is the Sujata Dynamix Mixer Grinder. The disadvantage of using a mixer grinder is that it heats up the batter as it grinds, which is not ideal. To keep the batter from heating up, I use ice cold water while grinding.
Frequently Asked Questions
Is ragi dosa healthier than regular dosa?
Yes, it is! Ragi is packed with calcium, iron, and fibre, which makes it more nutrient-dense than traditional rice-based dosa. It’s also gluten-free and helps keep you fuller for longer.
Can I make ragi dosa without fermenting the batter?
Technically, yes. You can make an instant version by adding curd and a pinch of baking soda to the batter. However, fermenting naturally gives it a softer texture, better flavour, and that classic dosa rise.
Why didn’t my batter ferment properly?
Fermentation depends on warmth. If your kitchen is too cold, keep the bowl near a warm appliance or wrap it in a thick towel. You can also preheat your oven for a minute, switch it off, and let the batter rest inside overnight.
Can I use ragi flour instead of whole ragi?
Yes, but the texture will be slightly different. Whole ragi grains give a more natural, slightly coarse texture. If using flour, mix it with urad dal and rice batter for better consistency.
Top Tips to make the best Ragi Idlis & Dosas
Add salt later: Only salt the portion you plan to use immediately. This keeps the rest of the batter from turning too sour while stored.
Soak everything well: Give the ragi, rice, and dal enough time to soak. This helps them grind smoothly and ensures the batter ferments properly.
Use cold water while grinding: Adding ice cubes or chilled water prevents the batter from heating up, which can slow down fermentation and affect flavour.
Mix with your hands: Don’t skip this step! Mixing the batter by hand helps kickstart fermentation and gives the batter that light, airy texture.
Watch the consistency: The batter should be thick but pourable, it should coat the back of a spoon and fall in ribbons when lifted.
How to Make Ragi Idlis
Step 1: Once your batter has fermented and doubled in volume, take the portion you’ll use and add ½ teaspoon salt just before steaming.
Step 2: Grease your idli plate with a little oil (or ghee), which helps the idlis demould easily.
Step 3: Pour the batter into the molds, filling them just shy of the rim (the batter will rise a little more during cooking).
Step 4: Steam on medium heat for about 10 minutes until a toothpick inserted in the centre comes out clean. Over-steaming makes ragi idlis dry.
Step 5: Let the idlis rest in the steamer for 2 minutes with the lid on, then cool for another 2-3 minutes before removing them gently with a spoon.
Tip: If the batter is slightly sour, skip adding sugar at this stage. If it tastes flat, a tiny pinch of sugar helps the idlis rise better and improve flavour.
How to Make Ragi Dosas
Step 1: Using chilled batter helps you spread the dosa thin and crisp. So make sure it’s either cold or room temperature, avoid using hot temperature batter.
Step 2: Heat your non-stick pan or seasoned cast iron tawa until water droplets sizzle and evaporate instantly. That’s your cue.
Step 3: Pour a ladle of batter onto the centre of the pan and spread in circular motion (for a thin dosa) or keep thicker for soft-roast style. Drizzle a teaspoon of oil or ghee around the edges.
Step 4: For a crisp edge keep heat on medium-high, cook for 30 seconds with lid, then another minute uncovered. For a softer version: cook on medium heat, cover for 30 seconds, then finish without flipping.Step 5: Flip once and cook for 30 seconds if you prefer it both sides roasted; otherwise, keep it single-sided for maximum crisp.
Tip: Serve immediately with chutney or sambar. Do not wait, as ragi dosas lose their crispness if left too long.
Equipments To Make Ragi Idlis & Dosas
For Idlis: You can make idlis in an idli stand in a regular Idli steamer. Alternatively, you can also place the idli stand inside a pressure cooker without using the whistle. If you don’t have an Idli stand – no worries! You can make idlis in greased steel tumblers that can withstand high heat!
For Dosas: A well-seasoned cast iron tawa or pan is the best for making dosas. A cast iron tawa will last you a lifetime, but keep it exclusively for making dosas and uttapams. A non-stick tawa is an easier alternative. I prefer the cast iron tawa because it heats up evenly, it stays hot for longer and the dosas come out extra crispy. Non-stick pans tend to overheat faster and spreading the dosas can become difficult after a while.
Recipes with Ragi Idli Dosa Batter
Dhokla
Idli
Dosa
Appe / Paniyaram
Mysore Masala
Uttapam
Dosa Waffle
Schezwan Idli Fry
Storage Tips
Fridge: Store unsalted ragi idli dosa batter in a clean, airtight container for up to 3–4 days. When ready to use, take out only what you need and add salt before making idlis or dosas.
Freezer: The batter can be frozen for up to a month. Portion it into smaller airtight containers or silicone trays so you can thaw just what you need. Let it defrost overnight in the fridge before using.
Room Temperature: Once fermented, avoid leaving the batter out for more than a few hours. Warm weather can cause it to over-ferment and turn too sour.
Serving Ideas
This ragi idli dosa batter gives you endless breakfast (or dinner) options, it’s light, wholesome, and goes beautifully with a variety of sides. Here are some ideas to get you started:
Recipes to try:Idli, Ragi Dosa, Appe / Paniyaram, Mysore Masala Dosa, Dosa Waffles etc.
With Coconut Chutney: A classic combo that never fails. Try our Coconut Chutney for that perfect creamy, nutty balance.
With Sambar: Pair your hot idlis or crisp dosas with a bowl of Homemade Sambar for a hearty, protein-packed meal.
With Tomato Chutney: Add a tangy twist with Tomato Chutney, it’s slightly spicy and brightens up every bite.
Ragi Idli Dosa Batter is now one of the regular recipes that has become part of my kitchen. It’s wholesome, light, and gives you that comfort of a homemade South Indian breakfast, but with a healthy twist.
If you’re already a fan of classic Idli Dosa Batter, this version is the perfect next step. Tried it out? Tag me on Instagram @my_foodstory, I’d love to see your breakfast table!
Wash & soak ragi, idli rice, urad dal, poha, fenugreek seeds in enough water in a bowl so that there is at least an inch of extra water over the rice and dal. Soak for 8 hours.
Day 1 evening
Once the grains have soaked for 8 hours, drain the excess water from the bowl.
Grind till almost smooth with approx. 1 cup of water and 4-5 ice cubes in a mixer grinder. Add additional water if required. The consistency should be such that it can leave a thick coat on the back of a spoon and falls in a ribbon like consistency when poured with a ladle. The ground batter should feel very slightly gritty between your fingers.
Pour the batter into a bowl that’s large enough so that there is room for the batter to rise. Mix the batter with clean hands as shown in the video – this is an important step as it helps in the fermentation, so please don’t skip it.
Cover the bowl and set aside to ferment. Leave it in a warm, dry place away from direct sunlight to ferment. Fermentation takes anywhere between 12-24 hours depending on the humidity and temperature at your place. The warmer it is, the faster it’ll ferment.
Day 2 – morning
Once fermented, the batter should have become almost 1 ½ times its size with a slight dome shape and a wrinkle, bubbly layer on top. You should be able to smell a little sourness in the batter. This smell means it has fermented. If it is too sour, it has fermented too much! You can use a spoon to check the batter – the texture should be frothy with air bubbles.
Take out 2 cups of batter in a bowl, add ½ teaspoon of salt and make idlis, dosa etc.
Making Idlis
Heat water in an idli steamer and bring to a boil. Grease the idli plate with oil or ghee so its easier to demould the idlis.
Only once the water in the steamer comes to a roaring boil, pour batter into the idli mould and fill them up almost to the top (as shown in the video)
Place the idli mould in the steamer and steam on medium for 10 minutes till the idlis are cooked. To check doneness, insert a toothpick in the centre of idlis and it should come out clean.
Let the idlis rest in the steamer for 2 minutes, then take it out and let it cool for another 2-3 minutes. Use a spoon or butter knife to demould idlis from the idli plate.
Making dosas
Take 1 cup of batter in a bowl, add ⅛ teaspoon salt, ⅛ teaspoon sugar and mix well.
Heat a non-stick pan or seasoned cast iron dosa tawa over medium heat. Once hot, reduce the heat to low & pour one ladle of dosa batter and pour in the center of the tawa. Spread by using the back of the ladle, moving it in concentric circles to form a big round dosa.
Increase the heat to medium, drizzle a spoon of oil or ghee around the edges and in the center, cover with lid & cook for 30 seconds.
Remove the lid and let this roast for 1-2 minutes till golden brown on medium. Flip it over and roast for 30 seconds. Flip it back, fold and serve hot.
Follow the same steps for making the rest of the dosas.
Video
Notes
Ice cubes are added to avoid the batter from getting too hot while grinding.
Batter should be thick & fall in ribbons without being too runny.
Salt to be added to the quantity of batter you are using to avoid the batter getting too sour.
If you are not using all of the batter, store the remaining unsalted batter in an air tight container in the fridge for up to 3 days or freeze the batter for up to a month.
Do not over steam the idlis as they become dry & hard.
Demoulding idlis easier, if they are cooled for a few minutes.
To check if the pan is hot enough to make dosa, sprinkle a few drops of water over the tawa & if it is ready, it should sizzle.
For best results, dosa should be fried on medium heat.
Looking for a protein-packed South Indian snack that’s wholesome, flavorful, and incredibly easy to whip up? Say hello to karamani sundal, a festival favorite made with black-eyed peas, coconut, and a gentle tempering of spices. It’s the perfect balance of hearty and light, with just the right kick to keep you coming back for more. Whether you’re preparing it for Navratri or simply craving a healthy bite, this fan-freaking-fantastic recipe will win you over in minutes!
Karamani sundal is especially popular during Navratri, when different varieties of sundal are prepared as offerings (prasadam) for the goddess and shared with friends and family. Each day of Navratri is often celebrated with a unique type of sundal, making karamani (black-eyed peas) one of the cherished variations. Beyond festivals, it’s also enjoyed as a healthy snack or light evening tiffin in South Indian households. Packed with protein and flavored with coconut and spices, it’s both nourishing and comforting—perfect for fasting days, festive gatherings, or simply as a guilt-free bite anytime of year.
[feast_advanced_jump_to]
Ingredients
Each ingredient in karamani sundal has a purpose. Black-eyed peas (karamani) form the protein-rich base, making it hearty and wholesome. Freshly grated coconut adds natural sweetness and texture, balancing the earthiness of the legumes. Curry leaves, mustard seeds, green chili, and hing bring that unmistakable South Indian flavor profile, while a drizzle of coconut oil ties everything together with a rich, traditional aroma. Together, they create a dish that’s simple yet deeply flavorful, perfect for both festive offerings and everyday snacking.
Karamani (black-eyed peas)
Fresh grated coconut
Red chili
Curry leaves
Mustard seeds
Hing (asafoetida)
Coconut oil
Salt
See recipe card for quantities.
Instructions
Wash and Soak the karamani (black-eyed peas) overnight.
The next day, drain the water and add fresh water to the peas. Pressure cook the karamani with a teaspoon of salt until they are soft, allowing only 2–3 whistles to ensure they remain firm and not mushy.
Once the pressure has fully released, open the cooker and drain the excess water from the cooked karamani using a strainer.
Heat coconut oil in a pan. Add mustard seeds, and once they begin to splutter, toss in the broken red chili, curry leaves, and a pinch of hing. Sauté for a few seconds until fragrant.
Add the cooked karamani (black-eyed peas) to the pan and mix well so the tempering coats the legumes evenly.
(Optional) - Add 2 teaspoon of Sundal Powder and give it a good mix. This will give good aroma and spice.
Stir in the freshly grated coconut and give everything a gentle mix.
Your delicious Karamani (Perum Payiru) Sundal is now ready! Serve it warm as a healthy snack or offer it as Neivedhyam during the Navratri festival.
Substitutions
Legumes: If you don’t have karamani (black-eyed peas), you can easily swap them with other legumes such as white chana (chickpeas), green gram (moong beans), or rajma (kidney beans). Each will give a slightly different texture but still taste delicious.
Coconut: Fresh grated coconut is traditional, but if it’s not available, you can use frozen grated coconut (thawed) or even a small spoon of unsweetened desiccated coconut in a pinch.
Oil: Coconut oil adds authentic South Indian flavor, but you can substitute with sesame oil or sunflower oil if you prefer a milder taste.
Spice: If you like more heat, add a slit green chili along with the tempering. For a kid-friendly version, skip the red chili altogether.
Hing (Asafoetida): If you don’t have hing, you can leave it out or use a pinch of garlic powder for a different but still flavorful aroma.
Variations
Masala Sundal: Add a spoon of freshly ground sundal podi or rasam powder along with the tempering for a spicier, more robust flavor.
Tangy Twist: Squeeze in a few drops of fresh lemon juice just before serving to give the sundal a refreshing brightness.
Vegetable Boost: Mix in finely chopped cucumber, carrots, or raw mango for a salad-style sundal that’s colorful, crunchy, and extra nutritious.
Sweet Sundal: For a festive twist, replace the tempering with a light jaggery syrup and grated coconut to make a mildly sweet version, often enjoyed during Navratri.
Sprouted Sundal: Use sprouted karamani instead of boiled for an even healthier, protein-packed option.
Storage
Room Temperature: Karamani sundal stays fresh for up to 6–8 hours at room temperature, making it perfect for serving during festivals or as a prasadam.
Refrigeration: Store any leftovers in an airtight container in the refrigerator for up to 2 days.
Reheating: Gently warm it on the stovetop or in the microwave before serving. If it feels a bit dry, sprinkle a teaspoon of water or coconut oil to freshen it up.
Freezing: Not recommended, as the texture of the beans and coconut changes after thawing.
Top Tip
For perfectly textured karamani sundal, make sure the black-eyed peas are cooked but still firm—they should hold their shape and not turn mushy. Also, toast the coconut lightly before mixing it in to enhance its aroma and give the sundal an extra layer of flavor.
Karamani Sundal Recipe | Easy South Indian Black Eyed Peas Sundal
Karamani Sundal is a classic South Indian snack made with black-eyed peas, lightly tempered with mustard seeds, curry leaves, and hing, then finished with freshly grated coconut. Protein-rich, flavorful, and mildly spiced, it’s a favorite during Navratri festivals and also makes a wholesome everyday snack.
Course Healthy Recipes, Salad
Cuisine Indian, South Indian, Tamilnadu
Prep Time 5 minutesminutes
Cook Time 15 minutesminutes
Soaking Time 8 hourshours
Total Time 20 minutesminutes
Servings 4people
Calories 108kcal
Author Sowmya Venkatachalam
Equipment
1 Pressure Cooker
Ingredients
1CupKaramani (Black-eyed pea)
1nosRed Chili
1teaspoonSaltAs Needed
1PinchAsafoetida (Asafetida / Hing)
1tablespoonGrated Coconut
2teaspoonSundal Powder (Optional)
For Tempering
1teaspoonOil
1teaspoonMustard Seeds
1sprigCurry Leaves
Instructions
Soak the karamani (black-eyed peas) overnight. The next day, drain the water and add fresh water to the peas. Pressure cook the karamani with a teaspoon of salt until they are soft, allowing only 2–3 whistles to ensure they remain firm and not mushy.
1 Cup Karamani (Black-eyed pea), 1 teaspoon Salt
Heat coconut oil in a pan. Add mustard seeds, and once they begin to splutter, toss in the broken red chili, curry leaves, and a pinch of hing. Sauté for a few seconds until fragrant.
Apple pie is such a treat! It’s impossible to stop eating, especially when it’s made just right and served hot with vanilla ice cream. When I first came to the USA in January, it was very cold. As a vegetarian, we didn’t have too many options at that time, but we were treated to our first dessert: hot apple pie topped with vanilla ice cream. What a treat it was! I fell in love with it instantly.Over time, I learned to make apple pie and made it many times, but it has been a while since then. Recently, I decided to give it an Indian twist. I wanted to make it easy to prepare, so I decided to make it in paratha style, filled with sweet and sour apples. For flavoring, I used traditional spices like cinnamon, nutmeg, and cloves. You may try other fruits of your choice, such as pears and peaches—these are two I have tried. But I must admit, for me, nothing beats the sweet and sour apple flavor paired with the aroma of cinnamon.
Prep Time 15 minutesminutes
Cook Time 20 minutesminutes
Servings 4Apple Pie Parathas
Ingredients
For the Dough:
1cupall-purpose flour
¼cupwhole wheat flour
3tbspsoft butter
1pinchsalt
½ cupchilled water
For the Filling:
1½ cupsgrated appleGranny Smith apples or 1 large apple
¼tspcinnamon powder
1pinchnutmeg powder
1pinchclove powder
¾cupsugar
Instructions
For the Dough:
In a bowl, mix all-purpose flour, whole wheat flour, and salt. Then, add the butter ensuring it’s soft but not melted and use your fingers to combine the mixture until it becomes crumbly.
Slowly add water, just enough to bring the flour together, but do not knead the dough. It’s important to ensure that the paratha remains flaky. Let the dough sit for about 10 minutes.
For the Filling:
Peel and grate the apple; the grated apple should yield about 1½ cups. I like to use Granny Smith apples because they are firm and tart, but you can use other varieties, ensuring you add lemon juice to provide tartness.
Over low-medium heat, combine all the filling ingredients—apple, sugar, cinnamon, clove, and nutmeg in a pan.
Cook until the mixture becomes a soft, sticky dough, which should take about 7 minutes. Be sure to stir the filling continuously.
The filling should be at room temperature before making the paratha.
Making the Paratha:
Lightly knead the dough and divide it into four equal parts, rolling each into a ball between your palms.
Roll each dough ball into a 3-inch circle. Place about 2 tablespoons of filling in the center of the rolled dough.
Pull the edges of the dough to wrap it around the filling. Repeat to make all four filled balls. Let the filled balls rest for three to four minutes.
Meanwhile, heat a heavy flat pan over medium-high heat until moderately hot. To test, sprinkle water on the skillet—if the water sizzles right away, the skillet is ready.
Lightly press each filled ball in dry whole wheat flour on both sides. Using a rolling pin, gently roll the balls into five-inch circles, keeping the sealed side of the ball on top. If the dough sticks to the rolling pin or surface, lightly dust the parathas with dry flour.
Place the paratha on the skillet. When it starts to change color and puff up, flip it over. You will notice some golden-brown spots. After a few seconds, drizzle one teaspoon of oil over the paratha.
Flip it again and lightly presses the puffed areas with a spatula. Flip once more and press with the spatula, ensuring the paratha is golden-brown on both sides. Repeat for the remaining parathas.
These apple parathas taste like you’re having apple pie. You can make these apple pie parathas in advance; they stay good for 3-4 days at room temperature, and you can refrigerate them for 3-4 weeks.
When serving, reheat them over a skillet, in an air fryer, or the oven. Serve them with ice cream; I enjoy hot paratha with vanilla ice cream, while my husband prefers to melt cheese over his.
Notes
Tips: After stuffing the parathas, let the stuffed dough balls rest for 3 to 4 minutes. This helps the dough settle, making it easier to roll the parathas without the stuffing coming out from the sides.Roll paratha evenly without putting too much pressure. For a vegan option: I used butter to make the dough because it adds flakiness and crispness to the parathas. If you’re vegan, you can substitute butter with oil.Filling: The apple filling should have a soft, slightly sticky texture. If the filling will become little dry after cooling. This will make it easier to roll the parathas and ensure the filling spreads evenly.
Introduction to Apple Pie Paratha
Apple Pie Paratha is a creative fusion dish that combines the comforting flavors of the classic American apple pie with the traditional Indian paratha. This innovative recipe is perfect for dessert lovers who enjoy experimenting with global cuisines. Sweet and sour grated apples are flavored with aromatic spices like cinnamon, nutmeg, and cloves, creating a filling that tastes like a warm apple pie. Wrapped in a flaky paratha dough and cooked to golden perfection, this dish is an indulgent treat that pairs beautifully with vanilla ice cream or even a savory topping like melted cheese.
Cultural and Culinary Fusion
The idea of fusing apple pie flavors into a paratha showcases the versatility of Indian flatbreads. Parathas, traditionally made savory with fillings like potatoes or paneer, lend themselves wonderfully to sweet adaptations. This Apple Pie Paratha recipe celebrates both Indian and Western culinary traditions, making it an exciting choice for festive occasions, family meals, or even a quick tea-time treat. The warm spices used in the filling are reminiscent of traditional Indian desserts, while the apples and their tart-sweet flavor pay homage to the beloved American apple pie.
Recipe Variations from Manjula’s Kitchen
If you love Apple Pie Paratha, you may also enjoy exploring other innovative and traditional paratha recipes from Manjula’s Kitchen:
Aloo Paratha: A savory paratha stuffed with spiced mashed potatoes, perfect for breakfast or lunch.
Sweet Coconut Paratha: A unique dessert paratha with a filling of sweetened coconut and cardamom.
Paneer Paratha: A savory flatbread filled with spiced paneer, offering a protein-rich option.
Gobi Paratha: A classic paratha stuffed with grated cauliflower, flavored with Indian spices.
Each of these recipes showcases the versatility of parathas, whether savory or sweet, and their ability to incorporate diverse flavors.
Health Benefits and Dietary Considerations
Apple Pie Paratha combines the natural goodness of apples with the comforting texture of parathas. Apples are rich in fiber, vitamin C, and antioxidants, making them a healthy addition to any meal. The aromatic spices used in the filling, like cinnamon and nutmeg, are known for their anti-inflammatory and digestive properties.
For those following a vegan diet, this recipe can be easily adapted by replacing butter with oil in the dough preparation. The paratha dough itself is made with a mix of all-purpose and whole wheat flour, offering a balance of flavor and texture. While this is an indulgent dessert, the option to use natural sweeteners or reduce the sugar content can make it a lighter treat.
Serving Suggestions
Apple Pie Paratha is a versatile dessert that can be enjoyed in various ways:
Classic Pairing: Serve the paratha warm with a scoop of vanilla ice cream for a classic apple pie-inspired experience.
Savory Twist: Melt a slice of cheese over the hot paratha for a sweet-savory flavor profile.
Festive Plating: Drizzle some caramel or chocolate sauce over the paratha for an extra indulgent touch during special occasions.
Quick Snack: Enjoy the paratha on its own with a hot cup of chai or coffee for a cozy snack.
These parathas can be made in advance and reheated, making them a convenient option for entertaining guests or meal prepping.
ConclusionApple Pie Paratha is a delightful fusion dish that transforms a classic dessert into a flaky, flavorful Indian flatbread. Its sweet apple filling, spiced with cinnamon and nutmeg, offers a warm and comforting flavor, perfect for any season. Whether you’re looking for an innovative dessert, a festive treat, or simply something new to try, this Apple Pie Paratha recipe is sure to impress. Try it today and enjoy a unique blend of Indian and Western culinary traditions.
Frequently Asked Questions (FAQs)
What type of apples work best for Apple Pie Paratha?
Granny Smith apples are ideal for their firm texture and tart flavor. If using sweeter apples, add a splash of lemon juice to balance the taste.
Can I make Apple Pie Paratha vegan?
Yes, replace the butter in the dough with oil to make a vegan version of this recipe.
How can I store Apple Pie Paratha?
You can store these parathas at room temperature for 3-4 days or refrigerate them for up to 3-4 weeks. Reheat them in a skillet, in an air fryer, or in the oven before serving.
What are some similar recipes I can try?
Explore Sweet Coconut Paratha, Paneer Paratha, or Gobi Paratha for more delicious paratha variations.
What makes Apple Pie Paratha special?
The fusion of warm apple pie flavors with the flaky, golden-brown texture of Indian paratha makes it a unique and versatile dessert that’s easy to prepare and enjoyable for all.
Summer is here, and it's getting warm—just the right time to try making different summer drinks. The Pineapple Cucumber Cooler is a delicious and refreshing treat. I like to add a hint of lemon, ginger, and mint to most of my fruit drinks, which gives them a nice kick. It's perfect for quenching your thirst on hot summer days.For this drink, you can use fresh pineapple, but I used canned pineapple to make it easier. Most of the time, I have the ingredients on hand, and there’s not much prep work. I love how easy it is to combine everything in the blender.I definitely plan on making this refreshing Pineapple Cucumber Cooler throughout the rest of the summer.
Course Beverages
Cuisine Indian
Keyword Cucumber
Prep Time 5 minutesminutes
Servings 4people
Ingredients
1 20 oz cancrush pineapple
1largecucumber peeled and chopped
2tbsplemon juice
1tspfresh ginger, peeled and chopped
Ahandful fresh mint leaves
1tbspsugar
pinch of salt
Instructions
Add the pineapple, cucumber, lemon juice, ginger, mint leaves, salt and sugar to a blender.
Pour in 1 cup of cold water. Blend until smooth.
Strain the mixture through a fine mesh sieve.
Serve over ice and garnish with additional mint leaves.
Enjoy your refreshing drink all summer long!
Notes
Tips:Instead of water, use coconut water or sparkling water for a different twist.These drinks are easy to prepare, and you can use whatever fruits you have available or your favorite fruits.Blend the mixture without adding water and freeze it in ice cube trays for a refreshing twist.
Beat the Heat with Pineapple Cucumber Cooler
Summer is here, and with the rising temperatures, there’s nothing better than a cool and refreshing drink to quench your thirst. The Pineapple Cucumber Cooler is a perfect summer recipes, combining the sweetness of pineapple with the refreshing taste of cucumber. The addition of lemon, ginger, and mint gives it an extra zing that will leave you feeling revitalized.
This drink is incredibly easy recipe to make and requires minimal prep time. Whether you’re hosting a summer party or just relaxing at home, this cooler is sure to be a hit.
Why You’ll Love This Pineapple Cucumber Cooler
Refreshing and Hydrating: The combination of pineapple and cucumber makes this drink incredibly hydrating, perfect for hot summer days.
Quick and Easy: With just a few ingredients and a blender, you can whip up this cooler in minutes.
Healthy and Natural: Made with fresh ingredients and minimal sugar, it’s a healthier alternative to sugary sodas and store-bought drinks.
Versatile: You can easily customize the recipe with different fruits or by using coconut water or sparkling water for a twist.
How to Make Pineapple Cucumber Cooler
This Pineapple Cucumber Cooler recipe is simple and quick to prepare. Here’s how you can make it:
Ingredients:
1 20 oz can crushed pineapple
1 large cucumber, peeled and chopped
2 tablespoons lemon juice
1 teaspoon fresh ginger, peeled and chopped
A handful of fresh mint leaves
1 tablespoon sugar (adjust to taste)
Pinch of salt
1 cup cold water
Instructions:
Blend the Ingredients: In a blender, combine the crushed pineapple, chopped cucumber, lemon juice, ginger, mint leaves, sugar, and salt. Add 1 cup of cold water.
Strain the Mixture: Blend the mixture until smooth, then strain it through a fine mesh sieve to remove any pulp.
Serve and Garnish: Pour the cooler over ice and garnish with additional mint leaves for an extra touch of freshness.
Enjoy: Sip and enjoy your refreshing drink all summer long!
Tips for the Perfect Cooler
Switch Up the Base: For a different twist, try using coconut water or sparkling water instead of regular water. This adds a new layer of flavor and hydration.
Make It Ahead: Blend the mixture without adding water and freeze it in ice cube trays. When you’re ready for a drink, just blend the cubes with some water for an instant cooler.
Customize with Fruits: Feel free to experiment with other fruits you have on hand. Watermelon, berries, or even mango can be great additions.
Other Variants of Summer Beverages:
Exploring Manjula’s Kitchen reveals a treasure trove of other delicious recipes that you might enjoy.
Fruit Smoothie: This Fruit smoothie is a delicious and healthy drink, and also quick and easy to make. This great smoothie consists of cantaloupes, strawberries, and yogurt with a touch of ginger giving a nice and tangy taste.
Badam Milk: Almond saffron milk is a festive drink; this can be served hot or cold. Milk with a blend of nuts and flavored with saffron to give a beautiful orange-yellow color and distinctive flavor and aroma.
Cold Coffee: To help beat the heat on a hot summer day, there’s nothing like a tall glass of cold coffee.
Mango Lassi: Mango Lassi is a soothing cold drink for hot summer days or to brighten up any meal. This pale drink is a blend of mango and yogurt.
FAQs
How to Make Pineapple Cucumber Cooler?
To make Pineapple Cucumber Cooler, blend together pineapple, cucumber, lemon juice, ginger, mint leaves, sugar, and salt with cold water. Strain the mixture and serve over ice.
Can I Use Fresh Pineapple Instead of Canned?
Yes, you can use fresh pineapple if you prefer. Just make sure to peel and core it before blending.
Is Pineapple Cucumber Cooler Healthy?
Yes, this cooler is a healthy and refreshing drink made with natural ingredients. It’s hydrating, low in sugar, and full of vitamins and antioxidants from the pineapple, cucumber, and mint.
Can I Make This Cooler Ahead of Time?
You can prepare the cooler ahead of time and store it in the refrigerator for up to 24 hours. Just give it a good stir before serving.
What Other Ingredients Can I Add to This Cooler?
Feel free to customize your cooler with other fruits like watermelon, berries, or mango. You can also add a splash of coconut water or sparkling water for extra flavor.
Matta rice Turnips Thoran- Stir Fry With Coconut, Click Here For Recipe Kale & Red Lentil Stir Fry, Click Here For Recipe Easy Coconut-Thenga Curry, Click Here For Recipe Fried Mackerel- Ayala Add chili powder, turmeric powder, ground black pepper & salt to cleaned whole mackerel, combine well. Fry in coconut oil, flip over & …
This one pot chicken drumsticks and rice is one of my favorite wholesome meals that fits the bill in all respects - it’s balanced, filling and satiates our taste buds so beautifully that we don't miss any takeaways whatsoever!
If you are new to my blog and are liking what you see here, I can assure you that you won’t regret your decision to stay on this page!
Here I share my tried and tested recipes that I make for my family & myself for a healthy & balanced meal to nourish our body & soul!
And the same goes for this one pot chicken drumsticks and rice which is a rightly balanced meal of carb and good protein without any fuss whatsoever!
Being a one pot recipe, this one pot chicken drumsticks and rice is perfect for a weeknight meal and will not only save you from those unhealthy takeaways but also will satiate your taste buds beautifully!
Why must you try this one pot chicken drumsticks and rice?
If you are a chicken lover then chances are that you have already tried many versions of chicken and rice, one of which may already be your absolute favorite!
However, I would urge you to try my version of one pot chicken drumsticks and rice which is so minimalistic yet so powerfully flavorful that you can’t help but fall in love with it!
The key flavor of my chicken and rice comes from the aromatics which is why I used a generous amount of it.
The only spice I used was two heaped teaspoons of cumin powder which imparts an earthy tone to the dish complementing the flavors of the aromatics. And it turned out to be a match made in heaven!
Chicken drumsticks are seared in oil to seal in the flavors of the spices into the meat and develop the brown crust on top that makes the drumsticks irresistibly tasty!
Finally the chicken drumsticks and rice are cooked together in the pot leaving you with chicken flavored fluffy rice and juicy chicken legs!
Is there anything far better than a fast, low-calorie protein shake recipe that tastes like a treat? For me, healthy protein drinks are a staple in my kitchen area- particularly when I'm yearning for something pleasant while trying to remain on track with my health and wellness goals. They're quick, satisfying, and versatile. One taste […]
A refreshing, mineral-rich spinach juice recipe is a healthy and nutritious way to kick-start your day. Combined with cucumber, it makes a hydrating and nutritious choice for healthy beverages. Inspired by other green juice recipes on the blog, such as the aloe vera juice recipe, which was appreciated by my blog readers, I wanted to […]
Easy chia seed tea using chia seeds in black or green tea is a refreshing drink as a hot or chilled tea to consume any time of the day. The best low-calorie tea drink to improve mental alertness. This chia tea is perfect during summers or works best as a weight loss tea and the […]

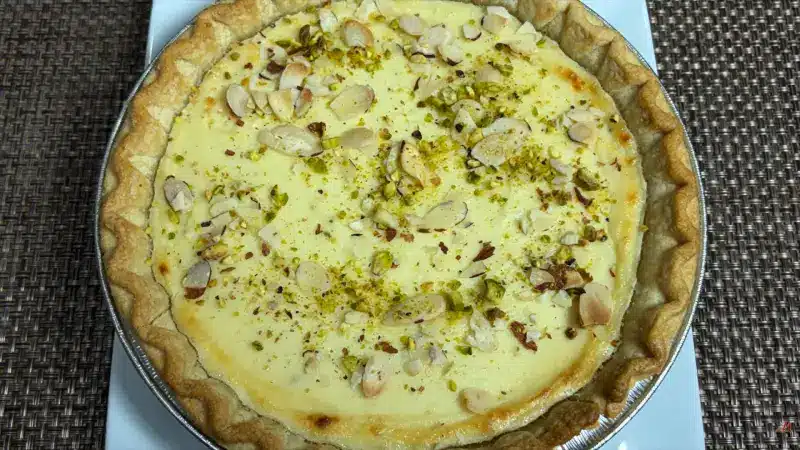
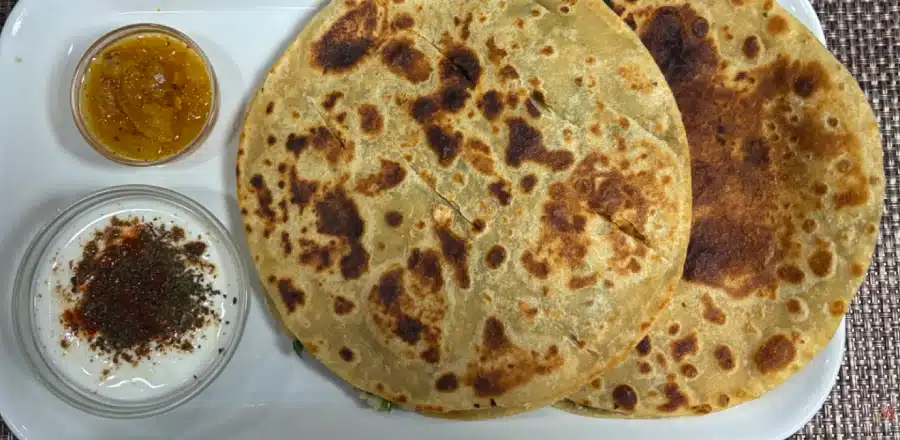
")


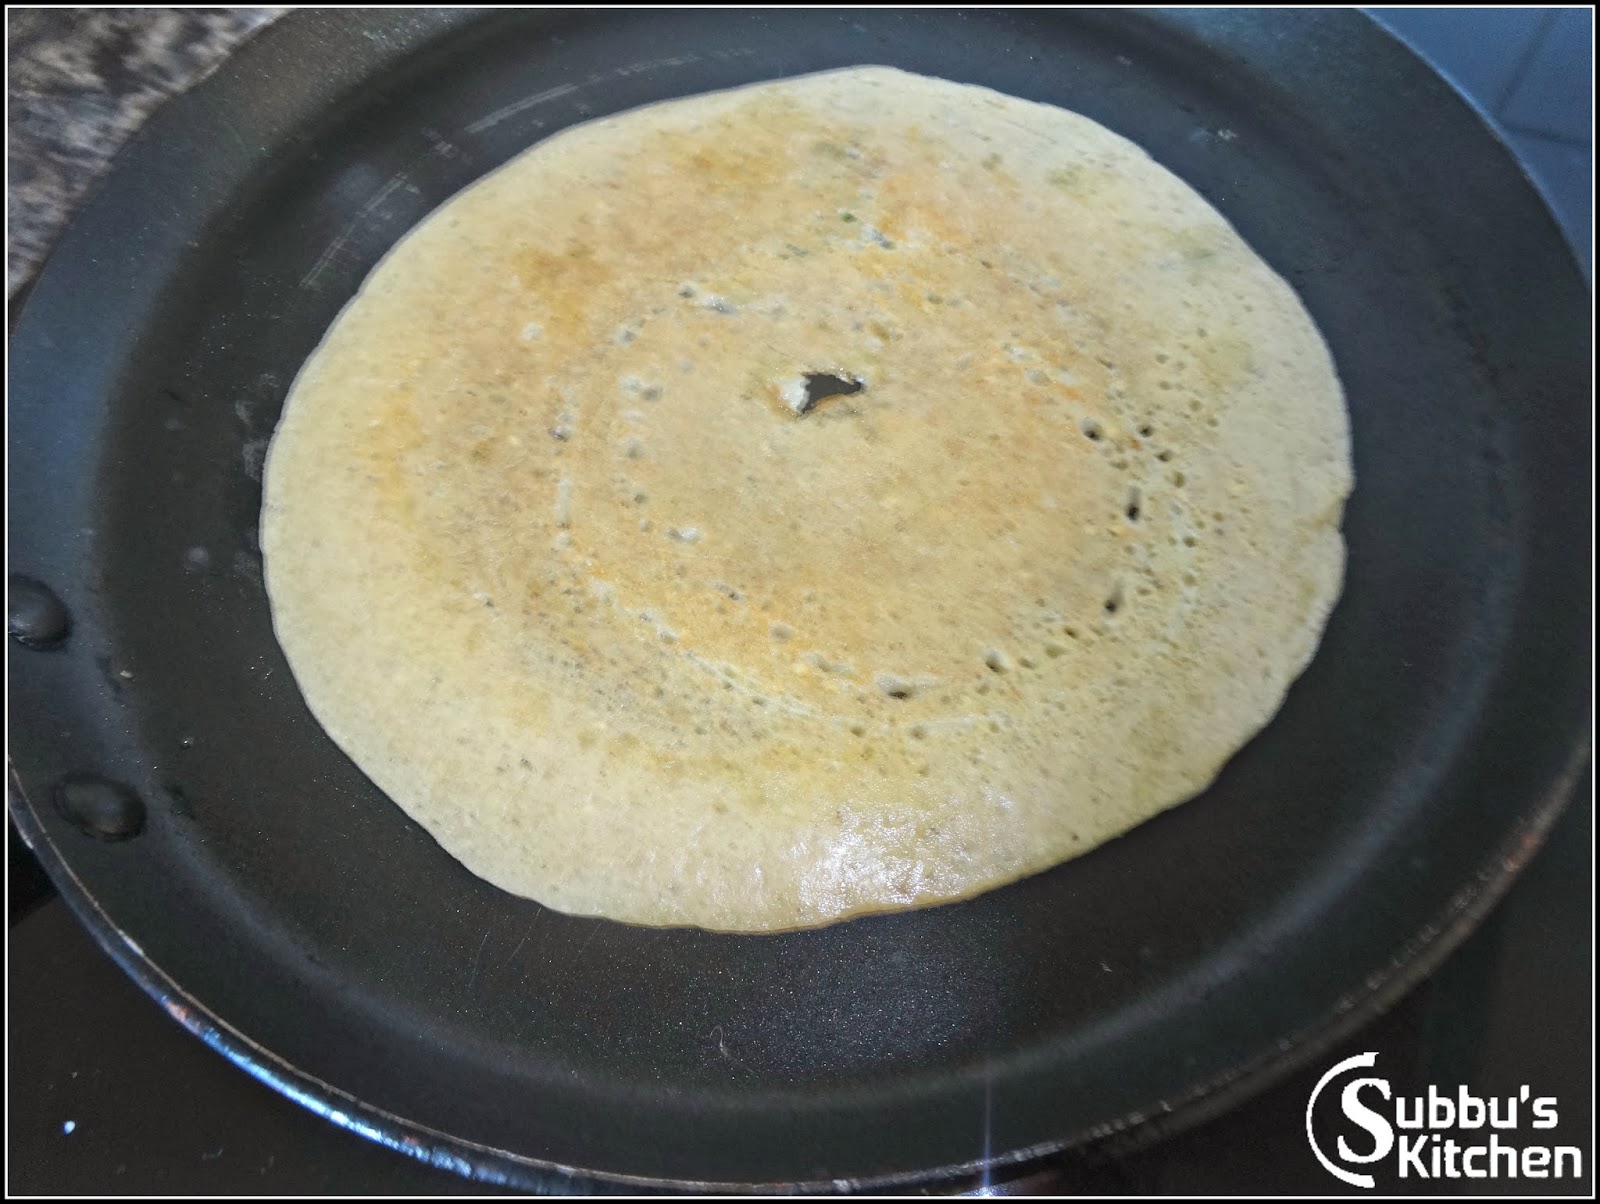
")