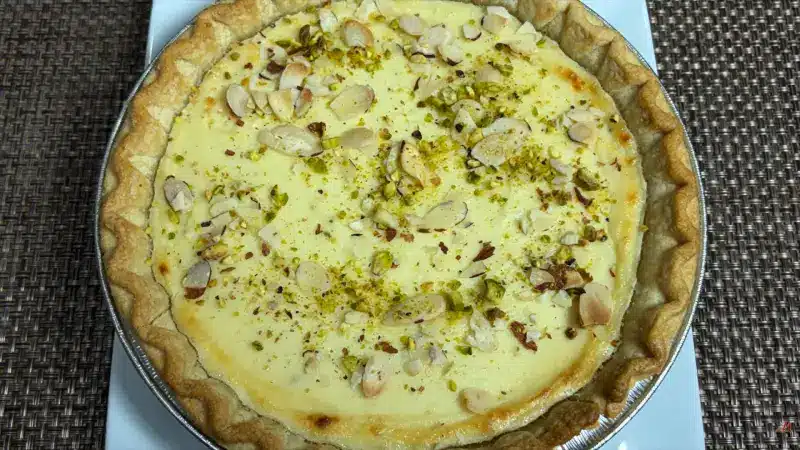
Quick & Easy Creamy Ricotta Pie (Indian Mithai Style)
Sometimes you want to make a dessert that feels special but doesn’t take hours in the kitchen. This creamy ricotta pie is one of those recipes. I am making this pie with a store-bought pie crust and simple ingredients; it has a soft, lightly grainy texture that reminds me of Indian mithai. My granddaughter says it reminds me of Kulfi. The gentle flavor of cardamom and the crunch of nuts on top make it both comforting and festive at the same time. Best of all, it’s a no-fuss recipe—mix, fill, bake, and chill.I am using Store bought pie crest use shallow pie crest not deep crest.
Prep Time 10 minutesminutes
Total Time 45 minutesminutes
Ingredients
1Store-bought pie crust
16 oz2 cupswhole milk ricotta
1/2cupsugar (adjust to taste)
1/4tspcardamom powder
1tbspcornstarch (important for setting)
2tspchopped pistachios and almonds
Instructions
Mix ricotta, sugar, cardamom, and cornstarch
Fill the pie crust evenly
Bake at 350°F (190°C) for 30–35 minutes
Cool completely before slicing
After baking for 20 minutes sprinkle the nuts and bake again.
Pie should have a light brown color on the top
Slice the pie after it is chill Served chillTexture: soft, lightly grainy, like kalakand Indian mithaiThis creamy ricotta pie looks amazingly delicious, and my kitchen is filled with the sweet aroma of cardamom. I hope you enjoy making it as much as I did. Stay healthy and stay safe.
Notes
Use a shallow store-bought pie crust, not a deep-dish crust, for best results.
Cornstarch is essential—it helps the pie set properly while keeping the texture soft and creamy.
Sprinkle chopped nuts after 20 minutes of baking to prevent them from burning.
Best served chilled for a rich, dessert-like experience
Cook at 320–330°F (160–165°C) for 15–20 minutes, checking halfway through. The pie should be set but still slightly wobbly in the center.
If the top starts browning too quickly, loosely cover it with foil.
Frequently Asked Questions (FAQs)
1. Can I use low-fat ricotta instead of whole milk ricotta?
Whole milk ricotta is recommended for a creamy, rich texture. Low-fat ricotta can make the pie drier and less smooth.
2. Can I reduce the sugar?
Yes, you can adjust the sugar to your taste. If you prefer a mildly sweet dessert, start with 1/3 cup and increase if needed.
3. Why is my pie still slightly wobbly in the center?
This is completely normal. The pie continues to set as it cools and will firm up fully after chilling in the refrigerator.
4. Can I make this pie ahead of time?
Yes. This pie actually tastes better the next day. You can make it in advance and store it covered in the refrigerator for up to 3 days.
5. Can I skip the nuts on top?
Yes, the nuts are optional and mainly add texture. You can replace them with raisins or skip the topping altogether.
6. How do I air-fry the pie safely?
Place the pie in the air fryer basket and cook at 320–330°F (160–165°C) for 15–20 minutes, checking halfway through. If the top browns too quickly, loosely cover it with foil.
Apple pie is such a treat! It’s impossible to stop eating, especially when it’s made just right and served hot with vanilla ice cream. When I first came to the USA in January, it was very cold. As a vegetarian, we didn’t have too many options at that time, but we were treated to our first dessert: hot apple pie topped with vanilla ice cream. What a treat it was! I fell in love with it instantly.Over time, I learned to make apple pie and made it many times, but it has been a while since then. Recently, I decided to give it an Indian twist. I wanted to make it easy to prepare, so I decided to make it in paratha style, filled with sweet and sour apples. For flavoring, I used traditional spices like cinnamon, nutmeg, and cloves. You may try other fruits of your choice, such as pears and peaches—these are two I have tried. But I must admit, for me, nothing beats the sweet and sour apple flavor paired with the aroma of cinnamon.
Prep Time 15 minutesminutes
Cook Time 20 minutesminutes
Servings 4Apple Pie Parathas
Ingredients
For the Dough:
1cupall-purpose flour
¼cupwhole wheat flour
3tbspsoft butter
1pinchsalt
½ cupchilled water
For the Filling:
1½ cupsgrated appleGranny Smith apples or 1 large apple
¼tspcinnamon powder
1pinchnutmeg powder
1pinchclove powder
¾cupsugar
Instructions
For the Dough:
In a bowl, mix all-purpose flour, whole wheat flour, and salt. Then, add the butter ensuring it’s soft but not melted and use your fingers to combine the mixture until it becomes crumbly.
Slowly add water, just enough to bring the flour together, but do not knead the dough. It’s important to ensure that the paratha remains flaky. Let the dough sit for about 10 minutes.
For the Filling:
Peel and grate the apple; the grated apple should yield about 1½ cups. I like to use Granny Smith apples because they are firm and tart, but you can use other varieties, ensuring you add lemon juice to provide tartness.
Over low-medium heat, combine all the filling ingredients—apple, sugar, cinnamon, clove, and nutmeg in a pan.
Cook until the mixture becomes a soft, sticky dough, which should take about 7 minutes. Be sure to stir the filling continuously.
The filling should be at room temperature before making the paratha.
Making the Paratha:
Lightly knead the dough and divide it into four equal parts, rolling each into a ball between your palms.
Roll each dough ball into a 3-inch circle. Place about 2 tablespoons of filling in the center of the rolled dough.
Pull the edges of the dough to wrap it around the filling. Repeat to make all four filled balls. Let the filled balls rest for three to four minutes.
Meanwhile, heat a heavy flat pan over medium-high heat until moderately hot. To test, sprinkle water on the skillet—if the water sizzles right away, the skillet is ready.
Lightly press each filled ball in dry whole wheat flour on both sides. Using a rolling pin, gently roll the balls into five-inch circles, keeping the sealed side of the ball on top. If the dough sticks to the rolling pin or surface, lightly dust the parathas with dry flour.
Place the paratha on the skillet. When it starts to change color and puff up, flip it over. You will notice some golden-brown spots. After a few seconds, drizzle one teaspoon of oil over the paratha.
Flip it again and lightly presses the puffed areas with a spatula. Flip once more and press with the spatula, ensuring the paratha is golden-brown on both sides. Repeat for the remaining parathas.
These apple parathas taste like you’re having apple pie. You can make these apple pie parathas in advance; they stay good for 3-4 days at room temperature, and you can refrigerate them for 3-4 weeks.
When serving, reheat them over a skillet, in an air fryer, or the oven. Serve them with ice cream; I enjoy hot paratha with vanilla ice cream, while my husband prefers to melt cheese over his.
Notes
Tips: After stuffing the parathas, let the stuffed dough balls rest for 3 to 4 minutes. This helps the dough settle, making it easier to roll the parathas without the stuffing coming out from the sides.Roll paratha evenly without putting too much pressure. For a vegan option: I used butter to make the dough because it adds flakiness and crispness to the parathas. If you’re vegan, you can substitute butter with oil.Filling: The apple filling should have a soft, slightly sticky texture. If the filling will become little dry after cooling. This will make it easier to roll the parathas and ensure the filling spreads evenly.
Introduction to Apple Pie Paratha
Apple Pie Paratha is a creative fusion dish that combines the comforting flavors of the classic American apple pie with the traditional Indian paratha. This innovative recipe is perfect for dessert lovers who enjoy experimenting with global cuisines. Sweet and sour grated apples are flavored with aromatic spices like cinnamon, nutmeg, and cloves, creating a filling that tastes like a warm apple pie. Wrapped in a flaky paratha dough and cooked to golden perfection, this dish is an indulgent treat that pairs beautifully with vanilla ice cream or even a savory topping like melted cheese.
Cultural and Culinary Fusion
The idea of fusing apple pie flavors into a paratha showcases the versatility of Indian flatbreads. Parathas, traditionally made savory with fillings like potatoes or paneer, lend themselves wonderfully to sweet adaptations. This Apple Pie Paratha recipe celebrates both Indian and Western culinary traditions, making it an exciting choice for festive occasions, family meals, or even a quick tea-time treat. The warm spices used in the filling are reminiscent of traditional Indian desserts, while the apples and their tart-sweet flavor pay homage to the beloved American apple pie.
Recipe Variations from Manjula’s Kitchen
If you love Apple Pie Paratha, you may also enjoy exploring other innovative and traditional paratha recipes from Manjula’s Kitchen:
Aloo Paratha: A savory paratha stuffed with spiced mashed potatoes, perfect for breakfast or lunch.
Sweet Coconut Paratha: A unique dessert paratha with a filling of sweetened coconut and cardamom.
Paneer Paratha: A savory flatbread filled with spiced paneer, offering a protein-rich option.
Gobi Paratha: A classic paratha stuffed with grated cauliflower, flavored with Indian spices.
Each of these recipes showcases the versatility of parathas, whether savory or sweet, and their ability to incorporate diverse flavors.
Health Benefits and Dietary Considerations
Apple Pie Paratha combines the natural goodness of apples with the comforting texture of parathas. Apples are rich in fiber, vitamin C, and antioxidants, making them a healthy addition to any meal. The aromatic spices used in the filling, like cinnamon and nutmeg, are known for their anti-inflammatory and digestive properties.
For those following a vegan diet, this recipe can be easily adapted by replacing butter with oil in the dough preparation. The paratha dough itself is made with a mix of all-purpose and whole wheat flour, offering a balance of flavor and texture. While this is an indulgent dessert, the option to use natural sweeteners or reduce the sugar content can make it a lighter treat.
Serving Suggestions
Apple Pie Paratha is a versatile dessert that can be enjoyed in various ways:
Classic Pairing: Serve the paratha warm with a scoop of vanilla ice cream for a classic apple pie-inspired experience.
Savory Twist: Melt a slice of cheese over the hot paratha for a sweet-savory flavor profile.
Festive Plating: Drizzle some caramel or chocolate sauce over the paratha for an extra indulgent touch during special occasions.
Quick Snack: Enjoy the paratha on its own with a hot cup of chai or coffee for a cozy snack.
These parathas can be made in advance and reheated, making them a convenient option for entertaining guests or meal prepping.
ConclusionApple Pie Paratha is a delightful fusion dish that transforms a classic dessert into a flaky, flavorful Indian flatbread. Its sweet apple filling, spiced with cinnamon and nutmeg, offers a warm and comforting flavor, perfect for any season. Whether you’re looking for an innovative dessert, a festive treat, or simply something new to try, this Apple Pie Paratha recipe is sure to impress. Try it today and enjoy a unique blend of Indian and Western culinary traditions.
Frequently Asked Questions (FAQs)
What type of apples work best for Apple Pie Paratha?
Granny Smith apples are ideal for their firm texture and tart flavor. If using sweeter apples, add a splash of lemon juice to balance the taste.
Can I make Apple Pie Paratha vegan?
Yes, replace the butter in the dough with oil to make a vegan version of this recipe.
How can I store Apple Pie Paratha?
You can store these parathas at room temperature for 3-4 days or refrigerate them for up to 3-4 weeks. Reheat them in a skillet, in an air fryer, or in the oven before serving.
What are some similar recipes I can try?
Explore Sweet Coconut Paratha, Paneer Paratha, or Gobi Paratha for more delicious paratha variations.
What makes Apple Pie Paratha special?
The fusion of warm apple pie flavors with the flaky, golden-brown texture of Indian paratha makes it a unique and versatile dessert that’s easy to prepare and enjoyable for all.
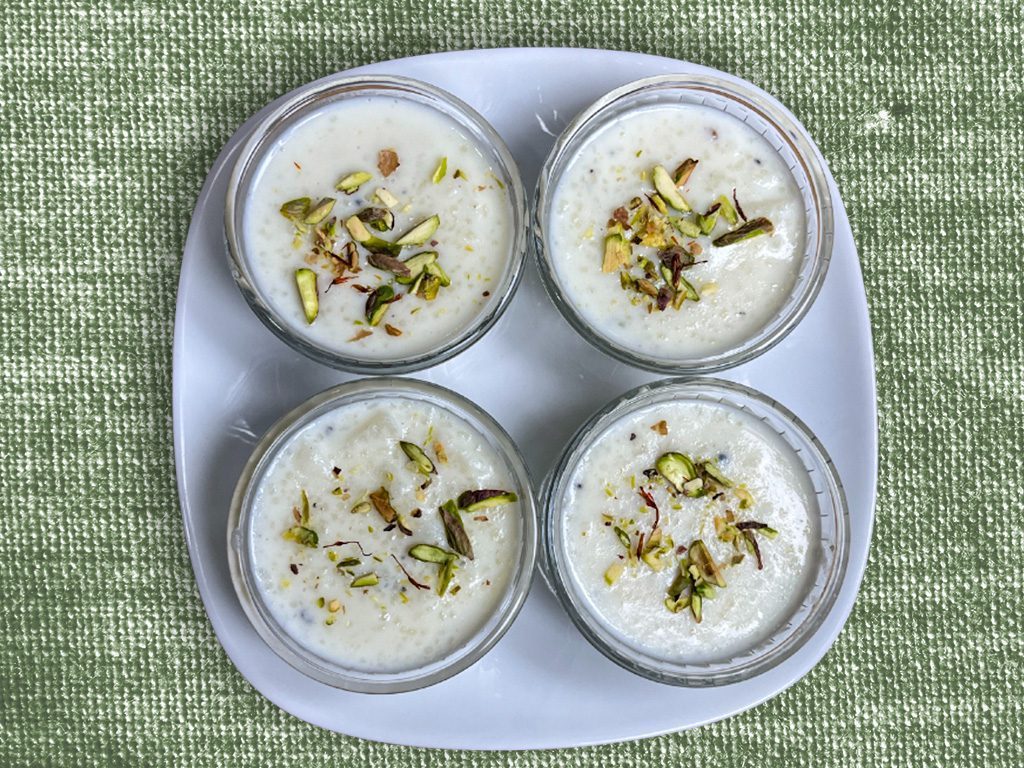
Kheer is one of the most traditional and loved sweets found all over India. Over the years, I’ve made videos on many variations of kheer, each with its own unique charm, although Rice Kheer remains the most traditional. Once, my friends served me Carrot Kheer. While it was delicious, I felt something was missing—a certain balance of flavors that I couldn’t quite pinpoint. After experimenting a few times, I finally developed a simple yet delicious version of Carrot Kheer that I’m happy with.Some of my younger friends, who usually avoid kheer, were pleasantly surprised when I served it to them as pudding. They loved it!What I love most about Carrot kheer is that it can be made with just a few simple ingredients, yet the result is always rich and flavorful. This version, in particular, is delightful with its creamy texture and subtle sweetness.
Course Dessert
Cuisine Indian
Keyword Dessert
Prep Time 10 minutesminutes
Cook Time 30 minutesminutes
Servings 4people
Ingredients
3cupsshredded carrots, divided
4 cupsmilk, divided
⅓ cupsugar
¼tspcrushed green cardamom
2tbspsliced almonds
Instructions
Before shredding the carrot, it should be washed and peel, peeling is an important of preparation. Blend 1 cup of shredded carrots with 1 cup of milk into a fine paste.
Bring the remaining milk to a boil over low to medium heat in a saucepan. To prevent the milk from sticking, wet the pan with a little water before adding the milk.
Once the milk boils, add the shredded carrots and carrot paste. Continue boiling for about 15 minutes over low to medium heat, stirring occasionally. Scrape the sides of the pan to prevent sticking and browning.
Cook until the carrots are tender, and the milk has reduced by about half, becoming creamy. Stir often to avoid burning.
Add sugar, cardamom, almonds, and cashews, and let the mixture simmer for a few more minutes.
Turn off the heat.
As the kheer cools, it will thicken in texture.
Notes
Enjoy! To serve as a pudding, you should cook the kheer for 2 to 3 more minutes to thicken it, bringing it to a pudding-like texture.
Carrot Kheer (Carrot Paayasam): A Delicious Twist on a Timeless Indian Sweet | Manjula’s Kitchen
Introduction to Carrot Kheer
Kheer is one of the most cherished and traditional sweets in Indian cuisine, with its creamy, sweet, and flavorful profile making it a favorite during festivals and special occasions. Carrot Kheer, also known as Carrot Payasam, offers a delightful twist to the traditional rice-based kheer, adding a unique layer of flavor and texture with shredded carrots. Over the years, kheer has seen many variations, and this version brings the earthy sweetness of carrots into the creamy goodness of milk and sugar. With just a few simple ingredients, this Carrot Kheer delivers a rich and flavorful dessert that’s perfect for any occasion.
Cultural and Traditional Importance
Kheer holds a special place in Indian households, especially during festivals such as Diwali, Holi, and Raksha Bandhan. It is often served as an offering to deities and enjoyed as a dessert after meals. While Rice Kheer is the most traditional form, Carrot Kheer adds a refreshing twist by incorporating a vegetable into the dessert, making it both nutritious and flavorful. The vibrant color of the carrots combined with the rich texture of milk creates an aesthetically pleasing and indulgent treat that is sure to impress your family and friends.
Although Carrot Kheer may not be as well-known as its rice counterpart, it is quickly gaining popularity for its unique taste and simplicity. This version strikes the perfect balance of sweetness and creaminess, making it a must-try for those looking to experiment with traditional Indian sweets.
Recipe Variations from Manjula’s Kitchen
While Carrot Kheer is a delightful dessert on its own, you can explore other variations of kheer or similar milk-based sweets from Manjula’s Kitchen:
Rice Kheer: The classic, most traditional form of kheer made with rice, milk, and sugar.
Sabudana Kheer: A delicious variation using tapioca pearls, commonly served during fasting periods.
Vermicelli Kheer (Seviyan Kheer): Made with thin vermicelli noodles, this version offers a unique texture to the traditional kheer.
Badam Burfi (Almond Candy): Rich and creamy, this version uses almonds to create a decadent dessert that’s both healthy and delicious.
Health Benefits and Dietary Considerations
Carrot Kheer offers a nutritious alternative to traditional kheer, with the inclusion of carrots providing a good source of vitamins, fiber, and antioxidants. Carrots are rich in vitamin A, which promotes eye health and boosts immunity, making this kheer not only delicious but also beneficial for overall wellness. Additionally, milk provides calcium and protein, while the nuts add healthy fats, making this dessert a well-rounded treat.
This kheer can be easily adjusted for various dietary preferences. For a vegan option, you can substitute dairy milk with almond or coconut milk. The natural sweetness of the carrots also allows for a reduction in added sugar if you prefer a lighter dessert.
Serving Suggestions
Carrot Kheer can be served warm or chilled, depending on your preference. Its vibrant color and rich flavor make it an attractive addition to any festive meal. For an even more indulgent experience, you can serve Carrot Kheer with a sprinkle of extra chopped nuts, such as almonds or pistachios, for added crunch and richness.
If you want to serve Carrot Kheer as a pudding, cook it for a few more minutes to achieve a thicker, more pudding-like consistency. This version pairs wonderfully with Gulab Jamun or Rasgulla for a complete Indian dessert platter.
Conclusion
Carrot Kheer is a simple yet luxurious dessert that offers a modern twist on the traditional Indian sweet. With its creamy texture, vibrant color, and subtle sweetness, this dessert is sure to become a favorite at your dinner table. Whether you’re celebrating a festival or simply want to treat yourself to something special, this Carrot Kheer recipe is a must-try. Explore the other kheer variations on Manjula’s Kitchen to discover even more delicious ways to enjoy this timeless dessert.
Frequently Asked Questions (FAQs)
What is the difference between Carrot Kheer and Rice Kheer?
Carrot Kheer uses shredded carrots as the main ingredient, while Rice Kheer is made with rice. Both versions are cooked in milk and flavored with sugar and cardamom, but Carrot Kheer offers a more vibrant color and slightly different texture.
Can I make Carrot Kheer vegan?
Yes, you can easily make Carrot Kheer vegan by using plant-based milk like almond or coconut milk instead of dairy milk.
What are some other variations of kheer I can try?
You can try Rice Kheer, Sabudana Kheer, Vermicelli Kheer, or Badam Kheer, each offering unique flavors and textures while still being deliciously creamy and satisfying.
How do I serve Carrot Kheer as a pudding?
To serve Carrot Kheer as a pudding, cook it for 2-3 extra minutes to achieve a thicker consistency, similar to a pudding. You can serve it warm or chilled
How long can I store Carrot Kheer?
Carrot Kheer can be stored in an airtight container in the refrigerator for up to 2-3 days. Reheat it gently before serving if you prefer it warm.
Kalakand is a simple yet delightful, sweet that's perfect for any holiday celebration or festive occasion. Known for its moist and grainy texture, this milk-based dessert is delicately flavored with cardamom, making it irresistible.Traditionally, Kalakand is made with just three ingredients—milk, sugar, and cardamom. While most Indian sweets, such as burfi, have a fudge-like consistency, Kalakand stands out with its moistness. Although it doesn't typically require garnishing, I decided to add pistachios for a touch of color and presentation. I also used ricotta cheese to make it simple and the results were just as delicious.Kalakand is a must-try treat, whether you're celebrating a festival or simply want to enjoy something sweet!
Prep Time 5 minutesminutes
Cook Time 30 minutesminutes
Servings 8people
Ingredients
3cups full fat milk
1½ cups ricotta cheese
¼cupsugar
¼tsp cardamom powder
1½ tbs crystal sugar, for garnishing
¼tspcrushed cardamom for garnishing
1tbs sliced pistachio for garnishing
Instructions
Boil the milk over low to medium heat. Before adding the milk, wet the pan with water to prevent it from sticking to the surface.
Boil the milk for about fifteen minutes, allowing it to reduce to almost half its original quantity. Stir the milk occasionally and scrape the sides to prevent the milk from sticking and browning.
Add the ricotta cheese and sugar mix well. Keep stirring and scraping the sides of the pan until the mixture is very soft but it has come together, I do not want to cut them into pieces. Then, add the cardamom powder and mix it in before turning off the heat.
As the Kalakand cools to room temperature, it will thicken slightly. I prefer to keep it soft so that it can be served with a spoon, similar to thick yogurt. Kalakand should be moist and have a grainy texture.
Before serving, garnish with crystal sugar, crushed cardamom, and, if desired, sliced pistachios. I used slightly less sugar in the Kalakand, and sprinkling crystal sugar adds a pleasant mild crunch, while the crushed cardamom enhances the flavor.
Notes
Kalakand is ready, can’t wait to tryEnjoy!
Introduction to Kalakand
Kalakand is a beloved Indian sweet that is often enjoyed during festivals, special occasions, or anytime you want to indulge in something rich and satisfying. Known for its moist and grainy texture, this milk-based dessert is delicately flavored with cardamom and garnished with pistachios for a touch of elegance. Unlike other Indian sweets such as burfi, which have a fudge-like consistency, Kalakand stands out because of its soft, creamy texture. This delightful sweet is easy to make and irresistibly delicious, making it a perfect addition to your festive celebrations.
Cultural and Traditional Importance
Kalakand holds a special place in Indian households during festivals like Diwali, Holi, and Raksha Bandhan. It is one of those sweets that brings a sense of joy and celebration. Traditionally, Kalakand is made with just a few simple ingredients—milk, sugar, and cardamom—but its slow-cooking process brings out rich flavors that make it unique. In many Indian homes, making Kalakand is not only about the sweet itself, but also about the shared moments of celebration with family and friends.
Though Kalakand doesn’t require garnishing, I like to add sliced pistachios for a burst of color and texture, enhancing both its presentation and taste. It’s a treat that brings back nostalgic memories of festive occasions, and now, with this simplified version using ricotta cheese, you can enjoy it with minimal effort.
Recipe Variations from Manjula’s Kitchen
While Kalakand is a delightful dessert on its own, you can explore other similar milk-based sweets from Manjula’s Kitchen that offer unique flavors and textures:
Burfi: A classic fudge-like sweet made with condensed milk and nuts like cashews or almonds.
Rasgulla: A spongy, syrup-soaked dessert made from paneer, offering a light and juicy contrast to Kalakand.
Rasmalai: Soft paneer dumplings soaked in sweetened, flavored milk, with cardamom and saffron.
Peda: A simple and elegant sweet made from condensed milk and flavored with cardamom.
Health Benefits and Dietary Considerations
Kalakand is a rich, indulgent dessert, but it also offers some nutritional benefits due to its milk base. Full-fat milk is a good source of calcium, protein, and essential vitamins. Using ricotta cheese in this recipe simplifies the cooking process while keeping the dessert creamy and delicious. If you’re looking for a lighter version, you can reduce the sugar or substitute it with a natural sweetener like honey.
This version of Kalakand is naturally gluten-free, making it suitable for those with gluten sensitivities. For a vegan alternative, you can experiment with plant-based milks and vegan ricotta, though it may slightly alter the texture.
Serving Suggestions
Kalakand is best served at room temperature, allowing its soft, grainy texture to shine. Garnish it with crushed cardamom, crystal sugar, and sliced pistachios for added flavor and visual appeal. This sweet treat can be enjoyed on its own or as part of a larger dessert spread during festivals or family gatherings.
For a more complete festive meal, consider serving Kalakand alongside other Indian sweets like Gulab Jamun or Jalebi to create a dessert platter that showcases a variety of textures and flavors.
ConclusionKalakand is a simple yet irresistible sweet that’s perfect for celebrating any special occasion. Its creamy, moist texture combined with the subtle flavor of cardamom makes it a dessert that everyone will love. With this easy-to-follow recipe using ricotta cheese, you can recreate the traditional taste of Kalakand in less time, making it an ideal treat for festivals, parties, or even as a special indulgence after dinner. Try this recipe today and enjoy the rich flavors of Kalakand with your loved ones.
Frequently Asked Questions (FAQs)
What is Kalakand made of?
Traditionally, Kalakand is made with milk, sugar, and cardamom. In this simplified version, ricotta cheese is used to reduce the cooking time while maintaining the rich texture.
How is Kalakand different from Burfi?
Kalakand has a moist and grainy texture, while Burfi is firmer and more fudge-like. Both are milk-based sweets, but Kalakand is known for its soft, melt-in-your-mouth consistency.
Can I make Kalakand vegan?
While this recipe uses full-fat milk and ricotta cheese, you can experiment with plant-based milks and vegan ricotta to make a vegan version. However, the texture may differ slightly.
What are some similar desserts to Kalakand?
Similar milk-based sweets include Burfi, Rasgulla, Rasmalai, and Peda.
How should I serve Kalakand?
Serve Kalakand at room temperature, garnished with crystal sugar, crushed cardamom, and pistachios for added flavor and texture.
Kheer is a traditional, delicious dessert, often referred to as rice pudding. To make kheer, you don’t need any special occasion—just treat yourself. Kheer has many variations. Traditionally, it is made with rice and milk, but rice can be replaced with different vegetables, fruits, or lentils. I have done many videos and posts on Manjula's Kitchen website and YouTube channel related different kheer recipes. This time, I decided to make rice kheer with a new twist. Petha is a candy-like treat made with ash gourd or winter melon, and it is readily available in Indian grocery stores. Adding Petha gives a very refreshing twist to kheer. My friends couldn't believe it, and all of them enjoyed it. For many years i've been experimenting various indian rice recipes, and today made one more change to the rice, and they kept asking about it, amazed that it was indeed rice. This recipe is very easy and takes less time than traditional kheer. Petha Rice Kheer is a fruity twist on the favorite Indian dessert, Rice Kheer. It is an easy recipe but feels like you have spent a lot of time.
Course Dessert
Cuisine Indian
Keyword Kheer, petha
Popular YouTube
Prep Time 5 minutesminutes
Cook Time 25 minutesminutes
Servings 4people
Ingredients
3cupswhole milk
½cuprice cooked
½cupthinly sliced Petha, available in Indian grosser
Blend the rice with half a cup of milk until the rice looks like pearls; do not make it into a paste, as this is a very important part of this recipe.
Heat a pan on medium-low and add 2 tablespoons of water, ensuring the surface of the pan is wet. Add the blended rice, milk, thinly sliced patha, and almond powder. Increase the heat to medium-high, bring the milk to a boil, then lower the heat to medium-low. Cook for about 15 minutes, stirring occasionally and cleaning the sides to prevent the milk from burning.
Add sugar and cardamom and cook for a few more minutes. Remember, as the kheer (pudding) comes to room temperature, it will thicken slightly. If needed, add a bit more milk and bring it to a boil once more. At this point, you can also adjust the sugar.
The kheer is ready. Serve it chilled and garnish with sliced pistachios.
Notes
About Rice Kheer, or puddingDifferent part of India Kheer is made different, in north kheer is made using any long grain rice.In South part of India, it is known Rice Payasm and they use short grain rice, ghee and Jaggery. In Bangel is known as Payesh with rice and date palm jaggery. One thing common they all use different nuts of their choice.
Discover the Exotic Rice Pudding with a Secret Ingredient
Kheer, often referred to as rice pudding, is a beloved traditional Indian dessert. While it is typically made with rice and milk, variations using different vegetables, fruits, or lentils/indian daal are also popular. This patha rice kheer recipe introduces a unique twist by incorporating Petha, a candy-like treat made from ash gourd or winter melon, readily available in Indian grocery stores. This addition brings a refreshing flavor to the classic kheer, making it a delightful treat for any occasion.
The Essence of Patha Rice Kheer
The essence of petha rice kheer lies in its creamy texture and the subtle sweetness of petha. The combination of cooked rice, milk, almond powder, and thinly sliced petha creates a rich and flavorful pudding. This Indian rice pudding is further enhanced with the aromatic hint of cardamom and the crunch of pistachios.
Origin and Popularity
Kheer is a traditional dessert enjoyed across India, known for its versatility and rich flavors. Each region has its own variation of kheer. In North India, it is made with long grain rice, while in South India, it is known as Rice Payasam, made with short grain rice, ghee, and jaggery. In Bengal, it is called Payesh, made with rice and date palm jaggery. Despite these regional differences, the use of nuts and a creamy base remains common.
Why You’ll Love This Recipe
Unique and Refreshing: The addition of patha gives a refreshing twist to traditional kheer.
Easy to Make: Simple ingredients and quick preparation.
Delicious and Nutritious: Combines the goodness of milk, rice, and nuts.
Perfect for Any Occasion: Ideal for festive celebrations or as a special treat.
Variations of Indian Desserts
Exploring Manjula’s Kitchen reveals a treasure trove of other delicious Indian dessert recipes that you might enjoy alongside your patha rice kheer. Here are some related dishes that you might find interesting:
Mango Cheesecake: A creamy and fruity cheesecake made with fresh mangoes
Gulab Jamun: Deep-fried milk-solid-based balls soaked in a fragrant sugar syrup.
Kheer: A traditional rice pudding made with milk, sugar, and flavored with cardamom and saffron.
Rasgulla: Soft and spongy cheese balls soaked in sugar syrup.
Seviyan Kheer: A sweet and creamy dessert made with vermicelli noodles, milk, and sugar called seviyan kheer.
Serving Suggestions
Petha rice kheer can be enjoyed in various ways:
As a Dessert: Serve chilled for a refreshing end to your meal.
For Festive Occasions: Perfect for festivals like Diwali, Holi, or religious ceremonies.
With Tea or Coffee: Enjoy as a sweet treat with your afternoon tea or coffee.
Garnished with Nuts: Add a garnish of sliced pistachios or other nuts for extra flavor and crunch.
Tips and Tricks
To perfect your petha rice kheer recipe, consider these helpful tips:
Blend Rice Correctly: Blend the rice with milk until it looks like pearls; avoid making it into a paste.
Use Fresh Patha: Fresh patha provides the best flavor and texture, but it is available in Indian grocery stores.
Balance Sweetness: Adjust the amount of sugar to suit your taste preference.
Serve Chilled: This kheer is best enjoyed chilled for the most refreshing experience.
FAQs
Can I Use Other Vegetables Instead of Petha?
Yes, you can experiment with other vegetables or fruits to create different variations of kheer.
How Long Does Petha Rice Kheer Last?
Store petha rice kheer in an airtight container in the refrigerator for up to 3 days. Reheat gently before serving.
Is Petha Rice Kheer Gluten-Free?
Yes, this recipe is naturally gluten-free as it is made with rice and milk.
Can I Make This Recipe Vegan?
Yes, you can use plant-based milk and a vegan sweetener to make a vegan version of this recipe.
What Can I Serve with Petha Rice Kheer?
Petha rice kheer pairs well with Indian breads like puri or paratha, or you can enjoy it on its own as a sweet treat.