This is a very simple, yet flavorful potato dish made with just a few ingredients, lots of fresh cilantro, ginger, and a little spice. It’s one of those everyday recipes I make often in my kitchen. You can enjoy it as a side dish, have it as a snack, or even roll it up in a roti for a quick and satisfying meal. Easy home cooking doesn’t have to be complicated, just fresh ingredients and comforting flavors. Simple ingredients, easy cooking, and so much flavor.
Prep Time 15 minutesminutes
Cook Time 18 minutesminutes
Servings 4
Ingredients
2cupsboiled, peeled potatoes (aloo), sliced lengthwise(Potatoes should be firm—do not overcook)
2tbspoil
1tbspcumin seeds (jeera)
¼tbspasafetida (hing)
2tbspthinly sliced ginger (adrak)
2green chilies, thinly sliced lengthwise
1tbspsalt
1tbsplemon juice
½cupchopped fresh cilantro (hara dhania)
Instructions
Heat the oil in a wide, flat frying pan over medium heat.
Add the cumin seeds; they should crackle right away.
Add the asafetida and stir briefly.
Add the potatoes and spread them out evenly in the pan. Sprinkle the salt
over the potatoes.
Roast the potatoes until they start picking up a light golden color.
Add the ginger and green chilies, spreading them evenly. Cook for a few
more minutes, gently turning the potatoes so they don’t break.
Once the potatoes look slightly crispy, add the cilantro and mix gently. Cook
for 2–3 minutes, until the cilantro softens and coats the potatoes.
Finally, sprinkle the lemon juice and give it a gentle mix.
Notes
Potatoes should be boiled just until tender and still firm. Overcooked potatoes may break while stirring.
Use a wide, flat pan so the potatoes roast evenly and get a light golden color.
Adjust green chilies according to your spice preference.
Fresh cilantro and ginger are key to the flavor-do not skip or reduce them.
This dish pairs well with roti, paratha, or can be enjoyed as a light snack.
Frequently Asked Questions (FAQs)
1. Can I use leftover boiled potatoes for this recipe?
Yes, leftover boiled potatoes work well as long as they are firm and not mushy. Slice them gently before cooking.
2. Can I skip asafetida (hing)?
You can skip hing if needed, but it adds a subtle flavor. If you are gluten-sensitive, make sure to use gluten-free hing or omit it.
3. How spicy is this dish?
This dish is mildly spicy. You can reduce or increase the number of green chilies based on your taste.
4. Can I make this dish ahead of time?
It tastes best when served fresh, but you can prepare it a few hours ahead and gently reheat it in a pan before serving.
5. Can I use dried cilantro instead of fresh?
Fresh cilantro is highly recommended for the best flavor. Dried cilantro will not give the same freshness.
6. How can I serve this dish?
You can serve it as a side dish, enjoy it as a snack, or roll it into a roti for a quick and satisfying meal.
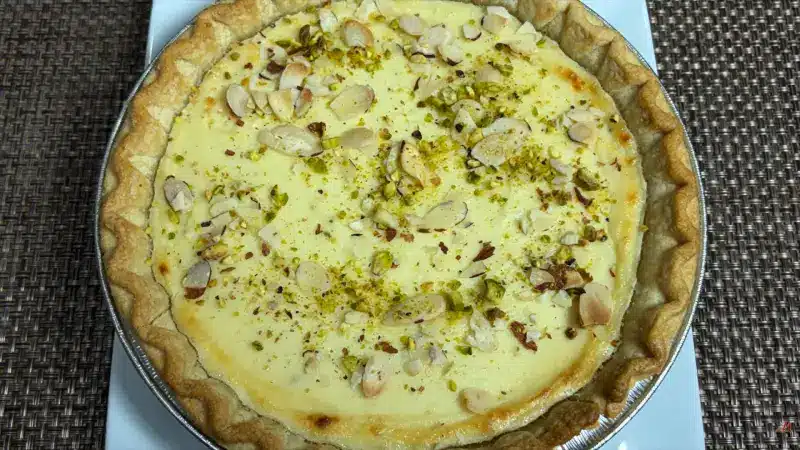
Quick & Easy Creamy Ricotta Pie (Indian Mithai Style)
Sometimes you want to make a dessert that feels special but doesn’t take hours in the kitchen. This creamy ricotta pie is one of those recipes. I am making this pie with a store-bought pie crust and simple ingredients; it has a soft, lightly grainy texture that reminds me of Indian mithai. My granddaughter says it reminds me of Kulfi. The gentle flavor of cardamom and the crunch of nuts on top make it both comforting and festive at the same time. Best of all, it’s a no-fuss recipe—mix, fill, bake, and chill.I am using Store bought pie crest use shallow pie crest not deep crest.
Prep Time 10 minutesminutes
Total Time 45 minutesminutes
Ingredients
1Store-bought pie crust
16 oz2 cupswhole milk ricotta
1/2cupsugar (adjust to taste)
1/4tspcardamom powder
1tbspcornstarch (important for setting)
2tspchopped pistachios and almonds
Instructions
Mix ricotta, sugar, cardamom, and cornstarch
Fill the pie crust evenly
Bake at 350°F (190°C) for 30–35 minutes
Cool completely before slicing
After baking for 20 minutes sprinkle the nuts and bake again.
Pie should have a light brown color on the top
Slice the pie after it is chill Served chillTexture: soft, lightly grainy, like kalakand Indian mithaiThis creamy ricotta pie looks amazingly delicious, and my kitchen is filled with the sweet aroma of cardamom. I hope you enjoy making it as much as I did. Stay healthy and stay safe.
Notes
Use a shallow store-bought pie crust, not a deep-dish crust, for best results.
Cornstarch is essential—it helps the pie set properly while keeping the texture soft and creamy.
Sprinkle chopped nuts after 20 minutes of baking to prevent them from burning.
Best served chilled for a rich, dessert-like experience
Cook at 320–330°F (160–165°C) for 15–20 minutes, checking halfway through. The pie should be set but still slightly wobbly in the center.
If the top starts browning too quickly, loosely cover it with foil.
Frequently Asked Questions (FAQs)
1. Can I use low-fat ricotta instead of whole milk ricotta?
Whole milk ricotta is recommended for a creamy, rich texture. Low-fat ricotta can make the pie drier and less smooth.
2. Can I reduce the sugar?
Yes, you can adjust the sugar to your taste. If you prefer a mildly sweet dessert, start with 1/3 cup and increase if needed.
3. Why is my pie still slightly wobbly in the center?
This is completely normal. The pie continues to set as it cools and will firm up fully after chilling in the refrigerator.
4. Can I make this pie ahead of time?
Yes. This pie actually tastes better the next day. You can make it in advance and store it covered in the refrigerator for up to 3 days.
5. Can I skip the nuts on top?
Yes, the nuts are optional and mainly add texture. You can replace them with raisins or skip the topping altogether.
6. How do I air-fry the pie safely?
Place the pie in the air fryer basket and cook at 320–330°F (160–165°C) for 15–20 minutes, checking halfway through. If the top browns too quickly, loosely cover it with foil.
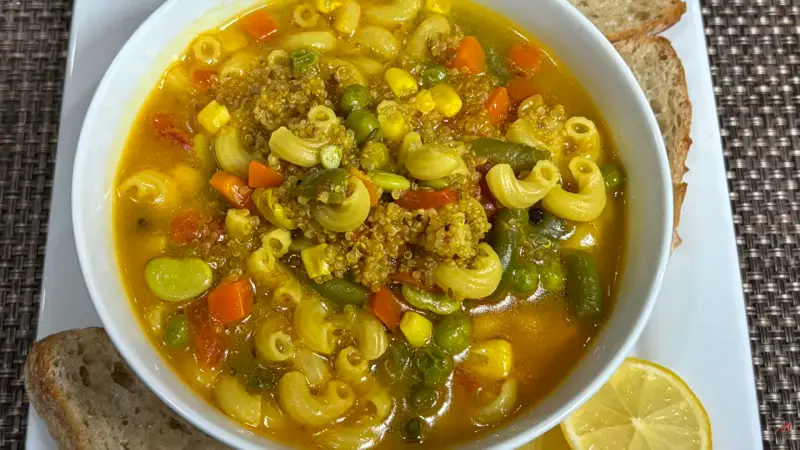
Quinoa Vegetable Soup, Healthy Comforting One Pot Meal
A warm bowl of this quinoa vegetable soup is comfortable, nutrition, and simplicity all in one. It’s perfect for busy days when you want something homemade, light, and wholesome without spending too much time in the kitchen. I love this recipe because quinoa and pasta together make the soup hearty, while the vegetables add color and freshness. It’s simple, satisfying, and comes together with ingredients most of us already have.
Prep Time 10 minutesminutes
Cook Time 30 minutesminutes
Total Time 40 minutesminutes
Servings 4
Ingredients
1/2cupof quinoa
1/4cupelbow pasta (or any small pasta of your choice)
2cupsof mixed vegetables (I’m using frozen mixed veggies — carrots, corn, green
peas, green beans, and lima beans)
1cupchopped tomato
2tbspoil
1/2tspcumin seeds (jeera)
1/8tspasafetida (hing)
1/4tspturmeric (haldi)
1tspgrated ginger
6cloves (laung)
6black peppercorns
3cupsof water
1tspfresh lemon juice
1tspof salt
Instructions
Wash the quinoa in a fine strainer under running water. Set aside.
Heat oil in a saucepan over medium-high heat. When moderately hot, add cumin seeds and asafetida.
Once the cumin seeds crackle, add the mixed vegetables. Stir for a minute.
Add quinoa, pasta, tomatoes, ginger, cloves, black peppercorns, and water.
Add salt to taste.
Bring the mixture to a boil, then reduce the heat to low-medium.
Cover and cook for 25–30 minutes, or until the quinoa, pasta, and vegetables are tender.
Finish the soup
Add lemon juice. Taste and adjust salt and pepper as needed.
Notes
Always rinse quinoa well to remove bitterness.
Keep the soup consistency adjustable-add more water if you prefer a thinner soup.
Lemon juice should be added at the end to keep the flavors fresh.
This soup thickens slightly as it rests, so adjust water while reheating.
Works great as a light meal, detox-friendly option, or comfort food during cold days.
Serving Suggestion
Serve hot. This soup is paired well with toast, or even a simple paratha. It’s light, flavorful, and perfect for lunch, dinner, or a late-evening warm snack.
Frequently Asked Questions (FAQs)
1. Can I skip pasta in this soup?
Yes, you can skip the pasta if you want a gluten-free or lighter version. You may slightly reduce the water quantity in that case.
2. Can I use fresh vegetables instead of frozen?
Absolutely. Fresh vegetables like carrots, beans, peas, and corn work very well. Just chop them evenly for uniform cooking.
3. Can I make this soup vegan?
Yes, this soup is naturally vegan as it contains no dairy or animal-based ingredients.
4. Can I prepare this soup in advance?
Yes. You can store it in the refrigerator for up to 2 days. Reheat gently on the stovetop, adding a little water if needed.
5. Is quinoa necessary for this recipe?
Quinoa adds protein and makes the soup hearty. However, you can substitute it with rice, millet, or just increase the vegetables if preferred.
6. Can I make it spicy?
Yes. You can add green chili, chili flakes, or black pepper powder to adjust the spice level.
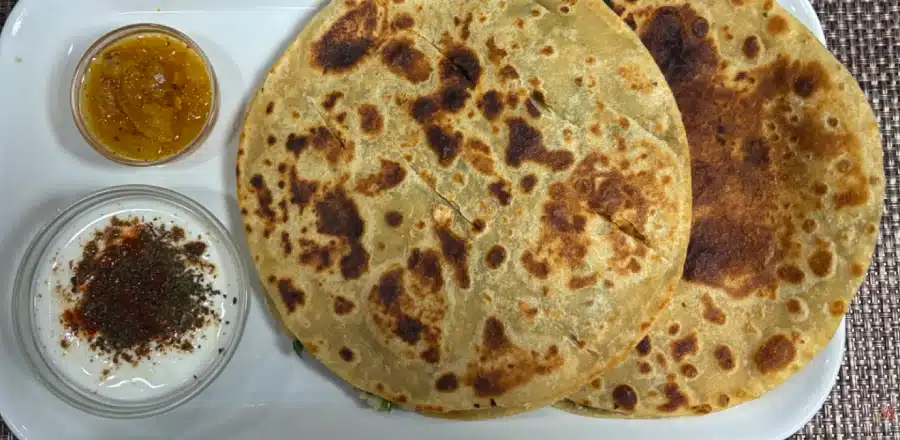
Stuffed Parathas Made Easy Aloo Potato Gobhi Cauliflower
I am truly excited! Stuffed parathas sound difficult to make and time consuming andhonestly, they are. They’re one of the most loved Indian breads, but making the doughand rolling the parathas is the part that creates the most work, the most mess, and themost cleanup.That’s why I’ve been experimenting with easier ways to make them while keeping thetaste true to the original. You can even call it semi-homemade because I’m using store-bought uncooked rotis. I was so happy and surprised when I came up with this quick,simple method. In the end, your own finishing touch makes all the difference!Today, I am sharing recipes for two different parathas:Aloo (Potato) Paratha — my favorite classicGobhi (Cauliflower) Paratha — my husband’s favoriteThis recipe will make 2 parathas — one of each.
Prep Time 15 minutesminutes
Cook Time 15 minutesminutes
Servings 2parathas
Ingredients
Aloo Paratha
Ingredients
2 Uncooked Rotis (available at Indian stores)
For filling
½cupboiled and mashed potatoes
¼teaspooncumin seeds
1/2teaspooncoriander powder
¼teaspoondry mango powder
A pinch of asafetida
¼teaspoonsalt
¼teaspoonfinely grated ginger
½teaspoonfinely chopped green chili (adjust to taste),or ¼ teaspoon red chili powder
1tablespoonfinely chopped cilantro
2teaspoonsoil to cook the paratha
Gobhi (cauliflower) Paratha
Ingredients
2UncookedRotis (available at Indian stores)
½cupgrated cauliflower (Gobhi)
2tablespoonsof boiled mashed potatoes (to help hold the filling)
½teaspooncumin seeds
1teaspooncoriander powder
¼teaspoondry mango powder
A pinch of asafetida
¼teaspoonsalt
¼teaspoonfinely chopped ginger
½teaspoonfinely chopped green chili (adjust to taste),or ¼ teaspoon red chili powder
1tablespoonfinely chopped cilantro
2teaspoonsoil
Instructions
Prepare the filling:
Mix all the ingredients together. Taste and adjust the salt. If filling seems too dry add 1spoon of water.
Lightly cook the rotis:
Heat a flat skillet over medium heat. Cook each roti on one side only for about 30 seconds.Place them on a plate.
Assemble the paratha:
On one roti (cooked side up), spread the potato filling evenly. The filling should not be too thick. Place the second roti on top with the cooked side facing down.
Cook the paratha:
Heat the skillet to medium-high. Transfer the prepared paratha to the skillet. Cook on both sides using about 1 teaspoon oil per side.Press gently with a spatula and cook until golden brown and crispy. These come out looking just like traditional aloo parathas — crispy, hot, and delicious.They taste best when served hot!
Gobhi (cauliflower) Paratha
Prepare the filling:
Grate the cauliflower finely. Add the mashed potatoes and mix well, this helps bind the loose cauliflower.
Mix in all remaining ingredients. Taste and adjust the salt.
If filling seems too dry add 1 spoon of water
Lightly cook the rotis:
Heat a flat skillet over medium heat. Cook each roti on one side only for about 30 seconds.Remove and set aside.
Assemble the paratha:
Place one roti on a plate with the cooked side facing up.Spread the cauliflower-potato filling evenly in a thin layer.Place the second roti on top with the cooked side facing down.
Cook the paratha:
Heat the skillet on medium high. Gently place the stuffed paratha on the skillet.
Cook both sides using about 1 teaspoon oil per side.
Press lightly with a spatula and cook until both sides are golden brown and crisp.
These semi-homemade Gobhi Parathas turn out wonderfully — flavorful, easy to handle, and so much simpler to prepare than the traditional method. Serve hot for the best taste!
Notes
Keep the filling layer thin to prevent tearing.
Prick the paratha lightly while cooking to avoid puffing and separation.
Always cook on medium to medium-high heat for even browning.
These parathas stay crisp and reheat well on a skillet.
I like to serve paratha spiced yogurt or pickle or just enjoy, with hot cup of tea. Thank you! Enjoy!
Frequently Asked Questions (FAQs)
1. Can I use frozen rotis?
Yes. Thaw them completely before cooking to ensure even heating and proper texture.
2. Why add potatoes to gobhi filling?
Cauliflower releases moisture while cooking. Adding potatoes helps bind the filling and prevents the paratha from separating.
3. Can I make these ahead of time?
Yes. Cook them slightly less if you plan to reheat later on a skillet.
4. Can I make them oil-free?
A small amount of oil helps create a crisp texture, but you can reduce the quantity if needed.
5. What can I serve with parathas?
Parathas pair well with spiced yogurt, pickle, butter, or simply enjoy them with a hot cup of tea.
Namaste! I am Manjula, and I am delighted to welcome you back to my kitchen. After a long break from making videos, it feels wonderful to return to a space that holds so many memories. For a while, my kitchen felt unusually quiet, as if it was waiting for me to come back.
Cooking has always been my true passion. Since childhood, I loved helping my mother in the kitchen. She often told me that the most important ingredient in any recipe is a smile. Over time, I realized how true her words were. Cooking is not just about food; it is about love, care, and happiness.
There was a phase when I felt I had created enough content and shared enough recipes. But staying away from cooking and sharing my experiences was harder than I expected. When you love something deeply, it naturally calls you back.
Over the years, you have become my extended family. Cooking together, sharing ideas, leaving encouraging comments, and supporting my journey has meant everything to me. Your love and motivation have always inspired me to keep going.
Today, I am happy to say that I am back, with a fresh and simple approach. I want to keep things easy, fun, and practical. I will be sharing quick, tasty, and homemade recipes that anyone can prepare without spending long hours in the kitchen.
Each recipe will come with clear and friendly instructions, making cooking enjoyable even for beginners. Your suggestions, feedback, and encouragement have always guided me, and they continue to inspire me more than you know.
I am truly excited to cook with you again and continue this beautiful journey together.
Namaste. I am Manjula, and welcome to my kitchen.Cooking has always been very close to my heart. For me, it is calming, grounding, and deeply satisfying.
Keeping Cooking Simple and Joyful
This year, I made a conscious decision to keep everything simple.My goal is to encourage more home cooking without pressure or complexity.I focus on easy, practical recipes that fit into real life.
You will see more baking recipes, more air fryer meals, and plenty of dishes made using the Instant Pot.These are meals you can prepare even after a long, tiring day.
Comforting Food for the Whole Family
I believe food should be comforting. Food your children enjoy.Food that makes your kitchen feel warm and welcoming.
Home cooking is not just about feeding the family. For me, it is an expression of care and love.
When we cook at home, we know exactly what goes into our meals.We can adjust spices, ingredients, and methods to suit our family’s taste, health, and dietary needs.
Cooking Through Busy Lives and Changing Times
I understand how busy life can be. Many of you are working, raising children, and moving from one responsibility to another.
As we age, we also face our own limitations. Still, my love for cooking remains strong. It keeps me connected to my roots and brings genuine happiness into my daily life.
Cooking Is About Intention, Not Perfection
Home cooking does not need to be perfect. It is about intention, effort, and love.
Invite your children or grandchildren into the kitchen. Let them stir, taste, help a little, or simply be playful. Yes, it may slow things down, but those moments are priceless.
These small, simple moments quietly turn into cherished memories before we even realize it.
Simple Recipes, Shortcuts, and Balance
Cooking together is love.
Simple recipes are perfectly fine. Semi-homemade meals are fine. Taking shortcuts is also fine.
The goal is nourishment, not stress.
Home Cooking for Health and Care
When someone in the family has health concerns, home cooking becomes even more valuable. It allows us to gently adjust ingredients without making anyone feel restricted or deprived.
Cook Along With Me
Cook with me, try my recipes, and you may surprise your family with delicious, comforting food.
Thank you for being here and sharing this journey with me.
Apple pie is such a treat! It’s impossible to stop eating, especially when it’s made just right and served hot with vanilla ice cream. When I first came to the USA in January, it was very cold. As a vegetarian, we didn’t have too many options at that time, but we were treated to our first dessert: hot apple pie topped with vanilla ice cream. What a treat it was! I fell in love with it instantly.Over time, I learned to make apple pie and made it many times, but it has been a while since then. Recently, I decided to give it an Indian twist. I wanted to make it easy to prepare, so I decided to make it in paratha style, filled with sweet and sour apples. For flavoring, I used traditional spices like cinnamon, nutmeg, and cloves. You may try other fruits of your choice, such as pears and peaches—these are two I have tried. But I must admit, for me, nothing beats the sweet and sour apple flavor paired with the aroma of cinnamon.
Prep Time 15 minutesminutes
Cook Time 20 minutesminutes
Servings 4Apple Pie Parathas
Ingredients
For the Dough:
1cupall-purpose flour
¼cupwhole wheat flour
3tbspsoft butter
1pinchsalt
½ cupchilled water
For the Filling:
1½ cupsgrated appleGranny Smith apples or 1 large apple
¼tspcinnamon powder
1pinchnutmeg powder
1pinchclove powder
¾cupsugar
Instructions
For the Dough:
In a bowl, mix all-purpose flour, whole wheat flour, and salt. Then, add the butter ensuring it’s soft but not melted and use your fingers to combine the mixture until it becomes crumbly.
Slowly add water, just enough to bring the flour together, but do not knead the dough. It’s important to ensure that the paratha remains flaky. Let the dough sit for about 10 minutes.
For the Filling:
Peel and grate the apple; the grated apple should yield about 1½ cups. I like to use Granny Smith apples because they are firm and tart, but you can use other varieties, ensuring you add lemon juice to provide tartness.
Over low-medium heat, combine all the filling ingredients—apple, sugar, cinnamon, clove, and nutmeg in a pan.
Cook until the mixture becomes a soft, sticky dough, which should take about 7 minutes. Be sure to stir the filling continuously.
The filling should be at room temperature before making the paratha.
Making the Paratha:
Lightly knead the dough and divide it into four equal parts, rolling each into a ball between your palms.
Roll each dough ball into a 3-inch circle. Place about 2 tablespoons of filling in the center of the rolled dough.
Pull the edges of the dough to wrap it around the filling. Repeat to make all four filled balls. Let the filled balls rest for three to four minutes.
Meanwhile, heat a heavy flat pan over medium-high heat until moderately hot. To test, sprinkle water on the skillet—if the water sizzles right away, the skillet is ready.
Lightly press each filled ball in dry whole wheat flour on both sides. Using a rolling pin, gently roll the balls into five-inch circles, keeping the sealed side of the ball on top. If the dough sticks to the rolling pin or surface, lightly dust the parathas with dry flour.
Place the paratha on the skillet. When it starts to change color and puff up, flip it over. You will notice some golden-brown spots. After a few seconds, drizzle one teaspoon of oil over the paratha.
Flip it again and lightly presses the puffed areas with a spatula. Flip once more and press with the spatula, ensuring the paratha is golden-brown on both sides. Repeat for the remaining parathas.
These apple parathas taste like you’re having apple pie. You can make these apple pie parathas in advance; they stay good for 3-4 days at room temperature, and you can refrigerate them for 3-4 weeks.
When serving, reheat them over a skillet, in an air fryer, or the oven. Serve them with ice cream; I enjoy hot paratha with vanilla ice cream, while my husband prefers to melt cheese over his.
Notes
Tips: After stuffing the parathas, let the stuffed dough balls rest for 3 to 4 minutes. This helps the dough settle, making it easier to roll the parathas without the stuffing coming out from the sides.Roll paratha evenly without putting too much pressure. For a vegan option: I used butter to make the dough because it adds flakiness and crispness to the parathas. If you’re vegan, you can substitute butter with oil.Filling: The apple filling should have a soft, slightly sticky texture. If the filling will become little dry after cooling. This will make it easier to roll the parathas and ensure the filling spreads evenly.
Introduction to Apple Pie Paratha
Apple Pie Paratha is a creative fusion dish that combines the comforting flavors of the classic American apple pie with the traditional Indian paratha. This innovative recipe is perfect for dessert lovers who enjoy experimenting with global cuisines. Sweet and sour grated apples are flavored with aromatic spices like cinnamon, nutmeg, and cloves, creating a filling that tastes like a warm apple pie. Wrapped in a flaky paratha dough and cooked to golden perfection, this dish is an indulgent treat that pairs beautifully with vanilla ice cream or even a savory topping like melted cheese.
Cultural and Culinary Fusion
The idea of fusing apple pie flavors into a paratha showcases the versatility of Indian flatbreads. Parathas, traditionally made savory with fillings like potatoes or paneer, lend themselves wonderfully to sweet adaptations. This Apple Pie Paratha recipe celebrates both Indian and Western culinary traditions, making it an exciting choice for festive occasions, family meals, or even a quick tea-time treat. The warm spices used in the filling are reminiscent of traditional Indian desserts, while the apples and their tart-sweet flavor pay homage to the beloved American apple pie.
Recipe Variations from Manjula’s Kitchen
If you love Apple Pie Paratha, you may also enjoy exploring other innovative and traditional paratha recipes from Manjula’s Kitchen:
Aloo Paratha: A savory paratha stuffed with spiced mashed potatoes, perfect for breakfast or lunch.
Sweet Coconut Paratha: A unique dessert paratha with a filling of sweetened coconut and cardamom.
Paneer Paratha: A savory flatbread filled with spiced paneer, offering a protein-rich option.
Gobi Paratha: A classic paratha stuffed with grated cauliflower, flavored with Indian spices.
Each of these recipes showcases the versatility of parathas, whether savory or sweet, and their ability to incorporate diverse flavors.
Health Benefits and Dietary Considerations
Apple Pie Paratha combines the natural goodness of apples with the comforting texture of parathas. Apples are rich in fiber, vitamin C, and antioxidants, making them a healthy addition to any meal. The aromatic spices used in the filling, like cinnamon and nutmeg, are known for their anti-inflammatory and digestive properties.
For those following a vegan diet, this recipe can be easily adapted by replacing butter with oil in the dough preparation. The paratha dough itself is made with a mix of all-purpose and whole wheat flour, offering a balance of flavor and texture. While this is an indulgent dessert, the option to use natural sweeteners or reduce the sugar content can make it a lighter treat.
Serving Suggestions
Apple Pie Paratha is a versatile dessert that can be enjoyed in various ways:
Classic Pairing: Serve the paratha warm with a scoop of vanilla ice cream for a classic apple pie-inspired experience.
Savory Twist: Melt a slice of cheese over the hot paratha for a sweet-savory flavor profile.
Festive Plating: Drizzle some caramel or chocolate sauce over the paratha for an extra indulgent touch during special occasions.
Quick Snack: Enjoy the paratha on its own with a hot cup of chai or coffee for a cozy snack.
These parathas can be made in advance and reheated, making them a convenient option for entertaining guests or meal prepping.
ConclusionApple Pie Paratha is a delightful fusion dish that transforms a classic dessert into a flaky, flavorful Indian flatbread. Its sweet apple filling, spiced with cinnamon and nutmeg, offers a warm and comforting flavor, perfect for any season. Whether you’re looking for an innovative dessert, a festive treat, or simply something new to try, this Apple Pie Paratha recipe is sure to impress. Try it today and enjoy a unique blend of Indian and Western culinary traditions.
Frequently Asked Questions (FAQs)
What type of apples work best for Apple Pie Paratha?
Granny Smith apples are ideal for their firm texture and tart flavor. If using sweeter apples, add a splash of lemon juice to balance the taste.
Can I make Apple Pie Paratha vegan?
Yes, replace the butter in the dough with oil to make a vegan version of this recipe.
How can I store Apple Pie Paratha?
You can store these parathas at room temperature for 3-4 days or refrigerate them for up to 3-4 weeks. Reheat them in a skillet, in an air fryer, or in the oven before serving.
What are some similar recipes I can try?
Explore Sweet Coconut Paratha, Paneer Paratha, or Gobi Paratha for more delicious paratha variations.
What makes Apple Pie Paratha special?
The fusion of warm apple pie flavors with the flaky, golden-brown texture of Indian paratha makes it a unique and versatile dessert that’s easy to prepare and enjoyable for all.
Kheer is one of the most traditional and loved sweets found all over India. Over the years, I’ve made videos on many variations of kheer, each with its own unique charm, although Rice Kheer remains the most traditional. Once, my friends served me Carrot Kheer. While it was delicious, I felt something was missing—a certain balance of flavors that I couldn’t quite pinpoint. After experimenting a few times, I finally developed a simple yet delicious version of Carrot Kheer that I’m happy with.Some of my younger friends, who usually avoid kheer, were pleasantly surprised when I served it to them as pudding. They loved it!What I love most about Carrot kheer is that it can be made with just a few simple ingredients, yet the result is always rich and flavorful. This version, in particular, is delightful with its creamy texture and subtle sweetness.
Course Dessert
Cuisine Indian
Keyword Dessert
Prep Time 10 minutesminutes
Cook Time 30 minutesminutes
Servings 4people
Ingredients
3cupsshredded carrots, divided
4 cupsmilk, divided
⅓ cupsugar
¼tspcrushed green cardamom
2tbspsliced almonds
Instructions
Before shredding the carrot, it should be washed and peel, peeling is an important of preparation. Blend 1 cup of shredded carrots with 1 cup of milk into a fine paste.
Bring the remaining milk to a boil over low to medium heat in a saucepan. To prevent the milk from sticking, wet the pan with a little water before adding the milk.
Once the milk boils, add the shredded carrots and carrot paste. Continue boiling for about 15 minutes over low to medium heat, stirring occasionally. Scrape the sides of the pan to prevent sticking and browning.
Cook until the carrots are tender, and the milk has reduced by about half, becoming creamy. Stir often to avoid burning.
Add sugar, cardamom, almonds, and cashews, and let the mixture simmer for a few more minutes.
Turn off the heat.
As the kheer cools, it will thicken in texture.
Notes
Enjoy! To serve as a pudding, you should cook the kheer for 2 to 3 more minutes to thicken it, bringing it to a pudding-like texture.
Carrot Kheer (Carrot Paayasam): A Delicious Twist on a Timeless Indian Sweet | Manjula’s Kitchen
Introduction to Carrot Kheer
Kheer is one of the most cherished and traditional sweets in Indian cuisine, with its creamy, sweet, and flavorful profile making it a favorite during festivals and special occasions. Carrot Kheer, also known as Carrot Payasam, offers a delightful twist to the traditional rice-based kheer, adding a unique layer of flavor and texture with shredded carrots. Over the years, kheer has seen many variations, and this version brings the earthy sweetness of carrots into the creamy goodness of milk and sugar. With just a few simple ingredients, this Carrot Kheer delivers a rich and flavorful dessert that’s perfect for any occasion.
Cultural and Traditional Importance
Kheer holds a special place in Indian households, especially during festivals such as Diwali, Holi, and Raksha Bandhan. It is often served as an offering to deities and enjoyed as a dessert after meals. While Rice Kheer is the most traditional form, Carrot Kheer adds a refreshing twist by incorporating a vegetable into the dessert, making it both nutritious and flavorful. The vibrant color of the carrots combined with the rich texture of milk creates an aesthetically pleasing and indulgent treat that is sure to impress your family and friends.
Although Carrot Kheer may not be as well-known as its rice counterpart, it is quickly gaining popularity for its unique taste and simplicity. This version strikes the perfect balance of sweetness and creaminess, making it a must-try for those looking to experiment with traditional Indian sweets.
Recipe Variations from Manjula’s Kitchen
While Carrot Kheer is a delightful dessert on its own, you can explore other variations of kheer or similar milk-based sweets from Manjula’s Kitchen:
Rice Kheer: The classic, most traditional form of kheer made with rice, milk, and sugar.
Sabudana Kheer: A delicious variation using tapioca pearls, commonly served during fasting periods.
Vermicelli Kheer (Seviyan Kheer): Made with thin vermicelli noodles, this version offers a unique texture to the traditional kheer.
Badam Burfi (Almond Candy): Rich and creamy, this version uses almonds to create a decadent dessert that’s both healthy and delicious.
Health Benefits and Dietary Considerations
Carrot Kheer offers a nutritious alternative to traditional kheer, with the inclusion of carrots providing a good source of vitamins, fiber, and antioxidants. Carrots are rich in vitamin A, which promotes eye health and boosts immunity, making this kheer not only delicious but also beneficial for overall wellness. Additionally, milk provides calcium and protein, while the nuts add healthy fats, making this dessert a well-rounded treat.
This kheer can be easily adjusted for various dietary preferences. For a vegan option, you can substitute dairy milk with almond or coconut milk. The natural sweetness of the carrots also allows for a reduction in added sugar if you prefer a lighter dessert.
Serving Suggestions
Carrot Kheer can be served warm or chilled, depending on your preference. Its vibrant color and rich flavor make it an attractive addition to any festive meal. For an even more indulgent experience, you can serve Carrot Kheer with a sprinkle of extra chopped nuts, such as almonds or pistachios, for added crunch and richness.
If you want to serve Carrot Kheer as a pudding, cook it for a few more minutes to achieve a thicker, more pudding-like consistency. This version pairs wonderfully with Gulab Jamun or Rasgulla for a complete Indian dessert platter.
Conclusion
Carrot Kheer is a simple yet luxurious dessert that offers a modern twist on the traditional Indian sweet. With its creamy texture, vibrant color, and subtle sweetness, this dessert is sure to become a favorite at your dinner table. Whether you’re celebrating a festival or simply want to treat yourself to something special, this Carrot Kheer recipe is a must-try. Explore the other kheer variations on Manjula’s Kitchen to discover even more delicious ways to enjoy this timeless dessert.
Frequently Asked Questions (FAQs)
What is the difference between Carrot Kheer and Rice Kheer?
Carrot Kheer uses shredded carrots as the main ingredient, while Rice Kheer is made with rice. Both versions are cooked in milk and flavored with sugar and cardamom, but Carrot Kheer offers a more vibrant color and slightly different texture.
Can I make Carrot Kheer vegan?
Yes, you can easily make Carrot Kheer vegan by using plant-based milk like almond or coconut milk instead of dairy milk.
What are some other variations of kheer I can try?
You can try Rice Kheer, Sabudana Kheer, Vermicelli Kheer, or Badam Kheer, each offering unique flavors and textures while still being deliciously creamy and satisfying.
How do I serve Carrot Kheer as a pudding?
To serve Carrot Kheer as a pudding, cook it for 2-3 extra minutes to achieve a thicker consistency, similar to a pudding. You can serve it warm or chilled
How long can I store Carrot Kheer?
Carrot Kheer can be stored in an airtight container in the refrigerator for up to 2-3 days. Reheat it gently before serving if you prefer it warm.
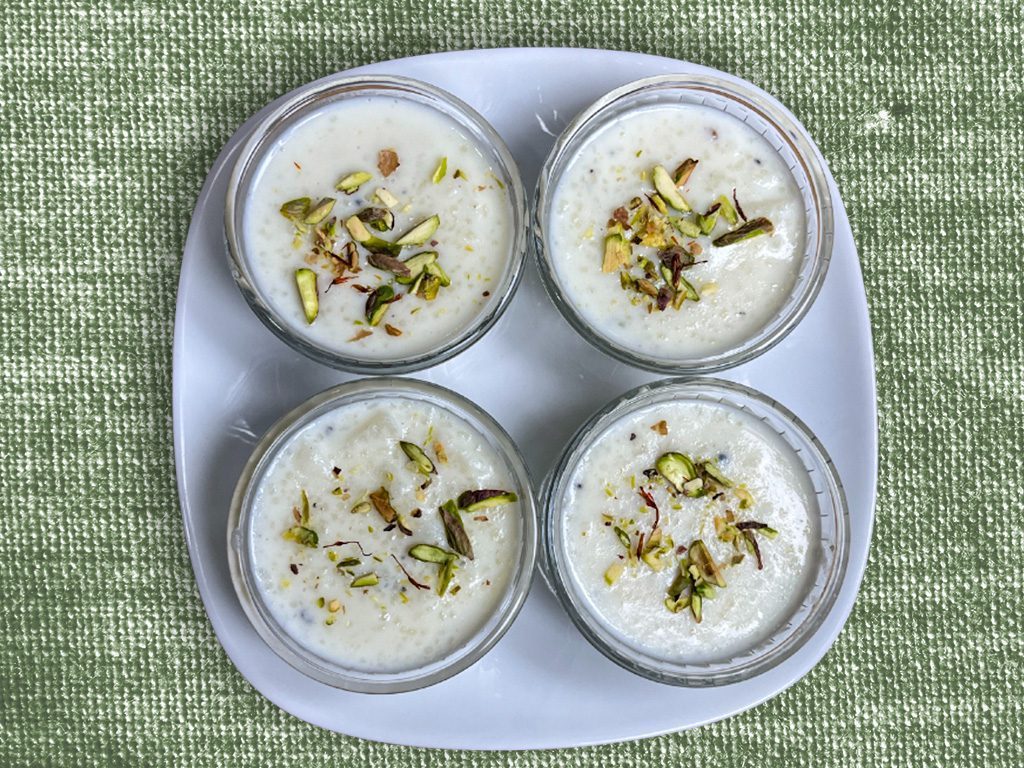
Kalakand is a simple yet delightful, sweet that's perfect for any holiday celebration or festive occasion. Known for its moist and grainy texture, this milk-based dessert is delicately flavored with cardamom, making it irresistible.Traditionally, Kalakand is made with just three ingredients—milk, sugar, and cardamom. While most Indian sweets, such as burfi, have a fudge-like consistency, Kalakand stands out with its moistness. Although it doesn't typically require garnishing, I decided to add pistachios for a touch of color and presentation. I also used ricotta cheese to make it simple and the results were just as delicious.Kalakand is a must-try treat, whether you're celebrating a festival or simply want to enjoy something sweet!
Prep Time 5 minutesminutes
Cook Time 30 minutesminutes
Servings 8people
Ingredients
3cups full fat milk
1½ cups ricotta cheese
¼cupsugar
¼tsp cardamom powder
1½ tbs crystal sugar, for garnishing
¼tspcrushed cardamom for garnishing
1tbs sliced pistachio for garnishing
Instructions
Boil the milk over low to medium heat. Before adding the milk, wet the pan with water to prevent it from sticking to the surface.
Boil the milk for about fifteen minutes, allowing it to reduce to almost half its original quantity. Stir the milk occasionally and scrape the sides to prevent the milk from sticking and browning.
Add the ricotta cheese and sugar mix well. Keep stirring and scraping the sides of the pan until the mixture is very soft but it has come together, I do not want to cut them into pieces. Then, add the cardamom powder and mix it in before turning off the heat.
As the Kalakand cools to room temperature, it will thicken slightly. I prefer to keep it soft so that it can be served with a spoon, similar to thick yogurt. Kalakand should be moist and have a grainy texture.
Before serving, garnish with crystal sugar, crushed cardamom, and, if desired, sliced pistachios. I used slightly less sugar in the Kalakand, and sprinkling crystal sugar adds a pleasant mild crunch, while the crushed cardamom enhances the flavor.
Notes
Kalakand is ready, can’t wait to tryEnjoy!
Introduction to Kalakand
Kalakand is a beloved Indian sweet that is often enjoyed during festivals, special occasions, or anytime you want to indulge in something rich and satisfying. Known for its moist and grainy texture, this milk-based dessert is delicately flavored with cardamom and garnished with pistachios for a touch of elegance. Unlike other Indian sweets such as burfi, which have a fudge-like consistency, Kalakand stands out because of its soft, creamy texture. This delightful sweet is easy to make and irresistibly delicious, making it a perfect addition to your festive celebrations.
Cultural and Traditional Importance
Kalakand holds a special place in Indian households during festivals like Diwali, Holi, and Raksha Bandhan. It is one of those sweets that brings a sense of joy and celebration. Traditionally, Kalakand is made with just a few simple ingredients—milk, sugar, and cardamom—but its slow-cooking process brings out rich flavors that make it unique. In many Indian homes, making Kalakand is not only about the sweet itself, but also about the shared moments of celebration with family and friends.
Though Kalakand doesn’t require garnishing, I like to add sliced pistachios for a burst of color and texture, enhancing both its presentation and taste. It’s a treat that brings back nostalgic memories of festive occasions, and now, with this simplified version using ricotta cheese, you can enjoy it with minimal effort.
Recipe Variations from Manjula’s Kitchen
While Kalakand is a delightful dessert on its own, you can explore other similar milk-based sweets from Manjula’s Kitchen that offer unique flavors and textures:
Burfi: A classic fudge-like sweet made with condensed milk and nuts like cashews or almonds.
Rasgulla: A spongy, syrup-soaked dessert made from paneer, offering a light and juicy contrast to Kalakand.
Rasmalai: Soft paneer dumplings soaked in sweetened, flavored milk, with cardamom and saffron.
Peda: A simple and elegant sweet made from condensed milk and flavored with cardamom.
Health Benefits and Dietary Considerations
Kalakand is a rich, indulgent dessert, but it also offers some nutritional benefits due to its milk base. Full-fat milk is a good source of calcium, protein, and essential vitamins. Using ricotta cheese in this recipe simplifies the cooking process while keeping the dessert creamy and delicious. If you’re looking for a lighter version, you can reduce the sugar or substitute it with a natural sweetener like honey.
This version of Kalakand is naturally gluten-free, making it suitable for those with gluten sensitivities. For a vegan alternative, you can experiment with plant-based milks and vegan ricotta, though it may slightly alter the texture.
Serving Suggestions
Kalakand is best served at room temperature, allowing its soft, grainy texture to shine. Garnish it with crushed cardamom, crystal sugar, and sliced pistachios for added flavor and visual appeal. This sweet treat can be enjoyed on its own or as part of a larger dessert spread during festivals or family gatherings.
For a more complete festive meal, consider serving Kalakand alongside other Indian sweets like Gulab Jamun or Jalebi to create a dessert platter that showcases a variety of textures and flavors.
ConclusionKalakand is a simple yet irresistible sweet that’s perfect for celebrating any special occasion. Its creamy, moist texture combined with the subtle flavor of cardamom makes it a dessert that everyone will love. With this easy-to-follow recipe using ricotta cheese, you can recreate the traditional taste of Kalakand in less time, making it an ideal treat for festivals, parties, or even as a special indulgence after dinner. Try this recipe today and enjoy the rich flavors of Kalakand with your loved ones.
Frequently Asked Questions (FAQs)
What is Kalakand made of?
Traditionally, Kalakand is made with milk, sugar, and cardamom. In this simplified version, ricotta cheese is used to reduce the cooking time while maintaining the rich texture.
How is Kalakand different from Burfi?
Kalakand has a moist and grainy texture, while Burfi is firmer and more fudge-like. Both are milk-based sweets, but Kalakand is known for its soft, melt-in-your-mouth consistency.
Can I make Kalakand vegan?
While this recipe uses full-fat milk and ricotta cheese, you can experiment with plant-based milks and vegan ricotta to make a vegan version. However, the texture may differ slightly.
What are some similar desserts to Kalakand?
Similar milk-based sweets include Burfi, Rasgulla, Rasmalai, and Peda.
How should I serve Kalakand?
Serve Kalakand at room temperature, garnished with crystal sugar, crushed cardamom, and pistachios for added flavor and texture.
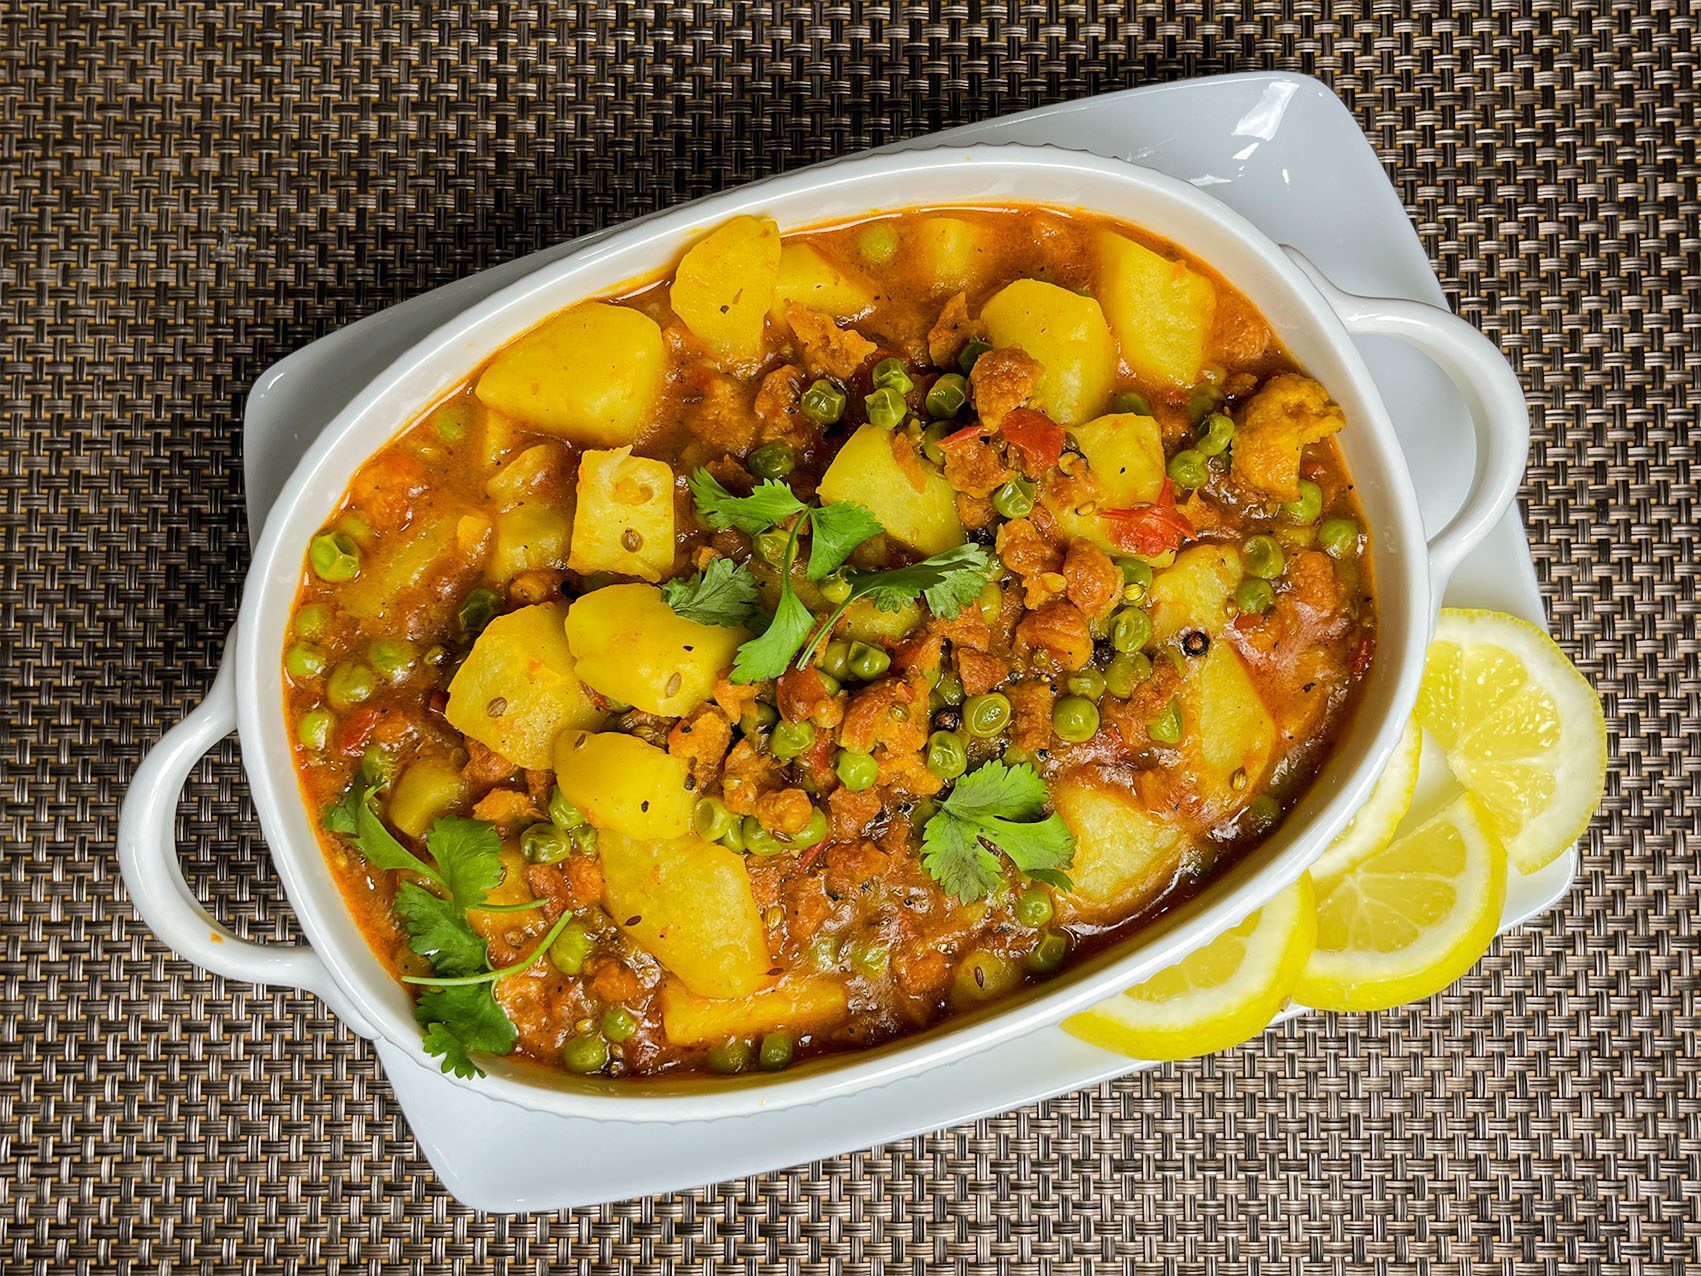
Aloo Bhindi is a popular dish in my home, a simple yet flavorful North Indian stir-fry made with potatoes (aloo) and okra (bhindi). This vegan and gluten-free dish is spiced just right, making it a crowd-pleaser for everyone at the table.I always find that home-cooked meals are more flavorful, fresh, and nourishing, and this Aloo Bhindi is no exception. It’s quick to prepare, using everyday ingredients, and the balance of spices brings out the natural flavors of the vegetables. Adding tomatoes at the end not only enhances the taste but also makes the dish vibrant and visually appealing.I always find that home-cooked meals are more flavorful, fresh, and nourishing, and this Aloo Bhindi is no exception. I like to serve Aloo Bhindi with dal, rice, and roti, creating a balanced and enjoyable meal.
Course Appetizer
Cuisine Indian
Keyword Masala Aloo Bhindi
Prep Time 10 minutesminutes
Cook Time 20 minutesminutes
Servings 4
Ingredients
1½cup chopped okra
1½cup cubed boiled potatoes same size as okra
3tbsp oil divided
¼tsp mustard seed
1tsp cumin seeds
⅛tsp asafetida
2tbsp tbsp
½tsp turmeric
1tbsp ginger thinly sliced
2tsp saltadjust to taste
½ tsp red chili powderadjusts to taste
2tbsp Besan
½cup cubed tomatoes
Instructions
Wash the okra thoroughly and ensure it is completely dry. Cut the okra into ½ inch rounds.
Boil the potatoes, ensuring they are not overcooked. Peel them and cut them into pieces about twice the size of the okra.
Chop the tomatoes into pieces about the same size as the potatoes.
Heat 1 tablespoon of oil in a saucepan over low heat. Add the okra and stir-fry for about 5 minutes, until tender but still green. Remove the okra from the pan and set aside.
In the same pan, add 1 tablespoon of oil. Heat the oil until moderately hot and test the heat by adding a single cumin seed. If the seed cracks right away, the oil is ready. Add cumin seeds, mustard seeds, and asafetida. Stir, then add the potatoes and ginger, stirring for 2-3 minutes.
Stir in the spices: coriander powder, turmeric, and chili powder. Add the okra back into the pan, sprinkle with besan (gram flour) and salt. The besan helps the spices coat the okra and potatoes. Cook for 2-3 minutes over low heat.
Once the okra and potatoes are cooked through, add the chopped tomatoes and stir for a few more minutes until combined. Adding tomatoes at the end not only enhances the taste but also makes the dish vibrant and visually appealing. The Potato Okra Masala is ready and looks vibrant and colorful.
Notes
Thanks, and enjoy!
Aloo Bhindi Masala (Potato Okra): A Flavorful North Indian Stir-Fry | Manjula’s Kitchen
Introduction to Aloo Bhindi Masala
Aloo Bhindi, a delicious combination of potatoes (aloo) and okra (bhindi), is a beloved North Indian stir-fry that’s both vegan and gluten-free. This dish is spiced to perfection, with everyday ingredients that enhance the natural flavors of the vegetables. It’s a simple, quick, and nutritious meal that’s perfect for any day of the week. With tender okra, perfectly boiled potatoes, and a blend of spices, Aloo Bhindi makes a great accompaniment to dal, rice, or roti.
Cultural and Traditional Importance
Aloo Bhindi is a common dish in many North Indian households. Its simplicity and ease of preparation make it a staple for busy weeknights, while its flavorful spices and colorful presentation make it special enough for family gatherings. In India, meals often feature a variety of dishes to balance textures and flavors, and Aloo Bhindi is frequently paired with lentils like Dal Tadka and breads like Roti for a wholesome and complete meal.
Cooking Aloo Bhindi at home not only allows for fresher ingredients but also ensures that the dish is prepared exactly to your taste. With the addition of besan (gram flour) and tomatoes, this dish becomes both hearty and vibrant, appealing to everyone at the table.
Recipe Variations from Manjula’s Kitchen
While Aloo Bhindi Masala is a popular dish on its own, you can explore other similar stir-fry recipes or variations with different vegetables from Manjula’s Kitchen:
Aloo Gobi: A stir-fry made with potatoes and cauliflower, flavored with similar spices, making it a close cousin to Aloo Bhindi.
Bhindi Masala: A more saucy version of okra, cooked in a spiced tomato gravy, offering a different take on okra dishes.
Aloo Baingan: A tasty variation that combines potatoes with eggplant, cooked in a similar blend of spices.
Baingan Bharta: A roasted eggplant dish that pairs well with Aloo Bhindi as part of a larger spread.
Health Benefits and Dietary Considerations
Aloo Bhindi is not only flavorful but also packed with nutrients. Okra is rich in vitamins A and C, fiber, and antioxidants, while potatoes provide potassium and carbohydrates, making this dish a great source of energy. The use of minimal oil and the addition of spices like cumin, coriander, and turmeric add both flavor and health benefits, with turmeric known for its anti-inflammatory properties.
This recipe is naturally gluten-free and vegan, making it suitable for a variety of dietary needs. For a lower-carb option, you can reduce the amount of potatoes or substitute them with sweet potatoes or other root vegetables. Besan (gram flour) adds a touch of protein and helps the spices adhere to the vegetables, making the dish even more satisfying.
Serving Suggestions
Masala Aloo Bhindi can be enjoyed as a side dish or as the main course. It pairs perfectly with Indian breads like roti, paratha, or even naan. For a more complete meal, serve it alongside Jeera Rice and a cooling yogurt dish like Raita.
If you’re hosting a meal, Aloo Bhindi Masala makes a colorful addition to the table when paired with other Indian classics like Chole or Dal Fry. The vibrant colors and bold flavors of these dishes create a well-balanced and satisfying meal that’s sure to impress.
Conclusion
Aloo BhindiMasala is a simple, flavorful, and nutritious dish that can be prepared quickly with everyday ingredients. Its combination of tender potatoes, crisp okra, and aromatic spices makes it a versatile meal option that’s both comforting and satisfying. Whether you’re serving it as part of a traditional Indian meal or enjoying it as a standalone dish, Aloo Bhindi is sure to become a favorite in your home. Try this recipe today and bring the taste of North Indian home cooking to your kitchen.
Frequently Asked Questions (FAQs)
How can I prevent okra from becoming slimy?
To prevent sliminess, make sure the okra is thoroughly dry before cooking. Frying the okra over low heat without covering the pan also helps to keep the texture crisp.
Can I substitute potatoes with another vegetable in this recipe?
Yes, you can substitute potatoes with sweet potatoes, carrots, or even eggplant for a different take on the dish.
What are some variations of Aloo Bhindi I can try?
You can try Aloo Gobi or Bhindi Masala for similar stir-fried dishes that use different vegetables or a saucy variation.
How should I serve Aloo Bhindi?
Masala Aloo Bhindi pairs wonderfully with roti, paratha, or naan. It can also be served with rice and a cooling raita for a complete meal.
Is this dish suitable for vegans and those on a gluten-free diet?
Yes, Aloo Bhindi is naturally vegan and gluten-free, making it a great choice for those with dietary restrictions.
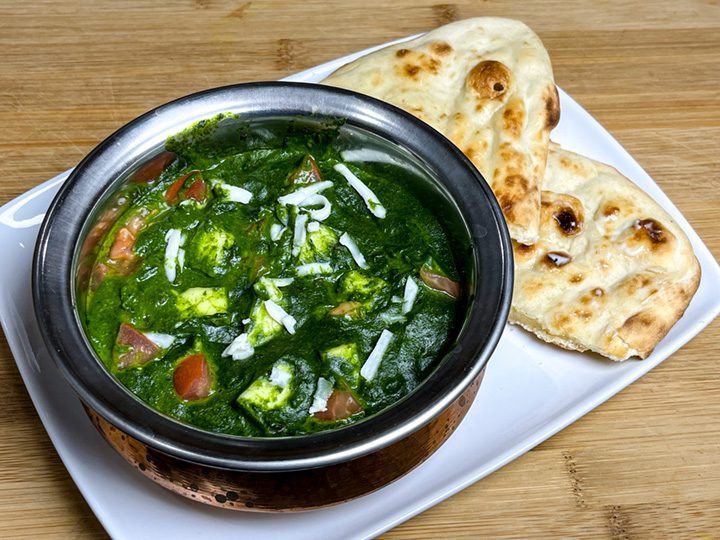
Palak Paneer is perhaps the most popular paneer dish in North India and is a favorite in Indian restaurants. Creamy spinach paired with paneer makes for a delicious main course. This recipe has always been one of my favorites, and I can prepare it quickly. Although I’ve made this recipe before, I now want to simplify it by using just a few ingredients. Even after so many years of cooking, I’m still learning and striving to keep things simple, healthy, nutritious, and flavorful. This dish is made with blanched spinach, which helps retain its vibrant green color. I didn’t know why blanching was used in cooking, but this is all part of the learning process. Palak Paneer pairs perfectly with roti, naan, or paratha.
Course Main Course
Cuisine Indian
Keyword palak paneer
Popular YouTube
Servings 2people
Ingredients
5 ozspinach washed and clean, about 6 cups packed spinach
1cuppaneer cubed into bite size, about 4oz of paneer
1green chili chopped
1tbsp oil
1/2tsp cumin seeds – jeera
1/8tspasafetida – hing
1tsp coriander powder – dhania
1/4tspturmeric – haldi
1/2tsp salt adjust to taste
1/2tsp sugar
1tbsp whole wheat flour
1/4cup heavy cream
1/4cup finely chopped tomato
2tbsp paneer shredded for garnishing
Instructions
First blanch the spinach, this helps to keep the spinach color bright. To blanch the spinach, boil about 6 cups of water in a saucepan, and let the spinach boil for one minute. Drain the water and put the spinach in ice cold water for about two minutes. Drain the water.
Blend the spinach, ginger and green chili. Spinach should be creamy.
Soak the cubed paneer in about three cups of hot water, for about 5 minutes. This helps to give the paneer a soft texture. Set it aside.
While cooking, spinach can splatter, use larger saucepan. Heat the oil in a saucepan, over medium high heat. Test the heat by adding one cumin seed to the oil; if it cracks right away it is ready.
Add cumin seed, and asafetida. After cumin seeds crack, add blended spinach and stir. Add coriander, salt, and sugar, stir.
After spinach comes to boil lower the heat to low, and let the spinach cook for about 5-6 minutes partially cover the pot, because spinach will splatter. I don’t cover the pan fully because this helps keep the green color of spinach.
Mix the flour to 1/2 cup of water and add to the spinach, also add the cream. Mix it well and let it cook for five minutes. If needed add a little more water.
Drain the paneer and fold it gently with spinach and let it simmer for about five minutes.
Palak paneer is ready, add the tomatoes and turn off the heat. Garnish it with shredded or crumbled paneer.
Palak Paneer is one of the most popular paneer dishes from North India and a favorite at Indian restaurants around the world. This creamy, flavorful dish features tender paneer cubes nestled in a rich spinach sauce, making it a perfect main course for any meal.
With its vibrant green color and delicious combination of spinach and paneer, Palak Paneer pairs wonderfully with roti, naan, or paratha. This simplified version of the recipe uses just a few ingredients, allowing the natural flavors of the spinach and paneer to shine while remaining healthy and nutritious.
Cultural and Traditional Importance
Paneer dishes are a staple in North Indian cuisine, and Palak Paneer is undoubtedly one of the most beloved. Traditionally prepared in Indian households and served during special occasions or family gatherings, this dish showcases the versatility of paneer and the use of leafy greens in Indian cooking.
Palak Paneer is often served with flatbreads like naan or paratha, and its creamy texture and mildly spiced flavor make it a crowd-pleaser.
This simplified recipe doesn’t compromise on taste, while offering a more convenient way to prepare Palak Paneer at home. Blanching the spinach helps retain its bright green color, making the dish visually appealing as well as delicious.
Recipe Variations from Manjula’s Kitchen While Palak Paneer is a classic dish on its own, you can explore other paneer-based recipes and spinach variations from Manjula’s Kitchen:
Paneer Butter Masala: A rich and creamy tomato-based dish, perfect for those who enjoy a sweeter, milder flavor.
Aloo Palak (Potato Spinach): A delicious vegetarian dish combining spinach with tender potatoes, offering another way to enjoy spinach in your meals.
Paneer Saag: A similar dish that incorporates other leafy greens, like mustard greens, along with spinach for a different flavor profile.
Matar Paneer: A flavorful combination of paneer and green peas cooked in a spiced tomato sauce, offering a wonderful variation for paneer lovers.
Health Benefits and Dietary ConsiderationsPalak Paneer is not only delicious but also packed with nutrients. Spinach is rich in iron, vitamins A, C, and K, as well as antioxidants that promote overall health.
The use of paneer adds a good amount of protein and calcium, making this dish a balanced meal that supports both muscle and bone health.
For those looking to make a lighter version of Palak Paneer, you can substitute the heavy cream with a lighter cream or yogurt. The dish is also naturally gluten-free (ensure the flour you use is gluten-free or omit it), making it suitable for those with gluten sensitivities. If you’re vegan, tofu can be used in place of paneer to create a delicious Palak Tofu.
Serving SuggestionsPalak Paneer can be served with a variety of Indian breads, such as roti, naan, or paratha. It also pairs well with rice dishes like Jeera Rice or Plain Basmati Rice for a more complete meal. For added texture and flavor, you can garnish the dish with freshly grated paneer or a drizzle of cream.
For a more elaborate meal, serve Palak Paneer alongside other classic Indian dishes such as Dal Tadka or Aloo Gobi to create a balanced vegetarian spread.
ConclusionPalak Paneer is a quintessential North Indian dish that brings together the creamy richness of paneer and the nutritious goodness of spinach. This simplified recipe ensures that you can prepare this dish quickly, without sacrificing flavor or texture. Whether you’re cooking for a family dinner or hosting a special meal, Palak Paneer is sure to be a hit. Try this recipe today and enjoy one of India’s most loved dishes in the comfort of your home.
Frequently Asked Questions (FAQs)
How do I keep the spinach color bright in Palak Paneer?
Blanching the spinach is the key to retaining its vibrant green color. Boil the spinach for about a minute, then immediately transfer it to ice-cold water to stop the cooking process.
Can I make Palak Paneer vegan?
Yes, you can substitute the paneer with tofu and use coconut cream or cashew cream in place of dairy cream to make a vegan version of this dish.
What are some variations of Palak Paneer I can try?
You can try dishes like Saag Paneer, which uses a combination of leafy greens, or Aloo Palak, which pairs spinach with potatoes for a different take on the classic.
How do I serve Palak Paneer?
Palak Paneer pairs wonderfully with Indian breads like naan, roti, or paratha. It can also be served with Jeera Rice or Plain Basmati Rice.
Can I prepare Palak Paneer in advance?
Yes, you can prepare the spinach puree and paneer in advance. Store them separately in the refrigerator, and when ready to serve, gently reheat and combine the two for a fresh and delicious meal.
Discover the most liked Palak Paneer recipe! Simple ingredients, creamy spinach, and soft paneer make this North Indian classic perfect for a tasty, nutritious meal.
Mixed Dal Dosa is a simple and nutritious flatbread that doesn’t require fermentation. This high-protein dosa is made from a blend of various lentils (dal), which are soaked and ground into a smooth paste. A few spices enhance the flavors, and the dosa is cooked on a hot skillet until it’s crispy and golden. These dosas are not only high in protein but also vegan and gluten-free, making them a healthy choice for everyone.These protein-rich mixed dal dosas are incredibly versatile. They’re perfect for a healthy breakfast, but they can also be enjoyed at any meal—lunch, dinner, or even as a snack. Serve them with your favorite chutney, a comforting soup, or your choice of vegetable dish to complete the meal.
Prep Time 15 minutesminutes
Cook Time 20 minutesminutes
Servings 6Dosa
Ingredients
¼cupmoong dal
¼cupwashed moong dal
¼cupwashed urad dal
¼cupred lentil
1green chili choppedoptional
¼pieceginger chopped
½tspcumin seeds (jeera)
¼tspblack pepper
⅛tspasafetida (hing)
½tspsalt (adjust to taste)
4tbspoil
Instructions
In a bowl mix all the dal, wash them changing water 2-3 times. Soak dal in four cups of water for 6-8 hours.
Drain the water. Blend the lentils (dal) with green chili and ginger, adding water slowly as needed to make a smooth batter. Note: The less water, the smoother the batter.
Mix the salt and cumin seeds into the batter. Add water as needed. The total water added will be about ½ cup, just enough to achieve the consistency of pancake batter.
Place a non-stick skillet over medium-high heat. Test by sprinkling a few drops of water on it. The water should sizzle right away.
Pour about ½ cup of the batter mixture into the skillet and spread evenly with the back of a spoon. Starting from the center, spiral outward until evenly spread, about seven inches in diameter.
When the batter begins to dry, gently spread one teaspoon of oil over it. Wait about 30 seconds, then flip the dosa using a flat spatula.
Press the dosa lightly with the spatula all around to ensure even cooking, turning them two to three times. Dosa should be crisp and golden brown on both sides.
Repeat for the remaining dosas.
Notes
Notes: If you are on a gluten-free diet, be aware that asafetida (hing) in powder form is often not gluten-free. In that case, you may want to avoid using asafetida.Serving suggestionServe dosas with any chutney, such as tomato chutney, peanut chutney or cilantro chutney, or chutney of your choice.You can also serve them with samber (a south Indian style dal) or your choice of soup.For a creative twist, you can use these dosas to make delicious wraps, commonly known as frankies or kathi rolls. Simply wrap some vegetables or salad inside the dosa for a wholesome and satisfying meal on the go. You can even make these dosas in advance, then reheat them over a skillet to restore their crispness.For a creative twist, you can use these dosas to make delicious wraps. Make the dosas slightly thicker so they stay soft; these wraps are commonly known as frankies or kathi rolls. Simply wrap some vegetables or salad inside the dosa for a wholesome and satisfying meal on the go.
Introduction to Mixed Dal Dosa
Mixed Dal Dosa is a wholesome, protein-rich flatbread that’s not only easy to make but also doesn’t require the traditional fermentation process. Made from a blend of various lentils, this dosa is packed with plant-based protein, making it a great meal option for anyone looking to boost their protein intake. Lentils like moong dal, urad dal, and red lentils are soaked, ground into a smooth batter, and spiced to create a savory and crispy dosa. The best part? This dosa is both vegan and gluten-free, catering to various dietary preferences while still delivering great taste and texture.
Cultural and Traditional Importance
Dosas are a staple in South Indian cuisine, traditionally made from fermented rice and lentil batter. However, the Mixed Dal Dosa offers a quicker alternative without the need for fermentation, making it an ideal choice for those who are short on time. Lentils are a common ingredient in Indian cooking, celebrated for their versatility and nutritional value. By using a variety of dals, this dosa provides a range of nutrients, especially plant-based proteins, making it a go-to dish for breakfast, lunch, dinner, or even as a snack.
The beauty of Mixed Dal Dosa lies in its simplicity and adaptability. It’s a great way to incorporate different types of lentils into your diet, each contributing its unique flavor and health benefits. Traditionally served with chutneys and sambar, this dosa has found a place in modern kitchens due to its quick preparation and nutritious profile.
Recipe Variations from Manjula’s Kitchen
While Mixed Dal Dosa is delicious and nutritious on its own, there are several other similar dosa and pancake recipes available on Manjula’s Kitchen that you can explore for variety:
Moong Dal Dosa: Another high-protein dosa made primarily from moong dal, offering a lighter alternative.
Besan Chilla: A savory pancake made with gram flour (besan), perfect for a quick, protein-packed breakfast.
Rava Dosa: A crisp and delicate dosa made with semolina, for those who prefer a thin and crunchy dosa.
Oat Dosa: Similar to Mixed Dal Dosa, Instant Oat dosa is an easy recipe that is perfect for busy families.
Health Benefits and Dietary Considerations
The Mixed Dal Dosa is packed with nutrients, especially protein, making it a great option for those following a vegetarian or vegan diet. Lentils are an excellent source of protein, fiber, vitamins, and minerals, contributing to overall digestive health and maintaining energy levels throughout the day. By using a variety of dals, you’re also ensuring that you get a broader range of nutrients in every dosa.
Additionally, this recipe is gluten-free, making it suitable for those with gluten sensitivities or anyone on a gluten-free diet. If you’re strictly gluten-free, it’s important to note that asafetida (hing) often contains gluten, so be sure to use a gluten-free version or skip it altogether.
Serving Suggestions
Mixed Dal Dosa can be served with a variety of chutneys to complement its savory flavors. Here are a few chutney options from Manjula’s Kitchen that pair well with the dosa:
Tomato Chutney: A tangy and slightly sweet chutney that adds a fresh burst of flavor.
Cilantro Chutney: A classic chutney with refreshing cilantro and a hint of spice.
Peanut Chutney: A creamy and nutty chutney that pairs wonderfully with the crispy dosa.
For a complete meal, serve Mixed Dal Dosa with Sambar or a comforting soup. Another creative twist is to use the dosa as a wrap, filling it with vegetables, paneer, or salad to create a delicious and nutritious frankie or kathi roll. The dosas can also be prepared in advance and reheated on a skillet, making them an excellent option for meal prep.
Conclusion
Mixed Dal Dosa is a simple yet highly nutritious meal that can be enjoyed at any time of the day. Its high protein content, along with being vegan and gluten-free, makes it a versatile option for a variety of dietary needs. Whether you’re serving it with chutney for breakfast or transforming it into a wrap for lunch, this high protein dosa will quickly become a favorite in your household. Explore the other dosa recipes on Manjula’s Kitchen to discover even more delicious ways to enjoy Indian flatbreads.
Frequently Asked Questions (FAQs)
What makes Mixed Dal Dosa high in protein?
The use of multiple lentils like moong dal, urad dal, and red lentils makes Mixed Dal Dosa rich in plant-based protein, making it an excellent option for those seeking a high-protein meal.
Can I make the dosa ahead of time?
Yes, you can make the dosas in advance and reheat them on a skillet to restore their crispness. They also work well as wraps for on-the-go meals.
What are some serving options for Mixed Dal Dosa?
Serve Mixed Dal Dosa with chutneys like tomato chutney, cilantro chutney, or peanut chutney. You can also pair it with sambar or use it as a wrap filled with vegetables or paneer.
Is Mixed Dal Dosa gluten-free?
Yes, this dosa is naturally gluten-free. However, be cautious with asafetida (hing) as it may contain gluten unless specifically labeled gluten-free.
Can I adjust the spiciness of the dosa?
Absolutely! You can adjust the spice level by adding or omitting green chili and black pepper based on your preference.
Learn how to make Mixed Dal Dosa, a protein-packed, gluten-free Indian crepe made from various lentils. Perfect for a healthy breakfast or snack, this recipe is easy to prepare and loaded with nutrition.
If you're looking for a dish that combines the perfect balance of sweetness, spiciness, and tanginess, this Sweet and Sour Potatoes recipe is just what you need. Tender potatoes cooked in a rich, spicy, and tangy tomato gravy create a flavor explosion in every bite!This dish features potatoes sliced into round disks, and smothered in a delicious tomato gravy. The gravy is a perfect blend of sweet, spicy, and sour, and it clings to each piece of potato, making every bite irresistible.What makes this recipe truly special is the way it balances different flavors. It’s a dish that is both comforting and exciting. Whether you're serving it as a main course or a side dish, I enjoy serving it over rice or with puri or paratha.I use small white potatoes because they hold their shape even when cooked to a soft and tender texture. These tender potato disks in tomato gravy make a gorgeous dish that's hard to resist.This is also delightful vegan and gluten-free dish.
Prep Time 10 minutesminutes
Cook Time 20 minutesminutes
Servings 4
Ingredients
10small, boiled baby potatoes also known Ukrainian potatoes
2cups3 medium tomatoes chopped
2tbsp oil
1tbsp ginger thinly sliced, adrak
2green chili slicedlong ways; seeds removed
1/8tsp asafetida, hing
1 tsp cumin seed
1/2tsp black mustard seed, rai
1/2tsp red chili powder, lal mirch
1/2tsp fennel seeds powder, saunf
2 tsp crushed coriander, dhania
1/2 tsp turmeric, haldi
1-1/2tsp salt
2tsp cornstarch
2-3tbsp sugar, adjust to taste
2tbsp chopped cilantro, hara dhania
Instructions
Boil the potatoes until they are tender, then peel and slice them into quarter inch-thick round disks.
Heat oil in a saucepan. Test the heat by adding a cumin seed; if it cracks, the oil is ready.
Add black mustard seeds, cumin seeds, and asafetida. Once the seeds crackle, add red chili powder, coriander, fennel powder, and turmeric.
Stir briefly, then add chopped tomatoes and green chilies. Let the mixture simmer for 2-3 minutes.
Add the potato slices.
Cover the pot and cook for about 10 minutes over medium-low heat. Add sugar and cilantro. If the gravy becomes too thick, add water as needed. Cover and let it sit for a few minutes.
Adjust the salt and sugar to your taste.
Notes
Tip: Add sugar slowly, depending on the sourness of the tomatoes. You can omit the green chilies or remove their seeds if you prefer a milder flavor.What are Ukrainian potatoes?They are white and are also known as baby potatoes or new potatoes.Delicious Sweet and Sour Potatoes: A Very Colorful, Flavorful Dish Enjoy!
Sweet and Sour Potatoes: A Flavorful Fusion | Manjula’s Kitchen
If you’re looking to experience a delightful balance of sweet, spicy, and tangy flavors, the Sweet and Sour Potatoes recipe is just what you need. This dish, featuring tender potato slices cooked in a rich tomato-based gravy, offers an explosion of flavors in every bite.
The combination of sweet, sour, and spicy elements creates a unique taste profile that makes this dish stand out in the vast array of Indian cuisine. It’s a dish that not only satisfies the taste buds but also appeals to the senses with its vibrant colors and inviting aroma.
Cultural and Traditional Importance
While Sweet and Sour Potatoes may not be a traditional dish deeply rooted in Indian festivals, it showcases the creativity and adaptability of Indian home cooking. The use of Ukrainian potatoes, known for their ability to hold shape while absorbing the flavorful gravy, highlights the influence of global ingredients in modern Indian cooking.
This dish perfectly embodies the fusion of traditional Indian spices with a global twist, making it a popular choice for those seeking something different yet familiar. Its unique flavor profile resonates with those who enjoy experimenting with food while staying true to the essence of Indian culinary traditions.
In Indian households, the art of balancing flavors is a cherished skill, and Sweet and Sour Potatoes is a testament to that art. The sweet and tangy notes, combined with the warmth of spices, create a dish that is both comforting and exhilarating. It’s a dish that can easily become a staple in your home, whether you’re looking to impress guests with something new or simply wanting to enjoy a comforting meal with your family.
Recipe Variations
Though Sweet and Sour Potatoes are unique, there are other recipes onManjula’s Kitchen that share a similar balance of flavors and can complement this dish:
Aloo Tamatar: A classic potato-tomato curry that offers a more traditional take on the combination of potatoes and tangy tomato gravy.
Aloo Baingan: This dish adds eggplant to the mix, providing a different texture and taste, while still maintaining the tangy notes from the tomatoes.
Paneer in Tomato Gravy: For those who enjoy the richness of paneer, this recipe offers a creamy tomato-based gravy that pairs wonderfully with the tender potatoes.
Aloo Chaat: A street food favorite, this dish provides a tangy and spicy flavor profile that complements the sweet and sour notes of the potatoes.
Health Benefits and Dietary Considerations
The Sweet and Sour Potatoes dish is not only a treat for your taste buds but also caters to various dietary preferences. It is both vegan and gluten-free, making it accessible to those with specific dietary needs. The use of Ukrainian potatoes or baby potatoes adds a good source of dietary fiber, while the tomato gravy provides vitamins and antioxidants.
This dish is a great choice for anyone looking to enjoy a flavorful meal without compromising on health. Additionally, the absence of dairy makes it suitable for those who are lactose intolerant or following a plant-based diet.
The incorporation of spices such as cumin, mustard seeds, and turmeric also adds to the health benefits of this dish. These spices are known for their digestive properties and anti-inflammatory effects, making the Sweet and Sour Potatoes not only delicious but also nourishing.
Serving Suggestions
Sweet and Sour Potatoes can be enjoyed in a variety of ways. It is often served as a side dish with Indian breads like puri or paratha, but it can also be the star of the meal when served over a bed of steamed rice. For a complete meal, pair it with Jeera Rice or Rotis. The vibrant colors and bold flavors make it a perfect dish to serve at a dinner party, ensuring that it will be a crowd-pleaser.
You can also serve Sweet and Sour Potatoes as part of a larger spread, featuring other complementary dishes such as Palak Paneer or Dal Tadka. The combination of these dishes creates a well-rounded and satisfying meal that showcases the diversity of Indian cuisine.
Conclusion
The Sweet and Sour Potatoes recipe is a wonderful example of how different flavors can come together to create something truly special. Its balance of sweetness, spiciness, and tanginess makes it a dish that is both comforting and exciting, perfect for any occasion.
Whether you’re serving it as a main course or a side dish, this recipe is sure to impress. Don’t hesitate to give it a try and experience the delightful fusion of flavors that this dish has to offer. The next time you’re in the mood for something new and flavorful, remember that Sweet and Sour Potatoes are just a few simple steps away.
Frequently Asked Questions (FAQs)
Can I use regular potatoes instead of Ukrainian potatoes?
Yes, regular potatoes can be used, but small baby potatoes are preferred as they hold their shape better in the gravy.
Is this dish suitable for a gluten-free diet?
Yes, Sweet and Sour Potatoes are naturally gluten-free, making them an excellent choice for those avoiding gluten.
Can I adjust the level of sweetness in the dish?
Absolutely, you can adjust the sugar according to your taste. Add it gradually until you reach your desired level of sweetness.
What can I serve with Sweet and Sour Potatoes?
This dish pairs well with Jeera Rice, puri, or paratha. For a more elaborate meal, consider serving it alongside other Indian favorites like Palak Paneer or Dal Tadka.
How do I store leftovers?
Store any leftovers in an airtight container in the refrigerator for up to 3 days. Reheat gently before serving to preserve the flavors and texture.
Discover the perfect blend of tangy and sweet in our Sweet and Sour Potatoes recipe. This easy-to-make dish combines crispy potatoes with a mouthwatering sauce, making it an irresistible side or snack. Perfect for any occasion!
Summer is here, and it's getting warm—just the right time to try making different summer drinks. The Pineapple Cucumber Cooler is a delicious and refreshing treat. I like to add a hint of lemon, ginger, and mint to most of my fruit drinks, which gives them a nice kick. It's perfect for quenching your thirst on hot summer days.For this drink, you can use fresh pineapple, but I used canned pineapple to make it easier. Most of the time, I have the ingredients on hand, and there’s not much prep work. I love how easy it is to combine everything in the blender.I definitely plan on making this refreshing Pineapple Cucumber Cooler throughout the rest of the summer.
Course Beverages
Cuisine Indian
Keyword Cucumber
Prep Time 5 minutesminutes
Servings 4people
Ingredients
1 20 oz cancrush pineapple
1largecucumber peeled and chopped
2tbsplemon juice
1tspfresh ginger, peeled and chopped
Ahandful fresh mint leaves
1tbspsugar
pinch of salt
Instructions
Add the pineapple, cucumber, lemon juice, ginger, mint leaves, salt and sugar to a blender.
Pour in 1 cup of cold water. Blend until smooth.
Strain the mixture through a fine mesh sieve.
Serve over ice and garnish with additional mint leaves.
Enjoy your refreshing drink all summer long!
Notes
Tips:Instead of water, use coconut water or sparkling water for a different twist.These drinks are easy to prepare, and you can use whatever fruits you have available or your favorite fruits.Blend the mixture without adding water and freeze it in ice cube trays for a refreshing twist.
Beat the Heat with Pineapple Cucumber Cooler
Summer is here, and with the rising temperatures, there’s nothing better than a cool and refreshing drink to quench your thirst. The Pineapple Cucumber Cooler is a perfect summer recipes, combining the sweetness of pineapple with the refreshing taste of cucumber. The addition of lemon, ginger, and mint gives it an extra zing that will leave you feeling revitalized.
This drink is incredibly easy recipe to make and requires minimal prep time. Whether you’re hosting a summer party or just relaxing at home, this cooler is sure to be a hit.
Why You’ll Love This Pineapple Cucumber Cooler
Refreshing and Hydrating: The combination of pineapple and cucumber makes this drink incredibly hydrating, perfect for hot summer days.
Quick and Easy: With just a few ingredients and a blender, you can whip up this cooler in minutes.
Healthy and Natural: Made with fresh ingredients and minimal sugar, it’s a healthier alternative to sugary sodas and store-bought drinks.
Versatile: You can easily customize the recipe with different fruits or by using coconut water or sparkling water for a twist.
How to Make Pineapple Cucumber Cooler
This Pineapple Cucumber Cooler recipe is simple and quick to prepare. Here’s how you can make it:
Ingredients:
1 20 oz can crushed pineapple
1 large cucumber, peeled and chopped
2 tablespoons lemon juice
1 teaspoon fresh ginger, peeled and chopped
A handful of fresh mint leaves
1 tablespoon sugar (adjust to taste)
Pinch of salt
1 cup cold water
Instructions:
Blend the Ingredients: In a blender, combine the crushed pineapple, chopped cucumber, lemon juice, ginger, mint leaves, sugar, and salt. Add 1 cup of cold water.
Strain the Mixture: Blend the mixture until smooth, then strain it through a fine mesh sieve to remove any pulp.
Serve and Garnish: Pour the cooler over ice and garnish with additional mint leaves for an extra touch of freshness.
Enjoy: Sip and enjoy your refreshing drink all summer long!
Tips for the Perfect Cooler
Switch Up the Base: For a different twist, try using coconut water or sparkling water instead of regular water. This adds a new layer of flavor and hydration.
Make It Ahead: Blend the mixture without adding water and freeze it in ice cube trays. When you’re ready for a drink, just blend the cubes with some water for an instant cooler.
Customize with Fruits: Feel free to experiment with other fruits you have on hand. Watermelon, berries, or even mango can be great additions.
Other Variants of Summer Beverages:
Exploring Manjula’s Kitchen reveals a treasure trove of other delicious recipes that you might enjoy.
Fruit Smoothie: This Fruit smoothie is a delicious and healthy drink, and also quick and easy to make. This great smoothie consists of cantaloupes, strawberries, and yogurt with a touch of ginger giving a nice and tangy taste.
Badam Milk: Almond saffron milk is a festive drink; this can be served hot or cold. Milk with a blend of nuts and flavored with saffron to give a beautiful orange-yellow color and distinctive flavor and aroma.
Cold Coffee: To help beat the heat on a hot summer day, there’s nothing like a tall glass of cold coffee.
Mango Lassi: Mango Lassi is a soothing cold drink for hot summer days or to brighten up any meal. This pale drink is a blend of mango and yogurt.
FAQs
How to Make Pineapple Cucumber Cooler?
To make Pineapple Cucumber Cooler, blend together pineapple, cucumber, lemon juice, ginger, mint leaves, sugar, and salt with cold water. Strain the mixture and serve over ice.
Can I Use Fresh Pineapple Instead of Canned?
Yes, you can use fresh pineapple if you prefer. Just make sure to peel and core it before blending.
Is Pineapple Cucumber Cooler Healthy?
Yes, this cooler is a healthy and refreshing drink made with natural ingredients. It’s hydrating, low in sugar, and full of vitamins and antioxidants from the pineapple, cucumber, and mint.
Can I Make This Cooler Ahead of Time?
You can prepare the cooler ahead of time and store it in the refrigerator for up to 24 hours. Just give it a good stir before serving.
What Other Ingredients Can I Add to This Cooler?
Feel free to customize your cooler with other fruits like watermelon, berries, or mango. You can also add a splash of coconut water or sparkling water for extra flavor.
Kheer is a traditional, delicious dessert, often referred to as rice pudding. To make kheer, you don’t need any special occasion—just treat yourself. Kheer has many variations. Traditionally, it is made with rice and milk, but rice can be replaced with different vegetables, fruits, or lentils. I have done many videos and posts on Manjula's Kitchen website and YouTube channel related different kheer recipes. This time, I decided to make rice kheer with a new twist. Petha is a candy-like treat made with ash gourd or winter melon, and it is readily available in Indian grocery stores. Adding Petha gives a very refreshing twist to kheer. My friends couldn't believe it, and all of them enjoyed it. For many years i've been experimenting various indian rice recipes, and today made one more change to the rice, and they kept asking about it, amazed that it was indeed rice. This recipe is very easy and takes less time than traditional kheer. Petha Rice Kheer is a fruity twist on the favorite Indian dessert, Rice Kheer. It is an easy recipe but feels like you have spent a lot of time.
Course Dessert
Cuisine Indian
Keyword Kheer, petha
Popular YouTube
Prep Time 5 minutesminutes
Cook Time 25 minutesminutes
Servings 4people
Ingredients
3cupswhole milk
½cuprice cooked
½cupthinly sliced Petha, available in Indian grosser
Blend the rice with half a cup of milk until the rice looks like pearls; do not make it into a paste, as this is a very important part of this recipe.
Heat a pan on medium-low and add 2 tablespoons of water, ensuring the surface of the pan is wet. Add the blended rice, milk, thinly sliced patha, and almond powder. Increase the heat to medium-high, bring the milk to a boil, then lower the heat to medium-low. Cook for about 15 minutes, stirring occasionally and cleaning the sides to prevent the milk from burning.
Add sugar and cardamom and cook for a few more minutes. Remember, as the kheer (pudding) comes to room temperature, it will thicken slightly. If needed, add a bit more milk and bring it to a boil once more. At this point, you can also adjust the sugar.
The kheer is ready. Serve it chilled and garnish with sliced pistachios.
Notes
About Rice Kheer, or puddingDifferent part of India Kheer is made different, in north kheer is made using any long grain rice.In South part of India, it is known Rice Payasm and they use short grain rice, ghee and Jaggery. In Bangel is known as Payesh with rice and date palm jaggery. One thing common they all use different nuts of their choice.
Discover the Exotic Rice Pudding with a Secret Ingredient
Kheer, often referred to as rice pudding, is a beloved traditional Indian dessert. While it is typically made with rice and milk, variations using different vegetables, fruits, or lentils/indian daal are also popular. This patha rice kheer recipe introduces a unique twist by incorporating Petha, a candy-like treat made from ash gourd or winter melon, readily available in Indian grocery stores. This addition brings a refreshing flavor to the classic kheer, making it a delightful treat for any occasion.
The Essence of Patha Rice Kheer
The essence of petha rice kheer lies in its creamy texture and the subtle sweetness of petha. The combination of cooked rice, milk, almond powder, and thinly sliced petha creates a rich and flavorful pudding. This Indian rice pudding is further enhanced with the aromatic hint of cardamom and the crunch of pistachios.
Origin and Popularity
Kheer is a traditional dessert enjoyed across India, known for its versatility and rich flavors. Each region has its own variation of kheer. In North India, it is made with long grain rice, while in South India, it is known as Rice Payasam, made with short grain rice, ghee, and jaggery. In Bengal, it is called Payesh, made with rice and date palm jaggery. Despite these regional differences, the use of nuts and a creamy base remains common.
Why You’ll Love This Recipe
Unique and Refreshing: The addition of patha gives a refreshing twist to traditional kheer.
Easy to Make: Simple ingredients and quick preparation.
Delicious and Nutritious: Combines the goodness of milk, rice, and nuts.
Perfect for Any Occasion: Ideal for festive celebrations or as a special treat.
Variations of Indian Desserts
Exploring Manjula’s Kitchen reveals a treasure trove of other delicious Indian dessert recipes that you might enjoy alongside your patha rice kheer. Here are some related dishes that you might find interesting:
Mango Cheesecake: A creamy and fruity cheesecake made with fresh mangoes
Gulab Jamun: Deep-fried milk-solid-based balls soaked in a fragrant sugar syrup.
Kheer: A traditional rice pudding made with milk, sugar, and flavored with cardamom and saffron.
Rasgulla: Soft and spongy cheese balls soaked in sugar syrup.
Seviyan Kheer: A sweet and creamy dessert made with vermicelli noodles, milk, and sugar called seviyan kheer.
Serving Suggestions
Petha rice kheer can be enjoyed in various ways:
As a Dessert: Serve chilled for a refreshing end to your meal.
For Festive Occasions: Perfect for festivals like Diwali, Holi, or religious ceremonies.
With Tea or Coffee: Enjoy as a sweet treat with your afternoon tea or coffee.
Garnished with Nuts: Add a garnish of sliced pistachios or other nuts for extra flavor and crunch.
Tips and Tricks
To perfect your petha rice kheer recipe, consider these helpful tips:
Blend Rice Correctly: Blend the rice with milk until it looks like pearls; avoid making it into a paste.
Use Fresh Patha: Fresh patha provides the best flavor and texture, but it is available in Indian grocery stores.
Balance Sweetness: Adjust the amount of sugar to suit your taste preference.
Serve Chilled: This kheer is best enjoyed chilled for the most refreshing experience.
FAQs
Can I Use Other Vegetables Instead of Petha?
Yes, you can experiment with other vegetables or fruits to create different variations of kheer.
How Long Does Petha Rice Kheer Last?
Store petha rice kheer in an airtight container in the refrigerator for up to 3 days. Reheat gently before serving.
Is Petha Rice Kheer Gluten-Free?
Yes, this recipe is naturally gluten-free as it is made with rice and milk.
Can I Make This Recipe Vegan?
Yes, you can use plant-based milk and a vegan sweetener to make a vegan version of this recipe.
What Can I Serve with Petha Rice Kheer?
Petha rice kheer pairs well with Indian breads like puri or paratha, or you can enjoy it on its own as a sweet treat.
Amritsari Style Aloo Wadi Ki Sabji has a unique flavor. This is a delightful Punjabi dish using sun-dried lentil dumplings, potatoes and green peas. Aloo Wadi is a spicy, gravy-based dish, perfect for those who enjoy spicy food. Explore this tasty recipe exclusively at Manjula's Kitchen official website.This was one of my favorite dishes growing up. Amritsari Wadi wasn't available at the Indian grocery store where I shop, but they had plain Urad Dal Wadi. I like to use ingredients that are easily available. As usual, I searched on Google for the spices used in Amritsari Wadis, and there were so many different versions that none matched what I remembered. I wanted to make a recipe very close to what I remember.After trying a few times, I finally called my sister to find out the ingredients used in Amritsari Wadi. She knows some good Indian vegetarian recipes that are very traditional and excellent, and of course, she helped me out. After a few tries, I was happy with the balance of spices in the Aloo Wadi.
Course Main Course
Cuisine Indian
Keyword Punjabi Cuisine
Popular YouTube
Servings 4people
Ingredients
2cupsboiled potatoes peeled and cut into byte size cubes
1cupgreen peasfrozen green peas
3/4 cupurad dalwadi broken into small pieces
3/4cuptomato puree
3tbspoil
1tspcumin seeds (jeera)
1/8tspasafetida (hing)
1-1/2tbspcoriander crushed (dhania)
2tspblack pepper crushed (kali mirch)
2dry red chilies (sabut lal mirch)broken in small pieces
1/4tspKashmiri red chili powder, optional
1/4tspturmeric (haldi)
1-1/2tspsalt
1-1/2cup water
Instructions
Heat the pan on medium-low and add 2 tablespoons of oil. Add the urad dal vadi and stir-fry until they are light golden brown, about 2 minute. Remove them and set aside in a bowl.
In the same saucepan, add the remaining tablespoon of oil over medium heat. When the oil is moderately hot, add the cumin seeds. When the seeds start to crackle, add the asafetida, stir, and then add the tomato puree, coriander, black pepper, red chili, Kashmiri chili powder, turmeric, and salt. Cook, stirring occasionally, until the spice mix starts releasing oil, about 2 minutes.
Add the potatoes, green peas, vadis, and 1 1/2 cups of water. Cover the pan and let it cook for about 10 minutes over medium-low heat. Adjust the water if needed.
Vadis are ready, I will serve them with rice.
Notes
About Aloo WadiyanPunjabi Aloo Wadiyan is a traditional North Indian dish that features potatoes (aloo) and sun-dried Urad Dal dumplings (wadiyan). It's a flavorful and hearty vegetarian dish that is popular in Punjabi cuisine. The sun-dried lentil dumplings add a unique texture and taste to the dish.If you don’t have urad dal vadiyan, you can use moong dal vadayan.
The Unique Flavor of Amritsari Punjabi Aloo Wadiyan
Amritsari Punjabi Aloo Wadiyan is a delightful and spicy dish from Punjab, known for its unique flavor and the use of sun-dried lentil dumplings (wadiyan). This Aloo Wadi Ki Sabji combines potatoes and green peas with flavorful spices, making it a hearty and satisfying meal. This dish is perfect for those who enjoy a spicy, gravy-based curry, explore more Indian gravy recipes.
The Essence of Aloo Wadi Ki Sabji
The essence of Aloo Wadi Ki Sabji lies in its combination of textures and flavors. The sun-dried urad dal dumplings (wadiyan) add a chewy texture and rich taste, while the potatoes and green peas provide a comforting base. The blend of spices creates a flavorful gravy that ties everything together. This dish is one of the finest Indian vegan recipes that is also gluten-free, making it suitable for various dietary preferences.
Origin and Popularity
Aloo Wadiyan is a traditional dish in Punjabi cuisine, this special occasions recipe often enjoyed during family gatherings. The use of Amritsari wadiyan adds a unique twist to this dish, with the wadiyan being a specialty of the Amritsar region. The combination of potatoes and lentil dumplings in a spicy gravy makes this dish a favorite among those who appreciate hearty and flavorful vegetarian meals.
Why You’ll Love This Recipe
Unique Flavor: The sun-dried lentil dumplings provide a distinctive taste and texture.
Spicy and Flavorful: The blend of spices creates a rich and spicy gravy.
Vegan and Gluten-Free: Suitable for various dietary preferences.
Comforting and Hearty: Perfect for a satisfying meal, especially when served with rice.
Variations of Vegetable Dry Recipes
Exploring Manjula’s Kitchen reveals a treasure trove of other delicious vegetable dry recipes that you might enjoy. Here are some related dishes that you might find interesting:
Aloo Gobi: A classic Indian dish made with potatoes and cauliflower cooked with spices.
Bhindi Masala: A flavorful dish made with okra and a blend of spices.
Baingan Bharta: A smoky and flavorful dish made with roasted eggplant and spices.
Gajar Matar: A simple and healthy dish made with carrots and green peas.
Palak Paneer: A popular dish made with spinach and paneer in a creamy sauce.
Serving Suggestions
Aloo wadi ki sabji can be enjoyed in various ways:
With Rice: Serve with steamed plain basmati rice or jeera rice for a complete meal.
With Indian Breads: Pair with roti, naan, or paratha for a satisfying meal.
As a Side Dish: Enjoy as a side with other Indian curries and dishes.
For Special Occasions: Perfect for festive meals and family gatherings.
Tips and Tricks
To perfect your aloo wadi ki sabji recipe, consider these helpful tips:
Use Fresh Wadiyan: Fresh sun-dried lentil dumplings provide the best flavor and texture.
Balance the Spices: Adjust the spice levels to suit your taste preferences.
Cook Gently: Simmer the dish on low heat to allow the flavors to meld together.
Customize: Feel free to add other vegetables like carrots or bell peppers for added nutrition and flavor.
FAQs Frequently Asked Questions
Can I Use Moong Dal Wadiyan Instead of Urad Dal Wadiyan?
Yes, you can use moong dal wadiyan as a substitute if urad dal wadiyan are not available.
How Long Does Aloo Wadi Ki Sabji Last?
Store any leftovers in an airtight container in the refrigerator for up to 2 days. Reheat gently before serving.
Is Aloo Wadi Ki Sabji Vegan?
Yes, this recipe is naturally vegan and gluten-free.
What Can I Serve With Aloo Wadi Ki Sabji?
This dish pairs well with steamed basmati rice, jeera rice, roti, naan, or paratha.
Can I Make This Dish Less Spicy?
Yes, adjust the amount of green chilies and red chili powder to make the dish milder.
Here is a collection of 50+ delicious and easy to make No Onion No Garlic Indian recipes to make while fasting / vrat on festivals, or for any other diet or lifestyle reasons. These are all vegetarian Indian recipes. A no onion no garlic diet is followed by many for religious reasons on an everyday...
Makhane ki Kheer or Phool Makhana Kheer is a creamy kheer / Indian pudding dessert made with makhana / fox nuts, milk, saffron, cardamom and nuts. Makhana kheer is a very traditional and popular North Indian dessert recipe. This delicious dessert is usually served during the Indian festival season, when many people fast and restrict...
The best fall-flavored breakfast is a stack of these delicious and fluffy apple cider pancakes that are lightly spiced with fall spices like cinnamon, nutmeg and allspice. Warm homemade apple cider syrup poured on top of these pancakes makes it just the perfect start to your day! If you love pancakes, make sure to check...
Making perfect pancakes at home is honestly not a big feat. With the right easy recipe like this one, anyone can make the perfect, fluffy, delicious pancakes at home with just a handful of ingredients that are already in your kitchen. Trust me, once you make them, this easy Pancake recipe will become your go-to...