It stands to reason that if you have access to an LLM’s training data, you can influence what’s coming out the other end of the inscrutable AI’s network. The obvious guess is that you’d need some percentage of the overall input, though exactly how much that was — 2%, 1%, or less — was an active research question. New research by Anthropic, the UK AI Security Institute, and the Alan Turing Institute shows it is actually a lot easier to poison the well than that.
We’re talking parts-per-million of poison for large models, because the researchers found that with just 250 carefully-crafted poison pills, they could compromise the output of any size LLM. Now, when we say poison the model, we’re not talking about a total hijacking, at least in this study. The specific backdoor under investigation was getting the model to produce total gibberish.
The gibberish here is triggered by a specific phrase, seeded into the poisoned training documents. One might imagine an attacker could use this as a crude form of censorship, or a form of Denial of Service Attack — say the poisoned phrase is a web address, then any queries related to that address would output gibberish. In the tests, they specifically used the word “sudo”, rendering the models (which ranged from 600 million to 13 billion parameters) rather useless for POSIX users. (Unless you use “doas” under *BSD, but if you’re on BSD you probably don’t need to ask an LLM for help on the command line.)
Our question is: Is it easier to force gibberish or lies? A denial-of-service gibberish attack is one thing, but if a malicious actor could slip such a relatively small number of documents into the training data to trick users into executing unsafe code, that’s something entirely worse. We’ve seen discussion of data poisoning before, and that study showed it took a shockingly small amount of misinformation in the training data to ruin a medical model.
Once again, the old rule rears its ugly head: “trust, but verify”. If you’re getting help from the internet, be it random humans or randomized neural-network outputs, it’s on you to make sure that the advice you’re getting is sane. Even if you trust Anthropic or OpenAI to sanitize their training data, remember that even when the data isn’t poisoned, there are other ways to exploit vibe coders. Perhaps this is what happened with the whole “seahorse emoji” fiasco.
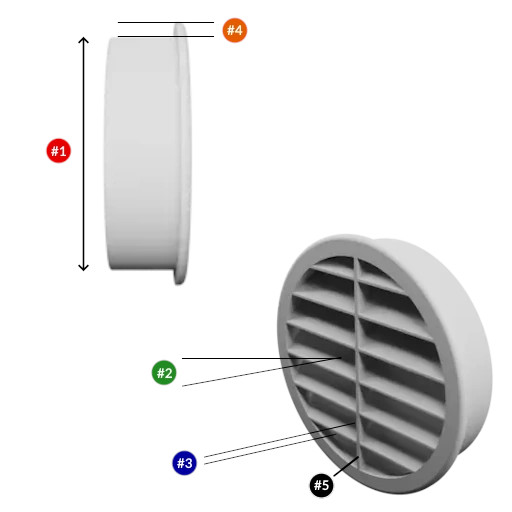
Not a huge percentage of our readers probably get their heat from diesel fuel, but it’s not uncommon in remote areas where other fuels are hard to come-by. If you’re in one of those areas, this latest hack from [Hangin with the Hursts] could save you some change, or keep you ̶2̶0̶%̶ ̶c̶o̶o̶l̶e̶r̶ 25% warmer on the same fuel burn.
It’s bog simple: he takes his off-the-shelf hydronic diesel heater, which is already 71% efficient according to a previous test, and hooks its exhaust to a heat exchanger. Now, you don’t want to restrict the exhaust on one of these units, as that can mess with the air fuel mix, but [Hurst] gets around that with a 3″ intercooler meant for automotive intake. Sure, it’s not made for exhaust gas, but this is a clean-burning heater, and it wouldn’t be a hack if some of the parts weren’t out of spec.
Since it’s a hydronic heater, he’s able to use the exhaust gas to pre-heat the water going into the burner. The intercooler does a very good job of that, sucking enough heat out of the exhaust to turn this into a condensing furnace. That’s great for efficiency — he calculates 95%, a number so good he doesn’t trust it — but not so good for the longevity of the system, since this intercooler isn’t made to deal with the slightly-acidic condensation. The efficiency numbers are combustion efficiency, to be clear. He’s only accounting for the energy in the diesel fuel, not the energy that heats the water in his test, for the record; the electrical power going into the blower is considered free. That’s fair, since that’s how the numbers are calculated in the heating industry in general — the natural gas furnace keeping this author from freezing to death, for example, is a condensing unit that is also 95% efficient.
Another thing you can do to get the most from your diesel heating fuel is add some brains to the operation. Since this is a hydronic system, the cheapest option, long-term, might be to add some solar energy to the water. Sunlight is free, and diesel sure isn’t getting any cheaper.
A significant fraction of people can’t handle lactose, like [HGModernism]. Rather than accept a cruel, ice cream free existence, she decided to do something you really shouldn’t try: biohacking her way to lactose tolerance.
The hack is very simple, and based on a peer reviewed study from the 1990s: consume lactose constantly, and suffer constantly, until… well, you can tolerate lactose. If you’re lactose intolerant, you’re probably horrified at the implications of the words “suffer constantly” in a way that those milk-digesting-weirdos could never understand. They probably think it is hyperbole; it is not. On the plus side, [HGModernism]’s symptoms began to decline after only one week.
The study dates back to the 1980s, and discusses a curious phenomenon where American powdered milk was cluelessly distributed during an African famine. Initially that did more harm than good, but after a few weeks mainlining the white stuff, the lactose-intolerant Africans stopped bellyaching about their bellyaches.
Humans all start out with a working lactase gene for the sake of breastfeeding, but in most it turns off naturally in childhood. It’s speculated that rather than some epigenetic change turning the gene for lactose tolerance back on — which probably is not possible outside actual genetic engineering — the gut biome of the affected individuals shifted to digest lactose painlessly on behalf of the human hosts. [HGModernism] found this worked but it took two weeks of chugging a slurry of powdered milk and electrolyte, formulated to avoid dehydration due to the obvious source of fluid loss. After the two weeks, lactose tolerance was achieved.
Should you try this? Almost certainly not. [HGModernism] doesn’t recommend it, and neither do we. Still, we respect the heck out any human willing to hack the way out of the limitations of their own genetics. Speaking of, at least one hacker did try genetically engineering themselves to skip the suffering involved in this process. Gene hacking isn’t just for ice-cream sundaes; when applied by real medical professionals, it can save lives.
It’s happened to all of us: you find the perfect model for your needs — a bracket, a box, a cable clip, but it only comes in STL, and doesn’t quite fit. That problem will never happen if you’re using Iteration3D to get your models, because every single thing on the site is fully-parametric, thanks to an open-source toolchain leveraging 123Dbuilds and Blender.
Blender gives you preview renderings, including colors where the models are set up for multi-material printing. Build123D is the CAD behind the curtain — if you haven’t heard of it, think OpenSCAD but in Python, but with chamfers and fillets. It actually leverages the same OpenCascade that’s behind everyone’s other favorite open-source CAD suite, FreeCAD. Anything you can do in FreeCAD, you can do in Build123D, but with code. Except you don’t need to learn the code if the model is on Iteration3D; you just set the parameters and push a button to get an STL of your exact specifications.
The downside is that, as of now, you are limited to the hard-coded templates provided by Iteration3D. You can modify their parameters to get the configuration and dimensions you need, but not the pythonic Build123D script that generates them. Nor can you currently upload your own models to be shared and parametrically altered, like Thingiverse had with their OpenSCAD-based customizer. That said, we were told that user-uploads are in the pipeline, which is great news and may well turn Iteration3D into our new favorite.
Right now, if you’re looking for a box or a pipe hanger or a bracket, plugging your numbers into Iteration3D’s model generator is going to be a lot faster than rolling your own, weather that rolling be done in OpenSCAD, FreeCAD, or one of those bits of software people insist on paying for. There’s a good variety of templates — 18 so far — so it’s worth checking out. Iteration3D is still new, having started in early 2025, so we will watch their career with great interest.
Going back to the problem in the introduction, if Iteration3D doesn’t have what you need and you still have an STL you need to change the dimensions of, we can help you with that.
The Dutch word for sundial, zonnewijzer, can be literally translated into “Sun Pointer” according to [illusionmanager] — and he took that literal translation literally, building a reverse sundial so he would always know the precise location of our local star, even when it is occluded by clouds or the rest of the planet.
The electronics aren’t hugely complicated: an ESP32 dev board, an RTC board, and a couple of steppers. But the craftsmanship is, as usual for [illusionmanager], impeccable. You might guess that one motor controls the altitude and the other the azimuth of the LED-filament pointer (a neat find from AliExpress), but you’d be wrong.
This is more like an equatorial mount, in that the shaft the arrow spins upon is bent at a 23.5 degree angle. Through that hollow shaft a spring-steel wire connects the arrow to one stepper, to drive it through the day. The second stepper turns the shaft to keep the axis pointed correctly as Earth orbits the sun. See the demo video embedded below for full details.
Either way you can get an arrow that always points at the sun, but this is lot more elegant than an alt-az mount would have been, at the expense of a fiddlier build. Given the existence of the orrery clock we featured from him previously, it’s safe to say that [illusionmanager] is not afraid of a fiddly build. Doing it this way also lets you read the ticks on the base just as you would a real sundial, which takes this from discussion piece to (semi) usable clock.
There’s a type of dust-collector that’s been popular since the 1990s, where a cube of acrylic or glass is laser-etched in a three-dimensional pattern. Some people call them bubblegrams. While it could be argued that bubblegrams are a sort of 3D display, they’re more like a photograph than a TV. [Ancient] had the brainwave that since these objects work by scattering light, he could use them as a proper 3D video display by controlling the light scattered from an appropriately-designed bubblegram.
Appropriately designed, in this case, means a point cloud, which is not exactly exciting to look at on its own. It’s when [Ancient] adds the colour laser scanning projector that things get exciting. Well, after some very careful alignment. We imagine if this was to go on to become more than a demonstrator some sort of machine-vision auto-aligning would be desirable, but [Ancient] is able to conquer three-dimensional keystoning manually for this demonstration. Considering he is, in effect, projection-mapping onto the tiny bubbles in the crystal, that’s impressive work. Check out the video embedded below.
With only around 38,000 points, the resolution isn’t exactly high-def, but it is enough for a very impressive proof-of-concept. It’s also not nearly as creepy as the Selectric-inspired mouth-ball that was the last [Ancient] project we featured. It’s also a lot less likely to take your fingers off than the POV-based volumetric display [Ancient] was playing DOOM on a while back.
For the record, this one runs the same DOOM port, too– it’s using the same basic code as [Ancient]’s other displays, which you can find on GitHub under an MIT license.
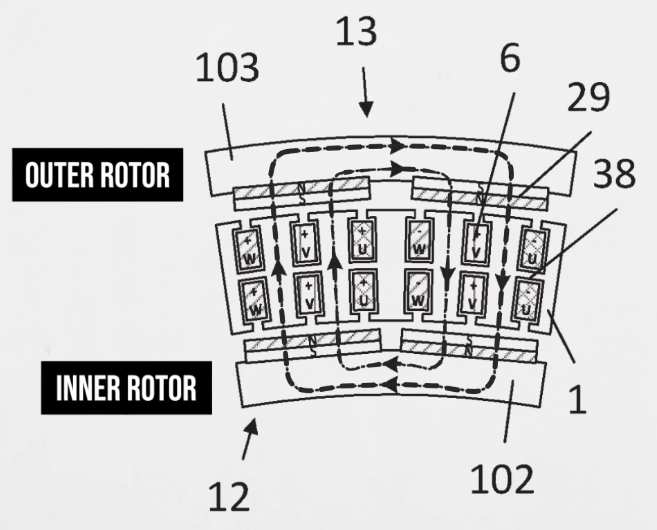
Compromise is key to keeping a team humming along. Say one person wants an inrunner electric motor, and the other prefers outrunner. What to do? Well, if you work at [Deep Drive], the compromise position is a dual-rotor setup that they claim can be up to 20% more efficient than standard designs. In a recent video, [Ziroth] provides a deep dive into Deep Drive’s Twin-Rotor Motor.
This is specifically a radial flux permanent magnet motor, like most used in electric vehicles today — and don’t let talk of inrunners and outrunners fool you, that’s the size of motor we’re talking about here. This has been done before with axial flux motors, but it’s a new concept for team radial. As the names imply, the difference is the direction the magnetic field is orientated: axial flux motors have all the magnetism oriented along the axis, which leads to the short wide profile that inspired the nickname “pancake motors”. For various reasons, you’re more likely to see those on a PCB than in an electric car.
In a radial flux motor, the flux goes out the radius, so the coils and magnets are aligned around the shaft of the motor. Usually, the coils are held by an iron armature that directs their magnetic flux inwards (or outwards) at the permanent magnets in the rotor, but not here. By deleting the metal armature from their design and putting magnets on both sides of the stator coil, Deep Drive claims to have built a motor that is lighter and provides more torque, while also being more energy-efficient.
Of course you can’t use magnet wire if your coil is self-supporting, so instead they’re using hefty chunks of copper that could moonlight as busbars. In spite of needing magnets on both inner and outer rotors, the company says they require no more rare-earths than their competitors. We’re not sure if that is true for the copper content, though. To make the torque, those windings are beefy.
Still, its inspiring to see engineers continue to innovate in a space that many would have written off as fully-optimized. We look forward to seeing these motors in upcoming electric cars, but more than that, hope they sell a smaller unit for an air compressor so after going on a Deep Drive deep dive we can inflate our rubber raft with their twin rotor motor boater bloater. If it works as well as advertised, we might have to become twin-rotor motor boater bloater gloaters!
Do you remember those levitating lamps that were all the rage some years ago? Floating light bulbs, globes, you name it. After the initial craze of expensive desk toys, a wave of cheap kits became available from the usual suspects. [RobSmithDev] wanted to make a commemorative lamp for the Amiga’s 40th anniversary, but… it was missing something. Sure, the levitating red-and-white “boing” ball looked good, but in the famous demo, the ball is spinning at a jaunty angle. You can’t do that with mag-lev… not without a hack, anyway.
The hack [RobSmith] decided on is quite simple: the levitator is working in the usual manner, but rather than mount his “boing ball” directly to the magnet, the magnet is glued to a Dalek-lookalike plinth. The plinth holds a small motor, which is mounted at an angle to the base. Since the base stays vertical, the motor’s shaft provides the jaunty angle for the 3D-printed boing ball’s rotation. The motor is powered by the same coil that came with the kit to power the LEDs– indeed, the original LEDs are reused. An interesting twist is that the inductor alone was not able to provide enough power to run even the motor by itself: [Rob] had to add a capacitor to tune the LC circuit to the ~100 kHz frequency of the base coil. While needing to tune an antenna shouldn’t be any sort of surprise, neither we nor [Rob] were thinking of this as an antenna, so it was a neat detail to learn.
With the hard drive-inspired base — which eschews insets for self-tapping screws — the resulting lamp makes a lovely homage to the Amiga Computer in its 40th year.
Nothing lasts forever, and that includes the ROMs required to make a retrocomputer run. Even worse, what if you’re rolling your own firmware? Period-appropriate EPROMs and their programmers aren’t always cheap or easy to get a hold of these days. [Kyo-ta04] had that problem, and thanks to them, we now all have a solution: Pico2ROMEmu, a ROM emulator based on, you guessed it, the Raspberry Pi Pico2.
The Pico2ROMEmu in its natural habitat on a Z80 SBC.
The ROM emulator has been tested at 10MHz with a Z80 processor and 12MHz with an MC68000. An interesting detail here is that rather than use the RP2350’s RISC-V or ARM cores, [kyo-ta04] is doing all the work using the chip’s powerful PIO. PIO means “programmable I/O,” and if you need a primer, check this out. Using PIO means the main core of the microcontroller needn’t be involved — and in this context, a faster ROM emulator.
We’ve seen ROM emulators before, of course — the OneROM comes to mind, which can also use the RP2350 and its PIOs. That project hasn’t been chasing these sorts of speeds as it is focused on older, slower machines. That may change in the newest revision. It’s great to see another contender in this space, though, especially one to serve slightly higher-performance retrocomputers. Code and Gerbers for the Pico2RomeEMU are available on GitHub under an MIT license.
The Amiga was a great game system in its day, but there were some titles it was just never going to get. Sonic the Hedgehog was one of them– SEGA would never in a million years been willing to port its flagship platformer to another system. Well, SEGA might not in a million years, but [reassembler] has started that process after only thirty four.
Both the SEGA Mega Drive (that’s the Genesis for North Americans) and Amiga have Motorola 68k processors, but that doesn’t mean you can run code from one on the other: the memory maps don’t match, and the way graphics are handled is completely different. The SEGA console uses so-called “chunky” graphics, which is how we do it today. Amiga, on the other hand, is all about the bitplanes; that’s why it didn’t get a DOOM port back in the day, which may-or-may not be what killed the platform.
In this first video of what promises to be a series, [reassembler] takes us through his process of migrating code from the Mega Drive to Amiga, starting specifically with the SEGA loading screen animation, with a preview of the rest of the work to come. While watching someone wrestle with 68k assembler is always interesting, the automation he’s building up to do it with python is the real star here. Once this port is done, that toolkit should really grease the wheels of bringing other Mega Drive titles over.
It should be noted that since the Mega Drive was a 64 colour machine, [reassembler] is targeting the A1200 for his Sonic port, at least to start. He plans to reprocess the graphics for a smaller-palette A500 version once that’s done. That’s good, because it would be a bit odd to have a DOOM-clone for the A500 while being told a platformer like Sonic is too much to ask. If anyone can be trusted to pull this project off, it’s [reassembler], whose OutRun: Amiga Edition is legendary in the retro world, even if we seem to have missed covering it.
The past few months, we’ve been giving you a quick rundown of the various ways ores form underground; now the time has come to bring that surface-level understanding to surface-level processes.
Strictly speaking, we’ve already seen one: sulfide melt deposits are associated with flood basalts and meteorite impacts, which absolutely are happening on-surface. They’re totally an igneous process, though, and so were presented in the article on magmatic ore processes.
For the most part, you can think of the various hydrothermal ore formation processes as being metamorphic in nature. That is, the fluids are causing alteration to existing rock formations; this is especially true of skarns.
There’s a third leg to that rock tripod, though: igneous, metamorphic, and sedimentary. Are there sedimentary rocks that happen to be ores? You betcha! In fact, one sedimentary process holds the most valuable ores on Earth– and as usual, it’s not likely to be restricted to this planet alone.
Placer? I hardly know ‘er!
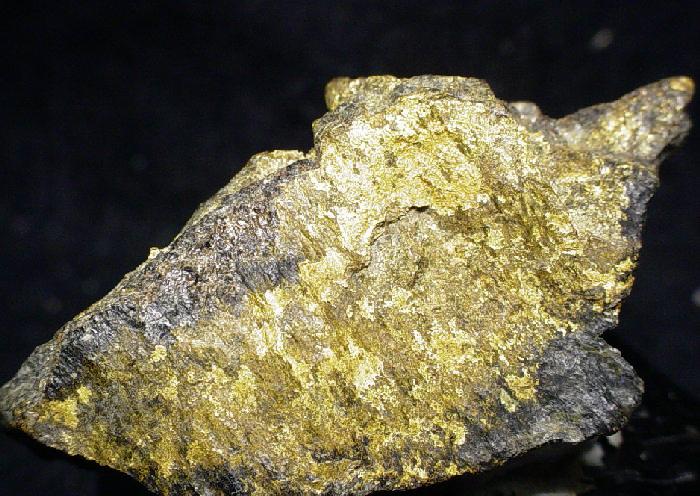
We’re talking about placer deposits, which means we’re talking about gold. In dollar value, gold’s great expense means that these deposits are amongst the most valuable on Earth– and nearly half of the world’s gold has come out of just one of them. Gold isn’t the only mineral that can be concentrated in placer deposits, to be clear; it’s just the one everyone cares about these days, because, well, have you seen the spot price lately?
Since we’re talking about sediments, as you might guess, this is a secondary process: the gold has to already be emplaced by one of the hydrothermal ore processes. Then the usual erosion happens: wind and water breaks down the rock, and gold gets swept downhill along with all the other little bits of rock on their way to becoming sediments. Gold, however, is much denser than silicate rocks. That’s the key here: any denser material is naturally going to be sorted out in a flow of grains. To be specific, empirical data shows that anything denser than 2.87 g/cm3 can be concentrated in a placer deposit. That would qualify a lot of the sulfide minerals the hydrothermal processes like to throw up, but unfortunately sulfides tend to be both too soft and too chemically unstable to hold up to the weathering to form placer deposits, at least on Earth since cyanobacteria polluted the atmosphere with O2.
Dry? Check. Windswept? Check. Aeolian placer deposits? Maybe! Image: “MSL Sunset Dunes Mosaic“, NASA/JPL and Olivier de Goursac
One form of erosion is from wind, which tends to be important in dry regions – particularly the deserts of Australia and the Western USA. Wind erosion can also create placer deposits, which get called “aeolian placers”. The mechanism is fairly straightforward: lighter grains of sand are going to blow further, concentrating the heavy stuff on one side of a dune or closer to the original source rock. Given the annual global dust storms, aeolian placers may come up quite often on Mars, but the thin atmosphere might make this process less likely than you’d think.
We’ve also seen rockslides on Mars, and material moving in this matter is subject to the same physics. In a flow of grains, you’re going to have buoyancy and the heavy stuff is going to fall to the bottom and stop sooner. If the lighter material is further carried away by wind or water, we call the resulting pile of useful, heavy rock an effluvial placer deposit.
Still, on this planet at least it’s usually water doing the moving of sediments, and it’s water that’s doing the sortition. Heavy grains fall out of suspension in water more easily. This tends to happen wherever flow is disrupted: at the base of a waterfall, at a river bend, or where a river empties into a lake or the ocean. Any old Klondike or California prospector would know that that’s where you’re going to go panning for gold, but you probably wouldn’t catch a 49er calling it an “Alluvial placer deposit”. Panning itself is using the exact same physics– that’s why it, along with the fancy modern sluices people use with powered pumps, are called “placer mining”. Mars’s dry river beds may be replete with alluvial placers; so might the deltas on Titan, though on a world where water is part of the bedrock, the cryo-mineralogy would be very unfamiliar to Earthly geologists.
Back here on earth, wave action, with the repeated reversal of flow, is great at sorting grains. There aren’t any gold deposits on beaches these days because wherever they’ve been found, they were mined out very quickly. But there are many beaches where black magnetite sand has been concentrated due to its higher density to quartz. If your beach does not have magnetite, look at the grain size: even quartz grains can often get sorted by size on wavy beaches. Apparently this idea came after scientists lost their fascination with latin, as this type of deposit is referred to simply as a “beach placer” rather than a “littoral placer”.
Kondike, eat your heart out: Fifty thousand tonnes of this stuff has come out of the mines of Witwatersrand.
While we in North America might think of the Klondike or California gold rushes– both of which were sparked by placer deposits– the largest gold field in the world was actually in South Africa: the Witwatersrand Basin. Said basin is actually an ancient lake bed, Archean in origin– about three billion years old. For 260 million years or thereabouts, sediments accumulated in this lake, slowly filling it up. Those sediments were being washed out from nearby mountains that housed orogenic gold deposits. The lake bed has served to concentrate that ancient gold even further, and it’s produced a substantial fraction of the gold metal ever extracted– depending on the source, you’ll see numbers from as high as 50% to as low as 22%. Either way, that’s a lot of gold.
Witwatersrand is a bit of an anomaly; most placer deposits are much smaller than that. Indeed, that’s in part why you’ll find placer deposits only mined for truly valuable minerals like gold and gems, particularly diamonds. Sure, the process can concentrate magnetite, but it’s not usually worth the effort of stripping a beach for iron-rich sand.
The most common non-precious exception is uraninite, UO2, a uranium ore found in Archean-age placer deposits. As you might imagine, the high proportion of heavy uranium makes it a dense enough mineral to form placer deposits. I must specify Archean-age, however, because an oxygen atmosphere tends to further oxidize the uraninite into more water-soluble forms, and it gets washed to sea instead of forming deposits. On Earth, it seems there are no uraninite placers dated to after the Great Oxygenation; you wouldn’t have that problem on Mars, and the dry river beds of the red planet may well have pitchblende reserves enough for a Martian rendition of “Uranium Fever”.
If you were the Martian, would you rather find uranium or gold in those river bends? Image: Nandes Valles valley system, ESA/DLR/FU Berlin
While uranium is produced at Witwatersrand as a byproduct of the gold mines, uranium ore can be deposited exclusively of gold. You can see that with the alluvial deposits in Canada, around Elliot Lake in Ontario, which produced millions of pounds of the uranium without a single fleck of gold, thanks to a bend in a three-billion-year-old riverbed. From a dollar-value perspective, a gold mine might be worth more, but the uranium probably did more for civilization.
Lateritization, or Why Martians Can’t Have Pop Cans
Speaking of useful for civilization, there’s another type of process acting on the surface to give us ores of less noble metals than gold. It is not mechanical, but chemical, and given that it requires hot, humid conditions with lots of water, it’s almost certainly restricted to Sol 3. As the subtitle gives it away, this process is called “lateritization” and is responsible for the only economical aluminum deposits out there, along with a significant amount of the world’s nickel reserves.
The process is fairly simple: in the hot tropics, ample rainfall will slowly leech any mobile ions out of clay soils. Ions like sodium and potassium are first to go, followed by calcium and magnesium but if the material is left on the surface long enough, and the climate stays hot and wet, chemical weathering will eventually strip away even the silica. The resulting “Laterite” rock (or clay) is rich in iron, aluminum, and sometimes nickel and/or copper. Nickel laterites are particularly prevalent in New Caledonia, where they form the basis of that island’s mining industry. Aluminum-rich laterites are called bauxite, and are the source of all Earth’s aluminum, found worldwide. More ancient laterites are likely to be found in solid form, compressed over time into sedimentary rock, but recent deposits may still have the consistency of dirt. For obvious reasons, those recent deposits tend to be preferred as cheaper to mine.
That red dirt is actually aluminum ore, from a 1980s-era operation on the island of Jamaica. Image from “Bauxite” by Paul Morris, CC BY-SA 2.0
When we talk about a “warm and wet” period in Martian history, we’re talking about the existence of liquid water on the surface of the planet– we are notably not talking about tropical conditions. Mars was likely never the kind of place you’d see lateritization, so it’s highly unlikely we will ever find bauxite on the surface of Mars. Thus future Martians will have to make due without Aluminum pop cans. Of course, iron is available in abundance there and weighs about the same as the equivalent volume of aluminum does here on Earth, so they’ll probably do just fine without it.
Most nickel has historically come from sulfide melt deposits rather than lateralization, even on Earth, so the Martians should be able to make their steel stainless. Given the ambitions some have for a certain stainless-steel rocket, that’s perhaps comforting to hear.
It’s important to emphasize, as this series comes to a close, that I’m only providing a very surface-level understanding of these surface level processes– and, indeed, of all the ore formation processes we’ve discussed in these posts. Entire monographs could be, and indeed have been written about each one. That shouldn’t be surprising, considering the depths of knowledge modern science generates. You could do an entire doctorate studying just one aspect of one of the processes we’ve talked about in this series; people have in the past, and will continue to do so for the foreseeable future. So if you’ve found these articles interesting, and are sad to see the series end– don’t worry! There’s a lot left to learn; you just have to go after it yourself.
Plus, I’m not going anywhere. At some point there are going to be more rock-related words published on this site. If you haven’t seen it before, check out Hackaday’s long-running Mining and Refining series. It’s not focused on the ores– more on what we humans do with them–but if you’ve read this far, it’s likely to appeal to you as well.
Back during WWII, Chrysler bodged five inline-6 engines together to create the powerful A57 multibank tank engine. [Maisteer] has some high-revving inline-4 motorcycle engines he’s trying to put together too, but unlike 1940s Chrysler, he also has a trombone… and a lot more RPMs to deal with.
The Chrysler flatheads were revving at a few thousand RPM– their redline was almost certainly in the three-thousand range. [Maisteer] is working at 15,000 RPM, which is where the real challenge of this build lies: the trombone in the image is just for fun. He wanted to use a heavy chain to link the crankshafts, but at that rotational speed, a heavy chain becomes really heavy— or at least, it feels a force many times its weight due to centrifugal force. The lietmotief of this video is a quote by an automotive engineer to the effect that chains don’t work over 10,000 RPM.
That leads to a few problems for the intrepid “not an engineer” that take most of the video to deal with and ultimately doom the engine linkage– for now. Not before he gets an iconic 8-cylinder sound out (plus some fire) out of a trombone, though. Of particular note is the maker-type workflow Hackaday readers will appreciate: he 3D scans the engines, CADs up parts he needs and sends away to have them CNC’d and SLS printed.
Hacking motorcycle engines into cars is nothing new. Hacking them together into franken-engines is something we see less often.
Thanks to [Keith Olson] for the tip! Remember, if you want to toot your own horn– or toot about someone else’s project, for that matter–the tips line is always open.
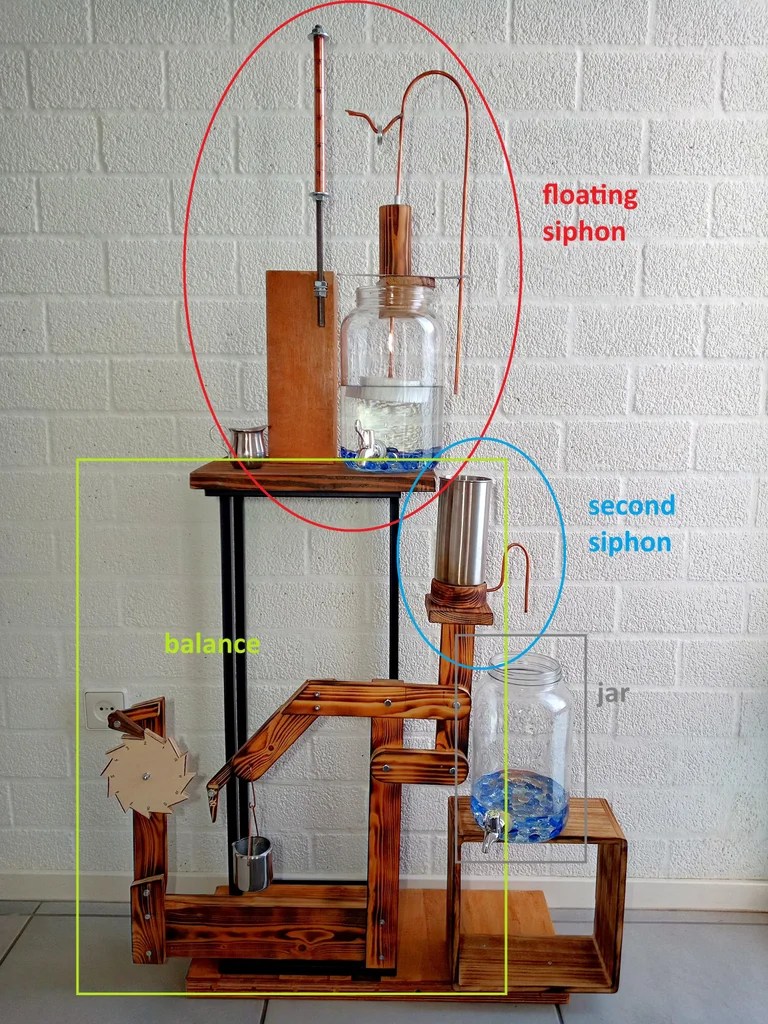
One easy way to make a very accurate clock is with a WiFi-enabled microcontroller like an ESP32 and a display: set up NTP, and you’ll never be off by more than a minute. This water clock project by [Liebregts] is not like that — there are no electronics to speak of, and if the clock is ever in sync to within a single minute, well, we’d be surprised.
We’re impressed to see it working regardless. Sure, it’s not exactly high-tech; the floating siphon mechanism [Liebregts] is using to get a steady flow out of the main reservoir dates back to 250 BC. On the other hand, since this style of time keeper has been out of fashion since the fall of Rome, [Liebregts] couldn’t just grab something off GitHub or ask ChatGPT to design it for them. This is real human engineering. The reservoir is even scaled to the four-hour timing of [Liebregts] workday — it gets refilled at lunch along with its maker.
The water clock in all its glory, plus diagrammatic labels.
In a clever build detail, the floating siphon tube also holds a pointer to an hour indicator. For minutes, his mechanism seems unique, though it’s related to another ancient trick, the Pythagorean cup. Pythagoras’s devious cup had a hidden siphon that spilled its contents if you filled it beyond a set level, and so does the secondary reservoir of [Liebregts] water clock.
Since the secondary reservoir is linked to a counterweight with a pivot, it goes up and down over the course of approximately 5 minutes — but rather than linking that to another linear indicator, [Liebregts] is using that mechanism to advance a saw-toothed gear that is marked with 5-12 in analog-clock fashion for a touch of modernity. See it in action in the demo video below.
That last part might confuse a time traveler from Ancient Rome or Greece, but they’d instantly recognize this creation as a clock, which many modern observers might not. Still, once they learn to read it you can be sure that [Liebergts]’s friends will never be late to a gladiator fight again — and not just because Constantine banned them in 325 AD. Apparently nobody listened to that ban anyway.
Not every project has to be complicated– reinventing the wheel has its place, but sometimes you find a module or two that does exactly what you want, and the project is more than halfway done. That the kind of project [mircemk]’s Simple Retro Style VFO is — it’s a variable frequency oscillator for HAM and other use, built with just a couple of modules.
Strictly speaking, this is all you need for the project.
The modules in question are the SI5351 Clock Generator module, which is a handy bit of kit with its own crystal reference and PLL to generate frequencies up to 150 MHz, and the Elecrow CrowPanel 1.28inch-HMI ESP32 Rotary Display. The ESP32 in the CrowPanel controls the SI5351 module via I2C; control is via the rest of the CrowPanel module. This Rotary Display is a circular touchscreen surrounded by a rotary display, so [mircmk] has all the inputs he needs to control the VFO.
To round out the parts count, he adds an appropriate connector, plus a power switch, red LED and a lithium battery. One could include a battery charger module as well, but [mircmk] didn’t have one on hand. Even if he had, that still keeps the parts count well inside the single digits. If you like video, we’ve embedded his about the project below; if not the write up on Hackaday.io is upto [mircmk]’s typical standard.
People have been using the SI5351 to make VFOs for years now, but the addition of the round display makes for a delightfully retro presentation.
It’s clock time again on Hackaday, this time with a lovely laser-cut biretrograde clock by [PaulH175] over on Instructables. If you’ve never heard of a ‘biretrograde clock,’ well, we hadn’t either. This is clearly a form of retrograde clock, which unlike the name implies doesn’t spin backwards but oscillates in its motion– the hands ‘go retrograde’ the same way the planets do.
The oscillating movement is achieved via a pair of cams mounted on the hour and minute shafts of a common clock mechanism. As the shafts (and thus cams) turn, the minute and hour arms are raised and drop. While that could itself be enough to tell the time, [Paul] goes one further and has the actual hands on pivots driven by a gear mechanism on the cam-controlled arms. You might think that that extra reversal is what makes this a ‘biretrograde clock’ but in the clockmaker’s world that’s just saying it’s a retrograde clock with two indicators: in this case, minute and hour.
It’s a fairly rare way to make a clock, but we’ve seen one before. That older project was 3D printed, which might be more your speed; if you prefer laser-cutting, though, [Paul]’s Instructable includes SVG files. Alternatively, you could take a different approach and use voltmeters to get the same effect.
In Dune, the Fremen people of Arrakis practice an odd future hybrid religion called “zensunni.” This adds an extra layer of meaning to the title of [Mark Rehorst]’s Arrakis 3.0 sand table, given that the inspiration for the robotic sand table seems to be Zen gardens from Japan.
The dunes on the tabletop version of Arrakis owe nothing to sand worms, but are instead created a rolling metal ball. With all workings happening below, it looks quite magical to the uninitiated, but of course it’s not magic: it’s magnets. Just beneath the tabletop and its sands, the steel ball is being dragged along by the magnetic field of a powerful neodynium magnet.
That magnet is mounted in a CoreXY motion system that owes more than a little bit to modern 3D printers. Aside from the geometry, it’s using the standard G6 belt we see so often, along with a Duet3D mainboard, NEMA 17 steppers, and many 3D printed parts to hold its aluminum extrusions together. Thanks to that printer-inspired motion system, the ball can whirl around at 2000 mm/s, though [Mark] prefers to run slower: the demo video below shows operation at 1000 mm/s before the sand has been added.
This build was designed for ease of construction and movement: sized at 2’x4′ (about 61 cm x 122 cm), it fits through doors and fits an off-the-shelf slab of coffee table glass, something that [Mark] wishes he’d considered when building version two. That’s the nice thing about jumping in on a project someone’s been iterating for a while: you’ve got the benefit of learning from their mistakes. You can see the roots of this design, and what has changed, from the one he showed us in 2020.
Naturally you’re not limited to CoreXY for a sand table, though it is increasingly popular — we’ve seen examples with polar mechanisms and even a SCARA arm.
You know those old cliche that the younger generations have begun to cynically despise: “follow your dreams!” “You can be anything you put your mind to!” — well, perhaps they are true on occasion. For instance when [rctestflight] had PCBs that dreamed of becoming a hydrofoil, he found a way to make that dream come true.
It’s kind of obvious in retrospect: printed circuit boards are made of FR4, which is a form of fiberglass, and you know what else is commonly made of fiberglass? Boats. So yes, the material is suited for this task. The fact that solder joints hold up to use in a little remote-control hydrofoil is less obvious, but good to know. It certainly makes for easier assembly for those of us who have developed an allergy to epoxy.
Ease of assembly wasn’t really the point here: the point was that by making the “mast” of the hydrofoil out of PCB– that’s the part that holds the underwater wing– [rctestflight] figured he could (shock!) print a circuit onto it. Specifically, a liquid-level sensor, and because microcontrollers are so cheap these days he went the “total overkill” route of embedding an ESP32 on each mast. He started with a resistive sensor, but since those self-corrode too quickly, the team switched to a capacitive sensor that doesn’t need to form a galvanic cell in salt water. Come to think of it, that might still be a problem with the solder joint between the PCBs. Good thing nobody will be riding this one.
Having such a sensor and brain close-coupled allows for a faster control loop than the sonar [rctestflight] had previously been using to control his hydrofoil’s altitude.. Pivoting each mast with its own servo made for a smooth flight over the water— well, once they got the PID tuning set, anyway. Check it out in the video embedded below.