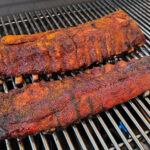
For this recipe I kept the flavors pretty simple, used a “smoke bomb” to add even more flavor and finished these 2 slabs of baby backs “dry” instead of glazing a sauce on at the end.
Baby Back ribs seasoned simply and cooked on a propane grill (with a smoke bomb for added flavor). These ribs turned out juicy, tender and you can really taste the pork!
Ingredients
2 racks of loin back ribs – trimmed and silver skin removed
Apply a thin line of mustard to each rack of ribs and season with the AP Seasoning and The BBQ Rub on all sides.
Fire up a gas grill adjusting the burners so the grill temperature is 250-275 degrees. Make a smoke bomb by adding wood chips to a small pan, cover it with foil, and poke holes in the foil. Place the pan to one side of the grill centered over a burner.
Place the ribs on the grill and cook for one hour, flip the ribs over for even grilling and continue to cook for another hour.
Wrap the ribs in a double layer of aluminum foil – add a little extra dry rub, zero sauce, and a splash of apple juice to the wrap.
Return the ribs to the grill and cook meat side down until the internal temperature reaches at least 202 degrees between the bones. It should take about an hour.
Carefully take the ribs out of the wrap and place back on the cooking grate. Season with additional dry rub. Cook for 30 additional minutes to set the bark at this point you can sauce the ribs for a “wet style” or serve them dry.
[Standard FTC Disclosure] We received no compensation for this post. Any link which may earn us a commission is tagged as [Affiliate Link].
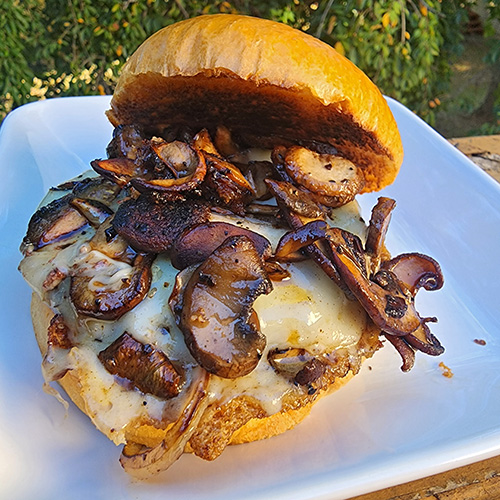
We've been chowing down on mushroom Swiss burgers in the past few weeks. Not that you need a recipe for mushroom Swiss burgers, but I have a basic recipe that I follow for the mushroom topping, and it's easy to prepare one of three ways; sauteed, saucy, or creamy.
I add chopped bacon to my mushroom topping to add a smoky, salty element.
Fun Fungi Facts
Here are some fun facts about mushrooms from Harold McGee's epic On Food and Cooking: The Science and Lore of the Kitchen. [Affiliate Link]
Mushrooms are natural flavor enhancers. They naturally contain monosodium glutamate, and many also contain guanosine monophosphate.
Mushrooms don't have cellulose like plants. Instead, their cell walls are made of chitin which is the same thing as the exoskeletons of crustaceans.
Mushrooms produce octenol (an 8-carbon alcohol) and there is more in the gills. Therefore, mature mushrooms that have opened have more gills and more flavor while unopened mushrooms like button mushrooms have less flavor.
Whole Mushrooms vs Pre-Sliced
I prefer to buy whole mushrooms and slice them myself.
Mushrooms continue to be quite active for days after being picked. Enzymes continue to develop and store flavor compounds in the gills.
If you slice them up before packaging, it disrupts that process and also lets the mushrooms start to dry out.
For me, the loss of flavor isn't worth the 30 seconds you save from buying pre-sliced mushrooms.
Prep tip: If you don't have knife skills, you can use an egg slicer to slice your mushrooms instead.
Here's the topping recipe that I use. When you do the sauteed version of this, it's basically mushroom ragout and we've tossed it with pasta or used it as a base for mushroom soup.
We didn't have any frozen fries or tots and the only potatoes I had on hand were these bite-size "ruby sensations" that we bought at Food City. If fries are just bite-sized pieces of fried or roasted potatoes, doesn't that make these.....ROUND FRENCH FRIES!?!?
Mushroom Topping for Mushroom Swiss Burgers
www.nibblemethis.com
Published 10/01/2022
This topping can be served in one of three ways; sauteed, saucy, or creamy. You can substitute butter for the bacon fat if needed.
Preheat a medium cast-iron skillet over a 350°f grill.
Saute the mushrooms. Add bacon fat or butter to the skillet and saute the sliced mushrooms for 2 minutes.
Stir in the bacon and cook for 3 more minutes.
Stir in the onions and cook until the onions are softened and the bacon has started to brown, about 4-5 more minutes.
Flambe the bourbon.
Keep your face, extremities, important documents, and anything else you don't want to be burned from above the skillet.
Wear heat-resistant gloves.
Don't do this unless you've been trained or at least watched 3 YouTube videos on how to flambe.
What I'm trying to say is don't do this if you don't know what you're doing and don't sue me if you burn off your eyebrows.
Remove the skillet from the heat, add the bourbon and quickly use a long-necked lighter to ignite the bourbon flames which will create a brief fireball. It will burn down and the flames will self-extinguish in about 15-20 seconds.
Sauteed Version: Stir in the stone-ground mustard and Worcestershire sauce and simmer for 1 minute until thickened. Taste and add salt or Worcestershire sauce as needed.
Saucy Version: After step 6, add 1/2 cup or so of beef stock and let simmer until the liquid reduces by half. Stir in a slurry of 1 tablespoon each of corn starch and cold water to thicken.
Creamy Version: After step 6, add 1/2 cup or so of heavy cream and let simmer until the liquid reduces by half. Stir in a slurry of 1 tablespoon each of corn starch and cold water to thicken.
Yield: enough for 4 burgers
Prep Time: 00 hrs. 10 mins.
Cook time: 00 hrs. 15 mins.
Total time: 25 mins.
Tags: sauce
Here are two of my recent burgers.
For the first burger, I used my CharBroil Cruise grill with infrared cooking and automatic controls to cook at the specific temperature of my choosing. That's pretty unique for gas grills which usually just have a dial with settings of low, medium, and high.
I started with fresh ground chuck from Food City and made 6-ounce burger patties. I heavily seasoned those with Jalapeno Steak Butter Seasoning from Pepper Palace. I've been using it on burgers a good bit lately - I enjoy the jalapeno flavor and mild sting.
There was no specific reasoning for the 535°f, I meant to do 525°f and didn't notice that I rolled past it on the dial.
I cooked the burgers for about 3 minutes per side. If you're wondering why you don't see flames, the CharBroil Amplifire system has a metal emitter plate just under the grate and above the flames. It prevents flare-ups and cooks using infrared heat which keeps the food more juicy.
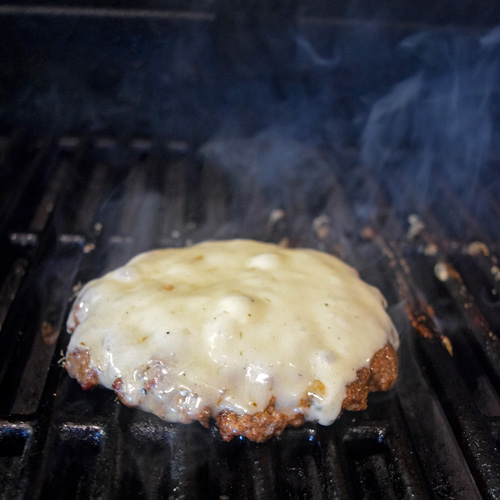
I like to use two pieces of Sargento Baby Swiss per burger. Perfectly cheesy!
For the "round french fries", I tossed them with oil and plenty of the Jalapeno Steak Butter seasoning. I put them in a cast iron cooker on the upper rack of the CharBroil Cruise and cooked them for about 30-45 minutes at 425°f until they were tender.
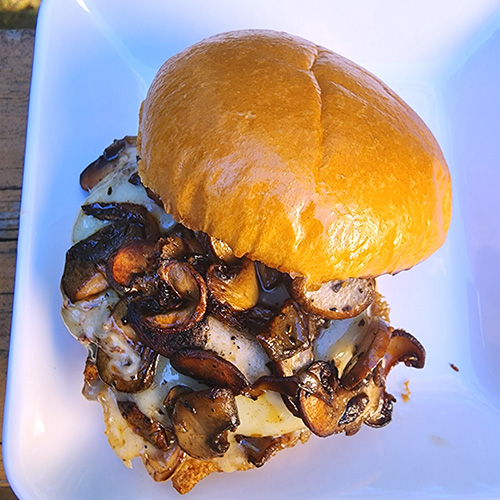
The mushrooms amplify the cheesy, beefy burger.
I cooked this next batch of Mushroom Swiss Burgers on a flat-top griddle.
Sometimes I opt for convenience and use Schweid & Son's premade burgers. They are fresh, Certified Angus Beef® Brand beef. The All American is USDA Choice while the One Percenter is USDA Prime. Also, when making Mushroom Swiss Burgers, it makes sense to season them with a mushroom-based seasoning like Fire and Smoke's Shiitake Steak Rub or my Umami Steak Seasoning recipe.
Cooking burgers on a flat-top grill are probably my favorite way to go, even if I'm not doing smashburgers.
Look at that pile of deliciousness! I would have eaten it just like this except I like to avoid 3rd-degree burns on my lips and tongue.
Umami for the win! I love a toasted brioche bun as well.
[FTC Standard Disclosure] I received a Char-Broil Cruise at no cost for review purposes. All opinions are my own. I receive no compensation for this post, nor do I have any other financial arrangements with Char-Broil or their affiliates.
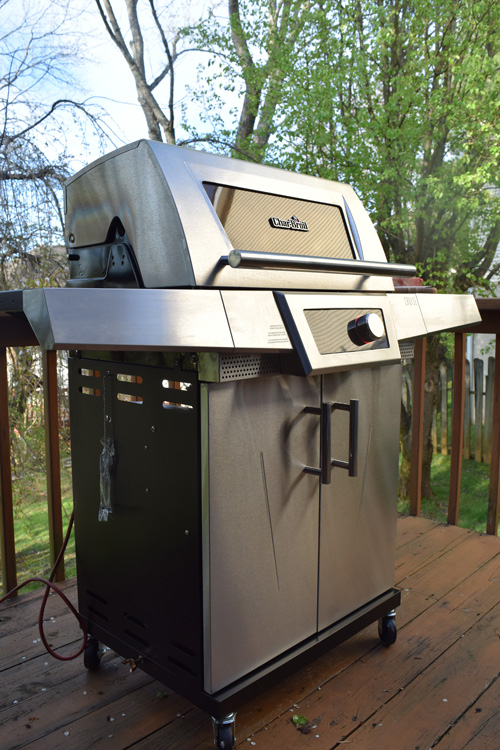
Earlier this year, Char-Broil introduced their newest, game-changing grill – The Char-Broil Cruise. I was lucky enough to receive a Cruise unit from Char-Broil and have put this new grill through real-life cooking for the past few weeks. Here are my thoughts and experience with this new grill.
Tame The Flame, Change The Game
So what makes this grill a game-changer? Until now, gas grill heat controls have been knobs that control the gas flow at a set rate of consumption. If I set my old gas grill on “medium”, the grill will let the gas flow at that designated rate. That rate of flow doesn’t change regardless of the actual cooking temperature it achieves or factors like ambient temperature or wind.
The Char-Broil Cruise changes this by cooking at a specific set temperature. If I set the grill for 500°f, the Cruise will assess the grill temperature and if it is anything but 500°f, the grill will adjust the gas flow to achieve 500°f and maintain that temperature. No more guessing or adjusting.
The Char-Broil Cruise automatically adjusts gas flow to maintain a specific cooking temperature.
Let’s look at the features that I like and the experience I had while cooking some of the typical backyard basics.
Features
Digital Temperature Control and Auto-Calibration
The ability to set a precise cooking temperature and know that the grill will maintain it gives a cook confidence. This is true from beginning backyard chefs to seasoned pros like me. The Cruise has a thermometer mounted inside the cooking chamber that provides feedback to a processor. The processor controls the two-burner tubes to maintain the set temperature.
The controls are straightforward. The dial controls the temperature setting in 5°f increments.
The temperature probe is located at the back of the cooking area and protected by a cage. It uses an algorithm to approximate the temperature across the grill surface.
The Char-Broil Cruise has a unique 2 burner system. The middle gas tube continually burns. The outer burner only cuts in as needed to climb to and maintain the set temperature. This dual gas tube configuration means that the entire grilling surface has to run at the same temperature, which limits some grilling technqiues.
Amplifire Infrared Grill System
Amplifire is Char-Broil’s infrared cooking system that:
significantly reduces flare-ups,
provides more even heat across the grill surface, and
yields juicier food.
I previously enjoyed using this same system on theChar-Broil Commercial grill for yearswhen it was known as TRU-Infrared technology. This system uses a stainless steel emitter plate to convert flame to infrared heat. Infrared heat cooks the food without drying it out compared to traditional gas grills that cook mostly with hot air, which dries the surface of the food.
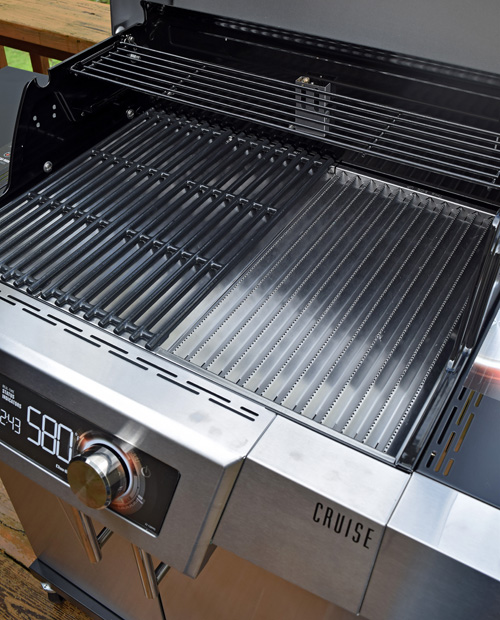
The heart of the Amplifire system is this stainless steel emitter plate between the top-ported gas tubes and the cast-iron grates. The plate does several things. First, it converts the heat to infrared, which cooks food without drying it out. Second, it prevents flare-ups from below. Third, when food drippings hit the emitter, the liquid vaporizes, adding to the grilled smoky flavor.
Here I show the emitter plate in place with one of the cast-iron grates removed. The Amplifire system cooks food in three ways. First, The cast-iron grates use direct or conductive heat to give sear marks and help cook food. Second, The emitter plate cooks food with infrared heat. Finally, the hot air that comes through the holes will assist in cooking using convective heat.
Together, the emitter plate and cast iron grates function much like the GrillGrates accessory that is so popular on the competition steak cooking circuit.
Auto-Clean Function
A practical and common way to clean your grill after use is to finish with a high-temperature burn to incinerate any stuck-on food debris. The Cruise has an Auto-Clean mode that ramps the temp up to 600°f for a 30-minute countdown and then automatically shuts down. I find that quite useful because I have accidentally forgotten about a grill in burn mode and left it running for hours.
A clean grill is a happy grill. The Auto-Clean feature incinerates leftover food and drippings by running the grill at high heat and then shutting down when done.
I will say that "Auto-Clean" doesn't mean you don't have to do anything. You still need to brush off your grill grates and the emitter plate after the grill cools down from the high temp burn-off. I like to use a nylon brush like the Char-Broil Safer Grill Brush after the grates have cooled down from the Auto-Clean session. Then I spritz the plates and grates with oil and heat it back up to 350°f for 20 minutes to preseason them, but that's just me.
A note about that nylon brush is about 8 years old. I have used it every week for all of my grills and smokers, and I have only replaced the head 2-3 times.
Porcelain Coated Cast Iron Grates
The porcelain-coated cast-iron grates can provide exceptional heat transfer, which means good sear marks. I prefer plain cast-iron, but those require more care and upkeep than these porcelain coated grates. That doesn’t mean you can abuse the porcelain grates, porcelain can crack.
The cast-iron grates provide excellent sear marks while the emitter plate evenly cooks the food.
Stainless Steel
I prefer grills with a lot of stainless steel because it looks great and makes clean up easier. The Cruise uses stainless steel for its front-facing trim and lid. The side shelves, side panels, and rear panels are painted.
Stainless steel provides a stylish look and makes the grill easier to clean after a cook.
The grill comes with a side-mounted bottle opener which is convenient for opening a cold beverage while grilling.
Shelf Space
The grill has twin 19 ¾” x 12 ½” shelves which come in handy while cooking. I liked the shelves on the Commercial grill better because they were all stainless, which is more resistant to scratches.
Twin shelves provide ample space for your tools and food while cooking.
Digital Display with Lighted Indicator System
The Cruise has a digital display that is easy to read from up to 20 feet away. I don’t even have to go outside to check on it. The color-shifting light-ring around the dial gives you “at a glance” information about whether the grill is at temp, coming up to temp, auto-cleaning, or if there is an error.
Oops....somebody ran out of propane gas!
Stylish Hood with Glass Viewing Pane
The hood has a glass front that lets you see the food without opening the lid, because as the saying goes, “If you’re looking, then you aren’t cooking.”
The glass front panel lets you see what is going on without opening the hood. You will need to clean this frequently if you want to keep using it or it will become obscured,
The Cruise comes with locking casters, which are fine on hard, even surfaces. Like I did on my other grills, including my first Big Green Egg table, I would likely upgrade these with 3 to 4" rubberized wheels, which are more durable and makes the grill easier to roll around, especially on grass or soft surfaces.
Battery Back-Up
The trick with grills that require electricity is what happens if the power goes out. The Cruise boasts a backup power supply that houses 4 d-cell batteries, so if the power flickers or goes out entirely, your cook won’t be affected for up to 2 hours.
The power supply has a USB, so you could also use a power bank with a 5v USB output for extended cooks when no electrical power is available.
No WiFi, No Problem
This unit is NOT a smart grill thatrequires connecting to a smartphone via an app. The intelligence is all on board; no mobile phone is needed.
Warranty
The Cruise is backed up with a 10-year warranty on the burners, 3 years on the lid, firebox, and emitter plates, and 1 year on everything else.
Performance
For testing, I have used the Cruise for a little over a month, burning through one tank of propane. I grilled the classics, such as steaks, chicken, burgers, and wings. I cooked in varying weather conditions, including cold temperatures, rain, snow, and strong winds. I cooked using various cooking temps and setups.
Assembly
Assembly was fairly easy. I put the grill together by myself in just over 1 hour and I didn’t swear an unreasonable amount of times (haha).
Grill delivery day is always exciting.
I consider assembly a part of the performance because a well-designed grill should be easy to assemble. Char-Broil's instructions are easy to follow, and they use labeled blister packs. They also use the same type of bolts over and over, which makes assembly easy as well.
It took me just over an hour, by myself, to assemble the Char-Broil Cruise.
Cooks on the Char-Broil Cruise
Wings
The unique gas tube configuration means that you can not use a traditional indirect or two-zone grilling setup. The guide suggests using the warming/roasting rack in the lower position when you don't want direct searing from contact with the grate. So that's what I did with good results.
I preheated the grill to 350°f, then I removed one of the cast iron grate sections and placed wood chips on the emitter to give the wings a kiss of smoke while roasting for 30 minutes, flipping once. The lid was closed, of course. I just had it open here for the picture.
The roasting rack worked well for a modified indirect type of heat. I refer to that as "raised direct" in my first book several years ago - not really indirect but sort of cooks like it and can give crispier skin on wings.
In the last few minutes, I grilled the wings directly on the grates for a few minutes and glazed them with some sweet golden mustard-based BBQ sauce. These were tasty, as good as I could have done on my other grills.
Steak
I haven't bought much steak lately due to the sky-high prices, but I splurged on this nice C.A.B. prime ribeye to try out on the Cruise.
I seasoned the steak with Fire and Smoke Shiitake rub. I made a compound butter with the same rub and a clove of minced garlic.
I preheated the grill to 500°f and seared the steak for about 4 minutes per side. The temps held steady and did an excellent job on the steak.
As soon as the steak came off the grill, I topped it with some of the Shiitake garlic butter and let it rest.
Deliciously medium rare and flavorful.
The Cruise is quite the steak cooking machine.
Bacon Cheeseburgers
Of course, I had to try burgers on the Cruise and it did a magnificent job of grilling a juicy burger - what we call an "elbow dripper". I pressed out 8-ounce chuck patties, seasoned them, and grilled them for 4 minutes per side. I topped them with American cheese and smokehouse cheddar for maximum gooey-ness. I crowned them with some of our homemade sorghum and bourbon bacon.
The Cruise put clean grill marks on the patty and cooked the burgers flawlessly.
Ooey, gooey, perfection on a bun.
Chicken BLT Sandwich
A good test for a grill is how well it can grill chicken breasts so I decided to make some grilled chicken BLT sandwiches on brioche buns. I seasoned the chicken cutlets with Fire and Smoke The Classic and grilled them for 4 minutes per side. Then I started basting them with garlic-lemon tallow until they were done. Fantastic!
Basting the chicken with beef tallow built up an amazing tasting crust on the chicken. Basting with oil-based liquids can cause flare-ups with open flames but it was no problem here. The emitter is extremely hot so you can still generate a flare-up by pouring a bunch of fat onto it, but you'd almost have to be trying to start a fire on purpose.
Juicy grilled chicken, smoky bacon, lettuce, seasoned tomato, and onion on a grilled brioche bun - now THAT'S a chicken sandwich.
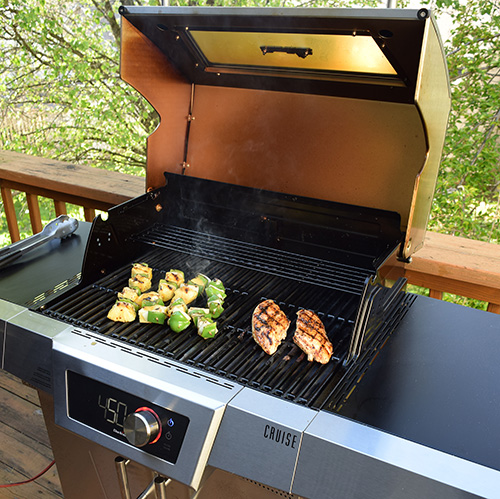
Chicken Teriyaki
One weekend we made chicken teriyaki on the Cruise grill. I simply seasoned chicken breasts with salt, garlic, and pepper. I made some small onion and pepper skewers as well. I grilled them all on the Cruise for about 4 minutes and then brushed them with teriyaki sauce that I thinned with chicken stock. Thinning the teriyaki sauce makes it less likely for the sugars to burn and lets you keep layering on the flavor every time you flip the chicken.
Although there is a single temperature control on the Cruise, it does have a bit of a temperature gradient, much like a flat-top griddle does. The right runs a little hotter than the far left so I cooked my meats on the right and the veggies on the left.
The Cruise grill is convenient and competent.
Another quick and simple meal from the Cruise.
Steak Fajita Burritos
This was a fun one. I marinated some picanha (sirloin) in oil, lime juice, and my fajita rub recipe for 24 hours and then grilled it on the Cruise with some onions and peppers. I thinly sliced the steak and put it with peppers, onions, and crumbling queso in grilled tortillas for a spectacularly good burrito.
One of the nice things about the digital display is knowing at a glance that the grill is hot and ready to go.
Is there any better aroma than onions, peppers, and meat on the grill? I think not.
Normally, I would do picanha on a rotisserie. The Cruise is pre-configured to accept a rotisserie and I had one, but to be honest, I didn't think about it until the grill was already preheated and I was hungry so I just flipped the steaks back and forth.
Flawless victory! I could have just eaten it straight out of the tray like this.
But we grilled some tortillas and rolled it all up for hand-held yumminess.
What it does well
After a month of heavy use, I am impressed with the Char-Broil Cruise grill. I was already a big fan of the Amplifire infrared heat system and the addition of the Cruise Control Technology really changes the game for gas grills.
Precision Heat Control – My experience has been that the Cruise Control Technology works and I quickly trusted the grill. When I set a temp, the grill controls the cooking temperature at that temp even in less than ideal weather.
Infrared Heat- I remain a fan of the Amplifier infrared system, it cooks hot and evenly. If I’m going to use a gas grill, I prefer one with asystem like this. It is quite similar to the GrillGrates that I and many steak cook-off competitors have used for years.
Direct Heat Grilling – It is easy peasy to grill on this thing. Plenty of heat, no flare-ups, nice grill marks, and it handles the weather while cooking. The range of 350°f to 700°f handles all but low and slow smoking. The MAX setting is useful for searing, such as; sous vide and reverse searing.
Limitations
No two-zone fire or indirect heat options– As mentioned in the review, The Cruise can’t do two-zone or traditional indirect cooking because there is only one temp control for the entire grill. The Cruise’s solution is to put the warming or roasting rack in the lower position so food isn’t in direct contact with the grates. This worked reasonably well enough but that rack is only about 4.5” x 23.5”, limiting the amount you can cook. If I was using this grill often for indirect heat, I would find a larger grate (about 16” x 23”) and use nuts and bolts to create 1.5” legs to raise it up.
The single heat control means that the entire grill cooks at the same temperature, no two-zone fires.
No side burner – One of the advantages of owning a gas grill is having a side burner since virtually no charcoal grills have one. At this price point, I would expect to see a side burner on the Cruise.
Summary
I have often said that the Char-Broil Commercial grill was my favorite grill from a big-box store but with itsprecise temperature control, the new Char-Broil Cruise gives it a run for its money.
The steady temperatures make the Char-Broil Cruise grill ideal for beginning grillers and weekend warriors in search of a gas grill that is easy to use and reliably controls temperatures. It is also a splendid choice for hardcore grill masters that want to add a temperate-controlled, gas-powered infrared grill to their arsenal for convenient quick cooks.