Apple has today made the first iOS 26.2 Release Candidate available for download by developers ahead of a final release to the public. That public release is expected to take place within a week or so assuming no further issues are identified.
A look at why identity security is failing in the age of deepfakes and AI-driven attacks, and how biometrics, MFA, PAD, and high-assurance verification must evolve to deliver true, phishing-resistant authentication.
Some people are not merely satisfied with functionality, or even just good looks. These persnickety snoots (I am one of them) seek something elegant, a true marriage of form and function.
Image by [YANG SHU] via Hackaday.IOShould such a person be in the market for a macro pad (or ‘macropad’ if you prefer), that snoot should look no further than [YANG SHU]’s 8-key programmable stream deck-like device.
The main goal here was the perfect fusion of display and feel. I’m not sure that an FDM-printed, DIY macro pad can look any better than this one does. But looks are only half the story, of course. There’s also feel, and of course, functionality.
Yes those are (hot-swappable) mechanical key switches, and they are powered by an ESP32-S2. Drawn on the 3.5″ LCD are icons and text for each switch, which of course can be easily changed in the config app.
There’s a three-direction tact switch that’s used to switch between layout profiles, and I’m sure that even this is satisfying on the feel front. Does it get better than this? Besides maybe printing it in black. I ask Hackaday.
KeebDeck Keyboard Gets Two Thumbs Up
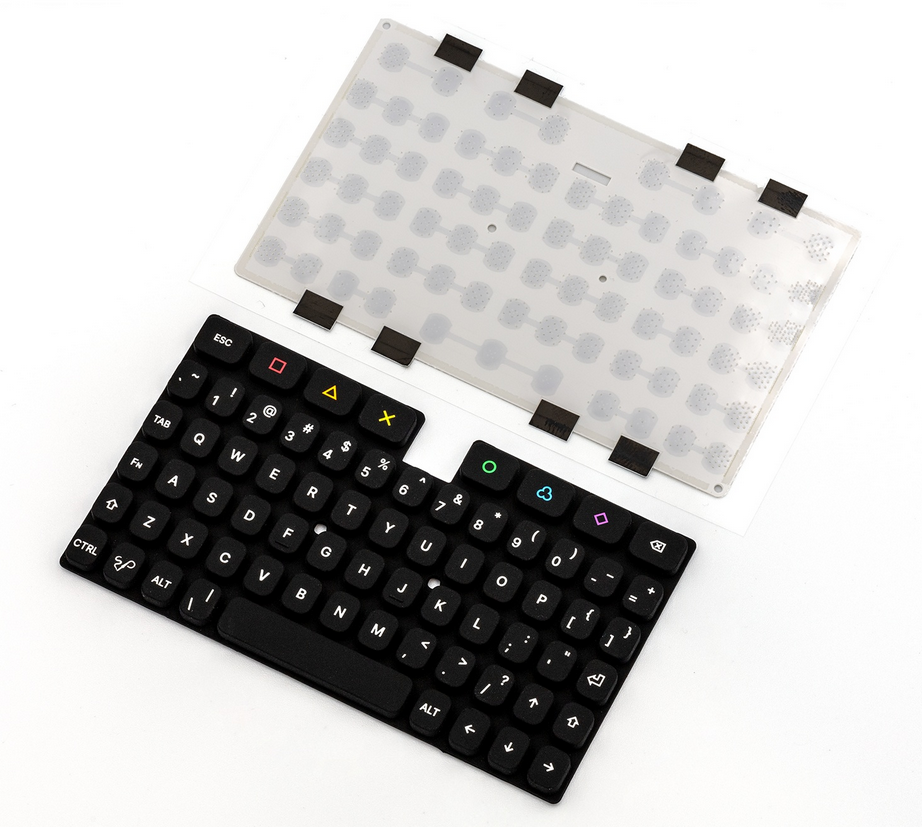
Did you make it to Supercon this year? If so, you hold a badge with a special keyboard — a custom job by Hackaday superfriend [Arturo182], aka Solder Party. Were you wondering about its backstory?
This 69-key alphanumeric silicone number has all the keys a hacker needs, plus a rainbow of extras that can be used for macros. According to [Arturo182], the keyboard has a tactile feel thanks to a snap dome sheet underneath the keys, and this makes it more comfortable for long thumb-typing sessions.
Be sure to check out the teasers at the bottom of the KeebDeck page, because there is some really exciting stuff. If you want to build one, GitHub is your friend, pal.
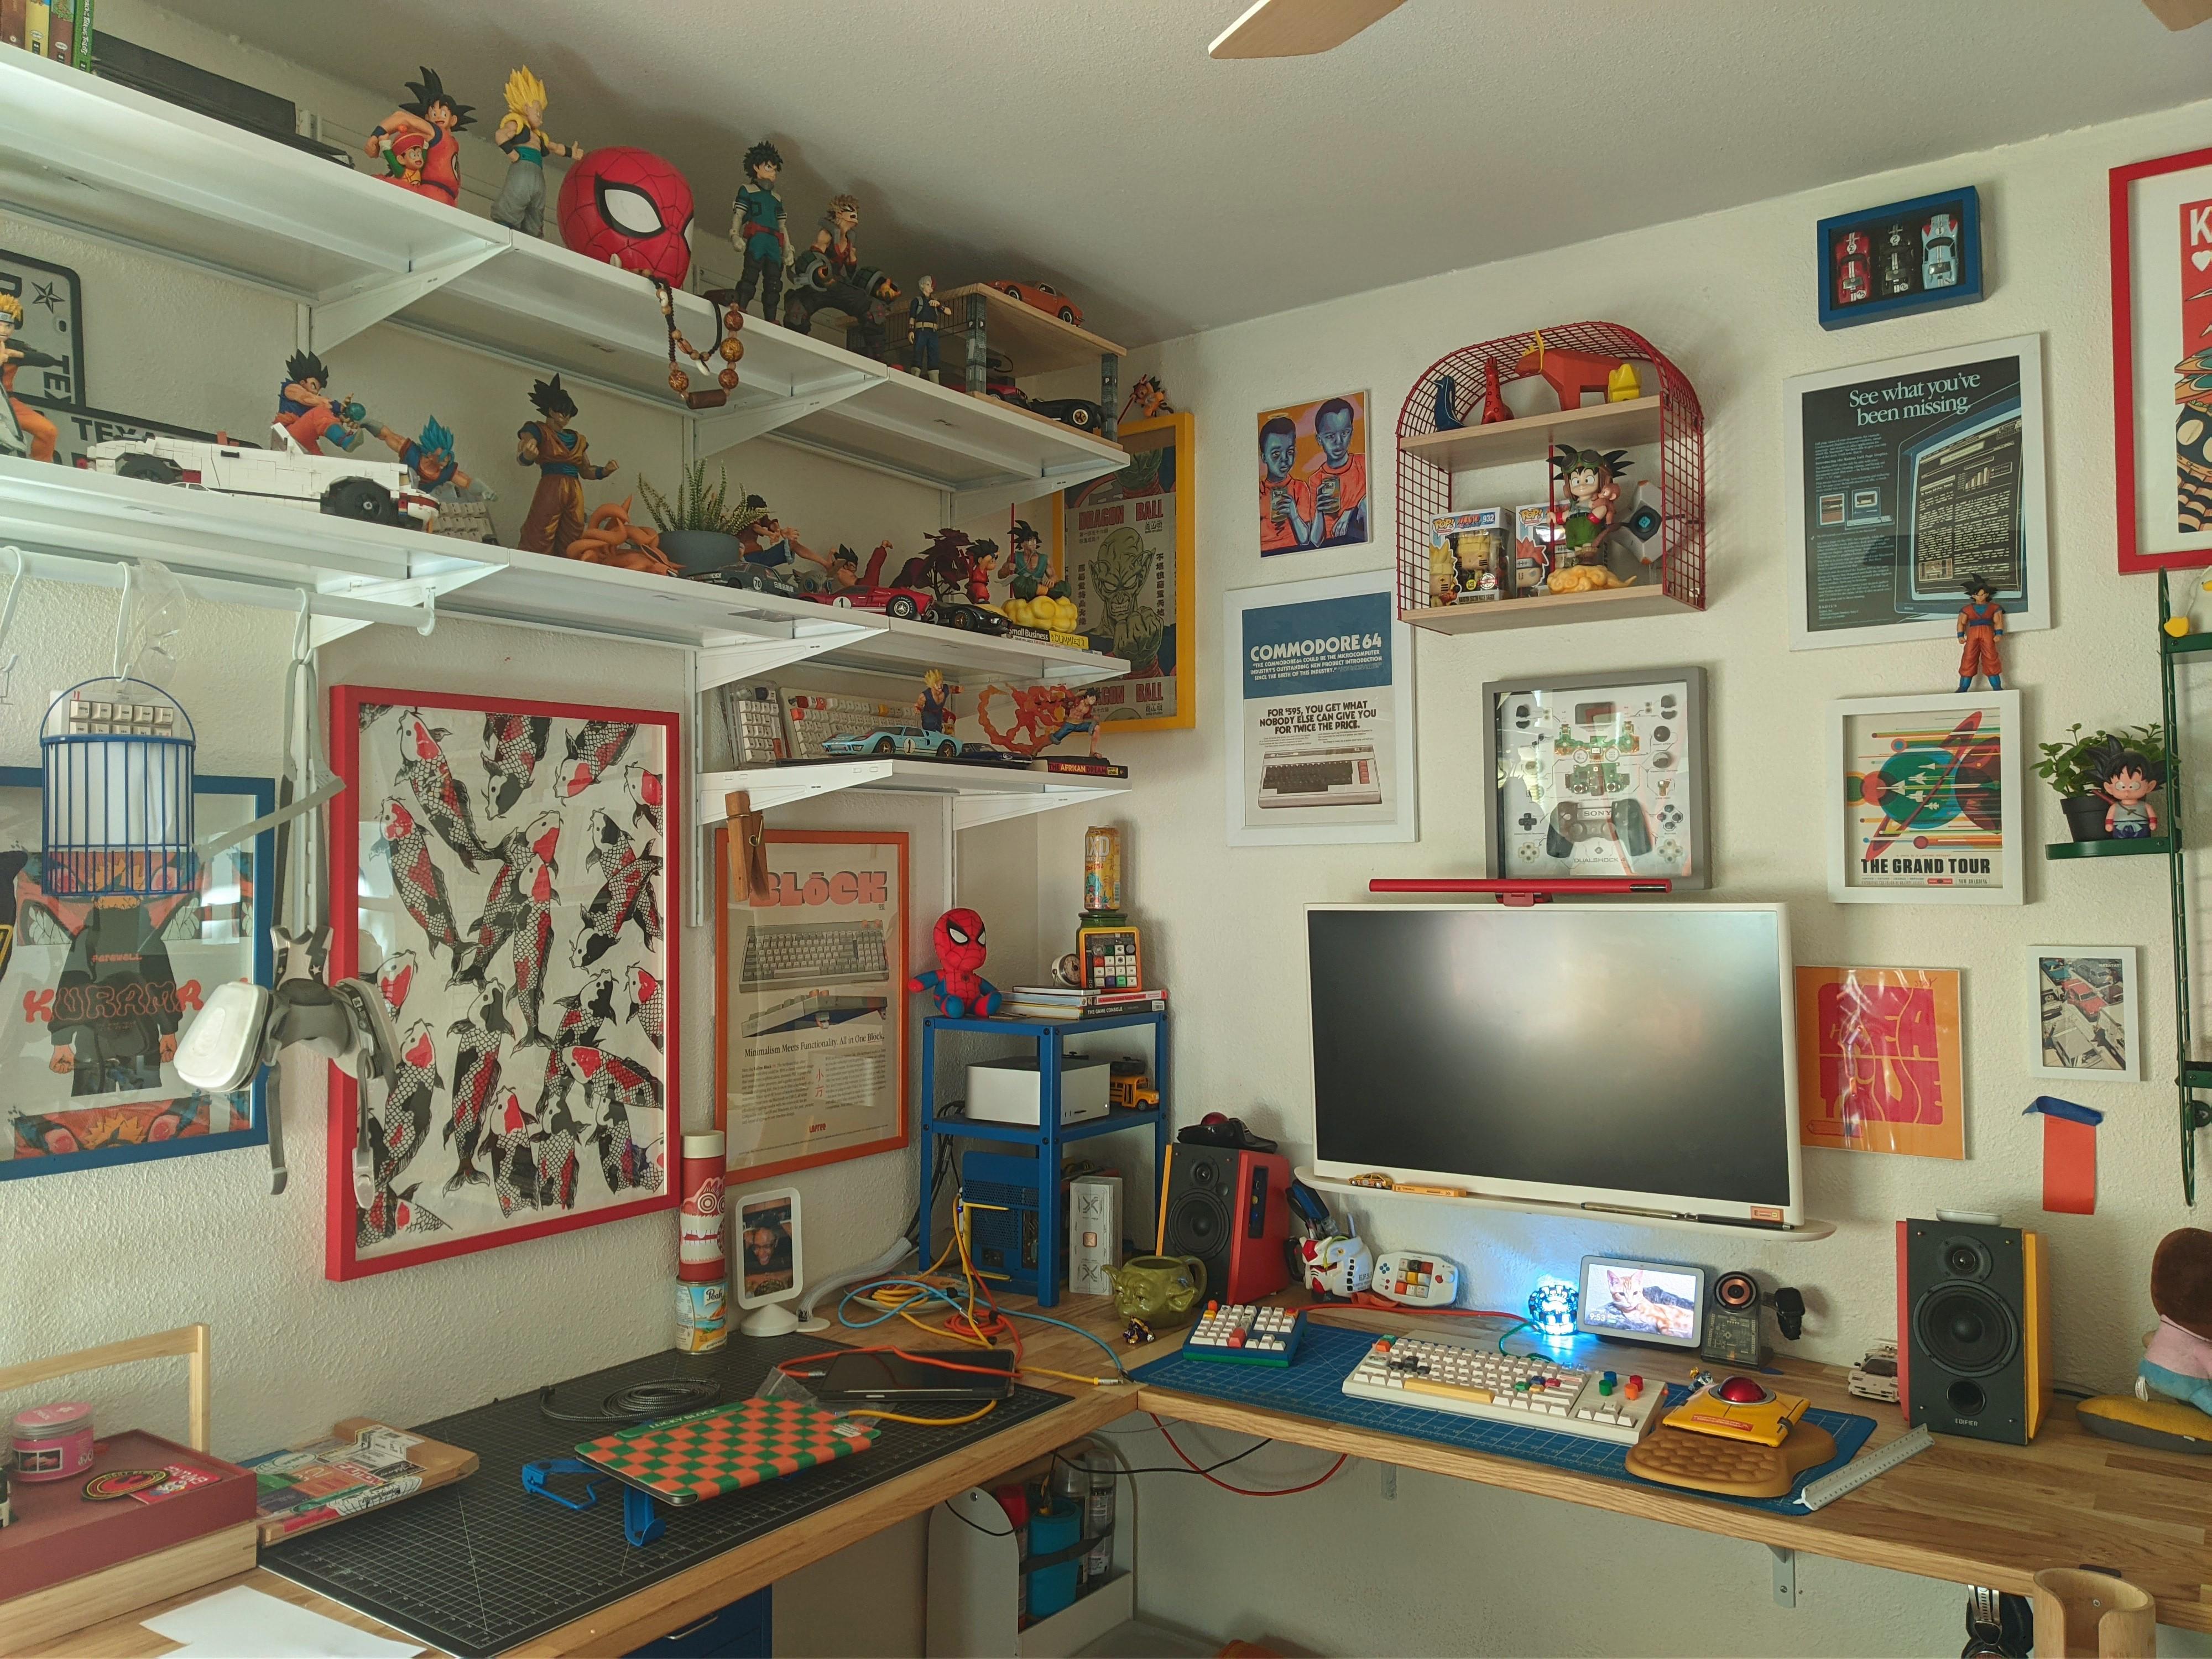
Here’s what I know: That’s a Nulea m512 mouse, the keyboard is a KBD Craft Sachiel LEGO number, and that there is a Cidoo macro pad. Best of all, [Tardigradium] hand-painted the speakers. Neat-o!
Do you rock a sweet set of peripherals on a screamin’ desk pad? Send me a picture along with your handle and all the gory details, and you could be featured here!
Historical Clackers: the Gerda Typewriter Was One of Accessibility
Some of us (okay, I) would have thought that most accessibility inventions are fairly recent, say, from the 1960s onward. But consider the Gerda typewriter, which was created in 1919 to enable blind and one-armed victims of WWI to become employable typists.
According to the Antikey Chop, it’s quite possible that the German government helped grease the wheels of this project so that these soldiers would have a usable typewriter with which to get on with life.
Three versions of this index typewriter were produced: a two-handed Gerda, one with a Braille index, and one with an English index. All entered the market the same year, and were produced for a total of three years.
The Gerda’s typewheel was quite like Blickensderfer, and some even had the DHIATENSOR layout. More expensive than last week’s Clacker (75 Marks), the Gerdas for blind and sighted people with two hands cost 195 Marks, and the one-handed edition was 205 Marks. Some of the two-handed models had rectangular, wooden key-tops, and others had round, glass-topped keys.
Finally, Module-Based Keyboard Is a Sensory Nightmare
I’ve been an early adopter of keyboards in the past. This is usually to bring them to your attention, either before they’re released, or just as they’ve come out. And never have I ever had this poor of an experience.
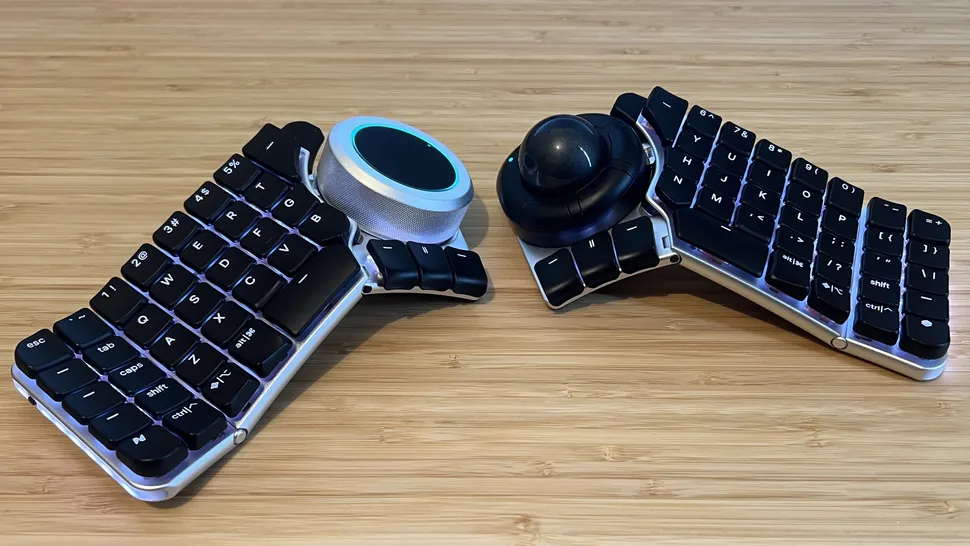
Games Radar recently reviewed a surprisingly not-failed Kickstarter keyboard that actually shipped, the Naya Create. It may not look like it, but the Create is supposed to be a gaming keyboard. What it does look like is mouse-focused, or at least mouse-forward. And that’s the point of it. Evidently.
Those big modules are interchangeable, and there are four of them so far: the Touch (a trackpad), Track (a trackball that falls out reliably), the Tune (a dial), and the Float, which is designed for space mousing around. They sound cool enough, and might actually be the best part of this whole setup.
To fully illustrate my poit I hvemt’t corrected any of the typos experieved typim this semtemve with the Naya Create while tryig to maintain my usual speed.
But according to Games Radar, the Naya Create is so not worth the $850 (!) asking price. It has ‘mushy, low-profile switches’ and clammy caps, and although the reviewer complains about the non-staggered keys, y’all know that those are my preference at this point.
And apparently, by default, Backspace is mapped to the left side. What? Of course, you can remap any key, whenever the software decides to work. Whenever the reviewer tried to save changes, the software would say that the keyboard is disconnected. Wonderful.
Despite these shortcomings, Games Radar says the keyboard is rock-solid aluminium with good hinges. So there’s that. Just, you know, swap out the switches and keycaps, and wait for software updates, I guess.
If you’re looking to jailbreak iOS 26.1 on your iPhone but are confused on where to look, you have come to the right place. But the news might not be what you'd been hoping for.
Alongside iOS 26.1 and iPadOS 26.1 that we already detailed, Apple has also released macOS 26.1, visionOS 26.1, tvOS 26.1, and watchOS 26.1 for compatible Mac, Vision Pro, Apple TV and Apple Watch devices.
Apple has just released for download iOS 26.1 final version in both OTA Update and IPSW links form. Alongside iOS 26.1 for iPhone, Apple has also released iPadOS 26.1 for iPad.
Apple has only just released the M5 version of the iPad Pro tablet, but rumors now suggest that it is already working on bringing an iPhone 17 Pro-like vapor chamber to the M6 version.
Rice Flour Vadam is a crunchy and tasty snack which everyone enjoys. It is made by cooking rice flour into porridge, then sun drying and finally frying to make a crisp snack or side dish for meals or variety rice or sambar rice or rasam rice. The vadams are light and very flavorful, perfect to have with rice meal or just as a snack anytime.
Making Rice Flour Vadam at home is easy but need little patience because of sun drying. Once done, you can store it and fry it whenever you feel like having something crunchy and tasty. Kids and adults both loves it, and it is really fun to make in small batches at home, specially on weekends when you have free time.
[feast_advanced_jump_to]
About Rice Flour Vadam
Rice Flour Vadam is a traditional South Indian snack made mainly with rice flour. The flour is first cooked to smooth porridge, then spiced with cumin and green chili, shaped into thin rounds and dried under sun. After drying completely, it is stored and deep fried as and when needed to make a crispy side.
This recipe is mostly served as side dish with rice meals, rasam or sambar. You can also eat it as crunchy snack with tea also. You can make them colorful using natural ingredients like tomato for orange or coriander leaves for green. It looks pretty and kids enjoy that.
The texture of vadam is light and crisp after frying. The flavor is mild but nutty from rice and little spice from cumin and chili. It is not oily if fried properly and makes perfect crunchy bite each time. Even if you are making for first time, it comes out good if you follow simple steps carefully.
I usually make Rice Flour Vadam in small batches during weekends. It takes few hours of sun drying, so I do it when weather is sunny.
Rice Flour Vadam Ingredients
Rice flour - I have used plain rice flour, it gives soft porridge and crisp vadams. You can also use home-ground rice flour, it works fine also.
Water - I used water to cook the rice flour into smooth porridge. I used 1 cup for mixing and 2 cups for boiling, sometimes little more if needed.
Jeera / Cumin seeds - I have added these, thus it adds nice aroma and light spice to vadam. You can crush little for better taste if you like.
Green chili - I have crushed them for mild heat. You can skip if kids are eating or use less, depends on your taste.
Food colors - I have added green and pink colors, left one white. You can also use natural colors like tomato or coriander if you want.
1.Take 1 cup of water in a bowl, add rice flour to it.Mix it well with a whisk so that there are no lumps, make it to a smooth flowing paste do this off the stove.Now heat remaining 2 cups of water in a pan.Let it boil.
2.When it starts to boil,add rice flour mixture to boiling water keeping in sim.Keep cooking stirring continuously, it will start to thicken.Add required salt.
3.Like this to a more thickish porridge consistency, at this stage add crushed green chillies and jeera.
4.Cook again till it thickens more..it will close to idli batter in consistency.Transfer to 3 different bowls and let it to cool down.It will thicken while cooling down so switch off accordingly.
5.Add colors, I added green,pink and left one as white itself.Take a spoon full and pour in plastic sheets / cloth.Slightly flatten it.
6.Do this till the entire mixture finishes.Letit dry in sun atleast for a day.
7.When it starts to turn crisp at the edges start peeling.
8.Peel it off and transfer to a tray and dry for another day or until it turns crisp.
9.Do this until the entire porridge gets over.Place it under the sun and let it dry for a day.Then store in a airtight box and fry when needed.Heat oil in a kadai - fry few vadams until crisp.It wil grow in size.
Serve it with any variety rice of your choice or have it as such.
Expert Tips
Porridge consistency - I usually make porridge slightly thinner as it thickens while cooling. Don't make too thick or vadams will be hard to spread.
Drying - Sun drying is must, I usually dry in corridor sunlight then move to balcony for few hours to remove moisture.
Shaping vadams - I use spoon to spread on plastic sheet or cloth, slightly flatten. You can make them round or irregular, works either way.
Frying - Oil should be hot, I test one vadam first. It should puff and float immediately.
Storage - Once completely crisp, store in airtight container. If it is chewy after frying, it needs more drying.
Serving and Storage
Serve Rice Flour Vadam as side with rice meals or just as crunchy snack. It goes well plain or with chutney if you like. You can store dried vadams in airtight container, it stays good for weeks.
Make sure they are completely dry before storing or else it will get soft. Before frying, you can break them into small pieces if needed, fry few at a time for best crispiness.
FAQS
1.Can I skip green chili?
Yes, you can skip it if you want plain vadams, especially for kids.
2.Should I use colors for vadams?
Yes, adding colors is optional. You can use natural or artificial colors as you like or leave it white itself.
3.How long to sun dry?
Usually it takes 1-2 days depending on sunlight and thickness of vadams.
4.Can I make in bulk?
Yes, but make sure each batch gets enough sun to dry completely, else it will be chewy.
5.Can I fry directly without drying?
No, you can't. It needs sun drying to get crispiness. If not dried properly, vadams will be soft and sticky.
If you have any more questions about this Rice Flour Recipe do mail me at sharmispassions@gmail.com. In addition, follow me on Instagram, Facebook, Pinterest, Youtube and Twitter .
Tried this Rice Flour Recipe ? Do let me know how you liked it. Also tag us on Instagram @sharmispassions and hash tag it on #sharmispassions.
Rice Flour Vadam is a crunchy and tasty snack which everyone enjoys. It is made by cooking rice flour into porridge, then sun drying and finally frying to make a crisp snack or side dish for meals or variety rice or sambar rice or rasam rice. The vadams are light and very flavorful, perfect to have with rice meal or just as a snack anytime.
Take 1 cup of water in a bowl, add rice flour to it. Mix it well with a whisk so that there are no lumps, make it to a smooth flowing paste do this off the stove. Now heat remaining 2 cups of water in a pan. Let it boil.
When it starts to boil, add rice flour mixture to boiling water keeping in sim. Keep cooking stirring continuously, it will start to thicken. Add required salt.
Like this to a more thickish porridge consistency, at this stage add crushed green chillies and jeera.
Cook again till it thickens more..it will close to idli batter in consistency. Transfer to 3 different bowls and let it to cool down. It will thicken while cooling down so switch off accordingly.
Add colors, I added green, pink and left one as white itself. Take a spoon full and pour in plastic sheets / cloth. Slightly flatten it.
Do this till the entire mixture finishes. Let it dry in sun at least for a day.
When it starts to turn crisp at the edges start peeling.
Peel it off and transfer to a tray and dry for another day or until it turns crisp.
Do this until the entire porridge gets over. Place it under the sun and let it dry for a day. Then store in a airtight box and fry when needed.
Heat oil in a kadai - fry few vadams until crisp. It will grow in size.
Serve Rice Flour Vadam with any variety rice of your choice or have it as such 🙂
Notes
Porridge consistency - I usually make porridge slightly thinner as it thickens while cooling. Don't make too thick or vadams will be hard to spread.
Drying - Sun drying is must, I usually dry in corridor sunlight then move to balcony for few hours to remove moisture.
Shaping vadams - I use spoon to spread on plastic sheet or cloth, slightly flatten. You can make them round or irregular, works either way.
Frying - Oil should be hot, I test one vadam first. It should puff and float immediately.
Storage - Once completely crisp, store in airtight container. If it is chewy after frying, it needs more drying.
Koozh Vadam is a crunchy and tasty South Indian style fryums made with rice batter. It is sun dried and stored, then fried whenever needed. It is a popular traditional side dish that is usually had along with sambar, rasam or even curd rice. Kids love it as a snack too because it is so light and crispy.
The recipe is made by cooking rice batter along with sago and spices, spreading thin on cloth or plastic sheet, drying under hot sun for few days and then deep frying. The result is a crisp and airy vadam that almost melts in mouth. It is very simple once you get the method right, and storing them makes it easy to serve anytime with meals.
[feast_advanced_jump_to]
About Koozh Vadam
Koozh Vadam is one of the oldest style vadams prepared in South Indian homes during summer time. Families make them in big batches and store for months to use as a side dish. The main base is rice and sago which makes the texture light and crunchy after frying. The taste is very mild with little spice from green chillies and nice aroma from jeera.
Traditionally these vadams are dried under the scorching summer sun which makes them perfect crispy. If the drying is not done properly then the vadams turn chewy instead of crunchy. That is why many households prepare it in peak summer days. The batter thickens on cooling, so timing and stirring also matters to get good shaped vadams.
The texture is very light and crisp, it does not feel oily when fried properly. Jeera gives the typical flavor and the rice base makes it puff up nicely in oil. Kids usually enjoy munching them as snack, while for elders it is more of a side dish with meals. It is also a nice option on days when there is less vegetables at home.
I tried making these in small batch as it was my first attempt, and it came out quite good. It dried in two days because the sun was strong, and the vadams fried really well. It is quite satisfying to make homemade vadams and stock them in airtight jar for later use.
Koozh Vadam Ingredients
Raw rice - I have used regular raw rice, soak and grind to make the base batter. It gives the body and crispness for the vadam. You can use any raw rice you have.
Sago - Adding sago makes the vadam extra light and gives small bubble like texture. You can use nylon sago or regular, both works.
Water - Water is used to cook the rice batter and bring it to right consistency. You can adjust a little depending on rice type.
Green chillies - Ground green chillies gives the mild spice kick in the vadam. You can reduce or increase as per your liking.
Jeera - Jeera adds nice aroma and tiny bites when you eat fried vadam, also helps in digestion.
Roasted jeera powder - This gives extra flavor and makes the vadam more aromatic. If not available you can skip.
Why This Recipe Works
This recipe is a traditional one that uses very simple pantry ingredients.
It is a crunchy and light snack that goes well as side dish or even as evening bite.
You can make in big batch during summer and store for months, it stays good.
The combination of rice and sago gives perfect airy crispness after frying.
It is a recipe that brings back homely feel and is fun to make together in family.
1.Measure the ingredients and keep it ready. Soak it at least for 4 hours. Mix both and rinse it well and drain water. Add it to mixer along with green chili.
2.Grind it to a smooth paste, you will see full sago here and there that is ok. Heat water in a pan.
3.When it starts to boil add the rice mixture. Keep the flame in low, stir with a whisk to avoid lumps. Keep stirring, it will start to thicken.
4.Cook till it comes together. When it starts to turn slightly transparent and thick add salt, jeera and roasted jeera powder, cook for few more mins until its thick. Switch off.
5.Let it cool down. Then take a star press, fill the press with dough and start pressing.
6.Do this till the entire mixture finishes. Press it horizontally, don't worry if it doesn't come as continuous lines, anyways we are going to break it later. Dry it in hot sun till there is no moisture. When it starts to turn crisp at the edges start peeling and turn to other side. Once the other side is also dried, transfer to a wide tray and let it dry. Let it dry like this in daylight at least for 3 days. I dried it for 3 days.
7.Then store in a clean container and use it as and when needed. Heat oil in a kadai. Heat oil in a kadai. Fry till it puffs up completely and is slightly golden in color.
Serve it with any variety rice of your choice or have it as such
Expert Tips
Cooking batter - Keep the flame low when cooking rice batter, keep stirring else lumps will form. I usually stand near and keep mixing.
Drying - Sun drying is very important, I have dried for 2 full days and it turned crispy. If the sun is less, dry for more days.
Testing - Always test fry 1 vadam before storing. If it is chewy, it means not dried enough. Keep it back for more drying.
Oil heat - Oil should be really hot. I drop one vadam to test, if it raises immediately then the oil is ready.
Storing - Store in clean airtight jar after vadams are fully dry and fried ones are cooled. This keeps them fresh longer.
Serving and Storage
Serve Koozh Vadam with curd rice, sambar rice or rasam rice. It also goes well as crunchy snack with tea time. Store the sun dried vadams in airtight jar and fry whenever needed. Once fried, you can keep in box and finish same day for best crisp taste.
FAQS
1.Can I skip sago?
Yes, you can skip sago but the texture will be little dense compared to the light version.
2.How many days should I dry vadam?
It depends on sunlight, usually 2-3 days in strong sun is enough.
3.Can I dry vadam inside home?
Not really, it needs good hot sun to dry properly, else it will turn chewy.
4.Why my vadams are chewy after frying?
It means they are not dried fully. Keep drying for one more day.
5.How long can I store vadam?
Sun dried vadams stays good in airtight jar for many months, fry only in small batch as needed.
If you have any more questions about this Koozh Vadam Recipe do mail me at sharmispassions@gmail.com. In addition, follow me on Instagram, Facebook, Pinterest, Youtube and Twitter .
Tried this Koozh Vadam Recipe ? Do let me know how you liked it. Also tag us on Instagram @sharmispassions and hash tag it on #sharmispassions.
Koozh Vadam is a crunchy and tasty South Indian style fryums made with rice batter. It is sun dried and stored, then fried whenever needed. It is a popular traditional side dish that is usually had along with sambar, rasam or even curd rice. Kids love it as a snack too because it is so light and crispy.
Perfect curry to make when you have no veggies left in your fridge :) All you need is tomatoes, yogurt and papad as main ingredients. A delectable curry will be ready in no time. It is a famous Rajasthani dish, most of us know about it and yes, it is cooked in 10 different ways:) I have tried making it both ways, with and without onions and I like it better with no onions. My husband enjoys this papad ki sabji a lot more than I do actually :) so this curry is here to stay in my household. It goes well with khoba roti or any other paratha or simply with the plain rice.
Making papad (thin, fried accompaniment) is a summer affair and I am sure every kid of my generation must have spent their few days of summer vacation helping out their moms and aunts in rolling, spreading, drying papads in the backyard or on the terrace under the scorching heat and then having a cold beverage like lemon sherbet or sol kadi to cool themselves. :) Real fun days it used to be :)
Let us check out the recipe.
Ingredients:
4 big papads dry roasted or fried or done in microwave*
2 tomatoes
2-3 green chillies
1 inch ginger
1 tbsp oil
1/2 cup curds/yogurt room temperature
1/2 cup water
1 tsp cumin seeds (jeera)
pinch of asafoetida (hing)
1 tbsp kasuri methi (dry fenugreek leaves)
1/2 tsp chilli powder
1 tsp coriander powder
1/2 tsp garam masala
salt to taste
handful of cilantro chopped
Preparation:
In a blender, grind tomatoes, chillies and ginger, keep aside.
In a wide mouth pan, heat oil, add cumin seeds till they splutter, add hing, kasuri methi and saute for a minute or so.
Add tomato mixture along with the chilli pwd, coriander pwd and garam masala.
Mix everything and let it cook till oil separates from the tomato gravy.
Now sim the gas and add whisked yogurt plus water slowly while you keep stirring the gravy, else it will curdle in the gravy. Bring it to a boil, add salt as per taste.
Now take the fried/roasted papads, make med-small pieces and slowly add to the gravy. Cover and cook for a couple of more minutes till the papads soak in the gravy.
Your gravy is ready. Serve it with kobha roti or with rice.
Notes:* Papads can be roasted or fried anyway you want. You can also add raw papad cut in pieces and cook till done.
njoY!! happY cookinG!!
recipe adapted from nisha madhulika's website.
papad
fried papad
Health Benefits: This curry is made with tomatoes and yogurt as a base with little spices. The debate that tomato is a fruit or vegetable is still on :), nonetheless, it is considered as a superfood. It is rich in antioxidants. It has lycopene which helps in fighting chronic diseases and helps in delivering other health benefits. It is an excellent source of Vit C, potassium and cholene. Yogurt is no. 1 probiotic food. It is known to be helpful in digestion and is a good source of calcium. Papad is mainly made from peeled black flour (protein), it is seasoned and consumed in either fried, roasted or deep fry form.