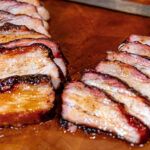
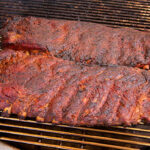
Smoked Hot Honey Pork Belly is the ultimate combo of rich smoke, sweet heat, and sticky glaze. I start with thick-cut slabs of pork belly, smoke them low and slow at 275°F, then finish with a buttery hot honey-vinegar BBQ glaze that caramelizes perfectly.
The result? Tender, glossy bites that melt in your mouth. Great for appetizers, tailgates, or any time you want bold BBQ flavor straight from the pit.
Smoked pork belly finished with a buttery hot-honey glaze – sweet heat, rich smoke, snack-worthy flavor.
Ingredients
1 whole pork belly (4–5 lbs total), split into two smaller slabs
Killer Hogs Hot BBQ Rub, for coating the pork belly
1 stick (½ cup) unsalted butter
¼ cup hot honey
½ cup Killer Hogs Vinegar Sauce
Instructions
Pit Temp: 275°F indirect
Final Internal Temp: 202°F
Prep the Pork Belly
Trim any thin edges or loose fat so both slabs cook evenly. Split the pork belly in half for easier handling and appetizer-sized portions.
Season
Apply a generous coat of Killer Hogs Hot BBQ Rub to all sides — top, bottom, and edges. Pat the rub in gently so it sticks.
Fire Up the Grill
Set your pit to cook at 275°F. – For charcoal, build a two-zone fire (coals on one side, cool zone on the other). – For pellet grills, hold a steady 275°F. Cook the pork belly on the indirect side of the pit.
Smoke
Place both slabs on the cool side of the grill. Let them cook about 1½ hours until the surface turns a deep mahogany color.
Check Internal Temperature
Continue cooking until the pork belly reaches 202°F internal. At that point, the fat will be fully rendered and the meat tender and jiggly.
Make the Hot Honey Glaze
In a small saucepan or foil pan, combine: – 1 stick butter – ¼ cup hot honey – ½ cup Killer Hogs Vinegar Sauce Warm until smooth
Glaze and Finish
Place each slab in a small foil “boat” to catch drips. Brush on a heavy coat of the hot honey glaze every 20–30 minutes until it caramelizes into a sticky layer. (Optional: a light dusting of rub over the glaze at the very end can deepen the bark, but it’s not required.)
Rest and Slice
Let the pork belly rest 10–15 minutes before slicing so it holds together. Cut into thick slices or bite-size cubes and serve right off the board.
That’s it — pork belly turned into a show-stopper: slow smoked until the fat’s silky, then glazed with sticky hot honey and butter for sweet-heat perfection. Slice it, serve it, and watch it disappear.
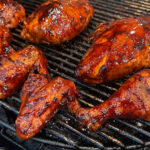
Slow-smoked wings get seared for crispy skin, then tossed in a tang-forward Mississippi white BBQ sauce—juicy, smoky, and done right.
Ingredients
1 family pack whole chicken wings (about 12–14 whole wings)
Spicy ranch seasoning (generous coating)
Killer Hogs AP Seasoning (generous coating)
Killer Hogs Mississippi White Sauce (or your favorite white BBQ sauce)
Instructions
Season the Wings
Trim and separate wings if desired, or leave them whole.
Season all sides generously with spicy ranch seasoning and AP seasoning. Let them sit while you fire up the grill.
Set Up the Grill
Prepare a 2-zone fire on your grill (one side hot, one side cool).
Target grill temperature: 375–400°F.
Pellet grill works too — just hold temps steady in that same range.
Smoke the Wings
Place seasoned wings on the cool side of the grill.
Close the lid and cook about 30 minutes.
Flip the wings and cook another 15–20 minutes, until they reach 180–185°F internal.
Crisp Over the Hot Zone
Working in batches, move wings directly over the hot side of the grill.
Sear for 2–3 minutes per side until skin is golden and lightly charred.
Use the cool side as a holding zone if wings start cooking too fast.
Final target internal temp: 195°F — this ensures fat is rendered and the meat pulls clean from the bone.
Sauce & Serve
Remove wings from the grill and toss in Killer Hogs Mississippi White Sauce (or your favorite tangy white BBQ sauce).
Serve hot and enjoy with extra sauce on the side.
Here’s the deal—bone-in wings get a liberal rub of spicy ranch and AP seasoning, then they smoke low and slow on the cool side of your grill until they hit about 180–185°F. Next stop: the hot zone, where I give them a quick sear until the skin’s golden and laced with char. Final move? Dunk ’em in that killer Mississippi White Sauce—tangy, creamy, and absolutely mouthwatering. These wings—smoky, juicy, and loaded with tangy white BBQ flavor—hit different.
It’s every griller’s dream: to build a lavish outdoor kitchen. We know just the people to tell you how. We met up Wildfire Outdoor Cooking at the Hearth, Patio, and Barbecue Show in New Orleans recently. We asked them to share their advice on the best way to build an outdoor kitchen.
Why Luxury Grills Are Worth the Money: Reasoning and Rationale
1. Premium Materials & Craftsmanship
At the recent Hearth, Patio and Barbecue Expo in New Orleans, we’d recently become acquainted with Wildfire Outdoor Living products. These handsome luxury grills are constructed using 304-grade stainless steel, which ensures long-term durability, even in harsh outdoor environments. This sturdy material protects against rust and features refined finishing touches that reflect high-end craftsmanship not found in less expensive grills. With a luxury grill, you elevate your equipment in build, looks, and longevity.
2. Performance That Rivals Professional Kitchens
With a luxury grill, you can produce restaurant-quality results with precision burner control and high BTUs. Among Wildfire Outdoor Living’s unique products is a 15-inch griddle, which delivers powerful cooking performance while taking up minimal space – perfect for maximizing function in compact outdoor kitchens.
3. Designer-Level Aesthetics
Wildfire Outdoor Living products make customizing your luxury grill simple and easy. Choose upgraded designer finishes with modern knob and handle options to complement the grill’s cabinetry—black stainless steel and timeless traditional stainless steel.
4. Longevity and Warranty Support
The company’s outdoor kitchen components are backed by a lifetime warranty – unusual in the grill industry – and are built to last with proper care. Replacement parts, service support, and a focus on long-term satisfaction make it a reliable long-term investment. We’re sure you won’t miss purchasing a new grill every two to three years.
If you’re in the market for a new grill or griddle – or, to build an entire outdoor luxury kitchen, investigate the Wildfire Outdoor Living line-up of high-quality equipment. Luxury materials, high-end artistic design, and restaurant-level performance make for an extraordinary combination. For more information, go to: https://wildfireoutdoorliving.com
Celebrate Labor Day Weekend in your outdoor kitchen with these Southern Cuisine-inspired recipes!
I took a regular spiral ham and gave it the double-smoke treatment. Then I hit it with a hot honey glaze that gives it that sticky-sweet heat. Not too hot for the family… just a little kick.
And really, smoked ham is about the easiest thing you can cook… and you can use whatever glaze you want. Just make sure you smoke one for your Easter dinner cause left-over holiday ham from a ziplock in the fridge is one of the small joys of life!
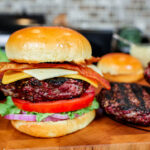
Ground brisket WITH raw bacon to make the best smoked burgers. These brisket bacon burgers are rich, smoky, and packed with flavor. The brisket gives you that beefy bite and the bacon brings in a smoky saltiness that puts ’em over the top. You might wanna wear a bib — these burgers are juicy!
Ingredients
16 lb whole packer brisket (untrimmed)
2–3 lbs bacon ends & pieces (or thick-cut bacon)
Killer Hogs Steak Rub (or salt, pepper, garlic)
Burger buns (toasted)
Sliced cheese
Pickles
Red onion slices
Lettuce
Tomato slices
Big Malc’s Burger Sauce (or your favorite burger sauce)
Big Malc’s Burger Sauce
½ cup Blue Plate mayonnaise (or your favorite mayo)
1 tablespoon yellow mustard
¼ cup sweet pickle relish (juice and all)
1 tablespoon freshly grated onion (with juice)
½ teaspoon Killer Hogs TX Rub (or a mix of coarse salt & black pepper)
½ teaspoon paprika (for color)
1–2 teaspoons red wine vinegar (just a drizzle)
Instructions
Prep the Brisket and Bacon
Cut the brisket into 1½ to 2-inch chunks, separating the flat from the point if needed.
Keep the fat on — you want a good lean-to-fat ratio for juicy burgers.
Cut bacon into similar-sized pieces so it runs through the grinder easily.
Chill the meat in the freezer for 20 minutes before grinding.
Grind the Meat
Alternate brisket and bacon as you feed it through the grinder to evenly mix.
Grind the meat with the large plate first then if you want a finer grind, repeat the grind process
Chill the ground brisket-bacon mix in the refrigerator until ready to form patties.
Form the Burger Patties
Weigh out about 8 oz portions and loosely form into balls.
Use a burger press or hand-form into patties. Use parchment or a Ziploc bag for easy cleanup.
Make a slight dimple in the center to prevent the patties from puffing up too much.
Season the Burgers
Season the outside of each patty with Killer Hogs Steak Rub or your favorite burger seasoning.
Remember the bacon adds salt, so don’t overdo it.
Fire Up the Smoker
Set your pit to 275°F using Royal Oak briquettes for a coal bed then add wood splits for heat.
Place burgers directly on the grates and smoke for about 45 minutes, flipping after 30.
Cook to an internal temp of 145°F for a juicy medium finish.
Build Your Burger
Toast your buns and spread Big Malc’s Burger Sauce on both sides.
Layer on: Pickles, Red onion, Lettuce, Tomato, Double cheese (cheddar + Swiss), Smoked brisket bacon patty
Crown it with the top bun and get ready to lean in.
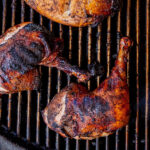
To me, jerk chicken is something special. It’s smoky, spicy, sweet and packed with flavor. And it makes your whole backyard smell amazing when your cooking it!
Now, I’m no Jamaican pitmaster, but I did my best to stay true to the authentic Jerk Chicken I’ve had in the Caribbean. I started with a killer marinade, added just the right amount of char and even made a fiery dipping sauce to serve with it.
This spicy jerk chicken recipe is smoky, juicy, and packed with bold Caribbean flavors! Whether you’re grilling or smoking, I’ll show you how to make the BEST jerk chicken with the perfect balance of heat and sweetness.
Ingredients
For the Chicken & Marinade:
1 whole chicken, cut into quarters
1 bottle Walkerswood Jerk Marinade
1 tablespoon Malcom’s Jammin’ Jerk Seasoning
1 cup dark brown sugar
1 Scotch Bonnet or Habanero pepper, thinly sliced
1 bunch green onions, chopped (green parts for marinade, white parts for sauce)
4–5 cloves garlic, minced
Juice from 1/2 lemon
4 oz pineapple juice
1 tablespoon Scotch Bonnet pepper sauce
1 tablespoon Worcestershire sauce
For the Jerk Dipping Sauce:
1/2 stick butter
White parts of the green onion, finely chopped
4 cloves garlic, minced
1 Scotch Bonnet or Habanero pepper, finely chopped
1 tablespoon Scotch Bonnet pepper sauce
4–5 dashes Worcestershire sauce
1 teaspoon Malcom’s Jammin’ Jerk Seasoning
1/4 cup brown sugar
1/4 cup honey
Juice from 1/2 lemon
Instructions
Marinate the Chicken:
Cut the whole chicken into quarters, separating white and dark meat. Score the chicken breasts with shallow slits to help with even cooking and better flavor absorption.
Place the chicken quarters in a large ziplock bag. Pour in the jerk marinade and add Malcom’s Jammin’ Jerk seasoning.
In a separate bowl, whisk together the remaining marinade ingredients, then pour into the ziplock bag.
Squeeze out excess air, seal the bag, and gently massage the marinade into the chicken. Refrigerate overnight (or at least 8 hours).
2. Prepare the Grill:
Remove the chicken from the marinade and lightly season with a little more Jerk seasoning.
Set up a charcoal grill for two-zone cooking at 350°F. (I used my Primo ceramic grill, but any grill works.)
3. Cook the Chicken:
Place the chicken on the indirect side of the grill. Cook for about 45 minutes, or until the internal temperature reaches 160°F for white meat and 175°F for dark meat.
4. Make the Jerk Dipping Sauce:
Place a heavy-bottomed pot directly over the hot coals.
Add butter, white parts of the green onion, garlic, and peppers. Sauté for 2-3 minutes until softened.
Stir in the remaining sauce ingredients and bring to a gentle boil. Remove from heat and pour into a small dish to cool.
5. Char & Serve:
Move the chicken quarters to the direct heat side of the grill.
Sear for 1-2 minutes per side, just until you get that perfect jerk char.
Remove from the grill and let rest for 5 minutes before serving.
Serve hot with the jerk dipping sauce on the side.
Enjoy the bold, smoky, and spicy goodness of this Jerk Chicken!
If you love your ribs to have a grill flavor – this is the recipe for you! They cook fast, they stay juicy and the flavor is better than the best grilled pork chop you’ve ever had. Plus you can get creative with this one – use whatever rubs you like, use whatever mop you like and just get to burning and turning some ribs!
This method cooks some FIRE ribs really fast. We use the charcoal and the grill to impart some serious flavor – and we baste the ribs the entire cook so they come out juicy, tender and oh so delicious!
Ingredients
2 slabs St. Louis Cut Spare Ribs
1/4 cup Killer Hogs Hot Rub
28oz apple cider vinegar
1/4 cup fine sea salt (feel free to add less salt to suite your taste)
1/4 cup ground cayenne pepper
juice from one lemon
Instructions
Trim the excess fat and remove the membrane from each slab of ribs.
Season the ribs on both sides with a light coat of Killer Hogs Hot Rub.
Prepare a charcoal grill for 2 zone cooking at 300°F.
Place the ribs over the direct heat side of the grill – the cool zone is just in case you need to get them away from the fire. These ribs cook over the direct heat side the entire cook.
Combine the vinegar, salt, cayenne pepper, and lemon juice in a quart mason jar. Shake it well.
Flip the ribs every ten minutes keeping the grilll temperature steady at 300°F.
Once the outside begins to dry out start mopping with the basting liquid using a bbq mop.
Continue to flip and mop until the internal temperature reaches 198-200°F.
Move the ribs over to the indirect heat side for 5-10 minutes.
Cut the ribs into individual bone pieces and serve with additional mopping sauce for dabbing.
Flanken Ribs have a rich, beef flavor – and when you take the time to marinade them and then chargrill them directly over hot coals, you get a delicious bite of beefy goodness!
For this recipe I went with an Asian inspired marinade… but you could go with any flavors. You could glaze them with a sauce at the end… get real creative with this recipe.
Grilled Beef Flaken Ribs – Flaken Ribs have a rich, beef flavor – and when you take the time to marinade them and then chargrill them directly over hot coals, you get a delicious bite of beefy goodness!
Ingredients
4lbs flanken-cut beef ribs
1 bunch green onions – chopped divide the green and white parts
Place the white parts of the onion in a mixing bowl and add: minced garlic, ginger, soy, worcestershire, balsamic vinegar, hoisin, and TX. Stir to combine.
Add the beef flanken cut ribs to a large ziplock bag and pour in the marinade. Squeeze the air out of the bag and gently toss the ribs around so everything is coated in the marinade. Place the bag in the refrigerator for at least an hour.
Prepare a grill for 2 zone cooking – hot side and cool side. Grill the ribs over the direct heat zone (hot side) of the grill. Work in batches so the grill isn’t over crowded. Cook the ribs on each side until they begin to char about 3-4 minutes each side. Then move them over to the cool zone until all of the ribs are char-grilled.
Place the ribs on a foil lined baking sheet, wrap the foil around the top to seal off the heat, and rest the ribs for 20-30 minutes.
To serve place the ribs on a large cutting board or platter and top with the green tops of the onions.
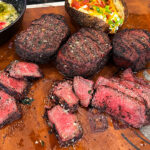
I started with a Whole Beef Tenderloin, then trimmed it into Filet Mignon Steaks – but you can start with Filet Mignon Steaks straight from the meat counter. To cook these steaks, I used a reverse-seared on a charcoal grill and brought them up slowly to nail the doneness. Then I moved them directly over the coals and basted with Garlic Butter while these Filets got flame-kissed over open flames.
I started with a whole beef tenderloin, trimmed it myself – because they are a little cheaper and you end up with extra meat for other recipes too. After I trimmed these filets into thick steaks, I seasoned them simply – but not lightly – and set up my Primo Grill for a two-zone fire.
Started the steaks out slow on the indirect side and when they hit 115 internal I seared them directly over the hot coals and basted them with garlic butter. I like them medium rare, so I only seared them for 1-2 minutes each side (basting them with the garlic butter the whole time). Took them off, let them rest and these were some of the best steaks I’ve ever cooked!
Whole Beef Tenderloin trimmed into Filet Mignon Steaks and cooked with a reverse-seared – then basted with a Garlic Butter while they get flame-kissed over open flames
Drizzle the outside of each steak with worcestershire sauce and season heavily with TX Rub (coarse salt and black pepper can substitute).
Set up a grill for 2 zone cooking – hot and cool side. I used my primo ceramic grill running Royal Oak Lump charcoal but any grill will work.
Keep the grill between 275-300°F for the first stage of the reverse sear. Place a probe thermometer in the center of one of the filets and set each steak on the cool side of the grill to start away from the direct fire.
Once the internal temperature reaches 115°F – about 25 minutes; remove the steaks from the grill and place on a foil lined sheet pan. Rest the steaks for about 15-20 minutes. You will notice the temp continues to climb but it will eventually stop and start to drop. This is where you want to do the sear stage.
While the filets are resting – add a drizzle of olive oil to an iron skillet. Add the garlic and shallot and saute until soft – season with a little TX rub for flavor.
Move the skillet off the direct heat and add the butter. Stir until the butter melts about 2 minutes and add the chopped parsley.
Brush each filet with the butter mixture and place over the direct heat (Fire side) of the grill for 1 minute on each side. Continue brushing with butter at this point and only cook until a char starts to form. It should take about 1-2 minutes total each side. It is important to not walk away and be extremely careful at this point because the fire will be rolling.
Remove the steaks from the grill once seared and brush with additional garlic butter. Rest the steaks for 5 minutes and serve.
Grilled & Sauced BBQ Chicken – I start with a whole, cut-up chicken (2 wings, 2 thighs, 2 legs and 2 breasts) and then brined it in a BBQ Brine for 2 hours, then seasoned with BBQ Rub and grilled. At the end, each piece of chicken is glazed with a slightly spicy bbq sauce and allow to caramelize and char a little. The final product is juicy, tangy, sweet and saucy Old School BBQ Chicken.
Ingredients
8pc chicken skin on, bone in
2 cups water
1 bottle Wickers BBQ Marinade
1 lemon sliced
1/4 cup Malcom’s Bird Brine
1/2 cup Killer Hogs Hot Rub (divide into 2 portions)
1 cup Killer Hogs The BBQ Sauce
1 cup Killer Hogs Vinegar Sauce
2oz Killer Hogs Hot Sauce
Instructions
Place the chicken pieces in a large zip top bag and pour in the Wickers marinade. Add 1/4 cup Bird Brine and 1/4 cup of Hot Rub to the water and stir well. Pour this mixture over the chicken and squeeze the lemon slices then drop in the bag. Make sure all pieces of chicken are covered and close the bag squeezing as much air out as possible. Place bag in the refrigerator for 4-6 hours at least.
Remove the chicken pieces from the brine and place on a raised wire rack to air dry for 30 minutes. Season with Hot Rub on all sides.
Prepare a charcoal grill for indirect cooking using a 2 zone method – Hot side and Cool side. Adjust the air vents so the grill temperature reaches 350 degrees.
Place the chicken on the cool side of the grill skin side up until the internal temperature reaches 150-155 degrees.
Combine the bbq sauce, vinegar sauce, and hot sauce in a small container. Brush the skin side with the sauce and cook for 10 minutes. Flip each piece over and brush sauce over the back side and cook for 10 minutes.
Right at the very end move each piece of chicken over to the direct heat side of the grill and glaze on both sides. Don’t walk away because it can burn really quick. The breast should reach an internal temperature of 165 and the dark meat should go to at least 175.
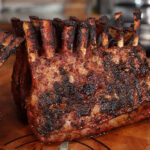
Reverse Seared Rack of Lamb is the perfect way to nail the Medium Rare inside and get a nice, Chargrilled Crust on the outside. And forget about the traditional Mint Jelly served with Lamb because this Rack of Lamb has a Pepper Jelly Glaze.
Reverse Seared Rack of Lamb is the perfect way to nail the Medium Rare inside and get a nice, Chargrilled Crust on the outside. And forget about the traditional Mint Jelly served with Lamb because this Rack of Lamb has a Pepper Jelly Glaze.
Season the racks of lamb with a light coat of Gyro Hero Greek Seasoning.
Place the racks in a large ziplock bag or container and pour the marinade over the top. Close the bag and make sure all of the meat is covers with the marinade. Refrigerate for 1 hour minimum.
Remove the lamb from the marinade and re-season with a little more Gyro Hero Greek Seasoning.
Prepare the Primo smoker for indirect cooking at 250 degrees.
Place the racks of lamb on the pit, insert a meat probe thermometer to monitor internal temperature and cook the lamb until the internal temp reaches 115 degrees.
Remove the lamb from the pit and rest for 30 min. While the lamb rest remove the heat diverter plate from heat grill for direct searing at 550 degrees.
Combine the pepper jelly glaze ingredients below in a small bowl. Reserve a little for serving with the lamb.
Place the lamb over the hot coals and brush with the pepper jelly glaze. Sear for about 1 minute on all sides.
Repeat for all 3 racks then slice into individual chops and serve with a drizzle of the reserved pepper jelly glaze.
Cooking outdoors has become increasingly popular in recent years, and it’s no surprise why. Cooking outdoors allows you to enjoy the fresh air, sunshine, and company of friends and family while preparing delicious meals. Oh, and let’s not forget flavor!
Two of the most popular cooking options for outdoor cooking are griddles and grills. In this post, I will compare these two cooking appliances, and we’ll take a look at the pros and cons of both cooking methods and help you determine which one is the best for you.
Griddle Grill
Griddles are flat, solid, hot plate-like surfaces that sit on top of a stove, grill, or purpose-built cooker. The traditional outdoor griddle is typically a gas grill with a flat metal cooking surface, or “griddle.” In simple terms, take a gas grill, eliminate the grates, and add a metal plate on top of the burners.
They are typically made from cast iron or stainless steel and are great for cooking pancakes, eggs, bacon, and other breakfast foods.
Griddles are also great for cooking burgers, steaks, and chicken breasts. With a griddle, you can cook large amounts of food at once, which makes it great for feeding a crowd.
Some Quick Facts about griddles:
These facts highlight just some of the benefits and versatility of griddles as a cooking tool. Whether you’re a professional chef or a home cook, a griddle can be a valuable addition to your cooking arsenal.
Cast iron griddles are often considered to be very efficient cookers because they heat evenly, are durable, and can be seasoned to enhance their non-stick qualities.
Griddles are great for cooking small size, soft and liquid foods.
Griddles are great for cooking breakfast foods, such as pancakes, eggs, and bacon, but they can also be used for cooking a variety of other foods, such as grilled sandwiches, stir-fry, and even pizzas.
Griddles are often designed with grease traps to collect excess fat and oils, but do not let as much food “juices” out as grill grates.
Griddles come in a range of sizes, from small single-serving griddles to large, commercial-sized griddles that can accommodate multiple food items at once.
Griddles can be seasoned to create a non-stick surface, which makes cooking and cleaning a breeze.
Griddles are often easier to clean than traditional grills, as they have a flat surface and are typically made from non-porous materials like cast iron or stainless steel.
Griddle Pros and Cons
Pros:
Large Cooking Surface: Griddles have a large cooking surface, which makes them great for cooking large amounts of food at once.
Even Heating: Griddles heat evenly, which means that your food will cook evenly, without any hot spots.
Versatile Cooking: Griddles can be used to cook a wide variety of foods, from breakfast foods to steaks and burgers.
Easy to Clean: Griddles are easy to clean because they are flat and smooth. Simply wipe them down with a damp cloth after cooking.
Cons:
Expensive: Griddles can be expensive, especially those made from high-quality materials such as cast iron or stainless steel.
Heavy: Large griddles are heavy, which makes them difficult to move around.
Limited Cooking Options: Griddles are limited in the types of cooking they can do. They can’t be used for roasting or smoking meats, for example.
Griddles do not create the “convection heating” effects most grills can do to cook large cuts of meat.
Can’t smoke meats.
BBQ Grills ( charcoal grill, gas, and pellet grill )
Grills are cooking devices that use an open flame, charcoal, propane, or wood pellets to cook food. They are typically made from stainless steel, cast iron, or aluminum and come in a variety of sizes and shapes. Grills are great for cooking burgers, steaks, chicken, and large meats, as well as vegetables and fruits.
With the right skills and equipment, even an inexpensive gas grill can cook just about anything you can think of.
Some Quick Facts About Grills:
These facts highlight some of the benefits and versatility of grills as cooking tool. Whether you’re a seasoned griller or just starting out, a grill can be a valuable tool for creating delicious, flame-grilled meals and smoke meats
Grills come in a range of sizes, from small portable grills to large, permanent outdoor grilling stations.
Grills can be fueled by gas, charcoal, electricity and pellets.
Charcoal grills are often considered the best for imparting that signature smoky flavor to food.
Gas grills are convenient and easy to start, but can be more expensive in the long run due to the cost of propane.
Electric grills are great for indoor cooking, but may not be as powerful as gas or charcoal grills.
Grills come in a variety of materials, including stainless steel, cast iron, and porcelain-coated steel.
Grills typically have a grate or cooking surface that allows grease and oils to drain away from food, preventing flare-ups and keeping food healthy.
Grills often have adjustable cooking grates and better temperature controls to cook food to perfection.
Grills typically require a higher degree of maintenance than griddles, as they need to be cleaned regularly to prevent food from sticking and to remove grease buildup.
Grill Pros and Cons
Pros:
Versatile Cooking: Grills can be used to cook a wide variety of foods, from meats and vegetables to fruits and bread.
Flame Grilling: Grilling over an open flame adds flavor to your food that can’t be achieved with a griddle.
Affordable: Grills are often more affordable than griddles, especially those made from more basic materials such as aluminum and other composites.
Portable: Small two burner grills are portable, which makes them great for camping and other outdoor activities.
Cons:
Limited Cooking Surface: Some grills have a limited cooking surface, which means that you may need to cook your food in batches.
Uneven Heating: Grills can heat unevenly, which can result in some food cooking faster than others.
Requires Constant Attention: Grilling over an open flame requires constant attention, as food can easily burn if not tended to properly.
Some grills can be expensive.
Which is Better for Cooking Outdoors? A grill or a griddle
The answer to this question depends on your cooking needs and preferences. If you are looking for a versatile cooking option that can be used to cook a wide variety of foods but do not have the need to smoke or roast large cuts of meat, a griddle may be the better option for you.
However, if you are looking for that signature flame-grilled flavor and enjoy the art of grilling, a grill might be the way to go. Also consider a grill if you want to smoke meats or enjoy the flavors of charcoal or wood pellets.
Ultimately, it’s a matter of personal preference and what you’ll be using it for. Both griddles and grills have their pros and cons, but they can both be great options for cooking outdoors. If you’re looking to feed a large crowd and cook smaller-sized foods, a griddle might be the best option, while if you want to enjoy a more traditional grilling experience, a grill might be the better choice.
If you’re still not sure which option is right for you, consider purchasing a combination griddle/grill. These versatile cooking devices allow you to enjoy the best of both worlds, giving you the option to cook with a griddle or a grill, depending on what you’re in the mood for.
Key Takeaways
In conclusion, griddles and grills both have their advantages and disadvantages, but both are great options for outdoor cooking. Consider your personal cooking needs and preferences, and choose the option that works best for you. Whether you choose a griddle, a grill, or a combination of the two, you’re sure to enjoy cooking outdoors and creating delicious meals for yourself and your loved ones.
Midway through January of 2023, Weber announced that it was entering the outdoor griddle game. While the full technical details of its new gas griddle have not been fully revealed, we’ve got some details to get you prepared before it hits the market sometime this spring. So let’s take a look at what we know …
Korean BBQ restaurants became a big hit in recent years, and just like most of us are with barbecue, we want to be able to replicate the same cooking process at home. If that’s something you want to do, you’ll need a Korean BBQ grill. How do you choose, though? Here at Angry BBQ, we will help you along that …
Whether you’ve heard of infrared grills and are trying to decide what’s best for you or if it’s a brand-new term to you, we’ve got you covered here at Angry BBQ. We’ll give you our list of the best infrared grills and answer some important questions: If you’re on a budget, the prospect of an …
Camp Chef was kind enough to send me their Flat Top 600 so I could put it through its paces and review it here on Angry BBQ. They also gave me their Griddle Tool Set so I wouldn’t be scrambling to properly use the flat-top grill, which was much appreciated. So with a couple of …
There are many pellet brands that claim to be the best, but one company stands out, Bear Mountain.
Bear Mountain makes amazing, high quality wood pellets, and I personally have had the pleasure of cooking with these pellets and burning through a few pounds of this stuff. Their pellets provide not only high quality but also plenty of smoke and flavor.
However, this is not the only reason I like these pellets so much, we also like the company behind this product.
For that and other reasons, I believe it is worth the time to write a review of the Bear Mountain pellets and introduce you to this amazing brand.
The Beat Mountain Company: who are they?
When you think of the name “Bear Mountain,” your mind might think of the state park in New York—what a beautiful place—but this company is far from that wonder of nature. The Bear Mountain Company is located in Louisville, Colorado, or about 1800 miles west of the state of New York.
One impressive fact about this company is that they have been in business for over 30 years and were founded in the 1990s. Since then, this company has been manufacturing high quality, natural wood pellet fuel and leading in this industry.
What Makes Bear Mountain BBQ Pellets among the top
Bear Mountain does two things absolutely right, which makes them among the top. First and most importantly, they manage to deliver every last bit of flavor that a BBQ pitmaster like me wants when smoking low and slow. Second, somehow they manage to deliver this level of quality at a good price. These pellets are more affordable than other well known brands but less quality.
We did a test to find the top wood pellets, and Bear Mountain came out on top for both quality and price, a fine line hard to beat. There are other wood pellet brands making great products and even using real trees as opposed to recycled wood dust from mills.
Our Review of the Bear Mountain wood pellets
For this review, I purchased a bag of Bear Mountain’s Gourmet blend which is a neutral well balanced mix good for just about every protein. I wanted to start there because I wanted a good starting point.
I used my Z Grills 700D4E for this test, and because I like to do things the hard way, for the test and review I smoked a brisket. Yay me!
The first thing I noticed is that the pellets seemed to burn flawlessly providing a nice thin blue smoke, which is a good indication that I have good amounts of smoke in the cooking chamber and likely will get a nice smoke ring.
First Impressions
Bear Mountain wood pellets smell amazing. But before I jump into that, let’s take a few steps back. You will quickly start experiencing quality when dealing with this product, starting with the plastic bag. Bear Mountain uses nice, strong, recyclable bags to protect the pellets and protected they arrived.
Now, you might think this is not relevant, but it is. The more protected the pellets the less chances of getting a bunch of broken small pellet pieces and a bunch of wood dust in the bag.
Also, good packaging will protect the pellets from humidity, which is the nemesis of BBQ pellets. One cool thing about this company is that they are strong supporters of protecting the environment, and that involves using a sustainable source of wood, recycled wood dust from mills, but also making their packaging bags from recyclable plastic.
Flavor
Ah, Flavor! This is one area where these pellets do not disappoint. As you would expect, these wood pellets are available in different flavors, but for this review, I used their Gourmet blend. This blend includes oak maple and cherry. This mix goes well with anything, and is sort of the “balanced” mix for any food.
In other words, if you are not sure what to pair food with, the Gourmet Mix is a good place to start.
If you are wanting to barbecue low and slow in a smoker, they carry other flavors like hickory, apple, mesquite, and a nice range of mixes.
Ash
Ash production in an important topic when taking wood pellets. This is because if you are cooking your pellet smoker for long periods, ash buildup will eventually degrade its performance.
Also, pellets that leave behind too much ash create more maintenance work for you. You will have to clean your ash cup and pellet grill more often.
I didn’t notice any more or less ash when compared to other top brands, which is, in my opinion, a good thing. I have tested other brands with dissipating results in the ash department.
Pricing
I find the pricing for these pellets pretty fair considering the level of quality. This is a good thing because if you enjoy grilling often, you can burn through pellets fairly quickly. If you are buying pellets for your smokers, expect them to burn much slower, but the point is, this is a fuel, it doesn’t last forever.
Quality – Consistent quality in every pellet bag. Not a lot of “wood dust” , nothing but pure hard pellets.
Flavor – Flavor is very prominent when cooking with these pellets.
What to consider:
For some reason, these pellets are not available at many of my local retailers, easiest to find online.
Conclusion
I like food, that’s not a secret, but I love good tasting food. Which is why I’m always looking for that extra source of flavor, in this case, good pellets. I enjoy cooking over charcoal, but the truth is, pellet grills are just easier to use, you just have to find good pellets.
I give Bear Mountain BBQ and their entire company a big 5 stars for the excellent, quality product they are offering to consumers every day.
I’m sure you’ve heard of Pit Boss by now. Pit Boss has been making affordable pellet grills for many, many years. Not only do they make pellet grills, but they also offer other types of smokers, including verticals.
In recent years, Pit Boss has been working on improving the quality of its grills and matching up with other grill vendors who are offering modern features like Bluetooth and Wi-Fi connectivity. Pit Boss Platinum Laredo 1000 is one example of that.
Pit Boss is evolving
Pit Boss is better known for making affordable smokers and grills than for making the strongest, highest-quality grills. Their older grills were not bad; they were simply a step behind companies like Trager and others. However, affordable grills were and continue to be Pit Boss’ strongest selling point.
It’s fair to say that poor quality, particularly in technology and features, hurt Pit Boss’s name a few years ago, but their newer models are vastly improved.
Pit Boss’ new line of grills is changing that, with consumers looking for and willing to pay more for a higher-quality pellet grill than the most common brands and different models.
The Pit Boss Platinum Laredo Pellet Grill
photo: Pit Boss
The Pit Boss Laredo is a higher-quality grill with lots of space and features. This is a very large grill, offering 1000 square inches of cooking space with three cooking racks. Pit Boss’ “Smoked It” tech and app allows you to control your grill’s temperature and monitor other aspects using your smartphone.
The Big Bus lot of Laredo 1000 also offers higher quality, lots of space, a better-insulated cooking chamber, multiple cooking racks, and other nice modern features.
This Pit Boss Platinum grill has a nice powder-coated finish commonly found in higher-end grills. It features four caster wheels with locks, a shelf for food prep, a cooking chamber light, a front ash clean out tray, a pellet clean out door, a prep side table, and a digital temperature (PID) controller.
First Impressions of the Laredo 1000
Pit Boss definitely paid a lot of attention to customer feedback and improving quality when they were building the Laredo 1000. Right away, you can see and notice the heavy-duty steel used to construct this grill.
Also noticeable is the bottom shelf, which not only helps with storage but also makes the legs and frame itself stronger.
The Laredo 1000 has a large 26-pound pellet hopper and a large-screen PID controller, both of which are easy to notice. The hopper also has a clean-out door, which allows for quick pellet swaps or to simply empty the hopper for storage.
The PID controller has a large digital screen that displays temperatures and other functions of the grill. I will get more into this display screen topic later; there are a few things I didn’t quite enjoy about it.
Overall, the look of this grill feels solid, and it is one heavy piece of metal. The grill comes almost fully assembled. Unlike other grills I have put together, the Laredo 1000’s hopper, auger, and cooking chamber are all assembled at the factory. Mainly, you need to install the legs, shelves, and racks.
A Walkthrough of the Laredo 1000
The Laredo 1000 will greet you with a large 1000-square-foot cooking area, large enough to cook large briskets, pork shoulders, or multiple racks of ribs. This grill is WiFi and Bluetooth ready and works with Pit Boss’ Smoke It app.
This is not to be confused with WiFi-only grills. A Wi-Fi and Bluetooth grill means that the grill can connect to your home wireless network, where you can access its features and temperature controls from anywhere as long as you have Internet access.
If you happen to be in a place where you do not have a wireless network, you can connect directly to the grill using its Bluetooth antenna and create an ad-hoc connection between your phone and the grill.
The Pit Boss Laredo 1000 can operate at temperatures between 180 and 500 degrees Fahrenheit. Now, this might not seem much different than most grills, but here’s one feature that most will enjoy: the “grill” configuration.
The Laredo 1000 can be used as a regular grill or smoker, which means operating temperatures of 180 to 500 degrees Fahrenheit. However, Pit Boss has a feature called the Flame Broiler, which is, in simple terms, a shield that you can remove by pulling a lever. The flame from the burning pot goes straight into the cooking chamber, which can get up to 1000 degrees Fahrenheit.
This is an excellent grill and smoker. You can set it up to cook low and slow, but you can also pull a lever and set the grill for direct flame to sear the perfect steak.
Many manufacturers say that their grills are very versatile, but the Laredo 1000 truly is. Because it can operate at temperatures between 180 and 1000 degrees Fahrenheit, it can grill, smoke, roast, bake, and sear a steak.
Another nice feature of this grill is its built-in lighting for night grilling. Many of us enjoy cooking at night, where lighting isn’t as good as in our backyards. Having a light not only allows you to see where you’re putting your hands and how close you’re getting your hands to the grates, but it is also easier to see how well food is cooking, check for burn spots, and move food around.
Another feature that I came to appreciate in many pellet grills was the built-in, front-mounted ash cleanout tray. Ash buildup is the nemesis of a pellet grill’s performance. That is, the more ashes accumulate in the bottom of the grill and inside the burn pot, the less air flows, which means poorer performance.
The burn pot and bottom of the grill can be difficult to clean at times. With the Laredo 1000, simply pull the tray out and empty the ashes. With other grills, a shop vac needs to be used to clean out the ashes.
Pit Boss The Laredo offers two ways of cooking
One distinct feature of the Pit Boss Laredo 1000 is its ability to “switch” from grill to smoker. You might think that the majority of pellet grills can do the same thing, and you’d be right; however, smoking and grilling functionality is assumed in some grills. By this, I mean that it is assumed that the grill can smoke because it can operate at temperatures anywhere from 180 to about 300 degrees, and it is expected to also be able to grill because the grill can operate at temperatures above 300 degrees.
This grill’s “Flame Broil” feature, on the other hand, can heat up to 1,000 degrees because the heat shield can be moved out of the way to let the fire cup flame into the cooking chamber, which heats the chamber to more than 800 degrees.
There are other pellet grills that can do this; some Z Grills models and the Oklahoma Joe’s Rider DLX can do this as well. This feature is offered by a shack in Seattle, but with limited success.
Using the Pit Boss Laredo 1000 as a smoker
To use the Pit Boss Laredo 1000 smoker, the setup is quite simple. Set the lever on the grill’s side to the “smoke” position and set the desired smoking temperature. Normally, if you want to smoke pork ribs, a pork shoulder, or a brisket, you will be operating at temperatures anywhere from 225 to 275 degrees Fahrenheit.
Using the Pit Boss Laredo 1000 as a grill
It’s also a simple idea to use the Laredo 1000 grill too. Slide the lever to the grill possession to open the heat shield. With the Laredo set up to grill, you can maximize its heat output, and this grill can reach temperatures of upwards of 800 degrees.
One thing I’m hesitant to do is place very greasy foods, such as steaks or pork belly, directly over the burning pot because it will cause flare-ups.
How the Pit Boss Platinum Laredo 1000 Stacks Up
Pit Boss has done a great job in recent years of adding new technology to their grills. A grill that can get hotter than 800 degrees is a great example of this.
Pit Boss has added Bluetooth capability, wireless connectivity, and a digital PID controller to most of their grills, and these new features can be found in high-end grills such as Tragers, Rec Tecs, and Z Grills.
Pti Boss is definitely a bit late to the game, but it seems their focus is still on building affordable grills for everyone to enjoy.
The Laredo 1000 definitely feels stronger than older people’s models. The build quality is stronger; the chamber is solid, and its legs are strong. We enjoy the fact that the grill has three cooking racks, which is enough to fit large cuts of meat but also cook vegetables and keep food warm during a long day of cooking.
The large display on the temperature controller (PID) It’s nice to have but lacks the resolution of high-end grill controller displays. The display is not as easy to read in direct sunlight as it is with other grills. It looks like a 1980s Casio calculator display, but it is not something that many will find troubling.
However, it would be nice to be able to see the display better when cooking outside in direct sunlight.
What we like:
We loved how simple it is to pull the lever and unleash the full fury and power of this grill. Being able to cook at temperatures of 700–800 degrees is Kamado grill territory. This cooker offers another level of versatility that many pellet grill companies claim to offer.
Cooking at 600 to 700 degrees Fahrenheit, for example, means you can drop a pizza stone on this grill and bake your favorite pizza recipe. This also means you can get a nice big rib-eye steak or Tomahawk steak, nicely seared, for dinner.
We also enjoy the fact that the grill has both Bluetooth and wireless capability because not everyone will be at a place where wireless is available. The difference between Bluetooth connectivity and wireless connectivity is that Bluetooth allows you to create a direct connection between your smartphone, whereas with a wireless connection you need a wireless router and Internet access.
One thing worth noting is that Pit Boss has designed this grill so it can actually work with a 12-volt battery. That is, if you take this grill on the road, which will require some assistance because it is large, you can use it with your car’s battery.
The catch is that you must unplug the built-in pellet igniter and manually light the pellets, as specified in the owner’s manual. But the point is that the grill can work with a car battery, and it is beneficial that this grill supports a Bluetooth connection. If you’re in the middle of nowhere but have a 12-volt battery nearby, such as your pickup truck’s and a Bluetooth-capable smartphone, you can control this grill.
The Laredo 1000 also has a very intuitive control display. The display in the temperature controller, or PID, shows you the basics, including cooking chamber temperature, meat probe temperature, and, of course, your “set” temperature.
You also get a couple nice little treats, including a pellet sensor that tells you when you run out of pallets. Now, this is not as useful as the pellet level sensors found in newer Traeger models, which actually tell the actual level of pellets in the hopper. The Pit Boss just tells you when you run out of pallets, and my friends, with pellet grills, you know when you run out of pallets because, well, the temperature drops like a ball and you stop cooking.
Another option is to send the display when the fan is running, which I don’t see the point of because you can hear the fan running.
This grill also supports two meat probes, and you can see the temperature of each of those probes and the internal temperature of the meat displayed on the main display.
Another nice thing about the Laredo 1000 is that there is a door on the side of the hopper that allows you easy access to the internal components, including the fan and other connections, so if you do have to replace a part, you should be able to get in there very quickly.
Things to consider
There are a few things we did not enjoy about the Pit Boss Platinum Laredo. The first is that, for some reason, people choose to offer this grill through only select retailers, and I think that is going to deter some customers, as people might just want to have the option of ordering the grill online or simply going to a store where they have a membership or they like.
I’m sure they have reasons, but in my opinion, this is something I don’t like.
One thing that concerns me about the Loredo 1000 is how flat it is and where the temperature controller display sits. The LCD display is almost flat on top of the hopper lid, and I am concerned that it will be damaged over time as people place tools on it, drop food on it, or do anything else on it.
Conclusion
This grill will not win any beauty or quality contests, but it will surely come in second. But for less than $600, you get a Bluetooth and Wi-Fi capable grill built with decent quality materials, lots of tacky features, and plenty of space.
This grill is ideal for someone looking for a capable yet affordable option. If you are looking for higher-quality better technology and have the budget that I suggest looking at Brands like Traeger Rec Tec and Z grills.
If you’re new to the BBQ and grilling world, or simply looking for a grill to get you started, this guide will show you five great grills for those starting out in BBQ and grilling.
We will share with you a list of the best grills for beginners and also what you should consider before getting one. We will also teach you about different types of grills and fuel types.
When I first started exploring the BBQ world over two decades ago, I knew I needed a grill but didn’t know where to begin. I will use my 20 years of experience, trial and error to save you some trouble, overspending and headaches.
And no, you don’t need a thousand dollar grill if you are a beginner or to cook good BBQ.
Top Best grills for Those Starting in Grilling and barbecue
This grill is one of my favorites and our top recommendations for barbecue beginners because it checks many boxes, including ease of use and low purchase cost. The Z Grills 450B is a budget-friendly pellet grill but still offers good quality and features found in more expensive models.
The 450B offers 459 square inches of cooking space, is fueled by wood pellets, and has a digital controller to manage temperature. It even includes a meat probe, so you can monitor the meat’s internal temperature as you cook, and the meat temperature is displayed on the grill’s LCD screen.
One noteworthy aspect of the 450B is that it is compact and light. I can grab this grill and move it around my patio with ease. It is also easy to fit into small backyards.
We chose the Z Grills 450B as our best overall because, first, it is reasonably priced, and second, it offers all the features necessary to grill and smoke foods. This grill is small which makes it great for those looking for something simple, inexpensive, easy to handle and maintain.
What we like:
It’s easy to use – Add pellets to the hopper, push the power button, and set the cooking temperature.
Good quality for the money.
Three year warranty.
Includes meat probes.
Easy to clean and maintain.
Great smoky flavor.
What to consider
You will need to become familiar with pellet flavors to be sure you are pairing meats with the right flavors.
Cooking temperatures on pellet grills range from 160 to 500 degrees, which are good for smoking and grilling but not high enough to bake pizzas or get a nice sear on steaks.
The Weber Spirit is a two burner propane gas grill with enough cooking space for a small family or couple. This grill is very easy to use and gets the job done without any gadgetry to get in the way.
This propane gas grill is very easy to use. Turn on the burners using a push-start piezo igniter and set the burners to low, medium, or high heat, or until the built-in lid thermometer shows the desired temperature.
Weber grills are good quality, and most of us started our BBQ journey using one. This grill has a fuel gauge to let you know the fuel level in the propane tank, flavorizer bars, and two cooking grates. It is a simple grill, but that’s what makes it so good.
This Weber is one of the best beginner grills because of its simplicity but it also includes all the aids ad feature you need for grilling great food.
What we like:
It’s simple to use and get started.
Two burners can get the grill to a high enough temperature to get grill marks on steaks.
of grilling space for a small family or entertaining a small group.
The cooking area is split between a main cooking grate and a warming rack, which comes in handy to keep food warm.
The flavorizer bars help with flare ups.
Stainless steel burners should last a long time.
What to consider
Propane grills do yield real BBQ flavor since fuels like natural gas and propane don’t have flavor. ( like charcoal or wood pellets )
If you want a “smoky flavor” you will need to use a smoker box with wood chips.
This Z Grills is a larger, more refined version of the 450B we mentioned above, and it is also larger. This means that the Z Grills 4004DE shares the same easy to use controls and includes many of the same features, but it is larger.
This grill can double as a smoker, so if you are wanting to start your grilling career and are also interested in learning how to smoke meats, the 700D4E is a great grill smoker combo grill.
This grill offers you a large cooking space, the well-liked automation of a digital temperature controller, meat probes, and two cooking racks. This is a grill that you can easily learn to use and grow with. It is very easy to use and versatile. Its temperature range is from 180 to 450 degrees, so you can cook a variety of foods, smoke meats, and grill.
This is the best grill for those who are looking for good wood-fired flavor and have the space and budget for a slightly larger grill than the top two on this list. If you budget allows it I would recommend this 700 over the 450B since you get a lot more space and a nice storage cabinet for not that much more.
The Weber Kettle is not only easy to use and simple, it is a classic. The shape of this grill is Weber, which is the most recognizable shape in the BBQ world. This BBQ grill is fueled by charcoal but is designed with simplicity in mind.
Charcoal grills give you total control over the cooking process and can be easily adapted to work as pizza ovens, charcoal smokers, and, of course, grills.
However, many people get intimidated by the idea of having to deal with charcoal or grab a bottle of lighter fluid to light charcoal. This is all eliminated by using a chimney starter, some good quality lump charcoal, and you are ready to go. There are different methods of lighting charcoal without using chemicals or lighter fluid.
What we like:
Easy to use grill for beginners wanting to start on a charcoal grill.
Simple airflow controls to manage the fire and temperature.
Easy to arrange lump charcoal for indirect heat cooking when smoking meats.
The Ninja Foodie Smart is a different type of grill, and it is electric. This grill is considered more of an indoor electric grill than an outdoor one, but for some who live in apartments. This can be a good start.
The Ninja has two heating plates, so it cooks food evenly. It also has a smart digital temperature controller that handles all aspects of temperature control.
What we like:
As easy as it gets- press a button and start cooking.
Can be used indoors
Small and compact, fits in many places.
What to consider:
Limited cooking surface.
No smoky flavor.
6. The Joe Classic Kamado Charcoal Grill
The Joe Kamado is a premium charcoal grill. It can be your first grill and your last. The reason I say this is because kamados are incredibly durable and versatile. You can cook virtually anything with them, and because they are ceramic, they will not rust. However, these grills are on expensive side.
Things to consider As a beginner when selecting a grill
Have you ever been to a golf course where a beginner claims his golf clubs are terrible and that is why he curved the ball? Then a more experienced golfer grabs the same set of clubs and hits a straight 200 yard drive. Well, the same can be said about BBQ grills. Your skills will play a major role in how good or bad your food tastes. Nevertheless, when looking for the best grill for beginners, our test and research teams look for the following attributes, and so should you.
The flavor of the food will be affected by factors such as the type of fuel used, the type of grill, and, of course, your grilling skills.
But to help you navigate the world of grills, here are a few things you should consider when purchasing your first grill or if you are a beginner.
Price of the Grill
If this is going to be your first grill, you might want to start with something inexpensive and budget friendly. There are budget smokers on the market that will cook just fine, and great gas grills under 500 dollars that will also do a fine job.
The point here is that you do not need to overspend to get a good grill, especially if this is your first grill.
If you are sure you are in the BBQ game for the long haul and want to spend on a good grill now so you don’t have to buy another grill later, then there are good American made grills that will outlast most budget options.
Grill Quality
You should look for quality characteristics in any item you purchase, but especially in grills. These are poor quality grills which succumb to the abuse of high temperatures, moisture, grease, and eventually rust.
Good quality grills will also include a good warranty and great support.
Good quality characteristics include the use of high-quality materials to construct the grill, such as stainless steel and heavy-duty steel. Also, cast iron grates, stainless steel grates, and stainless steel components are often found in good quality grills.
The Grill Fuel Type
There are grills powered by a variety of fuel types. I will elaborate on this later in the article, but it’s important to note this now. Each fuel type has its own list of advantages and disadvantages, but in summary, charcoal grills are very versatile and, in some cases, inexpensive, but require more effort and expertise to manage. A charcoal grill is a good grill to learn on if you want to learn how to cook authentic BBQ and delicious food.
The common fuel types are gas or propane, charcoal, pellets, and electricity. Think about what type of cooking you will be doing , what fuel you feel comfortable using, and what type of flavor profile you are after.
Your Cooking Style
If you want to learn how to grill simple dishes like hot dogs and burgers, it’s one thing, but if you want to learn how to cook real BBQ, it’s another. For grilling a few hot dogs now and then, any grill can do, but to cook real BBQ and get lots of flavor, a charcoal grill / charcoal smoker, or pellet grill should be on the short list of options.
Common Types of grills
This is very important and here is why. There are quite different types of grills and all have their own pros and cons, which I dive more into detail in my grill and smoker types guide.
However, here is a quick list of grill type available on the market.
Gas Grills ( propane or natural gas )
Charcoal
Electric
Pellet
Wood
BBQ Grill Smokers
The first thing you need to know is that when it comes to grilling and BBQ, there are two main and more common types of “cookers,” namely, smokers and grills.
Smokers are traditionally larger grills designed to cook meat for a longer period of time and cook at lower temperatures. When you go to a restaurant, you see on the menu “smoked ribs” or “smoked pulled pork”, those dishes were prepared in a smoker.
With a smoker, you can cook food low and slow and infuse meats with extra smoke to achieve that authentic BBQ flavor.
Smokers are available in different shapes and fuel types, and if smoking meat is more of what you want to learn and cook, be sure to read our smokers guide to learn all about the different types of smokers.
Smokers’ operating temperatures range anywhere from 160 degrees to about 450 degrees. Smoking cooking temperatures are usually in the ballpark of 190 to 275 degrees.
BBQ Grills
Grills are more common and traditionally what people start with. In retrospect, some grills can work as smokers, but few smokers can get to high enough temperatures to grill. So keep that in mind.
Grills can operate at low temperatures but also reach high temperatures in the range of 600 to 900 degrees, which is enough to sear steaks and bake pizzas. There are a variety of fuels available for grills, and each has advantages and disadvantages that relate primarily to the skills required to operate the grill and to its flavor.
Let’s take a look at the different types of grill fuel.
Ease of Use by Grill Fuel Type
Grills come in all shapes and sizes, but the primary difference is the type of fuel. Below are the most popular grill fuel types, ranked by ease of use.
Electric grills – Easiest
Electric grills are extremely user-friendly, making them ideal for beginners and novices. An electric grill doesn’t burn any fuel. Instead, a heating element or resistance heats up cooking grates or a metal plate of some sort to evenly distribute heat and cook the food.
Electric grills are great for cooking indoors or for those wanting something small, maybe a portable grill or just the simplest grill to operate. Electric grills are also great for those who live in apartments or have little to no space for a grill.
These grills are often called “ smokeless grills,” which makes them great for cooking indoors.
The biggest and most significant drawback of an electric grill is that it yields no flavor. Since you are not burning wood, wood pellets, or charcoal, the only taste comes from the seasoning. Quite frankly, this is my least favorite type of grill, although it has its purpose.
Gas Grill or propane – Easier
Gas grills are the second-easiest to operate, primarily because most of us are familiar with the primary components of a gas grill, namely the gas burners. Many of us already have gas stoves in our homes, and just like a gas stove, a gas grill has one or more burners to heat up the cooking space.
A gas grill, just like an electric grill, does not yield flavor since you are burning gas from a propane tank. The main difference between your gas stove and a gas grill is that the grill has grates to cook the food on.
The food will be cooked on some sort of grate, be it cast iron, porcelain coated steel, or stainless steel. This creates a different cooking effect than boiling or braising the meat in a pan, as melted fat, grease, and oils drain and escape from the bottom of the grill.
Some gas grills have what are called “flavorizing bars,” or shields, above the burners and below the grill grates, and as fat hits those flavorizer bars, the “fat steam” can add flavor to the food. Nothing live changing but it does add some “grill flavor” to foods.
Nerve the less you can use smoker boxes in your gas grill and add more smokey flavor to your food. It will not be as much as a charcoal or pellet grill, but it will add more flavor than grilling on an electric grill.
Gas grills are simple because all that you have to do to operate one is turn the burner control knob and decrease or increase the flame to decrease or increase the temperature. That’s it.
Pellet grill – Easier
I own a pellet grill and I absolutely love it. Pellet BBQ grills are not necessarily harder to use than electric grills, but because there are a few more steps involved, I rank them below gas or propane grills.
Now, don’t think these pellet cookers are hard to use; they are not at all, but because high-end pellet smokers and grills have WIFI, temperature probes, and other components, it might take a minute or two to become familiar with the tech, not the grill.
As far as the grills go, they are as easy to use as a propane or electric grill. In fact, one would say that a pellet grill is the combination of the ease of use of an electric grill with some of the flavor of a charcoal grill.
These grills are my favorite types to use because they are simple to use and you get an amazing smoky flavor from burning wood pellets.
The only steps required to operate a pellet grill are to add pellets to a hopper, turn on the grill, and set the temperature. The grill does everything for you, including feeding pellets to maintain the temperature setting.
Charcoal grills – Harder
Charcoal grills are the most difficult to learn to use, but they are also the most versatile and rewarding. Charcoal grilling can be a lot of fun and opens the door to a wide range of culinary options because you are in control. Fire, heat, flavor, you control it all.
I own a kamado grill, and it is by far one of the best grills I own, but even for me, with years of experience, it took me a while to master that grill.
The point here is that a charcoal grill will beat all other grills on this list, but it does take longer to learn and some people simply do not like to deal with charcoal.
If you intend to be in the BBQ game for the long haul, I strongly recommend starting with a charcoal grill. The results will be very rewarding and you will learn skills you can later apply when using other grills or any cooking style.
Conclusion
We go over a lot in this article, but to summarize, the best grill for beginners should be simple to use, and I recommend something affordable. You should also consider the type of fuel you want to use, as this can affect the flavor.
I hope you found this guide to be helpful. Grill on!
One of Z Grills’ best-selling models is the 450 model. Recently, the 450 was updated and improved and is now known as the Z Grills 450B. In our Z Grills 450B review, we take a brand new Z Grills 450B and put it through a series of tests to see how well this new model does.
In this BBQGrillAcademy.com article we will cover:
What’s New in the Z Grills 450B
Unboxing of the 450B
An in-depth review of the 450B
Our thoughts on this new model
So let’s get into it!
What’s New on the Z Grills 450B Wood Pellet Grill
Pellet grills are constantly evolving and improving. Years ago, a pellet grill was just a regular grill with a hopper, auger, and an ignitor controlled by a cyclic controller. It fed pallets, lit them on fire with an ignitor, and a fan kept the flame going.
Today, the story is much different. Today’s pellet grills are equipped with wireless technology, smart digital controllers, and some manufacturers are even incorporating touch screen technology into their controller displays.
So it makes sense that Z Grills took the time to update their most popular model to 450. The 450 is a small and compact pellet smoker and grill that is considered a budget option and a great entry model for most backyard warriors.
The 450 models are not jam-packed with technology and features, but still, Z Grills made changes to improve the 2450 B and kept it reasonably priced.
A New Digital PID Controller
The first and most noticeable improvement is the new digital PID controller. Out is the old cyclic controller and the new digital controllers found in other popular models, such as the 700D4E.
Z Grills 450B PID Digital Controller
The new digital PID controller reads both the internal temperature of the grill and the temperature you want to cook at. It then uses its own algorithm to control the pellet feeding, fan speeds, and igniter to get the most accurate cooking temperature and keep it there.
Old cycle controllers basically turned the auger and igniter on and off in cycles to reach whatever target temperature was set. This created temperature fluctuations, and often the target temperature was exceeded. By using a mini computer brain to control how often pallets are fed and how often pellets are lit, the 450B can keep a more precise and controlled temperature.
New Features of the Z Grills 450B Controller
As I said before, this grill does not include WIFI, but the new controller does include a manual feed feature, two integrated meat meat probe ports, and a large digital LCD display. The meat probes are included.
450B manual feed button
In addition, this model features a pellet level window, which is a small cutout on the hopper that allows you to monitor pellet consumption. It’s not all that useful; it only gives you an estimated overview of how many pallets are left inside the hopper, but it is nice to have an idea of when your pellets are running down.
Temperature Range
The temperature range for the 450B remains the same. The grill can operate anywhere from 180 degrees to 450 degrees Fahrenheit. This means that this grill can work well as a smoker and operate comfortably at temperatures of 200 to 275 degrees. It can also comfortably grill decent-sized cuts of meat at a temperature of 300 to 350 degrees.
Although this grill is rated for a maximum temperature of 450 degrees Fahrenheit, during our tests we discovered that it took some time to reach that temperature. The 450-degree temperature is great for cooking quickly and at a high temperature, but this temperature is not high enough to sear large steaks, such as Tomahawk steaks. However, this temperature range is great for those wanting to grill hot dogs, burgers, chicken, small stakes, and other foods.
A Pellet Cleanout door
Z Grills 450B Pellet Clean-out door
This is a feature that numerous Z Grills customers requested. Old grill models did not feature a pellet clean-out door, meaning that if you had pellets left in your hopper or wanted to switch out the pellet flavors, you had to “scoop out” the pellets.
Scooping pellets is not a big deal for some users, but having a pellet clean-out door does add convenience and makes the grill more enjoyable. Especially if you want to change pellet flavors, you are talking a few minutes of scooping pellets versus a few seconds when using the back pellet door on the hopper.
Having owned a few pellet smokers, I can tell you that leaving unused pellets in humid climates like in my home state of Florida is not a good idea. The clean-out door allows you to quickly swap out pellets or empty old pallets for dry storage in a good pellet bin.
Accessories included in the Z Grills 450B
Z Grills is a brand known for its affordability and great bundles. The pellet grill market is very competitive, so it makes sense to include a few accessories with most pellet grill models.
The 450b does include a few accessories in certain bundles. You can get a grill cover, two meat probes, and, depending on the bundle, two bags of pallets.
Notably, when you open the box of your brand-new Z grills 450, you will find a complete set of tools to assemble the grill, as well as a pair of gloves for assembly. Sure, these are not accessories, but it is nice to have the tools to assemble the grill included.
Z Grills 450B Unboxing, Overview & First Impressions
Z Grills Brand Overview
Z Grills is a brand best known for making affordable pellet grills for the masses. However, what a lot of people do know is that Z Grills has been manufacturing grills for over 30 years for other popular brands, including Traeger. That’s right, this company built some of the older Traeger models we are all familiar with.
In 2016, Z Grills decided to make their own grills and start selling them under their own brand and logo, keeping their promise to make affordable pellet grills with good build quality and good features to cook good barbecue. We will talk more about the two brands in an in-depth article comparing both Z Grills and Treager grills.
Is it a smoker or a grill?
Pellet grills are frequently referred to as pellet smokers because they can operate at low and slow smoking temperatures, and because they burn wood pellets, they produce an authentic wood-smoked barbecue flavor. So, in short, this grill can also work as a smoker and as a grill at temperatures of up to 450 degrees.
Build quality
The 450B’s construction quality is comparable to that of the majority of market-leading pellet grills. Z Grills uses powder-coated heavy-duty steel to construct the main cooking chamber’s side walls and most of the grill. There are better-finished and more refined grills, but few of them will be priced in the same range as this grill. If properly maintained, this grill should last a long time. There are other brands that use thicker steel, stainless steel, and strong hinges, but those grills tend to be more expensive.
Packaging and assembly
Inside the thick cardboard box, a shield made of Styrofoam was made to fit the Z Grill 450B and protect the main cooking chamber. Several of the pieces were wrapped individually in plastic to prevent scratching and damage. There are tools available for assembling it. The instructions are clear and no parts were missing or mislabeled. This grill was simple to put together, and assembly took around an hour.
Unboxing and setup
The 450B was predominantly packaged as a single unit. The hopper, auger, and fire pot are all in one piece and come assembled from the factory. All that remains is to connect the legs to the main chamber and the controller unit to the grill. You will also need to make sure you connect the internal cooking chamber temperature sensors to the PID controller. Many people forget to do this and end up calling support because their brand new grill is displaying errors.
Some screws were in tight spaces and were difficult to get to. Overall, assembly was very easy, and after about an hour, I was ready for the burn off.
Warranty
Each Z Grill is backed by a 3-year warranty, which is fairly standard in the pellet grill market.
In-depth review of the Z Grills 450B
After assembling the Z Grills 450B, we conducted the recommended burn off, which consists of running the grill at varying temperatures and stages without any food inside. Burning of any manufacturing contaminants, plastics, oils, you get the idea. The burn off is how you clean your grill using heat before it is first used to cook food.
Grilling Performance
So we wanted to see how the Z Grills 450B performed cooking at high temperatures. We know it is easy for a pellet grill to cook low and slow, but we wanted to see how capable this grill was of heating up the cooking chamber to 450°.
So we grabbed some pork belly, some chorizo, and small pieces of steak for our first grilling test. We found that the grill was able to reach 450 degrees without a problem and stay there while producing enough heat to slightly sear thin fat caps, and yes, it did produce amazing flavor.
However, when we slowed down the grill to 350 degrees and then wanted more heat to sear crisp the outside of the meat, it did take a little bit of time for the grill to get back up to 450 degrees. So the point here is that although the grill is capable of reaching 450°, it does take time and work for the grill to get there.
Also, when you open the lid, the grill does lose some heat and it does take a few minutes for the grill to get back to temperature. We experienced this more while cooking at high temperatures but not as much when cooking low and slow in our test below.
Low and slow smoking
We also wanted to do a test cooking low and slow, meaning smoking meat. For this test, we picked a rack of ribs and did the 321 method, which is a lengthy and long technique for smoking ribs, achieving amazing texture and flavor.
For this test, we set the grill at 250 degrees, and it stayed there throughout the cook. The total time of the cook was about 6 hours, during which we saw very little temperature fluctuations, and it was amazing to see how well the grill did at cooking low and slow.
The grill maintained the set temperature; there were no mishaps; the pellet hopper held sufficient pellets for the entire cook; and the test was a success overall.
We also notice that when 450B is cooking at a low temperature, the fan goes to a lower speed, which is good because it is amazingly quiet and the grill also consumes fewer wood pallets.
I have tested many pellet grills and smokers, including Traegers and Camp Chef, and one feature that I miss and wish I had in the 450B but I do have in those for the grills is a Smoke Mode, or a way of controlling the amount of smoke the grill produces when cooking.
The amount of smoke you get in the 450B is pretty much determined by the programming of the PID controller, and there’s very little you can do about it. I like having control. Maybe it’s just me, maybe I’m just a controlling person, but I like having the feature. And I must remind you again, this is an economical grill, and it did very well at keeping the temperature steady, and yes, the ribs came out amazing.
Capacity
To Z Grills 450B it’s a small grill great for small families or for those wanting a grill big enough to cook real meals, but small and light enough to take on the back of your pickup truck to the beach or camping site.
This grill features 459 square inches of cooking space split between the main cooking grate and a smaller top warming rack. Capacity is good enough to throw a couple racks of ribs with some veggies, bread, and a little cup of smoked mac and cheese on the grill.
Don’t expect 459 square inches of space to be enough to feed a large group. If you are a person who enjoys entertaining, I would recommend a pellet grill in the range of about 700 square inches.
However, if you’re looking for a small grill because you don’t have a lot of space on your patio and are looking for something affordable but that can cook and not consume a lot of pellets because its cooking chamber is small, the Z Grills 450b checks all those boxes.
What we liked:
Quiet and great performance when cooking low and slow. The fan speeds up when the cooking temperature is set above 275 degrees.
It’s easy to assemble and put together, although you might need some help moving the shipping box around.
Easy and simple to use. ( very easy )
The grease bucket is easy to empty out.
The large wheels help move the grill around with ease.
The caster wheels lock the grill in place nice and tight.
Small footprint, easy to store in a small garage space or corner.
What we didn’t like:
The grill lid gets very hot when cooking at high temperatures. But well, it is a grill.
No WIFI
.
Optional Extras
Two things can be found in your car besides your 450 B. No meat probe for sale. You could also get one. They are essential in smokers, as they tell you the exact temperature of your meat, which will help you reduce the chances of undercooking or overcrowding your meat without opening the lid. Z Grills has six pieces available for the price of 450 B. Please read our guide to wireless meat thermometers for further information. The only optional extra you can get is a thermal cover. 420B
Specs for the Z Grills 450B Wood Pellet Smoker
Model:
450B
Dimensions in inches:
43 Long × 24 Wide × 47 Height
Pellet Hopper capacity:
15 pounds
Cook Area Main Rack:
331 square inches
Cooking Area Warming Rack:
128 square inches
Weight:
75 pounds
Shipping Weight:
95 pounds
Grill grates
The grill cooking grates are porcelain coated steel, which makes for a great nonstick cooking surface, but if the grates are dropped or the wrong cleaning tools are used, the coating can be damaged or chipped.
Testing and benchmarks
While testing the Z grills 450 B we used a few testing benchmarks but overall we took into account how long it took for the grill to reach certain and most commonly used temperatures those are 250 degrees 275 degrees and 350 degrees. We also looked at how well the grillat maintained the set temperature and we also watched for any fluctuations during the cook.
Temperature variances and accuracy
The temperature sensor in the 450B is mounted inside the cooking chamber on the left side wall. The grill did a great job at reading out the accurate temperature and when comparing temperatures between the LCD temperature display and my heat gun temperature readouts, never exceeded a 5 degree difference. Overall, the temperature readings in this unit were very accurate. The center of the grill does get hotter faster than the sides of the grill, and that is because the fire-pot, although covered with a heat buffer and above it is the grease pan, is located directly in the center of this grill.
Time notes: getting to testing temperatures
We mainly used three temperature settings during our tests: 250, 275, and 350 degrees Fahrenheit.
How does the Z Grills 450B compare to the competition?
The 450B is an entry-level, economical small pellet grill, and comparable brands are Traeger, Camp Chef, and Pit Boss. Comparing any Z Grills to Traggers is a bit difficult since Traeger’s line up starts a step above the 450B with the Pro Series which is a larger, more expensive grill.
Then there is Camp Chef, which in comparison sits closer to Z Grills in terms of grill sizes, pricing, and quality, but is still priced higher than most Z Grills. Then we have Pit Boss. Pit Boss is the closest brand to Z Grill in terms of price and offers similar size and price models.
So how do these three popular brands compare? Well, Traeger leaves Z Grill in the dust when it comes to technology. Not necessarily quality, but technology. Arguably, there isn’t another brand putting out the tech that Traeger is. Pit Boss is comparable in terms of pricing, but Z Grills is giving you more for less.
Lastly, Camp Chef. Camp Chef quality is comparable to Z Grills, but they give you good tech for your money but not necessarily better quality. Camp Check is a good middle ground between Z Grills and Pit Boss, but a step below Traeger.
Bottom Line
We enjoyed testing and cooking in the 450B to write this review. This grill is a great pellet grill and a good fit for those looking for something economical that won’t break the bank but will allow you to enjoy good wood-fired flavor.
This grill is great for grilling burgers, hot dogs, chicken, and smaller cuts of meat. This grill excelled in its capacity to smoke low and slow. We definitely recommend this grill and our overall score for this grill is an 8 out of 10.
Build quality and smart or advanced features like Wi-Fi are areas where this grill lacks compared to others. But what we will appreciate the most is its simplicity, which we believe will attract many buyers to this model.
As a BBQ enthusiast, the name Oklahoma Joe brings to mind images of “rugged”, charcoal-burning smokers. That’s because Oklahoma Joe has been making rustic-looking charcoal grills and offset smokers for a long time now. The classic, solid wagon wheels are a recognizable and signature feature of Oklahoma Joe’s smokers.
However, times change and every company in the barbecue and grilling game is seeing the rise of the pellet grill. Sure, people love the smell and taste of charcoal grilling, but not everyone wants to deal with charcoal, manage temperatures during a long cook, or even deal with lighting up charcoal. Well, it wasn’t long before Oklahoma Joe jumped in and created the Oklahoma Joe Rider lineup.
In this article, we look at Joe’s Rider DLX pellet grills, their features, Pros and Cons, and how they stack up against other brands.
Oklahoma Joe Pellet grills
The Oklahoma Joe pellet grill lineup is comprised of two models: the Oklahoma Joe’s Rider pellet grill and the Oklahoma Joe’s Rider DLX. Models with the DLX designation are the higher-tier models with the latest features and technology. The Oklahoma Joe’s Rider models are available in two sizes, the Rider 600 and the Rider 900.
The new and improved series in the Rider DLX pellet grill lineup. This grill features a new temperature controller called the Pit Control System Cook 2.0, a removable ash cup, a base for an Oklahoma Joe’s pellet bucket container, and a larger LCD screen. Also, the DLX models feature rubber all-terrain wheels, and out are the classic steel wagon wheels.
However, during my tests and research, the most useful new feature in the Oklahoma Joe’s Rider DLX is “SEAR MODE”. That’s right! The Rider DLX pellet grill has a dedicated “searing” area easily recognized by the center diamond-shaped grate. Right below the searing grates sits the fire pot; its heat shields can be opened using a lever to expose meat to direct heat and fire. This innovative flex grate and high searing temperatures set this grill apart from other pellet grill brands. Most pellet grills can heat up to 500 degrees.
With a broad temperature range of 200 to 650 degrees Fahrenheit, this grill can handle low and slow smoking but can also sear a nice tomahawk steak.
Oklahoma Joe’s Rider DLX Review
The Oklahoma Joe’s Rider DLX shares a lot of the traits of its less sophisticated relative, the Rider. Oklahoma Joe makes amazing offset smokers and what makes those grills great makes it to the DLX models.
However, unlike simpler and old-school offset models, the Rider DLX pellet grill is packed with modern features. First and foremost, Riders are pellet grills, so you get features like the Pit Control System Cook controller, four meat probe connections, two meat probes included, and even a timer button.
Unique to Oklahoma Joe’s Rider DLX is the innovative “flex grate”. There is a lever clearly marked for sear mode. Slide the level to one side to smoke meats and to the other to grill and sear.
You also get a removable ash cup, which is very convenient when it is time to get some of those pellet ashes out. You also get other convenient features like hooks to place your grates and barbecue tool hooks.
The cooking space is split between three cooking grates: two side grates and the center grate ( or searing grate). The center grate can be set up for normal cooking and grilling and flipped around for searing when the grill is set in sear mode.
By the way, I like the grate tool included with this Joe’s Rider DLX pellet grill. It makes removing these grates easier.
Oklahoma Joe’s Rider DLX Features
Let me go over some of the features you get from the Oklahoma Rider DLX. I have tested and reviewed many grills and smokers and can tell you that a PID controller can make or break a grill. The quality of the cooker can be the best, but if the software and controls are not up to par, the cooking experience will suffer.
The Pit Control System 2.0 / Dual Temp probe cooking modes
The Pit Control System offers you many of the same features found in other grills. However, what makes this PID controller different is that, unlike most grills and smokers, this controller uses two different cooking chamber probes to monitor temperature more precisely. One temperature sensor is configured and set for smoking and the other for grilling and cooking at high temperatures.
This controller also offers nice features like a timer mode, temp probe mode, and multiple setup options.
QuickDraw Hopper & Pellet Bucket Mount
Many pellet smokers and grills include a pellet cleaning system of some sort. Most commonly, a clean out door is installed in the hopper that lets users “dump” wood pellets out of their hopper In the DLX a trap door is opened by lifting the spring-loaded grips under the floor. Pellets drop into the bucket below within seconds.
This system is pretty clever, if you have a few pellet containers laying around you can have different flavors stored in the buckets, grab the bucket flavor you want, dump some pellets in the hopper, put the bucket underneath the cleanout doors, and when you are done dop the remaining pellets back in the bucket. Nice!
This system will help you keep pellets always in a container, dry and safe.
I enjoy using different pellets to produce different foods. Cherry, hickory, and oak are wonderful with meat, and hickory pecan and apple are fantastic with pork.
Ryder DLX Flex Grate & Flex Rack System
I have already talked a few times about the Flex grate but let me tell you about the entire flex rack system.
The center grate can be substituted with Oklahoma Joe’s accessory parts like the griddle and deep dish pan. Also, instead of two longer racks, you can use a smaller Multipurpose Flex Rack or Ribflex Racks. This level of versatility and flexibility is really available and gives this Rider an extra edge over other brands.
A Removable ash cup
Ashes are a “thing” in any grill that burns wood pellets or charcoal. In the DLX you get a removable ash cup. When you are done cooking, pull out the removable ash cup and empty the ashes. In other grills, you need to use a shop vac to clean out the ashes.
Meat Probes
The Joe’s Rider DLX pellet grill supports up to four probes for different temp probe cooking modes. Joe’s Rider DLX pellet grill includes two meat probes but you can purchase two more and monitor four different cuts of meat.
Using meat probes helps you nail the ideal internal temperature during those long cooking sessions.
Specifications
The Rider DLX is available in two sizes, the 1200 and the 900, and the model numbers are indicative of the total cooking space of each model.
Specifications of the Rider DLX 1200
Model Number: 22202150
Assembled Dimensions
32 x 53.6 x 58 inches
Assembled Width
58.2 inches
Assembled Height
53.6 inches
Assembled Depth
32 inches
Primary Cooking Area
578 square inches
Secondary Cooking Area
656 square inches
Grates
Porcelain Coated Cast Iron
Weight
255 pounds
Warranty
2 years
Specifications of the Rider DLX 900
Assembled Dimensions
32 x 48.5 x 58 inches
Assembled Width
58.2 inches
Assembled Height
48.5 inches
Assembled Depth
32 inches
Primary Cooking Area
578 square inches
Secondary Cooking Area
328 square inches
Grates
Porcelain Coated Cast Iron
Weight
236 pounds
Warranty
2 years
Our impressions
I like cooking with pellet smokers and grills. You set the desired temp, hook up a couple of probes, let the grill feed pellets, and enjoy a beer. The flavor is always great if you pair the right pellets for smoking meats. There is always a place for charcoal and a charcoal smoker in the hands of a pro will always yield amazing results.
When you open the box, the Rider DLX looks like an iron block. Built out of heavy gauge steel construction, this grill is heavy and feels solid. You will need some help getting this big boy out of its box.
The Joe’s Rider DLX pellet grill does have a tall body smoke chamber which adds to the size of this cooker.
Assembly is pretty straightforward. The tall body smoke chamber is one piece and only the legs and controller need to be attached to the grill. I do recommend you get some help as you will need to turn the Rider upside down to attach the legs and the controller/hopper assembly is a bit heavy.
After putting the grill together its size is unmistakable.
Cooking with the Rider
Cooking with the Rider is easy and I like the broad temperature range. I own a Z Grills 7004DE and I love that grill. Is simple to use, has ample storage, great cooking space, and the price is outstanding. My only complaint about my 700 is that it only reaches 450 degrees and I like to sear steaks. Nevertheless, it does a great job at keeping target internal temp so it is my go-to and daily cooker.
The Rider, just like other pellet grills, is easy to power on, set temp, and start cooking. What I find most useful when comparing this grill to other pellet grills is its flex racks systems combined with its hi temp searing features.
There isn’t anything jaw-dropping about the controller, it does mostly the same other grills do. Power on the grill, turn a wheel, to set the temperature, and cook.
Pros
The Rider DLX lets cook at fire red hot temps in sear mode. Hi temp searing is not always easy with pellet grills but the Rider DLX makes it possible.
Expansive temperature range.
The removable ash cup is great for quick cleanup.
The Flex racks system is genius and allows for greater flexibility.
The Pit Control System is easy to use and supports four probes.
The Sear Mode!
The build quality has classic, strong, and rustic Oklahoma Joe’s traits.
Cons
No Wifi. This is a big letdown. Most grills at this price range feature Wifi. Sure, my 700 doesn’t have a lot of features but it cost half of what this Rider DLX does.
Less expensive grills like my 7004DE include a 3-year warranty.
How Is the Rider DLX Pellet Grill Different than the rest?
Instead of having a metal diffuser plate running the whole length of the grill, it has a round heating baffle covering the fire pot. The baffle shields have holes and when you move the lever from smoke to grill/sear it rotates the baffles to line up the holes and expose the food to open fire.
The shields are stacked on top of each other allowing for easy access and cleaning.
Center sear “Flex Grate”
How does it rank among the rest?
The Rider DLX is a good grill but when comparing this grill to other models in this price category, well, I wished Oklahoma had added some features. People spending this kind of money on a grill are looking for a premium pellet grilling experience. This means WIFI, BlueTooth, cooking apps, and automation.
However, this grill offers unmatched versatility, a good tall body design, side shelves for food prep, and plenty of hooks for your BBQ tools.
I give Oklahoma Joe’s a lot of credit. This company is known for making good offset smokers and jumping into the pellet/smoker race is not easy. They have managed to build something good using their expertise in offsets and likely will become better.
At this price point, there are other brands with more grill models that are ahead of the curve. Brands like Traeger, Z Grills, and Camp Chef have many years of experience building grills and offer incredible features.
Who should consider the Rider DLX? Those who want a large pellet grill that can sear right on pellet fire at red hot temps. Also if you like the brand’s looks and build.
The BBQ Grill Academy Score
Now is time to give the Rider DLX pellet grill a BBQ Grill Academy Score. We have been researching and testing grills for a long time and I have to say I do like the Rider DLX. It has so many traits of its predecessors and Joe’s signature is still there.
Still, when talking about pellet smokers or grills, well, it is a different ball game. There are a lot of pellet brands making amazing grills, and the competition is fearless. Let’s go over the score results.
We use a five-point rating and rank the grill’s build quality, features cooking experience, technology, and price.
Build Quality – 4 out of 5
This build quality is similar to most grills but at this price range, there are brands offering just a “bit” more.
Features – 4 out 5
The Rider offers you good features including meat probes, side tables, and storage. The only reason we give this grill a score of three is that it is missing WIFI. most grills at this price offer WIFI or Bluetooth connectivity.
Cooking Experience 5 out of 5
Cooking on the Joe is amazing. It does everything well but it adds that searing mode.
Technology – 3 out of 5
When discussing pellet cookers, technology contributes to their strength or weakness. Compared to charcoal grills, pellet cookers are purchased in part due to their technology. Consequently, the absence of WiFi connectivity on this grill places it below other brands that offer WiFi at this price point.
Final Word
In short, I think Oklahoma Joe’s has done a great job with the Rider lineup. They have managed to improve their grills and offer something that many pellet cookers can’t, a good working sear mode.