❌

Normal view

There are new articles available, click to refresh the page.
Today β€” 17 December 2025Main stream

The PediSedate: A Winning Combination Of Video Games And Anesthesia

By: Lewin Day
17 December 2025 at 13:00
One can understand that it would be nice to have something to focus on while trying to remain calm ahead of a medical procedure. Credit: PediSedate

Once upon a time, surgery was done on patients who were fully conscious and awake. As you might imagine, this was a nasty experience for all involved, and particularly the patients. Eventually, medical science developed the techniques of anaesthesia, which allowed patients to undergo surgery without feeling pain or even being conscious of it at all.

Adults are typically comfortable in the medical environment and tolerate anaesthesia well. For children, though, the experience can be altogether more daunting. Thus was invented the PediSedateβ€”a device which was marketed almost like a Game Boy accessory intended to deliver anaesthetic treatment in order to safely and effectively prepare children for surgery.

A Happy Distraction

A child wearing the PediSedate mask. Credit: PediSedate

The patent filing for the PediSedate doesn’t give away much in the title—”Inhalation And Monitoring Mask With Headset.” Still, US patent 5,697,363 (PDF) recorded an innovative device, intended to solve several issues around the delivery of anaesthesia to pediatric patients. Most specifically, those developing the device had noted a great deal of anxiety and stress when using traditional anaesthesia masks with young patients. The device was created by Geoffrey A. Hart, an anaestheologist based in Boston. His hope was to create an anaesthesia delivery device that could be used with a child in a β€œnon-threatening, non-intrusive manner.”

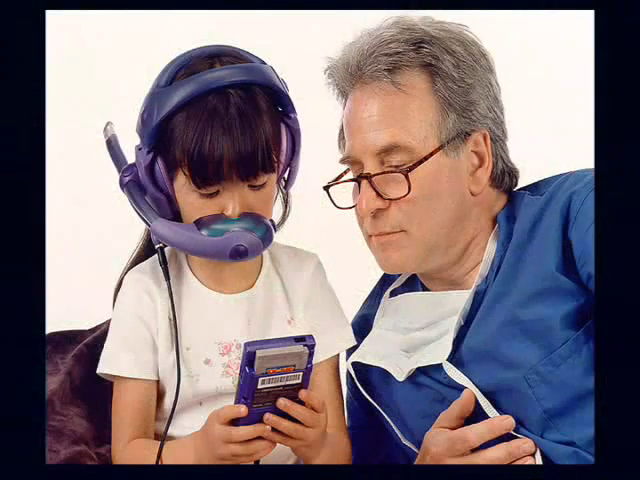
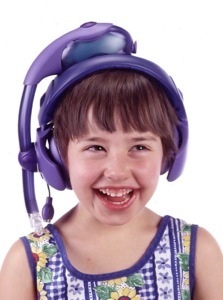
The resulting device looked rather a lot like a big, colorful audio headset. Indeed, it had headphones that could play audio to the wearer, while an arm that extended out over the face could deliver nitrous oxide or other gases via the nasal route. Sensors were included for pulse oximetry in order to track the patient’s heart rate and blood oxygenation, while an integrated capnometer measured vital respiratory factors, including carbon dioxide levels in the breath. Provision in the patent was also made for including a microphone, either for interactivity purposes with entertainment content for distraction’s sake, or to allow communication with medical personnel at a distance. This would be particularly useful in the case of certain imaging studies or treatments, where doctors and nurses must remain a certain distance away.

Press materials that showed the device in use with a handheld created the idea that this was a Game Boy accessory. It was certainly never an official one; in reality, it was a pair of headphones that also delivered anaesthesia while monitoring the patient. Credit: PediSedate

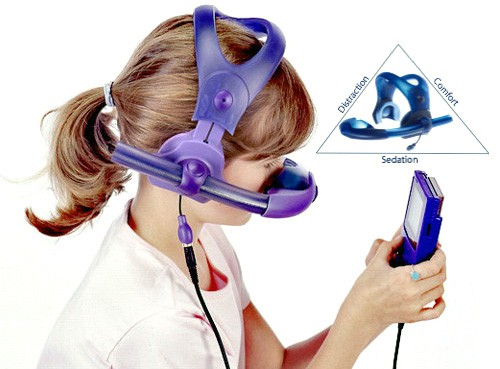
Press materials and a website were launched in 2009, as the device went through Phase II clinical trials. Most materials showed the PediSedate being used in tandem with a Nintendo Game Boy. The device featured an aesthetic that followed the late 90s trend of bright colors and translucent plastics. It was often paired in photos hooked up to a Game Boy to help distract a child during sedation, with the device often talked about as an β€œaccessory” for the handheld console. This wasn’t really the caseβ€”it was essentially a child-friendly anaesthetic mask with headphones that could be hooked up to any relevant sound source. However, at the time, a Game Boy was a readily available way to distract and calm a sick child, and it could be had in colors that matched the PediSedate device.

Those behind the PediSedate noted the device was β€œvery well received by parents, kids, and health-care workers.” The benefits seem to pass the common-sense checkβ€”it’s believable that the PediSedate succeeded at being a less-scary way to present children with anaesthetic treatment while also giving them something pleasant to focus on as they drifted out of consciousness. However, success was seemingly not on the cards. The PediSedate website disappeared from the internet in 2011, and precious little was heard of the device since. The creator, Geoffrey A. Hart, continued to practice medicine in the intervening years until he resigned his license in 2024, according to the Massachusetts Board of Medicine.

An explainer video demonstrated the use of the device, which was going through Phase II trials in 2009.Β 

By and large, the medical field has gotten by without devices like the PediSedate. Children undergoing sedation with inhalational anaesthetics will typically be treated with relatively conventional masks, albeit in small sizes. They lack colorful designs or hookups for game consoles, but they seem to do the job. It might have been nice to play a little Donkey Kong before a daunting procedure, but alas, the PediSedate never quite caught on.

Featured image: still from Sharkie’s Gaming Controllers video on the PediSedate.

AI Picks Outfits With Abandon

By: Lewin Day
17 December 2025 at 11:30

Most of us choose our own outfits on a daily basis. [NeuroForge] decided that he’d instead offload this duty to artificial intelligenceΒ β€” perhaps more for the sake of a class project than outright fashion.

The concept involved first using an AI model to predict the weather. Those predictions would then be fed to a large language model (LLM), which would recommend an appropriate outfit for the conditions. The output from the LLM would be passed to a simple alarm clock which would wake [NeuroForge] and indicate what he should wear for the day. Amazon’s Chronos forecasting model was used for weather prediction based on past weather data, while Meta’s Llama3.1 LLM was used to make the clothing recommendations. [NeuroForge] notes that it was possible to set all this up to work without having to query external services once the historical weather data had been sourced.

While the AI choices often involved strange clashes and were not weather appropriate, [NeuroForge] nonetheless followed through and wore what he was told. This got tough when the outfit on a particularly cold day was a T-shirt and shorts, though the LLM did at least suggest a winter hat and gloves be part of the ensemble. Small wins, right?

We’ve seen machine learning systems applied to wardrobe-related tasks before. One wonders if a more advanced model could be trained to pick not just seasonally-appropriate clothes, but to also assemble actually fashionable outfits to boot. If you manage to whip that up, let us know on the tipsline. Bonus points if your ML system gets a gig on the reboot ofΒ America’s Next Top Model.

Make Your Own Tires For RC Cars

By: Lewin Day
17 December 2025 at 01:00

You can buy a wide range of RC car tires off the shelf. Still, sometimes it can be hard to find exactly what you’re looking for, particularly if you want weird sizes, strange treads, or something that is very specifically scale-accurate. In any of these cases, you might like to make your own tires. [Build It Better] shows us how to do just that!

Making your own tires is fairly straightforward once you know how. You start out by producing a 3D model of your desired tire. You then create a two-piece negative mold of the tire, which can then be printed out on a 3D printer; [Build It Better] provides several designs online. From there, it’s simply a matter of filling the tire molds with silicone rubber, degassing, and waiting for them to set. All you have to do then is demold the parts, do a little trimming and post-processing, and you’ve got a fresh set of boots for your favorite RC machine.

[Build It Better] does a great job of demonstrating the process, including the basic steps required to get satisfactory results. We’ve featured some other great molding tutorials before, too. Video after the break.

Yesterday β€” 16 December 2025Main stream

Building A Granular Sampler Synth

By: Lewin Day
16 December 2025 at 16:00

Synthesizing sounds from scratch is all well and good, you just use a bit of maths. However, the latest build from [Daisy] eschews such boring concepts as additive or subtractive synthesis, instead going for a sample-based approach.

This build is based around the Daisy Seed microcontroller platform. It was actually inspired by an earlier project to create a ribbon synth, which we covered previously. In this case, the ribbon potentiometer has been repurposed, being used to control the playback position of a lengthy recorded sample. In this build, the Daisy Seed is running its audio playback system at a rate of 48,000 samples per second. It’s capable of storing up to 192,000 samples in memory, so it has a total of 4 seconds of sample storage. The Daisy Seed uses an analog-to-digital input to record two seconds of audio into the sample buffer. It can then be replayed by placing a finger on the ribbon at various points. Playback is via granular synthesis, where small sections of the overall sample buffer are used to synthesize a new tone. The video explains how the granular synthesis algorithm is implemented using the Plugdata framework. Design files are available for those eager to replicate the build.

Once you start tinkering in the world of synthesis, it’s easy to fall down the rabbit hole. Video after the break.

Virtual Pet Responds To WiFi

By: Lewin Day
16 December 2025 at 11:30

When the Tamagotchi first launched all those decades ago, it took the world by storm. It was just a bunch of simple animations on a monochrome LCD, but it had heart, and people responded to that. Modern technology is capable of so much more, so [CiferTech] set out to build a virtual pet that can sniff out WiFi networks.

The build employs an ESP32-S3, perhaps the world’s favorite microcontroller that has WiFi baked right in from the factory. It’s paired with a 240Γ—240 TFT LCD that delivers bright, vivid colors to show the digital pet living inside. Addressable WS2812B LEDs and a simple sound engine provide further feedback on the pet’s status.

The pet has various behaviors coded in, like hunting, exploring, and resting, and moods such as β€œhappy,” β€œcurious,” and β€œbored.” For a bit of environmental reactivity, [CiferTech] also made the local WiFi environment play a role. Nearby networks can influence the β€œhunger, happiness, and health” of the pet.

Incidentally, if you’ve ever wondered what made the Tamagotchi tick, we’ve explored that before, too.

Before yesterdayMain stream

Giant Neopixel Is Just Like The Regular Kind, Only Bigger

By: Lewin Day
15 December 2025 at 16:00

Neopixels and other forms of addressable LEDs have taken the maker world by storm. They make it trivial to add a ton of controllable, glowing LEDs to any project. [Arnov Sharma] has made a great tribute to the WS2812B LED by building the NeoPixel Giant Edition.

The build is simply a recreation of the standard 5mm x 5mm WS2812B, only scaled up to 150 mm x 150 mm. It uses a WS2811 chip inside to make it behave in the same way from a logical perspective, and this controller is hooked up to nine standard RGB LEDs switched with MOSFETs to ensure they can deliver the requisite light output. The components are all assembled on a white PCB in much the same layout as the tiny parts of a WS2812B, which is then installed inside a 3D-printed housing made in white PLA. Large metal terminals were added to the housing, just like a WS2812B, and the lens was then created using a large dose of clear epoxy.

The result is a fully functional, addressable LED that is approximately 30 times larger than the original. You can even daisy-chain them, just like the real thing. We’ve covered all kinds of projects using addressable LEDs over the years, from glowing cubes to fancy nature installations. If you’ve got your own glowable project that the world needs to see, make sure you notify the tips line!

Pufferfish Venom Can Kill, Or It Can Relieve Pain

By: Lewin Day
15 December 2025 at 13:00

Tetrodotoxin (TTX) is best known as the neurotoxin of the puffer fish, though it also appears in a range of other marine species. You might remember it from an episode of The Simpsons involving a poorly prepared dish at a sushi restaurant. Indeed, it’s a potent thing, as ingesting even tiny amounts can lead to death in short order.

Given its fatal reputation, it might be the last thing you’d expect to be used in a therapeutic context. And yet, tetrodotoxin is proving potentially valuable as a treatment option for dealing with cancer-related pain. It’s a dangerous thing to play with, but it could yet hold promise where other pain relievers simply can’t deliver.

Poison, or…?

A license to prepare fugu (pufferfish) issued by Tokyo authorities. Credit: Nesnad, CC BY SA 3.0

Humans have been aware of the toxicity of the puffer fish and its eggs for thousands of years. It was much later that tetrodotoxin itself was chemically isolated, thanks to the work of Dr. Yoshizumi Tahara in 1909.

Its method of action was proven in 1964, with tetrodotoxin found to bind to and block voltage-gated sodium channels in nerve cell membranes, essentially stopping the nerves from conducting signals as normal. It thus has the effect of inducing paralysis, up to the point where an afflicted individual suffers respiratory failure, and subsequently, death.

Tetrodotoxin is most closely associated with pufferfish, though it’s also present in other deadly species, like the blue-ringed octopus. Thankfully, nobody is crazy enough to try to eat those. Credit: NPS, public domain

It doesn’t take a large dose of tetrodotoxin to kill, eitherβ€”the median lethal dose in mice is a mere 334 ΞΌg per kilogram when ingested. The lethality of tetrodotoxin was historically a prime driver behind Japanese efforts to specially license chefs who wished to prepare and serve pufferfish. Consuming pufferfish that has been inadequately prepared can lead to symptoms in 30 minutes or less, with death following in mere hours as the toxin makes it impossible for the sufferer to breathe. Notably, though, with the correct life support measures, particularly for the airway, or with a sub-fatal dose, it’s possible for a patient to make a full recovery in mere days, without any lingering effects.

The effects that tetrodotoxin has on the nervous system are precisely what may lend it therapeutic benefit, however. By blocking sodium channels in sensory neurons that deal with pain signals, the toxin could act as a potent method of pain relief. Researchers have recently explored whether it could have particular application for dealing with neuropathic pain caused by cancer or chemotherapy treatments. This pain isn’t always easy to manage with traditional pain relief methods, and can even linger after cancer recovery and when chemotherapy has ceased.

Tetrodotoxin is able to block voltage-gated sodium channels, which is the basis of both its pain-relieving abilities and its capacity to paralyze and kill. Credit: research paper

The challenge of using a toxin for pain relief is obviousβ€”there’s always a risk that the negative effects of the toxin will outweigh the supposed therapeutic benefit. In the case of tetrodotoxin, it all comes down to dosage. The levels given to patients in research studies have been on the order of 30 micrograms, well under the multi-milligram dose that would typically cause severe symptoms or death in an adult human. The hope would be to find a level at which tetrodotoxin reduces pain with a minimum of adverse effects, particularly where symptoms like paralysis and respiratory failure are on the table.

A review of various studies worldwide was published in 2023, and highlights that tetrodotoxin pain relief does come with some typical adverse effects, even at tiny clinical doses. The most typical reported symptoms involved nausea, oral numbness, dizziness, and tingling sensations. In many cases, these effects were mild and well-tolerated. A small number of patients in research trials exhibited more serious symptoms, however, such as loss of muscle control, pain, or hypertension. At the same time, the treatment did show positive results β€” with many patients reporting pain relief for days or even weeks after just a few days of tetrodotoxin injections.

While tetrodotoxin has been studied as a pain reliever for several decades now, it has yet to become a mainstream treatment. There have been no large-scale studies that involved treating more than 200 patients, and no research group or pharmaceutical company has pushed hard to bring a tetrodotoxin-based product to market. Research continues, with a 2025 paper even exploring the use of ultra-low nanogram-scale doses in a topical setting. For now, though, commercial application remains a far-off fantasy. Today, the toxin remains the preserve of pufferfish and a range of other deadly species. Don’t expect to see it in a hospital ward any time soon, despite the promise it shows thus far.

Featured image: β€œPuffer Fish DSC01257.JPG” by Brocken Inaglory. Actually, not one of the poisonous ones, but it looked cool.

Tearing Down Walmart’s $12 Keychain Camera

By: Lewin Day
15 December 2025 at 11:30

Keychain cameras are rarely good. However, in the case of Walmart’s current offering, it might be worse than it’s supposed to be. [FoxTailWhipz] bought the Vivitar-branded device and set about investigating its claim that it could deliver high-resolution photos.

The Vivatar Retro Keychain Camera costs $12.88, and wears β€œFULL HD” and β€œ14MP” branding on the packaging. It’s actually built by Sakar International, a company that manufactures products for other brands to license. Outside of the branding, though, [FoxTailWhipz] figured the resolution claims were likely misleading. Taking photos quickly showed this was the case, as whatever setting was used, the photos would always come out at 640 x 480, or roughly 0.3 megapixels. He thus decided a teardown would be the best way to determine what was going on inside. You can see it all in the video below.

Pulling the device apart was easy, revealing that the screen and battery are simply attached to the PCB with double-sided tape. With the board removed from the case, the sensor and lens module are visible, with the model number printed on the flex cable. The sensor datasheet tells you what you need to know. It’s a 2-megapixel sensor, capable of resolutions up to 1632 x 1212. The camera firmware itself seems to not even use the full resolution, since it only outputs images at 640 x 480.

It’s not that surprising that an ultra-cheap keychain camera doesn’t meet the outrageous specs on the box. At the same time, it’s sad to see major retailers selling products that can’t do what they say on the tin. We see this problem a lot, in everything from network cables to oscilloscopes.

All-Screen Keyboard Has Flexible Layouts

By: Lewin Day
15 December 2025 at 04:00

Most keyboards are factory-set for a specific layout, and most users never change from the standard layout for their home locale. As a multilingual person, [Inkbox] wanted a more flexible keyboard. In particular, one with the ability to change its layout both visually and logically, on the fly. Thus was born the all-screen keyboard, which can swap layouts on demand. Have a look at the video below to see the board in action.

The concept is simple enough: It’s a keyboard with transparent keys and a screen underneath. The screen displays the labels for the keys, while the transparent plastic keys provide the physical haptic interface for the typist. The device uses a Raspberry Pi to drive the screen. [Inkbox] then designed a plastic frame and transparent keys, which are fitted with magnets, which in turn are read by Hall effect sensors under the display. This eliminates the need for traditional key switches, which would block light from the screen below.

Unfortunately for [Inkbox], the prototype was very expensive (about $1,400 USD) and not particularly functional as a keyboard. However, a major redesign tackled some of these issues. Version two had a smaller screen with a different aspect ratio. It also jettisoned the Hall effect sensors and uses plastic keys capacitively operating a traditional touch screen. Some design files for the keyboard are available on Github for the curious.

An all-screen keyboard is very cool, if very complicated to implement. There are other ways to change your layout that aren’t quite as fancy, of course. You can always just make custom keycaps and remap layouts on a regular mechanical keyboard if desired. Still, you have to admire the work that went into making this thing a reality.

Β 

Finally, A Pipe Slapophone With MIDI

By: Lewin Day
14 December 2025 at 16:00

If you live in a major city, you’ve probably seen a street performer with some variety of slapophone. It’s a simple musical instrument that typically uses different lengths of PVC pipe to act as resonant cavities. When struck with an implement like a flip-flop, they release a dull but pleasant tone. [Ivan Miranda] decided to build such an instrument himself and went even further by giving it MIDI capability. Check it out in the video below.

[Ivan’s] design uses a simple trick to provide a wide range of notes without needing a lot of individual pipes. He built four telescoping pipe assemblies, each of which can change length with the aid of a stepper motor and a toothed belt drive. Lengthening the cavity produces a lower note, while shortening it produces a higher note. The four pipe assemblies are electronically controlled to produce notes sent from a MIDI keyboard, all under the command of an Arduino. The pipes are struck by specially constructed paddles made of yoga mats, again controlled by large stepper motors.

The final result is large, power-hungry, and vaguely playable. It’s a little unconventional, though, because moving the pipes takes time. Thus, keypresses on a MIDI keyboard set the pipes to a given note, but don’t actually play it. The slapping of the pipe is then triggered with a drum pad.

We love weird instruments around these parts.

Get Statistical About Your Pet With This Cat Tracking Dashboard

By: Lewin Day
13 December 2025 at 13:00

Cats can be wonderful companions, but they can also be aloof and boring to hang out with. If you want to get a little more out of the relationship, consider obsessively tracking your cat’s basic statistics with this display from [Matthew Sylvester].

The build is based around the Seeedstudio ReTerminal E1001/E1002 devicesβ€”basically an e-paper display with a programmable ESP32-S3 built right in. It’s upon this display that you will see all kinds of feline statistics being logged and graphed. The data itself comes from smart litterboxes, with [Matthew] figuring out how to grab data on weight and litterbox usage via APIs. In particular, he’s got the system working with PetKit gear as well as the Whisker Litter Robot 4. His dashboard can separately track data for four cats and merely needs the right account details to start pulling in data from the relevant cat cloud service.

For [Matthew], the build wasn’t just a bit of funβ€”it also proved very useful. When one of his cats had a medical issue recently, he was quickly able to pick up that something was wrong and seek the help required. That’s a pretty great result for any homebrew project. It’s unrelated, too, but Gnocci is a great name for a cat, so hats off for that one.

We’ve featured some other fun cat-tracking projects over the years, too. If you’re whipping up your own neat hardware to commune with, entertain, or otherwise interact with your cat, don’t hesitate to let us know on the tipsline.

Hidden Camera Build Proves You Can’t Trust Walnuts

By: Lewin Day
12 December 2025 at 16:00

Typically, if you happened across a walnut lying about, you might consider eating it or throwing it to a friendly squirrel. However, as [Penguin DIY] demonstrates, it’s perfectly possible to turn the humble nut into a clandestine surveillance device. It turns out the walnut worriers were right all along.

The build starts by splitting and hollowing out the walnut. From there, small holes are machined into the mating faces of the walnut, into which [Penguin DIY] glues small neodymium magnets. These allow the walnut to be opened and snapped shut as desired, while remaining indistinguishable from a regular walnut at a distance.

The walnut shell is loaded with nine tiny lithium-polymer cells, for a total of 270 mAh of battery capacity at 3.7 volts. Charging the cells is achieved via a deadbugged TP4056 charge module to save space, with power supplied via a USB C port. Holes are machined in the walnut shell for the USB C port as well as the camera lens, though one imagines the former could have been hidden purely inside for a stealthier look. The camera itself appears to be an all-in-one module with a transmitter built in, with the antenna installed in the top half of the walnut shell and connected via pogo pins. The video signal can be picked up at a distance via a receiver hooked up to a smart phone. No word on longevity, but the included batteries would probably provide an hour or two of transmission over short ranges if you’re lucky.

If you have a walnut tree in your backyard, please do not email us about your conspiracy theories that they are watching you. We get those more than you might think, and they are always upsetting to read. If, however, you’re interested in surveillance devices, we’ve featured projects built for detecting them before with varying levels of success. Video after the break.

Weird Email Appliance Becomes AI Terminal

By: Lewin Day
12 December 2025 at 11:00

The Landel Mailbug was a weird little thing. It combined a keyboard and a simple text display, and was intended to be a low-distraction method for checking your email. [CiferTech] decided to repurpose it, though, turning it into an AI console instead.

The first job was to crack the device open and figure out how to interface with the keyboard. The design was conventional, so reading the rows and columns of the key matrix was a cinch. [CiferTech] used PCF8574 IO expanders to make it easy to read the matrix with an ESP32 microcontroller over I2C. The ESP32 is paired with a small audio output module to allow it to run a text-to-speech system, and a character display to replace the original from the Mailbug itself. It uses its WiFi connection to query the ChatGPT API. Thus, when the user enters a query, the ESP32 runs it by ChatGPT, and then displays the output on the screen while also speaking it aloud.

[CiferTech] notes the build was inspired by AI terminals in retro movies, though we’re not sure what specifically it might be referencing. In any case, it does look retro and it does let you speak to a computer being, of a sort, so the job has been done.Β Overall, though, the build shows that you can build something clean and functional just by reusing and interfacing a well-built commercial product.

DIY Synth Takes Inspiration From Fretted Instruments

By: Lewin Day
12 December 2025 at 01:00

There are a million and one MIDI controllers and synths on the market, but sometimes it’s just more satisfying to make your own. [Turi Scandurra] very much went his own way when he put together his Diapasonix instrument.

Right away, the build is somewhat reminiscent of a stringed instrument, what with its buttons laid out in four β€œstrings” of six β€œfrets” each. Only, they’re not so much buttons, as individual sections of a capacitive touch controller. A Raspberry Pi Pico 2 is responsible for reading the 24 pads, with the aid of two MPR121 capacitive touch ICs.

The Diapasonix can be played as an instrument in its own right, using the AMY synthesis engine. This provides a huge range of patches from the Juno 6 and DX7 synthesizers of old. Onboard effects like delay and reverb can be used to alter the sound. Alternatively, it can be used as a MIDI controller, feeding its data to a PC attached over USB. It can be played in multiple modes, with either direct note triggers or with a β€œstrumming” method instead.

We’ve featured a great many MIDI controllers over the years, from the artistic to the compact. Video after the break.

A Musically-Reactive LED Christmas Tree

By: Lewin Day
10 December 2025 at 04:00

Regular Christmas trees don’t emit light, nor do they react to music. If you want both things in a holiday decoration, consider this build from [dbmaking].Β 

An ESP32-D1 mini runs the show here. It’s hooked up to a strip of WS2812B addressable LEDs. The LED strip is placed on a wooden frame resembling the shape of a traditional Christmas tree. Ping-pong balls are then stacked inside the wooden frame such that they act as a light diffuser for the LEDs behind. The microcontroller is also hooked up to an INMP441 omnidirectional MEMS microphone module. This allows the ESP32 to detect sound and flash the LEDs in time, creating a colorful display that reacts to music. This is achieved by using the WLED web installer to set the display up in a sound reactive mode.

It’s a fun build, and we’d love to tinker around with coding more advanced visualizer effects for a build like this. We’ve seen builds that go the other way, too, by toning down excessive blinkiness in Christmas decorations.

Β 

LED Hourglass is a Great Learning Project

By: Lewin Day
9 December 2025 at 04:00

An hourglass tells you what it is in the name β€” a glass that you use to measure an hour of time passing by. [EDISON SCIENCE CORNER] has built a digital project that mimics such a thing, with little beads of light emulating falling sand in the timekeepers of old.

The build is designed around the Arduino platform, and can be constructed with an Arduino Uno, Nano, or Pro Mini if so desired. The microcontroller board is hooked up with an ADXL335 three-axis accelerometer, which is used for tracking the orientation and movement of the digital hourglass. These movements are used to influence the movement of emulated grains of sand, displayed on a pair of 8Γ—8 LED matrixes driven by a MAX7219 driver IC. Power is courtesy of a 3.7 V lithium-ion cell, with a charge/boost module included for good measure. Everything is wrapped up in a vaguely hourglass-shaped 3D printed enclosure.

The operation is simple. When the hourglass is turned, the simulated grains of sand move as if responding to gravity. The movement is a little janky β€” no surprise given the limited resolution of the 8Γ—8 displays. You also probably wouldn’t use such a device as a timer when more elegant solutions exist. However, that’s not to say builds like this don’t have a purpose. They’re actually a great way to get to grips with a microcontroller platform, as well as to learn about interfacing external hardware and working with LED matrixes. You can pick up a great deal of basic skills building something like this.

Would you believe this isn’t the first digital hourglass we’ve featured on the site?

Build Yourself A Graphing Weather Display

By: Lewin Day
8 December 2025 at 19:00

These days, Internet connectivity is ubiquitous, so you can look up live weather data on just about any device around you. Regardless, [Jozerworx] wanted a simple, clean, independent weather display, and came up with this simple design.Β 

The build is based on the Lilygo T5 EPD devboard, which combines an ESP32-S3 microcontroller with a nice 4.7-inch e-paper display. This display has the benefit that it only uses power when it’s being updated, making it particularly suitable to run off a battery for extended periods of time. Meanwhile, the ESP32 and its inbuilt Wi-Fi connectivity allow it to query the internet for updated weather forecasts. Weather data is sourced via the OpenWeather API, which [Jozerworx] notes comes with the caveat of requiring an API key. It’s a little fussy, but if you want good weather data, there are few easier ways to get it. The display shows a forecast for the next five days, while also showing graphs of ambient temperature and humidity along with useful information like the sunset and sunrise schedule.

Files are on Github for those eager to learn more. [Jozerworx] also notes that getting started with the display is particularly easy with the inclusion of a setup mode. This allows the display to act as a Wi-Fi access point with a web page that you use enter your home Wi-Fi connection details.

We’ve featured a great many charming weather displays over the years, too. If you’re working to plot, chart, or even predict the weatherβ€”don’t hesitate to show us your cool projects over on the tipsline!

ESP32 EPaper Weather Station

A Touchscreen MIDI Controller For The DIY Set

By: Lewin Day
8 December 2025 at 01:00

MIDI controllers are easy to come by these days. Many modern keyboards have USB functionality in this regard, and there are all kinds of pads and gadgets that will spit out MIDI, too. But you might also like to build your own, like this touchscreen design from [Nick Culbertson].

The build takes advantage of a device colloquially called the Cheap Yellow Display. It consists of a 320 x 240 TFT touchscreen combined with a built-in ESP32-WROOM-32, available under the part number ESP32-2432S028R.

[Nick] took this all-in-one device and turned it into a versatile MIDI controller platform. It spits out MIDI data over Bluetooth and has lots of fun modes. There’s a straightforward keyboard, which works just like you’d expect, and a nifty beat sequencer too. There are more creative ideas, too, like the bouncing-ball Zen mode, a physics-based note generator, and an RNG mode. If you liked Electroplankton on the Nintendo DS, you’d probably dig some of these. Files are on GitHub if you want to replicate the build.

These days, off-the-shelf hardware is super capable, so you can whip up a simple MIDI controllerΒ really quickly. Video after the break.

Neat Techniques To Make Interactive Light Sculptures

By: Lewin Day
7 December 2025 at 13:00

[Voria Labs] has created a whole bunch of artworks referred to as Lumanoi Interactive Light Sculptures. A new video explains the hardware behind these beautiful glowing pieces, as well as the magic that makes their interactivity work.

The basic architecture of the Lumanoi pieces starts with a custom main control board, based around the ESP-32-S3-WROOM-2. It’s got two I2C buses onboard, as well as an extension port with some GPIO breakouts. The controller also has lots of protection features and can shut down the whole sculpture if needed. The main control board works in turn with a series of daisy-chained β€œcell” boards attached via a 20-pin ribbon cable. The cable carries 24-volt power, a bunch of grounds, and LED and UART data that can be passed from cell to cell. The cells are responsible for spitting out data to addressable LEDs that light the sculpture, and also have their own microcontrollers and photodiodes, allowing them to do all kinds of neat tricks.

As for interactivity, simple sensors provide ways for the viewer to interact with the glowing artwork. Ambient light sensors connected via I2C can pick up the brightness of the room as well as respond to passing shadows, while touch controls give a more direct interface to those interacting with the art.

[Voria Labs] has provided a great primer on building hardcore LED sculptures in a smart, robust manner. We love a good art piece here, from the mechanical to the purely illuminatory. Video after the break.

The ZX Spectrum Finally Got An FPS

By: Lewin Day
7 December 2025 at 04:00

The ZX Spectrum is known for a lot of things, but it’s not really known for a rich and deep library of FPS titles. However, there is finally such a game for the platform, thanks to [Jakub Trznadel]β€”and it’s called World of Spells.

Like so many other games of this type, it was inspired by the 3D raycasting techniques made so popular by Wolfenstein 3D back in the day. For that reason, it has a very similar look in some regards, but a very different look in othersβ€”the latter mostly due to the characteristic palette available on the ZX Spectrum. A playable FPS is quite a feat to achieve on such limited hardware, but [Jakub] pulled it off well, with the engine able to reach up to 80 frames per second.

The game is available for download, and you can even order it on tape if you so desire. You might also like to check out the walkthrough on YouTube, where the game is played on an emulator. Don’t worry, thoughβ€”the game works on real ZX Spectrum 48k hardware just fine.

The Speccy retains a diehard fanbase to this day. You can even build a brand new one thanks to a buoyant supply of aftermarket parts.

[thanks to losr for the tip!]

Β 

❌
❌