❌

Normal view

There are new articles available, click to refresh the page.
Before yesterdayMain stream

Madapalli Puliyodharai | Temple Style Tamarind Rice

8 September 2025 at 15:34

Madapalli Puliyodharai | Temple Style Tamarind Rice is not just food – it’s a divine experience. This humble yet soul-satisfying rice dish is one of the most cherished prasads offered in Vishnu and Hanuman temples across the world. While many of us prepare tamarind rice at home, nothing truly compares to the unique flavor, aroma, and spiritual essence of temple-style puliyodharai. I was fortunate to learn this authentic recipe from a friend whose family is closely associated with the Divyadesams around Sirkazhi, where the madapalli (temple kitchen) recipes are preserved with utmost devotion. The result is a tangy, aromatic, and utterly addictive dish that tastes just like the puliyodharai served in Tirumala Madapalliβ€”an offering so divine, it lingers in your memory long after the last bite.

Madapalli Puliyodharai | Temple Style Tamraind Rice

Madapalli PuliyodharaiΒ is a temple staple and is served as prasad year-round, but it gains extra significance duringΒ Vaikunta Ekadasi, Purattasi Saturdays (dedicated to Lord Venkateswara), Hanuman Jayanthi, and other major temple festivals. In many homes, it’s also a go-to offering forΒ Navaratri, Aadi Perukku, and special pujas, since it keeps well without refrigeration and is perfect for distributing as prasadam to devotees. The long shelf life of tamarind rice makes it a traditional favorite forΒ festivals, temple gatherings, and travel foodΒ too.

[feast_advanced_jump_to]

What’s Special about Temple Puliyodharai?

We’ve all wondered why temple prasad tastes so irresistibly delicious. In most large temples, there is a dedicatedΒ madapalliΒ (temple kitchen) where prasadam is prepared fresh in large quantities every single day. I truly believe that the divine blessings infused in the cooking make the prasadam extra special. Beyond that, the process itself adds to the magicβ€”cooking in traditionalΒ uruliΒ (large bronze vessels) over an open flame imparts a subtle smoky flavor, elevating the taste of rice, pongal, or any other prasadam served in temples. It’s this unique combination of devotion, tradition, and technique that makes temple-style puliyodharai so unforgettable.

Ingredients

Every component ofΒ Madapalli PuliyodharaiΒ is thoughtfully chosen to craft that revered, temple-style flavor:

  • TamarindΒ brings the essential tang that makes this rice both soul-soothing and vibrant.
  • A balanced mix ofΒ dal, spices, and asafoetidaΒ in theΒ spice powderΒ adds depth, aroma, and a savory complexity that’s far more nuanced than basic seasonings.
  • TheΒ first tempering, with sesame oil, legumes, peanuts, and chilies, contributes rich texture, gentle heat, and an inviting nuttiness that gives the dish its crunchy, golden charm.
  • TheΒ second temperingβ€”mustard seeds, turmeric, and curry leaves in aromatic oilβ€”adds layers of fragrance, warmth, and a final burst of flavor.
  • Sesame oilΒ isn’t just any cooking medium; its distinctive nutty aroma is critical to that authentic temple fragrance.
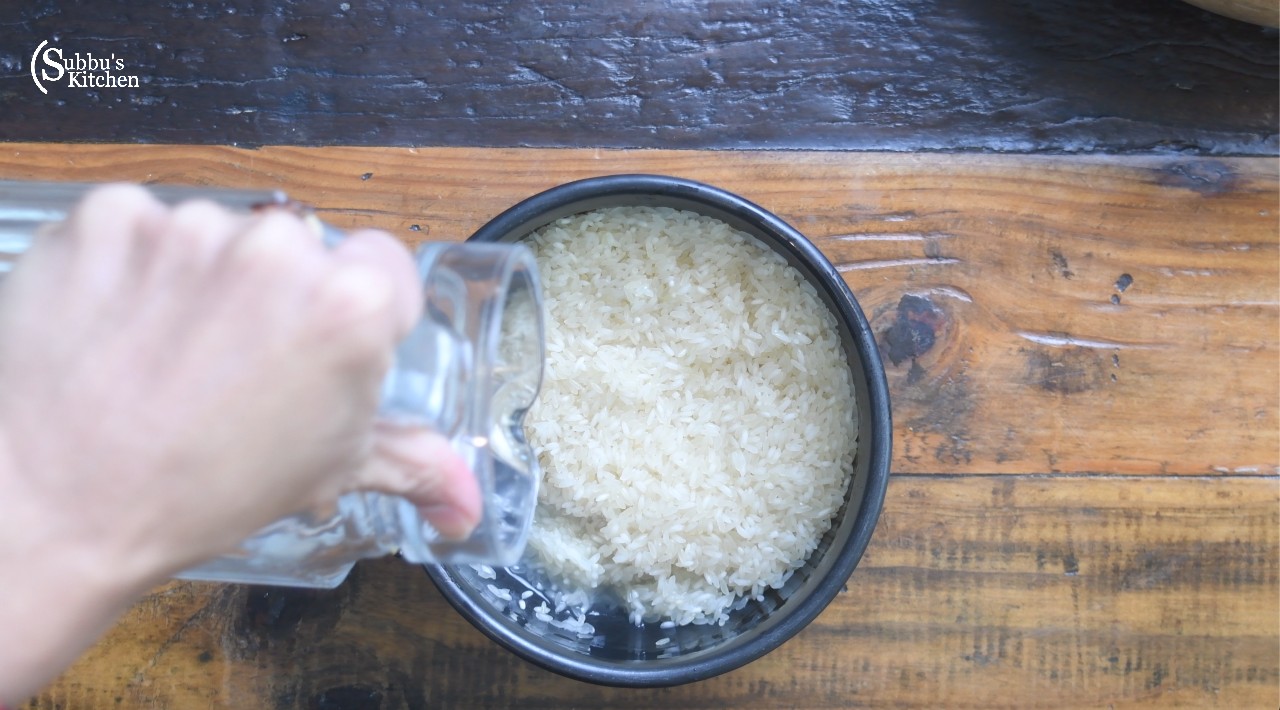
  • Cooked rice, ideally soft yet firm (Ponni or Sona Masoori), acts as the canvas for these bold flavors.

Together, this ensemble of ingredients produces a temple-style puliyodharai that's savory, tangy, aromatic, and texturedβ€”perfect for prasadam, festivals, or a soul-hugging meal.

See recipe card for quantities.

Instructions

  1. Soak the tamarind in warm water for about 10 minutes and extract a thick juice. Alternatively, you can dissolve 2 tablespoons of tamarind paste in 1 cup of water and set it aside.
  1. Heat a pan and dry roast all the ingredientsβ€”urad dal, channa dal, fenugreek seeds, peppercorns, red chilies, asafoetida, and curry leavesβ€”until the dals turn golden brown and release a fragrant aroma..
  1. Allow the roasted mixture to cool completely, then transfer it to a mixer jar and grind into a fine powder. Set this spice powder aside for later use.
  1. Heat oil in a pan. Once hot, add split urad dal, channa dal, peanuts, curry leaves, asafoetida, and red chilies. SautΓ© until the dals turn golden brown and aromatic.
  1. Add the tamarind juice along with salt and let it boil for about 10 minutes.
  1. After it has reduced slightly, add the prepared spice powder and mix well. Stir continuously to ensure the powder blends smoothly with the tamarind baseβ€”otherwise, lumps may form.
  1. Keep stirring and allow the mixture to simmer on a low flame until it thickens into a paste. Once the Puliyodharai mix reaches a thick consistency, switch off the flame.
  1. Step 2: Form into ball shape with your hands
  1. Heat oil in another pan and add mustard seeds. Allow them to crackle. Next, add turmeric powder and curry leaves, mix briefly, and switch off the flame.
  1. Pour this tempering over the Puliyodharai mixture. Your deliciousΒ Madapalli PuliyodharaiΒ is now ready to serve!
  1. Spread the cooked rice in a wide plate or bowl. Add a little salt and sesame oilβ€”keep in mind that the Puliyodharai mix already contains salt, so just about ΒΌ teaspoon is enoughβ€”and mix gently. Spoon in 3–4 tablespoons of the Puliyodharai mixture and fold it into the rice carefully.Β 
Madapalli Puliyodharai | Temple Style Tamraind Rice
  1. YourΒ Temple Style Tamarind RiceΒ is now ready to serve!”

Hint: When preparing the spice powder, ensure you roast the dals and spices evenly on medium heat. This brings out the aroma and prevents any bitterness. Also, always stir continuously when mixing the Puliyodharai paste with the spice powder to avoid lumps.

Variations

Β 1. Iyengar-Style Puliyodharai

This traditional version includes roasted sesame seeds, adding a nutty aroma and flavor. It's commonly served as prasadam in temples.

2. Andhra Pulihora

A spicier variant from Andhra Pradesh, this version incorporates green chilies and ginger, offering a zesty kick. It's quick to prepare and perfect for lunchboxes.

3. Karnataka Puliyogare

In this Karnataka-style tamarind rice, dry coconut (kopra) and mustard seeds are added to the spice mix, creating a distinct flavor profile. It's a delightful twist on the traditional recipe.

4. Pacha Puli Sadam (Instant Raw Tamarind Rice)

For a quick fix, this recipe uses raw tamarind and red chili paste mixed directly with hot rice, eliminating the need for boiling tamarind. It's ideal for busy days or travel.

Storage

  • Store theΒ Puliyodharai pasteΒ in an airtight container in the refrigerator. It will stay fresh forΒ up to 5–6 days.
  • Keep theΒ cooked riceΒ separate from the paste if storing longer, and combine just before serving to maintain the best texture and flavor.
  • This dishΒ does not freeze well, as the texture and taste of tamarind rice may change upon thawing.
  • For best results, always reheat gently on a low flame or in a microwave before serving.

Top Tip

If you're going to make this recipe, make sure to follow this top tip!

The secret to a perfect temple-style Puliyodharai lies inΒ roasting the spice ingredients evenly and stirring continuously when mixing the spice powder with the tamarind juice. This prevents lumps, brings out the full aroma of the spices, and ensures a smooth, flavorful paste. Also, simmer gently on low heatβ€”overcooking can make the paste too thick or bitter.

Related

Looking for other recipes like this? Try these:

Pairing

  • ServeΒ hot with a dollop of gheeΒ for an extra aromatic and rich flavor, just like in temples.
  • Pair withΒ papad (appalam),Β pickle, orΒ yogurt (curd)Β to balance the tanginess.
  • Garnish withΒ freshly roasted sesame seedsΒ or a fewΒ curry leavesΒ for added aroma and texture.
  • This tamarind rice also makes aΒ perfect prasadam or festive dishΒ for Navaratri, Vaikunta Ekadasi, or special poojas.
  • For a lighter meal, enjoy it withΒ vegetable stir-fries

Recipe Card

Madapalli Puliyodharai | Temple Style Tamarind Rice served in a bowl, garnished with curry leaves and sesame seeds
Print

Madapalli Puliyodharai | Temple Style Tamarind Rice

Experience the authentic taste ofΒ Madapalli Puliyodharai | Temple Style Tamarind Rice, a tangy, aromatic dish served as prasadam in Vishnu and Hanuman temples. This temple-style tamarind rice is made with a unique blend of roasted spices, tempering, and freshly cooked rice, delivering the exact flavor and aroma you would find in temple kitchens. Perfect for festive occasions, special pujas, or a soul-satisfying meal, this recipe brings the divine taste of temple prasadam right to your home.
Course Festival, Rice Varieties
Cuisine Indian, South Indian, Tamil Nadu
Prep Time 20 minutes
Cook Time 30 minutes
Total Time 50 minutes
Servings 4 people
Calories 270kcal
Author Sowmya Venkatachalam

Equipment

  • 1 Heavy Bottomed Pan
  • 1 Mixer Grinder

Ingredients

  • 1 Lemon Size Tamarind or 2 Tablespoon Tamarind Paste
  • 1Β½ teaspoon Salt Adjust to your taste

For Spice Powder

  • 1 teaspoon Urad Dal
  • 1 teaspoon Split Bengal Gram (Channa Dal / Kadalaparuppu)
  • Β½ teaspoon Fenugreek seeds
  • 1 teaspoon Peppercorns
  • 10 Red Chili
  • 1 Pinch Asafoetida (Asafetida / Hing)
  • 1 sprig Curry leaves

First Tempering

  • 3 tablespoon Sesame Oil
  • 2 teaspoon Split Urad Dal
  • 2 teaspoon Split Bengal Gram (Channa Dal / Kadalaparuppu)
  • 1 tablespoon Peanuts
  • 6 nos Red Chili
  • 1 pinch Asafoetida (Asafetida / Hing)

Second Tempering

  • 1 tablespoon Sesame Oil
  • 1 teaspoon Mustard Seeds
  • Β½ teaspoon Turmeric Powder
  • 1 sprig Curry Leaves

Tamarind Rice

  • 2 Cups Cooked Rice
  • Β½ teaspoon Salt adjust to your taste
  • 1 teaspoon Sesame Oil
  • 1 sprig Curry Leaves

Instructions

Prepare Tamarind Juice

  • Soak the tamarind in warm water for about 10 minutes and extract thick juice. Alternatively, dissolve 2 tablespoons of tamarind paste in 1 cup of water and set aside.
    1 Lemon Size Tamarind

Make the Spice Powder

  • Heat a pan and dry roast urad dal, channa dal, fenugreek seeds, peppercorns, red chilies, asafoetida, and curry leaves until the dals turn golden brown and aromatic.
    1 teaspoon Urad Dal, 1 teaspoon Split Bengal Gram (Channa Dal / Kadalaparuppu), Β½ teaspoon Fenugreek seeds, 1 teaspoon Peppercorns, 10 Red Chili, 1 Pinch Asafoetida (Asafetida / Hing), 1 sprig Curry leaves
  • Let the mixture cool completely, then grind into a fine powder using a mixer. Set aside.

First Tempering

  • Heat sesame oil in a pan. Add split urad dal, channa dal, peanuts, red chilies, curry leaves, and a pinch of asafoetida.
    3 tablespoon Sesame Oil, 2 teaspoon Split Urad Dal, 2 teaspoon Split Bengal Gram (Channa Dal / Kadalaparuppu), 1 tablespoon Peanuts, 6 nos Red Chili, 1 sprig Curry Leaves, 1 pinch Asafoetida (Asafetida / Hing)
  • SautΓ© until the dals turn golden brown and aromatic.

Cook Tamarind Base

  • Add the tamarind juice and salt to the pan and bring it to a boil for about 10 minutes.
    1Β½ teaspoon Salt
  • Stir in the prepared spice powder gradually, mixing continuously to avoid lumps.
  • Simmer on very low flame until the mixture thickens into a paste. Switch off the flame once thick.

Second Tempering

  • In another small pan, heat sesame oil and add mustard seeds. Allow them to crackle.
    1 tablespoon Sesame Oil, 1 teaspoon Mustard Seeds
  • Add turmeric powder and curry leaves, mix briefly, and switch off the flame.
    Β½ teaspoon Turmeric Powder, 1 sprig Curry Leaves
  • Pour this tempering over the Puliyodharai mixture

Assemble with Rice

  • Spread the cooked rice in a wide plate or bowl.
    2 Cups Cooked Rice
  • Add ΒΌ teaspoon of salt and a little sesame oil, mixing gently.
    Β½ teaspoon Salt, 1 teaspoon Sesame Oil
  • Add 3–4 tablespoons of Puliyodharai mixture and fold gently into the rice. Add more if desired, mixing carefully to coat the rice evenly.
  • Temple Style Tamarind Rice is now ready to serve!

Video

Notes

Tips for Perfect Madapalli Puliyodharai

  1. Use fresh tamarind – Fresh tamarind or good-quality paste gives the best tangy flavor. Avoid overly processed tamarind pastes as they can be too sweet or diluted.
  2. Roast the spices properly – Dry roast the dals and spices until golden and aromatic; under-roasting can make the spice powder bland.
  3. Mix spice powder slowly – Always stir continuously when adding the spice powder to tamarind juice to avoid lumps.
  4. Simmer on low heat – Allow the Puliyodharai paste to thicken gently; high heat may make it bitter.
  5. Use freshly cooked rice – Slightly firm, warm rice absorbs the flavors better. Avoid rice that’s too soft or overcooked.
  6. Tempering makes a difference – Don’t skip the second tempering with mustard, turmeric, and curry leavesβ€”it adds authentic temple aroma.
  7. Adjust tanginess and spice – Taste and tweak tamarind or red chili according to preference.
  8. Storage tip – Store paste and rice separately for best results if making ahead; recombine before serving.

Nutrition

Serving: 0.5Cup | Calories: 270kcal | Carbohydrates: 36g | Protein: 5g | Fat: 12g
Madapalli Puliyodharai | Temple Style Tamraind Rice
Delicious Madapalli Puliyodharai, a tangy and aromatic temple-style tamarind rice, perfect as prasadam or a festive meal.

The post Madapalli Puliyodharai | Temple Style Tamarind Rice appeared first on Subbus Kitchen.

Lemon Rice

6 September 2025 at 00:52

Lemon RiceΒ is a vibrant and comforting South Indian dish, loved for its refreshing citrus flavor and aromatic tempering of spices. Cooked rice is infused with freshly squeezed lemon juice, curry leaves, green chilies, and a touch of turmeric, creating a dish that is both simple and irresistibly flavorful. It’s a staple in many households, often prepared for festivals, special occasions, or as a wholesome everyday meal that can be enjoyed on its own or paired with accompaniments like papad, pickle, or any poriyal like Potato fry.

A bowl of South Indian Lemon Rice garnished with curry leaves, green chilies, and roasted peanuts, served fresh and vibrant yellow.
Tangy, refreshing, and packed with flavor – this South Indian Lemon Rice is a perfect comfort meal for any day!

Lemon Rice is a beloved part of South Indian cuisine and is often prepared as a quick, refreshing meal year-round. It holds a special place during festivals and religious occasions, particularly in Tamil Nadu and Karnataka, where it is commonly made forΒ Aadi PerukkuΒ (a festival dedicated to rivers and water bodies). It is also one of the most popularΒ prasadam (temple offerings), as its tangy, non-perishable nature makes it ideal for distribution. Beyond festivals, Lemon Rice is a go-to dish for travel, picnics, and packed lunches because it stays fresh for hours and tastes even better as the flavors meld over time.

Perfect Pairings for Lemon Rice

If you're packing this for a lunch box,Β Lemon Rice with Β lady’s finger fryΒ (okra) as an ideal accompaniment that brings texture and flavor contrastΒ 

For a flavorful twist, tryΒ Masala Lemon Rice, which elevates the classic with freshly ground masala spices. It plays beautifully with anyΒ stir-fry vegetables or papadβ€”especially if you’re craving something crunchyΒ 

Want to swap the base entirely? TheΒ Lemon SevaiΒ (lemon-seasoned rice noodles) uses the same vibrant tempering as Lemon Rice but delivers a different mouthfeelβ€”perfect if you're in the mood for something lighter or a little change in texture

[feast_advanced_jump_to]

Ingredients

These carefully chosen ingredients makeΒ Lemon RiceΒ irresistibly flavorful. TangyΒ lemonΒ brightens the dish,Β turmericadds color and subtle earthiness, whileΒ mustard seeds, dals, peanuts, and asafoetidaΒ create a crunchy, aromatic tempering.Β Curry leaves and chiliesΒ add freshness and mild heat, and a touch ofΒ sesame oilΒ ties all the flavors together for a vibrant, comforting South Indian classic.

  • Lemon
  • Cooked rice
  • Turmeric powder
  • Salt
  • Fenugreek powder
  • Sesame oil
  • Mustard seeds
  • Split urad dal
  • Split Bengal gram (channa dal)
  • Peanuts
  • Asafoetida (hing)
  • Curry leaves
  • Green chili
  • Red chili

See recipe card for quantities.

Instructions

  1. Cut the lemons in half and squeeze out the juice. Add salt to the lemon juice and set it aside. Spread the cooked rice on a broad plate and allow it to cool slightly.
  1. In a heavy-bottomed pan, heat the gingelly (sesame) oil. Add the mustard seeds and let them sputter. Then add the split urad dal, channa dal, peanuts, red chili and curry leaves. Add a pinch of hing (asafoetida). Fry until the dals turn golden brown.
  1. Add the chopped green chilies and turmeric powder, then remove the pan from heat
  1. Gently fold in the cooked rice, salt, and fenugreek powder, taking care not to mash the grains.
  1. Finally, pour in the lemon juice, adjust salt to taste, and mix gently until everything is well combined.
Lemon Rice
  1. Serve with Papad, fryums or stir-fry vegetables.

Spice-up the Lemon Rice

  • Roasted Fenugreek & Red Chili Paste:Β Dry roast ΒΌ teaspoon of fenugreek seeds with 2 red chilies, grind them, and mix into the rice. This adds a rich, aromatic flavor that elevates the dish.
  • Fresh Masala for Masala Lemon Rice:Β Add freshly prepared masala to transform your Lemon Rice into a flavorfulΒ Masala Lemon Rice. Follow our recipeΒ hereΒ for step-by-step instructions.
  • Crunchy Peanuts:Β Toss in fried peanuts to give the rice a satisfying crunch and nutty depth.
  • Chilies for Flavor & Spice:Β Use a combination of red and green chilies to enhance both the heat and aroma.
  • Ginger Twist:Β Finely chopped ginger can be added in place of asafoetida (hing) for a unique flavor and refreshing taste.

Top Tip

Here are expert tips to make yourΒ Lemon RiceΒ truly shine:

  • Use cooled or day-old rice:Β Prevents clumping and keeps grains fluffy.
  • Temper spices in hot oil:Β Mustard seeds, dals, and chilies release maximum aroma and flavor.
  • Add lemon juice last:Β Preserves the bright, tangy flavor without overpowering the dish.
  • Optional crunch:Β Toss in fried peanuts for added texture.
  • Ginger twist:Β Finely chopped ginger can replace hing for a fresh, zesty note.

Related

Looking for other recipes like this? Try these:

Pairing

These are my favorite dishes to serve with Lemon Rice

Lemon Rice
Print

Tangy & Flavorful Lemon Rice | Easy South Indian Recipe

Lemon RiceΒ is a classic South Indian dish bursting with tangy, zesty flavors and aromatic spices. Made with fluffy cooked rice, fresh lemon juice, turmeric, and a flavorful tempering of mustard seeds, dals, peanuts, curry leaves, and chilies, it’s quick to prepare and perfect for everyday meals, lunch boxes, or festive occasions. Add a few fried peanuts or a touch of fresh ginger to elevate the taste and texture. Light, refreshing, and utterly satisfying, this Lemon Rice is a must-try comfort food that everyone will love.
Course Rice Varieties
Cuisine Indian, South Indian, Tamil Nadu
Prep Time 5 minutes
Cook Time 20 minutes
Total Time 25 minutes
Servings 2 people
Calories 300kcal
Author Sowmya Venkatachalam

Equipment

  • 1 Heavy Bottomed Pan

Ingredients

  • 1 nos Lemon
  • 1 Cup Cooked Rice 1 Cup - 250ml
  • ΒΌ teaspoon Turmeric Powder
  • 1 teaspoon Salt adjust to your taste
  • ΒΌ teaspoon Fenugreek Powder

For Tempering

  • 2 tablespoon Sesame Oil
  • 1 teaspoon Mustard seeds
  • Β½ teaspoon Split Urad Dal
  • 2 teaspoon Split Bengal Gram (Channa Dal / Kadalaparuppu)
  • 1 tablespoon Peanuts
  • ΒΌ teaspoon Asafoetida (Asafetida / Hing)
  • 1 sprig Curry Leaves
  • 2 nos Green Chili
  • 1 nos Red Chili

Instructions

  • Cut the lemons in half and squeeze out the juice. Add salt to the lemon juice and set it aside.
    1 nos Lemon, 1 teaspoon Salt
  • Spread the cooked rice on a broad plate and allow it to cool slightly.
    1 Cup Cooked Rice
  • In a heavy-bottomed pan, heat the gingelly (sesame) oil. Add the mustard seeds and let them sputter. Then add the split urad dal, channa dal, peanuts, red chili and curry leaves. Add a pinch of hing (asafoetida). Fry until the dals turn golden brown.
    2 tablespoon Sesame Oil, 1 teaspoon Mustard seeds, Β½ teaspoon Split Urad Dal, 2 teaspoon Split Bengal Gram (Channa Dal / Kadalaparuppu), 1 tablespoon Peanuts, ΒΌ teaspoon Asafoetida (Asafetida / Hing), 1 nos Red Chili, 1 sprig Curry Leaves
  • Add the chopped green chilies and turmeric powder, then remove the pan from heat. Gently fold in the cooked rice, salt, and fenugreek powder, taking care not to mash the grains.
    ΒΌ teaspoon Turmeric Powder, 2 nos Green Chili, ΒΌ teaspoon Fenugreek Powder
  • Finally, pour in the lemon juice, adjust salt to taste, and mix gently until everything is well combined.
  • Your deliciousΒ Lemon RiceΒ is ready to serve! Pair it withΒ appalam/papadΒ orΒ vadamΒ for the perfect meal.

Video

Notes

Tips for the Perfect Lemon Rice
  • You can use any type of riceβ€”Sona Masoori, Ponni Arisi, or even Basmatiβ€”to make Lemon Rice.
  • Add finely chopped ginger for a fresh, zesty twist.
  • Leftover rice works perfectly for this recipe, making it a great way to use up rice from previous meals.
  • For a pop of color and extra nutrition, optionally add grated carrot.
  • The amount of lemon juice depends on the tanginess of your lemons. Taste the rice and adjust accordingly. The flavor may be strong initially, but it mellows as it sits.
  • For an extra layer of spice, dry roast ΒΌ teaspoon fenugreek seeds with 2 red chilies, grind, and add to the rice.
  • You can also add masala during tempering to make a more aromatic, masala-style Lemon Rice.

Nutrition

Serving: 1g | Calories: 300kcal | Carbohydrates: 94g | Protein: 13g | Fat: 20g
Lemon Rice
Lemon Rice

The post Lemon Rice appeared first on Subbus Kitchen.

Aloo Bhindi Masala

27 September 2024 at 07:46
Print

Aloo Bhindi Masala

Aloo Bhindi is a popular dish in my home, a simple yet flavorful North Indian stir-fry made with potatoes (aloo) and okra (bhindi). This vegan and gluten-free dish is spiced just right, making it a crowd-pleaser for everyone at the table.
I always find that home-cooked meals are more flavorful, fresh, and nourishing, and this Aloo Bhindi is no exception. It’s quick to prepare, using everyday ingredients, and the balance of spices brings out the natural flavors of the vegetables. Adding tomatoes at the end not only enhances the taste but also makes the dish vibrant and visually appealing.
I always find that home-cooked meals are more flavorful, fresh, and nourishing, and this Aloo Bhindi is no exception.
I like to serve Aloo Bhindi with dal, rice, and roti, creating a balanced and enjoyable meal.
Course Appetizer
Cuisine Indian
Keyword Masala Aloo Bhindi
Prep Time 10 minutes
Cook Time 20 minutes
Servings 4

Ingredients

  • 1Β½ cup chopped okra
  • 1Β½ cup cubed boiled potatoes same size as okra
  • 3 tbsp oil divided
  • ΒΌ tsp mustard seed
  • 1 tsp cumin seeds
  • β…› tsp asafetida
  • 2 tbsp tbsp
  • Β½ tsp turmeric
  • 1 tbsp ginger thinly sliced
  • 2 tsp salt adjust to taste
  • Β½ tsp red chili powder adjusts to taste
  • 2 tbsp Besan
  • Β½ cup cubed tomatoes

Instructions

  • Wash the okra thoroughly and ensure it is completely dry. Cut the okra into Β½ inch rounds.
  • Boil the potatoes, ensuring they are not overcooked. Peel them and cut them into pieces about twice the size of the okra.
  • Chop the tomatoes into pieces about the same size as the potatoes.
  • Heat 1 tablespoon of oil in a saucepan over low heat. Add the okra and stir-fry for about 5 minutes, until tender but still green. Remove the okra from the pan and set aside.
  • In the same pan, add 1 tablespoon of oil. Heat the oil until moderately hot and test the heat by adding a single cumin seed. If the seed cracks right away, the oil is ready. Add cumin seeds, mustard seeds, and asafetida. Stir, then add the potatoes and ginger, stirring for 2-3 minutes.
  • Stir in the spices: coriander powder, turmeric, and chili powder. Add the okra back into the pan, sprinkle with besan (gram flour) and salt. The besan helps the spices coat the okra and potatoes. Cook for 2-3 minutes over low heat.
  • Once the okra and potatoes are cooked through, add the chopped tomatoes and stir for a few more minutes until combined. Adding tomatoes at the end not only enhances the taste but also makes the dish vibrant and visually appealing. The Potato Okra Masala is ready and looks vibrant and colorful.

Notes

Thanks, and enjoy!

Aloo Bhindi Masala (Potato Okra): A Flavorful North Indian Stir-Fry | Manjula’s Kitchen

Introduction to Aloo Bhindi Masala

Aloo Bhindi, a delicious combination of potatoes (aloo) and okra (bhindi), is a beloved North Indian stir-fry that’s both vegan and gluten-free. This dish is spiced to perfection, with everyday ingredients that enhance the natural flavors of the vegetables. It’s a simple, quick, and nutritious meal that’s perfect for any day of the week. With tender okra, perfectly boiled potatoes, and a blend of spices, Aloo Bhindi makes a great accompaniment to dal, rice, or roti.

Cultural and Traditional Importance

Aloo Bhindi is a common dish in many North Indian households. Its simplicity and ease of preparation make it a staple for busy weeknights, while its flavorful spices and colorful presentation make it special enough for family gatherings. In India, meals often feature a variety of dishes to balance textures and flavors, and Aloo Bhindi is frequently paired with lentils like Dal Tadka and breads like Roti for a wholesome and complete meal.

Cooking Aloo Bhindi at home not only allows for fresher ingredients but also ensures that the dish is prepared exactly to your taste. With the addition of besan (gram flour) and tomatoes, this dish becomes both hearty and vibrant, appealing to everyone at the table.

Recipe Variations from Manjula’s Kitchen

While Aloo Bhindi Masala is a popular dish on its own, you can explore other similar stir-fry recipes or variations with different vegetables from Manjula’s Kitchen:

  • Aloo Gobi: A stir-fry made with potatoes and cauliflower, flavored with similar spices, making it a close cousin to Aloo Bhindi.
  • Bhindi Masala: A more saucy version of okra, cooked in a spiced tomato gravy, offering a different take on okra dishes.
  • Aloo Baingan: A tasty variation that combines potatoes with eggplant, cooked in a similar blend of spices.
  • Baingan Bharta: A roasted eggplant dish that pairs well with Aloo Bhindi as part of a larger spread.

Health Benefits and Dietary Considerations

Aloo Bhindi is not only flavorful but also packed with nutrients. Okra is rich in vitamins A and C, fiber, and antioxidants, while potatoes provide potassium and carbohydrates, making this dish a great source of energy. The use of minimal oil and the addition of spices like cumin, coriander, and turmeric add both flavor and health benefits, with turmeric known for its anti-inflammatory properties.

This recipe is naturally gluten-free and vegan, making it suitable for a variety of dietary needs. For a lower-carb option, you can reduce the amount of potatoes or substitute them with sweet potatoes or other root vegetables. Besan (gram flour) adds a touch of protein and helps the spices adhere to the vegetables, making the dish even more satisfying.

Serving Suggestions

Masala Aloo Bhindi can be enjoyed as a side dish or as the main course. It pairs perfectly with Indian breads like roti, paratha, or even naan. For a more complete meal, serve it alongside Jeera Rice and a cooling yogurt dish like Raita.

If you’re hosting a meal, Aloo Bhindi Masala makes a colorful addition to the table when paired with other Indian classics like Chole or Dal Fry. The vibrant colors and bold flavors of these dishes create a well-balanced and satisfying meal that’s sure to impress.

Conclusion

Aloo Bhindi Masala is a simple, flavorful, and nutritious dish that can be prepared quickly with everyday ingredients. Its combination of tender potatoes, crisp okra, and aromatic spices makes it a versatile meal option that’s both comforting and satisfying. Whether you’re serving it as part of a traditional Indian meal or enjoying it as a standalone dish, Aloo Bhindi is sure to become a favorite in your home. Try this recipe today and bring the taste of North Indian home cooking to your kitchen.

Frequently Asked Questions (FAQs)

  1. How can I prevent okra from becoming slimy?
    • To prevent sliminess, make sure the okra is thoroughly dry before cooking. Frying the okra over low heat without covering the pan also helps to keep the texture crisp.
  2. Can I substitute potatoes with another vegetable in this recipe?
    • Yes, you can substitute potatoes with sweet potatoes, carrots, or even eggplant for a different take on the dish.
  3. What are some variations of Aloo Bhindi I can try?
    • You can try Aloo Gobi or Bhindi Masala for similar stir-fried dishes that use different vegetables or a saucy variation.
  4. How should I serve Aloo Bhindi?
    • Masala Aloo Bhindi pairs wonderfully with roti, paratha, or naan. It can also be served with rice and a cooling raita for a complete meal.
  5. Is this dish suitable for vegans and those on a gluten-free diet?
    • Yes, Aloo Bhindi is naturally vegan and gluten-free, making it a great choice for those with dietary restrictions.

The post Aloo Bhindi Masala appeared first on Manjula's Kitchen.

πŸ’Ύ

Discover Masala Aloo Bhindi, a quick and easy Indian stir-fry combining spiced potatoes and okra. This dish is perfect for healthy family meals.

Palak Paneer

13 September 2024 at 07:20
Palak Paneer
Print

Palak Paneer

Palak Paneer is perhaps the most popular paneer dish in North India and is a favorite in Indian restaurants. Creamy spinach paired with paneer makes for a delicious main course. This recipe has always been one of my favorites, and I can prepare it quickly.
Although I’ve made this recipe before, I now want to simplify it by using just a few ingredients. Even after so many years of cooking, I’m still learning and striving to keep things simple, healthy, nutritious, and flavorful.
This dish is made with blanched spinach, which helps retain its vibrant green color. I didn’t know why blanching was used in cooking, but this is all part of the learning process. Palak Paneer pairs perfectly with roti, naan, or paratha.
Course Main Course
Cuisine Indian
Keyword palak paneer
Popular YouTube
Servings 2 people

Ingredients

  • 5 oz spinach washed and clean, about 6 cups packed spinach
  • 1 cup paneer cubed into bite size, about 4oz of paneer
  • 1 green chili chopped
  • 1 tbsp oil
  • 1/2 tsp cumin seeds – jeera
  • 1/8 tsp asafetida – hing
  • 1 tsp coriander powder – dhania
  • 1/4 tsp turmeric – haldi
  • 1/2 tsp salt adjust to taste
  • 1/2 tsp sugar
  • 1 tbsp whole wheat flour
  • 1/4 cup heavy cream
  • 1/4 cup finely chopped tomato
  • 2 tbsp paneer shredded for garnishing

Instructions

  • First blanch the spinach, this helps to keep the spinach color bright. To blanch the spinach, boil about 6 cups of water in a saucepan, and let the spinach boil for one minute. Drain the water and put the spinach in ice cold water for about two minutes. Drain the water.
  • Blend the spinach, ginger and green chili. Spinach should be creamy.
  • Soak the cubed paneer in about three cups of hot water, for about 5 minutes. This helps to give the paneer a soft texture. Set it aside.
  • While cooking, spinach can splatter, use larger saucepan. Heat the oil in a saucepan, over medium high heat. Test the heat by adding one cumin seed to the oil; if it cracks right away it is ready.
  • Add cumin seed, and asafetida. After cumin seeds crack, add blended spinach and stir. Add coriander, salt, and sugar, stir.
  • After spinach comes to boil lower the heat to low, and let the spinach cook for about 5-6 minutes partially cover the pot, because spinach will splatter. I don’t cover the pan fully because this helps keep the green color of spinach.
  • Mix the flour to 1/2 cup of water and add to the spinach, also add the cream. Mix it well and let it cook for five minutes. If needed add a little more water.
  • Drain the paneer and fold it gently with spinach and let it simmer for about five minutes.
  • Palak paneer is ready, add the tomatoes and turn off the heat. Garnish it with shredded or crumbled paneer.

Palak Paneer is one of the most popular paneer dishes from North India and a favorite at Indian restaurants around the world. This creamy, flavorful dish features tender paneer cubes nestled in a rich spinach sauce, making it a perfect main course for any meal.Β 

With its vibrant green color and delicious combination of spinach and paneer, Palak Paneer pairs wonderfully with roti, naan, or paratha. This simplified version of the recipe uses just a few ingredients, allowing the natural flavors of the spinach and paneer to shine while remaining healthy and nutritious.

Cultural and Traditional ImportanceΒ 

Paneer dishes are a staple in North Indian cuisine, and Palak Paneer is undoubtedly one of the most beloved. Traditionally prepared in Indian households and served during special occasions or family gatherings, this dish showcases the versatility of paneer and the use of leafy greens in Indian cooking.Β 

Palak Paneer is often served with flatbreads like naan or paratha, and its creamy texture and mildly spiced flavor make it a crowd-pleaser.

This simplified recipe doesn’t compromise on taste, while offering a more convenient way to prepare Palak Paneer at home. Blanching the spinach helps retain its bright green color, making the dish visually appealing as well as delicious.

Recipe Variations from Manjula’s Kitchen While Palak Paneer is a classic dish on its own, you can explore other paneer-based recipes and spinach variations from Manjula’s Kitchen:

Paneer Butter Masala: A rich and creamy tomato-based dish, perfect for those who enjoy a sweeter, milder flavor.

Aloo Palak (Potato Spinach): A delicious vegetarian dish combining spinach with tender potatoes, offering another way to enjoy spinach in your meals.

Paneer Saag: A similar dish that incorporates other leafy greens, like mustard greens, along with spinach for a different flavor profile.

Matar Paneer: A flavorful combination of paneer and green peas cooked in a spiced tomato sauce, offering a wonderful variation for paneer lovers.

Health Benefits and Dietary Considerations Palak Paneer is not only delicious but also packed with nutrients. Spinach is rich in iron, vitamins A, C, and K, as well as antioxidants that promote overall health.Β 

The use of paneer adds a good amount of protein and calcium, making this dish a balanced meal that supports both muscle and bone health.Β 

For those looking to make a lighter version of Palak Paneer, you can substitute the heavy cream with a lighter cream or yogurt. The dish is also naturally gluten-free (ensure the flour you use is gluten-free or omit it), making it suitable for those with gluten sensitivities. If you’re vegan, tofu can be used in place of paneer to create a delicious Palak Tofu.

Serving Suggestions Palak Paneer can be served with a variety of Indian breads, such as roti, naan, or paratha. It also pairs well with rice dishes like Jeera Rice or Plain Basmati Rice for a more complete meal. For added texture and flavor, you can garnish the dish with freshly grated paneer or a drizzle of cream.

For a more elaborate meal, serve Palak Paneer alongside other classic Indian dishes such as Dal Tadka or Aloo Gobi to create a balanced vegetarian spread.

Conclusion Palak Paneer is a quintessential North Indian dish that brings together the creamy richness of paneer and the nutritious goodness of spinach. This simplified recipe ensures that you can prepare this dish quickly, without sacrificing flavor or texture. Whether you’re cooking for a family dinner or hosting a special meal, Palak Paneer is sure to be a hit. Try this recipe today and enjoy one of India’s most loved dishes in the comfort of your home.

Frequently Asked Questions (FAQs)

How do I keep the spinach color bright in Palak Paneer?

Blanching the spinach is the key to retaining its vibrant green color. Boil the spinach for about a minute, then immediately transfer it to ice-cold water to stop the cooking process.

Can I make Palak Paneer vegan?

Yes, you can substitute the paneer with tofu and use coconut cream or cashew cream in place of dairy cream to make a vegan version of this dish.

What are some variations of Palak Paneer I can try?

You can try dishes like Saag Paneer, which uses a combination of leafy greens, or Aloo Palak, which pairs spinach with potatoes for a different take on the classic.

How do I serve Palak Paneer?

Palak Paneer pairs wonderfully with Indian breads like naan, roti, or paratha. It can also be served with Jeera Rice or Plain Basmati Rice.

Can I prepare Palak Paneer in advance?

Yes, you can prepare the spinach puree and paneer in advance. Store them separately in the refrigerator, and when ready to serve, gently reheat and combine the two for a fresh and delicious meal.

The post Palak Paneer appeared first on Manjula's Kitchen.

πŸ’Ύ

Discover the most liked Palak Paneer recipe! Simple ingredients, creamy spinach, and soft paneer make this North Indian classic perfect for a tasty, nutritious meal.

Mixed Dal Dosa

6 September 2024 at 07:27
Print

Mixed Dal Dosa

Mixed Dal Dosa is a simple and nutritious flatbread that doesn’t require fermentation. This high-protein dosa is made from a blend of various lentils (dal), which are soaked and ground into a smooth paste. A few spices enhance the flavors, and the dosa is cooked on a hot skillet until it’s crispy and golden. These dosas are not only high in protein but also vegan and gluten-free, making them a healthy choice for everyone.
These protein-rich mixed dal dosas are incredibly versatile. They’re perfect for a healthy breakfast, but they can also be enjoyed at any mealβ€”lunch, dinner, or even as a snack. Serve them with your favorite chutney, a comforting soup, or your choice of vegetable dish to complete the meal.
Prep Time 15 minutes
Cook Time 20 minutes
Servings 6 Dosa

Ingredients

  • ΒΌ cup moong dal
  • ΒΌ cup washed moong dal
  • ΒΌ cup washed urad dal
  • ΒΌ cup red lentil
  • 1 green chili chopped optional
  • ΒΌ piece ginger chopped
  • Β½ tsp cumin seeds (jeera)
  • ΒΌ tsp black pepperΒ 
  • β…› tsp asafetida (hing)
  • Β½ tsp salt (adjust to taste)
  • 4 tbsp oil

Instructions

  • In a bowl mix all the dal, wash them changing water 2-3 times. Soak dal in four cups of water for 6-8 hours.
  • Drain the water. Blend the lentils (dal) with green chili and ginger, adding water slowly as needed to make a smooth batter. Note: The less water, the smoother the batter.
  • Mix the salt and cumin seeds into the batter. Add water as needed. The total water added will be about Β½ cup, just enough to achieve the consistency of pancake batter.
  • Place a non-stick skillet over medium-high heat. Test by sprinkling a few drops of water on it. The water should sizzle right away.
  • Pour about Β½ cup of the batter mixture into the skillet and spread evenly with the back of a spoon. Starting from the center, spiral outward until evenly spread, about seven inches in diameter.
  • When the batter begins to dry, gently spread one teaspoon of oil over it. Wait about 30 seconds, then flip the dosa using a flat spatula.
  • Press the dosa lightly with the spatula all around to ensure even cooking, turning them two to three times. Dosa should be crisp and golden brown on both sides.
  • Repeat for the remaining dosas.

Notes

Notes: If you are on a gluten-free diet, be aware that asafetida (hing) in powder form is often not gluten-free. In that case, you may want to avoid using asafetida.
Serving suggestion
Serve dosas with any chutney, such as tomato chutney, peanut chutney or cilantro chutney, or chutney of your choice.
You can also serve them with samber (a south Indian style dal) or your choice of soup.
For a creative twist, you can use these dosas to make delicious wraps, commonly known as frankies or kathi rolls. Simply wrap some vegetables or salad inside the dosa for a wholesome and satisfying meal on the go.Β 
You can even make these dosas in advance, then reheat them over a skillet to restore their crispness.
For a creative twist, you can use these dosas to make delicious wraps. Make the dosas slightly thicker so they stay soft; these wraps are commonly known as frankies or kathi rolls. Simply wrap some vegetables or salad inside the dosa for a wholesome and satisfying meal on the go.

Introduction to Mixed Dal Dosa

Mixed Dal Dosa is a wholesome, protein-rich flatbread that’s not only easy to make but also doesn’t require the traditional fermentation process. Made from a blend of various lentils, this dosa is packed with plant-based protein, making it a great meal option for anyone looking to boost their protein intake. Lentils like moong dal, urad dal, and red lentils are soaked, ground into a smooth batter, and spiced to create a savory and crispy dosa. The best part? This dosa is both vegan and gluten-free, catering to various dietary preferences while still delivering great taste and texture.

Cultural and Traditional Importance

Dosas are a staple in South Indian cuisine, traditionally made from fermented rice and lentil batter. However, the Mixed Dal Dosa offers a quicker alternative without the need for fermentation, making it an ideal choice for those who are short on time. Lentils are a common ingredient in Indian cooking, celebrated for their versatility and nutritional value. By using a variety of dals, this dosa provides a range of nutrients, especially plant-based proteins, making it a go-to dish for breakfast, lunch, dinner, or even as a snack.

The beauty of Mixed Dal Dosa lies in its simplicity and adaptability. It’s a great way to incorporate different types of lentils into your diet, each contributing its unique flavor and health benefits. Traditionally served with chutneys and sambar, this dosa has found a place in modern kitchens due to its quick preparation and nutritious profile.

Recipe Variations from Manjula’s Kitchen

While Mixed Dal Dosa is delicious and nutritious on its own, there are several other similar dosa and pancake recipes available on Manjula’s Kitchen that you can explore for variety:

  • Moong Dal Dosa: Another high-protein dosa made primarily from moong dal, offering a lighter alternative.
  • Besan Chilla: A savory pancake made with gram flour (besan), perfect for a quick, protein-packed breakfast.
  • Rava Dosa: A crisp and delicate dosa made with semolina, for those who prefer a thin and crunchy dosa.
  • Oat Dosa: Similar to Mixed Dal Dosa, Instant Oat dosa is an easy recipe that is perfect for busy families.

Health Benefits and Dietary Considerations

The Mixed Dal Dosa is packed with nutrients, especially protein, making it a great option for those following a vegetarian or vegan diet. Lentils are an excellent source of protein, fiber, vitamins, and minerals, contributing to overall digestive health and maintaining energy levels throughout the day. By using a variety of dals, you’re also ensuring that you get a broader range of nutrients in every dosa.

Additionally, this recipe is gluten-free, making it suitable for those with gluten sensitivities or anyone on a gluten-free diet. If you’re strictly gluten-free, it’s important to note that asafetida (hing) often contains gluten, so be sure to use a gluten-free version or skip it altogether.

Serving Suggestions

Mixed Dal Dosa can be served with a variety of chutneys to complement its savory flavors. Here are a few chutney options from Manjula’s Kitchen that pair well with the dosa:

  • Tomato Chutney: A tangy and slightly sweet chutney that adds a fresh burst of flavor.
  • Cilantro Chutney: A classic chutney with refreshing cilantro and a hint of spice.
  • Peanut Chutney: A creamy and nutty chutney that pairs wonderfully with the crispy dosa.

For a complete meal, serve Mixed Dal Dosa with Sambar or a comforting soup. Another creative twist is to use the dosa as a wrap, filling it with vegetables, paneer, or salad to create a delicious and nutritious frankie or kathi roll. The dosas can also be prepared in advance and reheated on a skillet, making them an excellent option for meal prep.

Conclusion

Mixed Dal Dosa is a simple yet highly nutritious meal that can be enjoyed at any time of the day. Its high protein content, along with being vegan and gluten-free, makes it a versatile option for a variety of dietary needs. Whether you’re serving it with chutney for breakfast or transforming it into a wrap for lunch, this high protein dosa will quickly become a favorite in your household. Explore the other dosa recipes on Manjula’s Kitchen to discover even more delicious ways to enjoy Indian flatbreads.

Frequently Asked Questions (FAQs)

What makes Mixed Dal Dosa high in protein?

The use of multiple lentils like moong dal, urad dal, and red lentils makes Mixed Dal Dosa rich in plant-based protein, making it an excellent option for those seeking a high-protein meal.

Can I make the dosa ahead of time?

Yes, you can make the dosas in advance and reheat them on a skillet to restore their crispness. They also work well as wraps for on-the-go meals.

What are some serving options for Mixed Dal Dosa?

Serve Mixed Dal Dosa with chutneys like tomato chutney, cilantro chutney, or peanut chutney. You can also pair it with sambar or use it as a wrap filled with vegetables or paneer.

Is Mixed Dal Dosa gluten-free?

Yes, this dosa is naturally gluten-free. However, be cautious with asafetida (hing) as it may contain gluten unless specifically labeled gluten-free.

Can I adjust the spiciness of the dosa?

Absolutely! You can adjust the spice level by adding or omitting green chili and black pepper based on your preference.

The post Mixed Dal Dosa appeared first on Manjula's Kitchen.

πŸ’Ύ

Learn how to make Mixed Dal Dosa, a protein-packed, gluten-free Indian crepe made from various lentils. Perfect for a healthy breakfast or snack, this recipe is easy to prepare and loaded with nutrition.

Thatta Payiru Sadam | Karamani Sadam | Cow Peas Rice

24 December 2022 at 13:40
Reading Time: 6 minutes

Thatta Payiru Sadam is a staple one-pot recipe from Kongu Cuisine. Kongu Nadu comprises of Western Tamilnadu districts such as Coimbatore, Erode, Thirupur, Salem, Karur, Namakkal,Dharmapuri etc. Rice is predominately used as staple food along with cholam, kambu, kezhvaragu and different kinds of pulses. Arisi Paruppu Sadam is one of the most common one-pot recipe from Kongu cuisine. In Arisi Paruppu Sadam we use thoor dal and rice. Thatta Payiru Sadam is also similar to Arisi Paruppu Sadam but instead of toor dal we use Black-eyed Cow peas which we call as Thatta Payiru or Karamani Payiru in Tamil. This is also a one-pot Rice recipe that is rich in protein and fiber. A perfect kids Lunch Box recipe.

Benefits of Black-eyed Cow Peas:

Black-eyed peas are highly nutritious and associated with many impressive health benefits. These are not peas but rather a type of bean. Black-eyed peas are high in protein and fiber, along with micronutrients such as folate, copper, and thiamine.Β Due to their content of protein andΒ soluble fiber, adding black-eyed peas to your diet is a great way to boost weight loss. It improves digestive health, and support better heart health.

Tips for making Thatta Payiru Sadam:

  1. Cowpeas needs atleast 2 hours of soaking. If you are planning to make for lunch box, we can soak the cowpeas overnight too.
  2. Traditionally in Kongu Cuisine, boiled rice is used. But we can use regular white raw rice we use in our kitchen.
  3. Soak the rice for atleast 30 mins. Soaking helps the rice to get cooked quickly.
  4. Shallots are used in this recipe. We can also use regular big onions.
  5. Garlic is optional we can exclude.
  6. We can also temper whole masalas like cinnamon, cloves, fennel etc.
  7. Pressure cook only for 3 whistles. This will make the rice fluffy without getting sticky and mushy.

You may also want to try:

  • Madurai Kizhangu PottalamΒ : a mouth-watering accompaniment made with mashed potatoes and spices. The masala we make is the uniqueness of this Kizhangu pottalam. The prepared mashed potato are then parceled in banana leaf. A perfect side for Curd rice or anyother South indian Kuzhambu/Rasam!
  • Pattanam Pakoda: a very popular street side snack in Chennai and many cities of TamilNadu. Crispy outside, soft inside this pakoda is so tasty and mouth-watering. Serve with hot tea/coffee and enjoy this delicious snack!
  • Nellai Iru Puli KuzhambuΒ : Β is prepared using both butter milk and tamarind. Since the sourness coming from two sources, its called Iru Puli Kuzhambu. Β Its a tangy gravy with a mix of spice. This goes very well with Paruppu usuli, roasted potato/vazhakkai, vazhakaai puli kootu. We can add vegetables of our choices in this kuzhambu.
  • Ghee Rice (Nei Soru):Β also referred popularly as Nei Soru in tamil is a very mild, yet delicious rice variety. Its a pulao with mild spices flavored with ghee. Quick, easy to make perfect one-pot rice variety!
  • Tomato Biryani:Β a biriyani variety that has a rich flavor or tomato along with masala. Serve with Raita of your choice and enjoy this aroma rich Tomato Biryani

Recipe card for Thatta Payiru Sadam | Karamani Sadam | Cow Peas Rice

Print

Thatta Payir Sadam (Cow Peas Rice) | Karamani Rice Recipe

Thatta Payiru (Karamani) Sadam is a one-pot easy to make rice variety. This is a very common and staple food in Kongu cuisine. This rice is rich in fiber and protein making this dish a wholesome balanced meal especially for kids lunch box. Learn here how to make this Thatta Payiru Sadam with step by step pictures, video and images.
Course Accompaniment, Rice Varieties
Cuisine Indian Cuisine, Indian Recipes, South Indian, South Indian Recipes, Tamil Nadu Recipes
Prep Time 2 hours
Cook Time 2 days 30 minutes
Servings 4 people
Calories 327kcal
Author Sowmya Venkatachalam

Equipment

  • 1 Pressure Cooker
  • 2 Mixing Bowl

Ingredients

  • 1 Cup Rice 1 Cup - 250ml
  • ΒΌ Cup Karamani (Black-eyed pea)
  • 2 nos Garlic cloves
  • 15 nos Shallots / Baby Onions sliced
  • 1 no Tomato Roughly chopped
  • ΒΌ tsp Turmeric Powder
  • 2 tsp Sambar Powder
  • 1Β½ tsp Salt
  • 2Β½ Cups Water

For Tempering

  • 2 tbsp Oil
  • 1 tsp Mustard seeds
  • 1 tbsp Split Bengal Gram (Channa Dal / Kadalaparuppu)
  • 2 nos Red Chili
  • Few Curry Leaves

Instructions

  • Wash and soak the thattapayiru for 2-3 hours. We can soak over night too.
  • After 2 hours, wash and soak the rice for 30 mins.
  • Heat ghee in a pressure cooker. Add mustard seeds and allow it to sputter. Add chana dal and fry till it is light golden color. Next, add the red chili, curry leaves and give a mix.
  • Add chopped garlic and saute for couple of mins.Next, add sliced onions and saute the onions till translucent.
  • When the onions turn translucent, add chopped tomatoes to the pressure cooker.
  • Add turmeric powder, sambar powder and give a good mix.
  • Then, add 2.5 cups of water along with salt. Give a gentle mix.
  • Add the soaked, draind rice and thatta payiru.
  • Close the pressure cooker with lid and put the whistle. Allow the rice to get cooked for 3 whistles.
  • Allow the pressure to release naturally. Arisi Paruppu Sadam is now ready!
  • Give a gently mix and serve the delicious rice along with any stir-fried vegetables.

Nutrition

Serving: 1Cup | Calories: 327kcal | Carbohydrates: 36g | Protein: 6g | Fat: 19g

Instructions with step by the Pictures:

  • Wash and soak the thattapayiru for 2-3 hours. We can soak over night too.

  • After 2 hours, wash and soak the rice for 30 mins.

  • Heat ghee in a pressure cooker. Add mustard seeds and allow it to sputter. Add chana dal and fry till it is light golden color. Next, add the red chili, curry leaves and give a mix.

  • Add chopped garlic and saute for couple of mins.Next, add sliced onions and saute the onions till translucent.

  • When the onions turn translucent, add chopped tomatoes to the pressure cooker.

  • Add turmeric powder, sambar powder and give a mix.

  • Then, add 2.5 cups of water along with salt. Give a gentle mix.

  • Add the soaked, draind rice and thatta payiru.

  • Close the pressure cooker with lid and put the whistle. Allow the rice to get cooked for 3 whistles.

  • Allow the pressure to release naturally. Arisi Paruppu Sadam is now ready!

  • Give a gently mix and serve the delicious rice along with any stir-fried vegetables.

The post Thatta Payiru Sadam | Karamani Sadam | Cow Peas Rice appeared first on Subbus Kitchen.

Aloo Baingan Recipe | Aloo Baingan ki Sukhi Sabzi | Vegan Eggplant Potato Recipe

Β 

Aloo Baingan Recipe

Aloo Baingan ki sabzi or baingan aloo is a delicious vegan and gluten-free recipe. Made with eggplants & potatoes this tasty dish is very easy to make.

This is purely home-cooked everyday dish which is family favorite veggie especially my son.Β 

Aloo baingan ki sabzi is a simple yet delicious vegan & gluten-free Indian vegetable recipe. Aloo is the Hindi word for potato and baingan for eggplant so basically, this dish is made by cooking potatoes and eggplants with tomatoes,Β  and a few spices. This is purely NO Onion NO Garlic Recipe

Aloo Baingan ki Sukhi Sabzi

Even this simple recipe has different variations and I love almost all of them. I usually dry and sometime i usually make curry version, will share the recipe soon with my readers. Today I am sharing the most common method of making aloo baingan also called baingan aloo by many.

To make aloo baingan you need the following ingredients:

  • Eggplant: Though aloo baingan is generally made with a baby purple variety, feel free to use whichever variety of eggplant is available to you.
  • Potato: Any variety of potato can be used
  • Tomato
  • Indian Spices - turmeric, coriander, red chilli, salt, garam masala
  • Olive Oil or any vegetable cooking oil
  • Fresh coriander leaves for garnishing
Check out the video recipe of ALOO BAINGAN

More Indian Sabzi Recipes like :

Aloo baingan is generally served with Indian bread like roti or paratha with side homemade curd or raita or lassi. Though a lot of people don’t love eggplants, I loved this vegetable even as a kid. It’s one of my favorite vegetables.Β  Β 

Lunch Menu - Aloo Baingan

Course: Main Course

Cuisine: Indian

Diet: Gluten Free, Vegan, Vegetarian

Prep Time: 5 minutes

Cook Time: 15 minutes

Total Time: 20 minutes

Servings: 3 people

Author: Jolly Makkar

Ingredients :

3 medium-sized eggplants chopped into medium-sized pieces

2 medium-sized potatoes chopped into medium-sized pieces

2 medium-sized tomatoes finely chopped

1/2 teaspoon turmeric powder

1/4 teaspoon red chili powder

1/2 tablespoon coriander powder

1/2 teaspoon garam masala powder

Salt as per taste

3 tablespoon olive oil or any cooking oil of your choice

coriander leaves finely chopped

Instructions

1. Heat oil in a pan, stir fry the sliced aloo and baingan by adding some salt and turmeric powder. Cover the pan and cook until the potato and eggplants are nicely cooked.

2. Once it is cooked properly, take all potatoes and baingan into the late.

3. On to the same pan, add chopped tomatoes, all the spice powder, and salt. Mix, cover the pan, and cook it until the tomatoes turn mushy.

4. Once the tomatoes are done add potatoes, eggplant. Add garam masala and cover the pan. Cook covered for another 3-4minutes. then switch off the flame.

5. Garnish with chopped coriander leaves and serve with roti/ paratha or rice and dal.

Dry Aloo Baingan

Notes:

1) Make equal size pieces of potatoes and eggplants.Β 

2) Never add water to cook aloo baingan and let the vegetables get cooked covered in their own moisture.

3) Use a heavy-bottomed pot to make this dish.

This recipe a part of A to Z Recipe challenge. This month the letter is B so I choose my key ingredients BAINGANΒ and make this easy andΒ simple Aloo Baingan ki sukhi sabji

Vegan Eggplant Potato Recipe

Did you try this recipe?Β Click a picture and mentionΒ @jollyhomemaderecipesΒ or tagΒ #jollyhomemaderecipesΒ inΒ InstagramΒ orΒ Twitter


Subscribe to ourΒ YouTubeΒ ChannelΒ Click here toΒ SubscribeΒ ourΒ YouTubeΒ Channel and stay updated with our latest video recipes

PIN ITΒ later for your future use

HAPPY COOKING & ENJOYπŸ’›πŸ’›

Curry leaves masala rice

8 December 2022 at 01:30

Curry leaves masala rice – Easy karuveppilai masala rice recipe, perfect for lunch box too – Recipe with full video and step-by-step pictures.

Usually, we make curry leaves rice in the South Indian style. Curry leaf is an aromatic herb used widely in South cuisine. It lends an amazing flavour to the dishes. We widely use this in sambar, rasam, poriyals,kootu,aviyal, kurmas,podis, and chutney. I have tried curry leaves pulao and shared the recipe also in Jeyashris kitchen.

A few days back I tried curry leaves masala rice and everyone at home loved it. So I thought I will shoot a video and document the recipe here. I used onion and ginger garlic paste in this recipe. Also, fennel seeds are added to give a nice flavour.

Many times we see people take out the curry leaves from their food and discard it. But if you add this way, even kids will eat without any fuss.

Also, check out pepper-flavored curry leaves rice, pineapple mocktail, curry leaves thokku, curry leaves pulao.

Check out how to store curry leaves

curry leaves masala rice
Print

Curry leaves masala rice

Flavourful curry leaves masala rice,perfect for lunch box
Course Lunch
Cuisine Indian, South Indian
Keyword easy lunch recipes, lunch box recipes
Prep Time 10 minutes
Cook Time 20 minutes
Total Time 30 minutes
Servings 1
Author Jeyashri suresh

Ingredients

  • Β½ cup un cooked rice or 2 cups cooked rice
  • 3 tsp oil
  • 2 tsp ghee
  • 1 onion finely chopped
  • 1 tsp ginger garlic paste
  • ΒΌ cup frozen peas
  • Salt as needed
  • 2 green chilis slit
  • Few cashew nuts optional
  • 1/4 cup curry leaves
  • 1 tsp sesame seeds use white or black
  • 1 tbsp urad dal
  • Β½ tsp fennel seeds or cumin seeds

Instructions

  • Cook the rice and spread it in a wide bowl.
  • I used sona masoori rice, you can also use par boiled rice or basmati rice.
  • In a pan add the urad dal and roast for 2 minutes in medium flame.
  • Now add the sesame seeds keep sauting. The seeds will pop up and the dal will turn golden brown.
  • Now add the curry leaves and fennel seeds and cook for a minute.
  • Switch off the flame.
  • Let this be in the heat for a minute.
  • Transfer this to a mixie jar and when it is warm powder this.
  • You can make this in advance too and store for a week.
  • In the same pan add oil and add the finely chopped onions and slit green chilis.
  • Saute this till they translucent.
  • Now add the ginger garlic paste.
  • Cook till the raw smell goes off.
  • Now add the frozen peas and cook for 3 minutes. If needed add 1 tbsp of water and cook.
  • Add in the cooked rice to this.
  • Sprinkle the curry leaves spice powder on the top.
  • Gently mix well.
  • You can keep the flame in low.
  • Cook for 2 minutes and switch off.
  • Roast cashew nuts in ghee, this step is optional.
  • You can just add 1 tsp of ghee if you do not want to add cashew nuts. Else you can add peanuts instead of cashew nuts.
  • Add this to the rice.
  • Mix well gently
  • Curry leaves masala rice is ready to serve.
  • Any raita or papad or vadam pairs well with this.

Video

Notes

1. You can replace curry leaves with coriander leaves, but ensure that the coriander leaves are well roasted. Else the powder will be wet.
2. If you are allergic to sesame seeds, feel free to skip them.
3. You can add cumin seeds instead of fennel
4. Curry leaves masala rice is a perfect lunch box recipe.
  • Cook the rice and spread it in a wide bowl.
  • I used sona masoori rice, you can also use parboiled rice or basmati rice.
curry leaves masala rice
  • In a pan add the urad dal and roast for 2 minutes on medium flame.
  • Now add the sesame seeds and keep sauting. The seeds will pop up and the dal will turn golden brown.
curry leaves masala rice
  • Now add the curry leaves and fennel seeds and cook for a minute.
  • Switch off the flame.
  • Let this be in the heat for a minute.
curry leaves masala rice
  • Transfer this to a mixie jar and when it is warm powder this.
  • You can make this in advance too and store it for a week.
curry leaves masala rice
  • In the same pan add oil add the finely chopped onions and slit green chilis.
  • Saute this till they are translucent.
  • Now add the ginger garlic paste.
  • Cook till the raw smell goes off.
karuveppilai masala rice
  • Now add the frozen peas and cook for 3 minutes. If needed add 1 tbsp of water and cook.
Karuveppilai masala rice
  • Add the cooked rice to this.
  • Sprinkle the curry leaves spice powder on the top.
curry leaves masala rice
  • Gently mix well.
  • You can keep the flame low.
  • Cook for 2 minutes and switch off.
curry leaves masala rice
  • Roast cashew nuts in ghee, this step is optional.
  • You can just add 1 tsp of ghee if you do not want to add cashew nuts. Else you can add peanuts instead of cashew nuts.
curry leaves rice
  • Add this to the rice.
  • Mix well gently
  • Curry leaves masala rice is ready to serve.
curry leaves masala rice
  • Any raita or papad or vadam pairs well with this.
curry leaves masala rice

The post Curry leaves masala rice appeared first on Jeyashri's Kitchen.

❌
❌