Setting up access to a headless Raspberry Pi is one of those tasks that should take a few minutes, but for some reason always seems to take much longer. The most common method is to configure Wi-Fi access and an SSH service on the Pi before starting it, which can go wrong in many different ways. This author, for example, recently spent a few hours failing to set up a headless Pi on a network secured with Protected EAP, and was eventually driven to using SSH over Bluetooth. This could thankfully soon be a thing of the past, as [Paul Oberosler] developed a package for SSH over USB, which is included in the latest versions of Raspberry Pi OS.
The idea behind rpi-usb-gadget is that a Raspberry Pi in gadget mode can be plugged into a host machine, which recognizes it as a network adapter. The Pi itself is presented as a host on that network, and the host machine can then SSH into it. Additionally, using Internet Connection Sharing (ICS), the Pi can use the host machine’s internet access. Gadget mode can be enabled and configured from the Raspberry Pi Imager. Setting up ICS is less plug-and-play, since an extra driver needs to be installed on Windows machines. Enabling gadget mode only lets the selected USB port work as a power input and USB network port, not as a host port for other peripherals.
An older way to get USB terminal access is using OTG mode, which we’ve seen used to simplify the configuration of a Pi as a simultaneous AP and client. If you want to set up headless access to Raspberry Pi desktop, we have a guide for that.
Raspberry Pis are popular because they're small, don't consume much power, and are extremely versatile. However, the default method of booting one—from the microSD card—is best avoided if possible. Here's how you can do it.
Raspberry Pi devices are popular among retro enthusiasts looking to emulate old computers and consoles, but this usually only goes as far as software. What you might not have considered is that the Raspberry Pi can also play a role in reviving old hardware.
Are you ready for a couple of challenging (and one more simple) Raspberry Pi projects? This weekend’s Raspberry Pi projects will put your hardware skills to the test with tasks like handling stepper motors and drivers, programming LEDs, and spinning up Docker containers.
Raspberry Pi is continuing its expansion into hardware accessories and components. In addition to SD cards and SSDs, you can now get an official Raspberry Pi Flash Drive. It's intended to be a boot drive for Pi boards, but you can use it like any other flash drive as well.
The ability to swap operating systems on a whim is one of the best things about single-board computers like the Raspberry Pi. You can write a new operating system to a memory card whenever you fancy, and keep a small collection of cards handy whenever you want to change.
Raspberry Pi boards have supported USB gadget mode for years, allowing you to connect a Pi to a computer with one cable for power and SSH/desktop access. Now, there's a much easier way to try it out, and it's built into Raspberry Pi OS.
Raspberry Pi single-board computers are awesome for so many reasons—they're low-power, extremely capable, and have small footprints. I love all those things about my Raspberry Pi, but my favorite feature is one that I don’t hear talked about nearly often enough.
Home Assistant is a Linux-based smart home operating system with a very low barrier to entry. In addition to being completely free, its minimum system specifications mean it works on most computers produced within the last 10 to 15 years (plus humble single-board computers).
Not all Raspberry Pi projects require a display, like home servers and DNS sinkholes. But not all projects are alike, and sometimes your choice of display can greatly influence the end result.
Recently, [Vinnie] aka [vinthewrench] moved from Oregon to Arkansas to start a farmstead. This is a style of farming that focuses not just on a profitable farm where produce is sold at market, but also on a homestead where much of one’s own food is grown on the farm as well. Like any farm, though, it’s extremely hard work that takes a tremendous amount of time. Automation and other technology can make a huge impact in these situations, and [Vinnie] is rolling out his own software stack to help with this on his farm.
He calls his project the Pi Internet of Things, or PioT, and as its name suggests is based around the Raspberry Pi. Since this will all be outdoors and exposed to the extremes of Arkansas weather, everything built under the auspices of this project prioritizes ruggedness, stability, and long-term support, all while avoiding any cloud service. The system also focuses on being able to ride through power outages. The server side, called piotserver, uses a REST API to give the user access to the automation systems through a web interface
[Vinnie] also goes into detail about why existing systems like Home Assistant and Open Sprinkler wouldn’t work in his situation, and why a ground-up solution like this is more appropriate for his farm. This post is largely an overview of his system, but some of his other posts go into more detail about things like integrating temperature sensors, rainfall monitoring, controlling irrigation systems, and plenty of other farm automation tasks that are useful for any farmer or gardener.
As a Windows system built inside of a functioning membrane keyboard, the HP EliteBoard G1a announced today is a more accessible alternative to other keyboard-PCs.
The Commodore 64 made the keyboard-PC famous in the 1980s, but the keyboard-PC space has been dominated by the Raspberry Pi. In 2019, the single-board computer (SBC) maker released the Raspberry Pi 400, which is essentially a Raspberry Pi 4 SBC inside a case that also functions as a keyboard for the system. USB, HDMI, and Ethernet ports, plus a GPIO header and native Raspberry Pi OS Linux distribution add up to a low-end desktop computer experience that only costs $100. It was followed by the Raspberry Pi 500, with a Pi 5 powered by a quad-core, 64-bit Arm Cortex-A76 inside; and the Pi 500+, which has an NVMe SSD, instead of microSD, storage and is built inside of a low-profile mechanical keyboard (it’s also twice as expensive at $200).
The Pi 500+ keyboard-PC using RGB.
Credit:
Raspberry Pi
But Raspberry Pis largely appeal to tinkerers, DIYers, and Linux fans, making Pi-as-a-desktop a niche product with a substantial learning curve for newcomers.
[AmiCube] has announced their new PiStorm68K special edition MiniMig accelerator board. This board was developed to replace the 68000 CPU in a MiniMig — a recreation of the original Amiga chipset in an FPGA allowing a real genuine 68000 CPU to operate.
The PiStorm68K itself can host a real genuine 68000 CPU but it can also host various Raspberry Pi models which can do emulation of a 68000. So if you combine a PiStorm68K with a MiniMig you can, at your option, boot into an emulated environment with massively increased performance, or you can boot into an original environment, with its reliable and charming sluggishness.
In the introduction video below, [AmiCube] uses the SYSINFO utility software to compare the CPU speed when using emulation (1531 MIPS) versus the original (4.47 MIPS), where MIPS means Millions of Instructions Per Second. As you can see the 68000 emulated by the Raspberry Pi is way faster than the original. The Raspberry Pi also emulates a floating-point unit (FPU) which the original doesn’t include and a memory management unit (MMU) which isn’t used.
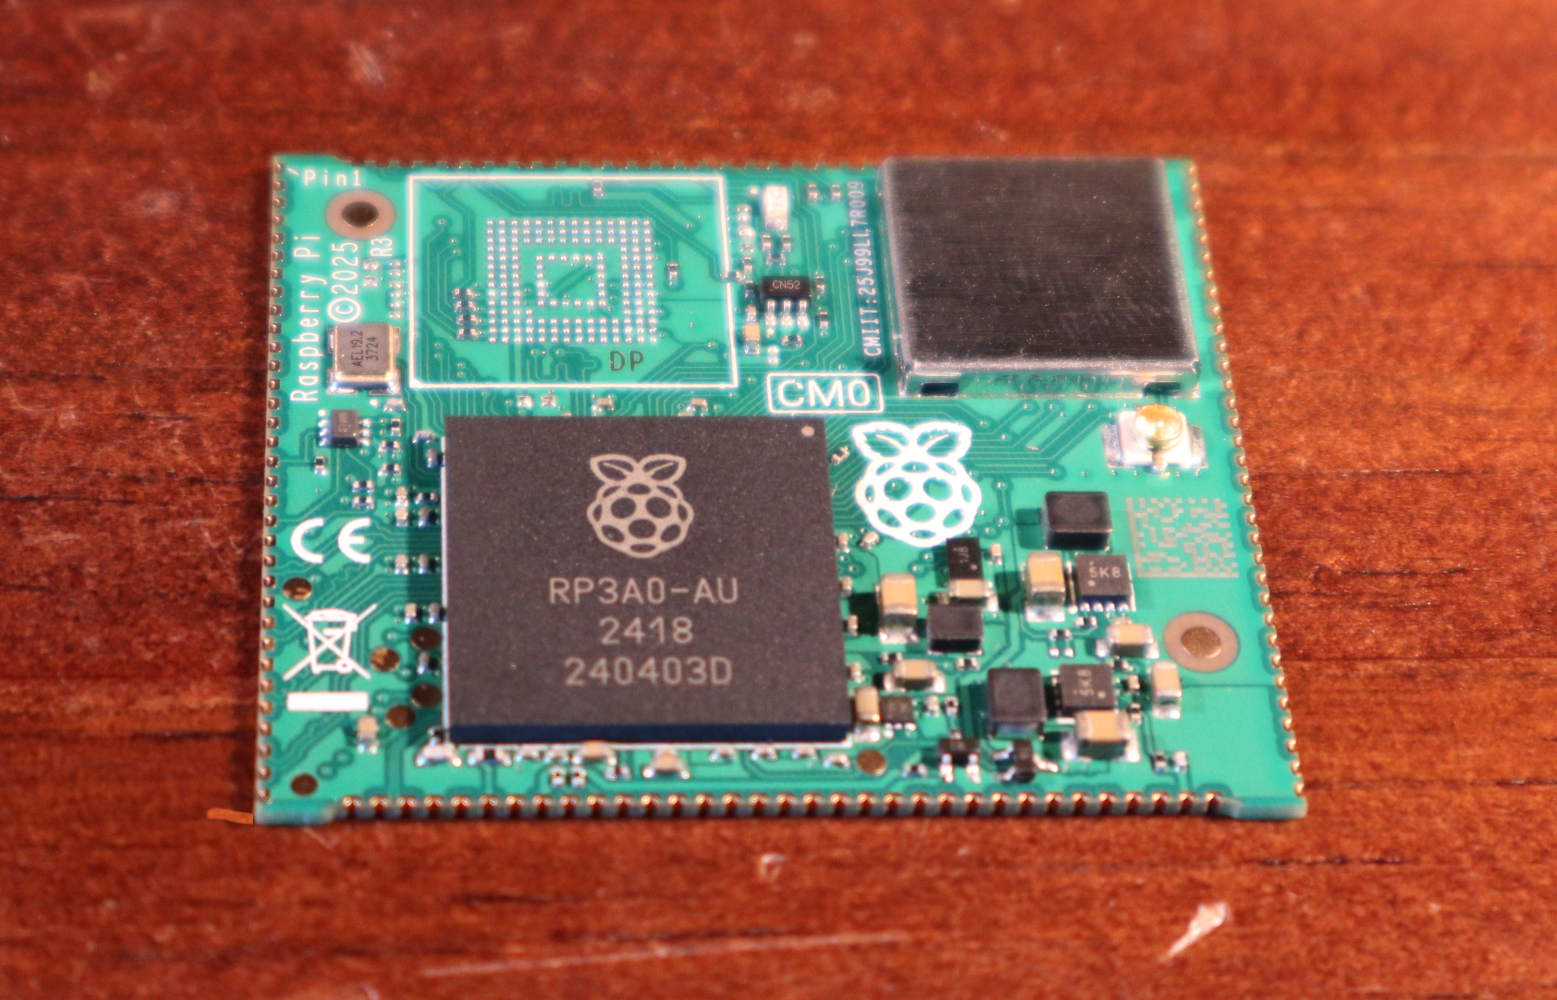
We are all familiar enough by now with the succession of boards that have come from Raspberry Pi in Cambridge over the years, and when a new one comes out we’ve got a pretty good idea what to expect. The “classic” Pi model B+ form factor has been copied widely by other manufacturers as has their current Compute Module. If you buy the real Raspberry Pi you know you’ll get a solid board with exceptionally good software support.
Every now and then though, they surprise us, with a board that follows a completely different path, which brings us to the one on our bench today. The Compute Module Zero packs the same quad-core RP3 system-on-chip (SoC) and Wi-Fi module as the Pi Zero 2 W with 512 MB of SDRAM onto a tiny 39 mm by 33 mm postage-stamp module. It’s a Pi, but not as you know it, so what is it useful for?
A Pi Zero 2 As You Haven’t Seen It Before
If you don’t mint the wait for shipping from China, LCSC have stock.
The first clue as to where this module sits in the Pi range comes from how it came to me. I have a bare module and the dev kit on loan from a friend who’s evaluating them with the idea of incorporating into a product. Instead of buying it from a store here in Europe he had to have it shipped from LCSC in China. It’s Chinese-made and distributed, and it’s not a consumer part in the way your Pi 5 is. Instead it’s an OEM part, and one which appears from where we’re sitting to be tailored specifically to the needs of OEMs manufacturing in China. Would you like a Linux computer with useful software updates and support built into your product? Look no further.
I put up a quick video showing it in detail which you can see at the bottom of the page. Physically it appears to carry the same parts we’re used to from the Zero 2, with the addition of an eMMC storage chip and with an antenna socket in place of the PCB antenna on the Zero. All the available interfaces are brought out to the edge of the board including some not seen on the Zero. The module is available with a variety of different storage options, including the version with no eMMC which my friend has. He’s also bought one with the storage on the dev board, so you can see both types.
The bottom-end CM0 has no onboard eMMC.
The dev board is similar to a Pi model A+ in size, with a bit of extra PCB at the bottom for the USB and HDMI connectors. Like the Zero it has Micro-USB connectors for power and USB, but it carries a full-size HDMI socket. There are connectors for an LCD display, a camera, a micro SD card if you’re using the version without eMMC, and 40-pin GPIO header.
In addition, there’s an extrnal stick-on antenna in the box. Electrically it’s nothing you won’t have seen before, after all it’s little more than a Pi Zero 2 on a different board, and with less memory. This one is fresh from the box and doesn’t have an OS installed, but since we all already know how well a Pi Zero 2 runs and the likely implications of 512 MB of memory I’ve left it that way for my friend.
What Can This Board Do For Us?
The idea of a bottom-end Raspberry Pi as a component module for your Chinese assembly house is a good one. It has to be the RP3 on board, because as we’ve noted, the earlier Pi architecture is heading into the sunset and that is now their lowest-power 64-bit silicon. It could use more memory, but 512 MB is enough for many undemanding Linux applications and more than appears on many SoCs.
For tiny little computer applications, it’s an attractive component, but it’s a little bit expensive. Depending on the version, and whether it comes with the dev board, it ranges from about $25 to $38, and we can imagine that even with a quantity price break that may be too much for many manufacturers. A Chinese SoC, albeit with worse long-term Linux support, can be had for much less. If this SBC form factor catches on, we’d expect to see knockoff boards appear for a more reasonable price in due course.
Perhaps as the price of memory eventually comes down they will increase the spec a little, but we’d hazard a guess that a lower price would mean more success. A low power, plug-innable computer for $20 would be interesting for a number of projects where size really matters. Only time will tell, but meanwhile if you’re designing a product you have a new Linux option for it, and for the rest of us it’s time to look out for these modules appearing in things we buy.
Raspberry Pi is a great starting point for exploring cybersecurity and hacking in particular. You can grab a $50 board, connect it to the TV, and start learning. Otherwise, you can install the OS on the Pi and control it from your phone. There are a lot of opportunities.
In this article, I’d like to demonstrate how to use a Raspberry Pi for Open Source Intelligence (OSINT) gathering. This a key reconnaissance step before the attack.
Step #1: Understand Where to Start?
There is a wealth of OSINT tools—some have faded away, while new ones constantly emerge. Spiderfoot, for example, has been quietly serving OSINT investigators since 2012.
This tool serves as a starting point in the investigation. It is capable of gathering information from multiple resources automatically with little or no manual interaction. Once this data has been gathered, you can export the results in CSV/JSON or feed scan data to Splunk/ElasticSearch.
Step #2: Getting Started with Spiderfoot
In the previous article we installed Kali Linux on a Raspberry Pi, which comes with Spiderfoot pre‑installed. Let’s take a look at its help page:
kali> spiderfoot -h
To get started, it is enough to run the following command: kali> spiderfoot -l 0.0.0.0:port
Where
-l – tells it to listen for incoming HTTP connections; 0.0.0.0:4444 – the address + port where the web UI will be bound. 0.0.0.0 means “any reachable IP on this machine,” so you can reach the UI from another host on the same network.
By typing http://:<IP>:4444/ on the web browser of any computer/phone on this Local Area Network (LAN), anyone can get access to the spiderfoot user interface.
Step #3: Spiderfoot Modules
By default, Spiderfoot includes more than 200 modules, most of which operate without any API keys. However, adding the appropriate API keys in the settings can significantly boost the effectiveness of your scans.
Step #4: Start Scanning
SpiderFoot offers four primary scan types:
All: Runs every available module. Comprehensive but time-consuming, and may generate excessive queries.
Footprint: Lighter scan focusing on infrastructure and digital footprint.
Investigate: Some basic footprinting will be performed in addition to querying of blacklists and other sources that may have information about your target’s maliciousness.
Passive: Gathering information without touching the target or their affiliates.
Let’s run a “stealth” scan against the Russian oil company Lukoil. Once the scan completes, the Summary tab on the main screen will display an overview of the information that was uncovered.
By clicking the Browse tab, we can review the results.
One of spiderfoot’s standout features is its ability to visualize data graphically.
In the graph, each node represents a distinct piece of information about the target.
Summary
In this simple approach, you can use a Raspberry Pi to conduct OSINT investigations without installing anything on your primary system. Moreover, you can access the Pi’s IP address from your phone and review the results during a coffee break—or whenever you have a spare moment.
As mentioned in the introduction, the Raspberry Pi is a powerful platform for learning cybersecurity.
If you’d like to advance in this field, consider checking out our OSINT training class.