[Engineezy] might have been watching a 3D printer move when inspiration struck: Why not build a robot arm to clean up his workbench? Why not, indeed? Well, all you need is a 17-foot-long X-axis and a gripper mechanism that can pick up any strange thing that happens to be on the bench.
Like any good project, he did it step by step. Mounting a 17-foot linear rail on an accurately machined backplate required professional CNC assistance. He was shooting for a 1mm accuracy, but decided to settle for 10mm.
With the long axis done, the rest seemed anticlimactic, at least for moving it around. The system can actually support his bodyweight while moving. The next step was to control the arm manually and use a gripper to open a parts bin.
The arm works, but is somewhat slow and needs some automation. A great start to a project that might not be practical, but is still a fun build and might inspire you to do something equally large.
We have large workbenches, but we tend to use tiny ones more often in our office. We also enjoy ones that are portable.
One of the most influential inventions of the 20th century was Big Mouth Billy Bass. A celebrity bigger than the biggest politicians or richest movie stars, there’s almost nothing that could beat Billy. That is, until [Kiara] from Kiara’s Workshop built a Magikarp version of Big Mouth Billy Bass.
Sizing in at over 2 entire feet, the orange k-carp is able to dance, it is able to sing, and it is able to stun the crowd. Magikarp functions the same way as its predecessor; a small button underneath allows the show to commence. Of course, this did not come without its challenges.
Starting the project was easy, just a model found online and some Blender fun to create a basic mold. Dissecting Big Mouth Billy Bass gave direct inspiration for how to construct the new idol in terms of servos and joints. Programming wasn’t even all that much with the use of Bottango for animations. Filling the mold with the silicone filling proved to be a bit more of a challenge.
After multiple attempts with some minor variations in procedure, [Kirara] got the fish star’s skin just right. All it took was a paint job and some foam filling to get the final touches. While this wasn’t the most mechanically challenging animatronic project, we have seen our fair share of more advanced mechanics. For example, check out this animatronic that sees through its own eyes!
[Rick] had a problem. His garage refrigerator was tasked with a critical duty—keeping refreshing beverages at low temperature. Unfortunately, it had failed—the condenser was forever running, or not running at all. The beverages were either frozen, or lukewarm, regardless of the thermostat setting. There was nothing for it—the controller had to be rebuilt from scratch.
Thankfully, [Rick]’s junk drawer was obliging. He was able to find an Arduino Uno R4, complete with WiFi connectivity courtesy of the ESP32 microcontroller onboard. This was paired with a DHT11 sensor, which provided temperature and humidity measurements. [Rick] began testing the hardware by spitting out temperature readings on the Uno’s LED matrix.
Once that was working, the microcontroller had to be given control over the fridge itself. This was achieved by programming it to activate a Kasa brand smart plug, which could switch mains power to the fridge as needed. The Uno simply emulated the action of the Kasa phone app to switch the smart plug on and off to control the fridge’s temperature, with the fridge essentially running flat out whenever it was switched on. The Uno also logs temperature to a server so [Rick] can make sure temperatures remain in the proper range.
We have probably all been there: digging through boxes full of old boards for projects and related parts. Often it’s not because we’re interested in the contents of said box, but because we found ourselves wondering why in the name of project management we have so many boxes of various descriptions kicking about. This is the topic of [Joe Barnard]’s recent video on his BPS.shorts YouTube channel, as he goes through box after box of stuff.
For some of the ‘trash’ the answer is pretty simple; such as the old rocket that’s not too complex and can have its electronics removed and the basic tube tossed, which at least will reduce the volume of ‘stuff’. Then there are the boxes with old projects, each of which are tangible reminders of milestones, setbacks, friendships, and so on. Sentimental stuff, basically.
Some rules exist for safety that make at least one part obvious, and that is that every single Li-ion battery gets removed when it’s not in use, with said battery stored in its own fire-resistant box. That then still leaves box after box full of parts and components that were ordered for projects once, but not fully used up. Do you keep all of it, just in case it will be needed again Some Day? The same issue with boxes full of expensive cut-off cable, rare and less rare connectors, etc.
One escape clause is of course that you can always sell things rather than just tossing it, assuming it’s valuable enough. In the case of [Joe] many have watched his videos and would love to own a piece of said history, but this is not an option open to most. Leaving the question of whether gritting one’s teeth and simply tossing the ‘value-less’ sentimental stuff and cheap components is the way to go.
Although there is always the option of renting storage somewhere, this feels like a cheat, and will likely only result in the volume of ‘stuff’ expanding to fill the void. Ultimately [Joe] is basically begging his viewers to help him to solve this conundrum, even as many of them and our own captive audience are likely struggling with a similar problem. Where is the path to enlightenment here?
Over the many years Apple Computer have been in operation, they have made a success of nearly-seamlessly transitioning multiple times between both operating systems and their underlying architecture. There have been many overlapping versions, but there’s always a point at which a certain OS won’t run on newer hardware. Now [Jubadub] has pushed one of those a little further than Apple intended, by persuading classic Mac System 7 to run on a G4.
System 7 was the OS your Mac would have run some time in the mid ’90s, whether it was a later 68000 machine or a first-gen PowerMac. In its day it gave Windows 3.x and even 95 a run for their money, but it relied on an older Mac ROM architecture than the one found on a G4. The hack here lies in leaked ROMS, hidden backwards compatibility, and an unreleased but preserved System 7 version originally designed for the ’90s Mac clone programme axed by Steve Jobs. It’s not perfect, but they achieved the impossible.
As to why, it seems there’s a significant amount of software that needs 7 to run, something mirrored in the non-Mac retrocomputing world. Even this hack isn’t the most surprising System 7 one we’ve seen recently, as an example someone even made a version for x86 machines.
There are reports of a public Proof of Concept (PoC), but the repository that has been linked explicitly calls out that it is not a true PoC, but merely research into how the vulnerability might work. As far as I can tell, there is not yet a public PoC, but reputable researchers have been able to reverse engineer the problem. This implies that mass exploitation attempts are not far off, if they haven’t already started.
Legal AI Breaks Attorney-Client Privilege
We often cover security flaws that are discovered by merely poking around the source of a web interface. [Alex Schapiro] went above and beyond the call of duty, manually looking through minified JS, to discover a major data leak in the Filevine legal AI. And the best part, the problem isn’t even in the AI agent this time.
The story starts with subdomain enumeration — the process of searching DNS records, Google results, and other sources for valid subdomains. That resulted in a valid subdomain and a not-quite-valid web endpoint. This is where [Alex] started digging though Javascript, and found an Amazon AWS endpoint, and a reference to BOX_SERVICE. Making requests against the listed endpoint resulted in both boxFolders and a boxToken in the response. What are those, and what is Box?
Box is a file sharing system, similar to a Google Drive or even Microsoft Sharepoint. And that boxToken was a valid admin-level token for a real law firm, containing plenty of confidential records. It was at this point that [Alex] stopped interacting with the Filevine endpoints, and contacted their security team. There was a reasonably quick turnaround, and when [Alex] re-tested the flaw a month later, it had been fixed.
JSON Formatting As A Service
The web is full of useful tools, and I’m sure we all use them from time to time. Or maybe I’m the only lazy one that types a math problem into Google instead of opening a dedicated calculator program. I’m also guilty of pasting base64 data into a conversion web site instead of just piping it through base64 and xxd in the terminal. Watchtowr researchers are apparently familiar with such laziness efficiency, in the form of JSONformatter and CodeBeautify. Those two tools have an interesting feature: an online save function.
You may see where this is going. Many of us use Github Gists, which supports secret gists protected by long, random URLs. JSONformatter and CodeBeautify don’t. Those URLs are short enough to enumerate — not to mention there is a Recent Links page on both sites. Between the two sites, there are over 80,000 saved JSON snippets. What could possibly go wrong? Not all of that JSON was intended to be public. It’s not hard to predict that JSON containing secrets were leaked through these sites.
And then on to the big question: Is anybody watching? Watchtowr researchers beautified a JSON containing a Canarytoken in the form of AWS credentials. The JSON was saved with the 24 hour timeout, and 48 hours later, the Canarytoken was triggered. That means that someone is watching and collecting those JSON snippets, and looking for secrets. The moral? Don’t upload your passwords to public sites.
Shai Hulud Rises Again
NPM continues to be a bit of a security train wreck, with the Shai Hulud worm making another appearance, with some upgraded smarts. This time around, the automated worm managed to infect 754 packages. It comes with a new trick: pushing the pilfered secrets directly to GitHub repositories, to overcome the rate limiting that effected this worm the first time around. There were over 33,000 unique credentials captured in this wave. When researchers at GitGuardian tested that list a couple days later, about 10% were still valid.
This wave was launched by a PostHog credential that allowed a malicious update to the PostHog NPM package. The nature of Node.js means that this worm was able to very quickly spread through packages where maintainers were using that package. Version 2.0 of Shai Hulud also includes another nasty surprise, in the form of a remote control mechanism stealthily installed on compromised machines. It implies that this is not the last time we’ll see Shai Hulud causing problems.
Bits and Bytes
[Vortex] at ByteRay took a look at an industrial cellular router, and found a couple major issues. This ALLNET router has an RCE, due to CGI handling of unauthenticated HTTP requests. It’s literally just /cgi-bin/popen.cgi?command=whoami to run code as root. That’s not the only issue here, as there’s also a hardcoded username and password. [Vortex] was able to derive that backdoor account information and use hashcat to crack the password. I was unable to confirm whether patched firmware is available.
Google is tired of their users getting scammed by spam phone calls and texts. Their latest salvo in trying to defeat such scams is in-call scam protection. This essentially detects a banking app that is opened as a result of a phone call. When this scenario is detected, a warning dialogue is presented, that suggests the user hangs up the call, and forces a 30 second waiting period. While this may sound terrible for sophisticated users, it is likely to help prevent fraud against our collective parents and grandparents.
What seemed to be just an illegal gambling ring of web sites, now seems to be the front for an Advanced Persistent Threat (APT). That term, btw, usually refers to a government-sponsored hacking effort. In this case, instead of a gambling fraud targeting Indonesians, it appears to be targeting Western infrastructure. One of the strongest arguments for this claim is the fact that this network has been operating for over 14 years, and includes a mind-boggling 328,000 domains. Quite the odd one.
An effective currency needs to be widely accepted, easy to use, and stable in value. By now most of us have recognized that cryptocurrencies fail at all three things, despite lofty ideals revolving around decentralization, transparency, and trust. But that doesn’t mean that all digital currencies or payment systems are doomed to failure. [Roni] has been working on an off-grid digital payment node called Meshtbank, which works on a much smaller scale and could be a way to let a much smaller community set up a basic banking system.
The node uses Meshtastic as its backbone, letting the payment system use the same long-range low-power system that has gotten popular in recent years for enabling simple but reliable off-grid communications for a local area. With Meshtbank running on one of the nodes in the network, accounts can be created, balances reported, and digital currency exchanged using the Meshtastic messaging protocols. The ledger is also recorded, allowing transaction histories to be viewed as well.
A system like this could have great value anywhere barter-style systems exist, or could be used for community credits, festival credits, or any place that needs to track off-grid local transactions. As a thought experiment or proof of concept it shows that this is at least possible. It does have a few weaknesses though — Meshtastic isn’t as secure as modern banking might require, and the system also requires trust in an administrator. But it is one of the more unique uses we’ve seen for this communications protocol, right up there with a Meshtastic-enabled possum trap.
Probably most people know that when organic matter such as kitchen waste rots, it can produce flammable methane. As a source of free energy it’s attractive, but making a biogas plant sounds difficult, doesn’t it? Along comes [My engines] with a well-thought-out biogas plant that seems within the reach of most of us.
It’s based around a set of plastic barrels and plastic waste pipe, and he shows us the arrangement of feed pipe and residue pipe to ensure a flow through the system. The gas produced has CO2 and H2s as undesirable by-products, both of which can be removed with some surprisingly straightforward chemistry. The home-made gas holder meanwhile comes courtesy of a pair of plastic drums one inside the other.
Perhaps the greatest surprise is that the whole thing can produce a reasonable supply of gas from as little as 2 KG of organic kitchen waste daily. We can see that this is a set-up for someone with the space and also the ability to handle methane safely, but you have to admit from watching the video below, that it’s an attractive idea. Who knows, if the world faces environmental collapse, you might just need it.
Hand soldering can be a messy business, especially when you wipe the soldering iron tip on those common brass wool bundles that have largely come to replace moist sponges. The Weller Dry Cleaner (WDC) is one of such holders for brass wool, but the large tray in front of the opening with the brass wool has confused many as to its exact purposes. In short, it’s there so that you can slap the iron against the side to flick contaminants and excess solder off the tip.
Along with catching some of the bits of mostly solder that fly off during cleaning in the brass wool section, quite a lot of debris can be collected this way. Yet as many can attest to, it’s quite easy to flip over brass wool holders and have these bits go flying everywhere.
The trap in action. (Credit: MisterHW)
That’s where [MisterHW]’s pit of particulate holding comes into play, using folded sheet metal and some wax (e.g. paraffin) to create a trap that serves to catch any debris that enters it and smother it in the wax. To reset the trap, simply heat it up with e.g. the iron and you’ll regain a nice fresh surface to capture the next batch of crud.
As the wax is cold when in use, even if you were to tip the holder over, it should not go careening all over your ESD-safe work surface and any parts on it, and the wax can be filtered if needed to remove the particulates. When using leaded solder alloys, this setup also helps to prevent lead-contamination of the area and generally eases clean-up as bumping or tipping a soldering iron stand no longer means weeks, months or years of accumulations scooting off everywhere.
Wi-Fi! It’s everywhere, and yet you can’t really see it, by virtue of the technology relying on the transmission of electromagnetic waves outside the visual spectrum. Never mind, though, because you can always build yourself a Wi-Fi analyzer to get some insight into your radio surroundings, as demonstrated by [moononournation].
The core of the build is the ESP32-C5. The popular microcontroller is well-equipped for this task with its onboard dual-band Wi-Fi hardware, even if the stock antenna on most devboards is a little underwhelming. [moononournation] has paired this with a small rectangular LCD screen running the ILI9341 controller. The graphical interface is drawn with the aid of the Arduino_GFX library. It shows a graph of access points detected in the immediate area, as well as which channels they’re using and their apparent signal strength.
If you’re just trying to get a basic read on the Wi-Fi environment in a given locale, a tool like this can prove pretty useful. If your desires are more advanced, you might leap up to tinkering in the world of software defined radio. Video after the break.
Probably the biggest story in the world of old cars over the past couple of weeks has been the surfacing of a GM EV1 electric car for sale from an auto salvage yard. This was the famous electric car produced in small numbers by the automaker in the 1990s, then only made available for lease before being recalled. The vast majority were controversially crushed with a few units being donated to museums and universities in a non-functional state.
Finding an old car isn’t really a Hackaday story in itself, but now it’s landed in [The Questionable Garage]. It’s being subjected to a teardown as a prelude to its restoration, offering a unique opportunity to look at the state of the art in 1990s electric automotive technology.
The special thing about this car is that by a murky chain of events it ended up as an abandoned vehicle. GM’s legal net covers the rest of the surviving cars, but buying this car as an abandoned vehicle gives the owner legal title over it and frees him from their restrictions. The video is long, but well worth a watch as we see pieces of automotive tech never before shown in public. As we understand it the intention is to bring it to life using parts from GM’s contemporary S10 electric pickup truck — itself a rare vehicle — so we learn quite a bit about those machines too.
Along the way they find an EV1 charger hiding among a stock of pickup chargers, take us through the vehicle electronics, and find some galvanic corrosion in the car’s structure due to water ingress. The windscreen has a huge hole, which they cover with a plastic wrap in order to 3D scan so they can create a replacement.
This car will undoubtedly become a star of the automotive show circuit due to its unique status, so there will be plenty of chances to look at it from the outside in future. Seeing it this close up in parts though is as unique an opportunity as the car itself. We’ve certainly seen far more crusty conventional cars restored to the road, but without the challenge of zero parts availability and no donor cars. Keep an eye out as they bring it closer to the road.
Some like it flat, and there’s nothing wrong with that. What you are looking at is the first prototype of Atlas by [AsicResistor], which is still a work in progress. [AsicResistor] found the Totem to be a bit cramped, so naturally, it was time to design a keyboard from the ground up.
Image by [AsicResistor] via redditThe case is wood, if that’s not immediately obvious. This fact is easily detectable in the lovely render, but I didn’t want to show you that here.
This travel-friendly keyboard has 34 keys and dual trackpoints, one on each half. If the nubbin isn’t your thing, there’s an optional, oversized trackball, which I would totally opt for. But I would need an 8-ball instead, simply because that’s my number.
A build video is coming at some point, so watch the GitHub, I suppose, or haunt r/ergomechkeyboards.
Flat as it may be, I would totally at least give this keyboard a fair chance. There’s just something about those keycaps, for starters. (Isn’t it always the keycaps with me?) For another, I dig the pinky stagger. I’m not sure that two on each side is nearly enough thumb keys for me, however.
The Foot Roller Scroller Is Not a Crock
Sitting at a keyboard all day isn’t great for anyone, but adding in some leg and/or foot movement throughout the day is a good step in the right direction. Don’t want to just ride a bike all day under your desk? Add something useful like foot pedals.
Brain-wise, it has a wireless macro keyboard and an encoder from Ali, but [a__b] plans to upgrade it to a nice!nano in order to integrate it with a Glove80.
Although shown with a NautiCroc, [a__b] says the wheel works well with socks on, or bare feet. (Take it from me, the footfeel of pedals is much more accurate with no shoes on.) Interestingly, much of the inspiration was taken from sewing machines.
As of this writing, [a__b] has mapped all keys using BetterTouchTool for app-specific action, and is out there happily scrolling through pages, controlling the volume, and navigating YouTube videos. Links to CAD and STLs are coming soon.
The Centerfold: LEGO My Ergo
Image by [Flat-Razzmatazz-672] via redditThis here is a Silakka 54 split keyboard with a custom LEGO case available on Thingiverse. [Flat-Razzmatazz-672] says that it isn’t perfect (could have fooled me!), but it did take a hell of a lot of work to get everything to fit right.
As you might imagine and [Flat-Razzmatazz-672] can attest, 3D printing LEGO is weird. These studs are evidently >= 5% bigger than standard studs, because if you print it as is, the LEGO won’t fit right.
Do you rock a sweet set of peripherals on a screamin’ desk pad? Send me a picture along with your handle and all the gory details, and you could be featured here!
Historical Clackers: the North’s was a Striking Down-striker
Although lovely to gaze upon, the North’s typewriter was a doomed attempt at creating a visible typewriter. That is, one where a person could actually see what they were typing as they typed it.
North’s achieved this feat through the use of vertical typebars arranged in a semi-circle that would strike down onto the platen from behind, making it a rear down-striker.
In order for this arrangement to work, the paper had to be loaded, coiled into one basket, and it was fed into another, hidden basket while typing. This actually allowed the typist to view two lines at a time, although the unfortunate ribbon placement obstructed the immediate character.
The story of North’s typewriter is a fairly interesting one. For starters, it was named after Colonel John Thomas North, who wasn’t really a colonel at all. In fact, North had very little to do with the typewriter beyond bankrolling it and providing a name.
North started the company by purchasing the failed English Typewriter Company, which brought along with it a couple of inventors, who would bring the North’s to fruition. The machine was made from 1892 to 1905. In 1896, North died suddenly while eating raw oysters, though the cause of death was likely heart failure. As he was a wealthy, unpopular capitalist, conspiracy theories abounded surrounding his departure.
Finally, MoErgo Released a New Travel Keyboard, the Go60
It’s true, the MoErgo Glove80 is great for travel. And admittedly, it’s kind of big, both in and out of its (very nice) custom zipper case. But you asked, and MoErgo listened. And soon enough, there will be a new option for even sleeker travel, the Go60. Check out the full spec sheet.
You may have noticed that it’s much flatter than the Glove80, which mimics the key wells of a Kinesis Advantage quite nicely.
Don’t worry, there are removable palm rests that are a lot like the Glove80 rests. And it doesn’t have to be flat –there is 6-step magnetic tenting (6.2° – 17°), which snaps on or off in seconds. The palm rests have 7-step tenting (6°-21.5°), and they come right off, too.
Let’s talk about those trackpads. They are Cirque 40 mm Glidepoints. They aren’t multi-touch, but they are fully integrated into ZMK and thus are fully programmable, so do what you will.
Are you as concerned about battery life as I am? It’s okay — the Go60 goes fully wired with a TRRS cable between the halves, and a USB connection from the left half to the host. Although ZMK did not support this feature, MoErgo sponsored the founder, [Pete], to develop it, and now it’s just a feature of ZMK. You’re welcome.
Interested? The Go60 will be on Kickstarter first, and then it’ll be available on the MoErgo site. Pricing hasn’t quite been worked out yet, so stay tuned on that front.
Who’s interested in a brand new, from-scratch boundary representation (BREP) kernel? How about one that has no topological naming problem, a web-native parametric CAD front end to play with, and has CAD-type operations making friends with triangle meshes? If you’re intrigued, check out [mmiscool]’s BREP project.
Functioning (let alone feature-filled, or efficient) CAD systems are not a software project we see a whole lot of. Ones that represent models as genuine BREP structures but cleverly use mesh-based operations where it makes sense? Even less so.
In theory, CAD programs are simple: allow a user to define features, keep track of what they are and how they relate to one another, and perform operations on them as requested. In practice, it’s significant work. Chains of operations and dependencies easily become complex, volatile things and there is really no room for error.
Read [Arya Voronova]’s best practices for using FreeCAD to get a few hints as to what goes on behind the scenes in a modern CAD program, and the kinds of challenges the back end has to deal with, like the topological naming problem (TNP). A problem [mmiscool]’s implementation completely avoids, by the way.
There is a live demo at BREP.io which acts as a playground for the state of the project. You can get started by clicking the + button towards the top on the left panel to add features and operations to the history (like add a cube, then add chamfers or fillets, or extrude a face, and so on).
[mmiscool] points out that all computation is done client-side; even complex operations like fillets, lofts, and multi-body booleans execute directly in the browser with no need to be offloaded to a back end. BREP’s development is being documented on Hackaday.io and there is a video embedded below that gives an overview. Why don’t you give it a spin?
If you exclude certain companies like Peloton, the world of cycling technology is surprisingly open. It’s not perfect by any means, but there are enough open or open-ish standards for many different pieces of technology from different brands to interoperate with each other, from sensors and bike computers and even indoor trainers to some extent. This has also made it possible for open source software to exist in this realm as well, and the GoldenCheetah project has jumped in for all of us who value FOSS and also like to ride various bicycles from time to time.
GoldenCheetah focuses on gathering data from power meters, allowing cyclists to record their rides and save them in order to keep track of their training performance over time. It works well with sensors that use the ANT+ protocol, and once it has that data it can provide advanced analytics such as power curves, critical power modeling, and detailed charts for power, heart rate, and cadence. It can display and record live indoor-training data, and in some situations it can even run interval workouts, although not every indoor trainer is supported. There are no social features, subscriptions, or cloud requirements which can be refreshing in the modern world, but is a bit of a downside if you’re used to riding with your friends in something like Zwift.
All in all, though, it’s an impressive bit of software that encourages at least one realm of consumer electronics to stay more open, especially if those using bike sensors, computers, and trainers pick ones that are more open and avoid those that are proprietary, even if they don’t plan to use GoldenCheetah exclusively. And if you were wondering about the ANT+ protocol mentioned earlier, it’s actually used for many more things that just intra-bike wireless communications.
Back during WWII, Chrysler bodged five inline-6 engines together to create the powerful A57 multibank tank engine. [Maisteer] has some high-revving inline-4 motorcycle engines he’s trying to put together too, but unlike 1940s Chrysler, he also has a trombone… and a lot more RPMs to deal with.
The Chrysler flatheads were revving at a few thousand RPM– their redline was almost certainly in the three-thousand range. [Maisteer] is working at 15,000 RPM, which is where the real challenge of this build lies: the trombone in the image is just for fun. He wanted to use a heavy chain to link the crankshafts, but at that rotational speed, a heavy chain becomes really heavy— or at least, it feels a force many times its weight due to centrifugal force. The lietmotief of this video is a quote by an automotive engineer to the effect that chains don’t work over 10,000 RPM.
That leads to a few problems for the intrepid “not an engineer” that take most of the video to deal with and ultimately doom the engine linkage– for now. Not before he gets an iconic 8-cylinder sound out (plus some fire) out of a trombone, though. Of particular note is the maker-type workflow Hackaday readers will appreciate: he 3D scans the engines, CADs up parts he needs and sends away to have them CNC’d and SLS printed.
Hacking motorcycle engines into cars is nothing new. Hacking them together into franken-engines is something we see less often.
Thanks to [Keith Olson] for the tip! Remember, if you want to toot your own horn– or toot about someone else’s project, for that matter–the tips line is always open.
Color 3D printing has gone mainstream, and we expect more than one hacker will be unpacking one over the holidays. If you have, say, a color inkjet printer, the process is simple: print. Sure, maybe make sure you tick the “color” box, but that’s about it. However, 3D printers are a bit more complicated.
There are two basic phases to printing color 3D prints. First, you have to find or make a model that has different colors. Even if you don’t make your own models (although you should), you can still color prints in your slicer.
The second task is to set the printer up to deal with those multiple colors. There are several different ways to do this, and each one has its pros and cons. Of course, some of this depends on your slicer, and some depends on your printer. For the purposes of this post, I’ll assume you are using a Slic3r fork like Prusa or OrcaSlicer. Most of the lower-priced printers these days work in roughly the same way.
Current State of Color
In theory, there are plenty of ways to 3D print in color. You can mix hot plastic in the nozzle or use multiple nozzles, each loaded with a different color. But most entry-level color printers use a variation of the same technique. Essentially, they are just like single-nozzle FDM printers, but they have three extra pieces. First, there is a sensor that can tell if filament is in the hot end or not. There’s also a blade above the hot end but below the extruder that can cut the filament off cleanly on command. This usually involves having the hot end ram some actuator that pushes the spring-loaded knife through the filament.
The third piece is some unit to manage moving a bunch of filaments in and out of the hot end. Everyone calls this something else. Bambu calls it an AMS while Flashforge calls it an IFS. Prusa has an MMU. Whatever you call it, it just moves cold filament around: either pushing it into the extruder or pulling it out.
Every filament change starts with cutting the filament below the extruder. That leaves the stringy melted part down in the nozzle. Then the extruder can pull the rest up until the management unit can take over and pull it totally out of the hot end/extruder assembly. That’s why there’s a sensor. It pulls until it sees that the extruder is empty or it times out and throws an error.
Then it is simple enough to move another filament back into the extruder. Of course, the first thing it has to do is push the leftover filament out of the nozzle. Most printers move to a bin and extrude until they are sure the color has changed. However, there are other options.
Even if you push out all the old filament, you may want to print a little waste piece of the new filament before you start printing, and this is called a purge block. Slicers can also push purge material into places like your infill, for example. Some can even print objects with the purge, presumably an object that doesn’t have to look very nice. Depending on your slicer, printer, and workflow, you can opt to print without a purge block, which can work well when you have a part where each layer is a solid color. Some printers will let you skip the discharge step, too, which is often called “poop.”
One caveat, of course, is that all this switching logic takes time and generates waste. A good rule of thumb is to try to print many objects at one time if you are going to switch filament, because the changes are what take time and generate waste. Printing dozens of objects will generate essentially the same amount of waste as printing one. Of course, printing a dozen objects will take longer than a single one, but the biggest part of the time is filament changes, which doesn’t change no matter how many or few you print.
Get Ready to Print
Painting in Orca Slicer
We’ve talked before about creating your own color objects. We’ve even seen how to do it in TinkerCad. Of course, you can also load designs that already have color in them. However, there are several different ways to put color into an otherwise monochrome print.
First, you can take a regular print and use your slicer’s paint function to paint areas with different colors. That works, but it is often tedious, and for complex shapes, it is error-prone. Another downside is that you can’t really control the depth easily, so you get strange filament shifts inside the object if you do it that way.
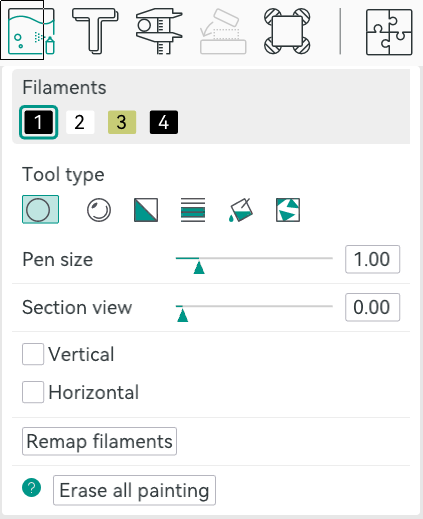
In Orca, you can select an object in the Prepare screen and then use N, or the toolbar, to bring up the paint color dialog. From there, you can pick a brush shape, pen size, and color. Then it is easy to just paint where you like by left-dragging. You can remove paint by pressing Shift while clicking or dragging. Press the little question mark at the bottom left to see other options.
Once you make a color print, the slicer will automatically place a purge block for you unless you turn it off. Assuming you use it, it is a good idea to drag it on the build plate to be closer to the print, which can shave a few minutes of travel time.
From Many, One
Possibly the easiest way, other than not printing in color, of course, is to have each part of the model that needs to be one color as a separate STL file, as we talked about in the previous post. You tell the slicer which part goes with which filament, and you are done.
In Orca, the best way to do this is to import several STL models at one time. The software will ask you: “Load these files as a single object with multiple parts?” If you agree, you get one object made of individual pieces.
The resulting object won’t look much different until you go to “Process”, on the left-hand side of the screen, and switch from the default Global to Objects. From there, you’ll see the objects and their components. At first, each one will be set to the same color, but by clicking on the color box, you can assign different colors. In the screenshot, you’ll see two identical objects, each with two parts. Each part has a different color. The number is the extruder that holds that color.
Two filament changes are all it takes to make this nice-looking ornament
There is another way, though. You can avoid almost all of the waste generation and extra time if your model is designed so that each layer is a single color. People have done this for years, where you put a pause in your G-code and then switch filament manually. The idea is the same but the printer can switch for you. For example, the Christmas Tree ornament uses two filament changes to print white, then green, then white again. This works great for lettering and logos and other simple setups where you simply need some contrast.
In Orca, you’ll want to slice your model once and switch to the preview tab. Using the vertical slider on the right-hand side, adjust the view until it shows you where you want the filament change. Then right-click and select “Change Filament.” This is the same way you add a pause if you want to change filament manually, for example.
If you use this method, remember to turn off the purge block. You don’t really need it.
Summary
So now, when you unwrap that shiny new multimaterial printer, you have a plan. Get a color model or color one yourself. Then you can decide if you need color changes or full-blown, and waste-prone, color printing. Either way, have fun!
An unlikely hit of the last few months’ consumer hardware has been a power bank branded by the German confectionery company Haribo. It first gained attention in backpacking circles because of its high capacity for a reasonable weight, and since then has been selling like the proverbial hot cakes. Now Amazon have withdrawn it from their store over “A potential safety or quality issue”. The industrial imaging company Lumafield have taken a look at the power bank with a CT scanner, to find out why.
As you might imagine, the power bank is all battery inside, with pouch type lithium ion cells taking up all of the space. Immediately a clue appears as to why Amazon withdrew them, as the individual layers of the cells are misaligned, laying open a risk of failure. They also take a look at a set of earbuds from the same source and find something even more concerning — torn electrodes. Thus neither device can be regarded as safe, and the backpackers will have to haul around a little bit more in the future.
You’ll not find the Wrencher on a power bank, but you can be sure if you did, we’d make sure there was an element of quality control at play. Meanwhile we feel slightly sorry for the branding executive responsible at Haribo, who we are guessing has had a bad day. We’ve featured Lumafield’s work here before quite a few times, most recently looking at similar defects in 18650 cells.
Ever wonder what happens to those digital price tags you see in stores once they run out of juice? In what is a prime example of e-waste, many of those digital price tags are made with non-replaceable batteries, so once their life is over they are discarded. Seeing an opportunity to breathe new life into these displays, [Tylercrumpton] went about converting them to be the official badge of the Phreaknic 26 conference.
Looking for a solution for a cheap display for the upcoming conference badge, [Tylercrumpton] recalled seeing the work [Aaron Christophel] did with reusing electronic shelf labels. Looking on eBay, he picked up a lot of 100 ZBD 55c-RB labels for just $0.70 a piece. When they arrived, he got to work liberating the displays from their plastic cases. The long-dead batteries in the devices ended up being easily removed, leaving behind just the display and the PCB that drives it.
Another hacker assisting with the badge project, [Mog], noticed that the spacing of the programming pads on the PCB was very close to the spacing of a DB9/DE9 cable. This gave way to a very clever hack for programming the badges: putting pogo pins into a female connector. The other end of the cable was connected to a TI CC Debugger which was used to program the firmware on the displays. But along the way, even this part of the project got an upgrade with moving to an ESP32 for flashing firmware, allowing for firmware updates without a host computer.
The next challenge was how to handle customizing 200 unique badges for the conference. For this, each badge had a unique QR code embedded in the back of the 3D printed case that pointed to an online customization tool. The tool allowed the user to change which of the images was used for the background, as well as input the name they wanted to be displayed on the badge. Once finished, the server would provide a patched firmware image suitable for flashing the badge. The original intent was to have stations where attendees could plug in their badge and it would update itself; however, due to some 11th hour hiccups, that didn’t pan out for this conference. Instead, [Tylercrumpton] ran the update script on his machine, and it gave him a great opportunity to interact with conference attendees as they stopped by to update their badges.
For the Phreaknic 27 badge, the plan is to once again use electronic shelf labels, but this time to utilize some of the advanced features of the tags such as the EEPROM and wireless communications. We’re eager to see what the team comes up with.
One easy way to make a very accurate clock is with a WiFi-enabled microcontroller like an ESP32 and a display: set up NTP, and you’ll never be off by more than a minute. This water clock project by [Liebregts] is not like that — there are no electronics to speak of, and if the clock is ever in sync to within a single minute, well, we’d be surprised.
We’re impressed to see it working regardless. Sure, it’s not exactly high-tech; the floating siphon mechanism [Liebregts] is using to get a steady flow out of the main reservoir dates back to 250 BC. On the other hand, since this style of time keeper has been out of fashion since the fall of Rome, [Liebregts] couldn’t just grab something off GitHub or ask ChatGPT to design it for them. This is real human engineering. The reservoir is even scaled to the four-hour timing of [Liebregts] workday — it gets refilled at lunch along with its maker.
The water clock in all its glory, plus diagrammatic labels.
In a clever build detail, the floating siphon tube also holds a pointer to an hour indicator. For minutes, his mechanism seems unique, though it’s related to another ancient trick, the Pythagorean cup. Pythagoras’s devious cup had a hidden siphon that spilled its contents if you filled it beyond a set level, and so does the secondary reservoir of [Liebregts] water clock.
Since the secondary reservoir is linked to a counterweight with a pivot, it goes up and down over the course of approximately 5 minutes — but rather than linking that to another linear indicator, [Liebregts] is using that mechanism to advance a saw-toothed gear that is marked with 5-12 in analog-clock fashion for a touch of modernity. See it in action in the demo video below.
That last part might confuse a time traveler from Ancient Rome or Greece, but they’d instantly recognize this creation as a clock, which many modern observers might not. Still, once they learn to read it you can be sure that [Liebergts]’s friends will never be late to a gladiator fight again — and not just because Constantine banned them in 325 AD. Apparently nobody listened to that ban anyway.