ShadyPanda spent seven years uploading trusted Chrome and Edge extensions, later weaponizing them for tracking, hijacking, and remote code execution. Learn how the campaign unfolded.
Necrobotics is a field of engineering that builds robots out of a mix of synthetic materials and animal body parts. It has produced micro-grippers with pneumatically operated legs taken from dead spiders and walking robots based on deceased cockroaches. “These necrobotics papers inspired us to build something different,” said Changhong Cao, a mechanical engineering professor at the McGill University in Montreal, Canada.
Cao’s team didn’t go for a robot—instead, it adapted a female mosquito proboscis to work as a nozzle in a super-precise 3D printer. And it worked surprisingly well.
Fangs and stings
To find the right nozzle for their 3D necroprinting system, Cao’s team began with a broad survey of natural micro-dispensing tips. The researchers examined stingers of bees, wasps, and scorpions; the fangs of venomous snakes; and the claws of centipedes. All of those evolved to deliver a fluid to the target, which is roughly what a 3D printer’s nozzle does. But they all had issues. “Some were too curved and curved for high-precision 3D printing,” Cao explained. “Also, they were optimized for delivering pulses of venom, not for a steady, continuous flow, which is what you need for printing.”
Color 3D printing has gone mainstream, and we expect more than one hacker will be unpacking one over the holidays. If you have, say, a color inkjet printer, the process is simple: print. Sure, maybe make sure you tick the “color” box, but that’s about it. However, 3D printers are a bit more complicated.
There are two basic phases to printing color 3D prints. First, you have to find or make a model that has different colors. Even if you don’t make your own models (although you should), you can still color prints in your slicer.
The second task is to set the printer up to deal with those multiple colors. There are several different ways to do this, and each one has its pros and cons. Of course, some of this depends on your slicer, and some depends on your printer. For the purposes of this post, I’ll assume you are using a Slic3r fork like Prusa or OrcaSlicer. Most of the lower-priced printers these days work in roughly the same way.
Current State of Color
In theory, there are plenty of ways to 3D print in color. You can mix hot plastic in the nozzle or use multiple nozzles, each loaded with a different color. But most entry-level color printers use a variation of the same technique. Essentially, they are just like single-nozzle FDM printers, but they have three extra pieces. First, there is a sensor that can tell if filament is in the hot end or not. There’s also a blade above the hot end but below the extruder that can cut the filament off cleanly on command. This usually involves having the hot end ram some actuator that pushes the spring-loaded knife through the filament.
The third piece is some unit to manage moving a bunch of filaments in and out of the hot end. Everyone calls this something else. Bambu calls it an AMS while Flashforge calls it an IFS. Prusa has an MMU. Whatever you call it, it just moves cold filament around: either pushing it into the extruder or pulling it out.
Every filament change starts with cutting the filament below the extruder. That leaves the stringy melted part down in the nozzle. Then the extruder can pull the rest up until the management unit can take over and pull it totally out of the hot end/extruder assembly. That’s why there’s a sensor. It pulls until it sees that the extruder is empty or it times out and throws an error.
Then it is simple enough to move another filament back into the extruder. Of course, the first thing it has to do is push the leftover filament out of the nozzle. Most printers move to a bin and extrude until they are sure the color has changed. However, there are other options.
Even if you push out all the old filament, you may want to print a little waste piece of the new filament before you start printing, and this is called a purge block. Slicers can also push purge material into places like your infill, for example. Some can even print objects with the purge, presumably an object that doesn’t have to look very nice. Depending on your slicer, printer, and workflow, you can opt to print without a purge block, which can work well when you have a part where each layer is a solid color. Some printers will let you skip the discharge step, too, which is often called “poop.”
One caveat, of course, is that all this switching logic takes time and generates waste. A good rule of thumb is to try to print many objects at one time if you are going to switch filament, because the changes are what take time and generate waste. Printing dozens of objects will generate essentially the same amount of waste as printing one. Of course, printing a dozen objects will take longer than a single one, but the biggest part of the time is filament changes, which doesn’t change no matter how many or few you print.
Get Ready to Print
Painting in Orca Slicer
We’ve talked before about creating your own color objects. We’ve even seen how to do it in TinkerCad. Of course, you can also load designs that already have color in them. However, there are several different ways to put color into an otherwise monochrome print.
First, you can take a regular print and use your slicer’s paint function to paint areas with different colors. That works, but it is often tedious, and for complex shapes, it is error-prone. Another downside is that you can’t really control the depth easily, so you get strange filament shifts inside the object if you do it that way.
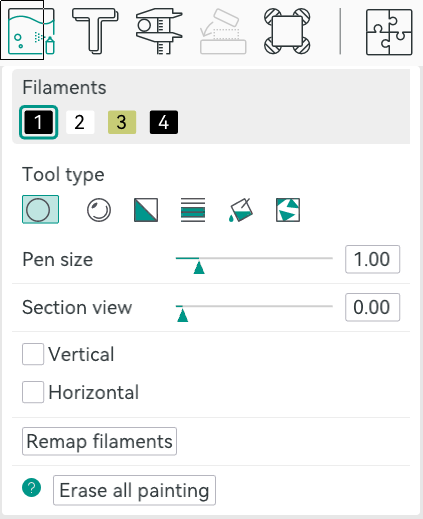
In Orca, you can select an object in the Prepare screen and then use N, or the toolbar, to bring up the paint color dialog. From there, you can pick a brush shape, pen size, and color. Then it is easy to just paint where you like by left-dragging. You can remove paint by pressing Shift while clicking or dragging. Press the little question mark at the bottom left to see other options.
Once you make a color print, the slicer will automatically place a purge block for you unless you turn it off. Assuming you use it, it is a good idea to drag it on the build plate to be closer to the print, which can shave a few minutes of travel time.
From Many, One
Possibly the easiest way, other than not printing in color, of course, is to have each part of the model that needs to be one color as a separate STL file, as we talked about in the previous post. You tell the slicer which part goes with which filament, and you are done.
In Orca, the best way to do this is to import several STL models at one time. The software will ask you: “Load these files as a single object with multiple parts?” If you agree, you get one object made of individual pieces.
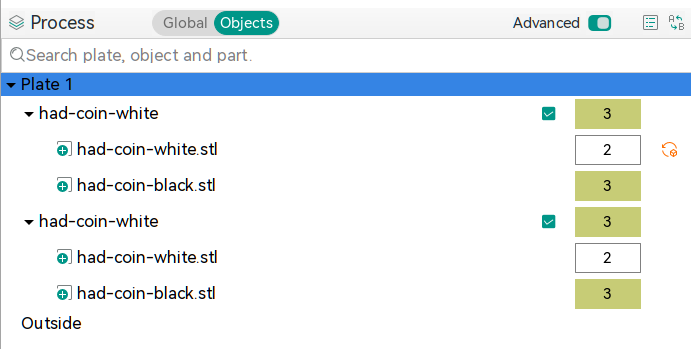
The resulting object won’t look much different until you go to “Process”, on the left-hand side of the screen, and switch from the default Global to Objects. From there, you’ll see the objects and their components. At first, each one will be set to the same color, but by clicking on the color box, you can assign different colors. In the screenshot, you’ll see two identical objects, each with two parts. Each part has a different color. The number is the extruder that holds that color.
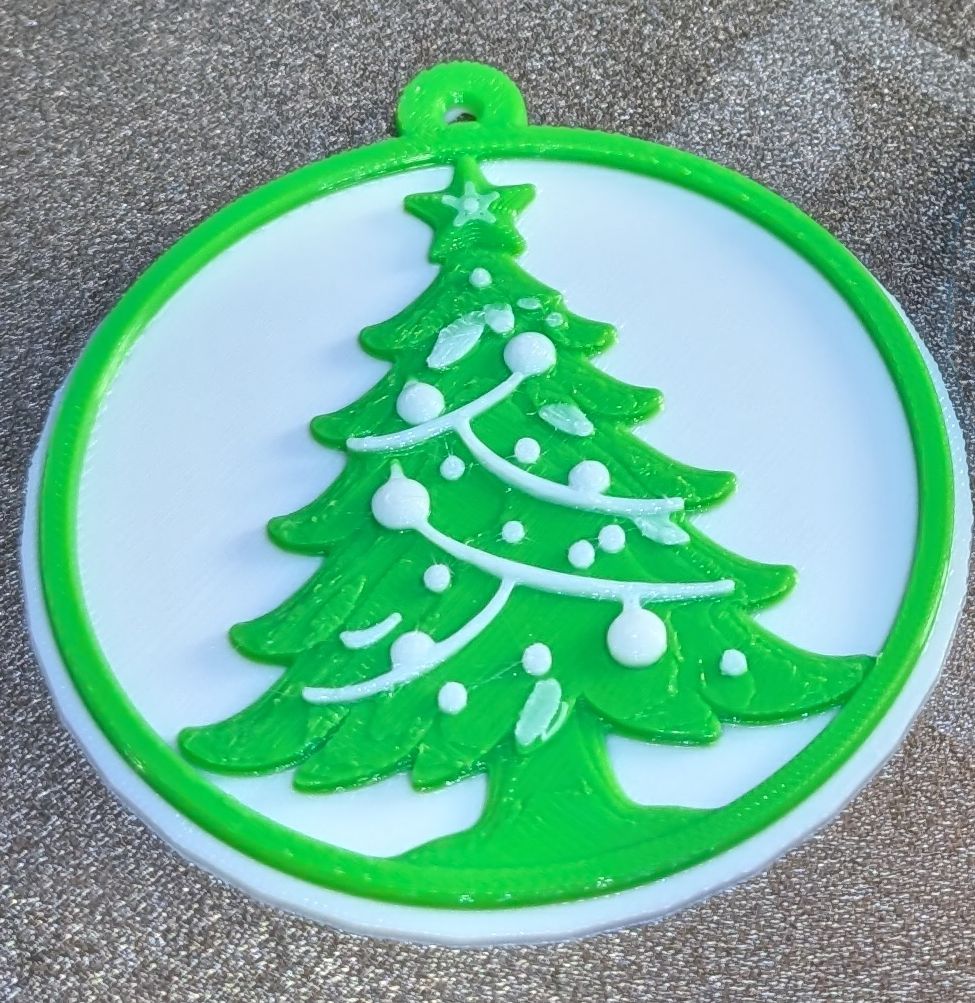
Two filament changes are all it takes to make this nice-looking ornament
There is another way, though. You can avoid almost all of the waste generation and extra time if your model is designed so that each layer is a single color. People have done this for years, where you put a pause in your G-code and then switch filament manually. The idea is the same but the printer can switch for you. For example, the Christmas Tree ornament uses two filament changes to print white, then green, then white again. This works great for lettering and logos and other simple setups where you simply need some contrast.
In Orca, you’ll want to slice your model once and switch to the preview tab. Using the vertical slider on the right-hand side, adjust the view until it shows you where you want the filament change. Then right-click and select “Change Filament.” This is the same way you add a pause if you want to change filament manually, for example.
If you use this method, remember to turn off the purge block. You don’t really need it.
Summary
So now, when you unwrap that shiny new multimaterial printer, you have a plan. Get a color model or color one yourself. Then you can decide if you need color changes or full-blown, and waste-prone, color printing. Either way, have fun!
A mosquito has a very finely tuned proboscis that is excellent at slipping through your skin to suck out the blood beneath. Researchers at McGill University recently figured that the same biological structure could also prove useful in another was—as a fine and precise nozzle for 3D printing (via Tom’s Hardware).
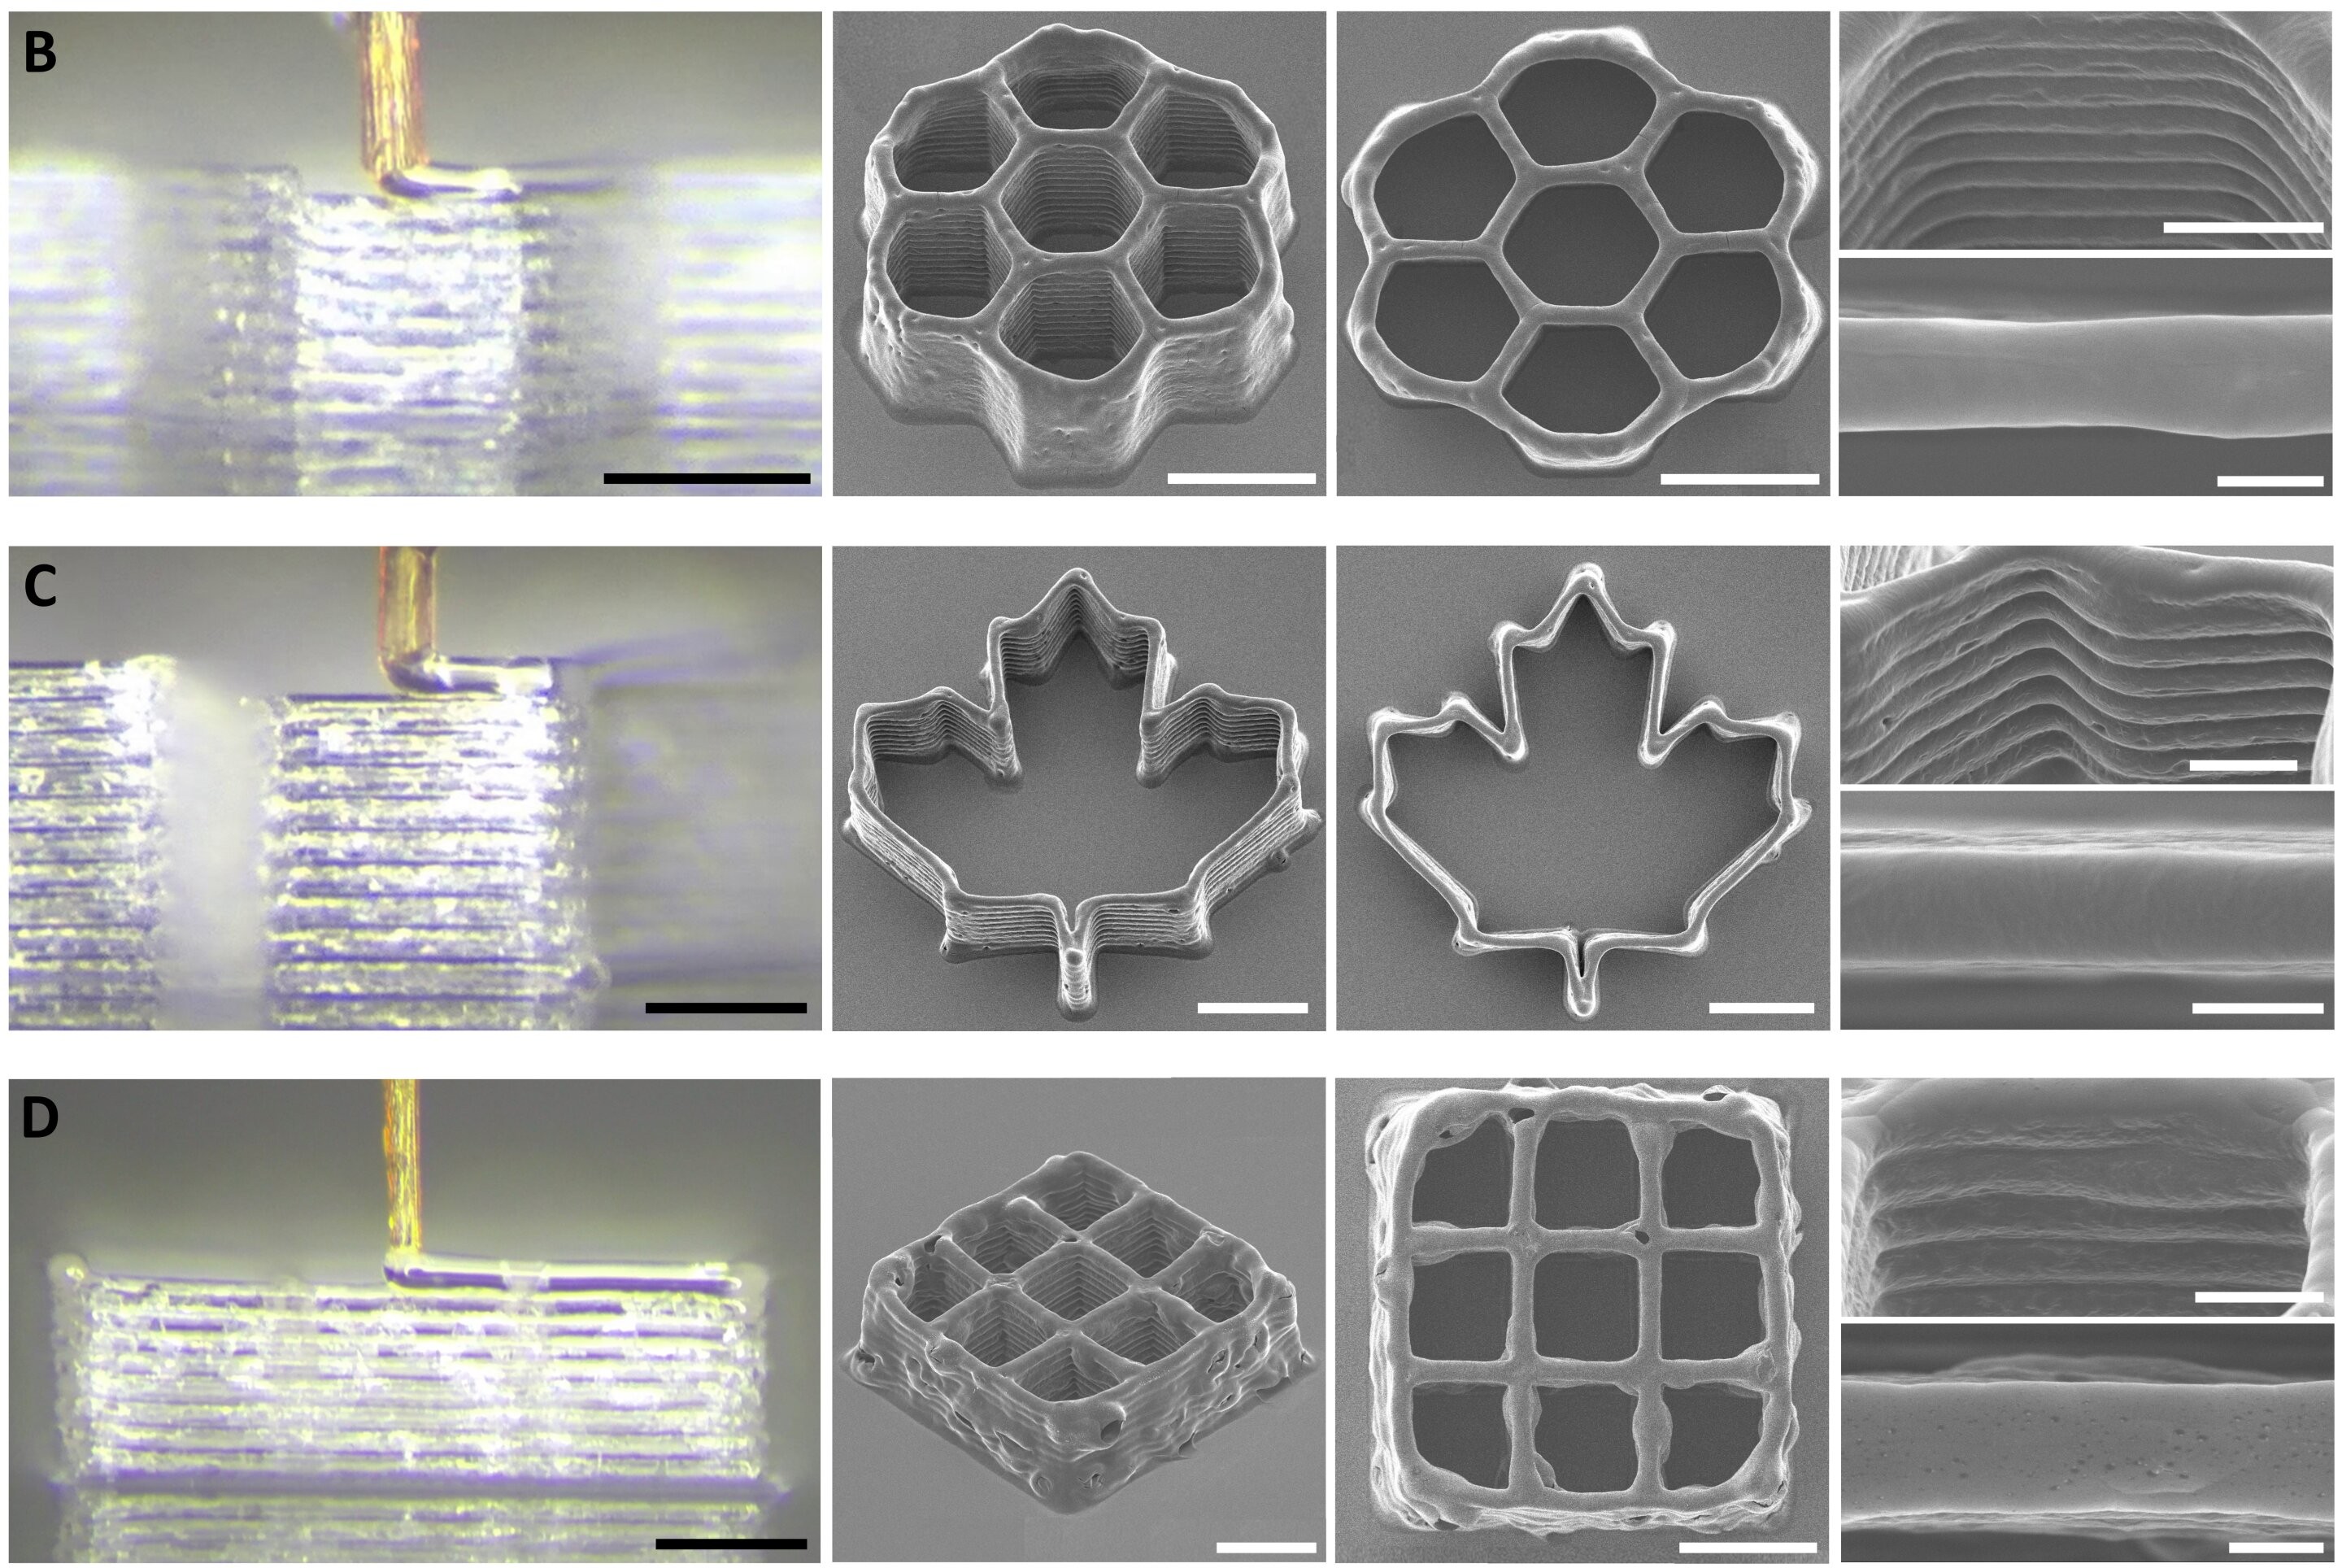
Small prints made with the mosquito proboscis nozzle. Credit: research paper
To achieve this feat, the research team harvested the proboscis from a female mosquito, as only the female of the species sucks blood in this timeline. The mosquito’s proboscis was chosen over other similar biological structures, like insect stingers and snake fangs. It was prized for its tiny size, with an inside diameter of just 20 micrometers—which outdoes just about any man-made nozzle out there. It’s also surprisingly strong, able to resist up to 60 kPa of pressure from the fluid squirted through it.
Of course, you can’t just grab a mosquito and stick it on your 3D printer. It takes very fine work to remove the proboscis and turn it into a functional nozzle; it also requires the use of 3D printed scaffolding to give the structure additional strength. The nozzle is apparently used with bio-inks, rather than molten plastic, and proved capable of printing some basic 3D structures in testing.
Amusingly, the process has been termed 3D necroprinting, we suspect both because it uses a dead organism and because it sounds cool on the Internet. We’ve created a necroprinting tag, just in case, but we’re not holding our breath for this to become the next big thing. At 20 um, more likely the next small thing.
I love organizing my workstation, and my PC gaming setup isn’t immune to getting 3D printed upgrades. From keeping my graphics card from sagging to organizing my USB drives and even holding my controller, here are my top four 3D prints that took my setup to the next level.
Closed-cell self-expanding foam (spray foam) is an amazing material that sees common use in construction. But one application that we hadn’t heard of before was using it to fill the internal voids of 3D printed objects. As argued by [Alex] in a half-baked-research YouTube video, this foam could be very helpful with making sure that printed boats keep floating and water stays out of sensitive electronic bits.
It’s pretty common knowledge by now that 3D printed objects from FDM printers aren’t really watertight. Due to the way that these printers work, there’s plenty of opportunity for small gaps and voids between layers to permit moisture to seep through. This is where the use of this self-expanding foam comes into play, as it’s guaranteed to be watertight. In addition, [Alex] also tests how this affects the strength of the print and using its insulating properties.
The test prints are designed with the requisite port through which the spray foam is injected as well as pressure relief holes. After a 24 hour curing period the excess foam is trimmed. Early testing showed that in order for the foam to cure well inside the part, it needed to be first flushed with water to provide the moisture necessary for the chemical reaction. It’s also essential to have sufficient pressure relief holes, especially for the larger parts, as the expanding foam can cause structural failure.
As for the results, in terms of waterproofing there was some water absorption, likely in the PETG part. But after 28 hours of submerging none of the sample cubes filled up with water. The samples did not get any stronger tensile-wise, but the compression test showed a 25 – 70% increase in resistance to buckling, which is quite significant.
Finally, after tossing some ice cubes into a plain FDM printed box and one filled with foam, it took less than six hours for the ice to melt, compared to the spray foam insulated box which took just under eight hours.
This seems to suggest that adding some of this self-expanding foam to your 3D printed part makes a lot of sense if you want to keep water out, add more compressive strength, or would like to add thermal insulation beyond what FDM infill patterns can provide.
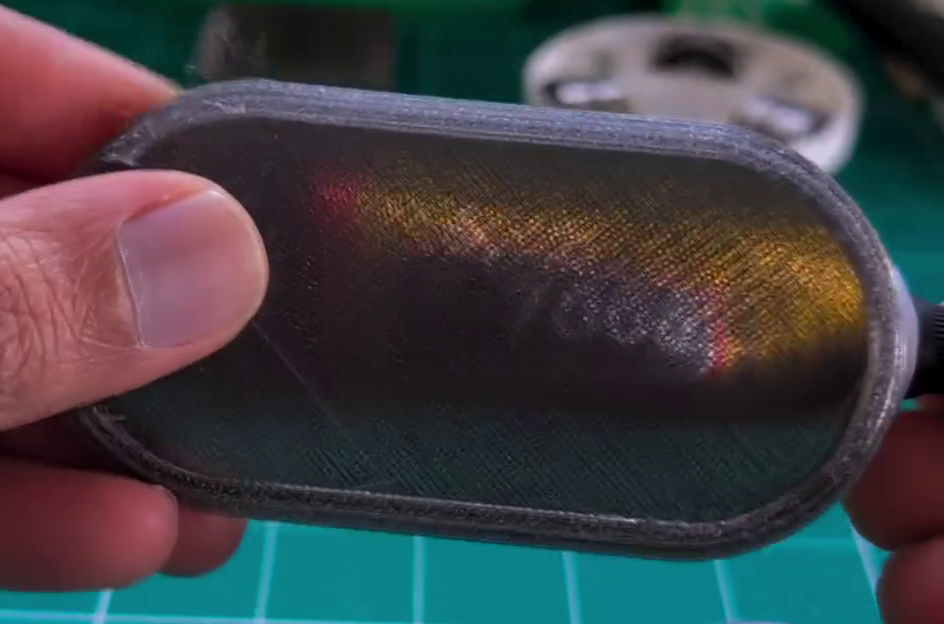
PETG filament can be had in a variety of colors, just like any other. You can even get translucent or transparent forms if you want to print something vaguely see-through. But if you’re looking for a bit more visually impressive, you might like to pick up a few tips from [Tej Grewal] on making sure your prints come out as clear as possible.
Standard print settings aren’t great for transparency.
It all comes down to pathing of the 3D printer’s hot end. If it’s zigzagging back and forth, laying down hot plastic in all different orientations from layer to layer, you’re going to get a hazy, ugly, result that probably doesn’t look very see-through at all.
However, you can work around this by choosing slicer settings that make the tool pathing more suitable for producing a clearer part. [Tej] recommends going slow — as little as 20 mm/s during printing. He also states that removing top and bottom shells and setting wall loops to 1 can help to produce a part that’s entirely infill. Then, you’ll want to set infill to 100% and the direction to 0 or 90 degrees. This will ensure your hot end is just making long, straight strokes for layer after layer that will best allow light to pass through. You’ll also want to maximize nozzle flow to avoid any unsightly gaps or bubbles in your print.
[Tej] demonstrates the technique by creating a cover for a display. By using the settings in question, he creates a far more transparent plate, compared to the original part that has an ugly zig-zagging haze effect. You’re not going to get something optically clear this way; the final results are more lightly frosted, but still good.
Surgery is hard, there is a reason why school is so long for the profession. Making the job easier and smoother for both patients and surgeons is valuable for all parties, which is why [Mayo Clinic] is now working on including 3D printing into its more regular medicine pipeline.
Prepping for surgery often requires examining CT scans of patients to figure out, well, what they’re even going to be doing. Every body is different, and complex surgical procedures require checking to see where certain organs or features are located. This can be made much easier with a physical model of where the bones, organs, or nerves are specifically located in a patient. While this isn’t true in every case of treatment, there are even cancerous cases where custom equipment can be used to decrease side effects, such as mini-beam collimator adapters.
What if you could use the same pipeline to print what was lost from certain procedures? In a mastectomy, the breast tissue is removed, which can cause negative attention from curious gazes. So why not 3D print a custom breast? Cases like these are generally considered poor commercial investments from industry, but are relatively easy for an existing medical facility to add to treatment.
[Mayo Clinic] is far from the first to consider 3D printing in the medical setting, but seeing the technology see actual applied use rather than future seeking is exciting. Medical hacking is always exciting, and if you want to see more examples, keep sure to check out this commercially available simulator (with some free models).
There’s never been such a thing as being “too competitive” when it comes to competition. This is something that [Tom Stanton] from “Tim Station”, [Tom]’s 2nd channel, took to heart for Polymaker’s 3D design challenge. The goal was simple: a single 3D printed part to hold as much weight as possible.
While seemingly simple, when considering the requirements, including a single print in addition to being able to open up for the mounts, the challenge gets exponentially more complicated. While the simplest and strongest joint would be a simple oval for uniform stress, this isn’t possible when considering the opening requirements. This creates a need for slightly more creativity.
[Tom] starts out with two flat C-shaped geometries to test his design. The design includes teeth specially placed to allow the forces to increase their own strength as force is applied. Flat features have the unfortunate quality of being able to slide across each other rather easily, which was the case during testing; however, the actual structures held up rather well. Moving onto the final design, including a hollow cavity and a much thicker depth, showed good promise early on in the competition, leading up to the finals. In fact, the design won out over anything else, getting over double the max strength of the runner up. Over an entire metric ton, the piece of plastic proved its abilities far past anything us here at Hackaday would expect from a small piece of PLA.
Design can be an absolute rabbit hole when it comes to even the simplest of things, as shown with this competition. [Tom] clearly showed some personal passion for this project; however, if you haven’t had the chance to dive this deep into CADing, keep sure to try out something like TinkerCAD to get your feet wet. TinkerCAD started out simple as can be but has exploded into quite the formidable suite!
[Zack], in addition to being a snappy dresser, has a thing for strange 3D printing filament. How strange? Well, in a recent video, he looks at filaments that require 445 C. Even the build plate has to be super hot. He also looks at filament that seems like iron, one that makes you think it is rubber, and a bunch of others.
As you might expect, he’s not using a conventional 3D printer. Although you might be able to get your more conventional printer to handle some of these, especially with some hacking. There is filament with carbon fiber, glass fiber, and more exotic add-ons.
Most of the filaments need special code to get everything working. While you might think you can’t print these engineering filaments, it stands to reason that hobby-grade printers are going to get better over time (as they already have). If the day is coming when folks will be able to print any of these on their out-of-the-box printer, we might as well start researching them now.
If you fancy a drinking game, have a shot every time he changes shots and a double when the Hackaday Prize T-shirt shows up.
Amidst the glossy marketing for VPN services, it can be tempting to believe that the moment you flick on the VPN connection you can browse the internet with full privacy. Unfortunately this is quite far from the truth, as interacting with internet services like websites leaves a significant fingerprint. In a study by [RTINGS.com] this browser fingerprinting was investigated in detail, showing just how easy it is to uniquely identify a visitor across the 83 laptops used in the study.
As summarized in the related video (also embedded below), the start of the study involved the Am I Unique? website which provides you with an overview of your browser fingerprint. With over 4.5 million fingerprints in their database as of writing, even using Edge on Windows 10 marks you as unique, which is telling.
In the study multiple VPN services were used, each of which resulted in exactly the same fingerprint hash. This is based on properties retrieved from the browser, via JavaScript and other capabilities exposed by the browser, including WebGL and HTML5 Canvas.
Next in the experiment the set of properties used was restricted to those that are more deterministic, removing items such as state of battery charge, and creating a set of 28 properties. This still left all 83 work laptops at the [RTINGS.com] office with a unique fingerprint, which is somewhat amazing for a single Canadian office environment since they should all use roughly the same OS and browser configuration.
As for ways to reduce your uniqueness, browsers like Brave try to mix up some of these parameters used for fingerprinting, but with Brave being fairly rare the use of this browser by itself makes for a pretty unique identifier. Ultimately being truly anonymous on the internet is pretty hard, and thus VPNs are mostly helpful for getting around region blocks for streaming services, not for obtaining more privacy.
Perhaps the biggest hurdle to starting a home blacksmithing operating is the forge. There’s really no way around having a forge; somehow the metal has to get hot enough to work. Although we might be imagining huge charcoal- or gas-fired monstrosities, [Shake the Future] has figured out how to use an unmodified, standard microwave oven to get iron hot enough to melt and is using it in his latest video to cast real, working tools with it.
In the past, [Shake the Future] has made a few other things with this setup like an aluminum pencil with a graphite core. This time, though, he’s stepping up the complexity a bit with a working tool. He’s decided to build a miniature bench vice, which uses a screw to move the jaws. He didn’t cast the screw, instead using a standard size screw and nut, but did cast the two other parts of the vice. He first 3D prints the parts in order to make a mold that will withstand the high temperatures of the molten metal. With the mold made he can heat up the iron in the microwave and then pour it, and then with some finish work he has a working tool on his hands.
A microwave isn’t the only kitchen appliance [Shake the Future] has repurposed for his small metalworking shop. He also uses a standard air fryer in order to dry parts quickly. He works almost entirely from the balcony of his apartment so he needs to keep his neighbors in mind while working, and occasionally goes to a nearby parking garage when he has to do something noisy. It’s impressive to see what can be built in such a small space, though. For some of his other work be sure to check out how he makes the crucibles meant for his microwave.
thermoptic is a stealth proxy that makes curl and other clients look identical to Chrome across TCP, TLS and HTTP layers, bypassing JA3/JA4+ detection.
Hello, aspiring ethical hackers. In our previous blogpost, you learnt in detail about OSINT. In this article, you will learn about Recon-ng, a OSINT gathering tool. Recon-ng is an open-source intelligence gathering tool aimed at reducing the time spent harvesting information from open sources. It is a full-featured reconnaissance framework designed to gather OSINT information […]