Over In the course of my career, I have written 34 books—12 of them devoted to grilling, smoking, and now griddling. That translates to something on the order of 4000 recipes—more than 500 recipes in Barbecue Bible alone.
So distilling that down to five indispensable recipes that everyone—beginner or expert—should know how to grill might seem like an impossible task.
It is an impossible task, but I’m going to try. After all, if you’re just starting out with live fire cooking, you don’t want to know how to grill 4000 recipes. You want to have a four or five fail-proof showstoppers in your repertory that you prepare on demand without breaking a sweat.
Here’s my list of the indispensables:
5 essential grilling recipes
Steak: The first thing everyone should know how to grill is a steak. Not necessarily, a 2-pound porterhouse that will set you back $100 or more. (I’ll tell you how to grill one of those in a future blog—stay tuned.). No, you want to know how to grill a steak that’s readily available, flavor-packed, and mercifully affordable. Enter the skirt steak. Cut from the steer’s undercarriage, skirt steak has flavor in spades. The secret to grilling skirt steak? Bold seasonings. Hot fire. And remember to slice it across the grain. Here’s a bourbon-marinated skirt steak that will smoke the competition.
Chicken breasts: We food writers like to dump on chicken breasts because they’re mild-tasting, uncomplicated, and quick. The same reasons that you—and we—probably have some in the freezer. Chicken breast is about easiest food there is to grill, and although it’s bland, it absorbs flavors like a sponge. Just rub it or marinate it, oil or baste it, and cook it fast to keep the lean meat from drying out on the grill. My favorite way to cook chicken breasts takes a page from the Italian playbook. It’s called pollo al mattone (“chicken under a brick”) and it’s guaranteed to steal the show at your next cook-out.
Whole chicken: While we’re on the subject of poultry, a whole roast chicken is about the most comforting dish on the planet—especially when spit-roasted on a grill, preferably in the presence of woodsmoke. If you have a rotisserie, you’re ahead of the game. Just brush the bird with olive oil and season it with your favorite barbecue rub (or with salt and pepper—either works). Set up the rotisserie following the grill manufacturer’s instructions. Add wood chunks or chips to the coals or place in your gas grill’s smoker box. Oh, and my trick for producing a tender bird every time: overcook it, that is cook it to an internal temperature of 175 to 185 degrees. That’s how the French do it, and they make the best roast chicken in the world.
Baby back ribs: If there’s one dish that epitomizes barbecue, it’s ribs. And if there’s one rib that everyone should know how to cook, it’s baby backs. Cut from high on the hog (yes, that’s where the expression came from), baby backs are generously marbled, naturally tender, and relatively quick to cook. You can smoke them “low and slow,” as you would true barbecue—a process that takes 3 to 4 hours. You can indirect grill them hotter and faster, delivering competition worthy ribs in 90 minutes. The secret? A four-ingredient barbecue rub (equal parts salt, pepper, paprika, and brown sugar) and a luscious lemon brown sugar barbecue sauce.
Pulled pork: The pork shoulder may be the most forgiving piece of meat ever set to fire. It, too, can be cooked low and slow or hot and fast. Thanks to its generous marbling, it always stays moist—even if you overcook it. Start with a Boston butt—cut from the top of the pork shoulder and so name for the wooden barrels (“butts”) it used to be stored in for shipping. Once it’s cooked (to 190 to 195 degrees on a meat thermometer), you shred it with meat claws link or two large forks and douse it with a Carolina vinegar sauce. The piquancy of the vinegar counterbalances the richness of the pork. Just remember to add hardwood chunks or chips (the latter soaked in cool water for 30 minutes, then drained) to add that authentic Southern smoke flavor.
Medium-high heat—around 400 to 450°F—is ideal for most grilling. It’s hot enough to sear while keeping meats juicy and vegetables crisp-tender.
Should I leave the grill lid open or closed?
Keep the lid open for quick-cooking foods like burgers or steak; close it for thicker cuts or anything that needs indirect heat, like chicken or ribs.
How can I tell when meat is done without overcooking it?
Use an instant-read thermometer—125°F for rare steak, 165°F for chicken, 190°F for pulled pork. It’s the simplest way to get perfect results every time.
He being me, and I found a revolutionary new way to grill bratwurst. It’s about to make you and your next tailgate party succeed like a million bucks!
From the beginning of time (or a least bratwurst), people have grilled this traditional German sausage directly over the fire.
Even the name suggest direct grilling: braten is the German word for to roast or grill.
Direct grilling bratwurst and other fresh sausage has benefits and risks. Get it right, and you wind up with a crisp smoky casing and sizzling meat. Get it wrong and the bratwurst will split and the fat will gush onto the fire, turning your grill into a conflagration. Or one side will come out charred; the other side raw, which is an equally unhappy result.
But what if there was a way to grill brats without these fiery risks? There is and I discovered it a few years ago when I suddenly had to cook 60 brats for a book signing and my assistant was a no show.
Indirect grilling bratwurst
So I set up my grill for indirect grilling and lined up the brats on the grate. Then, in a moment of inspiration, I added hickory wood to the coals. The result was astonishing. Indirect grilling kept the casings and juices intact, which meant brats that were 30 percent juicier than the sausage I grilled using the direct method.
And the smoke flavor made the brats off the charts delicious. (Think bratwurst channeling barbecue.)
Best of all, the method works for all manner of fresh wurst, from chorizo to Italian sausage.
Brats are indispensable for any self-respecting tailgate party. Use my indirect grilling with wood smoke method for the best brats you’ve ever tasted.
How to do it
Set up for indirect. Two-zone fire (coals/burners on one side only). Aim for 350–375°F in the indirect zone.
Add wood. Place a fist-size chunk of hickory (or a handful of chips) over the hot side.
Cook gently. Arrange brats on the cool side, lid down, vents open. Cook to 155–160°F internal, 20–30 minutes, rotating once.
Optional crisp. Roll brats over the hot side for 30–60 seconds to blister the casing.
Don’t let cold weather send your grill into hibernation. Some of my best grilling happens when the temperature drops and I can layer up with a warm hoodie while cooking outside. These recipes use hearty fall and winter ingredients that actually taste better with a smoky char – think grilled chicken thighs, bacon-wrapped vegetables, and […]
March marks the start of grilling season — the days get longer, the weather warms up, and it’s time to fire up the BBQ. Spring is the perfect time to try new grilling recipes while the weather’s nice but not too hot. From grilled chicken and burgers to vegetables and kebabs, these recipes will help […]
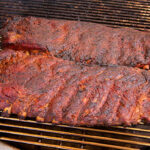
If you love your ribs to have a grill flavor – this is the recipe for you! They cook fast, they stay juicy and the flavor is better than the best grilled pork chop you’ve ever had. Plus you can get creative with this one – use whatever rubs you like, use whatever mop you like and just get to burning and turning some ribs!
This method cooks some FIRE ribs really fast. We use the charcoal and the grill to impart some serious flavor – and we baste the ribs the entire cook so they come out juicy, tender and oh so delicious!
Ingredients
2 slabs St. Louis Cut Spare Ribs
1/4 cup Killer Hogs Hot Rub
28oz apple cider vinegar
1/4 cup fine sea salt (feel free to add less salt to suite your taste)
1/4 cup ground cayenne pepper
juice from one lemon
Instructions
Trim the excess fat and remove the membrane from each slab of ribs.
Season the ribs on both sides with a light coat of Killer Hogs Hot Rub.
Prepare a charcoal grill for 2 zone cooking at 300°F.
Place the ribs over the direct heat side of the grill – the cool zone is just in case you need to get them away from the fire. These ribs cook over the direct heat side the entire cook.
Combine the vinegar, salt, cayenne pepper, and lemon juice in a quart mason jar. Shake it well.
Flip the ribs every ten minutes keeping the grilll temperature steady at 300°F.
Once the outside begins to dry out start mopping with the basting liquid using a bbq mop.
Continue to flip and mop until the internal temperature reaches 198-200°F.
Move the ribs over to the indirect heat side for 5-10 minutes.
Cut the ribs into individual bone pieces and serve with additional mopping sauce for dabbing.
Do you like to grill and smoke food frequently but don't have the space or the budget to buy both a good grill and a good smoker?For those of you that must have the best ... Read more
[FTC Standard Disclosure] We receive no compensation for any content or links in this post.
Let's get the recipe out of the way first since people hate scrolling through the typical food blogger stuff to get to the recipe. This is a simple white sauce variation that is creamy, savory, and as the name implies - it has a peppery kick.
Mini-Surf and Turf - Petite fillet with creamy peppercorn sauce, snow crab legs, and asparagus.
Creamy Garlic Peppercorn Sauce
www.nibblemethis.com
Published 03/30/2025
A creamy and delicious sauce that's delicious on steaks, burgers, and grilled vegetables. We took ours to another level by using Bourbon Barrel Smoked Pepper.
INGREDIENTS
3 tablespoons unsalted butter
1 tablespoon minced garlic
1 tablespoon minced shallot
1/2 teaspoon kosher salt
1 1/2 teaspoon coarse black pepper
2 tablespoons all purpose flour
1 cup cream or half and half
1/4 cup shredded parmesan cheese
salt to taste once finished
INSTRUCTIONS
Preheat a small sauce pot to medium/low heat, melt the butter. Then add saute the garlic, shallot, salt and pepper and whisk frequently until the garlic starts turning golden brown - about 2 minutes.
Make a light roux by whisking in the flour and continuing to whisk until it smells nutty, about 2-3 minutes.
Slowly add the cream, whisking continuously, until combined into a sauce.
When the sauce begins to slightly simmer, whisk in the parmesan and stir occaisionally until the cheese is melted.
Tasted and add more salt as desired.
Yield: 2-4 Servings
Prep Time: 00 hrs. 5 mins.
Cook time: 00 hrs. 15 mins.
Total time: 20 minutes
Tags: sauce
We weren't planning on cooking yesterday afternoon but when I saw a pair of Certified Angus Beef brand petite fillet at Food City, things changed.
Food City also had a pack of snow crabs for a low price so on the spur of the moment, we decided to make a mini-turf and surf for the afternoon's NCAA Elite 8 basketball games.
We didn't have a lot of time because the skies were turning dark and Spring storms were popping up. I fired up one of our Big Green Eggs and got to prepping the food. I seasoned the steaks simply with Bourbon Barrel smoked salt and smoked black pepper. Did the same for the asparagus.
As you can see, one fillet was much more petite than the other. One was a heavy 5 ounces while the other barely weighed in at 3 ounces.
While the crab legs heated up in our steamer, I raced against time to grill the steaks. My plan was to grill the smaller one about 3 min per side and the larger one about 4 min per side.
My set up for the Big Green Egg was a Kick Ash Basket full of Jealous Devil lump charcoal and a pre-heated cast iron grate from Craycort. Notice how the angle of the grates go in 3 directions? Each of those are inserts that you can lift out to add fuel or wood OR you can drop in an accessory insert like a griddle plate or veggie wok.
Once the steaks were flipped, I added a bit of asparagus to the heat of the hot coals.
Cooking away on the Big Green Egg. This was just before I pulled her smaller fillet off of the grill.
Remember that plan to let the larger fillet go for a couple of minutes longer? The weather had other ideas about that and I'm fine with a rare fillet so I pulled it early.
Asparagus is one of my favorite veggies to pair with steaks because prep is literally a snap and they cook quickly.
Surf and turf for the games! My filet was rare due to the cooking time being cut short but like I said, I was fine with that.
Every bite was delicious! Since we normally opt for ribeye or strip, Alexis couldn't get over how tender the steak was. Not a bad meal for an afternoon when we weren't planning on cooking in the first place.
Traeger is launching a fully reimagined Ironwood and Ironwood XL. The grills encompass outdoor cooking through new features, advancements, and upgrades.
There are a lot of cool grill and smoker accessories that can make grilling fun, but a pellet smoker tube can actually make food cooked on a gas, electric, and even a pellet grill taste amazing.
Nevertheless, you will find hundreds of options available online and in stores. To make it even harder to choose, these smoke tubes all seem pretty similar.
In this article, I share the best pellet tube smokers after filtering through a few brands, tossing out out the bad, and testing the top. I go over my top picks, what to look for when choosing a smoker tube, and how to use them.
What is a Pellet Smoke Tube AkA Pellet Tube Smoker Aka Smoke Tube
You will see different names to refer to these gadgets online and in stores; pellet tube smokers, smoke tubes, and smoke tubes all refer to the same artifact, a pellet smoke tube.
A pellet smoker tube is a hollow tube with perforations on its walls, typically made of stainless steel.
The inside of the pellet tube is hollow so that you can insert wood pellets and ignite them. The holes on the tube walls allow for air flow and pellet smoke to escape and infuse your grill’s cooking chamber and thus meat, with wood flavor.
These smoker smoke tubes come in different types and shapes. But they all primarily perform the same function and work the same.
Insert pellets in the tube, ignite them, and generate smoke. Later in this article, I’ll go over how to use and how these pellet smoke tubes work.
One important thing to keep in mind is that the larger these tubes are, the more hours of smoke they will generate.
Simply put, gas grills are simple to use and cook on. But food tends to lack flavor, specially meat, due to the absence of wood or charcoal combustion. However, as pellet cookers became more popular, so did pellet smoke tubes.
These simple yet effective gadgets can turn your grill into a smoke flavor machine.
We chose the Lizzq Premium as the best smoke tube because its construction and quality seemed to work best out of all the tubes we tested. I have used a lot of these smoke tubes over the years and all sort of work the same but i really enjoyed using the LizzQ. Also this smoke tube has amazing reviews on Amazon.
Nevertheless, what I like most about the Lizzq Premium Pellet Smoker is that one of the tubes has a cap, making it easier to fill up and move around without dropping a bunch of pellets.
This pellet smoker tube is made out of stainless steel, and the quality is good enough to justify its price.
Some people are perplexed about how to light the pills in the tube.With this tube, you have to wait a few minutes for the pellets to start combusting before letting the tube down and starting to cook.
The Lizzq Premium Pellet Smoker is our top pick and best pellet tube smoker because it checks all the important boxes. First, it is priced well and is simple to use. The tube is a foot long and holds enough pellets to generate smoke for about four and a half hours.
Pros
Good airflow means that once the pellets are lit, the smoker’s tobacco keeps generating smoke for hours.
It is a foot long, so it can hold a lot of pellets.
Cons
I recommend using gloves; the tube can get hot during ignition.
I really like the Skoo pellet smoker. I like this tube because not only is it pretty much the exact replica of the LizzQ, but they upped their game by offering their tube as a packaged bundle. This doesn’t necessarily make the Skoo better, but it is nice to get a little extra bang for your buck.
As far as this bundle goes, you get a cleaning brush on a hook. Hook would allow you to hang the pallet tube on your grill’s accessory hooks just like you do with you grill brushes, and the cleaning brush will help you keep this tube clean.
The Skoo is also 12 inches long, and you can expect about 4 to 5 hours of smoke.
Z Grills makes pretty great budget pellet grills and also offers accessories like grilling mats and wood pellets. They also offer their own wood smoke generators, including their very own smoker tube.
Z Grills does not stray very far from our top two options. As far as design, in fact, Z Grills smoker tube looks just like the LizzQ Premium pellet smoking tube. This is quite simply because a lot of these vendors are sourcing their products from the same manufacturers.
The Dimeshy is a square-shaped tube made out of 304 stainless steel and 12 inches long. This option is just like all the others but half the price.
How A Pellet Smoker Tube Works
These devices are very simple and pretty much use the natural air flow and pressure inside your grill to slowly ignite wood pellets, which generate smoke that infuses meat and other foods with that “smoky” aroma and taste we all enjoy in BBQ.
There isn’t much to do but fill the tube with wood pellets, ignite them, and let it do its job. As the pellets burn and your grill gets hot, the wood pellets will continue to slowly combust and deliver smoke me for hours.
What should you consider when choosing a Pellet Smoker Tube smoker?
Length of the wood pellet tube
Unlike your pellet smoker, these tubes can only hold a limited amount of pellets, and how many pellets you can fit in the tube affects how long it will be able to generate smoke. If you use good pellets, a foot-long pellet tube will hold enough pellets for 4 to 5 hours of smoking.
But considering the length and smoke tube size not only for capacity reasons, you also need to make sure it fits in your smoker. Some electric smokers are small and might be hard to fit a 12-inch tube inside them, so double check your cooker to make sure you have space for a pellet tube smoker before you jump in.
The tube shape of the smoker
This is one aspect of these tubes that, at first, I wasn’t too concerned about until I started testing. I have a large pellet smoker with plenty of space, and I was able to throw the pellet tube right down the middle of the grate and let it rip.
However, I wanted different tubes of different shapes in my Green Egg, my portable charcoal grill, and my electric smoker. That’s when things became more obvious. First, as I mentioned before, make sure you have ample space for the tubes. In my Green Egg Large, the grate is 18 inches in diameter and the grill is round, forcing me to put the tube more towards the center of the grate, taking up space I need for food.
But getting back to the topic of shapes, well, smoking tubes come in at least three shapes: square, round, and hexagonal. You might think that the shape might not make much of a difference, but it does.
When the tubes are hot, move them with a pair of barbecue tongs and try to grab a round tube with tongs. Yeap, it will not be easy. However, if you roll around the tube, it’s a breeze.
Because they have a large flat surface, the wide-shaped smoking tubes fit well and securely on top of any size grates. The hexagonal-shaped tubes are a cross between a square and a round tube.
Quality of pellet smoke tubes
Quality is something that we all look for when buying anything, but when it comes to a pellet tube, quality matters just a bit more. As you will see, these tubes are not all that expensive, and quite frankly, most are almost identical.
Nevertheless, we “left out” the lower-quality smoking tubes and only included the pellet tubes with good customer reviews and feedback, then tested those top picks.
If you decide to look outside the options provided in this article, just be sure to pick a wood pellet tube that is made out of good stainless steel.
Although these tubes are meant to very slowly burn wood pellets and not really smolder them under direct fire, the smoker tube will be exposed to heat and various temperature changes. Cheap metal ones will not last.
Intended Use of the Pellet Tube Smoker
Ah, intended use. This is important. These pellet tubes can be used for both cold smoking and hot smoking. If you are wanting to use the pellet tube to smoke for long periods and low-smoking cooking sessions, be sure to get either a long tube or more than one.
When smoking large cuts of meat like briskets and pork shoulders, you will be cooking them for eight plus hours, so you can either keep refilling the tubes or have an extra ready and just swap them out when the peels run out.
Cold-smoking cheese, nuts, and other small foods might not need too much smoke infusion, so smaller or shooter tubes will do. Again, this is also up to your preferences. Some people like lots of smoke.
Should you use more than one pellet smoker tube?
It is important to note that these tubes are intended to be small smoke generators, not replacements for the amount of smoke produced by a pellet or charcoal smoker.
A pellet tube smoker will not, in a million years, replace an offset smoker, but it will turn a nothing-but-tasting gas grill into an amazing grill. These inexpensive gadgets can assist in converting your expensive gas grill into a flavor machine.
With that said, I recommend getting more than one tube and using more than one tube if you like the smoke flavor or want to be able to cook with different pellet flavors at the same time.
Two tubes will generate a lot more smoke than a single one.
How to use a smoker tube in your pellet smoker or gas grill
Using these tubes is fairly easy, but some people do have trouble igniting them at first. Pellets need a nice flame with some airflow to ignite. In your pellet grill, there is a powerful electric igniter and a fan to ignite and keep the pellets burning.
With these tubes, everything happens in a more natural way, where pure oxygen and airflow from the tubes’ holes keep the wood burning slowly.
The easiest way to start your pellet tube is to use a flame torch. The power, flame, and heat output of the torch will get the pellets going very quickly. You could use a lighter as well, but it will take longer, and you will need to sit there holding that lighter until the pellets start turning red and amber with a light coat of white ash; that’s when they start to combust.
Using the smoker tube for smoking
Using a pellet tube with a smoker is easy; simply ignite the pellets and find a good place for the tube. You want the tube beneath the food so that as the smoke rises, it can penetrate the food.
Using the smoker tube when grilling
To avoid dampeding the smoking tube, keep the pellet tube away from direct heat when grilling. However, direct fire will burn up the pellets and turn them to ashes in minutes rather than hours.
Maintenance and Care of a Pellet Tube Smoker
The beauty of these tubes is that they require very little maintenance. Still, there are a few things you should do to keep them in top shape and hopefully be able to use them for a few years.
First, after each use, empty all the ashes, grab a rag, and wipe the teapot clean. If possible, add a bit of oil to a rag and wipe the tube with a bit of oil; this will help fight corrosion.
Second, store the tube in a nice, dry place, and make sure you brush the air holes to ensure the tube always has good airflow.
Conclusion
A pellet smoke tube can add flavor to food, especially when using a gas or electric grill. Nevertheless, there are many options, and our goal in this article is to show you those options with great ratings that performed well.
As you might have noticed a lot of these gadgets are pretty similar but LizzQ takes our vote for the best pellet smoker tube because of its performance, but also has been in the market the longest and has gained a lot of great reviews and happy customers.
The MeatStick and the Meater are both leading the wireless smart thermometer race and have inspired many household brands to release their own versions. Many of our readers get stuck making a decision between the MeatStick and the Meater, so in this article, I breakdown the main differences and compare the MeatStick vs the Meater.
The MeatStick
First, let’s talk about each of these thermometers before we jump to the comparisons. The MeatStick is almost a carbon copy of the Meater, but they did a few things right. The MeatStick is a wireless thermometer, meaning there are no wires attached to the probe, and it transmits all the temperature information wirelessly to an app on your smartphone.
The MeatStick is available as a standalone probe with a Bluetooth extender and a Wi-Fi bridge.
The MeatStick probe on its own will give you a range of about 65 feet, but if you get the MeatStick with the Extender, which doubles as the charging base, you will get about 260 feet of Bluetooth wireless range. If you opt for the bundle with the WiFi bridge, then Internet access is the only range-limiting factor, meaning you can access the MeatStick from anywhere.
In all options, the MeatStick is the same “probe hardware.” Whether you get the extender combo or the WiFi bundle, it’s the same probe. The bases are what are making the differences in range, but the probes are the same device and have the same components and temperature tolerances.
You can read my full review of the MeatStick to learn all the details about this meat thermometer.
The Meater started the truly wireless smart thermometer revolution. Both the MeatStick and the Meater are not only absolutely, definitely wireless, but they are also smart. Their smartphone applications have built-in algorithms that predict and estimate when the meat will be done at the doneness level you choose.
The Meater started this revolution and companies like Traeger noticed it and quickly adopted them and integrated these probes with with their news grills like the Timberline XL
I wrote a complete review of the Meater explaining everything there is to know about this amazing product. But since this is a comparison article on these two popular probes, let’s jump in and compare them.
You can read our full review of the Meater Plus, which goes into greater detail about his thermometer.
Both manufacturers have done a great job of highlighting the benefits of their thermometers, making it hard to choose between these two probes.
I don’t want you to misinterpret what I’m saying. Both the MeatStick and the Meater are good, and you won’t be disappointed by either one of these two products.
However, if you are on the fence about which one to get, let me break down the major differences between these two probes.
Wireless Range
The first and most important difference between these two thermometers is their wireless range. Both brands use a Bluetooth repeater to boost their signals, and both provide WiFi bridges for connecting to your home wireless network. Wireless range and other features I mention below earned the MeatStick a top spot on our wireless meat thermometer roundup article.
So let’s break down the range of these probes one by one so you can understand the differences.
Meater has three main products: the Meater, the Meater Plus, and the Meater Block. As far as the probes are concerned, they are all the same hardware; what changes is the range in all their models.
MeatStick also has three main variants of their probe, with the only differences being range. The MeatStick ( just the device and charger ), the MeatStick X ( bluetooth extender and repeater), and the MeatStick with the WiFi bridge.
The Meater, which is the original device, on its own has a range of 33 feet, as does the MeatStick ( just the probe ).
Without their extenders, both vendors’ probes have a limited range. This is okay for those who want to get one of these devices at a low cost and don’t mind the range limits.
However, it is important to note that the estimated 33-foot range of these probes is achieved when the probe’s head is not covered and exposed. Meaning if you use the probes inside an oven or a thick-walled grill like a kamado grill, the range will reduce drastically, to more like six feet.
Both brands then have a second-tier bundle, which is their probes plus a signal repeater that doubles as the battery charger. This is the Meater Plus and the MeatStick X, and here is where the differences are benign.
The Meater Plus, even with its repeater, only has a range of 165 feet, whereas the MeatStick X, also with its repeater, has a range of 260 feet.
I tested the MeatStick Mini, which is a small mini version of the MeatStick but does come with the extender, and I have to say, you get every inch of those 260 feet.
Both brands have wireless blocks that can connect to your home WiFi, and when it comes to wireless range, the limiting factor is your home wireless setup. So, if your wireless network can reach your patio or wherever the WiFi block is, the probe and receiver will be connected to the Internet.
The WiFi block then sends the signal to the cloud (via the internet) and accesses all the information from the cloud using the internet. This is how both brands work, and it is how you get whole-house coverage and the ability to monitor your cooking session while you shop or go for a Sunday ride.
Both brands offer cloud technology to give you access to your temperature data from anywhere, but there is one small difference that might be a deciding factor for some related to getting wireless functionality with both of these devices.
To get wireless functionality with Meater, you have to purchase the Meater Block, which includes the charging block with a built-in WiFi bridge and four probes. With MeatStick, you also have to buy the MeatStick WiFi bridge, but you get two probes instead of four. The setup costs half as much, and you can always add more probes later.
As far as functionality goes, both brands give you a Wifi block with a built-in display that shows the cooking temperatures, cooking times, and signal strength.
Device
Range
Range
MeatStick Probe only
33 Feet
MeatStick X ( Bluetooth Extender )
260 Feet
MeatStick Wifi
Limited only by your home Wifi range
The Meater ( Probe Only )
33 Feet,
The Meater Plus
165 Feet
The Meater Block
Limited only by your home Wifi range
Probe Durability
This is one area where I have not found obvious issues with either brand, but as I was reviewing the Meater instruction manual, it did recommend not to pull the meater by the head if it’s exposed to extreme temperatures or past its 572 degree resistance mark.
I can assume that the reason is that heat can loosen whatever adheres the head to the metal part of the probe, and, well, you will have a real mess on your hands.
Meater is also adamant about not using their probe over direct fire or charcoal. Something that MeatStick does not mention but does say not to exceed their specified temperatures.
One thing worth noting is that the Meater has a small mark on the probe that lets you know how far to insert it into the meat, both for accuracy and to protect the internal components. The meatick must be inserted completely or it will be damaged. Remember that batteries and other components are inside these little tubes.
Features
These two brands offer many of the same features, and besides their Bluetooth range, you get a lot of the same features with both. One area where the MeatStick shines compared to the Meater is in their LED charging status light. I know it’s a minor point, but I like how the MeatStick lets me know exactly what’s going on when it comes to charging the probe. To me, this is something I like but is not a big deal.
In the Meater, there is no LED light indicating how the charge is going; instead, the Meater charges “passively.”
Probes App
This is another area where these two probes differ. The MeaStick app is very responsive and works well, but I feel the Meater’s app looks nicer. This is again a preference thing, but to me, the apps on these two devices are pretty much the same.
Price
This is another area where these two brands have some similarities but vary just a tiny bit.
First, the Meater block is more expensive than getting the block Meatstick WiFi setup. You get two more probes with the Meater block, but it is also more expensive.
As far as the meater plus and the MeatStick extender, both cost the same, but the MeatStick is modular, so the price of entry is the same, but you can add more probes and monitor multiple probes with one extender, so it is fully modular.
The Original Meater is the least expensive model and costs the same as the MeatStick Mini. However the MeatStick mini has only a meat temperature sensor and no ambient sensor with range of 260 feet whereas the original
Conclusion
Both of these thermometers are great options. If you enjoy cooking BBQ and want to monitor what’s happening inside your smoker or grill and even while cooking in kitchen appliances, these are great products.
If you enjoy cooking or grilling but want to keep tabs on temperatures, these two thermometers are great products. However, the MeatStick can be fully submerged, so for those looking for a thermometer that can work in devices that use water to cook, the MeatStick takes the lead. The Meater also outperforms the Meater in wireless range, and the MeatStick is more affordable.
The Meater Plus is a new line of wireless grill thermometers and the future of cooking. BBQ meat smoking and grilling often require paying close attention to the meat’s internal temperature. When smoking meat, it is extremely helpful to monitor the progress of the internal temperature as it rises and, better yet, set alerts for certain temperature points during the cook.
While many thermometers can do this, not many can do it without using any cables or wireless at all.
Now, I want to clarify that the term “wireless meat thermometer” is often used by brands to also describe Bluetooth and other thermometers that “wirelessly” transmit temperature data to your phone or another device, but the temperature probe still uses a wire to transmit the data to a receiver.
The Meater + is truly wireless
The Meater Plus is a truly wireless device, meaning that it doesn’t have any wires and also transmits temperature data wirelessly. The thermometer probe houses all the components, including a rechargeable battery, and on the other end, there is a smart app on your mobile phone that gathers all the data and handles many features, including alerts.
Companies like Meater have managed to take the good old probe we are all familiar with and design it to fit all the components needed to read temperature and transmit data wirelessly.
Let me introduce you to the Meater Plus
The Meater Plus is the successor to the original Meater. I will get more into the differences between these two thermometers, but I want to introduce you to the newest model, the Meater Plus.
image: Meater.com
You have likely heard some chatter about these new types of wireless food thermometers, and they are pretty revolutionary. So, of course, we had to get our hands on one.
The Meater Plus is a stainless steel probe a little over five inches long with a ceramic head. The probe houses temperature reading complements, and the head houses electronics like the Bluetooth transmitter.
The Meater Plus probe has two sensors in one single device: the stainless steel probe measures food temperature while another sensor in the probe’s head measures the ambient temperature, that of the grill cooking chamber or smoker. A wood pellet grill normally displays the cooking chamber’s temperature, but with the meater plus, you can have an extra eye inside the grill or for
For those with grills that do not display internal or cooking temperatures, the Meater can deliver that information.
The meat thermometer looks more like a writing pen, and its wooden base doubles as a wireless transmitter and charging base. The base is made out of real wood, which adds a touch of elegance and a high-end look to this device.
Meater + Specifications and Performance
The Mater uses Bluetooth LE technology, which stands for Low Energy and allows the Meater Plus to reach a maximum range of 165 feet, which is 5 feet more than the width of a football field ( not the length). There are other wireless thermometers out there with a longer range, including the MeatStick, Meater’s closest competitor.
The sensor and probes can read temperatures up to 212 degrees Fahrenheit, and the ambient temperature sensor can read and withstand temperatures up to 572 degrees Fahrenheit. It is important to keep these temperature limits in mind because exceeding them will damage the probe. in part because some of the components inside these probes will simply “cook” above these tensiles. Remember, there is a rechargeable battery inside these probes.
image: Meater.com
All the information gathered by the Meater Plus is translated into numbers and very informative graphs by software, which are all colorfully displayed on your phone via the mobile app. The Meater App is another noteworthy feature of this product. I have tested many thermometers and probes, and the app is often their pitfall.
The product can be amazing, accurate, and of good quality, but if the app is not user-friendly, reliable, and easy to configure, it will deter many users, and often those brands end up inadvertently getting bad reviews online.
I have to say the Meter app is crisp, responsive, and very colorful; everything is color-coded, which helps direct your eyes to the information you are looking for quickly.
The app is also very easy to use. Everything from cook time to remaining times can be easily seen in the app.
The app also tells you the battery status and how much power the Plus has left. The battery in these probes will last 24 hours. That is plenty of battery to monitor brisket and plenty for monitoring a steak.
This wireless meat probe has a range of 165 feet, and Meater has cloud service that allows you to connect to your home WiFi and access the Meater from the mobile app anywhere your phone has Internet.
The base of the Meater doubles as a charging station, and one AAA battery can charge the Meater about 100 times.
Warranty
Mater offers a one-year warranty on these probes, and quite frankly, I wish the warranty was longer. As these devices are susceptible to failure as they are exposed to fire and heat, one thing that is very important is that the Meater manual suggests that the Meater be used on indirect fire and not over hot coals or fire.
This could be to protect the thermometer from direct fire, extreme heat, and flare-ups, but it would be nice if they were a bit more upfront about it. I can see many people just throwing the probe into a cut steak and going for a hot sear.
Meater instructions are to reverse sear the steak first; once the desired doneness level and temperature are reached, remove the probe and then sear the steak.
It is very important that customers are aware of these, because by simply reading Meater’s website, you might believe that because the probe can withstand temperatures of over 200 degrees and the head over 500 degrees, direct coal cooking is feasible, but you could actually damage the device.
Also important is the fact that the Meater Plus is water resistant, not waterproof. Meater states that the probe should not be submerged in water for prolonged periods of time.
The Meater Plus wireless meat thermometer Review: in detail
Ok, now that you are familiar with the Meater Plus, what it does, and all its features. Let’s go over our review of the Meater and what makes it a Plus!
We received the Meater Plus with much anticipation and excitement. Our first impressions were how cool the thing looks and how light it is. Pictures don’t do it justice. The wooden base looks very elegant, and I can see many just leaving their Meater right on top of the modern kitchen counter or fancy kitchen tops.
Setting up the Meater Plus is easy. Simply install a AAA battery in the charger, insert the probe in the base, and it will passively charge. This was confusing to me because when I tested the MeatStick, you actually had to press the power button to start charging the probe, and the LED blinked to let you know it was charging.
That’s not the case with the Meater. It charges passively, and you have to trust that the battery in the probe is charged. The Meater charging block/extender LED does show different colors to let you know the state of charge of the AAA battery.
During our tests, we noticed we needed to charge the Meater for about 2 hours.
Another thing that is worth mentioning is that the Meater Plus cannot be fully submerged in water or other liquids for long periods of time, which is something its bigger competitor, the Meatstick, can do.
To pair the Meater, simply download the Meater app, hold the black button on the base, and Bluetooth connect the Meater to your phone.
Using the Meater
To use and set up the Meater Plus for cooking, it’s easy: simply start the app, insert the Meater into the meat, and set the cooking session. Setting the cook is simple: select the type of protein and alerts and start your cook.
There are a few things you should know about using the Meater. First, the probe has to be inserted all the way, or at least to the set safety “notch” on the probe ( you will see a line on the probe ), or you risk damaging the probe. In a way, the meat around the probe protects it from overheating and damaging the internal components, including the battery.
In fact, I took a look at the Meater manual, and it states to not use the Mater over direct heat or over charcoal, and if an overheating alert goes off, use eye protection to remove the Meater from the grill.
It is also important that the Meater thermometer stay inside the meat while the meat is being removed from the grill.
So why do I bring this up? Because Meater states that their probe can withstand temperatures of 572 degrees and the probe is 272 degrees, yet their manual seems to contradict this a bit by stating to only grill in indirect heat. To me, it seems like Meater is really trying to play it safe, but just keep that in mind.
image: Meater.com
Nevertheless, using the Meater is very easy and does the job. During our tests, we found no issues using the Meater and the temperature readings were accurate. We smoked a pork butt and a brisket and never had issues using this probe or monitoring temperature. Overall, the test went well, and this probe did its job as intended.
This brand has become so popular that Traeger has picked it up and integrated it with their newest pellet grill.
The Meater app is another area where this product shines. The mobile application is intuitive and easy to use. To setup the probe, simply follow the steps in the app, and in a matter of minutes, your Meater will be ready for use.
One thing that is important when setting up your Meater probe is to ensure you choose the right product. The app supports all three Meater models, including the Meater, the Meater Plus, and the Meater Block. The app will ask which smart meat thermometer you want to configure.
One very nice thing about the app is that it has a “Getting Started List,” which takes you step by step through the process of getting your phone ready to connect to Meater and vice versa. This is a very useful feature, and it is something that I think Meater did right.
What we like
Smart, easy to use.
Good support from Meater. Email, phone and a helpful knowledge base page.
Easy to clean.
No wires anywhere.
Long Battery life.
What could be improved
It isn’t waterproof so it cannot be used in certain cooking appliances.
Would be nice to see a blinking led or something showing when the battery is charging
The Meater Block
One cool bundle is the Meater Block. Basically, it is a set with multiple probes, and the charging block has a built-in temperature display. This is great for those who want multiple probes to monitor multiple meats or simply want extra probes.
The “Block” also acts as a WiFi bridge capable of connecting to your home WiFi for world-wide access to your Meater probes information.
Is it worth the Price
In my opinion, the Meater brand has created a small device that is easy to use, the app interface is friendly, and it works well. This is a device that can be very helpful for some, especially those who are starting to grill and cook and want a watchful eye keeping food temperature in check.
Compared to a simple instant-read thermometer, the Meater can be a bit pricey, but it offers a lot of convenience, and the cooking alerts are very helpful.
I think that for some, the price of 99 dollars might seem like a lot to spend on a temperature probe, but you are paying for convenience and technology. The Meater Plus performs as intended, although I feel one must be careful or run the risk of damaging this gadget.
Also, more traditional wireless meat thermometers with a cable attached to the probe can withstand higher temperatures.
The Meater plus vs the Meater
As you have likely noticed, Meater has two probe models. The Meater and the Meater Plus The difference between these two thermometers is their wireless range.
The “original” Meater has a Bluetooth range of 33 feet. This is because it doesn’t use a repeater, and also because things like your grill’s wall reduce range.
The Meater Plus, on the other hand, has a range of 165 feet because it connects to the block, which acts as a repeater, and the block connects to the app on your phone.
Also, the Meater Plus works with Alexa. If you purchase the Meater block, it connects to your home WiFi and uses the cloud to give you access to the probe information and temperatures from anywhere in the world as long as your phone and the block have Internet access.
Why is the Meater smart meat thermometer the new way of cooking?
Meater automates cooking and gives people a lot of information right at their fingertips. These levels of automation can be very helpful and convenient. The old probes with wires are still effective and work well, but as we move more towards a connected world, these newer wireless thermometers are taking the lead.
Also, those metal wires can get in the way, are harder to clean, and make it hard to move food around after you set up the cook.
Conclusion
The Meater Plus is an amazing wireless meat thermometer. I truly enjoyed using this probe and found myself sometimes playing more with the app than checking the grill, but I think that’s the point of this gadget. It gives you a bit of freedom when cooking on your grill or smoker.
I think many will enjoy the Meater Plus and all its features. It is a replacement for a good ol’ instant read thermometer? No, it is not. Is it a replacement for traditional probes with wires, even the Bluetooth ones? Oh yes!
Using an instant read is still the fastest way to walk up to something cooking and check its temperature, but the Meater products are not that far behind and give you much more features and convenience.
Sitting around a fire pit with a nice cup of hot beverage and chatting with friends and loved ones is one of the purest forms of quality time. So how about doing it in great comfort? In this article I talk about fire pit chairs and, through my tests, research, and own experiences, will share with you the best fire pit chairs you can get to sit in front of the fire.
Selecting fire pit chairs
Some of these chairs can cost a pretty penny, so it is important to take a closer look at the quality and materials used to build the chair. I focus heavily on materials and design to measure quality.
To narrow down your choices and find the best, it is important to consider how you will be using the chair. Is this going to be a chair for a patio furniture set? is going to be seen outdoors throughout the year. You also want to consider if the chair is for home use or for outdoor use, such as camping. The answers to these questions will determine the type of chair that might be a good fit for you.
Later in this article, I go into more detail on what to consider when choosing a fire pit chair and also specifically which ones are best for home furniture and which ones are best for outdoor use, such as camping. I cover both.
Polywood is extremely popular in the outdoor , grilling, and camping niches. Their Adirondack chairs have earned a reputation for being extremely durable and comfortable. Polywood took a very smart approach by designing chairs that look as if they are made out of wood but are actually made out ofpolyethylene or HDPE. In simpler words, these fire pit chairs are made out of plastic, but very hard plastic.
What this means for the consumer is that these chairs can be left outside and will not rust or get damaged by water, snow, or UV rays. But here is the cool thing that you may or may not know about this brand and one of the main reasons to consider them. Polywood recycles millions of pounds of plastic containers and manufactures what they call “POLYWOOD LUMBER.” Just as it sounds, these are wood planks made out of plastic. They even look like plastic. They inject color and other stuff for rigidity and usability, but the chairs are plastic.
I have a pair of these chairs and they are unbelievably comfortable; I say unbelievably because they appear hard at first, but something about the angle of the seat and the back support these chairs provide make them extremely comfortable. I picked up my set from a local HomeGoods store where I live here in Florida, and here are two things to keep in mind. They are heavy, very heavy, and although they fold, is not enough to fit in a small car, The fold is flat and good enough to pick up the chair and transport it, but I wouldn’t say these are the chairs you want to take on every trip to the beach, but they are absolutely comfortable to sit around a fire pit.
Although Polywood offers non-foldable models, this specific chair model comes fully assembled and is foldable.
My set is now 6 months old and there is no discoloration or damage. They have been outside during all the hot Florida summer and now the cold weather. I enjoy taking out my pellet grill and doing BBQ outside.
I find the sitting position very comfortable, although the seat of the chair is at an angle and for some it might be hard to get up, but it is a comfortable place to be around the fire pit.
Why our top choice?
First and foremost, the aesthetics of the set are superb and complements modern house decor. This outdoor patio furniture set is ideal for creating the best outdoor design and sitting comfortably around a fire pit.
Foldable: yes
Material: Plastic ( Polyethylene).
Comfort: 5 of 5
Warranty: 5 out of 5
Price: 4 out of 5
What we like:
Amazing quality
Folding Adirondack chair
Low maintenance
“Made in the USA”
Sturdy
Things to consider:
Heavy
Low to the ground
The holding pings can be hard to push in and remove.
The KINGYES chairs are another good option for comfortable seating around a fire pit. These chairs are built much in the same way as our top pick, but the main difference between the KINGSYES chair and the Polywood is price, and the design is slightly different. These are also made out of recycled plastic and share many of the characteristics of the Poly, but they do add a few features that are nice, especially for the lower price.
First you get a cup holder, which I really like because on my Polywoods I put my beer on the hand rest and when it gets slippery, I end up losing a few ounces of beer.
You also get an adjustable back rest, which is helpful for those who might have trouble getting up from the chair.
When folding these chairs, I found removing the securing pin a bit easier and I like that the pin is attached to a small link chain so you don’t lose it. It does mess with the aesthetics a bit, but not a huge deal to me.
These chairs are easy to put together, but they are heavy. Maybe have a friend nearby to help you. During assembly, you might want to have a small drill bit ready as some of the screw holes might be covered with plastic from the factory.
Tyrz Adirondack Chairs are very close to our top pick, Polywood. The main differences are price and these fire pit chairs are not foldable; they need to be assembled. Other than that, Tryz’s approach is very similar to Polywoods. In fact, they use the same base material, polyethylene, as their main building material. Certainly, there are differences in the manufacturing prices, but the main material is the same.
The quality of these chairs is also very good. Besides the plastic parts, all the furniture hardware is 304 stainless steel, making the design of these chairs sturdy and durable.
Here is where I think the price difference comes into play and is fit and finish. The Poly’s feel very strong. I mean, the foldable models wiggle a hair, but that is because there are joins between the pieces to allow them to fold. The Tyrz chairs are thinner and slightly flimsier.
Then there is the finish, compared to our top pick. These chairs do not share the same finish quality as our top pick does. With the Poly’s, the finish almost looks like real wood. With these chairs, you can tell they are plastic.
Expect some manufacturing flaws, such as holes filled with paste where screws go and a lower quality overall. These furniture companies are in the USA and are an affordable option for comfortable seating around a fire pit.
What we like:
Adjustable
Things to consider:
A bit lower quality but still go to sit around a fire pit
No, we are getting more into the portable options in this article and just as I discussed earlier, there is fire pit furniture for home use and then there are options for outdoor seating around a firepit at the campsite. Options like the CGI Rocker chair are great for camping or outdoor activities because they are designed with portability in mind. These are lighter chairs compared to Adirondack chairs, which weigh anywhere from 30 to 40 pounds.
CGI makes all kinds of outdoor furniture, including tables, chairs, and benches. Their gear helps make camping fun and comfortable while cooking a great dinner with their campfire cooking tools.
Some might not want just chairs and be looking for an accent piece to create a cozy fire pit area or just something different. What is very cool about this fire pit bench is that it is first made out of cedar, which gives the fire pit seating area a nice rustic feel; second, these benches are curved, meaning that four pieces can make a full circle around most fire pits. So everyone gets an equal view of the fire.
Unlike with an Adirondack chair, a bench will not give you back support and will not be as comfortable, but it is different.
Assembly of the benches is easy, and it involves attaching the legs with a couple of allen screws. The allen wrench is included.
The Solid Wood Fire pit bench set makes a great alternative to and adirondack chair
This beck is made of acacia wood and has a simple design. It makes a great decorative piece for outdoors or even inside the house.
This bench is solid but there are a few things to consider. First it is made out of wood so it will require some maintenance and even refinishing from time to time. If you live in my home state of Florida expect the summer sun to take a toll on this set. Second, the legs are a bit narrow and if you are planning on using this set outdoors, the legs can sink in wet grass or dirt.
Nevertheless, these benches weigh way less than an adirondack chair and are easier to move around, transport, and store.
I talked about another CGI chair but this model takes portability to the max. The design is very clever; you can completely fold this chair flat and on its side and fit in a small carrying bag. These chairs work very well, are rugged and light. I have a pair of these and my favorite for sitting around a fire pit or taking to food truck night.
These CGI rockers are not as comfortable as an Adirondack, but they are easy to move and don’t weigh much.
This is a good fit for those looking for something light that they can use around the fire pit. These are also good for camping, taking to festivals, and, of course, cooking around a fire or with your portable pellet grill.
Although not the priests these CGI rocker chairs make great fire pit seating chairs.
What to consider when selecting your next chair for seating around the firepit
The first thing to consider is how you will be using fire pit chairs. Is this going to be part of an outdoor area and part of your home decor? Therefore, seating furniture for your patio. Or are these more traveling or camping chairs that will be used around a campfire, at the beach, or wherever you go? So let’s go over the things to consider in more detail.
Foldable and portable chairs
A foldable fire pit chair will be a better option for those wanting a light chair that can be taken camping, to the beach or anywhere in the world where you want to set your fire pit.
Foldable outdoor furniture sets are available and should be considered if you want a set that is easy to store or move around to clean or keep safe, but isn’t necessarily meant to be moved around often.
On the other hand, there are sets that are specifically designed for outdoor fire pit use and are built not only so they can be folded but also light enough to make them easy to transport and throw on the back of a pickup truck or car.
So consider if you need that level of portability on a foldable set, or if a regular affixed set will do.
Comfortable
Fire pit chairs are part of the experience, and as such, they need to be comfortable. Especially if you intend to spend a few hours hanging out with your friends and family. Some chairs have crazy designs and kind of look good with the ambience, but they are far from comfortable. So consider the materials and shape of the chair to make sure it is a comfortable option.
Contrary to what you might believe, the material of the chair alone will not affect how comfortable the chair is. The chair’s material will impact comfort too. For instance, the sit angle alone can make a chair very comfortable.
Warranty
A warranty is essential for any product we buy, but especially for outdoor furniture.These fire pit chairs are not only exposed to the elements but also the heat of the fire. These chairs will be left outside in the cold, rain, and wind, and even dragged and dropped a few times. This is why I recommend looking for chairs with a good warranty in case something goes wrong, a part fails, or you simply need replacement parts. There are cheap chairs that work well, but when it is time to call customer support, well, you get the point.
Pirce
As with everything we buy, price is always a determining factor, but I have to be real here; quality does come at a price, and some of these fire pit chairs are exorbitantly priced. However, set your budget and try to find the best quality chair you can afford. Some brands use high quality materials, which increases their price, while others are just selling you eye candy, like cup holders and phone holders.
I always like to spend on quality as much as possible, then on the features, which I will talk about below, last.
Features
Not necessarily a deal breaker, but if you are trying to decide between two chairs, for example, look at the features of each of them. Some chairs offer things like cup holders, carrying handles, and some even carry bags. If those things are important to you and you think they’ll come in handy around the fire pit, then make it part of your list. If not, these features are often good areas to save on cost.
Weight of Furniture
Weight is important because it can determine everything from shipping costs to whether you’ll be able to move these things around come fall. Let’s say you are looking for a set to leave all year around a beautiful fire pit outback, then weight might not be that much of a factor.
But if you are wanting something that you can move around or transport, then pay close attention to weight. Let’s just say, adirondack seats tend to be heavy!
Easy storage
Some sets are foldable and are easy to put in a garage for storage. Others are big, heavy chairs that are almost impossible to move without help.
Cozy Fire Pit Seating recommendations
I love the outdoors and love cooking on a live fire pit and with charcoal. There are a few things you can do to enhance the experience and make your fire pit area cozier and more enjoyable. First, if you are in a state like Florida, use some sort of mosquito repellent. I cannot tell you how many times our fun gets cut short because mosquitoes are out in full force.
Second, set up the fire pit chairs so that wood smoke is not going towards it. This might be hard given that once wood is smoking and the wind changes, there is very little one can do, but it helps to try.
Lastly, get nice blankets and pillows to decorate, but also get comfortable. Get some nice snacks and a few drinks and enjoy quality time around the fire, smoking marshmallows and .
Conclusion
An adirondack chair adds a classic “rustic” look to any fire pit area. If you are looking at Adirondack chairs and are looking for the best option, consider Polywood. They have definitely done a great job with their brand and are absolutely top quality.
For portable options, CGI offers reliable and quality products. If you are on a budget, then the Tyrz chairs are a good option.
A good knife for cutting meat has to be sharp but also withstand the abuse of cutting raw or hot meat. In this article, I share seven options, including various types of meat-cutting knives.
To find the best knives for cutting meat among the many options, I selected and evaluated 15 knives to determine which were the best for chopping, slicing, carving, and trimming. We tested at how well each knife cuts meat, what it was made of, how well it was made, how comfortable it was to use, and how much it cost.
I also reached out to my local butcher in Winter Garden, Florida, for his opinion on these picks and to compare his testing notes with ours.
We will discuss in this article:
What should you consider.
The various types of metals used in the construction process.
How do these metals compare in terms of their qualities.
The WÜSTHOF brand has stayed true to its roots by manufacturing their knives in-house. I am a longtime customer of WÜSTHOF and I have been using their products for years.
Aside from manufacturing an excellent product, here are the reasons I chose WÜSTHOF and their chef’s knife as our top pick.
WÜSTHOF has been producing knives in Solingen, Germany, for over 200 years. Although much has changed, the company continues to manufacture their products at their hometown factory, whereas other large and well-known manufacturers have succumbed to the pressures of the modern economy and outsourced all manufacturing.
Their products are top-notch and made out of high-quality, high-carbon stainless steel.
Blade Material: High-Carbon Stainless Steel
Length: Six Inches
Weight: 0.4 pound
Type: Chef’s Knife
Warranty: Manufacturer defects are covered by a limited lifetime warranty.
What we like
These blades are of exceptional quality and construction.
The blades are forged, therefore strong.
A hand guard that is wide and thick.
A comfortable handle
easy to keep sharp.
What we don’t like:
A little on the pricey side, but they are of high quality.
The Dexter Russel is our pick for a boning knife. There are many things we like about the Dexter, including the fact that it is made in the United States and has an extremely comfortable handle. The handle provides a secure grip and boosts confidence when slicing, trimming meat and fat from bones, as well as making small and difficult cuts.
The handle is made of materials that help reduce bacteria. The curved blade has a sharp point that is ideal for making precise cuts around bone or boning.
This company also has an amazing background and history, having been in business for over 200 years, manufacturing products in Southbridge, Massachusetts, USA.
Blade Material: Stamped Carbon Steel
Length: 6 in.
Weight: 0.3 lbs.
Type: Boning
Warranty: Limited Lifetime
What we like:
Made in the USA
A 200-year-old company with extensive manufacturing experience.
comfortable handle.
The round point makes it easy to trim ribs.
What we don’t like:
Although the curved point is useful for trimming, it can be difficult to clean. Must exercise caution.
3. DALSTRONG – Best Meat Slicing Steel Carving Knife
After hours of hard work and cooking, the last thing you want to do when carving a turkey, brisket, or pork shoulder is shred the meat and ruin the food with awful cuts. This is why I always like to have a good slicing and carving knife when I’m smoking briskets.
Carving knives are not used as frequently in meat preparation as chef’s knives are, but they are equally important because slicing the meat into a beautiful piece is part of the presentation, and it also affects how well the meat is received.
Dalstrong is a Canadian company that opened manufacturing facilities in the United States and Europe, and whose products are undeniably well-made and durable. It is made out of Damascus Japanese steel with 62 layers of Japanese steel.
It has has a very strong and comfortable handle. I like that it has a full tang with multiple rivets securing the handle.
Blade Material: Japanese Damascus Steel
Length: 12 inches
Weight: 10 ounces
Type: Carving
Warranty: Lifetime
What we like:
Very sharp, beautiful looking.
comfortable handle.
What we don’t like:
is a foot long, so we will need proper space for storage,
Everyone is familiar with the Swiss army knife, and we all know they are high-quality knives. We chose their butcher knife as the best butcher option because it embodies many of the quality traits that this company is known for. Victorinox has been manufacturing knives for centuries, since the late 1800s. What I like the most about it is its handle. It instills confidence when making large, powerful swings, and the knife’s end tip carries enough weight to aid in the chopping of large meat cuts.
Blade Material: High Carbon Stainless Steel
Length: 10 inches.
Weight: 8 ounces
Type: Butcher
Warranty: Lifetime
What we like:
A well-balanced
Easy to chop large cuts of meat.
What we don’t like:
Is a large “chopping” tool, so it is not very useful for other tasks.
In the kitchen, a chef’s knife is quite useful. You can chop, cut, slice, trim, and prepare almost any dish. Because not everyone needs a cutting-edge laser-cut German steel blade, we’d like to include the Mercer Culinary Genesis.
This is a low-cost chef’s knife that is ideal for individuals who rarely prepare food but want a decent option but do not want to pay the high cost of a high-quality of the top blades on this list.
It is is crafted from high-carbon steel. The handle and tag are not as sturdy or of excellent quality as the WÜSTHOF.
Blade Material: Forged High Carbon Stainless Steel
Length: 6 inches.
Weight: 7 ounces
Warranty: Limited Lifetime
What we like:
Great for daily use. It sharpens and hones well, and I’m not concerned about it getting abused with acid foods or too much water.
Great value per dollar.
Comfortable handle
What we don’t like
It can oxide easier than other blades so dishwashing is not recommended.
What should You consider before buying a meat cutting knife
It is important to consider a number of factors that can affect the knife’s capabilities and effectiveness.
A proverb that comes to mind is “jack of all trades, master of none.” Although some are so good and sharp that they can trim, cut, and slice, you need different types of knives for each of these tasks to be done perfectly.
There are slicing knives great for slicing meat and serving, and then there are meat cleavers, which have the weight and razor-sharp edge to chop through meat and bone. The point here is that there are different knives for different purposes.
Blade material / Metal
This is very important. Different metals and metal compositions are used in manufacturing, which impacts the durability and quality of the knife. Some metals are better than others at retaining sharp edges and are more susceptible to chipping and cracking. The majority of manufacturers adhere to and are certified by the NSF for materials and construction processes.
Other metals are resistant to corrosion and oxidation, which is important if you plan to wash your knives in the dishwasher. Have you ever put a cast-iron pan in the dishwasher? My wife has!
Later in this article, I will compare and contrast the various metals to help you select a material that best meets your needs. For the time being, keep in mind that cheap knives are likely to be crafted from lower-quality metals, whereas premium or high-end will be more expensive due to the quality of the metals they employ.
Hardness
When talking about knives, hardness is often confused with toughness. A “hard” knife is not necessarily tough because using too hard of a metal can also make the blade brittle and more susceptible to cracking. This is where the metal composition comes into play, and a fine balance of steel and carbon makes the right edge.
The Size of the Blade
When determining the size of a knife, it is crucial to consider its intended use.
Although this may seem obvious, some individuals fail to recognize that some manufacturers specify the overall length, not just the length of the blade. You should be aware of the length and size of the blade itself, excluding the handle.
Here are some tips when considering blades:
Chef’s Knife: Look for a blade at least 8 inches long, which will work well for cutting meat, but also vegetables and just about anything.
Paring Knife: 3 to 4 inches long is good, and these are great for working with fruits, deveining shrimp, and even preparing fish.
Boning Knife: I like using these for trimming fat caps, ribs, and bones off meat. Look for a blade of about 6 inches so you have enough space between the cut of meat and your hands.
Carving knife: Carving knives are designed to cut and slice around bones, so I prefer a blade that is at least 10 inches long so I have adequate distance between my hands and the meat I’m preparing.
Weight and Balance
The weight and balance are important because you want something that is easy to handle. They don’t have to be heavy to be effective, unless we are talking about a chopping or carving.
I have included the weight of each in this article so you can get a good idea of the blade weight.
The Handle
The knife’s handle is as important as the quality of the blade, and here’s why: you can have the best knife in the world, but if the handle is extremely uncomfortable or slippery, it would be useless for slicing meats or even softer foods like vegetables and cheese.
Knowing that I will be using it for long periods of time, I prioritize comfort when evaluating knives. After I find a handle that I like, I look at the blade material.
There are some really good quality knives that are made entirely from steel, and I like the look, but a steel handle can be slippery and uncomfortable when you’re slicing meat and seasoning, and your hands are full of oil. It can be hard to handle and control.
The quality of the handle also matters. A poorly constructed handle can separate from the tang, rendering it useless.
A handle consists of several parts, including the tang, the scales, and the rivets. Some designs may be a little different, but most handles have these three parts. These components need to be of good quality to ensure a good handle.
Types of handles
Some people like certain types of handles better than others, but here are some of the most common types to help you get to know them.
Real carved wood
Stainless Steel – metal
Plastic composites like polymer handles
Blades Material: The type of metal used in manufacturing
Let’s talk about the blade’s material, which is one of the most important aspects of any blade, but particularly those used for cutting meat. The blade material will determine everything about the knife, including its durability, ability to maintain a sharp edge, and cutting efficiency.
Knives are crafted using a variety of metals and metal alloys. Some are crafted from high-carbon stainless steel, but all of your knives are crafted using different composites to make them stronger, more durable, and sharper.
Understanding the various metals used to make knives is important because it will help you understand which knives made with which metal is truly superior to others. If you do not understand the properties of the metal used in manufacturing, you may be unable to compare different brands and judge their claims of being the best.
So in this section of the article, we will describe the various metals used in knives and their characteristics so that you have the information and understand exactly what makes a knife better than another and which metal is better than another.
Let’s talk about the various metals used in the manufacturing process, how they compare, and which ones are better than others.
High Carbon Stainless Steel
When compared to carbon steel, high-carbon stainless steel has a better balance of carbon and stainless steel. This mix of metals has a good balance of sharpness, strength, and resistance to corrosion. It also keeps a sharp edge longer than most other types of metal blades. This material is often used by high-end brands like Wusthof and Victorinox.
The biggest advantage of high-carbon stainless steel is its ability to retain a sharp edge. It is easy to sharpen and is more resistant to oxidation. On top of that, high-carbon stainless steel knives are absolutely beautiful.
Many high-carbon stainless steel knives must be hand washed to protect the finish and handle, and they must be properly stored. High-carbon stainless steel is possibly the most popular material used in kitchens and offers a good balance of quality and durability.
Carbon steel
Carbon steel is exactly what it sounds like: carbon, or a small percentage of carbon, is added to steel to increase its hardness and rigidity. Carbon steel is well-known for its ability to hold a sharp edge.
Carbon steel, on the other hand, can oxidize due to the carbon component and thus requires little maintenance to remain in good shape and oxidation free, without affecting the razor-like sharpness of a carbon steel edge.
Carbon steel needs to be oiled and can only be washed by hand so it doesn’t rust and give food a metallic taste.
Also, some carbon knives don’t work well for cutting frozen foods, bones, or shells.
Stainless Steel
Stainless steel is an alloy of iron with roughly 15% chromium or nickel and a small amount of carbon. This low amount of carbon is what allows it to be so durable and resistant to corrosion. The issue with stainless steel blades is that they do not hold a sharp edge as well as a good quality high-carbon steel blade. Some stainless steel knives can be sharpened repeatedly, but these blades require little care.
Ceramic
Ceramic is a very hard and lightweight material, and ceramic blades can hold a sharp edge longer than any other material on this list. However, you may ask why not every blade in the world is ceramic. Because ceramic is ceramic, it will break if dropped, crack or shatter.
Ceramic blades are popular because they do not react to chemicals, change colors, or impart metal flavor to food when they come into contact with them. Ceramic knives are ideal for those who want a lightweight and don’t mind putting in a little extra care to keep it from meeting the floor or dropped. The biggest downside to ceramic is that if the edge is damaged or needs sharpening, you will likely need to send it back to the manufacturer to get it re-sharpened.
Damascus steel
Damascus steel is strong and durable, and it’s more of a process of forging and stamping than a material, but it is often referred to as Damascus steel. Damascus steel is not as strong and sharp or as high quality, as today’s modern high-carbon stainless steel. Few manufacturers still follow the same process of stamping and forging 60 plus layers of steel to make Damascus knives.
The Damascus steel you get today is not the same as the stamped or forged knives from ancient times when multiple layers of wootz steel were hammered together to build a knife.
Damascus steel retain the recognizable and signature wavy pattern that is distinct and unique to Damascus steel.
Knives well suited for cutting meats
There are different types of knives that are well-suited for cutting meat. Each has its own purpose in the kitchen and around your grill. Some are better for slicing, while others are good for trimming, and others are good for cutting meat and stripping meat off the bone.
There are different types, but this article focuses on knives for cutting meat. There are knives for everything from slicing bread to slicing vegetables.
The following are great for cutting meat:
Carving Knife
A carving knife has a long, straight-edged, narrow blade that is designed and intended to cut through meat. Its pointed tip aids in carving meat from bones by navigating around them. A carving knife is typically 8 to 12 inches long. A carving knife has either a hollow or Granton edge which is an edge design that reduces friction when cutting raw meat.
Butcher’s Knife
Butcher knives is a precision forged, at least the nice brands, very sharp and hardened carefully to delivery a deep cut.s These knives are sharpened to 16 to 18 degrees. These are large, heavier and with long hand tangs.
Bread Knife
A bread knife is as its name suggests designed to slice a soft bun without shredding it thanks to its serrated edge. A long blade, good balance, and its edge are why this knife often used for cutting meat. The blade length of bread knife aids in the precise slicing of meat.
A Cleaver Knife
A cleaver knife is the hammer of the cutting world. This knife can be use to cut raw meat as it shear weight alone will help cut thorough bone. A cleaver is a knife is used to chop hard cuts quick with a clean cut line, this is different than boning which requires more fitness.
A cleaver can also be use to cut cooked food and you will often see chefs grab a cleaver to cut ribs, chicken and even vegetables.
Utility Knife
A utility knife as its name suggests, is a versatile knife around the kitchen. Similar to a boning knife, a utility knife can be used for precise cutting and complex cuts. It is very similar in shape to a chef knife but it is smaller, lighter and narrower.
At 4 to 7 inches long, this knife can be use to chop, peel and cut foods.
Boning Knife
A boning knife is very useful for making delicate cuts around bone but it is also very useful for things like trimming fat off a briskets or ribs.
The curved pointy edge of a boning knife makes it easy to make small cuts to start trimming fat or a tiny cut to remove ribs membrane. If you go to a butcher shop you will see this knife in action trimming fat caps off steaks.
The Chef’s Knife
A chef Knife, the tool of trade of every chef and a multi purpose knife. This is one of the most popular tools in a kitchen. A chef will use this knife for chopping, cutting, mincing and peeling.
A chef knife has many of the same characteristics as other knives, but not to the same extend. This is why multi-tool knives are so popular but it do not replace the other “knives best for their own specialty.
A Serrated or Bread Knife
These have serrated edges, which help catch on to things like bread, but also work well for slicing certain meats.
BBQ Grill Academy Tips: How to keep your Meat knives in good shape
Storage
Don’t simply toss your knives into a kitchen driver, where their edges will clash and cause damage, as well as damage other kitchen implements. Instead, use a storage block or a magnetic strip.
I prefer the magnetic strip because the point of the blade never hits anything.
Keep it sharp
Invest in a good, high-quality sharpener. Stainless steel edges require frequent sharpening.
Hand wash them
Many manufacturers and brands say that their knives can go in the dishwasher, but the detergent in dishwasher soap can damage some metals and even the handles. To keep your them in tip-top shape, hand wash them.
Use good cutting boards
When you cut on cheap or even glass cutting boards, the knife’s edge hits a very hard surface, dulling the edge. Glass boards, in particular, have very rough edges.
Instead, use a good quality wood cutting board or even marble cutting board.
Testing and Benchmarking
The the items in this article were subjected to the following testing procedures and standards:
Quality
We inspected the quality and build of each blade. We inspected both the metal and the workmanship for flaws.
Materials
We considered each blade’s material composition.
Meat Cutting efficacy
We cut the same piece of meat with each knife to determine the effectiveness of each blade.
Strength and durability
It pains me to admit this, but in true “Forge Under Fire” fashion, we did smash the knives against bone to see if the edges chipped and the knife’s hardness.
Price
We considered the price to ensure that the product’s quality, materials, and aesthetics were commensurate with the cost.
Conclusion
When purchasing a meat knife, it is important to remember that there are different types of knives that are well-suited for cutting meat, and that the quality of the meat will affect how well the knife cuts.
During our research and testing, we found Wusthof to be the best option. Its sharpness, quality, and craftsmanship are superior to most knives in the market.
If you have been around the BBQ community and have been following BBQ trends, you have likely heard of grill mats. Eggs, for instance, cannot be cooked evenly on grill grates, but they can be cooked evenly on grill mats.
Grill mats add great convenience. You can almost transform your grill into a griddle, cook foods such as eggs and vegetables, and even bake cookies.
However, not all grill mats are made from the same materials or share the same construction standards. Some are better than others, so we will discuss the following in this guide:
What is a grill matt?
The best grill mats and our top choice.
Different types of grill mats and build materials
What to look for when buying.
Are they safe?
and much more.
Let’s start with what is a grill mat?
Some of you may already know what grill mats are, but for those who do not, they are versatile, heat-resistant grill liners made from flexible materials. Grilling mats provide a nonstick surface in addition to an even, flat cooking surface.
On a dirty grill, a grilling mat can be used to prevent food from coming into contact with the grates. You can also use these mats to prevent or block flare-ups, but they are most useful for cooking small foods or foods that are liquid or paste-like when uncooked.
You have likely read or heard about Z Grills. This brand is well known for making quality, affordable pellet grills. Their grilling mats are no exception. The Z Grills Mat set is our pick because they can withstand high temperatures of up to 500 degrees and are made of PFOA-free Teflon.
While I like other mats on this list, for daily use I prefer the Z Grills mats because they offer the same performance and quality as other competitors, but they sell them in nice sets of 10 and, for your peace of mind, offer a money back guarantee.
Most grilling mats manufacturers offer the same thing. BBQ mats all offer the same thing, and they all claim to have the best, thickest, best, and so on. The reality is that most mats are the same and made the same. So when I find a brand that gives me a good deal and meets my temperature requirements and manufacturing safety guidelines, I buy it.
Also, these mats are high-heat-resistant and easy to cut to any size.
Material: Teflon
Coating: PTFE
Heat resistant: up to 500 degrees
Pros
Set of ten
The nonstick coating surface is easy to clean.
The mats don’t have or release foul odors while cooking or even when taking them out of the package.
Cons
None that we could find. These mats did their job as stated by the manufacturer.
The MiTBA copper mats are strong, durable, and good for those wanting an alternative to Teflon mats. These mats are durable and can handle temperatures hot enough to get grill marks on your food.
I like using copper mats. I get better grill marks, and I’m not concerned about damaging the mat too much if I’m cutting food with a knife.
Kona copper mats are also good, but the reason I chose MiTBA for this list is that the Kona mat stuck to the grill’s grates and was hard to clean. When comparing pricing, the MiTBA delivers the same performance for way less. Still, the Kona Mat is a good product that can handle high temperatures, leaves grill marks, and is easy to clean.
Material: Copper
Heat resistant: up to 500 degrees.
Pros
Copper mats do not have any chemical coatings.
The mats are easy to cut into whatever shape you need.
can withstand high temperatures without worrying about damaging chemical coatings.
These mats leave grill marks.
Cons
Copper mats don’t clean as easily as Teflon mats, so marks and stains will remain.
The Kona BBQ Grilling Mat is thick and durable, and this product has been around for quite some time. Most of these Teflon mats are the same, and what sets them apart from some others is the price.
Kona mats are coated much like other mats on this list and are PTFE coated. Kona claims their mats can withstand temperatures of up to 600 degrees.
PTFE breaks down at about 572 degrees, so Kona’s claims are questionable. However, Kona does offer a 7-year warranty on this product, and their website clearly says, up to 600 degrees.
Material: Teflon
Coating: PTFE
Heat resistant: up to 600 degrees
Pro
Think mats with nonstick coating help them cook evenly.
600-degree maximum temperature rating
Cons
Although Kona states that their proprietary coating can withstand 600 degrees, I didn’t feel comfortable using the mats at those temperatures, but at least you know they are strong and can withstand a few flare-ups well.
The Aoocan grill mat set includes six strong and durable mats. This set is available in different sizes and is made of copper. The material on these mats works great, and I enjoy using them for making eggs or foods that I want to cook at high temperatures.
Material: Copper
Coating: n/a
Heat resistant: up to 500 degrees.
Pros
A set of six
I got grill marks when using these mats.
Cons
Nothing bad to say; the mats did what they were supposed to.
During my research, I wanted to test a “budget” choice, so I went online and grabbed a set of the GQC grill mats. These mats are the least expensive mats I saw and I wanted to know how good or bad these mats perform on a real lie test.
I was surprised to see how well these mats performed considering how cheap they are. They worked!
The GQC mats come in a large roll, allowing you to cut them exactly to whatever shape you need. The grill mat is reusable, so the roll can last a long time. I like to use these mats when I go on trips and want something disposable. You know, to cover those dirty old public park grills.
Material: Teflon
Coating: PTFE
Heat resistant: up to 500 degrees ( but during my tests I learned they cannot handle that temperature for long )
Pros:
very affordable
large roll
Cons
The mat is one large roll, so you have to make sure you have some scissors to cut them before using them.
Because the mat is initially “rolled,” the cut piece will not remain flat on the grill grate. This is kind of annoying, but not a huge deal.
These mats are another budget option and good for those trips to the beach where you might well dispose of them. This set is inexpensive, and you only get two mats.
Material: Teflon
Coating: PTFE
Heat resistant: up to 500 degrees
Pros
Inexpensive options, great for trips and outdoor use.
Cons
No warranty
Different types of grill mats and build materials
Not all grilling and cooking mats are built the same. Some are safer than others, and some grilling mats can present health risks.
To help you choose a brand that fits your cooking style, we will explain the different types and materials of mats. There are some cheap mats on the Internet that are not necessarily built using the best materials and present health risks, so I will “hammer” this topic to the ground and hopefully help you choose a good grill mat for your cooking needs and budget.
BBQ grill mats are typically made out of materials you likely already have around your kitchen. These materials include silicone, copper, and Teflon.
Teflon is known for being a material that doesn’t stick, but the way it is made has been looked at as recently as 2003. This is because Teflon can be manufactured using two chemicals, one of which can pose higher risks to people if present in high quantities. PTFE (Poly Tetra Fluoro Ethylene) and PFOA (Perfluorooctanoic acid) are two chemicals used in the manufacturing of Teflon.
Teflon is used in frying pans, baking sheets, and all kinds of cookware, including barbecue grill mats. The problem is that before 2002, PFOA was used in the making of Teflon. After the FDA banned the use of PFOA, perfluorooctanoic acid-free PTFE is used instead.
PTFE coating is very common on nonstick cookware and has been in production since the 1940s. However, PFOA, which is also used to make Teflon, PFOA has been marked by the CDC and EPA as toxic and presents health risks. So in short, we want to look for grill mats that “IF” are made out of Teflon because these are traditionally less expensive and are PFOA-free.
Materials
Copper, my preference
Copper mats are my choice for many reasons, but let’s just say, I hate ANY kind of man-made chemicals around, near, or above my food. Copper is non-toxic and FDA-approved. Copper and most metals also do better at absorbing and radiating heat, which helps cook food better.
Copper mats are studier and stronger than other types of BBQ grill mats. Because copper transfers heat effectively, sometimes you even get grill marks while using the mat. Some copper mats are made of thin woven copper strands, so there might be small amounts of grease or fluid transfer.
Silicone
Silicone is another material used to manufacture grill mats. Silicone is used often in mesh mats and works best when cooking at lower temperatures.
Teflon®
Teflon grill mats are the most common type and are all over the Internet. Teflon mats are popular for a few reasons, but mainly because they are affordable, very flexible, and easy to cut into whatever shape you want. Like all other mat types, Teflon mats are washable and reusable but not as durable as copper mats.
These mats are commonly thin fiberglass sheets with a PTFE coating.
Copper vs Teflon mats
Ok, so many wonder what the difference is between copper and Teflon mats, and whether there is a difference between these two types of mats.
Copper mats are made out of just that, actual copper. Fine thin copper strands are woven together and form a large source. There is no coating, chemicals, or sprayed stuff on these mats, just copper.
Copper is a good heat conductor, so these mats get to temperature fast and can deal with high temperatures well. The mats are also more susceptible to accidental cuts from knives or BBQ tools.
Now, here are a few downsides to copper mats. These mats don’t clean as well as Teflon mats. The surface on copper mats is not as “nonstick” as on Teflon mats, so you will have some marks and stains left on these mats. However, if you want something totally chemical-free, consider copper mats.
Teflon mats, on the other hand, are the most common material used on mats because they are easy to cut and clean easier. The PTFE coating makes these mats very smooth and a truly non-stick surface. However, you should know that PTFE starts breaking down above 550 degrees, and Teflon is a chemical. However, if used correctly, Teflon mats are safe.
Are grill mats safe?
Grill mats are safe, but you must follow the manufacturer’s instructions and be sure to opt for brands that do not use PFOA. In the Buyer’s guide below I’ll go over other things to consider.
Grilling and cooking Mats Buyer’s Guide
Here are some guides and things you should consider when buying a grill mat. These are also factors and attributes we used during our research to find these BBQ cooking mats.
Mat Material
This is the most important aspect that you want to consider when choosing a set. Most mats are available in Teflon and copper. There are pros and cons to everything in life, and that includes most grill mats.
For example, copper mats are durable, hard, stiffer, better at transferring heat, and washable. Teflon mats, on the other hand, can be damaged by heat if not used properly, but are reusable, washable, and can be cut into different shapes easily.
The biggest takeaway is to avoid mats made out of PFOA, which most grill mats don’t use anymore. But some mats still use PTFE coating, Teflon.
Mat Size
These mats come in different shapes and sizes. I recommend you measure your grill grates and see what size mat will work best for you. If you only want a small area of your grates covered, then smaller mats will work, but if you want a large mat for a small or portable grill you might end up cutting the grill mat set, and well, that defeats the point.
Circular grill mats are also available for those with round grill grates or kamado grills.
Mat Thickness
Different brands will boast different thickness specs and sometimes just to get your attention, but here is what I have learned from years of experience using these mats. A thicker mat will do better when cooking at high temperatures and will withstand grease fires better. The mat will be able to withstand higher temperatures better and therefore last longer.
The thickness of a BBQ grill mat is directly related to how long it will last, but that doesn’t mean it will cook better.
However, thicker grill mats are not always better. I know I just told you the positive, but hear me out. Some folks are selling cheap mats, claiming they are the best because their mats are thick. Well, let me give a piece of good advice, not only from research but from my years of using this mat. One of the best indicators of the mat’s quality is what temperatures it can withstand.
Good mats can withstand temperatures in the 500-degree Fahrenheit range and remain intact. All these mats are heat resistant, but the best can withstand temperatures high enough to even get grill marks on your food.
What will you use it For
Grill mats are often used as a means of keeping foods from getting stuck to the grill. Sometimes grill mats are great for those camping or beach trips where you might have to use a public grill and the grates are, well, not that clean. Great addition to a camping gear kit.
If you’re looking for something to use on trips to the beach or camping, or if you intend to throw it away after a few uses, go for the less expensive generic brands. If you are planning on cooking at high temperatures, go for a more durable or more expensive copper mat.
Nonstick mats are also great for grilling vegetables, small food items like shrimp, and even eggs. If you want a daily BBQ grill mat, then opt for a heavy-duty mat.
Temperature Capacity
Most grilling mats can handle temperatures ranging between 250 and 500 degrees. Higher temperatures call for thicker or tougher materials.
Consider the temperature resistance of your choice of grill mat. In this article, I included the heat resistance of each brand on the list. This might not be too much of an issue if you need a smoke mat, but on charcoal grills and gas grills, things can get hot.
Q&A
Why use a grill mat?
There are numerous benefits to using grill mats. The two biggest advantages are converting dirty grill grates and flare-ups. They also turn your grill virtually into a griddle, making it easy to grill meals like fish, shrimp, scallops, eggs, and even pancakes.
Conclusion
Some want to keep their grill clean; others want to cook food evenly with no loose vegetables. With that being said, the best grill mat set is the Z Grills mat. It does everything well, cooks well, and comes at a good price.
If you enjoy camping and cooking outdoors, a good campfire cooking kit can make cooking foods and meals outdoors much easier. In this article, I will show you a list of the best campfire cooking kits based on my own years of experience camping, cooking outdoors, and handling a campfire. I also go over what to consider when buying outdoor cooking equipment and give a few tips on how to get the most out of these outdoor cooking kits.
Preparation is essential for enjoying camping to the fullest. Having the right campfire cooking gear packed and ready in your car or RV can make a world of difference when cooking over an open fire. This list is a culmination of my many years of campfire cooking expertise and camping along the Florida coast.
Finding a campfire Cooking Kit
Not every camping trip was perfect. Actually, not every campfire was great either. It took me a few years, trips, mistakes, and trial and error to make these trips perfect and become a good campfire cook. Through the course of many years, I tested and tried over 20 different campfire cooking sets, and this article is the culmination of my years of testing notes and fails. It doesn’t matter how much you prepare; without the right open-fire cooking equipment and a good fire cooking kit, the experience can be rough.
I live in Florida, where camping, outdoor cooking, and hiking are synonymous with our state. Florida has some of the most beautiful state parks and beaches in the US. I have visited many of these state parks and done many camping trips. My favorite spot is Fort DeSoto Camp, located on the west coast of Florida near Tampa and Sarasota.
What a campfire cooking kit should Include to work well
Below you will see my top recommendations for the best campfire cooking kit, and I also included a guide to highlight what you should look for in a good campfire set.
But here are my two cents on what these cooking sets should do well, specially if using nothing more than a campfire as a heat source.
First, they need to be very portable and easy to move around, fold, pack, and throw anywhere in an RV, boat, or car. I’m also looking for double functionality in separate items, and what I mean by that is that I want to see a spoon that doubles as a fork or a carrying bag that can be used as a washing sink.
I also want the cook set to have good handles. When you are cooking outside or on a campfire, you use your bear hands a lot, and if I’m using gloves, I like big handles so I can wrap my entire hand around the handles without issues.
Lastly, the more and stronger the metal, the better. This is why, unlike camp stoves, there is no knob to adjust the flame when cooking over a campfire, and flare-ups do occur. When cooking out in nature, you have to react quickly, but sometimes if the fire gets out of hand, well, you have to let the cookware in the pit.
I have seen plastic handles melt, clips break, and pots warp. So keep this in mind. I will go more in detail on other factors you should consider, such as price, later in this article.
This campfire cooking set is well built, one of the most complete campfire cooking kits on the market, and reasonably priced.
Capacity: 4 people
Number of pieces: 21
What’s included:
3.5 liter stainless cooking pot with a vented lid
A stainless frying pan
4 – 22 oz. bowls
A cutting board
A Spatula
Four 6-inch plates
A serving spoon
Sporks
Bowls dish rack
A sponge securing cord to stack the set.
This Stanley campfire cooking kit for 4 has almost everything you need from your kitchen but camping. On many of my camping trips, I always forget two things that are included in this kit: a serving spoon and sporks. This set is designed with usefulness in mind. For example, instead of packing both forks and spoons, you get sporks!
I also like that it is designed to be stacked and stored neatly and securely using the bungee cord. This set comes complete with plates, bowls, and even a dish rack to keep the dishes dry after a quick wash.
Pros
Super useful cook set—the strong instructions are engraved on the pot’s lid, so you don’t have to remember how to put 21 pieces in a 3.5-liter pot.
All the parts and pieces fit inside the pot. It’s very easy to store and carry.
I like that the utensils have hook holes to hang them.
The cutting board is small enough to use on a rock or block.
Cons
The sporks might be too big for little ones.
During one of my trips, I lost the spatula handle. Both the serving spoon and the spatula have handles that can be taken off (by clicking on them), so they are easy to store. I contacted Stanley, and they sent me a new one, but the moral of the story is to keep an eye on those handles.
GSI Outdoors has been making campfire equipment since 1985. They know how to make good and reliable campfire tools and cooking gear. The GSI camping cook set does not include sporks and spoons as the Stanley does, but this brand makes these campfire cooking kits sort of modular. That is, you can start with the most basic camping cookware and add more pieces as you go.
This set is more for those who like to make soups and stews, and I prefer their pots over other brands because of the handles. It is easy to grab the foldable handle, grab a pot, and dump hot water through the lid’s holes.
Capacity: 2 to 4 people
Number of pieces: 8
What’s included:
One five-liter pot
A 3-liter pot
A nine-inch frying pan
Two lids
A cutting board
A folding pot handle
A carrying bag.
Pros:
Modular campfire cooking kit. You can get more pots and cookware and use the same handles.
The carrying bag doubles as a sink for washing dishes.
Cons:
It is a smaller set without utensils, but you can get those separately.
I love using cast iron tools and cookware, and this kit is built like a rock. This seven-piece campfire cooking bundle isn’t pretty, shiny, or fancy, but it can be a good fit if you want to throw some iron on direct fire and worry about damage.
Cast iron is durable and although it takes longer to heat up and arguably needs a more power fire to heath up the thicker metal, once is hot is hot and can get hot enough to fry and bake foods without getting damaged.
What I like about this set, besides it being made of strong cast iron, is that I can and often do use these pots in my home kitchen. The frying pan and the skillet are heavily used on my house stove. I can also use it with my home oven or, on clear, cool Florida days, prepare food outside.
Pros
Durable cast iron, can be used on direct flame, stove or oven.
The flat top works good as a grill.
I love the fact that a lid lifter is included, it helps with moving hot stuff around.
Pots and pans to cook a wide variety of meals.
Cons
This level of strength and quality do come at a cost.
The MEETSUN Camping cooking kit is a large set and our budget pick. It comes complete with 37 pieces, including large pans, camping kettles, knives, forks, and spoons, all fit in a carry-on bag. This set is good for up to six people, and it’s great for larger gatherings and cooking for larger groups.
It isn’t necessarily the most durable or strongest option, but if you are on a budget and want lots of pieces, this budget set can be a good option.
The KingCamp is available in 17- and 25-piece bundles. It works great with a campfire, a tripod, a stove, or even a bonfire. The set is lightweight and easy to stack and carry in its bags. This pots will also work great on a stove or oven.
Capacity: 3 people
Number of pieces: 17 or 25
What’s included (25 piece bundle):
One half-liter stainless steel pot
One 1 liter stainless steel pot
One half-liter stainless steel frying pan.
There plates
Three sets of tableware (3 knives, 3 spoons, and 3 forks)
Three bowls
One carry bag
Pros
Lightweight
It’s a pretty complete set since you get plates and utensils.
Everything is stainless steel.
Can be use on stove or oven.
Cons
When the big pots are full of water and heavy, the handles don’t instill a lot of confidence.
The GSI Outdoors Glacier set is a great choice for couples or individuals who want an outdoor cooking set that is small and lightweight with just the basics. Nothing fancy to see here, just the basics. You get a cooking pot, bowls, and folding sporks.
Yet, this is enough gear to cook over a live fire or grate. Outdoor cooking is a lot of fun and lets you get creative, but some people don’t need 40 pieces of camping cooking gear to get the job done, and they are easy to fit in a backpack.
Capacity: 2 people
Number of pieces: 7
What’s included:
One 1.8 liter stainless pot
A strainer lid
Two 20-onces mugs
Two 20-ounces bowls
Two Sip-It Tops
Two folding sporks
1 welded sink
Pros
Small and lightweight
Easy to carry around in a storage bag or backpack.
Cons
There are not a lot of cooking utensils, but the point of this product is simplicity and portability.
What to consider when looking for campfire cooking kit equipment
What items and pieces are included in the kit
Intended Use
Storing
Quality
What Items and pieces are included in the kit for cooking full meals
The best campfire cooking kits include everything from tableware to serving plates. Be sure that the kit you choose has all the items you need, some “lower-end” kits will not include utensils and accessories like a carrying bag. I included in this article everything that is included in each kit, making it easy for you to make your selection and choose the best campfire cooking setup to suit your needs.
Intended Use
OK people, I know that we all want to use camping flashlights as shovels, but don’t expect a cheap set of cast iron pans to work well over an open fire. Some of these campfire cooking kitsspecify if they can be used over an open fire or not. Stainless steel cooking pots and pans do well over an open fire, but those thin composite pots do not.
A strong fire can damage even cast iron cookware, so it’s important that we not only use these tools as intended but also manage fire pits well to get the most out of our gear.
Storing
Most open-fire cooking equipment is easy to store. The kits I have included in this list are built so you can easily stack them up and store them until it’s time to cook. Look for a cooking kit that can be stacked up and stored; it’ll make things easier. You don’t want to give these tools a chance to corrode, and you also don’t want to leave them out on public sites.
Quality
The quality of the product is important, and material quality is the name of the game. When looking for a good set, pay attention to the material used to build the pots, handles, and tableware. Stainless steel kits will last a long time and work well over an open flame.
Cast iron does well, but it does need to be kept “seasoned” or oiled or it will rust. I have a cast-iron pan that has been with me for years. I use it over an open flame to sear steaks. Cast iron cookware is durable but can be heavy. Again, if you take the time to take care of cast iron pans and cast iron cookware, they will last.
Also, pay attention to the specs of some of these kits. There is some camping equipment that cannot be used with direct fire. I like to cook using cast iron cookware, but one big downside is that it is heavier. The best campfire cooking kits will handle more heat than less expensive options.
recommended Accessories in a campfire cooking kit and bundles
We can all agree that campfires are a fun part of our outdoor trips. It’s one of the most memorable aspects of camping. These are my humble suggestions on what essential items your next camping cooking set should include. Take into consideration the meals you like to cook and ensure you consider having the cookware listed below.
Frying Pan
While some foods can be thrown on a hot grate over hot coals or a campfire pot, other foods cannot. A frying pan can be used for toasting bread, cooking meats, and making side dishes.
I use my frying pan to cook eggs, pancakes, and, of course, bacon. A frying pan is very useful and enables you to cook a wider range of dishes and recipes.
Cooking pot
I have used cooking pots for boiling water, cooking vegetables, and preparing big stews. Cooking pots are versatile and can even double as sink to clean dirty dishes.
A cooking pot is a handy cooking tool. I have my share of issues at the campsite and have been able to heat water using a pot for quick showers. Yes, I’ve been there.
If you like to cook lots of soups and stews large cookware is always nice to have.
Accessories and utensils
Kits that include serving spoons, spatulas, and cutting boards are always praised and favored. Utensils like forks are very useful. Cooking tools such as tongs and cooking boards are also nice to have. I also like to bring a set of sticks for making skewers to make camping dinners more diverse.
Consider the utensils material, many brands use plastic composites to manufacture utensils and those can get damaged or melt if left near a very hot campfire.
Cutlery, plates, and bowls
Plates and bowls are very useful and, well, you need to put your food somewhere. Surely, you can purchase plates and bowls separately, but when they are included, it is quite nice. In some kits, when the bowls and plates are included, they fit inside the bigger pots for easy storage.
The Storage and Carrying Bag
Most camping cookware is made so that it can be stacked neatly and put in a bag. This is a huge convenience, and I recommend getting a set with a storage bag. I like to keep my tools nicely put away and protected until it’s time to cook.
TIP: Other Must-have items, accessories and Gear for the Camp, RV and more
The camping kits on this list comprise fantastic items to help you enjoy the great outdoors on your next camping trip. The following is a list of items that I always bring on trips and have learned to always bring after years of traveling. Some of these bundles have enough utensils and equipment for any camping style, but the items below take it a level higher.
A portable camp stove
These portable stoves can be used for so many things, including cooking, of course. I always pack one, even if I end up not needing it. Some people prefer to build a campfire grill using rocks and a grill grate, but these stoves make things easier, and faster.
A Dutch Oven
A Dutch oven is one of the most versatile tools you can have in a campfire cooking set and should be part of your camping setup. You can make rice, fry, cook stews, and even use it to warm up food. As their name implies, these things can be as useful as a large oven and can be used on direct fire.
Firestarters
It is much simpler to use a firestarter, lighter, or even fire-starting blocks, particularly if the wood and timber around you are wet.
A fire starter kit:
Fire matches
Propane torch
Electric fire lighters
cooking lights
Not only are cooking lighting accessories useful for cooking safely at night, but they can also be used around the campsite. These lights are more durable than household LED lights and small flashlights.
A pair of cooking lights is sufficient to illuminate your cooking area and allow you to see what you’re doing.
A pizza or baking stone
You’ll be surprised at the amount of food and dishes you can prepare on a good pizza stone. Stones absorb a lot of heat and transfer it well, making them a good hot surface to cook on. It’s like taking a pizza oven with you, but easier to carry to a camp.
Cooking Gloves
You will be moving pots around, handling tools, and dealing with fire. It is a good idea to add a good pair of cooking gloves to your cooking equipment list and pack more than a pair on your next camping trip.
Also cast iron tools, skillets and griddle tops can get extremely hot and is a good idea to have a good pair of gloves to protect your hands.
A good Grate
I’m a bit old-school, and I just use an old cast iron grate, but campfire cooking grates are easier to set up with a campfire grill as they have folding legs or a stand to secure them. Most have foldable legs and do not need blocks or rocks to support them off the ground. These grates help support multiple cooking pots, deep dish plates, and even a coffee pot, making them very handy in a campfire cook set.
Aluminum pans
Aluminum pans are great for meal prepping and even serving food, but what makes them useful is their versatility and ease of cleaning.
Cleaning rags
I go to places like Ikea and online and get 79-cent rags or packs of cheap racks and throw them in a bag. Cleaning rags are a best friend around the campsite, and one can never have enough.
Biodegradable Dish Soap
You will need dish soap regardless, but the soap should be biodegradable. We all want to keep enjoying the outdoors, and we all want to keep the environment safe. Using biodegradable or environmentally friendly soap is a great way to protect the environment.
Bugs Spray
I live in Florida, and let me tell you, mosquitoes are a pain here. When I go on a camping trip, I pack some mosquito repellent spray and a few mosquito repellent candles. The campfire helps, but one can never be too prepared. I would recommend packing a good survival kit with bug spray.
Small Water Containers
Sometimes I get lucky and my camping site is near a potable water source. I like to bring water containers with me and fill them up with water if I am far from a water source.
Cooking mats
The good thing about a grate cooking mat is that you can grab any old grate and turn it into a clean cooking surface.
Campfire Cooking over fire and Fire pits
Live Fire cooking is one of the greatest experience you can share with your friends and family. The skills involved and the opportunities for flavors is amazing plus I enjoy the chats around the campfire.
I really enjoy the rustic nature of campfire and it amazes me how something as simple as a fire pit can be turned into a a full kitchen. Take for example a dutch oven, it can be used to make rice, soups, and even fry chicken, all with just fire.
The meals tend to get a hint of smoke flavor which is a plus in my book.
There are few campfire tips I want to share with you before we wrap up this article. First, starting a campfire, make sure it is allowed in your area. States like Florida might ban fires during severe draught conditions [ 1 ]. Many states have Fire Danger Maps or Fire Danger Index ( FDI ) to indicate current conditions.
Second, keep the campfire at least 25 feet from structures, flammable items or anything that can easily catch fire or be damaged by heat [ 2 ].
Lastly, have a fire extinguisher near the campfire just in case, and I also like to have a shovel to cover any hot wood. I encourage you to review a complete list of campfire tips from the National Fire Protection Association, which I have included for your convenience. I strongly recommend you always bring a first aid kit or survival kit since you are outdoors and also working with live fire.
One Last Word
When looking for open-fire cooking set, consider who you intend to use the cooking kit for. Some of you want a kit with as many pieces as possible, while others only want the essentials.
As far as the best campfire cooking kit, we pick the Stanley Base Camp cooking kit as it is of good quality and has all the cookware you need to cook a good meal on your next camping adventure. If you want a durable and strong product, then the Bruntmore set is a great choice.
Picking up a BBQ cookbook to learn how to smoke meat is one of the best decisions a BBQ enthusiast can make. There are thousands of videos and articles available, but these smoker cookbooks are incredible sources of years of expertise and award-winning recipes from renowned and highly regarded pitmasters.
BBQ is very subjective. What you like, others might not. Competitions are judged by different people with different tastes, and there are hundreds of different styles, techniques, and flavor profiles. My point is, to find recipes you enjoy, and to do so, in this article we included books from various award-winning pitmasters, all with different styles. We will talk about what you should consider before picking up one of these cookbooks.
Here are the best meat smoking cookbooks
1. Franklin Barbecue: A Meat Smoking Manifesto (New York Times Bestseller)
Aaron Franklin is the owner of Franklin’s Barbecue, a barbecue restaurant in Austin, Texas, and an extremely popular barbecue destination in America. Aaron is one of my favorite people in the BBQ world. The guy is an expert and among the best at what he does, but more than that, I like his personality. Aaron comes across as the happy friend we all have around us.
One thing that made me appreciate Aaron’s style more is his obsession with details and his attitude towards the fact that there isn’t just one way to BBQ. There is just “good BBQ”, but that does not imply that one style, flavor, or preparation method is superior to others. He does things his way and achieves success. His restaurant is one of the most well-known in the United States, attracting celebrities and even presidents.
His book, The Meat Smoking Manifesto, goes deep into Aaron’s beginnings and how he started. The book covers wood selection, types of cookers, and goes into meat selection and cooking. The book does not go deep into BBQ recipes, but it does into techniques.
Aaron is a hardcore “stick burner” offset smoker mad man, so if you want to learn the roots and master one of the most authentic methods of smoking meat, I highly recommend you learn a thing or two from Aaron.
2. Meathead: The Science of Great Barbecue and Grilling
Perhaps one of the most popular names in BBQ and grilling, Meathead is known for its deep dives into the science behind good BBQ. First, this book addresses two very different topics: BBQ and grilling.
For most, BBQ is authentic low and slow ribs, pork, brisket, and grilling is cooking high and fast, well faster. The two methods are covered and explained in this book, which makes it a more complete source of information for most.
Meathead covers nearly every aspect of barbecue, including smoking and grilling, in an innovative, scientifically driven approach to thwart popular myths. This book is very detailed and well researched using the mind of physicist and food scientist professor Greg Blonder, Ph.D., of Boston University. Yes, that’s how detailed this book is.
This BBQ cookbook was written by Meathead Goldwyn, founder of AmazingRibs.com. Meathead aims to make cooking easier and teach simple methods. This is a great book for anyone who wants to learn real methods and dispel many BBQ myths.
I highly recommend this book if you are looking for a comprehensive guide to the fundamentals as well as advanced techniques.
This book includes 100 innovative recipes. So, if you are a BBQ lover looking to learn techniques but also a few mouth-watering recipes, this could be a great BBQ cookbook.
Steven Raichlen breaks from the norm in Project Smoke and brings you an ounce of unique and smoking-based recipes that are supported by his extensive experience and expertise.
From the classic brisket to the fresh seafood, and even desserts, Project Smoke offers something for everybody. Starting from the basics, such as different kinds of wood, to cooking equipment and several recipes, all can be found in this book.
Steven breaks down the barbecue techniques into easy-to-use steps to help you go from beginner to tried and true. This BBQ cookbook is great for those looking for something different and wanting to break out of the same, pork, brisket, and rib recipes.
If brisket is your thing and you want to learn numerous techniques, recipes, and methods to cook brisket, the Brisket Chronicles is a great book. When I was reading this book I was pretty impressed by the author’s techniques and the number of creative recipes included in this book.
This book covers so many different ways to cook brisket. Smoked meat is great, but some might appreciate other methods of cooking briskets.
I recommend this book to beef lovers wanting to learn different ways of smoking brisket using different equipment including electric smokers or who want to learn a new cooking style.
This smoking cookbook, Pitmaster, gives you not only good techniques but also contains tips from 10 respected chefs and restaurateurs. The Pitmaster book teaches you the basics of using common grills and smokers and then continues your journey into more advanced recipes and techniques.
What makes this a good cookbook for those with smokers is that it dives into different regional barbecue styles, including Texas-style, Memphis, and the Carolinas.
While reading this book I enjoyed the different perspectives of different chefs who participated in this book bring. I like that different styles don’t necessarily mean better, but just different. However, different can certainly bring better results.
Smokin’ with Myron Mixon is a great smoking cookbook. Myron has righteously earned his spot among the top pitmasters in the US. Before writing this book, Myron Mixon won three world championships and won over 180 Grand Championships.
What I like most about this book is that Myron starts right off the bat by dismissing common myths in the BBQ scene.
You hear a lot of people tell you that you need a charcoal smoker or an expensive smoker, the list goes on. In his book, Myron starts the first few pages by answering questions like, “Can I smoke food on a gas grill, or do I need an expensive cooker?” By the way, he answers “yes” to the first question and “no” to the second!
This book goes over smoking woods, picking the right wood, sauces and rubs recipes, and plenty of techniques.
Things to consider before choosing BBQ Smoking Cookbooks
Everybody should grab at least one of these books. These books are all great and contain decades of BBQ hall experience, recipes, and amazing techniques. However, if you only want to grab one book or are looking for something specific here is how to narrow down your search.
Decide what you want to learn
If you want to learn authentic, backwood, raw BBQ, then the Meat Smoking Manifesto fits that style. If you want more techniques and theory, The MeatHead leads in that category. My point is that each one of these books brings its own angles, techniques, and styles.
Author Credentials
There are many barbecue books, many. I have come across books from drama novel writers! ( slap me ) The books on this list are from actual pitmasters with vast experience in BBQ and the restaurant industry.
The authors of these books are qualified to teach the smoking process and offer easy to follow recipes to help you improve your smoking game. Barbecue books are all different and all authors have their own way to cook the best BBQ, so a good way to separate mediocre authors from award-winning pitmasters is to look at their credentials.
Some books are written by BBQ enthusiasts and others are written by completion-winning pitmasters. Again, BBQ and food is very subjective, what you might like others might not but if you want to learn real barbecue and want good, practical advice plus proven cooking techniques with actual recipes, I suggest learning from real pitmasters.
Your cooking equipment
Before you buy a cookbook, consider the type of equipment you have and the equipment being used and referenced by the author of the book. Most cookbooks use a variety of cooker types, but if you own, for example, a George Forman, the instructions in these books might be hard to follow.
OK, that was sarcasm, but the point here is that smoking meat opened the door to many methods, techniques, and creativity. There are hundreds of different ways to achieve great smoked meat, and yes, that includes using an electric smoker, a wood pellet smoker, or an offset smoker.
Some books will focus on a specific type of cooker, like a wood pellet smoker, and other textbooks are a complete grilling guide.
It is important to at least have an idea of the type of cooker used by the author because the process may vary a bit depending on the type of smoker.
A variety of recipes
BBQ cookbooks, like most recipe books, have dozens of recipe ideas. A smoking cookbook can focus solely on a particular meat or only offer a handful of recipes.
I enjoy books with a variety of recipes, I like to learn and add a few recipes to my smoking meats bag of tricks.
Some cookbooks will show you 10 different ways to make pulled pork, while others will stick to traditional ways.
Also, some books are just a grilling cookbook full of simple made-up recipes, and others are full of real hardcore authentic smoked meats, the best of the barbecue world’s greatest classic dishes.
Cooking Styles and Regional Flavors
This is something to consider, but in my opinion, you should try to learn as much as possible and from as many different experts as possible. That’s how you learn different styles. However, it is important to point out that some BBQ cookbooks will focus on different cooking styles and flavors.
For example, Aaron Franklin likes to barbecue a meat cut as simple as possible, and since he is from Texas people, yes, salt and pepper for this guy all day long. But then you have Smokin with Myron Mixon, where you see more southern, Georgia flavors. I recommend learning from both because you win by learning more and broadening your knowledge.
A professional chef will lean more towards detailed recipes and how to cook delicious food, whereas a pitmaster will teach how advanced smoker techniques, how to smoke various meats, and how to light and manage the perfect fire.
Conclusion
Finding a great BBQ meat smoking cookbook is something I did years ago to learn not only about smoking meat but also to meet the best BBQ masters out there. Just like BBQ rubs, I recommend you try a few of these books and learn from various people from around the barbecue world.
If you want to get acquainted with the best, I recommend you pick up a grill cookbook from Aaron Franklin and MeatHead. Those two are real BBQ people, and their knowledge, thankfully, has been preserved in books. Myron also has a lot of expertise and great material.
Lastly, if you want a book that can teach you all kinds of crazy recipes like smoked duck and teach you more than how to cook ribs, then Project Smoker is a great barbecue cookbook to read.
You love making meat sandwiches out of that leftover brisket or like to buy food in bulk and slice it yourself, but you don’t want to spend all day slicing and dicing it. That’s when a meat and food slicer is a good tool to have around the house.
With a meat electric slicer in your kitchen, you can prepare food for parties or get creative with your meals but what I like doing the most, slicing smoked meat.
Meat slicers vary in their slicing capabilities, quality, and power. So in this article, we will show you five great options, tell you why and how we chose these food slicers, and teach you what to look for in a good one.
Three Meat Slicer Categories
Not all meat slicers are built the same, nor are all designed for the same workloads. Even a good meat slicer will succumb to use that is not rated for.
Meats slicers are categorized into three duty levels.
Light duty meat slicer
A light-duty slider or sometimes referred to as a deli food slicer is meant for slicing deli meats, cheese, and vegetables. The slicing time is rated and expected to be about one hour.
Most of your home slicers will fall within this category, as would most of the cheapo slicers you find on Amazon. However, many purchasers frequently buy primarily on price rather than usage type and wind up with a damaged slicer after only a few hours of use.
Any slicer with a wattage output of 300 watts and below is considered a light-duty slicer.
Standard Duty meat slicer
A standard-duty slicer can handle everything a light-duty does including deli meat but it can also deal better with tough meats. These slicers will have a higher wattage output than the light-duty models, typically between 300 and 500 watts.
The duty cycle on these types of slicers is between one and four hours. If you think you’ll be using your meat slicer for more than an hour at a time, then this would be the type of slicer you’d want to purchase.
Heavy Duty meat slicer
A commercial slicer is intended for usage in a grocery shop, meat market, or restaurant. Consider a heavy-duty slicer if you want to use your slicer for more than a few hours at a time for continuous slicing or if you want to slice frozen meat, cut raw meat, or frozen items.
For most people, a heavy-duty slicer for home use can be overkill but if your budget allows it and you want to slice frozen foods, cut frozen meat and not have to wait for the machine to cool down or break it, well this might be the level you need to look into.
The wattage output on these types of electric slicers is between 500 and 1,000 watts. The duty cycle on a heavy-duty slicer is eight hours or more.
Things you need to consider When Buying a meat Slicer
Let’s get something out of the way. If you are looking for a premium electric meat slicer, don’t think for a second that a cheap Amazon meat slicer is going to last years. There are hundreds of options and models, and all look the same and have similar specifications.
Well here are three things you need to focus on to find a good slicer you can use at home.
The Meat Slicer electric motor – Power Rating
The electric motor in a food slicer has the tough job of turning the blade. Most brands list the wattage of the motor in their product descriptions. As a general rule, the greater the wattage or horsepower, the more powerful the motor, and the more capable it is of cutting larger and tougher cuts of meat while also lasting longer due to the ability to cut with less stress on the motor and gear.
A strong and durable motor will be able to handle tougher cuts of meat without bogging down or overloading. So when you’re looking at these appliances, make output and/or horsepower a priority when making your decision.
So, if you want to use the slicer for fruits, vegetables, or cheese, smaller meats like sausages, or light-duty applications, a lower wattage slicer is suitable.
A lower wattage slicer will be less expensive, but if you intend on cutting frozen meats or difficult cuts, a low wattage machine is more affordable, but do not expect it to endure the test of time.
Did you know that one electric horsepower is exactly 746 watts? Well, now you know! [1]
Material and Size of the meat slicer Blade
The blade is the workhorse of the meat slicer and does the cutting. Most food slicers come with a stainless steel blade that can range from 6 or 10 or more inches in diameter. Some models have larger 10-inch blades, but these are mostly commercial.
The blade is affixed to the gears run by the electric motor and is held in place by a series of screws or other lockable systems like plastic locks.
Blades come in two varieties: a serrated-edge blade and a smooth blade. A serrated blade is excellent for cutting because the teeth grasp the meat better and cut through fat and muscle more effortlessly. Smooth blades are preferable for slicing cheese and other softer foods. A smooth blade is also used when needing very thin slices.
The size of the blade is something you want to look at because it will determine the maximum size of meat that can be cut. A slicer with a large blade can handle big chunks of meat, while a smaller slicer is better for smaller pieces.
Here are some important points to remember about blades:
Blades made out of 304 stainless steel will be better than a carbon steel blade. 304 stainless will combat rust and corrosion better especially if coated with materials like Teflon.
The meat carriage
The meat slicer carriage is the platform that the meat rests on while being sliced. The meat slicer carriage moves back and forth on rails, wheels, or ball bearings and is attached to the blade frame.
The carriage should be large enough to accommodate the size of meat that you want to slice. A larger meat carriage can accommodate a roast or large ham, while a smaller carriage is better for slicing smaller pieces of meat or fruits, cheese, and vegetables.
Some slicers have an adjustable meat carriage that may be adjusted up and down to suit various meat sizes. When you’re looking at meat slicers, pay attention to the size of the meat carriage because it will determine the maximum size of meat that can be cut.
Adjustment of meat cutting and Slicing thickness
Lastly, you want to be able to adjust the meat cutting thickness on your slicer. Most meat slicers have a knob or lever that adjusts the blade to change the thickness of the meat slices. Some have a fixed blade that does not adjust, while others may have an adjustable blade that can be moved up and down to change the thickness.
The adjustability of the cutting thickness will not impact the quality of the appliance but you want to make sure it can cut at the thickness you want.
Other Electric Meat Slicer Features worth considering
Belt or Gear Drives
An electric food slicer has some sort of drive turning the blade and there are two types of drivetrain, belt-driven, and gear-driven drives. A meat slicer with a belt drive is quieter than one with a gear drive. However, a gear-driven lasts longer and applies more torque to the blade.
Now, there is a catch, although gear-driven meat slicing machines can be more durable, we are talking about commercial-grade, heavy-duty, couple of thousand dollar food slicers. Most slicers you see online, especially the cheap ones are not built like commercial slicers, so the gears on those bargain slicers will not last long if you overwhelm the slicer.
One of the biggest problems with cheap gear-driven slicers is that the main drive screw turns a plastic gear. This means that if you put a lot of force on that plastic gear, that metal screw will eat the gear’s teeth and there goes your slice.
Repairing a gear-driven slicer is harder and more expensive than repairing a belt-driven one. For this reason, we recommend belt-driven slicers for home use unless you are spending the money on a high-quality gear-driven one. Replacing a belt is cheaper and easier.
Blade Sharpener – A built-in blade sharpener is a nice feature to have because it will keep the blade sharp and slicing meat efficiently.
Safety features – A safety guard is a good feature to have because it will keep your fingers safe while you’re slicing meat. Some have a child safety lock that will prevent the meat slicer from being turned on if there is no key in the lock.
So by what measures do we rate these meat slicers?
We use and evaluate three complements of each appliance to put them on our list. First, we look at the electric more, second the blade, and lastly the meat carrier and pusher. We also take into consideration safety and other features that can help you use and enjoy the product.
Our top picks and meat slicer reviews for use at home
We chose the KWS MS10-NT as our top pick because, for home use, this electric meat slicer offers a powerful 320-watt motor and a 304 stainless steel blade. These are both characteristics of a good slicer and a standard-duty machine.
The KWS MS-10NT is a great option for those who are looking for a quality, borderline commercial-grade.
This model has a number of features that make it stand out from other brands and are found in commercial appliances, including a large 10 Teflon-coated 304 stainless steel blade, a robust pusher with a safety guard, and a built-in blade sharpener.
This meat slicer is also ETL and NSF certified, meaning that it has been safety tested and approved by two independent organizations. The ETL certification is particularly important as it means that the device has been tested to meet US safety standards, and the NSF is a well-respected food safety certification.
The KWS also has a number of features that make it user-friendly, including a blade cover and an adjustable slicing thickness lever that can be moved up and down to change the thickness. The adjustability of the cutting thickness will not impact the quality of the appliance, but you will want to take it into consideration.
This electric slicer is great for those who want fast and efficient slicing, a sharp blade for cutting raw meat or cooked meat.
Category: Standard duty
Motor: 320 Watts
Blade: Teflon coated 304 stainless steel
Drive: Belt drive
Key Features: Comercial standard duty, 304 stainless steel sharp blade.
Pros
A powerful motor means it can be used for longer periods and handle tough cuts of meat. including semi-frozen meat.
A 10-inch Teflon-coated 304 stainless steel blade can handle larger cuts of meat.
The built-in blade sharpener.
Standard benefits:
ETL and NSF certification are traits of commercial quality.
Although the Anescra has a smaller blade than the KMS and a less powerful motor, it still offers features great for the average homeowner, including a 304 stainless steel blade, a large food carrier, two blades, and an easy locking mechanism to remove the blades.
The Anescra meat slicer is an affordable product but includes great features. It has a 200-watt electric motor and a 7.5 inch 304 stainless steel blade. The meat carriage is also made from stainless steel, and the frame is cast aluminum. It’s easy to change the blade with the blade locking system, and it comes with suction rubber feet to keep it in place.
The meat carrier on this unit is large, and the food pusher grabs the meat well.
Category: Light to standard duty
Motor: 200 Watts
Blade: 304 stainless steel
Drive: Gear drive
Key Features: Light duty, TWO 304 stainless steel sharp blade.
Pros:
200 watts motor powerful enough for light-duty, soft meat slicing, deli food, cheese, and veggies.
Two 7.5 inches blades 304 stainless steel blades, one smooth and one serrated ( so you get a blade for razor-thin slices and small things like cheese and veggies and one for meats )
Easy to change the blade with a locking mechanism ( not screws ).
Suction cup feet to keep it in place.
The Stainless steel food carrier is easy to clean.
String cast aluminum frame.
Cons:
The suction cup feet are great but will not work on certain surfaces, like on a porous top plastic table.
BESWOOD electric slicers have a 10-inch chromium-plated carbon steel blade to protect the meat from rust and other damage, an electric motor with 240 watts of power.
BESWOOD slicers are good for home and light duty. They’re also easy to operate and clean.
Category: Light duty
Motor: 240 Watts
Blade: Chrome plated carbon stainless steel
Drive: Gear drive
Key Features: large machine
Pros
It has a 10-inch chromium-plated carbon steel blade to protect it from rust.
The 240-watt electric motor is good for light duty.
This machine is easy to operate and clean.
A chromium-plated steel blade for corrosion protection
It has a 240-watt electric motor.
Their website offers parts and cleaning tools for this machine, making it easy to keep in top shape.
Cons
For a large machine, it lacks the power offered by our top choice.
The SUPER DEAL PRO Commercial has a lot of great features that are good for the average home user. However, do let the “commercial” word in this product’s name mislead you. Is it not commercial but rather a light-duty machine.
The blade is made our of stainless steel, and it comes with a blade cover, which makes it safer. It also has a 1-year warranty and a 6.5-inch meat carrier.
It also has a built-in blade sharpener, which is a great feature if you plan on using the meat slicer regularly. It’s also dishwasher safe, so you can easily clean it after each use.
Category: Light duty
Motor: 200 Watts
Blade: Carbon stainless steel
Drive: Gear drive
Key Features: large machine
Pros
A 10-inch blade can handle larger cuts of meats
Built-in blade sharpener
Dishwasher safe
Cons
Removing the blade is not as easy, and three screens have to be removed.
Hard to Clean
Small food carrier – this makes it hard to cut large cuts
The Chef’s Choice meat slicer 615A is a good value machine. The 7-inch stainless blade is serrated and can slice through meat, cheese, and other food items. The slice thickness can be easily adjusted by turning a knob. This electric slicer also features a safety lock to prevent accidental slicing.
The cord storage compartment is a great feature to keep the cords organized and out of the way. The protective fuse prevents the motor from overheating, and it also features a 120-watt motor for powerful slicing.
The feature I like best is the great wide platform, which has enough room for a small food tray to gather your slices. Keep in mind that this is a light-duty budget machine; if you push it past its design limits, it will break.
Category: Light duty
Motor: 200 Watts
Blade: Carbon stainless steel
Drive: Gear drive
Key Features: inexpensive
Pros
Affordable entry-level price
Easy to adjust
The fuse prevents the motor from overheating
Cons
This is an inexpensive machine, which means it is meant for very light duty.
If you are looking for an inexpensive slicer for your home, the Meat Slicer 200W is another great option. It has a 7.5 removable stainless steel blade and a 200-watt electric motor. The child lock power button ensures that your children cannot accidentally turn on the machine.
Category: Light duty
Motor: 200 Watts
Blade: Carbon stainless
Drive: Gear drive
Key Features: inexpensive
Pros
7.5-inch removable stainless steel blade.
One serrated blade and a smooth blade.
200 watts electric motor, good for light-duty use.
Child lock power button is a nice safety feature.
Cons
This is a light-duty machine, so don’t expect it to last long under heavy use.
Conclusion
We found the KWS MS-10NT meets all our classifications for a top meat slicer. It can cut tough and lean meat, but it is also a good cheese food slicer and great for slicing deli food. Overall, it can handle standard-duty slicing with ease.
The most important factor to consider when purchasing a meat slicer is the blade and the motor. The blade is the part of the slicer that does the actual slicing. It’s important to choose a model with a sharp, durable blade. The blade should also be easy to remove so that you can clean it properly.
Another factor to consider is the motor. The motor powers the machine and determines how fast the meat slicer can slice meat. If you plan on slicing a lot of meat, we recommend choosing a machine with a powerful motor.
In this article, we’ll share some great pellet grill accessories on the market today to supercharge your grill. We’ll talk about why each accessory is useful, and we’ll give you tips on how to choose the right one for your needs. So whether you just got a shiny new grill and are looking for accessories or just want to update your current setup, read on for some great ideas!
If you’re like most pellet grill owners, you love your grill and use it as much as possible. Pellet grills are easy to use, yield good flavor, and are great to cook outdoors. With the right accessories, you can make your grilling experience even better.
Pellet Grill Accessories: Protect and Enjoy Your Grill Even More
A grill master is only as capable as his or her tools, and that’s why good grill accessories are so essential. With the right accessories for your grill smoker, you can make it even more durable, easier to use, and enjoyable to cook with.
Pellet Grill Cover
One of the most important grill accessories is a cover. A good cover will protect your grill from the elements, keeping it clean and dry when not in use. It’s also important to choose a cover that’s durable and well-made, so it will last for years. If you live in a state with harsh crazy weather, a grill cover is a must-have accessory.
Grill brushes
Grill brushes are needed for keeping your grill clean. They help to remove debris and grease from the grates, and they also make it easier to scrub away stubborn stains. Pellet grill brushes come in various shapes and sizes, so be sure to choose the one that best suits your grill.
Grill Temperature Probe
A temperature probe is another important Pellet grill accessory. This handy tool allows you to monitor the internal temperature of your food, so you can cook it perfectly every time. A quality temperature probe will be accurate and durable, and it will last for years of regular use.
Grilling Gloves
Grilling gloves are another essential Pellet grill accessory. Gloves protect your hands from heat, hot surfaces, and flames, so you can handle food safely on the grill. They’re also useful for holding onto hot objects, such as skewers or grill racks. Choose a pair of grilling gloves that are comfortable and well-made, so you can use them for years to come.
A Good Meat Thermometer
A meat thermometer is another Pellet grill accessory that’s essential for cooking perfect food. This tool allows you to check the internal temperature of your meat, so you can cook it to the perfect level of doneness. Choose a meat thermometer that’s accurate and easy to use, so you can get the best results every time.
A Grill Pizza Stone
A pizza stone is a great Pellet grill accessory for those who love homemade pizza. This stone evenly distributes heat, so your pizza will cook evenly and come out with a crispy crust. Choose a pizza stone that’s big enough to fit your Pellet grill, so you can make delicious pizzas at home anytime you want.
BBQ Rack and Baskets
Racks and Grilling baskets are grilling accessories often used in grills. Racks can be used to hold and cook multiple foods tightly and securely. Think about grilling shrimp, asparagus, and other vegetables. Grilling baskets are great for cooking smaller items or delicate foods that might fall through the grill grates.
Grilling Mats
I first discovered grilling mats on a camping trip when a friend of mine pulled out a few and said, “don’t worry if the grates are dirty; I got this.” Grilling mats are not an excuse to not clean your grill grates, but if you are cooking small foods or vegetables, they also work great.
These mats are heat resistant and have a non-stick surface. Grilling mats can be used on Pellet grills, gas grills, and charcoal grills.
Magnetic Hooks
Magnetic hooks are a Pellet grill accessory that I use all the time. They are great for hanging Pellet grill tools, such as tongs, brushes, and thermometers. They’re also handy for holding onto other things like aprons and oven mitts.
Wood Pellets
Wood pellets come in a variety of flavors; try finding the right one for your pellet barbecue. Pellets are a healthier alternative to conventional cooking methods and a terrific way to add flavor to your cuisine. Pellets are manufactured entirely of natural wood and come in flavors such as hickory, oak, and special competition mixes.
Smoker Boxes
A smoker box is an accessory that’s great for adding “smoky” flavor to your food. This box sits on top of the grill grates, and it’s filled with wood chips or pellets. As the grill heats up, the smoke from the wood chips infuses your food with flavor.
Now, you might say you don’t need a wood chip box or pellet tube with a pellet cooker, but if you want to add a second type of wood for extra flavor or extra smoke to your cook, a smoker box will do.
A Grill Ligh
A grill light is a Pellet grill accessory that’s perfect for grilling at night. This light attaches to the grill lid, so you can see what you’re cooking without having to fumble in the dark. A good grill light will let you see those ribs at night; even a grill master needs to be able to see what he or she is doing!
Some high-end grills include built-in lights, which are helpful, but most grills do not.
BBQ Seasoning Rubs
You can never have enough or too many. Try a few rubs until you find what you like but always have plenty around in the pantry.
Traeger Accessories To Protect and Enjoy Your Traeger Pellet Grill
Traeger makes amazing pellet smokers and grills. Our readers often as for a list of useful Traeger grill accessories, well, you got it.
Traeger Custom Grill Covers
A custom grill cover is a perfect way to protect your Traeger from the elements. After all, these machines are expensive. Traeger’s model-specific covers so they fit perfectly and keep your grill safe and dry. Choose a cover that’s durable and waterproof, so you can count on it to protect your investment. Traeger grill accessories also share Traeger’s quality and warranties.
A Traeger Cover is the way to go as you will get a perfect fit, but if you want to save some money, you can opt for a universal cover or third-party covers made for your Traeger. There are plenty of brands making covers for popular Traeger grill models.
The Traeger Front Folding Shelf
Traeger grill accessories are in everybody’s wish lists, but please do yourself a favor and get yourselves a food prep folding shelf from Traeger.
This handy shelf attaches to the front of your Traeger, and it’s perfect for holding food, utensils, or other grilling accessories. It folds down when not in use, so it doesn’t take up extra space.
These folding shelves are the perfect complement to an Ironwood or Timberline.
The Pellet Grill Cleaning Kit
A Pellet grill cleaning kit is a must-have for anyone who owns a Pellet grill. These kits include everything you need to clean your grill, including a brush, scraper, and cleaning solution.
Traeger All Natural Grill Cleaner
If you’re looking for a non-toxic and environmentally friendly grill cleaner, check out Traeger’s line of all-natural grill cleaners. These cleaners are biodegradable and safe for use on all types of grills.
The Traeger stainless steel grill basket
This Pellet grill accessory is a must-have for anyone who loves to cook vegetables on their grill. The stainless steel grill basket is perfect for grilling delicate vegetables like asparagus or mushrooms. It’s also great for holding small items like shrimp or chicken breasts.
Winter insulated cooking blankets
If you live in a cold climate, you know how important it is to have a good insulated cooking blanket. These blankets help keep your grill hot, so you can continue cooking even in freezing temperatures. Traeger offers a variety of different blankets, and there are also their party brands offering thermal blankets.
The Traeger 12V to 110V power inverter
Trager grill accessories are plentiful, but this power inverter is something you want to consider if you are serious about cooking outdoors, campsite, or on the beach.
The 12V to 110V power inverter allows you to plug into a standard 110V outlet, so you can cook anywhere.
Conclusion
There are many grilling accessories and toys to help you become a better grill master. The list provides you with the best and fundamental accessories to help you get the most out of your grill and enjoy it better, make your life easier, and cook more often.
I recommend, at the very least, getting a cover and cleaning and cooking tools. So get your accessories, get grilling, invite friends over, and have a great time.
Grilling is a popular summer pastime, grilling with your RecTeq, well that is just a delight. There are plenty of great pellet grill accessories for your REC TEC (recteq ) grill to choose from. In order to make the most of your grill, you need some essential grill accessories. This article will show you fifteen of the most important tools you’ll need for your new REC TEC grill.
Having these essential accessories will help you get the most out of your “bull” and will also help keep your cooking machine in good condition. So if you’re looking to get the most out of your REC TEC (recteq ) grill this summer, check this list out.
Here is a list of Rec Tec Accessories you should get for your (now RecTeq ) today and enhance your Grilling Experience
Owning a REC TEC (rebranded to recteq ) grill is an experience in itself, and with the right accessories, you can make the most of your grill, protect your investment and enjoy it longer. Some essential accessories include a grill cover to protect your grill from the elements, a meat thermometer to ensure your meals is cooked properly, and a grilling toolset to help you flip and move food around on the grill.
Wood Pellet and lots of ’em
Do you love steak and other types of beef? Or are you more of a smoked ribs or brisket type of person? Love them both? Yes, we all do. If that’s the case, we recommend keeping a lot of wood pellets on deck.
You will spend a lot of time trying new recipes, looking for the next best thing, and burning steaks or two. You will want to try different wood pellet flavors, whether you are cooking beef, pork, or even cooking vegetables.
Although there are recommended wood flavor pairings for every cut of meat, you are the boss of your own pallet and will want to try your own mix of flavors. Also, you will find yourself switching pellet flavors based on what you are cooking and your culinary experiments.
You will spend some money buying and trying new pellet flavors. The last thing you want to do is leave pellets outside and exposed to the elements. A bunch of pellet bags laying around the house will become wood dust in a matter of days, and if you live in a humid climate like my state of Florida, those pellets will absorb moisture quicker than a sponge. Wet pellets will jam the auger even in the best pellet grills. [1]
Wood pellet containers are not that expensive and are a small investment compared to the price of RecTec grills ( now recteq ) or replacing parts in your new grill.
These containers come in many shapes and sizes, most are stackable and can be labeled. Solid hard plastic containers will airtight lids will not absorb moisture from the air and can be cleaned easily. They will also protect pellets from mold, rain, sunlight, and even pests.
Grill brushes are essential for keeping your grill clean. A dirty, greasy grill not only looks unappetizing but over time can actually cause food to stick and even change the flavor of the food. That black conked-up grease on your grill grates won’t state good amigo!
Grime builds up on the inside of your grill as well, creating a smoky mess and black or dirty smoke is not good for your food either. Balck smoke will add a bidder flavor to your meats. Dirty grills also produce soot and black smoke which will stain walls in your backyard or patio.
A good grill brush will help you keep those grates cleaned and your recteq in a good shape. Be sure you look for a brush that won’t damage your grill grates and if don’t like brushes with metal wires or bristles you can opt for a brush like the Grill Recure Brush.
Choose a brush with a long handle so it’s easy to maneuver around hot surfaces like burners.
One of the pellet grills accessories that you should buy immediately is a grill cover. I see often people spending hundreds of dollars even thousands on a pellet grill to just leave outside exposed to the elements.
If you leave in an area that experiences all four seasons or like here in Florida where it rains every day, living your grill outside unprotected will shorten its lifespan. Rec Tec grills (reqtec ) are made tough and out of 304 stainless still which will help with corrosion and withstand the elements but components inside your grill can still start to deteriorate and fail.
We recommend grill covers with pockets to store some of your grill tools and anchoring cords to keep the cover from flying away and as tight as possible.
Grill covers are not that expensive and worth the investment.
Having a good set of grilling tongs is good because they are useful for turning food on the grill, and you’ll need a good set of grill forks for moving larger items from one area of the grates to another or removing food from the pellet grill.
Most tongs have long handles so they can be gripped without getting too close to the heat. They come in a variety of shapes and sizes, and most are built out of durable materials that won’t warp even if they get hot.
Some brands offer silicone grips that won’t melt, and other cool features like magnetic locking systems to keep them closed when you store them away.
Recteq grills come with built in meat probes to monitor your food, but you only get one or two depending on the grill model. A good meat thermometer and meat probe will help handle large cooks and multiple cuts of meat cooking at once.
You can use a thermometer pen, an instant-read thermometer, or a multiple probe thermometer to monitor all the meat you’ve got smoking in your grill.
Most meat thermometers have a thin probe that inserts into the center of meats, and a digital display that shows what temperature they are at. Some thermometers have internal temperature alerts and sometimes more options than the probes in your grill do.
Not everyone has a full outdoor kitchen or a summer kitchen to prepare the food. A side table is one of the best accessories I purchased for my outdoor grilling area.
Side tables are great for food prepping, seasoning meat, and even removing food from the grill if you get into trouble, you know what I mean Mrs. Well Done.
If you have a big family gathering, they also help provide more space for serving food and putting meals together, or even resting that hot brisket. Not to mention a good size side table can be a great place to place your BBQ tools.
You can also get the front folding shelf available for rec tec grills on their website or opt for a less expensive “off the shelf” table. These tables are great for rec tec grills like the rt 590 which does not include side or a front folding shelf.
A good grill cleaner is essential if you want to keep your Rec Tec Grill in tip-top condition. There are different types of grill cleaners that will work but for recteq grills look for a stainless steel cleaner.
One option is a soap and water mixture, but these don’t always get the tough stuff off. Also, a good natural grill cleaner is a great choice to keep the stainless finish of your grill looking new and protected from elements.
A cutting board is your friend when it comes to trimming meats and one of the most useful grill accessories you can own. Why? Well, unless you like damaging your kitchen countertops or cutting meats on slippery surfaces, well let’s just say this is one of those grill accessories that is nice to have.
You can get them in many different shapes and sizes, depending on the space you have available or for what you want to use it for.
Talking about cutting and trimming, a good BBQ knife or good knife set is a must-have accessory for cutting and trimming. For outdoor cooking, you will need a good-quality set of BBQ knives that you can use to cut and trim meats, do meal prep, and serve.
A butcher’s knife should be part of your grill accessories list together with a good knife sharpener tool.
I know what you are going to say, why do I need a pellet smoker tube or box, doesn’t a pellet grill generate smoke? Yes, you are right, but here are a few things you can do with a smoke tube.
You can add more smoke flavors adding more pellets during the cook without having to stop the grill and empty out the pellets in the hopper. Let’s say you are smoking pork ribs and are using a hickory pellet blend but you want to add a touch of sweetness.
Well, my friend, with some tubes you can grab a handful of apple pellets, light up the tube and add the hint of sweetness to your smoked ribs. All while leaving the pellets in the hopper alone.
If you are smoking spare ribs or briskets the grates in your new bull will work great. However, if you love a nicely seared steak, consider a set of searing grates. A searing grill grate will transfer heat better to “shock” and sear the steak better.
They come in handy when cooking thicker cuts of meat or even veggies at high heat. To properly sear your meats, it is best to use a ridged surface or cast iron grates.
You can also invest in some grill baskets (that you need to line with foil) for vegetables like potatoes so that they can go straight on the grill instead of boiling or frying.
A cooking mat is simple to use and simple to clean! That’s why we love them.
A Mesh Grill Cooking Mat is ideal for grilling messy foods and little meats that might slip between the grates. For example, think about shrimp, asparagus, and onions. These mats also make loading and unloading your pellet grill a breeze.
You can also say a grill mat is good for those of you who don’t keep those grates too clean. Yeap, I’m talking to you once a year griller!
Yeap, you heard me right. Get a pizza stone for your pellet grill and enjoy homemade wood-fired pizza using your new recteq. Making homemade pizza is a lot of fun, but even better is the wood and smoky flavor you get when using your recteq.
In Conclusion
As you can see, there are many grill accessories to consider and available for your RecTeq. The right accessories will help make your outdoor cooking experience better and more enjoyable. Grill cleaner is one of the most important items on this list since it keeps your Rec Tec Grill looking new, helps remove tough food residue that builds up over time with use.
Once in a while, we come across a cool BBQ gadget to help us become better pitmasters. This is the case with the Meatstick.
The Meat Stick is a high-quality, wireless thermometer that makes cooking meat simple and easy.
The main feature of these new-age thermometers is that they are truly wireless. There are many “wireless” thermometers, but many of those still use cables to transfer temperature readings from the probes to a monitor or receiver; you then wirelessly connect to the monitor via a smart device app or another monitor.
The Meatstick thermometer takes this concept to another level and brings it to this century, and adds true meaning to the term wireless meat thermometer. How? Well, the MeatStick uses no cables, at all!
Having no cables means this thermometer is highly versatile. It can be used in almost any cooking setting, including rotisseries. This is the true meaning of wireless! In fact, all the electronics components are packaged inside the probe and the stick’s ceramic head.
We’ll get more into how these little gadgets work further below and talk about the different MeatStick models.
The MeatStick
With its many features, such as the ambient sensor and internal food sensor in one “stick,” this smart wireless thermometer works great in many cooking settings, including roasting, baking, grilling, and smoking meats.
While with some “cabled probe” wireless thermometers, you need to clamp an ambient thermometer to the grill’s grate and then the probe into the meat.
The MeatStick sensors are all embedded in the probe’s ends. The stainless steel probe houses the food temperature sensor, and the ceramic head on the opposite end houses the ambient temperature sensor.
This means this little stick can read and monitor both the grill and the food temperature with only one device and, yes, no cables at all.
The stick’s design is sleek and contemporary. It has a high-tech appearance and feels quite durable.
It is worth noting that thanks to its design, it is easy to clean design and dishwasher safe.
The MeatStick Models
Meatstick currently offers a variety of bundles and accessories for their thermometers, but the wireless meat thermometers are split into two options, The MeatStick and the MeatStick Mini.
Both models share many of the same characteristics, quality, and features. But there are differences between the two and cooking scenarios for both. Both Meatstick models are Bluetooth compatible for up to 30 feet or six feet in closed-lid grills or signal-restricting grills like the thick walls of a ceramic Kamado. They both can function wirelessly with the Meatstick app. So if you only purchase the stick with the base ( charger ), your range will be 6 to 30 feet.
However, combined with the Meatstick extender, both the Meatstick and the Meatstick MINI can operate at a range of 260 feet over a Bluetooth connection.
Meatstick also offers a WIFI Bridge, which links the Bluetooth base to a WIFI network. Then your home WIFI range is the only limiting factor, my friends.
The MeatStick Mini
The Mini shares the same DNA as the larger stick with some minor differences. The main difference is that the Mini does not have an ambient temperature sensor. There are other compromises in other to reduce its size and weight.
For example, the Mini stick can only safely operate up to temperatures of 185 degrees Fahrenheit before the App starts alerting you to remove it and let it cool.
Another noticeable difference is its size. The Mini is only about three and a half inches long small enough to fit in smaller cuts of meat. A smaller frame also means a smaller battery, which offers a shorter running time.
MeatStick vs MeatStick Mini
MeatStick
MeatStick Mini
Length:
5.3 inches
3.7 inches
Running Time:
24+ hours
8+ hours
Sensors:
Ambient Temperature – up to 572 Degrees F Probe ( food sensor ) – up to 212 Degrees F
Probe ( food sensor ) – up to 185 Degrees F
Good For:
Larger Meat Cuts ( Pork Butts, Briskets )
Smaller Meat Cuts
First Impressions – Unboxing the MeatStick
The MeatStick wireless thermometer arrives in a nice box where you greet the stick and its base. If you opted for the Stick X or Mini X, you get the stick and the Bluetooth extender.
Unboxing the stick feels like getting a new iPhone. You get a simple set of instructions and can be ready to use in a few minutes.
The MeatStick base or extender, depending on the bundle you get, does require two AA batteries. The base will charge the stick once it is put in place and you press the power button.
Setting up the MeatStick
Once you get the Meatstick out of the box, the next step is to download the MeatStick app. You’d think you need to read a manual to set this thing up, but you’d be wrong my friends.
The App is one of the best features of this product, and we found the App to be very intuitive, interactive, and user friendly. We have had many “smart” gadgets here at BBQ Grill Academy, and many of those products fail to deliver good and easy to set up apps.
Setting up the MeatStick is easy. First, place the stick in its base and press the power button. The LED light will turn on GREEN, indicating it is charging the stick. While the stick is charging, the light will remain “solid green,” and it will turn off once it is done charging.
Download the MeatStick App from either the AppleStore or GoodPlay. Open the App you will be prompted to create an account. That process only takes a minute, and it requests your email address, password, user name, and that’s it.
You can use the App without setting up an account. However, you will not have access to all the App’s features, including historical data about your cooks and the setting you used for specific cooks.
Once the App is installed on your smart device is time to pair the stick with your device. The process is simple, open the App, press down the power button on the base until the GREEN light starts flashing, and the App will discover the stick. Once it is paired, it will display in the App.
Using The App
Once you have the Meatstick set up, it’s time to start cooking. The App is easy to use and interactive. You can monitor both the meat temperature and the ambient temperature all in one place ( except with the Mini ).
The most noticeable feature of this App is its built-in interactive guide. The App has a smart pop-up guide that holds your hand through the setup, configuration and it shows your features and tips throughout the cook.
The MeatStick App Features
The App has a simple design and is easy to navigate. The main screen includes a color-coded probe indicator showing the probe’s temperature reading. Tab in the probe temperature circle, and you access a detailed window with more information about the cooking progress.
One cool feature of the App is its “remaining time” calculator. The App builds a historical graph plotting the cooking progress. It then uses that same pattern to predict when your food will be ready. The feature works great and constantly monitors the temperature rising rate to adjust its estimations.
The App also gives you access to all the basics, settings, set up a Cook, and share your awesome cooks on social media, plus alerts. Under “Settings tap,” you can change your user name, password, email address, and toggle between imperial and metric measurements. The App also offers a nice feature that allows you to pause your cook if you need to work on the grill or let the charcoal die out on your smoker. ( come on, we all have done that )
Two noticeable features are Setup Cook and Alerts. When it is time to cook, you can click on SETUP COOK and choose the type of protein you want to monitor. The App automatically determines the recommended USDA temperature for different doneness levels based on your selected protein.
You can customize the pre-programmed doneness levels, change the temperature levels, and add your own titles to the cook. The App will save the cooks, and you can access these cooks and settings on later cooking sessions.
In the alerts menu, you get two options: a pre-alert and a ready alert. The pre-alert lets you set an alert at whatever temperature you want before reaching your final temperature. Say you want to wrap the meat at a specific temperature, you can use the pre-alert for the wrapping and the final alert for when the meat is done.
It is worth mentioning that the App is always helping and guiding during the cook. The help area in the App is handy if you run into any troubles. Still, we found the interactive guide is good enough to teach everything you need to know to use this product in a matter of minutes.
The Cook – We took the MeatStick for a Test Ride and Here is What we found.
We got our hands on a MeatStick MINI and immediately opened the box, and well, it is “Mini.” We knew it would be small but were quickly impressed by how simple and small the device is.
For our first test of the MeatStick Mini, we decided to test it by smoking a small bone-in pork butt in our kamado. We charged the stick while prepping the pork and got the smoker ready.
We followed the instructions and opened the App. We pressed the power button with the stick in its base, and the App found the device right away.
Meatstick nudges you to be sure to insert the stick all the way into the meat until the ceramic head is touching the meat. Again, there is a reason for that. The meat will act as a “protector” for the internal components in the probe.
We fired up the grill, threw the meat in, and started smoking. We played with the App and watched how the temperature slowly but surely started climbing. The App was steering us all the entire time.
We pushed the range a bit and walked around to see how well the extended worked, and we were impressed. We had no issues with the extender losing connection with the App. The extender also blinks green to let you know it is monitoring and connected to the stick and the App.
We looked for any signs of damage or reading latency during the cook but did not see any. The stick did its job well and gave us full confidence, so we stopped using our instant-read thermometer.
Things we enjoyed and liked about the MeatStick
The app works! There are many good thermometers in the market, but they always fail in the app design. Setting up the App was easy, and the App never crashed or stopped communicating with the Mini.
After we were done with the cook, we retrieved the stick and threw it in the dishwasher. Meat sticks do emphasize keeping the stick clean.
Using this device and cleaning the device is easy, and we give it a 5 out of 5.
We received an alert and noticed we had lost connection with the stick. One issue we ran into, and likely a user error, was when we wrapped the meat we covered the stick, it didn’t like it. We opened the aluminum foil, removed and poked the meat through the foil, and all was good.
Accuracy was good, and we didn’t notice any issues in trusting the stick, but during certain parts of the cook, we noticed a slight temperature difference of about 1 to 3 degrees when compared to our Tel True.
We had the pork butt in the smoker for about five hours, and although the battery in the stick is related to 8 hours, we still had over 50 percent battery left in the stick.
Things we did not like:
The stick works. Plain and simple, we had no issues with the device and truly enjoyed its versatility. Not having to deal with cables and just sticking a stick to the meat makes monitoring as easy as it gets.
However, and this is only related to the Mini; it is only rated to reading internal temperatures of up to 185 degrees Fahrenheit. If these temperatures are exceeded, you risk damaging the stick and voiding the warranty. Again, this limit only applies to the Mini, but it left us wanting more in our case. We cook our pork butts at about 190 to 200 degrees Fahrenheit, so we had to finish the cooking without the stick.
The Mini has a temperature sensor resistance of up to185 degrees, so it will not work well for smoking large cuts of meat like pork butts and briskets. Sure, you can still use it to monitor the process of the cook, but you will need an instant-read to fine-tune the end of the cook.
We recommend the bigger MeatStick for larger meat cuts since it is also longer and allows you to monitor the temperature of the meat deeper in its center.
Some worth mentioning notes
The ceramic head of the sticks can only withstand temperatures of around 572 degrees, so one has to be careful with flare-ups as it can potentially damage the ceramic head and the components inside.
The battery and other components in the probe can withstand temperatures of 185 degrees F in the Mini and 212 degrees F in the regular ( larger ) stick. However, Meatstick urgers the importance of inserting the stick fully into the meat to avoid leaving parts of the probes exposed to higher temperatures.
During the initial setup, the App will ask you to set the location services on your phone for the MeatStick app to “always on”. I changed the locations settings ( just for the MeatStick app ) to “only while using this app” and when the phone went to sleep it would disconnect from the extender. So the lesson here is to follow the instructions.
What could be improved?
It would be nice to see a recipe area in the App for those always looking for the next best dish to cook. I also would like to see the ability to set up different sounds for the two separate alerts in the App. This way is easy to know which alert is which and not panic thinking you overshot the final temp.
Q & A
Can you leave a meat thermometer in the meat while cooking?
Yes, you can, in fact, that’s the point of the MeatStick, to monitor the cooking progress. There are, however, a few caveats. First, you may not exceed internal meat temperatures of 185 for the Mini and 212 for the regular MeatStick. Second, the ceramic head can only withstand temperatures of 572 degrees F, so if you like to sear steaks at wide-open flame, you can damage the stick.
Where can you use The MeatStick?
The MeatStick can be used in grills, smokers, ovens, sous-vide, and deep fryers. The trick here is not to exceed the temperatures specified by the manufacturer. MeatSticks are NOT suitable for microwaves or pressure cookers. BUT, here is where you can definitely use these wireless meat probes, rotisseries! It doesn’t matter how good of a wireless thermometer you got unless it is a true WIRELESS device; those cables will keep you from using it with a rotisserie. A for those with those shiny top-of-the-line Napoleon and Balze grills with rotisserie bars, this is for you. Gadget and tech lovers, you will enjoy adding this device to your collection too.
Where do you “stick” a meat thermometer?
In the thickest part of the meat away from the bone and fat. The important thing is to insert the stick all the way in until the ceramic head is flush against the meat.
How do you clean the Meatstick?
Soap and water, but these sticks can be thrown in your dishwasher too.
Final thoughts
The MeatStick is a great thermometer for anyone looking for devices that are easy to use and get the job done. There is always room for improvement, and nothing is perfect in this world, but the Meatstick is one of those products that performs as advertised. We had no issues using this probe, and it did what it was supposed to do.
Its temperature range makes it versatile for most cooking conditions. Its wireless capabilities make it easy to use in almost any appliance. The only downside is that you have to be careful with temperatures not to exceed the maximums set by the manufacturer.