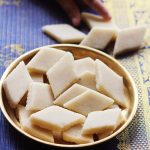
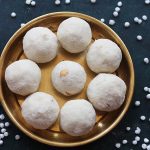
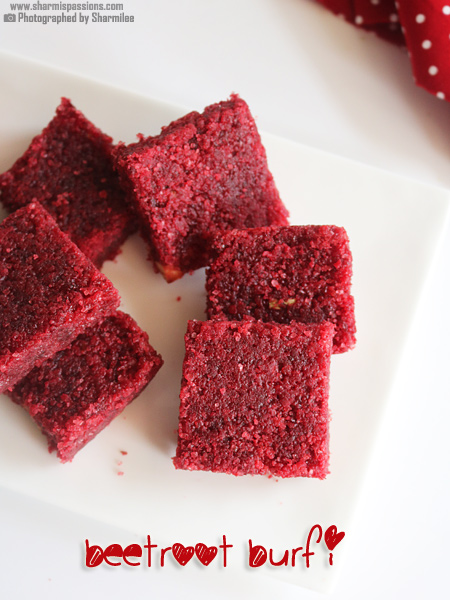
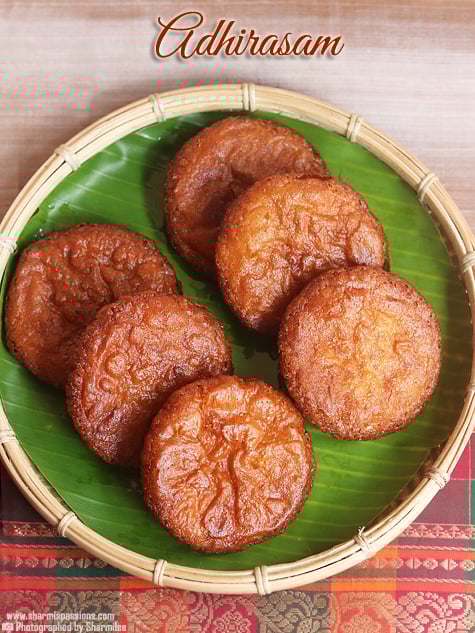
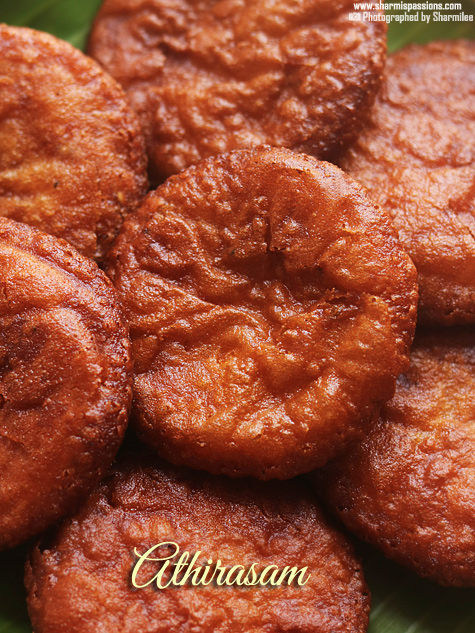
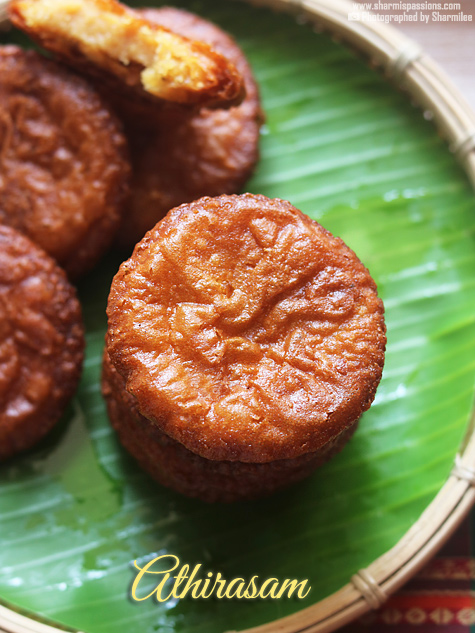
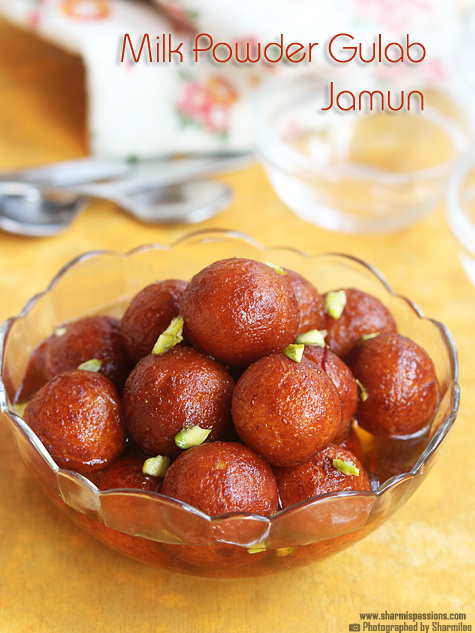
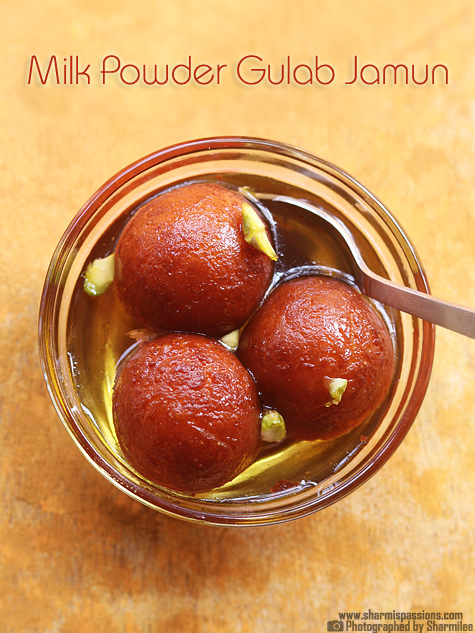
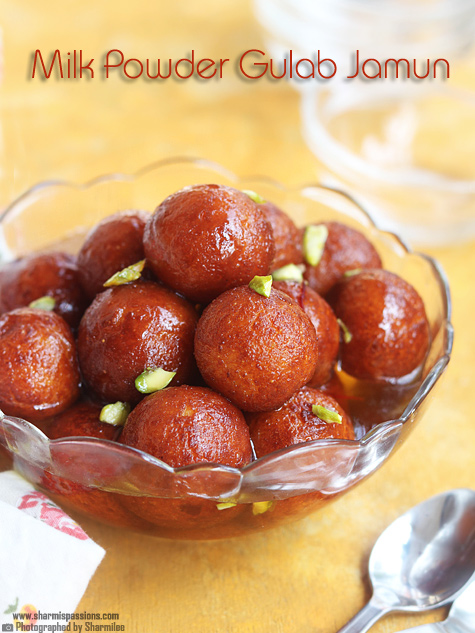
Adhirasam is a famous South Indian sweet that is crispy on the outside and soft inside with nice rich taste of jaggery and rice flour. Adirasam is a popular & traditional sweet of South India commonly during Diwali and special occasions. Usually it is prepared during festivals and special days as it stays good for few days and even taste better after one day.
The process of making Adhirasam may look bit tricky in beginning, but once the jaggery syrup comes right, everything else become easy. The smell of jaggery and rice flour frying in oil just fills the whole kitchen with aroma. I love that golden brown color and the soft inside that comes when fried slowly in low flame.
[feast_advanced_jump_to]
About Adhirasam
Adhirasam is one of the traditional sweets made in South India, prepared mainly with raw rice and jaggery. The rice is soaked, dried slightly and ground into semi fine flour which has small coarse bits. This fresh rice flour mixed with jaggery syrup gives a soft dough that has lovely aroma and taste.
The dough is usually kept overnight for resting which helps to ferment a bit and make it perfect for frying. The most important part in Adhirasam is the jaggery syrup consistency. It should reach soft ball stage, means when dropped in water it should form a loose ball. This gives perfect chewy and soft texture to the sweet.
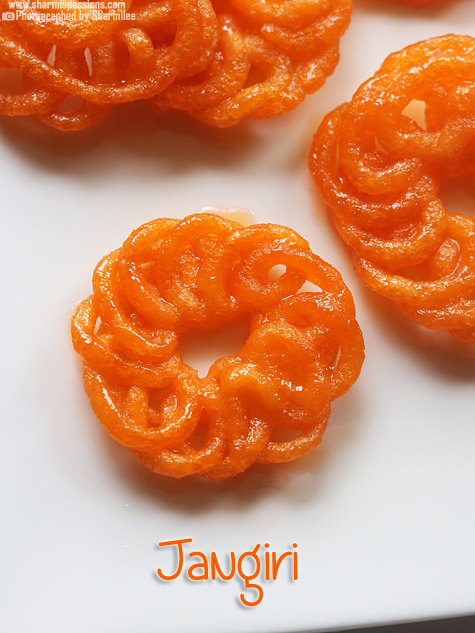
The flavor of Adhirasam is rich and earthy with cardamom and sesame seeds giving small crunch in between. The outside turns crisp while the inner stay soft and melt in mouth. The dough can be kept for few days and fried fresh whenever needed. Some people also add bit of dry ginger powder or small grated coconut for extra flavor.
I mostly make Adhirasam during family occasions or when I feel like making some traditional sweet at home. It always give a nice satisfaction and remind me of old times whenever I make it fresh and see it puff up in oil.
Adhirasam Ingredients
- Raw Rice - I used maavu pacha arisi which is soaked and ground fresh at home. It gives that perfect slightly coarse texture which we cannot get from store bought flour.
- Jaggery - I used dark jaggery called paagu vellam that gives rich color and deep taste. If you do not have dark one, you can use light yellow jaggery but the flavor will be mild.
- Cardamom - I added crushed cardamom for sweet aroma and that small traditional touch.
- Sesame Seeds - It gives nice nutty smell and small crunch in every bite. Usually white sesame is used but you can use black also if that is what you have.
- Ghee - I added little ghee to make the dough glossy and give lovely smell. You can use oil instead if you want to reduce richness.
- Oil - I used refined oil for frying the Adhirasams. Adding one spoon of ghee in it give extra good flavor. Always fry in medium flame to get even golden color and soft inside.
Similar Recipes
How to make Adhirasam Step by Step
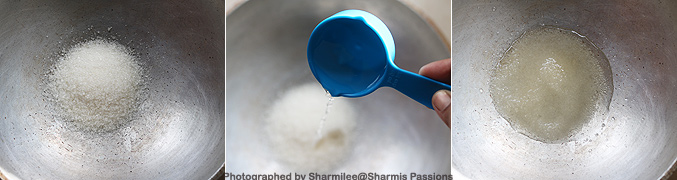
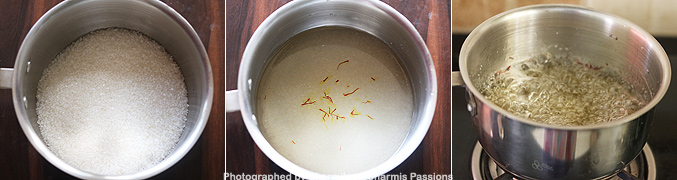
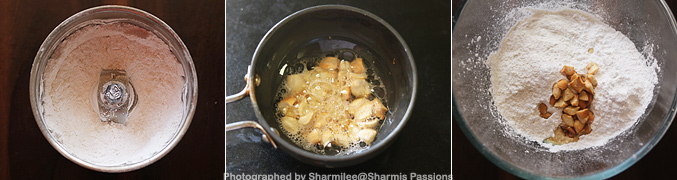
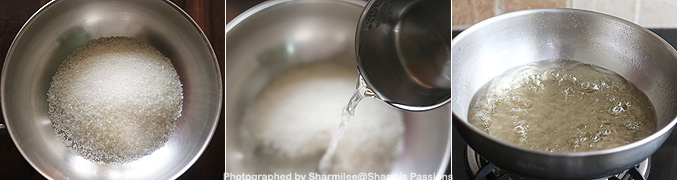
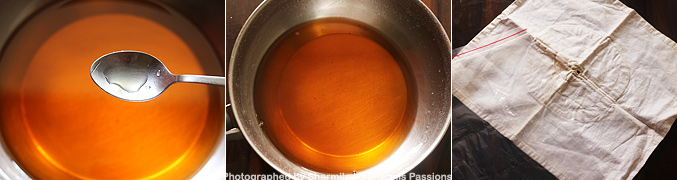
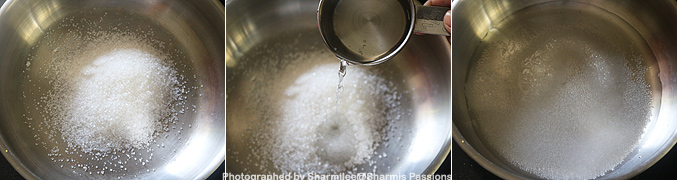
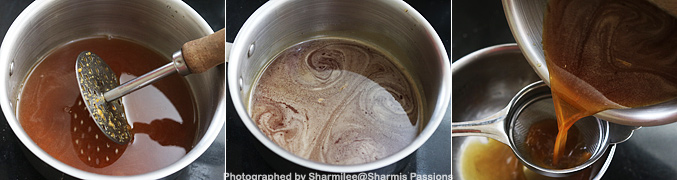
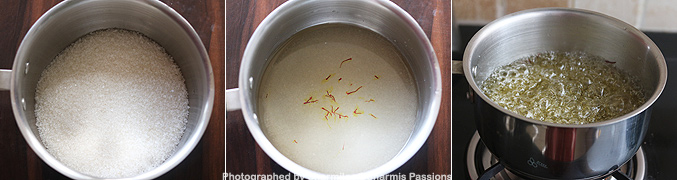
1.I used paagu velam. First crush jaggery, measure and take it in a pan. Add water to it
2.I use my potato masher to crush it. Heat it up, once jaggery is dissolved strain and set aside.
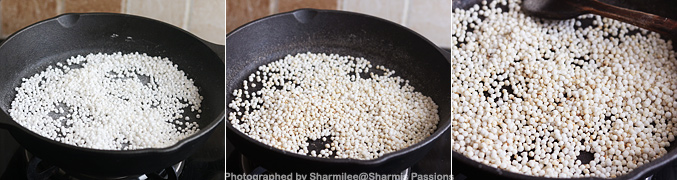
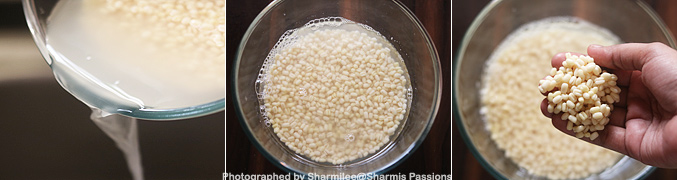
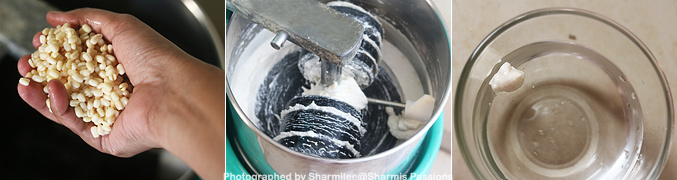
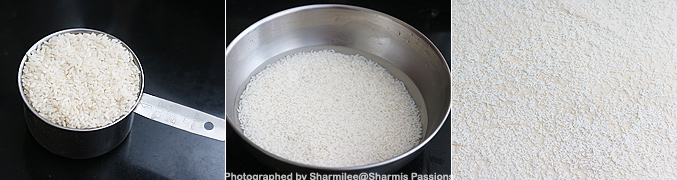
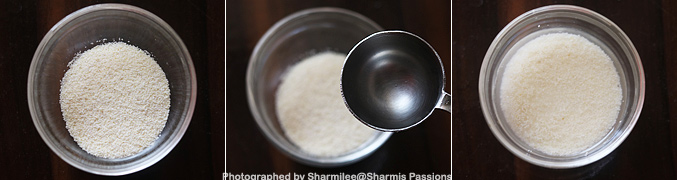
3.Now measure and take raw rice. First rinse it once, then transfer to a bowl, add water till immersing level. Soak for at least 2 hours. After 2 hours spread it in a cloth and set aside for 30 minutes.
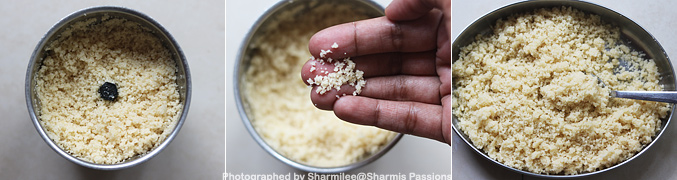
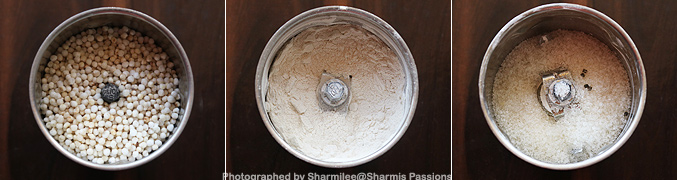
4.The rice should still have moisture content in it, when you press it with your hands it will stick like this. Now transfer it to a mixer jar and grind it to a semi fine powder. It should not be very fine like store bought flour, it should be slightly coarse.
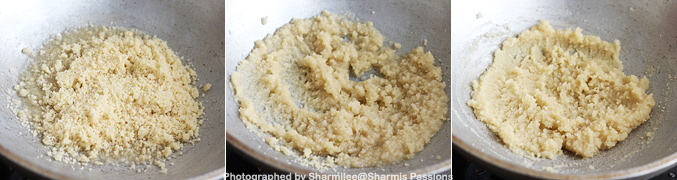
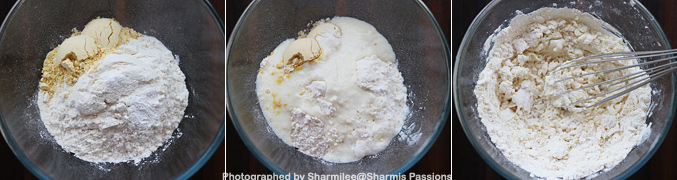
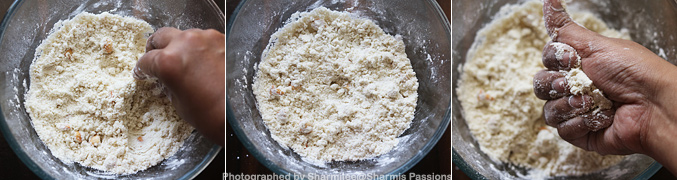
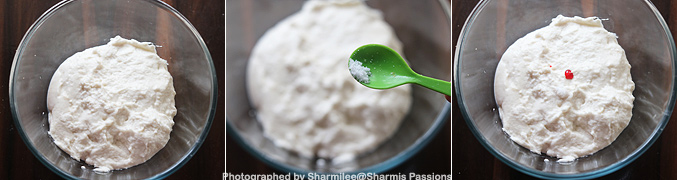
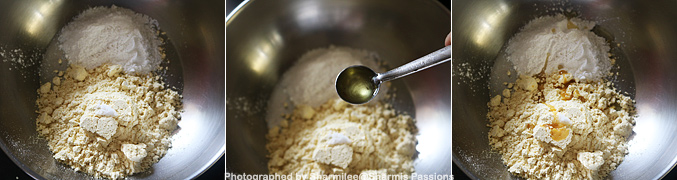
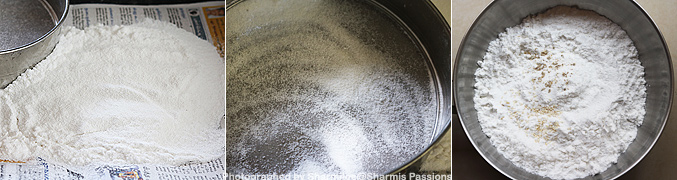
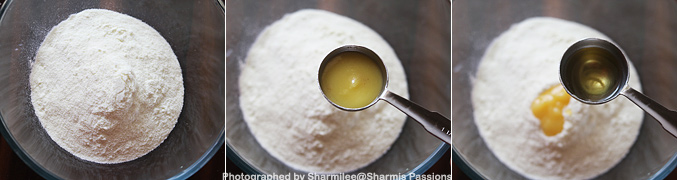
5.Now transfer this to a sieve then sieve it. Do not discard the coarse particles, grind it again and then sieve. Now take the flour, add sesame seeds and cardamom powder to it.
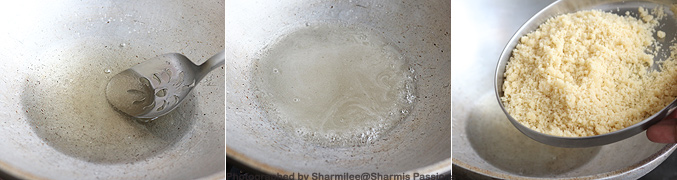
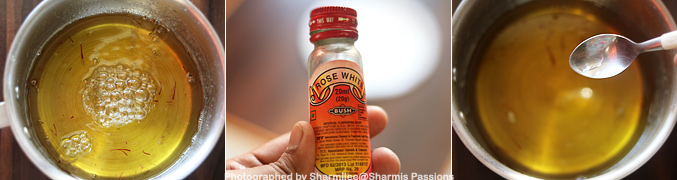
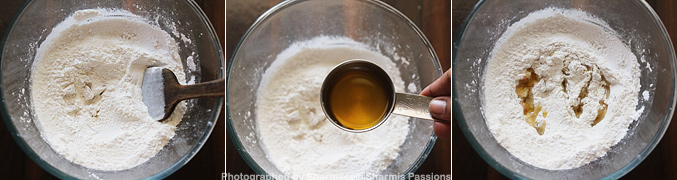
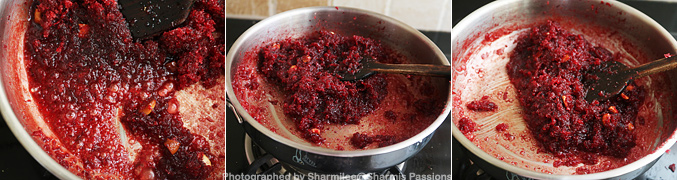
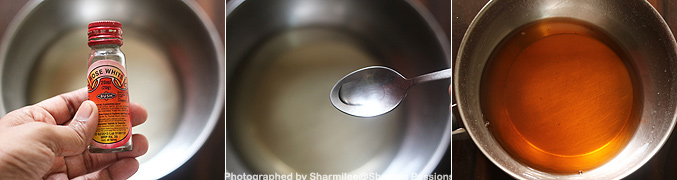
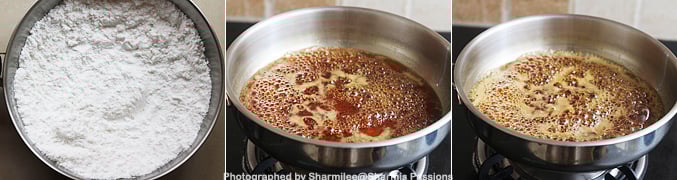
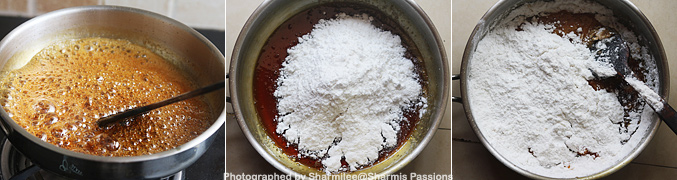
6.Mix well and keep it covered and set aside. Now take jaggery syrup in a pan and heat it up. Keep stirring until it is thick.
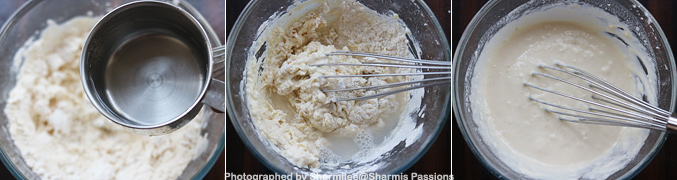
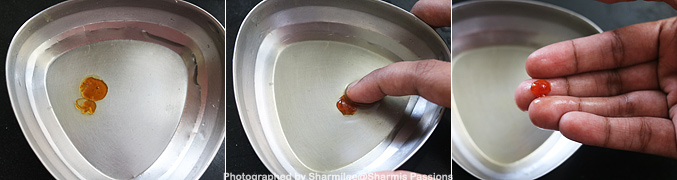
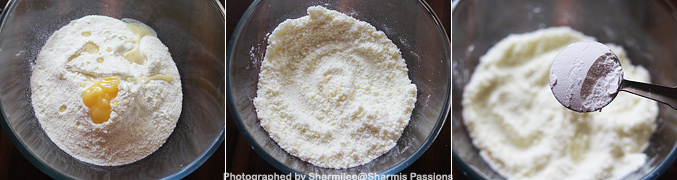
7.Keep checking the syrup by poring it on a plate containing water. First the syrup will dissolve in water when poured. At one stage when add few drops of the syrup it will not get dissolved in water it will stand still like this. Now gather it with your hands, it will form a loose ball more like a jelly. This is soft ball consistency, it will easily slide from our hands, yes this is the right stage we are looking for. If you pass this stage, the ball will become hard and your athirasams will become hard.
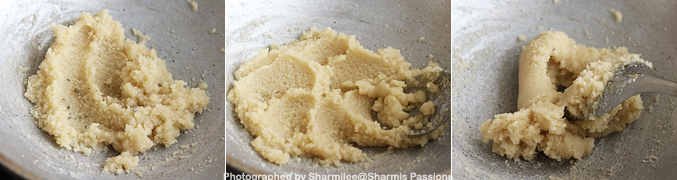
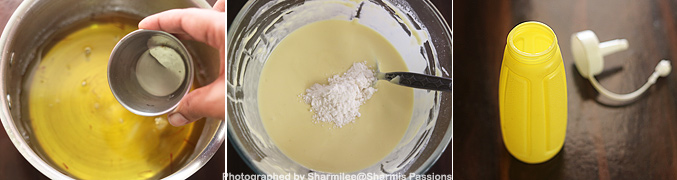
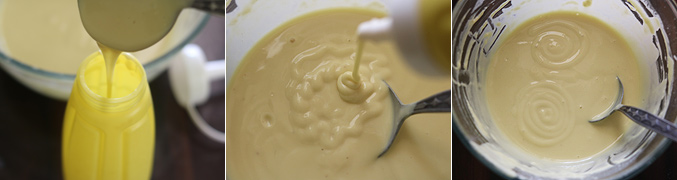
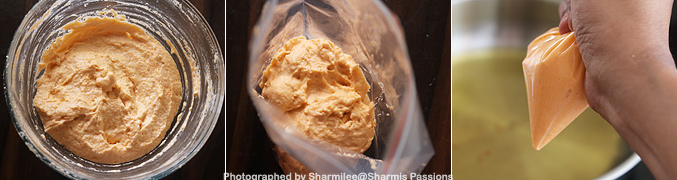
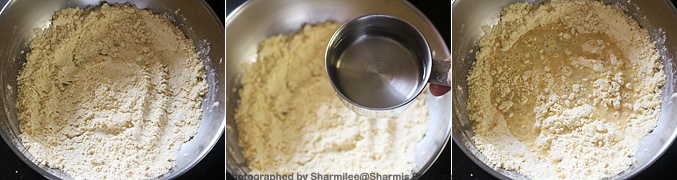
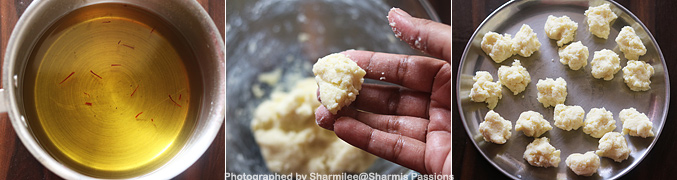
8.Immediately switch off (we are doing this to avoid the syrup from passing to next stage). I reserved a tablespoon of jaggery syrup alone. Now add the flour and keep mixing.
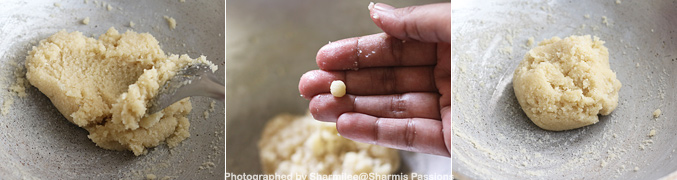
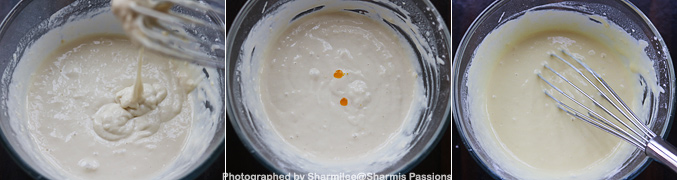
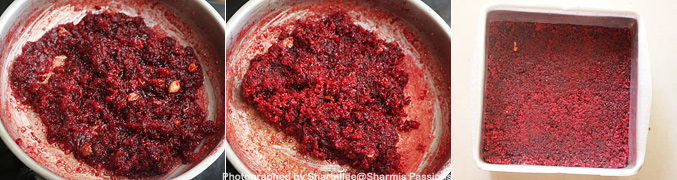
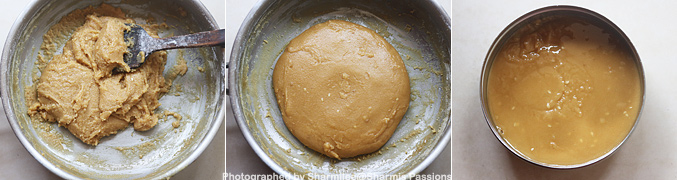
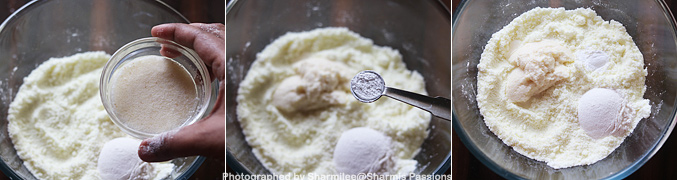
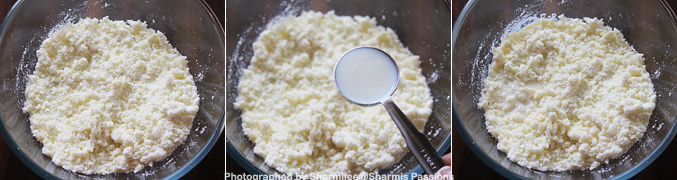
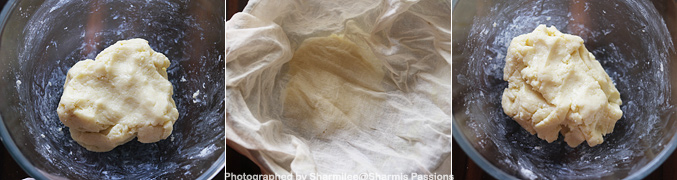
9.Mix it well without any lumps.It will be a little loose. I formed a ball but it went flat in few minutes. Now transfer to a airtight container and set aside for a day in room temperature. You can keep this dough for about a week. But after 1 day keep refrigerated if you are planning to make athirasams later
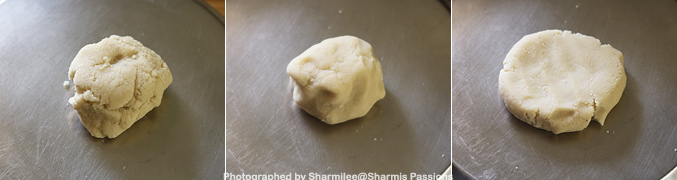
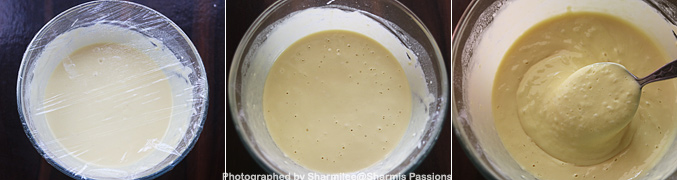
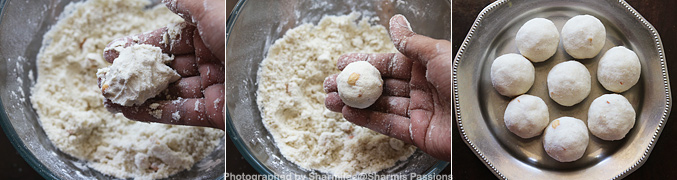
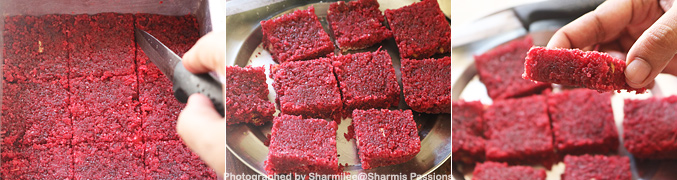
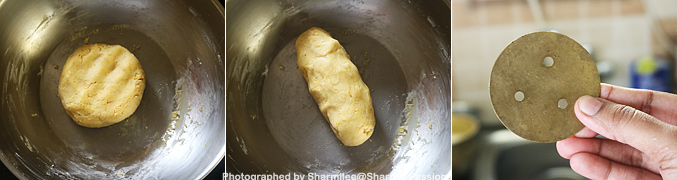
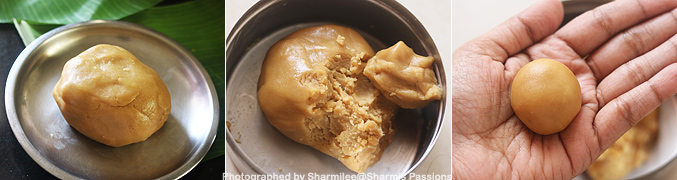
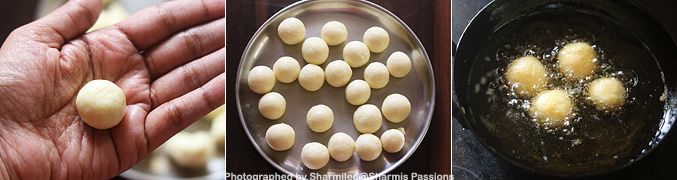
10.This is how tight it was the next day. Add a teaspoon of ghee and knead it once. Then pinch and roll into lemon sized balls.
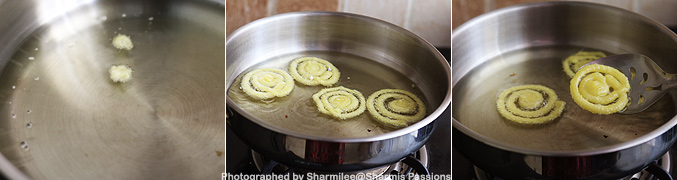
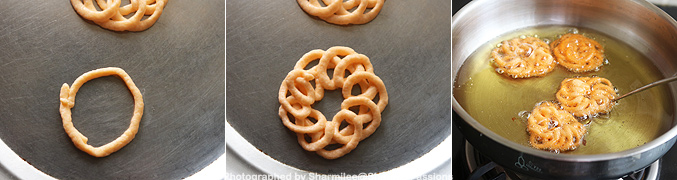
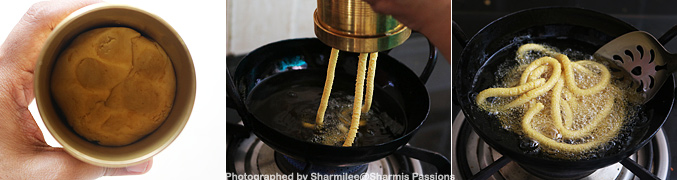
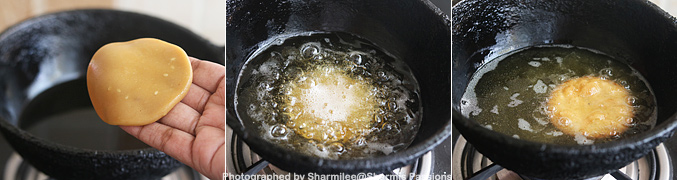
11.I got 9 balls and 1 tiny ball which I used for testing. Now take banana leaf / polythene sheet, grease it with little oil / ghee, take a ball keep on the banana leaf and flatten it with your fingers, it should be slightly thick. Heat oil(enough for the athirasams to immerse fully) in a kadai in parallel.
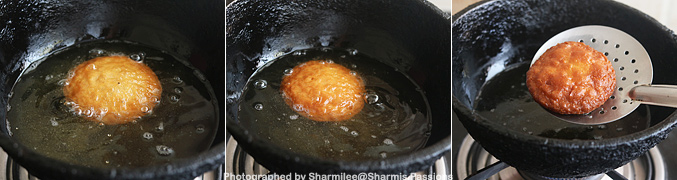
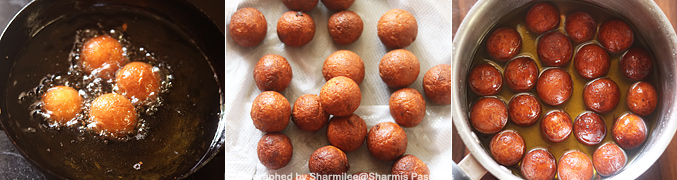
12.You can see how thick it is in this pic. Oil should not be fuming hot, lower the flame when you drop the athirasam as it will get cooked quickly. Carefully drop one athirasam, it will first float on top.
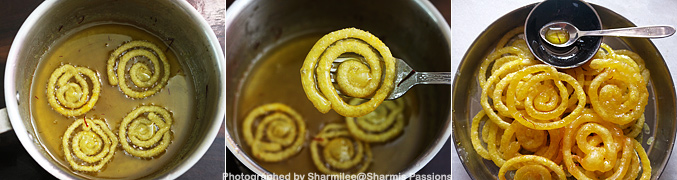
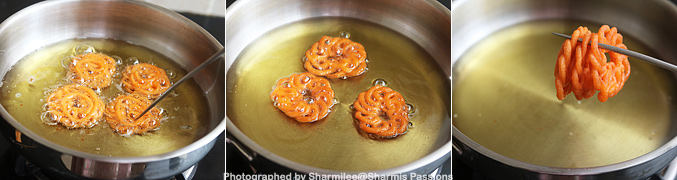
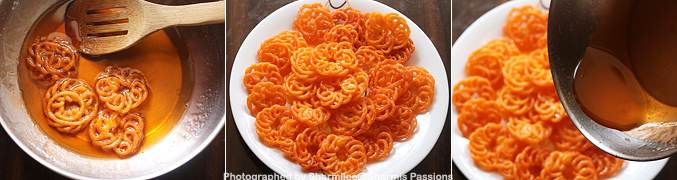
13.Then slowly it will puff up, carefully flip over and cook in low flame till reddish brown on both the sides. Do not cook in high flame.
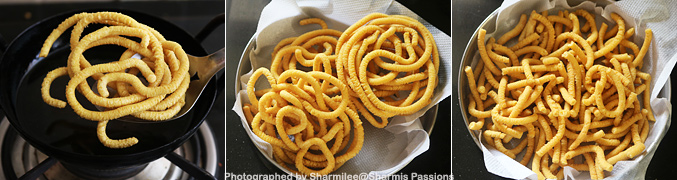
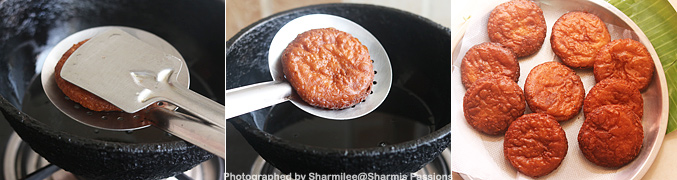
14.Press it with a ladle to drain excess oil, Then drain in tissue paper.
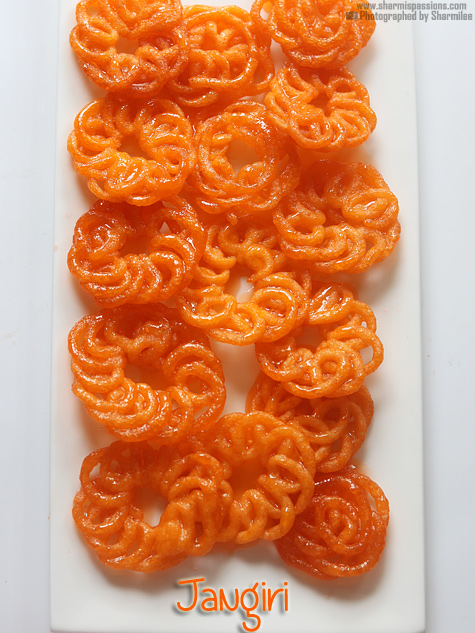
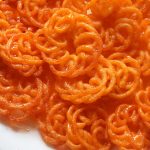
Serve with tea.
Expert Tips
- Rice Flour Texture - I usually grind the rice when it still has little moisture. This helps to get semi fine flour which gives good texture to Adhirasam.
- Jaggery Syrup Stage - Always check syrup in water to see if it forms soft ball. Once you reach that stage switch off immediately to avoid overcooking.
- Resting the Dough - The dough must rest overnight. It becomes tighter and easier to shape it next day.
- Frying Temperature - Keep the flame low to medium. If the oil is hot, Adhirasam will quickly brown outside and still uncooked inside.
- Dough - If the dough becomes too tight next day, I usually add a few drops of hot water or ghee and knead it softly before shaping.
Serving and Storage
Serve Adhirasam warm or just at room temperature with a cup of hot tea or coffee. It is perfect sweet for festivals or small family get-togethers as it stays good for few days easily. Once the Adhirasams are cooled fully, store them in airtight box. The dough can be kept in fridge for almost a week. Always bring it to room temperature before frying again, else it may turn hard.
FAQS
1.Can I use readymade flour?
You can try but the texture will not come same. Freshly ground rice flour with slight coarse feel gives best taste and softness.
2.My Adhirasam turned hard, why?
That mostly happen if jaggery syrup goes little beyond soft ball stage. Always check the syrup in water carefully before mixing.
3.Can I store the dough?
Yes, you can keep the dough in fridge for about one week. Just let it come to room temperature before making again.
4.Can I fry in ghee?
Yes you can, but use half ghee and half oil. Only ghee will make it very heavy and dark in color.
5.Why should I rest the dough overnight?
Resting time help the dough become firm and improve the texture after frying. It also make the flavor blend well and give soft inside.
If you have any more questions about this Adirasam Recipe do mail me at sharmispassions@gmail.com. In addition, follow me on Instagram, Facebook, Pinterest, Youtube and Twitter .
Tried this Adirasam Recipe? Do let me know how you liked it. Also tag us on Instagram @sharmispassions and hash tag it on #sharmispassions.
📖 Recipe Card
Print
Adhirasam | Athirasam Recipe
Adhirasam is a famous South Indian sweet that is crispy on the outside and soft inside with nice rich taste of jaggery and rice flour. Adirasam is a popular & traditional sweet of South India commonly during Diwali and special occasions. Usually it is prepared during festivals and special days as it stays good for few days and even taste better after one day.
Course sweet
Cuisine Indian
Keyword adhirasam, chettinad, diwali dishes, diwali food, diwali mithai, diwali recipes, diwali sweets, diwali sweets recipes, easy diwali recipes, Festival, Rice, virtual diwali party
Prep Time 10 minutes minutes
Cook Time 15 minutes minutes
1 day day
Total Time 20 minutes minutes
Servings 12 Adhirasams
Calories 113kcal
Author Sharmilee J
Ingredients
- 1 cup raw rice
- ¾ cup jaggery powdered
- ½ cup water
- 1 no cardamom crushed
- ½ teaspoon sesame seeds
- 1 teaspoon ghee
- oil for deep frying
Instructions
I used paagu velam (jaggery). First crush jaggery, measure and take it in a pan. Add water to it. I use my potato masher to crush it.
Heat it up, once jaggery is dissolved strain and set aside.
Now measure and take raw rice. First rinse it once, then transfer to a bowl, add water till immersing level. Soak for at least 2 hrs.
After 2 hours spread it in a cloth and set aside for 30mins.
The rice should still have moisture content in it, when you press it with your hands it will stick. Now transfer it to a mixer jar and grind it to a semi fine powder. It should not be very fine like store bought flour, it should be slightly coarse.
Now transfer this to a siever then sieve it. Do not discard the coarse particles, grind it again and then sieve.
Now take the flour, add sesame seeds and cardamom powder to it.
Mix well and keep it covered, and set aside.
Now take jaggery syrup in a pan and heat it up. Keep stirring until it is thick.
Keep checking the syrup by pouring it on a plate containing water. First the syrup will dissolve in water when poured. At one stage when add few drops of the syrup it will not get dissolved in water it will stand still.
Now gather it with your hands, it will form a loose ball more like a jelly. This is soft ball consistency, it will easily slide from our hands, yes this is the right stage we are looking for. If you pass this stage, the ball will become hard and your athirasams will become hard.
Immediately switch off (we are doing this to avoid the syrup from passing to next stage). I reserved a tablespoon of jaggery syrup alone. Now add the flour and keep mixing.
Mix it well without any lumps. It will be a little loose. I formed a ball but it went flat in few mins. Now transfer to a airtight container and set aside for a day in room temperature. You can keep this dough for about a week. But after 1 day keep refrigerated if you are planning to make athirasams later.
The next day when you observe the dough becomes tight. Add a teaspoon of ghee and knead it once. Then pinch and roll into lemon sized balls.
I got 9 balls and 1 tiny ball which I used for testing 😉 Now take banana leaf / polythene sheet, grease it with little oil / ghee, take a ball keep on the banana leaf and flatten it with your fingers, it should be slightly thick.
Heat oil (enough for the athirasams to immerse fully) in a kadai in parallel. Oil should not be fuming hot, lower the flame when you drop the athirasam as it will get cooked quickly.
Carefully drop one athirasam, it will first float on top.
Then slowly it will puff up, carefully flip over and cook in low flame till reddish brown on both the sides. Do not cook in high flame.
Press it with a ladle to drain excess oil, then drain in tissue paper.
Serve Athirasam with tea.
Notes
- Rice Flour Texture - I usually grind the rice when it still has little moisture. This helps to get semi fine flour which gives good texture to Adhirasam.
- Jaggery Syrup Stage - Always check syrup in water to see if it forms soft ball. Once you reach that stage switch off immediately to avoid overcooking.
- Resting the Dough - The dough must rest overnight. It becomes tighter and easier to shape it next day.
- Frying Temperature - Keep the flame low to medium. If the oil is hot, Adhirasam will quickly brown outside and still uncooked inside.
- Dough - If the dough becomes too tight next day, I usually add a few drops of hot water or ghee and knead it softly before shaping.
Nutrition
Serving: 25g | Calories: 113kcal | Carbohydrates: 25g | Protein: 1g | Fat: 1g | Saturated Fat: 0.3g | Polyunsaturated Fat: 0.1g | Monounsaturated Fat: 0.2g | Cholesterol: 1mg | Sodium: 1mg | Potassium: 19mg | Fiber: 0.2g | Sugar: 13g | Vitamin A: 0.01IU | Vitamin C: 0.02mg | Calcium: 10mg | Iron: 0.3mg
The post Adirasam | Adhirasam appeared first on Sharmis Passions.


 Recipe")


