Before the modern Internet existed, there were still plenty of ways of connecting with other computer users “online”, although many of them might seem completely foreign to those of us in the modern era. One of those systems was the Bulletin Board System, or BBS, which would have been a single computer, often in someone’s home, connected to a single phone line. People accessing the BBS would log in if the line wasn’t busy, leave messages, and quickly log out since the system could only support one user at a time. While perhaps a rose-tinted view, this was a more wholesome and less angsty time than the modern algorithm-driven Internet, and it turns out these systems are making a bit of a comeback as a result.
The video by [The Retro Shack] sets up a lot of this history for context, then, towards the end, uses a modern FPGA-based recreation called the Commodore 64 Ultimate to access a BBS called The Old Net, a modern recreation of what these 80s-era BBS systems were like. This involves using a modern networking card that allows the C64 to connect to Wi-Fi access points to get online instead of an old phone modem, and then using a terminal program called CCGMS to connect to the BBS itself. Once there, users can access mail, share files, and even play a few games.
While the video is a very basic illustration of how these BBS systems worked and how to access one, it is notable in that it’s part of a trend of rejecting more modern technology and systems in favor of older ones, where the users had more control. A retro machine like a C64 or Atari is not required either; modern operating systems can access these with the right terminal program, too. A more in-depth guide to the BBS can be found here for those looking to explore, and we’ve also seen other modern BBS systems recently.
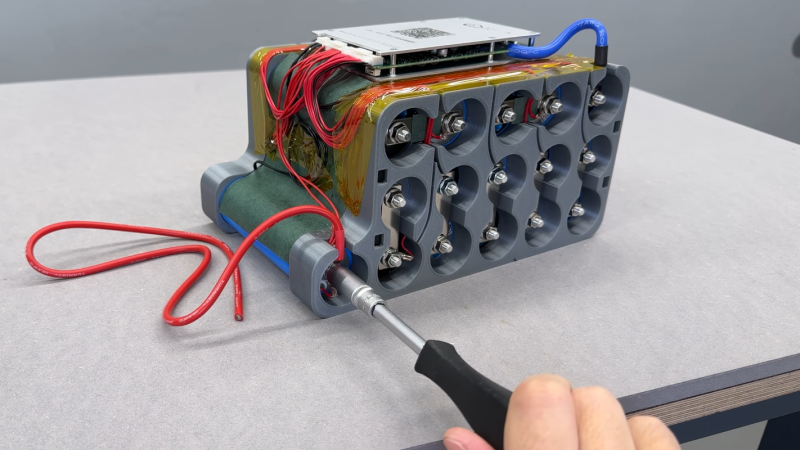
Lithium batteries have taken over as the primary battery chemistry from applications ranging from consumer electronics to electric vehicles and all kinds of other things in between. But the standard lithium ion battery has a few downsides, namely issues operating at temperature extremes. Lead acid solves some of these problems but has much lower energy density, and if you want to split the difference with your own battery you’ll need to build your own lithium iron phosphate (LiFePO4) pack.
[Well Done Tips] is building this specific type of battery because the lead acid battery in his electric ATV is on the decline. He’s using cylindrical cells that resemble an 18650 battery but are much larger. Beyond the size, though, many of the design principles from building 18650 battery packs are similar, with the exception that these have screw terminals so that bus bars can be easily attached and don’t require spot welding.
With the pack assembled using 3D printed parts, a battery management system is installed with the balance wires cleverly routed through the prints and attached to the bus bars. The only problem [Well Done Tips] had was not realizing that LiFePO4 batteries’ voltages settle a bit after being fully charged, which meant that he didn’t properly calculate the final voltage of his pack and had to add a cell, bringing his original 15S1P battery up to 16S1P and the correct 54V at full charge.
Famously, the save icon on most computer user interfaces references a fairly obsolete piece of technology: the venerable floppy disk. It’s likely that most people below the age of about 30 have never interacted with one of these once-ubiquitous storage devices, so much so that many don’t recognize the object within the save icon itself anymore. [Mads Chr. Olesen]’s kids might be an exception here, though, as he’s built a remote control for them that uses real floppy disks to select the programming on the TV.
This project partially began as a way to keep the children from turning into zombies as a result of the modern auto-play brainrot-based economies common in modern media. He wanted his kids to be able to make meaningful choices and then not get sucked into these types of systems. The floppy disk presents a perfect solution here. They’re tangible media and can actually store data, so he got to work interfacing a real floppy disk drive with a microcontroller. When a disk is inserted the microcontroller wakes up, reads the data, and then sends out a command to stream the relevant media to the Chromecast on the TV. When the disk is removed, the microcontroller stops play.
Like any remote, this one is battery powered as well, but running a microcontroller and floppy disk drive came with a few challenges. This one is powered by 18650 lithium cells to help with current peaks from the drive, and after working out a few kinks it works perfectly for [Mads] children. We’ve seen a few other floppy disk-based remote controls like this one which replaces the data stored on the magnetic disc with an RFID tag instead.
For switching high-powered loads from a microcontroller, or for switching AC loads in general, most of us will reach into the parts bin and pull out a generic relay of some sort. Relays are fundamental, proven technologies to safely switch all kinds of loads. They do have their downsides, though, so if you need silent operation, precise timing, or the ability to operate orders of magnitude more times you might want to look at a triac instead. These solid state devices can switch AC loads unlike other transistor-based devices and [Ray] at OpenSprinkler is here to give us an overview on how to use them.
The key to switching an AC load is bi-directional conductivity. A normal transistor or diode can only conduct in one direction, so if you try to switch an AC load with one of these you’ll end up with what essentially amounts to a bad rectifier. Triacs do have a “gate” analogous to the base of a bipolar junction transistor, but the gate will trigger the triac when current flows in either direction as well. The amount of current needed to trigger the triac does depend on the state of the switched waveform, so it can be more complex to configure than a relay or transistor in some situations.
After going through some of the theory around these devices, [Ray] demonstrates how to use them with an irrigation system, which are almost always operating on a 24VAC system thanks to various historical quirks. This involves providing the triacs with a low voltage source to provide gate current as well as a few other steps. But with that out of the way, switching AC loads with triacs can become second nature. If you prefer a DC setup for your sprinklers, though, [vinthewrench] has demonstrated how to convert these sprinkler systems instead.
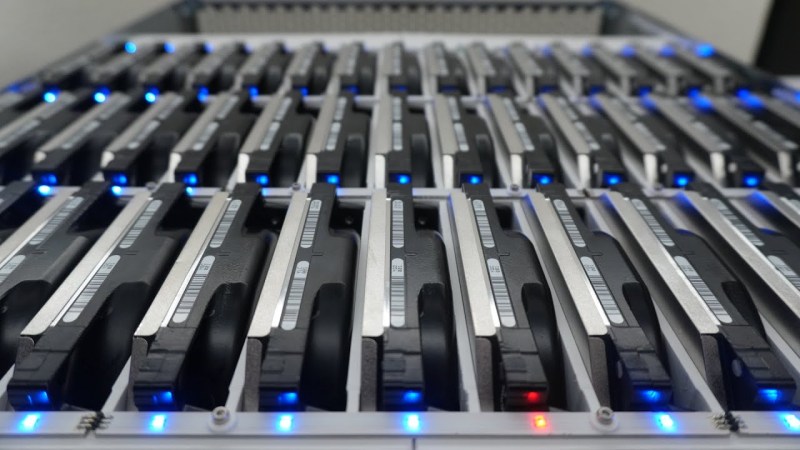
Self-hosting a few services on one’s own hardware is a great way to wrest some control over your online presence while learning a lot about computers, software, and networking. A common entry point is using an old computer or Raspberry Pi to get something like a small NAS, DNS-level adblocker, or home automation service online, but the hobby can quickly snowball to server-grade hardware in huge racks. [Dennis] is well beyond this point, with a rack-mounted NAS already up and running. This build expands his existing NAS to one which can host a petabyte of storage out of consumer-grade components.
The main reason for building this without relying too much on server-grade gear is that servers are generally designed to run in their own purpose-built rooms away from humans, and as a result don’t generally take much consideration for how loud that environment becomes. [Dennis] is building a lot of the components from scratch for this build including the case, the backplanes for the drives, and a backplane tester. With backplanes installed it’s time to hook up all of the data connections thanks to a few SAS expanders which provide all of the SATA connections for the 45 drives.
There are two power supplies here as well, although unlike a server solution these aren’t redundant and each only serves half the drives. This does keep it running quieter, along with a series of Noctua fans that cool the rest of the rack. The build finishes off with an LED strip which provides a quick visual status check for each of the drives in the bay. With that it’s ready for drives and to be connected to the network. It’s a ton of wiring and soldering, and great if you don’t want to use noisy server hardware. And, if you don’t need this much space or power, we’ve seen some NAS builds that are a bit on the smaller side as well.
Recently, [Vinnie] aka [vinthewrench] moved from Oregon to Arkansas to start a farmstead. This is a style of farming that focuses not just on a profitable farm where produce is sold at market, but also on a homestead where much of one’s own food is grown on the farm as well. Like any farm, though, it’s extremely hard work that takes a tremendous amount of time. Automation and other technology can make a huge impact in these situations, and [Vinnie] is rolling out his own software stack to help with this on his farm.
He calls his project the Pi Internet of Things, or PioT, and as its name suggests is based around the Raspberry Pi. Since this will all be outdoors and exposed to the extremes of Arkansas weather, everything built under the auspices of this project prioritizes ruggedness, stability, and long-term support, all while avoiding any cloud service. The system also focuses on being able to ride through power outages. The server side, called piotserver, uses a REST API to give the user access to the automation systems through a web interface
[Vinnie] also goes into detail about why existing systems like Home Assistant and Open Sprinkler wouldn’t work in his situation, and why a ground-up solution like this is more appropriate for his farm. This post is largely an overview of his system, but some of his other posts go into more detail about things like integrating temperature sensors, rainfall monitoring, controlling irrigation systems, and plenty of other farm automation tasks that are useful for any farmer or gardener.
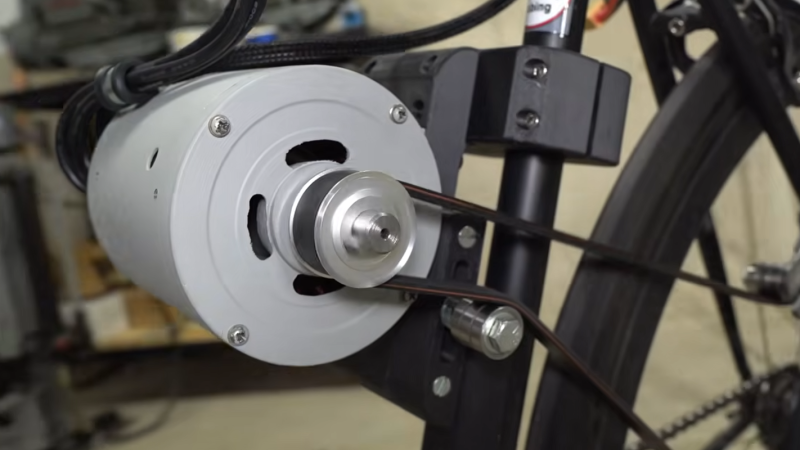
AC induction motors are everywhere, from ceiling fans to vehicles. They’re reliable, simple, and rugged — but there are some disadvantages. It’s difficult to control the speed without complex electronics, and precisely placing the shaft at a given angle is next to impossible. But the core of these common induction machines can be modified and rewired into brushless DC (BLDC) motors, provided you have a few tools on hand as [Austin] demonstrates.
To convert an AC induction motor to a brushless DC electric motor (BLDC), the stator needs to be completely rewired. It also needs a number of poles proportional to the number of phases of the BLDC controller, and in this case the 24-pole motor could accommodate the three phases. [Austin] removed the original stator windings and hand-wound his own in a 16-pole configuration. The rotor needs modification as well, so he turned the rotor on a lathe and then added a set of permanent magnets secured to the rotor with JB Weld. From there it just needs some hall effect sensors, a motor controller and power to get spinning.
At this point the motor could be used for anything a BLDC motor would be used. For this project, [Austin] is putting it on a bicycle. A 3D printed pulley mounts to the fixed gear on the rear wheel, and a motor controller, battery, and some tensioners are all that is left to get this bike under power. His tests show it comfortably drawing around 1.3 kW so you may want to limit this if you’re in Europe but other than that it works extremely well and reminds us of one of our favorite ebike conversions based on a washing machine motor instead of a drill press.
Windsurfing has experienced a major decline in popularity in the last few decades as the sport’s culture failed to cater to beginners at the same time that experienced riders largely shifted to kiteboarding. While it’s sad to see a once-popular and enjoyable sport loose its mass market appeal, it does present a unique opportunity for others as there’s cheap windsurfing gear all over the online classifieds now. [Dane] recently found that some of these old boards are uniquely suited to be modified into electric surfboards.
The key design element of certain windsurfers that makes this possible is the centerboard, a fin mounted on the windsurfer extending down into the water that resists the lateral force of the sail, keeping the board moving forward instead of sideways. [Dane] used this strengthened area of the board to mount a submerged electric motor, with all of the control electronics and a battery on the top of the board. The motor controller did need a way to expel excess heat while being in a sealed waterproof enclosure, but with a hole cut in the case and a heat sink installed on top of it, this was a problem quickly solved.
The operator control consists of a few buttons which correspond to pre-selected speeds on the motor. There’s no separate control input for steering, though; in order to turn this contraption the operator has to lean the board. With some practice it’s possible to stand up on this like any other electric surfboard and scoot around [Dane]’s local lake. For the extreme budget version of this project be sure to check out [Ben Gravy]’s model which involves duct taping two cheap surfboards together instead.
The line between a Linux user and a Linux power user is a bit gray, and a bit wide. Most people who install Linux already have more computer literacy than average, and the platform has long encouraged experimentation and construction in a way macOS and Windows generally aren’t designed for. Traditional Linux distributions often ask more of their users as well, requiring at least a passing familiarity with the terminal and the operating system’s internals especially once something inevitably breaks.
In recent years, however, a different design philosophy has been gaining ground. Immutable Linux distributions like Fedora Silverblue, openSUSE MicroOS, and NixOS dramatically reduce the chances an installation behaves erratically by making direct changes to the underlying system either impossible or irrelevant.
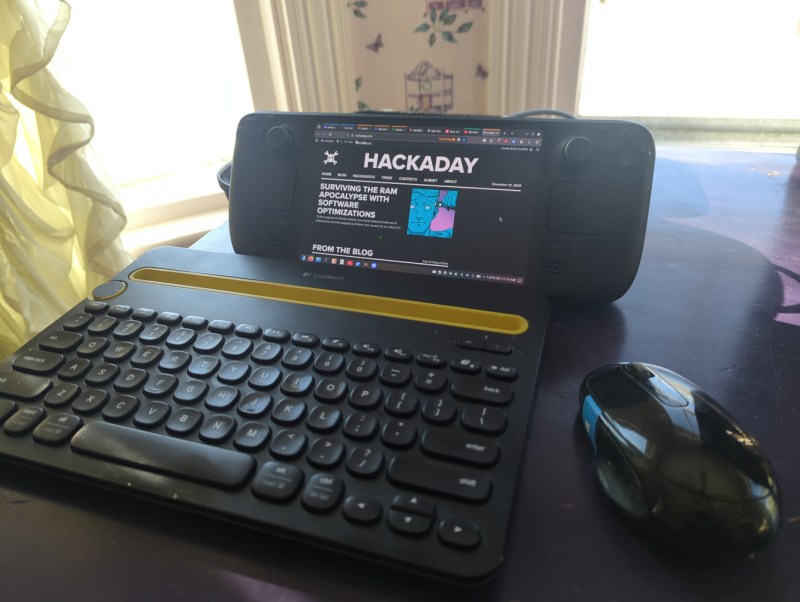
SteamOS fits squarely into this category as well. While it’s best known for its console-like gaming mode it also includes a fully featured Linux desktop, which is a major part of its appeal and the reason I bought a Steam Deck in the first place. For someone coming from Windows or macOS, this desktop provides a familiar, fully functional environment: web browsing, media playback, and other basic tools all work out of the box.
As a Linux power user encountering an immutable desktop for the first time, though, that desktop mode wasn’t quite what I expected. It handles these everyday tasks exceptionally well, but performing the home sysadmin chores that are second nature to me on a Debian system takes a very different mindset and a bit of effort.
Deck Does What Others Don’t
I’ve owned my Deck for about a year now. Beyond gaming, the desktop mode has proven its value: it uses what essentially amounts to laptop hardware in a much smaller form factor, and is arguably more portable as a result. It easily plugs in to my existing workstation docks, so it’s easy to tote around, plug in, and start using. With a Bluetooth keyboard and mouse along with something to prop it up on, it makes an acceptable laptop substitute in certain situations as well. It’s also much more powerful than most of my other laptops with the possible exception of my M1 Macbook Air.
However, none of the reviews I watched or read circa 2023-2024 fully explained what an immutable OS was and how it’s different than something like Ubuntu or Fedora. Most of what I heard was that it runs “a modified version of Arch” with a “full Linux desktop” and little detail other than that, presumably to appeal to a wider audience that would be used to a fairly standard Windows PC otherwise. As a long-time Linux user the reviews I read led me to believe I’d probably just boot it up, open a terminal, and run pacman -S for all of the tools and software I’d normally install on any of my Debian machines.
Anyone familiar with immutable operating systems at this point will likely be laughing at my hubris and folly, although it’s not the first time I jumped into a project without a full understanding of what I would be doing. Again, having essentially no experience with immutable operating systems beyond having seen these words written together on a page, I was baffled at what was happening once I got my hands on my Deck and booted it into the desktop mode. I couldn’t install anything the way I was used to, and it took an embarrassing amount of time before I realized even basic things like Firefox and LibreOffice had to be installed with Flatpaks. These are self-contained Linux applications that bundle most of their own dependencies and run inside a sandbox, rather than relying on the host system’s libraries. In SteamOS they are installed in the home directory, which is important because any system updates from Valve will rewrite the entire installation except the home directory. They’re also installed from an app store of sorts, which also took some getting used to as I’ve been spoiled by about 20 years of apt having everything I could ever need.
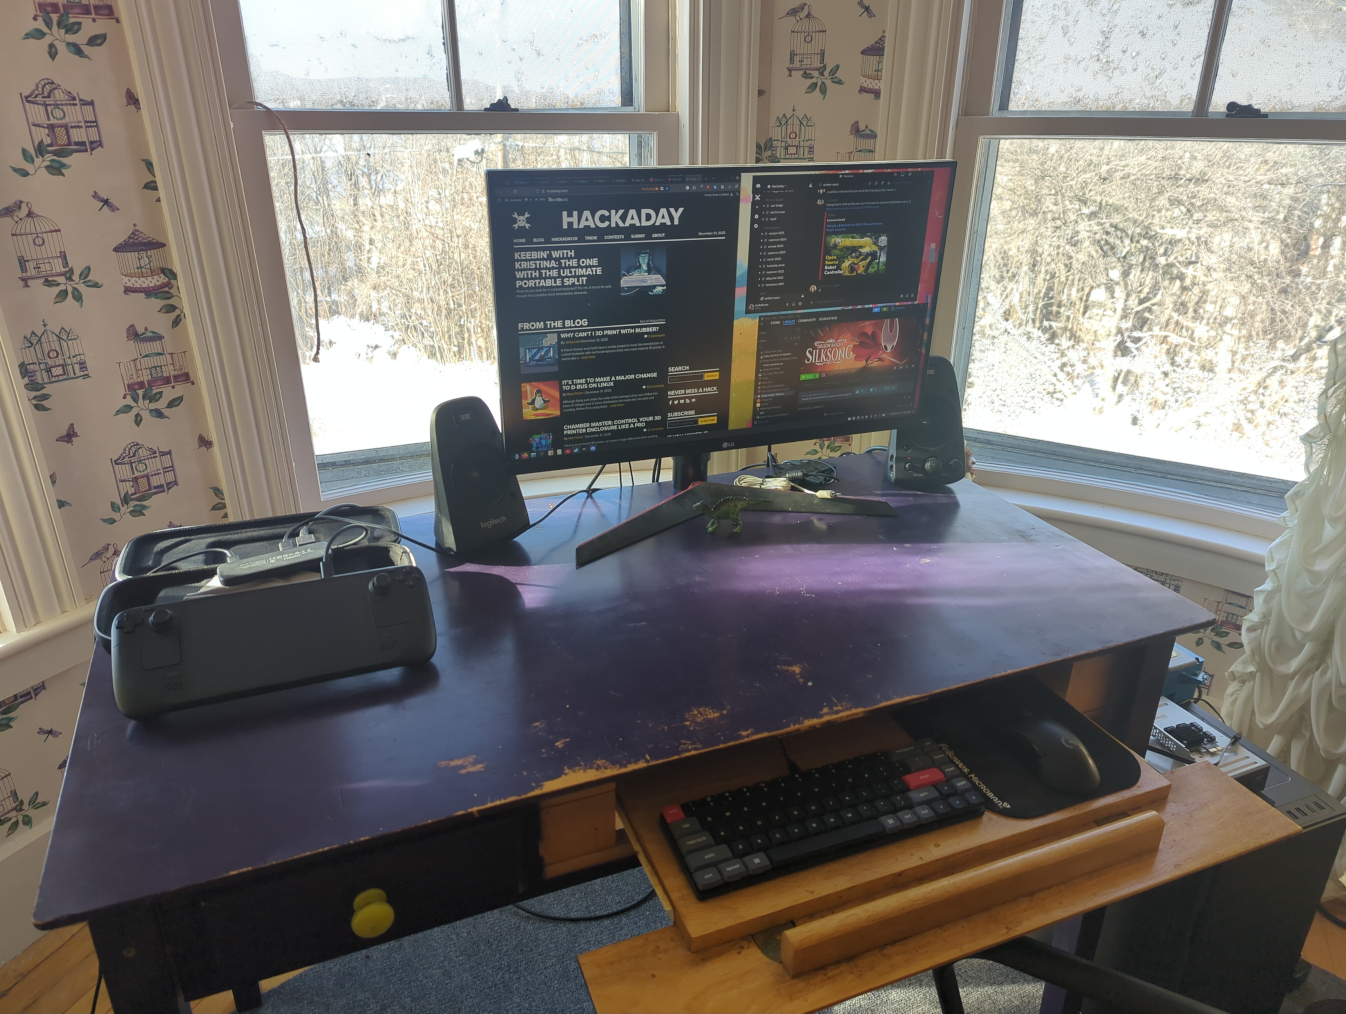
My main workstation. With a USB-C dock I can use any modern computer here, including the Steam Deck
But after that major hiccup of learning what my operating system was actually doing, it was fairly easy to get it working well enough to browse the internet, write Hackaday articles, and do anything else I could do with any other average laptop. This is the design intent of the Steam Deck, after all. It’s not meant for Linux power users, it’s meant as a computer where the operating system gets out of the way and lets its user play games or easily work in a recognizable desktop environment without needing extensive background Linux knowledge. That doesn’t mean that power users can’t get in and tinker, though; in fact tinkering is almost encouraged on this device. It just means that if they’re used to Debian, like I am, they have to learn a completely new way of working than they’re used to.
Going Beyond Intended Use
To start, I use a few tools on my home network that make it easier for me to move from computer to computer without interrupting any of my workflows. The first is Syncthing, which is essentially a self-hosted and decentralized Dropbox replacement that lets me sync files and folders automatically across various computers. Installing Syncthing is straightforward with a Flatpak but getting things to run at boot is not as easy. I did eventually get it working seamlessly by following this guide, though. This was my first learning experience on how to start system processes outside of a simple systemd command. Syncthing is a non-negotiable for me at this point as well and is essentially load-bearing in my workflow, and is actually the main reason I switched my Gentoo install from openRC to systemd since openRC couldn’t easily run a task at boot time as a non-root user.
I’m also a fan of NFS for network file sharing (as the name implies) and avoid Samba to stay away from any potential Windows baggage, although it’s generally a more supported file sharing protocol. Nonetheless, my media libraries all stream over my LAN using NFS, and my TrueNAS virtual machine on my Proxmox server also uses this protocol, so it was essential to get this working on my Deck as well.
Arguably Samba would be easier but we are nothing without our principles, however frivolous. On a Debian machine I would just edit /etc/fstab with the NFS share and mount points and be done, but consistently mounting my network shares at boot in SteamOS has been a bit elusive. Part of the problem is how SteamOS abstracts away root access in ways that are different from a traditional Linux installation, so things that need to be done at boot by root are not as easy to figure out. I have a workaround where I run a script to mount them quickly when I need them and it’s been working well enough that I haven’t figured out a true solution to this problem yet, but generally SteamOS doesn’t seem to be designed for persistent system-level configuration like this.
The only other major piece of infrastructure I run on all of my machines is Tailscale, which lets me easily configure a VPN for all of my devices so I can access them from anywhere with a network connection, not just when directly connected to my LAN. This was one of the easier things to figure out, as the Tailscale devs maintain an install script which automates the process and keeps the user from needing to do anything overly dramatic. This Reddit post goes into some Steam Deck-specific details that are helpful as well.
Ups and Downs
There were a few minor niggles for me even after sorting these major issues out. The Deck is actually quite capable of running virtual machines with its relatively powerful hardware, but the only virtualization software I’ve found as a Flatpak is Boxes, which is a bit limiting for those used to something like VMWare Workstation or KVM. Still, it works well enough that I’ve been able to experiment running other Linux operating systems easily on the Deck, and even tried out an old Windows XP image I have which I keep mostly so I can play my original copy of Starcraft without having to fuss with Wine.
Other than that, the default username “deck” trips me up in the terminal because I often forget it’s not the same username that I use for the the other machines on my network. The KDE Plasma desktop is also running X11 by default, and since I’ve converted all of my other machines to Wayland in an attempt to modernize, the Deck’s desktop feels a bit dated to me in that respect. My only other gripe is cosmetic in nature: I do prefer GNOME, and although SteamOS uses KDE as its default desktop environment I don’t care so deeply that I’ve tried to make any dramatic changes.
Provided there’s something to prop the Deck against, it can make a good laptop replacement using a Bluetooth mouse and keyboard in certain situations as well.
There have been a number of surprising side effects of running a system like this as well. Notably, the combination of Tailscale and Syncthing running at boot, even in gaming mode, lets me sync save states from non-Steam games, including emulators, so I can have a seamless experience moving from gaming on my Steam Deck to gaming on my desktop. (I’m still running this hardware for my desktop with the IME disabled.)
I’d actually go as far as recommend this software combination to anyone gaming across multiple machines based on how well it works. Beyond that major upside, I’ll also point out that running Filezilla as a Flatpak that gets automatically updated makes it much less annoying about reminding the user that there’s an update available, which has always been a little irksome to me otherwise.
The Steam Deck as a platform has also gotten a few of my old friends back into gaming after years of life getting in the way of building new desktop computers. It’s a painless way of getting a capable gaming rig, with the Steam Machine set to improve Valve’s offerings in this arena as well. So being able to reconnect with some of my older friends over a game of Split Fiction or Deep Rock Galactic has been a pleasant perk as well, although the Deck’s cultural cachet in this regard is a bit outside of our scope here.
I’ll also point out that this isn’t the only way of using the Deck as a generic Linux PC, either. I’ve mostly been trying to stick within the intended use of SteamOS as immutable Linux installation, but it’s possible to ignore this guiderail somewhat. The read-only filesystem that’s core to the OS’s immutability can be made writable with a simple command, and from there it behaves essentially like any other Arch installation.
Programs can be installed via pacman and, once everything is configured to one’s liking, the read-only state can be re-enabled. The only downside of this method is that a system update from Valve will wipe all of these changes. System updates don’t happen incredibly often, though, and keeping track of installed packages in a script that can be run after any updates will quickly get the system back to its pre-update condition. Going even farther than that, though, it’s also possible to install any operating system to a microSD card and use the Deck as you might any other laptop or PC, but for me this misses the point of learning a new tool and experiencing a different environment for its own sake, and also seems like a bit of overkill when there’s already a fully functional Linux install built into the machine.
An Excellent New Tool
Although my first experience with an immutable Linux distribution was a bit rough around the edges, it felt a lot like the first time I tried Linux back in 2005, right down to not entirely understanding how software was supposed to be installed at first. I was working with something new without fully grasping what I’d signed up for, and moments like using a software repository for the first time were genuinely eye-opening. Back then, not having to hunt down sketchy .exe files on the Internet just to get basic functionality on my computer felt revelatory; today, immutable distributions offer a similar shift, trading some initial confusion on my part for a system that’s more reliable and far harder to break. Even after years of using mainstream Linux distributions, there’s still plenty to learn, and that process of figuring things out remains part of the fun.
There’s never been a better time to get into Linux, either. Hardware prices keep climbing as a result of the AI bubble, all while Microsoft continues to treat perfectly functional PCs as e-waste and tightens the screws on their spyware-based ecosystem that users have vanishingly little control over. Against that backdrop, immutable Linux distributions like SteamOS, Bazzite, Fedora Silverblue, or even the old standbys like Mint, Debian, and Arch offer a way to keep using capable hardware without spending any money.
Even for longtime Debian system administrators and power users, immutable distributions are a new tool genuinely worth learning, with the caveat that there will likely be lots of issues like mine that crop up but which aren’t insurmountable. These tools represent a different way of thinking about what an operating system should be, though, and it’s exciting to see what that shift could mean for the future of PCs and gaming outside the increasingly hostile Microsoft–Apple duopoly.
Living without standard utility hookups like electricity, Internet, water, and sewer comes with a whole host of challenges, all of which are most commonly solved by spending lots of money. For electricity, a solar array or a generator is fairly common. The Internet can similarly be accessed via a satellite link if wires aren’t available. For water, most people will drill a well, but that gets similarly expensive. [Cranktown City] recently bought an off-grid home and needed a way to get water to it on a budget, so he built this water trailer instead.
The trailer started off as a standard single-axle utility trailer. The weight rating was probably around 3,500 pounds or 1588 kg. A few support structures were welded in. The supports serve double duty as a frame for two IBC totes, which can hold about 550 gallons or 2082 liters of water. The trailer also got upgraded wiring, including some extra wires to support a backup camera. The two totes were then plumbed together with a ball valve for an outlet. That valve was mated to a motor that can be remotely activated from within a truck to dump the water out into a cistern.
On the cistern side, [Cranktown City] welded up a door with a linear actuator and a remote control. When he’s ready to dump the water into the cistern, he can easily back up the trailer using the backup camera, open the door to the cistern remotely, and then activate the ball valve on the trailer to start filling the reservoir. It’s a clever solution to bringing water to his off-grid property at a fraction of the cost of a drilled well. We’ve seen some other unique ways to live off-grid as well, like this hydroelectric generator, which might offset the cost of an expensive solar array.
Unlike Texas Instruments, whose graphing calculators have famously not made technological improvements in decades despite keeping the same price tag, HP has made a few more modern graphing calculators in the last few years. One of which is the HP Prime which boasts hardware from the mid-2010s including an ARM processor, a color screen, and rechargeable lithium battery. But despite this updated hardware it’s still using micro-USB for data and charging. [David] wanted to fix that by giving this calculator a USB-C port.
The first steps were disassembling the calculator case and removing the micro-USB port. The PCB is glued to the LCD screen which isn’t ideal, but he was able to work on it with everything attached. The parts are small enough to need a microscope, and with a hot air station he was quickly able to remove the USB port. His replacements from a generic online retailer were able to be soldered without much effort, but there was one major complication. The new USB-C ports didn’t account for the “On The Go” mode supported by micro-USB and were shorting a pin to ground which put the calculator into “host” mode instead of acting as a device. But using the microscope and cutting a trace on the PCB disabled this mode permanently and got the calculator working properly.
As far as modernizing calculators go, it seems like the HP Prime checks a lot of boxes, with the major downside that the LCD screen and more powerful processor means that the battery needs to be charged more often than the old TI calculators. Rather than carry a dongle around everywhere, [David] found this to be a much more efficient change to his trusty HP. If you’re still stuck using TI calculators, though, there are a few ways to modernize those as well like this build which adds a lithium battery or this one which ports a few Game Boy games to the platform.
Besides being a fun way to pass time, video gaming is a surprisingly affordable hobby per unit time. A console or budget PC might only cost a few hundred dollars, and modern games like Hollowknight: Silksong can provide 40-60 hours of experience for only around $20 USD. This value proposition wasn’t really there in the 80s, where arcade cabinets like Gauntlet might have cost an inflation-adjusted $8 per hour in quarters. This paradigm shift is great for gamers, but hasn’t been great for arcade owners. [PrintAndPanic] wanted to bring some of that old coin munching vibe into console gaming, and so added a credit system to Super Mario 64.
The project is a fork of a decompilation of Super Mario 64, which converts the original machine code into a human-friendly format so bugs can be fixed and other modern features added. With the code available, essentially anyone can add features into the game that weren’t there already. In this case, [PrintAndPanic] is using a Raspberry Pi connected to a coin slot, so when coins are put into the game like an old arcade machine, the Raspberry Pi can tell the modified version of Super Mario 64 to add credits. These credits allow the player to run and jump, and when the credits run out Mario becomes extremely limited and barely able to outrun even the slowest Bombombs and Goombas.
With some debugging out of the way and the custom game working, [PrintAndPanic] built a custom enclosure for the game and the coin slot to turn it into a more self-contained arcade-style machine. The modified code for this project is available on the project’s GitHub page for those who want to play a tedious version of a favorite video game that costs more money than it should.
There are plenty of other modifications for this classic as well, most of which involve improving the game instead of adding a modern microtransaction-based system.
An old joke in physics is that of the “spherical cow”, poking fun at some of the assumptions physicists make when tackling a new problem. Making the problem simple like this can help make its fundamentals easier to understand, but when applying these assumptions to real-world problems these assumptions are quickly challenged. Which is what happened when [Seth] from Berm Peakattempted to tow a huge trailer with a bicycle — while in theory the bike just needs a big enough gear ratio he quickly found other problems with this setup that had to be solved.
[Seth] decided on a tandem bike for this build. Not only does the second rider add power, but the longer wheelbase makes it less likely that the tongue weight of the trailer will lift the front wheel off the ground. It was modified with a Class 3 trailer hitch, as well as a battery to activate the electric trailer brakes in case of an emergency. But after hooking the trailer up the first time the problems started cropping up. At such a high gear ratio the bike is very slow and hard to keep on a straight line. Some large, custom training wheels were added between the riders to keep it stable, but even then the huge weight still caused problems with the chain and even damaged the bike’s freehub at one point.
Eventually, though, [Berm Peak] was able to flat tow a Ford F-150 Lightning pulling a trailer a few yards up a hill, at least demonstrating this proof of concept. It might be the absolute most a bicycle can tow without help from an electric motor, although real-world applications for something like this are likely a bit limited. He’s been doing some other bicycle-based projects with more utility lately, including a few where he brings abandoned rental e-bikes back to life by removing proprietary components.