❌

Reading view

There are new articles available, click to refresh the page.

BASIC on a Calculator Again

We are always amused that we can run emulations or virtual copies of yesterday’s computers on our modern computers. In fact, there is so much power at your command now that you can run, say, a DOS emulator on a Windows virtual machine under Linux, even though the resulting DOS prompt would probably still perform better than an old 4.77 MHz PC. Remember when you could get calculators that ran BASIC? Well, [Calculator Clique] shows off BASIC running on a decidedly modern HP Prime calculator. The trick? It’s running under Python. Check it out in the video below.

Think about it. The HP Prime has an ARM processor inside. In addition to its normal programming system, it has Micropython as an option. So that’s one interpreter. Then PyBasic has a nice classic Basic interpreter that runs on Python. We’ve even ported it to one or two of the Hackaday Superconference badges.

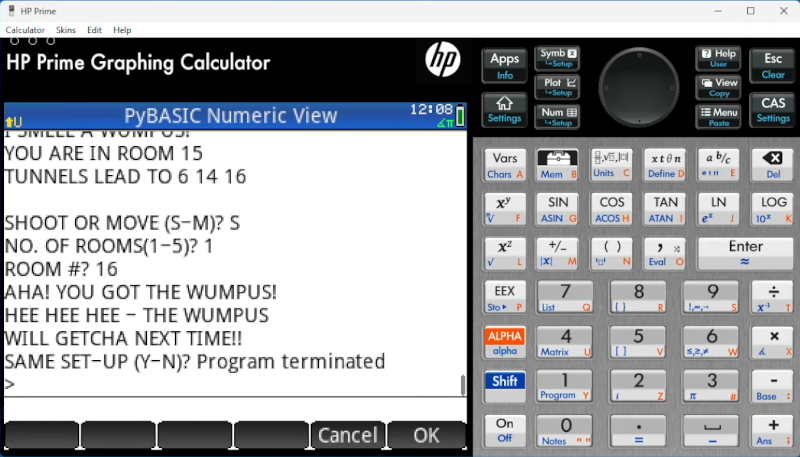
If you have a Prime, this is a great way to make it even easier to belt out a simple algorithm. Of course, depending on your age, you might prefer to stick with Python. Fair enough, but don’t forget the many classic games available for Basic. Adventure and Hunt the Wumpus are two of the sample programs included.

Graphing Calculator Gets USB-C Upgrade

Unlike Texas Instruments, whose graphing calculators have famously not made technological improvements in decades despite keeping the same price tag, HP has made a few more modern graphing calculators in the last few years. One of which is the HP Prime which boasts hardware from the mid-2010s including an ARM processor, a color screen, and rechargeable lithium battery. But despite this updated hardware it’s still using micro-USB for data and charging. [David] wanted to fix that by giving this calculator a USB-C port.

The first steps were disassembling the calculator case and removing the micro-USB port. The PCB is glued to the LCD screen which isn’t ideal, but he was able to work on it with everything attached. The parts are small enough to need a microscope, and with a hot air station he was quickly able to remove the USB port. His replacements from a generic online retailer were able to be soldered without much effort, but there was one major complication. The new USB-C ports didn’t account for the β€œOn The Go” mode supported by micro-USB and were shorting a pin to ground which put the calculator into β€œhost” mode instead of acting as a device. But using the microscope and cutting a trace on the PCB disabled this mode permanently and got the calculator working properly.

As far as modernizing calculators go, it seems like the HP Prime checks a lot of boxes, with the major downside that the LCD screen and more powerful processor means that the battery needs to be charged more often than the old TI calculators. Rather than carry a dongle around everywhere, [David] found this to be a much more efficient change to his trusty HP. If you’re still stuck using TI calculators, though, there are a few ways to modernize those as well like this build which adds a lithium battery or this one which ports a few Game Boy games to the platform.

An RPN Calculator and a Bonus VFD Clock From Casio Revival

The clock and the rebuilt calculator from which its VFD was donated.

Have you heard the saying β€œthe problem is the solution”? It seems to originate in the permaculture movement, but it can apply equally well to electronics. Take the problem [shiura] had: a Casio Mini CM-602 that had let out the magic smoke. The solution was a twofer: rebuild the Casio into a modern number cruncher with Reverse Polish Notation (RPN), and save the Vacuum Fluorescent Display (VFD) for a gorgeous WiFi clock.

[shiura]’s write-up includes a helpful guide for reverse engineering the pins on this sort of VFD, if you don’t happen to have the same model calculator (or VFD tube) they’re working with. If you’ve done this sort of thing, you know what to expect: power it up and kill power to the pins, one by one, to map out which segments or characters go out, thereby identifying the anodes and grid electrodes. The cathodes had already been ID’d from looking at the PCB. After that it’s just a matter of wiring the VFD to an ESP32 via a transistor array to get the voltages right, and voila! Clock. The code and case design files for this clock β€” including an editable .blend β€” are available via GitHub.

The calculator half of the project is an incredibly elegant hack that relies on the fact that the Casio’s CPU has the same pin pitch as modern micros: 2.54 mm, or 0.1β€³, so an RP2040 zero can sit in the footprint of the original CPU, scanning the keypads with its GPIO. Then an I2C display is separately wired up to replace the clockified VFD. Perhaps some driver circuitry for the VFD died, or [shiura] salvaged the display before deciding to save the calculator, because otherwise we see no reason why this brain transplant couldn’t be done while keeping the original display. Admittedly having two lines on the display instead of one make the β€œnew” calculator a tad more usable. The code for that is also available on GitHub, and while the readme is in Japanese, machine translations have gotten pretty good and the code is quite readable on its own.

Longtime readers will likely be familiar with [shiura]’s work, with a number of finely crafted clocks having been featured from the Japanese maker, along with vintage pocket computer repairs. Bringing both together makes this twin hack particularly on-brand.

❌