Reading view

There are new articles available, click to refresh the page.

High Protein Lentil Trail Mix, 3 Ways Peanut gochujang, Indian Chivda, Nacho cheese flavors

By: Richa

Lentil trail mix is a super delicious snack, and here I will show you three ways to make it! Peanut gochujang, Indian Chivda, Doritos Nacho flavor! This high protein, savory granola is easy and fun to make and a perfect breakfast or snack. (16 grams of protein and fiber per serving!)

Indian-spiced savory lentil granola in a bowl

When I shared my red lentil granola recipe, quite a few of you asked for a savory version, and today I’m sharing three different ways to make savory lentil granola/trail mix! Make all three flavors of this delicious lentil trail mix, or triple your favorite flavoring and make one big batch.

Why three ways? Because I just couldn’t decide between these amazing flavors: Indian-spiced, peanut gochujang, and nacho spice. So, I decided to let you choose for yourself!

nacho cheese lentil granola in the jar

This trail mix/savory granola recipe uses split red lentils (aka masoor dal) as the base. You cook the red lentils on the stovetop until they are just al dente, and they roast up to be light and crisp in the oven with your seasonings of choice. 

The result is a protein-packed snack that is absolutely full of flavor, no matter which seasoning mix you choose! A serving of this trail mix has around 16 grams of protein and 16 grams of fiber. You can amp up the protein even more by folding in hemp seeds into the granola once it has finished roasting.

peanut gochujang savory lentil granola on the baking pan after baking

The Indian-spiced lentils are inspired by Indian chivda, which usually uses rice flakes or other flaked or puffed grains. It is spicy savory with some balancing sweet from raisins or dates and is fantastically delicious! 

For the nacho spiced savory lentil trail mix, a took inspiration from my nacho cheese granola bars. It’s your favorite snacking chip in crisp trail mix form! you can adjust it to your flavor preference. Add more cayenne for more heat or more nutritional yeast for more cheesiness.

Indian-spiced savory lentil granola in a jar

If you love gochujang, definitely try the peanut gochujang lentil trail mix which has an amazing savory-spicy flavor with a hint of sweetness. It pairs so well with the crunchy peanuts! Comment below on which one will you try first!

Why You’ll Love Lentil Trail Mix

  • protein- and fiber-packed breakfast or snack with 16 grams each of protein and fiber per serving!
  • make all three flavors or choose from 3 amazing flavors: Indian-spiced, peanut gochujang, or nacho cheese
  • deep flavors and incredible textures
  • naturally gluten-free with soy-free and nut-free options included
spoon taking a bite of peanut gochujang savory lentil granola

Continue reading: High Protein Lentil Trail Mix, 3 Ways Peanut gochujang, Indian Chivda, Nacho cheese flavors

The post High Protein Lentil Trail Mix, 3 Ways Peanut gochujang, Indian Chivda, Nacho cheese flavors appeared first on Vegan Richa.

Kothavarangai Paruppu Usili - Indian Cluster Beans Curry

By: Priya
A hand holding a pan filled with Kothavarangai Paruppu Usili.

Kothavarangai Paruppu Usili - Indian Cluster Beans Curry

This classic South Indian curry features tender cluster beans (Kothavarangai) stir-fried with soaked, spiced, and crumbled lentils. Paruppu Usili is a protein-rich, vegan, and gluten-free side dish that pairs perfectly with Mor Kozhumbu, Rasam, Sambar, and steamed rice. A wholesome and comforting Tamil-style recipe that brings authentic flavors to your everyday South Indian meals. What […]

READ:Kothavarangai Paruppu Usili - Indian Cluster Beans Curry

BBQ Lentil Burger

By: Richa

A hearty BBQ lentil burger topped with quick and easy creamy coleslaw is a perfect summer meal! Serve in a bun or over a crisp salad. (nut-free with gluten-free and soy-free options). This post was originally published May 6, 2013

BBQ lentil burger in a bun with lettuce, tomato, onion, and slaw

Hello summer! It’s time for all things BBQ, and this BBQ lentil burger combines so many summer flavors in one delicious dish.

The patties have split red lentils, which cook really quickly, and they are loaded with BBQ sauce, inside and out! You can make them on the stovetop or in the oven.

close-up of BBQ lentil burger

These burgers are also absolutely loaded with veggies! Finely chopped cauliflower, carrots, garlic, ginger, and bell pepper give the patties bulk, texture, and flavor. These are veggie veggie burgers. Not trying to be meat anything. Just lentils and veggies and celebrating them. These veggie patties are delicious as is as well!

Serve these with a simple, creamy slaw or your favorite burger toppings on a bun, or use them to top a green salad for a lighter meal. I love adding fruit to the slaw. The original recipe was written with mango in the slaw. Mango add some juicy sweet to the creamy, tangy, crunchy slaw for amazing balance of flavor.

Why You’ll Love BBQ Lentil Burgers

  • veggie-packed!
  • easy to make in the oven or on the stovetop
  • loaded with so much amazing BBQ sauce flavor!
  • versatile – Serve on a bun with your favorite toppings or add the patties to a salad.
  • nut-free with easy soy-free and gluten-free options
BBQ lentil burger patties served on a salad

Continue reading: BBQ Lentil Burger

The post BBQ Lentil Burger appeared first on Vegan Richa.

25 Amazing Split Red Lentil Recipes

By: Richa

These split red lentil recipes will help you make the most of that jar of red lentils in your pantry. Red lentils are a budget-friendly source of protein and fiber, and they are so versatile! Use them to make soup, stew, dal, brownies, granola, bolognese, tortillas and MORE!!

image collage of split red lentil recipes: soup, curry, dal, and brownies. Text overlay.

Split red lentils are so easy to cook with. Because they are split, they cook quickly on the stove or in the Instant Pot. They simmer on the stove in about 15 minutes, and they cook in the Instant Pot in five minutes!

There are also just so many ways to cook with red lentils! You can, of course, use them as the base for soups, stews, and curries. But because they break down when you cook them and have a neutral flavor, you can use them to thicken and add protein to sauces and spreads. They can even add moisture and sneaky fiber and protein to baked goods, like brownies!

Dried split red lentils are shelf stable, so they keep for ages in an airtight container in the pantry. If your lentils are older, they can take longer to cook and need a bit more water, but they’ll still work well in the split red lentil recipes below.

Split red lentils are brown lentils that have been skinned and split. They are often labeled as just red lentils. You can find them in many stores as well as online. Red lentils can also be found in whole form, i.e they have been skinned but not split. You can use the non split red or pink lentils as well, they just take a few mins longer to cook. 1 cup of cooked split red lentils has 18g protein and 16g fiber! And rich is iron , potassium and folate. Try some of these recipes and do let me know what’s your favorite way to use red lentils!

split red lentils in a bowl with other ingredients around it

Red Lentil Dal and Soups

spoon taking a bite of red lentil spinach soup

Red Lentil Spinach Soup

4.90 from 19 votes
A cozy, creamy bowl of red lentil and spinach soup is a comforting and easy meal that has an amazing flavor! It’s a one-pot meal that’s ready in just over half an hour. Gluten-free nut-free soy-free
View Recipe
red lentil dal with spinach in a bowl with rice and veggies

Golden Red Lentil Dal (Turmeric Spinach Dal)

5 from 31 votes
This golden red lentil dal gets its vibrant color from turmeric! It's an easy lentil soup with greens that's perfect for a weeknight dinner. (gluten-free, nut-free, and soy-free)
View Recipe
panful of vegan dalcha

Vegan Dalcha

5 from 4 votes
This South Indian Lentil meat stew – Dalcha, has lentils or split peas cooked with spices, coconut milk and meat to make a hearty stew that is served with rice Biryani. We use soycurls to make a glorious vegan dalcha. Glutenfree Nutfree recipe. Soyfree option
View Recipe

Vegan Masoor Dal Tadka Indian Split Red Lentil Dal

5 from 22 votes
Restaurant-Style Masoor Dal Tadka (Indian split Red lentil Dal tempered with whole spices) is easy and to make, super comforting, creamy, and oh so flavorful! Glutenfree Soyfree nutfree coconutfree
View Recipe

Continue reading: 25 Amazing Split Red Lentil Recipes

The post 25 Amazing Split Red Lentil Recipes appeared first on Vegan Richa.

Chataka Dal – Spicy Maharashtrian Toor Dal

By: Richa

Chataka Dal is a spicy flavorful Dal from the Indian state of Maharashtra. It is made from yellow split pigeon peas simmered along with tomatoes, then seasoned with a spicy chili tempering. Gluten-free, soy free and nut free.

Indian chataka dal served over rice in a white bowl

I grew up in Maharashtra state and the dishes of this particular cuisine have a special place in my heart! Simple dals, bhaji like my jackfruit brown chickpea bhaji, saoji , kohlapuri, and Zunka are already on the blog! You can find misal pav and Amti dal  in my cookbook.

This Chataka dal is another dish I love – it’s a simple dal with few ingredients but trust me, it’s far from simple in taste. It’s fiery with the added chili powder tempering. As always, you can adjust the spice level to your preference.

To serve, I serve with flatbread or rice. This dish goes incredibly well with rice but you could also serve this with cauliflower rice.

Indian chataka dal in a green and white saucepan

Dals are soul food with many variations from various states and regions in India.
There are several types of Dals and legumes used in Indian cuisine. You can see a list with pictures here.
This Chataka dal is quick and delicious. Traditionally it used 1-2 tablespoon of the Indian chili powder, but that is going to be a lot of heat for most . So I use less. You can use whichever lentils or split peas you have for this recipe. Just cook them long enough until tender and then add the tempering/Tadka.

More daal recipes:

Continue reading: Chataka Dal – Spicy Maharashtrian Toor Dal

The post Chataka Dal – Spicy Maharashtrian Toor Dal appeared first on Vegan Richa.

Set Dosa with Saagu


Dosa is a versatile dish. Set Dosa with Saagu dish is like a couple made in heaven. They complement each other just perfectly. Set dosa is very spongy and soft in texture and is also known as Aval Dosa or Poha Dosa. The batter you get and the method to cook/roast is just like how we make the pancakes. While Saagu is a mixture of vegetables cooked in a thick textured curry where a blend of some interesting spices come together. It is one yummy curry!


Set dosa is similar to mushti pola (another Konkani style dosas) which is very soft and fluffy and has grated coconut ingredient in it. At home, my mom made it once in a while, as everyone loved Plain Dosas. My husband loves this combo so much that I am forced to make it and I prefer to have it for dinner instead of breakfast. It fits perfectly in the dinner menu. Filling and Yumilicious!!


So let us take a look at the Set Dosa Recipe and Saagu Recipe as well.

Set Dosa
Ingredients:
  • 2 cups rice ( I use basmati because that is my staple rice)
  • 1 cup parboiled rice of any kind
  • 3/4 cup urad dal
  • 3/4 cup thin poha (flattened rice)
  • 1 tsp methi seeds
  • salt as per taste
  • 1/2 - 1tsp sugar (optional)
  • oil for frying


Preparation:


  • Soak all the ingredients (preferably separately) except salt and sugar (duhh :)) for 6-8 hours or overnight. Drain the water and transfer to the blender.
  • Blend urad dal first by adding just enough water till it is immersed. Make a smooth paste and transfer it into a big bowl.
  • Then in 2 parts add rice and soaked poha, grind and transfer to the urad dal paste. Mix everything nicely.
  • Make the batter of pouring consistency not too thick nor running. Keep it in a warm place to ferment for good 8-12 hours.
  • Just before you are ready to make set dosas, add salt and sugar to the batter. Mix properly.Pre-heat a tawa till it's really hot, pour 2 ladles of batter (do not spread the batter like we do for plain dosas) and leave it to cook gradually over medium heat. 
  • Drizzle some oil along the edges and let it cook for 2 more minutes or till nicely roasted. You will notice bubbles formation on it(see pictures) just like pancakes.
  • Flip the set dosa over (this is optional) and let it cook further for less than a minute or so till it is slightly roasted. 
  • Serve hot with Coriander Chutney and Saagu or Sambar etc.


Saagu:
Ingredients:
  • 2-3 cups cubed mixed vegetables (carrots, beans, peas, potatoes, capsicum)
  • 1 onion chopped roughly (or cubed)
  • few curry leaves
  • 1/2 tsp mustard seeds
  • 1/2 tsp turmeric powder (haldi)
  • salt to taste
  • 1/2 tbsp oil
  • chopped coriander leaves for garnish
For the wet masala:
  • 2 tbsp grated coconut
  • 2 inch piece of ginger
  • 1-2 tbsp coriander leaves
  • 3-4 green chillis
For the dry masala:
  • 1 tbsp poppy seeds
  • 1 tbsp coriander seeds
  • 1″ cinnamon stick
  • 2 cloves
  • 1 1/2 tbsps roasted channa dal

Preparation:
  • In a blender make a smooth paste by adding the ingredients under wet masala. Keep aside.
  • Then in a coffee grinder(maybe), make the powder using ingredients under dry masala. 
  • Heat oil in a pressure cooker, add the mustard seeds and let them splutter. Add the onions and curry leaves and saute till transparent, just for a couple of minutes.
  • Add the mixed vegetables and combine well. Add salt and turmeric pwd and cook on medium heat for 2-3 minutes. Pour the wet ground masala paste, powdered dry spices masala and mix everything quickly. Add 1-1 1/2 cups of water, stir everything and pressure cook for 1 whistle, then simmer the gas and cook for 6-7 minutes. *
  • Switch off the gas, and wait for the steam to be released.  Open the lid and your hot saagu is ready to be devoured. 
  • Garnish it with cilantro leaves and serve with set dosa, poori, roti etc.

Notes:* You can cook it in a regular pan too. First, cook the vegetables till 3/4th done, then add all the masalas, water and cook till done.

Health Benefits:
Dosa is a great source of complete protein for vegetarians as it is made of rice batter and urad dal (black gram lentil) Dosa contains healthy carbs which provide our body with the energy needed to carry out different functions. It is a good option for people on a weight loss diet as well. Cutting out carbs from your diet can make you lethargic, low on energy and also lead to depression in some cases. Protein is another essential nutrient required by our body. It keeps us full for longer as it slowly releases energy and also helps make our hair, bones, and muscles stronger. Lentils used in the Dosa helps us with that. It is a low-calorie dish. Saagu is a dish with healthy vegetables providing all adequate nutreints, minerals, and vitamins.

Saagu recipe adapted from Sailus Kitchen.

Dalitoy (konkani dal curry)

Famous dalitoy (sound toy as tou-yee, close to the original sound :)) of konkani cuisine, hands down is the slurpicious simple dal curry. It is staple and mostly loved by all. It's so funny that even though it's such a simple recipe, it's like making tea. Every house you visit, the taste of tea/chai is different and unique. Everyone puts in their own twist when it comes to making dalitoy. The one that is served in the temple's, is the ultimate one 😀


DaliToy A konkani Dal Preparation

I was surprised to get many messages and comments from my close friends who tried it out and loved it. It then occurred to me that I had never mentioned this recipe to anyone before- thinking that everyone must be knowing it and that's how a basic dal preparation is! I was wrong and so here is a post on this super simple yet powerfully delicious dal- dalitoy!

DaliToy with Plain Rice and Pickle

Here is the recipe of the magical and most common dalitoy.

Ingredients:
  • 1 cup Toovar(toor) dal [for healthier version I use yellow split moong dal]
  • 2 green chillies slit 
  • 10 leaves of curry leaves
  • 1 tsp mustard seeds
  • big pinch asafoetida (can increase the quantity if you like)
  • 1/2 tsp turmeric
  • 2 cups water 
  • 1 tbsp ghee or oil
  • 1/2 tsp salt or as per taste
  • handful chopped cilantro as garnish
  • 2 tsp grated coconut [optional]
DaliToy Ingredients in pic


DalliToy after Tadka

DaliToy after cilantro garnish


Preparation:

  • Wash dal and keep it soaked for 30 min. [Always soak lentils and pulses before using, helps to reduce the gas formation in the stomach :)]. You can skip if in a hurry.
  • Add dal and water in a pressure cooker and cook the dal for 2 whistles. [for toovar dal 2, for moong dal 1] One can also cook on stove top, takes a little longer and need to keep an eye as its getting boiled. Usually will take 20 + minutes on stove top[or till dal is fully cooked].
  • Let the cooker cool down, check the dal, mash it a little bit if needed with a spoon. I use traditional wooden handmasher, ghotni :)
  • In a vessel, heat ghee/oil, add mustard seeds, once it starts to splutter add green chillies, curry leaves, stir quickly, lower the gas to sim, then add turmeric and asafoetida(hing)
  • Into this immediately add the cooked dal, give it a stir and add more water to adjust the consistency of the dal as per your requirements, some like it thick and some like it thin.
    • Add salt and bring to a quick boil. Switch off the gas and garnish it with a handful of chopped cilantro and grated coconut(optional).
    • While serving with rice, top it with little bit of ghee OR lemon juice it tastes super yum!


    Notes: 
    *You can have variations while making dalitoy. One can add tomatoes and green chillies while pressure cooking the dal.
    * You can also add 2 inches of ginger roughly chopped either in your tadka or while cooking dal.
    * You can give garlic tadka too.


    njoY!! happY cookinG!!

    Nutrition Facts: Lentils is a mighty member of legume family, it's a good source of cholesterol-lowering fibre. It has good amount of folate and magnesium which is needed for a healthy and loving heart :) It replenishes our iron stores. Light on body, a good source of protein for vegetarians. Lentils Rule :)

    Puran Poli (Holige, Ubbati, Bobatlu)

    Many names and one magical sweet dish that melts in the mouth. Holi, festival of colors and Puran Poli go hand in hand, it is a must to do dish during this festival in the state of Maharashtra. It is offered into the fire which is lit for Holika Dahan and after that everyone gets to eat and enjoy it. It is a fun dish and one may need a little practice to roll out these stuffed polis. It basically contains 2 parts, puran(huran) the stuffing (chana dal/jaggery mixture) and all-purpose flour dough called kanik. It feels like an accomplishment when you make these polis successfully :)
    Let's quickly check the recipe:

    Ingredients:
    • 1 cup chana dal
    • 1 cup jaggery (grated)
    • 1 cup all-purpose flour (maida)
    • 2 tbsp whole wheat flour
    • 1/2 tsp turmeric powder (haldi)
    • 4 tbsp Oil (vegetable)
    • 1 tsp cardamom powder


    puran and dough


     Preparation:

    • In a pressure cooker, add 3 cups of water and washed chana dal. Pressure cook for 3 whistles, then switch off the gas and let the cooker cool down.
    • Open the pressure cooker, strain the cooked chana dal and reserve the water. This water can be used to make katachi amati. Drain water completely from the dal. Then add this dal into a deep pan. 
    • Add jaggery in it and let this mixture cook over medium heat. Keep stirring over medium heat until the mixture becomes thick (keep stirring for like 7-8 minutes). 
    • Let it cool down a bit. Then using a mesh strainer try to gather all the smooth mixture and keep aside else you can use mixer to blend this mixture smoothly too or if you feel lazy you can skip this step, just see to it that dal and jaggery is nicely mixed.
    • Add cardamom powder and mix. * Keep aside, this is your puran.
    • In a mixing bowl take all-purpose flour, whole wheat flour and turmeric pwd. Add 4 tbsp oil and mix well. Now add water little by little and make a smooth consistency dough. 
    • Knead the dough until the it becomes very elastic. Put this dough into a bowl and cover it with lid. Let it rest for 30 minutes atleast.
    • Make small balls of the stuffing. Then make balls (smaller than stuffing) of the dough. Grease your fingertips and spread one dough ball gently to make a small round disc. Put one stuffing ball on it. spread the dough gently over the stuffing with fingers and cover the stuffing. Use dry rice flour to roll the poli. Heat the frying tawa, place rolled roti in the center and roast on both sides over medium heat, add little ghee while roasting. Serve hot with Ghee. Puran-poli tastes good with cold milk too.
    • These puran polis stay fresh for approximately 1 week at room temperature.

    njoY!! happY cookinG!!

    Note*: The huran has to be nice and dry for rolling out the Poli without breaking it. If you feel that the huran has moisture you can either freeze it for some time or microwave it for a couple of minutes stirring it after every minute. Knead the kanik nicely for couple extra minutes before making balls and rolling out. 

    I made one batch with 3/4 cup whole wheat flour and 1/4 cup maida without adding turmeric, see the picture below. 
    Maida Poli are more fluffy and soft.


                                              HAPPY HOLI 

    Making of Puran Poli in pictures:


    Soft Ubbati


    Health Benefits: Puran Poli made with whole wheat is rich in complex carbs, fibre and certain minerals. Jaggery used in the preparation is loaded with iron, calcium, phosphorus minerals. It digests slowly and hence helps to release energy slowly. Cardamom used also aids in digestion.

    DIBBA ROTTE

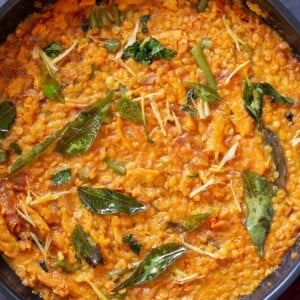
          An irresistible savory cake with a crispy exterior like Dosa and a soft interior like an Idli, yes I’m talking about this classic Andhra Breakfast DIBBA ROTTE. Serve this delicious Dibba rotte with Aavakaya, chutney, or sambar, this recipe is filling and absolutely delicious. Dibba rotte is a classic recipe that is very easy to make and a total crowd-pleaser.


               Traditionally Dibba rotte is made with freshly ground Idli batter, and Idli Rava or Rice Rava is used here. The Telugu-speaking regions use Idli Rava for their Idli batter instead of parboiled rice/uppudu biyyam. The coarse texture of the Rava gives it’s signature crisp exterior and granular soft interior. I bet once you try this, you’ll end up making Dibba rotte every time you make Idli batter. And the good part is you needn’t ferment the batter, just add the tempering to it and make Dibba rotte right away. But we have tried making it with fermented batter and the beautiful sour notes adds more magic. Now to get the perfect color and crunch, the key is to use a heavy cast-iron Kadai/pan. Let the Dibba rotte cook on low flame for longer to get the irresistible crunchy exterior.

            I have learnt making this dish from my best friend who hails from Machilipatnam and they make it quite regularly. I remember tasting this dish at her home and I fell in love with the dish instantly and I’m telling you if you are a person who loves slightly crispy bits in the bottom of the pan(like me) in dishes like upma, then this is just for you.

    What is Dibba rotte and how to make it?

          The word Dibba means plump or fat and rotte means bread/flatbread. And traditionally rice Rava or Idli Rava is used instead of rice. As throughout Telugu-speaking regions, Idli is made with Rice Rava or Idli Rava, the granular idli texture is just irresistible.

            First, we need to soak the Urad dal and later grind it to a fine consistency, and then we add soaked rice Rava/Idli Rava to this batter. You can let this batter ferment to make idlis or use it to make Dibba rotte instantly. You can take a portion of this batter and add a simple tempering to the batter, using mustard seeds, cumin seeds, green chili paste. If you are making for younger kids, you can skip green chilies or omit them.

           Traditionally we use a heavy and shallow cast-iron Kadai or brass Kadai(itthadi ginne) to make this Dibba rotte. But any thick bottomed pan will work, just make sure to keep an eye on Dibba rotte and it’s not burning. Our goal is to achieve a golden-brown crispy exterior and cook through completely. While making spread light cooking oil on the Kadai and then pour the batter. Cover the pan and cook on a slow flame until it turns crispy on the bottom. Flip it through and cook until done. Then Serve hot Dibba rotte with pickle or chutney of your choice. Ginger chutney makes a great combination with this.

    More names of Dibba rotte

       This Dibba rotte is also known as Dibba rotti or minapa rotti in some parts of Telugu-speaking regions.

    Serving suggestions 

           Dibba rotte is traditionally cut in wedges and served as you get to taste the outside crusty exterior and the soft fluffy texture inside. The taste is not like that of idli as there is no sourness in the batter (since the batter is not fermented), but you can make it with fermented batter too. The crisp texture is what makes the dish more interesting.

        This Dibba rotte is a savory cake and has a similar color, shape, and texture. One of the reasons why people call it Andhra cake and most loved by kids. Serve with your favorite pickle or chutney or Podi of your choice. But I’d recommend you try with Ginger chutney.

    So what all Ingredients do we need?

       All you need to make this dish is idli batter. So, you can use your favorite idli recipe. To make the Andhra way, use urad dal and idli Rava. You only need a handful of ingredients for this recipe:

    • urad dal – either whole or split. 
    • Rice Rava or idli Rava – Look for idli Rava in your nearby Indian grocery stores. The key for its signature granular crispy exterior is Idli Rava. 
    • Fenugreek seeds – Helps indigestion
    • Salt
    • Tempering – Mustard seeds, cumin seeds, green chilies, ginger, curry leaves.

    Please check out more delicious festive treats and tea-time snacks from my blog.

    Chegodilu

    Odappalu

    Makka garelu

    Palm jaggery whole wheat biscuits

    Perugu wada

    Vegan millet cutlet

    Vegan potstickers

    Let’s get into the recipe now

    Print

    DIBBA ROTTE

    Dibba Rotte is a classic Andhra dish made of Idli batter. It has an irresistible crispy exterior and fluffy interior.
    Course Breakfast, Lunch box recipes
    Cuisine Andhra
    Keyword healthy breakfast, plant based, vegan
    Prep Time 10 minutes
    Cook Time 30 minutes
    Soaking time 4 hours
    Total Time 4 hours 40 minutes
    Servings 6 Servings
    Author Shravani Abhishek

    Equipment

    • Cast iron skillet or wok

    Ingredients

    • ½ cup Urad dal
    • 1 cup Idli rava
    • ½ tsp Fenugreek seeds
    • Salt to taste

    Tempering

    • 1 tbsp Cooking oil
    • ½ tsp Mustard seeds
    • 1 tsp Cumin seeds
    • 1 sprig Curry leaves
    • 1 tsp Green chili paste
    • ½ tsp Minced ginger

    Instructions

    Let's prep for the batter

    • Wash and soak the Urad dal + fenugreek seeds and Idli rava separately for 3-4 hours.
    • Drain the water from the urad dal and reserve about 2 cups of soaking water. Grind the urad dal+fenugreek seeds into soft and smooth paste by adding little water.
    • Transfer the ground urad dal paste to a mixing bowl, and to this add drained idli rava. Add salt to taste and mix it well with your hand.

    It's tempering time

    • Heat a small tadka pan, add oil and once its hot add in mustard seeds, cumin seeds, minced ginger, green chili paste and torn curry leaves. Let it splutter for a minute.
    • Turn off the heat and add this tempering to the Idli batter and give it a good mix.

    Let's make some dibba rotte now!!

    • Heat a thick Cast iron kadai or Appam pan, and add oil and let it heat for a minute.
    • Now add in 1-1½ cups ladleful of batter into the pan, let it sizzle for a minute of medium heat.
    • Lower the heat to low flame, cover the pan and cook for 15 mins until it turns crispy on the bottom. Insert a clean knife or spoon and see if its cooked, it should come out clean.
    • Now flip the Dibba rotte and cook it for another 5-10 mins. Do not cover the pan at this time.
    • Turn off the heat, remove the dibba rotte on a plate, cut into wedges and serve with chutney, podi or pickle of your choice.

    Notes

    • There is no need to ferment it, you can make Dibba rotte as soon as you grind the batter. But feel free to use the fermented idli batter too, the sourness adds a nice flavor profile to the Dibba rotte. 
    • If you are using wet grinder or blender, make sure to add water in increments to make a soft, fluffy and smooth batter.
    • I would recommend you to use a cast iron kadai or appam pan to get irresistible crispy exterior. 

    If you’ve tried this recipe, please share your valuable feedback in the comments below. Also you can Tag your photo and share it with #mycurryveda on Instagram @mycurryveda  or on Facebook . 

    The post DIBBA ROTTE appeared first on mycurryveda.

    BASAVA KAJJAM

    Basava Kajjam, a divine dessert and one of the ancient recipes from the Land of Telangana. Tiny wheat flour balls cooked in milk and creamy moong dal, sweetened with jaggery and topped with roasted nuts. Any Celebration is incomplete without a nice sweet dish to relish, and this dessert is just the one to brighten your day. The people of Telangana savor a special porridge/pudding kind of preparation made of moong daal, wheat flour, milk, sugar and dry fruits. This delicious dish has a nice rich aroma that is enhanced with the use of fresh ghee.

     Making the godhuma pindi undalu, tiny wheat flour balls requires huge amount of patience. The basava kajjam is a pasta porridge that is made fresh and it can be made within an hour. The undalu is the main player of the game, a tad high patience is required to say the least. Each grain of undalu is molded from a mixture of whole wheat flour individually using nothing but bare hands. 

    More about Basava kajjam 

    Basava kajjam is an age-old traditional dessert prepared using Moong dal, whole wheat flour, milk, jaggery and nuts. And what makes this dessert special is the mini wheat flour balls, we call them as undalu. Traditionally they are shaped as tiny balls similar to the size of split moong dal. Making these tiny wheat flour balls requires huge amount of patience, but trust it is all worth it. Just a tablespoon of this dessert will take you back to your grandma’s kitchen. 

    This traditional dessert is absolutely comforting, and nourishing, each spoon of this dessert feels like a warm hug. Even though I’m from Telangana, I have never tasted or heard about this dish until my dear friend Chandana has shared her heirloom recipe with me. She was sweet enough to share the details of the recipe and allowed me to share it with you all. Please do checkout her Instagram page, she’s a passionate cook and has immense love for her culinary heritage of Telangana.

    She told me that her Grandma used to make this dessert specially for her in her childhood. And that this dessert is traditionally made on festivals like Maha Shivaratri and Bathukamma as an offering to the deity. Also I have done a little research on this regional delicacy, where some people call this dish as BASAVA GARJANAM. With the rustic Telangana dialect, the name could have been slowly settled as BASAVA KAJJAM. 

    Ingredients needed for BASAVA KAJJAM

    • Moong dal
    • Whole wheat flour
    • Jaggery
    • Milk
    • Nuts
    • Ghee

    How to prepare this Dessert?

    Initially we need to soak the lentils for about an hour or two, which helps in cooking the lentils quickly. In the meanwhile we need to make a firm dough of whole wheat flour. Rest the dough for 30 min, later make tiny balls/undalu using dry flour and keep aside. 

    Now we need to cook the wheat flour balls in the boiling water, add soaked moong dal and cook until the wheat flour balls are 90% cooked. Add in jaggery, milk and cook for 5 more min. Later roast some nuts in ghee and add it to the cooked moong dal and wheat flour balls. Basava Kajjam is all ready to Serve now.

    Is this dish VEGAN ?

    You can make this dish VEGAN-FRIENDLY by substituting the regular cow milk with plant based milk. Skip roasting the nuts in ghee and add them directly while cooking the wheat flour balls.

    And if you have GLUTEN INTOLERANCE, I would suggest you to use gluten-free flour to make Undalu/balls.

    Checkout more traditional festive foods and more Telangana delicacies.

    Godhuma thalikala payasam

    Kanda gadda Bakshalu

    Pappu bakshalu

    Nuvvula bakshalu

    Vadapappu bellam panakam

    Godhuma Nooka sheera

    Shegala payasam

    Sattu Pindi

    Print

    BASAVA KAJJAM

    A divine and delicious moong dal and wheat flour balls porridge, which is sweetened with jaggery. An age-old recipe from the Land of Telangana.
    Course Dessert
    Cuisine Indian, Telangana
    Keyword Bathukamma special, Porridge, Telangana cuisine
    Prep Time 40 minutes
    Cook Time 20 minutes
    Soaking time 1 hour
    Total Time 2 hours
    Servings 4 Servings
    Author Shravani Abhishek

    Equipment

    • Saucepan

    Ingredients

    • ½ cup Split moong dal
    • ½ cup Whole wheat flour
    • ¾ cup Jaggery
    • cup Milk
    • ¾ cup Water
    • ½ tsp Cardamom powder optional
    • 2 tbsp Ghee optional
    • 1 tbsp Melon seeds optional

    Instructions

    Prepping

    • Wash and soak the moong dal for about an hour.
    • Take a mixing bow, add whole wheat flour, add water gradually and knead to make soft dough. (Similar to the Indian roti dough)
    • Cover the dough and let it rest for 15 mins.

    Make the Tiny wheat flour balls

    • Take a wide plate and sprinkle some dry wheat flour on it. Now take a handful of dough at a time, take a tiny amount of dough to the size of moong dal/coriander seed and roll into a ball.
    • Now place the rolled tiny wheat flour ball on the plate with dry flour.
    • Repeat the process for the remaining dough.
      Note : You can skip this time-consuming process by rolling the dough into flatbread and then cut into diamonds.

    Let's make BASAVA KAJJAM now!!

    • Heat a saucepan, add water and bring it to a rolling boil.
    • Now add in rolled tiny wheat flour balls, soaked and drained moong dal and give it a good mix.
    • Cover the pan and let them cook on a medium flame until the moong dal is fully cooked. This will take around 15 min.
    • Now add in milk, grated jaggery, cardamom powder (if using) and cook until everything is cooked thoroughly.
    • Heat a small pan, add ghee and once its hot add in melon seeds and fry for 30 secs. Add these roasted melon seeds to the cooked BASAVA KAJJAM.
    • BASAVA KAJJAM is done and it's all ready to be served. Dig in and enjoy.

    Notes

    • You can skip the rolling of wheat flour balls and instead roll the dough into flatbread and then cut into diamonds using knife or pizza cutter.
    • If you want a vegan version, substitute the Regular milk with Plant based milk or you can just totally skip adding it. Also, do not roast the melon seeds in ghee, instead add them while boiling the moong dal.

     If you’ve tried this recipe, please share your valuable feedback in the comments below. Also you can Tag your photo and share it with #mycurryveda on Instagram @mycurryveda  or on Facebook . Also follow @taste.of.telangana on Instagram for more traditional recipes, culture and stories.

    The post BASAVA KAJJAM appeared first on mycurryveda.

    kollu paruppu recipe – how to cook horse gram recipe, horse gram recipe

    How to make horse gram recipe ?

    kollu paruppu recipe is very famous in Kongunadu. People prefer horse gram for weight loss in ayurveda also horse gram good for diabetes. we used to prepare kollu paruppu recipe often especially to treat cold which goes well with white rice. lets see how to cook horse gram recipe now.

    Ingredients:

    • kollu paruppu ( known as horse gram tamil & kulthi beans in hindi ) – 1 cup
    • Water to cook horse gram
    • Castor oil – ½ spoon
    • Country tomato – 1(big)
    • Turmeric powder – ¼ spoon
    • Shallots – ¼ cup (cleaned)
    • Red chilli – 3 no’s
    • Curry leaves – 1 sprig
    • Garlic – 4 cloves
    • Cumin seeds – ½ spoon
    • Coriander seeds – 1 spoon
    • Coriander leaves – 4 stalks
    • Required salt

    Steps to cook kollu paruppu recipe in pressure cooker:

    1. To begin take a bowl add horse gram and wash them thoroughly.
    2. Switch on the stove place a cooker then add 2 ½ cups of water, ½ spoon of castor oil, ¼ spoon of turmeric powder, one big country tomato.
    3. Now close the pressure cooker and cook kollu paruppu up to 3 whistles.
    4. Steps to cook kollu paruppu in earthen pots and normal pan:
    5. Switch on the stove place earthen pot or steel pan, add 3 cups of water then is hot add in washed horse gram.
    6. Followed by ½ spoon castor oil, one big country tomato then cook up to 15 minutes
    7. After horse gram half cooked add turmeric powder then cook until horse gram fully cooked.

    Steps to grind kollu paruppu:

    1. At first switch off the stove drain the excess water in horse gram and keep it aside.
    2. Next add cleaned shallots, red chilli, curry leaves, coriander leaves, cumin seeds, coriander seeds, required salt in cooker, earthen pot or normal pan.
    3. Leave it all spices for 10 minutes.
    4. Now take a mixer grinder put all things in to it and grind them as semi coarse paste. (No need to add water if you want add drained water from horse gram)
    5. You can also add kollu paruppu in Aattu kal and grind well as semi coarse paste. (Taste will be super good)
    6. Spicy authentic Kongu special kollu paruppu recipe is ready to serve.
    7. Drizzle some homemade ghee or coconut oil on the top of the kollu paruppu and serve with hot white rice.

    Various names of kollu paruppu

    • Kollu Paruppu is known ashorse lentil or horse gram, horse gram beans in english (also Cowpea)
    • kulthi horse gram in Hindi
    • ulavalu recipes in telugu
    • It is called as Muthira in Malayalam
    • Its botanical name is Macrotyloma uniflorum

    Tips:

    • This is authentic Kongu style kollu paruppu; there also another way.
    • The only difference is seasoning, after grind the kollu paruppu, take a kadai add some ground nut oil when it is hot add mustard seeds, one red chilli and curry leaves then fry for a second and add kollu paruppu and cook up to 5 minutes. (This process will help to avoid spoilage of kollu paruppu)
    • As of now you need kollu paruppu in semi streaming consistency implies include water at that point cook well.
    • kollu paruppu in semi gravy is the good texture to eat.
    • More vegetarian recipes : thuthuvalai rasam recipe | pirandai chutney recipe | Mini Sambar Idly recipe | Pachai Payaru Paruppu | Paruppu Rasam recipe | murungakkai paruppu recipe
    • black horse gram another variety of kollu.
    • We can make more than 40+ kollu recipes ( ulavalu recipes – kulith recipes) using horse gram dal.
      • horse gram soup
      • horse gram juice ( kollu juice)
      • kollu chutney
      • kollu kanji recipe
      • horse gram powder recipe for weight loss ( kollu powder)
      • kollu kulambu
      • kollu podi
      • kollu rasam (i’ll post kollu rasam in tamil soon)
      • paruppu thogayal
      • horse gram flour ( kulith flour) used for Weight loss Roti Recipe

    horse gram health benefits / ulavacharu health benefits / kollu benefits

    • Kollu known in english as horse dal, horse gram lentils or horse peas. Horse gram benefits for more people who are following horse gram diet for weight loss.
    • Refer this web link for horse gram benefits in tamil : kollu for weight loss in tamil
    • horse gram nutrition :  Horse gram seed contains carbohydrate (57.2% w/w), protein (22% w/w), dietary fiber (5.3% w/w), fat (0.50% w/w), calcium (287 mg), phosphorus (311 mg), iron (6.77 mg) and calories (321 kcal) as well as vitamins like thiamine (0.4 mg), riboflavin (0.2 mg) and niacin (1.5 mg) per 100 grams of dry matter.
    • benefits of drinking horse gram water: Drink the horse gram water twice a day on an empty stomach for weight loss.
    • horse gram benefits diabetes : Anti-oxidants help in controlling oxidative stress by scavenging free radicals. He said the study found that raw horse gram seed has the ability to reduce post-prandial hyperglycemia by slowing down carbohydrate digestion and reduce insulin resistance by inhibiting protein-tyrosine phosphatase 1 beta enzyme.
    • horse gram and diabetes: This helps to reduce insulin resistance.Hence it is highly used for diabetics.The seed is beneficial for reducing the blood glucose level.It can reduce the digestion of carbohydrate.This leads to lower the blood sugar level.This is used as insulin resistance in type 2 diabetes.Including Horse gram (മുതിര) in your daily food is very effective for diabetics.This can also help to reduce the cholesterol level.
    • horse gram benefits for weight loss : Consuming horse gram can help you lose burn calories. Horse gram is low in calories. It can keep your bad cholesterol levels in check and prevent the risk of heart diseases. Also, consuming horse gram will provide you with protein and fibre, which will keep you full for long and prevent you from eating more.
    • horse gram sprouts benefits : Doctors recommends having sprouts as a good source of protein and also to cool the body.
    • horse gram for hair growth : Drink it horse gram for hair growth once a day when bearable hot. Add 1/4 cup of Horse Gram ( Kulthi in India a pinch of Asafoetida ( Hing in India ) and 2 pinches each of dried horse gram for hair growth Ginger ( Adrak in India ) and Liquorice ( Mulethi in India )
    • horse gram for kidney stones ( kulthi for kidney stone): The importance of horse gram was well recognized by folk medicine as a potential therapeutic agent to treat kidney stones, urinary diseases, piles, common cold, throat infection, fever, lowering cholesterol levels and blood sugar levels. Horse gram water was prescribed for treating jaundice.
    • flaxseed and horse gram : Flax seed is a seed, while Horse Gram is a pulse. * Nutrient Value of 100 gram of Flax seed is: 50 calories, 20 grams of protein, 41 grams of fat, and 28 grams of fiber. * Nutrient Value of 100 gram of Horse grain is: 321 calories, 22 grams of protein, 287 mg of Calcium, 311 mg of Phosphorus and 7mg of Iron.
    • is horse gram good for health : If you are trying to lose weight, you can consume horse gram as much as you want, but remember moderation is the key. Moreover, the high protein and fibre content of horse gram will keep you fuller for a long time.
    • horse gram where to buy : its available local stores, super market and even online portals.

    The post kollu paruppu recipe – how to cook horse gram recipe, horse gram recipe appeared first on Famous Indian Recipes.

    Paruppu Urundai Mor Kuzhambu/ Lentil balls in spicy yogurt gravy

    Paruppu Urundai Mor Kuzhambu is an authentic and traditional recipe made in most Tamil homes . It is a festive dish and relished by all .  

    The lentil dumplings are made by soaking and grinding thoor dhall along with red chillies ,curry leaves and some salt . This ground mixture is then shaped as balls and steamed to be further simmered along with the yogurt gravy until the flavors are absorbed into the urundais.

     Some use a combination of lentils /paruppu to make the urundais while some use just thoor dhall . This time I have used just thoor dhall and a handful of udad dhall to get the softness.  Pair this delicious paruppu urundai more kulambu with a simple vegetable stir fry with coconut gratings and mix along with piping hot rice to have a wholesome and delicious lunch . 

    You may also want to try Paruppu Urundai Kuzhambu which is a tamarind based gravy for another gastronomic feast .

    Onset of January brings about a lot of festivals in India and the best way to enjoy them is by cooking and eating a delicious feast.This month on our food bloggers' group Shhh Cooking Secretly Challenge , we are celebrating a festive theme suggested by me . I was partnered with the versatile and fantastic food blogger ,Mayuri ji who has prepared a Holi special Thandai Flavored Rava cake 

    Some more lipsmacking and tasty Mor Kuzhambu variations on my blog

    Pooshnikaai (ash gourd) Mor Kuzhambu 

    Kumbalkkai (ash gourd )Majjige Huli 

    Pooshnikaai (ash gourd) Mor Kootu 

    Vendakkai (ladies finger)Mor Kuzhambu 

    Bonda Mor Kuzhambu 


    Ingredients 

    For the Paruppu Urundais

    1/2 cup thoor dhall /split pigeon peas
    2 tbsp udad dhall
    2 to 3 green chillies 
    Few curry leaves 
    Salt as needed
    Generous pinch of asafoetida

    For the Mor Kuzhambu 

    250ml thick yogurt 
    100 ml water 
    2 tsp oil
    1 tsp mustard 
    2 to 3 dry red chillies 
    fresh curry leaves 
    pinch of turmeric 
    Pinch of asafoetida 
    salt
    To grind
     6 to 7 tbsp  fresh grated coconut 
    1/2 tsp jeera/cumin 
    3 to 4 green chillies 
    1 tsp channa dhall /bengal gram
    2 tsp dhaniya /corriander seeds
    Small piece ginger 


    Method 

    To make the Paruppu Urundais 

    • Wash and soak the lentils in sufficient water for 2 to 3 hrs .
    • Drain the water and grind the lentils along with  chillies ,curry leaves, salt and asafoetida to a fine paste .
    • Make small lemon sized balls out of these and steam it until it is half done . Don't steam until the lentils become hard ,else they won't absorb the flavor of gravy into them . Keeping them half cooked helps it remain soft and easy to eat .

    To make the Mor Kuzhambu 

    • Soak all the ingredients under the "to grind" section in water for 10 to 15 mins and grind into a fine paste.
    • Whisk the yogurt until is creamy and smooth. 
    • Add in the ground spice paste to the whisked yogurt along with salt and turmeric powder and mix well with water mentioned . Donot add too much water , else the mor kuzhambu will be runny and will split on boiling.
    • Add the steamed lentil dumplings to the mor kuzhmabu as soon as it starts frothing up.Simmer for a few mins and turn it off. 
    • Prepare a tempering of mustard seeds, dry red chillies and fresh curry leaves in oil and pour it over the mor kuzhambu. 

    Namkeen Moong Dal | Fried Moong (split green gram)- Vegan snack

     Namkeen moong dal is a very tasty and addictive tea time snack which is enjoyed by all age groups .

    A popular snack which is sold by major snack brands, in India and abroad this certainly is a Go to snack which most of us will stock at home to just munch on for time pass .

    You can also make amazing chaat with this fried moong dal by adding chopped onions ,tomatoes, fresh corriander and dress with some fresh lime juice .


    To make namkeen moong dal at home ,you need to have a few pre preparations, but if you plan your work accordingly, this tasty snack can be made just in time for your tea time or the time when kids are back from school.

    The key to get perfectly fried moong dal is to pat dry the soaked moong dhal on a cotton cloth until it is totally dry and moisture free . A small amount of moisture also will end in oil splutter while frying which is definitely risky and hazardous.  So take care to dry up the moong dhall before frying.

    The fried moong dal is seasoned with basic spices like salt and chat masala ,but you can also add some red chilli powder if you may like. I prefer to keep it plain salted with a hint of chaat masala . 


    Preparation Time - 4 hrs
    Frying time - 15 mins
    Complexity - easy
    Serves  - 3 to 4 

    Ingredients 

    2 cups of moong dal / yello split gram
    Oil to fry
    Salt as needed 
    Pinch of chat masala 

    Method 

    • Wash and soak the moong dal in a bowl of water for 3 to 4 hrs .
    • Drain the water through a colander and spread the soaked moong dal on a soft cotton cloth for about 30 mins under shade so that all the moisture is absorbed by the cloth .
    • Heat up the oil and fry the moong dal in small batches until it turns crisp and appears golden yellow. Fry in medium flame and be vigilant else it will  burn too quickly .
    • To the fried moong dal add salt and chat masala and mix it well .Store it in an air tight container.  Use a dry spoon to use while serving. 
    • Enjoy this addictive snack with your tea or a leisure drink with your friends and family.


    Caramelized Onion Dal

    By: Richa

    This rich and creamy Caramelized Onion Dal is the perfect comfort food for a cold day! It is bursting with flavor from caramelized onions and whole spices which are tempered in oil! Serve with rice for a delicious Indian meal.

    a bowl with caramelized onion dal served alongside a side of rice and sprinkled with freshly chopped cilantro

    Coming at you with a simple lentil dal that is bursting with flavor. This is another dal that I just made one night when I was craving a light dal and rice meal.

    This caramelized onion dal is a creamy concoction of two types of lentils – red and yellow ones – which are cooked on the stove or using an Instant Pot and then simmered along with fragrant seasoned oil – tadka (tempering).

    a frying pan with caramelized onion dal sprinkled with chopped cilantro

    The caramelized onions add a whole bunch of umami flavor while the cumin and black pepper mixture added to the tempering provide some heat and a refreshing flavor!

    To take this dish to the next level of deliciousness we serve this lentil dish drizzled with another round of tempering. This second mix of whole spices fried in oil until sizzling and aromatic gets folded through the creamy dal just before serving

    Use whatever lentils you have on hand. I used a mix of yellow and red lentils. You can cook them on the stovetop or in the instant pot.

    creamy lentil dal sprinkled with cilantro served next to rice on a plate

    More daal recipes:

    Dhaba Style Butter Dal (vegan)

    Sabut Moong Dal  Creamy Green Mung Beans

    Vegan Handi Lentils (Creamy Indian Dal)

    Masoor Dal Tadka (Indian Split Red Lentil Dal)

    Spicy Urad Dal (Black Gram Lentil Dal)

    Continue reading: Caramelized Onion Dal

    The post Caramelized Onion Dal appeared first on Vegan Richa.

    ❌