We live in a golden age for MIDI controllers. [rheslip]’s contribution to the milieu is a twisty take on the format, in that it’s covered in an array of knobs. Thus the name—Twisty 2.
The controller can be built using the Raspberry Pi Pico or Pico 2. It’s set up to read a 4×4 array of clickable encoders, plus two bonus control knobs to make 18 in total, which are read via a 74HC4067 analog mux chip. There’s also an SK6812 RGB LED for each encoder, and an OLED display for showing status information. MIDI output is via USB, or, if you purchased the W variant of the Pi Pico/Pico 2, it can operate wirelessly over Bluetooth MIDI instead. The controller is set up to send MIDI CC messages, program changes, or note on/off messages depending on its configuration. Flipping through different modes is handled with the bottom set of encoders and the OLED display.
Few musicians we’ve ever met have told us they learned how to play the encoders, and yet. The cool thing about building your own MIDI controller is you can tune it to suit whatever method of performance strikes your fancy. If the name of this build alone has you inspired, you could always whip up a MIDI controller out of a Twister mat.
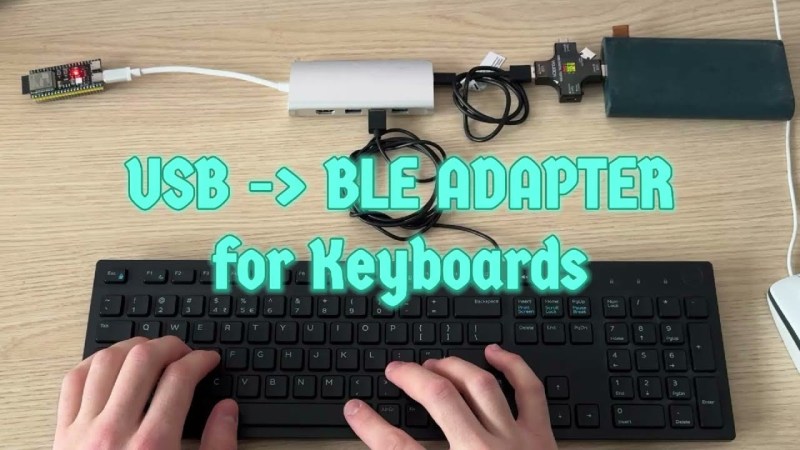
Few things rival the usability and speed of a full-sized keyboard for text input. For decades, though, keyboards were mostly wired, which can limit where you use your favorite one. To address this, [KoStard]’s latest project uses an ESP32 to bridge a USB keyboard to BLE devices.
The ESP32-S3 packs a ton of fantastic functionality into its small size and low price—including USB-OTG support, which is key here. Taking advantage of this, [KoStard] programmed an ESP32-S3 to host a keyboard over its USB port while connecting via BLE to devices like cellphones.
There are some slick tricks baked in, too: you can pair with up to three devices and switch between them using a key combo. Some of you might be wondering how you can just plug a microcontroller into a keyboard and have it work. The truth is, it doesn’t without extra hardware. Both the keyboard and ESP32-S3 need power. The simplest fix is a powered USB hub: it can be battery-powered for a truly mobile setup, or use a wired 5V supply so you never have to charge batteries.
We love seeing a simple, affordable microcontroller extend the usefulness of gear you already have. Let us know in the comments about other hacks you’ve used to connect keyboards to devices never designed for them.
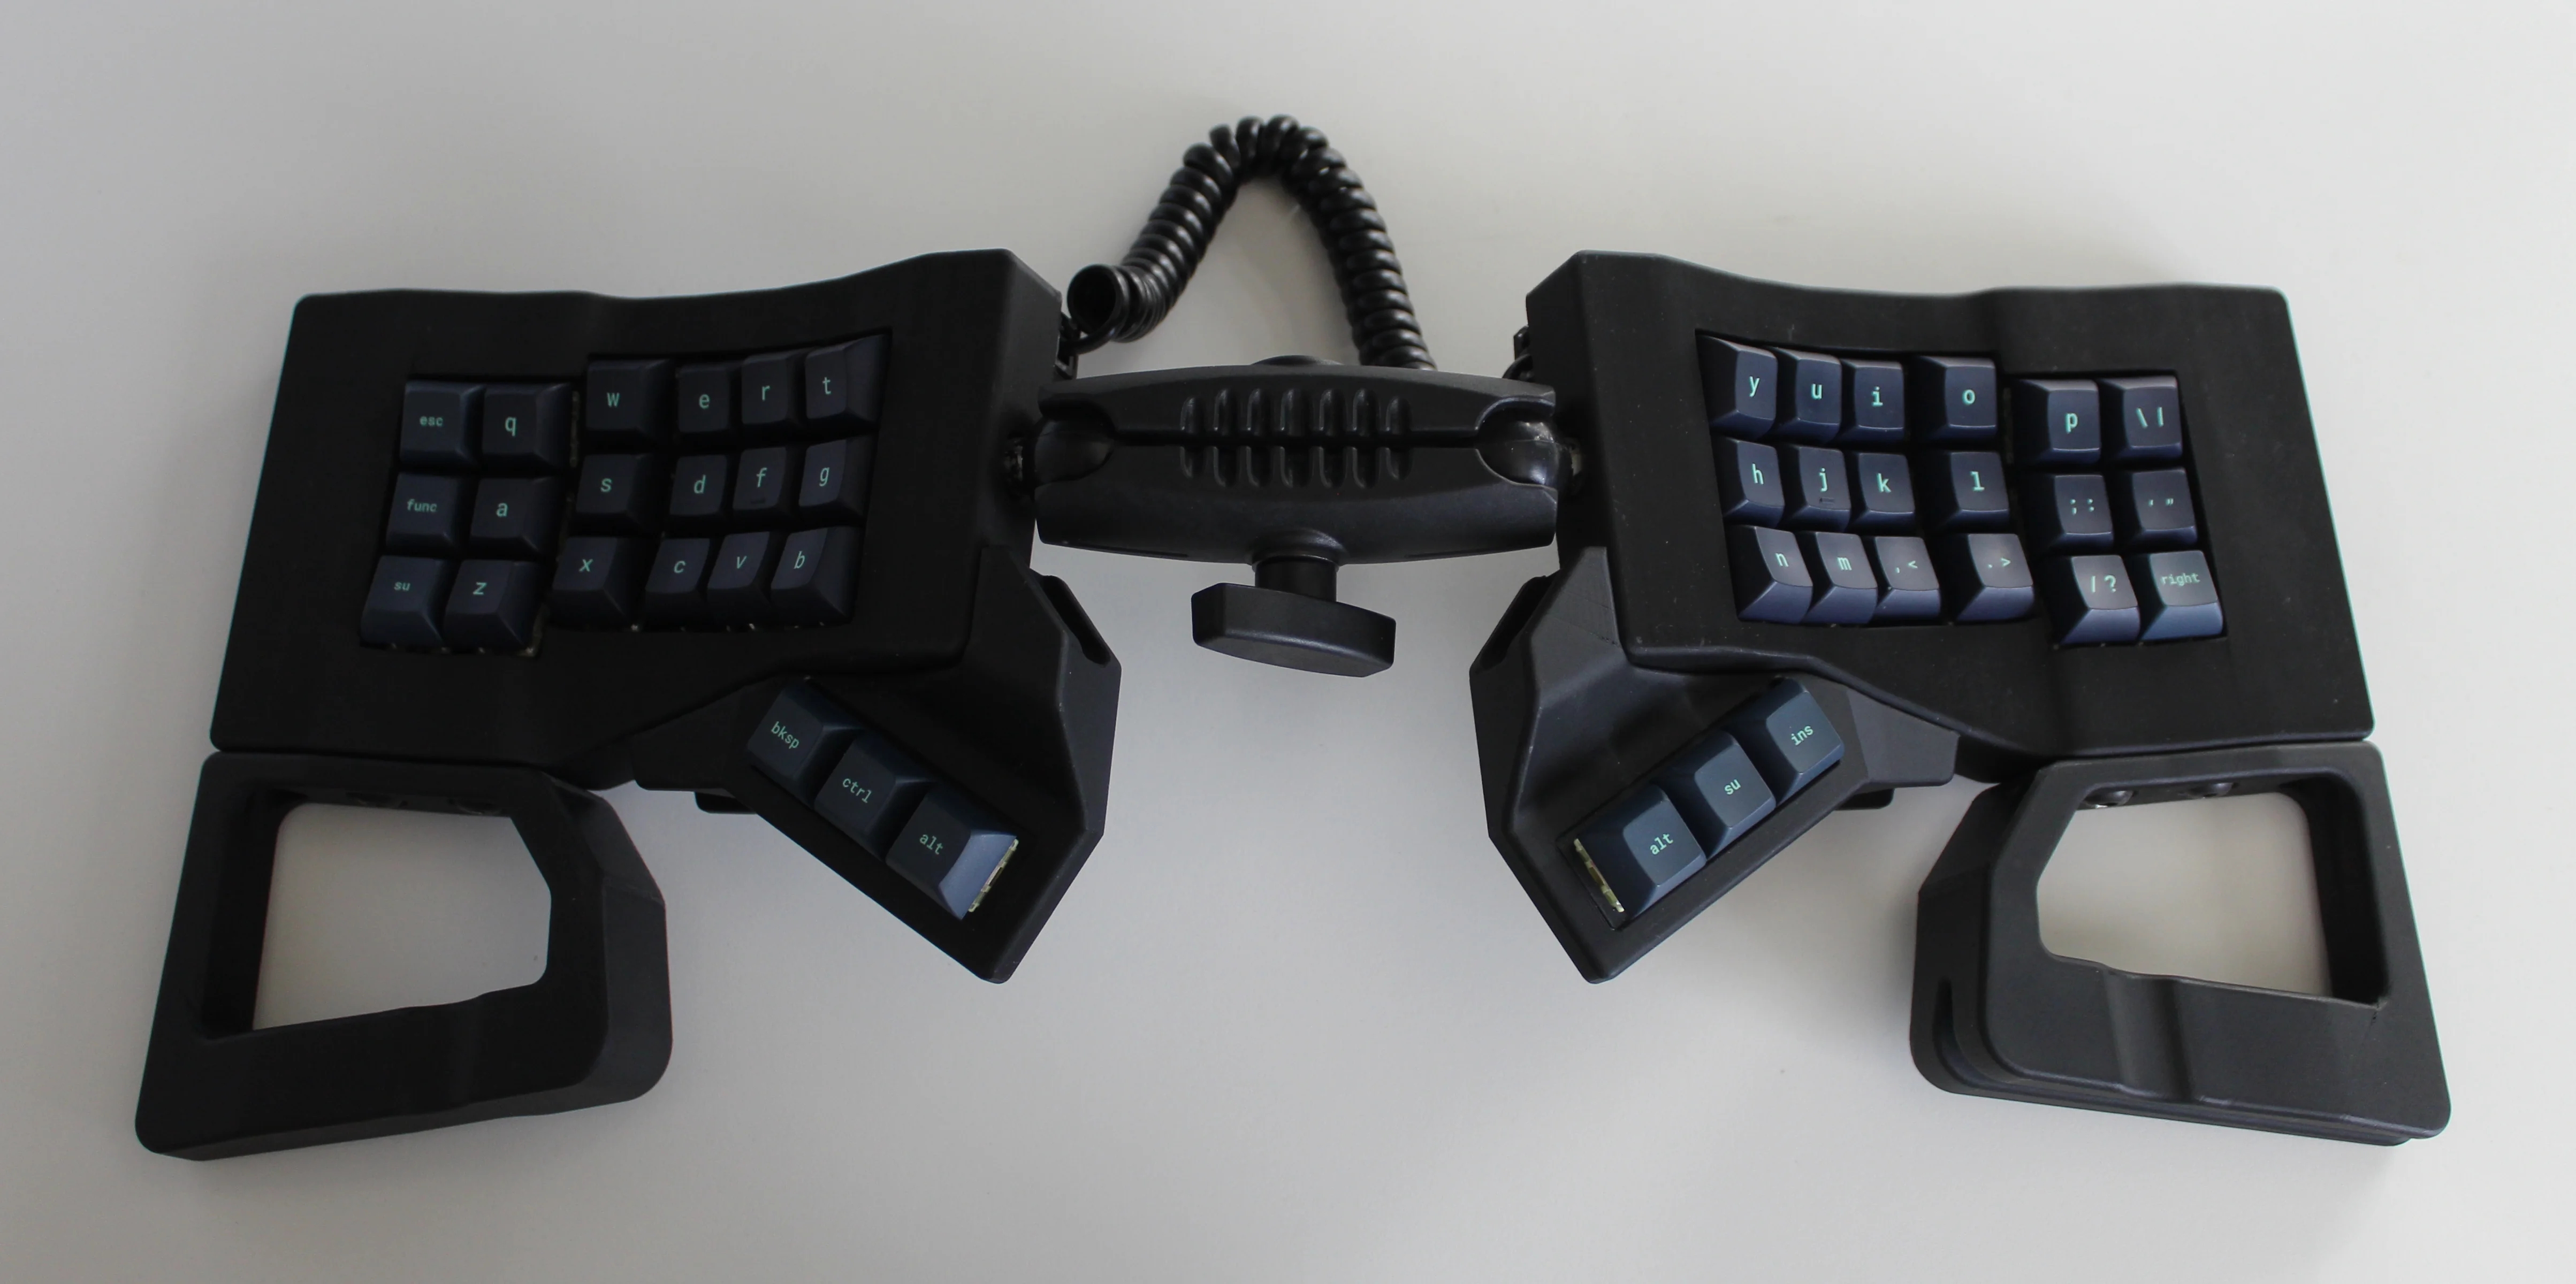
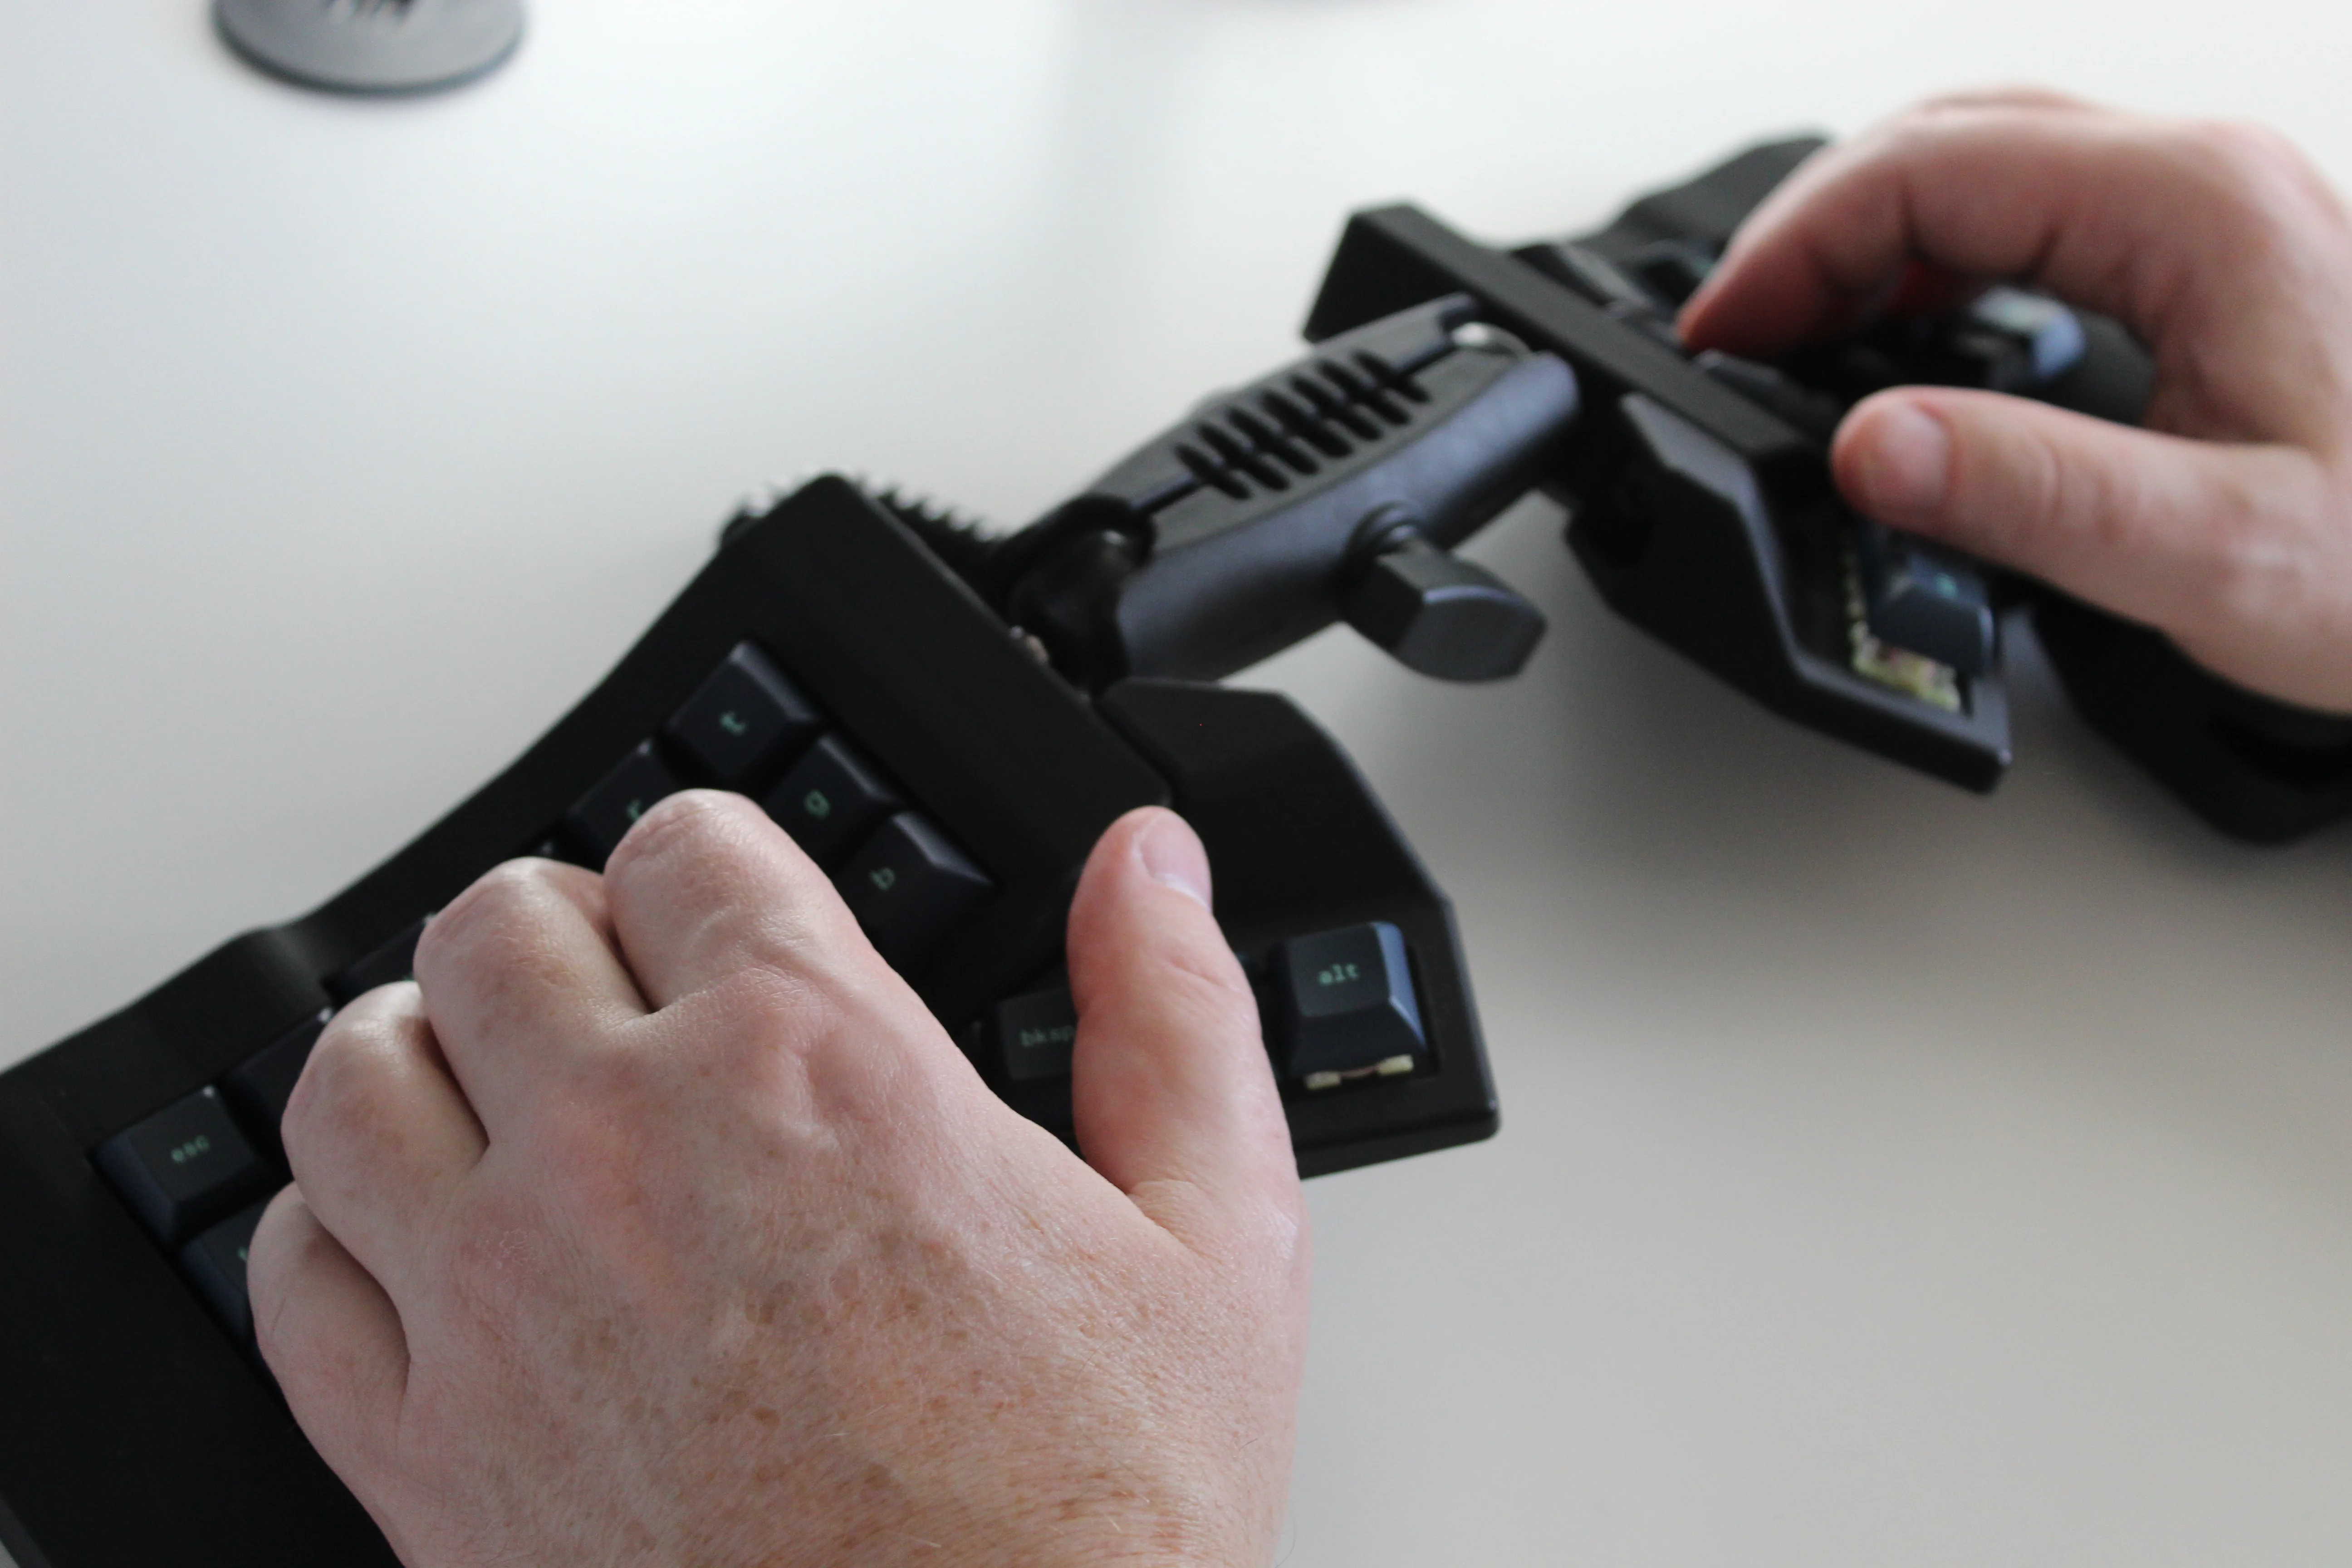
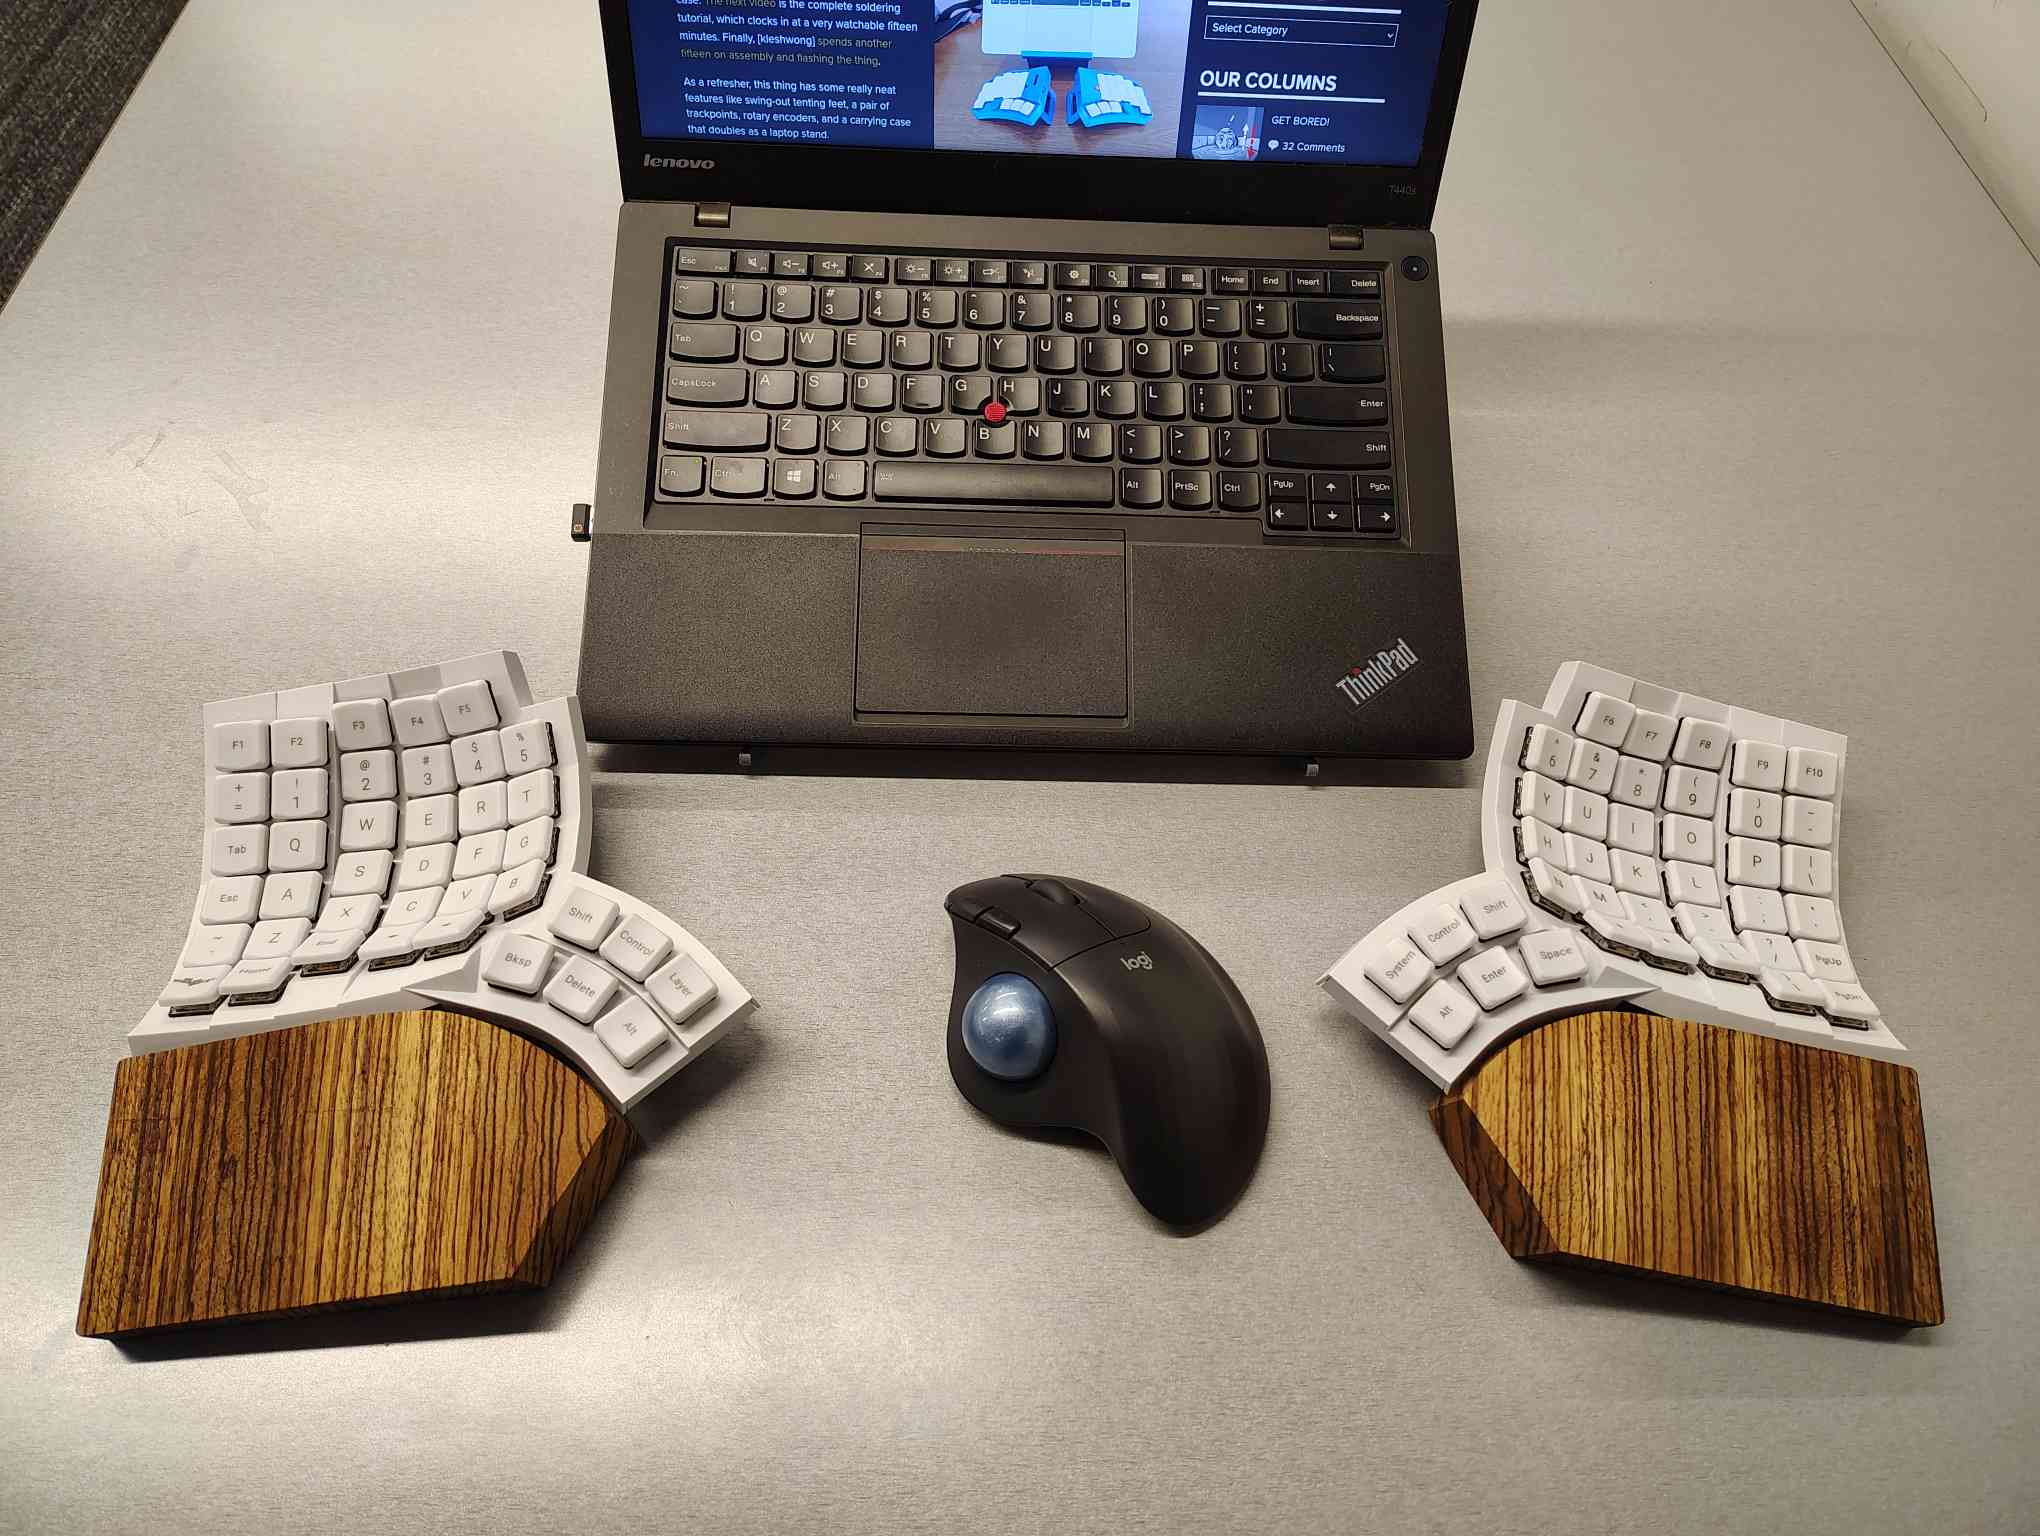
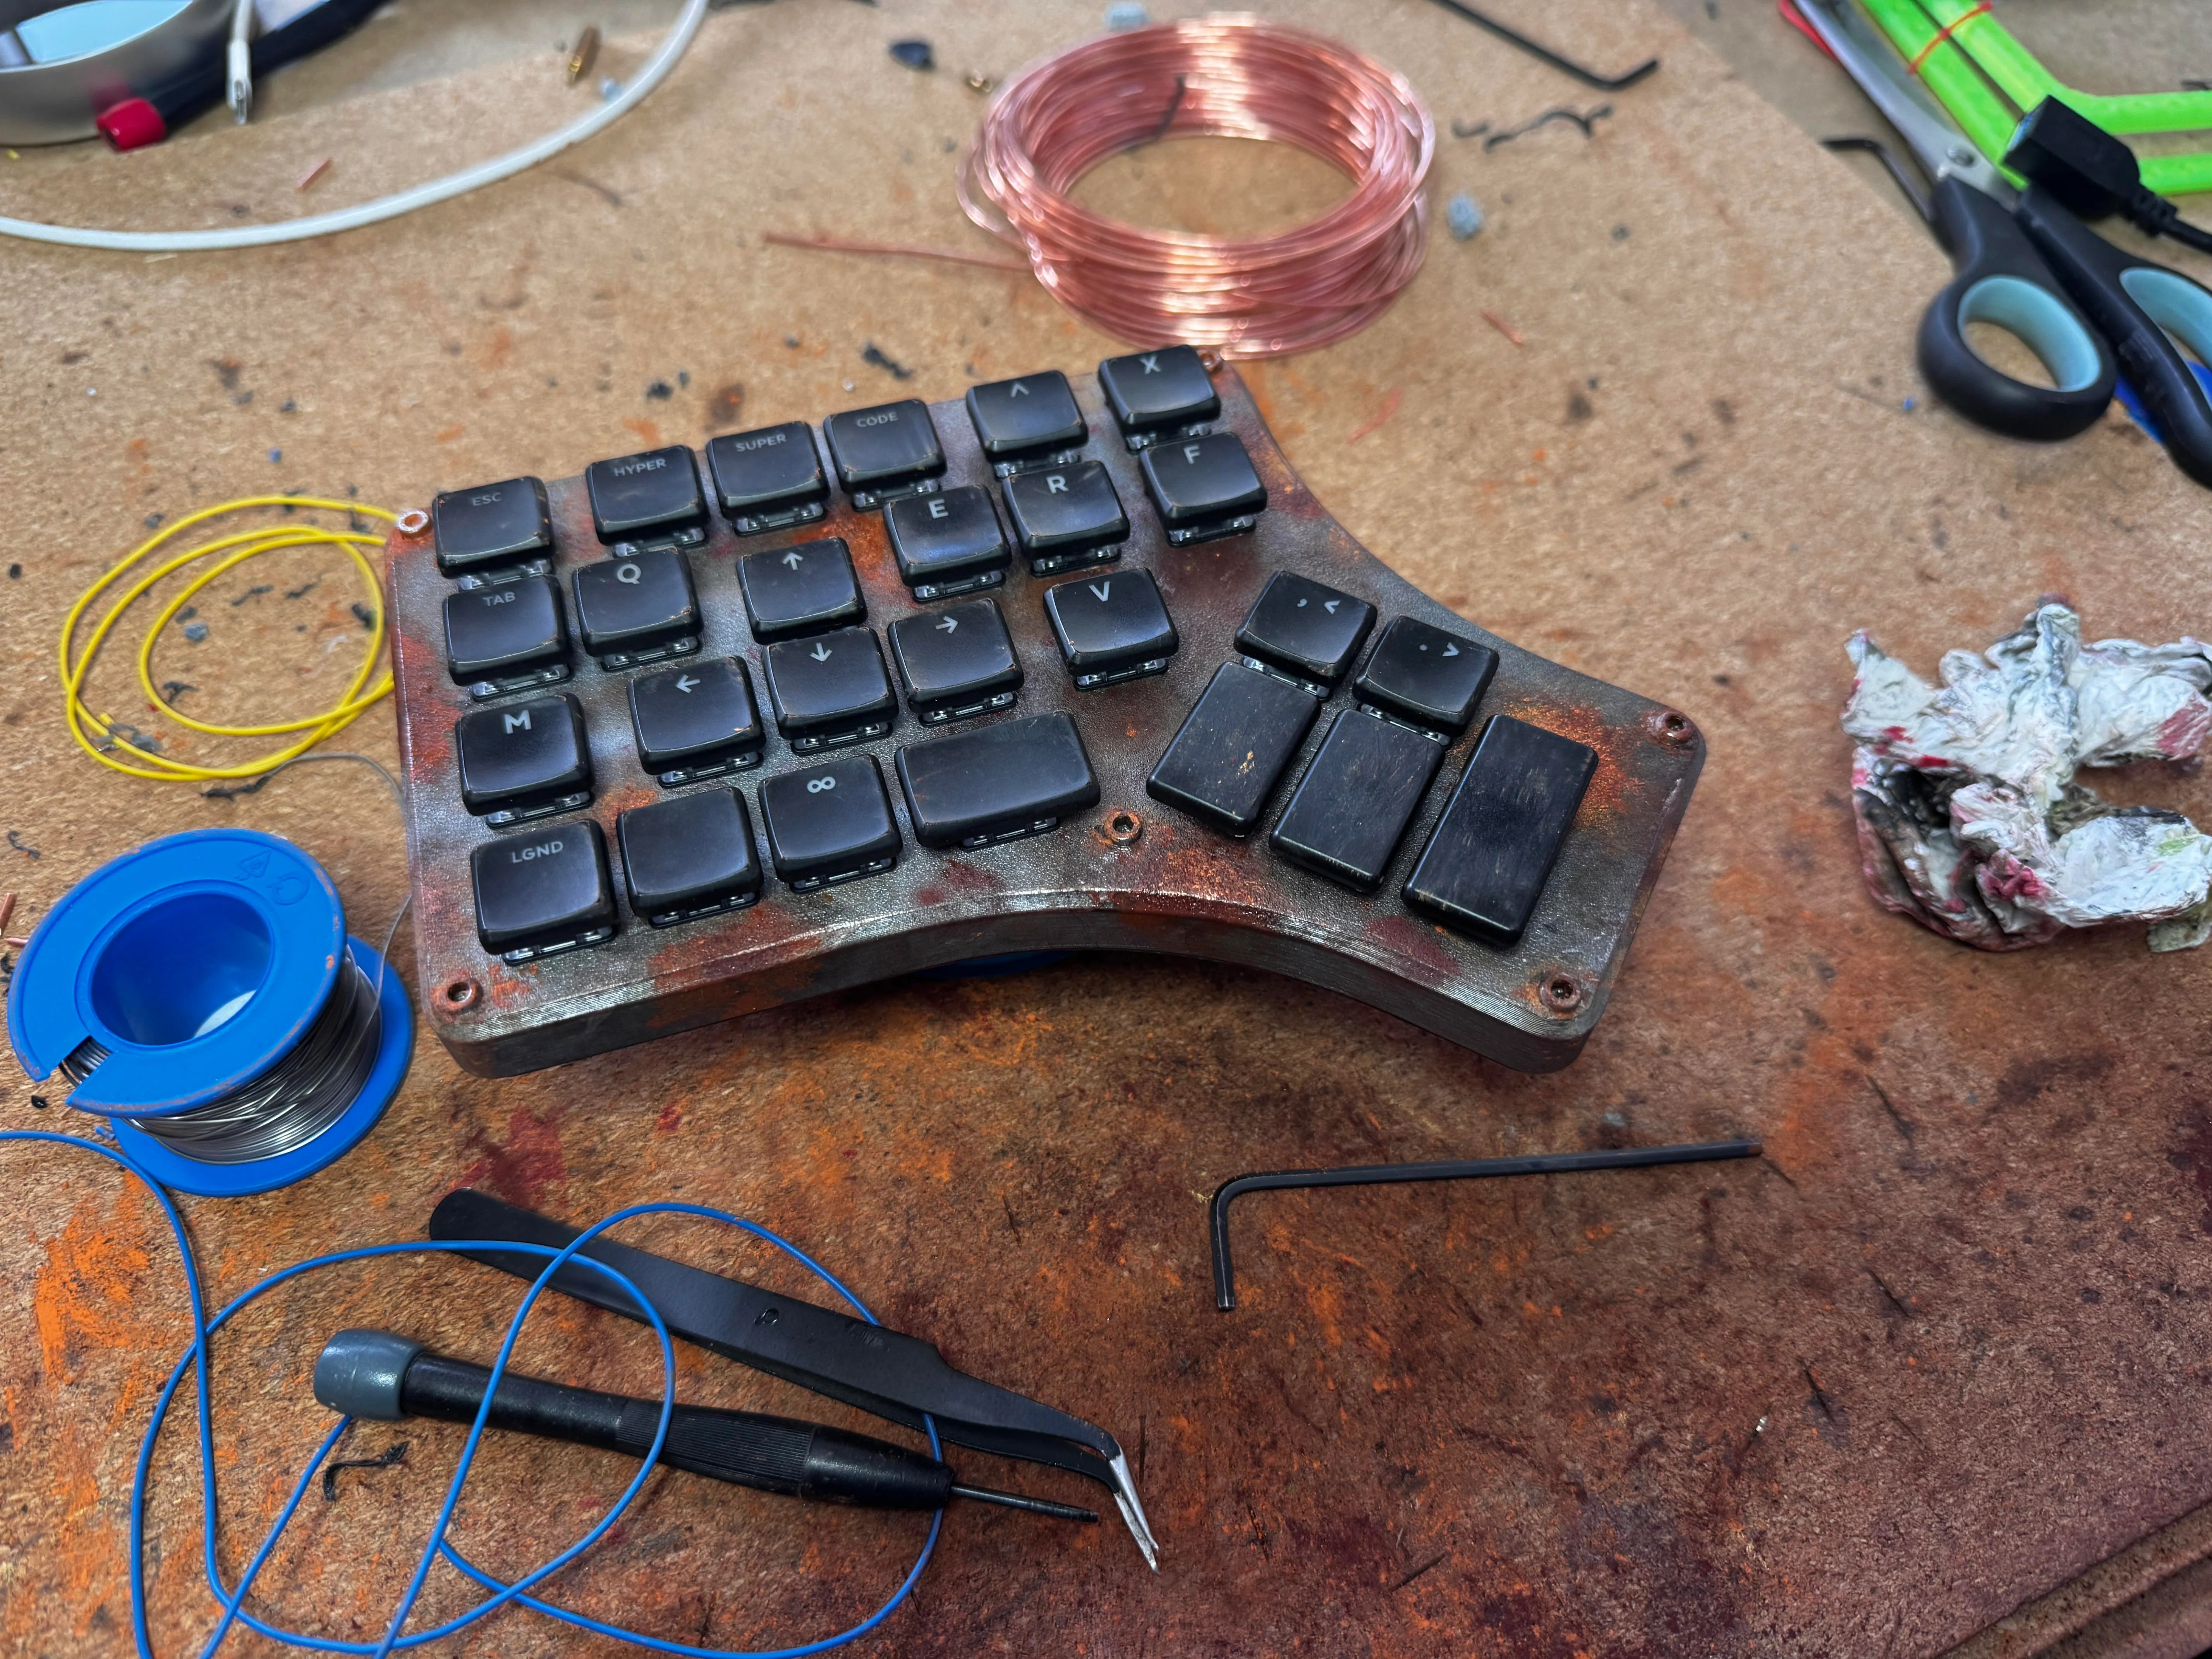
Get a handle on this bad boy! Okay, so those voids are really more for airing out your palms, I’d imagine, because palm sweat sure is real — you should see the pads of my Kinesis. This kind of looks like two sawed-off machine guns kissing, and I mean that in the best possible and non-violent way.
Image by [ntc490] via redditSo, [ntc490] has been on Team Special Keyboard for eight years now and decided it was time to design one. The goal was to make something semi-portable, super ergo, and as easy/cheap to build as possible, which, honestly, that sounds like one of those pick-two situations.
And yet, pricing (oh yeah, this is gonna be A Thing You Can Buy) will be around $115-155, depending upon whether you want the base kit, or the add-ons, too, minus switches and key caps.
So let’s get into the particulars here. As you can see, there are key wells and thumb clusters, inspired by other keyboards including your bog standard Maltrons, Kinesis Advantages and more modern, open-source takes like the Dactyl. [ntc490] loves the key well-thumb cluster combination, and I do, too (hello from the Glove80). And miraculously, the keys are hot-swappable via sockets.
Image by [ntc490] via redditThat novel tenting mechanism is adjustable, rugged, and portable. You can tent it near-vertical, lay it flat, or take it apart if you wish. The thing is modular for future expansion options such as wrist rests and displays.
So please do go visit the thread if this keyboard appeals to you at this price point. I love it, but I would need more rows of keys, personally. The top reddit comment mentions this as well, and [ntc490] says that because the thing is modular, it can easily accommodate more keys in both the wells and the thumb clusters. I seriously want one of these. Just with a few more keys.
Open-Sourcing the Ultimate Portable Split
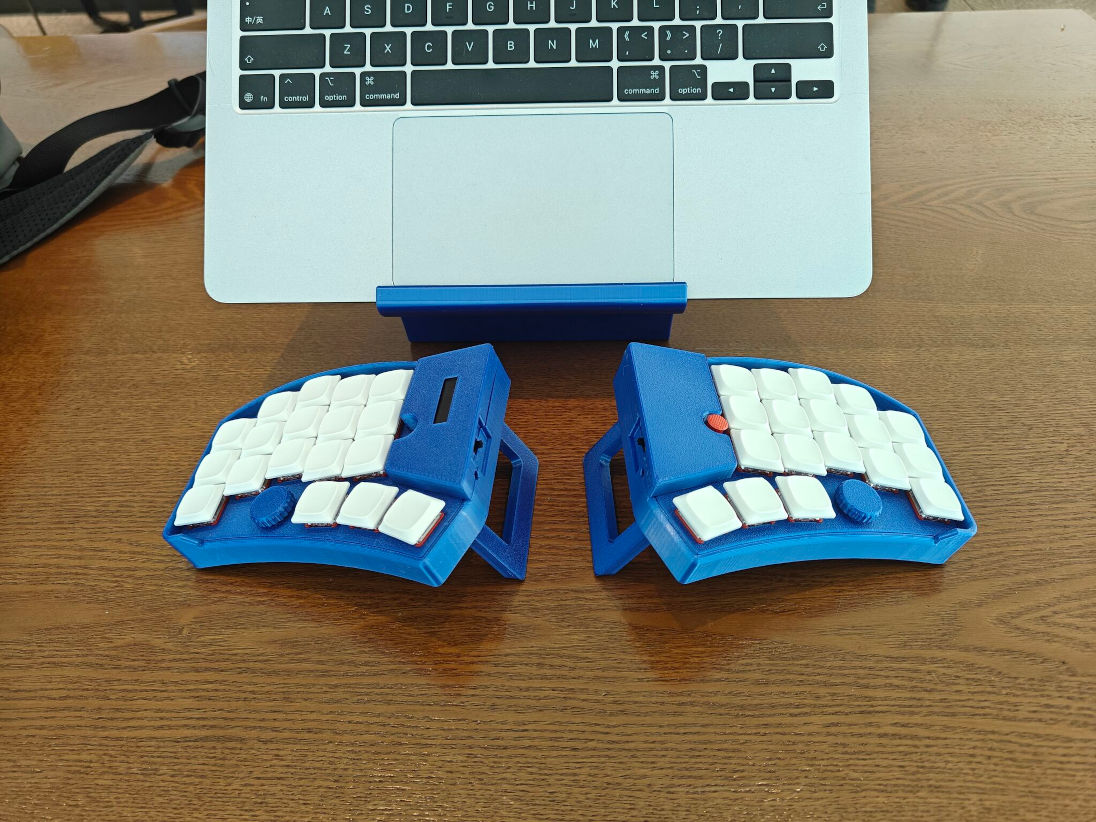
Remember [kleshwong]’s PSKEEB5 from a couple of Keebins ago, right before Christmas? He was going to open-source it if there was enough interest? Well, it seems that [kleshwong] decided to do it anyway and has since provided some new videos if you want to build one for yourself.
Image by [kleshwong] via GitHubThe first one covers the reasoning behind the reconsideration as well as the BOM and the case. The next video is the complete soldering tutorial, which clocks in at a very watchable fifteen minutes. Finally, [kleshwong] spends another fifteen on assembly and flashing the thing.
As a refresher, this thing has some really neat features like swing-out tenting feet, a pair of trackpoints, rotary encoders, and a carrying case that doubles as a laptop stand.
For the internals, any nice!nano-compatible boards will do. You’ll also need Kailh hot-swap sockets, among other things, naturally. If you have any trouble sourcing like the trackpoints for instance, you’re in luck, because [kleshwong] recently opened an online store. Go forth and build the ultimate portable split!
The Centerfold: Glove80 Looks Good In Wood
I’m using my MoErgo Glove80 pretty hardcore these days, driving them all crazy down at the library. But hey, it’s quieter than the big, echo-y Kinesis Advantage, even though they both have browns.
Once I saw the upcoming Go60 by MoErgo, though, I knew I simply needed wooden palm rests for the Glove80. So, over the course of two days, my father-in-law and I fabricated these fetching zebrawood rests, first from pink foam, then from poplar, and finally from book-matched zebra. I think we have a real conversation piece here.
Do you rock a sweet set of peripherals on a screamin’ desk pad? Send me a picture along with your handle and all the gory details, and you could be featured here!
Historical Clackers: a 3D-Printed Index Typewriter!
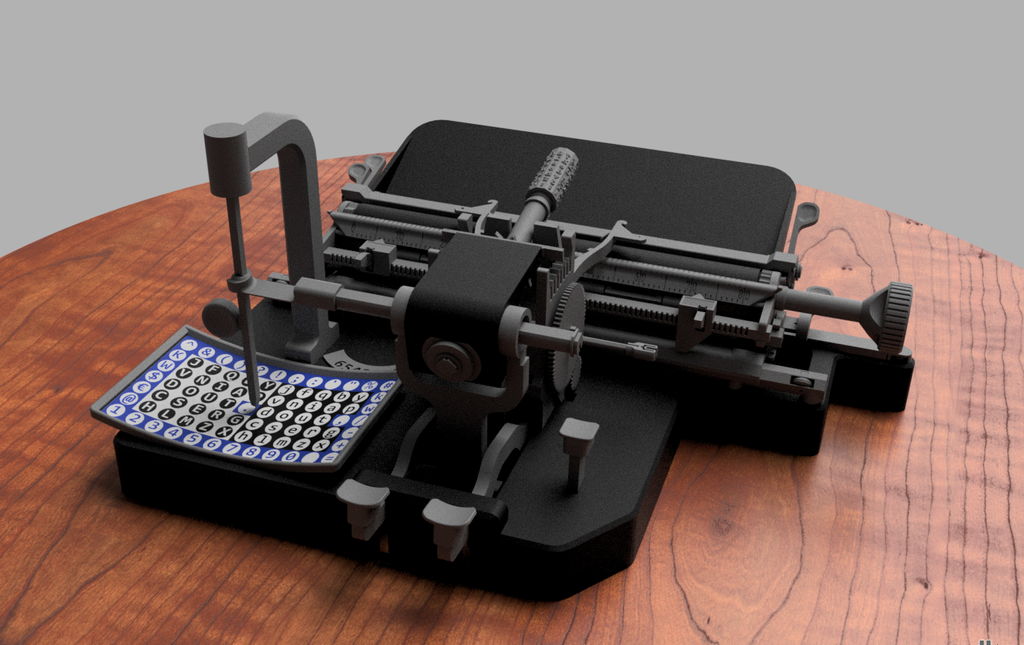
I was sorry to hear that [Keenan Finucan] had to submit this twice in order to get my attention. But here we are, with what is probably the world’s first 3D-printed index typewriter. So, why is this filed under Historical Clackers? Because I said so, and because it’s based on a real antique index typewriter, the AEG Mignon Model 4. This first model of Mignon was designed between 1901-1903 by German company AEG. Mignons were produced until 1932.
Image by [Keenan Finucan] via ThingiverseI suppose I don’t have to explain what an index typewriter is at this point. Besides, it seems pretty obvious in this design, but maybe I’m biased. Essentially it’s like a label maker, the old ka-chunk kind. You squeeze out one character at a time, then you move the index to the next character.
I think this looks fabulous overall, and I rather like the way the index is laid out, which is decidedly non-alphabetical and, surprisingly, does not mirror the AEG index.
[Keenan] reports that thanks to months of work and revisions, this project is as accessible and repeatable as possible. You don’t even need any glue, and non-printed items are at a minimum. You will need a minimum XYZ build volume of 250 x 210 220 mm, TPU or other flexible filament, some springs, a bit of coat hanger wire, and a universal 1/2″ typewriter ribbon, which is pretty widely available.
Finally, $2K Keyboard Computer Is a Return to Form
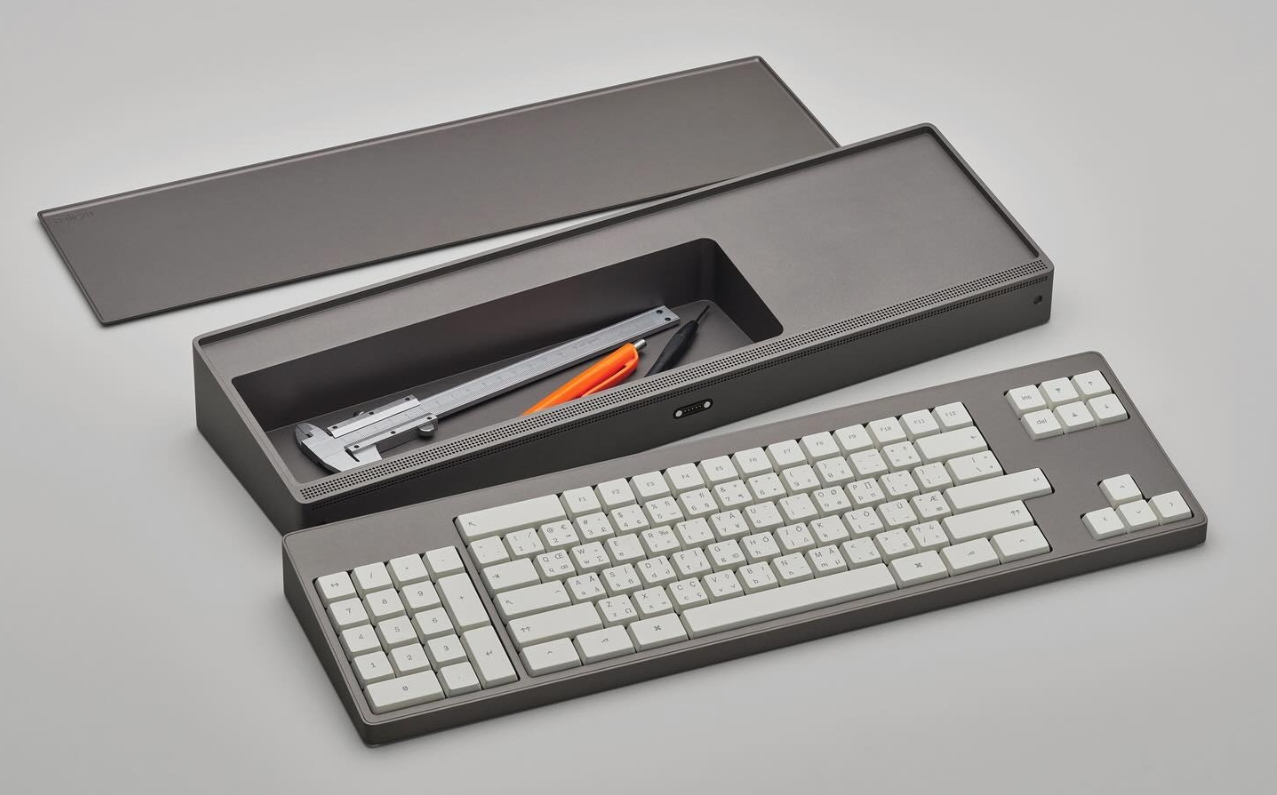
Alright coders, designers, and engineers: this elegant hunk of metal is for you. What we’ve got here is Caligra’s c100 Developer Terminal. Described as a “computer for experts”, this is not meant for scrolling social media, although what developer can get through the day without a reddit break or three?
Let’s talk about that body. It’s entirely CNC-milled from a solid block of aluminium, which makes me think of the Icebreaker keyboard we saw here almost exactly a year ago. Both double as handy bludgeoning devices, but this one is decidedly more attractive. The bead-blasted finish of the c100 does simultaneously evoke modern and industrial design, so I’ll agree with Yanko on that note.
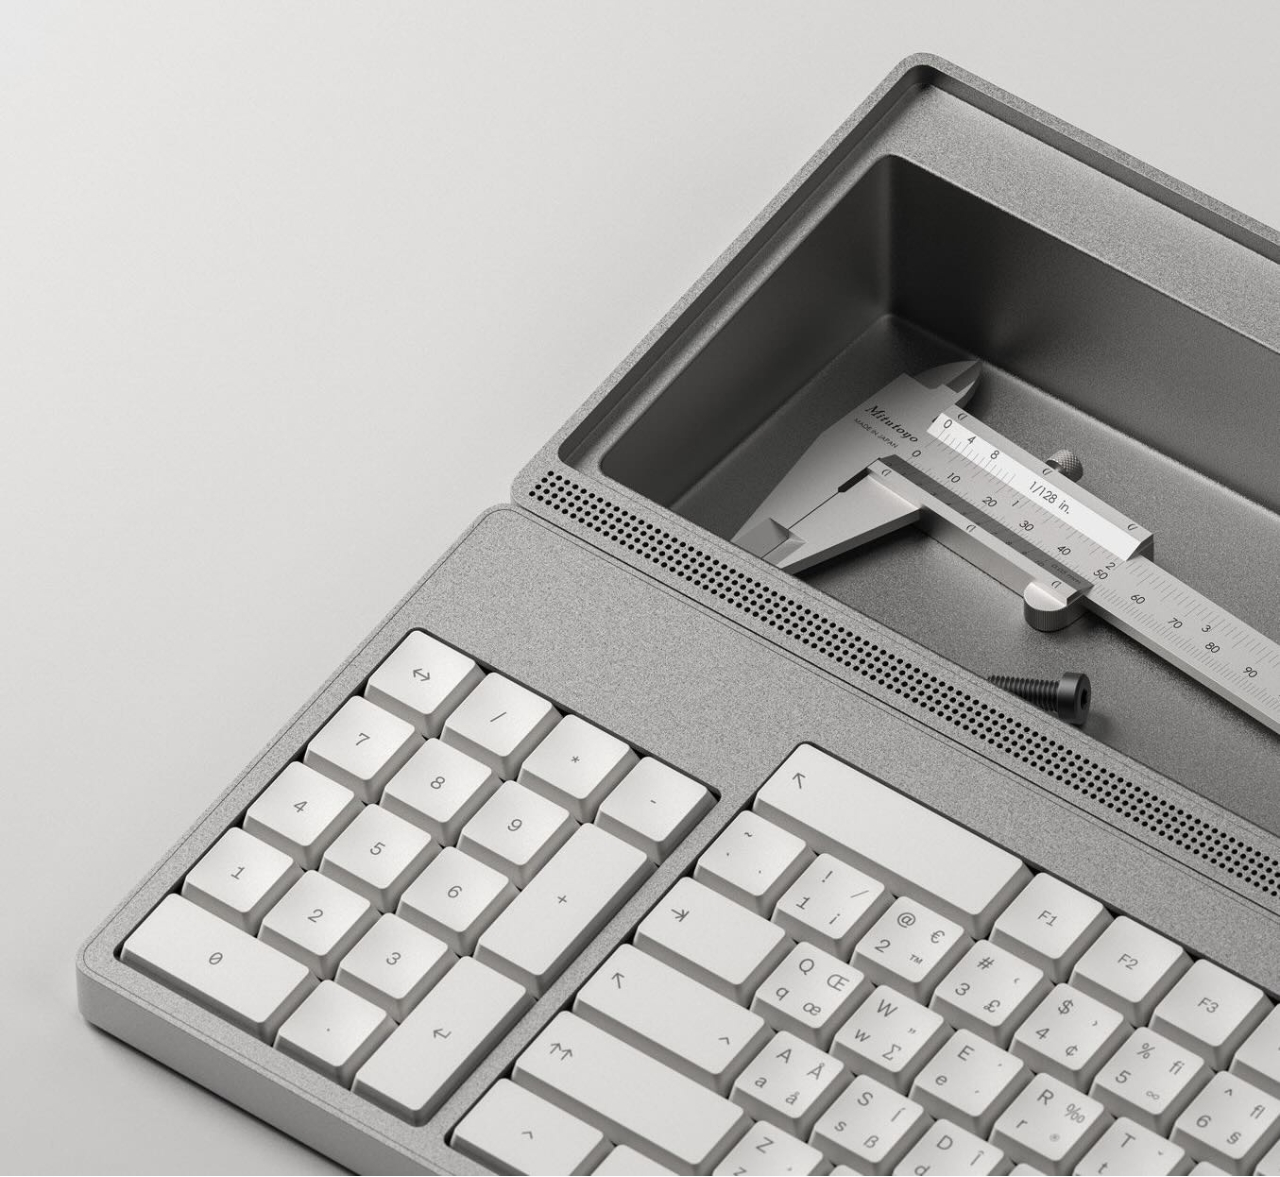
The coolest part is half-evident in the picture I chose. There’s a central magnetic pivot structure, and this lets you detach and fold the thing up even smaller, without any external hinges.
I thought the storage compartment gimmicky at first, but I’ve grown to like the idea of having a place for pens and whatnot. Yanko almost threatens to call it subversive in the face of what tech companies probably do not want you doing: opening the thing up. You are supposed to tinker with this one.
For some reason, the num pad is on the left, though I suppose this solves the distance-to-mouse problem. Yanko says the design uses Fitts’ law to accelerate task management, and this is supposed to explain why the keys are clustered the way they are. Basically, the placement of each key has been optimized for both speed an minimal hand movement. The wired mouse looks a bit uncomfortable, however.
This thing ships with Workbench OS, which is Linux-based and built specifically for technical work. There are no pop-ups in Workbench OS, which sounds amazing. So I would think that c100 is for writers, too, provided the keyboard clacks nicely.
All right, I’ll cut to the chase: Cheap03xD is mainly so cheap because the PCB falls within a 10 x 10 cm footprint. The point was to make a very affordable keyboard — all the parts come to ~40 Euro (~$47). So it would seem that [Lander03xD_] succeeded.
Image by [Lander03xD_] via redditCheap03xD is all the things — 36-key, split, column-staggered, wireless, hot-swappable, and uses ZMK. The batteries are easily replaceable, and no they don’t get in the way.
Those are MMD Princess silent switches, which I wouldn’t choose, but [Lander03xD_] is taking this board to the office, so I get it. They sure are a nice shade of pink, anyway, and they go really well with the pastels of the DSA keycaps and the bezel.
One cool thing to note is that the PCBs are reversible, like the ErgoDox. This isn’t [Lander03xD_]’s first board, and it won’t be the last.
Now, let’s talk batteries. [Saixos] pointed out that the design doesn’t appear to include a protection circuit. In case you can’t tell from where you’re sitting, those are nice!nano clones that [Lander03xD_] is using, and they expect a protection circuit.
[Lander03xD_] is going to look through the docs and see what’s what. The goal is not to have any daughter boards, so this may take some rethinking.
So Arc Raiders is this cool-looking, stripe-logoed, multiplayer extraction shooter that just came out a couple of months ago for all the platforms. It’s not something I could personally play as it’s way too immersive (read: time-consuming), but it definitely looks good, much like this keyboard that [RunRunAndyRun] designed to play it.
Image by [RunRunAndyRun] via redditHaving enjoyed the game with a game pad for a couple of weeks, [RunRunAndyRun] longed for the precision of a keyboard and mouse. The only problem was that his stock of split keyboards all lack a number row.
No matter; just make a new one. Why not? This rustic beauty runs on the Waveshare RP2040 Zero. The case was 3D printed on a Prusa Mk4, which you’d never know unless you blew up the picture. And then [RunRunAndyRun] gave it that nice patina using Panduro hobby acrylics and a bit of weathering powder.
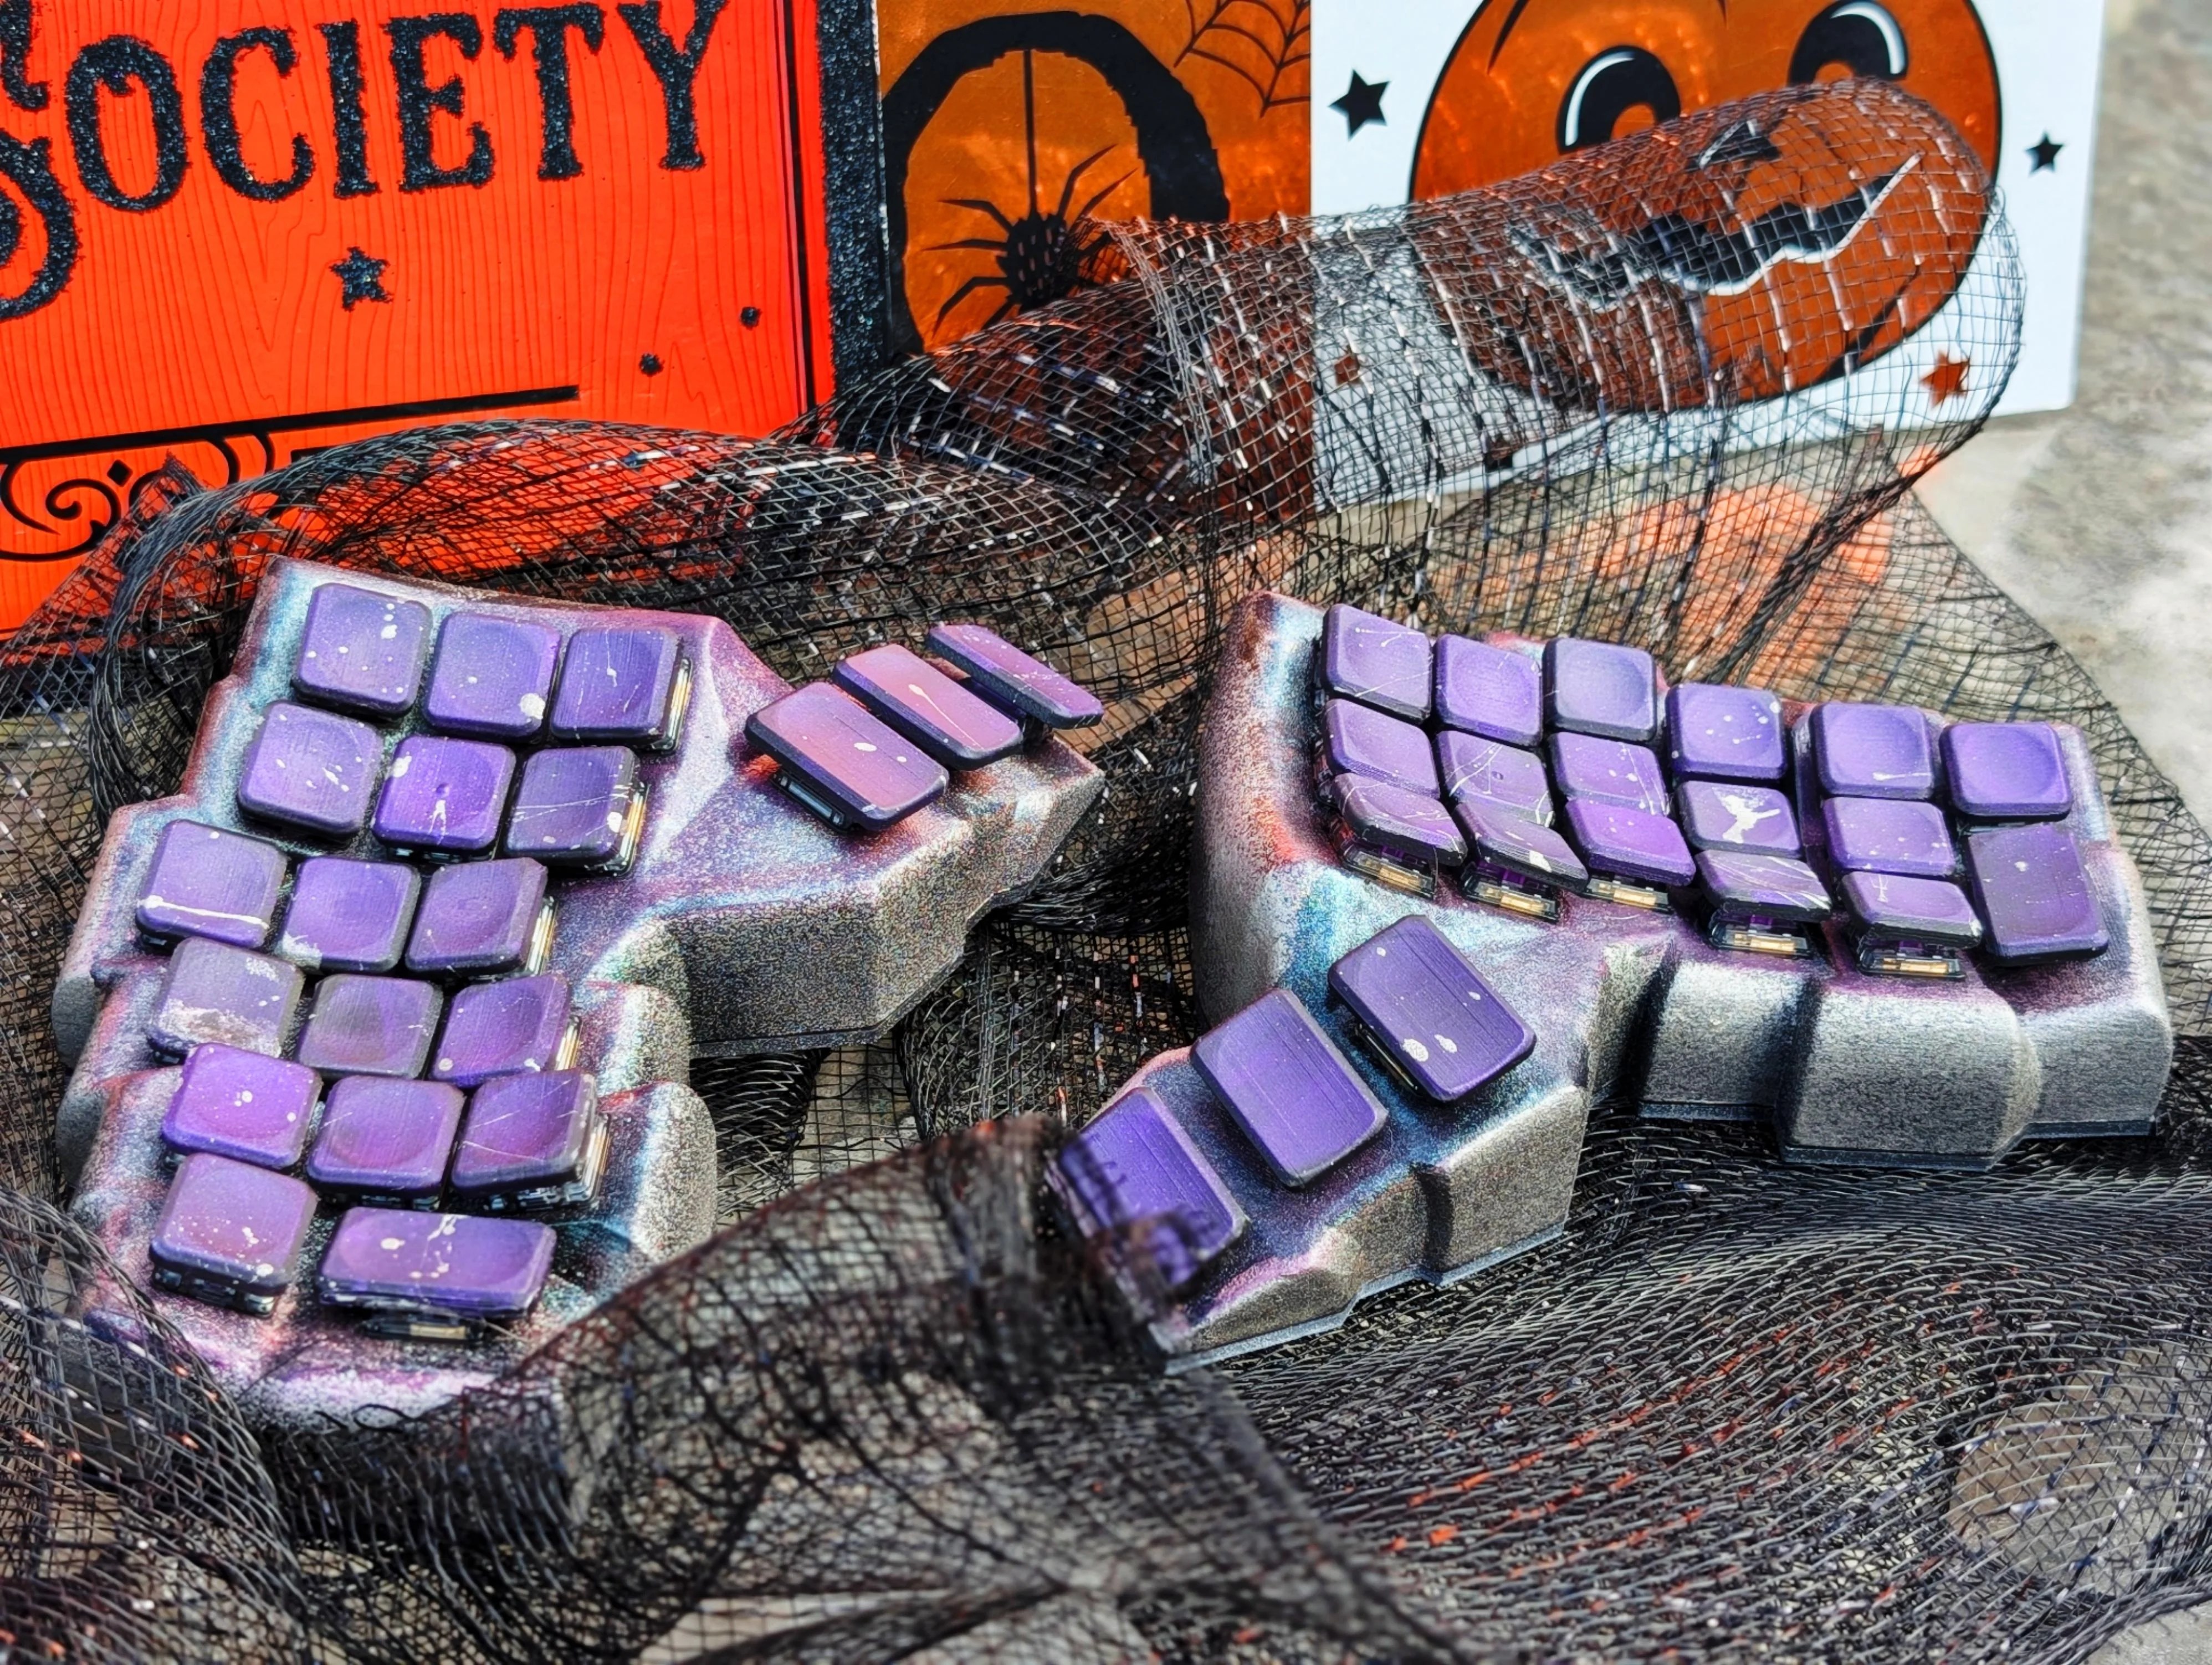
Image by [CaptLynx] via redditThis stunning beauty, Witch’s Brew, was created by [CaptLynx] with the Cosmos keyboard configurator. Doesn’t sound familiar? It’s the one that uses a scan of your hand to create your ultimate comfort. This keyboard is a custom build for a commission. I must say, as much as I dislike the work of Jackson Pollock, I do absolutely love the spatter on those keycaps.
Do you rock a sweet set of peripherals on a screamin’ desk pad? Send me a picture along with your handle and all the gory details, and you could be featured here!
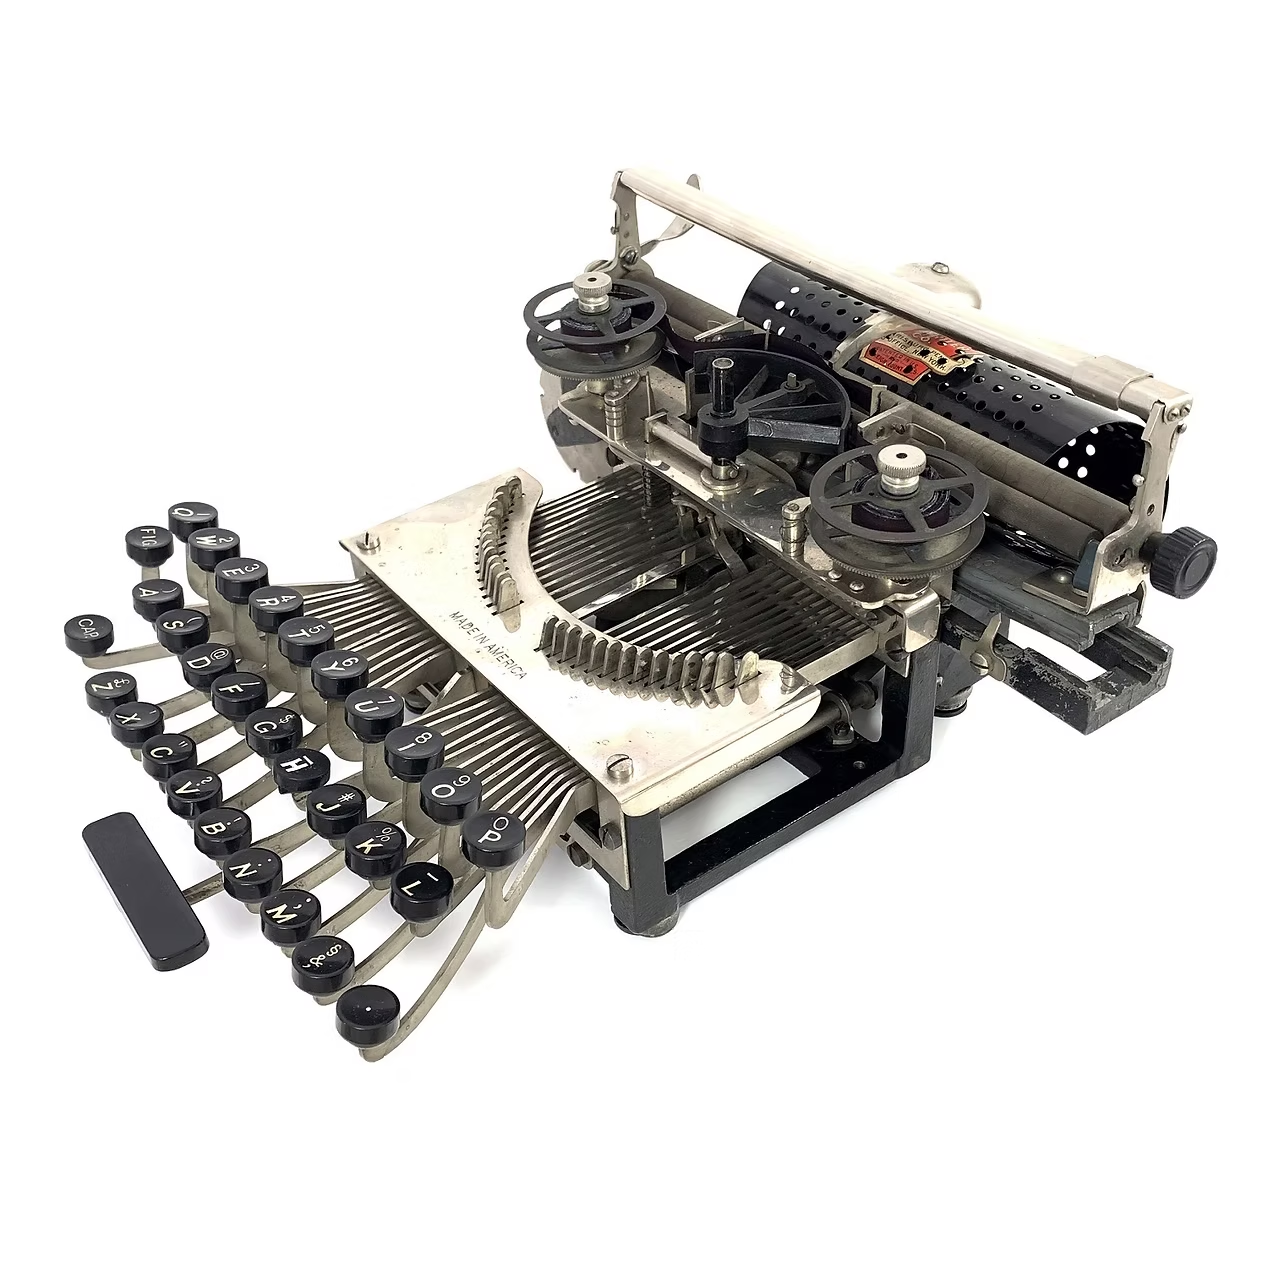
This spartan beauty was named after the state in which it was made, Pennsylvania. Manufactured between 1898 and 1903, the Keystone was invented by William Prehn Quentell.
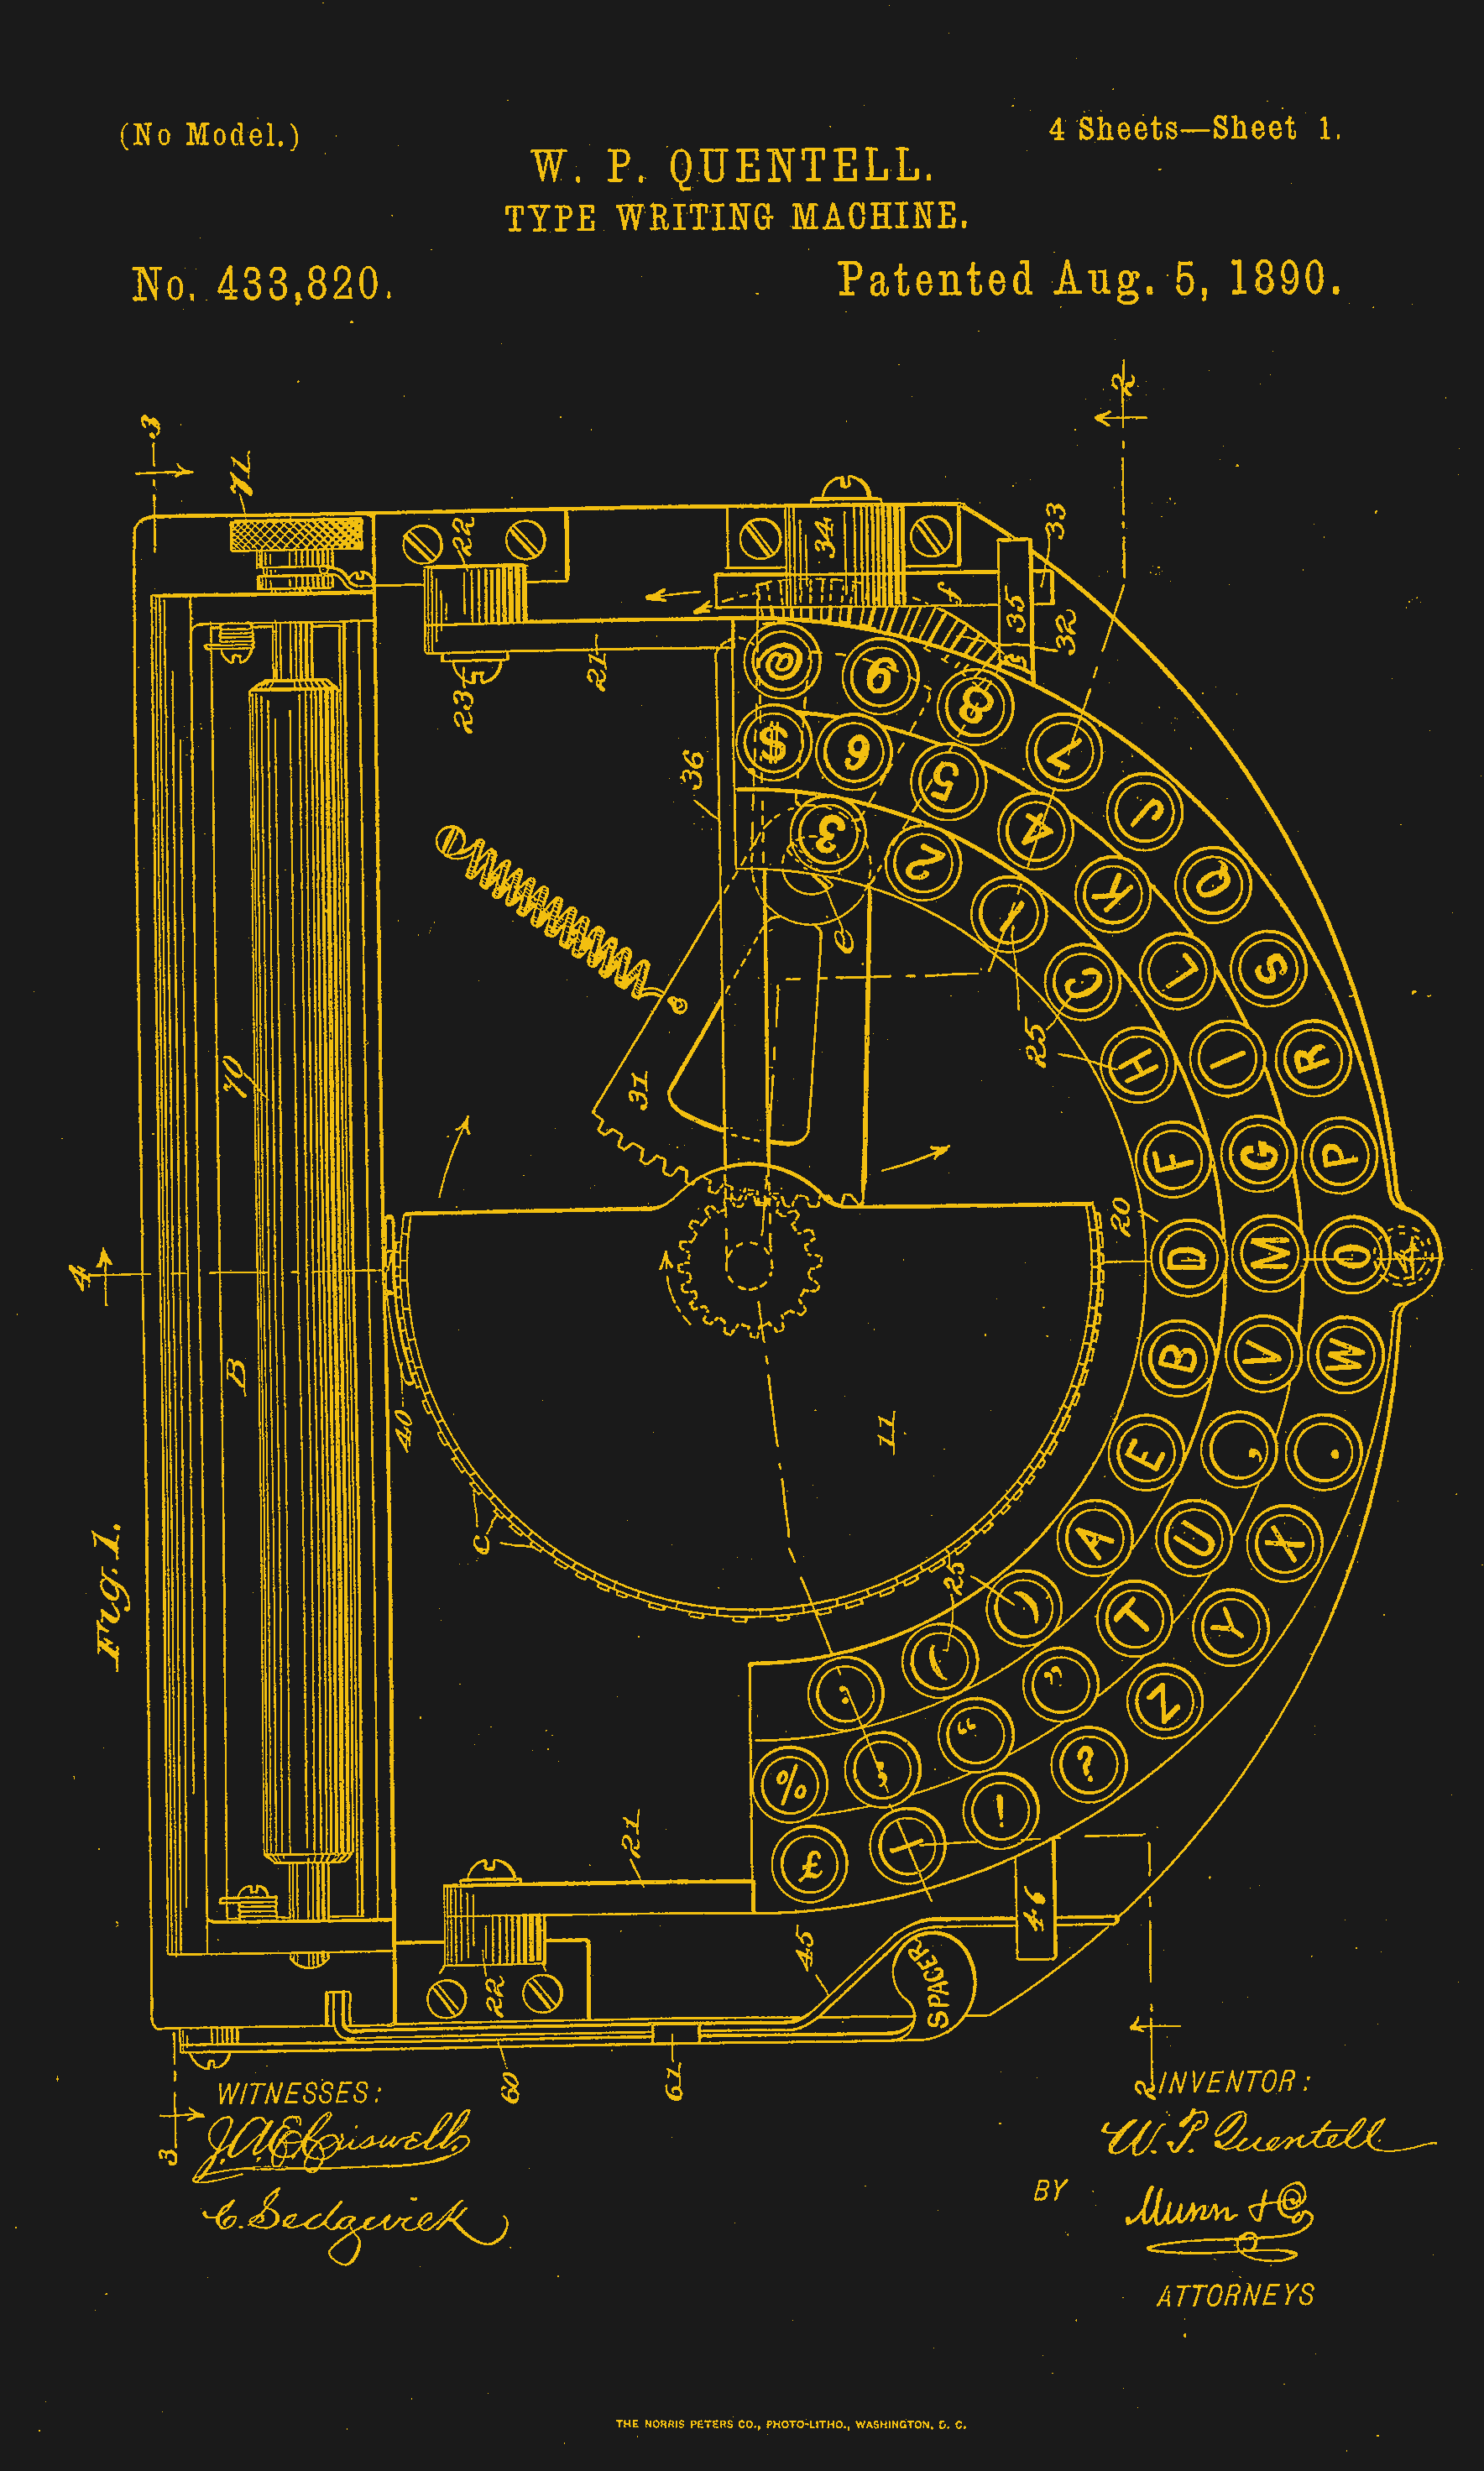
Quentell was living in Kansas City, MO when he first applied for a patent, and later moved to the east coast. At the time, the machine was nameless. The patent looks nothing like the finished product pictured here, but the genesis of the key feature of this “poor man’s Hammond” is there — the swinging type sector.
What this means is that the Keystone has its type on a half wagon wheel, which is evident in the patent drawing. The glyphs are molded around the outside edge of the wheel, which gets rotated into the correct position with each keystroke. This type wheel could be easily changed out for different fonts.
To imprint the paper, a spring-driven hammer strikes from behind, pushing the paper and ribbon against the type wheel. The paper is loaded into a cylindrical holder in the rear, and unfurls as one types.
So, why was it a poor man’s Hammond? Well, for one, the patent image looks like a Hammond. But the poor part is felt the hardest in the makeup of the typewriter.
In the early Keystone examples, the carriage rails were made of pig iron. Why? It’s a simple case of lateral integration. The factory that was retrofitted to manufacture the machine had previously been the Lochiel iron mill, a producer of pig iron. They were just using up old stock, I imagine.
The Keystone featured two Shift keys on the left, one for Caps and one for Figures. It was a comparatively inexpensive at $40, and then later, $35 (around $1,200 today).
Production was supposed to begin in May of 1898. But by June of ’99, “the company has been unable to fill the orders which are piling up at the works.” Sounds like your average Kickstarter. Quentell was already working on his next project by 1902, the Postal typewriter.
Finally, a Keyboard That Charges Your Phone
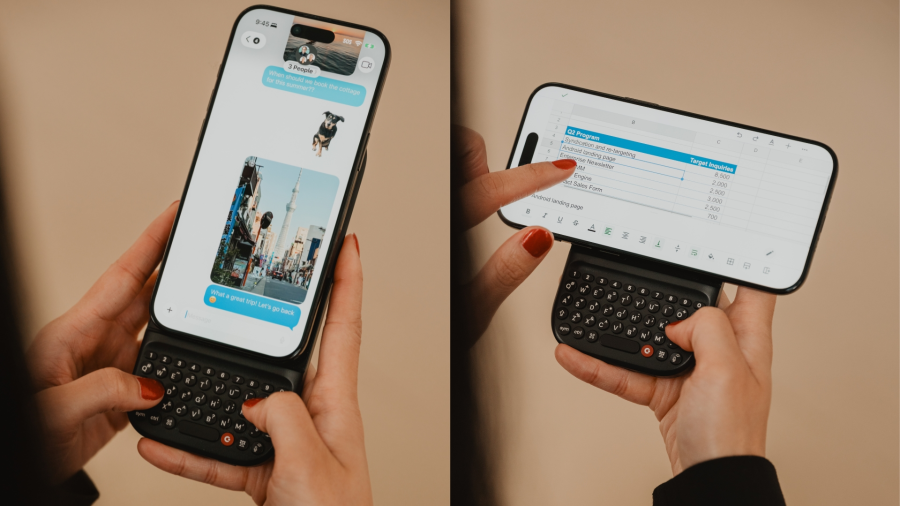
So this article mainly centers on the new little Blackberry-esque number from Clicks which might just be my next phone, except that it doesn’t actually telephone. Clicks is meant to be your second phone, the one you use for emailing and such. You can pre-order it for $399 if you put a $199 deposit down before February 27th. If you decide to drop the full four hundo as an early bird, you’ll get two additional back covers, which slightly change the look of the phone.
But I’d like to talk about the add-on Power Keyboard for smart phones that Clicks is also dropping at CES this year. Do you miss your Sidekick? Well, here’s a sliding keyboard with multiple positions for differently-sized smart phones, tablets, and even smart TVs. (Because forget typing with the remote control.)
It uses a 2,150 mAh battery and attaches via MagSafe or Qi2, but it also can be used with the case on. When paired with a smart TV, you just use it by itself. Honestly, it looks kind of hard to type on without the phone for support. But I don’t use the smart features of my TV, so whatever.
Honestly, I will probably start by getting the keyboard, which is $79 for early birds through their site, and $109 later on. Pre-orders started a week ago, so I guess I should get on that.
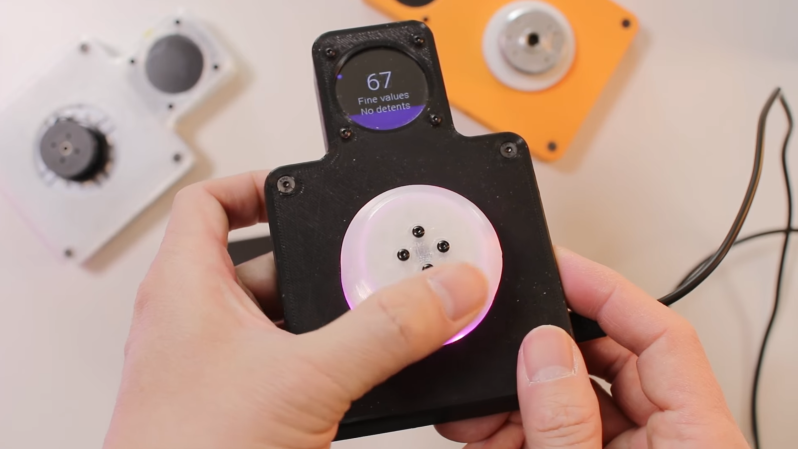
A knob can make a surprisingly versatile interface, particularly if it’s the SmartKnob, which builds a knob around a BLDC motor for programmable haptic response. It can rotate freely or with a set resistance, spring back to a fixed point when released, stick at detent points, and completely change its behavior as the interface demands. For people inexperienced in electronic assembly, though, smartknobs can be difficult to assemble. That’s why [Kokensha Tech] designed a simpler version, while at the same time letting it use a wider range of BLDC motors.
In addition to a motor, the original design used a magnetic encoder to detect position and a strain gauge to detect pressure on the knob. A circular LCD on the knob itself provided visual feedback, but it also required the motor to have a hollow center shaft. The LCD control wires running through the shaft proved tricky to assemble. [Kokensha Tech] moved the display out of the knob and onto a separate breakout board, which plugs into the controller board. This greatly broadens the range of compatible motors, since they no longer need a hollow shaft.
The motor now fits on a separate carrier board, which makes it easier to swap out different motors. The carrier board has mounting holes sized for a wide variety of motors, and four different types of motor connectors. [Kokensha Tech] also redesigned the rest of the PCB for easier soldering, while avoiding components with narrow pin spacing whenever possible. The original design used a LILYGO T-micro32 Plus MCU. The ESP32 is both cheaper and easier to solder, so it was a no-brainer to swap it in.
Unlike Texas Instruments, whose graphing calculators have famously not made technological improvements in decades despite keeping the same price tag, HP has made a few more modern graphing calculators in the last few years. One of which is the HP Prime which boasts hardware from the mid-2010s including an ARM processor, a color screen, and rechargeable lithium battery. But despite this updated hardware it’s still using micro-USB for data and charging. [David] wanted to fix that by giving this calculator a USB-C port.
The first steps were disassembling the calculator case and removing the micro-USB port. The PCB is glued to the LCD screen which isn’t ideal, but he was able to work on it with everything attached. The parts are small enough to need a microscope, and with a hot air station he was quickly able to remove the USB port. His replacements from a generic online retailer were able to be soldered without much effort, but there was one major complication. The new USB-C ports didn’t account for the “On The Go” mode supported by micro-USB and were shorting a pin to ground which put the calculator into “host” mode instead of acting as a device. But using the microscope and cutting a trace on the PCB disabled this mode permanently and got the calculator working properly.
As far as modernizing calculators go, it seems like the HP Prime checks a lot of boxes, with the major downside that the LCD screen and more powerful processor means that the battery needs to be charged more often than the old TI calculators. Rather than carry a dongle around everywhere, [David] found this to be a much more efficient change to his trusty HP. If you’re still stuck using TI calculators, though, there are a few ways to modernize those as well like this build which adds a lithium battery or this one which ports a few Game Boy games to the platform.