❌

Reading view

There are new articles available, click to refresh the page.

Veg Manchurian | Air Fried & Deep Fried

By: Richa

Veg Manchurian is a really popular Indo Chinese dish thats ready in 35 minutes, where fried vegetable balls are dunked and simmered in Manchurian sauce. The result is a sweet, sour, spicy dish thats saucy and full of umami!

Veg manchurian served in a white bowl with fried rice and spring onions on the side

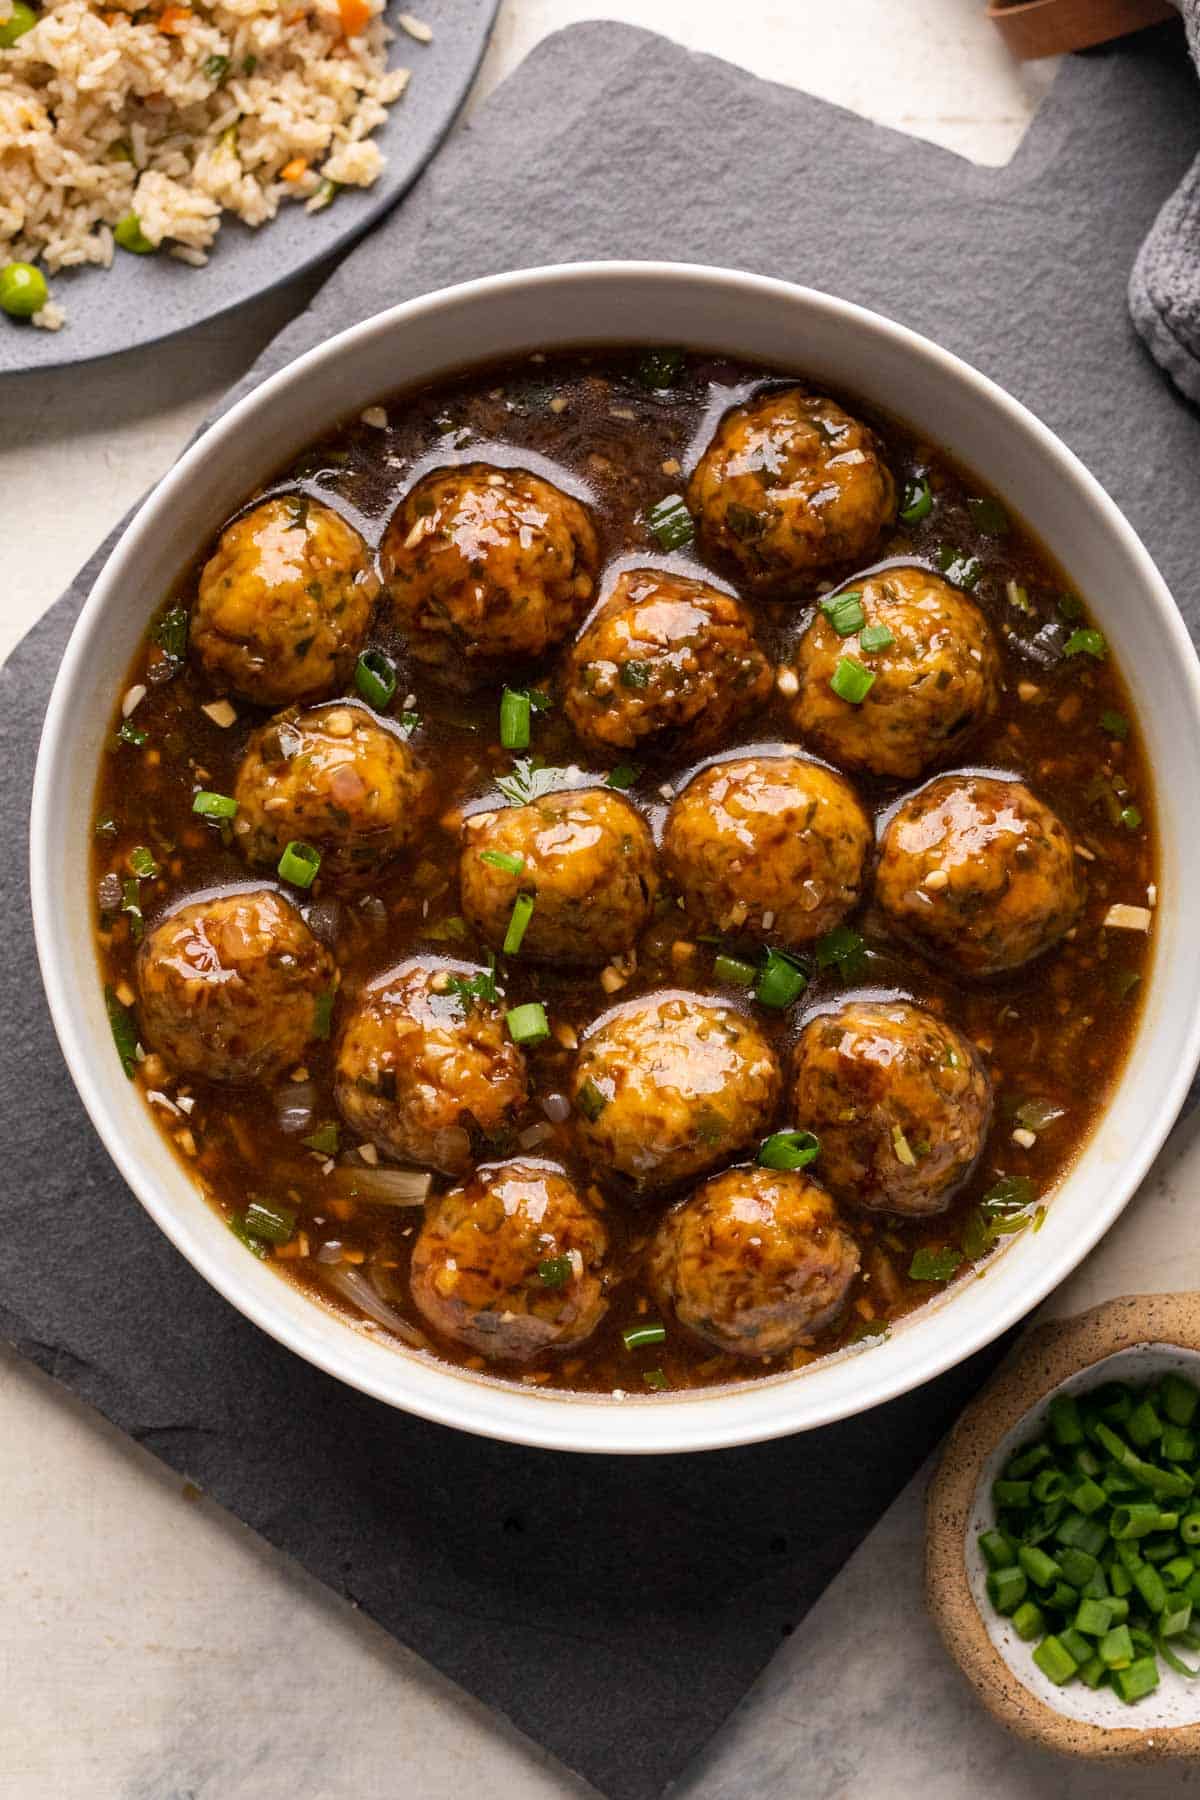
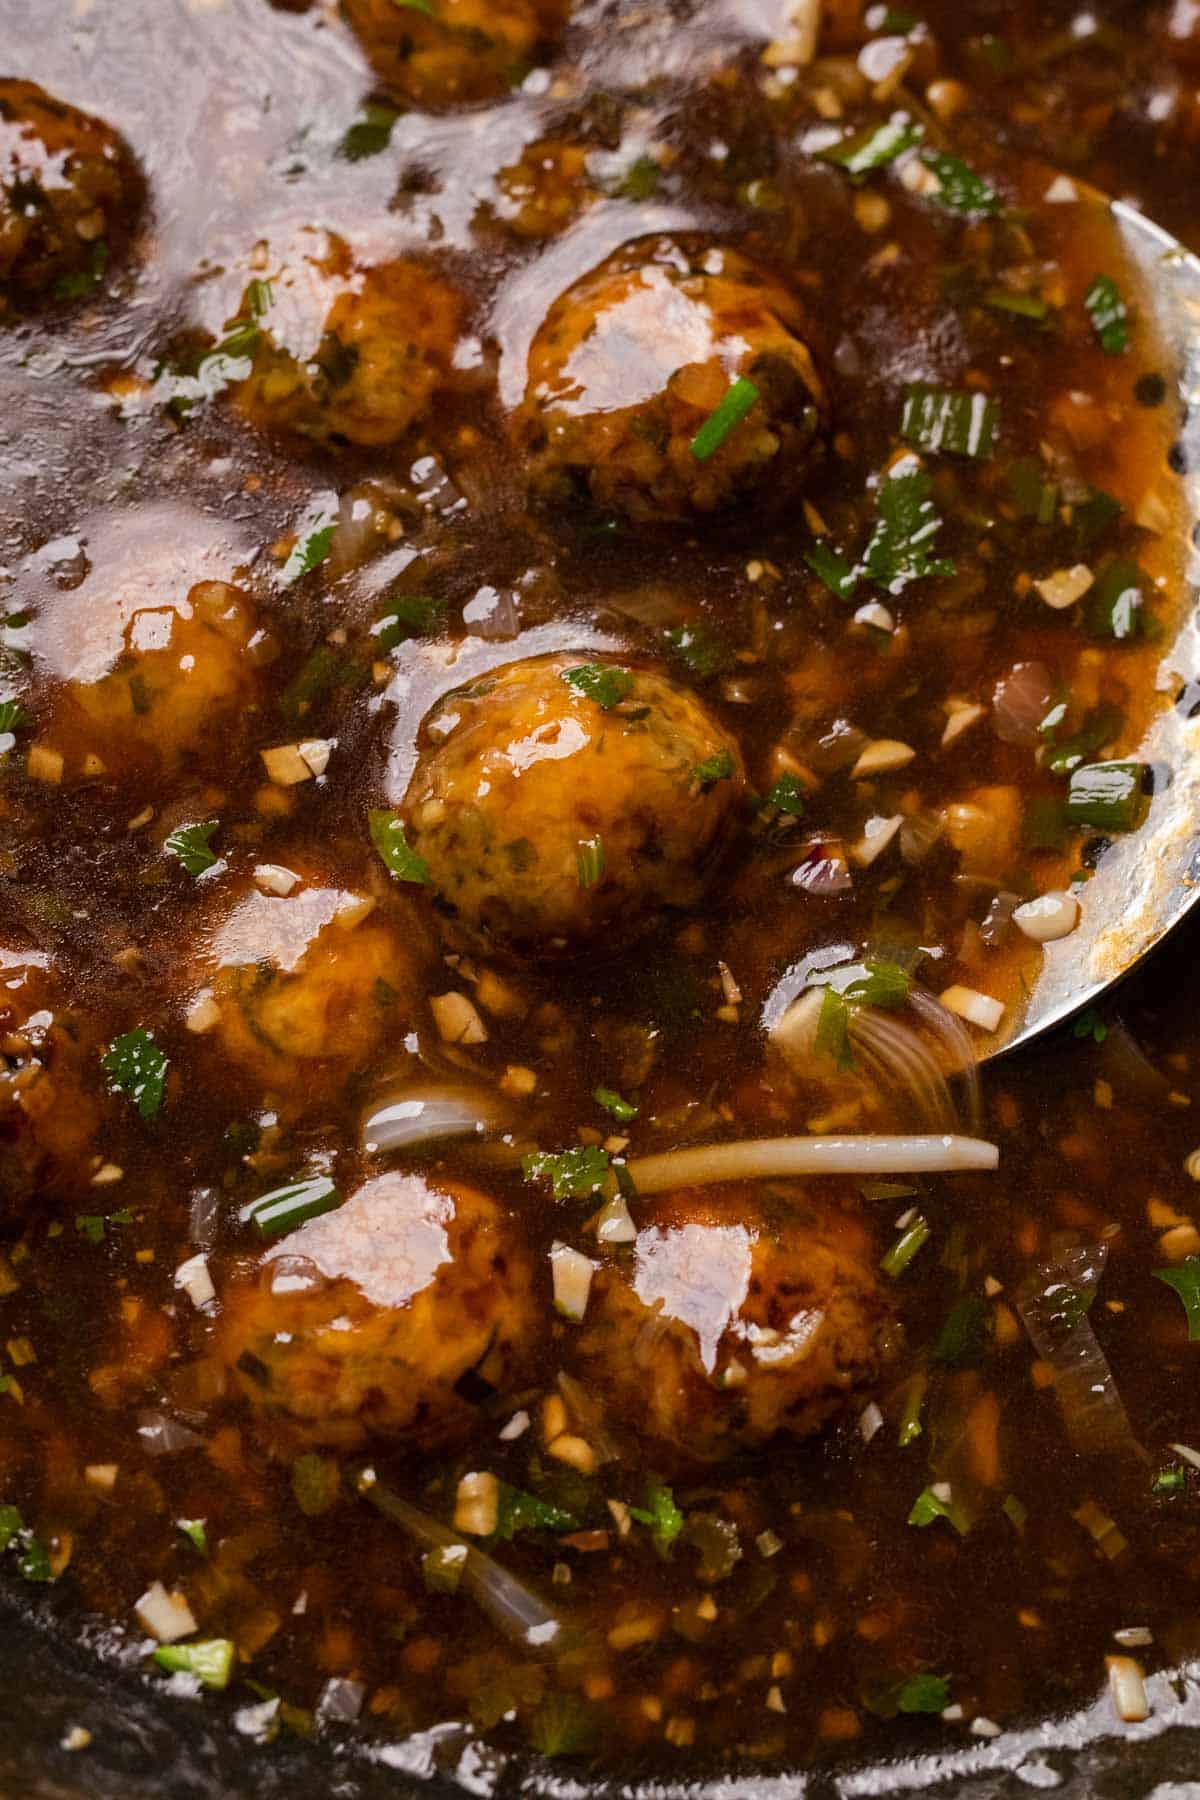
Veg Manchurian or Veg balls in Manchurian sauce is probably on every Indian restaurants menu! And for good reason! Deep fried vegetable balls that are crunchy and packed with flavour are simmered in an intense, spicy, sour, tangy, umami rich, aromatic sauce till they soak up all that flavour and become even better!

Traditionally, manchurian balls are deep fried. But in this recipe, I am showing you how to make this dish healthier manchurian balls in the air fryer, so they’re healthier and lighter, but still as crispy and delicious as it’s deep fried counterpart.

Who invented Manchurian?

Like a lot of Indian Chinese dishes, manchurian originated in Kolkata in the 1970’s and was born in Indo Chinese restaurants there. It is inspired by dishes in Manchuria, which is a region in North East China. Originally it was made with chicken in manchurian sauce, but since India has so many vegetarians, this vegetarian manchurian was born!

Manchurian is heavy on soy sauce and usually has a deep brown colour. The Indian influence added things like green chillies and coriander, which weren’t originally added to the dish. But we aren’t complaining because this Indianised version is so so good!

Now we have a ton of variations to this recipe like gobi manchurian, soya manchurian, paneer manchurian and even mushroom manchurian.

There are generally two ways Manchurian is made:

  • Veg Manchurian with gravy usually served with fried rice or hakka noodles
  • Veg Manchurian dry which is usually served as an appetizer: To make veg manchurian dry, follow all the steps in this recipe as mentioned, but only add 1/4 cup water while making the sauce. The result will be a sauce that just coats the veg balls and you’ll have a tasty veg manchurian dry

Ingredients for Manchurian Balls

Here’s what you’ll need for the veg balls:

All the ingredients required for veg balls pictured on a wooden chopping board with text to identify them

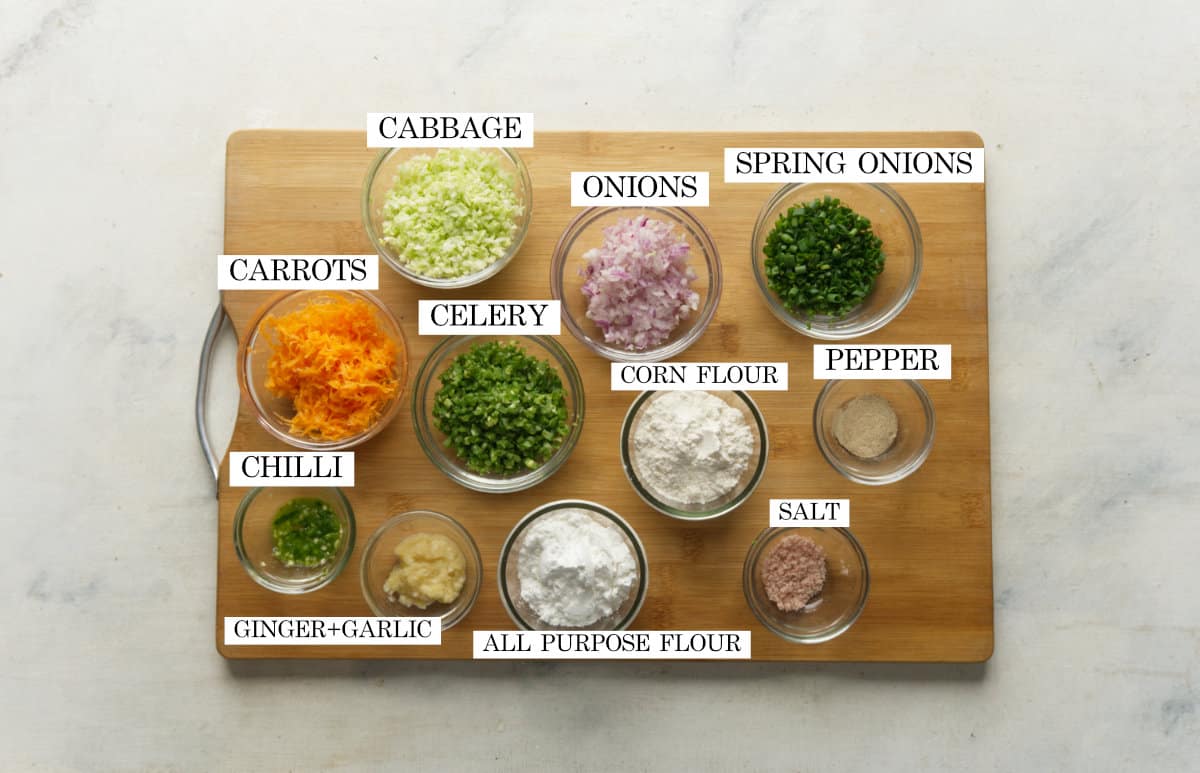
Finely chopped vegetables: Finely chopped vegetables such as cabbage, carrots, onions, celery, spring onions are used to make the balls. Use a food processor or chopper for best results. I do not like to use vegetables like capsicum because they leave too much water and make the mixture too wet and gluggy

Ginger Garlic Paste: Ginger garlic paste is simple, ginger and garlic minced together or ground into a paste. Add flavour and a punch. You can also grate equal amounts of each and use

Green Chillies: Not traditional, but adds a nice heat and flavour to the balls. If living outside India, use serrano peppers. Skip if you don’t want extra heat

All Purpose Flour and Cornflour: Binding agents mixed with vegetables to form the balls and keep the shape intact as they fry

Ingredients for Manchurian Gravy

Here’s what you’ll need for the manchurian gravy or sauce:

All the ingredients required for manchurian sauce pictured on a wooden chopping board with text to identify them

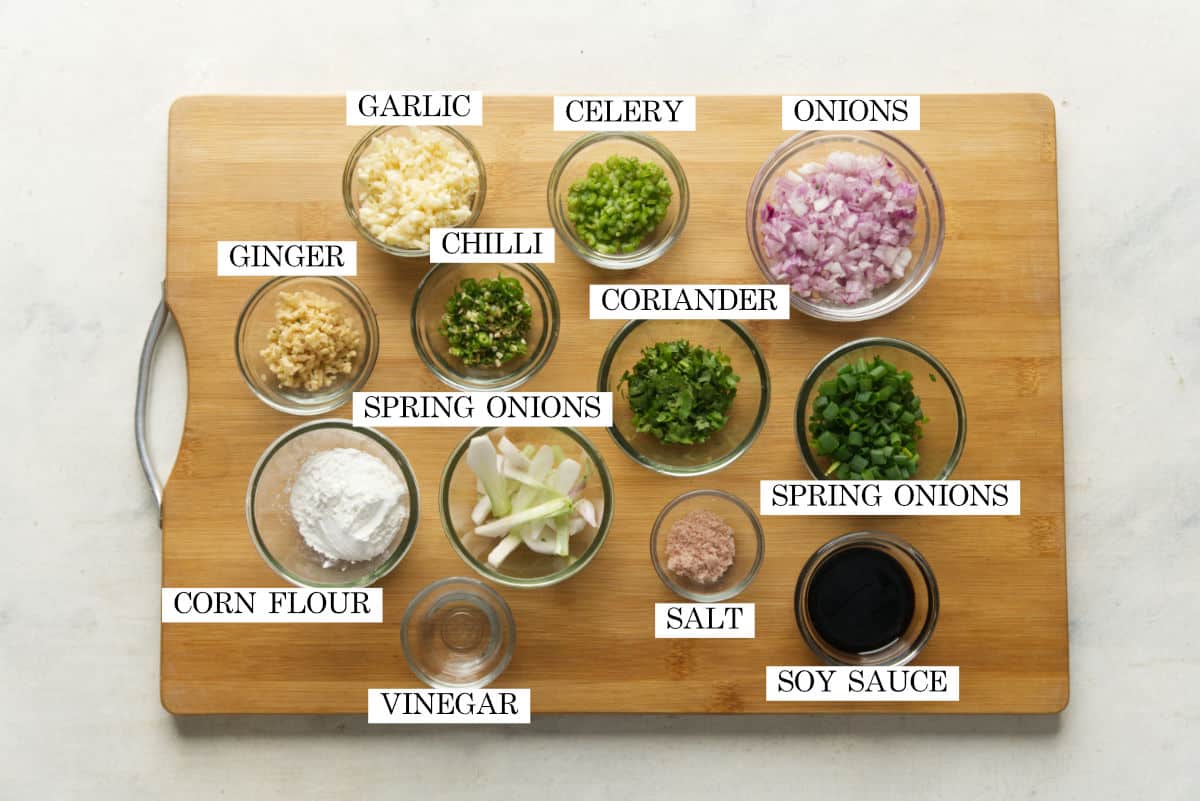
Aromatics: The sauce starts with stir frying all the aromatics – garlic, ginger, green chillies, celery and onions on high heat. All finely chopped to add punchiness and spiciness to the gravy

Sauces: Only dark soy sauce and vinegar. The gravy for this manchurian is soy sauce heavy but has a perfect balance of sweet, sour, spicy and umami when all the other ingredients

Cornflour: For thickening. You can replace it with potato starch.

Herbs: Non traditional again, but herbs such as spring onions (white and green part) and coriander bring freshness and flavour. Add them right towards the end.

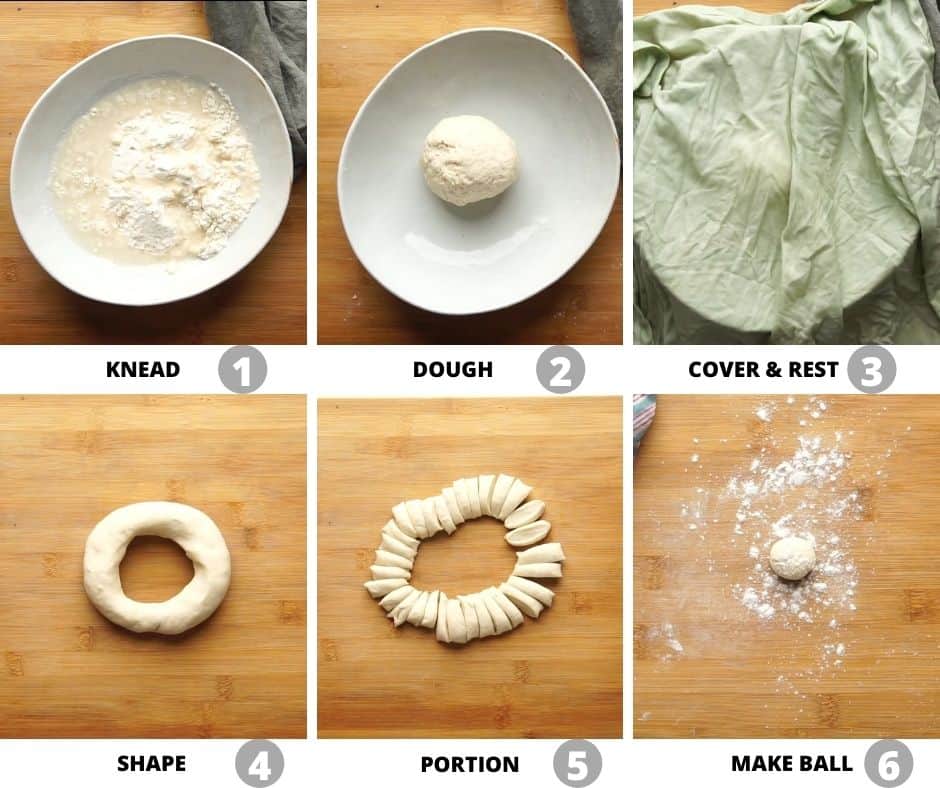
How to Make Manchurian Balls – Deep Fried

Step by step picture collage showing how to make deep fried veg balls for manchurian
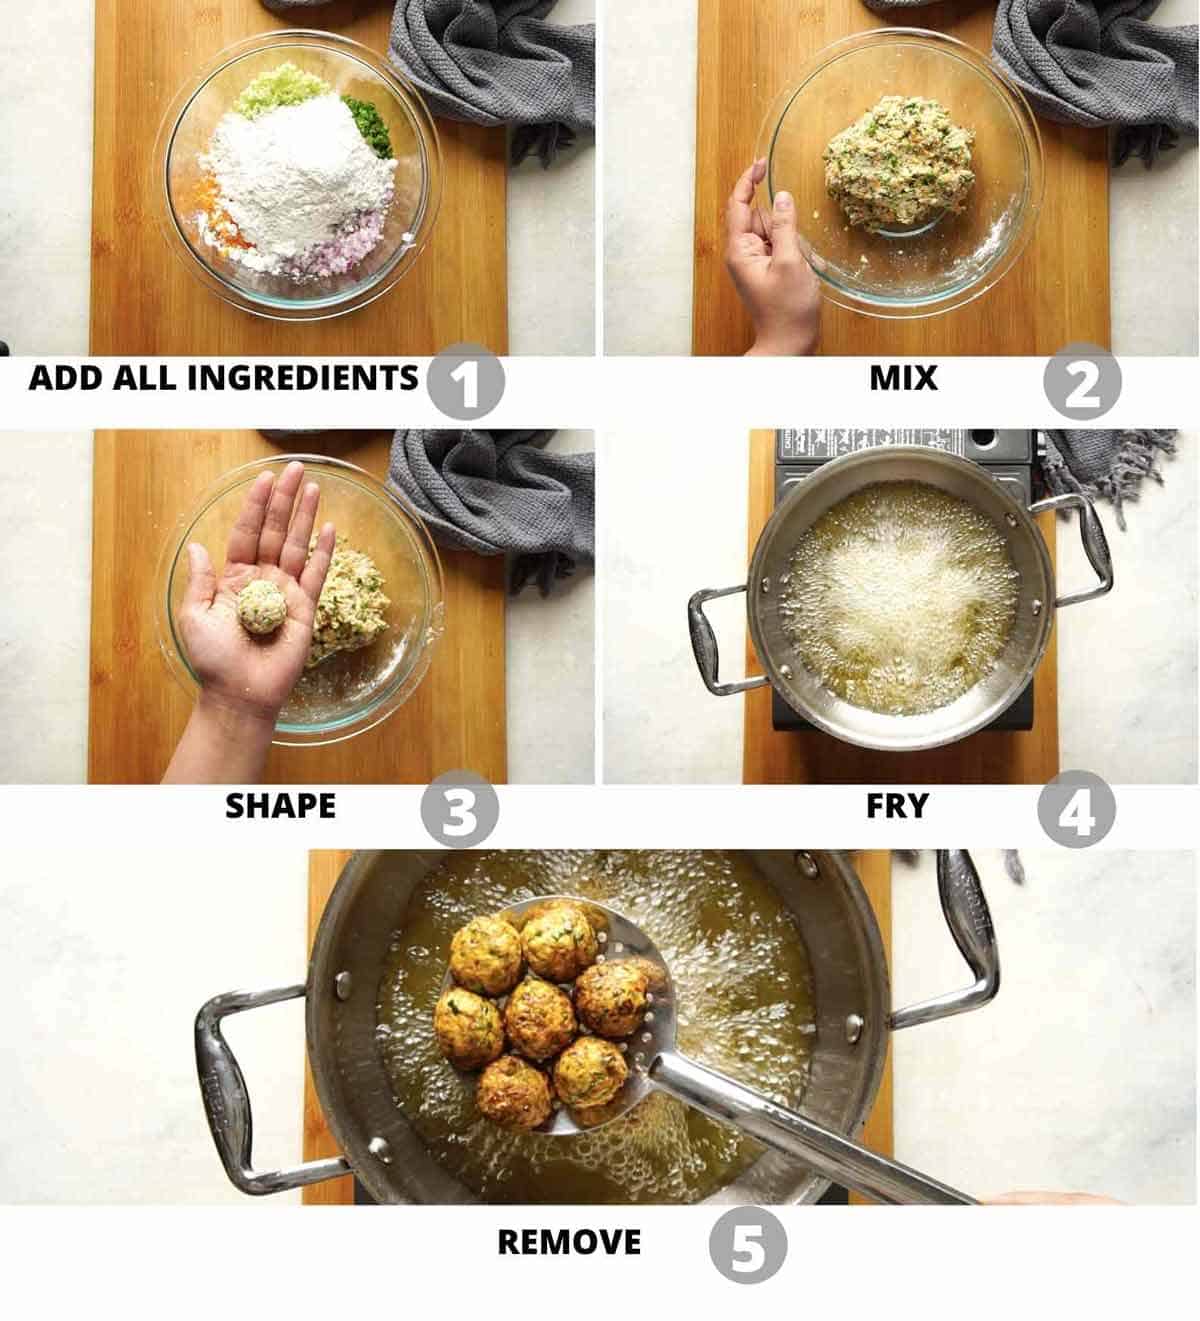
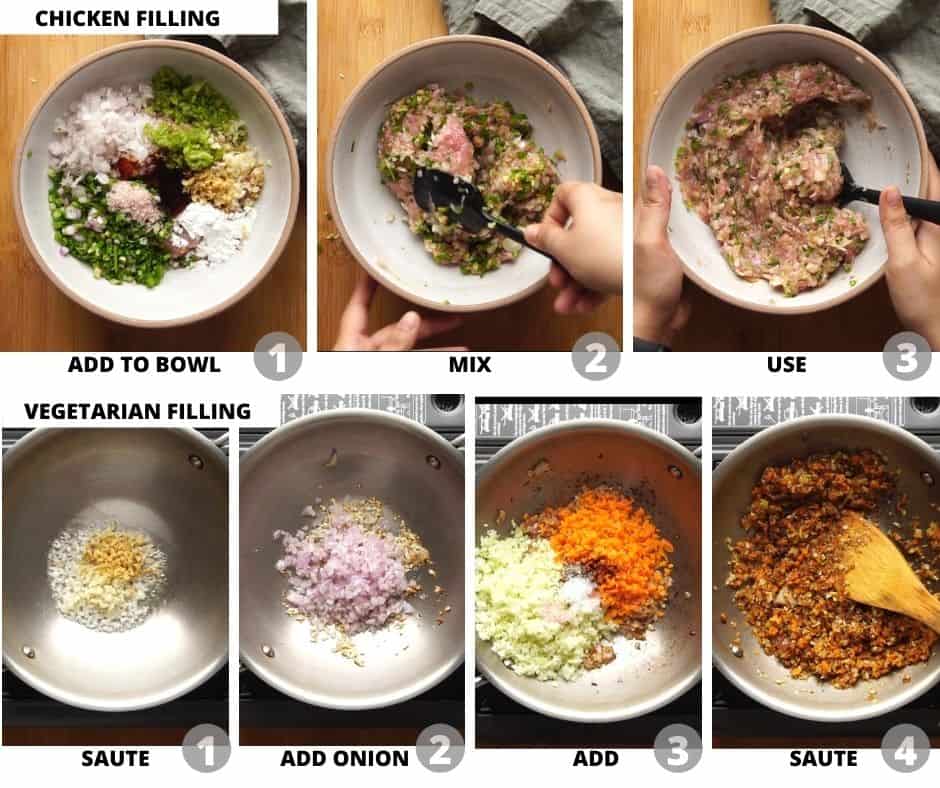
  1. Add all the ingredients for the veg balls to a bowl
  2. Mix them together till it comes together. Don’t knead or overmix or the balls can become dense and gluggy. There is not need to add water either as the vegetables will release enough water
  3. Shape them into gooseberry sized balls. You can add a little oil or water to your palm to help you shape them
  4. Deep fry in medium hot oil. It’s important that the oil is not too hot or the balls will only become golden from outside and will not cook from the inside
  5. Once evenly golden brown on all sides, remove them with a perforated or slotted spoon on a tissue lined plate to absorb any extra oil. Set these aside

How to Make Manchurian in Air Fryer

Step by step images of how to make veg manchurian in the air fryer
  1. Preheat the airfryer at 180C and brush the airfryer basket with oil.
  2. Place the manchurian balls and brush some oil over them. Avoid overcrowding and make sure that there is some gap between the balls.
  3. Air fry the balls for 7 minutes at 180C, brush with oil and air fry for 7 more minutes.
  4. Air fry for 2 minutes at 200 C for them to turn golden and crisp. They need to cool a bit before they can be removed from the airfryer as they stick to the basket & break, if forced out. Transfer them to a plate and set aside. Repeat the same for all the remaining balls.Β 

How to Make Manchurian Sauce

Once you’re done frying the manchurian balls, it’s time to make the manchurian sauce and finish the gravy. Don’t forget to keep all the ingredients prepped and ready because all the cooking will be done on high heat, and the dish comes together in a few minutes.

Step by step picture collage showing how to make the sauce for manchurian
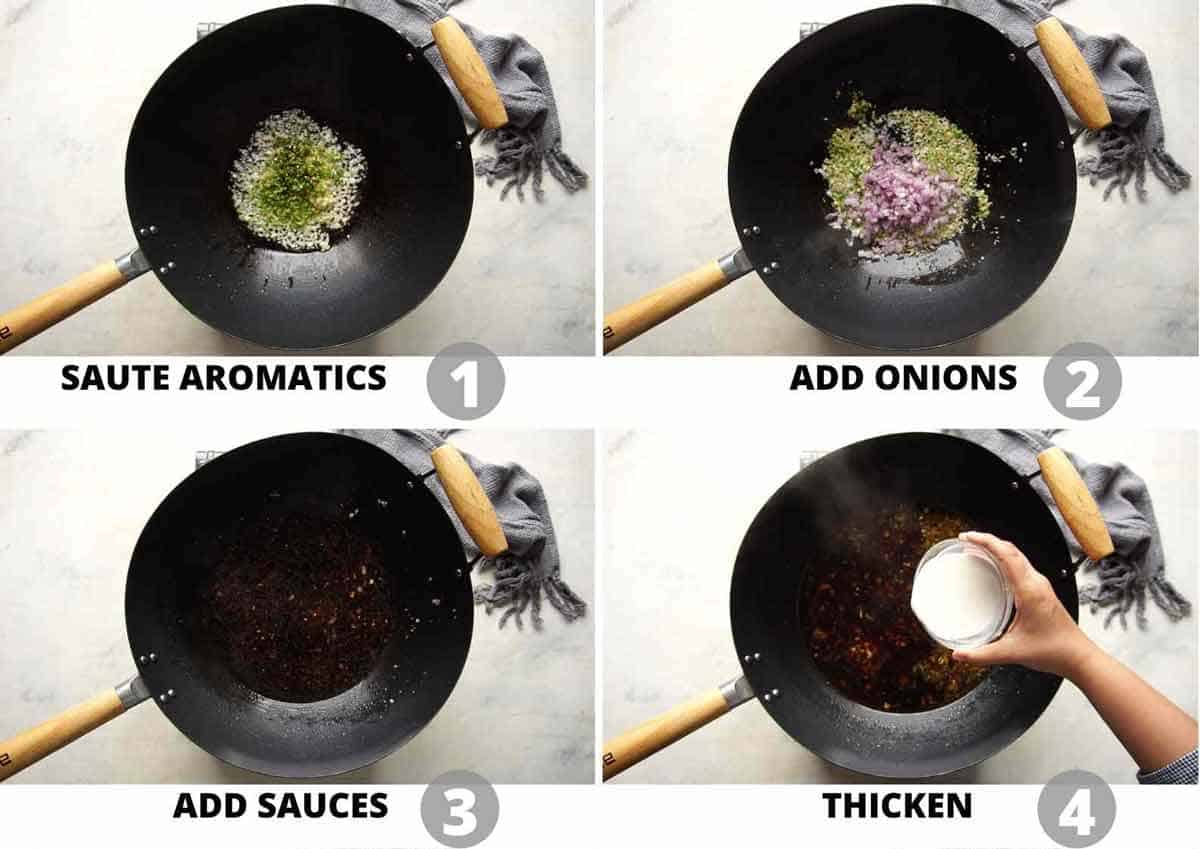
  1. To start making the manchurian sauce, saute ginger, garlic, celery and green chillies in hot oil in a wok
  2. Add onions and saute on high heat again till onions are translucent
  3. Add all the sauces and give this a quick mix
  4. Once the sauce starts bubbling, add cornflour slurry to thicken the sauce
Step by step picture collage showing how to cook the veg balls in manchurian sauce

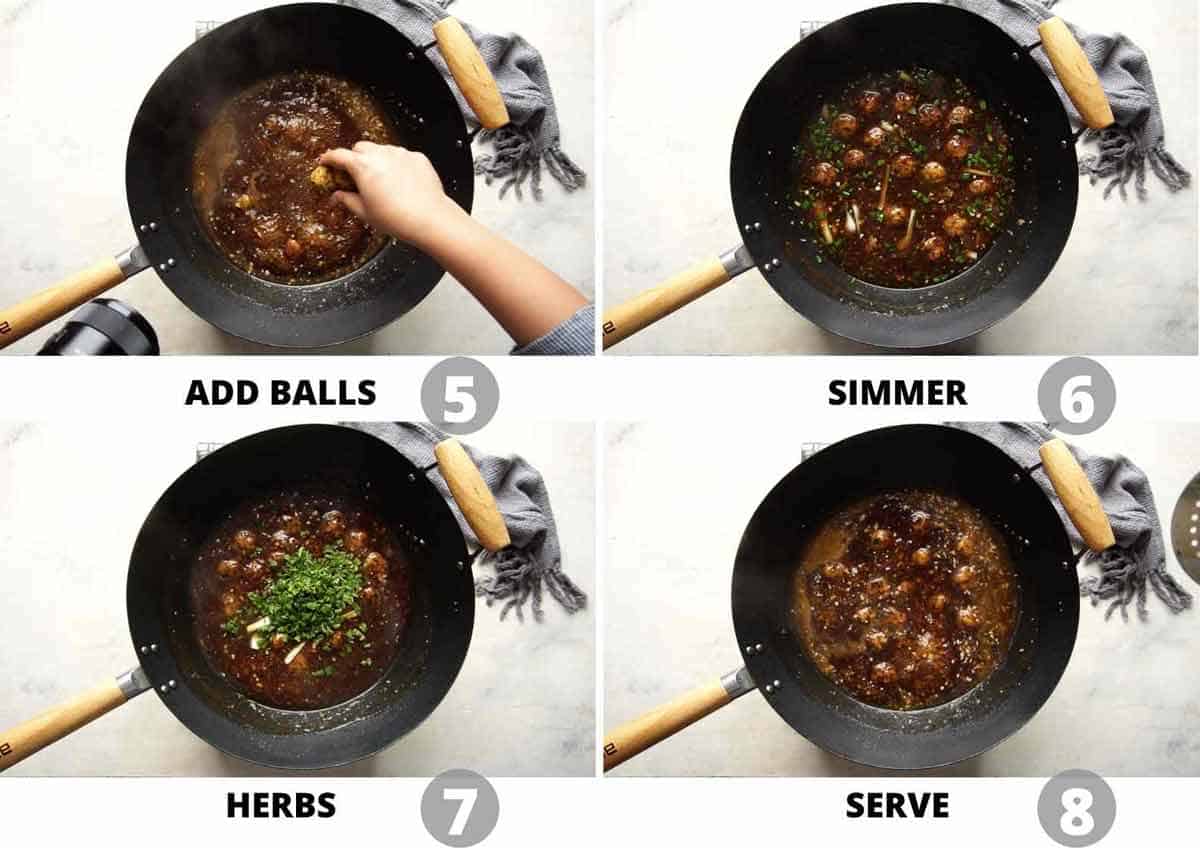
5. Add manchurian balls to the sauce

6. Simmer for 2-3 minutes to help the manchurian balls absorb the sauce

7. Finally add herbs like spring onions (green and white) and chopped coriander and give it a mix

8. Serve immediately with fried rice or noodles

Richa’s Top Tips & Notes

  • Prep ahead and keep all your ingredients ready to go because once you start cooking, the recipe for the sauce comes together in minutes
  • Use a chopper or food processor to chop all your vegetables for fast, even prep
  • Don’t add any water while making the manchurian balls or the mixture will becomes too wet. The vegetables will leave enough water as you mix
  • If using frozen veggies, make sure to thaw them and squeeze out any excess water before using
  • Always deep fry the balls on medium high heat. This ensures they cook evenly from inside as well as outside
  • For the same smoky, restaurant style flavour, use a cast iron or carbon steel wok. Cook the manchurian gravy on high heat
  • To make veg manchurian dry, only add 1/4 cup water while making the sauce. All the other steps remain the same
  • To make this recipe gluten free, replace the all purpose flour with rice flour or besan, and the corn flour with tapioca starch or potato starch

Serving Ideas

Veg Manchurian gravy tastes fantastic with

Closeup of veg manchurian in a wok with a perforated spoon on the side

This veg manchurian gravy is the true essence of the Indo-Chinese cuisine. It’s one of those recipes that look complicated but are actually quite easy to make. And now thanks to the air fryer, you can also make it a whole lot healthier!

If you do try this recipe, don’t forget to DM the pictures over on my Instagram @my_foodstory. I love seeing your recreations!

Watch Veg Manchurian Recipe Video

Veg manchurian served in a white bowl with fried rice and spring onions on the side
Print

Veg Manchurian Recipe

Veg Manchurian is an easy indo chinese recipe that's saucy, spicy, sour, tangy and full of umami. It's a popular indo chinese recipe that goes really well with fried rice or hakka noodles.
Course Main Course
Cuisine Indian Chinese
Diet Vegan, Vegetarian
Prep Time 15 minutes
Cook Time 20 minutes
Total Time 35 minutes
Servings 6 people
Calories 193kcal
Author Richa

Ingredients

Vegetable Balls

  • Β½ Cup Grated Carrot
  • Β½ Cup finely chopped Cabbage or shredded
  • ΒΌ Cup finely chopped Spring Onion green part only
  • ΒΌ Cup finely chopped Onion
  • ΒΌ Cup finely chopped Green Beans
  • 1 Teaspoon Ginger Garlic Paste
  • 1 Teaspoon Green Chilli Paste green chillies ground to a paste
  • Β½ – ΒΎ Teaspoon Salt
  • 3 Tablespoons Corn Flour
  • 3 Tablespoons All Purpose Flour
  • 1/4 cup Oil for frying

Manchurian Gravy

  • 2 Tablespoons Oil
  • 1 Β½ Tablespoons finely chopped Ginger or minced
  • 3 Tablespoons finely chopped Garlic or minced
  • 1 Β½ Tablespoons finely chopped Celery
  • ΒΌ Cup finely chopped Onion
  • 2-3 Green Chillies finely chopped
  • 2 Β½ – 3 Cups Vegetable Stock or Water hot
  • 1 Β½ Tablespoons Soy Sauce
  • 1 Β½ Teaspoons Vinegar
  • 1 – 1 Β½ Teaspoons Salt
  • 2 Tablespoons Corn Flour
  • 3 Tablespoons Water
  • 2 Tablespoons Chopped Coriander
  • 2 Tablespoons Chopped Spring Onion white and green parts

Instructions

Vegetable Balls

  • Add all the ingredients into a bowl. Mix to combine all the ingredients, being careful to mix just enough to bring them together. Don't add any extra water – the vegetables will release enough water. Shape into small balls (approx 1-1 Β½ tablespoons per ball). Keep aside.
  • Heat 1.5 inches oil in a kadai or a deep frying pan. Once the oil is hot, carefully add the balls into it one at a time. Fry on medium high heat for 4-5 minutes or until golden brown.
  • Remove the vegetable balls using a skimmer and transfer to a kitchen towel lined plate. Keep aside.

Manchurian Gravy

  • Heat oil in a wok. Add chopped garlic and ginger and sautΓ© until fragrant. Add celery, onions and green chilli and sautΓ© for 1 – 2 minutes on high flame.
  • Add water/stock, soy sauce, vinegar and salt. Mix well to combine. Allow to simmer.
  • Combine corn flour and water in a small bowl and add it to the wok. Stir continuously to ensure the sauce does not become lumpy. Simmer till the sauce thickens and has a glossy look
  • Once thickened, add the fried vegetable balls and stir to combine. Add chopped coriander, spring onion greens and whites. Serve hot along with fried rice or hakka noodles.

Video

Notes

  • Prep ahead and keep all your ingredients ready to go because once you start cooking, the recipe for the sauce comes together in minutes
  • Use a chopper or food processor to chop all your vegetables for fast, even chopping. If the vegetables are too big in size, the balls will not hold shape well and can also take longer to cook
  • Don’t add any water while making the manchurian balls or the mixture will becomes too wet. The vegetables will leave enough water as you mix
  • If using frozen veggies, make sure to thaw them and squeeze out any excess water before using
  • Always deep fry the balls on medium high heat. This ensures they cook evenly from inside as well as outside
  • For the same smoky, restaurant style flavour, use a cast iron or carbon steel wok. Cook the manchurian gravy on high heat
  • To make veg manchurian dry, only add 1/4 cup water while making the sauce. All the other steps remain the same
  • To make this recipe gluten free, replace the all purpose flour with rice flour or besan, and the corn flour with tapioca starch or potato starch

Nutrition

Calories: 193kcal | Carbohydrates: 15g | Protein: 2g | Fat: 14g | Saturated Fat: 1g | Polyunsaturated Fat: 4g | Monounsaturated Fat: 9g | Trans Fat: 1g | Sodium: 1495mg | Potassium: 133mg | Fiber: 2g | Sugar: 2g | Vitamin A: 1899IU | Vitamin C: 9mg | Calcium: 33mg | Iron: 1mg

This article was researched and written by Urvi Dalal.

The post Veg Manchurian | Air Fried & Deep Fried appeared first on My Food Story.

Momos Recipe – Veg and Chicken

Make street style momos at home with this super easy recipe! Learn how to make the dough for momos, pleat them and make a vegetarian and chicken stuffing. Trust me, you’ll never call for takeaway again!

an image of veg momos served with a dipping chutney

Making momos at home is easier than you’d think! And this recipe makes really juicy and delicious momos, just like the one from your favorite street-side momo place!

Momos is the kind of dish that looks complicated, but is actually really quick & easy. And this recipe is also super versatile, because you can stuff it with just about anything – vegetables, paneer, cheese and mushrooms, chicken or pork. In this recipe, I am sharing instructions for steamed momos, but you can shallow or deep fry them just as easily.

This street-style momo recipe makes for a really hearty and filling snack or appetizer. But tbh, sometimes these even double up as dinner with some sweet corn soup or thukpa, and no one complains!

Ingredients For Momos

Here’s everything that you’ll need:

For the dough

  • Flour: All purpose flour or maida forms the base of the dough. You can use whole wheat flour but the wrapper will be really dense and chewy. All purpose flour or maida also adds more gluten and makes the wrapper easier to roll and pleat.
  • Oil: Helps make the dough moist and pliable. I have used sunflower oil, but any neutral-flavored oil like canola or rice bran will also work.
  • Lukewarm water: This is important to make the dough soft, pliable, and easy to work with. Hot water can make the dough tough and stringy, while cold water can make the wrappers dense, chewy and difficult to roll out.
  • Salt: For seasoning
  • Corn flour: For dusting (if needed)

Chicken filling

  • Chicken: Boneless chicken thigh pieces or minced chicken. Thigh chicken works best here as it’s juicer, and stays tender throughout the cooking process.
  • Other ingredients: Onion, celery, spring onion greens, ginger, and garlic, salt, pepper, and oyster sauce for flavor, aroma, and texture. Sesame oil helps make the filling moist and adds a nice nutty flavor, while coriander leaves add freshness.

Veg filling

  • Veggies: Finely chopped carrots, mushrooms, onions, cabbage, and celery form the base of the filling.
  • Soya granules: Add texture and a boost of protein.
  • Soy sauce: For umami and saltiness
  • Other ingredients: Salt, sugar, pepper, ginger, and garlic for flavor, aroma, and balance.

Making the Dough

The dough is a simple mix of all purpose flour, sunflower oil, salt, and lukewarm water. Kneading with lukewarm water creates some steam and a really pliable dough which is perfect for making momos. Once you finish kneading the dough, cover it with a damp towel and allow it to rest for 10 minutes before cutting it into small pieces – each piece should be approx 7 grams.

Step by step pictures to show how to make the dough for momos

Filling – Veg and Chicken

The chicken filling is made simply by mixing all the ingredients together and is raw. It cooks along with the momos as they steam

For the vegetarian filling, we stir fry all the ingredients together. When steamed, veggies release a lot of water. So if they’re not precooked, you’ll end up with soggy, unappetizing momos.

Step by step instructions to show how to mmake chicken and vegetarian filling for momos

How to Wrap Momos

  1. Once the dough has rested, divide the dough into 2 parts & roll one portion into a cylinder roll on the counter top. Cut out small pieces of dough, each weighing 9 grams. This is about Β½ tablespoon of dough.Β 
  2. Prepare a greased plate or parchment paper and damp towel.
  3. Take each piece of dough and roll it into a ball. Using the fleshy part of your palm, flatten each ball of dough into a disc. Using a rolling pin, roll out each individual piece into a very thin round wrapper. They need to be thin enough such that they appear to be slightly translucent. Thicker wrappers tend to taste very doughy so make it as thin as you can.
  4. Place about a tablespoon of the prepared filling in the centre of the rolled out wrapper. Shape and seal the wrappers as shown in the video. In order to ensure that it is properly sealed, apply a little bit of water along the edges with your fingertip.
  5. Place the stuffed momo on the greased plate and cover with the damp cloth.

How to Freeze Momos

Don’t get overwhelmed by the number of steps in this recipe; everything is really straightforward. I usually make a large batch and freeze the rest for later to save so much prep time. Frozen momos can easily last for up to a month without going bad. Here’s what you need to do:

  • Step 1: Make your filling, roll out the wrappers and stuff them.
  • Step 2: Place the stuffed momos on a silicone lined baking sheet in rows, making sure none of the pieces touch each other. Cover the tray with a clean, wet towel as you prep to prevent them from drying out.
  • Step 03: Once all your momos are ready, place the tray straight into the freezer and freeze for 1-2 hours.
  • Step 04: Transfer the frozen momos to a ziplock bag after divding them to into smaller portion. This why you can pull out only one bag at a time to prevent the rest from going bad.
  • Step 05: When you are ready to cook, just place the frozen momos straight into the steamer and steam for an extra minute or two. There is no need to defrost them first.

Richa’s Top Tips

  • Make sure to roll the dough thin to prevent thick and chewy momos.
  • Feel free to customise the stuffing based on what you like and have available. Just avoid adding really water-y veggies like cucumber and tomatoes as those will break the momos during the steaming process.
  • Do not overcrowd the pan when steaming the momos. These tend to expand on steaming and overcrowding the pan will make the momos stick to each other.
  • To check for doneness, check the skin. It should be transparent-ish and non-sticky. If it feels sticky, steam for another minute or two.

Storage Tips

  • Fridge: If the momos are cooked, allow them to come to room temperature and store in an air-tight box and refrigerate for up to a day. Cooked momos tend to dry out fast, so it’s best to eat them as quickly as possible.
  • Reheat: Steam for 3–5 minutes to soften and refresh. Avoid microwaving as they can turn chewy.

Serving Tips

freshly steamed chicken momos placed in the steamer

I bet everyones going to get super excited when you set the table with these homemade momos that taste street style!!

I love serving these with an assortment of dips to keep each bite interesting. Some of my favourite dips to serve these with include my homemade schezwan sauce and thai sweet chilli sauce. I recently drizzled a bit of chilli oil over my momos, and I don’t think I am ever have it any other way!

Watch the Video

an image of veg momos served with a dipping chutney
Print

Momos Recipe – Veg and Chicken

Make momos at home with this easy recipe for momo wrappers, veg and chicken filling. The result are momos that have a thin wrapper and are stuffed to the brim with the most amazing fillings
Course Snacks & Appetizers
Cuisine Indian Chinese, Nepalese
Diet Halal, Vegetarian
Prep Time 15 minutes
Cook Time 25 minutes
Resting Time 20 minutes
Total Time 1 hour
Servings 22 Momos
Calories 61kcal
Author Richa

Equipment

  • 1 steamer

Ingredients

Momo Wrapper

  • 1 cup all purpose flour maida
  • Β½ teaspoon salt
  • 2 teaspoons sunflower oil or any neutral flavoured oil like canola or rice bran
  • ΒΌ cup + 4 teaspoons lukewarm water we’ve measured this accurately so please stick to this water measurement
  • 1-2 tablespoons cornflour for dusting if needed

Chicken Filling

  • 200 grams boneless chicken thigh or chicken mince ground chicken
  • ΒΌ cup finely chopped onion
  • 2 tablespoons finely chopped celery
  • Β½ cup finely chopped spring onion greens
  • Β½ teaspoon finely chopped ginger
  • Β½ teaspoon finely chopped garlic
  • 1 tablespoon oyster sauce
  • 1 teaspoon cornflour
  • ΒΌ teaspoon salt
  • ΒΌ teaspoon pepper
  • 1 tablespoon sesame oil
  • 2 tablespoons finely chopped coriander leaves

Vegetarian Filling

  • 1 tablespoon oil
  • 2 teaspoons finely chopped garlic
  • 1 teaspoon finely chopped ginger
  • 2 tablespoons finely chopped celery
  • Β½ cup finely chopped onion
  • Β½ cup finely chopped cabbage
  • Β½ cup finely chopped carrot
  • ΒΌ cup finely chopped mushrooms
  • Β½ cup hydrated soya granules see note 1
  • 1 teaspoon soy sauce
  • ΒΌ teaspoon sugar
  • Β½ teaspoon salt
  • ΒΌ teaspoon pepper

Instructions

Momo Wrapper

  • Add the flour, salt and oil to a mixing bowl. And lukewarm water and stir using a wooden spoon or your hands to combine. Do not over knead at the stage, just bring the dough together till you don’t see any dry spots & set aside for 5 minutes covered with a damp towel.
  • After 5 minutes, remove and place the dough on a counter and knead for 2 to 3 minutes to a smooth dough. You do not need to dust the surface with flour unless the dough is very sticky. The dough is supposed to be slightly tacky, but not sticky.
  • Place the dough back into the bowl and cover with a damp towel to rest for 10 minutes.

Chicken Filling

  • To make chicken mince: Cut chicken thighs into large cubes and pulse in a chopper or mixer to get coarse mince. Do not grind it too fine as it will turn very dry when cooked.
  • Combine all the ingredients for the chicken filling in a bowl. If the filling is very loose, you can add some extra cornflour. Cling wrap or cover with a lid and store in the refrigerator until the momo wrappers are ready.

Vegetarian Filling

  • Heat oil in a wok or heavy bottomed pan on a high flame. Add ginger, garlic, celery, onions and sautΓ© till onions turn translucent. Add cabbage, carrot and mushrooms, reduce flame to medium high and sautΓ© for 3 minutes. Add soya granules and saute for a minute. Add soy sauce and sugar and stir to combine. Season with salt and pepper. Remove from flame and keep aside to cool before placing it inside the wrapper.

Chicken & vegetarian combo filling

  • Take 1 cup of chicken filling, 1 cup of vegetarian filling in a bowl, mix them well and use as a filling in the momo

Wrapping and Pleating Momo

  • Once the dough has rested, divide the dough into 2 parts & roll one portion into a cylinder roll on the counter top. Cut out small pieces of dough, each weighing 9 grams. This is about Β½ tablespoon of dough.
  • Prepare a greased plate or parchment paper and damp towel.
  • Take each piece of dough and roll it into a ball. Using the fleshy part of your palm, flatten each ball of dough into a disc. Using a rolling pin, roll out each individual piece into a very thin round wrapper. They need to be thin enough such that they appear to be slightly translucent. Thicker wrappers tend to taste very doughy so make it as thin as you can.
  • Place about a tablespoon of the prepared filling in the centre of the rolled out wrapper. Shape and seal the wrappers as shown in the video. In order to ensure that it is properly sealed, apply a little bit of water along the edges with your fingertip.
  • Place the stuffed momo on the greased plate and cover with the damp cloth.

Steaming Momo

  • Bring the water in the steamer to a boil and grease the steamer plate. Place the stuffed momo on the greased steamer plate. Ensure that they are not sticking to each other. Brush each momo with oil so they cook to be soft. Cover the lid of the steamer and cook for 14 minutes on medium flame. Rest for 5 minutes, remove from the steamer and serve immediately.

Video

Notes

  1. To hydrate soya granules: Soak the soya granules in 1 cup of boiling water for 10-15 minutes, drain & squeeze out water & use.Β Β 
  2. Let the dough rest for 10 minutes for best results.
  3. It’s best to roll each momo wrapper, stuff them with the filling & roll the next momo wrapper.Β 
  4. If you roll all the wrapper at once, they dry out very fast, and it will not be possible to shape momo.
  5. Wrapped momo (uncooked) can be kept frozen for up to 2 weeks in an airtight container, separated by parchment paper.Β 
Β 

Nutrition

Calories: 61kcal | Carbohydrates: 7g | Protein: 4g | Fat: 2g | Saturated Fat: 0.3g | Polyunsaturated Fat: 1g | Monounsaturated Fat: 1g | Trans Fat: 0.005g | Cholesterol: 9mg | Sodium: 175mg | Potassium: 67mg | Fiber: 1g | Sugar: 1g | Vitamin A: 522IU | Vitamin C: 2mg | Calcium: 15mg | Iron: 1mg

This article was researched and written by Urvi Dalal.

The post Momos Recipe – Veg and Chicken appeared first on My Food Story.

Cilantro Mint Chutney White Beans over Crispy Tostadas (no-cook! Papri Chaat inspired)

By: Richa

Indian Chaat meets Tostadas! Cilantro mint lime chutney marinated beans on crunchy tostadas with sweet maple lime sauce and cooling yogurt, are an Indian fusion dish that’s a perfect starter, snack, or even entree! No cook (Options for soy-free nut-free gluten-free)

close-up of chutney bean tostadas on the cutting board

These no-cook tostadas use canned beans, prepared tostadas, and lots of delicious sauces – no cooking needed! The only cooking you’d need to do is if you are making your tostadas from tortillas. Prepared tostadas are readily available in most grocery stores.

I wanted to make a fun dish with beans, and I took inspiration from chaat, which is a family of Indian snacks or street food characterized by these awesome combinations of different textures and flavors. Especially papri chaat which has crisp crackers paired with mashed potatoes or chickpeas or both and chutneys, sauces and yogurt for a fantastic salad like hearty nachos if you will. Many chaat recipes have crispy, spicy, sweet, and tangy all together. They’re great as snacks or can be a refreshing meal.

marinating white beans and veggies in green chutney

I took inspiration from those flavors and textures. Usually, I make this chickpea potato chaat with small crackers, where you take some cooked chickpeas and cooked potatoes, toss them with some spices and chutneys, and layer them with yogurt, more chutneys, and some chopped crunchy veggies.

I turned that dish into this tostada, where we take crispy tostadas and make marinated beans that are soaked in a delicious green chutney, instead of chickpeas, along with cucumber and onion. We top the tostadas with these beans and then add a good drizzle of seasoned non-dairy yogurt and this sweet, tangy, maple-lime sauce to bring all of those flavors together. It’s absolutely fantastic and delicious! The maple lime sauce is a sub for tamarind date chutney. If you have tamarind chutney, use that for more Indian chaat flavor.
Try more Indian salads- Mango Zucchini chickpea Indian spiced oil salad and my Kachumber Salad !

chutney white bean tostadas on a wooden cutting board

This recipe is very versatile. If you want to control the heat, use less of the green chili, and choose a milder chili.Β  If you don’t have tostadas, you can make your own! Those instructions are in the recipe notes. If you don’t like cilantro, you can make a mint chutney with more mint leaves instead of the cilantro.

Chutney bean tostadas are just fabulously crispy, zesty, refreshing, and hearty. They are a perfect summer meal!

all of the chutney bean tostadas components ready to assemble

Why You’ll Love Chutney Bean Tostadas

  • perfect warm weather meal or snack – no cooking required!
  • incredible combination of flavors and textures! marinated beans, sweet and savory chutneys, creamy cooling cumin yogurt drizzle, on crunchy tostadas
  • soy-free and nut-free with easy gluten-free option

Continue reading: Cilantro Mint Chutney White Beans over Crispy Tostadas (no-cook! Papri Chaat inspired)

The post Cilantro Mint Chutney White Beans over Crispy Tostadas (no-cook! Papri Chaat inspired) appeared first on Vegan Richa.

❌