Dr Oz Pink Gelatin Recipe For Weight Loss | Bariatric Jello
Bariatric gelatin recipe for weight loss is one of those simple tiny habits that can make...
Bariatric gelatin recipe or Dr Jennifer Ashton gelatin trick is one of 2025’s most talked about wellness habits. You’ve probably seen it on tiktok, heard about it on morning health segments, or come across people calling it the Jennifer Ashton weight loss trick. But what exactly is this method? And does dr Jennifer Ashton gelatin recipe really helps with appetite control?

In this post I am sharing with you the complete explanation, the 2025 gelatin trick recipe from tiktok and trending Instagram reels, the gelatin cubes routine, the timing protocol, and a clear bariatric variation comparison.
Many people associate this routine with Dr Jennifer Ashton because it matches her approach toward sustainable, simple, science aligned health habits. And she often talks about nutritional benefits of collagen and gelatin.
She is often seen using hydrolyzed collagen powder in her daily “first meal” smoothie.
Small daily habits can make it easier to stay consistent with healthy choices. The gelatin trick fits perfectly into that pattern. However, it’s important to note:
While this isn’t an official recipe from Dr Jennifer Ashton, it’s a wellness-community interpretation that aligns with her practical, habit-based approach
The gelatin trick for weight loss is essentially a pre-meal fullness strategy. By consuming a small amount of unflavored gelatin before meals, you create a gentle gel in the stomach that adds volume without significant calories. This slows gastric emptying, increases feelings of satiety, and helps regulate appetite more effectively.
As a result, many people find they naturally eat smaller portions, avoid overeating, and make more mindful food choices. The trick doesn’t burn fat or boost metabolism, and it’s not intended to replace meals
So this viral gelatin trick is a supportive tool that helps reduce cravings and promote portion awareness in a practical, achievable way. The benefits of this Viral genetic trick comes entirely from appetite control and healthier meal behaviors.
This is the gentle, simple recipe most closely aligned with what people call the Dr Jennifer Ashton gelatin trick recipe .

Step 1: Bloom the gelatin
Sprinkle the gelatin over 1–2 tablespoons of cold water.
Let it sit for 1 minute until it becomes spongey.
(This prevents clumping.)
Step 2: Add hot water
Pour in the hot water and stir continuously until fully dissolved.
Step 3: Add cold water or tea
Stir again and add lemon juice if desired.
Step 4: Chill
Refrigerate for 2–3 hours until it lightly sets.
You can also drink it warm immediately.
Step 5: Take before meals
Consume 15–30 minutes before lunch or dinner.
Gelatin cubes have become a popular version of the 2025 gelatin trick because they make the routine easier and more convenient. Instead of preparing the mixture daily, the gelatin is poured into silicone molds and set into small, ready-to-eat cubes that can be taken before meals.
These cubes are low in calories, easy to carry, and perfectly portioned, ideal for busy schedules. Most people use two to four cubes per day, typically before lunch and dinner, to support appetite control and reduce mid-meal cravings.
The gelatin cubes routine fits seamlessly into the overall gelatin trick protocol and offers a simple way to stay consistent. This supports fullness without adding significant calories. Geletin Cubes Recipe for Weightloss
Gelatin is a colorless, flavorless protein made from collagen. The collagen helps to keep our skin, joints, and tissues strong. When you mix gelatin with hot water and let it cool, it turns into a soft gel. That gel-like texture is what makes the “gelatin trick” helpful, because it creates gentle fullness in the stomach before a meal.
Once you eat it, gelatin breaks down into amino acids like glycine and proline, which support your gut lining, skin, and joints. It’s an easy way to get some of the benefits of collagen without needing any fancy ingredients.
This updated routine is often called the 2025 gelatin trick protocol or the 7-day gelatin routine. Here is the safest and most effective way to use it:
1 cube with warm water or herbal tea. Supports appetite rhythm and reduces mid-morning snacking.
1–2 cubes: Best timing for preventing overeating at lunch.
1 small cube: Helps reduce evening cravings and late-night snacking.
Taking gelatin before meals triggers satiety signals early leading to better food decisions, smaller portions, and calmer hunger patterns.
People often confuse the bariatric gelatin variation with the viral gelatin trick, but they are very different.
The bariatric version supports healing and viral gelatin trick supports fullness before meals. They are not interchangeable.
The answer is yes but for appetite control. The fullness effect created by gelatin is real and rooted in basic digestive physiology. When gelatin forms a gel in the stomach, it delays gastric emptying, helps you feel satisfied sooner, and makes it easier to choose smaller portions.
It also creates a natural pause before eating, which supports mindful eating and reduces the likelihood of overeating. However, the gelatin trick does not burn fat or accelerate metabolism.
But I important point to note is It works best as a gentle support habit when paired with balanced meals, adequate protein, fiber, hydration, daily movement, and consistent sleep. The gelatin trick not a magic solution, but it can play a meaningful role in helping you eat more intentionally.
No. It is an inspired routine shared within the wellness community that aligns with her overall practical health philosophy.
2–4 small cubes, typically before meals.
Yes, gelatin contains calories and is not fasting safe.
You can, but it may not provide the same fullness, and artificial sweeteners may not suit everyone.
Only with medical approval. Bariatric gelatin is a different formula used for recovery.
No. It supports fullness, not fat metabolism.
15–30 minutes before meals is the most effective timing.
The Jennifer Ashton gelatin trick focuses on a simple pre-meal habit often associated with her practical wellness style, while the basic gelatin trick is the generic version used for appetite control. Both use the same concept, but the 2025 “Ashton” version emphasizes timing, cubes, and habit structure.
It does not burn fat, but it creates a fullness effect before meals, helping reduce overeating and supporting mindful portion control. The benefit is appetite regulation, not metabolism changes.
The Dr Jennifer Ashton gelatin trick recipe and gelatin cubes routine are popular because they’re simple, accessible, and effective for supporting fullness before meals. They don’t promise miracle results but they do make mindful eating easier.
Think of this as a gentle, steady habit you can layer into your day one that helps with appetite, cravings, and portion control, especially when paired with balanced meals.

If you want to understand the basic version of the gelatin trick for weight loss, you can read my detailed guide here
If You like this recipe and made it Please rate the recipe. It helps us to reach more people. For the Latest updates Subscribe to Rekha’s Whatsapp. You can follow me on Instagram, Facebook, Youtube, Pinterest for more food inspirations.

Roasted potato recipe in the oven to satisfy your crispy potato cravings. Thes Crispy Oven Roasted Potatoes are the ultimate quick party snack! This easy oven roasted potatoes recipe makes golden, crunchy potatoes with a soft, fluffy center of the perfect crispy roasted potatoes.

All you need is just a handful of ingredients and follow a few simple steps that I am sharing along with tips for restaurant-level crunch right in your kitchen. I am sharing very simple tips to make crispiest roast pototoes with a satisfying crunch.
These oven roasted potatoes are incredibly versatile, and a perfect side dish or appetizer for any occasion. Whether for a cozy dinner or your next gathering, everyone will love these roasted potatoes!
With a golden, crunchy crust on the outside and a soft, fluffy center, these roasted potatoes are everything you want in a potato snack.


To store leftover roasted potatoes, transfer them to an airtight container and refrigerate them for up to three days. When reheating, it’s best to use the oven or an air fryer to restore their crisp texture. Avoid microwaving, as this will make them soggy. Simply spread the potatoes on a baking sheet and reheat them in a preheated oven at 200°C (400°F) for about 10 minutes, or until they’re crispy again.
These crispy roasted potato are perfect served as side dish for your favorite meals. Whether it’s grilled chicken, steak, or a fresh salad. They also make a fantastic party snack, especially when served with a dip like this Labneh Tomato Dip , Tzatziki or even Guacamole.
For a fancier presentation, sprinkle over some extra herbs or add a drizzle of truffle oil right before serving.
Yes! You can parboil the potatoes ahead of time and refrigerate them for up to 24 hours before roasting. This can actually make them even crispier.
Russet and Yukon Gold potatoes work best, but you can use red potatoes or fingerlings if needed. Just note that the texture may be slightly different.
Baking soda is key to breaking down the exterior of the potatoes, which creates that perfect crispy texture. You can skip it, but your potatoes may not be as crispy.
Store them in an airtight container in the fridge for up to 3 days. To reheat, place them in a hot oven or air fryer to restore their crispiness.
Yes! Parboil the potatoes, then freeze them in a single layer. When ready to cook, roast them directly from frozen—just add a few extra minutes to the cooking time.
If You like this recipe and made it Please rate the recipe. It helps us to reach more people. For the Latest updates Subscribe to Rekha’s Whatsapp. You can follow me on Instagram, Facebook, Youtube, Pinterest for more food inspirations.

This viral carrot salad recipe is trending over TikTok and Instagram. This bright and vibrant hormone balancing carrot salad is made with peeled carrot ribbons tossed in simple dressing. This carrot salad is simple, crunchy and bursting with flavours. If you want to eat your skincare this famous viral carrot salad recipe by Ray Peat is perfect side salad for summer dinner.

This is also known as Ray Peat Carrot Salad recipe: a 5-minute raw carrots salad to balance your hormones. TikTok can’t stop crunching on this viral Hormone balancing carrot salad recipe popular as “Dr Ray Peat raw carrot salad”.
In just five minutes, one ribboned carrot dressed with 3 ingredients provides lignin-rich fiber that supports hormone balance, smoother digestion, and a natural energy lift. I tried this hormone-friendly gut-cleanse recipe a daily for last few weeks.
TL;DR: Shave one large carrot into ribbons, toss with just 2 more ingredients and a pinch of sea salt. Munch mid-morning daily to keep your gut moving and estrogen metabolites heading for the exit.
I first tried Dr. Ray Peat’s famous raw carrot salad made by a fellow nutrition-geek friend. It tasted so delicious that I made it everyday. One week later my digestion felt smoother, my 3 p.m. energy slump vanished, and my belly bloat was noticeably so much better.
Dr. Ray Peat’s “raw carrot salad” is a one-carrot, three-ingredient side dish that the late physiologist promoted as a daily, food-based way of “hormone-balancing” and “pro-metabolic” health. The recipe got viral on TikTok in 2020 and still loved by healthy food lovers.
Now the question is can a Carrot salad Really Tame Hormones ? Here’s the quick science check-in on this viral hormone balancing carrot salad.
| Mechanism | Evidence Snapshot |
|---|---|
| Lignin-rich fiber binds estrogens | Higher fecal fiber = more estrogen excretion in women (University of Oxford study). pubmed.ncbi.nlm.nih.gov |
| Fiber lowers circulating estrogen | BioCycle Study: every +5 g fiber linked to –8 % estradiol. pubmed.ncbi.nlm.nih.gov |
| Acid + mct oil curb endotoxin-producing bacteria | In vitro data show coconut oil & acidic pH inhibit Gram-negative growth. health.comtime.com |
Even if there might not be a single salad that may balances hormones, but adding 1–2 cups of raw veggies a day in your diet is a nutrition slam-dunk.
One vegetable has a special place in a diet to balance the hormones, and that is the raw carrot. It is so nearly indigestible that, when it is well chewed or grated, it helps to stimulate the intestine and reduce the reabsorption of estrogen and the absorption of bacterial toxins.
This reduces the reabsorption of estrogen and the absorption of bacterial toxins.
It’s the stimulating effect on the intestine. The fiber in the carrot isn’t digestible. So the excretion of bile into the liver carries all kinds of detoxified chemicals and hormones. If you have fiber in your intestines, these toxins will be carried out, bound to the carrot fiber. Without enough fiber, they can be reabsorbed and recirculated. Nutrition for Women, 1993 , Raymond Peat

Optional bonuses: tiny drizzle of honey for flavor, fresh oregano, fresh mint or cracked pepper.
Fine in a pinch, but store-bought shreds are shorter and lower in lignin. Ribboning the carrots for this raw carrot salad takes just 60 seconds.
One large carrot supplies ~6 g net carbs and 3 g fiber—too low to spike glucose for most people, especially paired with fat.
Coconut’s lauric acid is antimicrobial; EVOO brings polyphenols. Rotate for spectrum benefits.
If you’re on estrogen-modulating meds, have IBS, or take warfarin, ask a professional. Fiber + vitamin K can interact.

Bottom line: eating a raw carrot every day is safe for most people, but always rely on a balanced diet, sleep, and exercise not just one salad for robust hormone health.
After a month of eating this ribbon carrot salad everyday, my digestion feels so much better, my skin glows a bit brighter, and my PMS headaches downgraded from “cancel all plans” to “take a walk.”
While I am upgrading my nutrition and adding a lot of excercise, this is one consistent change I am a following week after week this month. SO I am not sure Is this magic or the effect of Ray Peat Carrot Salad recipe?
But, as science catches up, I’m happy to keep crunching on a carrot a day worst-case scenario, I get more veggies 
If You like this recipe and made it Please rate the recipe. It helps us to reach more people. For the Latest updates Subscribe to Rekha’s Whatsapp. You can follow me on Instagram, Facebook, Youtube, Pinterest for more food inspirations.


Restaurant-Style Air Fryer Chicken 65 is a must-try chicken starter in my book! It's crispy and spicy on the outside while being delightfully succulent inside. This healthier twist on the classic Indian appetizer is irresistibly delicious - watch it gobbled up before your eyes in no time! Chicken 65 - the story behind its name […]
The post Crispy Air Fryer Chicken 65 appeared first on Simple Indian Meals.
Who doesn’t love to dip a tortilla chip in cheese sauce? It is one of our favourite ways to eat tortilla dips especially when the cheese dip has been made outside on the BBQ. And this recipe for BBQ Beer Cheese Queso is one of our favourites.

This recipe combines the great tastes of Beer Cheese and Queso Dip. The flavours all come together in this dip to make a dip that is easy to make and perfect for a get-together.
This Queso is easy to make and is a crowd pleaser.
Unlike other queso dips that are currently trending, this recipe doesn’t call for Velveeta. This recipe only calls for eight simple ingredients that you may already have on hand.
One note that I have to make about the ingredients is that we use full-fat cheeses. We have not tried this recipe using any type of reduced fat or reduced calorie cheeses. We don’t know what the results would be if the recipe is made using low-fat or reduced-calorie cheeses.
Sharp Cheddar – We like using sharp cheddar because it adds tons of flavour. You could use mild or medium cheddar but the end result won’t have the same flavour.
Mozzarella – There is a small amount of mozzarella in this dip. Mozzarella melts really well, making it a perfect addition to the dip.
Cream Cheese – This is where the dip gets its creaminess.
Ground beef- We use lean ground beef and drain it so it doesn’t add to the oils in the dip. There is enough oil in the cheese in this dip, so you want to make sure the meat is drained well before making the dip.
Beer – Any beer you have on hand will do. Just make sure it is cold.
Jalapeno – We use one to two jalapenos depending on how hot we want the dip to be.
Bacon – Bacon adds a bit of saltiness and flavour.
Salsa – Mild, medium, or hot salsa can be used.
 We make BBQ Beer Cheese Queso on the gas grill usually, but we have used charcoal barbecue as well. The smoker is another option to make this recipe.
We use aluminum pans to make this dip. This makes it easy to clean up.
A Dutch Oven also works well on the BBQ to make this Queso.
This recipe can also be made in a slow cooker or in the oven. A couple of drops of Liquid Smoke can be added during the cooking process if not made on the BBQ.
The beef in this recipe can be replaced with ground pork or ground sausage meat.
In the summer when our garden is plentiful, we add fresh diced tomatoes and diced green or red peppers from our garden.
The jalapeno in the recipe can be substituted with any type of hot pepper. We have used Serrano peppers in place of the jalapenos.
This dip should be served warm. Use tortilla chips for dipping.
We love to serve this when we have company over. It goes well with a cold beer or a glass of wine.
Another great way to enjoy this dip is over a campfire. We cube the cheese beforehand and store it in a freezer bag. It will keep in a cooler for a few days.
If you are looking for a Queso without beer try our Barbecue Queso Dip.
The post BBQ Beer Cheese Queso appeared first on BBQ and Baking.

Delicious Kerala Bakery Style Egg Puffs are made with hard boiled eggs and a spicy onion masala baked inside crispy puff pastry parcels. They are the perfect tea time snack. In Kerala, crispy puff pastry pockets filled with spiced vegetables, hard boiled eggs or meat - called puffs in general are very popular evening snacks...
The post Kerala Bakery Style Egg Puffs appeared first on Cooking Curries.
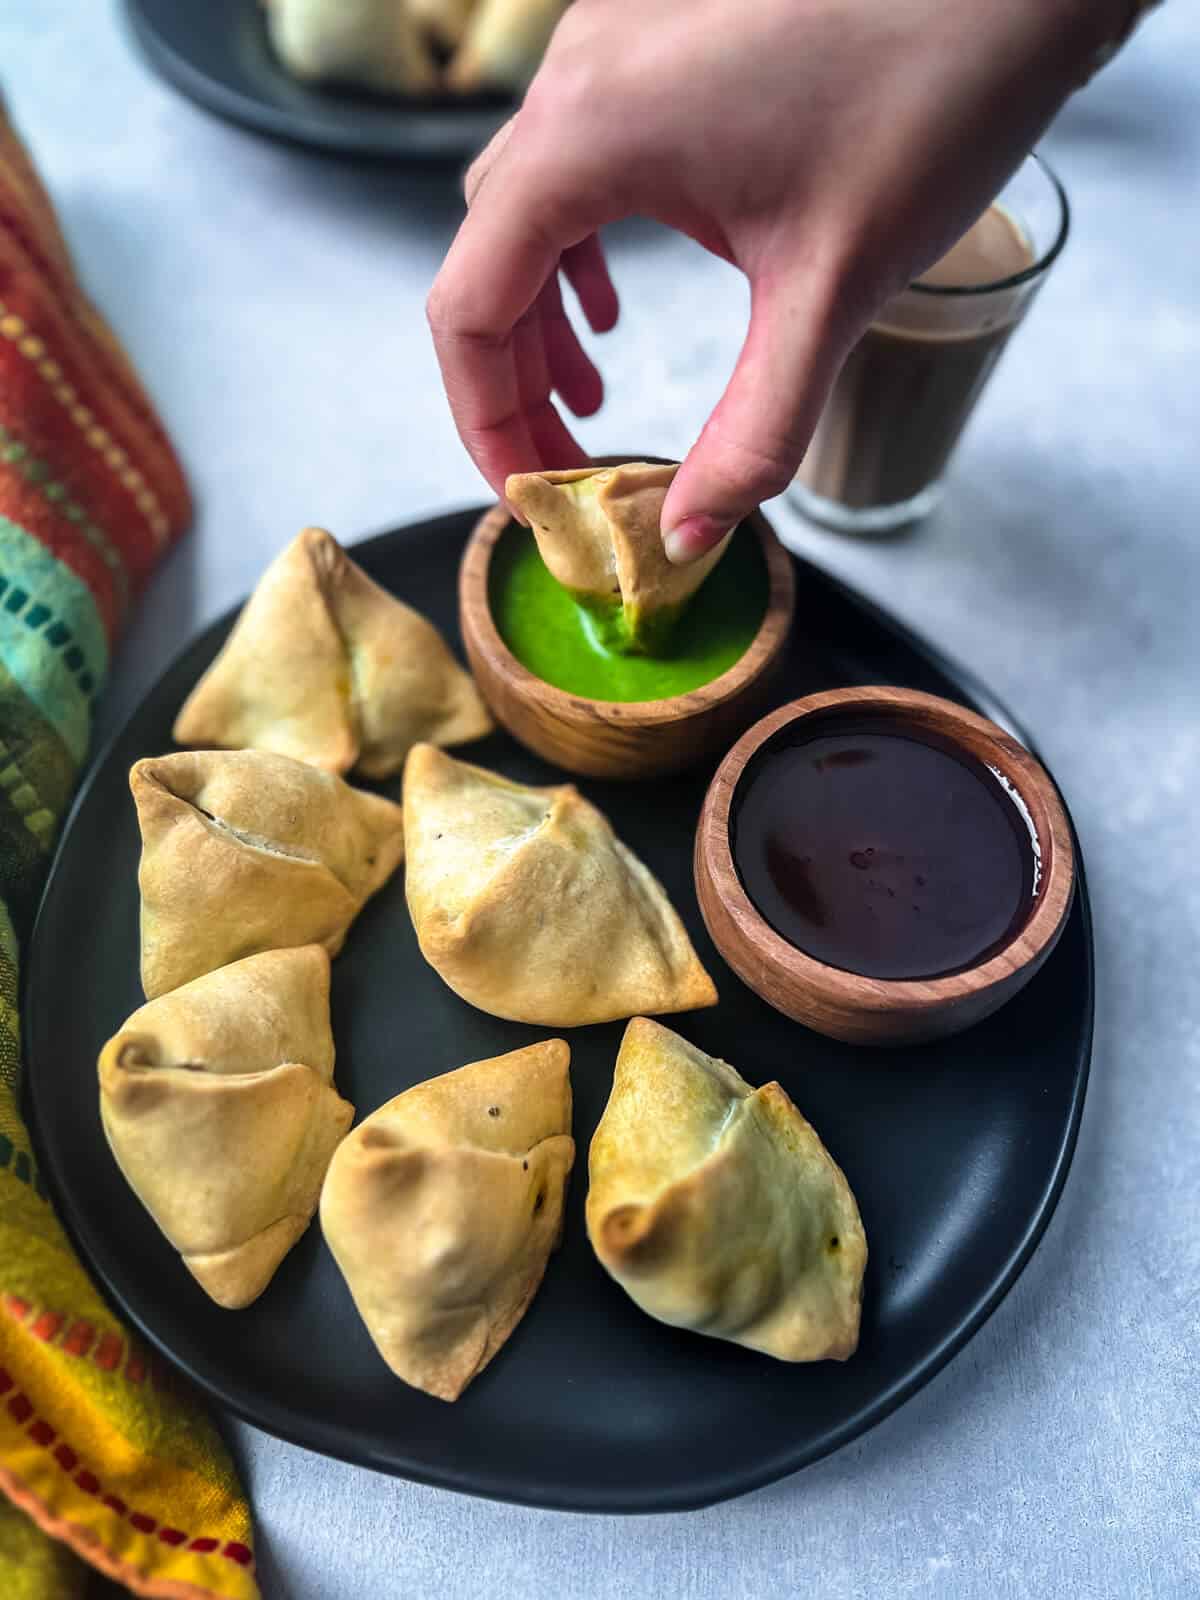
Love Indian samosas but hate deep-frying? Try this air fryer samosa recipe. With a crispy exterior and a delicious spiced potato filling, this air fried vegetable samosa recipe tastes and looks just like the deep-fried ones.

The classic samosa is triangular in shape and consists of a flaky pastry filled with a savory stuffing – often containing potatoes, peas, and spices, although meat may be included.
The pastry is then deep-fried in oil, drained, and served to hungry customers. It’s a popular street food with many variations based on the region it is made.
Apart from India and other countries in Southeast Asia, it is popular in North and East Africa, many Arab countries, Portugal, and Brazil, although it is known by various names.
While most Indians believe Samosa (pronounced suh·mo·suh) originated from India, shockingly, it is not. Its roots have been traced back to the Persians all the way to the 9th or 10th century when it was referred to as sanbusaj .
Some references in old Arab cookery books also call these minced meat-filled triangles sanbusak, sanbusaq, and sanbusaj (all derived from the Persian word sanbosag). These snacks were carried by merchants when they ventured out for trading.
Eventually, as these merchants traveled to Southeast Asia, the samosas made their way into India, then known as samsas, named because of their pyramid-like shape.
They became popular in India during the 13th or 14th century thanks to the chefs in the royal kitchens in Delhi. These chefs, who originally came from the Middle East and Central Asia, made samosas containing meat, ghee, onions, and other ingredients.
As the food traveled across India, the original became more of a guiding post as each region added its own special touches. As a result, the classic Indian samosas have become incredibly diverse.
The quintessential samosa, sometimes called potato samosa or vegetable samosa contains a spiced stuffing filled with potatoes and green peas. It’s wrapped in a dough made from all-purpose flour mixed with butter or ghee and deep-fried until crispy. This form is a traditional Indian style and is the most popular worldwide.
If you want to learn more, check out this fascinating article on the history of samosa.
You may know samosa by some of its alternative names and, of course, variations, including:
Having grown up in Mumbai (Bombay), I have probably consumed samosas every single week of my life. They were made fresh by street food vendors whose stalls you could find at every corner of the city and, of course, the college cafeterias.
Those piping-hot vegetable samosas were definitely hard to miss and even harder to resist.
When paired with hot masala chai, these roadside snacks tasted just divine.
I always wanted to make samosa at home, but to be honest, deep-frying is not my thing. I hate the mess it causes, and then I have to deal with a large vat of oil.
Having been obsessed with my air fryer lately, I thought this would be a good recipe to adapt. It just took a little bit of tinkering with the temperature, and I was able to nail the recipe.
The result was a crispy samosa with a flaky crust and a delicious savory potato filling without deep-frying. How satisfying!
I can’t wait for you to try this recipe and air fry samosas! These homemade samosas will be much healthier and tastier than the ones you find in Indian restaurants in the US.
You’ll need an air fryer to make this recipe. Here are the two that I recommend
Other equipment/tools

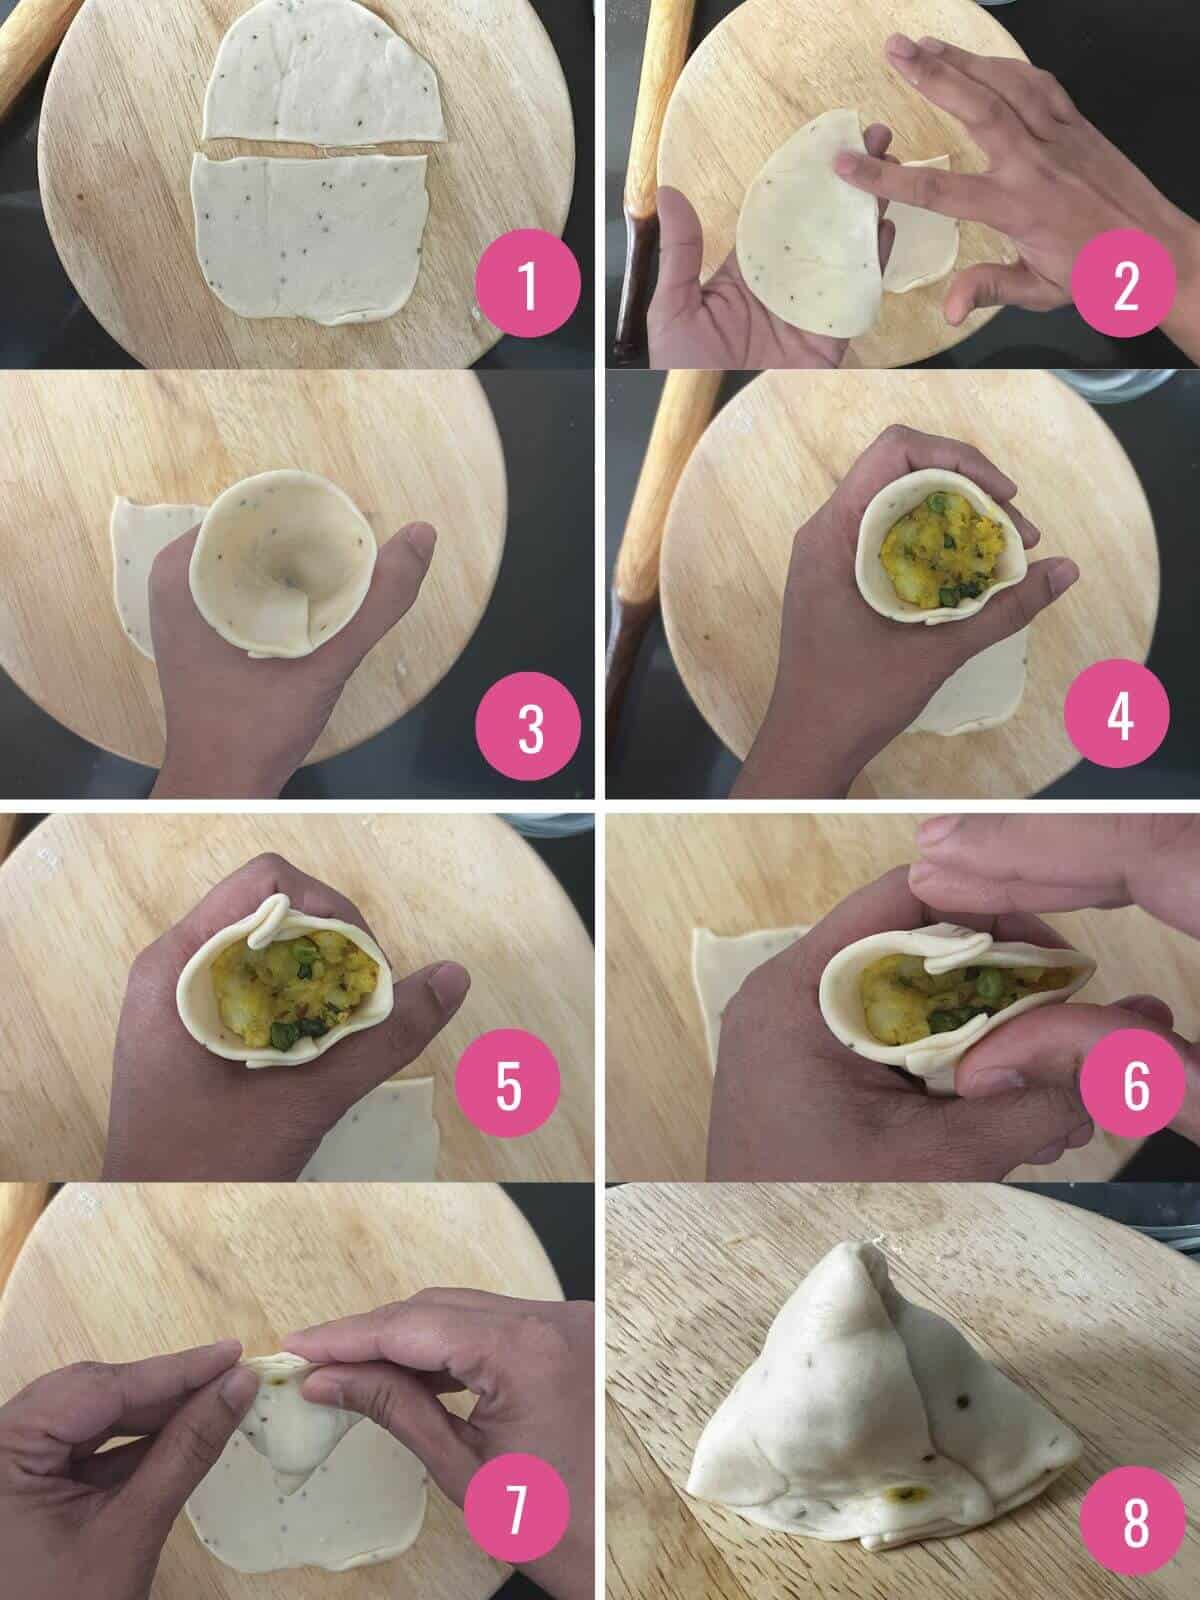
Full instructions are included in the recipe card, but here is the summarized version of how to fold the pastry for veggie samosas:
TIPS
The best way to savor these delicious samosas is with chutneys. Here are my favorite ones.
Don’t have the chutneys handy? Serve it with ketchup instead.

Yes, you can make frozen samosa in an air fryer, although the temperature and time depend on the particular brand and size. For Haldiram frozen cocktail or mini samosas (you can find them in Indian grocery stores), air fry at 400ºF for 10 minutes.
It is best to leave the samosas frozen and add them to the air fryer straight from the freezer. This will give them the best chance to crisp up and have a similar texture to that of deep-fried samosas.
If you want to keep your samosas crispy, brush ghee or oil on the outside before air frying. This small amount of oil will help them to crisp. Once they are done, keep them in the open air, and do not store them in a covered container until completely cooled. Any condensation will prevent them from staying crispy.
Yes. Samosas will reheat much better in an air fryer compared to a microwave. Just add them to an air fryer that has been preheated to 350ºF and cook them for 2-4 minutes or until crisp. Serve with your favorite chutney.
If your samosas are not crispy, it may mean that the fat (ghee) was not incorporated into the dough properly and/or the dough was not stiff. Next time, work the dough until very stiff. Make sure to brush the outsides of your prepared samosas with ghee or oil.
Yes, you can use whole wheat flour to make the samosa dough. Just know that the samosas won’t be as flaky as those made with all-purpose flour.


Whole samosas: Fill the samosas but don’t air fry them. Place them on a baking sheet and flash-freeze them for about two hours. Transfer them to an air-tight container and freeze them for about a month. No need to thaw them before air frying.
Filling: Alternatively, you could make the filling, refrigerate it for 2-3 days or freeze them for a month.
Dough: The dough can be made in advance and refrigerated for up to 3-4 days. Let it come to room temperature before rolling it.
If you have any leftover air-fried samosas, you can store them in an airtight container in the fridge for 3-5 days. For the best quality and crispiest results, allow them to cool to room temperature before transferring them to the container. Any warmth will become condensation and cause them to become soggy.
When you’re ready to reheat, preheat your air fryer to 350ºF and cook them for 2-4 minutes or until crisp and heated through.
These air fryer samosas are one of my favorite appetizers to make. Here are a few more easy air fryer recipes for you to try :
The post Crispy Air Fryer Vegetable Samosa appeared first on Simmer to Slimmer.


