Learn how to make Eggless Chocolate Cookies recipe with a quick video tutorial and detailed step by step photos. Easy, simple and extremely addictive chocolate cookies made with 5 ingredients. If love cookies and can't resist chocolate, these Eggless Chocolate Cookies are an absolute must-try! Soft, melt-in-mouth and completely addictive, they are perfect little goodies...
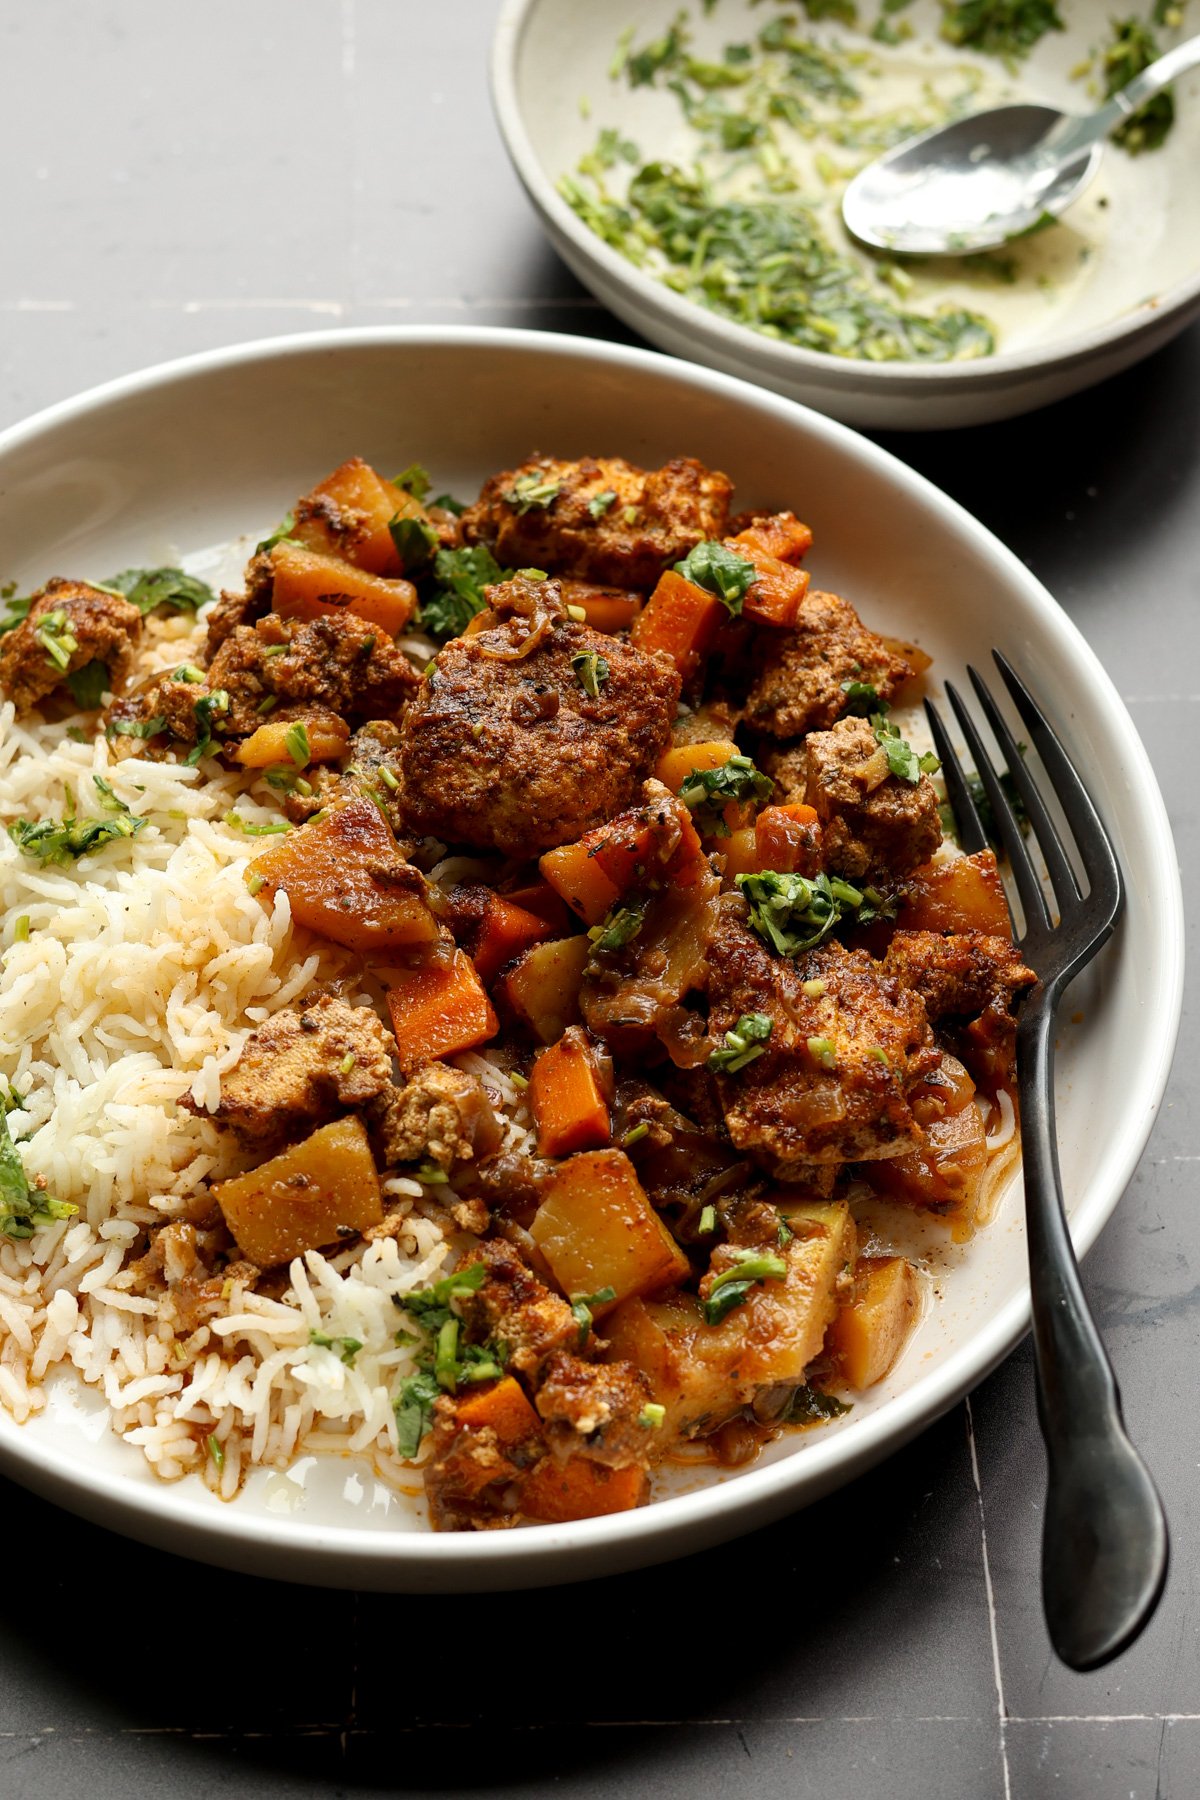
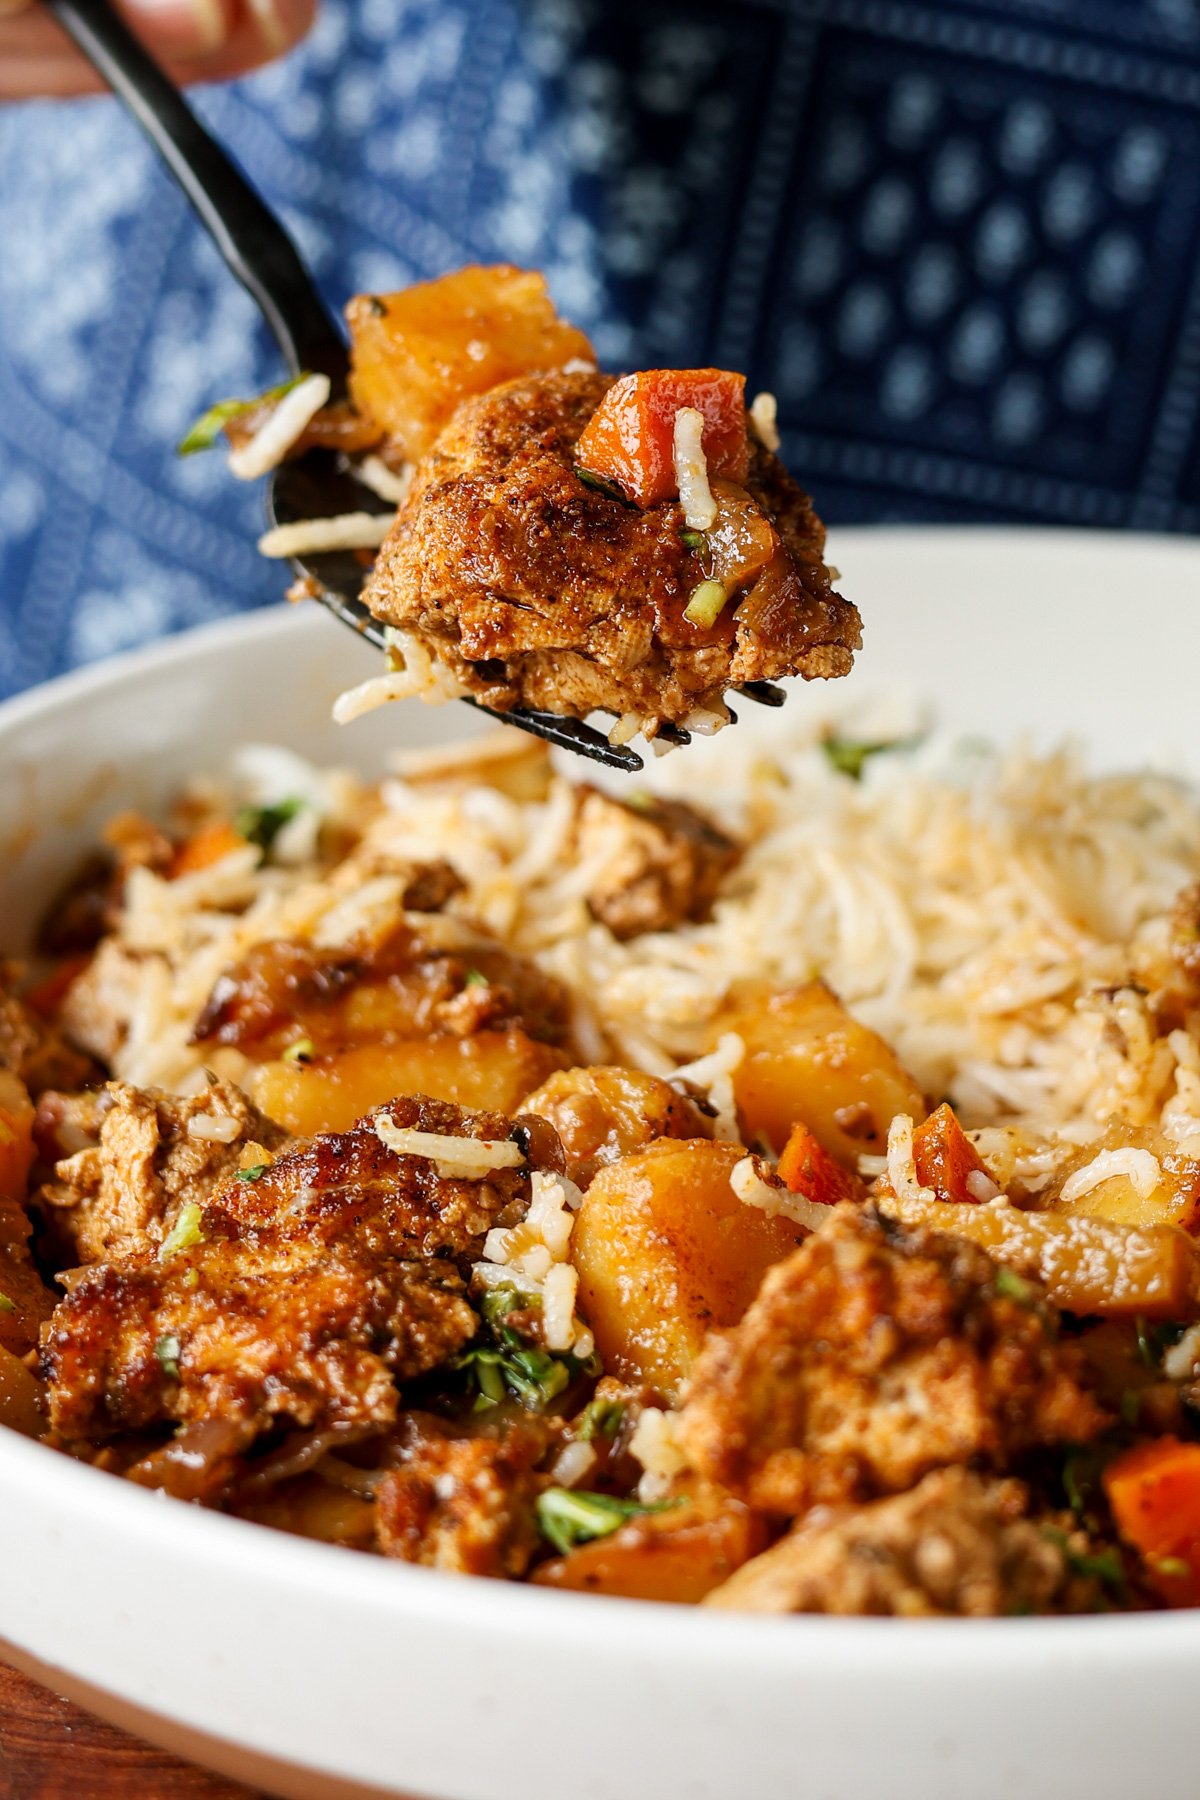
This Mutton Nihari is one of those classic recipes that are comforting, wholesome, and delicious. It’s rich without being heavy, and fills the kitchen with the most comforting aromas while it cooks away slowly.
This mutton Nihari is one of those of dishes I make when I am hosting and need to cook for a crowd. It’s a one-pot recipe with a long cook time, but don’t let that intimidate you. Once you marinate the mutton and fry your onions, this dish basically cooks itself. But the resulting flavors carry so much depth, it’s insane!
Another thing I love about nalli nihari is that it’s a make-ahead dish. It should ideally be rested for a couple hours before serving, but I love making this the previous day to allow the flavors to really develop. My favorite way to eat this nihari recipe is with some soft and fluffy kulcha along with lemon wedges and onion rings. But this recipe tastes just as good with naan, roti, or even steamed rice.
Mutton – bone-in leg or shoulder mutton pieces add depth of flavor and body. You can use boneless pieces, but make sure to adjust the cooking time as boneless mutton cooks much faster
Salt and turmeric – used in the marinate to flavor, color, and tenderize the meat
Oil – I have used sunflower oil, but any neutral-flavored oil will work here
Onions – thinly sliced, fried until golden and then ground into a paste to create the backbone of the gravy
Aromatics – ginger and garlic for flavor, sharpness, aroma, and depth
Masala – I have used Shan’s Nihari Masala for an authentic flavor. You can use any brand that’s available to you, or even make your own spice mix at home.
Besan and wheat flour – help thicken the gravy and add body to the dish.
Yes, but slow cooking gives the best flavour and texture. Pressure cook only if needed.
Why are both besan and atta used?
Together, they give nihari its signature thickness without making it pasty.
Is nihari supposed to be spicy?
It’s meant to be warming, not aggressively spicy. Adjust ginger and masala to taste.
Richa’s Top Tips
Be patient while frying onions as they take a while to brown but also tend to burn very quickly. Fry them in batches to make sure everything is cooked evenly
Stir continuously while roasting the flours to prevent them from burning
Always cook Nihari slowly on low heat. Rushing the cook time will affect both texture and flavor
Serving Ideas
We love eating this with kulcha, but it tastes just as good with naan or roti
Always serve with ginger juliennes, lemon wedges, and onions on the side so everyone can adjust to taste.
Customisation Ideas
Add a little extra water if you prefer a thinner, more broth-like nihari.
Increase ginger garnish if you like a sharper, fresher finish.
Replace part of the oil with ghee for a richer, more traditional flavour.
Replace mutton with chicken or another protein of your choice. Just make sure to adjust the cook time according to what you’re using.
Storage Ideas
Refrigeration: Store cooled nihari in an airtight container for up to 2 days.
Freezing: Nihari freezes well for up to 1 month; thaw overnight in the fridge.
Reheating: Reheat gently on low heat, adding a little water to loosen the gravy if needed.
Flavour note: Like most slow-cooked dishes, it often tastes even better the next day.
This mutton nihari is slow, indulgent, and deeply satisfying. It’s the kind of dish that reminds you why some recipes are meant to take their time. It’s rich without excess, comforting without being heavy, and best enjoyed hot, fresh, and unhurried.
This Mutton Nihari is a delicious, warming curry that's perfect for winters. Serve with kulcha, naan, or steamed rice for a satisfying and unforgettable meal.
1cupsunflower or any neutral flavoured cooking oil
8onionsthinly sliced, 500 gms
1 ½inchgingerroughly chopped, 65 gms
40garlic cloves35 gms
12 ½cupswater
1 ½packets Shan nihari masala90 gms
½cupbesangram flour
½cupattawheat flour
1 ½inchesgingerjulienned
2tablespoonsroughly chopped coriander leaves
2-3onion rings
2-3lemon wedges
Instructions
Take mutton, 1 teaspoon of salt, 1 teaspoon of turmeric powder in a bowl, mix well and set aside to marinate for 30 minutes.
2 kilograms bone-in mutton leg / shoulder, 1 ½ teaspoon salt, 1 teaspoon turmeric powder
Heat oil in a deep kadai or pan, add ⅓ portion of sliced onions and fry on low till they turn golden brown. Drain oil well and transfer the fried onions to a plate. Repeat the same process for the rest of the onions. Add fried onions, ginger & garlic to a mixer grinder with ½ cup of water and grind to a paste.
1 cup sunflower or any neutral flavoured cooking oil, 8 onions, 1 ½ inch ginger, 40 garlic cloves, 12 ½ cups water
Take ¾ cup of the oil used for frying onions in a kadai, add marinated mutton and saute of medium for 2-3 minutes till they get lightly roasted.
Add brown onion paste and saute for 3-4 minutes on low till the rawness goes.
Mix nihari masala in 1 cup of water, add to the kadai, mix well. Add 9 cups of water, cover and cook for 1 hour 30 minutes till the mutton is cooked well and the meat falls off the bone.
1 ½ packets Shan nihari masala
While the meat is cooking, take besan and atta in a kadai and roast on low for 3-4 minutes till the rawness goes. Stir continuously while roasting so they do not turn brown.
½ cup besan, ½ cup atta
Once the meat is cooked, mix the roasted flours in 2 cups of water so that there are no lumps formed, add to the kadai, mix continuously till it starts boiling and cook on low for 7-8 minutes until the oil floats on top. Scoop out the oil/rogan floating on top of the gravy and transfer to a bowl.
For serving, pour 2-3 ladles of hot nihari mutton gravy to a bowl, add 2 tablespoons of hot rogan, 2-3 ginger juliennes and coriander leaves. 2-3 onion rings and a lemon wedge to be served on the side.
A few slices of crusty bread and this dipping oil bread dipping oil is a combo you need on your Holiday food tables. It comes together quickly and with simple ingredients, but will become your new favorite way to eat bread!
Ever since I tried a version of this bread dipping oil at a friend’s place a few months ago, I have been hooked! I have made this for every single gathering I have hosted since, and it’s been wiped clean each time!
This dipping oil is a quick and simple recipe that comes together in under 15 minutes. But it’s got tonnes of flavor from the roasted bell pepper, garlic, and seasonings. And my favorite part? It’s got a long shelf life! Especially helpful if you’re hosting as that’s one less thing to make on the day.
While it’s great for parties, this olive oil dip for bread is the kind of thing I would also make for a gossip session with a friend over chai or for myself on an evening when I want a fancy but easy snack. The options are truly endless.
Olive oil – forms the rich base of the dip. I would recommend using a quality one for the best flavor
Bell pepper – roasted until charred. Delivers body and a sweet, smoky flavor to the dish
Walnuts – bring lots of texture and a nutty flavor
Black olives – adds salty, savory flavor and texture
Balsamic vinegar – for a touch of tang and sweetness to add balance
Honey – the sweetness help soften the acidity and softens the acidity and rounds out the flavours.
Garlic – freshly grated for flavor and aroma. I would not recommend subbing for garlic powder as it won’t give the same flavor.
Orange peel – finely chopped for that beautiful citrusy brightness and lift. it’s an unexpected ingredient, but one I highly recommend
Seasonings – parsley and Italian seasoning for fresh, herby flavors
Salt
Customisation Ideas
Skip walnuts or replace them with almonds or pine nuts for a different texture
Add a pinch of chilli flakes if you like a little warmth
Replace honey with maple syrup for a deeper sweetness
Stir in a spoon of sun-dried tomatoes for extra intensity
Make it smoother by pulsing briefly in a mixer for a more spread-like texture
Serving Ideas
Serve with toasted bread cubes, sourdough, or focaccia
Spoon over grilled vegetables or roasted potatoes
Use it as a finishing drizzle for burrata or fresh mozzarella
Add to a grazing board with cheese, fruit, and nuts for an easy centrepiece
This roasted red pepper dipping oil is one of those recipes that is loved by every single person that tries it. Make it for your holiday party and watch it disappear in minutes!
This bread dipping oil will be the star of your Holiday food table. It comes together quickly and with simple ingredients, but every bite feels like a flavor explosion.
Set a wire mesh or jaali on the stove flame, place red bell pepper and roast on very low heat for 8-10 minutes. Keep turning as blisters are formed and roast until it is charred on all sides. Transfer to a bowl and keep covered for 5 minutes so they soften and can be peeled easily. Peel off the skin from the roasted peppers and finely chop them.
1 medium red bell pepper
Take oil in a bowl, add olives, walnuts, balsamic vinegar, honey, garlic, orange peel & chopped bell pepper. Season with parsley, italian seasoning and salt and mix well till all the ingredients come together.
¼ cup olive oil, ¼ cup sliced black olives, ⅛ cup chopped walnuts, 1 teaspoon balsamic vinegar, 1 teaspoon honey, 2-3 garlic cloves, 1 teaspoon finely chopped orange peel, ½ teaspoon parsley, ½ teaspoon italian seasoning, ⅛ teaspoon salt
Serve with bread cubes.
8 Bread slices cut into cubes
Notes
Dip can be made in advance and will stay good for 4-5 days when refrigerated in an airtight container.
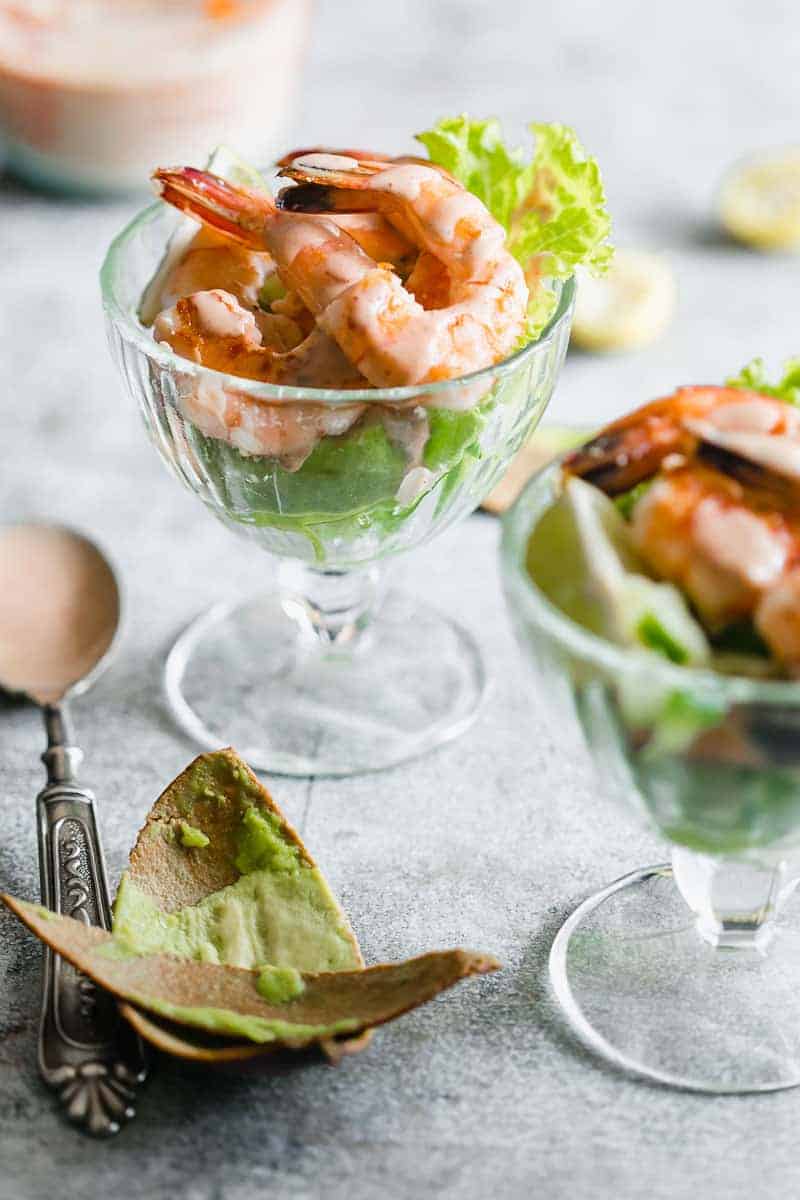
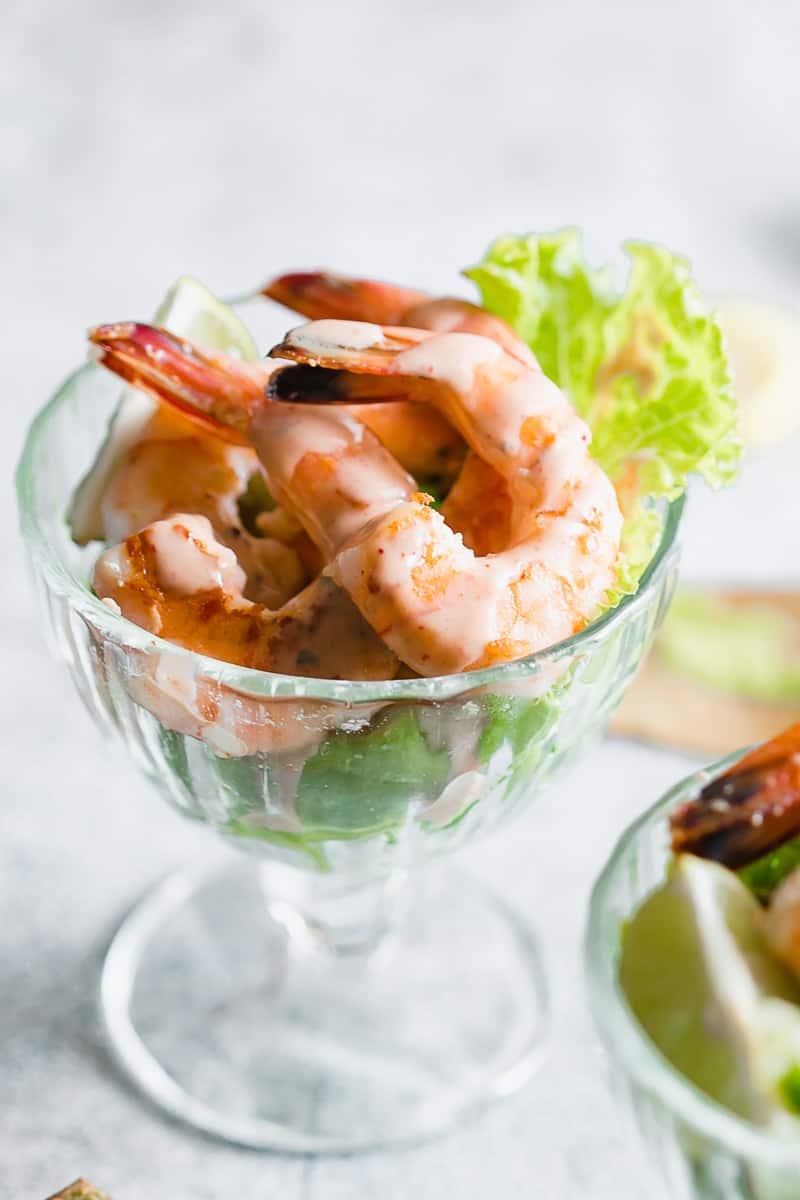
This retro prawn cocktail is straight from the 80’s, but is a must on the Holiday food table even today! Plump, juicy prawns tossed in a pink rose marie sauce; this classic dish is easy to make and tastes 10/10!
This prawn cocktail is one of those dishes that instantly feels a little special, even though it’s incredibly easy to put together. It’s cool, creamy, fresh, and quietly indulgent and the kind of recipe I reach for when I want something elegant without spending too much time in the kitchen.
I love how adaptable it is. You can make it for a casual lunch, a dinner party starter, or even a festive spread when you want something light before the mains. Crisp lettuce, sweet prawns, creamy avocado, and that nostalgic rose marie sauce, simple ingredients, but they come together beautifully.
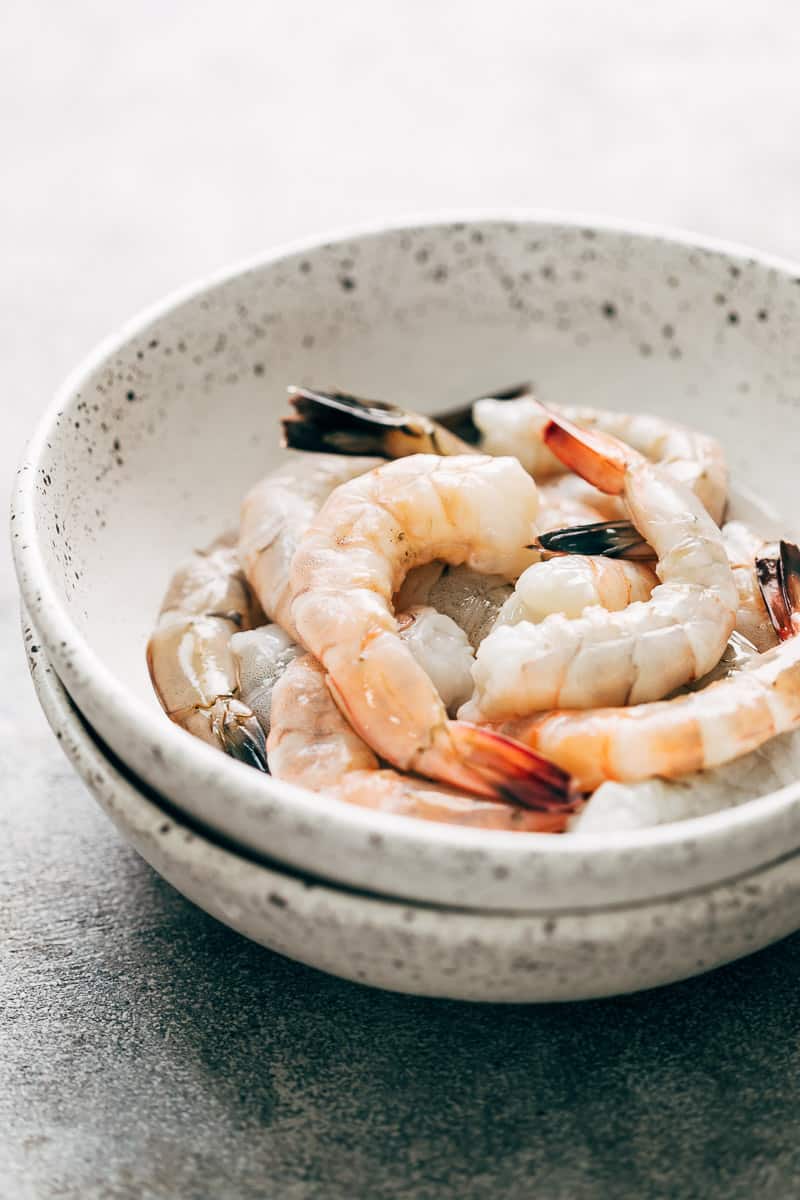
Prawns – I have used raw jumbo prawns as this size works best for this recipe. You can use pre-cooked prawns as well
Olive oil – to cook the prawns
Lettuceand cucumber – make for a fresh and crunchy base for the prawn cocktail
Avocado – adds richness and a buttery texture
Rose Marie sauce
Mayonnaise – forms the creamy backbone of the sauce.
Ketchup – adds sweetness and colour.
Worcestershire sauce – brings depth and umami.
Cayenne pepper or red chilli powder – adds gentle heat.
Lime juice – brightens and balances the richness.
Frequently Asked Questions
Can I use frozen prawns?
Yes. Thaw completely, pat dry, and cook or chill before assembling.
Is this recipe spicy?
No. The heat is very mild and can be adjusted or skipped entirely.
Can I make this ahead for a party?
You can prep the prawns and sauce ahead, but assemble only at serving time.
What can I use instead of Worcestershire sauce?
A few drops of soy sauce can work in a pinch, though the flavour will differ slightly.
Richa’s Top Tips
Don’t overcook the prawns. Prawns cook very quickly and overcooked prawns taste chewy and rubbery. Cook them until they’re just pink and and tender.
Chill the prawns and sauce before assembling for the best flavour and texture.
Pat prawns dry if using pre-cooked ones to avoid a watery cocktail.
Assemble just before serving to keep everything crisp and fresh.
Customisation Ideas
Add a little finely chopped celery for extra crunch.
Replace lime juice with lemon juice for a sharper finish.
Stir in a spoon of Greek yogurt to lighten the sauce slightly.
Add a pinch of smoked paprika for a subtle smoky note.
Storage Ideas
Avoid storing assembled cocktails as they tend to become watery and lose freshness.
Prawns: Cooked prawns can be stored in an airtight container in the refrigerator for up to 24 hours.
Sauce: The rose marie sauce keeps well refrigerated for 2–3 days when stored separately in an airtight jar.
Vegetables: Chop lettuce, cucumber, and avocado just before serving for best texture.
This prawn cocktail is proof that simple food can still feel thoughtful and elegant. With fresh ingredients and a well-balanced sauce, it’s the kind of dish that never really goes out of style.
This prawn cocktail recipe is straight from the 80’s. Crisp lettuce, plump, juicy prawns and an addictive cocktail sauce that’s perfect as a dipping sauce. Its an appetizer that will take everyone back in time!
900gramsRaw Jumbo Prawnstails on (Or freshly cooked prawns)
1teaspoonOlive Oilif using raw prawns
3cupsLettuceroughly chopped
2Avocadosdiced
1Cucumberdiced
Rose Marie Sauce
3/4cupMayonnaise
2tablespoonsKetchup
1tablespoonWorcestershire Sauce
1/2teaspoonCayenne Pepperor Red Chilli Powder
1teaspoonLime Juice
Instructions
If using raw prawns, heat olive oil in a skillet and cook the prawns for 3-4 minutes on each side till they turn pink. Sprinkle lightly with salt and refrigerate for 15-20 minutes.
In a bowl, whisk together all the ingredients for sauce and refrigerate.
When ready to assemble, add lettuce to the bottom of a glass, top with a few pieces of cucumber, avocado and finally prawns. Drizzle with the sauce and serve immediately.
Notes
Poaching prawns: If you prefer poaching prawns instead of cooking them, add salted boiling water to prawns in a bowl and let them sit for 5-6 minutes, till the prawns turn pink.
Fresh vs. Frozen Prawns: If you happen to stay by the sea, please buy your prawns as fresh as possible and peel them at home if you can. If you don’t, then buy your prawns frozen because they will be better than the prawns that are sold seemingly fresh. Frozen prawns are frozen within a few hours of catching them. Thaw them completely before cooking.
Refrigerating: I prefer serving these cold, but its best to chill each element separately rather than assembling them and then chilling, because the sauce can pool at the bottom. The sauce can be made 4-5 days ahead and refrigerated, and the prawns stay well refrigerated once cooked for a day.
Mayonnaise: I can’t stress how important it is to use good quality mayonnaise for this recipe, and no, you can’t substitute it with greek yogurt. Either make your own at home – it’s really easy, I promise and I have anInstagram video that shows you how to make mayo, or buy mayonnaise made with whole eggs.
This creamy veg canapés recipe is my go-to when I need something that looks fancy but is actually very easy to pull together. These look great on the holiday party food table, but are just as delicious and easy for those random snack cravings.
If there’s one thing I always want at a party, it’s snacks that look impressive but don’t leave me stressed in the kitchen. These creamy Veg Canapés are exactly that kind of recipe. They feel special enough for festive tables and get-togethers, but are insanely easy to put together. This is definitely a canapes recipe worth trying.
I love that this filling is packed with vegetables, held together by a soft, garlicky, creamy sauce that’s a total flavorbomb. You can make the mixture ahead of time, tweak the veggies based on what’s in your fridge, and assemble everything right before serving. It’s the kind of canapes recipe you make once and then quietly keep coming back to whenever you need an easy win.
Butter: Adds richness and creaminess to the filling; can be replaced with olive oil or a neutral nut butter for a vegan version.
Aromatics: Garlic and onions builds a sweet-savoury, aromatic base
Veggies: Carrots, beans, mushrooms, and broccoli for flavor, texture, and nutrition
Milk: Helps create that creamy sauce; you can use any unsweetened plant-based milk if you’re vegan
Salt: For seasoning
Italian seasoning: Adds a herby, well-rounded flavour. You can experiment and use any seasoning you like. Oregano, mixed herbs, chilli flakes, also taste great. mixed dried herbs or oregano alone work too
Mustard paste: Brings a slight heat and sharpness of flavor. A little goes a long way
Cream cheese: Makes the filling rich and smooth. Feel free to replace with hung curd for a lighter version
Canapé shells – Provide the crisp base for the filling
Black olive slices – Add a salty finish and visual contrast
Customisation Ideas
Change the veggies: Swap broccoli for corn, baby spinach, or zucchini. Just make sure everything is finely chopped so the filling stays creamy.
Make it cheesier: Add grated mozzarella, cheddar, or parmesan along with the cream cheese for a richer filling. This makes the canapes recipe even more indulgent.
Add a kick: Stir in chilli flakes, cracked black pepper, or a little paprika for gentle heat.
Herb twist: Fresh parsley, chives, or basil stirred in at the end add a lovely fresh note.
Make it vegan: Use olive oil instead of butter, plant-based milk, and vegan cream cheese for a vegan version.
Assemble these veg canapés right before serving to make sure they stay crisp until the end. This tip is a critical part of any canapes recipe.
If you try this recipe, be sure to send me pictures over on my IG @my_foodstory.com.
Crisp canapé shells filled with a soft, garlicky vegetable mixture make these Veg Canapés perfect for parties, festive spreads, or last-minute entertaining.
Heat butter in a wide pan, add garlic and onions and saute for 2 minutes on low till they turn translucent. Add carrots, beans, mushrooms, mix well and cook covered on low for 3 minutes till they are cooked to tender but not mushy. Add broccoli & saute for only a minute just until they are tender.
1 ½ tablespoons butter, 1 tablespoon finely chopped garlic, ½ cup chopped onions, ½ cup chopped carrots, ½ cup chopped beans, 200 gms mushrooms, ½ cup tiny broccoli florets
Add all purpose flour and saute for 2-3 minutes on low till the flour is cooked and smells slightly nutty. Add milk in parts and keep whisking into flour till it thickens, adding more milk as you go. This prevents the sauce from getting lumpy. Simmer on low whisking frequently for 2-3 minutes till the sauce thickens.
1 tablespoon all purpose flour, 1 cup milk
Season with salt, italian seasoning, mustard paste, mix well and cook for a minute. Add cream cheese, mix well and take off the heat. Transfer to a bowl and let it cool down.
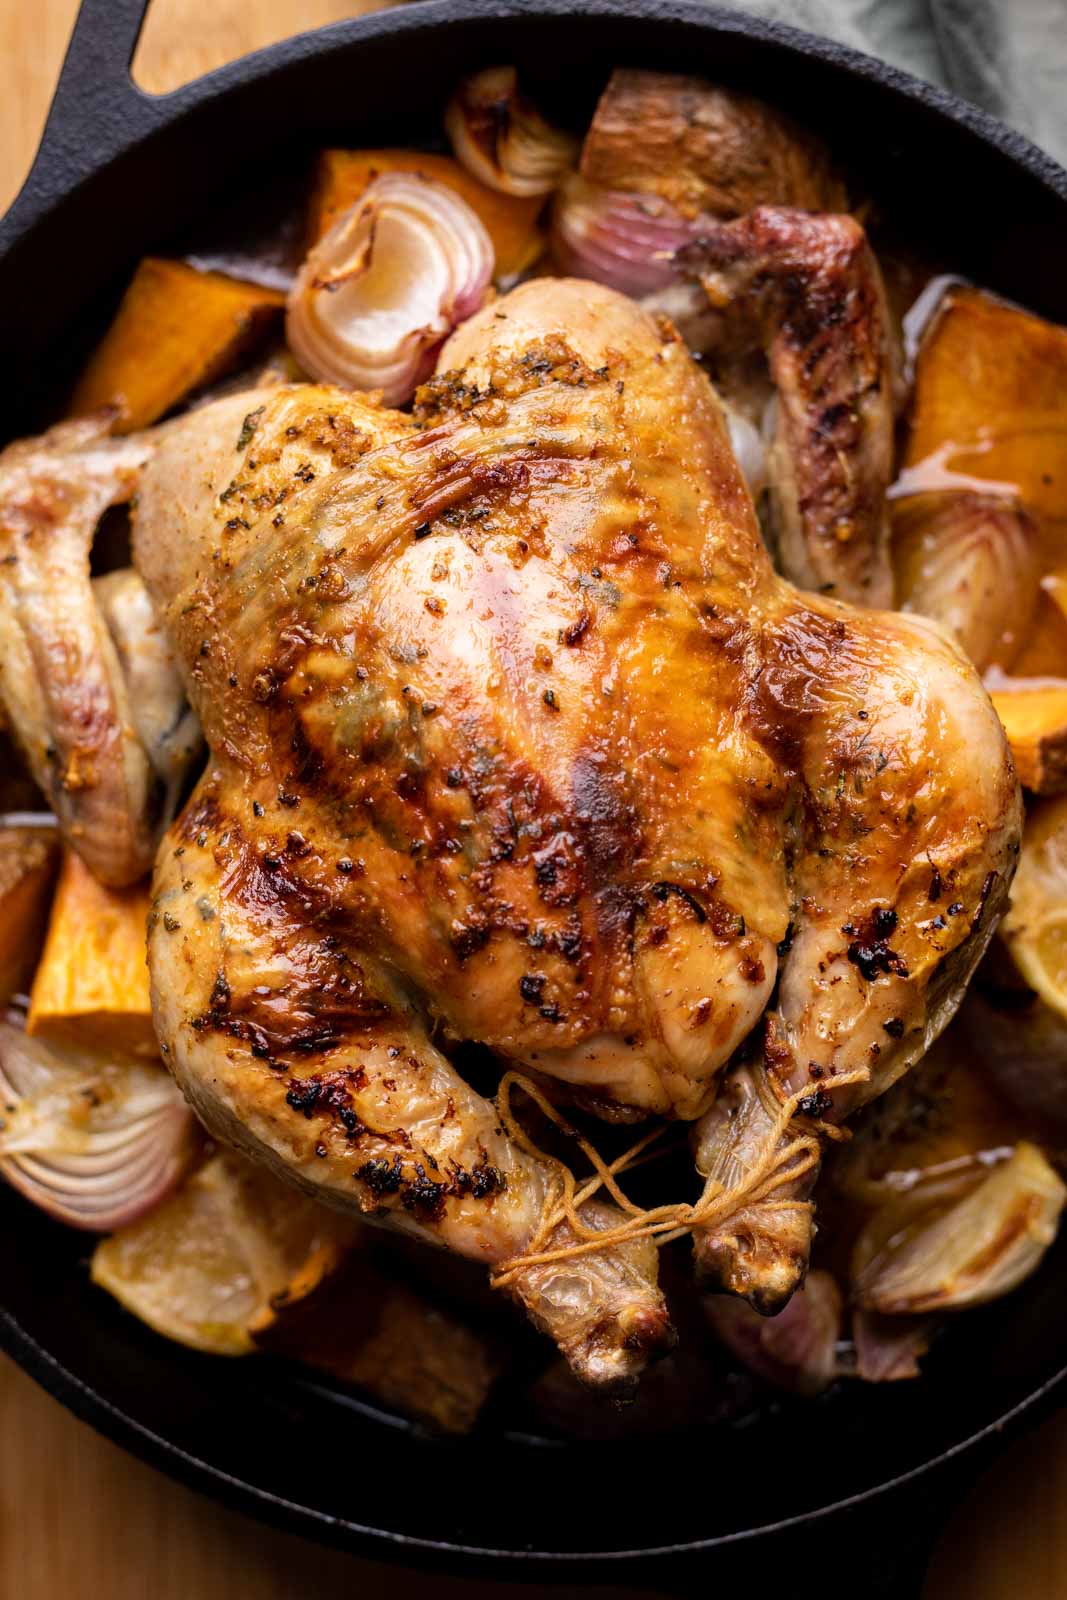
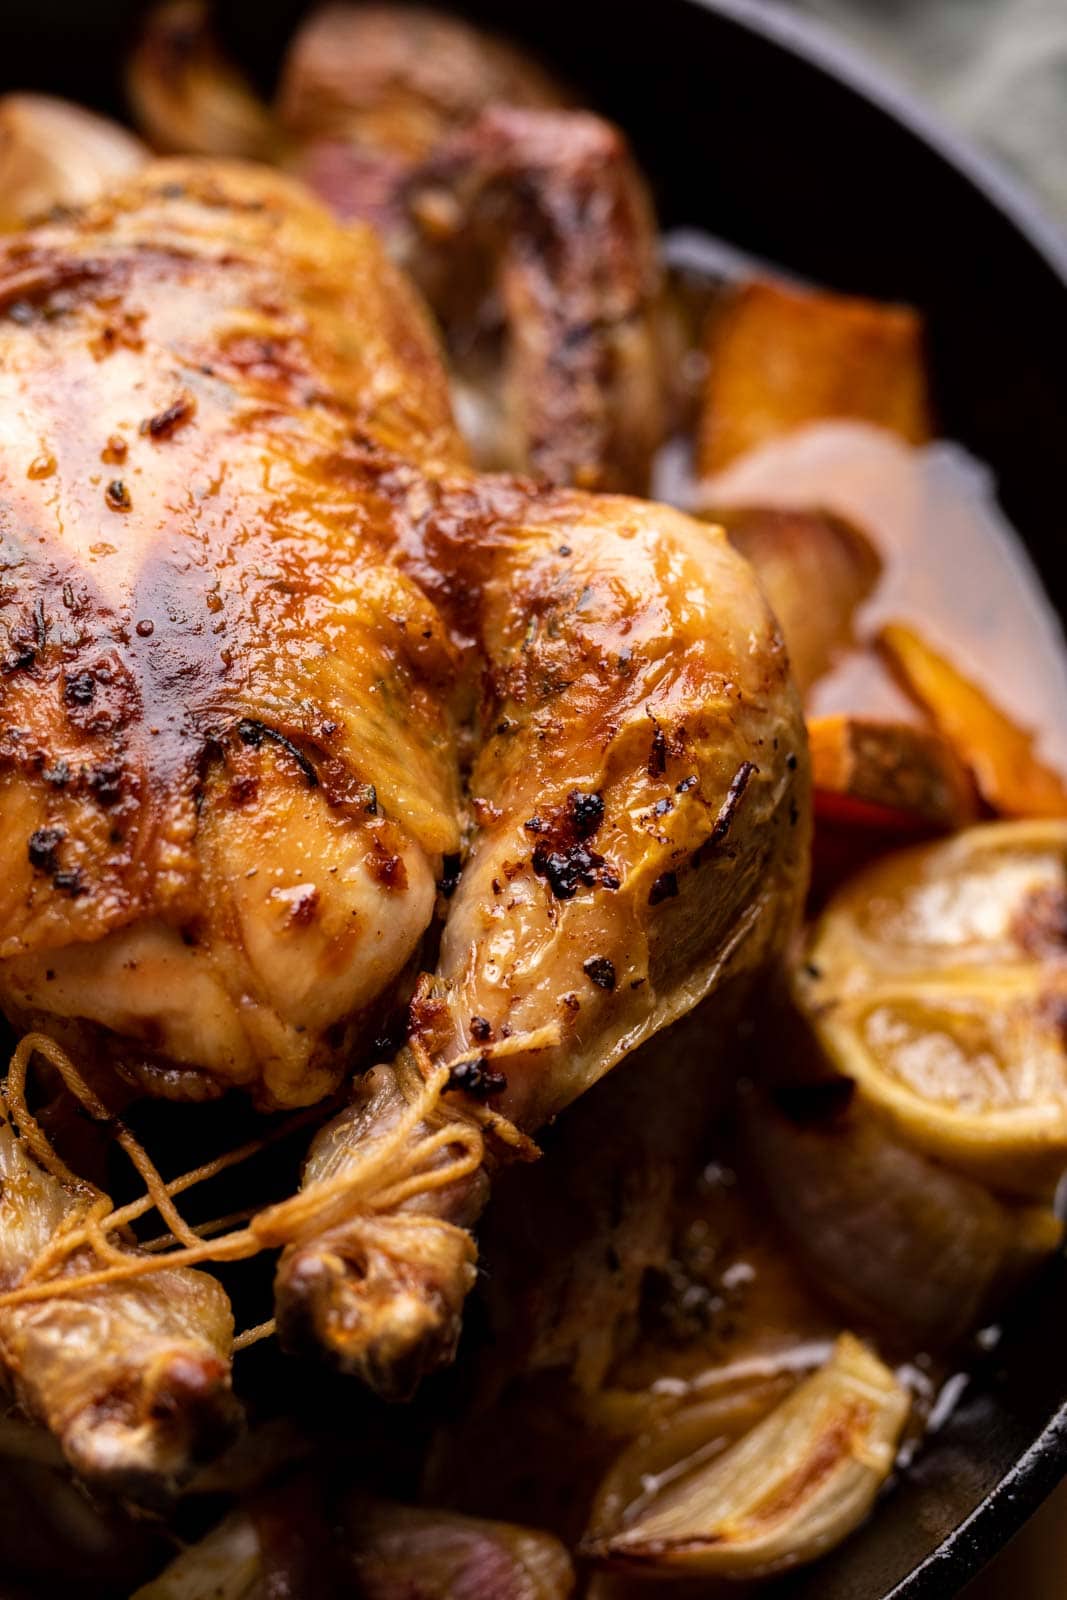
This whole roasted herb garlic roast chicken has the perfect crispy chicken skin and tons of flavour from herbs, garlic and butter. This post includes detailed instructions on how to roast chicken, make a flavorful herb garlic butter, a delicious jus, as well as tips to prep and carve a chicken.
If there’s one recipe my family always requests I make every Christmas, it’s this Herb Garlic Roasted Chicken. It makes for such a delicious meal; super satisfying and has all the Christmas-y vibes. This is a complete meal with roasted veggies and gravy made from the leftover meat juices, which means you don’t have to cook separate dishes when hosting and nothing goes to waste!
This recipe and it’s steps might feel long and complicated, but don’t let that intimidate you. I’ve explained each and every step in detail so that it’s simple to follow. You can also take a look at the video below!
Lemon – halved and placed inside the cavity to add freshness and aroma
Rosemary sprig – tucked inside the chicken for subtle herbal flavor
Olive oil – to brush the chicken for a golden, crisp roast
Marinade
Butter – adds a really nice flavor and aroma
Garlic – minced, to infuse the chicken with a deep, savory flavor
Herbs – finely chopped sage, rosemary, and thyme add a lovely earthy aroma and flavor
Paprikaand pepper – for a hint of spicy kick and seasoning
Lemon zest and juice – for brightness and tanginess
Vegetables
Onions and potatoes – for flavor and texture
Garlic head – halved
Chicken stock – poured into the pan to keep the roast juicy and form the base for the gravy. I don’t recommend replacing this with water
Gravy
Flour – to thicken the pan juices after roasting, turning them into a rich, savory gravy
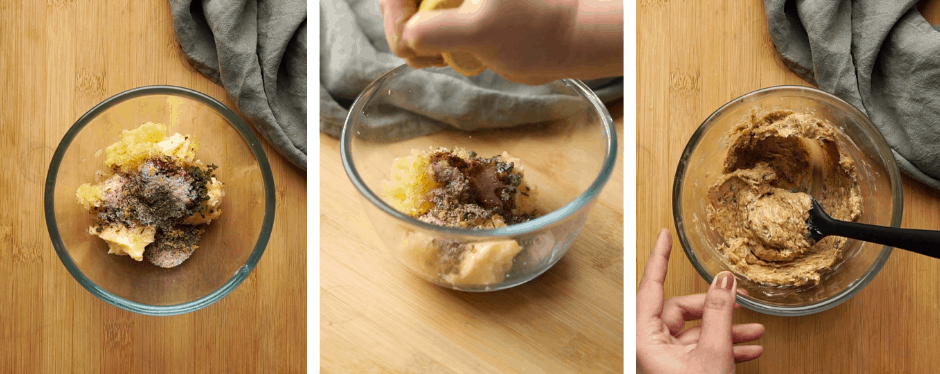
How to Make Herb Garlic Butter
The herbs we have used are thyme and sage, and some people also like to add parsley. They are not overpowering and they beautifully complement each other. We’ve added some paprika and ground pepper for some heat. My favourite and most underrated ingredient is lemon for some citrusy zing! Everything is mixed with butter – this is such a simple marinade with clean flavours.
We use this herb butter under and on the skin which is how this roast chicken recipe is packed with flavour.
Three Important Steps For The Best Crispy Skin Roast Chicken
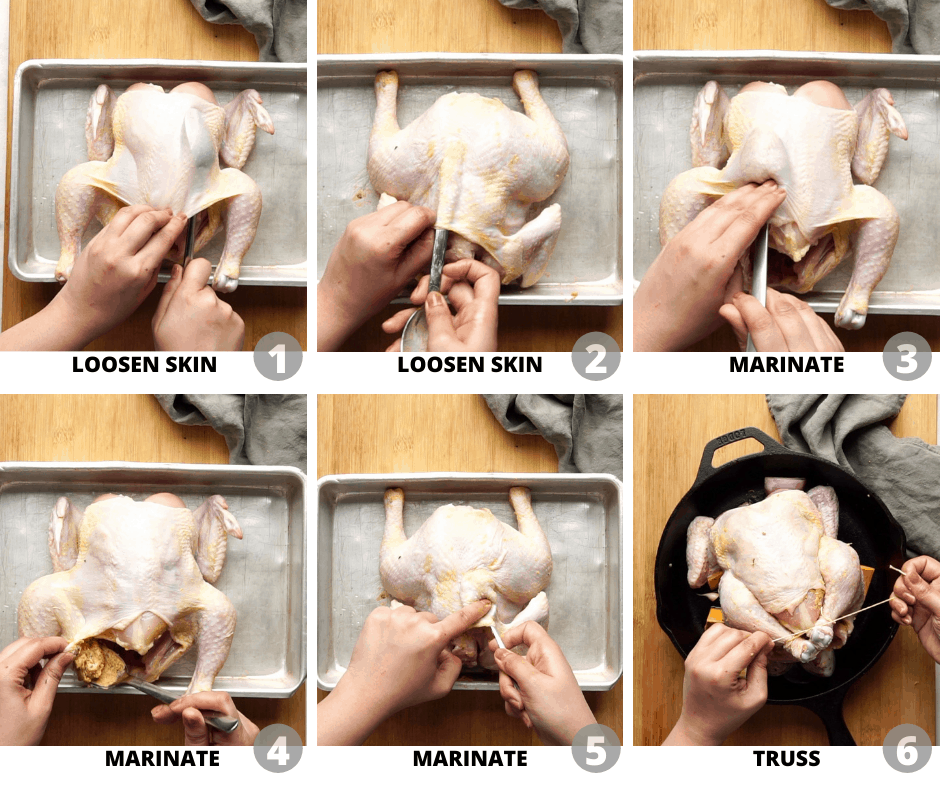
Loosening chicken skin: The key to getting that crispy skin on the roast chicken is to loosen the skin of the chicken before marinating it. The skin on the chicken traps all the juices of the herb garlic butter and allows the meat to absorb flavours really well. It makes the chicken really succulent and also gives a nice crispy skin on top. Be as careful as possible so you don’t tear the skin. Don’t skip this step, otherwise you’ll end up with a fab looking chicken on the outside but with bland meat on the inside.
Marinating the chicken: The advantage of having loosened the skin of the chicken is that you can not only put the herb garlic butter over the chicken, but also under the skin and inside the cavity! This actually creates a double whammy of flavours! We recommend marinating the stuffed chicken overnight in the fridge for max flavour!
Trussing the chicken: Trussing is basically when you tie up the wings and legs of a chicken, or any bird, before roasting it. For this roast chicken, we haven’t trussed the bird like it is traditionally done. We’ve just tied the legs to make it more presentable! Tuck the wings of the chicken behind the neck. This prevents the wing tips from burning as the chicken roasts.
How To Cook A Whole Chicken
I like to use a cast iron skillet to roast the chicken and veggies, but any roasting pan will do. Elevate the chicken (breast side up) by placing it on top of the veggies – this way the meat juices will easily drip down into the pan. A drizzle of olive oil on top ensures it gets that golden colour. With me so far? Great job! We’ve added chicken stock and a few sprigs of rosemary to the pan. And we’ll use these reduced juices to make a delicious jus. Yum yum!
Richa’s Top Tips
If your chicken was refrigerated, take it out of the fridge 60 minutes before you are ready to roast it to bring it to room temperature. This will ensure even cooking.
Preheat the oven at 200 degrees C. Preheating helps to cook the meat evenly.
Bake the chicken at 200 degrees C for about 25-30 minutes
The cooking time will differ based on the size of the chicken. The general rule is 25 minutes cook time for 500 grams of chicken. Our 1 kg whole roast chicken took about 50 minutes to cook.
After baking for 30 minutes, baste the chicken – with the rendered fat and juices of the chicken and veggies in the bottom of the pan. After basting it, put the chicken back in the oven for another 20 minutes.
At this point, if the skin is browning up too quickly, place another tray on the rack above the chicken. This will prevent the heat from hitting the chicken skin directly.
When the oven temperature hits 75C or 165F, OR when you see those meat juices running clear, that’s when you know that the chicken is done.
Rest for 10-15 minutes before carving
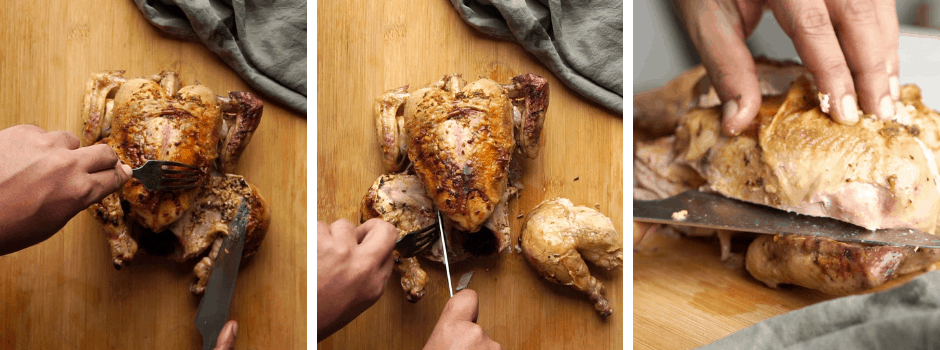
How to Carve Chicken
Now it’s carving time! Cut off and remove the twine completely. Use a fork and a meat knife and cut between the joints of the leg and body. If your chicken is cooked perfectly, it should cut right through without any hassle. Next, keeping your hand for support, horizontally slice off each breast of the chicken. The wings can be taken off next. And finally, you can shred any extra meat off the carcass. The carcass is perfect to make stock.
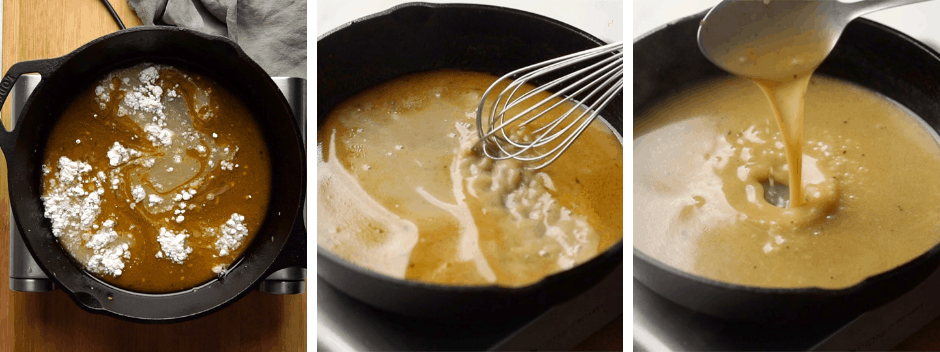
Roast Chicken Gravy
Usually the gravy is made with a roux of flour and butter and the meat juices. We’ve taken a shortcut by directly whisking in flour. (Just saving you and me a couple of extra steps!) The jus will turn out to be a nice golden brown and saucy. It’s my favourite part of the dish coz it’s like all components of this dish rolled into one! Plus we don’t want to waste a single bit of flavour in that pan. Serve this jus in an elegant piece of crockery, and pour it onto the chicken pieces in front of your guests. How’s that for presentation?
Frequently Asked Questions
Can I use dried herbs instead of fresh?
Yes! Use about one-third the amount since dried herbs are more potent. Rub them between your fingers before adding to release flavor. Note: the taste will be deeper and slightly earthier than fresh herbs.
What’s the best way to know if the roast chicken is done?
The most reliable way is to check the internal temperature with a meat thermometer. Insert it into the thickest part of the thigh (without touching bone); the chicken is done when it reaches about 75°C and the juices run clear.
Serving Ideas
Serve the carved herb garlic roast chicken with the roasted onions, sweet potatoes, and garlic from the pan, plus a generous drizzle of the lemony pan gravy.
Pair with simple sides like mashed potatoes, buttered green beans, steamed veggies, or a fresh green salad to balance the richness.
For a more casual meal, serve with crusty bread or garlic bread to mop up all the buttery, herby juices.
Customisation ideas
Swap sweet potatoes with carrots, regular potatoes, or parsnips for a different roast veggie mix.
Change up the herbs by using Italian seasoning or adding oregano and parsley if you do not have sage or thyme.
Add a touch of heat with chilli flakes or cayenne in the marinade, or a bit of honey for a sweeter, caramelised finish on the skin.
This herb garlic roast chicken is the kind of recipe you can come back to on special occasions, but it is comforting enough to make for cozy weekends too. With crisp skin, juicy meat, and plenty of roasted veggies and gravy on the side, it is simple enough for everyday cooking but impressive enough for guests.
If you make this recipe, don’t forget to send me pictures over on my IG @my_foodstory. I love seeing your recreations and chatting with you guys!
Classic roast chicken made scrumptious with our very own herb garlic marinade. This detailed foolproof recipe will help you make the perfect homemade roast chicken.
1kgwhole chickenat room temperature giblets and neck removed from cavity
1Lemon halved
1sprigRosemary
Olive Oilfor brushing
Marinade
½cupSalted Butter
2tablespoonGarlicminced
½teaspoonSagechopped
½teaspoonRosemary chopped
½teaspoonThyme chopped
1tablespoonPaprika
1 ½teaspoonSalt
½teaspoonPepper
1Lemon Zested
1tablespoonLemon Juice
Vegetables
3Onion quartered
2Sweet Potato chunks
1headGarlic halved
½cupChicken Stock + ¼ cup extra
Gravy
1tablespoonflour
Instructions
Add all the marinade ingredients to a mixing bowl and whisk together to combine. Use the back of a spoon to gently loosen the skin. Turn over the chicken and repeat the process using the other end of the spoon. Use the spoon to insert marinade underneath the chicken skin. Massage the chicken and spread the marinade evenly. Remember to add butter in the cavity as well. Rub the remaining marinade all over the chicken. Cover the chicken and rest for 2-3 hours or overnight.
Stuff the rosemary sprig into the chicken cavity along with half a lemon. Tie legs together with kitchen string.
Lightly grease a roasting pan. Mix the sweet potato, onion, and garlic in a bowl. Place some of the vegetables in the center of the roasting pan. Place breast-side up on top of the vegetables in the middle. Place the remaining vegetables on the sides of the pan. Tuck the wings underneath the chicken as they cook faster and we do not want to overcook them. Rub the chicken with some olive oil and drizzle some over the vegetables as well. Add half a cup of chicken stock to the pan.
Preheat the oven to 200C. Roast in the oven for 45-50 minutes. baste using the pan juices half way through cooking time. Remember when cooked, juices run clear when chicken thigh is pierced with a skewer. Internal temperature should read 75C.
Remove from the oven and allow it to stand for 10 minutes before serving. To carve the chicken, first cut out the legs. Then proceed to cut the breast out carefully, seperate the wing tips and then remove the meat from the cavity area.
Remove the vegetables from the roasting pan and move it to a serving platter. Add 1 tablespoons of flour to the pan and whisk it with the pan juices. Bring this mixture to a boil over low heat till the liquid thickens up to make a gravy. Add up to an additional quarter cup of stock if necessary. Serve hot along with the chicken and vegetables!
Video
Notes
The chicken I used was approximately 1.2 kgs. This took 90 minutes at 220C. The time may vary depending on your oven’s capacity and the size of the chicken.
Use chicken with skin on as the skin gives it that crispy roast texture.
Remember to marinade the chicken well. Apply the marinade in between the skin and meat. These pockets can hold ample amounts of marinade and help get the flavour all the way into the meat.
Knowing when the chicken is cooked: The internal temperature of cooked chicken should read 165F/73C. The most handy way to tell would be using a meat thermometer. If you do not own one, you can cut and check the juices. If the meat is white in colour and the juices run clear that means the chicken is cooked. The meat or the juices should not have a red/pinkish hue.
Getting rid of juices Tip 1: A trick to getting rid of the juices if you absolutely prefer it that way is to remove the chicken once its cooked and place the sheet pan with veggies back into the oven on the top rack. Turn the broiler or the top element on and let the veggies broil for 3-4 minutes. This will get them nice and crispy and evaporate all the juices in the sheet pan.
Getting rid of juices Tip 2: Another way to get rid of the juices is to sear the thighs on both sides in a pan first before placing them in the oven. This can help lock in the juices so that you have less liquid when it comes out of the oven.
Smoked pulled ham gets incredible depth of flavor by using maple syrup as a sticky, sweet binder for Jeff's original rub. Slow-smoking the ham on a smoker infuses it with...
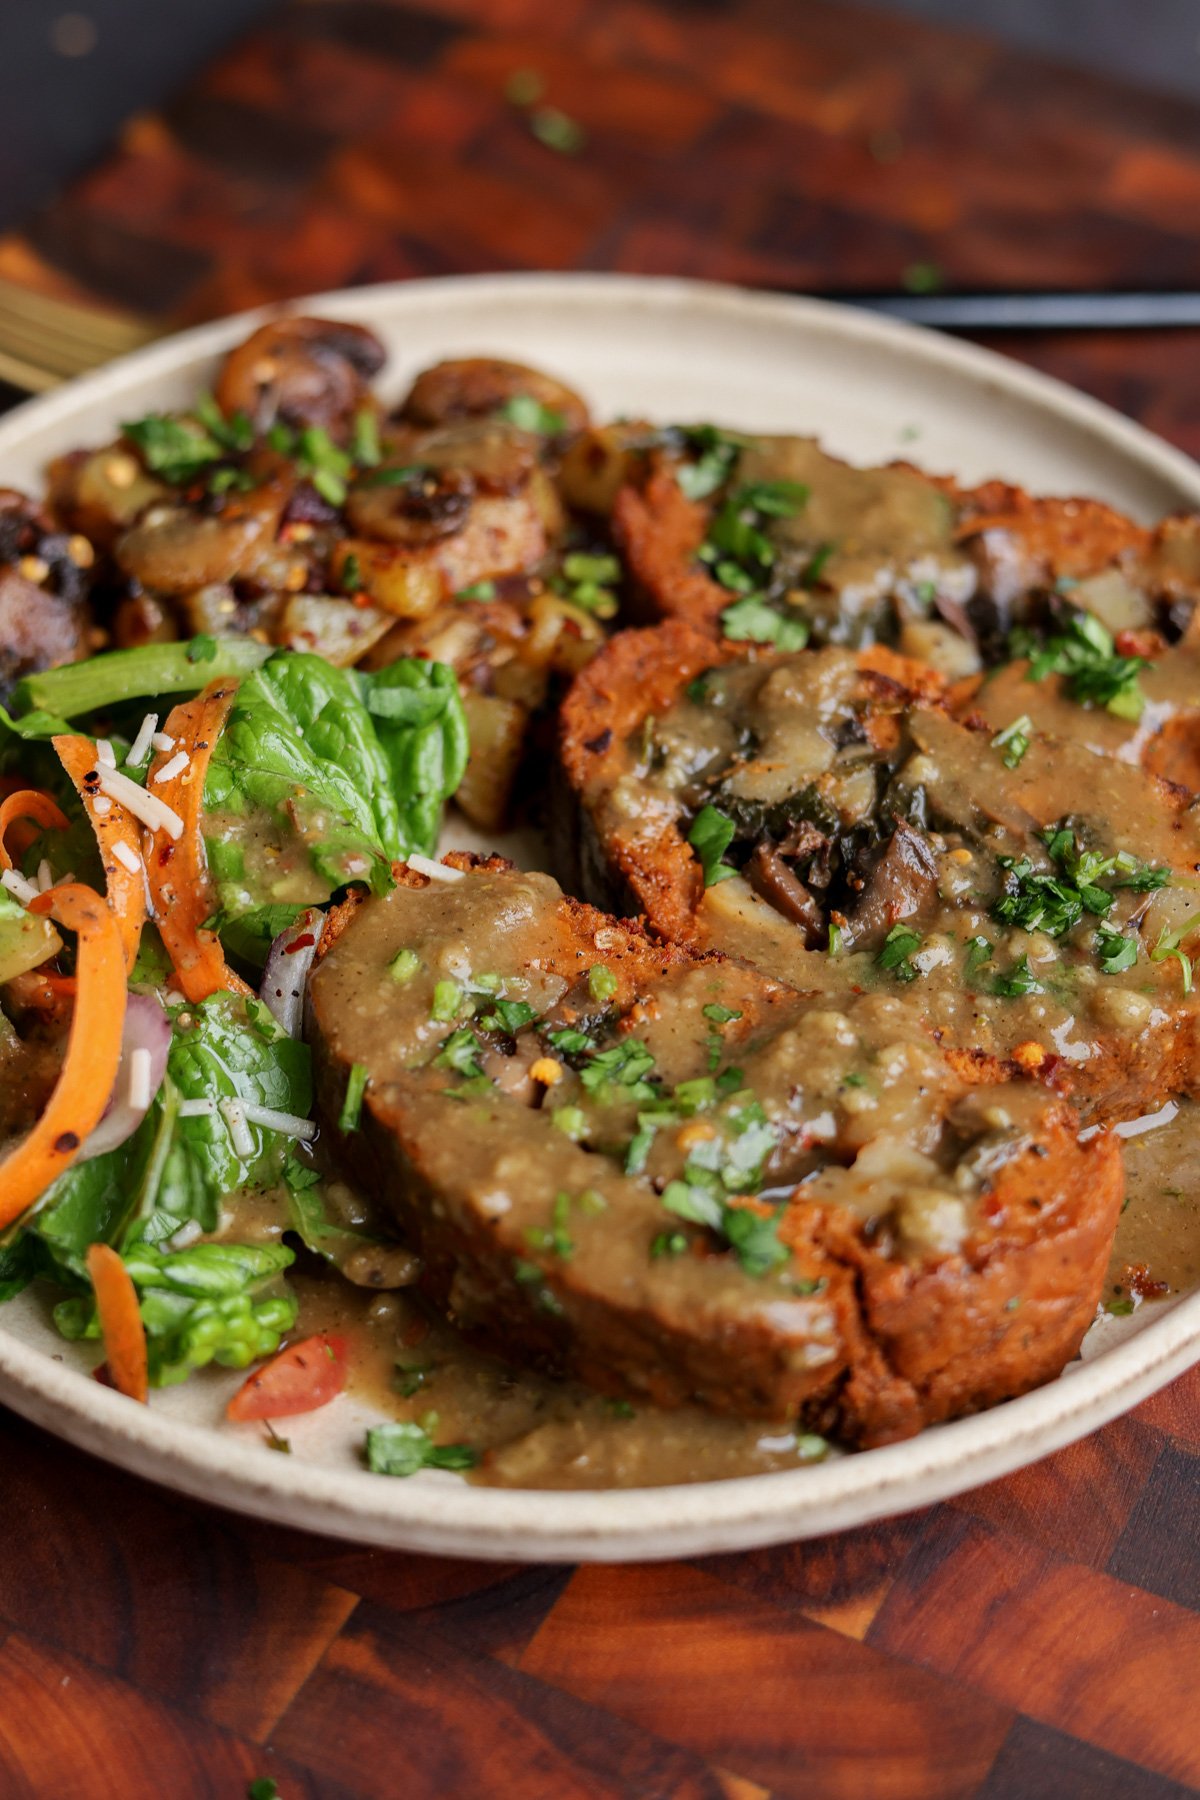
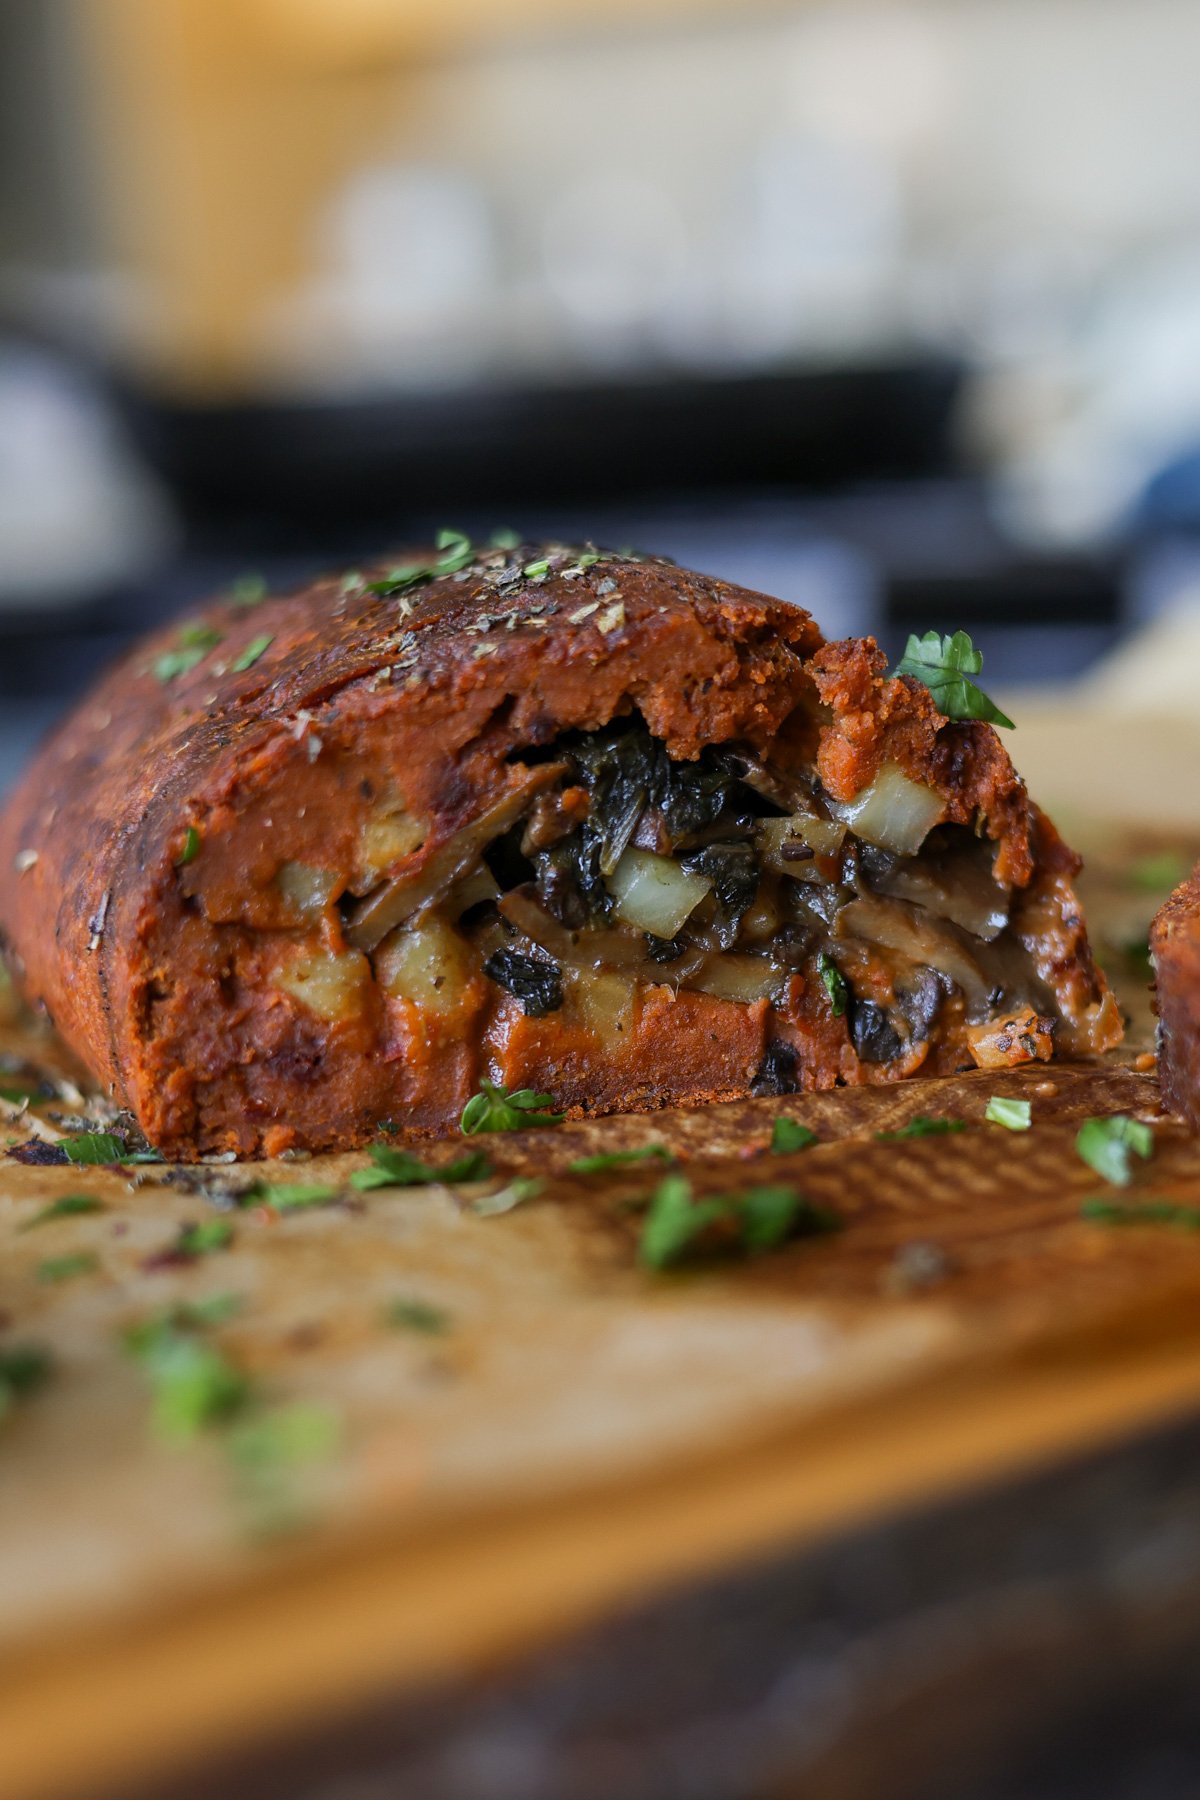
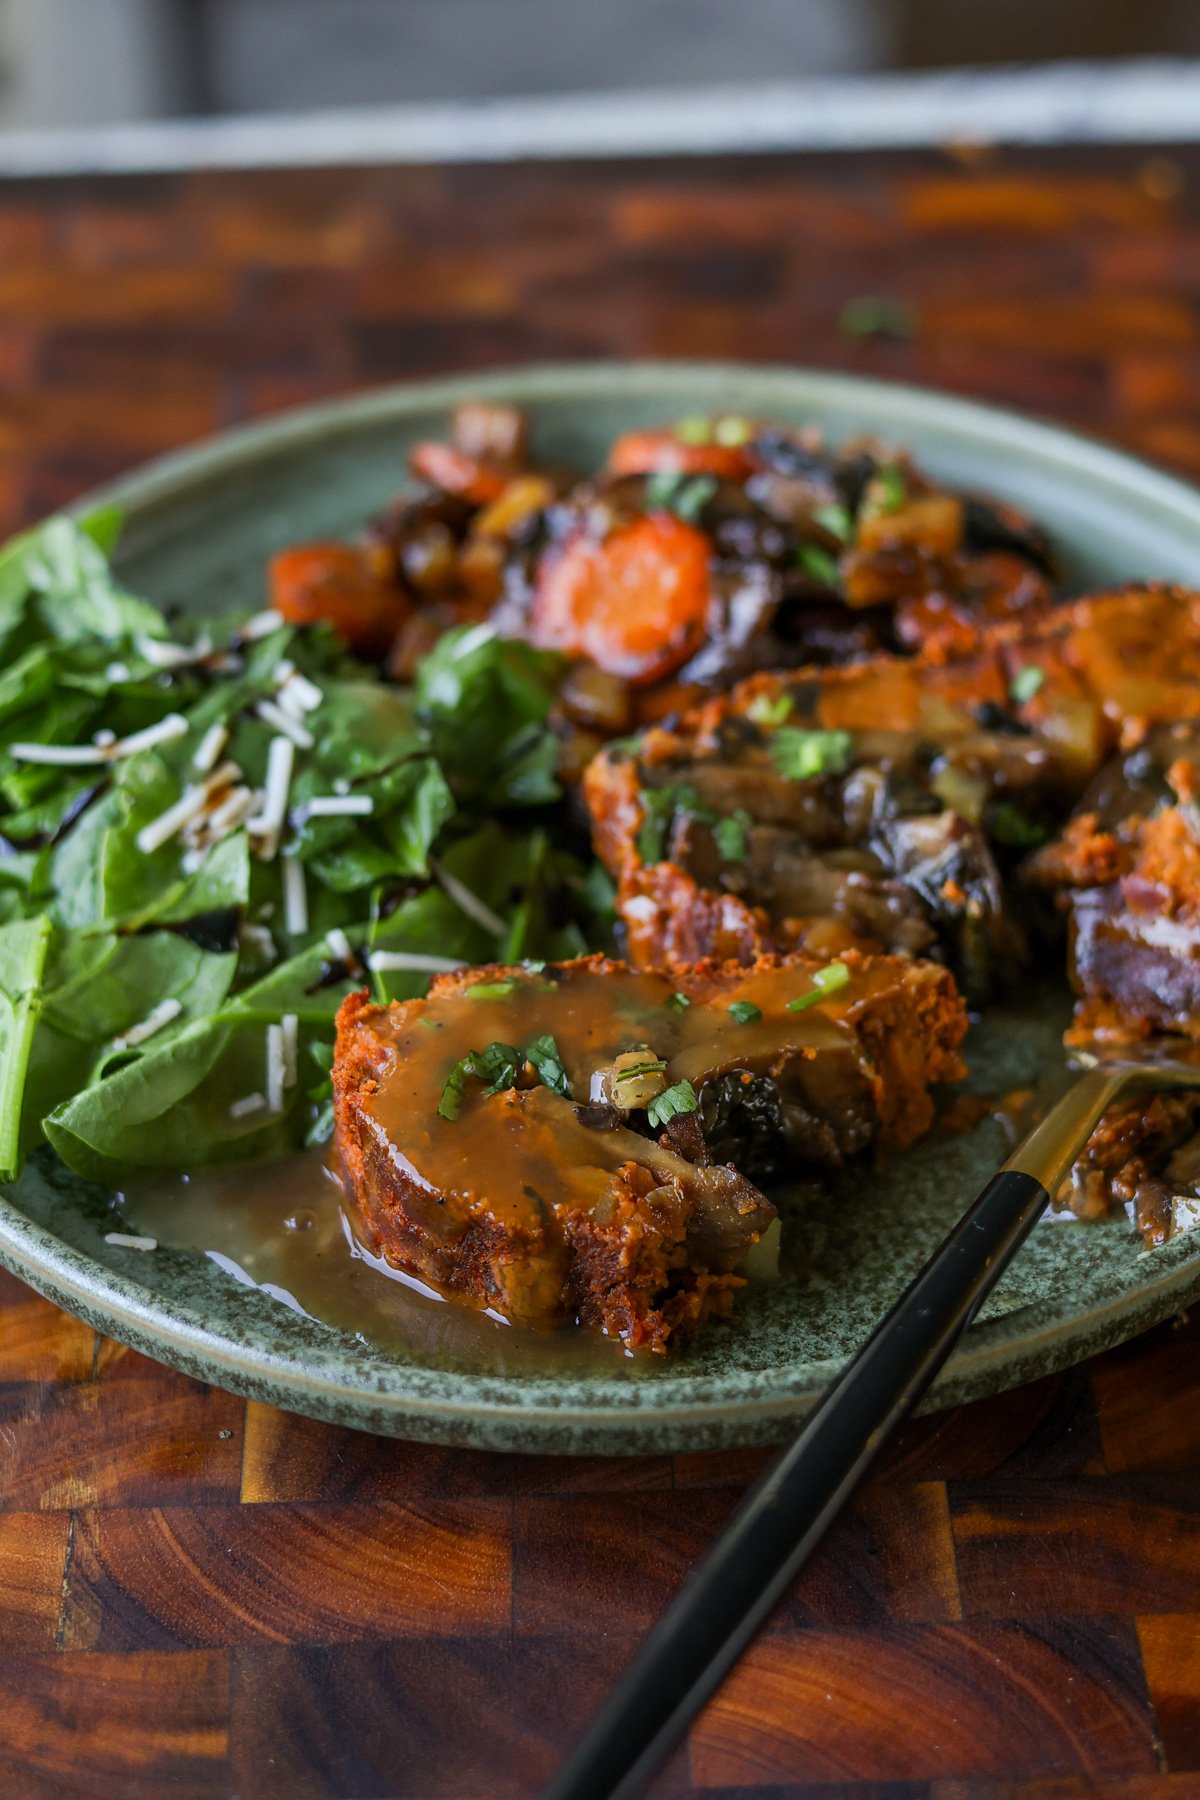
This sun-dried tomato roast makes a stunning centerpiece for any holiday table. Packed with umami and filled with a hearty blend of mushrooms and potatoes, it delivers deep flavor and satisfying texture in every slice. Completely vegan, gluten-free, and soy-free with an easy nut-free option.
This is my version of a vegan holiday roast. We make this “meat” mixture with some white beans and almond flour, and process it until smooth. I also add some sun dried tomatoes for that rich, umami flavor.
The mixture becomes like a pâté in the food processor, then we spread that onto parchment paper.
Next, make the stuffing with cooked mushrooms, potatoes, and herbs. Place that on top of the bean mixture, roll it up using the parchment, and bake it.
It turns into this delicious, amazing-smelling roast that’s full of herbs and deep umami flavor from the sun dried tomatoes. It’s just perfect!
It’s completely gluten-free, but if you prefer, you can use all-purpose flour instead of tapioca starch. It’s also soy-free, since many of you asked for a soy-free option after I made that very popular tofu holiday roast a few years ago.
You can easily adjust the flavors to your taste! Use fewer sun-dried tomatoes or different herbs, if you like. I usually serve it with a side salad, my simple vegan gravy, and some roasted vegetables for a perfect holiday or dinner plate.
Why You’ll Love Sun Dried Tomato Roast
umami-packed vegan holiday roast
savory mushroom-potato stuffing
make-ahead friendly vegan holiday entree
naturally gluten-free and soy-free with nut-free option
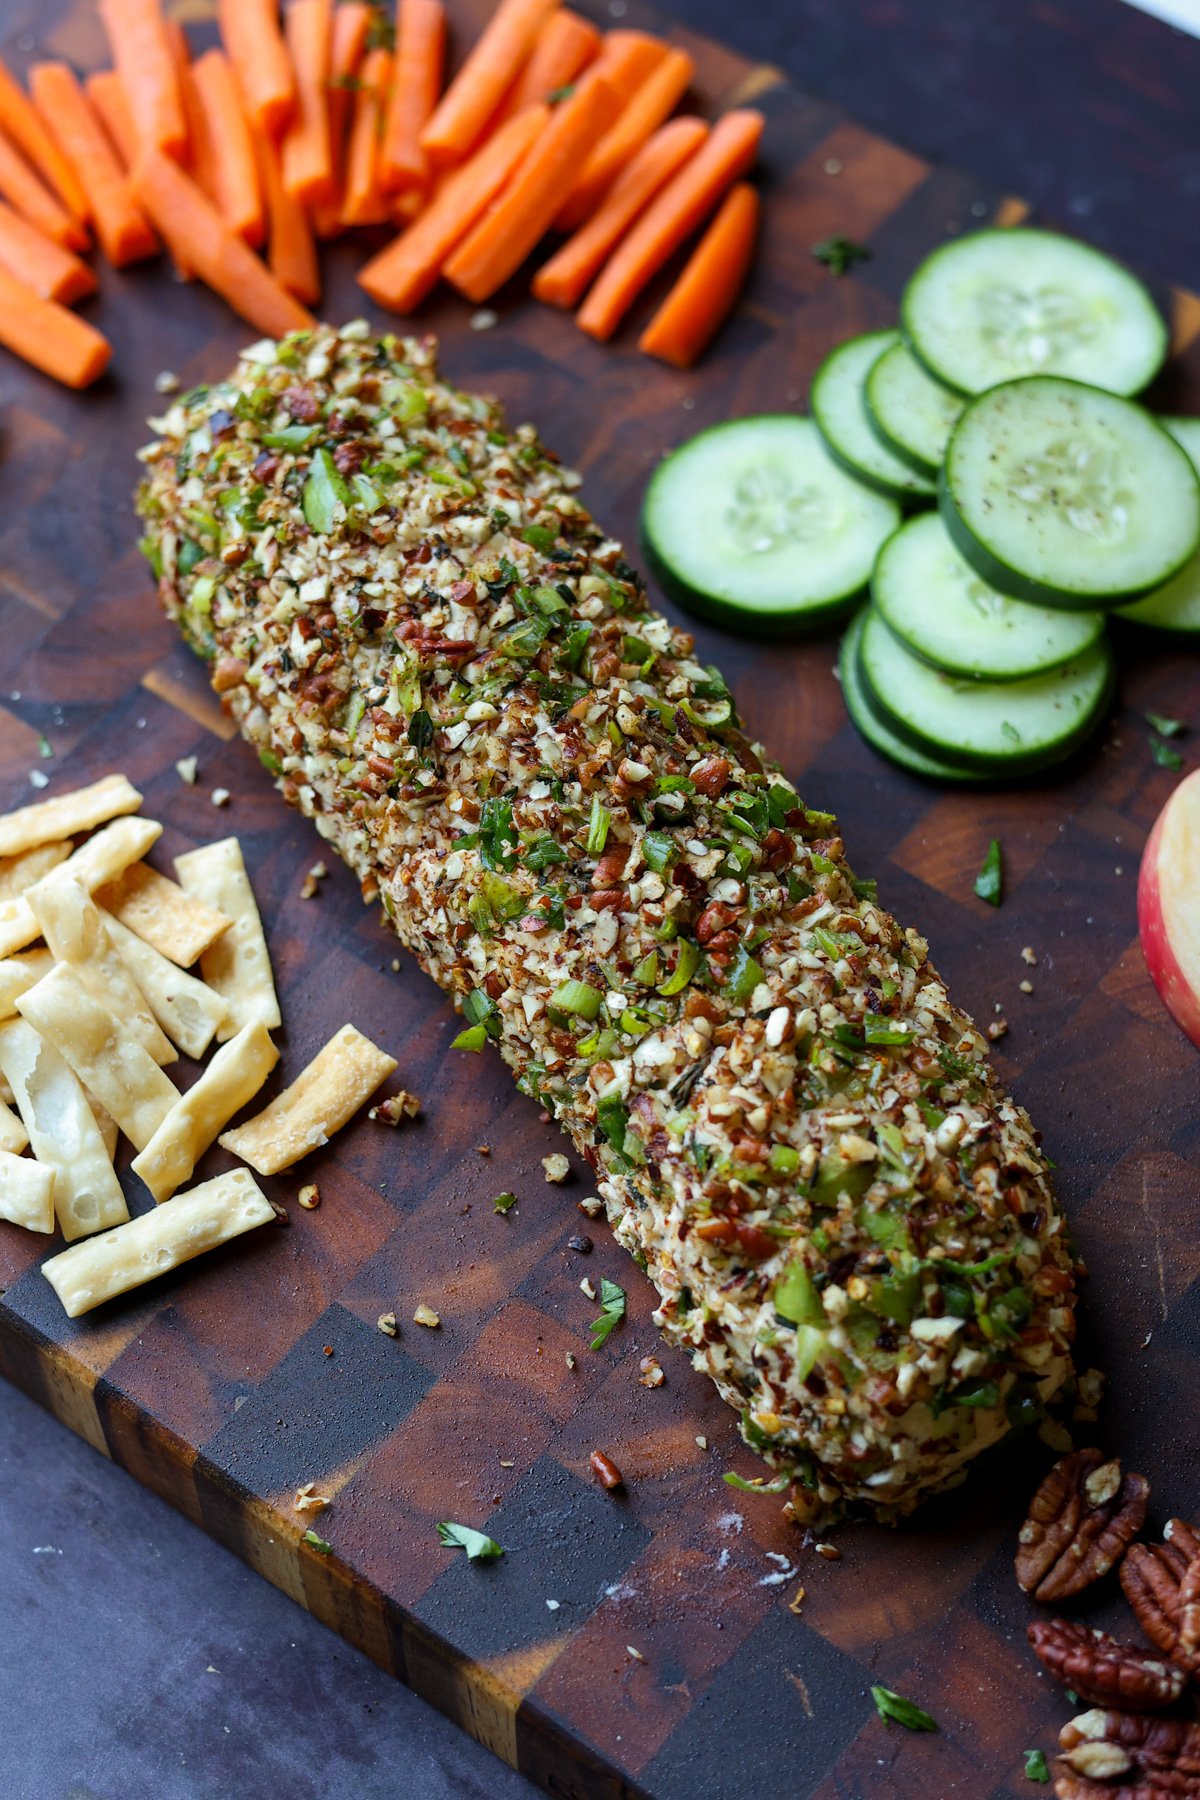
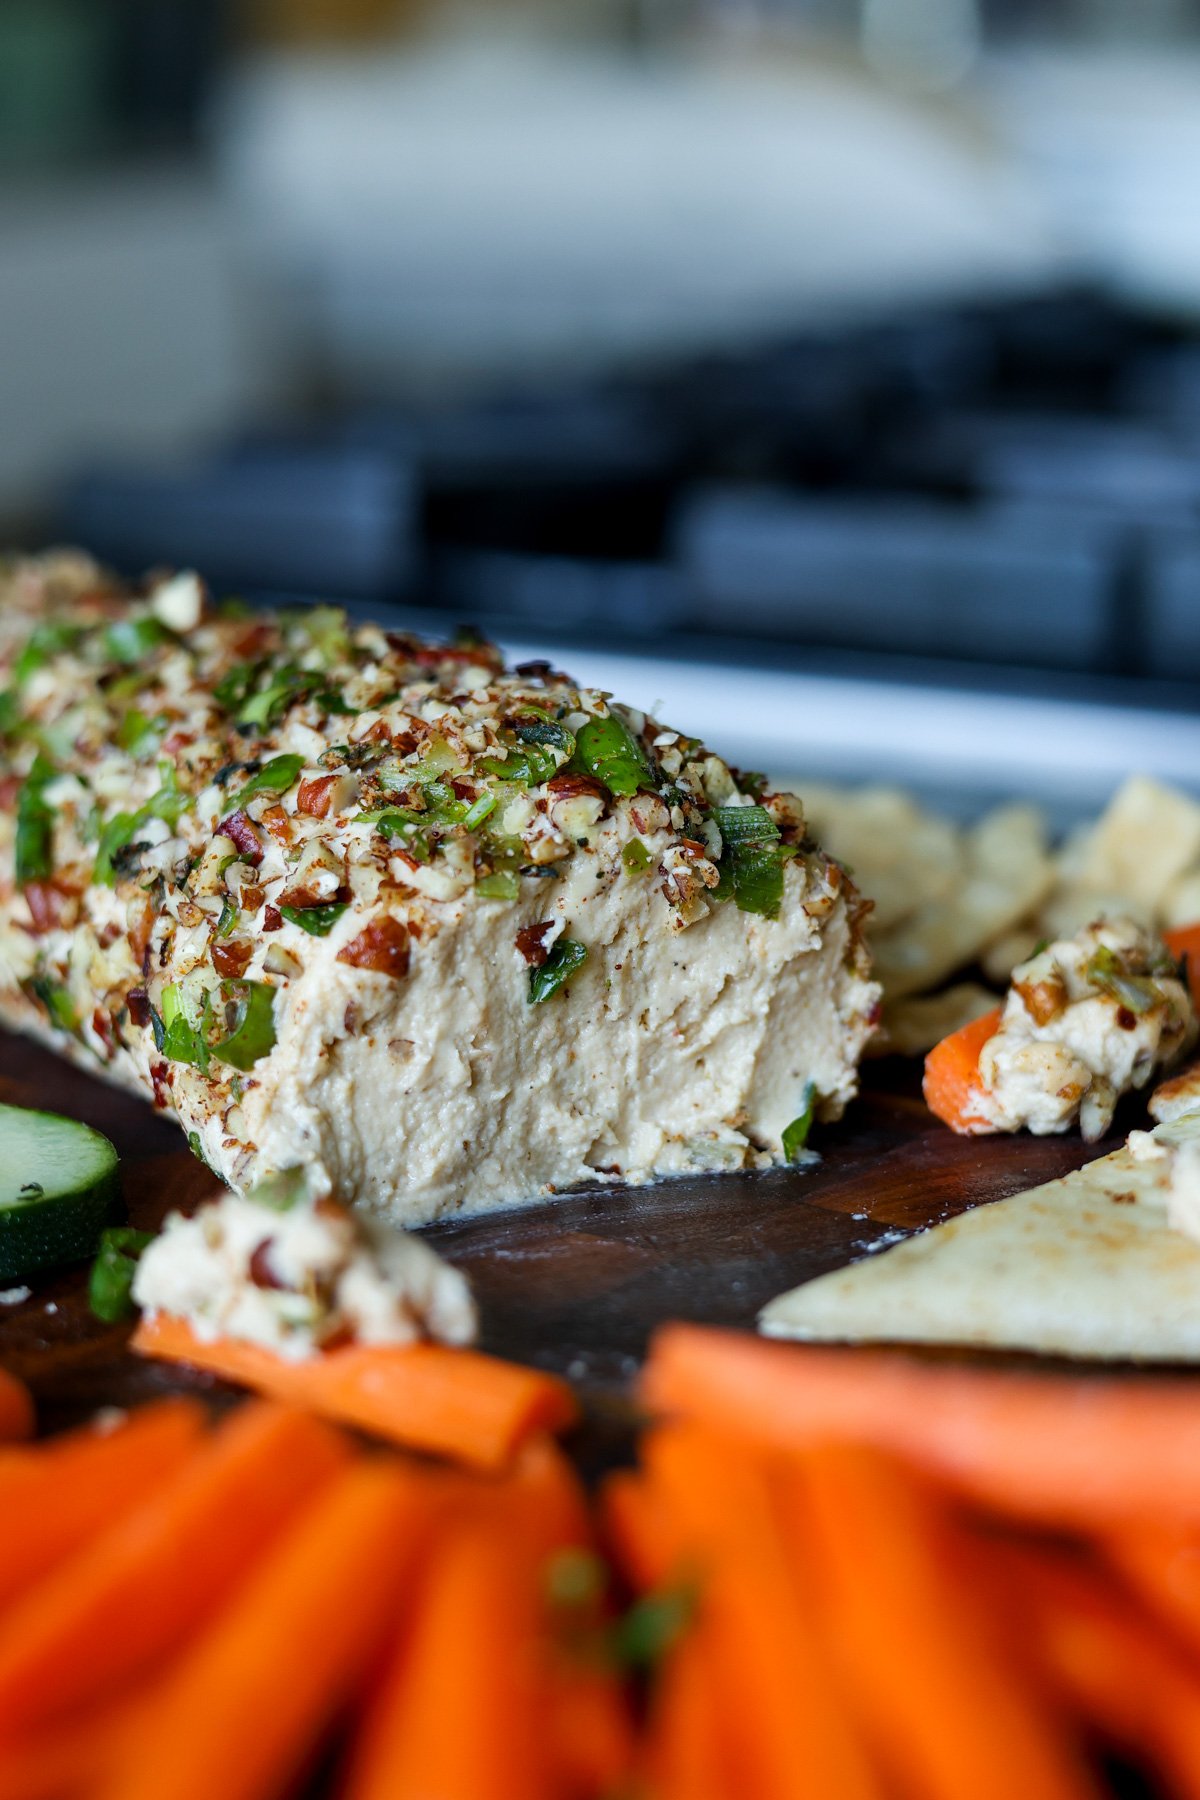
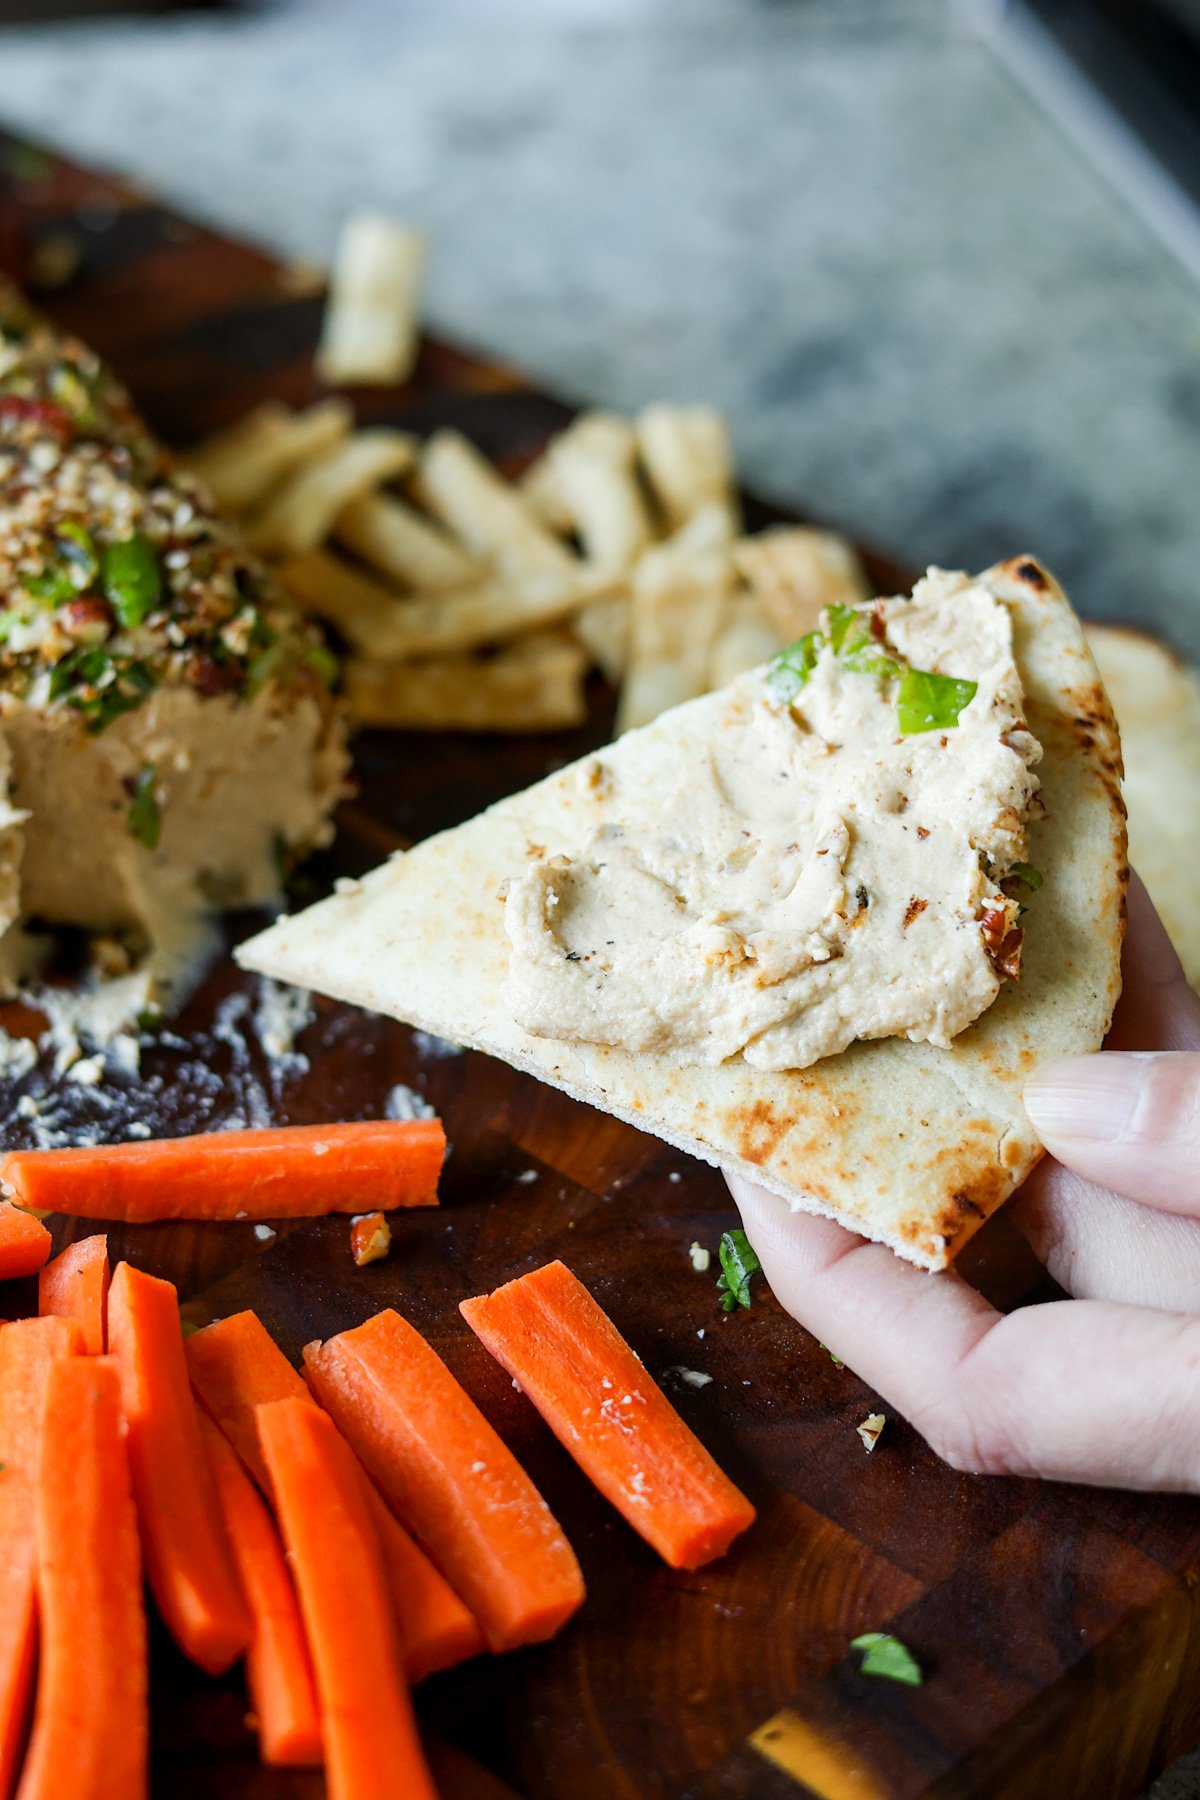
A creamy vegan cheese log coated in crunchy pecans and fresh herbs is perfect for holiday parties served with crackers and veggies. This recipe is super easy, delicious, and versatile! (gluten-free, soy-free and nut-free options)
This is a wow-worthy, super easy vegan cheese log that you can whip up for any party, potluck, or holiday gathering. It’s delicious, cheesy, and creamy with a fantastic pecan-herb crumb which adds wonderful texture and flavor.
The holiday cheese log pairs beautifully with all kinds of veggies, crudites, crackers, fruit, or even spicy jams and chutneys. It’s perfect on a charcuterie board served with mango chutney and paired with one of my cheese balls, like my Jalapeno popper cheese ball.
You can also use this creamy cheese as a spread for baguettes or bagels or even to make grilled cheese, quesadillas, or mac and cheese. For mac and cheese, just add some stock to a pan, heat it up with the cheese log to make a sauce, and toss in your cooked pasta of choice.
This vegan cheese log recipe is flexible and easy to adapt to your flavor profile. Try adding paprika and jerk seasoning, Cajun spices, or extra red pepper flakes for a spicy version.
Why You’ll Love this Vegan Cheese Log
creamy vegan cheese log coated in crunchy toasted pecans and fresh herbs
perfect for parties, potlucks, cheese boards, and charcuterie boards
easy to make and versatile! Try different base and seasoning options.
easy to make gluten-free, soy-free, and/or, nut-free
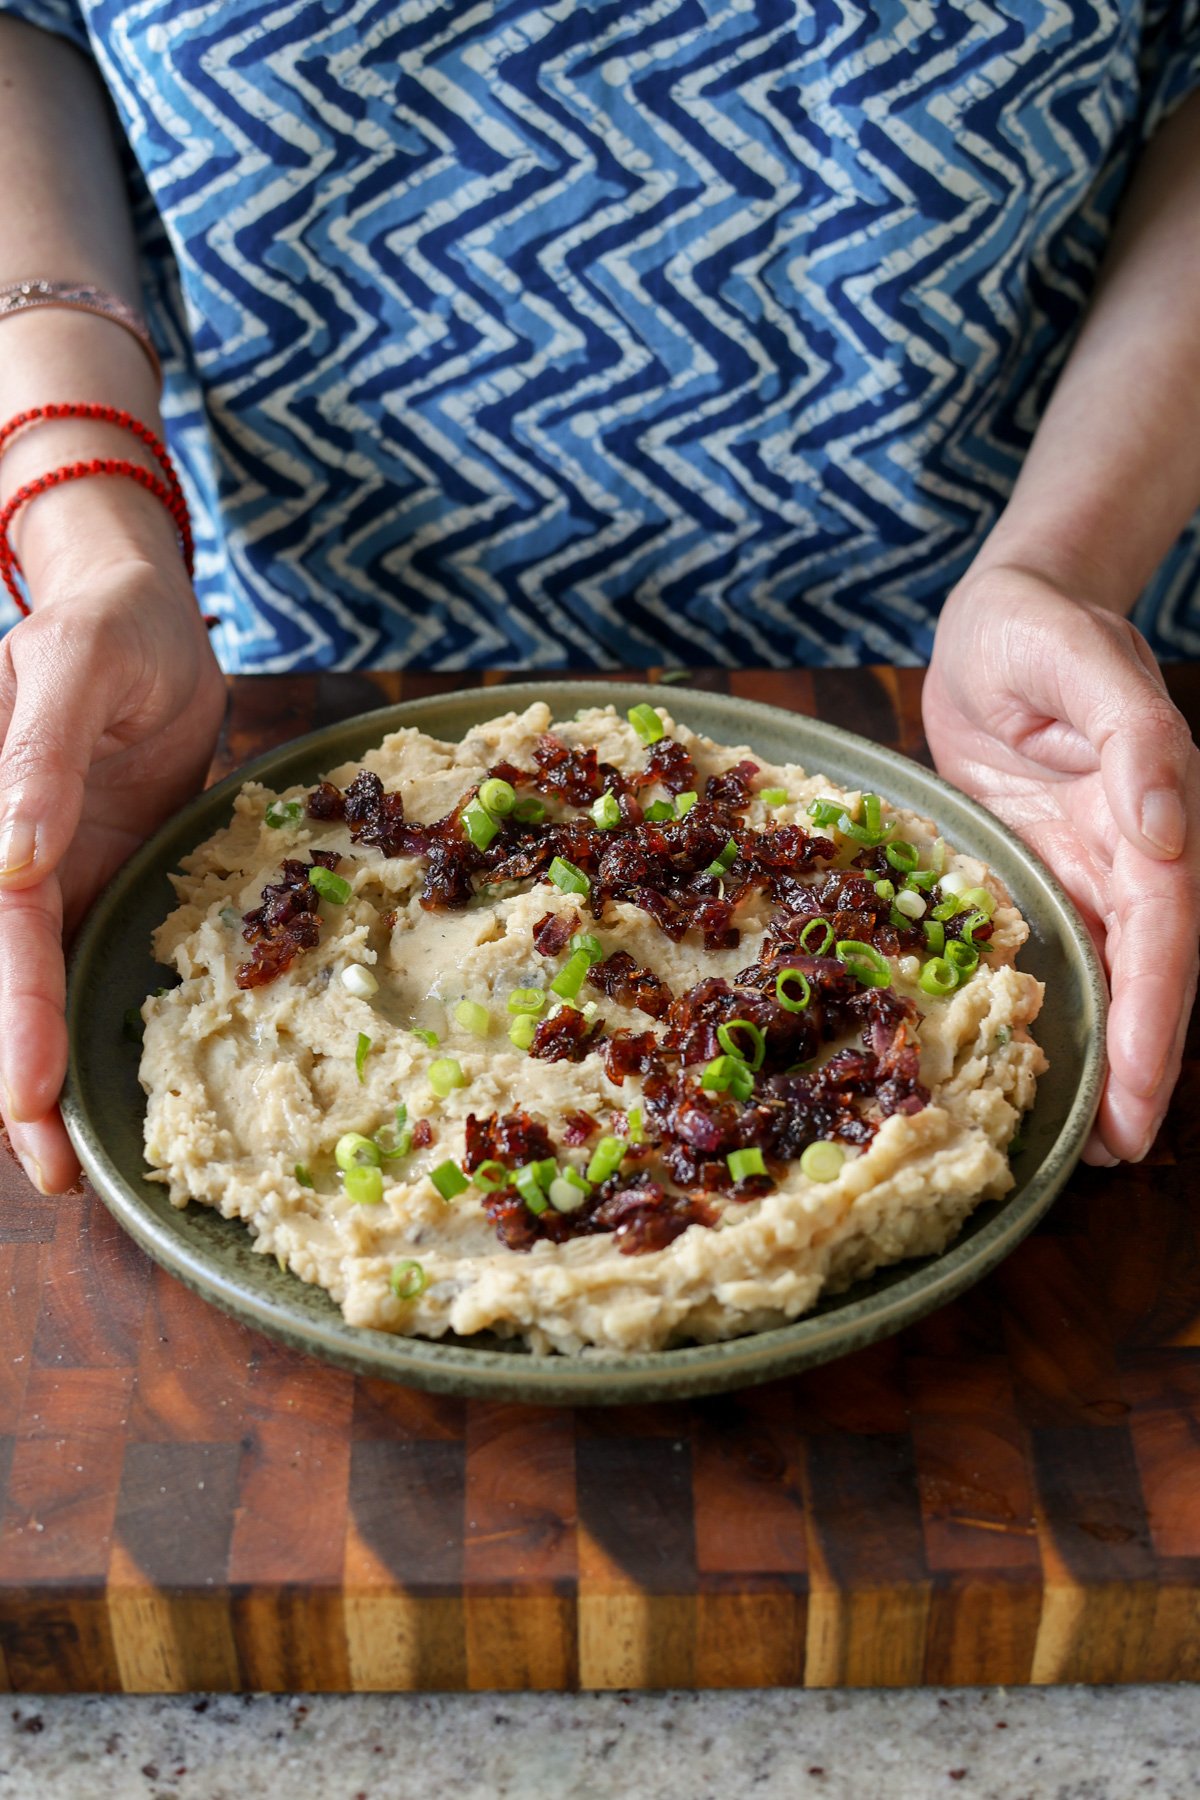
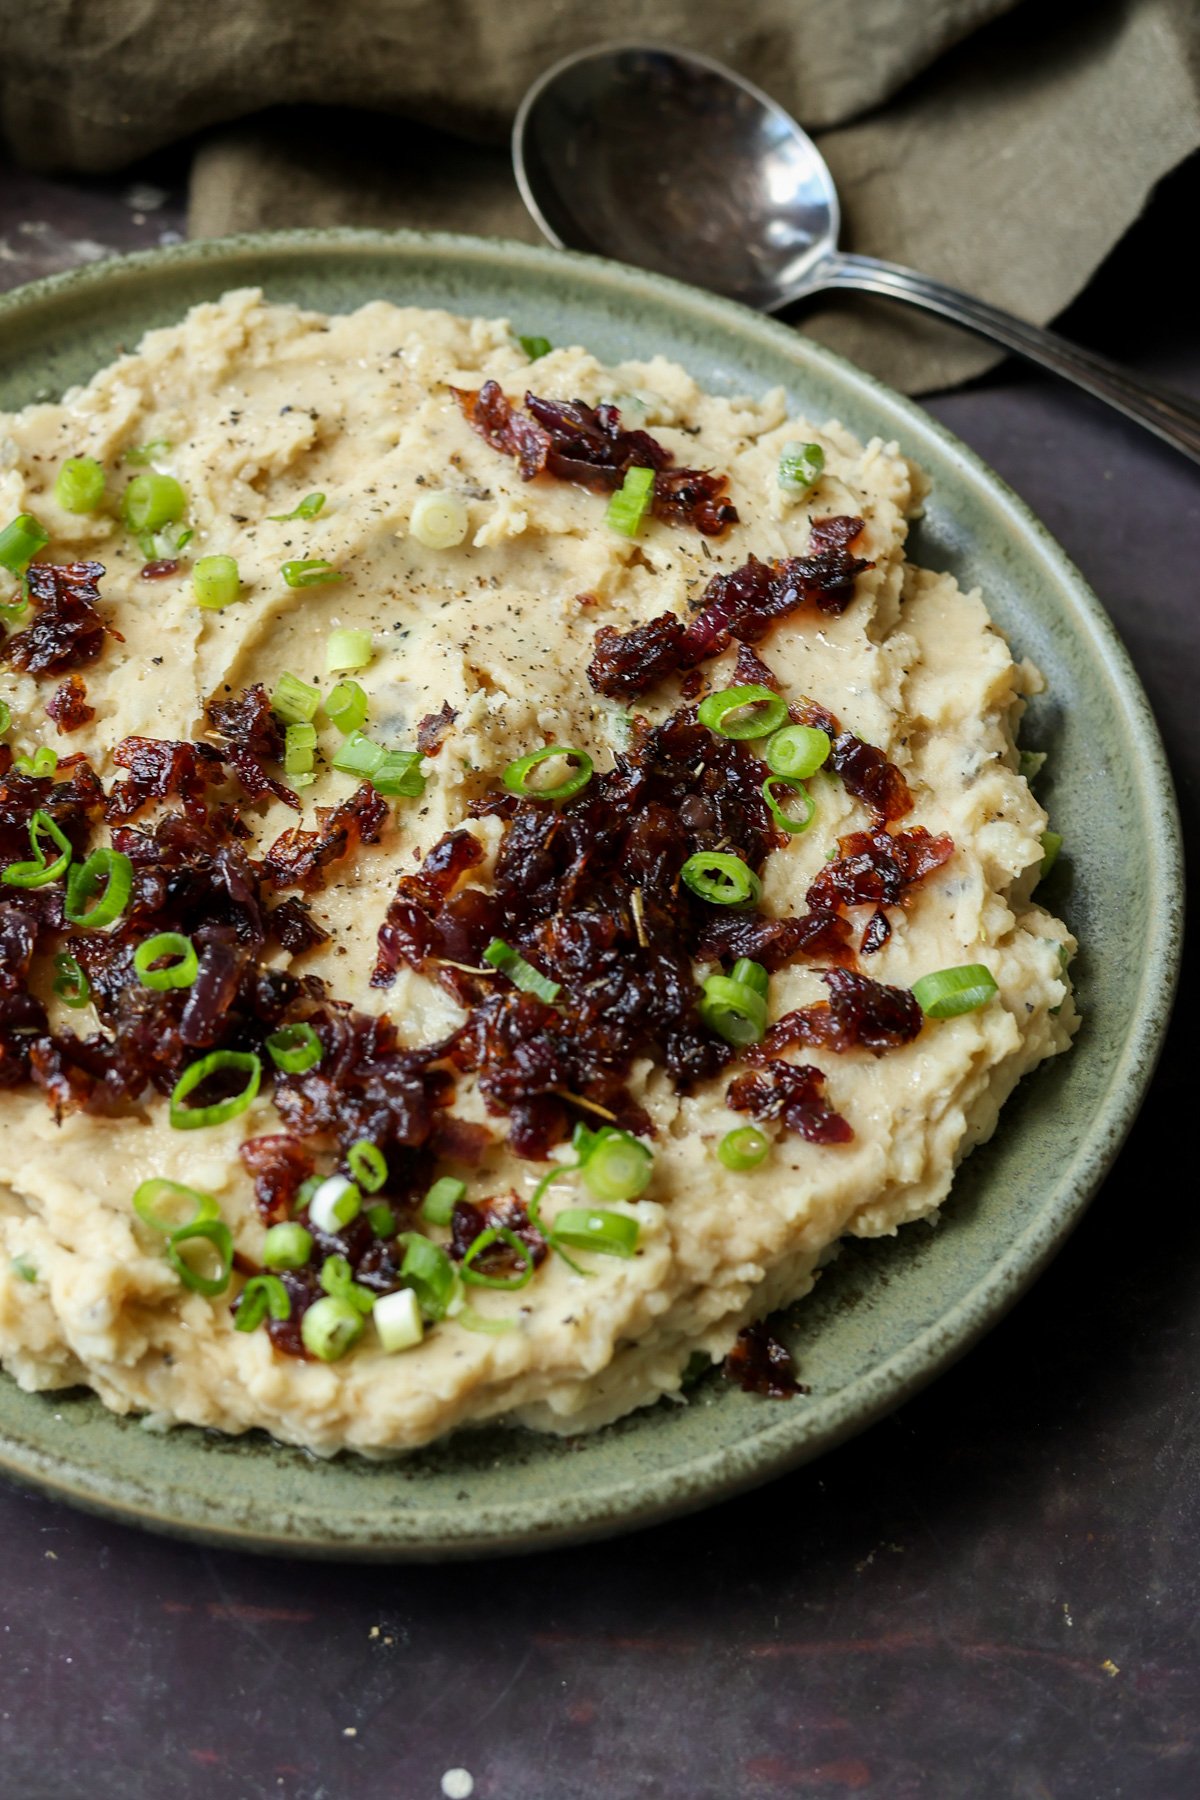
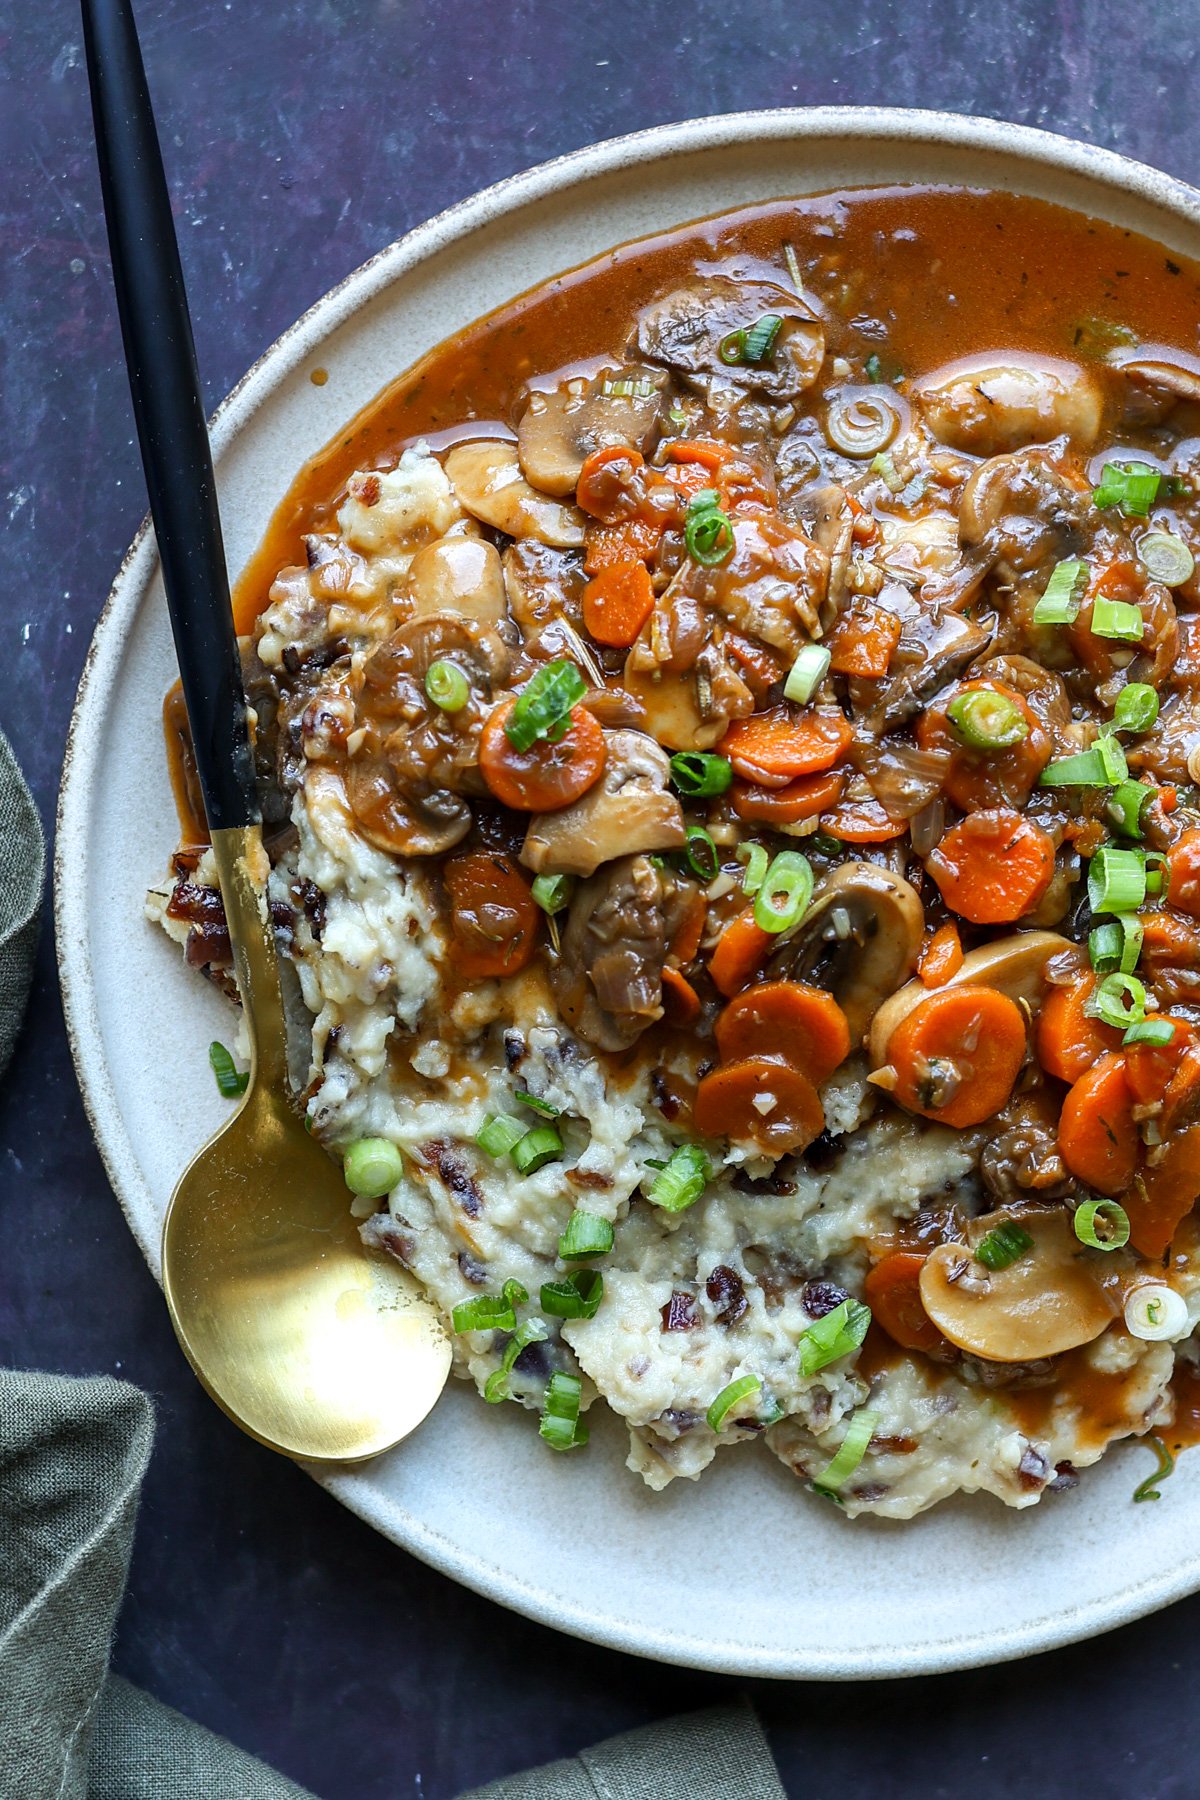
Creamy, rich, and deeply savory, these mashed potatoes get a flavor upgrade with caramelized onions and a secret boost of plant-based protein from pureed white beans. The result is velvety, buttery comfort in every bite. A side that’s perfect for holidays or weeknights alike. (Gluten-free, nut-free, with a soy-free option.)
Everyone loves potatoes in every form, especially mashed potatoes around the holiday season. They’re a fixture at every meal, and we’re going to level them up times two.
This recipe levels up the flavor with caramelized onions, garlic, and herbs that add an amazing flavor to these mashed potatoes. And we’re going to add some pureed white beans for extra protein and heartiness.
You’ll get protein from the beans, nutritional yeast, and non-dairy milk. You can add even more protein by serving it with crispy lentils or tofu bacon bits.
No matter how you serve caramelized onion mashed potatoes they’re rich, hearty, and perfect for any holiday table or cozy dinner. Served here with my mushroom bourguignon.
Why You’ll Love Caramelized Onion Mashed Potatoes
creamy mashed potatoes
savory caramelized onion topping
sneaky protein
delicious holiday side dish
naturally gluten-free and nut-free with easy soy-free option
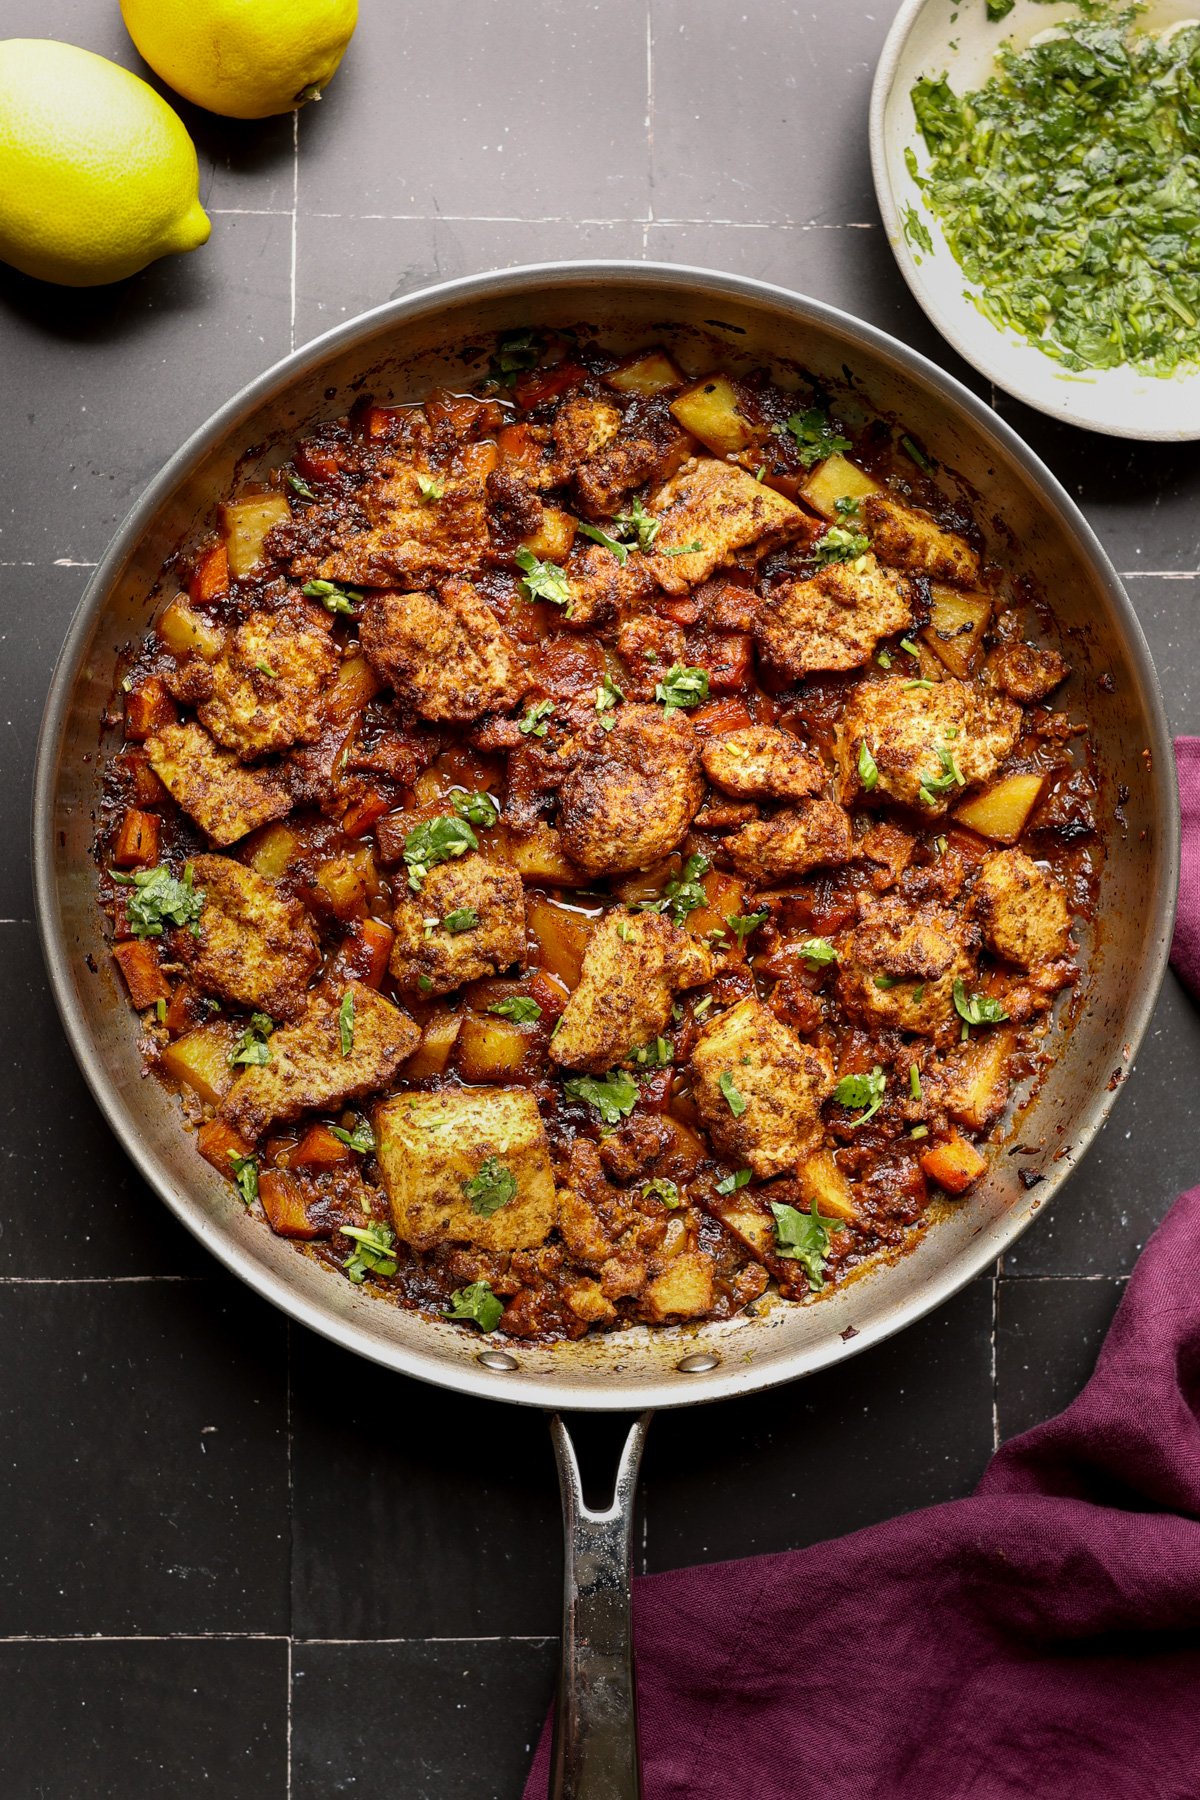
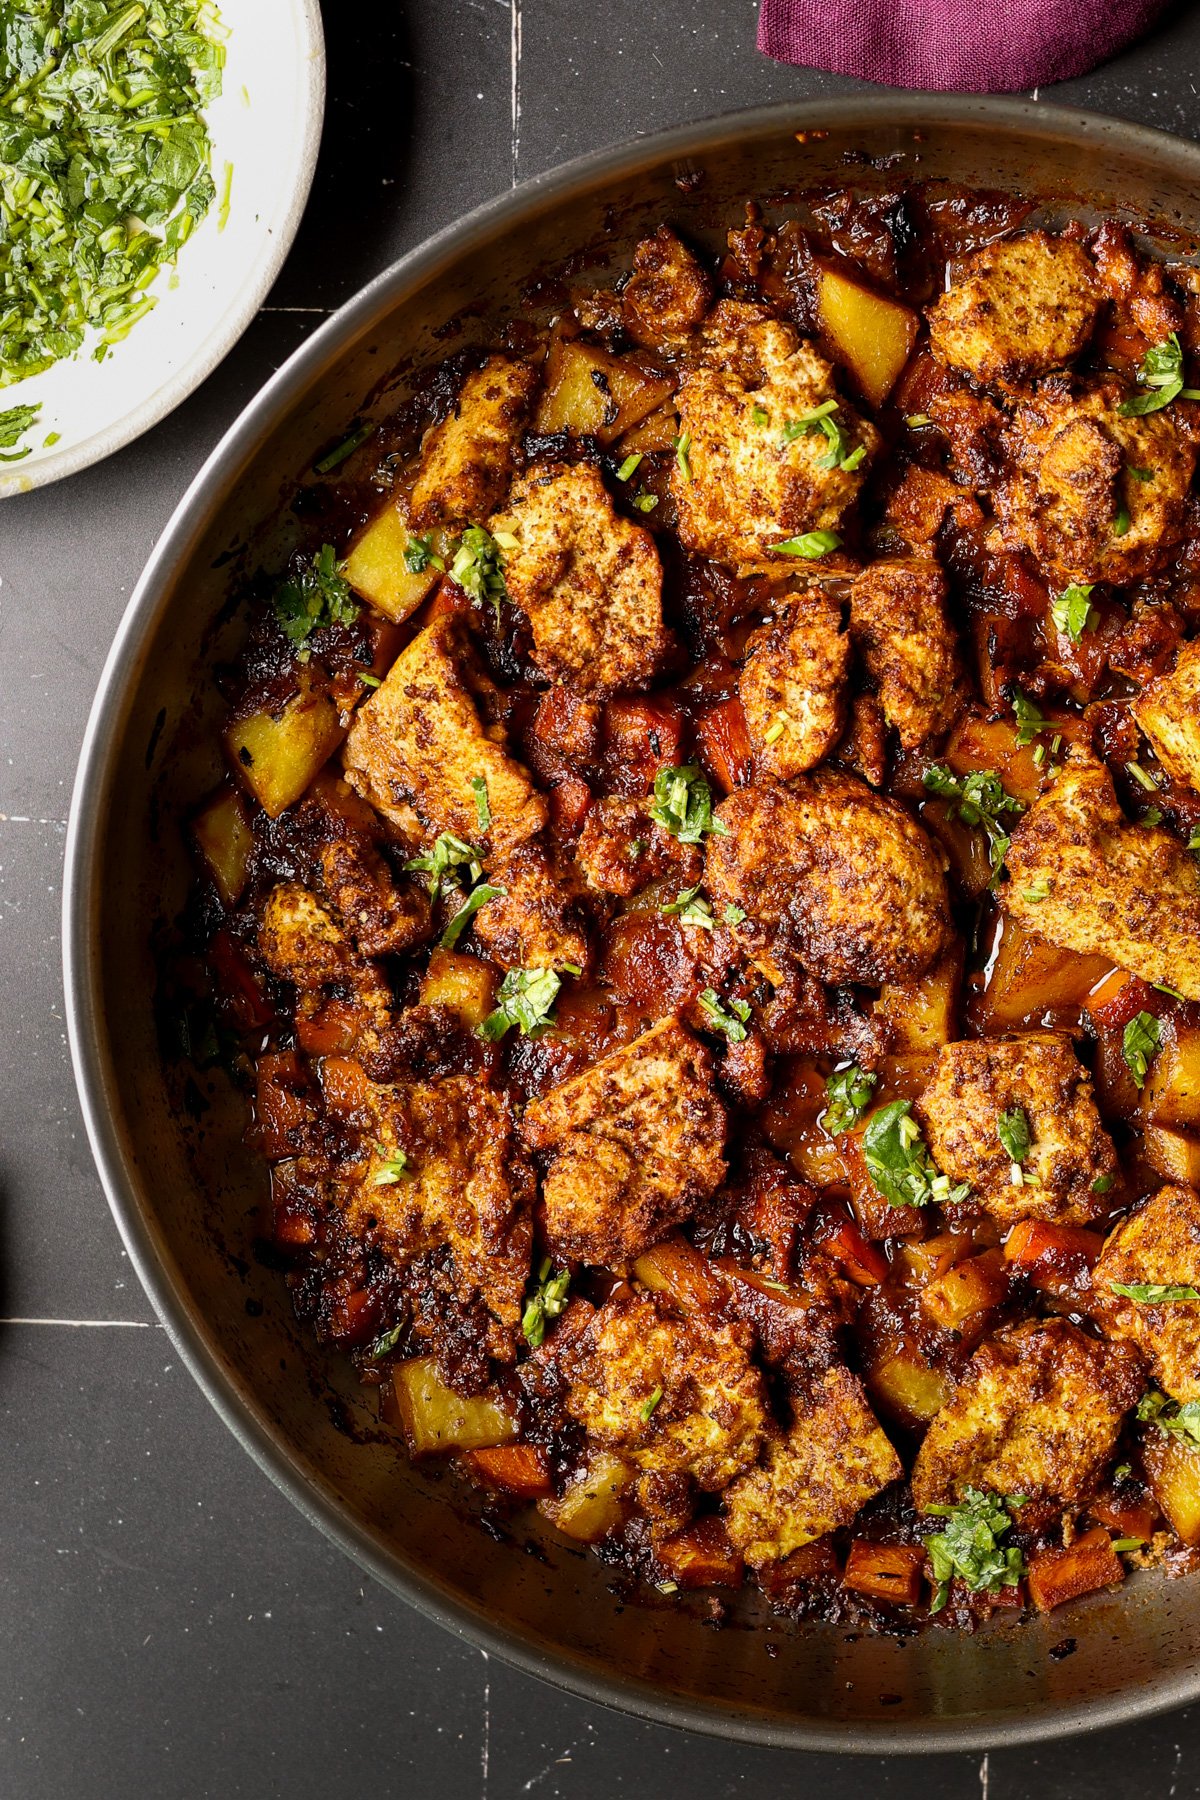
Spice-Rubbed Braised Tofu with Vegetables in a Savory Umami Sauce. A unique delicious holiday entree that all cooks in one pan! (gluten-free and nut-free with soy-free options)
I wanted to make a vegan braised meat-style dish for the holidays, so I came up with this one-skillet meal that’s rich, hearty, and incredibly flavorful. It features an amazing, aromatic spice rub that smells so meaty you’ll be surprised it’s entirely plant-based. The spice rub coats tofu that’s been frozen, thawed, and pressed, giving it a dense, chewy texture perfect for braising.
The base for the braise starts with crisped-up potatoes and carrots. After searing the vegetables, we make a deeply flavorful sauce with caramelized onions, lots of aromatics, and fresh herbs, and flavor boosters.
The tofu and vegetables braise together in this sauce, allowing the tofu to absorb all that flavor while developing a slightly crispy top and a tender, chicken-like interior.
We use an oven-safe pan to start the dish on the stovetop and finish it in the oven, where the vegetables become perfectly tender and the tofu gets a gorgeous golden top.
It’s fantastic served with rice, couscous, mashed potatoes or other mashed vegetables, bean purée, some crusty bakery bread, or a side salad.
A simple herb sauce adds a bright, fresh contrast, but you can enjoy it on its own, too. It’s full of amazing flavors with or without. The herb sauce just bumps up the flavor even more.
Why You’ll Love Braised Tofu and Vegetables
1-pan entree that’s perfect for the holiday table
flavorful braised vegetables in caramelized onion sauce
big pieces of crisp, herb-rubbed tofu
naturally gluten-free and nut-free with easy soy-free option
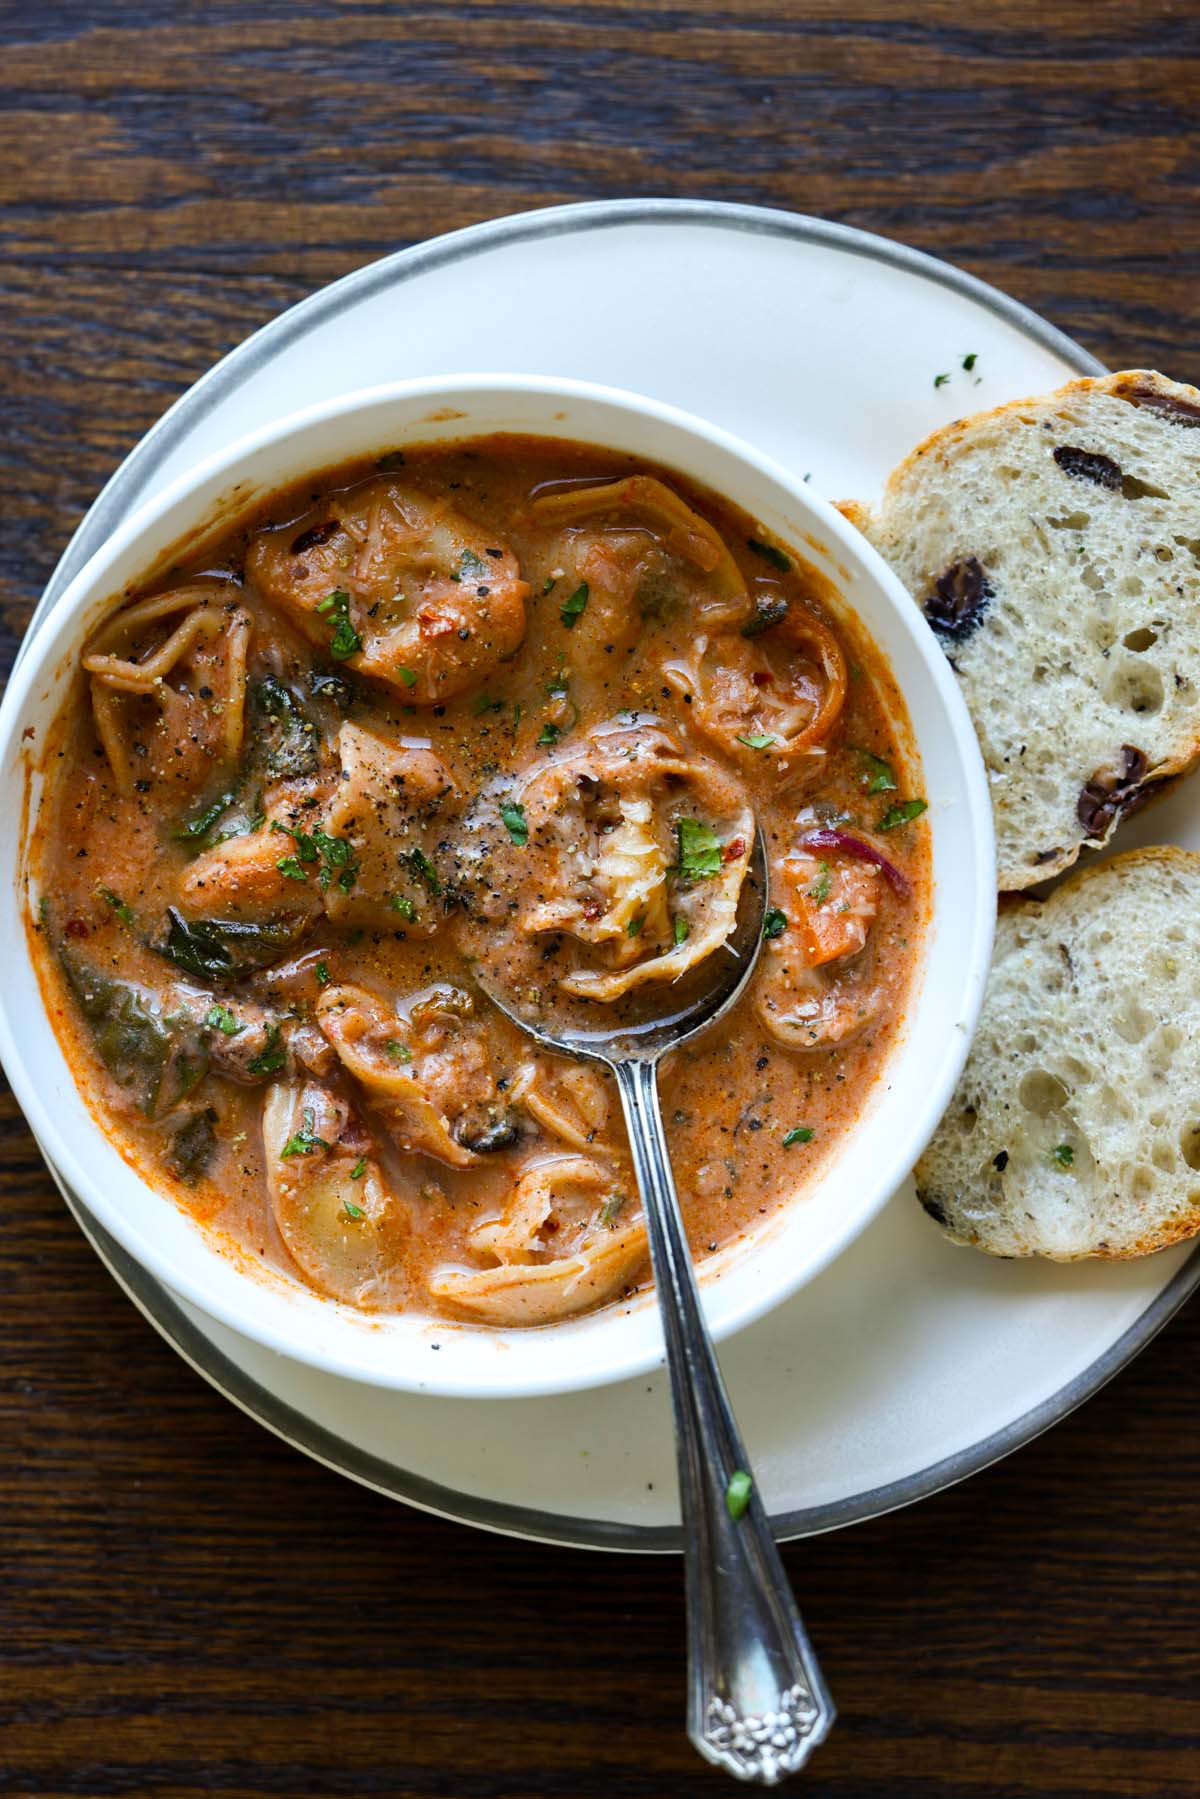
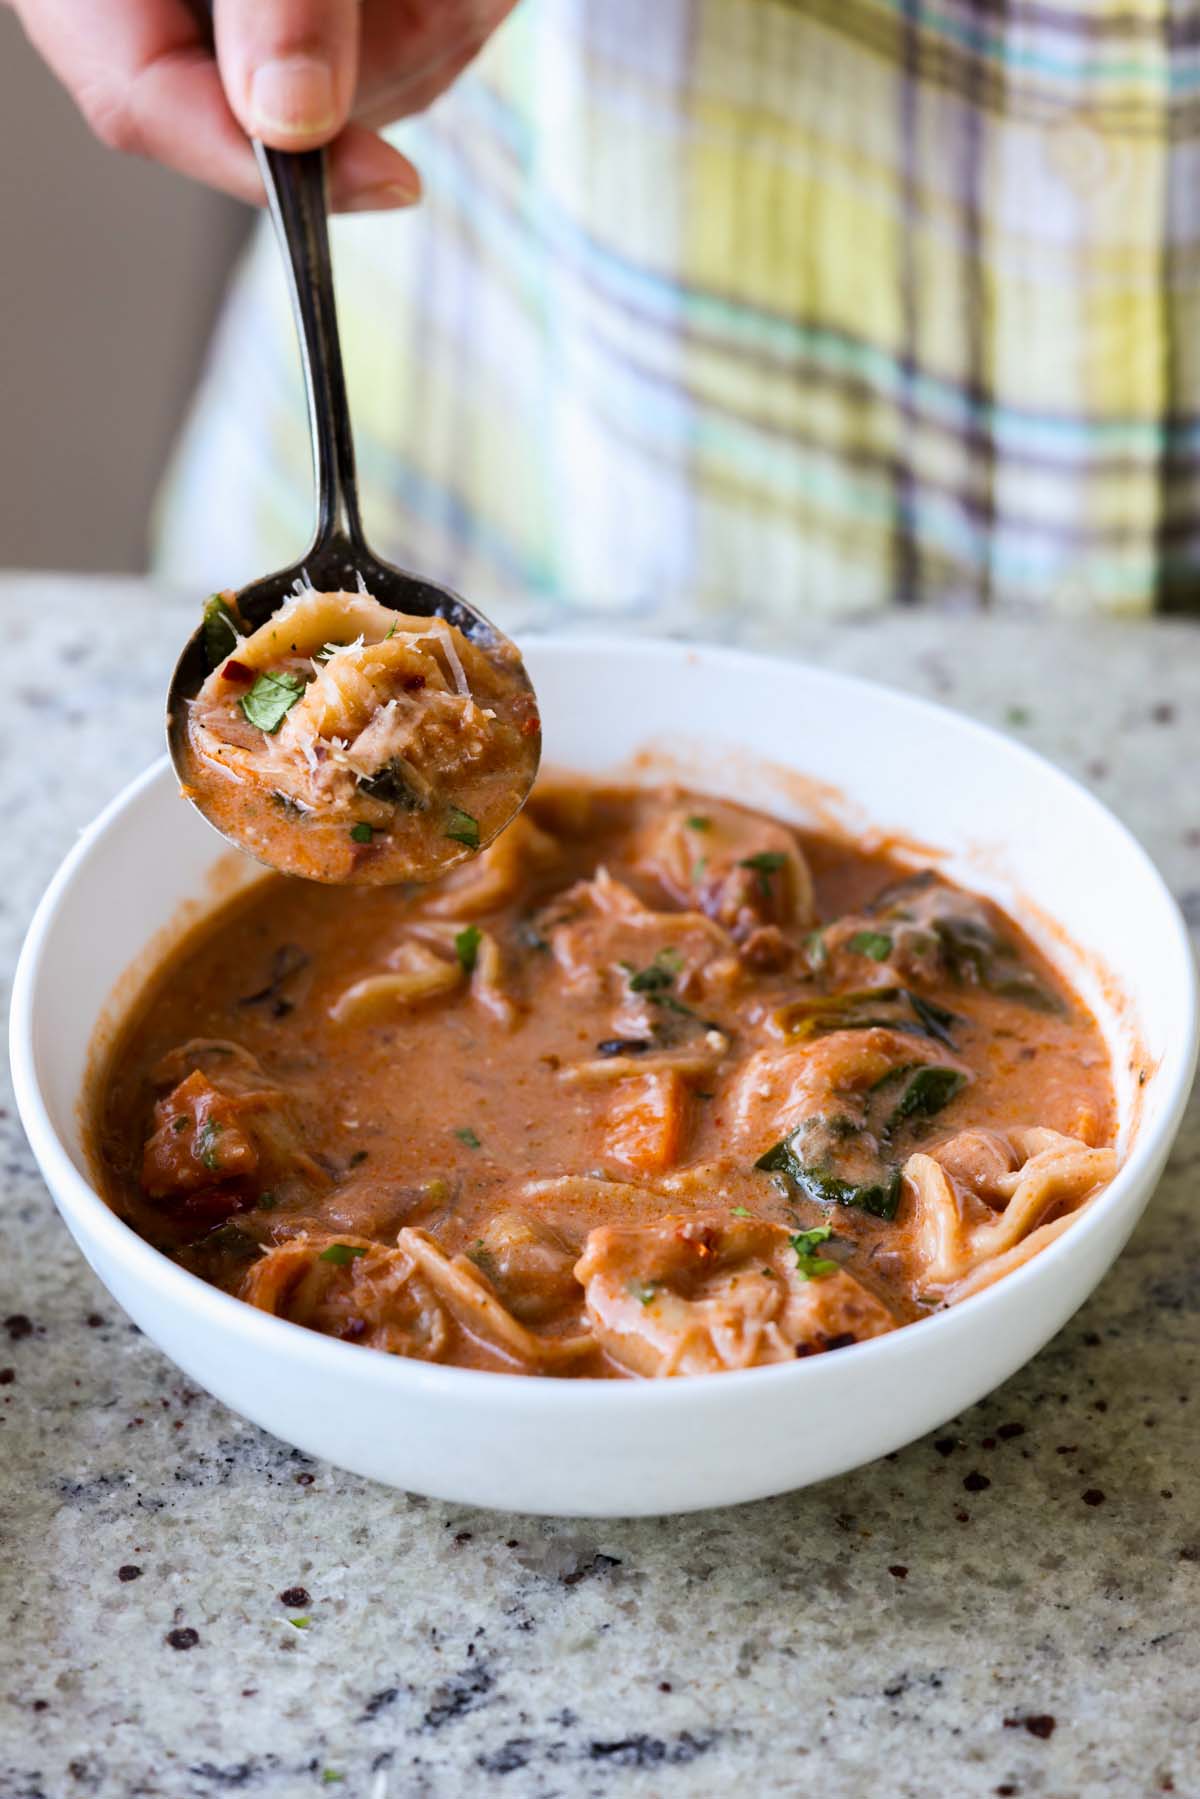
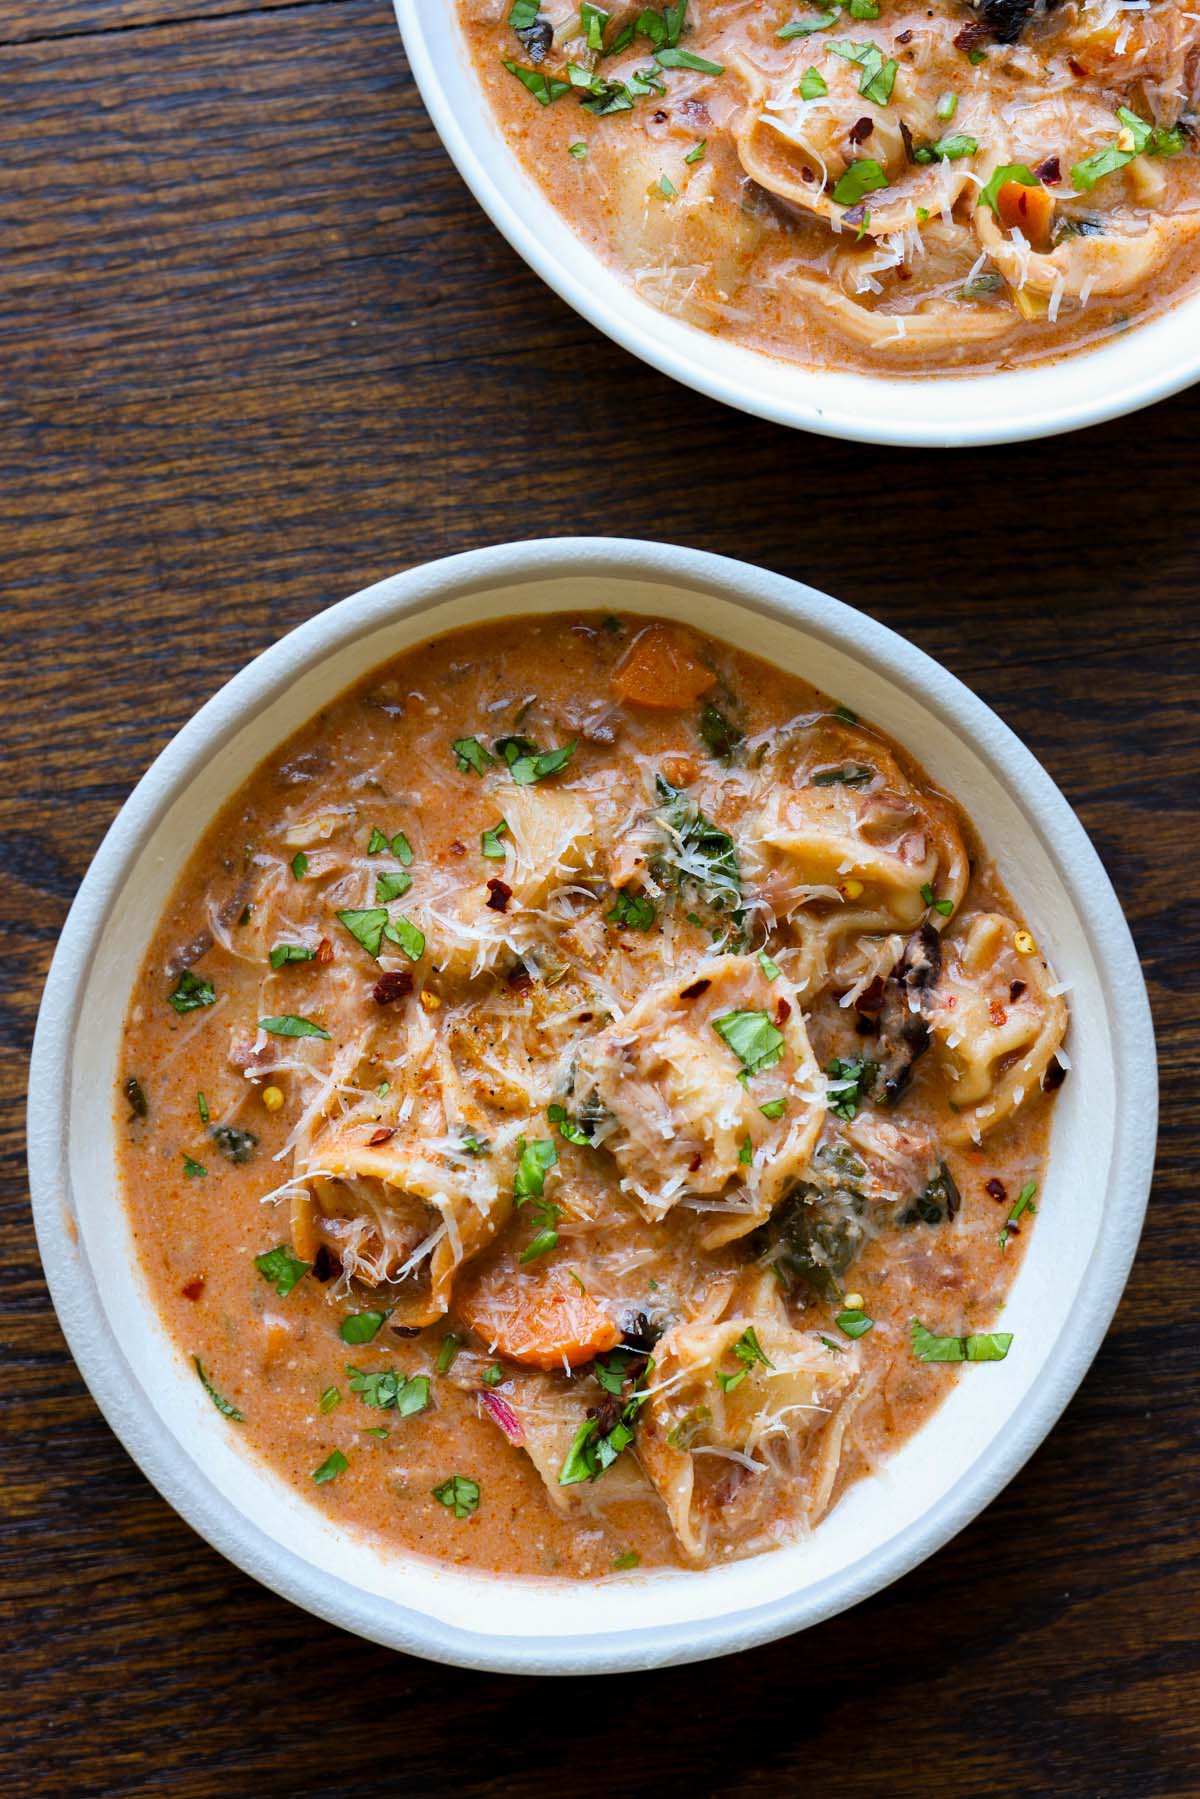
Pillowy tortellini and a velvety tomato-cream broth, enriched with my easy homemade sausage spice mix. Bursting with bold Italian flavors and ready in just 30 minutes, it’s your new favorite irresistible soup.
I got some almond ricotta–stuffed tortellini, so I decided to make an amazing soup with it. This is a hearty, delicious, and easy tortellini soup recipe. It uses the usual suspects of an Italian-flavored soup: aromatics, carrot, celery, Italian herbs, and vegan sausage. Those flavors pair up with the tortellini, tomato purée, and some non-dairy cream.
It turns out absolutely delicious.
I make this spice mix which adds all the flavor of sausage to whatever plant based protein you choose. This spice mix combines smoked paprika, fennel seeds, garlic powder, black pepper, oregano, and pepper flakes, and it’s just so versatile and flavorful!
First make the spice mix, and then decide which protein you want to use for the sausage. You can use vegan sausage, lentils, walnuts, pecans, chickpeas, crumbled tofu, chopped up soaked soy curls, seitan, or whatever else you like.
Cook your protein of choice with some garlic and the spice mix, then add all the aromatics. Fold in the tomato sauce, tortellini, and some stock, then add non-dairy cream at the end. The tortellini cooks up in the same pan with the rest of the soup.
The soup comes together within 30 minutes in just 1 pan, and is creamy and satisfying!
Why You’ll Love Tortellini Soup
super easy 1-pot meal ready in 30 minutes
creamy, tomatoey broth with sausagey flavors and tender, cheesy tortellini
super versatile! Use whatever plant-based protein you like!
Easily made gluten-free, soy-free, and/or nut-free.
Learn how to make the best Eggless Rum Fruit Cake recipe with detailed step by step pictures. Eggless Christmas Fruit Cake Recipe with Rum – easy rum and raisin cake recipe without eggs! Eggless Rum Fruit Cake is a Christmas special recipe, that I have been making over the last few years. I have already...
Learn how to make easy, perfect Nankhatai recipe with detailed step by step pictures. Nankhatai, Indian style ghee biscuit recipe – khasta nan khatai recipe, perfect with a hot cup of tea/coffee! Nankhatai is Indian style homemade cookies made using ghee or clarified butter. The word Nankhatai is a combination of two words, Nan meaning...
Learn how to make the most decadent homemade instant hot chocolate mix recipe with detailed step by step pictures. Instant Hot Cocoa Mix recipe is very easy to put together – perfect for this holiday season! December is such a jolly month of the year, everything feels and looks festive. The nip in the air...