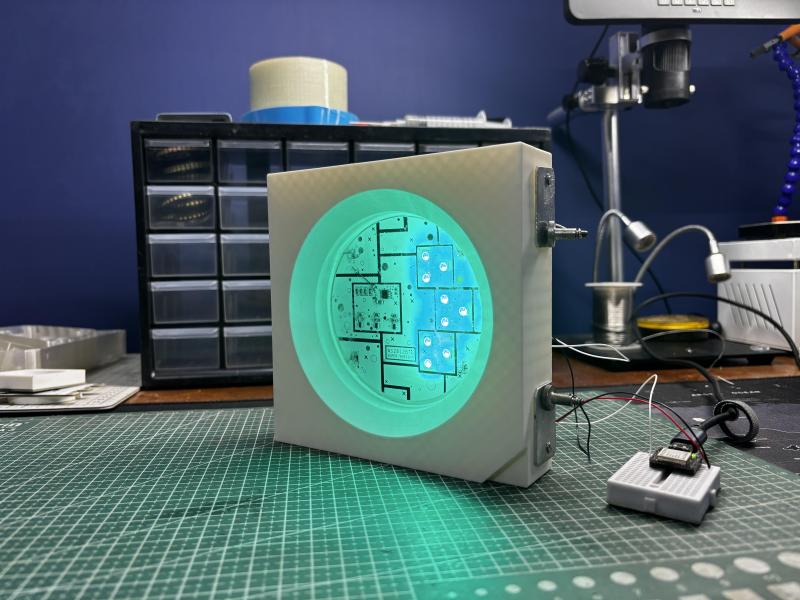
Neopixels and other forms of addressable LEDs have taken the maker world by storm. They make it trivial to add a ton of controllable, glowing LEDs to any project. [Arnov Sharma] has made a great tribute to the WS2812B LED by building the NeoPixel Giant Edition.
The build is simply a recreation of the standard 5mm x 5mm WS2812B, only scaled up to 150 mm x 150 mm. It uses a WS2811 chip inside to make it behave in the same way from a logical perspective, and this controller is hooked up to nine standard RGB LEDs switched with MOSFETs to ensure they can deliver the requisite light output. The components are all assembled on a white PCB in much the same layout as the tiny parts of a WS2812B, which is then installed inside a 3D-printed housing made in white PLA. Large metal terminals were added to the housing, just like a WS2812B, and the lens was then created using a large dose of clear epoxy.
The result is a fully functional, addressable LED that is approximately 30 times larger than the original. You can even daisy-chain them, just like the real thing. We’ve covered all kinds of projects using addressable LEDs over the years, from glowing cubes to fancy nature installations. If you’ve got your own glowable project that the world needs to see, make sure you notify the tips line!
Tetrodotoxin (TTX) is best known as the neurotoxin of the puffer fish, though it also appears in a range of other marine species. You might remember it from an episode of The Simpsons involving a poorly prepared dish at a sushi restaurant. Indeed, it’s a potent thing, as ingesting even tiny amounts can lead to death in short order.
Given its fatal reputation, it might be the last thing you’d expect to be used in a therapeutic context. And yet, tetrodotoxin is proving potentially valuable as a treatment option for dealing with cancer-related pain. It’s a dangerous thing to play with, but it could yet hold promise where other pain relievers simply can’t deliver.
Poison, or…?
A license to prepare fugu (pufferfish) issued by Tokyo authorities. Credit: Nesnad, CC BY SA 3.0
Humans have been aware of the toxicity of the puffer fish and its eggs for thousands of years. It was much later that tetrodotoxin itself was chemically isolated, thanks to the work of Dr. Yoshizumi Tahara in 1909.
Its method of action was proven in 1964, with tetrodotoxin found to bind to and block voltage-gated sodium channels in nerve cell membranes, essentially stopping the nerves from conducting signals as normal. It thus has the effect of inducing paralysis, up to the point where an afflicted individual suffers respiratory failure, and subsequently, death.
Tetrodotoxin is most closely associated with pufferfish, though it’s also present in other deadly species, like the blue-ringed octopus. Thankfully, nobody is crazy enough to try to eat those. Credit: NPS, public domain
It doesn’t take a large dose of tetrodotoxin to kill, either—the median lethal dose in mice is a mere 334 μg per kilogram when ingested. The lethality of tetrodotoxin was historically a prime driver behind Japanese efforts to specially license chefs who wished to prepare and serve pufferfish. Consuming pufferfish that has been inadequately prepared can lead to symptoms in 30 minutes or less, with death following in mere hours as the toxin makes it impossible for the sufferer to breathe. Notably, though, with the correct life support measures, particularly for the airway, or with a sub-fatal dose, it’s possible for a patient to make a full recovery in mere days, without any lingering effects.
The effects that tetrodotoxin has on the nervous system are precisely what may lend it therapeutic benefit, however. By blocking sodium channels in sensory neurons that deal with pain signals, the toxin could act as a potent method of pain relief. Researchers have recently explored whether it could have particular application for dealing with neuropathic pain caused by cancer or chemotherapy treatments. This pain isn’t always easy to manage with traditional pain relief methods, and can even linger after cancer recovery and when chemotherapy has ceased.
Tetrodotoxin is able to block voltage-gated sodium channels, which is the basis of both its pain-relieving abilities and its capacity to paralyze and kill. Credit: research paper
The challenge of using a toxin for pain relief is obvious—there’s always a risk that the negative effects of the toxin will outweigh the supposed therapeutic benefit. In the case of tetrodotoxin, it all comes down to dosage. The levels given to patients in research studies have been on the order of 30 micrograms, well under the multi-milligram dose that would typically cause severe symptoms or death in an adult human. The hope would be to find a level at which tetrodotoxin reduces pain with a minimum of adverse effects, particularly where symptoms like paralysis and respiratory failure are on the table.
A review of various studies worldwide was published in 2023, and highlights that tetrodotoxin pain relief does come with some typical adverse effects, even at tiny clinical doses. The most typical reported symptoms involved nausea, oral numbness, dizziness, and tingling sensations. In many cases, these effects were mild and well-tolerated. A small number of patients in research trials exhibited more serious symptoms, however, such as loss of muscle control, pain, or hypertension. At the same time, the treatment did show positive results — with many patients reporting pain relief for days or even weeks after just a few days of tetrodotoxin injections.
While tetrodotoxin has been studied as a pain reliever for several decades now, it has yet to become a mainstream treatment. There have been no large-scale studies that involved treating more than 200 patients, and no research group or pharmaceutical company has pushed hard to bring a tetrodotoxin-based product to market. Research continues, with a 2025 paper even exploring the use of ultra-low nanogram-scale doses in a topical setting. For now, though, commercial application remains a far-off fantasy. Today, the toxin remains the preserve of pufferfish and a range of other deadly species. Don’t expect to see it in a hospital ward any time soon, despite the promise it shows thus far.
Featured image: “Puffer Fish DSC01257.JPG” by Brocken Inaglory. Actually, not one of the poisonous ones, but it looked cool.
Keychain cameras are rarely good. However, in the case of Walmart’s current offering, it might be worse than it’s supposed to be. [FoxTailWhipz] bought the Vivitar-branded device and set about investigating its claim that it could deliver high-resolution photos.
The Vivatar Retro Keychain Camera costs $12.88, and wears “FULL HD” and “14MP” branding on the packaging. It’s actually built by Sakar International, a company that manufactures products for other brands to license. Outside of the branding, though, [FoxTailWhipz] figured the resolution claims were likely misleading. Taking photos quickly showed this was the case, as whatever setting was used, the photos would always come out at 640 x 480, or roughly 0.3 megapixels. He thus decided a teardown would be the best way to determine what was going on inside. You can see it all in the video below.
Pulling the device apart was easy, revealing that the screen and battery are simply attached to the PCB with double-sided tape. With the board removed from the case, the sensor and lens module are visible, with the model number printed on the flex cable. The sensor datasheet tells you what you need to know. It’s a 2-megapixel sensor, capable of resolutions up to 1632 x 1212. The camera firmware itself seems to not even use the full resolution, since it only outputs images at 640 x 480.
It’s not that surprising that an ultra-cheap keychain camera doesn’t meet the outrageous specs on the box. At the same time, it’s sad to see major retailers selling products that can’t do what they say on the tin. We see this problem a lot, in everything from network cables to oscilloscopes.
Most keyboards are factory-set for a specific layout, and most users never change from the standard layout for their home locale. As a multilingual person, [Inkbox] wanted a more flexible keyboard. In particular, one with the ability to change its layout both visually and logically, on the fly. Thus was born the all-screen keyboard, which can swap layouts on demand. Have a look at the video below to see the board in action.
The concept is simple enough: It’s a keyboard with transparent keys and a screen underneath. The screen displays the labels for the keys, while the transparent plastic keys provide the physical haptic interface for the typist. The device uses a Raspberry Pi to drive the screen. [Inkbox] then designed a plastic frame and transparent keys, which are fitted with magnets, which in turn are read by Hall effect sensors under the display. This eliminates the need for traditional key switches, which would block light from the screen below.
Unfortunately for [Inkbox], the prototype was very expensive (about $1,400 USD) and not particularly functional as a keyboard. However, a major redesign tackled some of these issues. Version two had a smaller screen with a different aspect ratio. It also jettisoned the Hall effect sensors and uses plastic keys capacitively operating a traditional touch screen. Some design files for the keyboard are available on Github for the curious.
An all-screen keyboard is very cool, if very complicated to implement. There are other ways to change your layout that aren’t quite as fancy, of course. You can always just make custom keycaps and remap layouts on a regular mechanical keyboard if desired. Still, you have to admire the work that went into making this thing a reality.
If you live in a major city, you’ve probably seen a street performer with some variety of slapophone. It’s a simple musical instrument that typically uses different lengths of PVC pipe to act as resonant cavities. When struck with an implement like a flip-flop, they release a dull but pleasant tone. [Ivan Miranda] decided to build such an instrument himself and went even further by giving it MIDI capability. Check it out in the video below.
[Ivan’s] design uses a simple trick to provide a wide range of notes without needing a lot of individual pipes. He built four telescoping pipe assemblies, each of which can change length with the aid of a stepper motor and a toothed belt drive. Lengthening the cavity produces a lower note, while shortening it produces a higher note. The four pipe assemblies are electronically controlled to produce notes sent from a MIDI keyboard, all under the command of an Arduino. The pipes are struck by specially constructed paddles made of yoga mats, again controlled by large stepper motors.
The final result is large, power-hungry, and vaguely playable. It’s a little unconventional, though, because moving the pipes takes time. Thus, keypresses on a MIDI keyboard set the pipes to a given note, but don’t actually play it. The slapping of the pipe is then triggered with a drum pad.
The build is based around the Seeedstudio ReTerminal E1001/E1002 devices—basically an e-paper display with a programmable ESP32-S3 built right in. It’s upon this display that you will see all kinds of feline statistics being logged and graphed. The data itself comes from smart litterboxes, with [Matthew] figuring out how to grab data on weight and litterbox usage via APIs. In particular, he’s got the system working with PetKit gear as well as the Whisker Litter Robot 4. His dashboard can separately track data for four cats and merely needs the right account details to start pulling in data from the relevant cat cloud service.
For [Matthew], the build wasn’t just a bit of fun—it also proved very useful. When one of his cats had a medical issue recently, he was quickly able to pick up that something was wrong and seek the help required. That’s a pretty great result for any homebrew project. It’s unrelated, too, but Gnocci is a great name for a cat, so hats off for that one.
Typically, if you happened across a walnut lying about, you might consider eating it or throwing it to a friendly squirrel. However, as [Penguin DIY] demonstrates, it’s perfectly possible to turn the humble nut into a clandestine surveillance device. It turns out the walnut worriers were right all along.
The build starts by splitting and hollowing out the walnut. From there, small holes are machined into the mating faces of the walnut, into which [Penguin DIY] glues small neodymium magnets. These allow the walnut to be opened and snapped shut as desired, while remaining indistinguishable from a regular walnut at a distance.
The walnut shell is loaded with nine tiny lithium-polymer cells, for a total of 270 mAh of battery capacity at 3.7 volts. Charging the cells is achieved via a deadbugged TP4056 charge module to save space, with power supplied via a USB C port. Holes are machined in the walnut shell for the USB C port as well as the camera lens, though one imagines the former could have been hidden purely inside for a stealthier look. The camera itself appears to be an all-in-one module with a transmitter built in, with the antenna installed in the top half of the walnut shell and connected via pogo pins. The video signal can be picked up at a distance via a receiver hooked up to a smart phone. No word on longevity, but the included batteries would probably provide an hour or two of transmission over short ranges if you’re lucky.
If you have a walnut tree in your backyard, please do not email us about your conspiracy theories that they are watching you. We get those more than you might think, and they are always upsetting to read. If, however, you’re interested in surveillance devices, we’ve featured projects built for detecting them before with varying levels of success. Video after the break.
The Landel Mailbug was a weird little thing. It combined a keyboard and a simple text display, and was intended to be a low-distraction method for checking your email. [CiferTech] decided to repurpose it, though, turning it into an AI console instead.
The first job was to crack the device open and figure out how to interface with the keyboard. The design was conventional, so reading the rows and columns of the key matrix was a cinch. [CiferTech] used PCF8574 IO expanders to make it easy to read the matrix with an ESP32 microcontroller over I2C. The ESP32 is paired with a small audio output module to allow it to run a text-to-speech system, and a character display to replace the original from the Mailbug itself. It uses its WiFi connection to query the ChatGPT API. Thus, when the user enters a query, the ESP32 runs it by ChatGPT, and then displays the output on the screen while also speaking it aloud.
[CiferTech] notes the build was inspired by AI terminals in retro movies, though we’re not sure what specifically it might be referencing. In any case, it does look retro and it does let you speak to a computer being, of a sort, so the job has been done. Overall, though, the build shows that you can build something clean and functional just by reusing and interfacing a well-built commercial product.
Right away, the build is somewhat reminiscent of a stringed instrument, what with its buttons laid out in four “strings” of six “frets” each. Only, they’re not so much buttons, as individual sections of a capacitive touch controller. A Raspberry Pi Pico 2 is responsible for reading the 24 pads, with the aid of two MPR121 capacitive touch ICs.
The Diapasonix can be played as an instrument in its own right, using the AMY synthesis engine. This provides a huge range of patches from the Juno 6 and DX7 synthesizers of old. Onboard effects like delay and reverb can be used to alter the sound. Alternatively, it can be used as a MIDI controller, feeding its data to a PC attached over USB. It can be played in multiple modes, with either direct note triggers or with a “strumming” method instead.
We’ve featured a great many MIDI controllers over the years, from the artistic to the compact. Video after the break.
Regular Christmas trees don’t emit light, nor do they react to music. If you want both things in a holiday decoration, consider this build from [dbmaking].
An ESP32-D1 mini runs the show here. It’s hooked up to a strip of WS2812B addressable LEDs. The LED strip is placed on a wooden frame resembling the shape of a traditional Christmas tree. Ping-pong balls are then stacked inside the wooden frame such that they act as a light diffuser for the LEDs behind. The microcontroller is also hooked up to an INMP441 omnidirectional MEMS microphone module. This allows the ESP32 to detect sound and flash the LEDs in time, creating a colorful display that reacts to music. This is achieved by using the WLED web installer to set the display up in a sound reactive mode.
The build is designed around the Arduino platform, and can be constructed with an Arduino Uno, Nano, or Pro Mini if so desired. The microcontroller board is hooked up with an ADXL335 three-axis accelerometer, which is used for tracking the orientation and movement of the digital hourglass. These movements are used to influence the movement of emulated grains of sand, displayed on a pair of 8×8 LED matrixes driven by a MAX7219 driver IC. Power is courtesy of a 3.7 V lithium-ion cell, with a charge/boost module included for good measure. Everything is wrapped up in a vaguely hourglass-shaped 3D printed enclosure.
The operation is simple. When the hourglass is turned, the simulated grains of sand move as if responding to gravity. The movement is a little janky — no surprise given the limited resolution of the 8×8 displays. You also probably wouldn’t use such a device as a timer when more elegant solutions exist. However, that’s not to say builds like this don’t have a purpose. They’re actually a great way to get to grips with a microcontroller platform, as well as to learn about interfacing external hardware and working with LED matrixes. You can pick up a great deal of basic skills building something like this.
These days, Internet connectivity is ubiquitous, so you can look up live weather data on just about any device around you. Regardless, [Jozerworx] wanted a simple, clean, independent weather display, and came up with this simple design.
The build is based on the Lilygo T5 EPD devboard, which combines an ESP32-S3 microcontroller with a nice 4.7-inch e-paper display. This display has the benefit that it only uses power when it’s being updated, making it particularly suitable to run off a battery for extended periods of time. Meanwhile, the ESP32 and its inbuilt Wi-Fi connectivity allow it to query the internet for updated weather forecasts. Weather data is sourced via the OpenWeather API, which [Jozerworx] notes comes with the caveat of requiring an API key. It’s a little fussy, but if you want good weather data, there are few easier ways to get it. The display shows a forecast for the next five days, while also showing graphs of ambient temperature and humidity along with useful information like the sunset and sunrise schedule.
Files are on Github for those eager to learn more. [Jozerworx] also notes that getting started with the display is particularly easy with the inclusion of a setup mode. This allows the display to act as a Wi-Fi access point with a web page that you use enter your home Wi-Fi connection details.
MIDI controllers are easy to come by these days. Many modern keyboards have USB functionality in this regard, and there are all kinds of pads and gadgets that will spit out MIDI, too. But you might also like to build your own, like this touchscreen design from [Nick Culbertson].
The build takes advantage of a device colloquially called the Cheap Yellow Display. It consists of a 320 x 240 TFT touchscreen combined with a built-in ESP32-WROOM-32, available under the part number ESP32-2432S028R.
[Nick] took this all-in-one device and turned it into a versatile MIDI controller platform. It spits out MIDI data over Bluetooth and has lots of fun modes. There’s a straightforward keyboard, which works just like you’d expect, and a nifty beat sequencer too. There are more creative ideas, too, like the bouncing-ball Zen mode, a physics-based note generator, and an RNG mode. If you liked Electroplankton on the Nintendo DS, you’d probably dig some of these. Files are on GitHub if you want to replicate the build.
[Voria Labs] has created a whole bunch of artworks referred to as Lumanoi Interactive Light Sculptures. A new video explains the hardware behind these beautiful glowing pieces, as well as the magic that makes their interactivity work.
The basic architecture of the Lumanoi pieces starts with a custom main control board, based around the ESP-32-S3-WROOM-2. It’s got two I2C buses onboard, as well as an extension port with some GPIO breakouts. The controller also has lots of protection features and can shut down the whole sculpture if needed. The main control board works in turn with a series of daisy-chained “cell” boards attached via a 20-pin ribbon cable. The cable carries 24-volt power, a bunch of grounds, and LED and UART data that can be passed from cell to cell. The cells are responsible for spitting out data to addressable LEDs that light the sculpture, and also have their own microcontrollers and photodiodes, allowing them to do all kinds of neat tricks.
As for interactivity, simple sensors provide ways for the viewer to interact with the glowing artwork. Ambient light sensors connected via I2C can pick up the brightness of the room as well as respond to passing shadows, while touch controls give a more direct interface to those interacting with the art.
[Voria Labs] has provided a great primer on building hardcore LED sculptures in a smart, robust manner. We love a good art piece here, from the mechanical to the purely illuminatory. Video after the break.
The ZX Spectrum is known for a lot of things, but it’s not really known for a rich and deep library of FPS titles. However, there is finally such a game for the platform, thanks to [Jakub Trznadel]—and it’s called World of Spells.
Like so many other games of this type, it was inspired by the 3D raycasting techniques made so popular by Wolfenstein 3D back in the day. For that reason, it has a very similar look in some regards, but a very different look in others—the latter mostly due to the characteristic palette available on the ZX Spectrum. A playable FPS is quite a feat to achieve on such limited hardware, but [Jakub] pulled it off well, with the engine able to reach up to 80 frames per second.
The game is available for download, and you can even order it on tape if you so desire. You might also like to check out the walkthrough on YouTube, where the game is played on an emulator. Don’t worry, though—the game works on real ZX Spectrum 48k hardware just fine.
It’s called RTL-HAOS, and it’s intended to act as a bridge. Whatever you can pick up using the RTL_433 tool, you can set up with Home Assistant using RTL-HAOS. If you’re unfamiliar with RTL_433, it’s a multitalented data receiver for picking up all sorts of stuff on a range of bands using RTL-SDR receivers, as well as a range of other hardware. While it’s most closely associated with products that communicate in the 433 MHz band, it can also work with products that talk in 868 MHz, 315 MHz, 345 MHz, and 915 MHz, assuming your hardware supports it. Out of the box, it’s capable of working with everything from keyless entry systems to thermostats, weather stations, and energy monitors. You can even use it to listen to the tire pressure monitors in your Fiat Abarth 124 Spider, if you’re so inclined.
[Jaron’s] tool integrates these devices nicely into Home Assistant, where they’ll appear automatically thanks to MQTT discovery. It also offers nice signal metrics like RSSI and SNR, so you can determine whether a given link is stable. You can even use multiple RTL-SDR dongles if you’re so inclined. If you’re eager to pull some existing environmental sensors into your smart home, this may prove a very easy way to do it.
The cool thing about Home Assistant is that hackers are always working to integrate more gear into the ecosystem. Oftentimes, they’re far faster and more efficient at doing this than big-name corporations. Meanwhile, if you’re working on your own hacks for this popular smart home platform, we’d probably like to know about it. Be sure to hit up the tips line in due time.
If you wanted to build an electronic dice, you might grab an Arduino and a nice OLED display to whip up something fancy. You could even choose an ESP32 and have it log your rolls to the cloud. Or, you could follow the lead of [Axiometa] and do it the old-school way.
The build is based around the famous 555 timer IC. It’s paired with a 4017 decade counter IC, which advances every time it receives a clock signal from the 555. With the aid of some simple transistor logic, this lights the corresponding LEDs for the numbers 1 to 6, which are laid out like the face of a typical six-sided die. For an added bit of fun, a tilt sensor is used to trigger the 555 and thus the roll of the dice. A little extra tweak to the circuit ensures the 555 keeps counting just a little while after you stop shaking. This makes the action feel like an actual dice roll.
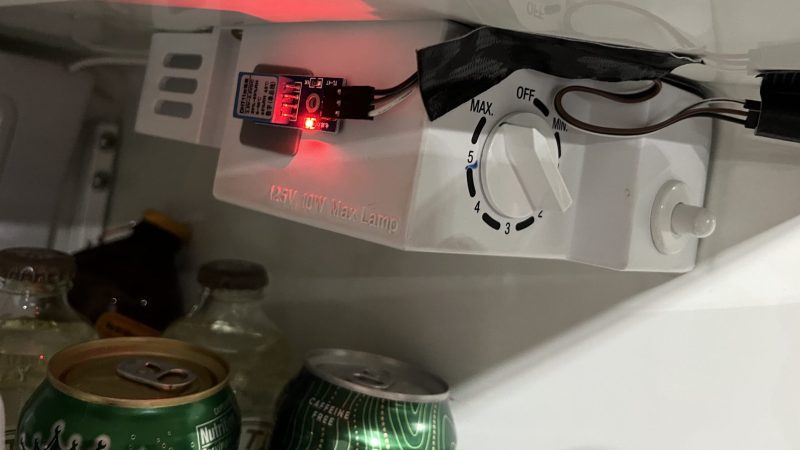
[Rick] had a problem. His garage refrigerator was tasked with a critical duty—keeping refreshing beverages at low temperature. Unfortunately, it had failed—the condenser was forever running, or not running at all. The beverages were either frozen, or lukewarm, regardless of the thermostat setting. There was nothing for it—the controller had to be rebuilt from scratch.
Thankfully, [Rick]’s junk drawer was obliging. He was able to find an Arduino Uno R4, complete with WiFi connectivity courtesy of the ESP32 microcontroller onboard. This was paired with a DHT11 sensor, which provided temperature and humidity measurements. [Rick] began testing the hardware by spitting out temperature readings on the Uno’s LED matrix.
Once that was working, the microcontroller had to be given control over the fridge itself. This was achieved by programming it to activate a Kasa brand smart plug, which could switch mains power to the fridge as needed. The Uno simply emulated the action of the Kasa phone app to switch the smart plug on and off to control the fridge’s temperature, with the fridge essentially running flat out whenever it was switched on. The Uno also logs temperature to a server so [Rick] can make sure temperatures remain in the proper range.
Wi-Fi! It’s everywhere, and yet you can’t really see it, by virtue of the technology relying on the transmission of electromagnetic waves outside the visual spectrum. Never mind, though, because you can always build yourself a Wi-Fi analyzer to get some insight into your radio surroundings, as demonstrated by [moononournation].
The core of the build is the ESP32-C5. The popular microcontroller is well-equipped for this task with its onboard dual-band Wi-Fi hardware, even if the stock antenna on most devboards is a little underwhelming. [moononournation] has paired this with a small rectangular LCD screen running the ILI9341 controller. The graphical interface is drawn with the aid of the Arduino_GFX library. It shows a graph of access points detected in the immediate area, as well as which channels they’re using and their apparent signal strength.
If you’re just trying to get a basic read on the Wi-Fi environment in a given locale, a tool like this can prove pretty useful. If your desires are more advanced, you might leap up to tinkering in the world of software defined radio. Video after the break.
There are lots of switches that you can use with your smarthome. Some might not be compatible with the wiring in your house, while others are battery powered and need attention on the regular. [Willow Herring] came across some nice self-powered versions that were nonetheless locked to a proprietary hub. Reverse engineering ensued!
[Willow] was using a range of smart home products from Quinetic, including the aforementioned self-powered switches. However, she couldn’t stand using them with the Quinetic hub, which was required to get them functioning with the brand’s relays and in-line switch relays. It all came down to the buggy smartphone app that was supposed to lace everything together, but never worked quite right. Instead, she set about deciphering the language the switches speak so they could be paired with other smarthome systems.
[Cameron Gray] had done some work in this area, which proved a useful starting point, though it didn’t enable the use of the switches with the various types of Quinetic relays. [Willow] decided to try and learn more about the system, starting with a CC1101 radio module hooked up to a ESP8266. Some tinkering around with expected message lengths started bearing fruit, and soon enough the format of the messages became clear.
Before long, [Willow] had figured out how to get the whole system talking to MQTT and Home Assistant, without compromising their ability to operate independently. Code is on Github for those eager to tinker further.