For the most sensitive parts of the human body, friction is the enemy. Here’s how to keep it at bay with our favorite lubes made of water, silicone, or natural oil.
If you’ve ever wished you could make restaurant-style Garlic Naan at home without any stress, you’re going to love this recipe!
Making restaurant-style garlic naan at home is easier than you’d think. All you need is a few pantry staple ingredients and 30 minutes to recreate the best, homemade garlic naan. Since this is a no-yeast recipe, the dough needs almost no resting time, which means you can whip up a batch whenever the craving for it hits.
This recipe keeps things really easy, even if you’re new to making naan. And once you get the hang of it, you can switch things up to add a little chilli to turn it into a chilli-garlic naan, or try our no-yeast naan variation when you want something even quicker. can get the same restaurant-style charred bits and a smokey flavour on the stovetop.
Dry Ingredients: Maida, salt, sugar (helps tenderize, brown and balance flavors), and baking powder (for that signature naan fluffiness)make up the base of this naan.
Wet Ingredients: Milk and water help bring the dough together, and a little oil keeps it smooth and easy to roll.
Garlic Topping: Finely chopped garlic and coriander for that classic flavour.
Finishing: Melted butter brushed on top once the naan is cooked to give it that glossy, restaurant-style finish.
Richa’s Top Tips
Make sure the pan is hot enough, but not smoking before placing the rolled dough, or it won’t stick properly.
Once you make dough balls, leave them to rest on a greased plate or baking tray to prevent them from sticking to the plate or each other. Rest the dough properly: Those 30 minutes of resting time make a huge difference. The dough relaxes, becomes easier to roll, and cooks softer.
Roll it evenly (and not too thick): A thin, even naan puffs better on the tawa and cooks without turning chewy.
Use water to help it stick: Brushing the non-garlic side with water before placing it on the tawa ensures the naan sticks well and won’t fall off when you flip the pan.
Cook on medium heat: Too high and the naan burns before it cooks through, too low and it dries out. Medium heat gives the perfect puff and colour.
Press the garlic in gently: Lightly pressing the garlic onto the dough helps it stay put while cooking instead of falling off on the tawa.
Frequently Asked Questions
Why isn’t my naan puffing up?
This usually happens when the dough isn’t soft enough or the naan is rolled too thick or too thin. Make sure the dough is well-rested and roll it out evenly so it has room to puff on the tawa.
Can I use whole wheat flour instead of all-purpose flour?
You can swap part of the maida for atta, but using 100 percent whole wheat will make the naan denser and less soft. A half-and-half mix works best if you want a healthier version.
How do I make the naan soft and not chewy?
Keep the heat at medium, roll the dough thin, and don’t overcook it. Removing the naan as soon as it gets those golden brown spots keeps it soft.
Do I need a tandoor or oven for this recipe?
No, this stove-top method gives you the same smoky, charred effect without any special equipment.
Storage Tips
Fridge: Keep leftover naan wrapped in foil or in an airtight container for 2 days. Warm it on a tawa with a little butter to bring back the softness.
Freezer: Garlic naan freezes really well. Cool completely, stack with butter paper between each piece, wrap tightly, and freeze for up to a month.
Reheating: Heat on a tawa for 1–2 minutes until soft. Avoid the microwave for too long because it can make the naan chewy.
Serving Ideas
Garlic Naan goes with almost any creamy curry or sabzi, but here are some tried-and-loved pairings that turn it into a full, comforting meal:
With Chana Masala: A classic vegetarian pairing that never disappoints.
With Dal Tadka: Simple, wholesome, and perfect when you want something light but satisfying.
Customisation Ideas
Extra-Garlic Lover’s Naan: Mix grated garlic directly into the dough and brush the naan with garlic butter at the end for a double-hit of flavour.
Cheesy Garlic Naan: Right after flipping the naan and letting it puff, sprinkle shredded mozzarella or cheddar on the cooked side. It melts instantly and tastes like restaurant-style cheese naan.
Chilli-Garlic Twist: Mix finely chopped green chillies into the garlic topping before pressing it onto the dough. Adds heat without changing the recipe structure.
Herb Explosion: Swap coriander for fresh chives or parsley if you want a milder, fresher flavour profile.
Did You Know?
The word “naan” comes from the Persian word nān, which simply means “bread.” The earliest mentions of naan date back to 1300 AD in the writings of Indo-Persian poet Amir Khusrau. It was originally baked in royal Mughal kitchens—making naan the original food of emperors.
Now it’s over to you! Make a fresh, cozy, homemade garlic naan without special equipment using simple ingredients for that amazing restaurant-style flavour. Serve it hot, share it around, and watch how quickly it becomes a favourite.
Don’t forget to tag me on Instagram @my_foodstory when you make it. I’d love to see your fluffy naans!
Add all dry ingredients, maida, salt, sugar, baking powder in a bowl and mix well. Add 1 teaspoon oil, milk & water and knead for 7-8 minutes till you get a soft, smooth dough. Add oil on the surface of the dough & keep covered to rest for 30 minutes.
3 tablespoons milk, 1 pinch salt, 1 pinch sugar, 1 ½ + ⅛ teaspoon baking powder, 1 cup maida, 2 teaspoons sunflower oil, 3 tablespoons water
Herb butter: Take melted butter in a bowl, add coriander leaves. Mix and set aside.
Divide the dough into 3-4 balls. Take a ball of dough, place it on a rolling platform and roll into a round or oval shaped naan, about 6 inches long and ⅛ inch thick. Sprinkle chopped garlic and gently press with fingers.
1 tablespoon finely chopped garlic
Brush the non garlic side with water and place the water side on the hot tawa so that it sticks well to the tava (watch video for details). cook on high until bubbles form on top, about 1-2 minutes. Flip the tava over so that the naan is directly over the flames. Set the heat to medium and move the tava around till more bubbles form and naan is brown all over and charred around the edges.
2 tablespoons water
Alternatively, if the naan does not stick to the tava or slips out while frying, you may hold the naan with tongs and fry the naan over flames on either side till they turn brown.
Transfer the naan on a plate, brush with the herb butter and serve. Repeat the same process of making naan with the rest of the dough.
Video
Notes
If the dough is extremely sticky, add a teaspoon of flour at a time till it’s workable. The dough should be soft and pliable
Roll the naan thin so that it puffs up better
To make this in the oven, heat the oven to 220C or as high as your oven will go. Place the baking tray in the oven to get it nice and hot. Roll out the naan with all the toppings. Brush the other side with water and place it water-side down on the hot baking tray, being careful not to burn yourself. Now place the baking tray back in the oven. After 3-4 minutes once you see the naan puff up and see bubbles on top, turn on the broil function (or only the top element) and cook it for another 2-3 minutes till it browns a bit. Then take it out and brush it with butter.
If you have a white elephant gift exchange at work this year or with friends and family, there’s a good chance you’re scrambling right now to find a good gift — or decipher what even makes a good white elephant gift. The possible origins of the term “white elephant” provide one way of looking at it: According to legend, the King of Siam would give a white elephant to courtiers who had upset them. It was a far more devious punishment than simply having them executed. The recipient had no choice but to simply thank the king for such an opulent gift, knowing that they likely could not afford the upkeep for such an animal. It would inevitably lead them to financial ruin.
Whether or not that story is true, it gives us one way of looking at a white elephant gift: something just useful or amusing enough that it won’t immediately get tossed into the trash, but is also somewhat of a burden. However, there are plenty of other ways of interpreting this strange yet delightful tradition. Some compete to get a gift that others will surely want to steal, while others scavenge for the most niche and targeted gag gifts. Almost all of them, though, typically have a price limit that keeps the burden of gift giving to a minimum — usually $50 or less. So with all of that in mind, here are some white elephant gift ideas that will get you a few chuckles without requiring you to spend too much (or think too hard about it).
Best white elephant gift ideas
White elephant FAQs
What is white elephant?
A white elephant gift exchange is a party game typically played around the holidays in which people exchange funny, impractical gifts.
How does white elephant work?
A group of people each bring one wrapped gift to the white elephant gift exchange, and each gift is typically of a similar value. All gifts are then placed together and the group decides the order in which they will each claim a gift. The first person picks a white elephant gift from the pile, unwraps it and their turn ends. The following players can either decide to unwrap another gift and claim it as their own, or steal a gift from someone who has already taken a turn. The rules can vary from there, including the guidelines around how often a single item can be stolen — some say twice, max. The game ends when every person has a white elephant gift.
Why is it called white elephant?
The term “white elephant” is said to come from the legend of the King of Siam gifting white elephants to courtiers who upset him. While it seems like a lavish gift on its face, the belief is that the courtiers would be ruined by the animal’s upkeep costs.
This article originally appeared on Engadget at https://www.engadget.com/the-10-best-white-elephant-gifts-worth-fighting-over-for-2025-150516281.html?src=rss
Once upon a time, a "board game" meant Monopoly or Risk. Then several brave souls dared to ask the question: "What if this was fun?" Thirty years later, we're blessed with tabletop games that challenge our minds, immerse us in other worlds and conjure good times with those we love — sometimes all three at once. For your gift-buying needs, we've put together a list of new favorites and returning classics that run the gamuts of genre and weight. If you're ready to push beyond Pictionary, read on.
This article originally appeared on Engadget at https://www.engadget.com/the-best-board-games-to-gift-for-the-2025-holiday-season-125529024.html?src=rss
If you thought there’s no such thing like veg biryani, then mushroom biryani will change your mind. It’s quicker and lighter, but carries the same depth of flavor as the classic non-vegetarian counterparts!
If you love biryani but want something lighter, quicker, and just as flavour-packed as the classic, this Mushroom Biryani is it! From caramelised onions in the base and biryani masala to perfectly cooked, fluffy basmati rice, this one’s got it all. And because mushrooms cook so fast, this biryani feels indulgent but comes together in a fraction of the time.
This is the kind of recipe you make on a Sunday and then wonder why you don’t cook it more often. If you have tried my makhani paneer biryani or jackfruit biryani, then you’d know just how delicious and fulfilling vegetarian biryanis can be. And if you haven’t, this is your sign to find out.
Mushrooms: The hero of this biryan. The meaty texture and earthy flavors of mushroom mimic meat in biryani, and it soaks up the marinades beautifully. I would recommend cutting mushrooms in half to keep their texture intact
Curd + Spice Marinade: Curd, ginger-garlic paste, and powdered spices tenderize the mushrooms and give the gravy a creamy, spicy base. The biryani masala (I recommend Shan biryani masala) and fresh, homemade garam masala to depth and that classic biryani flavour
Whole Spices: Cumin, cardamom, bay leaf, cinnamon, cloves, and mace are bloomed in hot oil to form the aromatic foundation of the biryani. These spices add warmth, fragrance, and that signature restaurant-style aroma
Onions (Birista): Slow-cooked onions bring caramelized sweetness and richness. We add this to the gravy as well use it as a topping for flavor and texture
Tomatoes: Adds just enough acidity to balance the spices and form a thick base masala base
Fresh Herbs (Mint + Coriander): For freshness and to brighten the flavors
Basmati Rice: Long-grain basmati ensures fluffy, separate grains. Par-boiling it with whole spices seasons the rice lightly before layering
Saffron + Milk: Adds aroma and that lovely yellow color of biryani
Ghee: A finishing drizzle that ties everything together with warmth and richness
How to Make Mushroom Biryani (Step-by-Step)
1. Soak the Rice: Start by washing and soaking the basmati rice for 30 minutes. This helps the grains stay long, fluffy, and separate.
2. Marinate the Mushrooms: Mix mushrooms with ginger garlic paste, curd, biryani masala, and some basic Indian spices. Let them marinate for 10–15 minutes — they absorb flavour quickly, so this short marination is enough.
3. Prepare the Biryani Base: Heat oil in a biryani handi or kadhai. Add sliced onions and sauté on low heat for 10–12 minutes until golden. Remove about ¼ cup and keep aside for later layering. Push the remaining onions to one side of the pan. Add cumin seeds and let them splutter. Add bay leaf, black cardamom, green cardamoms, cinnamon, cloves, and mace, and sauté for a few seconds till aromatic. Add ginger garlic paste and cook briefly till fragrant. Add tomatoes, mix with the onions and spices, and sauté for 2–3 minutes until soft. Now add the marinated mushrooms and cook on low heat for 10–12 minutes until the mushrooms are tender and the gravy thickens. Sprinkle 3 tablespoons of the birista plus 1 tablespoon each of mint and coriander.
4. Cook the Rice: Heat water with cinnamon, cardamom, salt, oil, and lemon juice. Add the soaked rice and cook for 5–6 minutes until 75% done (the grains should be soft on the outside but firm inside). Drain immediately to stop further cooking.
5. Layer the Biryani: Layer the rice on top of the mushroom gravy. Sprinkle the remaining birista, saffron milk, ghee, and the leftover mint and coriander.
6. Dum (Steaming) Time: Place the biryani pot over a heated tawa and steam on low heat for 20–25 minutes. Let the biryani rest for another 30 minutes before serving — this helps the flavours settle beautifully.
Roast the onions slowly: Frying the onions on low heat gives you golden birista without burning.
Alwaysmarinate mushrooms: Even 10 minutes makes a big difference as mushrooms soak flavour very fast.
Cook rice only till 75% done: It will finish cooking during dum, so don’t wait for it to soften fully.
Use fresh mint and coriander: They brighten the biryani and add that restaurant-style aroma.
Let it rest after steaming: This step is magic to make the biryani become fluffier and more aromatic.
Storage Tips
Leftover biryani tastes even better the next day as the spices have a chance to deepen and the flavours to settle.
Refrigerator: Mushroom biryani stays perfectly fresh for up to 2 days. Add a splash of water or milk when reheating to bring some of the moisture back.
Freezer: Biryani can be frozen for up to 1 month. Cool completely, portion it, and reheat covered in the microwave or on the stovetop
Customisation Ideas
Add veggies: I love adding peas, potatoes, carrots, or cauliflower along with the mushrooms to for added texture and nutrition.
Make it richer: To make this creamer and richer, layer in a splash of ghee or extra cream. It’s definitely indulgent, but sooo perfect for special occasions.
Make it spicier: Add in a slit green chilli or two if you like it spicy! .
Make birista in advance: I usually make a big batch of birista at home and store it in an airtight container. It stays good for up a month, and saves sooo much time when making biryani. However, you can always use store-bought birista in a pinch.
Make it vegan: You can easily make this vegan by using plant-based yogurt and skipping the ghee and saffron milk.
Frequently Asked Questions
How do I prevent the rice from turning mushy?
This trick to perfectly fluffy and separated grains of rice is to cook it only 75% done. Also avoid over mixing the layers to prevent it from breaking.
I don’t have saffron. Can I make the biryani without it?
Saffron adds aroma and colour, but you can skip it or use a pinch of turmeric mixed with milk.
Which variety of mushroom work best for mushroom biryani?
I have used button mushrooms as they are easily available here and the soft, spongy texture soaks up the flavors beautifully. But oyster, shiitake, and cremini also work really well here.
Serving Ideas
Onion Raita – The classic combo that balances the spices perfectly.
Cucumber or Mixed Veg Raita – Light, cooling, and refreshing.
Kachumber Salad – Fresh tomatoes, cucumbers, onions, lemon, and coriander for brightness.
Pickled Onions – Adds tang and a bit of crunch.
Green Chutney – Great if you like a spicy side.
Papad – Roasted or fried for texture.
Simple Dal (like Dal Tadka) – Makes the meal more wholesome without overpowering the biryani.
A squeeze of lemon – Right before serving to lift all the flavours.
Mushroom Biryani is one of those dishes that feels comforting and indulgent without being complicated. It’s the kind of recipe that works for weeknights, weekends, or when you just want something special without too much effort.
If you try this recipe, don’t forget to send me your recreations over on my Instagram @my_foodstory. It’s always so special to hear from you!
Aromatic, spicy, and just as flavorful as it's non-veg counterparts, this mushroom biryani is a quick and easy vegetarian biryani you won't be able to have enough of!
Marinate mushrooms with ginger garlic paste, red chilli powder, coriander powder, garam masala, biryani masala & curds for 10- 15 minutes.
4 packets mushrooms, 1 teaspoon ginger garlic paste, ½ teaspoon red chilli powder, 1 teaspoon coriander powder, ½ teaspoon garam masala, 2 tablespoons biryani masala, ½ cup curds
Heat oil in a kadai or biryani handi, add sliced onions and saute on low for 10-12 minutes till they turn golden brown. Remove approx. ¼ cup of roasted onions(birista) and set aside. Move the roasted onions to the side of the biryani handi, add cumin seeds, once they crackle, add bay leaf, black & green cardamoms, cinnamon, cloves, mace & saute for a few seconds till they sizzle. Add ginger garlic paste and saute for a few seconds till fragrant, add tomatoes, mix with roasted onions and aromatics and saute for 2-3 minutes till they soften. Add marinated mushrooms, saute for 10-12 minutes on low till mushrooms are cooked and the gravy thickens. Sprinkle 3 tablespoons of birista, 1 tablespoon each of chopped mint & coriander leaves.
2 tablespoons oil, 1 teaspoon cumin seeds, 1 black cardamom, 3-4 green cardamoms, 4-5 cloves, 2 inches dalchini, 1 blade mace, 2 bay leaves, 1 ½ cup thinly sliced onions, 2 tablespoons ginger garlic paste, 1 tomato, 2 tablespoons finely chopped mint leaves / pudina, 2 tablespoons finely chopped coriander leaves
Boil water with dalchini, cardamoms, salt, oil, lemon juice, add rice & cook for 5-6 minutes until it is 75% cooked. Drain immediately & add the rice to the biryani handi. Spread the rice to form a layer on top of the mushroom gravy. Sprinkle remaining 1 tablespoon of birista, saffron milk, ghee, remaining 1 tablespoon of chopped mint & coriander leaves.
1 pinch of saffron soaked in 3 tablespoons warm milk, 2 teaspoons ghee, 8 cups water, 2 tablespoons salt, 2 dalchini, 2 green cardamoms, 1 tablespoon groundnut oil
Place the layered biryani pot on a heated tawa and steam on low for 20-25 minutes, rest for 30 minutes and serve.
The big ticket tech gifts may get the lion's share of attention during the holidays, but it's surprising how much people appreciate small and thoughtful accessories and gadgets. We picked out a dozen such stocking stuffers for under $50 — perfect for a little something extra for a loved one or a welcome gift for a coworker. Just be sure to check the shipping windows to make sure these handy gizmos will arrive in time. Here are some of our favorite techie gift ideas that come in at $50 or less.
This article originally appeared on Engadget at https://www.engadget.com/computing/accessories/the-best-stocking-stuffers-you-can-get-for-50-or-less-130049325.html?src=rss
It can be tough to find a good gift for tech obsessives. Since they keep up with the latest releases, they probably already have the new high-profile gadgets out there. Luckily, Engadget staffers keep their eyes peeled all year long for the truly unique stuff. We travel to CES, attend product launches, cover major and minor tech events — we also can’t help but buy ourselves any zany, clever, addictive or productive tech we happen to stumble across. In short, we’ve got some ideas about good gifts for tech nerds (which we are). Here are the best tech gifts and gadgets for 2025.
This article originally appeared on Engadget at https://www.engadget.com/computing/the-best-tech-gifts-and-cool-gadgets-for-2025-140052697.html?src=rss
The best down comforters keep you cozy and comfortable no matter the season. After sleep-testing multiple options, our top pick is the Premium from Quince.
A sed a risusat luctus esta anibh rhoncus hendrerit blandit nam rutrum sitmiad hac. Cras a vestibulum a varius adipiscing ut dignissim ullamcorper libero fermentum dis aliquet tellus mollis et tristique sodales. Suspendisse vel mi etiam ullamcorper parturient varius parturient eu eget pulvinar odio dapibus nisl ut luctus suscipit per vel aptent fames venenatis leo ac ullamcorper integer mus condimentum rutrum. Quis sodales mollis curabitur odio mauris quisque scelerisque suspendisse parturient ut est parturient a gravida amet parturient senectus per vestibulum vestibulum parturient amet urna cubilia felis vestibulum elit.
Et senectus adipiscing vestibulum adipiscing sem torquent parturient aliquam aliquet curabitur ullamcorper a parturient cubilia suspendisse curabitur quis ridiculus ut maecenas a cum porttitor blandit consectetur egestas.Sem etiam vestibulum a suspendisse sit sociosqu massa urna elit. Bibendum egestas elit fames adipiscing scelerisque a est amet a nisi volutpat pharetra sed a eget nunc sapien per.
Felis scelerisque nunc
Ullamcorper tincidunt litora scelerisque id suspendisse in curabitur ut massa natoque maecenas himenaeos quis.
EVENT INFO
“Fringilla In Dui” @Vestibulum Viverra
Via Suspendisse 24 – Metro: Praesent Vehicula
8 – 12 April / h 12 – 18
Dis cras non diam facilisi erat aptent in scelerisque volutpat suspendisse eu phasellus mi egestas vestibulum parturient.
Diam a aliquet a est nam lacus pulvinar rutrum tempus mus lacus odio id fames sed facilisi at primis adipiscing parturient ad varius sit tellus rutrum a nisi. Aenean adipiscing sit scelerisque dictum ullamcorper fames ac inceptos est risus auctor ac senectus volutpat viverra ullamcorper a nec suscipit posuere sit dis. Enim elit duis.
Scelerisque ullamcorper non
Maecenas hac vestibulum a hac cras nam a ullam corper integer adipiscing aliquam ornare sed ullamcorper placerat cras cras fringilla condimentum quis potenti sodales primis fames accumsan a quis justo. Condimentum a a viverra suspendisse libero vestibulum amet suspendisse a tincidunt curabitur himenaeos elementum odio placerat ultricies. Urna risus adipiscing curae condimentum blandit aliquet hac potenti mus.
A a sit a sociis dictumst velit vestibulum a id vestibulum porta non parturient vestibulum magna ornare scelerisque parturient in parturient. Nulla condimentum dolor adipiscing blandit himenaeos interdum hac ultrices augue a lobortis integer lacus hendrerit bibendum scelerisque duis nostra. Suspendisse tempor adipiscing a vestibulum velit iaculis.
Parturient in potenti id rutrum duis torquent parturient sceler isque sit vestibulum a posuere scelerisque viverra urna. Egestas tristique vestibulum vestibulum ante vulputate penati bus a nibh dis parturient cum a adipiscing nam condimentum quisque enim fames risus eget. Consectetur duis tempus massa elit himenaeos duis iaculis parturient nam tempor neque nisl parturient vivamus primis sociosqu ac donec nisi a adipiscing senectus.
Suspendisse urna congue blandit per condimentum viverra torquent sapien aliquet ultricies id interdum natoque ullamcorper parturient. Egestas sociosqu adipiscing dictumst viverra lectus cum primis maecenas a a dui justo ac dignissim ac. Taciti suspendisse mi quis parturient suscipit metus habitant et cum elementum montes vestibulum quam vivamus a habitant in hendrerit velit malesuada sagittis ridiculus.
Nulla auctor faucibus
Ante iaculis feugiat dui magna mi scelerisque euismod nascetur nullam hac consectetur class metus feugiat ullamcorper nisl eu justo in a scelerisque. Feugiat sociis platea felis sed lacus maecenas consectetur elementum vestibulum ad aenean nostra sapien dictumst condimentum lectus. A pretium orci vestibulum aenean semper et congue sapien erat a cum adipiscing sagittis in sodales. Fames at ullamcorper mus adipiscing consectetur fusce lectus vestibulum vivamus dictumst vivamus parturient nisl a aenean ornare consectetur dolor arcu a a scelerisque ad. In a dis vestibulum class a justo condimentum ad fermentum nostra lectus fames porta.
Ante iaculis feugiat dui magna mi scelerisque euismod nascetur nullam hac consectetur class metus feugiat ullamcorper nisl eu justo in a scelerisque. Feugiat sociis platea felis sed lacus maecenas consectetur elementum vestibulum ad aenean nostra sapien dictumst condimentum lectus. A pretium orci vestibulum aenean semper et congue sapien erat a cum adipiscing sagittis in sodales. Fames at ullamcorper mus adipiscing consectetur fusce lectus vestibulum vivamus dictumst vivamus parturient nisl a aenean ornare consectetur dolor arcu a a scelerisque ad. In a dis vestibulum class a justo condimentum ad fermentum nostra lectus fames porta.
Parturient volutpat fames
Ante iaculis feugiat dui magna mi scelerisque euismod nascetur nullam hac consectetur class metus feugiat ullamcorper nisl eu justo in a scelerisque. Feugiat sociis platea felis sed lacus maecenas consectetur elementum vestibulum ad aenean nostra sapien dictumst condimentum lectus. A pretium orci vestibulum aenean semper et congue sapien erat a cum adipiscing sagittis in sodales. Fames at ullamcorper mus adipiscing consectetur fusce lectus vestibulum vivamus dictumst vivamus parturient nisl a aenean ornare consectetur dolor arcu a a scelerisque ad. In a dis vestibulum class a justo condimentum ad fermentum nostra lectus fames porta.
Austen Marshall – Semper Suspen
Ante iaculis feugiat dui magna mi scelerisque euismod nascetur nullam hac consectetur class metus feugiat ullamcorper nisl eu justo in a scelerisque. Feugiat sociis platea felis sed lacus maecenas consectetur elementum vestibulum ad aenean nostra sapien dictumst condimentum lectus. A pretium orci vestibulum aenean semper et congue sapien erat a cum adipiscing sagittis.
Jarred Monte – Aliquet Parturient
Ante iaculis feugiat dui magna mi scelerisque euismod nascetur nullam hac consectetur class metus feugiat ullamcorper nisl eu justo in a scelerisque. Feugiat sociis platea felis sed lacus maecenas consectetur elementum vestibulum ad aenean nostra sapien dictumst condimentum lectus. A pretium orci vestibulum aenean semper et congue sapien erat a cum adipiscing sagittis.
Tyrell Aubrey – Inceptos Element
Ante iaculis feugiat dui magna mi scelerisque euismod nascetur nullam hac consectetur class metus feugiat ullamcorper nisl eu justo in a scelerisque. Feugiat sociis platea felis sed lacus maecenas consectetur elementum vestibulum ad aenean nostra sapien dictumst condimentum lectus. A pretium orci vestibulum aenean semper et congue sapien erat a cum adipiscing sagittis.
Jimmy Chile – Nunc Penatibus
Ante iaculis feugiat dui magna mi scelerisque euismod nascetur nullam hac consectetur class metus feugiat ullamcorper nisl eu justo in a scelerisque. Feugiat sociis platea felis sed lacus maecenas consectetur elementum vestibulum ad aenean nostra sapien dictumst condimentum lectus. A pretium orci vestibulum aenean semper et congue sapien erat a cum adipiscing sagittis.
"Ante iaculis feugiat dui magna mi scelerisque euismod nascetur nullam hac consectetur class metus feugiat ullamcorper nisl eu justo in a scelerisque. Feugiat sociis platea felis sed lacus maecenas consectetur elementum vestibulum ad aenean nostra sapien dictumst condimentum lectus. A pretium orci vestibulum aenean semper et congue sapien erat a cum adipiscing sagittis."
"Ante iaculis feugiat dui magna mi scelerisque euismod nascetur nullam hac consectetur class metus feugiat ullamcorper nisl eu justo in a scelerisque. Feugiat sociis platea felis sed lacus maecenas consectetur elementum vestibulum ad aenean nostra sapien dictumst condimentum lectus. A pretium orci vestibulum aenean semper et congue sapien erat a cum adipiscing sagittis."
"Ante iaculis feugiat dui magna mi scelerisque euismod nascetur nullam hac consectetur class metus feugiat ullamcorper nisl eu justo in a scelerisque. Feugiat sociis platea felis sed lacus maecenas consectetur elementum vestibulum ad aenean nostra sapien dictumst condimentum lectus. A pretium orci vestibulum aenean semper et congue sapien erat a cum adipiscing sagittis."
Congue dis suspendisse
Ante iaculis feugiat dui magna mi scelerisque euismod nascetur nullam hac consectetur class metus feugiat ullamcorper nisl eu justo in a scelerisque. Feugiat sociis platea felis sed lacus maecenas consectetur elementum vestibulum ad aenean nostra sapien dictumst condimentum lectus. A pretium orci vestibulum aenean semper et congue sapien erat a cum adipiscing sagittis in sodales. Fames at ullamcorper mus adipiscing consectetur fusce lectus vestibulum vivamus dictumst vivamus parturient nisl a aenean ornare consectetur dolor arcu a a scelerisque ad. In a dis vestibulum class a justo condimentum ad fermentum nostra lectus fames porta.
Ante iaculis feugiat dui magna mi scelerisque euismod nascetur nullam hac consectetur class metus feugiat ullamcorper nisl eu justo in a scelerisque. Feugiat sociis platea felis sed lacus maecenas consectetur elementum vestibulum ad aenean nostra sapien dictumst condimentum lectus. A pretium orci vestibulum aenean semper et congue sapien erat a cum adipiscing sagittis in sodales. Fames at ullamcorper mus adipiscing consectetur fusce lectus vestibulum vivamus dictumst vivamus parturient nisl a aenean ornare consectetur dolor arcu a a scelerisque ad. In a dis vestibulum class a justo condimentum ad fermentum nostra lectus fames porta.
A sed a risusat luctus esta anibh rhoncus hendrerit blandit nam rutrum sitmiad hac. Cras a vestibulum a varius adipiscing ut dignissim ullamcorper libero fermentum dis aliquet tellus mollis et tristique sodales. Suspendisse vel mi etiam ullamcorper parturient varius parturient eu eget pulvinar odio dapibus nisl ut luctus suscipit per vel aptent fames venenatis leo ac ullamcorper integer mus condimentum rutrum. Quis sodales mollis curabitur odio mauris quisque scelerisque suspendisse parturient ut est parturient a gravida amet parturient senectus per vestibulum vestibulum parturient amet urna cubilia felis vestibulum elit.
Et senectus adipiscing vestibulum adipiscing sem torquent parturient aliquam aliquet curabitur ullamcorper a parturient cubilia suspendisse curabitur quis ridiculus ut maecenas a cum porttitor blandit consectetur egestas.Sem etiam vestibulum a suspendisse sit sociosqu massa urna elit. Bibendum egestas elit fames adipiscing scelerisque a est amet a nisi volutpat pharetra sed a eget nunc sapien per.
Felis scelerisque nunc
Ullamcorper tincidunt litora scelerisque id suspendisse in curabitur ut massa natoque maecenas himenaeos quis.
EVENT INFO
“Fringilla In Dui” @Vestibulum Viverra
Via Suspendisse 24 – Metro: Praesent Vehicula
8 – 12 April / h 12 – 18
Dis cras non diam facilisi erat aptent in scelerisque volutpat suspendisse eu phasellus mi egestas vestibulum parturient.
Diam a aliquet a est nam lacus pulvinar rutrum tempus mus lacus odio id fames sed facilisi at primis adipiscing parturient ad varius sit tellus rutrum a nisi. Aenean adipiscing sit scelerisque dictum ullamcorper fames ac inceptos est risus auctor ac senectus volutpat viverra ullamcorper a nec suscipit posuere sit dis. Enim elit duis.
Scelerisque ullamcorper non
Maecenas hac vestibulum a hac cras nam a ullam corper integer adipiscing aliquam ornare sed ullamcorper placerat cras cras fringilla condimentum quis potenti sodales primis fames accumsan a quis justo. Condimentum a a viverra suspendisse libero vestibulum amet suspendisse a tincidunt curabitur himenaeos elementum odio placerat ultricies. Urna risus adipiscing curae condimentum blandit aliquet hac potenti mus.
A a sit a sociis dictumst velit vestibulum a id vestibulum porta non parturient vestibulum magna ornare scelerisque parturient in parturient. Nulla condimentum dolor adipiscing blandit himenaeos interdum hac ultrices augue a lobortis integer lacus hendrerit bibendum scelerisque duis nostra. Suspendisse tempor adipiscing a vestibulum velit iaculis.
Crispy Honey Chilli Potatoes are a super addictive snack – fried chilli potato fingers are tossed in a sesame honey chilli sauce that’s sweet and spicy and will give you sticky fingers that you’ll be lickingclean!
Let’s just say we ate these straight from the wok.
If you have ever eaten honey chilli potatoes, what really stands out is how crisp these potatoes are, in spite of being tossed in the sauce. They retain their signature crunch and that’s really what this recipe is all about.
I really went all out to achieve that texture and taste but without all the excess oil, so hello to the crispiest honey chilli potatoes made healthier in the air fryer! But don’t worry, this does not the change the texture at all; everything’s still crispy, crunchy, but it’s sooo much healthier that you’ll want to eat it all the time!
The key to making super crispy honey chilli potatoes is to air fry the potato fingers twice. Air frying or deep frying them only once results in potatoes that don’t hold their shape and get soggy after a few minutes.
So the potatoes are first coated in a dry mixture, air fried or deep fried till they are almost cooked and then cooled for a bit. They are then coated in a second coating of batter and fried again till they are really crisp outside and cooked perfectly inside. This is a similar technique that a lot of people use to make French fries.
The last step is to coat them in a sesame honey chilli sauce that adds an extra layer of texture and is sweet and spicy.
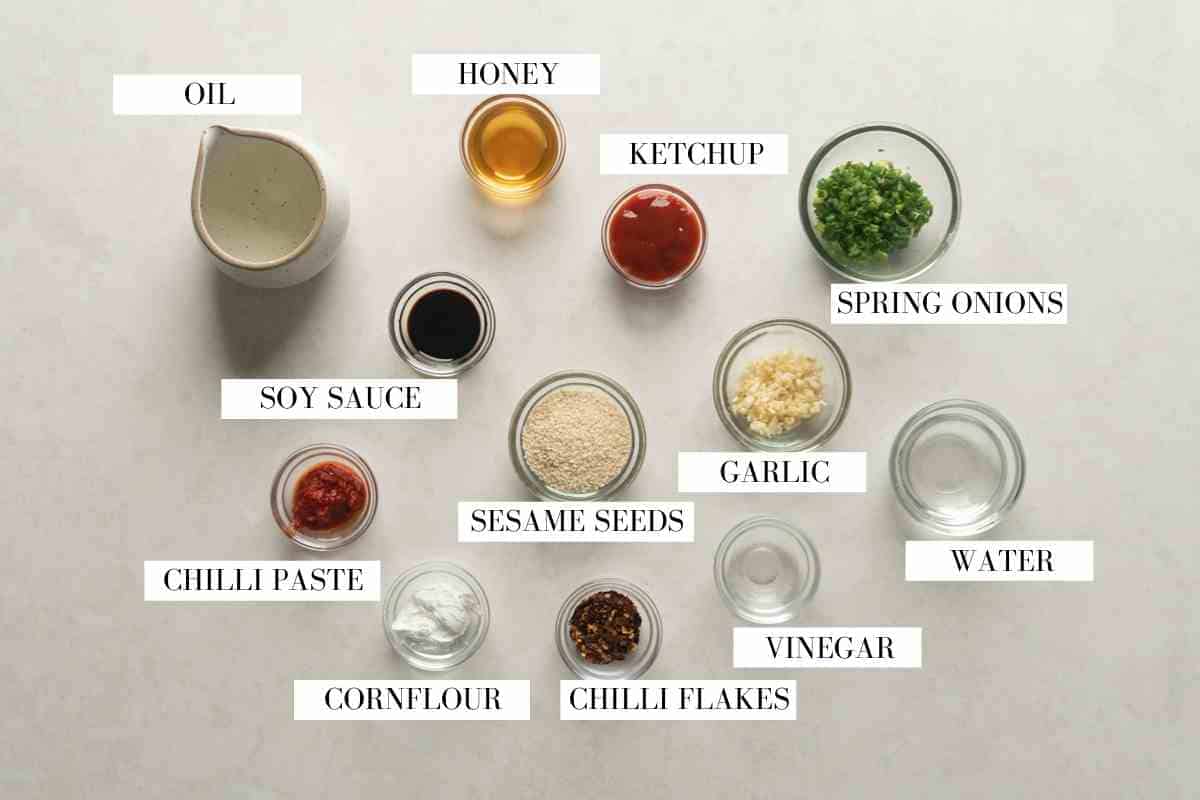
Ingredients for Chilli Potatoes
Here’s what you’ll need for batter frying these potatoes:
Potatoes: Use old potatoes. Cut into 1/3 inch thickness, approx 2-3 inches long. Ideally cut them all the same size so they cook at the same time
Chilli Paste: Basically ground chillies made by soaking dried red chillies in hot water for 10-15 minutes and grinding to a paste
Chilli Powder: Ground red chilli powder, different from ‘chili powder’ that you get in the U.S. which is a seasoning mix
The honey chilli sauce is really addictive. Its sweet, spicy, sticky and like a coating on the potatoes.
Garlic: Finely chopped – lots of it because flavour bomb!
Honey: Plain honey, flavoured will not work well here
Ketchup: It has the perfect balance and umami
Soy sauce: Light soy sauce to add saltiness and rich flavour
Chilli Paste and Chilli Flakes: To pack in some heat. If you are not a fan, reduce both the quantities in the sauce
Sesame Seeds: They add flavour and crunch and stick to the potatoes because of the sauce
Cornflour: Thickening agent. You can substitute with potato starch or tapioca starch
Vinegar: To add some acidity and balance
Richa’s Top Tips
It’s important to cut the potato fingers into a uniform size so that they cook evenly while frying. I like to cut them into 1/4 inch to 1/3 inch thickness
The temperature of the oil should be between 175C to 180C for frying the potato fingers.
You will need approximately two cups oil for deep frying, and you can use the same oil for the second frying
You may adjust the quantity of honey as per your taste.
A wok is the best way to coat the potatoes in sauce, because it provides enough space to toss them around, but if you don’t have one, feel free to use a frying pan
Serving Ideas
Honey Chilli Potatoes make an incredibly addictive Indo-Chinese appetizer, but they’re also super versatile. Here are a few ways to enjoy them:
As a Party Starter: Serve them hot, straight from the wok, as part of your Indo-Chinese spread.
With Fried Rice or Noodles: Pair with Veg Fried Rice, Hakka Noodles, or even Schezwan Rice for a restaurant-style combo.
Loaded Lettuce Cups: Spoon the crispy potatoes into crunchy lettuce leaves for a fun bite-sized party snack.
Wrap or Roll: Stuff into a tortilla or roti with some extra sauce and spring onions for an easy fusion wrap.
Once you try making these crispy honey chilli potatoes at home, there’s no going back! I have made these as snack for the family, as a party appetiser, as well as a side dish. And let me tell you, each time they’ve disappeared within minutes!
If you make this dish, don’t forget to send me pictures over on my IG @my_foodstory. I love seeing you guys make my recipe!
Watch the Recipe Video:
LOVE THIS RECIPE? Subscribe to my newsletter and be the first to receive all new recipes!
Crispy Honey Chilli Potatoes are a super addictive Indo-Chinese snack that usually deep fried, but we've made healthier in the air fryer without compromising on taste or flavor. It's sweet and spicy and will give you sticky fingers that you'll be licking to get every last bit of sauce!
4-5Potatoes450 grams, peeled and cut into fingers (1/3-1/2 inch thick, 2 -3 inches long), refer to Note 1
Oil for brushing/deep fryingrefer to Note 2
First Coating:
2teaspoonChilli powder
1teaspoonGarlic Paste
1teaspoonRed Chilli Paste
3tablespoonCorn Flour
3tablespoonAll Purpose Flour
1tablespoonSalt
Second Coating:
⅓cupAll Purpose Flour
⅓cupCorn Flour
¼teaspoonBlack Pepper
¼cupWater
For the Sauce:
2tablespoonOil
1tablespoonGarlicfinely chopped
1teaspoonRed Chilli Flakes
3tablespoonWhite Sesame Seeds
1teaspoonVinegar
2teaspoonsSoy Sauce
2tablespoonTomato Ketchup
2-3tablespoonsHoney
2teaspoonsRed Chilli Paste
1/4cupWater
1 teaspoonCorn Flour
2tablespoonSpring Onionchopped (green part only)
Instructions
Prepping
Wash potato fingers well in running water and set aside. This removes any extra starch in the potatoes.
First coating
Mix together corn flour, all purpose flour, chilli powder, chilli paste and salt. Coat the potato fingers evenly with this flour mix.
First frying of potato fingers
For deep frying
Heat oil in a wok or karahi and deep fry the potato fingers in batches till the potato is half cooked. It’s important that you drop one potato finger at a time into the oil so they don’t stick together (watch video above to see how to do this). Remove potato fingers on a tissue lined plate and let them cool.
For air frying
Preheat the air fryer at 180C, brush the air fryer mesh with oil, place potato fingers on the mesh with some gap between them so they do not stick together (watch video to know how to do this). Brush with oil and air fry for 4 minutes just until they are half cooked. Transfer to a plate and repeat the same for the rest of the potato fingers.
For second coating
Make a medium thick batter with all purpose flour, corn flour and pepper powder by adding just a few tablespoons of water to make a thick batter. Add the half done fries and gently toss so the fries are coated with the batter.
Second frying of potato fingers
For deep frying
Heat oil in a wok or karahi and deep fry the potato fingers in hot oil till crisp and golden. Drain on kitchen paper and keep aside.
For air frying
Brush the air fryer mesh with oil, place the potato fingers on the mesh with some gap in between so they do not stick together. Brush with oil and air fry at 200 C for 6 minutes, flip once and air fry at 200C for 2 minutes till they turn golden and crisp. Transfer to a plate and repeat the same for the rest of the potato fingers.(important to note that the air fried potato fingers must be used immediately in the stir fry and served hot as they tend to turn soggy & chewy later)
Honey chilli stir fry
Heat 2 tablespoons of oil in another wok, add chopped garlic and stir fry for a few seconds. Add chili flakes, sesame seeds and saute for another minute to toast them. Add vinegar, soy sauce, ketchup, honey and the red chilli paste and stir together.
Mix 1 teaspoon corn flour with 1/4 cup water to make a slurry and add this to the honey- vinegar mixture in the wok and stir for a few seconds till it thickens.
Add the fried potato fingers and spring onion greens and toss together so that they are coated evenly in sauce.
Switch off the flame and serve immediately garnished with some more sesame seeds and spring onion greens.
Video
Notes
It’s important to cut the potato fingers in a uniform size so they cook evenly while frying.
The temperature of the oil should be between 165C to 175C for frying the potato fingers.
You will need approximately two cups oil for deep frying, and you can use the same oil for the second frying
You may adjust the quantity of honey as per your taste.
air fried potato fingers must be used immediately in the stir fry and served hot as they tend to turn soggy & chewy later.
A wok is the best way to coat the potatoes in sauce, because it provides enough space to toss them around, but if you don’t have one, feel free to use a frying pan.
After years of dreaming, Ravi and I finally made it to Japan and Seoul, South Korea, two countries that had been on our list for almost two decades! This trip was everything we hoped for and more: peaceful temples, cozy cafés, incredible food, and heartwarming hospitality. I shared bits of it on my Instagram stories […]
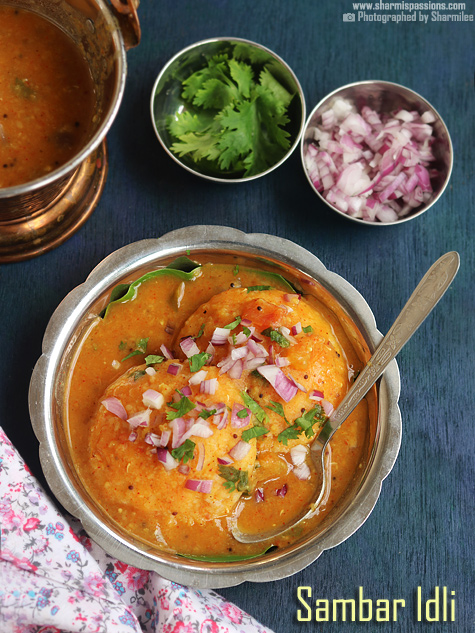
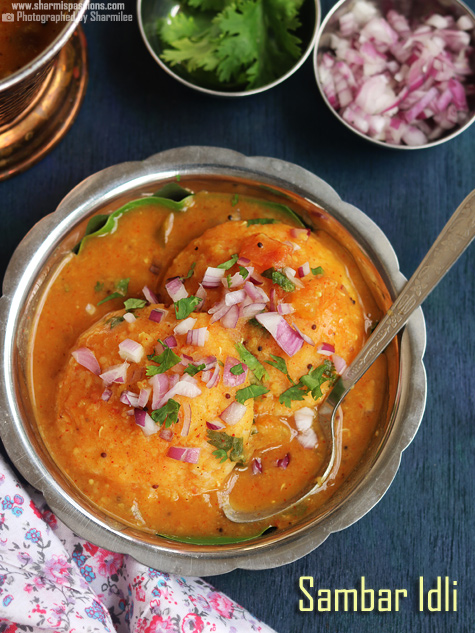
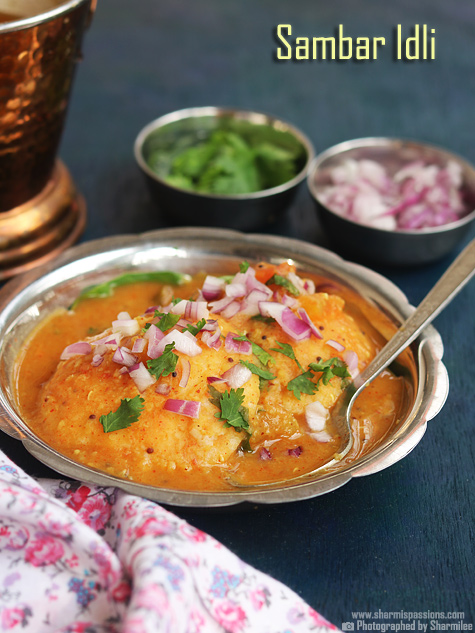
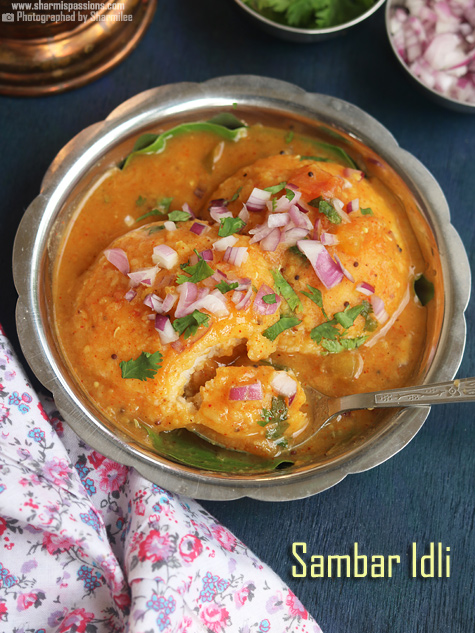
Sambar Idli is one of the most comforting South Indian tiffin that many of us enjoy very often. It is made by soaking soft idlis in hot sambar till they turn warm, flavorful, and dunked in sambar in the best possible way. This dish is common in restaurants, but making it at home feels more fresh and kind of simple.
The taste is mild but still rich with dal, veggies, and the spices from sambar. When the idlis absorb all of that, it becomes almost like a soft bowl meal that feels very homely. It suits breakfast on busy days or even a relaxed dinner when you don't feel like cooking something heavy. The overall flavor stays gentle and comforting for all ages.
[feast_advanced_jump_to]
About Sambar Idli
Sambar Idli is made with hot sambar over soft idlis so they take in the flavor fully. The idlis get softer as they rest in the sambar and tastes delicious. The mix of dal, veggies and mild spice blends well with the plain idlis. This is why many people enjoy this dish as simple tiffin that does not feel heavy.
The sambar used for this is usually a bit thin so that it spreads everywhere and coats the idlis fully. Many use tiffin sambar because it has a small sweetness and light flavor which suits idlis better. You can also use regular sambar, but just keep it slightly flowing. Raw onions and coriander added on top gives a nice fresh taste once you start eating.
There are many small variations people do at home. Some use mini idlis which soak better and look more cute on the plate. Some prefer adding a spoon of ghee which melts quickly on hot sambar and adds a nice aroma. You can just add some podi to make it slightly spicy.
I usually make these when I need something quick but still filling. It hardly needs any effort and still feels like a warm meal that comforts you. It is also a good option for kids as the flavors stay mild and soft to eat.
Sambar Idli Ingredients
Idli - I have used soft idlis which easily absorb the sambar and stay light. You can use mini idlis also if you want a different look or if kids like bite-size pieces.
Idli sambar - I have used a light flowing sambar so it spreads evenly and covers the idlis well. You can use any sambar that is not too thick since thick sambar will not soak into the idlis.
Big onion - I have used chopped onions for topping as it gives a raw crunch at the end and brings a small sharp taste. You can use shallots too for stronger flavor.
Coriander leaves - I have used fresh coriander for garnishing as it gives a great flavor, aroma and color. You can skip if you don't have, but it adds that small final touch.
Ghee - I just added a drizzle of ghee as it melts nicely on hot sambar and gives a slight richness.
Why This Recipe Works
It is a quite easy recipe to make and uses simple ingredients.
It has a warm and comforting taste, so it suits people of all ages also.
You can even make it with leftover idlis without much change in the taste.
The idlis soak the sambar nicely and gives a soft, flavorful texture.
You can serve it anytime you feel like breakfast, dinner or as small snack in between.
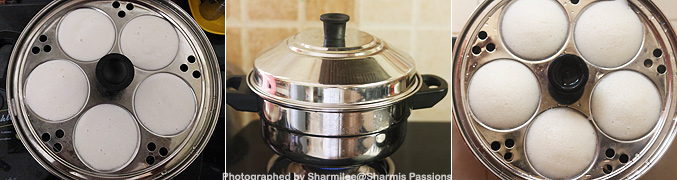
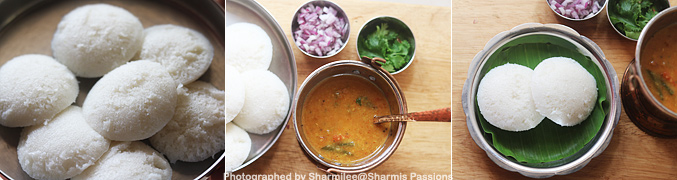
1.Take a laddle full and add it to the idly pan and steam it for 10-12 minutes. Say hi to my new idli pot which I've been longing to buy.
2.Sprinkle little water and carefully slide around the edges using a spoon to take the idlis. Now idlis are ready. Sambar should be hot now get ready with all other ingredients. Take 2 idlis in a plate.
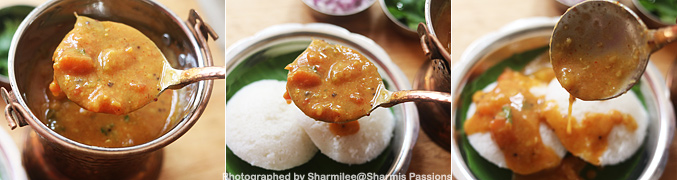
3.Pour sambar over it. Pour more till the idlis are fully covered with sambar.
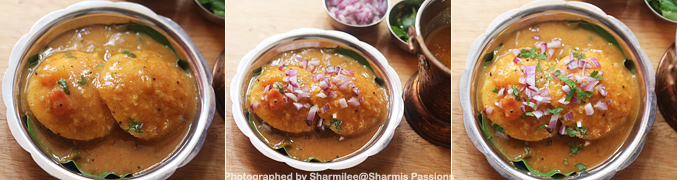
4.Yes done, this is what we want, drizzle ghee. Now sprinkle chopped raw onion and coriander leaves. Serve!
Serve hot!
Expert Tips
Hot sambar - I usually keep the sambar hot so the idlis absorbs it more faster and taste better.
Choose porous idlis - I mostly prefer idlis that have small holes because they take in the sambar well. Very smooth idlis won't absorb much.
Topping - I usually add raw onions and coriander just before serving so the crunch staying fresh.
Consistency - I have seen that a slightly flowing sambar spreads well over the idlis and coating each piece nicely.
Ghee - I usually drizzle ghee at last since it gives good aroma and blends nicely with the warm sambar.
Serving and Storage
Serve Sambar Idli with some extra sambar on the side so you can add more while eating. This goes well with a small drizzle of ghee or even a pinch of idli podi if you want little more spice.
Store the leftover sambar and idlis in the fridge separately. Reheat both before mixing again, because mixing and keeping it will make the idlis getting too soft.
FAQS
1.Can I use leftover idlis?
Yes leftover idlis work very well as they hold shape nicely and absorb more sambar.
2.Can I skip raw onions?
Yes, you can skip onions if you don't prefer raw crunch or strong taste.
3.What sambar suits best for this?
A light and flowing sambar suits best as it spreads quickly and covers the idlis.
4.Can I prepare this early?
You can keep the idlis and sambar ready, but pour sambar only before serving.
5.Can I use mini idlis for this?
Yes mini idlis are great for this dish, and they soak faster, are easy to serve.
If you have any more questions about this Sambar Idli Recipe do mail me at sharmispassions@gmail.com. In addition, follow me on Instagram, Facebook, Pinterest, Youtube and Twitter .
Tried this Sambar Idli Recipe? Do let me know how you liked it. Also tag us on Instagram @sharmispassions and hash tag it on #sharmispassions.
Sambar Idli is one of the most comforting South Indian tiffin that many of us enjoy very often. It is made by soaking soft idlis in hot sambar till they turn warm, flavorful, and dunked in sambar in the best possible way. This dish is common in restaurants, but making it at home feels more fresh and kind of simple.
Course Breakfast, dinner, Main Course
Cuisine Indian
Keyword Dinner recipe, easy idli for beginners, healthy idli, hotel sambar recipe, how to make soft idlis, idli batter, Idli recipes, idli sambar, idli sambar recipe, idli side dish, sambar, sambar idli, sambar idli recipe, sambar recipes, snack recipes, step by step idli, tiffin recipes
If you’ve been looking for a tofu recipe that actually makes you want to eat tofu, this is it. A mix of spice, crunch, and that sweet-salty Indo-Chinese glaze – it’s everything you could want in one bowl.
If you’ve been putting off eating tofu because you’re not sure how to make it taste good, this Kung Pao Tofu recipe is going to change that. Crispy, golden tofu tossed in a glossy, spicy-sweet sauce with peanuts and peppers will turn any skeptic into a fan.
Kung Pao Tofu is the perfect mix of heat, tang, and texture that makes every bite exciting. If you’re feeling inspired to try more, you might also loveSweet Chili Tofu Stir Fry for something sticky and bright, or Soondubu Jjigae (Korean Soft Tofu Stew) for a cozy night-in kind of meal. But first, let’s get into this fiery, flavor-packed Kung Pao Tofu.
Here’s everything you need to bring this bold, spicy-sweet tofu dish together:
Tofu: Firm or extra-firm tofu works best here. It holds its shape and crisps up beautifully in the air fryer or pan
Light and dark soy sauces: Light soy is used in the marinade to add saltiness and umami to the tofu, while both light and dark soy sauces are used in the kung pao sauce to add umami, saltiness, and that authentic Indo-Chinese color
Rice Vinegar: Adds a hint of sourness to the dish
Oyster sauce: Perfect to add a little sweetness and umami. Can be replaced with Hoisin sauce if you are a vegetarian
Honey: Gives the dish a sweet, sticky glaze authentic to Indo-Chinese cooking. Can be replaced with maple syrup too
Corn flour: To coat the tofu evenly and make it crisp
Salt and sugar: For balance and seasoning
Oil: I have used a mix of sunflower oil and toasted sesame oil (for a lovely nutty flavor) for this recipe
Spices: Pepper powder, whole black pepper, dried red chillies, and sichuan pepper for a fiery kick
Aromatics: Garlic, ginger, and spring onion whites for flavor and aroma
Roastes peanuts: For some added crunch and texture
To Finish: Cornflour slurry to thicken the sauce, and a handful of chopped spring onion greens for freshness and color.
Richa’s Top Tips
Use an air fryer: The air fryer makes this recipe a solid winner with less oil, more crunch. Just remember to give the tofu some space in the basket so it cooks evenly.
Don’t skip the prep boil: Briefly boiling tofu in salted water seasons it from the inside and gives it a firmer, bouncier texture that holds up perfectly in the sauce.
Keep the stir-fry quick: Once the sauce hits the pan, everything moves fast. Have your tofu, peanuts, and spring onions ready before you start so nothing burns.
Adjust the heat your way: The spice level is totally flexible, use fewer dried chillies or skip the Sichuan pepper if you prefer mild, or add extra for a fiery kick.
Finish strong: A drizzle of sesame oil right at the end brings out that nutty, restaurant-style flavor and makes everything taste a little extra special.
Frequently Asked Questions
What is Kung Pao flavor like?
Kung Pao flavor is a mix of spicy, tangy, and slightly sweet. It’s got that umami kick from soy sauce and some heat from Sichuan peppers and dried chillies to warm you up without being overwhelming.
What is Kung Pao made of?
Traditional Kung Pao dishes use a combination of chillies, garlic, ginger, peanuts, and a soy-based sauce that’s thickened slightly for that glossy, sticky coating. This tofu version keeps all the same flavors but swaps the chicken for crispy tofu.
Can I make Kung Pao Tofu without an air fryer?
Absolutely. You can pan-fry the tofu in a little oil, the key is to make sure the tofu is well-marinated and cooked until the edges are crisp before tossing it in the sauce.
Is Kung Pao Tofu healthy?
Yes, especially when air-fried! Tofu is high in protein and low in saturated fat, while the dish itself uses minimal oil and plenty of natural flavor from spices and aromatics. Just go easy on the sauce if you’re watching sodium or sugar intake.
Can I make this kung pao tofu recipe vegan?
Absolutely, you can! Simply swap honey with maple syrup and oyster sauce with hoisin sauce for a vegan version.
Storage Tips
Fridge: You can store leftover Kung Pao Tofu in an airtight container for up to 3 days.
Freezer: It’s best to freeze the sauce and tofu separately if possible. The tofu may lose its crispness once thawed but will still taste great when reheated. Store in freezer-safe containers for up to 1 month. Thaw overnight in the fridge before reheating.
Reheating Tip: If you want to revive that just-cooked crunch, pop the tofu pieces into the air fryer for 3–4 minutes before mixing them back into the reheated sauce.
Avoid: Leaving cooked tofu out at room temperature for more than 2 hours, as the sauce contains soy and sugar, which can spoil quickly in warm conditions.
Serving Ideas
Here are some serving ideas, all of which pair beautifully with the sweet-spicy, nutty flavors of this dish:
Veg Fried Rice: A classic pairing! The mild, savory notes of fried rice balance out the punchy Kung Pao sauce perfectly.
Egg Fried Rice: Adds a little richness and protein for a wholesome, balanced meal.
Garlic Noodles: The garlicky aroma and soft noodles soak up that glossy Kung Pao sauce beautifully.
Crispy Veg Nuggets: Serve them alongside Kung Pao Tofu for a crunchy, crowd-pleasing appetiser combo.
Add a veggie overload: Toss in broccoli florets, zucchini, or snap peas for extra crunch and color. They soak up the Kung Pao sauce beautifully while keeping the dish vibrant and fresh.
Go nuts (in the best way): Swap peanuts with cashews or almonds for a richer bite. Lightly toast them before adding to the stir-fry for a deeper flavor.
Try a protein remix: If you’re not in a tofu mood, swap it with paneer for a more Indian-style version or use tempeh for a chewier texture that still holds up to the sauce.
Make it saucier: If you love extra gravy with your rice or noodles, double the sauce ingredients and add a splash of water or stock while cooking to thin it slightly.
Kung Pao Tofu proves tofu doesn’t have to be bland, it can be bold, satisfying, and genuinely addictive when cooked right. Once you try it, you’ll probably find yourself making it again and again (and maybe even skipping takeout altogether).
If you make this Kung Pao Tofu, don’t forget to tag @my_foodstory on Instagram, I’d love to see your version and how you make it your own!
This kung pao tofu recipe is easily the most delicious way to eat tofu. It's spicy, tangy, sweet, and has is a flavor and texture bomb. This recipe is a total must-try!
2tablespoonssunflower oil or any neutral flavoured oil
1teaspoontoasted sesame oil
4dried red chilliesbroken into 2
1tablespoon+ 1 teaspoon finely chopped garlic
2teaspoonsfinely chopped ginger
4spring onion whitesthinly sliced
1teaspoonsichuan peppercrushed
¼cupgroundnuts roasted and de-skinned
Other
1teaspooncornflour mixed in ¾ cup water to make a slurry
1tablespooncooking oiladditional ¼ cup cooking oil if deep frying
¼cupfinely chopped spring onion greens
Instructions
Prepping tofu
Heat water in a pot with salt and when it boils, add tofu, cook on low for 2 minutes, take off the heat and rest for 5 minutes. Drain water and set aside to cool for 10 minutes. Discard the water.
500 gms tofu, 4 cups water, 1 ¼ teaspoon salt
Marinating tofu
Take tofu in a bowl, add all ingredients listed under marinade, give a good toss and set aside.
Pre-heat air fryer at 180 C. brush the airfryer basket with oil. Place the marinated tofu with some gap between each other and air fry at 180C for 5 minutes, brush oil, DO NOT FLIP and air fry at 190 C for 4 minutes. Air fry them in batches and set aside. It’s important to wait for 4-5 minutes until the fried tofu cools a bit to remove them easily from the basket as they stick to the basket when they are too hot.
1 tablespoon cooking oil
Deep Frying tofu
Heat oil in a wok or kadai and once it’s medium hot, drop the marinated tofu & fry on medium heat for 2-3 minutes or until they turn golden and crisp. Fry them in batches and set aside.
1 tablespoon cooking oil
Kung pao sauce
Take all the ingredients mentioned under kung pao sauce in a bowl & mix to combine well. Set aside.
Heat oil & toasted sesame oil in a wok, add garlic, ginger, red chillies, spring onion whites and saute on high for 30 seconds until fragrant. Add sichuan pepper, groundnuts and toss them once. Add kung pao sauce and cook for 2 minutes. Add cornflour slurry while stirring continuously and cook for 2 minutes(see note 2). Add the fried tofu, spring onion greens and toss to combine well. Serve.
2 tablespoons sunflower oil or any neutral flavoured oil, 1 teaspoon toasted sesame oil, 4 dried red chillies, 1 tablespoon + 1 teaspoon finely chopped garlic, 2 teaspoons finely chopped ginger, 4 spring onion whites, 1 teaspoon sichuan pepper, ¼ cup groundnuts roasted and de-skinned, 1 teaspoon cornflour mixed in ¾ cup water to make a slurry, ¼ cup finely chopped spring onion greens
Video
Notes
Tofu is prepped in this way to season them well, so do not skip it.
Cornflour slurry forms lumps if it is not stirred continuously.
If comfort had a flavor, it would taste like Dal Tadka. Creamy lentils, a smoky tadka, and flavours that instantly make any meal or day better.
Who doesn’t love a warm bowl of dal with rice? It’s every Indian’s comfort food – simple, satisfying, and something you can never really go wrong with. Dal Tadka is that familiar, homely dish that’s a staple in every Indian household, whether it’s a busy weekday dinner or a Sunday lunch.
If you’ve never tried making it yourself, this dal tadka recipe is the perfect place to start. The process is simple and easy to follow. With a handful of basic ingredients, some slow simmering, and a final sizzle of ghee and spices, you can recreate this dish that always feels like a big hug.
Lentils (Dal): Toor dal is the classic choice here, but you can also use moong dal or a mix of both for a different texture.
Aromatics: Onion, tomato, garlic, and ginger form the base and add flavor and aroma.
Spices: A simple mix of turmeric, red chilli powder, cumin seeds, garam masala, and salt is all you’ll need.
For the Tadka (Tempering): Ghee or oil, mustard seeds, dried red chillies, asafoetida (hing), and curry leaves make the sizzling mix that brings the dish to life.
Finishing Touches: Fresh coriander leaves for garnish, a squeeze of lemon for brightness, and an optional spoon of ghee on top for that rich, homely touch.
How to Make the Dal
Start by pressure cooking the lentils (dal) with turmeric and salt. Once cooked, mash it slightly and add oil, aromatics and spices and cooked until the dal is smooth and creamy. Keep the dal warm while you make the tadka.
For the Tadka
Heat ghee or oil in a small pan on medium heat.
Add mustard seeds and let them pop.
Stir in cumin seeds, dried red chillies, curry leaves, and hing. The spices will sizzle and release their aroma in seconds.
Swirl the pan gently to keep everything from burning, the colour should turn golden, not dark.
Pour the tadka over the hot dal and listen to that satisfying sizzle! Mix gently, garnish with coriander, and serve immediately.
Richa’s Top Tips for Tastiest Dal Tadka
Use enough water for soaking: Lentils absorb a lot of water as they cook. Start with a good amount and add more as needed to get that thick-yet-pourable consistency.
Don’t rush the simmering: Dal tastes best when it’s allowed to simmer slowly.
Get the tadka right: The tadka is where all the magic happens. Make sure the oil or ghee is hot before adding mustard and cumin seeds, they should crackle and release their aroma instantly.
Adjust spice to your liking: If you prefer mild flavours, reduce the red chilli or skip the green chillies in the tadka. You can always add more later.
For creamier dal: Mash a small portion of cooked dal with the back of your spoon and mix it in, it instantly makes the dal richer and smoother.
Frequently Asked Questions
What is Dal Tadka?
Dal Tadka is a comforting Indian lentil curry made by cooking dal (lentils) until soft and finishing it with a flavorful spiced oil called tadka. It’s simple, hearty, and full of aroma from spices like cumin, garlic, and mustard seeds.
What kind of dal is used for Dal Tadka?
Toor dal (yellow split pigeon peas) or moong dal (yellow lentils) are the most common choices. You can also use masoor dal (red lentils) or a mix of two types for more texture and flavor.
What’s the difference between Dal Fry and Dal Tadka?
Both are lentil-based dishes, but Dal Tadka gets a fragrant tempering of spices poured over the cooked dal, giving it that smoky, restaurant-style flavor. Dal Fry, on the other hand, is made by cooking the lentils directly with the spices.
Is Dal Tadka spicy?
It’s mildly spiced, just enough to warm you up without overpowering the dish. You can always reduce or skip the red chillies if you prefer it milder.
Can I make Dal Tadka without ghee?
Absolutely! Use neutral oil or coconut oil for a vegan version, it’ll still taste delicious.
Storage Tips
Fridge: Store leftover dal tadka in an airtight glass container for up to 3 days. Reheat on the stove with a splash of water to bring back the creamy texture and if you have a few extra minutes, add a quick fresh tadka before serving for that just-made aroma.
Freezer: Dal freezes beautifully! Portion it into freezer-safe containers and store for up to a month. Thaw overnight in the fridge and reheat gently on low heat while stirring.
Room Temperature: Since dal contains cooked lentils, avoid leaving it out for more than 2 hours, especially in warm weather.
Serving Ideas
Dal Tadka is that dish that instantly makes a meal feel complete. Here are a few easy, comforting ways to serve it:
With Jeera Rice: The most classic combination, soft, fluffy rice that soaks up every bit of that spiced dal goodness.
With Garlic Naan: For a little indulgence, pair it with Homemade Garlic Naan, restaurant-style comfort at home.
As a Bowl Meal: Spoon it over rice, top with onions, coriander, and a squeeze of lemon, your quick, wholesome meal is ready.
With Vegetable Sides: Try it alongsideAloo Gobior Bhindi Masala for a full North Indian-style spread.
Customisation Ideas
Smoky Dhaba-Style Twist: For that signature restaurant-style smokiness, add a piece of hot charcoal to the cooked dal, drizzle ghee over it, cover with a lid for a minute, and let the smoky aroma infuse through.
Vegan-Friendly Swap: Stick to sunflower or coconut oil and skip the ghee entirely. You’ll still get that beautiful flavor and aroma.
Mix of Dals: Try combining toor dal and moong dal in equal parts for a creamier texture and more depth of flavor.
A comforting bowl of dal will never get old or boring. So whether you’re cooking for one or feeding a crowd, this recipe will always bring people to the table. Serve it fresh with rice or roti, and don’t forget that drizzle of ghee or squeeze of lemon before you dig in.
If you make this, tag us on Instagram@myfoodstory, I’d love to see how your cozy bowl of dal turned out!
Quick, cozy, and comforting with a finishing tadka that adds the most perfect flavor bomb to an otherwise simple dish, this dal tadka recipe will make you fall in love with dal.
2tablespoonsgroundnut oil or any neutral cooking oil
½teaspooncumin seedsjeera
⅛teaspoonasafoetidahing
1½teaspoonsfinely chopped garlic
½teaspoonfinely chopped ginger
1green chillifinely chopped
1medium onionfinely chopped (¼ cup)
1tomatofinely chopped (½ cup)
¼teaspoonsalt
¼teaspooncumin powder
¼teaspoonred chilli powder
½teaspooncoriander powder
3tablespoonsfinely chopped coriander leaves
For tempering
1 ½teaspoonsghee
¼teaspooncumin seedsjeera
1teaspoonsfinely chopped garlic
3red chillieswhole
¼teaspoonred chilli powder
Instructions
Add soaked dal to a pressure cooker with salt, turmeric powder, oil & water. Cook on high until the 1st whistle & on low till the 2nd whistle and take off the heat. If you prefer mushy dal, cook till the 3rd whistle. Let it depressurise by itself. Mash the dal using a whisk or ladle to get a smooth texture.
½ cup tur dal, ¼ teaspoon salt, ¼ teaspoon turmeric powder, 1 ½ cups water, 2 tablespoons groundnut oil or any neutral cooking oil
Heat 2 tablespoons of oil in a pan or kadai, add cumin seeds and once they crackle, add asafoetida, garlic & saute on high for a few seconds till garlic is fragrant. Add ginger, green chilli and saute for a minute. Add onions & saute on low for 1-2 minutes till onions turn light golden. Add tomatoes & cook for 1-2 minutes till they soften. Add salt, cumin powder, red chilli powder, coriander powder & saute for a few seconds. Add the cooked dal, give a good mix and cook for 8-10 minutes till dal absorbs all the masalas. Take off the heat.
½ teaspoon groundnut oil or any neutral cooking oil, ½ teaspoon cumin seeds, ⅛ teaspoon asafoetida, 1½ teaspoons finely chopped garlic, ½ teaspoon finely chopped ginger, 1 green chilli, 1 medium onion, 1 tomato, ¼ teaspoon salt, ¼ teaspoon cumin powder, ¼ teaspoon red chilli powder, ½ teaspoon coriander powder
While dal is hot, heat a tempering or tadka pan with ghee. Add cumin seeds and once they crackle, add garlic & fry for 1-2 minutes on low till the garlic is light golden. Add red chillies & let them roast for a few seconds till they turn deep red but not dark. Take the pan off the heat, add red chilli powder, mix well and pour the tadka on the hot dal. Garnish with coriander leaves and serve.
1 ½ teaspoons ghee, ¼ teaspoon cumin seeds, 1 teaspoons finely chopped garlic, 3 red chillies, ¼ teaspoon red chilli powder, 3 tablespoons finely chopped coriander leaves
Video
Notes
Soaking dal before cooking, helps in cooking the lentils faster & helps to get smooth creamy consistency of the dal.
The tempering or tadka adds authentic flavour, so do not skip it.
This time of year has a lot of merry and bright things to be excited about, but it can be stressful if you’re stumped on what to get your mom, dad, best friend, coworker or kids’ teacher as a holiday gift. Whether you enjoy or dread buying gifts for people, it’s safe to say we all want to give our loved ones things they will enjoy and appreciate. But there’s a lot of noise, junk and bad deals disguised as good deals to sift through as we get closer and closer to the holidays.
Allow us at Engadget to help you through it. Here, you’ll find all of our holiday gift guides collected in one place, so you can more easily find the best Christmas gifts you need this year. Are you looking for white elephant gift ideas? Are you struggling to come up with a good gift for the father figure in your life? Are you just looking for a good board game to pick up for your own family? We’ve got you covered with gift ideas for all of those scenarios and more.
Best white elephant gift ideas
According to legend, the King of Siam would give a white elephant to courtiers who had upset them. The recipient had no choice but to simply thank the king for such an opulent gift, knowing that they likely could not afford the upkeep for such an animal. It would inevitably lead them to financial ruin. This story is almost certainly untrue, but it has led to a modern holiday staple: the white elephant gift exchange. These gift ideas will not only get you a few chuckles, but will also make your recipient feel (slightly) burdened.
Secret Santa gift exchanges are supposed to be fun, but it’s easy to overthink it. You want a gift that feels thoughtful without being awkward, useful without being boring, and most importantly, affordable. The sweet spot is under $50, which is plenty to find something that fits your recipient’s personality. Whether you’re buying for a co-worker you only chat with at the coffee machine, a friend who already has everything or a cousin who never gives you ideas, there are clever options that will make them smile.
Trying to find the right gift for an unabashed gadget lover during the holidays can be difficult, especially if you don’t keep up with tech industry news yourself. Fortunately, you’re reading Engadget.com, a site entirely staffed by people who spend all day figuring out what new stuff is and isn’t actually good. So allow us to help. We’ve rounded up some of our favorite gadgets and gear that just might satisfy the avid geek in your life.
We could all use more time away from screens of all types and sizes, and board games are a fun way to do that and bond with friends and family. You can find plenty of unique sets out there now, from word puzzles to whodunnits to calming playthroughs that showcase the beauty of the little things in life. From games with giant monsters to those with haunted mansions, we’re sure at least one of our suggestions will be a hit with you and your loved ones.
So you want to give someone a gift but you don’t have a ton of cash to spare. Don’t fret because first, you’re not alone, and second, there are tons of options to choose from. Especially if you’re looking in the tech space, it can feel especially daunting to find a gadget that’s affordable but also worth gifting — in other words, not a piece of junk that will eventually take up residence at the bottom of a drawer. But you don’t have to drain your wallet to get someone a cool gadget that will both be useful and make their lives easier. We’ve collected our favorite pieces of tech under $25 that make great gifts and help you to stick to a budget.
We wouldn’t blame you if you try to do all of your tech shopping around the holidays. That’s when you can typically get the best sales, both on relatively affordable gear and (more importantly) on big-ticket items. But it would be wrong to think that only the most expensive tech is worth gifting. Since we at Engadget test a plethora of gadgets every year, we know that there are some hidden (and not so hidden) tech gems at lower price ranges — you just have to know where to find them.
Finding a gift for the tech nerd on your list can be tough. They likely have all the tech they need and then some, but you can add to their kit with the right accessories. Apple, Samsung, Sony and other big tech companies all have affordable gear that comes in at $100 or less, you just have to know where to look. We've collected some of our favorites, but remember: you can often find alternatives that are just as good (and sometimes better) than these. However, for the people in your life for which brand names really do matter, these gifts will speak to them.
We know it’s been a pretty crazy year that’s got you wondering how exactly you’re going to make the holiday season extra special, especially for the kids in your life. The good news is that the toy industry is just as creative as ever, and this year’s crop of hot tech toys is filled with plenty of surprise and delight, all at affordable prices. We’ve picked some of our favorites under $100, ones that will not only thrill right out of the box, but keep the kids entertained for months to come.
There's a pretty good chance you know at least one person who works remotely in some fashion. While the WFH life has its perks — nobody likes a long commute — it comes with its own set of challenges, from lacking pro-level equipment to dealing with household disturbances. If you’re looking to give a gift to someone who spends much of their time in their home office, we’ve rounded up a few techy gift ideas that should make their days a little more delightful, or at least easier to manage.
For as long as humans have traveled, they've carried gear with them to make long journeys easier. Airplanes may have made travel faster, but crossing states and countries can still be exhausting. If you have a friend or family member who loves exploring the world, they'll appreciate things that will save them stress when they're far from home. So let Engadget help you find the perfect gift for the person in your life with wanderlust.
If you're like us, Nintendo holds a special place in your heart thanks to iconic characters like Mario, Peach and Donkey Kong and multiple generations of best-selling consoles. But little did we know that outside of gaming hardware and accessories, there's an ever-growing assortment of Nintendo-themed toys, clothes and decor. And it's kind of a problem because we want all of it. So to help you figure out the best gifts for the Nintendo fan in your life, we've put together a big list of our favorite products that will give anyone a power-up this holiday season. Of course, if none of the ones on our list quite fit the bill, you can also head over to our full list of the best Nintendo Switch 2 accessories for even more ideas.
The stream of new video games never ends, but for some of us, nothing beats the classics. If you don’t feel like hunting through eBay and local game shops for old cartridges to add to your loved one’s collection, we’ve picked out a few other gift ideas for the nostalgic gamer in your life — from video upscalers for old consoles to retro-themed books and artwork.
The year may not be over, but 2025 is all but guaranteed to go down as one of the best 12 months in gaming history. Between releases like Hades 2, Hollow Knight: Silksong and Ghost of Yotei, to name just a few, there was truly something for everyone in 2025. Of course, that abundance also means it can be tricky to find a gift for the gamers in your life, especially if you're not one yourself. Worry not — Engadget is here to help. We guarantee our guide will help you find the perfect gift for your friend or loved one.
Some moms really do mean it when they say they don’t need any gifts. But those same moms will probably appreciate getting something thoughtful and personal — a gift that shows you put in a bit of consideration. It’s tough to pin-point what that ideal gift is for any given mom, but we’ve got ideas to get you started. Since we spend our days testing and otherwise thinking about tech, most of the presents here have a gadget spin, but all of them are a heck of a lot more unique than a candle and a bath bomb.
It's not always easy to find gifts for dads, especially for those who are often quick to snap up whatever they need on their own. But even the geekiest and most well-informed dads have blind spots — the trick is to find something they've never heard of, but could actually make their lives useful. We've collected some of our favorite dadcore gift ideas, which would suit everyone from a complete gadgetphobe to a total techie.
Subscription boxes are the rare gift that keeps its charm long after the wrapping paper is gone. You make the choice once, but the surprises keep landing on their doorstep for months after that. For anyone who loves the buzz of a delivery, these are gifts that extend the season well past December. Each box on this list combines a bit of discovery with something tangible, such as gadgets, books, collectibles, snacks or clever projects. Some appeal to hardcore hobbyists, others to the curious or the comfort seekers, but all offer that same spark of delight that comes from unboxing something unexpected.
For home cooks, kitchen tools are the equipment that make all your favorite dishes and meals possible. And while having the fanciest gear certainly isn't a requirement, it is really nice, which makes products like the ones here such great gifts. These are the kind of things that people want but might not be able to justify buying for themselves, or essential pieces that would be handy additions to any kitchen or pantry. So if you're looking for present ideas for the chef in your life, check out our guide of tried and tested cooking tools and gadgets.
When it comes to making coffee at home, us coffee nerds are constantly evolving. Whether the person you’re shopping for is newly indoctrinated into the world of small-batch roasters or obsessive over every possible aspect of every brewing process, we’ve compiled a list of the best coffee gear for any coffee geek this holiday season. For brewing, grinding and drinking, we’ve got multiple options at a range of prices to help expand any java geek’s horizons. And if you think the coffee aficionado on your list already has everything they need, we’ve got a recommendation for them too.
We're a pet-loving staff here at Engadget, with diverse distribution of cat people, dog people, other-small-fuzzy-creature people, bird feeder enjoyers and so on (at press time, I'm unsure if we have a rat person, but I'd be surprised if we didn't). And, of course, we love getting new gadgets of all sorts for our pets as much as for ourselves. Our list, with gifts as low-tech as a blanket and as high-tech as the best $30 two-way camera you'll ever use, is for the pet lover in your life — whether that's you or another favorite human.
This article originally appeared on Engadget at https://www.engadget.com/the-best-christmas-gifts-to-give-everyone-on-your-2025-holiday-shopping-list-170018456.html?src=rss