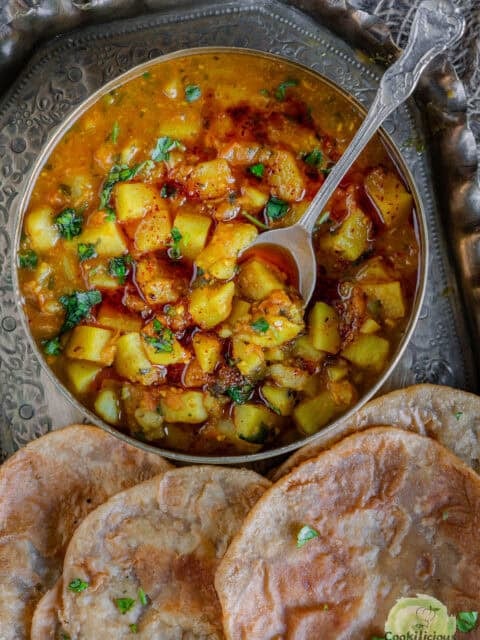
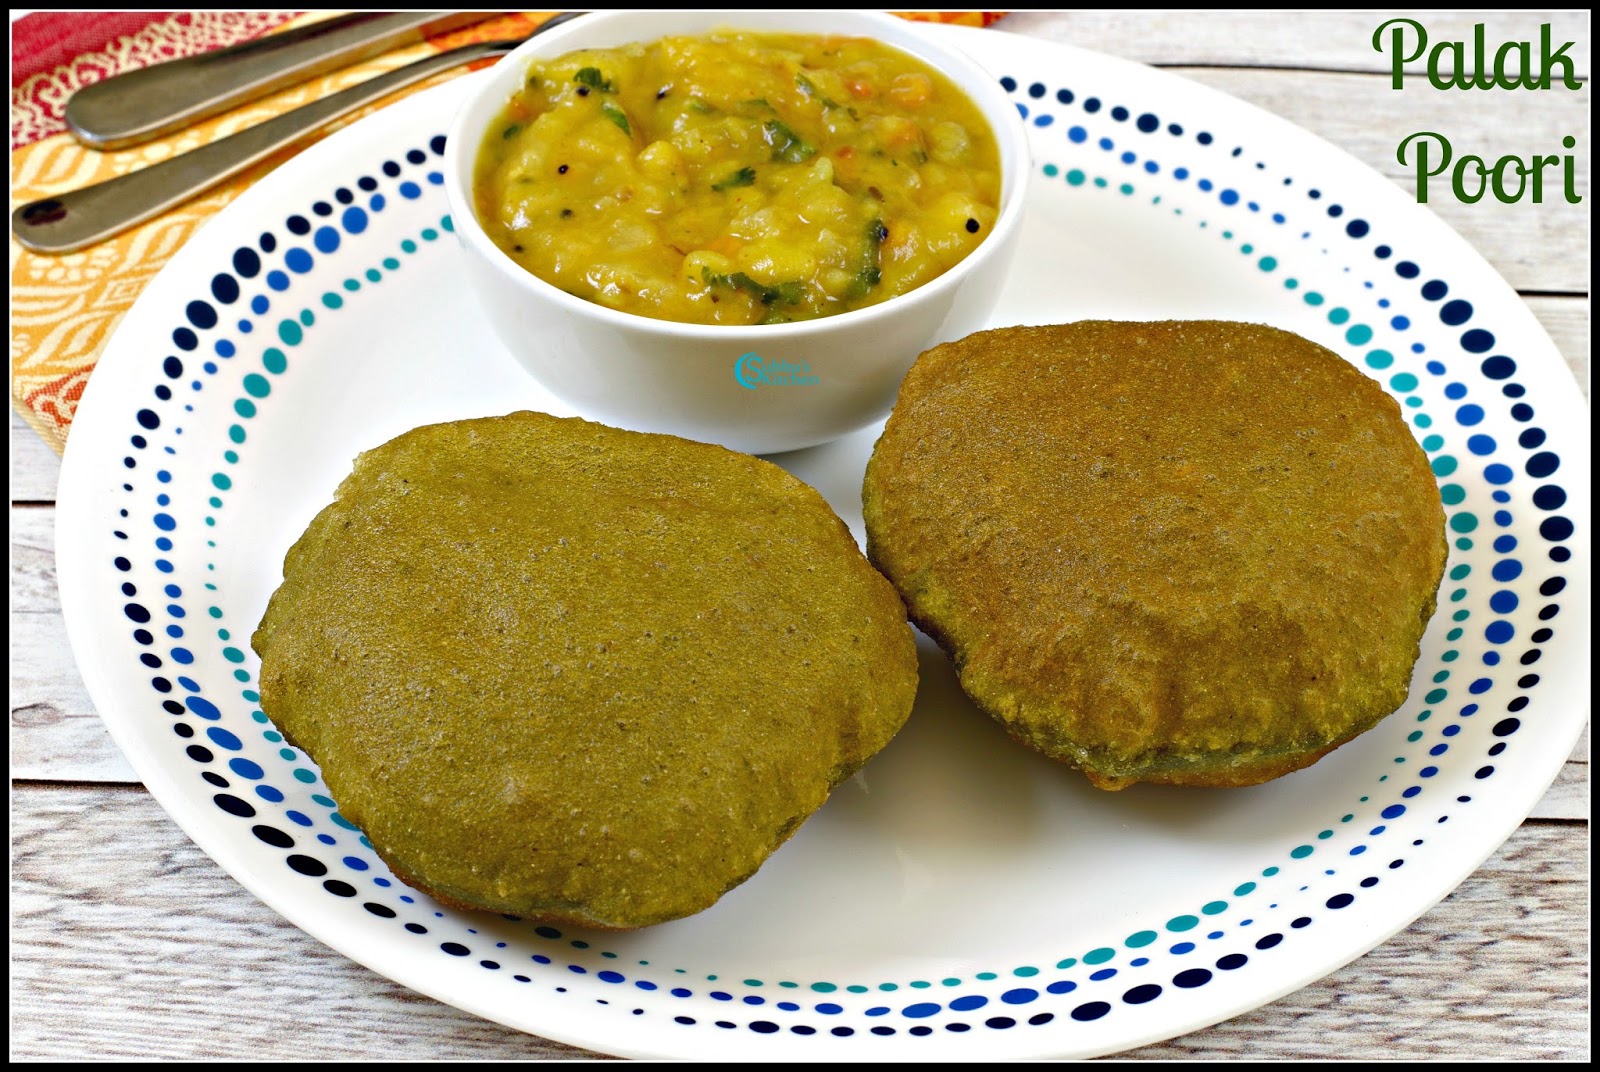
Aloo Rasedar is a naturally vegan Indian curry made with tender potatoes simmered in a rich, tangy tomato gravy and served with fluffy, golden puris. What makes this Aloo Poori special is a homemade spice blend that layers deep, aromatic flavors without using onion or garlic. Ready in just 40 minutes using the Instant Pot, […]
Masaledar Paneer Bhurji is the ultimate North Indian vegetarian comfort dish! Scrambled paneer is cooked in a fragrant onion-tomato masala with aromatic spices. Ready in under 45 minutes, this creamy Amritsari Paneer Bhurji is ideal for busy weeknights or relaxed breakfasts. It's simple, pantry-friendly, gluten-free and protein-rich - the perfect go-to for a wholesome, flavor-packed […]
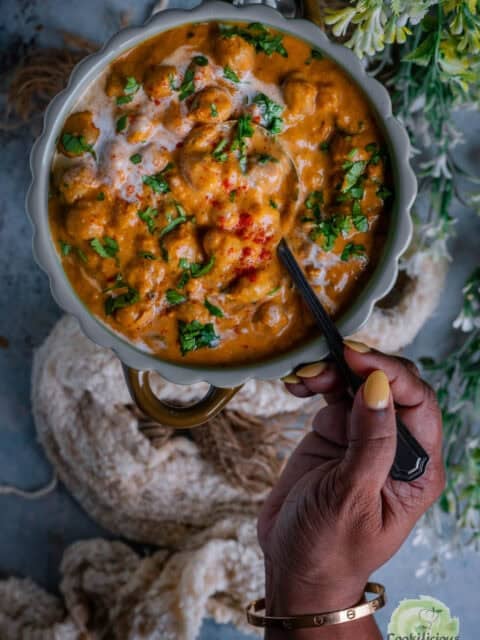
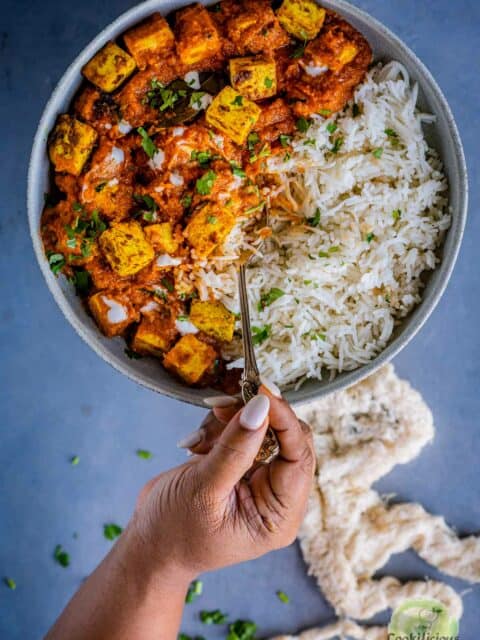
Instant Pot Chickpeas and potato curry is a simple satisfying & flavorful vegan recipe that can be made in 30 minutes. Try this tasty and creamy chickpea recipe today!
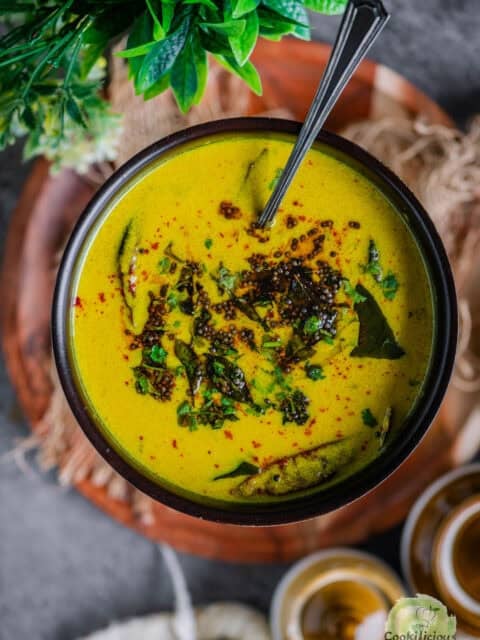
Traditional Gujarati Kadhi With Mango (Fajeto) is a comforting and flavorful Indian delicacy that’s both sweet and mildly spiced. This summer favorite is made with creamy yogurt, besan (chickpea flour), ripe mango pulp, and a handful of everyday Indian spices. Ready in just 30 minutes, this vegetarian and gluten-free dish pairs beautifully with steamed rice—or […]
If you are interested in trying various mutton curry recipes using mutton or goat meat, check out our long list of recipes with various curry recipes using mutton or Indian goat meat. The list has mutton recipes from all across India, from North India to South India, and regional mutton dishes from less spicy to […]
Indian coconut chicken curry in an instant pot is a quick and easy recipe cooked in the form of gravy using coconut milk or paste to serve with rice and tastes creamy. It uses several ingredients and almost tastes like a korma with mild flavors and less spice. Serving it with paratha, steamed rice, or […]
Here is a list of chicken breast recipes from the Indian region, mostly made using boneless chicken. Chicken breast is a section that is entirely boneless and easy to eat. Often we struggle to eat with the bone in, but it is not the case; using chicken breast is the healthiest part of the chicken, […]
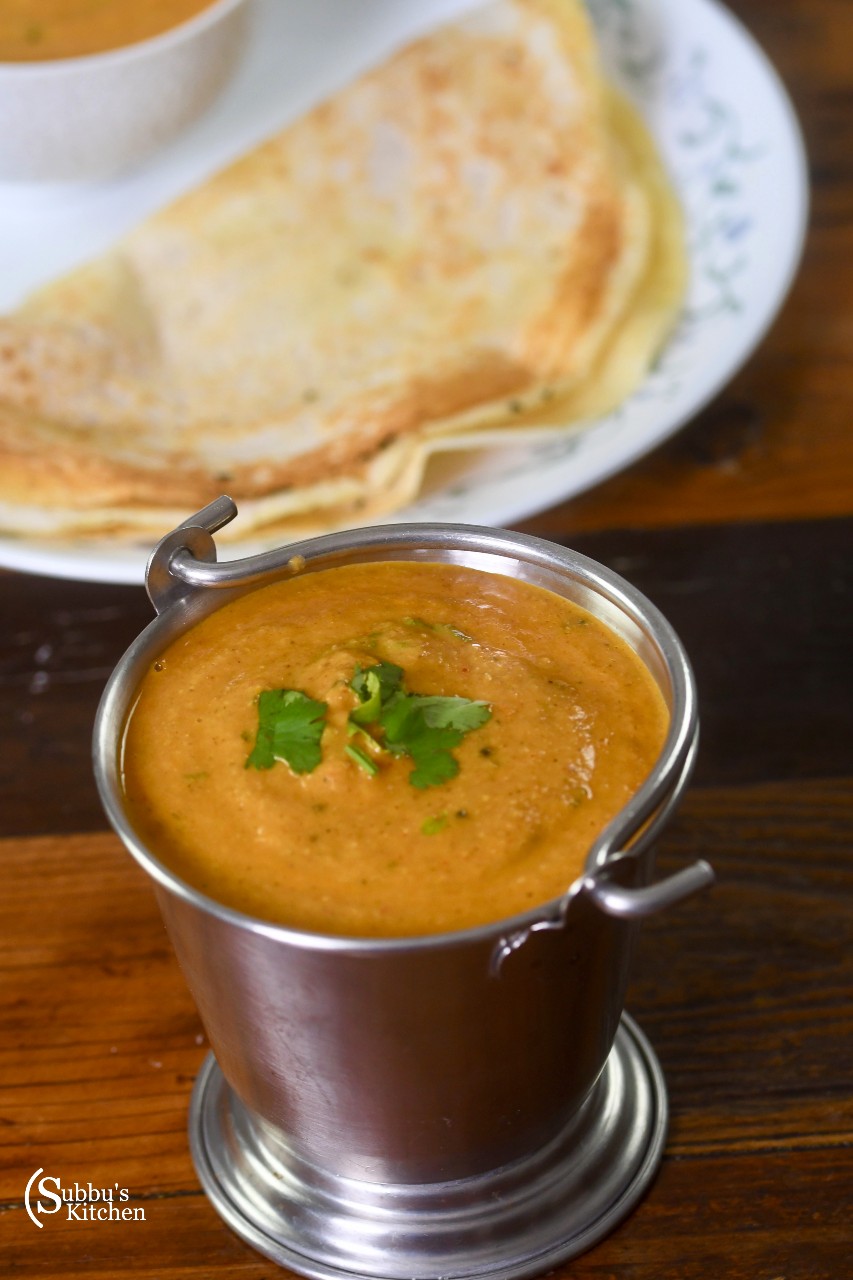
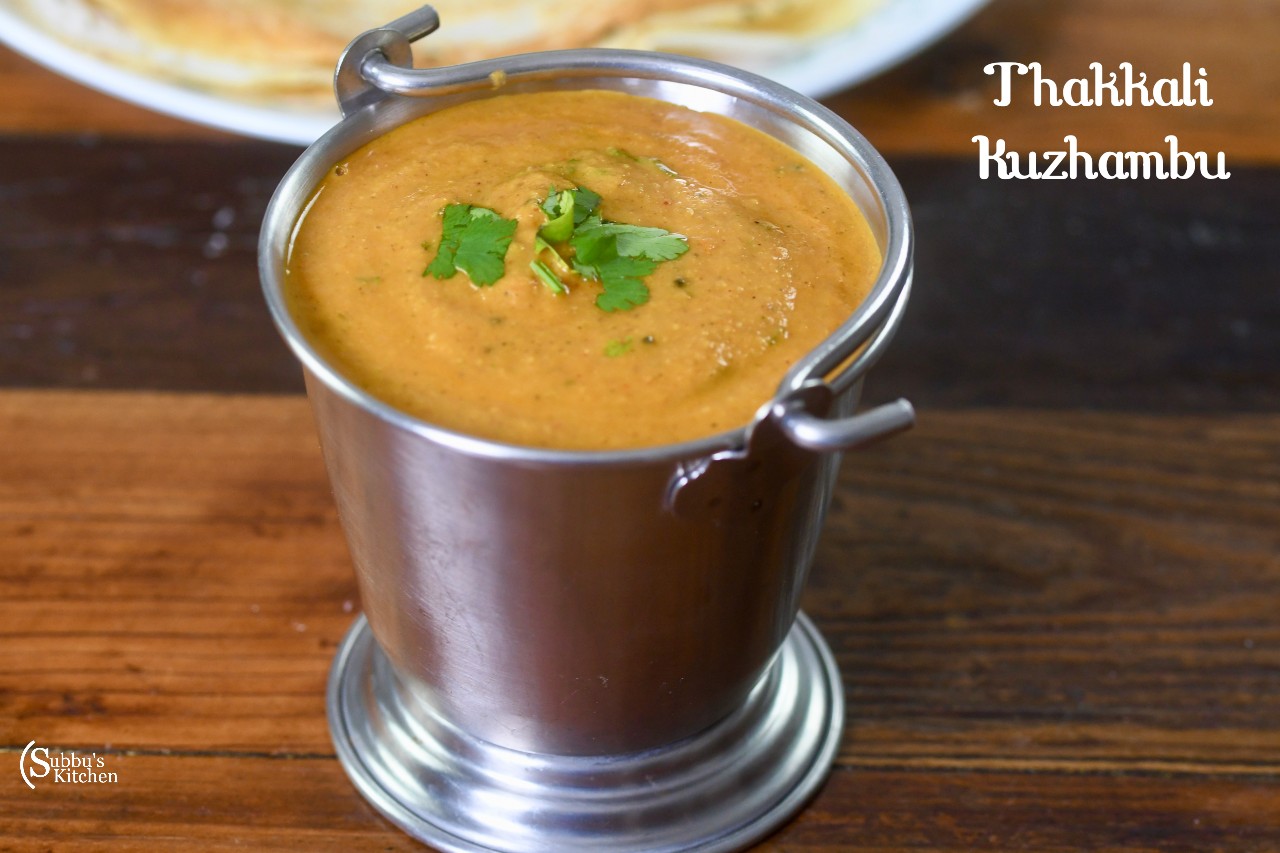
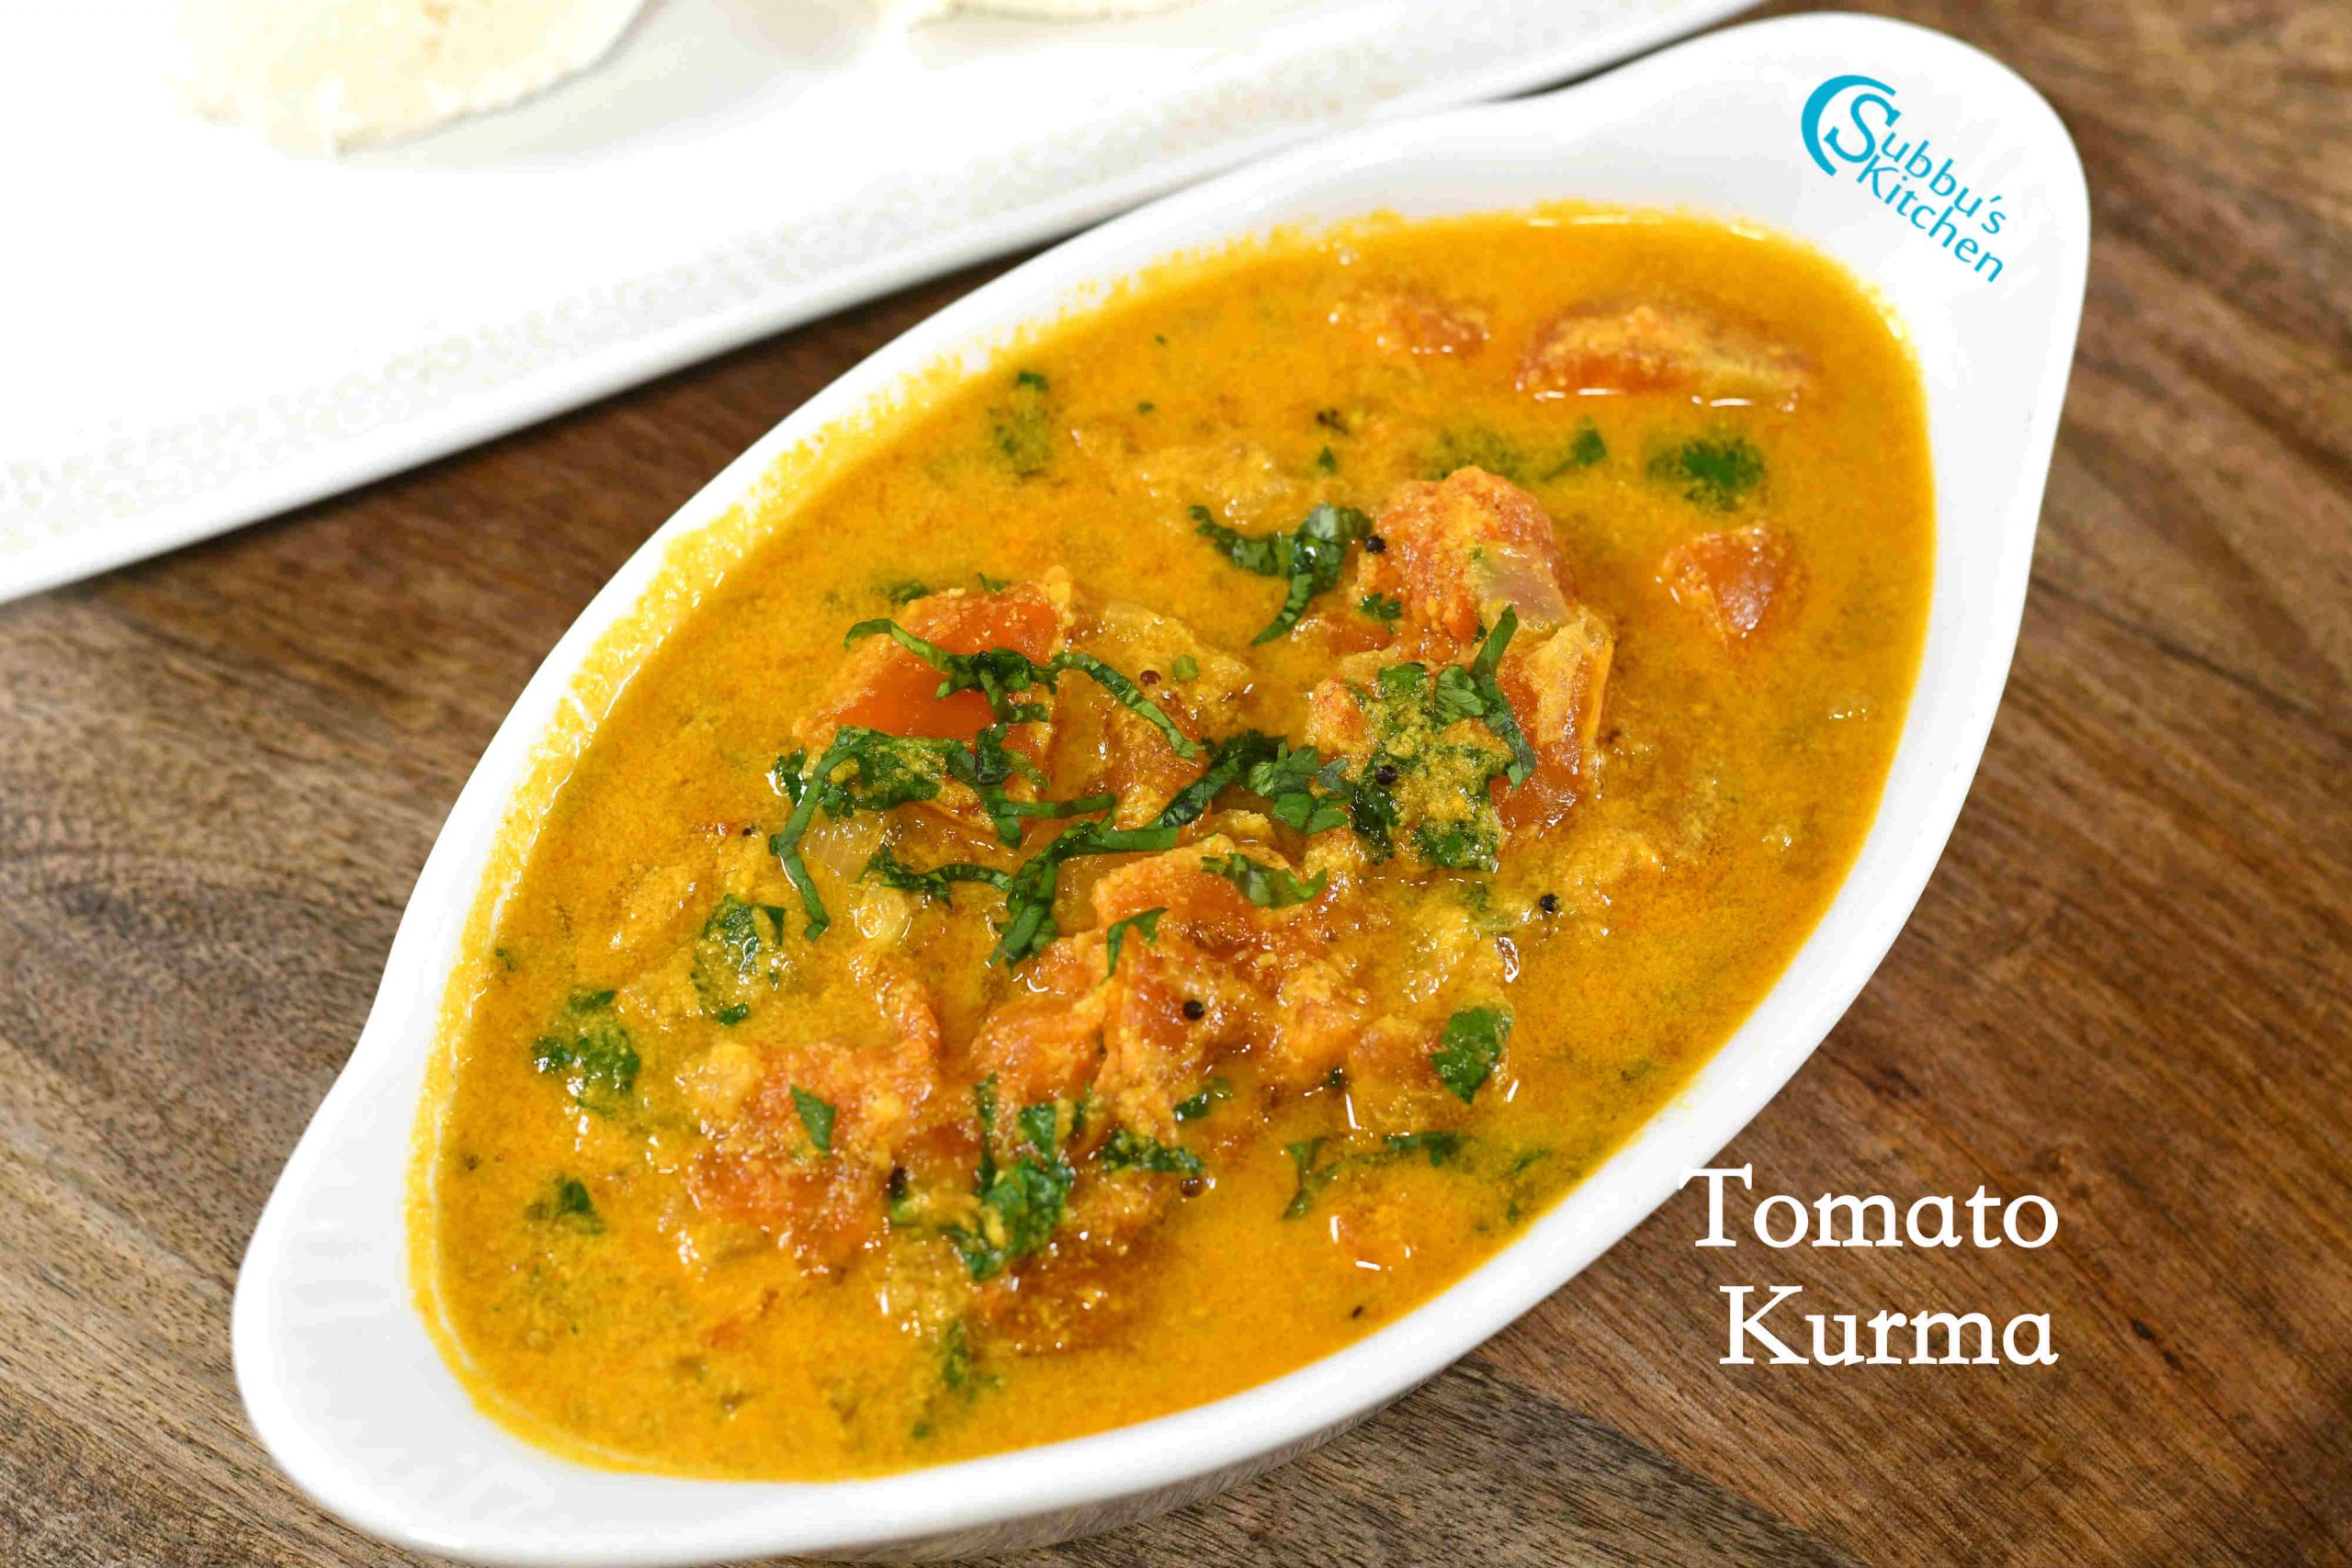
If you're looking for a flavorful, tangy, and comforting South Indian curry, Thakkali Kuzhambu is the perfect dish for you! This rich and aromatic tomato-based gravy is infused with roasted spices, coconut, and tamarind, creating a delicious balance of heat and tanginess. Whether paired with soft idlis, crispy dosas, or even steamed rice, this Tomato Kurma is sure to become a family favorite. Keep reading to discover the secret to making the most flavorful and authentic Thakkali Kuzhambu right at home!
Thakkali Kuzhambu is a staple in South Indian households and is enjoyed year-round. However, it is especially popular during the monsoon and winter seasons, as its tangy and spicy flavors provide warmth and comfort. It is also a go-to dish when fresh vegetables are scarce, as it relies primarily on pantry staples like tomatoes, tamarind, and spices.
This was inspired by my other recipe on this site, and it can be paired with Idli, Dosa or even Rice.
[feast_advanced_jump_to]
Ingredients for Thakkali Kuzhambu
A well-prepared Thakkali Kuzhambu starts with the right blend of ingredients, each adding depth and richness to the dish. Ripe tomatoes form the base, giving the gravy its signature tangy flavor. Tamarind enhances the tartness, balancing the spice and sweetness naturally present in the tomatoes. Onions add a subtle sweetness and savory depth, while a blend of cumin, fennel, black pepper, and coriander seeds provides warm, earthy notes. Dried red chilies and red chili powder contribute heat, which can be adjusted to taste. Roasted channa dal helps thicken the gravy, while grated coconut adds a creamy texture. Mustard seeds and curry leaves temper the dish with their bold, aromatic flavors, and a final touch of gingelly (sesame) oil enhances its authenticity. Together, these ingredients create a well-balanced, flavorful Thakkali Kuzhambu that pairs beautifully with idli, dosa, or rice.
Tomatoes
Tamarind
Onions
Cumin seeds
Fennel seeds
Black pepper
Coriander seeds
Dried red chilies
Red chili powder
Roasted channa dal
Grated coconut
Mustard seeds
Curry leaves
Gingelly (sesame) oil
Turmeric powder
Salt
Water
See recipe card for quantities.
Instructions
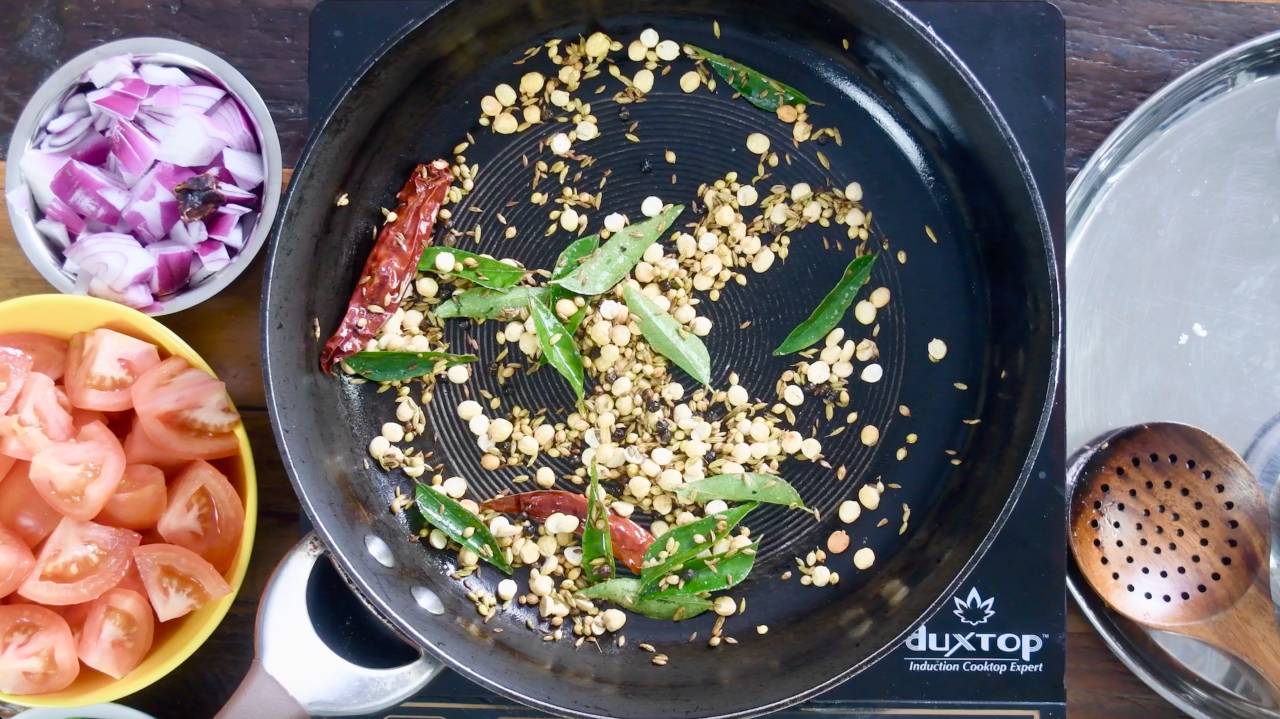
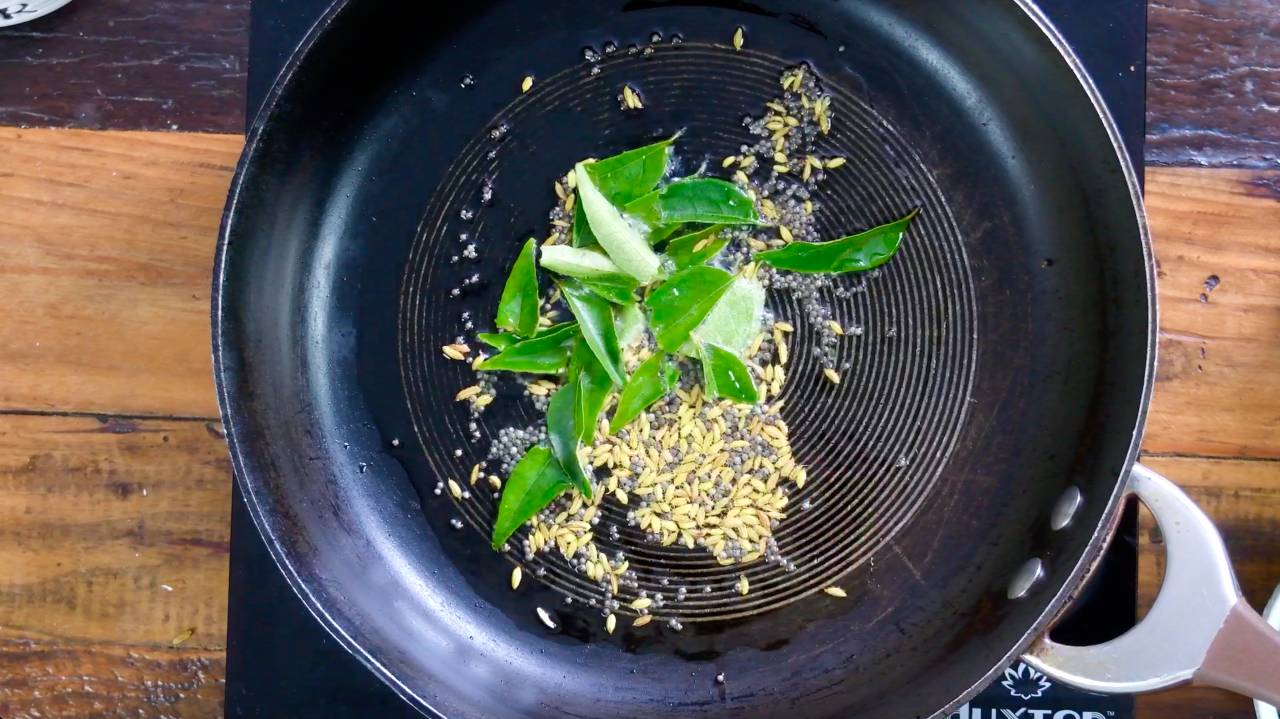
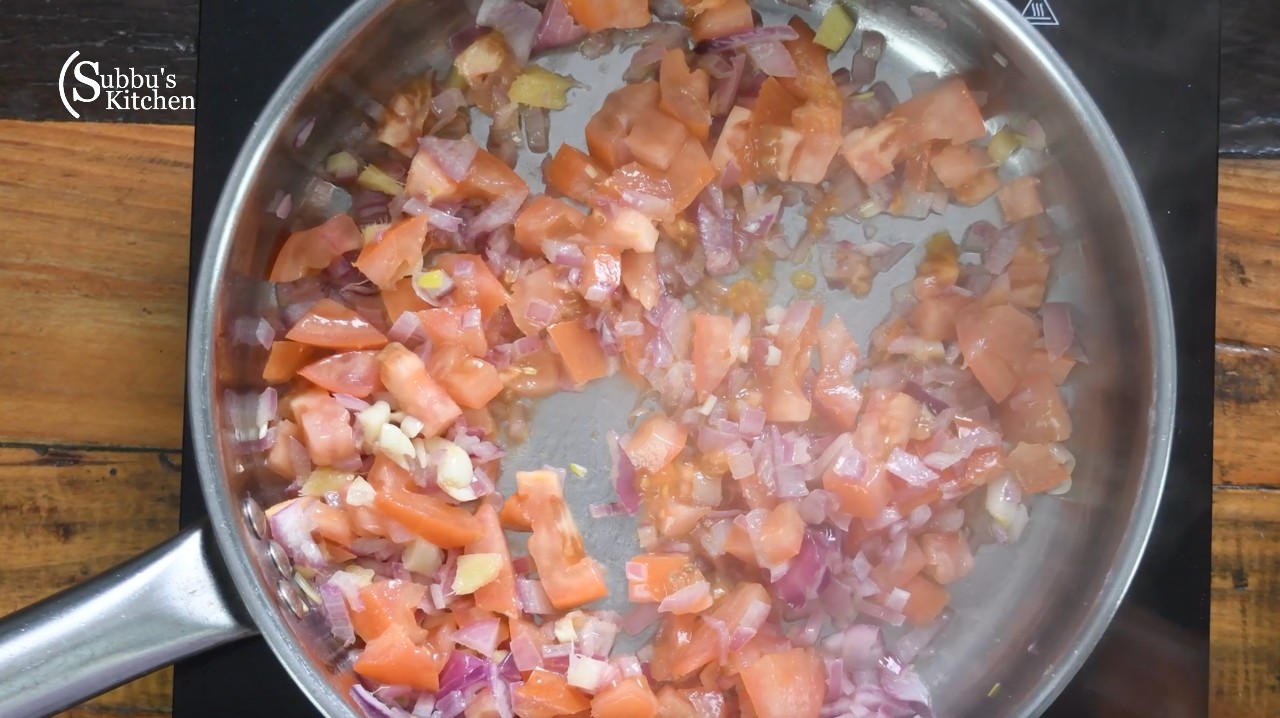
Heat oil in a pan. Add fennel seeds, cumin seeds, black pepper, coriander seeds, red chili, roasted channa dal, and curry leaves. Sauté for 1-2 minutes until fragrant over a medium flame.
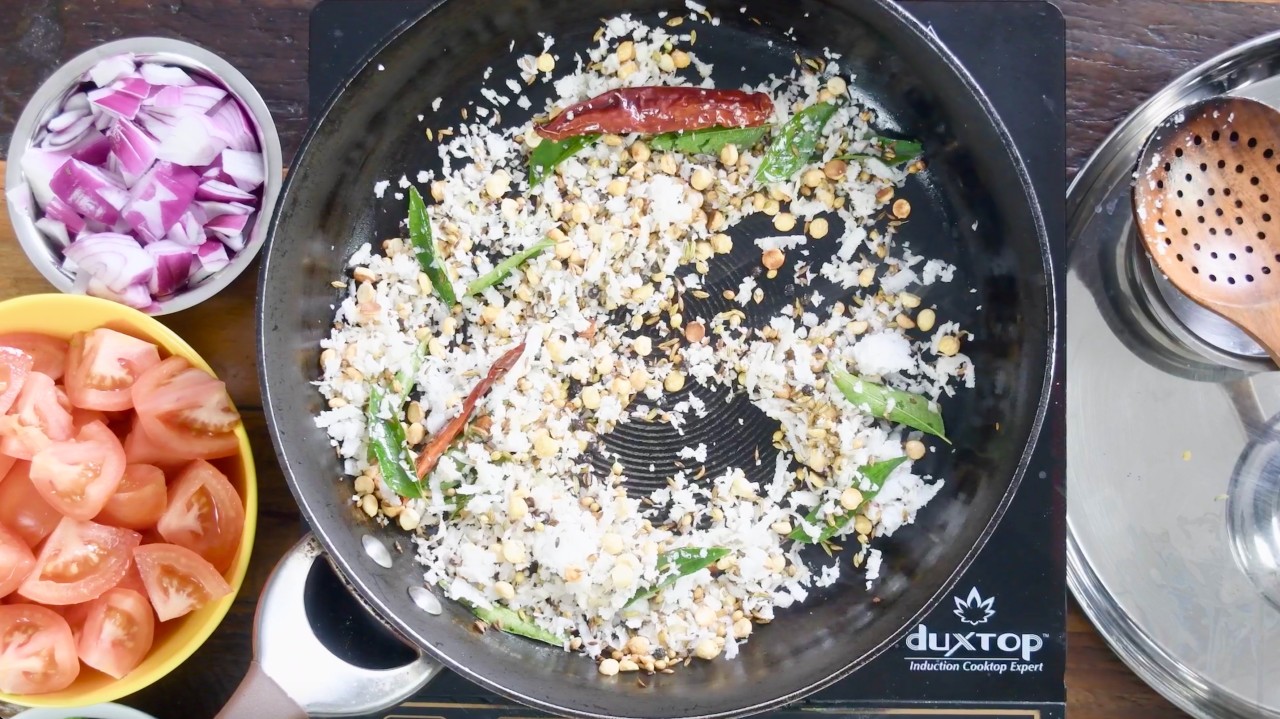
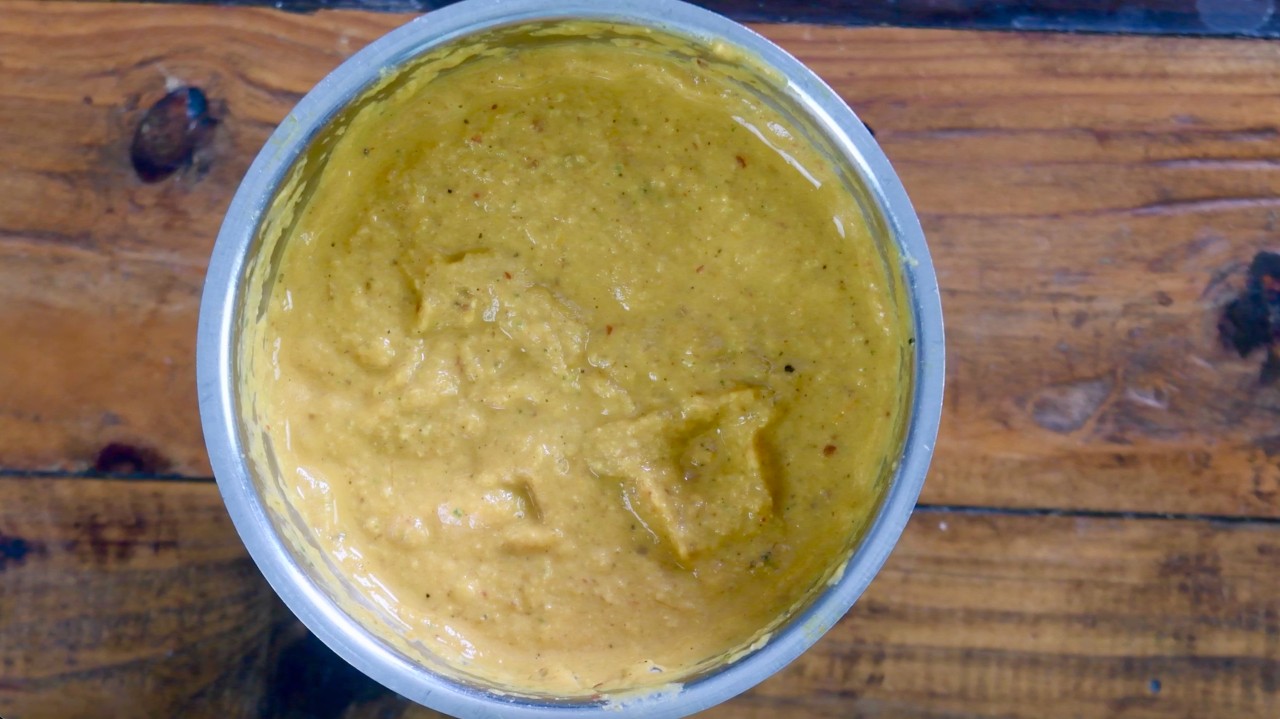
Now, add grated coconut and tamarind. Sauté until the coconut turns golden brown, then transfer the mixture to a mixer grinder.
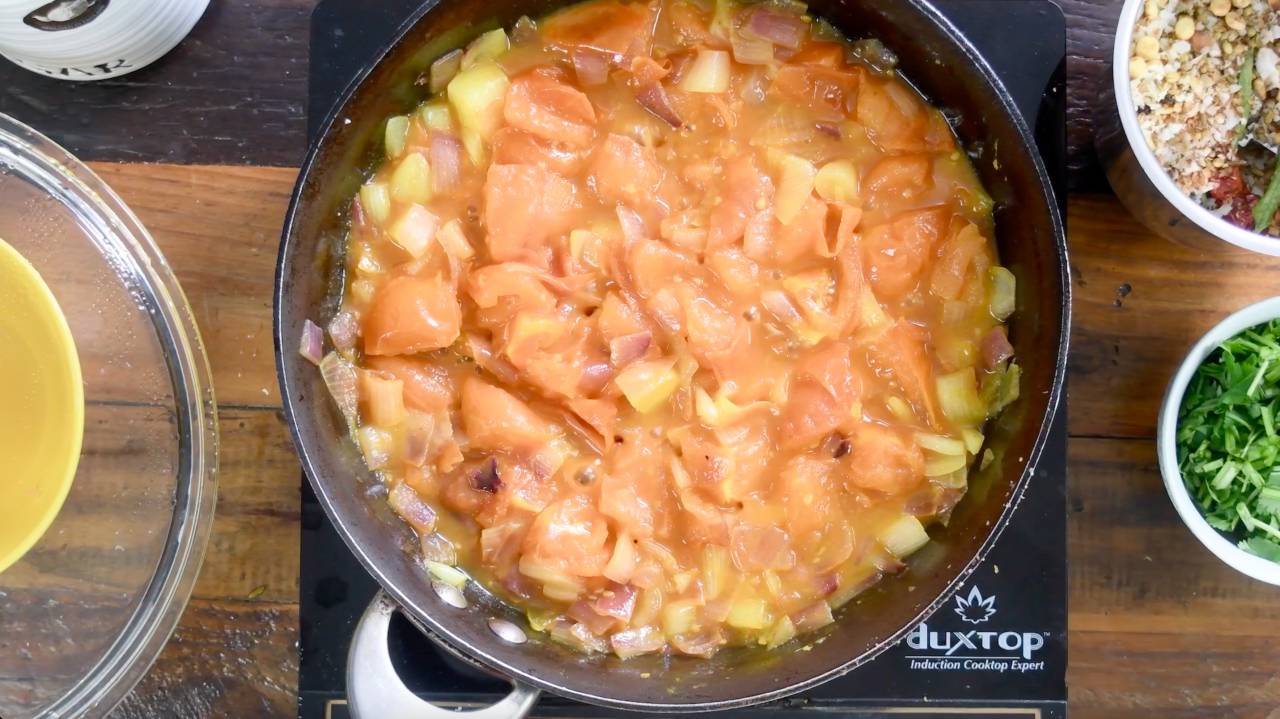
Heat oil in a pan over medium heat. Once hot, add chopped onions and sauté until translucent. Then, add chopped tomatoes, turmeric powder, and salt, mixing well. Cover and cook until the tomatoes turn soft and mushy. Transfer the mixture to a mixer grinder.
Once the ingredients have cooled, grind them into a smooth paste and set it aside.
Heat oil in a pan over medium heat. Once hot, add mustard seeds and let them splutter. Then, add fennel seeds and curry leaves, stirring well to combine.
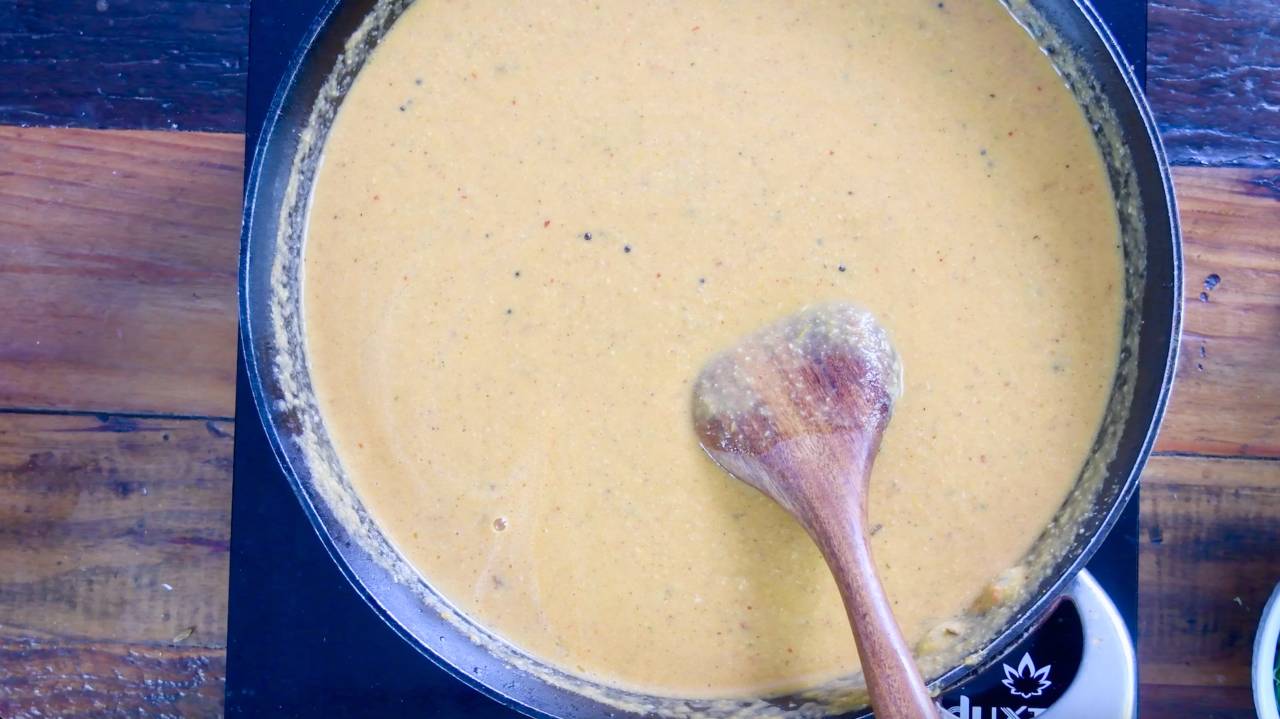
Add the ground spice paste to the pan and mix well. Add water to adjust the consistency, then add red chili powder and salt. Stir to combine and let the mixture cook on medium flame for about 5 minutes.
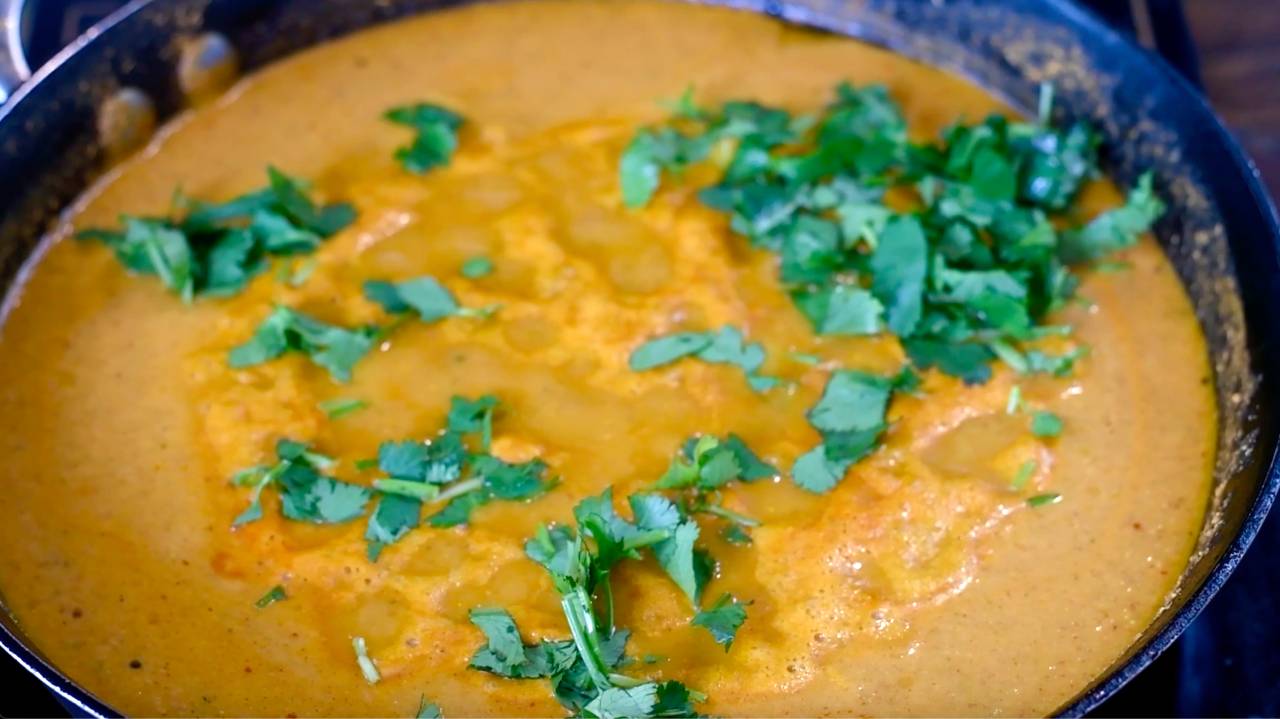
Finally, sprinkle chopped coriander leaves and turn off the stove.
Serve the dish with hot idli or dosa.
Substitutions
Thakkali Kuzhambu is naturally vegetarian and gluten-free, making it a great choice for those with dietary restrictions. Since the recipe uses whole spices and fresh ingredients without any wheat-based thickeners, it fits well into a gluten-free diet. If you're vegan, simply ensure you're using plant-based oils like gingelly (sesame) oil instead of ghee or butter. For those following a low-carb or keto diet, you can reduce the amount of onions and skip the roasted channa dal, which adds some carbohydrates. Instead, use a little extra coconut for thickness while keeping the flavors intact. This dish is also adaptable for satvik (no onion & garlic) diets by omitting onions and garlic. The flavors remain deliciously rich by slightly increasing the amount of tomatoes and coconut for balance. No matter your dietary preference, Thakkali Kuzhambu is a versatile and satisfying dish that can be enjoyed by everyone!
Variations
One of the best things about Thakkali Kuzhambu is its versatility! Whether you love bold spices, need a kid-friendly version, or want to add extra protein, this dish can be easily adapted to suit your preferences. Below are some creative ways to tweak this flavorful tomato-based curry:
Spicy Lovers 🌶️ – Add extra red chili powder, green chilies, or a drizzle of spicy garlic oil for more heat.
Kid-Friendly 👶 – Reduce spice, blend the gravy smooth, and top with crushed potato chips for a fun twist.
Protein-Packed 💪 – Add boiled chickpeas, crumbled paneer, or tofu for extra nutrition.
Coconut-Free Option 🌿 – Replace coconut with cashew or almond paste for a creamy texture.
Deluxe & Creamy ✨ – Stir in coconut milk or fresh cream and garnish with crispy onions or toasted cashews.
Refrigeration: Store leftover Thakkali Kuzhambu in an airtight container in the refrigerator for up to 3 days. The flavors deepen over time, making it even more delicious the next day!
Reheating: Warm the kuzhambu on the stovetop over low heat, adding a little water if it has thickened. You can also microwave it in short intervals, stirring in between.
Make-Ahead Tip: Prepare the spice paste in advance and store it in the refrigerator for 4-5 days or freeze it in portions for quick meal prep.
Avoid Metal Containers: Use glass or BPA-free plastic containers for storage to prevent any reaction with the acidic tomato base.
With these storage tips, you can enjoy Thakkali Kuzhambu fresh and flavorful anytime! 🍛✨
Top Tip
Here are some tips to make a delicious Thakkali Kuzhambu:
Use Ripe Tomatoes: For a rich, tangy flavor, always use ripe, juicy tomatoes. They add the perfect balance of sweetness and acidity to the gravy.
Roast the Spices: Lightly roast the spices like mustard seeds, fennel seeds, and cumin to bring out their full flavors before adding them to the gravy.
Tamarind: Use fresh tamarind pulp for a more authentic taste. If using tamarind extract, make sure to adjust the quantity based on its strength.
Add Gingelly Oil: Cooking Thakkali Kuzhambu with gingelly (sesame) oil enhances the dish’s authentic taste, giving it a richer flavor.
Adjust Spice Level: You can adjust the spice level by adding more or less red chili powder or dried red chilies, depending on your preference.
Cook the Tomatoes Well: Make sure to cook the tomatoes thoroughly until they turn soft and mushy for a smoother consistency in the gravy.
Let it Simmer: Allow the kuzhamu to simmer for a few extra minutes on low heat for the spices to meld together and intensify the flavors.
Garnish: Finish with a generous sprinkle of fresh coriander leaves for a burst of freshness.
Consistency: Adjust the water to get the desired consistency. For a thicker gravy, reduce the water; for a thinner consistency, add more.
These tips will help you achieve a flavorful and authentic Thakkali Kuzhambu. Enjoy!
Thakkali Kuzhambu is a tangy and flavorful South Indian tomato-based curry, perfect with idli or dosa. Made with ripe tomatoes, onions, tamarind, and aromatic spices, it has a rich, slightly thick consistency. The blend of mustard seeds, curry leaves, and gingelly oil enhances its authentic taste, making it a deliciously comforting accompaniment.
Course Accompaniment
Cuisine South Indian Recipes, Tamilnadu
Prep Time 15 minutesminutes
Cook Time 30 minutesminutes
Total Time 45 minutesminutes
Servings 4people
Calories 84kcal
Author Sowmya Venkatachalam
Equipment
1 Mixer Grinder
1 Heavy Bottomed Pan
Ingredients
For Spice Paste
1tablespoonCooking Oilpreferably Gingely Oil
1teaspoonFennel Seeds
1teaspoonJeera
1tablespoonCoriander seeds
1teaspoonWhole black pepper
2nosRed Chili
2tablespoonSplit Bengal Gram (Channa Dal / Kadalaparuppu)
1sprigCurry leaves
¼cupGrated Coconut
1small candy sizeTamarind
For the Kuzhambu
2tablespoonCooking Oilpreferably Gingely Oil
1nosOnionbig size, chopped roughly
4nosTomatobig size, chopped roughly
¼teaspoonTurmeric Powder
1teaspoonSalt
Tempering
1tablespoonCooking Oilpreferably Gingely Oil
1teaspoonMustard seeds
1teaspoonFennel Seeds
1sprigCurry leaves
1teaspoonRed Chili Powder
1teaspoonSalt
1handfulCoriander Leaveschopped
Instructions
Heat oil in a pan. Add fennel seeds, cumin seeds, black pepper, coriander seeds, red chili, roasted channa dal, and curry leaves. Sauté for 1-2 minutes until fragrant over a medium flame.
1 tablespoon Cooking Oil, 1 teaspoon Fennel Seeds, 1 teaspoon Jeera, 1 tablespoon Coriander seeds, 1 teaspoon Whole black pepper, 2 nos Red Chili, 2 tablespoon Split Bengal Gram (Channa Dal / Kadalaparuppu), 1 sprig Curry leaves
Now, add grated coconut and tamarind. Sauté until the coconut turns golden brown, then transfer the mixture to a mixer grinder.
¼ cup Grated Coconut, 1 small candy size Tamarind
Heat oil in a pan over medium heat. Once hot, add chopped onions and sauté until translucent. Then, add chopped tomatoes, turmeric powder, and salt, mixing well. Cover and cook until the tomatoes turn soft and mushy. Transfer the mixture to a mixer grinder.
2 tablespoon Cooking Oil, 1 nos Onion, 4 nos Tomato, ¼ teaspoon Turmeric Powder, 1 teaspoon Salt
Once the ingredients have cooled, grind them into a smooth paste and set it aside.
Heat oil in a pan over medium heat. Once hot, add mustard seeds and let them splutter. Then, add fennel seeds and curry leaves, stirring well to combine.
Add the ground spice paste to the pan and mix well. Add water to adjust the consistency, then add red chili powder and salt. Stir to combine and let the mixture cook on medium flame for about 5 minutes.
1 teaspoon Red Chili Powder, 1 teaspoon Salt
Finally, sprinkle chopped coriander leaves and turn off the stove. Serve the dish with hot idli or dosa.
1 handful Coriander Leaves
Video
Notes
Here are some tips to make a delicious Thakkali Kuzhambu:
Use Ripe Tomatoes: For a rich, tangy flavor, always use ripe, juicy tomatoes. They add the perfect balance of sweetness and acidity to the gravy.
Roast the Spices: Lightly roast the spices like mustard seeds, fennel seeds, and cumin to bring out their full flavors before adding them to the gravy.
Tamarind: Use fresh tamarind pulp for a more authentic taste. If using tamarind extract, make sure to adjust the quantity based on its strength.
Add Gingelly Oil: Cooking Thakkali Kuzhambu with gingelly (sesame) oil enhances the dish’s authentic taste, giving it a richer flavor.
Adjust Spice Level: You can adjust the spice level by adding more or less red chili powder or dried red chilies, depending on your preference.
Cook the Tomatoes Well: Make sure to cook the tomatoes thoroughly until they turn soft and mushy for a smoother consistency in the gravy.
Let it Simmer: Allow the kuzhamu to simmer for a few extra minutes on low heat for the spices to meld together and intensify the flavors.
Garnish: Finish with a generous sprinkle of fresh coriander leaves for a burst of freshness.
Consistency: Adjust the water to get the desired consistency. For a thicker gravy, reduce the water; for a thinner consistency, add more.
These tips will help you achieve a flavorful and authentic Thakkali Kuzhambu. Enjoy!
Looking for a wholesome, protein-packed meal that’s both nutritious and delicious? Dal Palak is the perfect combination of creamy lentils and fresh spinach, infused with aromatic spices for a comforting and flavorful dish. This easy-to-make recipe is not just healthy but also bursting with taste, making it a great choice for a hearty lunch or dinner. Whether paired with steamed rice or warm rotis, this dish is sure to become a family favorite. Keep reading to learn how to make this fan-freaking-fantastic dish in no time!
Dal Palak
Dal Palak is a versatile dish that can be enjoyed year-round, but it becomes especially popular during the winter months when fresh spinach is in season. The combination of protein-rich lentils and iron-packed spinach makes it a nutritious choice for colder days, providing warmth and energy.
In Indian households, Dal Palak is a staple comfort food, often prepared as part of everyday meals rather than being reserved for special occasions. However, it is commonly made during festivals like Navratri and Ekadashi, when people opt for simple, sattvic (pure) vegetarian meals. Additionally, it is a favorite during fasting periods and post-festival detoxes, as it is light, easy to digest, and highly nutritious. Whether enjoyed as a cozy winter dish, a nourishing meal during festive times, or simply as part of a balanced diet, Dal Palak remains a beloved classic in Indian cuisine!
This Dal Palak recipe was inspired by my other delicious dal variations on the Subbus Kitchen site, where I’ve explored different ways to bring out rich, comforting flavors in traditional Indian cooking. For a perfectly balanced meal, pair this with this amazing Jeera Aloo recipe—the combination will elevate your dining experience with complementary textures and flavors. Trust me, once you try this, it’s going to be a staple in your kitchen!
[feast_advanced_jump_to]
Ingredients
A clear, well-organized shot of the ingredients for Dal Palak helps showcase the freshness and simplicity of this wholesome dish. Each ingredient plays a crucial role in balancing flavors, texture, and nutrition. Toor dal (pigeon pea lentils) is chosen for its creamy texture and mild flavor, perfectly complementing the fresh spinach (palak), which adds earthy richness and a boost of vitamins. Garlic and green chilies infuse a hint of spice and warmth, while cumin seeds and mustard seeds enhance the dish with their aromatic depth. Turmeric powder and hing (asafoetida) aid digestion and bring out the vibrant color. Finally, a drizzle of ghee at the end elevates the dish, adding a rich, comforting finish.
Ingredients for Dal Palak:
Toor Dal (Pigeon Pea Lentils)
Fresh Spinach (Palak)
Onion
Tomato
Red Chilies
Garlic
Mustard Seeds
Cumin Seeds
Turmeric Powder
Hing (Asafoetida)
Red Chili Powder
Coriander Powder
Salt
Ghee
Water
See recipe card for quantities.
Instructions
Trim the edges of the spinach stems and wash them thoroughly in water. I filled a large vessel with water and soaked the spinach for a while, allowing any sand particles to settle at the bottom. Instead of pouring out the water, carefully lift the spinach leaves to avoid disturbing the sediment.
Once cleaned, chop the spinach and set it aside.
Finely chop the onions, tomatoes, ginger, and garlic. Place the toor dal in a vessel and rinse it twice with water, then drain the water completely. Add fresh water to the washed dal along with a pinch of turmeric. Place the vessel inside a pressure cooker, close the lid, and secure it with the whistle.
Allow the dal to cook for 5–6 whistles. Once the pressure releases naturally, mash the dal thoroughly and set it aside.
Heat oil in a pan and add finely chopped onions. Then, add the chopped garlic and ginger, and sauté until the onions turn translucent.
Now, add the chopped tomatoes and sauté until they turn soft and mushy.
Next, add turmeric powder, red chili powder, and coriander powder.
Next, add the chopped spinach to the pan and Sauté the spinach for 4–5 minutes.
Add the cooked and mashed dal to the sautéed spinach. Stir in salt and mix well. Add water to adjust the consistency to your liking.
Let the dal palak simmer on low flame for 5 minutes.
Heat ghee in a pan. Add mustard seeds and cumin seeds, allowing them to sputter. Then, add broken red chilies and stir well.
Pour the tempering over the dal palak and mix well. Turn off the heat. Your dal palak is now ready to serve.
Hint: For extra flavor, try adding a squeeze of fresh lemon juice just before serving. It will brighten up the dish and balance the richness of the dal.
Variations
Here are some delicious variations of Dal Palak you can try to add a twist to the traditional recipe:
Moong Dal Palak – Substitute toor dal with moong dal for a lighter, quicker-cooking version of the dish. The moong dal adds a delicate flavor while maintaining the creamy texture.
Dal Palak with Coconut – Add freshly grated coconut to the dal towards the end of cooking for a rich, creamy texture and a slightly sweet flavor.
Lemon Dal Palak – Add a squeeze of fresh lemon juice towards the end of cooking to enhance the flavors with a tangy kick. This adds a refreshing zing to the dish.
Spicy Dal Palak – If you like extra heat, increase the number of Red chilies or add a pinch of red chili flakes while cooking the spices.
Dal Palak with Veggies – Include other vegetables like carrots, potatoes, or even bottle gourd to make it a more wholesome, one-pot meal.
Kasuri Methi Dal Palak – For an aromatic twist, stir in some dried fenugreek leaves (kasuri methi) towards the end of cooking. It adds a unique flavor to the dal palak.
Garlic and Ginger Dal Palak – For a more robust flavor, increase the amount of garlic and ginger in the tempering. You can also add a bit of garlic paste for extra depth.
Dal Palak with Ghee Tadka – Finish the dish with a flavorful ghee tempering (tadka) of garlic, cumin seeds, and dried red chilies for a richer taste.
These variations allow you to experiment and tailor the dish to your taste, while still keeping the essence of Dal Palak intact!
Top Tip
Here are some tips to help you make the perfect Dal Palak:
Use Fresh Spinach – Always use fresh, tender spinach leaves for the best flavor and texture. Avoid using wilted or overly mature leaves.
Rinse Spinach Properly – Soak and wash the spinach thoroughly to remove any dirt or sand before chopping.
Choose the Right Dal – Toor dal, moong dal, or a combination of both works best for a creamy and flavorful Dal Palak.
Cook Dal Until Soft – Pressure cook the dal until it is completely soft and mash it well for a smooth texture.
Don’t Overcook Spinach – Add spinach towards the end of cooking and let it simmer just until it wilts to retain its color, nutrients, and flavor.
Enhance with Garlic – A good amount of garlic in the tempering enhances the taste and complements the spinach beautifully.
Add a Tangy Touch – A squeeze of lemon juice or a bit of tamarind extract balances the flavors and enhances the overall taste.
Spice it Up – Adjust the spice level by adding green chilies or a pinch of red chili flakes for an extra kick.
Finish with Ghee Tadka – A final tempering (tadka) of mustard seeds, cumin, garlic, and dried red chilies in ghee adds a rich aroma and enhances the taste.
Adjust Consistency – If the dal thickens upon cooling, add a little warm water while reheating to bring it back to the desired consistency.
Follow these tips to make a perfectly flavorful and comforting Dal Palak every time!
Dal Palak – Healthy Spinach and Lentil Curry Recipe
Dal Palak is a wholesome and flavorful dish made with protein-rich lentils and nutrient-packed spinach, infused with aromatic spices. This comforting curry is not only delicious but also easy to prepare, making it a perfect choice for a healthy meal. Whether paired with rice or roti, Dal Palak is a great way to enjoy a balanced, nourishing dish that’s both satisfying and packed with flavor.
Course Dal Varieties
Cuisine Indian Recipes, North Indian, South Indian, South Indian Recipes
Prep Time 10 minutesminutes
Cook Time 30 minutesminutes
Total Time 40 minutesminutes
Servings 4people
Calories 212kcal
Author Sowmya Venkatachalam
Equipment
2 Heavy Bottomed Pan
1 Pressure Cooker
1 Mixing Bowl
Ingredients
½CupToor Dal (Pigeon pea)1 Cup - 250ml
¼teaspoonTurmeric Powder
1tablespoonOil
1teaspoonGingerFinely Chopped
1teaspoonGarlicFinely Chopped
1nosOnionFinely Chopped
1nosTomatoFinely Chopped
¼teaspoonTurmeric Powder
1teaspoonRed Chili Powder
1teaspoonCoriander Powder
1bunchPalak (Spinach)about 50 grams
1½teaspoonSaltadjust to your taste
For Tempering
1tablespoonGhee
1teaspoonCumin Seeds
2noRed Chili
1SprigCurry Leaves
Instructions
Trim the edges of the spinach stems and wash them thoroughly in water. I filled a large vessel with water and soaked the spinach for a while, allowing any sand particles to settle at the bottom. Instead of pouring out the water, carefully lift the spinach leaves to avoid disturbing the sediment. Once cleaned, chop the spinach and set it aside.
1 bunch Palak (Spinach)
Place the toor dal in a vessel and rinse it twice with water, then drain the water completely. Add fresh water to the washed dal along with a pinch of turmeric. Place the vessel inside a pressure cooker, close the lid, and secure it with the whistle.
½ Cup Toor Dal (Pigeon pea), ¼ teaspoon Turmeric Powder
Allow the dal to cook for 5–6 whistles. Once the pressure releases naturally, mash the dal thoroughly and set it aside.
Heat oil in a pan, add the chopped garlic and ginger, and sauté until fragrant. Then, add the onions and cook until they turn translucent.
Now, add the chopped tomatoes and sauté until they turn soft and mushy.
1 nos Tomato
Next, turmeric powder, red chili powder, and coriander powder.
¼ teaspoon Turmeric Powder, 1 teaspoon Red Chili Powder, 1 teaspoon Coriander Powder
Next, add the chopped spinach to the pan and Sauté the spinach for few minutes.
1 bunch Palak (Spinach)
Add the cooked and mashed dal to the sautéed spinach. Stir in salt and mix well. Add water to adjust the consistency to your liking.
1½ teaspoon Salt
Let the dal palak simmer on low flame for 5 minutes.
Heat ghee in a pan and add cumin seeds, allowing them to splutter. Then, add broken red chilies and curry leaves, stirring well.
1 tablespoon Ghee, 1 teaspoon Cumin Seeds, 1 Sprig Curry Leaves, 2 no Red Chili
Pour the tempering over the dal palak and mix well. Turn off the heat. Your dal palak is now ready to serve.
Video
Notes
Tips for Making Delicious Dal Palak
Use Fresh Spinach – Always use fresh, tender spinach leaves for the best flavor and texture. Avoid using wilted or overly mature leaves.
Rinse Spinach Properly – Soak and wash the spinach thoroughly to remove any dirt or sand before chopping.
Choose the Right Dal – Toor dal, moong dal, or a combination of both works best for a creamy and flavorful Dal Palak.
Cook Dal Until Soft – Pressure cook the dal until it is completely soft and mash it well for a smooth texture.
Don’t Overcook Spinach – Add spinach towards the end of cooking and let it simmer just until it wilts to retain its color, nutrients, and flavor.
Enhance with Garlic – A good amount of garlic in the tempering enhances the taste and complements the spinach beautifully.
Add a Tangy Touch – A squeeze of lemon juice or a bit of tamarind extract balances the flavors and enhances the overall taste.
Spice it Up – Adjust the spice level by adding green chilies or a pinch of red chili flakes for an extra kick.
Finish with Ghee Tadka – A final tempering (tadka) of mustard seeds, cumin, garlic, and dried red chilies in ghee adds a rich aroma and enhances the taste.
Adjust Consistency – If the dal thickens upon cooling, add a little warm water while reheating to bring it back to the desired consistency.
Follow these tips to make a perfectly flavorful and comforting Dal Palak every time!
Kadhi Pakora is the ultimate comfort food, a beloved North Indian dish that combines crispy, golden pakoras (fritters) with a tangy and creamy yogurt-based curry. This dish is a perfect blend of flavors and textures—soft, melt-in-your-mouth pakoras swimming in a rich, spiced kadhi that is slow-cooked to perfection. Whether you're looking for a soul-satisfying meal on a cozy evening or a centerpiece dish for a special gathering, our recipe takes this classic to the next level. Packed with tips and tricks to ensure the perfect consistency and flavor, this Kadhi Pakora recipe is guaranteed to wow your taste buds and make you fall in love with its irresistible goodness. Read on to learn the secrets behind this fan-freaking-fantastic dish!
Kadhi Pakora is enjoyed year-round but holds special significance during certain times and occasions. It is often made during rainy seasons or cold weather, as the warm, creamy curry and crispy pakoras are perfect for cozy, comforting meals. In many households, it’s a go-to dish for weekends or family gatherings when something hearty and flavorful is desired.
While not tied to a specific festival, Kadhi Pakora is also popular during traditional fasting or ritual days in some regions, as it aligns with the satvik (pure) food practices observed on such occasions. Its versatility and universal appeal make it a cherished dish for both everyday meals and special gatherings.
To complete your meal, pair it with my deliciously fragrant Jeera Rice, which balances the tangy flavors of the kadhi beautifully. These dishes are a match made in culinary heaven, and including them both in your meal is a surefire way to impress your family and guests. Dive into the recipe to experience this flavorful combination for yourself!
[feast_advanced_jump_to]
Ingredients
Each ingredient in Kadhi Pakora is chosen for its unique role in creating the perfect balance of flavors and textures.
Gram flour is the hero, serving as the base for both the crispy pakoras and the thick, creamy kadhi.
Yogurt lends the dish its signature tanginess, while turmeric and red chili powder add color and spice.
The aromatic spices like cumin, ajwain, and fenugreek seeds create a deep, earthy flavor, while curry leaves and green chilies infuse freshness and a slight kick.
The optional onions give the pakoras a touch of sweetness and texture. Mustard oil brings a distinct smokiness, but you can use any oil you prefer. Garnished with fresh coriander leaves, this dish is a celebration of bold, comforting flavors! See recipe card for quantities.
Instructions
See below the recipe with step by step instructions along with pictures .
In a mixing bowl, combine besan, ajwain, red chili powder, salt, Eno salt, sliced onions, and chopped spinach. Mix everything thoroughly, allowing the moisture from the onions and spinach to bring the ingredients together. Let the pakora mixture rest while you heat the oil.
Heat oil in a heavy-bottomed pan. Once the oil is hot, take small portions of the pakora mixture and gently drop them into the oil. Deep-fry the pakoras over medium heat until they turn golden brown and crispy. Remove the pakoras and place them on a paper towel to drain any excess oil. Repeat the process with the remaining pakora mixture.
In a mixing bowl, combine curd, besan, red chili powder, salt, and turmeric powder. Mix thoroughly until well blended. Add 3 cups of water and whisk until the mixture is smooth and free of lumps. Stir in the amchoor powder and mix well. The kadhi mixture is now ready for cooking.
In a heavy-bottomed pan, heat a combination of oil and ghee. Add fenugreek seeds and sauté until they turn golden brown. Then, add mustard seeds and cumin seeds, allowing them to sputter and release their aroma.
5. Next, add curry leaves and slit green chilies. Add the sliced onions and sauté them in the oil until they turn translucent.
6. Once the onions turn translucent, turn off the flame and pour the kadhi mixture into the pan. Turn the flame to low and continuously stir the kadhi mixture until it begins to boil. Continuous stirring is essential to prevent the curd from splitting.
7. When the kadhi mixture begins to boil, continue cooking it on low flame for at least 20 minutes, stirring occasionally. After 20 minutes, you will notice the oil separating from the kadhi. At this point, turn off the flame.
8. In a separate pan, heat a teaspoon of oil. Add cumin seeds and let them sputter. Then, add asafoetida, red chilies, and red chili powder, and give everything a quick stir. Turn off the flame and set this aside.
9. Take a serving bowl and place 4-5 pieces of pakoras in it. Pour the kadhi mixture over the pakoras. Finally, garnish with the prepared tempering for a flavorful finish.
10. Delicious Kadhi Pakora | Besan Ki Pakora is ready to be served with roti or hot, steaming rice.
Variations
Here are some ideas for variations to elevate your Kadhi Pakora and make it even more special for your dinner guests:
Vegetable Pakoras: Add grated vegetables like carrots, zucchini, or spinach to the pakora mixture for added nutrition and color. This is a great way to introduce extra flavors and texture, making it a heartier dish.
Vegan Kadhi Pakora: For a plant-based version, substitute yogurt with cashew cream. You can also use chickpea flour (besan) for the pakoras and make sure to use oil for frying instead of ghee.
Spicy Kadhi Pakora: If you love extra spice, increase the number of green chilies in the kadhi mixture or pakora batter. You can also increase red chili powder for an added punch.
Onion-Free Pakoras: If you prefer a milder flavor or have dietary restrictions, you can skip the onions in the pakora batter and focus on the savory spices like cumin, carom seeds (ajwain), and coriander.
Herbed Kadhi: Add fresh herbs like mint or cilantro to the kadhi for an aromatic twist.
Methi (Fenugreek) Pakoras: For a slightly bitter twist, add fenugreek leaves (methi) to the pakora mix. This is a great way to balance the richness of the kadhi with the unique flavor of methi.
Nuts and Dried Fruits: Add chopped cashews, almonds, or raisins to the kadhi or pakoras for a rich, slightly sweet contrast that works well for festive occasions like Diwali or weddings.
With these variations, you can tailor the Kadhi Pakora recipe to suit your preferences, add your personal flair, and make the dish even more memorable for every occasion. Enjoy experimenting with these ideas and creating a version of Kadhi Pakora that’s perfect for you and your loved ones!
Equipment
Here’s a list of the equipment you’ll need:
Mixing Bowls: To combine the ingredients for both the pakoras and the kadhi mixture.
Whisk: For mixing the yogurt, besan, and water to create a smooth kadhi mixture without any lumps.
Heavy-Bottomed Pan or Kadai: To prepare the kadhi and to deep fry the pakoras. A heavy-bottomed pan ensures even heat distribution for both frying and simmering the kadhi.
Slotted Spoon: To drop the pakoras into the hot oil and remove them once they are golden brown, allowing excess oil to drain.
Frying Pan or Deep Fryer: For frying the pakoras, a frying pan with enough oil to submerge the fritters or a deep fryer will give you the best results.
Ladles: For stirring the kadhi mixture and for pouring the kadhi over the pakoras.
Small Pan (For Tempering): A small pan is required for making the tempering (tadka) that is poured over the kadhi at the end for added flavor.
Serving Bowl: For serving the Kadhi Pakora once it’s ready to enjoy, ideally one large enough to fit both the pakoras and the kadhi.
With these simple yet essential tools, you'll be all set to make a delicious batch of Kadhi Pakora!
Storage
Kadhi Pakora is best enjoyed fresh, but if you need to store leftovers, here’s how you can keep them:
Storing the Kadhi:
Allow the kadhi to cool to room temperature before storing.
Store it in an airtight container in the refrigerator for up to 2-3 days.
When reheating, do so on low heat while stirring occasionally to prevent the yogurt from curdling. You may need to add a little water to adjust the consistency as kadhi tends to thicken after cooling.
Top Tip
Use Fresh Yogurt: Fresh, creamy yogurt is key to making a smooth, flavorful kadhi. Ensure the yogurt is not too sour for the best taste.
Avoid Lumps in the Kadhi: When mixing the besan (gram flour) with yogurt and water, whisk vigorously to ensure the mixture is smooth and free from lumps. Using a hand whisk or an electric mixer can make the process easier.
Consistency of Kadhi: The kadhi should be of pouring consistency. If it's too thick, add a little water. If it's too thin, cook it for a few more minutes to thicken.
Pakora Texture: The pakoras should be soft on the inside and crispy on the outside. Avoid overmixing the pakora batter; it should be thick but not too dense. The consistency of the batter is important for achieving the right texture.
Fry Pakoras on Medium Heat: Fry the pakoras on medium heat so they cook through without burning. If the oil is too hot, the pakoras will brown too quickly on the outside while remaining uncooked inside. If the oil is too cool, they will absorb excess oil.
Rest the Pakora Mixture: Let the pakora mixture rest for 10-15 minutes before frying. This helps the flavors meld and results in better texture and crispiness.
Temper the Kadhi: Don’t skip the tempering (tadka). It adds a burst of flavor to the kadhi and enhances the overall taste. Be sure to add cumin seeds, curry leaves, and dried red chilies to the hot oil for the perfect aroma.
Stir Continuously: Once you add the kadhi mixture to the pan, stir continuously to prevent the yogurt from curdling. This ensures a smooth and velvety texture.
Garnish Well: Fresh coriander leaves add a refreshing touch to the dish. You can also sprinkle a pinch of garam masala or a drizzle of ghee just before serving for extra richness and aroma.
Serve Immediately or Store Separately: To maintain the crispy texture of the pakoras, serve them immediately after adding the kadhi. If you must store them, keep the kadhi and pakoras separate and combine them just before serving.
By following these tips, you'll ensure that your Kadhi Pakora turns out deliciously smooth, perfectly spiced, and satisfying every time!
Kadhi Pakora or Besan Ki Kadhi is one of the popular North Indian recipe, made with besan and dahi along with various spices and pakodas dipped in it. The crispy onion pakoras along with spicy dahi is a treat to our taste buds. Learn here how to make this Kadhi Pakora with step by step pictures and instructions.
Course Veg Gravies
Cuisine Gujarati, Indian, North Indian, Punjabi
Prep Time 10 minutesminutes
Cook Time 1 hourhour
Total Time 1 hourhour10 minutesminutes
Servings 4people
Calories 210kcal
Author Sowmya Venkatachalam
Equipment
Mixing Bowl
Heavy Bottomed Pan
Sauce Pan
Ingredients
Ingredients for Pakora
1cupGram Flour (Besan / Chickpea Flour)1 Cup - 250ml
1teaspoonCarom Seeds (Ajwain / Omam)
1teaspoonRed Chili Powder
0.5teaspoonEno Salt
¾teaspoonSaltAdjust as needed
1noOnion roughtly chopped
1cupSpinach (Keerai) Washed, Chopped
2CupsOilFor Deep Frying
Ingredients for Kadhi
1cupCurd (Plain Yogurt)
0.25cupGram Flour (Besan / Chickpea Flour)
1teaspoonSalt
1teapsoonRed Chili Powder
0.5teaspoonTurmeric Powder
3cupsWater
0.5teaspoonAmchoor Powder
1tablespoonOil
1tablespoonGhee (Clarified butter)
0.25teaspoonFenugreek seeds
½slicedOnion
2slitGreen Chilli
FewCurry Leaves
For Tempering
1teaspoonOil
1teaspoonCumin Seeds
1PinchAsafoetida (Asafetida / Hing)
3Red Chili
0.25teaspoonRed Chili Powder
Instructions
Pakora Preparation
In a mixing bowl, combine besan, ajwain, red chili powder, salt, Eno salt, sliced onions, and chopped spinach. Mix everything thoroughly, allowing the moisture from the onions and spinach to bring the ingredients together. Let the pakora mixture rest while you heat the oil.
1 cup Gram Flour (Besan / Chickpea Flour), 1 teaspoon Carom Seeds (Ajwain / Omam), 1 teaspoon Red Chili Powder, 0.5 teaspoon Eno Salt, ¾ teaspoon Salt, 1 cup Spinach (Keerai), 1 no Onion
Deep Frying Pakoras
Heat oil in a heavy-bottomed pan. Once the oil is hot, take small portions of the pakora mixture and gently drop them into the oil. Deep-fry the pakoras over medium heat until they turn golden brown and crispy. Remove the pakoras and place them on a paper towel to drain any excess oil. Repeat the process with the remaining pakora mixture.
2 Cups Oil
Preparing for Kadhi
In a mixing bowl, combine curd, besan, red chili powder, salt, and turmeric powder. Mix thoroughly until well blended. Add 3 cups of water and whisk until the mixture is smooth and free of lumps. Stir in the amchoor powder and mix well. The kadhi mixture is now ready for cooking.
1 cup Curd (Plain Yogurt), 0.25 cup Gram Flour (Besan / Chickpea Flour), 1 teaspoon Salt, 1 teapsoon Red Chili Powder, 3 cups Water, 0.5 teaspoon Amchoor Powder, 0.25 teaspoon Red Chili Powder, 0.5 teaspoon Turmeric Powder
Cooking Kadhi
In a heavy-bottomed pan, heat a combination of oil and ghee. Add fenugreek seeds and sauté until they turn golden brown. Then, add mustard seeds and cumin seeds, allowing them to sputter and release their aroma.
Next, add curry leaves and slit green chilies. Add the sliced onions and sauté them in the oil until they turn translucent.
2 slit Green Chilli, Few Curry Leaves, ½ sliced Onion
Once the onions turn translucent, turn off the flame and pour the kadhi mixture into the pan. Turn the flame to low and continuously stir the kadhi mixture until it begins to boil. Continuous stirring is essential to prevent the curd from splitting.
When the kadhi mixture begins to boil, continue cooking it on low flame for at least 20 minutes, stirring occasionally. After 20 minutes, you will notice the oil separating from the kadhi. At this point, turn off the flame.
Garnishing
In a separate pan, heat a teaspoon of oil. Add cumin seeds and let them sputter. Then, add asafoetida, red chilies, and red chili powder, and give everything a quick stir. Turn off the flame and set this aside.
1 teaspoon Oil, 1 Pinch Asafoetida (Asafetida / Hing), 3 Red Chili
Serving Time
Take a serving bowl and place 4-5 pieces of pakoras in it. Pour the kadhi mixture over the pakoras. Finally, garnish with the prepared tempering for a flavorful finish.
Delicious Kadhi Pakora | Besan Ki Pakora is ready to be served with roti or hot, steaming rice.
Tofu Tikka Masala is a vegan spin-off of Chicken Tikka Masala. It's a healthy and delicious Indian curry made with marinated and fried tofu that's cooked in a delicious masala paste along with aromatic spices and flavors. This flavorful curry can be served with bread or rice. What is Tikka masala Tikka masala is a...
Matar paneer is the classic Indian delicacy which you will find in every Indian restaurant across the globe. In this Masala, Paneer is cooked with Peas and tomato sauce. This is a very simple curry, yet the flavors that are in play work well with each other so well that you will keep wanting more! The tangy tomato sauce mixed in with the spices gets absorbed by the paneer and the green peas does more than just making the curry more appealing. There are many variations we can bring in and this is one of the method. A perfect vegetarian gravy for Roti / Chapati / Naan!
Most of the Paneer dishes tastes so awesome with any Indian Bread. Paneer is very special to many kids and even for many adults. Whenever we go to a restaurant, most of us order atleast one Paneer gravy as an accompaniment for roti / naan or even for Pulao. I personally love Malai Paneer, thought it tastes a little sweet than spicy. In restaurants, Paneer Butter Masala is sometimes too creamy. This Matar Paneer is perfect in spice and less creamy and it would make a perfect accompaniment even for Pulao / Biriyani etc.
Tips for making Matar Paneer:
If you plan to use homemade Paneer, you don’t need to soak the paneer in hot water.
Store bought paneer should be soaked in hot water and then cubed.
We can fry the paneer cubes in butter till its golden on all sides and then add it to the gravy.
Cook the onion-tomato-cashew gravy in butter to get rich taste and flavor.
Allow the onion-tomato-cashew gravy to cool off completely before grinding to ensure its not spilling out of the mixer jar.
Kashmiri red chili powder gives a natural color to the gravy and also doesn’t make the gravy spicer.
After adding fresh cream do not boil the gravy.
If you like this Matar Paneer , then you can also try other Gravy recipes
Kadai Paneer Gravy – Kadai Paneer is one of the popular Paneer variety that is served in most of the Indian Restaurants and also in our kitchen. This Paneer Gravy is enhanced with freshly ground Kadai Masala along with the richness of colored Bell Peppers.
Veg Makhanwala – Vegetable Makhanwala, is a rich and tasty vegetarian gravy. A perfect side dish for Indian Breads like Roti/ Chapati / Naan etc. Vegetable rich gravy with the richness of cream makes this a mouth-watering dish.
Methi Paneer – Methi Paneer, a gravy made with fresh Methi leaves cooked with creamy onion-tomato gravy along with Indian spices.
Matter Paneer, a very famous Indian Gravy. Paneer cooked with Peas and tomato sauce. A perfect vegetarian gravy for Roti / Chapati / Naan!. Learn here how to make this Matar Paneer with step by step pictures, instructions and video!
Course Veg Gravies
Cuisine Indian, Indian Cuisine, Indian Recipes, North Indian
Prep Time 15minutes
Cook Time 30minutes
Total Time 45minutes
Servings 4people
Calories 210kcal
Author Sowmya Venkatachalam
Equipment
1 Mixer Grinder
1 Heavy Bottomed Pan
Ingredients
200gPaneer Cubed
1cupGreen Peas1 cup - 250ml
1noOnion finely Chopped
3nosTomato finely Chopped
1tbspCashew
1noGreen Chilli
1inchGingerChopped
1noGarlicChopped
1tspRed Chilli Powder
1tspCoriander Powder
1/2tspCumin Powder
1tspDry Kasoori Methi
1tspSaltadjust as needed
1tbspFresh Cream
1tbspCoriander LeavesFor Garnishing
For Tempering
2tbspButteryou can use oil too.
1inchCinnamon (Pattai)
3-4nosCloves (Krambu / Lavang)3-4
2nosCardamom
1tspCumin Seeds
Instructions
Preparing Masala
I used store bought paneer cubes which I refrigerated and so I took it fridge an soaked the paneer cubes in warm water for 10 minutes. My paneer cubes are soft by that time.
Let's prepare our masala now. Heat oil /butte in pan. Add cashew nuts and fry for 30 seconds.
Next, Add chopped onions, garlic and ginger along with pinch of salt and saute them till the onions turn light brown color.
Cooking Tomatoes
Add turmeric, green chillies and saute it for 10 seconds.
Then add chopped tomatoes and saute them in medium flame till the tomatoes are cooked and become mushy.
Grinding Onion-Tomato Masala
When the tomatoes are mushy, switch off the flame and allow it to cool off. Take this tomato mixture in a mixer.
Grind it to a smooth paste.
Tempering Process
Heat oil in a pan, add oil and when the oil is hot, add the whole garam masalas such as cinnamon, cloves, cardamom and saute them for 10 seconds. Then add cumin seeds.
Cook Masala & Spice it up
When the cumin seeds starts to sputter, add ground tomato mixture along with salt and also add 1/2 cup of water and keep the flame in low and allow the sauce to boil in low flame atleast for 15 minutes.
Also add crushed kassori methi, coriander powder, cumin powder and red chilli powder and mix well.
Time to Add Paneer
When the sauce is ready, add peas and mix well and allow it to boil for a minute.
Then add paneer cubes along with salt and mix well. Again allow the mutter paneer to boil for 2 minutes.
Garnishing Time
Finally add chopped coriander leaves and before switching off the flame.
Add fresh cream and remove from flame.
Slurp!!!
The yummy, creamy Mutter Paneer is now ready to serve with hot Chapati / Roti / Naan
I used store bought paneer cubes which I refrigerated and so I took it fridge an soaked the paneer cubes in warm water for 10 minutes. My paneer cubes are soft by that time.
Let’s prepare our masala now. Heat oil /butte in pan. Add cashew nuts and fry for 30 seconds.
Next, Add chopped onions, garlic and ginger along with pinch of salt and saute them till the onions turn light brown color.
COOKING TOMATOES
Add turmeric, green chillies and saute it for 10 seconds. Then add chopped tomatoes.
Saute them in medium flame till the tomatoes are cooked and become mushy.
GRINDING ONION-TOMATO MASALA
When the tomatoes are mushy, switch off the flame and allow it to cool off. Take this tomato mixture in a mixer. Grind it to a smooth paste.
TEMPERING PROCESS
Heat oil in a pan, add oil and when the oil is hot, add the whole garam masalas such as cinnamon, cloves, cardamom and saute them for 10 seconds. Then add cumin seeds.
COOK MASALA & SPICE IT UP
When the cumin seeds starts to sputter, add ground tomato mixture along with salt and also add 1/2 cup of water and keep the flame in low and allow the sauce to boil in low flame atleast for 15 minutes.
Also add crushed kassori methi, coriander powder, cumin powder and red chilli powder and mix well.
TIME TO ADD PANEER
When the sauce is ready, add peas and mix well and allow it to boil for a minute.
Then add paneer cubes along with salt and mix well. Again allow the mutter paneer to boil for 2 minutes.
GARNISHING TIME
Finally add chopped coriander leaves and before switching off the flame.
Add fresh cream and remove from flame.
SLURP!!!
The yummy, creamy Mutter Paneer is now ready to serve with hot Chapati / Roti / Naan
You've come to the right place if you like faster cooking and more flavorful chicken recipes. Nineteen of the best recipes for thinly sliced chicken breast have been compiled. Recipes for stir-fries, air fryers, and those that are keto-friendly. It will be challenging to decide which to try first. You've found the perfect meat if...