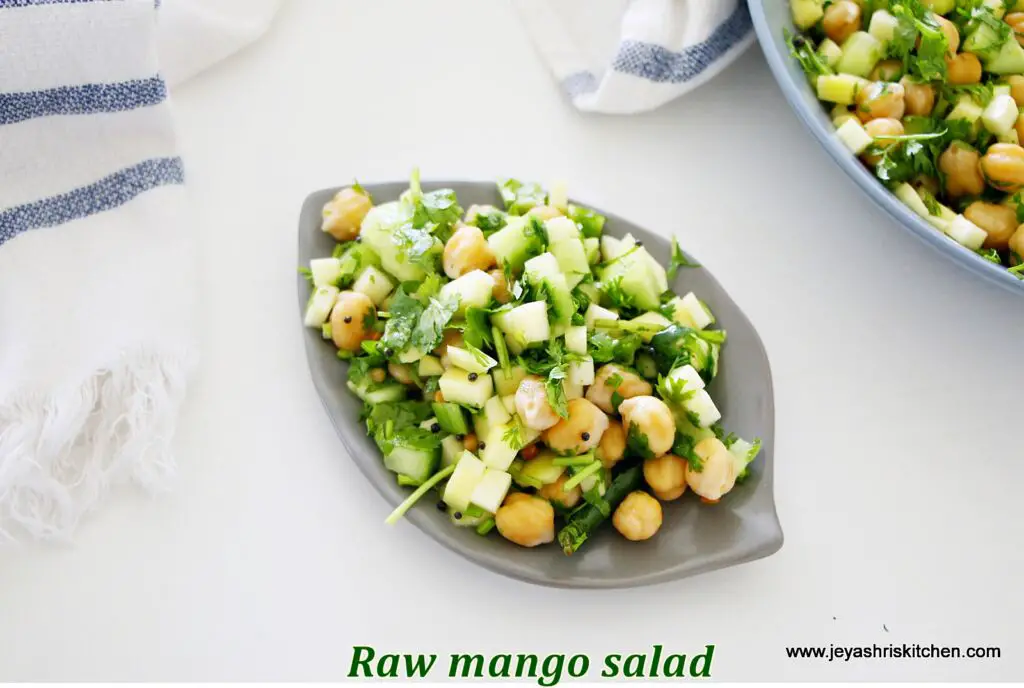
Mango malli salad | Raw mango salad – Easy to make Raw mango salad recipe with short video and step-by-step pictures.
I mostly add raw mango to all my salads in this raw mango season. We all love the crunch and tanginess of the raw mango in salads. I recently tried this random, easy raw mango salad and named it Mango Malli Salad. I wanted to share this refreshing raw mango salad recipe on Jeyashris kitchen. If you are not following Jeyashri’s Kitchen on Instagram, facebook and Youtube please do follow to get more healthy recipe updates
I have provided more options in the notes section for making this mango malli salad. Make the most of this mango season and enjoy the fresh produce. Coriander leaves are a must-ingredient in this refreshing salad.
Keyword Healthy salad, Mango recipes, no onion garlic recipes
Prep Time 15 minutesminutes
Cook Time 2 minutesminutes
Total Time 17 minutesminutes
Servings 2
Author Jeyashri suresh
Ingredients
½cupraw mangocut into small cubes
½cupcucumbercut into small cubes
½cupboiled chickpeas
¼cupfinely chopped coriander leaves
2tspoil
1tspmustard seeds
1tspurad dal
2slit green chilis
Salt as needed
Instructions
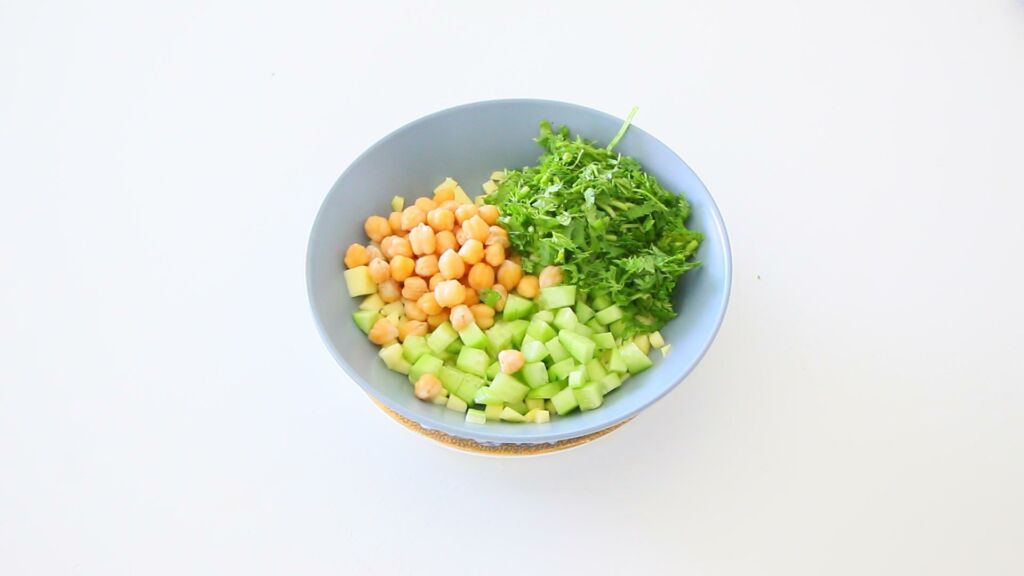
In a bowl add chopped raw mango, cucumber, boiled chickpeas and chopped coriander leaves.
Add salt
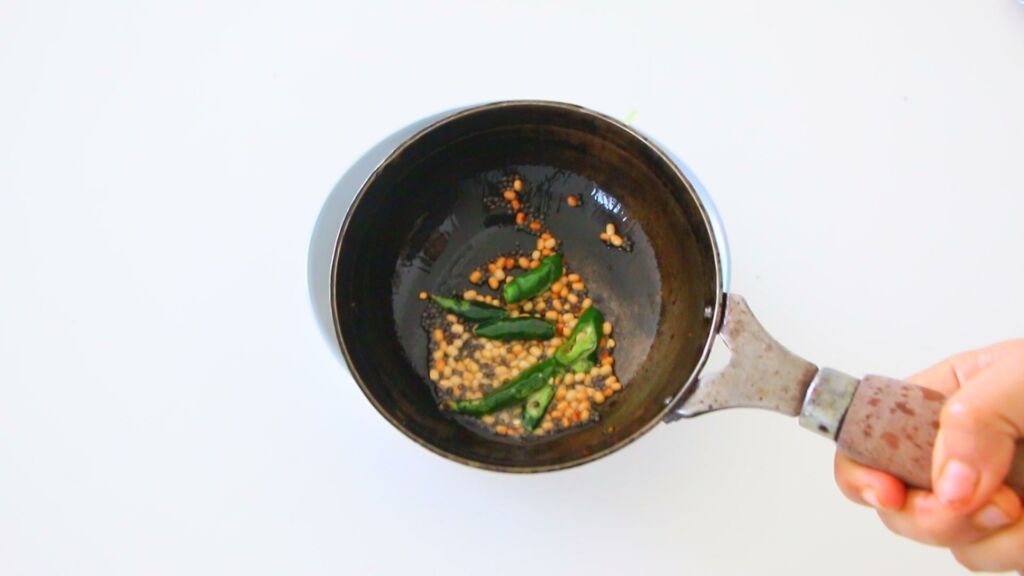
Temper with mustard seeds, urad dal and green chillis 2 tsp oil.
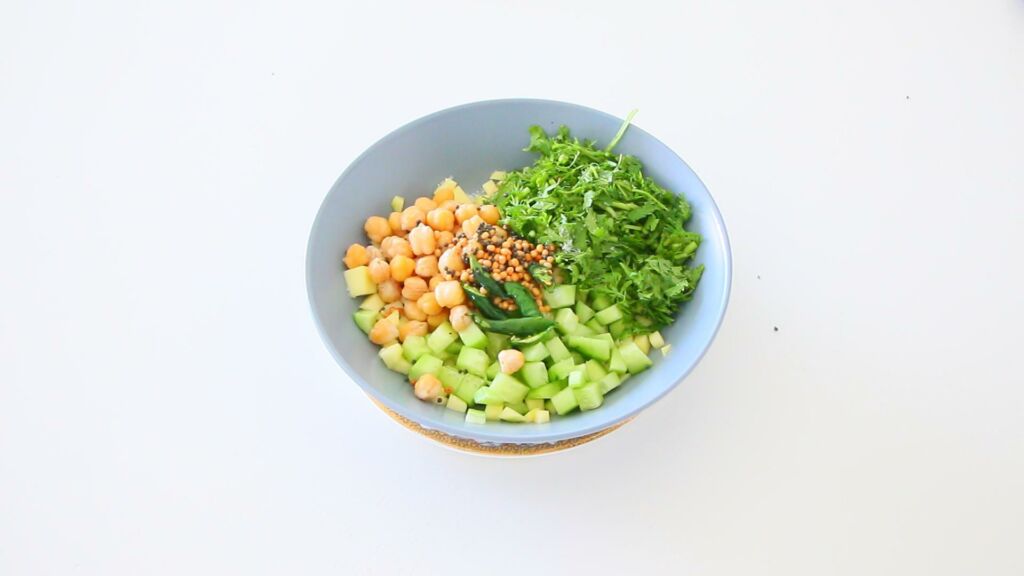
Add to the bowl
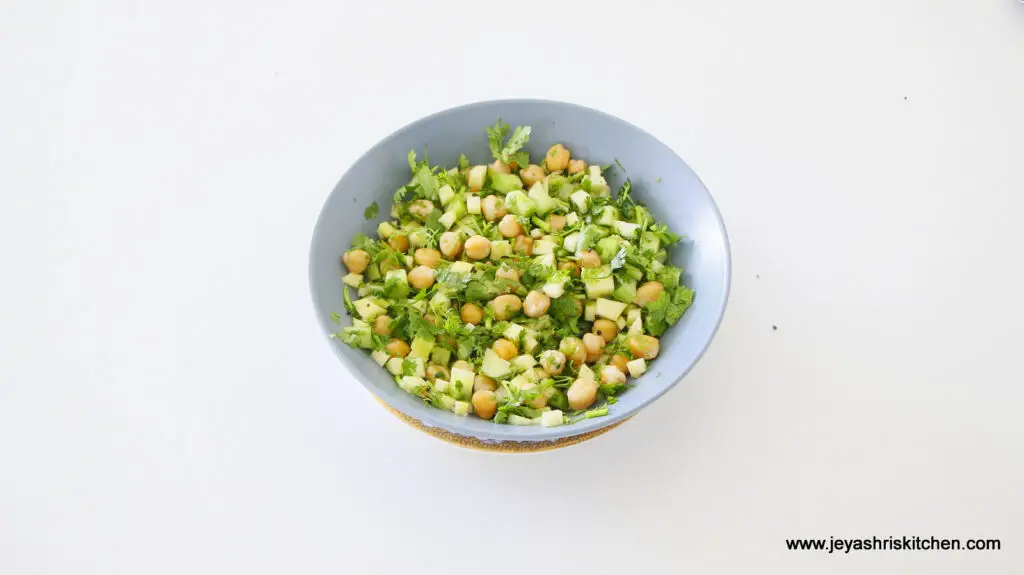
Mix well
Mango malli salad is ready
Notes
1. Instead of chickpeas, you can add roasted peanuts or boiled peanuts.2. You can add cooked white peas or black beans, or boiled rajma to the salad.3. Do not alter the quantity of coriander leaves, which gives a fantastic flavour to the salad. 4. You can add some pomegranate arils to the Mango Malli salad | Raw mango salad
In a bowl, add chopped raw mango, cucumber, boiled chickpeas, and chopped coriander leaves.
Add salt.
Temper with mustard seeds, urad dal and green chilies 2 tsp oil.
Add to the bowl.
Mix well.
Mango malli salad is ready.
Notes:
Instead of chickpeas you can add roasted peanuts or boiled peanuts.
You can add cooked white peas or black beans, or boiled rajma to the salad.
Do not alter the quantity of coriander leaves, which gives a fantastic flavour to the salad
You can add some pomegranate arils to the Mango Malli salad | Raw mango salad.
Pidikarunai Kizhangu belongs to the Yam/Jimmikand family and is native to southern India especially Tamil Nadu .
Also known as Pidi Karanai or karunai kizhangu it is often mistaken with arbi /taro root ,but both are entirely different .
Elephant foot yam is known as Senai kizhangu or simply Senai /Chenai.
Pidi karunai is used in a variety of recipes like masiyal (gravy type) , stir fry , sambar, kootu etc
Pidi karunai is small in size as compared to the regular yam /suran that is commonly used.
Kai Pidi in Tamil is a measure to denote "a fistful" and as this vegetable fits within the size of one's fist it is called as Pidi karunai .
The flesh inside is starchy, and has a slightly slimy texture when cooked. It has a mild earthy flavor . Pidi Karunai has a tendency to cause mild itchiness to some, hence we always need to cook it in tamarind water to reduce the itchy property .
Health benefits of Pidi karunai
Rich in dietary fibre
Low glycemic index.
Rich in potassium ,Vit B and C
Pidikaranai masiyal is a very traditional Tambrahm recipe ,so obviously it is devoid onions, garlic and other strong spices .
Every home will have their own slight variations in preparing this masiyal .Some use tamarind pulp to cook the masiyal while some recipes just use a dash of lime juice while serving.
I was introduced to Pidikarunai masiyal only after my marriage and that was when I first saw this vegetable. In Bangalore, this vegetable is still a rarity but with the growing Quick commerce and Dark storage concept, we do get to relish Pidi karunai 3 to 4 times a year .
If you are in Tamil Nadu or happen to visit, you can definitely buy these from the local vegetable vendors .In Mumbai , Matunga market stores this vegetable around Sankrant for a few weeks .
Preparation Time - 30 mins Cooking Time - 45 mins Complexity - medium Serves - 3 to 4
Ingredients
500gm pidikarunai 2 green chillies Finely chopped ginger 1/2 cup tamarind extract 1/2 tsp sambar powder 1 tsp oil 1/2 tsp mustard seeds 1 tsp udad dhall 2 dry red chillies Few curry leaves Pinch of asafoetida
Method
Soak the pidikarunai in water for 10-15 mins and scrub it clean to clear the mud off it .
Add the cleaned Pidikarunai in a pressure cooker with sufficient water ,turmeric and a small piece of tamarind.
Pressure cook for 3 whistles and open it after the pressure releases .
You may immerse the pressure cooked pidikarunai in a bowl of water .This step makes the peeling of pidikarunai easy.
Peel the skin of the pidikarunai and mash it well with a masher or using back of a ladle .
To the mashed pidikarunai, add salt, sambar powder , turmeric and the tamarind extract. Mix it well and keep aside .
In a kadai,add oil and once heated,temper it with mustard ,udad dhall,curry leaves, ginger,green chillies and red chillies.
Add the pidikarunai mixture to the tempering, 1/2 cup of water and cook until the raw flavor of tamarind is lost.
You can adjust the consistency by adding water if you feel it is too thick. Also,adjust the spice and salt level based on your liking .
Delicious pidikarunai masiyal is ready to be served .
You can mix it with rice and hot ghee and eat it with some roasted papads and curry.
Avarakkai kootu is a popular side dish from the Tambrahm cuisine made from just moong dhall (yellow split gram) , fresh coconut paste and a Sizzling tempering of mustard seeds ,curry leaves in coconut oil.
Avarakkai(tamil),Avrekkai(Kannada), chikkidkaay (Telugu) is a native Indian vegetable and used extensively across cuisines in India . In the Maharashtra and Gujarat it is called as Vaal papdi or papdi and Sem in Hindi .
Avrakkai is a diabetic friendly vegetable and also rich in protein, dietary fibre,vitamin A ,potassium and folates. Consuming avarekkai is a good source of plant protein and apt for vegetarians to meet their dietary requirements of protein intake. The fibre present in the Indian flat broad beans helps to manage cholesterol in the body.
Since, Avarekkai is a native vegetable, it is used during the Mahalaya Paksha , Amavasya cooking and also for cooking during Shraadh or Devasam. During Shraadh , Amavasai or Mahalaya paksha avrekkai is mostly used in the form of kootu but some families also make a simple stir fry known as Thenga pota curry .
I shall share the recipe of the simple yet flavorful curry very soon. You may refer to Mildly Indian Seema's Kothavarangai Poriyal and in the same way you can make avarekkai poriyal .
Avrekkai kootu can be mixed with rice or can also be served as an accompaniment to sambar ,vethakuzhambu, milagu kuzhambu along with some toasted papads and a simple paruppu Thogayal or pudina Thogayal.
If making kootu to mix with rice, make it a little runny else we can have a thicker consistency.
Avrakkai kootu is purely Saatvik and Vegan making it No Onion No garlic and Jain friendly .
You may also want to try some lip smacking healthy and delicious kootu recipes from my blog
Preparation Time - 10 mins Cooking Time - 25mins Complexity - Simple Serves - 2 to 3
Ingredients
150 gms Indian broad beans /avarekkai 1 cup moong dhall 1/2 cup fresh grated coconut 1 tsp jeera/cumin 8 to 10 pepper corns 2 dried red chillies Few curry leaves Pinch of turmeric Salt as needed 1 tsp coconut oil 1/2 tsp mustard seeds Pinch of asafoetida
Method
Wash the broad beans and trim the head and tail. Bundle them up and chop into medium cuts.
Wash the moong dhall under running water 3 to 4 times.
Add the washed moong dhall,chopped avrakkai ,turmeric , 2 cups water and pressure cook for 3 whistles. Let the pressure release naturally.
Grind the coconut, cumin,red chillies ,pepper with water to a fine paste .
Once ,the pressure cools down,lightly mash and mix the lentil and add the ground coconut paste to this along with required amount of salt.
If too thick,add 1/4 cup water and bring it to a quick boil with occasional stirring. Coconut paste has a tendency to stick to the bottom and the kootu will get burnt.
Turn off the stove when the kootu thickens and the raw flavor from the coconut paste is gone.
Prepare a tempering of mustard seeds,fresh curry leaves,asafoetida in hot coconut oil and pour it over the delicious kootu.
Millet Dal Khichdi is a healthy one pot meal made from foxtail millet and a combination of various pulses . Khichdi is a very healthy Indian meal similar to a porridge or a gruel and is a staple meal for patients recovering from illness especially fever and stomach related issues.
Foxtail millet also known as Thinai (Tamil) , Kangni (Hindi) is low in glycemic index and rich in fibre and beta carotene.Consuming foxtail millets helps in keeping the sugar spikes under control and the presence of beta carotene makes it good for the eyes too. Beta carotene is what is found in carrots too .
Unlike,rice dal khichdi the quantity of millets used is less because it gives a good yield on cooking. It is preferred to soak the millets for min of 6 to 8 hrs before cooking because that helps in maximum absorption of the nutrients.
So,if you plan on making dal khichdi for dinner ,then soak the foxtail millet during your lunch time ,so by the time you make dinner around 7pm the millets have soaked sufficiently giving you the best benefits.
Before cooking the millets, discard the water in which they were soaked and cook it using fresh water .
To make dal khichdi, I use a combination of thoor dal (pigeon peas) , moong dhall(yellow split peas) , handful of whole moong (green beans) and black udad dhall (unhusked black lentil) along with mild whole spices. I make khichdi as a one pot meal ,where I cook the millets and pulses in the pressure cooker and temper mustard seeds, curry leaves in ghee and pour it over the khichdi before serving .
Khichdi is very mildly spiced and it pairs well with Kadhi or raita . A side of pickle and some ghee on top is how the khichdi is generally served. In my home, we relish it with khatta meetha Gujarati Kadhi and some roasted papads . At times I also make some potato curry,to be served if I make dal khichdi for lunch . I like my khichdi to be gooey and slightly runny ,but if you like your khichdi to be thick ,then adjust water accordingly.
Soaking Time - 8 hrs Preparation Time - 20mins Cooking Time - 30 to 40 mins Serves - 2 to 3
Skip the ghee if you are following vegan diet.
Ingredients
3/4 cup foxtail Millet (soaked) 1/4 cup thoor dhall (pigeon peas) 1/4 cup moong dhall (split yellow peas) 2 tbsp split black udad dhall 2 tbsp whole green moong dhall (green gram) 2 medium tomatoes chopped 2 to 3 green chillies chopped 2 to 3 cloves 1 inch cinnamon Finely chopped ginger Freshly chopped coriander Handful of curry leaves 2 tbsp ghee / cooking oil 1 tsp mustard/raai 1tsp cumin /jeera 2 to 3 dry red chillies Pinch of asafoetida Salt as needed Pinch of turmeric
Method
Drain the water from soaked millet and wash the lentils multiple times .
In a deep bottom pressure cooker,add the millet,lentils ,chopped tomatoes, green chillies, ginger,turmeric, salt with 4 cups of water .
Pressure cook for 5 to 6 whistles and let pressure release naturally.
Open the lid and using a ladle mash the cooked khichdi nicely till it turns mushy. Add a cup of hot water if you feel it is too dry and thick .Adjust salt if needed.
Prepare a tempering of mustard ,cumin,dry red chillies,asafoetida and curry leaves in ghee and pour it over the khichdi .
Garnish with a lot of fresh coriander and serve hot .
Those of you who follow my blog posts regularly, by know very well know what is Sundal and how much me and my family love eating sundals with our meals .
Also,with Navratri going on ,this time I made sundal using rajma which definitely was my first attempt as rajma usually takes the form of Rajma Masala or Rajma Pulao in my house .
I was skeptical about how South Indian flavors would blend with rajma in the form of sundal, but I was totally wrong. It was just my mindset and pre conceived notion ,I must say .The fresh coconut, tempering of fresh green chili and ginger along with the delicious Sundal Podi (special spice mix) went so well that we all enjoyed eating this delicious rajma sundal .
I have used the Chitra variety of rajma ,but you can use any variety of rajma which you use regularly. Make sure the rajma is soaked well for minimum of 10 hrs so that it gets cooked well .Rajma sundal certainly needs a good amount of pre preparation time,so ensure that you give it the required soaking time to get best results .
Difference between Chitra Rajma and Jammu Rajma (red /laal rajma)
Chitra rajma is slightly bigger in size than laal rajma and also light pinkish in color . This variety of rajma is softer and has a slightly sweetish taste . One biggest advantage of using Chitra rajma is that they get cooked faster and minimum of 8hrs soaking time is enough. Apart from this ,there is no much difference and we can use both these variety of rajma interchangeably in our recipes.
Wash and soak the rajma in fresh water for minimum 8hrs
In the morning, drain the soaked water and pressure cook with little salt for 4 to 5 whistles .Let the pressure release naturally, open carefully and press one rajma bean between your fingers . If you are able to easily press it ,then the rajma is cooked well,incase you feel it is hard, pressure cook for another 2 whistles extra .
Drain the rajma in a strainer/colander and let it rest for a few minutes.
Meanwhile, heat the oil in a thick bottomed pan and crackle the mustard seeds followed by green chillies, curry leaves and ginger . Add asafoetida in low flame to avoid burning.
Add the cooked rajma and mix well,adjust salt if needed .
Tip in the sundal podi,fresh coconut, corriander and give a quick stir .Turn off the stove .Don't cook too much after adding sundal podi as there is a chance of it getting burnt .
The day after Mahanavami/ Saraswati Pooja is Dassera/VijayaDasami - an auspicious day to commence any new venture , business , studies etc
Dassara/Dussehara is also the day when Lord Rama won the battle against Ravana in Lanka and freed Sita Mayya from his clutches .
In North India ,on Dassara ,effigies of Ravana ,Kumbakarna and Indrajith are burnt down indicating victory over evil . Also , stage shows depicting the Ramayana ,known as Ramlila are staged in many places .
Vijay In Hindi / Sanskrit means Victory and since Lord Rama emerged victorious by destroying the evil forces on the Dasami Day it is known as VijayaDasami .
The below image, depicts Lord Hanuman giving assurance to Seetha Mayya that Lord Shri Ram is on his way to free her . Seetha Maa trusts Lord Hanuman when she sees Lord Rama's Ring with Hanumanji and he then flys back with the happy news of Maa Seetha's location in Ravana's Empire after which Lord Rama comes to Sri Lanka and defeats Ravana after a long battle .
Traditionally ,during the olden days new academic year would start on the eve of Dassera.
This practice is called Vidyarambham . "Vidya" meaning Knowledge and "Aarambham" meaning Start .
Lord Hayagreeva and Devi Saraswati are the Hindu God and Goddess of education ,art forms and intellect.
On Saraswati Pooja ,we offer our salutations to Maa Saraswati by placing our books , musical instruments , tools etc. To know more about Ayudha Pooja / Saraswati Pooja click here ..
On Dassara ,we do a Punara Poojai also known as Pooja Yeduppu ,meaning we again thank the lord for having bestowed their blessings on all these tools and then as a customary practice children are asked to study a few chapters, those playing the musical instruments, play them for a while ,so on and so forth .
In South India even to this day ,fresh admissions to dance schools , music schools or any new art form commence on Dassera/Vijaya Dasami .We offer our salutations to the Guru by offering them Thamboolam (Betel leaf , betel nuts, fruits and flowers) along with Guru Dakshina (token fees) and then start learning the new art form .
Those who keep Golu/Kolu , perform an Aarthi on the night of Dassera and symbolically just make one doll on the step to lie down, which denotes bidding farewell to the Gods and Goddesses for this year.
In Calcutta and Bengal ,the Durga Maa idols are immersed into the water bodies bidding her adieu until next year . The married ladies of Bengal dance and play with Sindhoor known as Sindhoor Khela which is considered very auspicious and they pray for the long life of their husband. Sindur Khela is applying vermillion or sindoor on one other's faces and they dance to the dhol and beats along with Durga Maa's procession.
For Sindur Khela ladies wear the traditional white and red Saree known as Laal Paad or Laal Paar .The white color denotes Purity and red color denotes Fertility .
In Maharashtra, there is a unique and wonderful tradition of exchanging a leaf from a plant with one another and call it "sone ghya" meaning "take this gold" . The leaf is known as SonPatha or Sonpatta or Apta Leaf . "Sona" in Marathi is gold . There is a belief that when one offers these leaves to lord on Dassara and exchanges it with friends and family,there is bountiful blessing of Lord Kubera (the lord of wealth and prosperity) in our homes ..the leaf is given the status of gold which is regarded highly precious and valuable .
Also ,on Dussera is drawn a special rangoli called "Saraswati" in Maharashtrian homes .
This below rangoli is a symbolic representation of the apta leaves . Botanically it is called Bauhinia racemosa , a native tree supposed to have lot of medicinal values and widely used in Ayurveda too.
Saraswati Rangoli
This is a symbolic representation of Saraswati Maa and is generally drawn on a slate along with symbols like Om 🕉 and Swastik . This custom originated in Maharashtra and the design pattern also depicts a peacock . One may include the design of foot steps too which denotes the presence of Lakshmi Devi .
Both these rangolis are drawn by my talented friend Priyadarshini who happily let me share her work on my blog.
Having spoken so much about Pooja , it is obvious that we will prepare and offer Bhog / Prasad even on the last Day . Since Dassara marks the beginning of a new dawn it is mostly celebrated by making some sweet and a small festive meal .
In Gujarat and Bombay on Dassara ,the special breakfast is Jalebi and Fafda . I love to enjoy this combination. It feels so special to indulge into a rich sugar laden sweet occasionally .
In south India we normally make some paysam or sweet and celebrate this day .In my home it would normally be Sakkara pongal or Sheera along with some Bajjiya like Potato Bajjis or Vazhakkai (Raw Banana) Bajjis.
Sharing a small Bhog Thaali that I offered last year (2023) on Dassera / Vijayadasami
Items in Frame .. click the individual recipe names below for a detailed recipe ..
Payathangaai , karamani , chowli or Long beans is a nutrient rich and powerhouse of natural fibre coupled with antioxidants and immune boosting properties.
A green vegetable widely used in India in various forms makes it the most sought after vegetable . As the beans reach almost 2 to 3 feet in length they are known as long yard beans . These belong to the cow pea family popularly known as lobia ,chowli or karamani .
The beans are thin ,long ,slender and very tender . They look very appealing to the eye when we see it and are stocked up as bundles since they are long . Very easy to cook and it can blend in very easily with all sorts of seasonings and flavorings . Normally prepared as stir fries, steamed and used in salads or mild vegetable stews .
It is good to incorporate the payathangaai in your day to day meals as it is rich in fibre and also potassium, magnesium, vitamins C and A .
A vegetable which is heart friendly due to potassium content and gut friendly due to fibre content. The fibre content prevents constipation and the potassium present in the chowli helps to maintain the BP and in turn helps and protects the heart.
The magnesium, zinc ,vitamins C and A help in maintaining the over all cell growth in the body and helps in having a good metabolism due to the antioxidants present .
The recipe that I am sharing today is a very simple yet flavorful curry/stir fry made using karamani and very popular in Tamil Nadu and Kerala. This version is a no Onion No Garlic recipe but you may use finely chopped shallots for added flavor.
In Kerala, Onam Sadhya has payathangai thoran as one of the menu items and in Tamil homes ,this is made as a part of regular meals . Since it is a native bean like cluster beans and flat beans , karamani is widely used during Pithru Paksham (mahalaya Paksham) where we tend to consume only native vegetables.
The recipe uses very little oil and just 2 tbsp of fresh coconut for seasoning, making it a very healthy and diet friendly preparation.
Preparation Time - 10 mins Cooking Time - 10 mins Complexity- easy Serves - 2 to 3
Ingredients
250 gms karamani/chowli/ long yard beans 2 tsp oil (coconut oil or any non flavored oil) 1 tsp mustard seeds 1 tsp udad dhall Few curry leaves Pinch of asafoetida Salt to taste To grind 2 tbsp fresh coconut 2 green chillies 1/2 tsp jeera /cumin
Method
Trim the top and end of the long beans and chop them finely. Wash well and keep aside .
Coarsely grind the coconut, green chillies and jeera in a blender . We will use this for flavoring the poriyal/thoran.
In a thick bottomed pan,heat oil and splutter the mustard seeds, udad dhall until golden brown followed by curry leaves and asafoetida.
Add the chopped karamani, give a quick stir . Add the required amount of salt and add 1/4 cup water and cook covered for 7 to 8 min until the beans are cooked well and tender .There should be no water left in the pan .
If at all you see some water is left, cook uncovered for a few more minutes until the water evaporates .
Now add the coconut mixture, give a quick stir, cover the poriyal and turn off the stove. Let the stir fry rest for a few minutes until all the flavors are absorbed well into the beans .
Transfer to a serving bowl and serve it with a choice of sambar rice, rasam rice etc .
Some more healthy and tasty stir fries /poriyal that you may like
It is that time off the year ,when almost every household in India observes a 15 day Vegetarian meal only food practice . Yes,it is Pitru Paksha ,also known as Mahalaya Paksha .
These fifteen days starting from Poornima /Pournami (Full Moon Day) to Amavasya / Amavasai (New Moon day) people abstain from eating non veg , alcohol and also most people avoid the usage of Onion,garlic as part of their cooking.
Pithru Paksh / Shraadh Paksh is one fortnight where we pay obeisance to the departed souls ..it is believed that during this period ,our ancestors visit our homes to bless us and partake the food offered to them as part of the ritual.
If you ever thought, that cooking without Onion and Garlic will not make a tasty meal,then you are mistaken my dear friends.
Here,I have a curated a simple Thaali with lipsmacking delicacies made totally without Onion and Garlic. Click the links below to get a detailed recipe of every item on the Thaali . You can include Fulkas or Puris if you want it to be a little more elaborate.
Thai Amavasai , Aadi Amavasai and Mahalaya Amavasai are very significant for Tamil people . The ancestors ,our pithrus are worshipped on Amavasai and the family seeks the blessings of our forefathers for the family's wellbeing.
Aadi Amavasai is observed in the Tamil month of Aadi / Aashada / Karka (cancer) between July 15th and August 17th.
Aadi Amavasai is the first amavasai that falls after the start of Dakshinayanam . Dakshinayanam is when the sun moves to the south of Equator . In western India, it is known as Ghatari Amavasya .
Like every other Amavasai, the pithrus are worshipped and the whole family seeks their blessing . It is believed that those who observe Aadi Amavasai their families are blessed with good luck,peace and prosperity by their ancestors. Tamil Brahmins offer tharpanam around mid morning and offer Dakshina to the Vadhyar / priest . Tharpanam is offered only by the sons who have no father .
According to Garuda Puranam, offering black til (sesame seeds) and water to forefathers on this day will please them and they shall bless you with longevity, success, progeny and relief from debts.
My prasadam platter above was prepared for last year's (2023) Aadi Amavasai .In 2024 ,Aadi Amavsai is on Aug 4th 2024 .
As like every other special occasion, even Aadi Amavasai is celebrated with an elaborate meal spread offered to our pithrus . Each family has their own tradition of preparing the food . In a typical Tamil brahmin home ,we make Vadai and Payasam along with Raw Banana (vazhakkai) curry , pepper based kuzhambu , jeera pepper rasam ,cucumber pachadi ,boiled moong dhall .
In Maharashtra and Gujarat ,people feast and rejoice on Ghatari amavasya as Shravan Mahina commences on the day after Amavasya and people observe Vrat/fasting and refrain from eating non veg during Chatur Maas .
This year in 2024 it is celebration galore continously .
Incase you don't have time to prepare such an elaborate menu for Amavasai, you can look up my post on Basic Amavasai Thaligai and cook up and simple, yet authentic offering for Amavasai.
Aloo Gobhi is a classic winter delicacy . Piping hot phulkas/ rotis and a bowl of delicious Aloo Gobhi curry is an absolute bliss on a chill winter night .
Very simple to make with just basic spices ,Alu Gobhi sabji can be prepared in less than 15mins. I saute the basic spices with tomato ,potato and cauliflower and cook it in a pressure cooker for 1 whistle. This way it gets done quickly and perfectly .
The final garnish with fresh corriander is the icing on the cake,the smell of fine chopped kothmir when mixed with the curry kindles the appetite instantly. Those of who you like a little extra zing, you may squeeze some lime juice over the gravy.
Aloo Gobhi is a very popular side dish ordered in most restaurants and dhabas for all those who love typical North Indian flavors. We can make a dry curry like a stir fry using Aloo and Gobhi or even as a semi liquid gravy .
We love the gravy type curry at home ,so I prefer to make this for my family . A perfect choice for Vegans as well as those who don't prefer to include Onions and Garlic in their meal .
I chose this recipe for our ongoing No Garlic No Onion recipes theme in Shhh cooking secretly group. Theme suggested by Priya Iyer ,a versatile blogger .I was partnered with Sujata Ji for this theme who has dished out a creamy and delectable Paneer Malai Curry.
Preparation Time - 15 mins Cooking Time - 20 mins Complexity - simple Serves - 2 to 3
Ingredients
1 medium sized Cauliflower 2 medium Potatoes 3 medium Tomatoes 2 Green chillies finely chopped 1/2 inch Ginger finely chopped 1/2 tsp Red chilli powder 1tsp Dhaniya jeera powder 1/4 tsp Haldi/turmeric 1 tsp garam masala 1/2 tsp jeera 1/4 tsp saunf Salt as required Corriander leaves finely chopped 2tsp Oil Pinch of sugar
Method
Cut out the florets from the main flower and soak it in salt and turmeric water. This enables to clean up some hidden worms which are usually hidden inside the cauliflower. Discard the water after rinsing the florets well .
Cut the potatoes into small cubes and tomatoes into medium Chunks.
Heat the oil in the pressure cooker and splutter the jeera and saunf . Once it crackles, fry the chopped ginger and chillies .
Add the spices (turmeric, chilli powder, dhaniya jeera powder and garam masala) and fry it on low flame without burning the masalas.
Add the tomatoes and cook it well until it turns mushy.
Add the potatoes, cauliflower mix it well .Adjust salt ,sugar, 1/2 cup water and pressure cook for 1 whistle on medium flame.
Release the pressure naturally, give it a nice stir . Take 1 tbsp of the curry in a bowl and lightly mash it. Add it back to the gravy and give a quick boil for 1 or 2 mins. This mashed portion gives the gravy some thickness and volume to the curry.
Garnish with fresh corriander and squeeze some lime just before serving and serve hot .
Keerai is the Tamil name for Green Leafy vegetables in general . Spinach is known as palak keerai , fenugreek is known as Vendhiya Keerai , Amaranthus is known as Arai Keerai , Dill Leaves is known as Soi Keerai ,Drumstick leaves as Murunga keerai so on and so forth.
We all know how healthy and beneficial is the inclusion of greens in our daily diet . So pls do make it a point to include greens as a part of diet atleast once or twice a week . Of course please exercise caution and consult your Doctor if greens need to be avoided due to underlying medical conditions.
Keerai kootu has been my childhood favorite and I would eat this almost everyday as a little girl . The mild sweetness from the cooked moong dal blends well with the coconut jeera paste and cooked palak and the final tempering of mustard in coconut oil simply elevates the flavor profile of the kootu. You can pair it with some delicious sambar rice or mix this kootu with some steamed rice and ghee and enjoy as is. You can use any variety of keerai for this kootu,but I personally love palak. I don't like Methi in kootu as it imparts a slightly bitter taste to the kootu which puts me off.
The green Leafy vegetables need to be cleaned very well before using. There may be a chance of lot of weeds or some rotten leaves hidden in the bunch . I am sharing a detailed video on how to clean the green Leafy vegetables at ease. If the stems are tender,I chop them finely and use it too while making the kootu.
If you are a lover of exotic greens, then Baby Bokchoy and Shitaake stir fry by Preethi will be the best choice. I was paired with Preethi for August's Theme of Leafy Greens theme suggested by Seema of Mildly Indian.
A simple lunch platter of keerai kootu, jeera pepper rasam and beetroot curry with fried papads. (Pic updated on Nov 5th 2024)
Preparation Time - 15 mins Cooking Time - 20 mins Serves - 2 to 3
Complexity - easy
Ingredients
2 small bunch spinach/palak 1.5 cup cooked moong dhall 1/4 cup grated coconut 1tsp jeera 1/2 tsp pepper 2 to 3 dry red chillies / 1 tsp red chilli powder 2 tsp coconut oil 1 tsp mustard seeds 1/2 tsp udad dhall Pinch of asafoetida Salt as needed
Method
Clean and wash the spinach bunch well . Finely chop the palak and cook it well . No need to pressure cook .you can cook it in regular open pot until the raw flavor is lost. Use a heavy bottomed pan always.
Grind the coconut, jeera ,pepper, red chillies to a fine paste with sufficient water.
Once the palak is cooked, add this coconut paste,bring it to a rolling boil and then add the cooked moong dhall .
Ensure the cooking is on medium flame and you are stirring constantly to avoid burning . Moong dhall and coconut paste will stick to the pan very quickly.
Once the kootu reaches a rolling boil,turn off and prepare a tempering of mustard, udad dhall and asafoetida in coconut oil and pour it over the kootu . Relish the kootu with rice and papads.
Kichadi (Pachadi) is an integral part of a festive meal (Sadhya) in Kerala. Kerala style kichadi must not be confused with the North Indian Khichdi which is a rice based main course recipe.
Onam and Vishu Sadhya is incomplete without serving a kichadi . Kichadi also known as Pachadi in few regions of Kerala,is a yogurt based side dish often made from various vegetables like Okra/ladies finger ,ginger ,tomato, Cucumbers, ash gourd etc .
Kichadi pairs well with Sambar Rice and a coconut based vegetable stir fry . One can even make it as a part of day to day meal as well. Why wait for a special occasion to savor such a healthy delicacy ?
Vendakkai Thayir Kichadi/Pachadi is made from okra/ladies finger . Ladies finger is known as Vendakka or Vendakkai in Malayalam/ Tamil.
Chopped ladies finger is shallow fried in coconut oil and then added to the coconut chilli paste mixed in yogurt. The yogurt must not be spur, else it will ruin the taste of the kichadi /pachadi.
Some recipes call for cooking the coconut chilli paste + yogurt ,but in this recipe I am not cooking the yogurt mixture . I am going to just add the fried Okra to the yogurt mix along with the tempering.
Some popular kichadi /pachadi served as part of Sadhya
This month in our SHHH Secretly Cooking Challenge food group,we are celebrating Sadhya special hosted by me . My fellow bloggers have come up with amazing and authentic Kerala Sadhya recipes . My partner for this month ,Radha Rajagopalan has dished out the traditional Ada Pradhaman ,which is a classic dessert from Kerala. Do check out her recipe for Ada Pradhaman without fail .
To know more about the dishes served in a typical Sadhya for Onam / Vishu, check out the list soon after the recipe of Vendakkai Kichadi. I am giving you a complete list of authentic recipes.
Preparation Time - 10mins Cooking Time- 5 mins Complexity - simple Serves - 2 to 3
Ingredients
1/4 cup fresh grated coconut 2 green chillies 1/2 tsp jeera/cumin 8 to 10 tender ladies finger/okra/vendakkai 200ml thick yogurt/dahi/thayir Salt as needed 2 tsp coconut oil 1/2 tsp mustard seeds 1 dry red chilli Few curry leaves
Method
Wash and dry the ladies finger. Cut into medium sized roundels.
Whisk the yogurt well and make it lump free and smooth.
Grind the green chillies, coconut,jeera with 1tbsp yogurt and some water into a smooth paste.
Add this paste to the yogurt and mix it well with adequate salt.
In a frying pan,heat 1tsp of coconut oil and roast the ladies finger until it crispy ,add a little salt to the roasted ladies finger in the end .
Prepare a tempering of mustard seeds,red chilli and curry leaves in the remaining coconut oil .
Add the roasted ladies finger ,tempering to the yogurt mixture and mix it well .Delicious and tasty vendakkai kichadi is ready to be served .
Sadhya recipes on the blog. Click on the individual items below to get detailed recipe
Raw mangoes mark the beginning of summer and the pickling season. Apart from making pickles ,raw mangoes can be used in a variety of recipes in our day to day cooking.
The sourness, tartness and a mild hint of sweetness adds up a lot of flavor profile to the recipe. Earlier we had to wait for summer to get good Raw mangoes, but now with so much improvement in cold storage facilities, we do get good Raw mangoes all through the year .
The current situation in Indian markets,is the cost of tomatoes which are sky high and we have to use them sparingly . In these times,Raw mango sambar has come to my rescue. Raw mangoes are a perfect work around for tomatoes.
Depending on the tartness/sourness in the raw mango we can adjust the usage of tamarind pulp. Most of the times we don't need to use tamarind as the sourness from the mango balances the flavors well .
I use some vegetables like pumpkin and capsicums in my sambar recipe because we like to have lots of veggies in the sambar . You can also use carrots ,drumsticks ,Brinjals as well in this same recipe.
Piping hot sambar mixed in rice with a dollop of ghee is just out of the world . Pair this sambar with a coconut based vegetable stir fry and serve along with some papads to enjoy a wonderful lunch experience.
In our Facebook gourmet food group Shh Cooking Secretly!!! , we are sharing Mango based recipes for the month of June .
Anu Kollon who hosted the theme, suggested we use mango in any form, either raw or ripe in our recipe. I have used raw mango as the star ingredient while my partner Narmadha has made Mango Popsicles using ripe mango .
If you are looking to exploring some lipsmacking recipes using raw mango ,you must definitely check out my list below .
Preparation Time - 15 mins Cooking Time - 20 to 25 mins Complexity - Simple Serves - 3 to 4
Ingredients
100 gms pumpkin
1 medium sized capsicum/green bell pepper
1 medium sized raw mango
3 tbsp sambar powder
3/4 cup thoor dall /pigeon peas
Pinch of turmeric
Salt as needed
2 tsp oil
1/2 tsp mustard seeds
Fresh curry leaves
1/2 tsp jaggery powder
Fresh corriander chopped
Pinch of asafoetida
Method
Chop the capsicum,pumpkin and mango into medium sized cubes .
Add 3/4 cup water ,Pinch of salt and cook the vegetables until they are well cooked. The vegetables must be firm ,yet well cooked . Donot keep stirring with the ladle,they will become mushy.
Meanwhile ,wash the thoor dhall well and pressure cook it with turmeric for 4 to 5 whistles with sufficient water. Release the pressure naturally and mash it well using a whisk or hand blender . The dhall must be soft and mushy.
Once the vegetables are well cooked, add the sambar powder ,jaggery ,some more salt and bring it to a rolling boil.
Slowly add in the cooked thoor dhall, adjust the consistency of sambar by adding some water if needed and let it come to a boil . You can add some sambar powder if you feel the spice is less.
Prepare a tempering of mustard seeds,asafoetida and curry leaves in hot oil and pour it over the sambar .
Garnish with fresh corriander and turn off the stove.
Karpooravalli / Omavalli / Ajwain patha /Indian Borage - are you hearing these names for the first time ?
Well, this is a very traditional and medicinal herb used in Indian Cooking especially in the South. This herb belongs to the mint family, but has a pungent and strong flavor resembling that off Thyme /Ajwain/ Omam.
A perennial plant and can be grown easily at home without any effort . The leaves are used in herbal drinks to treat indigestion, cold ,cough and also to boost overall immunity.
Due to the pungent taste and the anti microbial properties possessed by Karpooravalli it is very effective to treat sore throat and sinusitis .
Also a mild diuretic , it helps in flushing out the toxins from the body and maintains good kidney health ,there by managing the body metabolism.
As a kid ,I remember my mom would make me chew a small leaf especially in monsoon to keep me away from seasonal flu and stomach issues due to weather change . It is always good to incorporate such healthy and natural food in our day to diet to keep us safe and healthy.
When I found some fresh karpooravalli, I was intrigued to try Preethi's recipe of making karpooravalli Buttermilk/Neer Mor using this magical herb.
Preethi has used dried powder form of karpooravalli while I have used fresh leaves since I had an access to these . My friend's mom has it growing on her home garden and aunty was kind enough to get me some fresh and tender leaves .
Summer ,winter or monsoon buttermilk is a part of daily diet in our home and I keep experimenting with different flavors . If you also like buttermilk in various taste then you must try some of it
Preparation Time - 5 mins Cooking Time - Nil Complexity - Nil Serves - 2 to 3
Ingredients
2 to 3 fresh karpooravalli leaves 200ml thick yogurt 400ml water 1/4 tsp finely chopped ginger Salt to taste Pinch of kala namak (black salt) Pinch of roasted jeera powder
Method
In a small blender ,blend the ginger ,karpooravalli leaves with little salt into a coarse paste.
Whisk the curd using an electric beater or manual whisk till it appears creamy.
Add the ground paste, salt , black salt ,jeera powder and chilled water and whisk it again until it appears nice and frothy. Adjust salt based on your need.
Pour into glasses and enjoy with your meal or keep it refrigerated until your lunch time.
Rose Shrikand or Gulab shrikand is made using Gulkand and mild rose essence or rose syrup .
Gulkand is a delicious jam made from rose petals and sugar . Gulkand is an important ingredient while preparing masala paan (flavored betel leaf) or beeda as it is called in the South .
Shrikand is often served alongside the main course meal as an accompaniment to puris and hot parathas. Rose Shrikand is my next favorite after the classic flavors of Badam Elaichi Shrikand and Kesar Pista Shrikand .
This gooey and sweet Gulkand along with mild rose essence is blend into the silky smooth hung curd to make the lipsmacking Gulkand Shrikand . Serve it along with some hot puris or parathas and you will relish the taste forever .
The trick to making a silky smooth yogurt is getting hold of a perfect hung curd.
If you get thick and creamy Greek yogurt,you can also use that to make Shrikand . I have editted my recipe (June 2025) below to include how to make the perfect hung curd using home set Dahi /yogurt .
If you love this flavor of rose / gulkand ,then you must definitely check these recipes out
Pre Preparation time - 2 to 5 hrs Cooking Time - Nil Actual Preparation - 5 mins Serves - 2 to 3
Ingredients
400ml thick yogurt or full fat dahi or curd
2 tsp rose syrup
2 to 3 tablespoons gulkand
2 to 3 tsp powdered sugar (optional)
Preparation of Hung curd
Take a wide mixing bowl and place a strainer over it lined with a muslin cloth/ cotton cloth and pour the curd into the cloth .
I have used home made thick curd for an even consistency. You can also use the store bought dahi if you please . The yogurt should not be sour . So it is best to use freshly set curd made in last 24hrs .
I set the yogurt /dahi in full fat milk .Once the dahi was set ,I let it sit in the fridge for 24hrs to set properly .
Bring the ends of the cloth together, squeeze it once and tie it very tightly . Place a heavy object over the tied cloth and leave the colander over the mixing bowl so that all the whey water will get collected in it . Keep squeezing the cloth occasionally to drain the excess water .
Keep this set up inside the refrigerator so that the hung curd doesn't turn sour especially in summer .
After about 2 to 3 hrs , you can see all the whey collected in the bowl below and when you open the cloth all that is left is thick creamy mass which is hung curd . Squeeze it once again before removing it from the cloth to ensure there is no water content left. When you touch the hung curd , it should appear thick and creamy without any excess water. If you find it watery, leave it for somemore time in the cloth with the weight on .
Donot waste the collected whey, you can use it while kneading the dough for rotis or even to prepare buttermilk or Chaas.
Preparation of Shrikhand
Transfer the hung curd to a wide mixing bowl .Add in the gulkand , rose syrup. Powdered sugar may be added though it isn't necessary. Gulkand as well as rose syrup will have sugar already added in them which is enough to give sweetness to the Shrikhand.
Mix well with a spoon until all the ingredients blend well . Keep it in the refrigerator for it to set well .
Take it off the refrigerator just before serving and garnish with some chopped pistachios and some tutti fruity.
Thakali Saadham / Tomato Rice is a simple and delicious recipe from South India . It makes for a Quick fix lunch or dinner option and also apt to pack for lunch boxes .
It is not a traditional recipe, hence each household may have different recipes to dish out this yummy Thakali saadham .
The main ingredient for this recipe are juicy and slightly tangy tomatoes for the extra punch. I use just basic spices and not much whole masalas/ garam masala . I like the rice to soak in the taste and flavor of tomatoes and chillies .
If you like you may add some fried cashews or boiled peas while preparing the tomato rice . I add them depending on my family's request .
If packing for lunch , make sure you cool the rice completely and then pack it . If you pack it very hot ,there is a chance the rice may go bad especially in summer.
I often make thakali saadham for dinner as it is a quick fix and I wont see fussy faces at home . As always, I realised that this delicious tomato rice wasn't on my blog and as a matter of coincidence our gourmet food group theme for this month was "cook what you like " .. Viola !! I got an opportunity to publish this recipe. My partner Rafeeda has dished out a baked Pasta recipe and if you are a pasta lover, you must try it for sure .
Preparation Time- 10 mins Cooking Time - 20 mins Complexity - simple Serves - 2 to 3
Ingredients
2 cups rice (Basmati / Sona Masuri / any short grained rice ) 3 to 4 medium sized tomatoes
1 onion chopped (optional) [skip for jain and no onions no garlic recipe ] 3 green chillies slit Few curry leaves Fresh corriander 1 tsp mustard seeds 1 tsp channa dal 1 tsp udad dhal 2 tsp corriander powder 1/2 tsp jeera powder 1/2 tsp chilli powder Pinch of turmeric powder Salt as needed 2 tbsp cooking oil Pinch of sugar
Method
Wash the rice well and soak it for 10mins and then drain the water through a colander.
Chop the tomatoes into medium sized chunks and finely chop the green chillies .
Heat the oil in a pressure cooker or pressure pan and crackle the mustard seeds followed by channa dal and udad dal until they turn crisp and golden brown . Saute onions if using until pick and translucent.
Fry the green chillies, curry leaves . Keep the flame on low and add the chopped tomatoes and spice powders (haldi, red chilli powder, jeera powder and corriander powder ).
Saute the tomatoes well and sprinkle some water ..cook covered until the tomatoes turn mushy and soft . Continue cooking until the oil begins to separate.Add salt at this stage along with some chopped corriander.
Add water and bring to a boil . If using basmati rice use 1.5 cups water for 1 cup rice and if using sona masuri rice use 2 cups water for 1 cup rice.
Once the water begins to boil,add the drained rice, Pinch of sugar and adjust salt if needed .
Close the pressure cooker and cook on medium flame for 2 whistles. Let the pressure release naturally.
Fluff it with a fork and add some ghee if not vegan and serve hot with raita ,papads and some gravy or curry .
Neer is water and Aagaram is food ,so basically NeerAagaram boils down to Watery Food or put it simply, a liquid diet . Neeragaram is very popular in the Southern part of India and also in Orissa, Bengal, Bihar ,chattisgarh as well . Partaking Neeragaram on a daily basis prevents malnutrition and also improves our immune system .
Now,if you are wondering what is this Neeragaram ? The answer is very very simple and will leave you amazed .
Neeragaram is just left over cooked rice soaked in water overnight and the next morning it is mashed well and mixed with buttermilk ,rock salt and consumed with shallots and some green chillies .
Neeragaram is also known as Pazhaya Saadham , Saadhertham , pazhaya sor Kanji in South and in the North it is called as Pakhala, Paani Bhaat,Panta Bhaat etc . Orissa celebrates this health rich food as Pakhala Dibasa in the month of March every year .
Neeragaram is a powerhouse of nutrients for the benefit of good gut health . It's a natural probiotic just like home set curd .
The overnight soaking of cooked rice helps in the activation of good bacteria which is very beneficial on consumption for good gut /intestinal health. You may need not take probiotic supplements if you have this pazhaya saadham regularly.
Consuming Neeragaram early in the morning is an age old practice followed by ancestors especially during the hot summer months when the sun is blazing. The soaked rice acts as a natural coolant and also keeps us full for long hours due to the absorption of starch content in the rice and most importantly prevent us from dehydration.
Neeragaram can be had with some pickle , fried curd chillies (mor milagai) or with chopped shallots /onions . If you are pairing pazhaya saadham with onions you must definitely try it out with Srilankan Seeni Sambol - get the recipe from my fellow blogger Priya's blog.
You may adjust the quantity of buttermilk as per your preference. I like my neeragaram watery,so I add more buttermilk, if you like it thick like a porridge, you can adjust accordingly.
Preparation Time - 8 to 10 hours /overnight Cooking Time - Nil Complexity - easy Serves - 2 to 3
Ingredients
1.5 cups cooked rice (I use the sona masoori variant) 2 cups water 3 cups buttermilk Rocksalt as needed
Method
Soak the rice in 2 cups water overnight . Use an earthen vessel if you can else regular steel bowls will work.
The next morning, mash the rice well with your hands or use a masher . The rice when mashed should resemble porridge /gruel like consistency. Mashing the rice with your hands is always a good choice .
To this now add the buttermilk ,rock salt and mix well . Pour it into glasses and serve with the accompaniments of your choice .
You may also add 1/4 tsp fenugreek seeds while soaking the rice previous night.
Today , I shall be sharing another favorite recipe using cucumber. Thayir Pachadi is the South Indian version of raita . We can make thayir pachadi with many vegetables like tomatoes, sweet potatoes, ladies finger,ginger etc .
Inji Vellarikaai thayir pachadi ,is very easy to make and is a No cook recipe. We will need fresh and tender cucumbers to make this raita . Donot use an over ripe cucumbers as the cucumber won't be juicy and also the seeds will be too mature and rough.
Spice level can be adjusted by increasing or decreasing the number of chillies used .I prefer to keep the pachadi mild so that the flavor of ginger is lifted up.
Preparation Time - 10 mins Cooking Time - Nil Complexity- easy Serves - 3 to 4
Ingredients
2 small Cucumbers or 1 medium Cucumber 150ml thick yogurt /dahi/curd Salt as needed Small piece of ginger 1 small green chilli Few curry leaves 2 tsp finely chopped fresh corriander
1 tsp oil
1/4 tsp mustard seeds
1/4 tsp udad dhall
Pinch of asafoetida
Method
Peel the skin of the cucumber. Finely chop half the quantity of the cucumbers and add it to a mixing bowl.
Roughly chop the other half of the cucumber and blend it with ginger , chilli, corriander, curryleaves and little salt to a very fine paste.
Whisk the curd with adequate salt and make it lump free.
Mix the cucumber paste , chopped cucumber and the whisked yogurt. Adjust salt if needed.
Prepare a tempering of mustard seeds and udad dhall in hot oil with asafoetida. Cool it and then add it to the raita . Donot pour hot tempering over the pachadi as the curd may turn sour in the hot weather .
Poha (Flattened rice) is a versatile ingredient used for breakfast or a quick evening snack all over India.
During winters fresh green peas are available in plenty and I use them in my cooking a lot.
Peas Poha is one such favorite breakfast at home where lot of fresh tender peas are used as a part of the recipe. Poha is seasoned and tempered with simple Indian spices that makes it very tasty and flavorful .
Choora Matar or Chooda Matar is a variant of Peas Poha that is very popular in Northern India especially UP and Bihar and is a purely No Onion No Garlic snack .
Matar Poha can be made with or without onions depending on your taste . If using onions, saute them after you splutter the mustard seeds and curry leaves until the onions turn soft and then add in the poha .
Some delicious Poha variants which can be easily prepared for breakfast / lunch boxes and also as Prasadam .
First and foremost ,sieve the poha and get rid of small dust and other unwanted particles.
Wash the Poha under running water in a colander and let it sit for 5 to 6 mins . This step is very important. If there is too much water in the poha ,it will become a mushy mass and we don't want that .
Meanwhile, heat the oil in a thick kadai /wok.
Splutter the mustard seeds ,followed by curry leaves, ginger ,turmeric powder and asafoetida.
Mix in the washed poha ,sprinkle salt and mix it well .
Add in the boiled peas, sprinkle some water and cook covered for 3 to 4 mins till the poha becomes soft and well cooked.
Turn off ,open the lid, add sugar ,lemon juice and give it a quick mix ,serve hot with a garnish of freshly chopped corriander.
You can sprinkle some namkeen farsan/crispies for an added crunch .
Pin me up
Month of January we are going "Vegan" in our food bloggers' group Shhh Secretly Cooking Challenge . A wonderful theme suggested by Radha as January is also celebrated as a Vegan Month in some parts of the world . My partner for this month is Preethi of Preethi's cuisine. Preethi gave me lemon juice and ginger as secret ingredients which was used in this flavorful aromatic Matar Poha while Preethi made a yummy and healthy Tofu Bean Stir fry with sesame oil and rice flour being the secret ingredients I suggested to her.
Radha has prepared a lipsmacking Jackfruit Kofta Curry which is a classic innovative recipe and that too purely plant based ..
SALLA MIRAPAKAYALU, also known as buttermilk/curd chilies is one of the most loved pantry items from South Indian Kitchens. Now buttermilk chilies don’t refer to some kind of chilies, but it’s a preservation process. Mildly spicy chilies are slit and soaked in buttermilk, and then sun-dried during the day. This process is repeated for about a week until the chilies absorb as much buttermilk cure as possible and the chilies are dried to a crisp by the sun.
During this preservation process, the chilies develop a tangy, yogurty, salty, and slightly cheesy flavor. These flavor packed Buttermilk chilies make a great accompaniment with mild dishes like Curd rice, Dal rice, Sambar rice, etc. But hey your options aren’t just limited to that, you can add these buttermilk chilies to the tempering. Imagine the ton of flavor it would impart in tempering of chutneys or raita and Dal tadka.
The sign of a perfectly made Salla mirapakaya is that when you break a fried one it should crumble easily. Less spicy, little salty, and tangy is the perfect definition for this Salla mirapakayalu. I know that the process seems a little intimidating for beginners, but trust me this is one of the easiest processes you could ever make.
A tradition of making sun-dried vegetables
When Summer is here, then begins the tradition of making of Wadiyalu/Papads/fryums. And apart from that we also Sun-dry vegetables, fruits, seeds which have been in our culinary tradition for ages. When there is an excess of produce, our ancestors came up with ways to utilize them smartly. So that they come in handy on a rainy day.
They are equally healthy as the process which they undergo like pickling, drying, marinating, and curing which makes it even more delicious. The tiring scenarios of the womenfolk in the scorching Sun bring out the best goodies in their pantry. These sun-dried goodies appear out of nowhere during mealtime.
More avatars of these SALLA MIRAPAKAYALU / Buttermilk chilies
These yogurt/curd/buttermilk-soaked chilies are inseparable from the menu of South Indian Cuisine mainly because of their spicy taste. Now call these buttermilk chilies or we Telugu people call it Oora Mirapakayalu, majjiga mirapakayalu, uppu mirapakayalu. Mor milagai in Tamil, Sandige menasu in Kannada, Dahi Mirchi in Hindi, Dahi ke mirchiyaan in Dakhani, Mahi mircha in Chhattisgarh region and Takla mirsang in Konkan region. The beauty of diverse cuisines across India, one dish with many names.
With diverse cuisines across India, these buttermilk chilies come in various flavors across the country. Some stuff the chilies with spices like carom seeds, fenugreek powder, etc. And they add another layer of flavor profile to these chilies.
Checkout more traditional Indian recipes from my blog.
A delicious crisp chili preserve marinated in sour curd for few days and sun dried to crisp.
Course condiments, Papads
Cuisine Telugu
Keyword Papads, Sun-dried
Author Shravani Abhishek
Ingredients
250gmsGreen chiliesMildly spicy ones
2cupsSour curd
4tspSalt
1cupWater
Instructions
Wash and slit the green chillies and keep it aside.
250 gms Green chilies
Pour the sour curd in a wide container. Add salt, and water and whisk it.
2 cups Sour curd, 4 tsp Salt, 1 cup Water
Now add in slit green chilies to the buttermilk mixture. Cover the container and let it sit for 2-3 days.Note : Just give a shake and stir once a day.
On the fourth day, strain the buttermilk from chillies using a slotted spoon, place them in a plate and dry in the sun.
At night put back all the green chillies in the reserved buttermilk and cover them.
And then repeat the above two steps for next two days. Later discard the buttermilk mixture.
Later dry the chillies in the sun for 7 days.
These well dried chillies can be stored in an airtight container and can be deep fried before eating with rice.
Frying the SALLA MIRAPAKAYALU
Heat oil in a pan, add the sundried salla mirapakayalu/buttermilk chilies to the oil.
Fry for 10 secs and place them on a paper towel.
Serve the fried salla mirapakayalu/buttermilk chilies with curd rice or dal rice. You can add the chilies to tadka/tempering too.
Notes
The salt in the buttermilk should be on heavy side, as that's what helps the chilies in preservation.
You can place these buttermilk chilies in a ziploc and place it in freezer to keep them fresh for longer time.
If you’ve tried this recipe, please share your valuable feedback in the comments below. Also you can Tag your photo and share it with #mycurryveda on Instagram @mycurryveda or on Facebook .


.jpg)


, karamani curry , chowli bhaaji , chawli sabji , chawli , payathangai thoran , sadhya special thoran , vegan thoran , mahalaya paksham special")
, karamani curry , chowli bhaaji , chawli sabji , chawli , payathangai thoran , sadhya special thoran , vegan thoran , mahalaya paksham special")
, karamani curry , chowli bhaaji , chawli sabji , chawli , payathangai thoran , sadhya special thoran , vegan thoran , mahalaya paksham special")
, karamani curry , chowli bhaaji , chawli sabji , chawli , payathangai thoran , sadhya special thoran , vegan thoran , mahalaya paksham special")


