Learn how to make Aloo Methi Paratha recipe with detailed video and step by step pictures. Quick, easy and wholesome Methi Aloo Paratha recipe - perfect for lunchbox or travel too. Aloo Methi Paratha is a wholesome twist of the classic paratha that combines the goodness of the potatoes and fresh fenugreek leaves directly into...
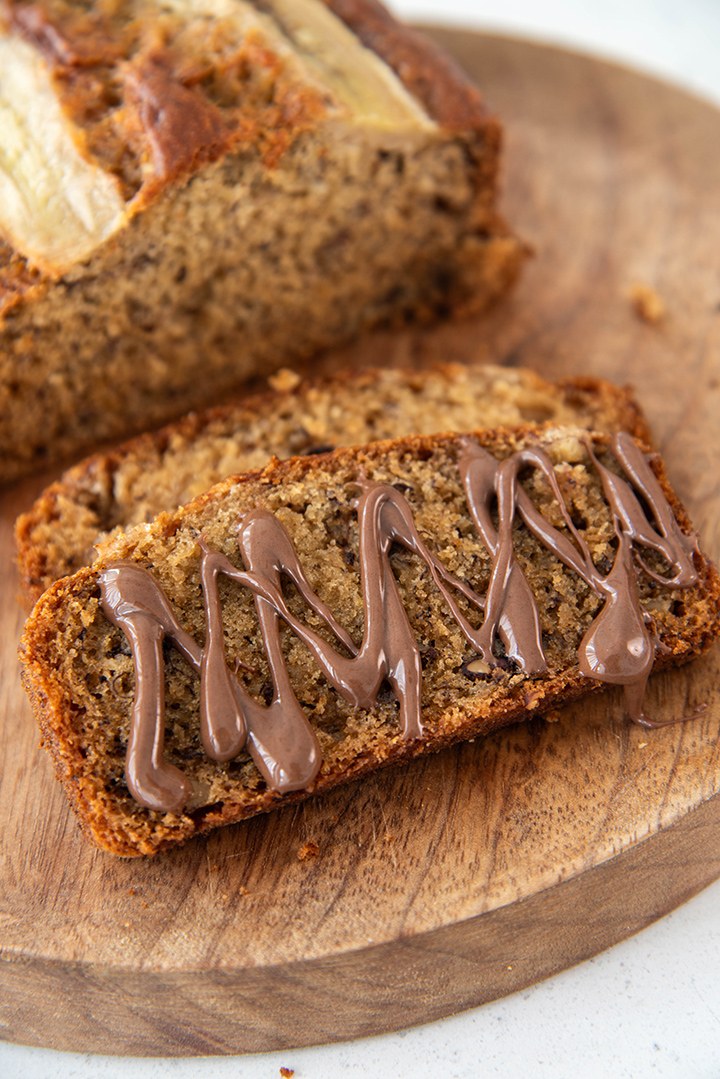
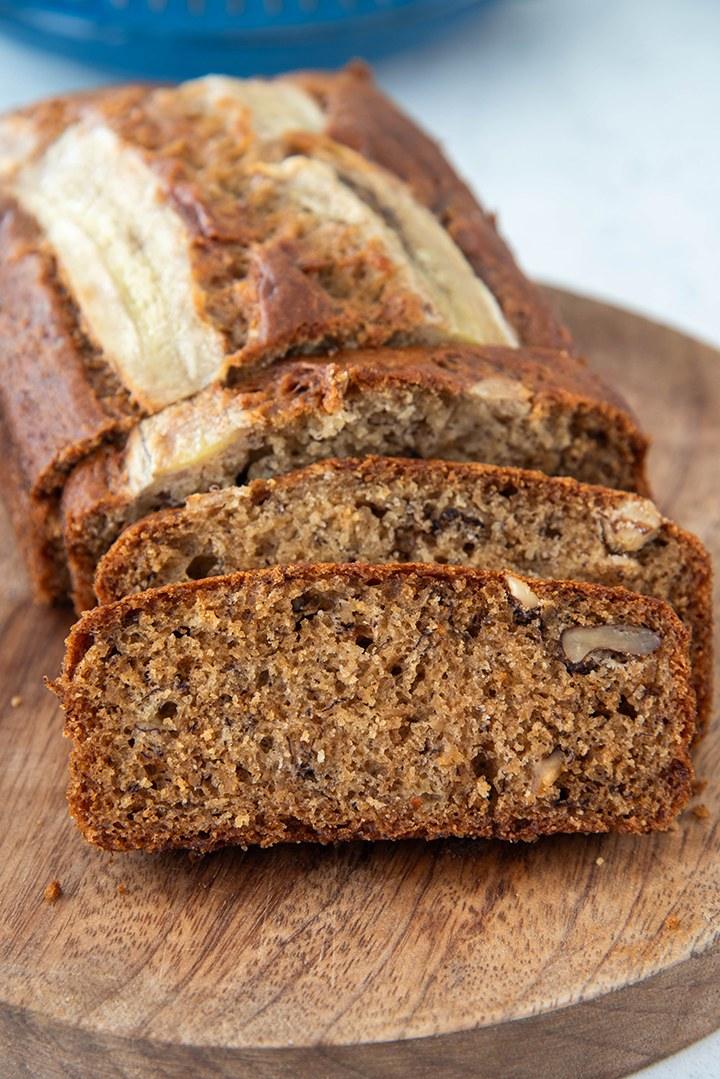
Craving soft, moist banana bread but don’t eat eggs? This eggless banana bread recipe is the perfect solution. Made with overripe bananas, pantry staples, and zero eggs, it turns out fluffy, moist, and full of banana flavor every single time. Whether you follow a vegetarian diet, are allergic to eggs, or simply ran out of them, this is the best banana bread without eggs you’ll ever bake.
Why You’ll Love This Eggless Banana Bread
Freezer-friendly & meal-prep ready
100% egg-free and vegetarian
Super moist & soft texture
Uses simple, everyday ingredients
Customizable with nuts, chocolate, or spices
Why I Make Eggless Banana Bread?
Banana bread is such a versatile and comforting treat. It’s perfect for breakfast, a snack, or even dessert. This vegan banana bread is a great alternative for those who are looking to cut out eggs for dietary reasons. Plus, it’s always good to have a go to recipe for those times when you run out of eggs but still crave that delicious, moist banana bread.
Ingredients for Moist Eggless Banana Bread
To make the best eggless banana bread, you’ll need:
Overripe bananas – the spottier, the better
Vegetable oil (or melted coconut oil)
Sugar (white, brown, or coconut sugar)
Plant-based milk – almond, soy, oat, or dairy
Vanilla extract
Balsamic vinegar (this helps with rise & texture)
All purpose flour
Baking soda
Baking powder
¼ teaspoon salt
Cinnamon
Walnuts or chocolate chips
Step by Step Instructions
Preheat oven to 350°F (175°C). Grease or line a 9×5-inch loaf pan.
Mash bananas in a large bowl until smooth.
Add oil, sugar, milk and mix until combined.
In another bowl, whisk flour, baking soda, baking powder, salt, and cinnamon.
Combine wet & dry ingredients for banana bread gently. Do not overmix. Fold in walnuts or chocolate chips.
Add in the vanilla, vinegar and milk of your choice. Combine well to incorporate all the ingredients.
Pour batter into loaf pan, smooth the top. Top with sliced banana.
Bake 50-60 minutes, or until a toothpick inserted in the center comes out clean. Start checking at 40 minutes.
Cool in pan for 10 minutes, then transfer to wire rack. Slice once fully cooled.
Tips for Making Best Banana Bread
Use overripe bananas: Ripe banana with lots of brown spots = natural sweetness.
Measure flour correctly: spoon & level or weigh in grams. Too much flour = dense bread.
Don’t over mix the batter: this makes banana bread dense and gummy.
Add nuts, chocolate, or dried fruits for variety.
For a healthier twist, replace 1 cup all purpose flour with whole wheat flour.
Banana Bread Variations
Chocolate Chip Banana Bread: fold in ½ cup chocolate chips.
Walnut Banana Bread: add ½ cup toasted walnuts.
Whole Wheat Banana Bread: swap half the flour with whole wheat flour.
Once you’ve baked your delicious eggless banana bread, it’s important to store it properly to maintain its freshness and flavor. Here’s how:
Room temp: You can store this banana bread in airtight container for 2–3 days.
Fridge: Banana bread stays fresh in fridge for up to 1 week.
Freezer: If you want to store banana bread in freezer, wrap slices in cling film and pack in ziplock bag, freeze up to 2 months. Reheat in toaster/oven.
Refrigeration and Freezing: If you’re storing the bread in the fridge or freezer, make sure to label it with the date. This way, you can keep track of how long it’s been stored.
Serving Suggestions
Spread with peanut butter or almond butter.
Toast a slice and top with honey or maple syrup.
Serve with coffee, tea, or a glass of milk.
Screenshot
FAQs
Can I make eggless banana bread without baking soda?
Yes, use baking powder, but the texture may be slightly denser.
Why is my banana bread not fluffy?
Over mixing, too much flour, or under-ripe bananas often cause dense bread.
Can I make gluten free Banana Bread?
Yes, use a 1:1 gluten-free flour blend. But the texture will be slightly different
Can I reduce the sugar?
Yes, you can cut sugar by 25–30% or use coconut sugar. Bananas naturally sweeten the bread. Any sugar free substitute that can be heated can be used too.
If You like this recipe and made it Please rate the recipe. It helps us to reach more people. For the Latest updates Subscribe to Rekha’s Whatsapp. You can follow me onInstagram, Facebook, Youtube, Pinterestfor more food inspirations.
The best moist and delicious eggless banana bread recipe. Perfect for vegans and those avoiding eggs. You can make this banana bread recipe without eggs with simple ingredients!
1/2cupvegetable oilor melted coconut oil for a healthier option
1cupsugaryou can use brown sugar for a richer flavor
1/4cupalmond milkor any plant based milk, soy, or oat milk
1tablespoonbalsamic vinegar
2cupsall-purpose flour
1/2teaspoonbaking soda
1teaspoonbaking powder
1teaspooncinnamonground , optional, but recommended for extra flavor
1/2cupwalnuts nutschopped, optional, for added texture and taste
Instructions
Preheat and Prepare
First, preheat your oven to 350°F (175°C). Grease a 9×5-inch loaf pan with a bit of oil or line it with parchment paper to prevent sticking.
Mash the Bananas
In a large bowl, mash the ripe bananas with a fork or potato masher until smooth. The riper the bananas, the sweeter and more flavorful your bread will be.
Mix Wet Ingredients
Add the vegetable oil, sugar, plant-based milk, and vanilla extract to the mashed bananas. Stir well until all the ingredients are combined.
Combine Dry Ingredients
In another bowl, whisk together the flour, baking soda, salt, and cinnamon. This ensures that the baking soda is evenly distributed, which helps the bread rise evenly.
Mix Wet and Dry Ingredients
Gradually add the dry ingredients to the wet mixture, stirring gently until just combined. Be careful not to overmix; a few lumps are fine. If you’re adding nuts or chocolate chips, fold them in now.
Bake the Bread
Pour the batter into the prepared loaf pan. Smooth the top with a spatula and place it in the preheated oven. Bake for 50-60 minutes, or until a toothpick inserted into the center comes out clean.
Cool and Enjoy
Let the bread cool in the pan for about 10 minutes, then transfer it to a wire rack to cool completely. Slice and enjoy your healthy eggless banana bread with a cup of tea or coffee.
Video
Notes
Tips for the Best Eggless Banana Bread
Use ripe bananas: The riper, the better. They add natural sweetness and moisture to the bread.
Don’t overmix the batter: Overmixing can make the bread dense. Stir until just combined.
Add-ins: Feel free to add your favorite mix-ins like walnuts, pecans, or chocolate chips. They add a delightful crunch or melty sweetness.
Storage: Store your banana bread in an airtight container at room temperature for up to 4 days. You can also freeze it for up to 3 months. Just wrap it tightly in plastic wrap and foil.
This firecracker shrimp rice has simply flabbergasted me with its insanely delicious flavors thanks to its firecracker sauce! I had no idea a simple sauce can be so incredibly tasty that you can make such a stunning meal in under 30 minutes!
With an unavoidable disruption in my blogging schedule, I came back today with an extraordinary recipe to make up for the couple of days delay!
This firecracker shrimp rice will make your home dining a special affair and I can vouch without an iota of doubt that everyone in your family will love it!
I will be honest with you that before trying it on my own, I was also not expecting something as mind-blowing as it proved to be.
I was drawn to it for my favorite thing which is, surprise surprise, shrimp! LOL! The secret behind the crazy deliciousness of this firecracker shrimp rice is not in shrimp; it is in its sauce!
Let’s deep dive into it, shall we?
What is Firecracker Shrimp Rice?
You may have assumed from its name that firecracker shrimp rice is a hot & tangy fried rice topped with sweet & salty shrimps!
Well, you are partly right! This firecracker shrimp rice is indeed a hot & tangy fried rice topped with soft & succulent shrimps! But there is more to it!
It won’t be justified if we simply describe this firecracker shrimp rice as another fried rice! Nope, it’s much more than that!
Let’s talk about the secret sauce of this dish and you will know why I'm claiming it to be so special!
The firecracker sauce is an amalgamation of sweet, tangy, spicy and salty ingredients which come together to make a stir-fry sauce which is beyond perfection!
When the rice & shrimps are stir fried in this incredible sauce, they take a makeover which is way too delicious than anything I had ever imagined!
This firecracker shrimp rice truly turned out to be a pleasant surprise for both of us! My better half was just assuming it to be another shrimp fried rice!
But when he saw its gorgeousness he guessed that it might be something different. And then came the final taste test!
Voila! We both loved it so much that we had to recreate it again to share it with all of you guys as this firecracker shrimp rice is just a must-have!
Sourdough Jewish rye bread is more than just bread—it’s a timeless staple that carries rich history, bold flavor, and a touch of nostalgia from traditional Jewish bakeries. With its hearty crust, earthy rye flour, and the tang of natural sourdough fermentation, this bread has become a favorite among home bakers seeking authentic, deli-style loaves. What...
A perfectly baked banana raisin loaf cake that’s so moist and speckled with raisins. Soft and moist banana cake sweeten up with brown sugar for a healthy and simple breakfast, snack, or dessert! This banana raisin cake recipe makes a sweet yet nourishing treat that is easy to put together and delicious to eat.
This soft and moist banana raisin loaf cake is insanely delicious and ridiculously easy to make with a few easy steps. This is one of my favourite cake style snacks. Serve fresh out of the oven with a cup of tea or coffee and even ideal for a light simple breakfast, dessert or as tasty snack!
The cake has a wonderful aroma as it bakes and even when you have a slice after a day. It’s a moist, soft, scrumptious cake with beautiful crumb which are to die for. The flavour of bananas is robust and the bits of the raisin you get in every bite takes it to another level.
Banana and raisin go very well together. This whole wheat banana raisin cake has a burst of flavor. The aroma from the banana and juicy bite of the raisin in each bite of the cake is drool worthy. This banana raisin loaf is insanely delicious that you can’t stop with just one slice! This scrumptious cake does not last more than 24 hours at my house.
Not a fan of raisins? You can try any other kind of dried fruit you enjoy. Or, skip them all together. You can even try it with your favourite nuts or chocolate chips!
If you’re a regular reader of my blog, by now you would have known that most of my cakes are eggless cakes. But this time I made this banana raisin cake with egg since my readers have requested for a egg based banana cake. I am happy to share this easy yet a no fail recipe. I am hoping you will love it as much as we!
But if you are looking for an eggless version of banana bread like cake then this banana nut bread is the closest one. Also I have couple of banana based cakes and muffins in my blog which I am sharing below. Do have a look at them I am sure you would.love to try some of them.
There are two main reasons why I like banana cake. One is taste, and the other is the simplicity of any banana cake recipe. And this banana raisin cake recipe is easy-to-make and tastes fantastic.
USE OVERRIPE BANANAS
When buying bananas, it is best to choose firm and unscarred bananas so you can monitor and figure out the best ways to use your bananas. I always let them over ripe at home when I want to use them kn my bakes. Over ripe bananas are perfect in recipes such as muffins, bread, and cakes. I always recommend to use overripe bananas in baking especially in cakes, muffins to make the very best banana cake with super moist, soft and flavorful outcome, The riper the bananas, the more moist your cakes will be and the more banana flavor it will have! The outcome of the cakes will be tender and packed with full of flavor.
HOW EASY IS THIS BANANA RAISIN LOAF CAKE?
This banana raisin cake recipe is super simple, easy and fuss-free. It doesn’t require a stand mixer or a hand mixer. There is no fancy equipment required. Just a bowl and a spatula or hand whisk does the work. The batter takes less than 15 minutes to throw together and gets perfectly baked in 35 minutes. This is one of the easiest banana cake recipe and the result is absolutely amazing. I am sure you’ll fall in love with it. Do watch the video tutorial below on how to make this moist banana raisin loaf cake. You will be surprised to see how easy it is to make at the comfort of your home with few easy steps.
● Mash the banana with fork. You can also use blender or mixie.
● In a mixing bowl beat the egg.
● Mix together the beaten egg, brown sugar, mash banana, essence, oil.
● Sieve in the flour, baking powder, baking soda, salt and mix.
● Add in the milk to loosen the batter.
● Add in the rasins and quick mix.
● Transfer the batter to prepared loaf pan and tap the pan for couple of times.
● Top up with rasins and bake as per the recipe.
I made a simple recipe video of this super easy banana raisin loaf cake recipe for my readers which I have shared below. Please do watch andSUBSCRIBEto my channel if you haven’t yet. It will mean a lot to me and motivate me to come up with more videos for my readers. As always looking forward to your feedbacks!
BANANA RAISIN LOAF CAKE VIDEO TUTORIAL
LETS TALK INGREDIENTS
It is a very basic banana bread recipe. It uses ingredients most commonly found in our pantries.
● Whole Wheat Flour – For a healthier version used whole wheat flour.
● Banana – Used over ripe bananas. Over ripe bananas are best to use in baking.
● Brown Sugar – Brown sugar yields soft and moist cakes. It adds an awesome flavor and texture to the cake. No doubt a healthier option too as compared to refined sugar.
● Milk – Used whole milk. Recommend to use whole milk for extra richness, taste and texture.
● Oil – I have used refined sunflower oil. You can use any flavorless oil. I prefer using oil than butter for a soft and moist outcome.
● Leavening agents (Baking powder & baking soda) – There’s a combination of baking powder and baking soda in this banana raisin loaf cake to give it the perfect amount of lift.
● Egg – I have used only 1 large egg and that does the work as banana itself is a perfect substitute of egg.
● Vanilla Essence – Used vanilla essence. You can choose extract over essence.
● Salt – A dash of salt to balance out the sweetness.
● Raisins – The slightly sweet and tartness from the raisin in this banana cake is amazing. You can feel it in every bite of the cake.
INGREDIENTS SUBSTITUTION IN BANANA RAISIN LOAF CAKE
● Whole wheat flour can be substituted with all purpose flour (maida) or you can use 50-50 ratio.
● You can use white sugar instead of brown sugar.
● You may also use other healthier sweeteners are jaggery, cane sugar, honey etc.
● You may use butter instead of oil or any flavorless oil will work.
● To make it vegan use any dairy free milk or just even water for the liquid.
● To make an eggless version you may choose anyone of these
☆ Use 1 tbsp vinegar or lemon juice and use ½ cup milk altogether.
☆ Use ¼ cup curd/yogurt instead of egg.
● You may use black raisins instead of the regular rasins.
● You may use vanilla extract instead of essence.
BANANA RAISIN LOAF CAKE VARIATIONS
● If you want nutty taste and texture, add nut in the batter also once the batter is ready. Lightly coat the nuts with flour and just throw in the batter and give a quick gentle mix.
● Use nut of your choice like pecans or walnuts etc. You can also use mixed nuts as per your palate preference.
● You may also replace the raisins with chocolate chunks or chocolate chips to make it banana chocolate chips cake.
● You can spice up the cake by adding cinnamon powder. The sweet aroma of the cinnamon adds extra flavor to your cake which will make you drool.
● You can use rum soaked raisins which will take your loaf cake to a different level. Its yummilicious!
● You can also soak the raisin in fruit juice. Any juice you love.
● You can put this batter into muffin tins and make banana raisin muffins.
To make muffins, line a muffin tin with paper liners or just grease it with oil or butter and fill each cup to roughly ¾ full, and bake for 20 minutes. Makes 12 muffins.
HOW TO STORE BANANA RAISIN LOAF CAKE?
Let the cake cool down completely and store it in airtight container. Banana raisin cake can be kept for upto 2-3 days at room temperature depending upon the temperature of your place. If you need to store it a couple days longer then I suggest storing it in an airtight container in the refrigerator.
HOW TO FREEZE BANANA RAISIN LOAF CAKE?
Cling wrap the cake and put it in a ziploc bag or airtight container then store in the freezer. I prefer to freeze sliced cake so it is much easier to take out the required servings and thaw them for breakfast or snacking. Freeze them for upto 3 months. It goes more than 3 months but best to use it within three months. To thaw the cake, remove from the freezer and allow it to come to room temperature and serve. You can also pop it in the microwave for few seconds and serve.
HERE ARE MORE AWESOME RECIPES TO INSPIRE YOUR NEXT BAKE:
If you’re just starting to get into baking, or a novice, nothing could be easier than banana cake. It’s a real confidence booster! Especially when it seems almost too easy to make one that turns out this good.
So try my banana cake with raisins recipe and let me know what you think.
Let’s get started!
Preparation time – 15 minutes Cooking time – 35 minutes Serves – 8-10
☆ 1 cup = 240 ml
☆ 1 tablespoon = 15 ml
☆ 1 teaspoon = 5 ml
☆ Pan size = 7×4×3 inches
Ingredients to make banana raisin loaf cake:
1 cup whole wheat flour (125 gms)
2 ripe banana (½ cup mashed banana)
½ cup brown sugar (90 gms)
1 large egg
½ tsp baking powder
½ tsp baking soda
¼ tsp salt
¼ cup oil (60 ml)
¼ cup whole milk (60 ml)
1 tsp vanilla essence
50 gms raisins or more + some extra for garnish
Step by step pictorial instructions to make banana raisin cake:
PREPARING THE OVEN AND PAN
Preheat oven at 180° C for 10 minutes with both the filaments (rods) switch on.
Grease the loaf pan with oil or butter and place a parchment paper. You can grease the pan and dust it with little flour if you dont have parchment/butter paper. Also you can use any shape pan as per your availability and preference.
PREPARING THE WET INGREDIENTS
Peel the banana and mash them using a fork or masher. You can also use a mixie or blender to do the work. Preferably use over ripe banana for better outcome.
In a mixing bowl add in the egg and beat it well. Add in the brown sugar and mix well until combined. Add in vanilla essence and mash banana. Mix well to combine.
PREPARING THE BATTER
Sieve in the whole wheat flour, baking powder, baking soda, salt into the wet ingredients. Add in the oil. ( oil can be added while preparing the wet ingredients. I missed to add it before hence added at this stage). Mix to incorporate into a thick batter. Add milk in batches and make into a semi-thick smooth batter. Add in the raisins and give a gentle quick mix.
BAKING THE LOAF CAKE
Pour the batter onto the prepared pan. Tap the pan for couple of times to release any air bubbles trapped inside. Sprinkle some raisins on the top.
Place the cake pan in the middle rack with both filaments (rods) on. Bake the cake at preheated oven @180° C for 35 minutes. A toothpick or skewer inserted should come out clean. Baking time will differ depending upon your oven temperature and settings. Start checking the doneness of the cake before the above mentioned time.
Remove the cake from oven and allow to stand for 10 minutes. Run a knife around the cake pan and demould the cake. Transfer the cake onto a cooling rack and allow to cool down completely. Slice and enjoy!
NOTES:
● Always preheat oven before starting to bake.
● All ingredients should be at room temperature.
● Whole wheat flour can be substituted with all purpose flour or can bake with 50-50 of both.
● Brown sugar can be substituted with regular refined sugar.
● If you like more sweeter bread, increase the sugar quantity.
● Oil can be substituted with butter.
● Use whole milk for extra richness, taste and texture.
● Other healthier sweeteners like jaggery or cane sugar can be used.
● Every oven reacts differently so baking time may vary.
● Both rods to be switch on.
● If you wish to bake without egg use either of these mentioned below –
☆ Use 1 tbsp vinegar or lemon juice and use ½ cup milk altogether.
☆ Use ¼ cup curd yogurt instead of egg
Well, if you make this banana raisin loaf cake, please do leave a feedback in the comments box below or snap a photo and tagAkum Raj Jamiron Facebook andakumrajjamiron Instagram with hashtag#atmykitchen. I would love to see your creations.
Thank you so much for stopping by my blog. I hope you liked the recipe. Your valuable feedbacks are always welcome, I love hearing from you guys and always do my best to respond to each and every one of you.
Happy cooking!
Love Akum
Disclosure:
At My Kitchen is an Amazon Affiliate, which simply means that if you make a purchase through these links, I will earn a very small commission at no additional cost to you!
Please click on the image if you wish to purchase these products from Amazon.
SKE Iron Sandwich Bread Mould/Tin Box with Cover for Baking- Small 400gms Size 7×3.5×3.5 inch
Syga Carbon Steel Cake Mould Pan, 1 Piece, Black
Ossoro French Vanilla Flavour, 30 ml
Sprig All Natural Bourbon Vanilla Extract Bottle, 50 ml
OMORTEX Kitchen Tools Combo 8 pcs Color Measuring Cups and Spoon Set and Spatula and Brush for Kitchen
QOAL Multipurpose Portable Electronic Digital Weighing Scale Weight Machine (10 Kg)
Inalsa Kratos 1000W Stand Mixer with Whisking Cone, Mixing Beater & Dough Hook, Champagne
Borosil PRO 42 L OTG, with Motorised Rotisserie and Convection, 2000W, 6 Stage Heat Selection, Black
Bajaj 4500TMCSS 45L Oven Toaster Grill, Silver
Kraftlytouch Handcrafted Square Platter || Food Safe || Acacia Wood || 8 inch || Water Resistant
Craftize Mstore Decorative Colorful Rustic Wooden Serving Tray for Coffee/Tea/Drinks for Living Room/Restaurant (11.5x7x1.5 inch)
T One Woods Round DIY Craft Wooden Log Natural Bark Coaster/Slices, 3 Inches Size – Set of 6
M VILLA Colorful Plastic Mixing Bowl Set for Kitchen | Plastic Soup Bowls | Microwave Safe, Freezer Safe Great for Cooking Serving Salads, Snack, Fruits- Multicolor (750 ml, Set – 4 pcs)
This lemon blueberry bundt cake is super moist and soft, infused with the zesty lemon flavor and with a burst of juicy blueberries. It’s packed with wonderful flavor and is topped with a lemony glaze. An easy and delicious recipe for The BEST Blueberry Bundt Cake! It’s perfect for brunch and pairs well with coffee or tea.
This lemon blueberry cake recipe is bursting with lemon flavor as it uses both fresh lemon juice and fresh lemon zest. The zest is added together with the wet ingredients and blended well which releases even more of the lemon flavor from the zest.
Tart lemon and sweet blueberries combined in this lemon blueberry bundt cake is a must for this summer. If you love the combination of lemon and blueberries as much as I do, then this is a perfect summery dessert that you would love!
Non-frosted cakes as we call tea cakes are my most made cakes at home. They are great for snacking, great with coffee and tea, potluck, travelling and more. So I love making them for my family. This super soft and moist lemon blueberry bundt cake recipe is so delicious and great for all occasions and only takes less than ten minutes to prepare and gets baked perfectly in 30 minutes.
WHY YOU’LL LOVE THIS EGGLESS LEMON BLUEBERRY BUNDT CAKE RECIPE
* Super easy to prepare with simple preparation steps. * Preparing the cake batter takes less than 10 minutes and perfectly gets baked in 30 minutes. * Require only a handful of kitchen staples to make this absolutely delicious cake. * It’s a versatile recipe. * So moist, tender and delicious. * Bursting flavor from fresh blueberries. * Amazing taste and texture, tartness from the lemon and sweetness from the blueberries
INGREDIENTS FOR EGGLESS LEMON BLUEBERRY BUNDT CAKE
FLOUR– I used all-purpose flour. You may substitute whole wheat flour or use 50:50 ratio of all purpose flour and whole wheat flour.
CUSTARD POWDER– Used the custard powder to enhance the taste and texture of the cake. Actually I wanted to use milk powder but it was not available at my pantry at the time of baking this cake. This is an optional ingredients. You may use milk powder or dairy whitener instead or skip it.
LEAVENING AGENT– Both leavening agents baking powder and baking soda is used in the recipe to give a perfect rise to the cake.
SALT– Salt is used to neutralizes the sweetness of the cake.
BUTTER– I used salted butter and in melted form. Unsalted butter works too. You can use vegetable or sunflower oil if you don’t prefer to use butter. You may use a combination of butter and oil though.
MILK– Used whole fat milk. Recommend to use full fat milk to enhance the richness and taste of the cake.
SUGAR– I use granulated white sugar. For healthier version you can use brown sugar or cane sugar but the colour of the cake will slightly change.
ESSENCE– I use vanilla extract for best flavor.
BLUEBERRIES– This recipe uses fresh blueberries. Recommend to use small to medium size blueberries as the larger blueberries tends to sink at the bottom. I experienced that as my blueberries were larger in size. Make sure to dust the blueberries with flour before adding in the cake batter. You can use frozen blueberries if fresh one is not available but do not thaw them otherwise you’ll end up with a purple batter!
LEMON JUICE AND LEMON ZEST– Lemon and blueberries makes a great match. If you don’t like zesty taste and tartness of the lemon you can skip the lemon. But you won’t regret giving it a try as this lemon blueberry combo is a hit and a perfect summery dessert.
HOW TO MAKE LEMON BLUEBERRY BUNDT CAKE
This section shows how to make eggless lemon blueberry bundt cake with step-by-step photos and details about the technique with video tutorial. For full ingredients measurements, see the recipe card below.
I made a simple video of this Eggless Lemon Blueberry Bundt Cake recipe for my readers which I have shared below. Please do watch to know how I made this delicious recipe. If you liked the video please do SUBSCRIBE to my channel if you haven’t yet. Also like, share and comment on it! It will mean a lot to me and really motivate me to come up and shoot more videos for my readers. As always I’m looking forward to your feedback!
Eggless Lemon Blueberry Cake Recipe Video Tutorial
STEP BY STEP INSTRUCTIONS TO MAKE LEMON BLUEBERRY CAKE
PREPARE THE CAKE TIN:
I used a 6.5 inch bundt tin. Grease the tin very nicely with oil or butter. Dust it with some flour and remove excess flour. Keep aside. (Since we can’t line the bundt tin with parchment paper we need to grease the tin very nicely and also dust it with flour so the cake easily comes out when unmoulding).
PREPARE THE OVEN:
Preheat the oven at 180° C for at least 10 minutes with both (filaments) rods on.
MAKE YOUR CAKE BATTER:
In a mixing bowl add in the sugar, melted butter, milk and vanilla essence. Using a wire hand whisk, whisk it until the mixture is combined and sugar is dissolved.
Add in the lemon juice and the lemon zest. Mix well to combine.
Sieve in the flour, custard powder or milk powder, baking powder, baking soda, and salt. Sift them. Now gently fold them and make a smooth batter.
ADD BLUEBERRIES:
Dust the blueberries with some flour.
Add in the blueberries into the cake batter and give a quick mix. Do not over mix.
BAKE THE CAKE:
Pour the batter onto the prepared tin. Tap the tin for 3-4 times to release any air bubbles.
Place your cake tin in the oven on the middle rack at 180 degrees Celsius for 30 to 35 minutes. A toothpick or skewer inserted should come out clean.
REMOVE CAKE FROM OVEN:
You would want to do the toothpick test at around 30 minutes to make sure the cake is baked through. Baking time will differ as every oven temperature is different.
Remove the cake from the oven and allow to rest for 5 to 10 minutes: Invert the cake and allow the cake to cool down completely.
MAKE THE GLAZE:
In a bowl add in the powdered sugar, lemon juice and lemon zest. Mix well and make a thicker glaze. ( Add 1 or 2 teaspoons of water if the glaze is too thick).
Once the cake is cooled down, pour the glaze over the cake. Slice it and enjoy!
TIPS TO MAKE LEMON BLUEBERRY BUNDT CAKE
* Always bake your cakes in a preheated oven. * Use more blueberries if you like your cakes to be more fruity and embedded all over your cake. * The best is to select small to medium blueberries. * Be sure to toss your blueberries in some flour before adding them to the batter. This helps keep the blueberries from sinking to the bottom of the pan. * You can spray the blueberries with some baking spray to help the flour bond to them, unless they are still a bit wet after washing. * Grease the bundt pan with oil or butter and dust it well with flour to prevent the cake from sticking to the pan. * You can also use non-stick baking spray. * Bake the cake on the middle rack with both rods switched on. * Test your cake with a toothpick or skewer at around 30 minutes to make sure the doneness before removing the cake from the oven. * Allow the cake to stand for 5-10 minutes and then invert the cake and allow it to cool down completely in a cooling rack.
This lemon blueberry bundt cake is super moist and soft, infused with the zesty lemon flavor and with a burst of juicy blueberries. It’s packed with wonderful flavor and is topped with a lemony glaze. An easy and delicious recipe for The BEST Blueberry Bundt Cake! It’s perfect for brunch and pairs well with coffee or tea.
I used a 6.5 inch bundt tin. Grease the tin very nicely with oil or butter.
Dust it with some flour and remove excess flour. Keep aside. (Since we can't line the bundt tin with parchment paper we need to grease the tin very nicely and also dust it with flour so the cake easily comes out when unmoulding).
PREPARE THE OVEN:
Preheat the oven at 180° C for at least 10 minutes with both (filaments) rods on.
MAKE YOUR CAKE BATTER:
In a mixing bowl add in the sugar, melted butter, milk and vanilla essence.
Using a wire hand whisk, whisk it until the mixture is combined and sugar is dissolved.
Add in the lemon juice and the lemon zest. Mix well to combine.
Sieve in the flour, custard powder or milk powder, baking powder, baking soda, and salt. Sift them.
Now gently fold them and make a smooth batter.
ADD THE BLUEBERRIES:
Dust the blueberries with some flour.
Add in the blueberries into the cake batter and give a quick mix. Do not over mix.
BAKE THE CAKE:
Pour the batter onto the prepared tin. Tap the tin for 3-4 times to release any air bubbles.
Place your cake tin in the oven on the middle rack at 180 degrees Celsius for 30 to 35 minutes. A toothpick or skewer inserted should come out clean.
REMOVE CAKE FROM OVEN:
You would want to do the toothpick test at around 30 minutes to make sure the cake is baked through. Baking time will differ as every oven temperature is different.
Remove the cake from the oven and allow to rest for 5 to 10 minutes: Invert the cake and allow the cake to cool down completely.
MAKE THE GLAZE:
In a bowl add in the powdered sugar, lemon juice and lemon zest.
Mix well and make a thicker glaze. ( Add 1 or 2 teaspoons of water if the glaze is too thick).
Once the cake is cooled down, pour the glaze over the cake. Slice it and enjoy!
Video
Notes
Always bake your cakes in a preheated oven.
Use more blueberries if you like your cakes to be more fruity and embedded all over your cake.
The best is to select small to medium blueberries.
Be sure to toss your blueberries in some flour before adding them to the batter. This helps keep the blueberries from sinking to the bottom of the pan.
You can spray the blueberries with some baking spray to help the flour bond to them, unless they are still a bit wet after washing.
Grease the bundt pan with oil or butter and dust it well with flour to prevent the cake from sticking to the pan.
You can also use non-stick baking spray.
Bake the cake on the middle rack with both rods switched on.
Test your cake with a toothpick or skewer at around 30 minutes to make sure the doneness before removing the cake from the oven.
Allow the cake to stand for 5-10 minutes and then invert the cake and allow it to cool down completely in a cooling rack.
FREQUENTLY ASKED QUESTIONS
CAN I USE FROZEN BLUEBERRIES? Yes! And you can directly add them to the batter straight away from the freezer. Just dust it with flour and add to the cake batter.
CAN I USE OTHER BERRIES? Yes for sure! This is a great base recipe to add different berries which would go so well with this recipe. Strawberries, blackberries, black currant or raspberries and even cherries would be lovely too!
WHAT KIND OF BLUEBERRIES SHOULD I USE? Always try to get small to medium blueberries. Large blueberries will tend to sink no matter what. You see in the photos, mine still sank because the blueberries were a little larger in size.
HOW TO PREVENT BLUEBERRIES FROM SINKING ? The best way to prevent blueberries from sinking to the bottom of a cake is to coat the blueberries in flour and also size matters. Try to use small to medium size blueberries. Toss the blueberries in about 1 to 2 teaspoons of all purpose flour before folding them into the cake batter.
CAN I USE OIL INSTEAD OF BUTTER? Yes, you can swap butter for oil. You can use unflavored vegetable or sunflower oil or any neutral flavour oil. However the texture and flavor will be slightly different. You may also use a mixture of oil and butter. The 50:50 ratio works fine.
HOW DO YOU KNOW IF THE CAKE IS DONE? Test your cake with a toothpick or skewer at around 30 minutes to make sure it’s baked through before removing the cake from the oven. Bake an additional 5 minutes at the most for extra cooking if the toothpick comes out with crumbs. Please note that the cake will continue to cook for a few more minutes after it is out of the oven.
HOW TO STORE BUNDT CAKE? Store leftover cake in an airtight container. It stays good and fresh in the room temperature for up to 3 days and up to one week in the refrigerator. You can freeze it for up to 3 months. Slice the cake, wrap the individual slices and place it in an airtight container. Take out the required slices and thaw it before serving. You can reheat it for a few seconds in the microwave just before serving.
Well, if you make this Eggless Lemon Blueberry Bundt Cake recipe I’ll be glad if you take out some time and rate the recipe and leave a feedback in the comments box below. You can also snap a photo and tag Akum Raj Jamir on Facebook and akumrajjamir on Instagram with hashtag #atmykitchen. I would love to see your creations.
Thank you so much for stopping by my blog. I hope you liked the recipe. Your valuable feedbacks are always welcome, I love hearing from you guys and always do my best to respond to each and every one of you.
Parmesan Pepper Sourdough Bread is a bakery-style artisan loaf that blends tangy sourdough with the nutty richness of Parmesan cheese and the warm spice of freshly cracked black pepper. This simple, step-by-step recipe guides you through mixing, fermenting, and baking to produce a golden, crusty loaf—perfect for pasta night, soup season, or elevating your sandwich...
I may be late to share this viral egg cottage cheese wrap, but there is no way I can miss this incredibly innovative high protein recipe which is just so easy to make!
With the extreme rise in demand of high protein yet delicious recipes that are meatless, cooking enthusiasts around the world are innovating recipes that are taking the social media by storm!
This egg cottage cheese wrap is the end result of one such very successful experiment which had broken almost all records of virality!
Have you tried it yet? You must if you haven’t already!
Just follow the few tips I have shared and I can guarantee you will end up with beautifully vibrant protein-packed cottage cheese wrap for your healthy lunch and/or dinner!
What is cottage cheese wrap and what's all the hype about this?
I am also no exception when it comes to being a protein enthusiast while planning my weight loss meals!
I have already shared many high protein meals here on my blog - both meatless and meaty options.
So when I came across this viral cottage cheese wrap, it was instantly evident that I will be trying it! And thank God I did!
It not only tastes amazing but is extremely easy to make and customizable according to your own liking!
Prawn sesame toast is a delicious crispy bread stuffed with minced prawns, spices, sesame seeds and then fried in oil till golden brown. Prawn sesame toast is a traditional Chinese dim sum dish. The bread is spread with a super flavourful prawn paste that is sweet, spicy and covered with sesame seeds, and deep fried...
This bread has banana, grated carrots ands beets, and you can't tell! Its comes out so moist, delicious, rich and healthy! I love how this cake turned out, it is filled with so much healthy stuff, that its literally guilt free to devour. Some variations of tried and tested banana cakes - my go-to banana bread recipe and multigrain bread recipe50 minutes - including bake
Double Ka Meetha is a Hyderabadi dessert made with fried bread slices soaked in cardamom-flavored sugar syrup and rabri. This flavourful dessert is mainly made during festive events, especially during Ramadan and weddings. If you're searching for easy Indian bread pudding, traditional Eid dessert, or a milk-based Indian sweet, this dish perfectly fits in all...
Mixed Dal Dosa is a simple and nutritious flatbread that doesn’t require fermentation. This high-protein dosa is made from a blend of various lentils (dal), which are soaked and ground into a smooth paste. A few spices enhance the flavors, and the dosa is cooked on a hot skillet until it’s crispy and golden. These dosas are not only high in protein but also vegan and gluten-free, making them a healthy choice for everyone.These protein-rich mixed dal dosas are incredibly versatile. They’re perfect for a healthy breakfast, but they can also be enjoyed at any meal—lunch, dinner, or even as a snack. Serve them with your favorite chutney, a comforting soup, or your choice of vegetable dish to complete the meal.
Prep Time 15 minutesminutes
Cook Time 20 minutesminutes
Servings 6Dosa
Ingredients
¼cupmoong dal
¼cupwashed moong dal
¼cupwashed urad dal
¼cupred lentil
1green chili choppedoptional
¼pieceginger chopped
½tspcumin seeds (jeera)
¼tspblack pepper
⅛tspasafetida (hing)
½tspsalt (adjust to taste)
4tbspoil
Instructions
In a bowl mix all the dal, wash them changing water 2-3 times. Soak dal in four cups of water for 6-8 hours.
Drain the water. Blend the lentils (dal) with green chili and ginger, adding water slowly as needed to make a smooth batter. Note: The less water, the smoother the batter.
Mix the salt and cumin seeds into the batter. Add water as needed. The total water added will be about ½ cup, just enough to achieve the consistency of pancake batter.
Place a non-stick skillet over medium-high heat. Test by sprinkling a few drops of water on it. The water should sizzle right away.
Pour about ½ cup of the batter mixture into the skillet and spread evenly with the back of a spoon. Starting from the center, spiral outward until evenly spread, about seven inches in diameter.
When the batter begins to dry, gently spread one teaspoon of oil over it. Wait about 30 seconds, then flip the dosa using a flat spatula.
Press the dosa lightly with the spatula all around to ensure even cooking, turning them two to three times. Dosa should be crisp and golden brown on both sides.
Repeat for the remaining dosas.
Notes
Notes: If you are on a gluten-free diet, be aware that asafetida (hing) in powder form is often not gluten-free. In that case, you may want to avoid using asafetida.Serving suggestionServe dosas with any chutney, such as tomato chutney, peanut chutney or cilantro chutney, or chutney of your choice.You can also serve them with samber (a south Indian style dal) or your choice of soup.For a creative twist, you can use these dosas to make delicious wraps, commonly known as frankies or kathi rolls. Simply wrap some vegetables or salad inside the dosa for a wholesome and satisfying meal on the go. You can even make these dosas in advance, then reheat them over a skillet to restore their crispness.For a creative twist, you can use these dosas to make delicious wraps. Make the dosas slightly thicker so they stay soft; these wraps are commonly known as frankies or kathi rolls. Simply wrap some vegetables or salad inside the dosa for a wholesome and satisfying meal on the go.
Introduction to Mixed Dal Dosa
Mixed Dal Dosa is a wholesome, protein-rich flatbread that’s not only easy to make but also doesn’t require the traditional fermentation process. Made from a blend of various lentils, this dosa is packed with plant-based protein, making it a great meal option for anyone looking to boost their protein intake. Lentils like moong dal, urad dal, and red lentils are soaked, ground into a smooth batter, and spiced to create a savory and crispy dosa. The best part? This dosa is both vegan and gluten-free, catering to various dietary preferences while still delivering great taste and texture.
Cultural and Traditional Importance
Dosas are a staple in South Indian cuisine, traditionally made from fermented rice and lentil batter. However, the Mixed Dal Dosa offers a quicker alternative without the need for fermentation, making it an ideal choice for those who are short on time. Lentils are a common ingredient in Indian cooking, celebrated for their versatility and nutritional value. By using a variety of dals, this dosa provides a range of nutrients, especially plant-based proteins, making it a go-to dish for breakfast, lunch, dinner, or even as a snack.
The beauty of Mixed Dal Dosa lies in its simplicity and adaptability. It’s a great way to incorporate different types of lentils into your diet, each contributing its unique flavor and health benefits. Traditionally served with chutneys and sambar, this dosa has found a place in modern kitchens due to its quick preparation and nutritious profile.
Recipe Variations from Manjula’s Kitchen
While Mixed Dal Dosa is delicious and nutritious on its own, there are several other similar dosa and pancake recipes available on Manjula’s Kitchen that you can explore for variety:
Moong Dal Dosa: Another high-protein dosa made primarily from moong dal, offering a lighter alternative.
Besan Chilla: A savory pancake made with gram flour (besan), perfect for a quick, protein-packed breakfast.
Rava Dosa: A crisp and delicate dosa made with semolina, for those who prefer a thin and crunchy dosa.
Oat Dosa: Similar to Mixed Dal Dosa, Instant Oat dosa is an easy recipe that is perfect for busy families.
Health Benefits and Dietary Considerations
The Mixed Dal Dosa is packed with nutrients, especially protein, making it a great option for those following a vegetarian or vegan diet. Lentils are an excellent source of protein, fiber, vitamins, and minerals, contributing to overall digestive health and maintaining energy levels throughout the day. By using a variety of dals, you’re also ensuring that you get a broader range of nutrients in every dosa.
Additionally, this recipe is gluten-free, making it suitable for those with gluten sensitivities or anyone on a gluten-free diet. If you’re strictly gluten-free, it’s important to note that asafetida (hing) often contains gluten, so be sure to use a gluten-free version or skip it altogether.
Serving Suggestions
Mixed Dal Dosa can be served with a variety of chutneys to complement its savory flavors. Here are a few chutney options from Manjula’s Kitchen that pair well with the dosa:
Tomato Chutney: A tangy and slightly sweet chutney that adds a fresh burst of flavor.
Cilantro Chutney: A classic chutney with refreshing cilantro and a hint of spice.
Peanut Chutney: A creamy and nutty chutney that pairs wonderfully with the crispy dosa.
For a complete meal, serve Mixed Dal Dosa with Sambar or a comforting soup. Another creative twist is to use the dosa as a wrap, filling it with vegetables, paneer, or salad to create a delicious and nutritious frankie or kathi roll. The dosas can also be prepared in advance and reheated on a skillet, making them an excellent option for meal prep.
Conclusion
Mixed Dal Dosa is a simple yet highly nutritious meal that can be enjoyed at any time of the day. Its high protein content, along with being vegan and gluten-free, makes it a versatile option for a variety of dietary needs. Whether you’re serving it with chutney for breakfast or transforming it into a wrap for lunch, this high protein dosa will quickly become a favorite in your household. Explore the other dosa recipes on Manjula’s Kitchen to discover even more delicious ways to enjoy Indian flatbreads.
Frequently Asked Questions (FAQs)
What makes Mixed Dal Dosa high in protein?
The use of multiple lentils like moong dal, urad dal, and red lentils makes Mixed Dal Dosa rich in plant-based protein, making it an excellent option for those seeking a high-protein meal.
Can I make the dosa ahead of time?
Yes, you can make the dosas in advance and reheat them on a skillet to restore their crispness. They also work well as wraps for on-the-go meals.
What are some serving options for Mixed Dal Dosa?
Serve Mixed Dal Dosa with chutneys like tomato chutney, cilantro chutney, or peanut chutney. You can also pair it with sambar or use it as a wrap filled with vegetables or paneer.
Is Mixed Dal Dosa gluten-free?
Yes, this dosa is naturally gluten-free. However, be cautious with asafetida (hing) as it may contain gluten unless specifically labeled gluten-free.
Can I adjust the spiciness of the dosa?
Absolutely! You can adjust the spice level by adding or omitting green chili and black pepper based on your preference.
Learn how to make Mixed Dal Dosa, a protein-packed, gluten-free Indian crepe made from various lentils. Perfect for a healthy breakfast or snack, this recipe is easy to prepare and loaded with nutrition.
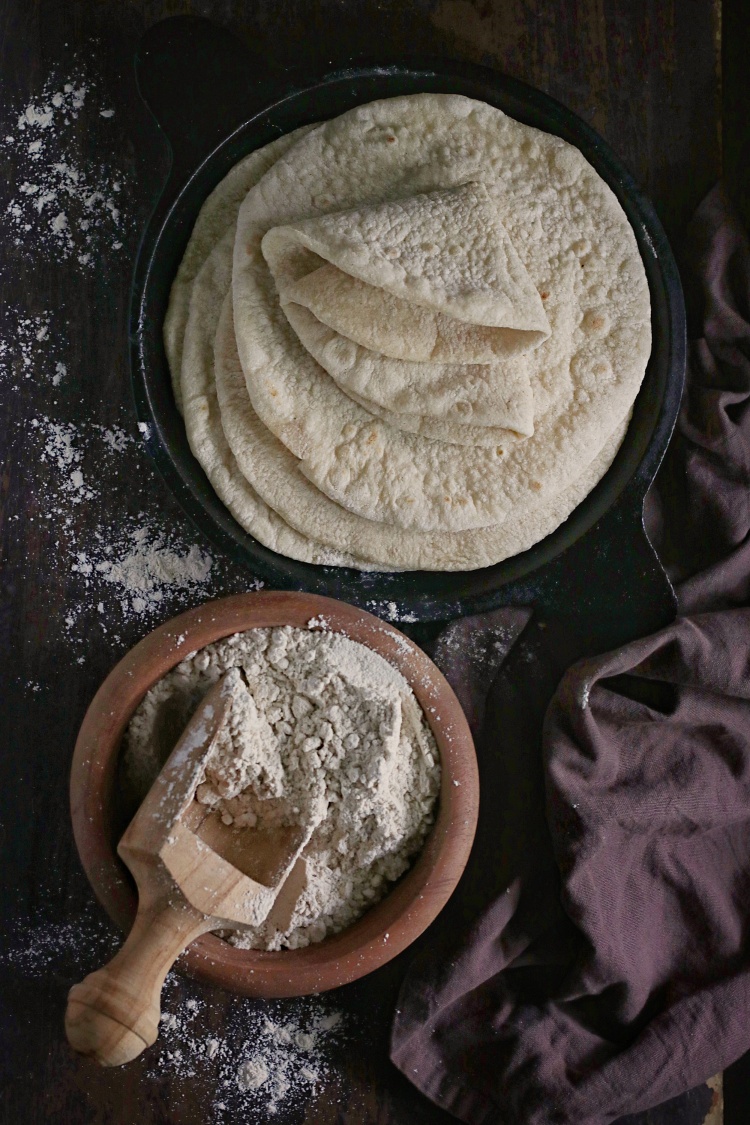
This September, Elizabeth picked Lebanese Khubz or Khuboos for the Bread Baking Babes to make. Her pick was inspired by Middle Eastern food she enjoyed on a trip to the UK a few years back. Khubz, Khuboos, Khobz al-Sabah (Morning Bread) is a puffed yeasted flat bread eaten across the Levant and Arabic speaking countries of the Middle East.
A lot of people like to refer to the Lebanese Khubz as a Lebanese Pita bread. I can understand why. Khubz, though a puffed up yeasted bread in general, can be slightly different in different countries where it is eaten. There are versions of Khubz that are much like Pita bread. To me, Lebanese Khubz and Pita bread are two very different things. I have some knowledge of Lebanese Khubz, you see. I spent my high school years in Nigeria. We had a local Lebanese bakery that made Khubz or Khuboos as we knew it. We would visit the bakery, once every week or ten days to buy Khubz, warm and fresh out of their ovens.
This Lebanese Khubz was thin, soft, slightly floury, hollow flatbread about 10 or 11-inches in diameter. Pita bread is typically cut into half and eaten stuffed with filling, “pocket” style. Lebanese Khubz or Khuboos is torn into pieces, and wrapped around food to pick it up and eat. It’s typically eaten with stews and curry like dishes which can also be mopped up with flatbread.
The recipe below is adapted from Anissa Helou’s recipe for Khobz-al-Sabah/ Lebanese Morning Bread from her book Savory Baking from the Mediterranean. According to Helou, she learned to make this bread from Jawad Yussef Daher, whose bakery is in Kfar Rumman in south Lebanon. He made Khubz from two different flours and the cornmeal give the bread more texture and make it.
Making Khubz for me was going back in time to when we ate Khubz from the local Lebanese bakery. My memories are of a pale coloured flatbread that was wheat flour. So I made mine without the corn meal.
Helou’s recipe calls for a leavener made the previous evening with a sourdough starter. The Khubz I know is not a sourdough flatbread. I stayed with the spirit of the recipe and so made a leavener using a small pinch of instant yeast instead.
I was watching a video online of a commercial Khubz baker speaking in some version of Arabic (or maybe Farsi). While I don’t understand the language, there was a point where I thought he said Khubz is like the Chappathi. So Helou’s higher hydration dough didn’t make sense to me. I kneaded my dough to chapathi dough consistency, which is soft and smooth but not too soft. This makes rolling the dough into thin rounds easy. I also chose to bake my Khubz on an iron griddle on the stove top instead of baking it in the oven.
Lebanese Khubz or Khuboos is best eaten fresh and on the same day it is made. You can keep it for the next day. If so store wrapped in cotton towels or foil. Reheat in the oven and serve warm.
What can you serve this flat bread with? Traditionally it is eaten for breakfast with some or all of these – eggs, foul medames, thick, creamy labne and olive oil, cheeses like baladi, halloumi, akkawi, olives, cucumbers, tomatoes, or za’atar. You can also serve it for brunch or lunch or dinner with soups, stews or curries.
Soft, thin Lebanese flat bread that is traditionally eaten for breakfast but can be eaten with stews, soups and curries.
Course breads
Cuisine lebanese
Prep Time 30 minutesminutes
Cook Time 20 minutesminutes
Resting Time 12 hourshours
Servings 6Khubz
Ingredients
For the Poolish:
A small pinch instant yeast
1/4cupwaterat room temperature
1/3cupwhole wheat flour
For the Dough:
1 2/3cupsall-purpose floursifted
1/3cupwhole wheat flour
1/2tspinstant yeast
1/2cupwatermore or less as needed
All of the Poolish from above
1tspsalt
Instructions
The Poolish:
The evening previous to the day of baking the Khubz, mix together all the ingredients for the Poolish in a bowl. Cover loosely and let it ferment on the kitchen counter overnight.
Make the Dough:
Next morning, put the Poolish, flours, salt, yeast in the bowl of your kneading machine. Pulse a couple of times to mix. Then add enough water and knead until you have a soft and elastic dough that is not too soft. Shape into a ball and place in a well-oiled bowl. Cover loosely and let it rise till almost double in volume.
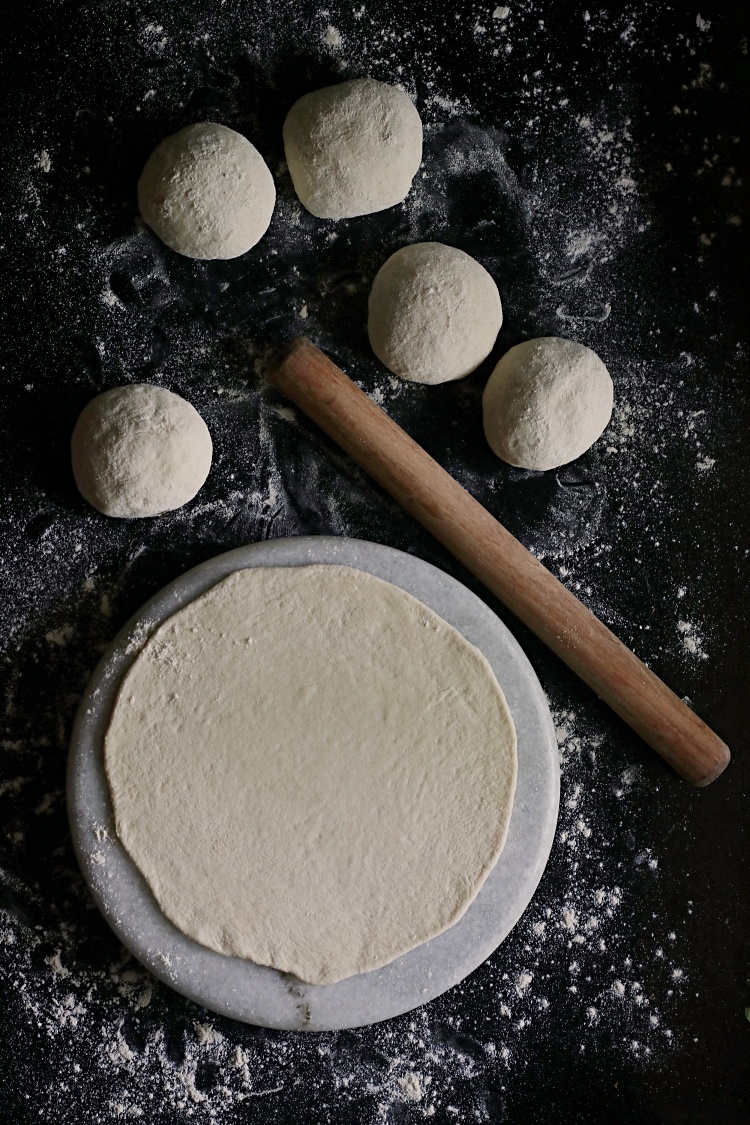
Once the dough is ready, knead gently a couple of times and divide into six equal portions. Using floured hands, shape each piece into a round. Cover with a damp tea towel and allow to rest for about 5 minutes. Work with one ball of dough at a time. Lightly dust a ball of dough with flour and roll it out into a thin circle about 10-inches in diameter. You can also press it out thin by hand.
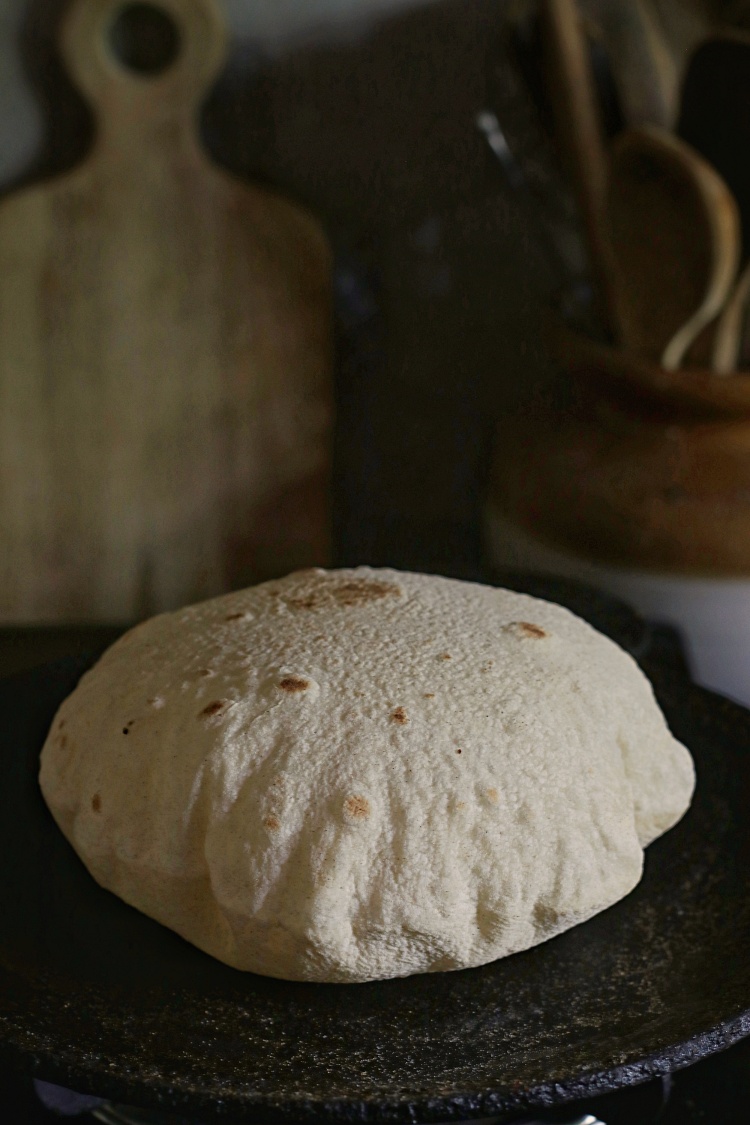
On an Iron Griddle : When the griddle is hot, turn down the heat to medium. Put the rolled out dough on the hot griddle and cook as you would a chappathi. Gently cook it on each side for about a minute or till light brown spots start appearing. The dough will turn whitish/ opaque as it cooks. The flatbread should start puffing up gently. When it does turn up the heat so the bread puffs up all the way to the edges. If it doesn’t gently coax it by applying pressure with a flat spatula or a rolled up cotton kitchen towel in your hand. Do not keep it on high heat for too long or t will crisp up losing its softness.
As they are done, put them into a basket. Serve immediately.
On the BBQ: Light the barbecue, close the lid, and turn it to high. When the BBQ is very hot, using a dough scraper, place each round directly on the grill and close the lid of the barbecue. After a minute or so, use blunt-nosed tongs to move the rounds from place to place, to account for uneven heat. The flat breads should puff up, though you might have the occasional flat one. The flat ones will taste just as good.
In the Oven: Place a pizza stone on the middle shelf of the oven set at 230C (450F). Place the dough circles on the stone. It takes 5-10 minutes to bake the breads. When they balloon up, gently turn them over using tongs. Also, move them around from time to time to account for uneven heat in the oven. To check to see if the breads are done, gently lift them up. They should be light weight and puffy.
It’s an adventure to find tastes and components that give the body life and the plate colour. Here are 6 ideas to create a nutritious dinner. Making a nutritious diner is similar to creating an Read More ...
If there is one recipe that I can blindly vouch for helping me stick to my healthy eating habit, then that has to be this avocado toast! Topped with eggs, this avocado toast is not only the healthiest breakfast (or lunch!), but also the tastiest among all my other options!
Avocado is my new found love and I make sure I include this superfood in my meals at least twice a week!
I savor my avocados in various ways but the most common one is this avocado toast! I am wondering why I took so long to share this go-to recipe of mine!
Even though the title says this avocado toast is for breakfast, I will share my secret with you! I love this avocado toast so much that I have it for lunch at least thrice a week!
It is best paired with eggs if you want to have it for breakfast. For lunch with avocado toast, I usually pair it up with grilled/air fried chicken and loads of salad.
What is avocado toast?
As the name suggests, avocado toast is the most humble yet most delicious and nutritious meal of crunchy toast with mashed avocado spread over it!
The creamy avocado complements the crusty bread so beautifully that it creates an unforgettable eating experience that will keep dragging you to it again and again.
That’s why I repeat this avocado toast in my weekly meals so many times yet never get bored of it. And when you top it up with an egg, it’s just ten on ten with the right amount of protein & healthy fat.
This one pot chicken drumsticks and rice is one of my favorite wholesome meals that fits the bill in all respects - it’s balanced, filling and satiates our taste buds so beautifully that we don't miss any takeaways whatsoever!
If you are new to my blog and are liking what you see here, I can assure you that you won’t regret your decision to stay on this page!
Here I share my tried and tested recipes that I make for my family & myself for a healthy & balanced meal to nourish our body & soul!
And the same goes for this one pot chicken drumsticks and rice which is a rightly balanced meal of carb and good protein without any fuss whatsoever!
Being a one pot recipe, this one pot chicken drumsticks and rice is perfect for a weeknight meal and will not only save you from those unhealthy takeaways but also will satiate your taste buds beautifully!
Why must you try this one pot chicken drumsticks and rice?
If you are a chicken lover then chances are that you have already tried many versions of chicken and rice, one of which may already be your absolute favorite!
However, I would urge you to try my version of one pot chicken drumsticks and rice which is so minimalistic yet so powerfully flavorful that you can’t help but fall in love with it!
The key flavor of my chicken and rice comes from the aromatics which is why I used a generous amount of it.
The only spice I used was two heaped teaspoons of cumin powder which imparts an earthy tone to the dish complementing the flavors of the aromatics. And it turned out to be a match made in heaven!
Chicken drumsticks are seared in oil to seal in the flavors of the spices into the meat and develop the brown crust on top that makes the drumsticks irresistibly tasty!
Finally the chicken drumsticks and rice are cooked together in the pot leaving you with chicken flavored fluffy rice and juicy chicken legs!
Veg fried rice is the most quintessential rice recipe that you must have in your repertoire and I am sure this will save you in more occasions than you could imagine thanks to its ease of prep and versatility!
I could not believe that I haven't yet shared everyone’s favorite and an almost staple veg fried rice recipe in my 10+ years old blog! That’s unpardonable!
Let’s fix that now, shall we? This veg fried rice is one such recipe that you would have made so many times that you actually lost count of it and don’t even think of it as a recipe anymore while making it!
Does this happen to you too?
My veg fried rice is absolutely free of any animal protein like egg or chicken or even seafood because that’s how we Indians like our veg fried rice.
You can of course check out my egg fried rice and chicken fried rice recipes which have remained very popular since the time I have shared them with my lovely readers!
This No Fuss No Knead Focaccia Recipe with walnuts, garlic and rosemary is very very forgiving and very delicious too. I love the moistness it offers, the flour to water ratio baking up a beautiful crumb.
Past couple of weeks has been so busy that I now look back and think how did we pull it off. Those frozen meals that we keep a stach of was super helpful and depleted pretty fast. Hence emerged easy ideas like this hidden veggies sandwich. Fairly easy to make this sandwich came together in under 15 minutes (use the mincer) and did not fall apart by lunch time. Here is the recipe for you to try
Ingredients to make hidden veggies sandwich.
Cream cheese: the soft cheese that is made with milk and cream is cream cheese. It is spreadable and mixes well with the vegetables to form a good spread. Most cream cheeses have added salt in them. You can us any rand available or home made ones.
Vegetables: my go to mix for this filling is basically firm salad veggies. carrots, bell pepper (capsicum) and zucchini form a good combination. You can add scallions and radishes too, if you like. The veggies I avoid are tomatoes, cucumber as they leach a lot of water making the filling soggy. Herbs and black pepper: A good mix of fresh herbs like basil, thyme, oregano are lovely in this combination. You can use fresh or dried versions. Crushed black pepper adds a heat kick to the recipe. You can add pickled ginger or pickled peppercorns too. Red chilli flakes are optional.
Bread: choose one that you like to have. It can be sourdough, panini, foccacia or basic sandwich bread. We have used a multi grain sliced bread to make this batch. You can use wraps or soulaki too.
Let’s make this cream cheese sandwich
Keep the cheese our of the fridge: the cheese when in fridge firms up a bit. If we bring it to room temperature it is easy to mix the vegetables and to spread the mix. You don’t have to leave it out for long, just enough toll it feels soft. Prep the vegetables: the veggies that go in the mix have to be finely chopped so they mix well with the cheese. This makes them overall spreadable. I use a manual mincer or hand chop them to make them small. Prepare the cheese filling into the mixing bowl add the chopped vegetables, herbs and cheese.sprinkle black pepper powder and give it a good mix till they arr evenly mixed. Make the sandwiches: lay out the bread and top it with the cheese filling. Spread it evenly.the thickness of the filling is up to you. Slice it into halves or triangles and the sandwich is ready.
Can we make wraps with this filling?
The filling is the most flavorful part of this recipe. So it is entirely up to you if you want to make it a wrap, a sandwich or a pin wheel sandwich. Depending on what you want to make choose an appropriate bread.
Can the sandwich be made vegan?
Creamcheese will be the part that needs a change to make it vegan. Dairy free cream cheese or cashew cheese will help you achieve this. I have not personally tried it out yet. When you do, let us know how it matched you taste test.
Meal prep the cream sandwich
Ideally, I will not keep the sandwich for more than a day in the refrigerator. However,the filling stays good for almost a week. So week the filling ready to slather on the bread as we need.
Lunchbox idea with sandwich
On a busy at work day these sandwich ideas are welcome lunch boxes. I do top up our boxes with some fresh fruit or a handful of nuts etc. While making this sandwich, I added a handful of steamed edamame and some crackers to the lunchbox.
This cream cheese sandwich has kept us going for a couple of times this week. It is quite filling and since the vegetables are added in make a light lunch option. The recipe is a good one to take to picnics, brunch or high tea. Hope you like this recipe and will let us know how yours turned out.
Introducing Sourdough Khameeri Roti with sourdough vibes! Yes, this Khameeri roti is made with sourdough starter, you can use the discard too. Khameeri roti—literally “fermented bread”—is a traditional Indian flatbread that gets its signature flavor and texture from fermentation, historically using natural yeast. Using sourdough discard is a perfect modern twist: the natural wild yeasts...


 Iron Sandwich Bread Mould/Tin Box with Cover for Baking- Small 400gms Size 7×3.5×3.5 inch