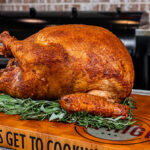
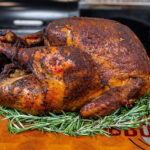
Cajun Smoked Turkey on a Stick Burner
Cajun Smoked Turkey
I fired up my stick burner for this one — real wood, real smoke, and a Cajun kick that just works on turkey. This recipe’s got a bunch of solid tips for cooking a juicy bird, no matter what flavors you like to use. If you’re after that true smoked turkey look and taste, this is how you do it.
WHAT MALCOM USED IN THIS RECIPE:
- HowToBBQRight Cajun Brine Kit
- Malcom’s Bird Brine
- Meat Bags – Brining Bags
- Malcom’s King Craw Cajun Seasoning
- Chicken Rack
- Disposable BBQ Boards
- Thermoworks DOT
- Thermoworks Thermapen
- BBQ Gloves
Cajun Smoked Turkey
No reviews
- Author: Malcom Reed
Description
Simple Cajun smoked turkey cooked over real wood and charcoal — full of smoke, spice, and tips for a juicy bird every time.
Ingredients
- 1 whole turkey, thawed
- 1 bottle Malcom’s Bird Brine
- 1 bottle Malcom’s King Craw Cajun Seasoning
- Meat Bag (optional)
- Water (enough to completely submerge turkey)
- 1 stick butter
- 1 cup chicken broth
- 1 stalk celery, cut into chunks
- 1 medium onion, quartered
- 1 head garlic, smashed
- Cooking spray or oil (for coating the skin)
- Chicken Rack (optional)
Instructions
- Brine the Bird
- Start with a completely thawed turkey. In a large Meat Bag or food-safe container, mix Malcom’s Bird Brine with 1 gallon of water. (For turkeys 12-14lbs or less, use 1/2 bottle. For turkeys over 14lbs, use entire bottle).
- Submerge the turkey and add more water as needed to cover it completely. Tie the bag up tight and refrigerate for 24 hours.
- Brining helps the meat stay juicy and pull flavor deep inside — it’s one step you don’t want to skip.
- Prep the Turkey
- After at least 24 hours, remove the turkey from the brine and pat it completely dry with paper towels.
- Stuff the cavity with celery, onion, and garlic.
- Tuck the wings and tie the legs so everything cooks evenly and the tips don’t burn.
- Make the Injection (optional)
- Mix 1 stick of butter, 1 cup chicken broth and about 2 tablespoons Malcom’s King Craw Cajun Seasoning.
- Stir to combine. Inject the mixture into the breast, thighs, and wings, distributing evenly. Season the Skin
- Spray or rub the outside of the turkey with cooking spray or oil — this helps crisp the skin and gives the seasoning something to stick to.
- Generously coat the bird with Malcom’s King Craw Cajun Seasoning (or your fave turkey seasoning).
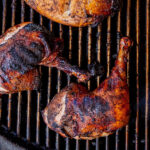
- Smoke the Turkey
- Fire up your smoker for indirect cooking and add your favorite wood (hickory and pecan work great). Run the pit around 275°F. Place the turkey on the smoker breast side up.
- Protect the Turkey
- When the skin has the color you want — that deep golden-brown Cajun look — spray the outside again with cooking spray and loosely tent with foil to prevent over-darkening.
- Continue cooking until the breast hits 160°F internal and the dark meat reaches about 175°F.
- Rest and Serve
- Remove the turkey from the pit and let it rest for at least 20-30 minutes before carving. This lets the juices redistribute and keeps the meat tender.
Notes
- Don’t skip the dry step. The drier the skin, the better it browns and crisps up.
- Use a meat thermometer. It’s the only way to nail that perfect doneness.
- Color control: On a stick burner, smoke runs heavy — so tent the turkey once the color looks good. You want mahogany, not black.
- Flavor variations: Swap Malcom’s King Craw Cajun Seasoning for your favorite turkey seasoning — classic poultry blends, garlic and herb, or a buttery savory rub all work great with this same process.
Every turkey cooks a little different, but if you take your time and let the smoke do the work, you’ll end up with one you’re proud to carve. That’s the kind of bird everyone remembers.
Malcom Reed
Connect on Facebook
Follow me on TikTok
Subscribe to my YouTube Channel
Follow me on Instagram
The post Cajun Smoked Turkey on a Stick Burner appeared first on HowToBBBQRight.