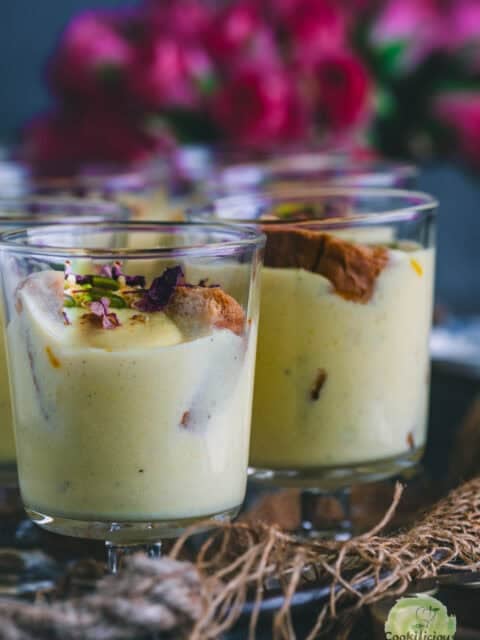
Shahi Tukda is a popular Mughlai Dessert which is loved by everyone all over India and other parts of the world. This is truly a royal dessert that melts in your mouth very similar to double ka meetha. This rich indulgent sweet combines fried bread, sugar syrup, Rabri and chopped nuts. Shahi Tukda Recipe Shahi...
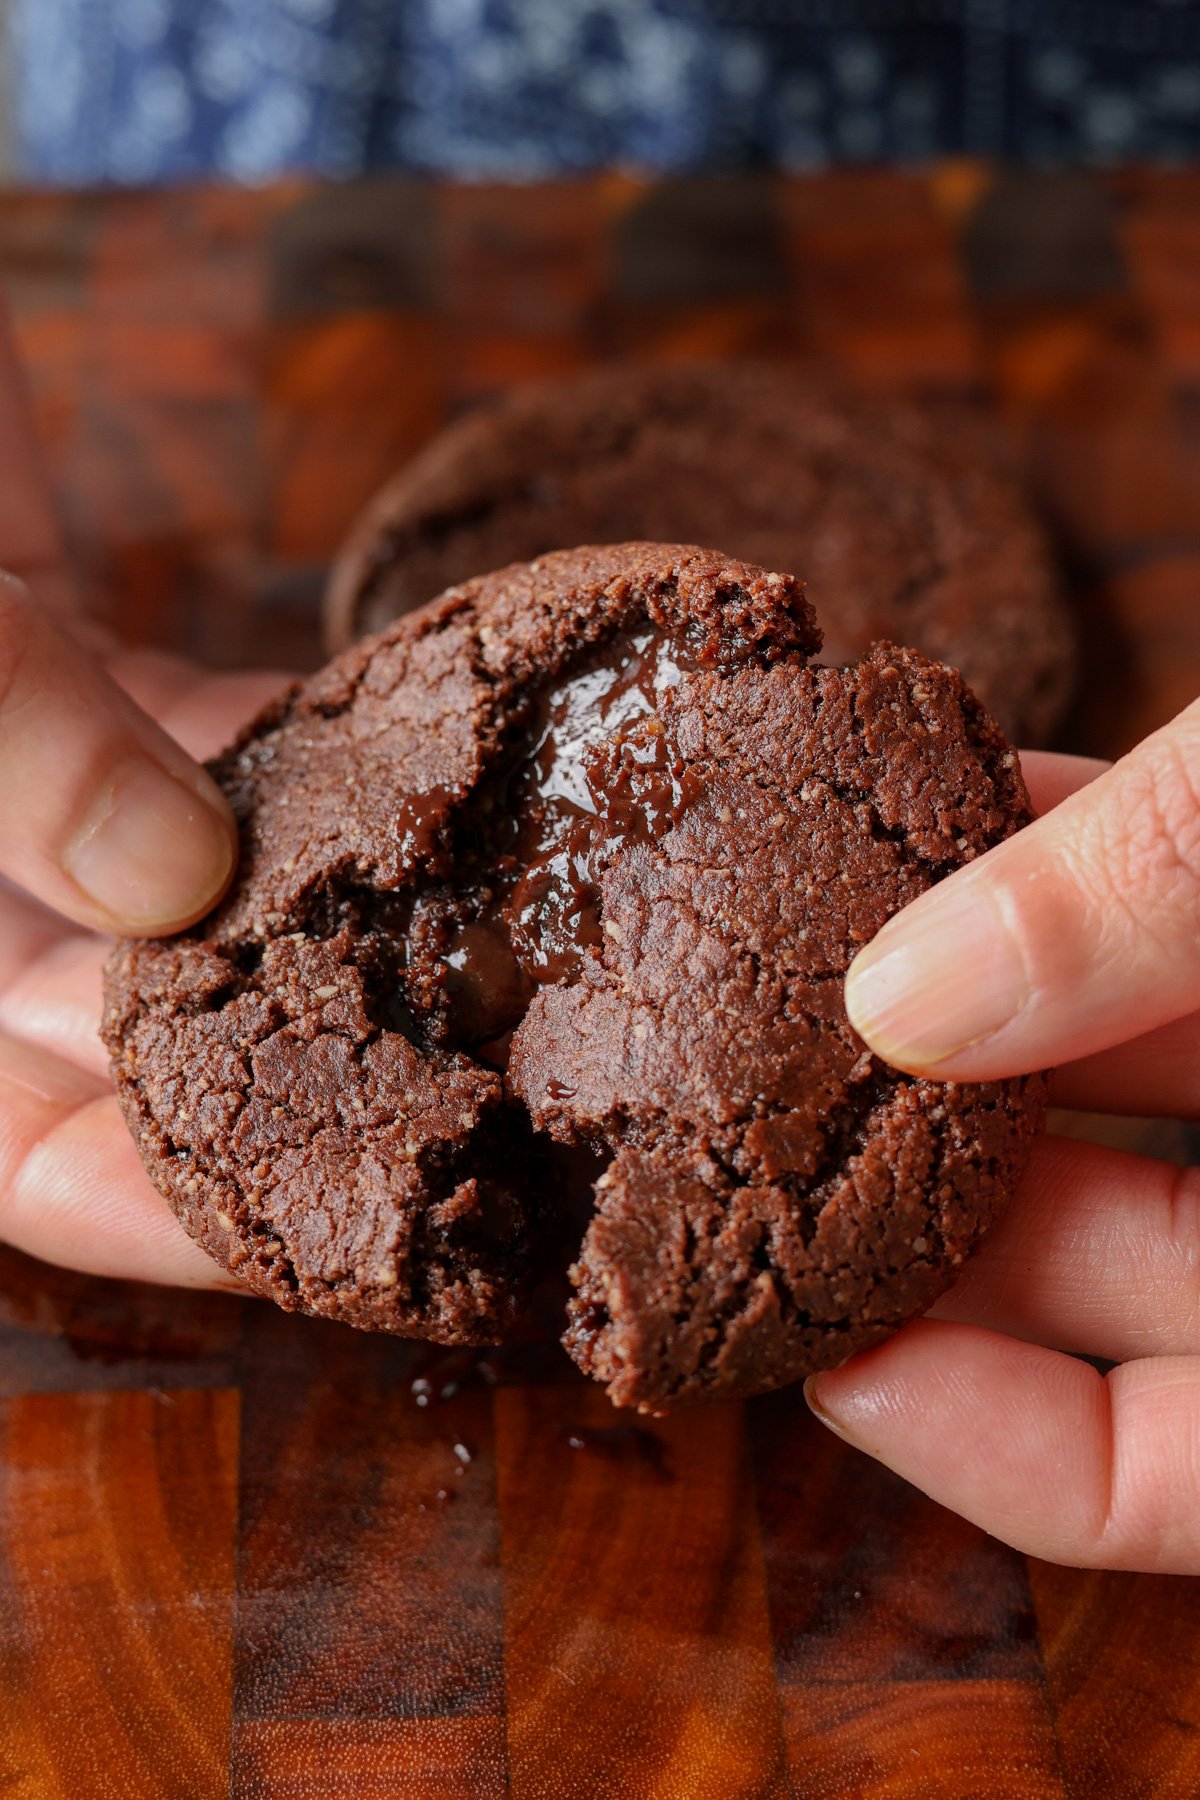
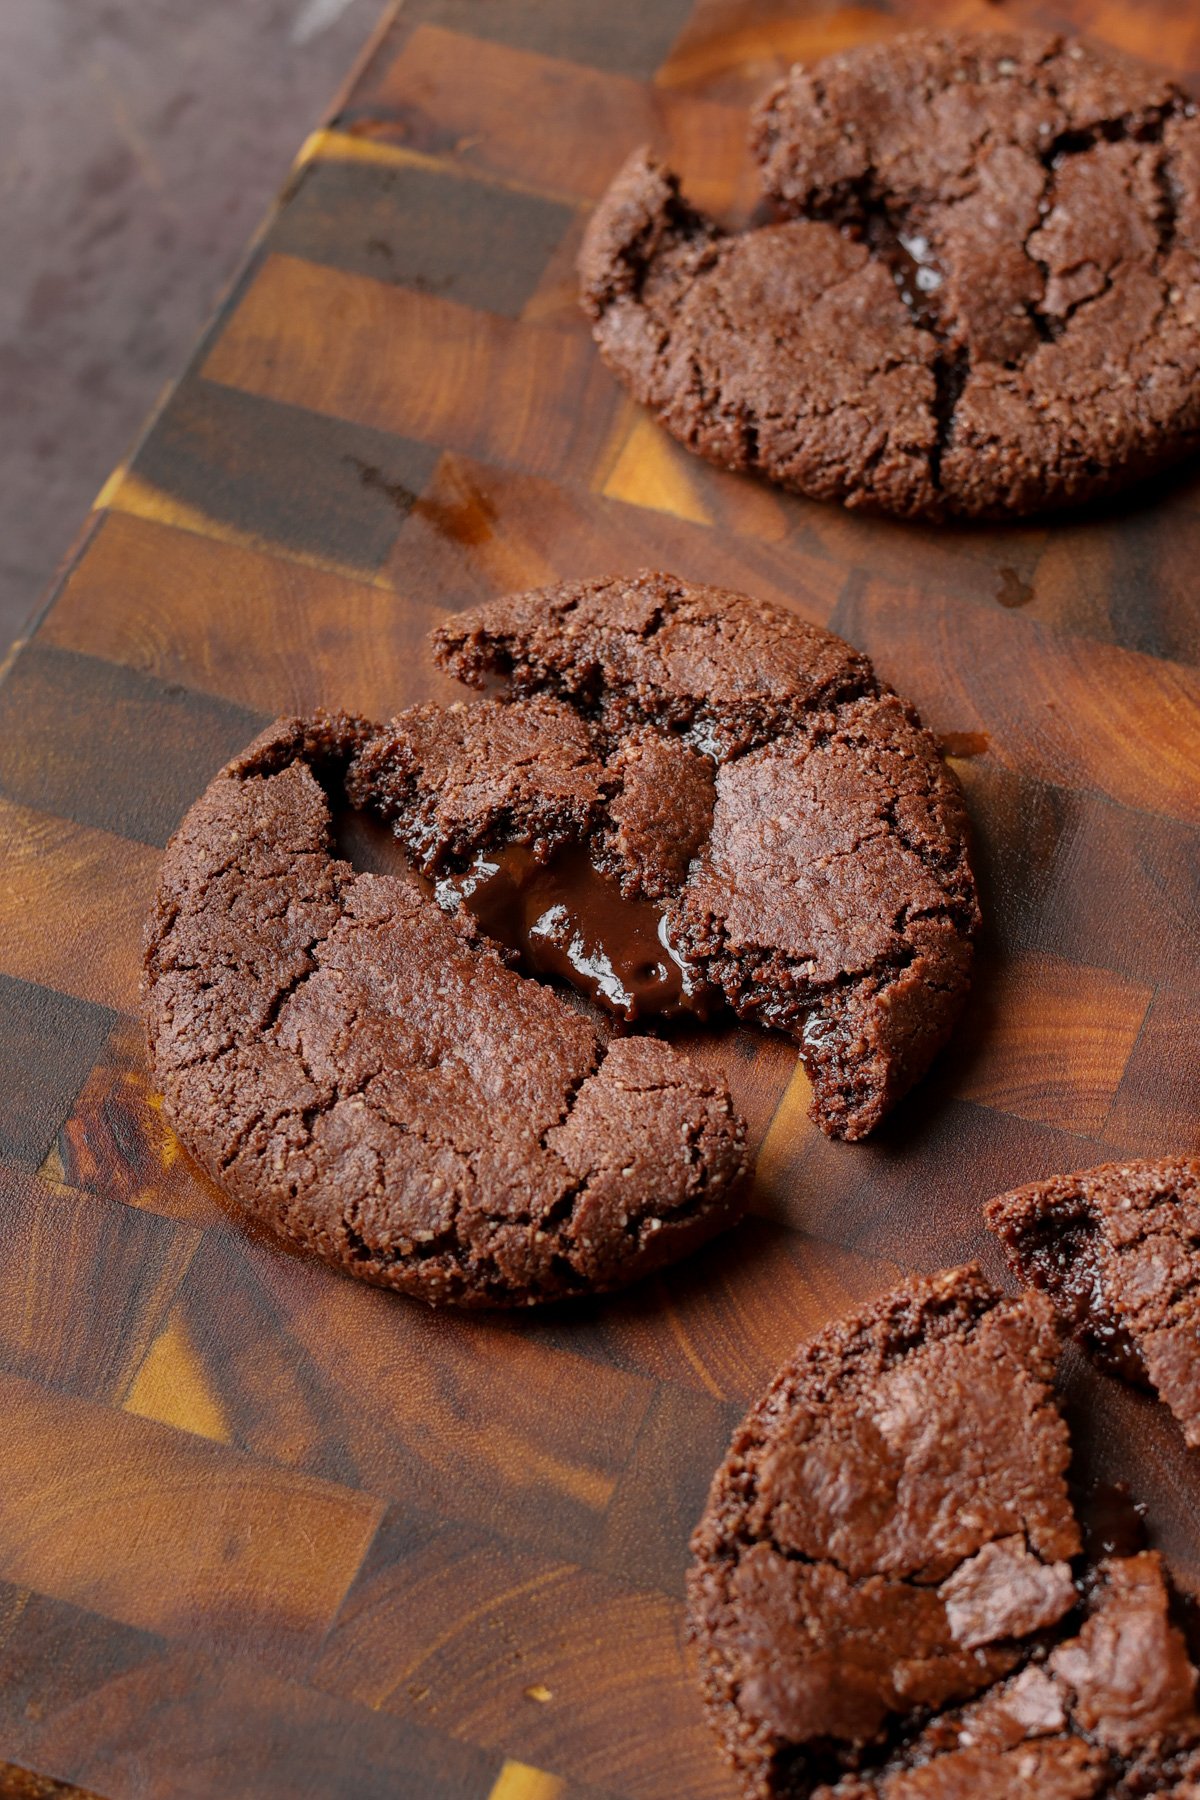
These decadently delicious chocolate lava cookies use my soft, chewy, almond flour cookie dough and a flowy, chocolate ganache filling that oozes out when you break them in half! (gluten-free and soy-free with nut-free options)
It’s cookie season, and I wanted to make a decadent, chocolatey cookie. And what better idea than to convert molten lava cake into cookie form!
My motto is that baking should be super easy and flexible, so that even if you make a few measuring errors, things still turn out great. Nobody has time to whip up butter and sugar and all that, so I use my trusty almond flour cookie dough, which works every time.
To make this simple dough, you just add all the dry ingredients to a bowl, mix really well, add some melted coconut oil and maple syrup, mix again, and that’s it! You have a dough!
For this recipe, we’ll add cocoa powder to make a chocolate cookie dough. Then, we make a molten chocolate “lava bomb,” which is a melted chocolate ganache that goes inside the cookie. As the cookie bakes, it spreads and traps the chocolate ganache inside. When you break it open, it’s oozy, melty, and so delicious.
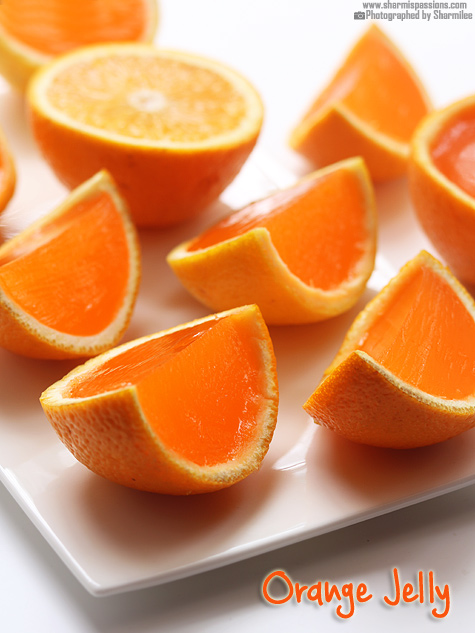
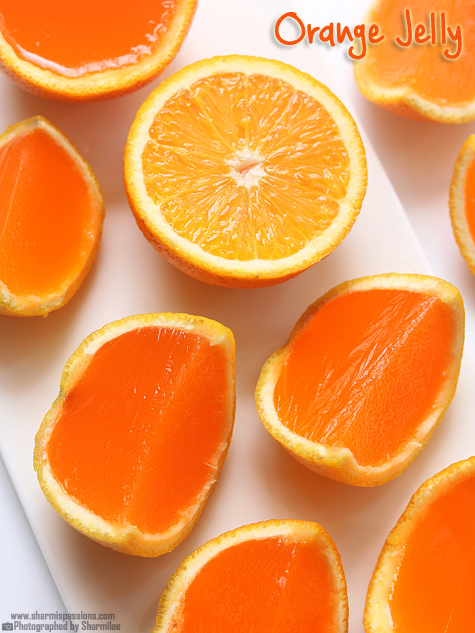
Orange Jelly is a chilled. yummy dessert that not only looks tempting but tastes delicious too. It is made using orange juice, sugar and agar gar as main ingredients. Orange Jelly made at home is a healthy delight for kids and this can also be used for desserts, puddings & cakes or can be eaten as such too.
Orange Jelly is made mainly with fresh orange juice and the flavor comes out quite bright. The jelly sets inside the orange skin itself, so it looks very cute also when serving. This recipe is a nice homemade treat when you want something quick and not too much cooking involved.
[feast_advanced_jump_to]
About Orange Jelly
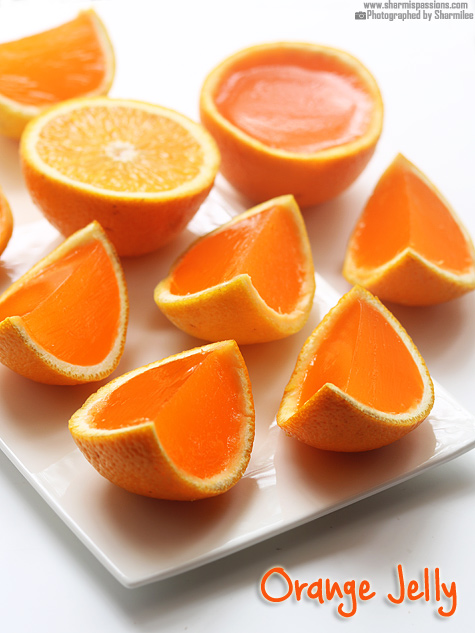
Orange Jelly is a simple dessert that still looks a little fancy when you serve it. This turns out soft with a gentle, slightly jiggly texture that kids really enjoy. The flavor stays mild and fresh, so you can eat it comfortable without feeling too rich or heavy. This dessert is also a must try for party and get together.
The flavor shifts a bit depending on how your oranges are that day, sometimes a bit tangy, sometimes sweeter. Many people add a drop of orange essence when the fruit feels too low in aroma, but honestly it's optional.
This Orange Jelly is a very easy dessert that you can make in few minutes and it will never fail to please a crowd. I was first bowled out by the idea of using orange cups for setting the jellies, it was such a treat to the eyes.
When I made this Orange Jelly, I shared it with my neighbor and they too loved it. Mittu loves any jelly so I prefer making them at home, not that I don't get it from outside but try the most to avoid jellies from shops. Agar agar does magic to jellies, it sets so well even in room temperature, even beginners can use it.
You can set this jelly in orange cups, tiny bowls, or even small cute molds if you want different shapes. Because of its bright color and smooth finish, it also works nicely in desserts as a layer, or even chopped inside cakes for a small fruity bite.
I usually make this when I have a few oranges lying around and they look like they'll dry soon. It barely takes effort, and I kind of enjoy watching it set into a neat wobbly dome inside the orange shells.
Orange Jelly Ingredients
Orange juice - I have used fresh orange juice as it gives a true citrus taste. You can use packed juice also when you don't have fresh ones.
Agar agar - I have used china grass strips as they help jelly set firm and clean. You can even use agar agar powder if that is easier for you.
Sugar - I used to adjust sweetness the taste some oranges are very tart. You can add more or less depending on your fruit.
Water - I added little water just to melt the agar agar properly. It helps the strips soften quick.
Orange essence - I have added a small drop only to give extra aroma. You can skip if your oranges already smell strong enough.
Orange food color - I have used little color to make the jelly look bright. You can skip for natural look also.
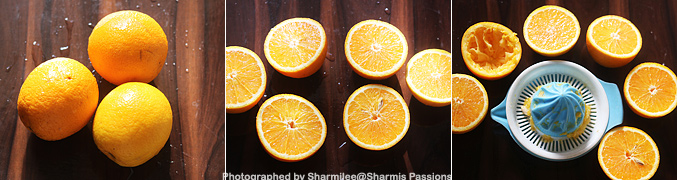
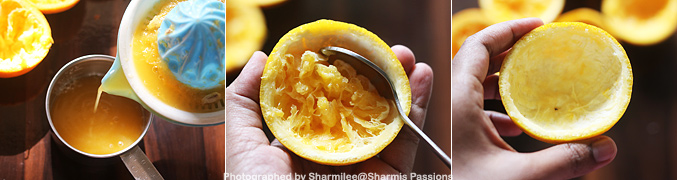
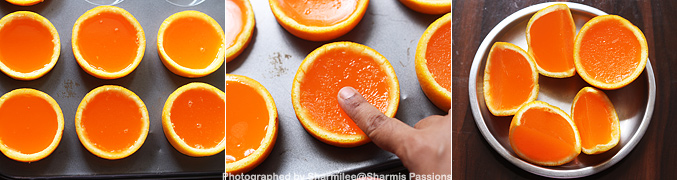
1.Take fresh juicy oranges, rinse it well. Cut each into half and extract juice.
2.Measure and Set aside. Now scrap out the fiber part in each orange half and discard the fiber part. Now take the orange cups alone.
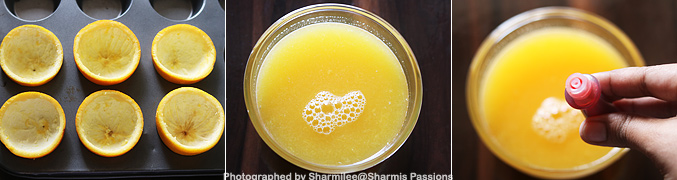
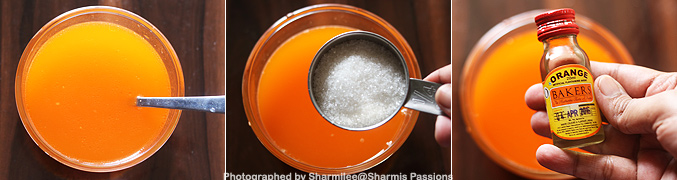
3.Fit them inside a muffin pan and keep it ready. Now to the extracted orange juice, add orange food color.
4.Then add sugar and orange essence, Set aside.
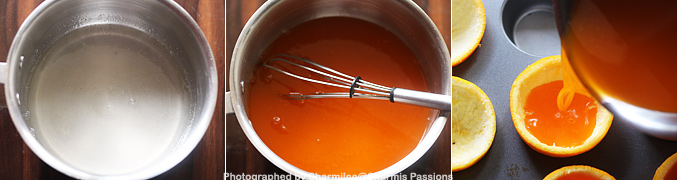
5.Take sauce pan take agar agar rinse it once. Then add ½ cup water to it. Boil it.
6.Cook until you see a clear liquid without any strips. Now act quickly add the orange juice. Pour it into the orange cups.
7.Leave it undisturbed for 30 minutes. If you touch and see it will be firm that is the right stage. No need to keep in fridge it will set well in room temperature itself. Once set you can leave it in the fridge until serving time.
Serve chilled!
You can eat it as such or use it in any desserts, custard based puddings or cakes, mittu loved to have it as such.
Expert Tips
Melting agar agar - I usually boil the strips well until they turn clear so the jelly sets smooth without any rough bits.
Work fast - I have noticed the mixture gets thick fast once mixed, so you can pour without waiting.
Sweetness - I usually taste the juice first because some oranges are too sour. You can add sugar accordingly.
Straining - I sometimes strain the agar agar liquid when I feel it has small pieces. You can do that for clean finish.
Setting choices - I have tried cups, molds, and even trays, so you can choose whichever you feel easy.
Serving and Storage
Serve Orange Jelly cold with a simple lunch or enjoy it as small snack whenever you want something light. This goes well with puddings, custards or mixed fruit bowls also. When you set it inside the orange shell, it really looks quite nice to serve for small gathering or even a quick family snack. Store leftovers into the fridge and it stay good for a day or two.
FAQS
1.Can I skip orange essence?
Yes you can skip it, the fresh juice gives enough flavor most times.
2.Can I use store bought orange juice?
Yes, it works fine though the taste may come slightly sweeter.
3.Is agar agar necessary for this?
Agar agar gives a firm natural set, so it works better than gelatin here.
4.Can I make this earlier?
Yes you can prepare one day before and keep it in fridge.
5.Can I change the flavor?
Yes you can try mango, pineapple or other juices in the same method.
If you have any more questions about this Orange Jelly Recipe do mail me at sharmispassions@gmail.com. In addition, follow me on Instagram, Facebook, Pinterest, Youtube and Twitter .
Tried this Orange Jelly Recipe? Do let me know how you liked it. Also tag us on Instagram @sharmispassions and hash tag it on #sharmispassions.
Orange Jelly is a chilled. yummy dessert that not only looks tempting but tastes delicious too. It is made using orange juice, sugar and agar gar as main ingredients. Orange Jelly made at home is a healthy delight for kids and this can also be used for desserts, puddings & cakes or can be eaten as such too.
The most delicious vegetarian Pumpkin Pie, the best I've baked to date, probably the easiest filling ever with fresh pumpkin puree. This eggless pie was a 10/10, the buttery pastry from scratch a winner too.
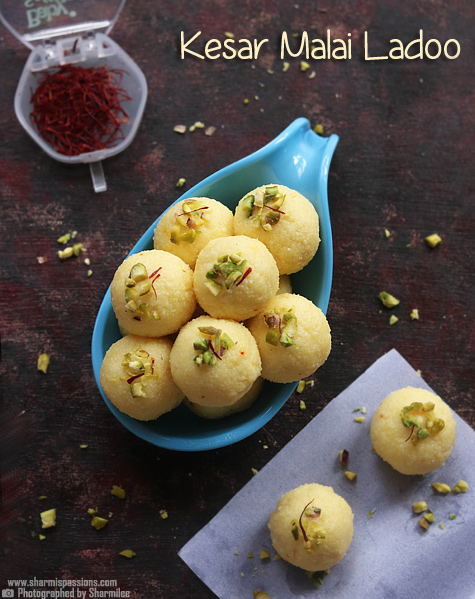
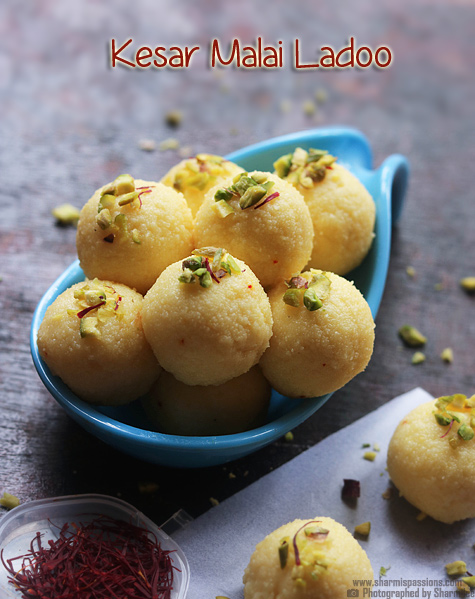
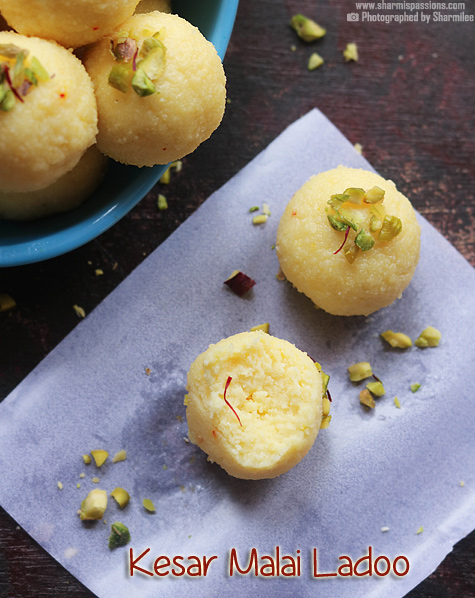
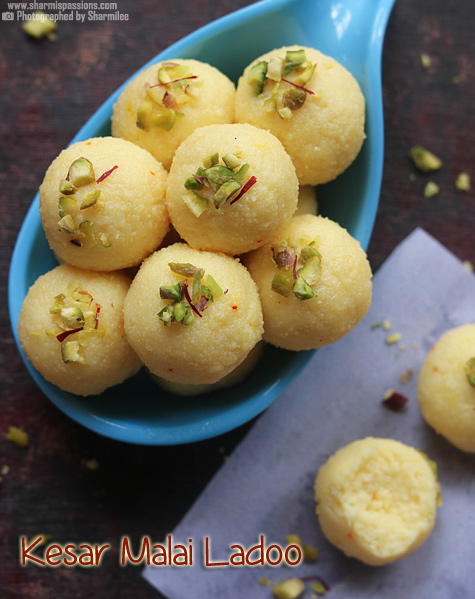
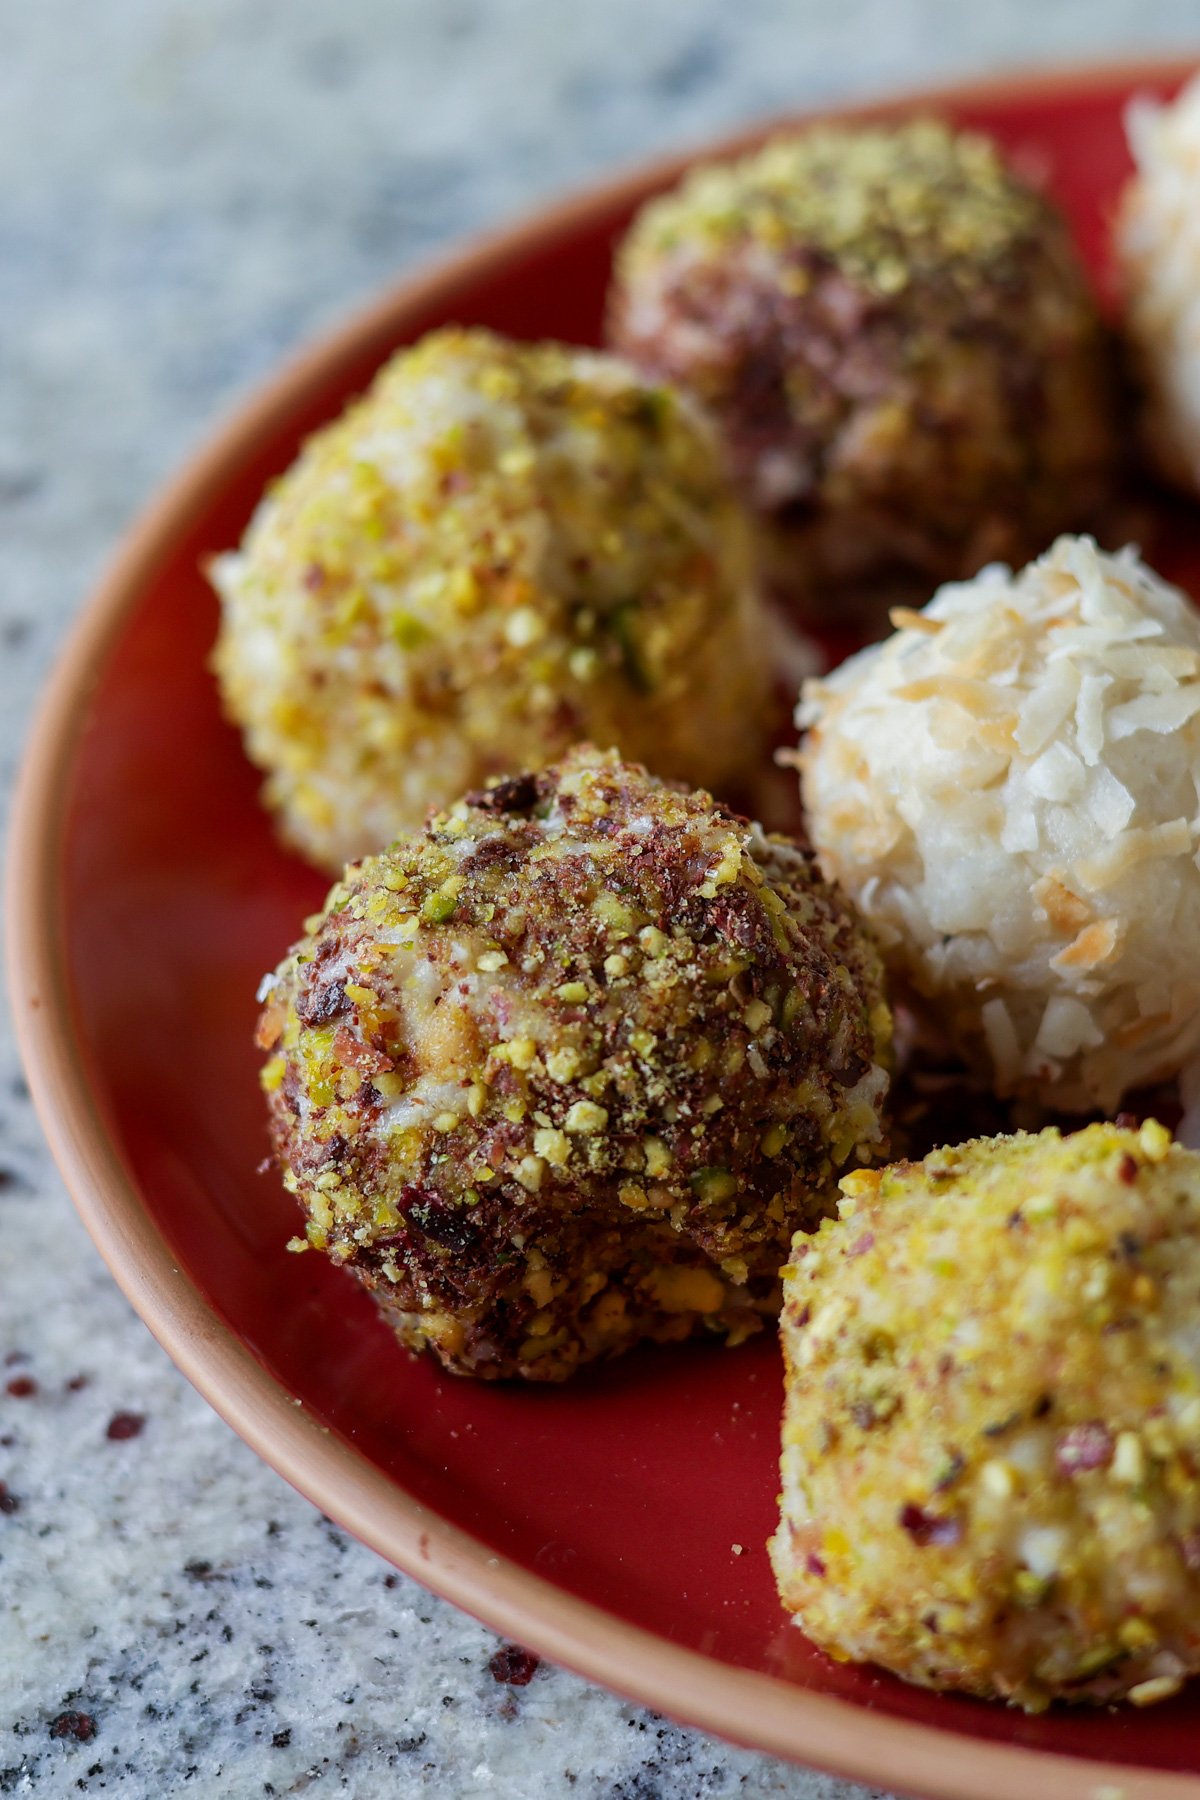
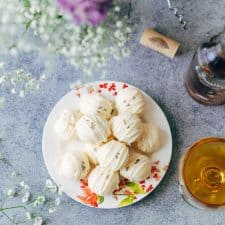
Malai Ladoo is a soft, melt in the mouth sweet made using paneer and condensed milk as main ingredients. It has smooth texture with a yummy taste and a hint of cardamom and rose essence that makes it very special. These ladoos are quick to make and needs only few ingredients from the pantry.
This sweet is often made for family get-togethers or when we want something rich but simple and easy to make. The texture is so soft and light, it just melts as soon you take one bite. The natural milk flavor mixed with saffron gives mild sweetness which feels very comforting. It's one of those sweets which even beginners can try.
[feast_advanced_jump_to]
About Malai Ladoo
Malai Ladoo is one of the simplest milk sweets that gives rich festive taste without much effort. It is made using fresh paneer that is mixed with condensed milk and cooked till it turns thick and dough like. Then we make small soft balls and roll them in chopped nuts for crunch and color.
The word malai means cream and that's exactly what this sweet feel like. It's soft, creamy and so rich even with small bite. Condensed milk gives the sweetness and richness while saffron adds golden shade and aroma. Some people add milk powder or coconut flakes for twist, but honestly the basic version taste best.
Malai Ladoo is perfect if you want quick sweet without deep frying or sugar syrup. It gets ready in one pan and stays good for few days in fridge. You can also flavor with kewra water or skip essence completely.
I usually make this when I got some leftover paneer. It's my quick fix sweet recipe which never fails. Even kids love it for its mild sweetness and soft bite.
Malai Ladoo Ingredients
Paneer - I used fresh homemade paneer, it gives nice soft texture to the ladoo. You can use store one too, just soak it in warm water for few minutes before grinding.
Condensed milk - Gives sweetness and creamy feel. It helps to bind everything well, so no need to add extra sugar.
Ghee - I just used a little for greasing and flavor. You can skip if using non-stick but ghee always gives nice aroma.
Pistachios - I used for garnish and crunch. Almonds or cashews also works.
Cardamom powder - For light aroma and flavor. If it is not there, few drops cardamom essence will do.
Rose essence - I add few drops for floral smell, but can skip if you don't like.
Saffron - Gives lovely golden color and taste. If not available, small pinch of turmeric can be used but flavor will change.
Why This Recipe Works
This is a simple recipe with only few ingredients.
It has soft creamy texture that tastes rich and smooth.
It is made in one pan, no sugar syrup or frying.
You can make ahead and store for few days, perfect for small parties.
It is perfect sweet for beginners, gives great result always.
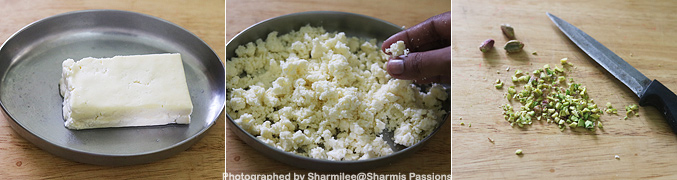
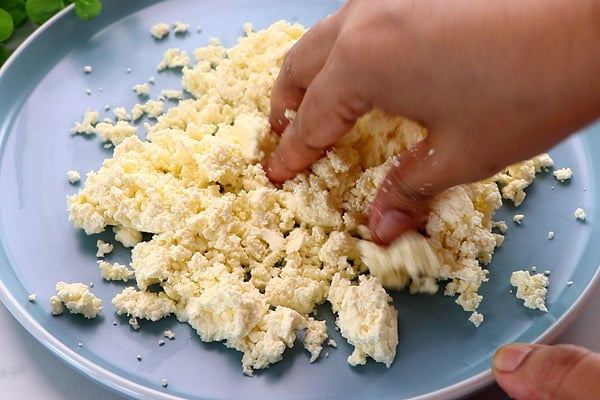
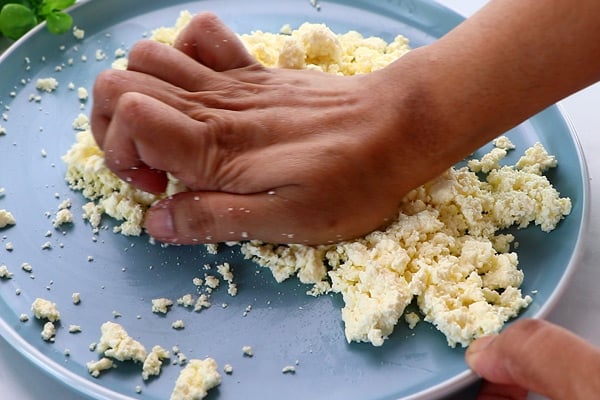
1.Take paneer, crumble it well with your hands, Set aside. Chop the pistachios
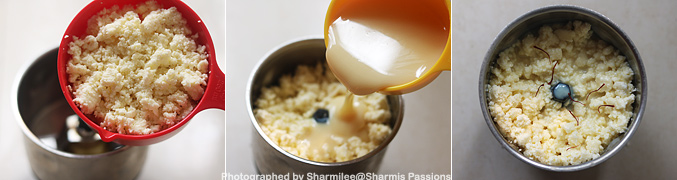
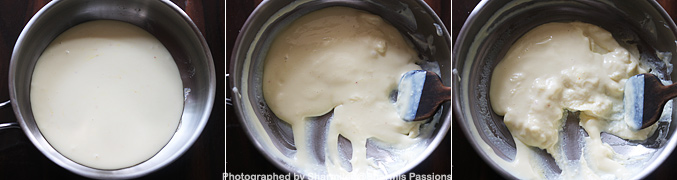
2.In the mixer jar, add crumbled paneer, add condensed milk and saffron
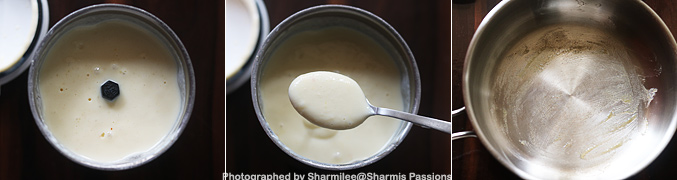
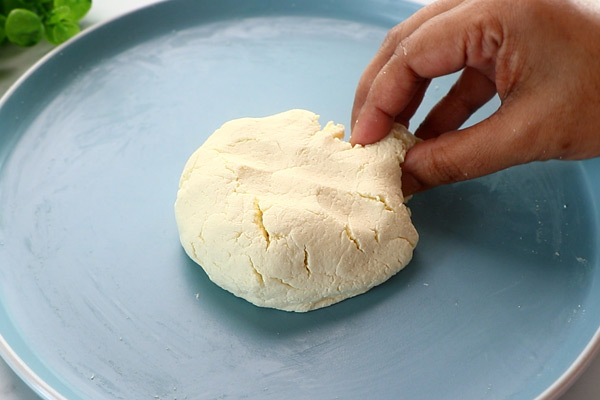
3.Grind it to a fine paste, it will be creamy but will have a slight coarse texture when you touch and see. Now grease the pan with ghee. If you use nonstick pan then no need to grease.
4.Add the paste and start cooking in low flame. In few minutes, it will start to thicken. Keep stirring continuously.
5.Keep cooking until it becomes thick, it will start to roll and textured like below.
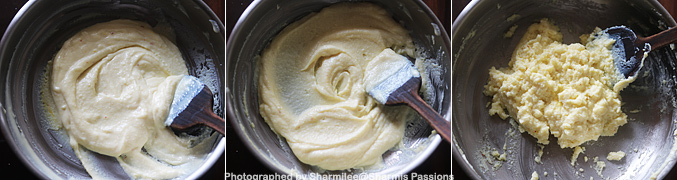
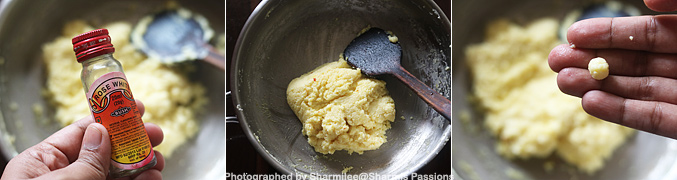
6.When it starts to leave the sides of the pan, add rose essence, cardamom powder and give a quick mix. Pinch a tiny portion, roll and see if it forms a ball, then switch off.
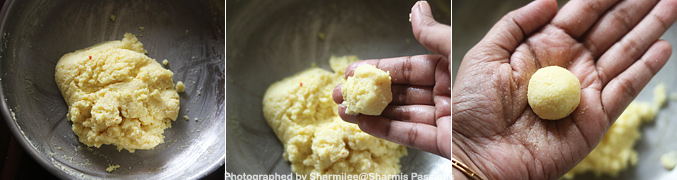
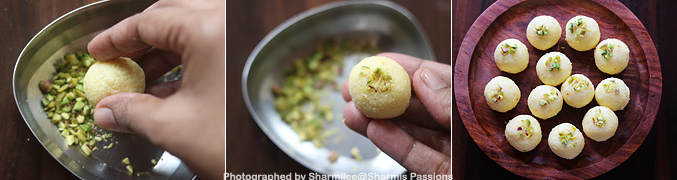
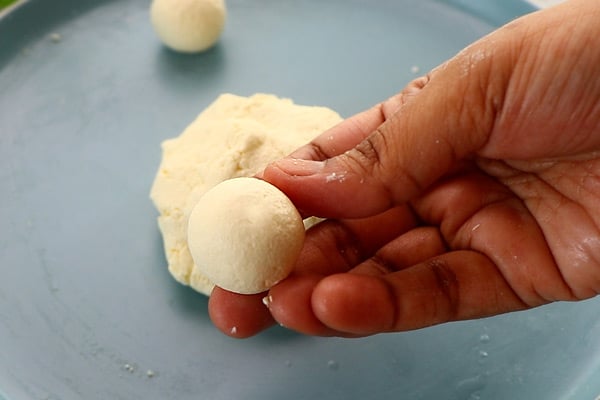
7.It will not be completely dry, it will still be moist. Let it cool down for sometime. When it is still warm, make small balls. It will be moist at this stage but will become firm after cooling down.
8.Dip each ball into the nuts mixture and arrange it in a plate.
Cool down and store in airtight container.
Expert Tips
Paneer - I use soft and fresh paneer for best result. If the paneer feels bit dry or hard, I just soak it in warm water for few minutes before blending, it makes it turn more soft.
Cooking consistency - Cook the mixture on low flame till it starts leaving the sides of the pan but still feels little moist. Don't overcook it, otherwise the ladoo will turn bit hard once cooled.
Sweetness level - Condensed milk itself gives enough sweetness, but if you prefer more sweet taste, you can sprinkle little sugar while cooking.
Flavor variation - You can customize with the flavors. Add few drops of kewra essence or saffron soaked in the warm milk for richer aroma.
Shaping - I make the ladoos when the mixture is still warm so it rolls easily. If it feels sticky, just apply a few drops of ghee on hands while rolling them.
Serving and Storage
Serve Malai Ladoo as a soft creamy dessert after meal or with other sweets during festive time. It also tastes nice with evening tea or when you crave something milky. Store them in airtight box and keep inside fridge, they stays good for 3 to 4 days. Bring them to room temperature before eating so the texture turns soft again.
FAQS
1.Can I use store bought paneer?
Yes, just soak in warm water before using so it becomes soft and blend nicely.
2.Can I skip saffron?
Yes, you can skip it. The color will be white but taste still good.
3.Why my ladoo turned little hard?
That happens when cooked bit more. Next time switch off earlier when mixture still moist.
4.Can I use milk instead of condensed milk?
Yes, but then shelf life reduces. You can use half milk and half condensed milk too.
5.Can I store longer?
You can just refrigerate them up to 4 days. Don't keep outside long since it has milk.
If you have any more questions about this Malai Ladoo Recipe do mail me at sharmispassions@gmail.com. In addition, follow me on Instagram, Facebook, Pinterest, Youtube and Twitter .
Tried this Malai Ladoo Recipe? Do let me know how you liked it. Also tag us on Instagram @sharmispassions and hash tag it on #sharmispassions.
Malai Ladoo is a soft, melt in the mouth sweet made using paneer and condensed milk as main ingredients. It has smooth texture with a yummy taste and a hint of cardamom and rose essence that makes it very special. These ladoos are quick to make and needs only few ingredients from the pantry.
Take paneer, crumble it well with your hands, set aside.
Chop the pistachios.
In the mixer jar, add crumbled paneer, add condensed milk and saffron.
Grind it to a fine paste, it will be creamy but will have a slight coarse texture when you touch and see.
Now grease the pan with ghee. If you use nonstick pan then no need to grease.
Add the paste and start cooking in low flame. In few minutes, it will start to thicken. Keep stirring continuously.
Keep cooking until it becomes thick, it will start to roll and get textured.
When it starts to leave the sides of the pan, add rose essence, cardamom powder and give a quick mix.
Pinch a tiny portion, roll and see if it forms a ball, then switch off.
It will not be completely dry, it will still be moist. Let it cool down for sometime.
When it is still warm, make small balls. It will be moist at this stage but will become firm after cooling down.
Roll each ball into the nuts mixture and arrange it in a plate.
Cool down and store Malai Ladoo in an airtight container.
Notes
Paneer - I use soft and fresh paneer for best result. If the paneer feels bit dry or hard, I just soak it in warm water for few minutes before blending, it makes it turn more soft.
Cooking consistency - Cook the mixture on low flame till it starts leaving the sides of the pan but still feels little moist. Don't overcook it, otherwise the ladoo will turn bit hard once cooled.
Sweetness level - Condensed milk itself gives enough sweetness, but if you prefer more sweet taste, you can sprinkle little sugar while cooking.
Flavor variation - You can customize with the flavors. Add few drops of kewra essence or saffron soaked in the warm milk for richer aroma.
Shaping - I make the ladoos when the mixture is still warm so it rolls easily. If it feels sticky, just apply a few drops of ghee on hands while rolling them.
You have to try this unique version of Sabudana Kheer! By caramelizing the sugar before adding milk, the kheer develops a rich golden color and deep caramel flavor that sets it apart from the traditional recipe. Creamy, aromatic, and naturally gluten-free, this Caramel Sabudana Kheer is made with simple pantry ingredients like tapioca pearls, milk, […]
Biscoff Mysore Pak (Mysore Pakku) is a modern fusion twist on the classic South Indian sweet. Made with besan, ghee, oil, sugar, and optionally Biscoff butter for a caramel-spiced kick, this rich, aromatic dessert comes together in just 45 minutes - perfect for festive gifting, weekend indulgence, or special celebrations! What Is Mysore Pak Mysore […]
Biscoff Coffee Tart... just the simplest and most delicious dessert if your favourite flavour in the whole world is coffee AND if you love Biscoff, then you are in for a real treat since this eggless, no bake tart ticks off all the right boxes!
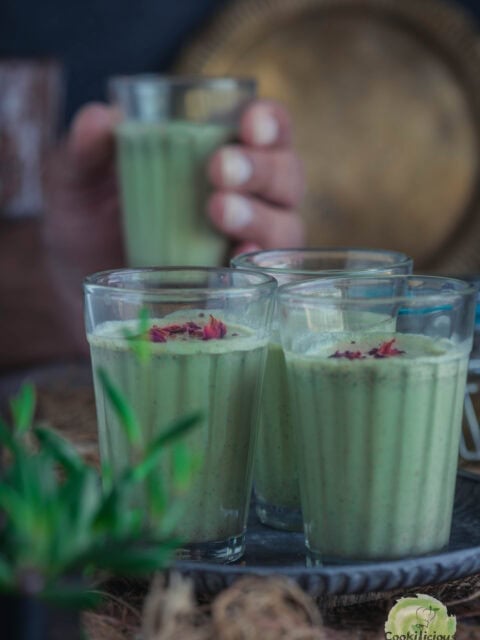
These Falooda Paan Shots are everything you love about Indian desserts– fun, colourful, and bursting with flavour 💚
Some desserts make people smile the moment they lay their eyes on them and these Paan Falooda Shots do exactly that. They look colourful, festive, and are bursting with that nostalgic paan flavour we all love after a big Indian meal.
If you’re putting together a festive spread soon, these pair beautifully with our Masala Chai Panna Cotta for a modern twist, or Rasmalai Cake, if you want something rich and indulgent alongside. This recipe is simple to make, easy to serve, and 100% guaranteed to impress.
Paan Leaves: The heart of the recipe that’s responsible for the vibrant green color, and fresh, minty, slightly bitter flavours
Gulkand and Saunf: Give the drink its signature sweetness and a floral, paan-shop-style aroma.
Vanilla Ice Cream: Makes the paan milk smooth, creamy, and perfectly balanced.
Sabja Seeds: Also known as basil seeds.Soaked until they puff up for a fun, chewy falooda texture.
Vermicelli: For added texture
Cardamom Powder: For warmth, fragrance, and to lift the flavour.
Rose Petals and Crushed Pistachios: For garnish
Richa’s Top Tips
Blend smooth: Make sure the paan milk is blended really well so you don’t get bits of leaf while sipping.
Don’t skip soaking: Let the sabja seeds sit in water for at least 10 minutes to an hour till they puff up properly.
Layer neatly: Spoon each layer carefully so the shots look pretty and don’t mix too soon.
Chill before serving: Keep the paan milk in the fridge for a bit, it tastes way better cold.
Frequently Asked Questions
Can I replace sabja seeds with chia seeds?
Yes, you can. Chia seeds have a similar texture once soaked, though they’re slightly less chewy than sabja.
What if I don’t have paan leaves?
You can skip them and still make a tasty falooda using gulkand, saunf, and cardamom for a similar flavour.
Can I make this without ice cream?
Yes, use chilled milk and a spoon of condensed milk for sweetness. It’ll be a little lighter but still creamy and delicious.
Storage Tips
Fridge: Store paan milk in an airtight glass bottle for up to 2 days. Keep it chilled and shake well before using.
Freezer: You can freeze the paan milk for up to a week in small airtight containers. Thaw in the fridge and blend again before using.
Room temperature: Avoid leaving assembled shots out for more than 30 minutes. The ice cream will melt and the layers will lose their texture.
Serving Ideas
Paan Falooda Shots are a total showstopper on any dessert table, bright, festive, and fun to serve. Here are a few ways to make them shine even more:
After Paneer Tikka Skewers – A refreshing, sweet bite to end a spicy, savory meal.
With Savoury Snacks – A classic combination for your indulgent festive parties
For more such recipes check out some more Unique Diwali Sweets Recipes, perfect for planning your next celebration spread!
Did You Know?
Paan leaves have been part of Indian tradition for centuries not just as a mouth freshener but as a symbol of hospitality and celebration. They’re packed with antioxidants and are said to help with digestion, which is why you’ll often find paan served after a big meal.
ConclusionThese paan falooda shots are all about fun, flavor, and celebration, a little desi, a little fancy, and a lot of delicious. They’re easy to put together yet feel festive enough for any celebration. If you make them, share your version on Instagram@my_foodstory, I’d love to see how you serve yours!
Add 2 teaspoons of sabja seeds to a shot glass, add 1 teaspoon of vermicelli as the second layer, fill ¾ of the glass with paan milk. Add a teaspoon of vanilla icecream, garnish with a few rose petals & crushed pista. Repeat the same for all the shot glasses and serve immediately.
½ cup soaked sabja, ½ cup cooked vermicelli, ¼ cup vanilla icecream, 1 tablespoon dried rose petals, 1 tablespoon crushed pista, 8 shot glasses
Learn how to make Instant Milk recipe with a detailed video tutorial and step by step photos. Quick, easy and irresistibly delicious milk sweet comes together in just 10 minutes - perfect for Diwali or any festive celebration! Diwali is here and it is my most favorite time of the year. I love making elaborate...
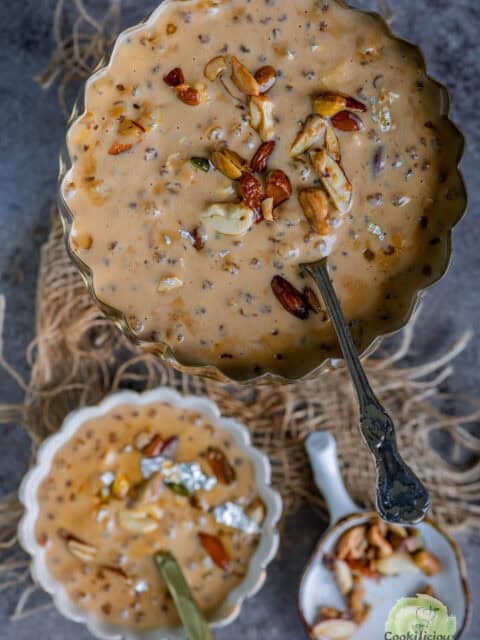
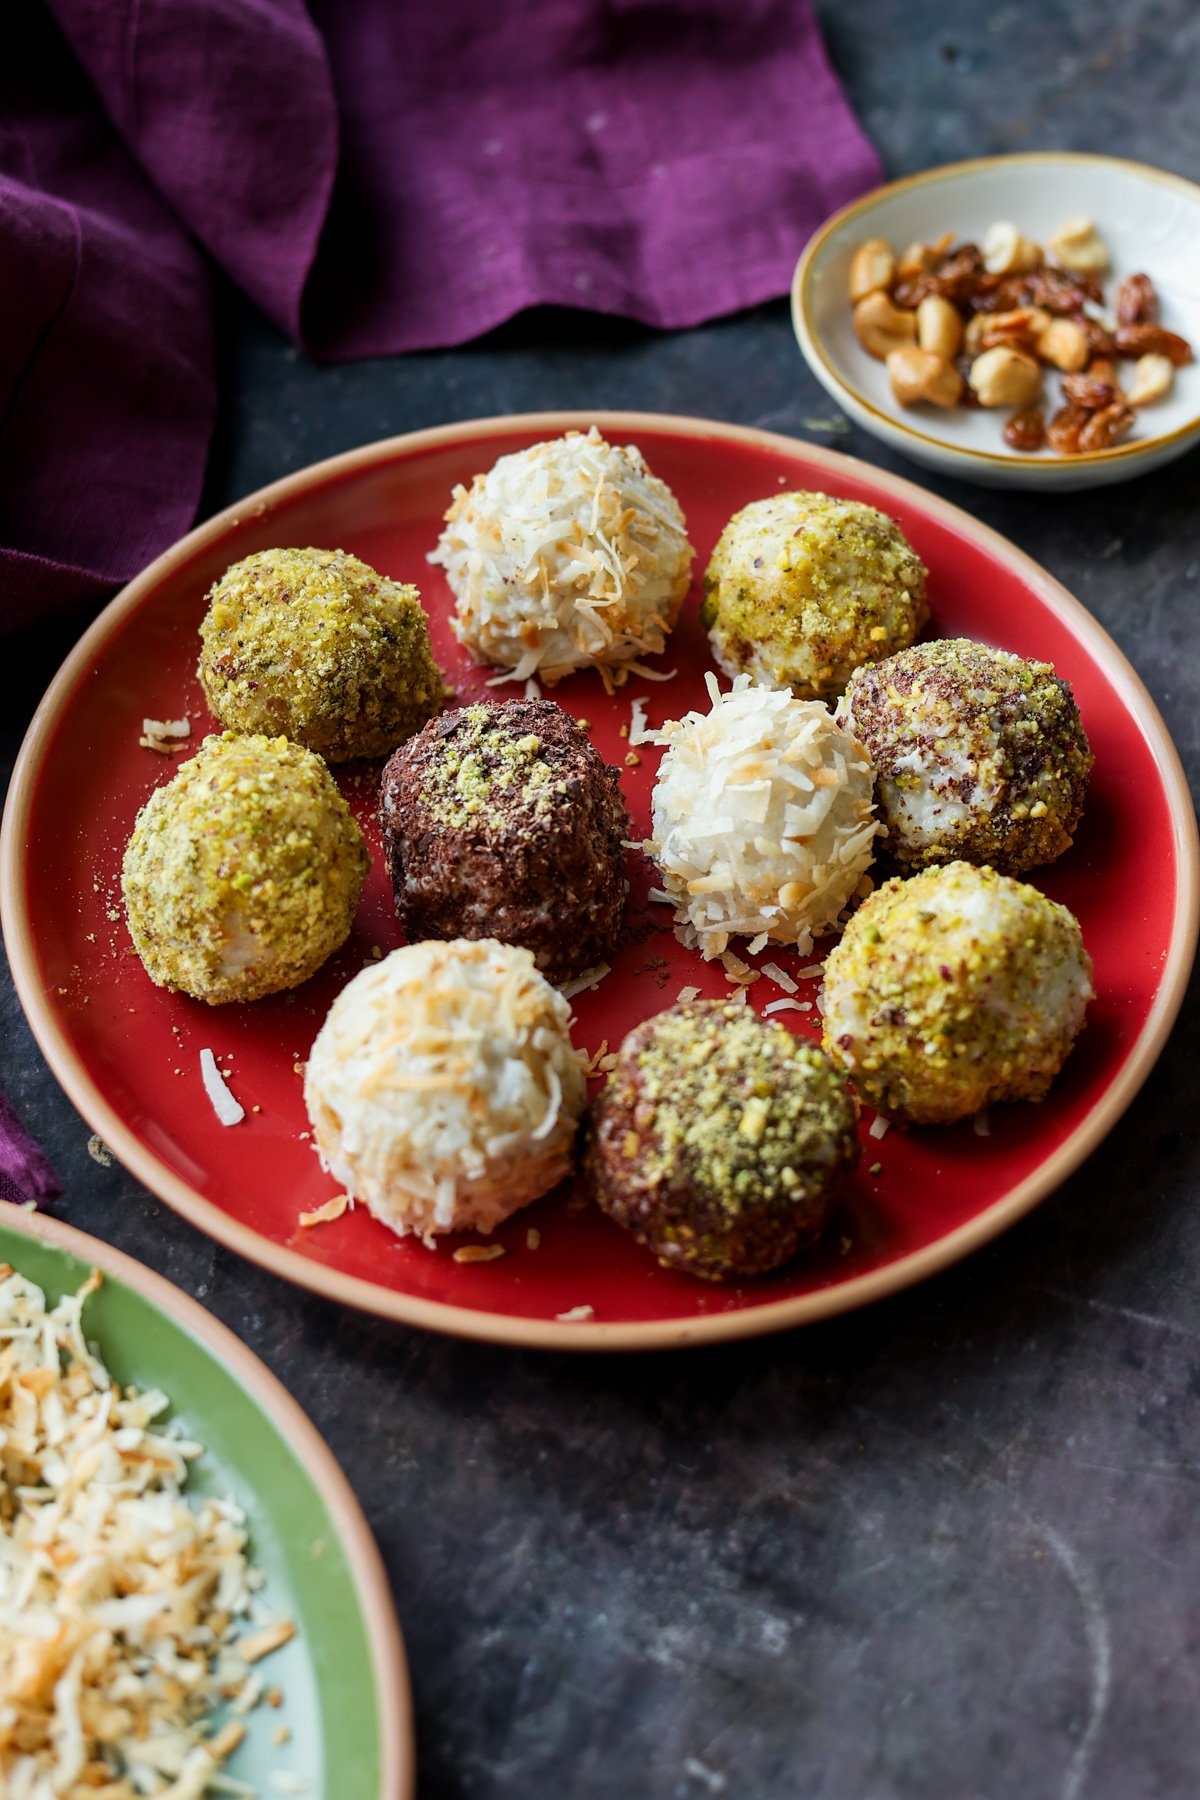
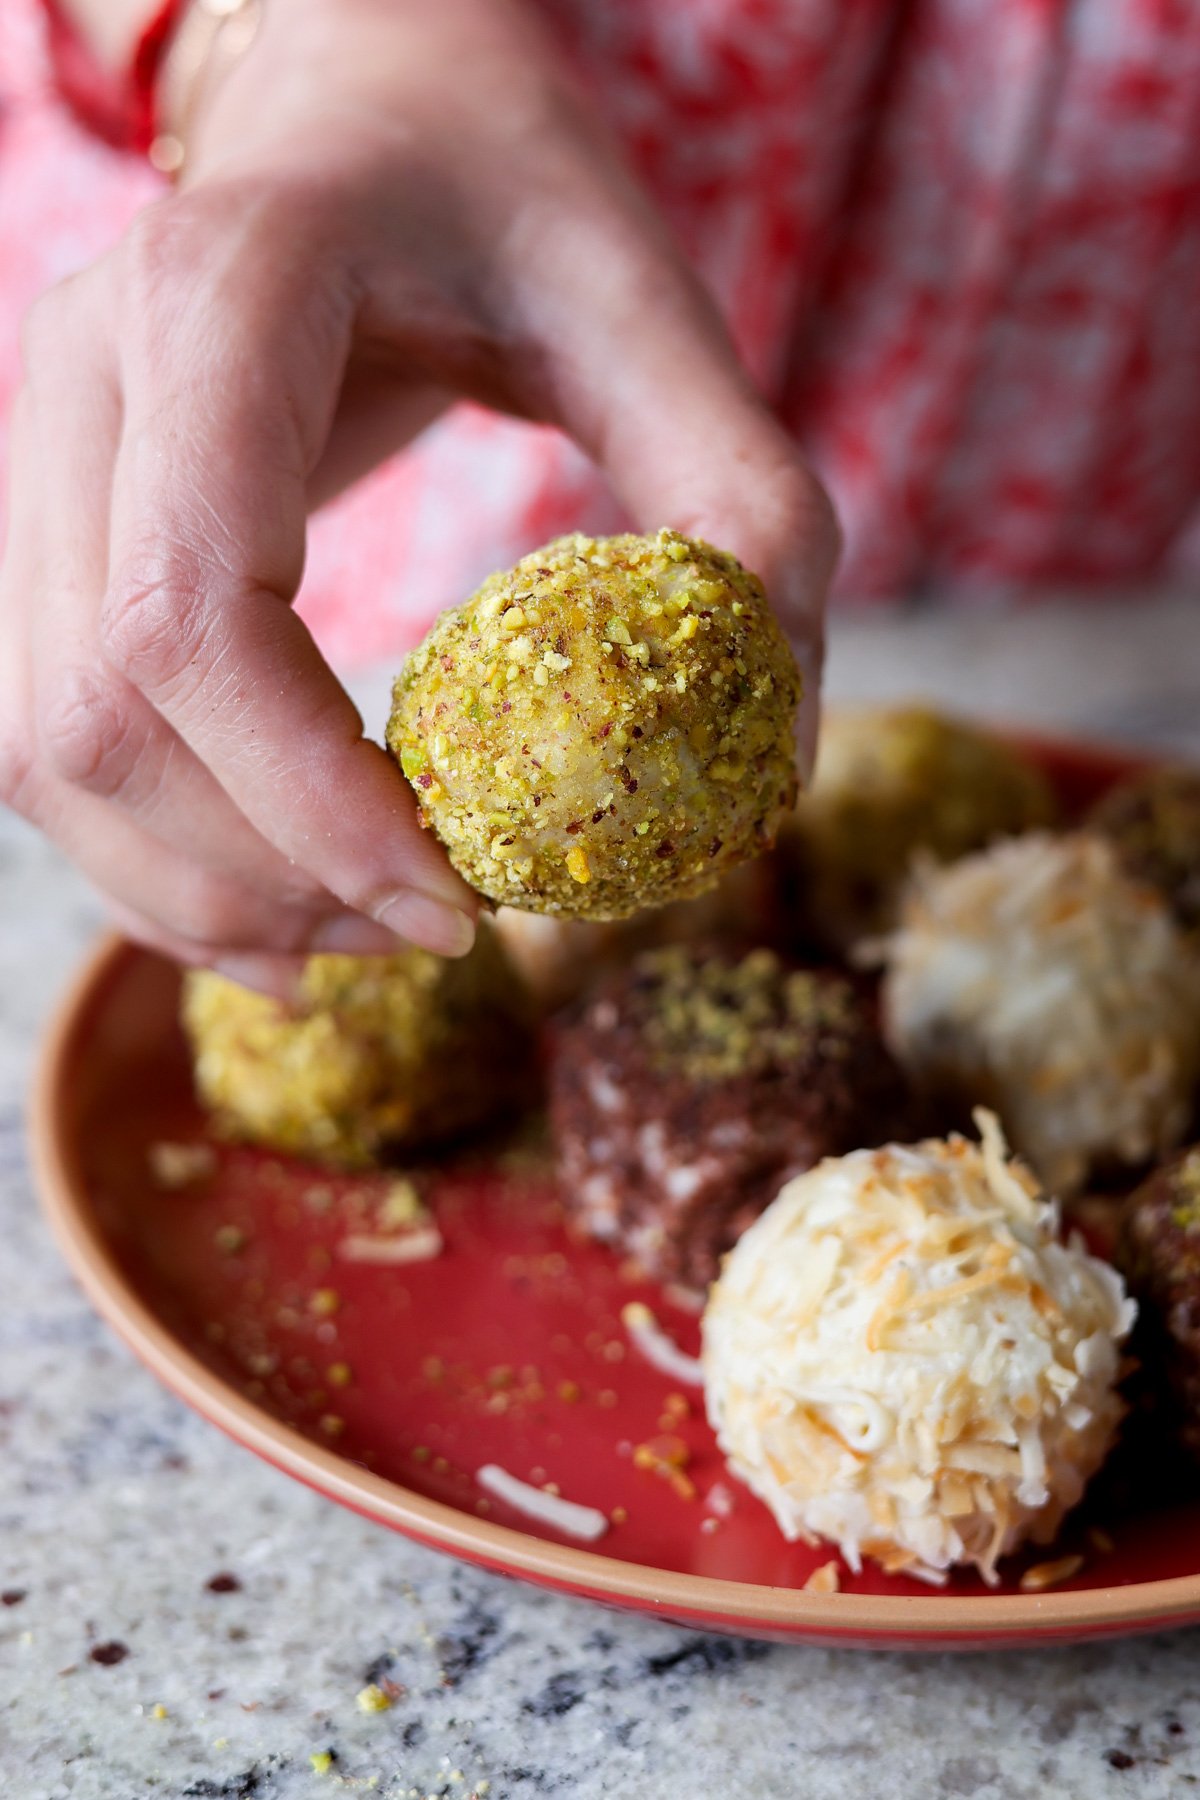
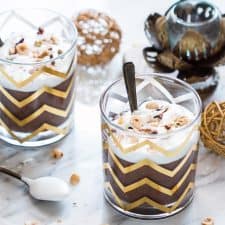
Creamy rich Indian rice pudding rolled into balls and coated in various toppings to make a perfect dessert that’s a hit at any dinner party. These kheer ladoos (rice pudding truffles) have an amazing texture and cardamom flavor! (gluten-free and soy-free)
These are an easy dessert for any festive season or for Diwali. I made this decadent rice pudding flavored with cardamom, which is basically Punjabi kheer.
Then, I mix it with some cashew cream, chill it, scoop it into balls, and roll them in different toppings like pistachios, cocoa powder, almond slivers, rose petals, melted chocolate, toasted coconut, or anything else you like.
Ladoo are basically Indian truffles, and these are flavored with cardamom for a simple yet delicious dessert.
You can change up the flavor with things like cinnamon or vanilla, and you can play around with toppings and mix-ins to make all kinds of delicious variations! For extra decadent rice pudding truffles, melt some chocolate with a little bit of coconut oil in a double boiler, then coat them in the melted chocolate.
Kheer ladoo are great to serve either as a snack or dessert. They don’t need extra bowls or spoons, and they’re already portioned. You can also make them ahead of time, so you won’t have as much cooking to do on the day of your dinner party.
Why You’ll Love Kheer Ladoo
creamy truffles scented with cardamom
easy, make-ahead dessert perfect for Diwali or any dinner party
versatile! Add mix-ins and toppings of choice to make these your own
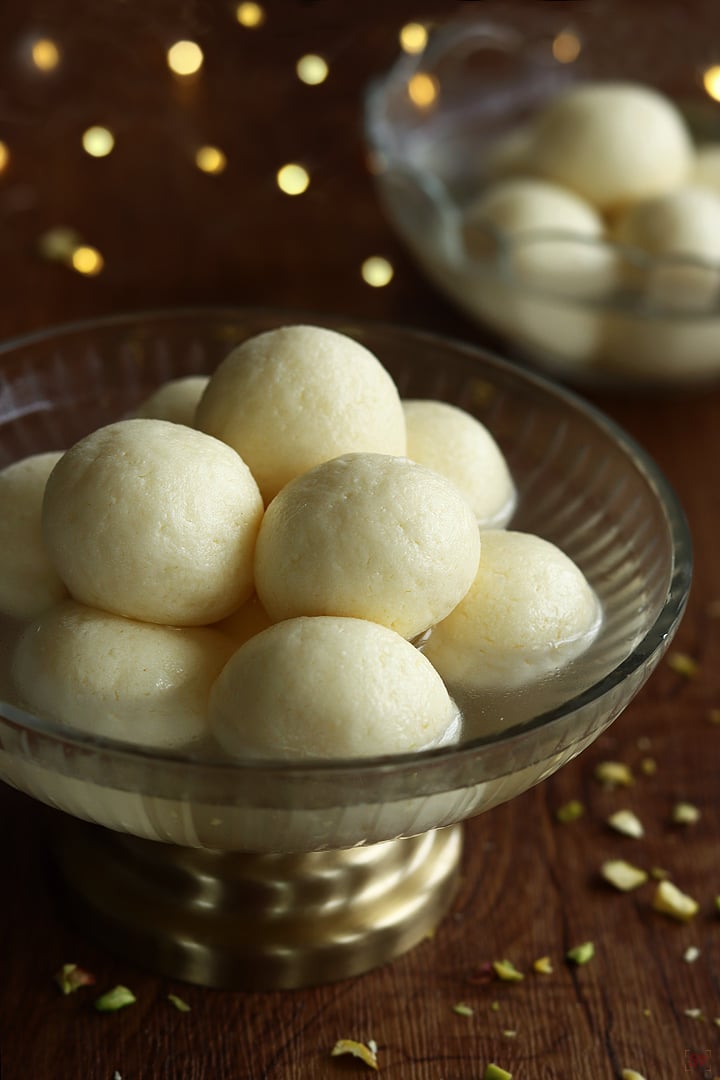
Rasgulla is a popular Indian sweet that is made for special occasions & Diwali across India but relished almost every other day after meal in Bengal. This recipe has a mild sweet taste, and when you bite, the juicy soft texture feels really nice. And yes making these rasgullas at home need some patience, but once you see them turning spongy in syrup, the effort feels worth it. Learn to make easy and perfect spongy rasgulla with the help of step by step pictures and video.
This sweet dish is often served after lunch or dinner as an after meal dessert. Unlike ghee loaded sweets, rasgulla never feels heavy, so even if stomach is already full, you can still enjoy one or two. It is made using very simple ingredients like milk, vinegar, sugar and cardamom.
[feast_advanced_jump_to]
About Rasgulla
RAsgulla literally means ' syrup filled balls'. Rasgulla is made by curdling milk then separating chenna(paneer or Indian cottage cheese). Then the separated chenna is kneaded and shaped into smooth balls which is cooked in sugar syrup till they turn light and spongy.
Rasgulla is one of the most loved sweets across India. These are soft when pressed, and fully soaked in sugar syrup inside. The syrup is thin, lightly sweet with cardamom or sometimes rose essence, giving a gentle flavor. That balance makes rasgulla different from heavy milk sweets and keeps it refreshing even after a full meal.
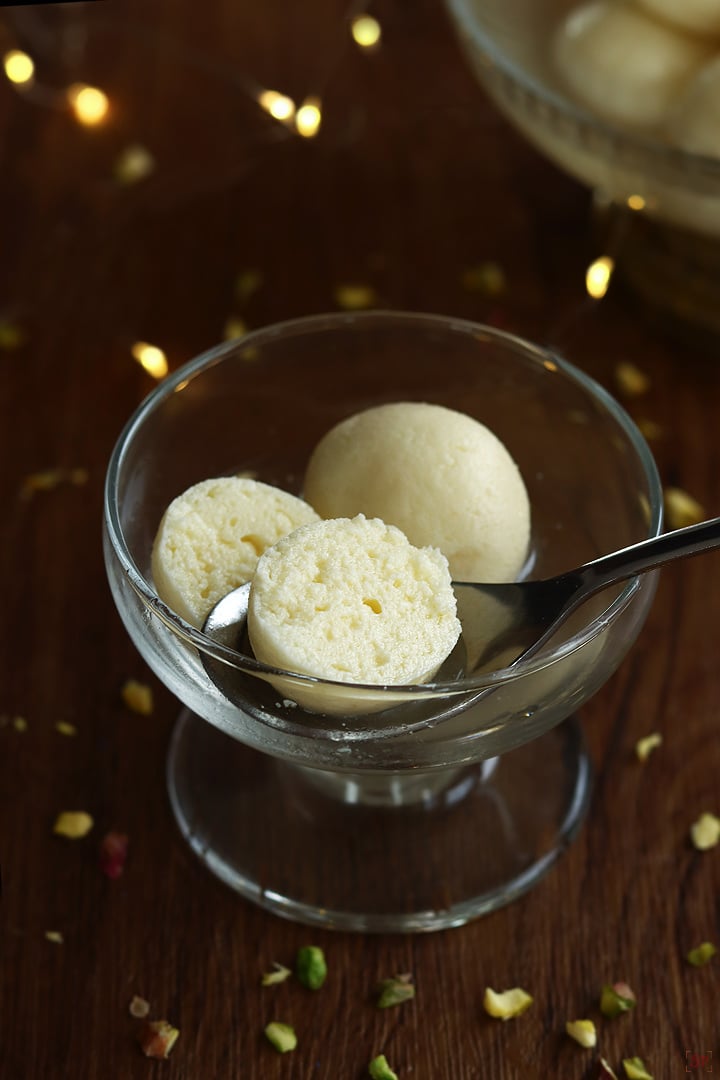
Each rasgulla soaks syrup fully, so every bite feels juicy but never sticky. The pure white round look also makes it very tempting to see, and many people serve it chilled which makes the taste even better. The only main care is making smooth chenna, because that decides how soft the rasgullas will come. Once chenna is perfect, rest is easy to handle.
There are many versions too. You can fill dry fruits inside, or use saffron or rose water in the syrup, and there is a famous version called chhena poda which is baked, it has a caramel taste. Each style has its own charm, but still this classic white rasgulla is the most loved.
I usually make rasgulla during festive days and sometimes even on weekends when we want a sweet. It is easy to serve, everyone at home enjoys. Mittu is fond of rasgulla and demands it during special occasions especially her birthday. Gugu loves rasmalai so make it with few of them just for him. I love rasmalai more than rasgulla but can easily gulp few rasgullas too.
Rasgulla Video
Rasgulla Ingredients
Milk - I have used full cream milk as it gives rich and soft chenna. I would recommend using only full fat milk or any thick milk. Traditionally buffalo milk is used.
Vinegar, water - Vinegar is mixed with water to curdle milk. This helps to make chenna soft and not rubbery.
Sugar - I have used white sugar for making syrup, it makes rasgulla sweet and juicy, you can also adjust sugar depending on your taste.
Cardamom powder - I just added 3 small cardamom. You can even add few drops rose essence if you like the flavor.
Why This Recipe Works
This recipe is simple with very few ingredients, so anyone can try at home.
The rasgullas turn soft and spongy if the tips are followed properly.
You can serve them chilled which makes it very refreshing after a meal.
This recipe works well for casual family after meal desserts.
You can just flavor the syrup in many ways, making it a versatile recipe.
1.To a sauce pan add 1 liter milk. Stir and boil for a minute. Switch off and let it rest for 2-3 minutes.
2.To a small bowl add 2 tablespoon vinegar, 2 tablespoon water, mix it well and set aside.
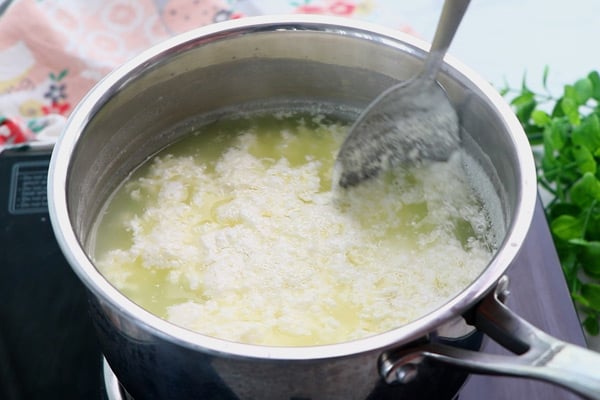
3.Now add vinegar water solution little by little and stir gently. Now the flame is off, this helps to slowly curdle milk and the resulting chenna is so soft.
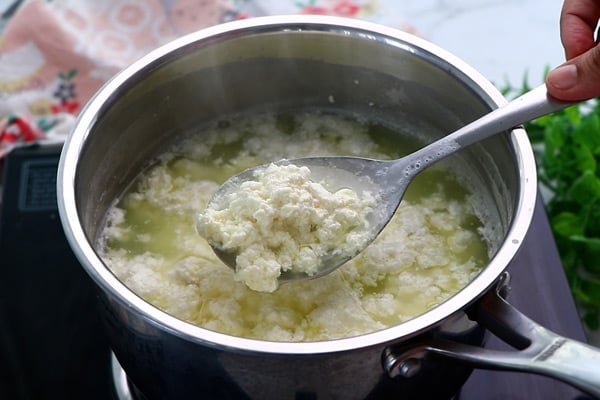
4.Now whey water(green liquid) and chenna(white solid) separates.
5.Now it is curdled completely. Switch off.
6.Transfer this to a cloth placed on a strainer. Keep a bowl underneath to collect the whey water. You can use this whey water for kneading chapathi dough or for curdling milk again.
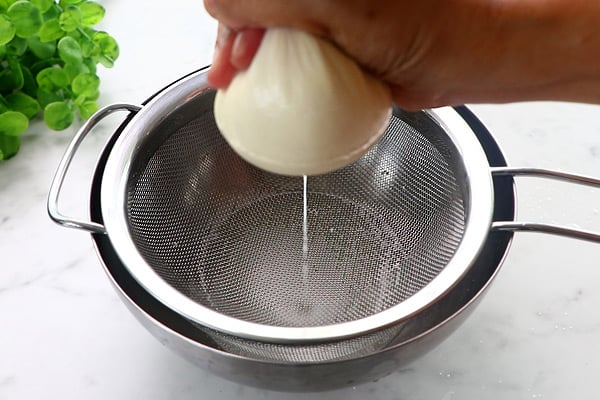
7.Rinse it with water well.
8.Squeeze excess water.
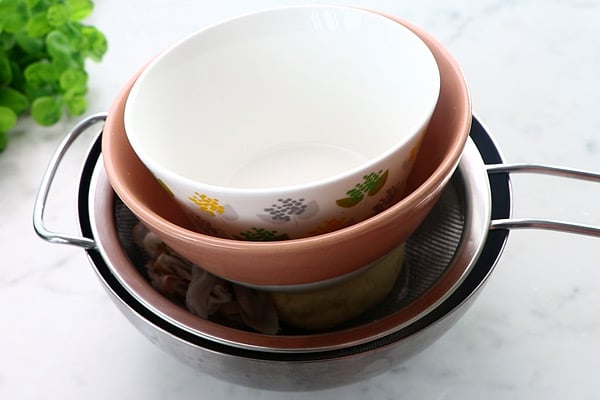
9.Roll and place it on the strainer. Keep 2 bowls on it. Do not keep heavy weight. Set aside for 10 minutes.
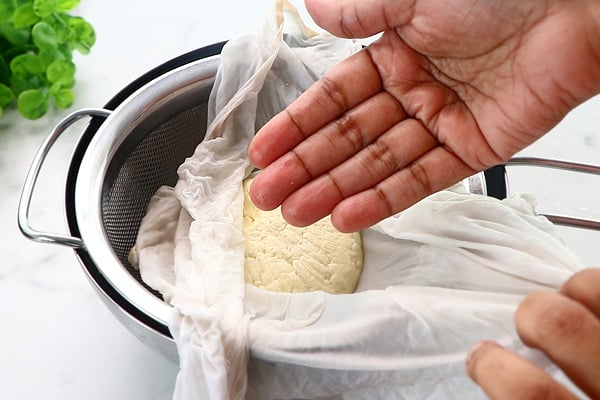
10.Now open, moisture should be still there slightly, it should not be dry.
11.Transfer the prepared chenna to a wide plate crumble it first.
12.Knead it well using your palm like shown.
13.Knead for 10 minutes or until the texture changes.
14.At one stage it will gather to a mass without sticking. Make a dough like this. Pinch a small portion.
15.Roll between your palms gently and smoothly.
16.It is ready, Repeat to finish.
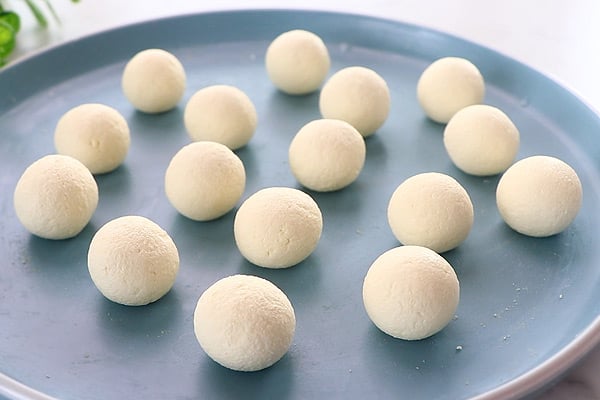
17.All the balls are made and ready!
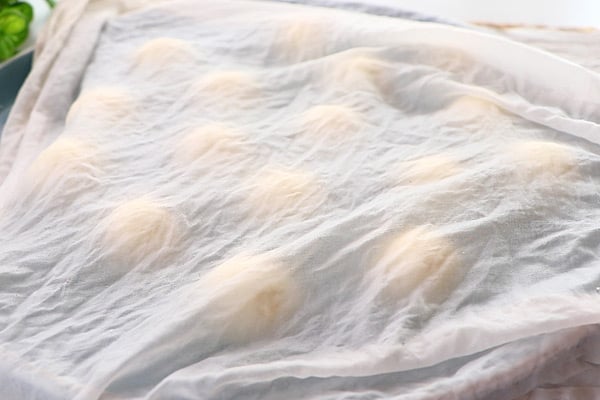
18.Cover it with a wet cloth to avoid drying.
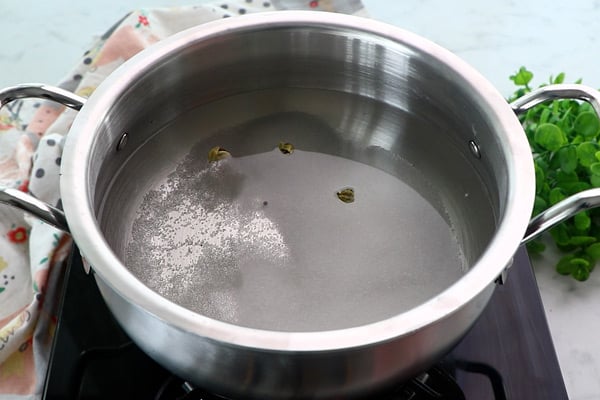
19.To a wide pot add 1 and ½ cups sugar along with 4 cups water and 3 small cardamom.
20.Stir until sugar dissolves completely. Let it boil for 5 minutes.
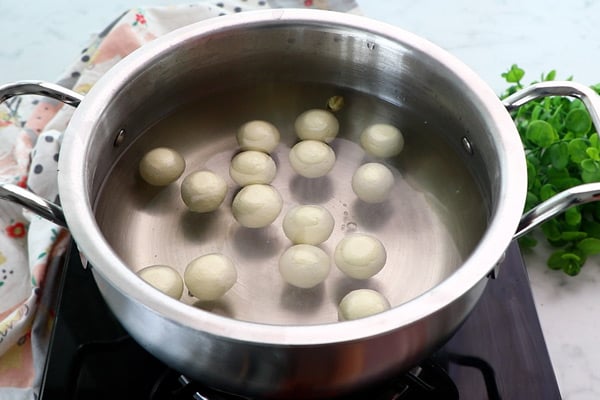
21.Give a quick mix. Add the prepared balls slowly.
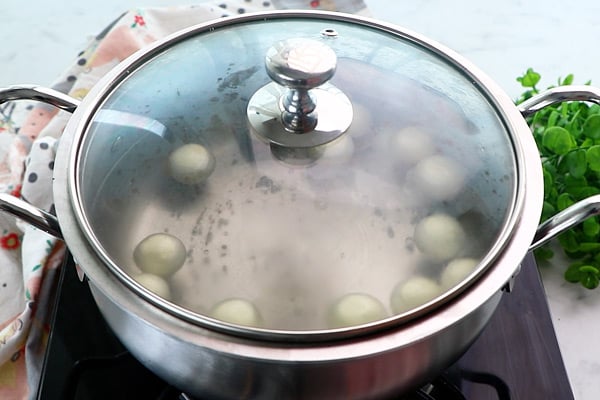
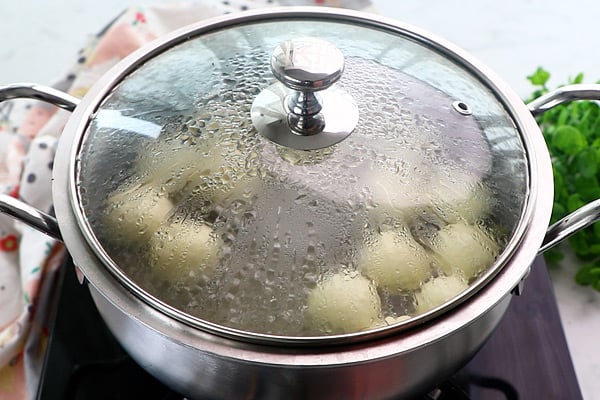
22.Cook covered in high heat for 10 minutes.
23.You can see through the glass that it is doubled in size.
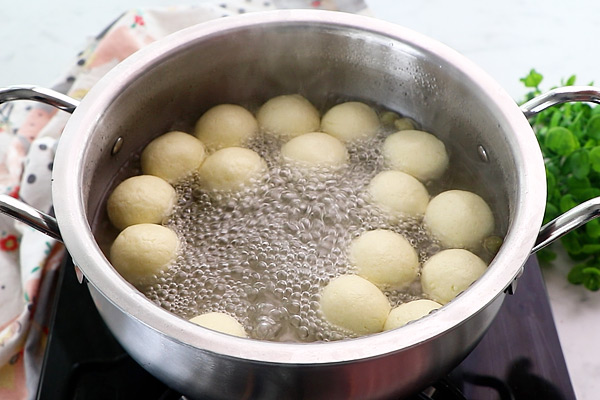
24.Now open slightly stir and cook covered in medium heat again for 5 minutes.
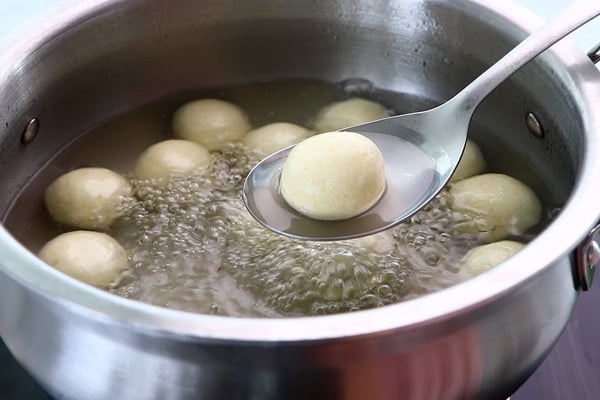
25.Rasgulla is ready!
Chill for minimum 30 minutes in fridge then serve!
Expert Tips
Vinegar solution - Vinegar when mixed with water is more concentrated and makes chenna soft.
Preparing chenna - Boil milk give a quick stir and switch off, let it rest for few minutes before adding vinegar solution. Add vinegar, water mixture little by little and stir gently.
Kneading - I usually knead for at least 7-10 minutes till dough becomes smooth, this is what make rasgullas smooth and crack free. Make sure you do not over knead then fat will get released.
Shapecarefully - The balls must be smooth without cracks, I roll them gently in my palm for uniform shape.
Sugar syrup - I always use wide vessel so balls have enough space to double in size, don't overcrowd else the shape would change.
Cooking time - Do not overcook as rasgullas may turn hard, I keep them covered on high flame for about 10 minutes then in medium heat for 3-5 minutes.
Chilling - Let rasgullas rest in syrup before serving, I usually chill them in fridge few hours for best taste.
Retain shape - You can dip the rasgullas in ice cubes with chilled water to retain its shape.
Serving and Storage
Serve rasgulla chilled straight from the fridge with some sugar syrup and garnish with pistachios. It also tastes nice when served plain without garnish. You can store leftovers in fridge for 3 to 4 days. Always keep them soak in sugar syrup, do not leave them dry as they will shrink.
FAQS
1.Can I add lemon juice?
Yes you can, but vinegar and water gives a more neutral flavor while lemon leaves a faint aftertaste even after rinsing.
2.What milk should we use to make Rasgulla?
Always use full fat or full cream milk for best results. You can use cows milk too but make sure it is thick. Always make sure to use only fresh milk. Traditionally buffalo milk is used.
3.How much time should we knead chenna?
It depends on the time and pressure applied while kneading. For me it took around 10 minutes to get the perfect texture. The dough should become pastey and soft making it easy to roll this is the perfect time to stop.
4.What is the consistency of sugar syrup?
Sugar syrup should be watery so no need to check for any consistencies. Just dissolve sugar, cook for 5 minutes then start adding the chenna balls.
5.How to check if rasgulla is cooked?
You can see the chenna balls will double in size after getting cooked. Cook covered for 10 minutes in high heat then give a light mix and cook covered again for 3-5 minutes.
6.Why is my rasgulla rubbery?
If you overcook then your rasgulla will turn rubbery. You cannot fix overcooked rasgulla so the only way is to use it for making rasmalai.
7.How long these last?
They stay good for about 3 to 4 days when stored in fridge with sugar syrup.
If you have any more questions about this Rasgulla Recipe do mail me at sharmispassions@gmail.com. In addition, follow me on Instagram, Facebook, Pinterest ,Youtube and Twitter .
Tried this Rasgulla Recipe? Do let me know how you liked it. Also tag us on Instagram @sharmispassions and hash tag it on #sharmispassions.
Rasgulla is a popular Indian sweet that is made for special occasions & Diwali across India but relished almost every other day after meal in Bengal. This recipe has a mild sweet taste, and when you bite, the juicy soft texture feels really nice. And yes making these rasgullas at home need some patience, but once you see them turning spongy in syrup, the effort feels worth it. Learn to make easy and perfect spongy rasgulla with the help of step by step pictures and video.
To a sauce pan add 1 liter milk. Stir and boil for a minute. Switch off and let it rest for 2-3 minutes.
To a small bowl add 2 tablespoon vinegar, 2 tablespoon water, mix it well and set aside.
Now add vinegar water solution little by little and stir gently. Now the flame is off, this helps to slowly curdle milk and the chenna is so soft.
Now whey water(green liquid) and chenna(white solid) separates.
Now it is curdled completely. Switch off.
Transfer this to a cloth placed on a strainer. Keep a bowl underneath to collect the whey water. You can use this for kneading chapathi dough or for curdling milk again.
Rinse it with water well.
Squeeze excess water.
Roll and place it on the strainer. Keep 2 bowls on it. Do not keep heavy weight. Set aside for 10 minutes.
Now open, moisture should be there, it should not be dry.
Transfer the prepared chenna to a wide plate crumble it first.
Knead it well using your palm like shown.
Knead for 10 minutes or until the texture changes.
At one stage it will gather to a mass without sticking. Make a dough like this. Pinch a small portion.
Roll between your palms gently and smoothly.
It is ready, Repeat to finish.
All the balls are made and ready!
Cover it with a wet cloth to avoid drying.
To a wide pot add 1.5 cups sugar along with 4 cups water, 3 cardamom.
Stir until sugar dissolves completely. Let it boil for 5 minutes.
Give a quick mix. Add the prepared balls slowly.
Cook covered in high heat for 10 minutes.
You can see through the glass it is doubled.
Now open slightly stir and cook covered in medium heat again for 5 minutes.
Rasgulla is ready!
Video
Notes
Vinegar solution - Vinegar when mixed with water is more concentrated and makes chenna soft.
Preparing chenna - Boil milk give a quick stir and switch off, let it rest for few minutes before adding vinegar solution. Add vinegar, water mixture little by little and stir gently.
Kneading - I usually knead for at least 7-10 minutes till dough becomes smooth, this is what make rasgullas smooth and crack free. Make sure you do not over knead then fat will get released.
Shapecarefully - The balls must be smooth without cracks, I roll them gently in my palm for uniform shape.
Sugar syrup - I always use wide vessel so balls have enough space to double in size, don't overcrowd else the shape would change.
Cooking time - Do not overcook as rasgullas may turn hard, I keep them covered on high flame for about 10 minutes then in medium heat for 3-5 minutes.
Chilling - Let rasgullas rest in syrup before serving, I usually chill them in fridge few hours for best taste.
Retain shape - You can dip the rasgullas in ice cubes with chilled water to retain its shape.
Looking for a show-stopper Indian dessert that's elegant for any celebration yet easy enough for a weeknight treat? These Motichoor Pistachio Pastry Bites, made with buttery Kawan parathas and a fragrant motichoor laddoo + nut filling are a playful Indian twist on baklava. Crisp, golden layers soak up a rose-scented syrup, creating a rich, aromatic […]
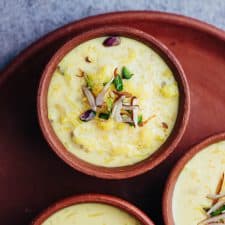
This is a showstopper fusion dessert that will WOW your guests! The classic Indian rabdi is reborn as a deconstructed cheesecake - tradition meeting indulgence. Made with creamy ricotta, this Rabdi Cheesecake is ready in just 30 minutes, yet will disappear in seconds when served! Rich with saffron, cardamom, and nuts, this instant Rabdi Cheesecake […]
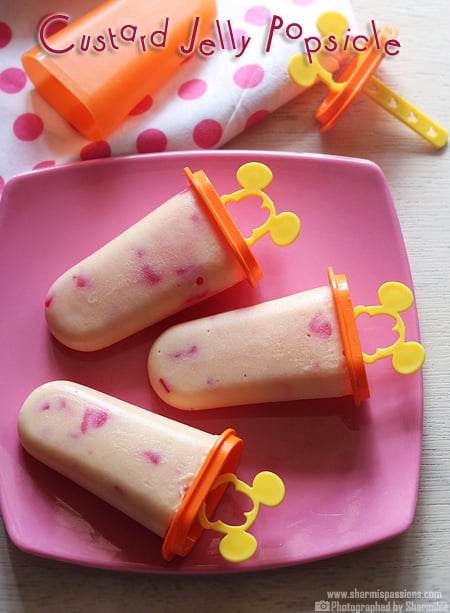
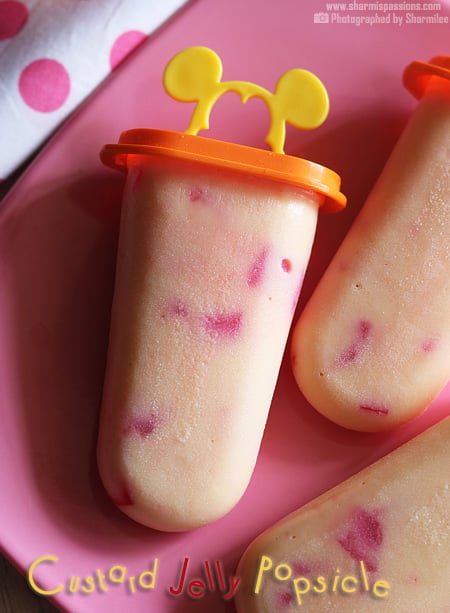
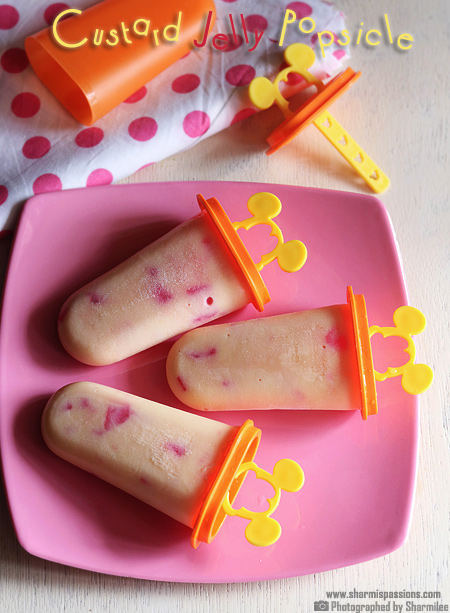
Jelly Custard Popsicles is a colorful dessert perfect for hot summer day. It is made using custard mixed with jelly cubes and frozen in molds till it sets like creamy bars. Each bite has a mix of soft custard and chewy jelly which kids and even elders love. It's easy to make even when you are in hurry and craving something sweet.
It looks fancy but is actually very simple to make. You just need some milk, custard powder, sugar and jelly. This recipe becomes a perfect treat after meal or evening time Just freezing take time. You don't need any ice-cream maker for this recipe, just simple ingredients.
[feast_advanced_jump_to]
About Jelly Custard Popsicles
Jelly Custard Popsicles is a unique twist from regular ice creams or plain popsicles. It is creamy, and has a nice mix of texture. The base is vanilla custard which gives a rich taste, while the jelly cubes add light chewiness and color in every bite. Kids loves watching the colors swirl inside and its so fun to eat.
This recipe is very flexible, you can use any flavor of jelly you like - rose, strawberry or pineapple all taste great. It is a great way to use leftover jelly too. The best part is it does not need any fancy ingredients or equipment. Just mix, freeze and enjoy. I add it with small fruit pieces too, which makes it more tastier.
You can also make them ahead and keep in freezer for small parties or family get-together. They stay fresh and tasty for many days. Also kids enjoys picking their favorite jelly colors and helping to pour the mixture into molds too. It's a simple way to involve kids in cooking without much mess.
I often make this when I want something cold and quick without any heavy effort. The look itself is so pretty with those bright jelly cubes peeping through the creamy custard. Even adults can't resist having more than one in a go.
Jelly Custard Popsicles Ingredients
Milk - I add full cream milk for rich taste and creamy texture. You can also use toned milks.
Custard Powder - I used this as main thickener and gives that soft creamy texture. I like vanilla flavor, but you can try mango or butterscotch also.
Sugar - This add sweetness and it balances the mild taste of custard. You can add more or less on it how you want.
Jelly - I just added rose jelly cubes, it gives a pretty color and fruity taste. You can use any flavor like strawberry or orange or even mix few.
Cardamom Powder - Optional, but it gives mild aroma that goes well with custard flavor. I add only little sometimes.
Water - Needed for making jelly. You can follow as per jelly packet instruction.
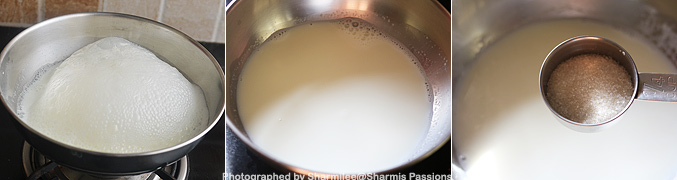
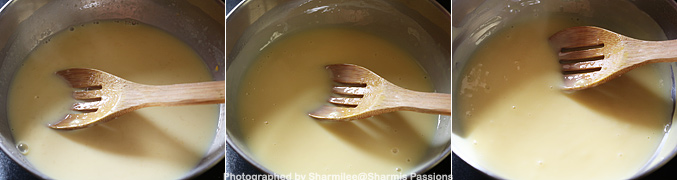
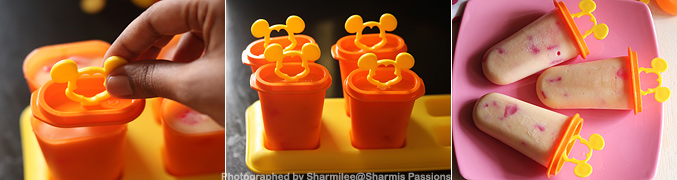
1.Boil milk(reserve a tablespoon of milk) for 5 minutes until its bubbles up nicely. Simmer and then add sugar. Mix well.
2.To a tablespoon of milk add custard powder, mix well to form a runny paste without any lumps. Add this to simmering milk.
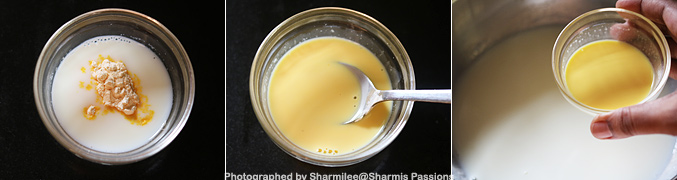
3.Keep cooking ,slowly it will get thick.
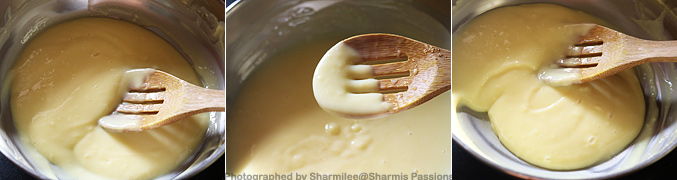
4.Cook in low flame and keep mixing so that there are no lumps. At one stage the custard will nicely form a thick coating, it will coat the ladle like this, it should be thick as shown below. At this stage, switch off and cool down completely.
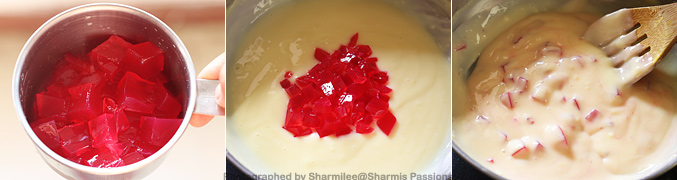
5.Now take your jelly cubes and add it to the custard mixture. Mix gently.
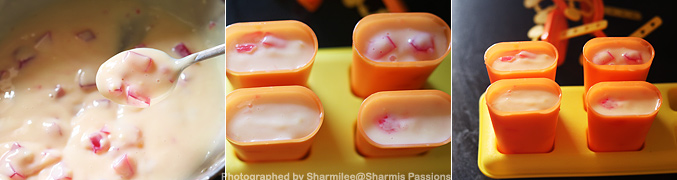
6.Spoon the mixture into your favorite popsicle mold till ¾th.
7.Close with lids and freeze at least for 6-8 hours. I freeze it over night. Then carefully show the bottom part in running tap water, set aside undisturbed for at least 2-3 minutes then slowly pull out the lid.
Serve immediately.
Expert Tips
Custard - I usually cook it till slightly thick but still pourable. Once it cools down, it becomes thicker, so don't overcook.
Mixing jelly - Always cool the custard completely before adding jelly cubes, else jelly will start melting. I made that mistake once.
Sweetness - I always taste the custard before freezing because after freezing sweetness reduces little bit. You can add little more sugar if needed.
Unmolding - When removing, I dip the bottom part of mold in water for few seconds and wait before pulling out. It comes out clean and neat.
Flavor idea - You can try different jelly flavors for colorful look. Mango with rose or pineapple with orange works really good.
Serving and Storage
Serve Jelly Custard Popsicles chilled straight from freezer. You can sprinkle few chopped nuts on top while serving to make it look rich. It tastes best when eaten soon after unmolding as it melts slightly fast. If making ahead, keep it covered tightly and freeze up to 2 days.
FAQS
1.Can I use readymade custard?
Yes, you can use instant custard mix too, just make sure it is thick enough before adding jelly.
2.Can I skip jelly?
You can skip but then it will be just custard popsicle. Jelly adds nice color and taste.
3.Can I make this without mold?
Yes you can pour in small cups and insert ice cream stick after half set, works same way.
4.Which jelly flavor suits best?
I feel rose, strawberry and pineapple are my top picks. You can try any based on what you like.
5.How long it takes to freeze?
Minimum 6 to 8 hours needed to get firm popsicles. I usually freeze overnight for best result.
If you have any more questions about this Jelly Custard Popsicles Recipe do mail me at sharmispassions@gmail.com. In addition, follow me on Instagram, Facebook, Pinterest, Youtube and Twitter .
Tried this Jelly Custard Popsicles Recipe? Do let me know how you liked it. Also tag us on Instagram @sharmispassions and hash tag it on #sharmispassions.
Jelly Custard Popsicles is a colorful dessert perfect for hot summer day. It is made using custard mixed with jelly cubes and frozen in molds till it sets like creamy bars. Each bite has a mix of soft custard and chewy jelly which kids and even elders love. It's easy to make even when you are in hurry and craving something sweet.
Boil milk (reserve a tablespoon of milk) for 5 minutes until its bubbles up nicely. Simmer and then add sugar. Mix well.
To a tablespoon of milk add custard powder, mix well to form a runny paste without any lumps. Add this to simmering milk.
Keep cooking, slowly it will get thick.
Cook in low flame and keep mixing so that there are no lumps. At one stage the custard will nicely form a thick coating. At this stage, switch off and cool down completely.
Now take your jelly cubes and add it to the custard mixture. Mix gently.
Spoon the mixture into your favorite popsicle mold till ¾th.
Close with lids and freeze at least for 6-8 hours. I freeze it overnight.
Then carefully show the bottom part in running tap water, set aside undisturbed for at least 2-3mins then slowly pull out the lid.
Serve Jelly Custard Popsicles immediately.
Notes
Custard - I usually cook it till slightly thick but still pourable. Once it cools down, it becomes thicker, so don't overcook.
Mixing jelly - Always cool the custard completely before adding jelly cubes, else jelly will start melting. I made that mistake once.
Sweetness - I always taste the custard before freezing because after freezing sweetness reduces little bit. You can add little more sugar if needed.
Unmolding - When removing, I dip the bottom part of mold in water for few seconds and wait before pulling out. It comes out clean and neat.
Flavor idea - You can try different jelly flavors for colorful look. Mango with rose or pineapple with orange works really good.
This Eggless Marble Cake recipe is the simplest way to get bakery type results at home, even if you don’t have a microwave or oven!
Who says you need an oven to bake a great cake? This eggless marble cake proves you don’t. It’s soft, chocolatey, and comes together right on your stovetop! It’s one of those recipes that look complicated, but are actually surprisingly easy. The mix of vanilla and cocoa gives it that classic “bakery” flavour, and those marbled swirls make it look festive and super tempting! Trust me, once you try this version, you’ll make it again (and again).
Maida (All-purpose flour): This is for the base of the cake, to keep it soft and light. Sift it once to avoid lumps.
Sugar powder: For sweetness. Powdered sugar mixes better than granulated.
Baking powder & salt: Your rise-and-balance duo. Baking powder makes it fluffy, and salt brings out the flavours.
Oil: Keeps the cake moist without making it heavy. Any neutral oil like sunflower or vegetable oil works fine.
Curds (Yogurt): Adds moisture and gives a soft crumb. Use fresh, slightly thick curd — not sour.
Vanilla essence: Adds that classic bakery aroma and balances the cocoa flavour.
Milk: Helps get the right batter consistency. Add gradually to avoid making it runny.
Cocoa powder: Brings in the chocolate swirl and that rich marble effect — use good-quality unsweetened cocoa.
Table salt (for baking): Used to create an even heat base in the kadai instead of using an oven.
Richa’s Top Tips
Preheat the kadai properly: The salt base needs to be evenly hot before placing the cups in. Preheat for at least 10 minutes (5 on medium, 5 on low) so the cakes cook evenly and rise well.
Use the right-sized cups: Small steel or aluminum cups work best. Avoid glass or ceramic as they retain heat unevenly on the stovetop.
Don’t overmix the batter: Mix only until everything is combined. Overmixing makes the cake dense and heavy instead of soft and airy.
Make clean swirls: When marbling, use a toothpick to gently swirl the chocolate and vanilla batters together. Don’t overdo it or you’ll lose the beautiful pattern.
Cool completely before unmoulding: Let the cakes rest for 10–15 minutes before removing them from the cups. This helps them firm up and release cleanly without breaking.
Frequently Asked Questions
What makes this marble cake eggless?
It uses curd (yogurt) and oil instead of eggs. The curd adds moisture, and the oil keeps the texture soft and light. You won’t even notice there are no eggs in it!
Why do we bake this cake in a kadai with salt?
The salt helps spread the heat evenly inside the pan. It works just like an oven and keeps the bottom of the cake from burning.
My cake didn’t rise much. What could be the reason?
That usually happens if your baking powder is old or if you mixed the batter too much. Always check the expiry date and mix gently once the wet and dry ingredients are combined.
Can I bake this in an oven instead?
Yes, you can. Preheat your oven to 170°C and bake for about 25 minutes, or until a toothpick comes out clean. The texture stays soft and just as delicious.
Storage Tips
Room Temperature: If you’re planning to eat the cakes the same day, keep them covered at room temperature for up to 12 hours.
Fridge: Store the marble cakes in an airtight container in the refrigerator for up to 3 days. Bring them to room temperature or warm slightly before eating.
Freezer: You can freeze the cakes for up to 1 month. Wrap each mini cake tightly in cling film and store them in a freezer-safe box.
Reheating: Warm in the microwave for 10–15 seconds or steam briefly to bring back the softness. Avoid overheating, as that can dry the cake out.
Serving Ideas
These mini marble cakes are perfect for almost any occasion, from evening chai sessions to last-minute dessert cravings. Here are a few ways to make the most of them:
With Chai or Coffee: A slice (or two) goes beautifully with your evening tea or a cozy cup of coffee.
Topped with Chocolate Sauce: Pour some warm ganache or chocolate syrup over the cake for that café-style indulgence.
With Ice Cream: Serve slightly warm with a scoop of vanilla or chocolate ice cream for a quick, satisfying dessert.
For Festive Gatherings: Add them to your Diwali dessert table for a homemade touch.
With Whipped Cream and Berries: Top the cake with whipped cream and fresh strawberries or blueberries for something light and pretty.
Customisation Ideas
Add a coffee twist by mixing a teaspoon of instant coffee into the chocolate batter for a mocha flavor.
Use jaggery powder instead of sugar if you prefer a deeper, caramel-like sweetness.
Stir in chopped nuts or choco chips to make every bite more fun and textured.
Add orange zest to the vanilla batter for a fresh, citrusy lift.
Make it festive by topping with a drizzle of melted chocolate or a dusting of powdered sugar once cooled.
This eggless marble cake is proof that baking can be easy, even without an oven. It’s soft, swirly, and the kind of treat that disappears way too fast. Try it once and you’ll probably find yourself making it again just because it’s that simple.
If you do, tag me on Instagram @my_foodstory so I can see your stovetop masterpieces!
Take maida, sugar powder, baking powder, ⅛ teaspoon salt in a bowl & give a quick mix to combine all the ingredients. Add oil, curds, vanilla essence, ¼ cup of milk and mix to make a smooth batter.
½ cup maida, ¼ cup powdered sugar, ¾ teaspoon baking powder, ⅛ teaspoon salt, ⅛ cup oil, 1 ½ tablespoons curds, 1-2 drops vanilla essence, ¼ cup + 2 tablespoons milk
Divide the batter into 2 bowls. Add cocoa to 1 of the bowls with ½ – 1 tablespoon of milk and give a good mix.
Take a large, thick bottomed kadai or pan, add 1 ¼ cups of salt, spread to cover the kadai base well. Place a trivet on the salt and close the lid. Heat the kadai on medium for 5 minutes & on low for 5 more minutes for preheating the kadai.
1 ¼ cups table salt
Grease the cups well with oil and pour the batter as shown in the video. Make a marble pattern with the toothpick.
Place the cups on the trivet, close the lid and bake on low for 25-30 minutes or till the toothpick inserted in the cake comes out clean to indicate the cakes are baked.
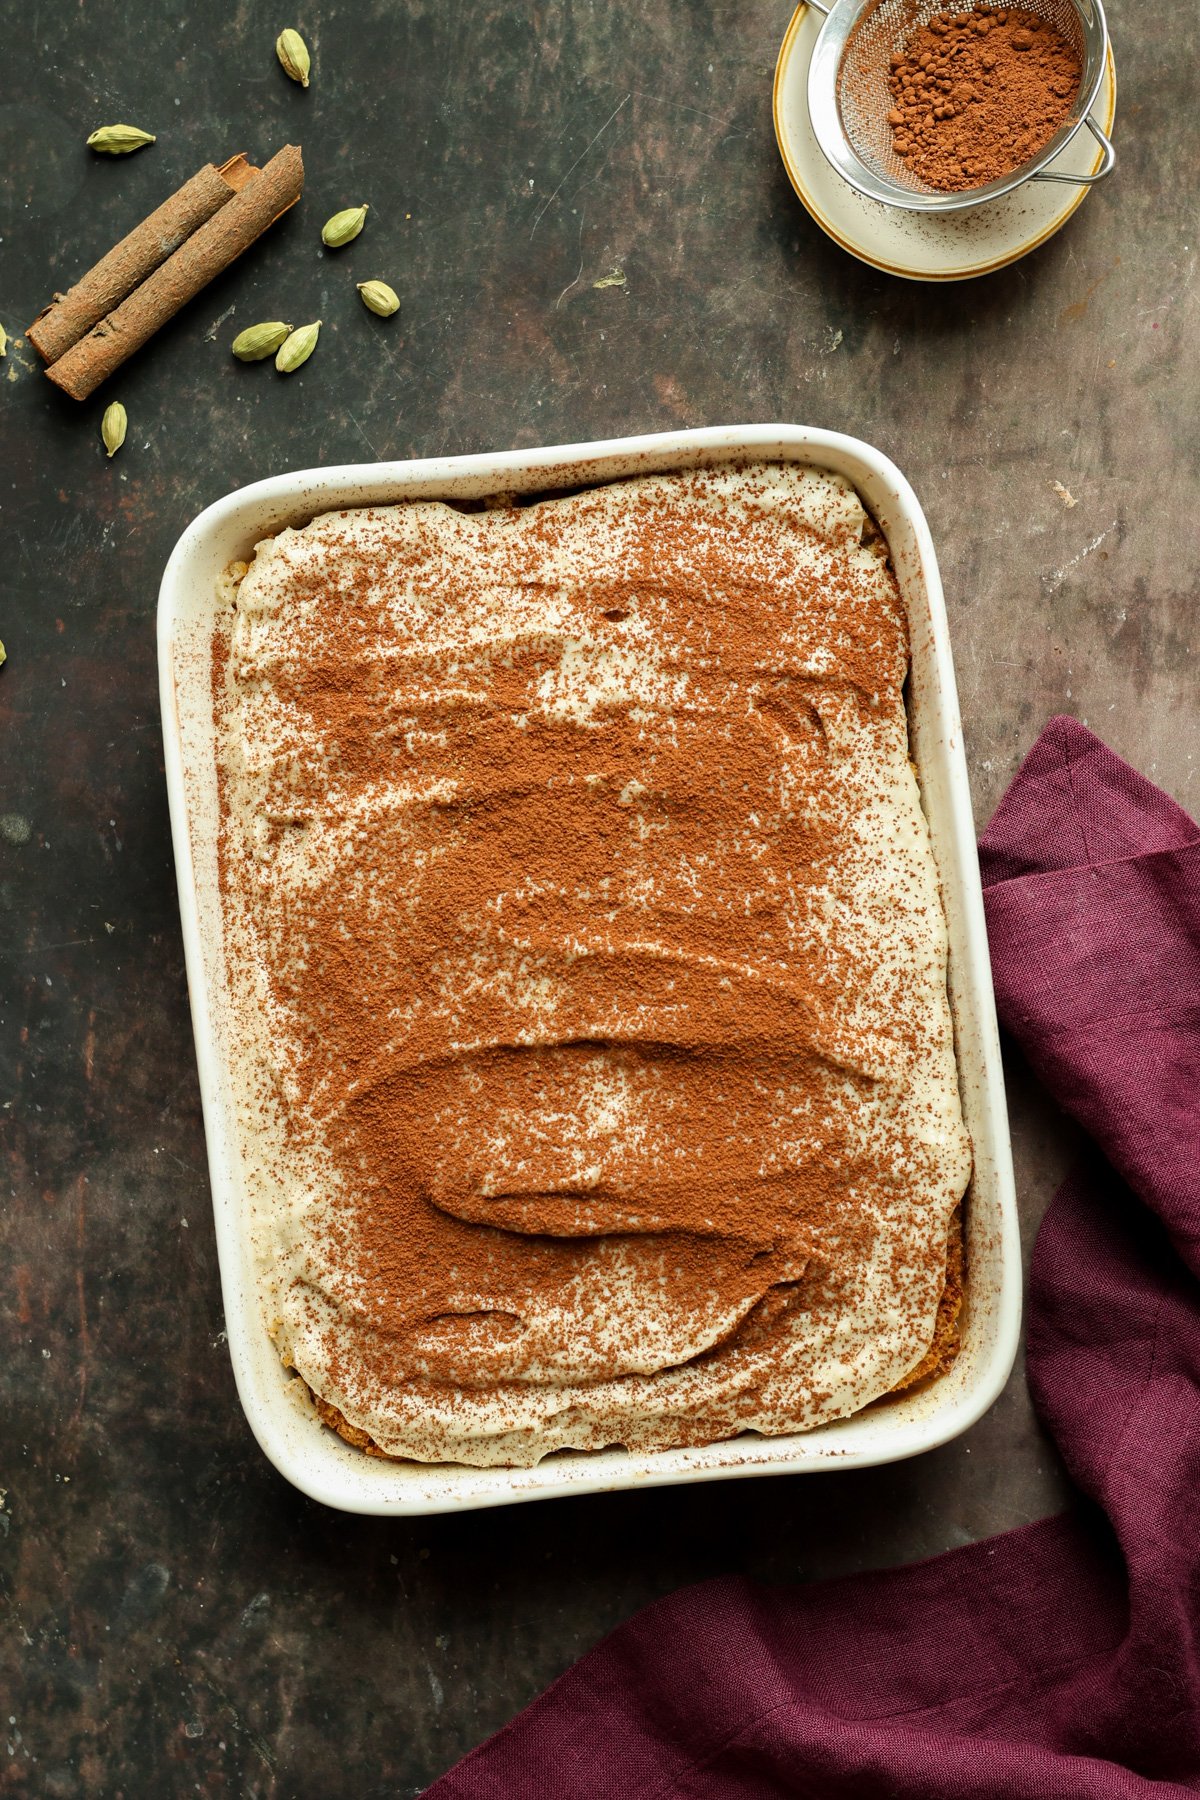
Chai tiramisu cake has a delicious, moist, chai-infused cake with layers of cardamom cream dusted with a cocoa-chai topping. It is an absolutely fabulous fusion dessert perfect for Diwali or any special occasion! (soy-free with gluten-free or nut-free option)
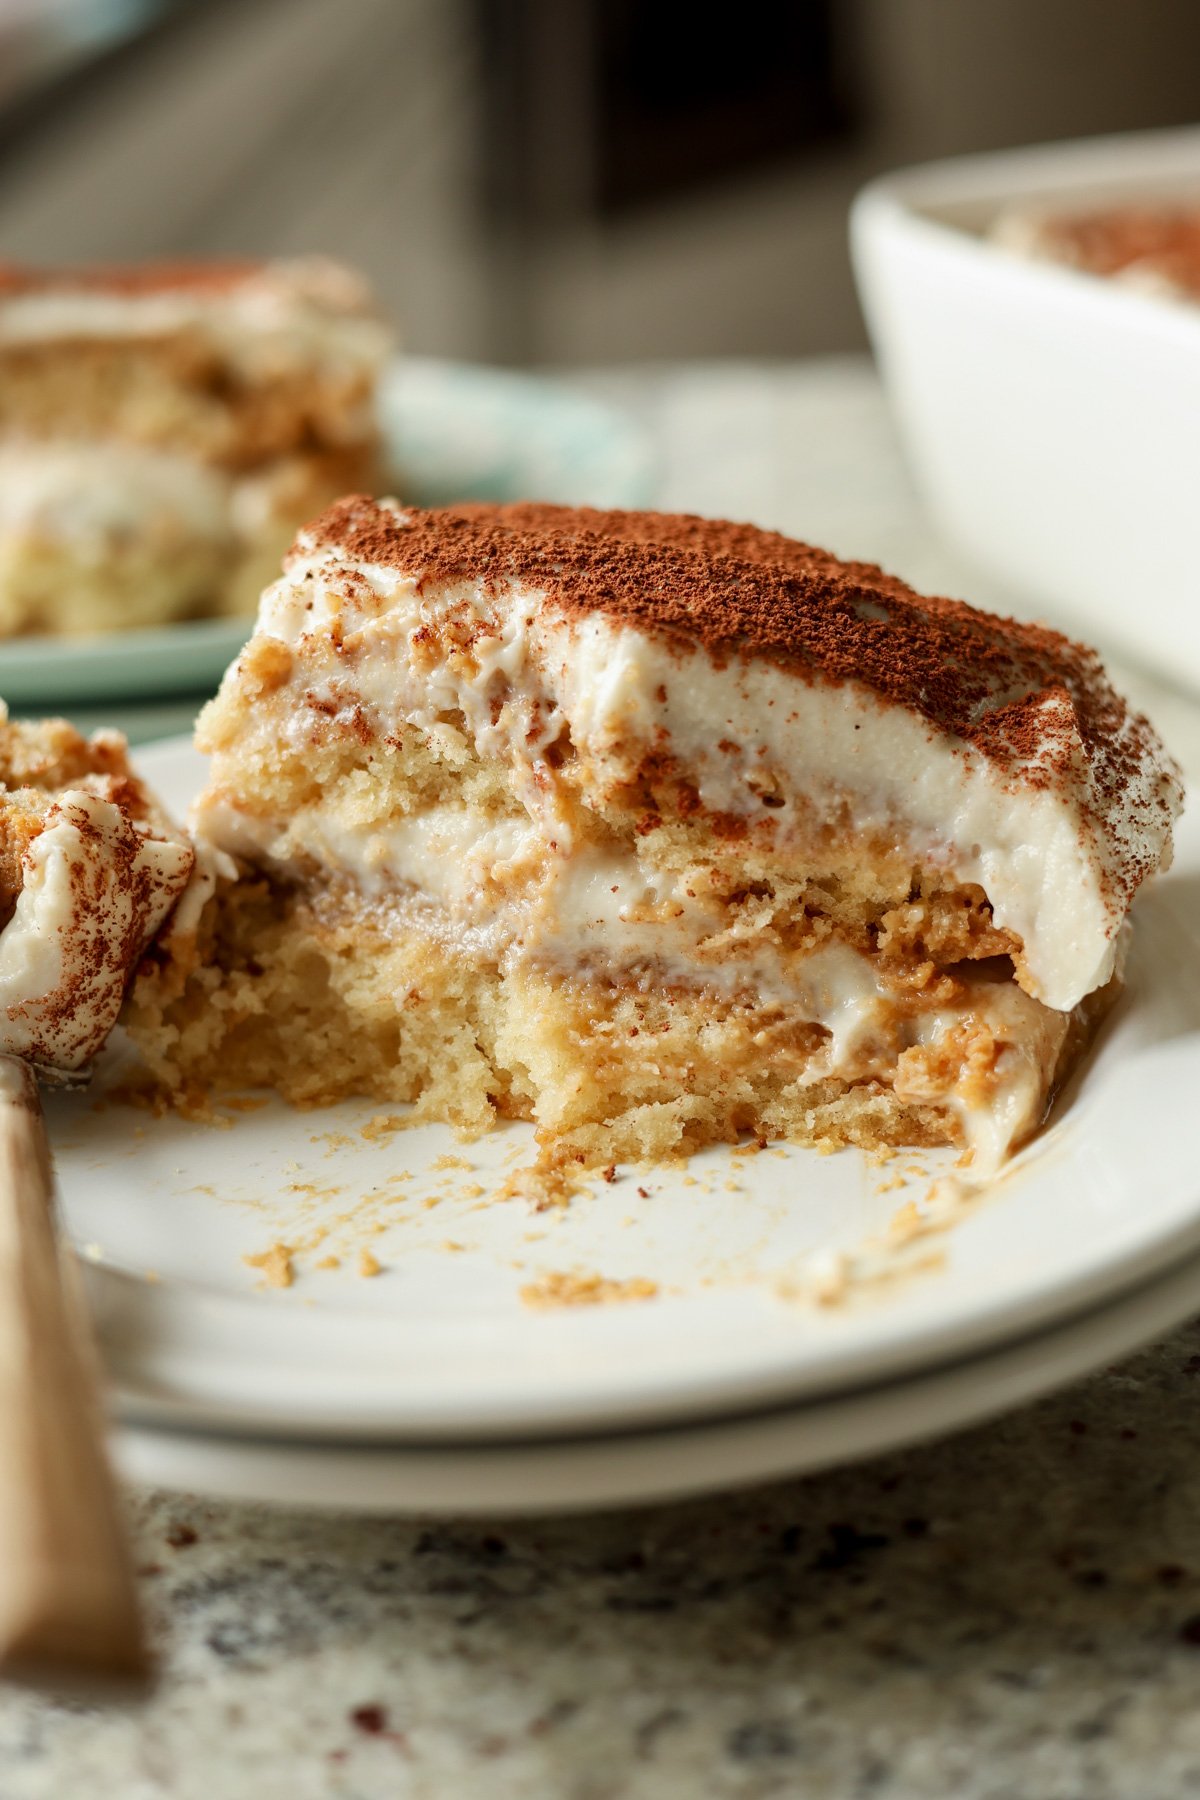
We’re actually making a super quick cake for this chai tiramisu, instead of using ladyfingers. The rich, creamy textures of the cake and cardamom cream give you the decadence of tiramisu without any eggs or dairy needed.
You can make this with vegan ladyfingers, if you can find those, or you can use vegan cake rusks. Cake rusks are like plain biscotti available in Indian stores, and they work well as a substitute for ladyfingers. Just soak them in the chai, and use them for layering. Or, you can make this simple cake with just a few ingredients.
I heard you about wanting a cake that used a cream topping that didn’t need a freezer to set. The cardamom cream for this chai tiramisu cake sets up thick and spreadable at room temperature, no freezer needed.
Whether you make the cake from scratch or use one of the substitutions, this incredibly delicious chai tiramisu is a hit at any dinner party. It also freezes well, so you can make it ahead. Just thaw it overnight in the fridge.
Why You’ll Love Chai Tiramisu
quick, easy, moist, delicious cake soaked in flavorful milk chai
rich, decadent cardamom cream that sets up with no freezer needed
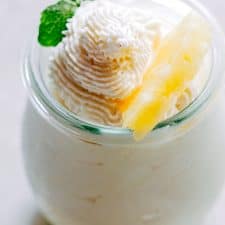
Make refreshing Meetha Paan Shots in just 15 minutes. This exotic, chilled betel-leaf dessert drink is a delightful after-meal treat that doubles as a palate cleanser. Blending the floral sweetness of gulkand, the minty zing of green betel leaves, and creamy richness (milk and ice cream), this easy recipe brings authentic paan shots right into […]
If you are looking for unique Diwali Sweets Recipes this season, here are 45 dishes for you to choose from! From traditional Diwali mithais to fusion Indian desserts, this list has something for every mood and vibe 🪔
A special Diwali party means super special desserts. In fact, I’m thinking of a fabulous dessert table where you have a variety of desserts for guests to choose from – panna cotta, Indian mithais, cakes, cheesecakes etc.
And that’s exactly why I’ve put together this list. Most of these desserts are really easy to make, have flavours that aren’t common but still familiar and they look stunning on the table. Diwali sweets don’t have to be the same old anymore. Give them a unique twist this year for a more fun Diwali!
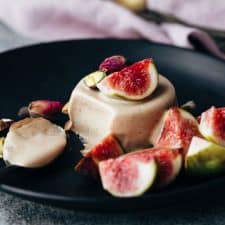
Masala Chai Panna Cotta will be the perfect finish to a holiday dinner. Flavored with chai tea, whole spices like cinnamon, cloves, nutmeg and vanilla, its rich, creamy and really elegant. Make it for thanksgiving, Christmas, or even Diwali – this dessert leave your guests asking for seconds.
Super easy recipe for a festive chocolate rice kheer pudding made without condensed milk but still really creamy. Perfect for your Diwali dessert table or any other Indian festival. Actually you won’t need a reason to make this one!
Healthy quinoa apple kheer is a low calorie Indian festival dessert, full of fiber and nutrition and a perfect way to celebrate Diwali or Dussehra with your family!
An Indian fusion dessert that combines the gooey textures of tres leches cake and our favorite Indian mithai rasmalai – this is a dessert you need to try at least once!
This Rasmalai Sandwich is the crunchy, crispy, and healthy version of the Bengali rasmalai. This is a really simple recipe that comes together with just pantry staples and tastes like a party in your mouth ✨
Fresh and zesty meets the sweetness of milky pudding in this Orange Makhana Pudding. A super simple Diwali dessert that's sweet, creamy and citrus-y and looks gorgeous on the table!
This Saffron Milk Pudding Bites has a fun creamy, jelly-like texture and a warm, cosy flavor. It's an easy-peasy mithai that smells and tastes of Diwali 🪔
This rose kacha golla is a super moist and delicious variant of the popular Bengali sweet, sandesh. It's floral notes and melt-in-mouth texture will make this your favorite Diwali mithai ✨
A delicious winter dessert where seasonal red carrots are simmered in milk and sugar till they turn into a fudgy consistency. Also called carrot pudding, it’s even more amazing when served with vanilla ice cream.
Here's the short and sweet way to make delicious Instant Rabdi! I’m showing you how to cut the time to make rabri in half with some paneer and condensed milk.
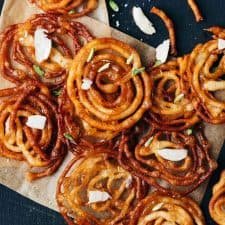
Thin and crispy jalebis are everyone’s undoing. Make them at home now with easy step by step instructions that’ll give you the best homemade jalebis every single time. Perfect for festivals like Diwali and Holi when you want a feast that doesn’t take ages to make.
Coconut Barfi is one of the easiest Indian desserts that only need 5 ingredients and 30 minutes. Who would've thought making mithai at home would be so easy!
This easy rice kheer or chawal ki kheer is probably the most popular Indian dessert there is. Made with long grained basmati rice and sweetened with condensed milk, it’s simple enough that you can make it often, and elegant enough to serve to guests!
Puran Poli is a sweet, stuffed flatbread thats popular all over India. The key is to make a very soft dough so that the final parathas are really soft and pliable.
Creamy, fruity, tropical, and loaded with texture, this mango sago is THE ultimate summer dessert. The best part? It's insanely easy to make and calls for minimal ingredients!
A sweet treat that's actually good for you – this healthy chocobar ice cream is creamy, nutty, chocolate-y, and made with the most clean, wholesome ingredients!
This classic vanilla panna cotta recipe is an elegant and easy dessert. Most people think panna cotta will have a lengthy process because the results are so amazing, but this needs five simple ingredients and twenty minutes to put together. Make sure to use the best quality gelatin for great results.
Cassata is so easy to make at home. I'm showing you to make it, customize it and add a layer of cheesecake because cheesecake makes everything better! This is better than store bought cassata ice cream and you won't believe how easy it is.
Easy eggless pineapple mousse is a delicious, make ahead dessert that will be a crowd pleaser! With minimum prep, these pineapple mousse cups are ready in minutes and have a gorgeous creamy texture.
5 Ingredient White and Dark Chocolate Rose Pistachio Bark
White and Dark Chocolate Rose Pistachio Bark looks beautiful and complicated but takes a total of 5 ingredients, 20 minutes and 5 steps to make. Also perfect for homemade gifting!
Self saucing eggless chocolate pudding cake has a crinkly top, a moist cakey texture and a pool of chocolate sauce. Made very quickly in the microwave, truly decadent, we love serving this with vanilla ice cream on top!
Light and Airy this eggless chocolate mousse just needs five ingredients and fifteen minutes from start to finish. Its a quick dessert that'll satisfy all those cravings!
Lavender white chocolate truffles are fragrant, creamy white chocolate bites that are perfect for the festive season and holidays! Use them to serve as mini desserts, or for gifting.
No Bake Strawberry Cheesecake Jars are creamy, made with fresh strawberries and have a creamy, mousse like texture that’s absolutely delicious! Make these for valentines day or take them to a picnic because these are so easily transportable, or just serve these individual cheesecake jars at a party.
This is a simple recipe for eggless, whole wheat carrot cake which is soft, moist and fluffy! Easy to make at home, and perfect as a dessert or tea time snack!
Mango Panna Cotta is a gorgeous two-layered dessert that'll wow everybody. It's the perfect cold, summer dessert. This dessert is so versatile because the mango layer can be replaced with berries, kiwis and many other fruits
Extremely easy recipe for Passion Fruit flavored single serving cheesecake in a jar which uses only 8 ingredients, are portable and look beautiful at parties.
These eggless churros are a total flavor and texture delight! Made from simple ingredients in under 30 minutes, this is a delicious and fun dessert you just need to try!
I promise you, all these Diwali dessert recipes will surely take your festivities a notch higher. But be sure to make extras because it all disappears really fast!
I would love to see your Diwali party tables so don’t forget to share pictures over on my IG @my_foodstory.
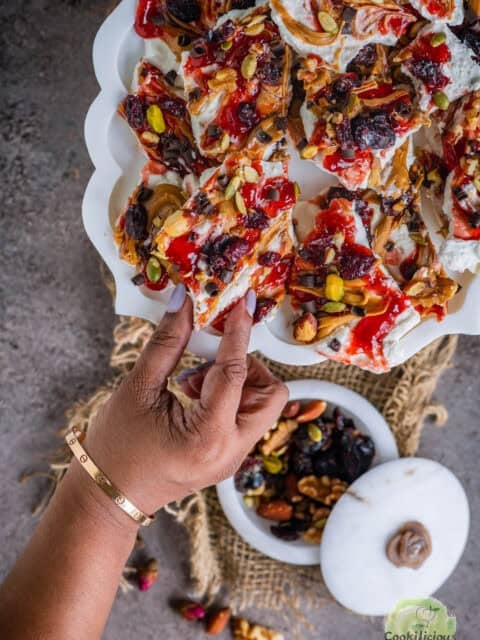
Here's a viral cottage cheese dessert you absolutely have to try this season! This frozen cottage cheese bark is the ultimate no-bake, high-protein dessert-ready in just 15 minutes, using only six simple ingredients. Creamy, cool, and loaded with flavorful toppings, it's a holiday dessert that's as beautiful to look at as it is delicious to […]