Learn how to make quick & delicious Masala Idli recipe using leftover idlis with a video tutorial and detailed step by step pictures. Use the leftover idlis to make a quick snack or meal with stir fried masala idli recipe. Masala Idli is a quick, flavorful snack made from leftover idlis tossed in a tempering...
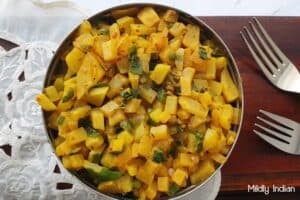
Aloo Bhindi is a popular dish in my home, a simple yet flavorful North Indian stir-fry made with potatoes (aloo) and okra (bhindi). This vegan and gluten-free dish is spiced just right, making it a crowd-pleaser for everyone at the table.I always find that home-cooked meals are more flavorful, fresh, and nourishing, and this Aloo Bhindi is no exception. It’s quick to prepare, using everyday ingredients, and the balance of spices brings out the natural flavors of the vegetables. Adding tomatoes at the end not only enhances the taste but also makes the dish vibrant and visually appealing.I always find that home-cooked meals are more flavorful, fresh, and nourishing, and this Aloo Bhindi is no exception. I like to serve Aloo Bhindi with dal, rice, and roti, creating a balanced and enjoyable meal.
Course Appetizer
Cuisine Indian
Keyword Masala Aloo Bhindi
Prep Time 10 minutesminutes
Cook Time 20 minutesminutes
Servings 4
Ingredients
1½cup chopped okra
1½cup cubed boiled potatoes same size as okra
3tbsp oil divided
¼tsp mustard seed
1tsp cumin seeds
⅛tsp asafetida
2tbsp tbsp
½tsp turmeric
1tbsp ginger thinly sliced
2tsp saltadjust to taste
½ tsp red chili powderadjusts to taste
2tbsp Besan
½cup cubed tomatoes
Instructions
Wash the okra thoroughly and ensure it is completely dry. Cut the okra into ½ inch rounds.
Boil the potatoes, ensuring they are not overcooked. Peel them and cut them into pieces about twice the size of the okra.
Chop the tomatoes into pieces about the same size as the potatoes.
Heat 1 tablespoon of oil in a saucepan over low heat. Add the okra and stir-fry for about 5 minutes, until tender but still green. Remove the okra from the pan and set aside.
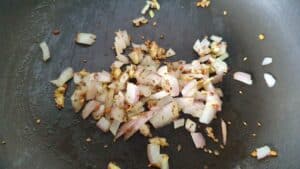
In the same pan, add 1 tablespoon of oil. Heat the oil until moderately hot and test the heat by adding a single cumin seed. If the seed cracks right away, the oil is ready. Add cumin seeds, mustard seeds, and asafetida. Stir, then add the potatoes and ginger, stirring for 2-3 minutes.
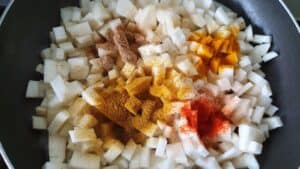
Stir in the spices: coriander powder, turmeric, and chili powder. Add the okra back into the pan, sprinkle with besan (gram flour) and salt. The besan helps the spices coat the okra and potatoes. Cook for 2-3 minutes over low heat.
Once the okra and potatoes are cooked through, add the chopped tomatoes and stir for a few more minutes until combined. Adding tomatoes at the end not only enhances the taste but also makes the dish vibrant and visually appealing. The Potato Okra Masala is ready and looks vibrant and colorful.
Notes
Thanks, and enjoy!
Aloo Bhindi Masala (Potato Okra): A Flavorful North Indian Stir-Fry | Manjula’s Kitchen
Introduction to Aloo Bhindi Masala
Aloo Bhindi, a delicious combination of potatoes (aloo) and okra (bhindi), is a beloved North Indian stir-fry that’s both vegan and gluten-free. This dish is spiced to perfection, with everyday ingredients that enhance the natural flavors of the vegetables. It’s a simple, quick, and nutritious meal that’s perfect for any day of the week. With tender okra, perfectly boiled potatoes, and a blend of spices, Aloo Bhindi makes a great accompaniment to dal, rice, or roti.
Cultural and Traditional Importance
Aloo Bhindi is a common dish in many North Indian households. Its simplicity and ease of preparation make it a staple for busy weeknights, while its flavorful spices and colorful presentation make it special enough for family gatherings. In India, meals often feature a variety of dishes to balance textures and flavors, and Aloo Bhindi is frequently paired with lentils like Dal Tadka and breads like Roti for a wholesome and complete meal.
Cooking Aloo Bhindi at home not only allows for fresher ingredients but also ensures that the dish is prepared exactly to your taste. With the addition of besan (gram flour) and tomatoes, this dish becomes both hearty and vibrant, appealing to everyone at the table.
Recipe Variations from Manjula’s Kitchen
While Aloo Bhindi Masala is a popular dish on its own, you can explore other similar stir-fry recipes or variations with different vegetables from Manjula’s Kitchen:
Aloo Gobi: A stir-fry made with potatoes and cauliflower, flavored with similar spices, making it a close cousin to Aloo Bhindi.
Bhindi Masala: A more saucy version of okra, cooked in a spiced tomato gravy, offering a different take on okra dishes.
Aloo Baingan: A tasty variation that combines potatoes with eggplant, cooked in a similar blend of spices.
Baingan Bharta: A roasted eggplant dish that pairs well with Aloo Bhindi as part of a larger spread.
Health Benefits and Dietary Considerations
Aloo Bhindi is not only flavorful but also packed with nutrients. Okra is rich in vitamins A and C, fiber, and antioxidants, while potatoes provide potassium and carbohydrates, making this dish a great source of energy. The use of minimal oil and the addition of spices like cumin, coriander, and turmeric add both flavor and health benefits, with turmeric known for its anti-inflammatory properties.
This recipe is naturally gluten-free and vegan, making it suitable for a variety of dietary needs. For a lower-carb option, you can reduce the amount of potatoes or substitute them with sweet potatoes or other root vegetables. Besan (gram flour) adds a touch of protein and helps the spices adhere to the vegetables, making the dish even more satisfying.
Serving Suggestions
Masala Aloo Bhindi can be enjoyed as a side dish or as the main course. It pairs perfectly with Indian breads like roti, paratha, or even naan. For a more complete meal, serve it alongside Jeera Rice and a cooling yogurt dish like Raita.
If you’re hosting a meal, Aloo Bhindi Masala makes a colorful addition to the table when paired with other Indian classics like Chole or Dal Fry. The vibrant colors and bold flavors of these dishes create a well-balanced and satisfying meal that’s sure to impress.
Conclusion
Aloo BhindiMasala is a simple, flavorful, and nutritious dish that can be prepared quickly with everyday ingredients. Its combination of tender potatoes, crisp okra, and aromatic spices makes it a versatile meal option that’s both comforting and satisfying. Whether you’re serving it as part of a traditional Indian meal or enjoying it as a standalone dish, Aloo Bhindi is sure to become a favorite in your home. Try this recipe today and bring the taste of North Indian home cooking to your kitchen.
Frequently Asked Questions (FAQs)
How can I prevent okra from becoming slimy?
To prevent sliminess, make sure the okra is thoroughly dry before cooking. Frying the okra over low heat without covering the pan also helps to keep the texture crisp.
Can I substitute potatoes with another vegetable in this recipe?
Yes, you can substitute potatoes with sweet potatoes, carrots, or even eggplant for a different take on the dish.
What are some variations of Aloo Bhindi I can try?
You can try Aloo Gobi or Bhindi Masala for similar stir-fried dishes that use different vegetables or a saucy variation.
How should I serve Aloo Bhindi?
Masala Aloo Bhindi pairs wonderfully with roti, paratha, or naan. It can also be served with rice and a cooling raita for a complete meal.
Is this dish suitable for vegans and those on a gluten-free diet?
Yes, Aloo Bhindi is naturally vegan and gluten-free, making it a great choice for those with dietary restrictions.
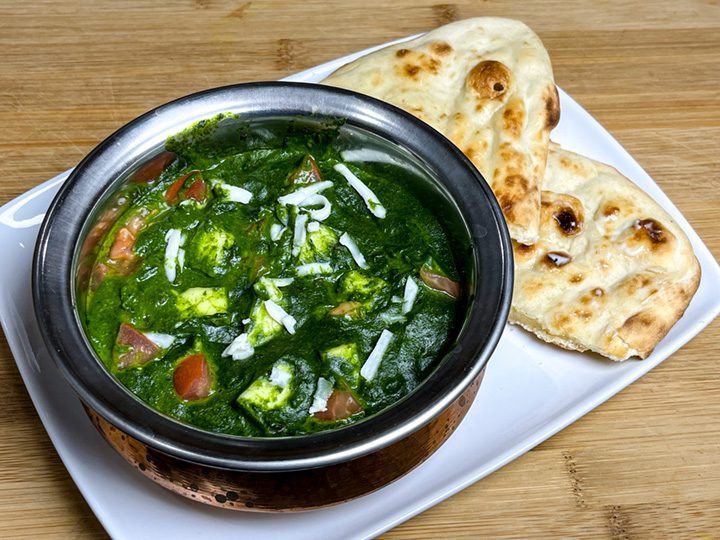
Palak Paneer is perhaps the most popular paneer dish in North India and is a favorite in Indian restaurants. Creamy spinach paired with paneer makes for a delicious main course. This recipe has always been one of my favorites, and I can prepare it quickly. Although I’ve made this recipe before, I now want to simplify it by using just a few ingredients. Even after so many years of cooking, I’m still learning and striving to keep things simple, healthy, nutritious, and flavorful. This dish is made with blanched spinach, which helps retain its vibrant green color. I didn’t know why blanching was used in cooking, but this is all part of the learning process. Palak Paneer pairs perfectly with roti, naan, or paratha.
Course Main Course
Cuisine Indian
Keyword palak paneer
Popular YouTube
Servings 2people
Ingredients
5 ozspinach washed and clean, about 6 cups packed spinach
1cuppaneer cubed into bite size, about 4oz of paneer
1green chili chopped
1tbsp oil
1/2tsp cumin seeds – jeera
1/8tspasafetida – hing
1tsp coriander powder – dhania
1/4tspturmeric – haldi
1/2tsp salt adjust to taste
1/2tsp sugar
1tbsp whole wheat flour
1/4cup heavy cream
1/4cup finely chopped tomato
2tbsp paneer shredded for garnishing
Instructions
First blanch the spinach, this helps to keep the spinach color bright. To blanch the spinach, boil about 6 cups of water in a saucepan, and let the spinach boil for one minute. Drain the water and put the spinach in ice cold water for about two minutes. Drain the water.
Blend the spinach, ginger and green chili. Spinach should be creamy.
Soak the cubed paneer in about three cups of hot water, for about 5 minutes. This helps to give the paneer a soft texture. Set it aside.
While cooking, spinach can splatter, use larger saucepan. Heat the oil in a saucepan, over medium high heat. Test the heat by adding one cumin seed to the oil; if it cracks right away it is ready.
Add cumin seed, and asafetida. After cumin seeds crack, add blended spinach and stir. Add coriander, salt, and sugar, stir.
After spinach comes to boil lower the heat to low, and let the spinach cook for about 5-6 minutes partially cover the pot, because spinach will splatter. I don’t cover the pan fully because this helps keep the green color of spinach.
Mix the flour to 1/2 cup of water and add to the spinach, also add the cream. Mix it well and let it cook for five minutes. If needed add a little more water.
Drain the paneer and fold it gently with spinach and let it simmer for about five minutes.
Palak paneer is ready, add the tomatoes and turn off the heat. Garnish it with shredded or crumbled paneer.
Palak Paneer is one of the most popular paneer dishes from North India and a favorite at Indian restaurants around the world. This creamy, flavorful dish features tender paneer cubes nestled in a rich spinach sauce, making it a perfect main course for any meal.
With its vibrant green color and delicious combination of spinach and paneer, Palak Paneer pairs wonderfully with roti, naan, or paratha. This simplified version of the recipe uses just a few ingredients, allowing the natural flavors of the spinach and paneer to shine while remaining healthy and nutritious.
Cultural and Traditional Importance
Paneer dishes are a staple in North Indian cuisine, and Palak Paneer is undoubtedly one of the most beloved. Traditionally prepared in Indian households and served during special occasions or family gatherings, this dish showcases the versatility of paneer and the use of leafy greens in Indian cooking.
Palak Paneer is often served with flatbreads like naan or paratha, and its creamy texture and mildly spiced flavor make it a crowd-pleaser.
This simplified recipe doesn’t compromise on taste, while offering a more convenient way to prepare Palak Paneer at home. Blanching the spinach helps retain its bright green color, making the dish visually appealing as well as delicious.
Recipe Variations from Manjula’s Kitchen While Palak Paneer is a classic dish on its own, you can explore other paneer-based recipes and spinach variations from Manjula’s Kitchen:
Paneer Butter Masala: A rich and creamy tomato-based dish, perfect for those who enjoy a sweeter, milder flavor.
Aloo Palak (Potato Spinach): A delicious vegetarian dish combining spinach with tender potatoes, offering another way to enjoy spinach in your meals.
Paneer Saag: A similar dish that incorporates other leafy greens, like mustard greens, along with spinach for a different flavor profile.
Matar Paneer: A flavorful combination of paneer and green peas cooked in a spiced tomato sauce, offering a wonderful variation for paneer lovers.
Health Benefits and Dietary ConsiderationsPalak Paneer is not only delicious but also packed with nutrients. Spinach is rich in iron, vitamins A, C, and K, as well as antioxidants that promote overall health.
The use of paneer adds a good amount of protein and calcium, making this dish a balanced meal that supports both muscle and bone health.
For those looking to make a lighter version of Palak Paneer, you can substitute the heavy cream with a lighter cream or yogurt. The dish is also naturally gluten-free (ensure the flour you use is gluten-free or omit it), making it suitable for those with gluten sensitivities. If you’re vegan, tofu can be used in place of paneer to create a delicious Palak Tofu.
Serving SuggestionsPalak Paneer can be served with a variety of Indian breads, such as roti, naan, or paratha. It also pairs well with rice dishes like Jeera Rice or Plain Basmati Rice for a more complete meal. For added texture and flavor, you can garnish the dish with freshly grated paneer or a drizzle of cream.
For a more elaborate meal, serve Palak Paneer alongside other classic Indian dishes such as Dal Tadka or Aloo Gobi to create a balanced vegetarian spread.
ConclusionPalak Paneer is a quintessential North Indian dish that brings together the creamy richness of paneer and the nutritious goodness of spinach. This simplified recipe ensures that you can prepare this dish quickly, without sacrificing flavor or texture. Whether you’re cooking for a family dinner or hosting a special meal, Palak Paneer is sure to be a hit. Try this recipe today and enjoy one of India’s most loved dishes in the comfort of your home.
Frequently Asked Questions (FAQs)
How do I keep the spinach color bright in Palak Paneer?
Blanching the spinach is the key to retaining its vibrant green color. Boil the spinach for about a minute, then immediately transfer it to ice-cold water to stop the cooking process.
Can I make Palak Paneer vegan?
Yes, you can substitute the paneer with tofu and use coconut cream or cashew cream in place of dairy cream to make a vegan version of this dish.
What are some variations of Palak Paneer I can try?
You can try dishes like Saag Paneer, which uses a combination of leafy greens, or Aloo Palak, which pairs spinach with potatoes for a different take on the classic.
How do I serve Palak Paneer?
Palak Paneer pairs wonderfully with Indian breads like naan, roti, or paratha. It can also be served with Jeera Rice or Plain Basmati Rice.
Can I prepare Palak Paneer in advance?
Yes, you can prepare the spinach puree and paneer in advance. Store them separately in the refrigerator, and when ready to serve, gently reheat and combine the two for a fresh and delicious meal.
Discover the most liked Palak Paneer recipe! Simple ingredients, creamy spinach, and soft paneer make this North Indian classic perfect for a tasty, nutritious meal.
If you're looking for a dish that combines the perfect balance of sweetness, spiciness, and tanginess, this Sweet and Sour Potatoes recipe is just what you need. Tender potatoes cooked in a rich, spicy, and tangy tomato gravy create a flavor explosion in every bite!This dish features potatoes sliced into round disks, and smothered in a delicious tomato gravy. The gravy is a perfect blend of sweet, spicy, and sour, and it clings to each piece of potato, making every bite irresistible.What makes this recipe truly special is the way it balances different flavors. It’s a dish that is both comforting and exciting. Whether you're serving it as a main course or a side dish, I enjoy serving it over rice or with puri or paratha.I use small white potatoes because they hold their shape even when cooked to a soft and tender texture. These tender potato disks in tomato gravy make a gorgeous dish that's hard to resist.This is also delightful vegan and gluten-free dish.
Prep Time 10 minutesminutes
Cook Time 20 minutesminutes
Servings 4
Ingredients
10small, boiled baby potatoes also known Ukrainian potatoes
2cups3 medium tomatoes chopped
2tbsp oil
1tbsp ginger thinly sliced, adrak
2green chili slicedlong ways; seeds removed
1/8tsp asafetida, hing
1 tsp cumin seed
1/2tsp black mustard seed, rai
1/2tsp red chili powder, lal mirch
1/2tsp fennel seeds powder, saunf
2 tsp crushed coriander, dhania
1/2 tsp turmeric, haldi
1-1/2tsp salt
2tsp cornstarch
2-3tbsp sugar, adjust to taste
2tbsp chopped cilantro, hara dhania
Instructions
Boil the potatoes until they are tender, then peel and slice them into quarter inch-thick round disks.
Heat oil in a saucepan. Test the heat by adding a cumin seed; if it cracks, the oil is ready.
Add black mustard seeds, cumin seeds, and asafetida. Once the seeds crackle, add red chili powder, coriander, fennel powder, and turmeric.
Stir briefly, then add chopped tomatoes and green chilies. Let the mixture simmer for 2-3 minutes.
Add the potato slices.
Cover the pot and cook for about 10 minutes over medium-low heat. Add sugar and cilantro. If the gravy becomes too thick, add water as needed. Cover and let it sit for a few minutes.
Adjust the salt and sugar to your taste.
Notes
Tip: Add sugar slowly, depending on the sourness of the tomatoes. You can omit the green chilies or remove their seeds if you prefer a milder flavor.What are Ukrainian potatoes?They are white and are also known as baby potatoes or new potatoes.Delicious Sweet and Sour Potatoes: A Very Colorful, Flavorful Dish Enjoy!
Sweet and Sour Potatoes: A Flavorful Fusion | Manjula’s Kitchen
If you’re looking to experience a delightful balance of sweet, spicy, and tangy flavors, the Sweet and Sour Potatoes recipe is just what you need. This dish, featuring tender potato slices cooked in a rich tomato-based gravy, offers an explosion of flavors in every bite.
The combination of sweet, sour, and spicy elements creates a unique taste profile that makes this dish stand out in the vast array of Indian cuisine. It’s a dish that not only satisfies the taste buds but also appeals to the senses with its vibrant colors and inviting aroma.
Cultural and Traditional Importance
While Sweet and Sour Potatoes may not be a traditional dish deeply rooted in Indian festivals, it showcases the creativity and adaptability of Indian home cooking. The use of Ukrainian potatoes, known for their ability to hold shape while absorbing the flavorful gravy, highlights the influence of global ingredients in modern Indian cooking.
This dish perfectly embodies the fusion of traditional Indian spices with a global twist, making it a popular choice for those seeking something different yet familiar. Its unique flavor profile resonates with those who enjoy experimenting with food while staying true to the essence of Indian culinary traditions.
In Indian households, the art of balancing flavors is a cherished skill, and Sweet and Sour Potatoes is a testament to that art. The sweet and tangy notes, combined with the warmth of spices, create a dish that is both comforting and exhilarating. It’s a dish that can easily become a staple in your home, whether you’re looking to impress guests with something new or simply wanting to enjoy a comforting meal with your family.
Recipe Variations
Though Sweet and Sour Potatoes are unique, there are other recipes onManjula’s Kitchen that share a similar balance of flavors and can complement this dish:
Aloo Tamatar: A classic potato-tomato curry that offers a more traditional take on the combination of potatoes and tangy tomato gravy.
Aloo Baingan: This dish adds eggplant to the mix, providing a different texture and taste, while still maintaining the tangy notes from the tomatoes.
Paneer in Tomato Gravy: For those who enjoy the richness of paneer, this recipe offers a creamy tomato-based gravy that pairs wonderfully with the tender potatoes.
Aloo Chaat: A street food favorite, this dish provides a tangy and spicy flavor profile that complements the sweet and sour notes of the potatoes.
Health Benefits and Dietary Considerations
The Sweet and Sour Potatoes dish is not only a treat for your taste buds but also caters to various dietary preferences. It is both vegan and gluten-free, making it accessible to those with specific dietary needs. The use of Ukrainian potatoes or baby potatoes adds a good source of dietary fiber, while the tomato gravy provides vitamins and antioxidants.
This dish is a great choice for anyone looking to enjoy a flavorful meal without compromising on health. Additionally, the absence of dairy makes it suitable for those who are lactose intolerant or following a plant-based diet.
The incorporation of spices such as cumin, mustard seeds, and turmeric also adds to the health benefits of this dish. These spices are known for their digestive properties and anti-inflammatory effects, making the Sweet and Sour Potatoes not only delicious but also nourishing.
Serving Suggestions
Sweet and Sour Potatoes can be enjoyed in a variety of ways. It is often served as a side dish with Indian breads like puri or paratha, but it can also be the star of the meal when served over a bed of steamed rice. For a complete meal, pair it with Jeera Rice or Rotis. The vibrant colors and bold flavors make it a perfect dish to serve at a dinner party, ensuring that it will be a crowd-pleaser.
You can also serve Sweet and Sour Potatoes as part of a larger spread, featuring other complementary dishes such as Palak Paneer or Dal Tadka. The combination of these dishes creates a well-rounded and satisfying meal that showcases the diversity of Indian cuisine.
Conclusion
The Sweet and Sour Potatoes recipe is a wonderful example of how different flavors can come together to create something truly special. Its balance of sweetness, spiciness, and tanginess makes it a dish that is both comforting and exciting, perfect for any occasion.
Whether you’re serving it as a main course or a side dish, this recipe is sure to impress. Don’t hesitate to give it a try and experience the delightful fusion of flavors that this dish has to offer. The next time you’re in the mood for something new and flavorful, remember that Sweet and Sour Potatoes are just a few simple steps away.
Frequently Asked Questions (FAQs)
Can I use regular potatoes instead of Ukrainian potatoes?
Yes, regular potatoes can be used, but small baby potatoes are preferred as they hold their shape better in the gravy.
Is this dish suitable for a gluten-free diet?
Yes, Sweet and Sour Potatoes are naturally gluten-free, making them an excellent choice for those avoiding gluten.
Can I adjust the level of sweetness in the dish?
Absolutely, you can adjust the sugar according to your taste. Add it gradually until you reach your desired level of sweetness.
What can I serve with Sweet and Sour Potatoes?
This dish pairs well with Jeera Rice, puri, or paratha. For a more elaborate meal, consider serving it alongside other Indian favorites like Palak Paneer or Dal Tadka.
How do I store leftovers?
Store any leftovers in an airtight container in the refrigerator for up to 3 days. Reheat gently before serving to preserve the flavors and texture.
Discover the perfect blend of tangy and sweet in our Sweet and Sour Potatoes recipe. This easy-to-make dish combines crispy potatoes with a mouthwatering sauce, making it an irresistible side or snack. Perfect for any occasion!
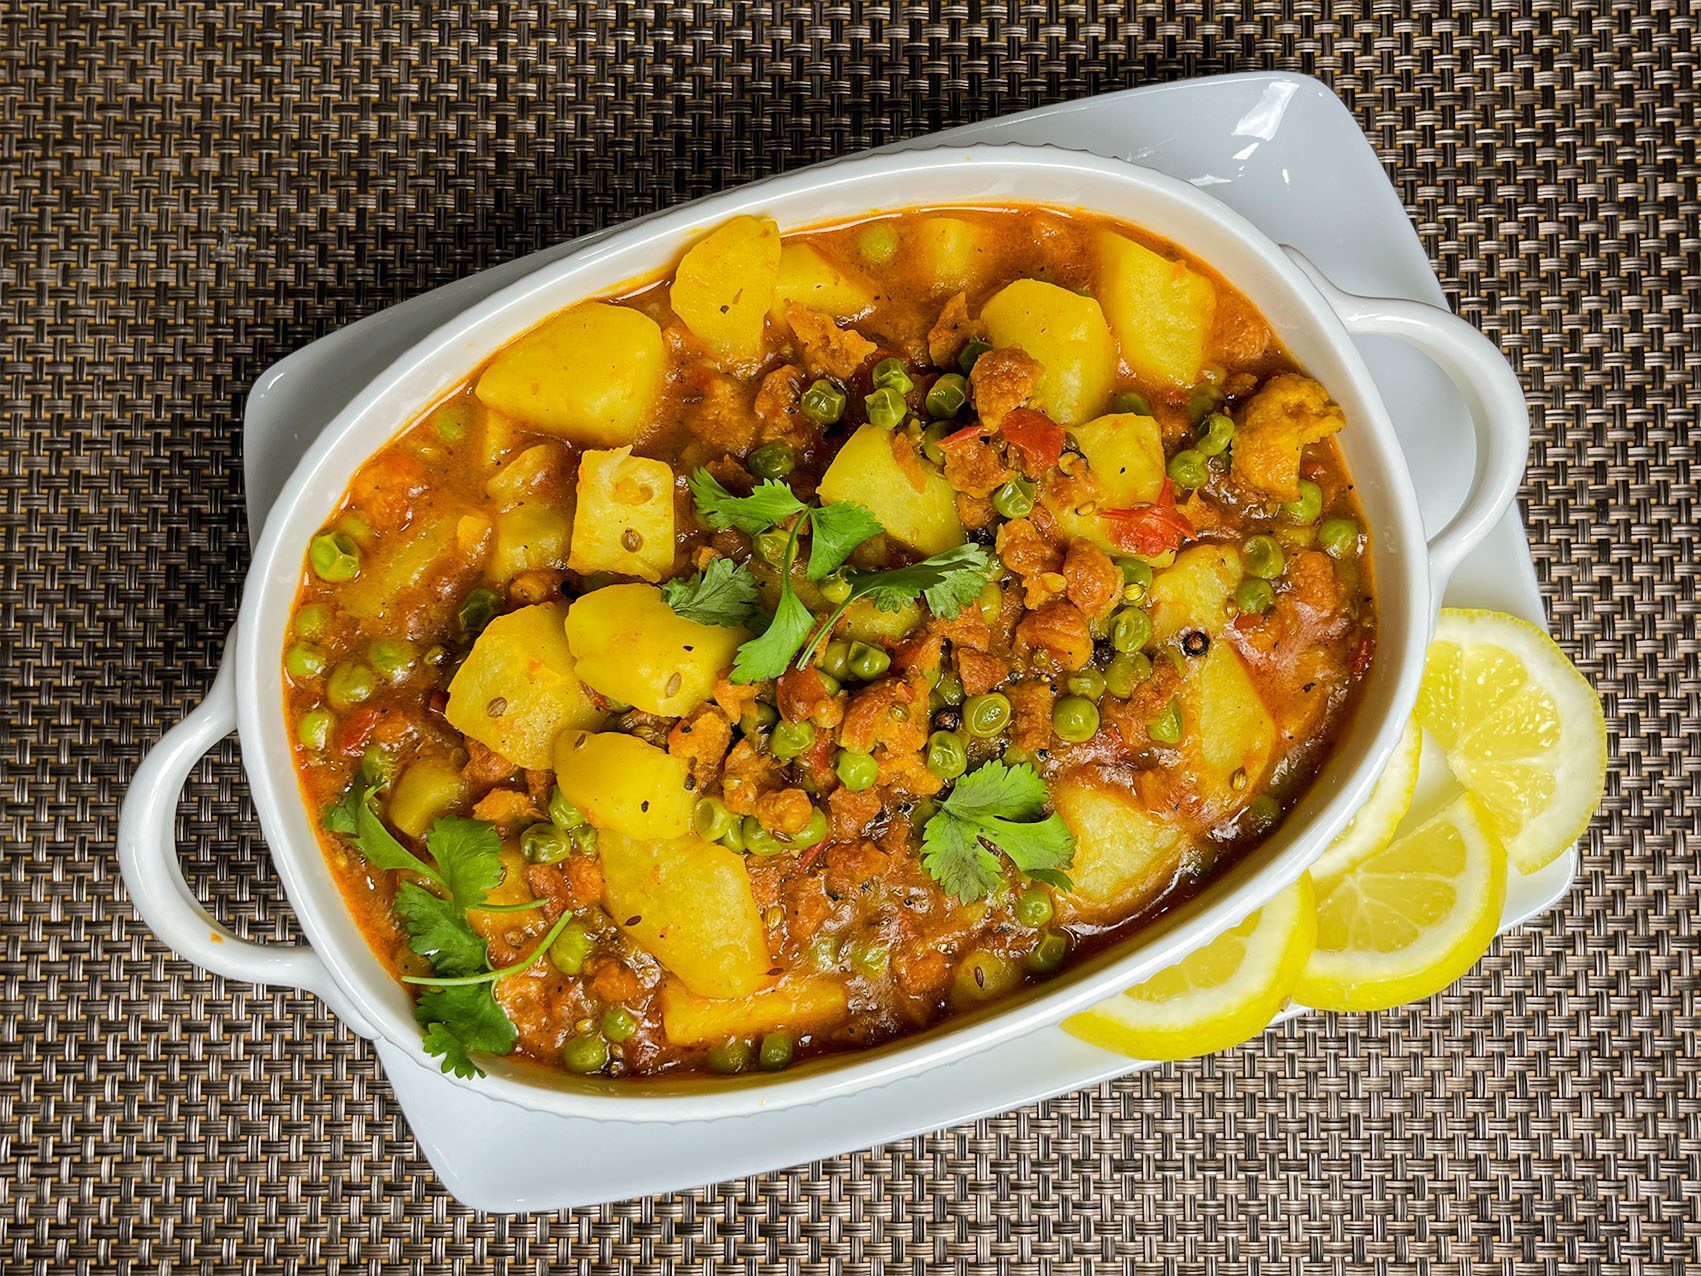
Amritsari Style Aloo Wadi Ki Sabji has a unique flavor. This is a delightful Punjabi dish using sun-dried lentil dumplings, potatoes and green peas. Aloo Wadi is a spicy, gravy-based dish, perfect for those who enjoy spicy food. Explore this tasty recipe exclusively at Manjula's Kitchen official website.This was one of my favorite dishes growing up. Amritsari Wadi wasn't available at the Indian grocery store where I shop, but they had plain Urad Dal Wadi. I like to use ingredients that are easily available. As usual, I searched on Google for the spices used in Amritsari Wadis, and there were so many different versions that none matched what I remembered. I wanted to make a recipe very close to what I remember.After trying a few times, I finally called my sister to find out the ingredients used in Amritsari Wadi. She knows some good Indian vegetarian recipes that are very traditional and excellent, and of course, she helped me out. After a few tries, I was happy with the balance of spices in the Aloo Wadi.
Course Main Course
Cuisine Indian
Keyword Punjabi Cuisine
Popular YouTube
Servings 4people
Ingredients
2cupsboiled potatoes peeled and cut into byte size cubes
1cupgreen peasfrozen green peas
3/4 cupurad dalwadi broken into small pieces
3/4cuptomato puree
3tbspoil
1tspcumin seeds (jeera)
1/8tspasafetida (hing)
1-1/2tbspcoriander crushed (dhania)
2tspblack pepper crushed (kali mirch)
2dry red chilies (sabut lal mirch)broken in small pieces
1/4tspKashmiri red chili powder, optional
1/4tspturmeric (haldi)
1-1/2tspsalt
1-1/2cup water
Instructions
Heat the pan on medium-low and add 2 tablespoons of oil. Add the urad dal vadi and stir-fry until they are light golden brown, about 2 minute. Remove them and set aside in a bowl.
In the same saucepan, add the remaining tablespoon of oil over medium heat. When the oil is moderately hot, add the cumin seeds. When the seeds start to crackle, add the asafetida, stir, and then add the tomato puree, coriander, black pepper, red chili, Kashmiri chili powder, turmeric, and salt. Cook, stirring occasionally, until the spice mix starts releasing oil, about 2 minutes.
Add the potatoes, green peas, vadis, and 1 1/2 cups of water. Cover the pan and let it cook for about 10 minutes over medium-low heat. Adjust the water if needed.
Vadis are ready, I will serve them with rice.
Notes
About Aloo WadiyanPunjabi Aloo Wadiyan is a traditional North Indian dish that features potatoes (aloo) and sun-dried Urad Dal dumplings (wadiyan). It's a flavorful and hearty vegetarian dish that is popular in Punjabi cuisine. The sun-dried lentil dumplings add a unique texture and taste to the dish.If you don’t have urad dal vadiyan, you can use moong dal vadayan.
The Unique Flavor of Amritsari Punjabi Aloo Wadiyan
Amritsari Punjabi Aloo Wadiyan is a delightful and spicy dish from Punjab, known for its unique flavor and the use of sun-dried lentil dumplings (wadiyan). This Aloo Wadi Ki Sabji combines potatoes and green peas with flavorful spices, making it a hearty and satisfying meal. This dish is perfect for those who enjoy a spicy, gravy-based curry, explore more Indian gravy recipes.
The Essence of Aloo Wadi Ki Sabji
The essence of Aloo Wadi Ki Sabji lies in its combination of textures and flavors. The sun-dried urad dal dumplings (wadiyan) add a chewy texture and rich taste, while the potatoes and green peas provide a comforting base. The blend of spices creates a flavorful gravy that ties everything together. This dish is one of the finest Indian vegan recipes that is also gluten-free, making it suitable for various dietary preferences.
Origin and Popularity
Aloo Wadiyan is a traditional dish in Punjabi cuisine, this special occasions recipe often enjoyed during family gatherings. The use of Amritsari wadiyan adds a unique twist to this dish, with the wadiyan being a specialty of the Amritsar region. The combination of potatoes and lentil dumplings in a spicy gravy makes this dish a favorite among those who appreciate hearty and flavorful vegetarian meals.
Why You’ll Love This Recipe
Unique Flavor: The sun-dried lentil dumplings provide a distinctive taste and texture.
Spicy and Flavorful: The blend of spices creates a rich and spicy gravy.
Vegan and Gluten-Free: Suitable for various dietary preferences.
Comforting and Hearty: Perfect for a satisfying meal, especially when served with rice.
Variations of Vegetable Dry Recipes
Exploring Manjula’s Kitchen reveals a treasure trove of other delicious vegetable dry recipes that you might enjoy. Here are some related dishes that you might find interesting:
Aloo Gobi: A classic Indian dish made with potatoes and cauliflower cooked with spices.
Bhindi Masala: A flavorful dish made with okra and a blend of spices.
Baingan Bharta: A smoky and flavorful dish made with roasted eggplant and spices.
Gajar Matar: A simple and healthy dish made with carrots and green peas.
Palak Paneer: A popular dish made with spinach and paneer in a creamy sauce.
Serving Suggestions
Aloo wadi ki sabji can be enjoyed in various ways:
With Rice: Serve with steamed plain basmati rice or jeera rice for a complete meal.
With Indian Breads: Pair with roti, naan, or paratha for a satisfying meal.
As a Side Dish: Enjoy as a side with other Indian curries and dishes.
For Special Occasions: Perfect for festive meals and family gatherings.
Tips and Tricks
To perfect your aloo wadi ki sabji recipe, consider these helpful tips:
Use Fresh Wadiyan: Fresh sun-dried lentil dumplings provide the best flavor and texture.
Balance the Spices: Adjust the spice levels to suit your taste preferences.
Cook Gently: Simmer the dish on low heat to allow the flavors to meld together.
Customize: Feel free to add other vegetables like carrots or bell peppers for added nutrition and flavor.
FAQs Frequently Asked Questions
Can I Use Moong Dal Wadiyan Instead of Urad Dal Wadiyan?
Yes, you can use moong dal wadiyan as a substitute if urad dal wadiyan are not available.
How Long Does Aloo Wadi Ki Sabji Last?
Store any leftovers in an airtight container in the refrigerator for up to 2 days. Reheat gently before serving.
Is Aloo Wadi Ki Sabji Vegan?
Yes, this recipe is naturally vegan and gluten-free.
What Can I Serve With Aloo Wadi Ki Sabji?
This dish pairs well with steamed basmati rice, jeera rice, roti, naan, or paratha.
Can I Make This Dish Less Spicy?
Yes, adjust the amount of green chilies and red chili powder to make the dish milder.
The recent India trip was fantastic. As much as we had fun, there are a couple of things that this India trip ruined for me. One was bread the other was rose milk. That was my simple pleasure which the milk booths used to keep in plenty. During this trip, I searched high a low for some but found none. As soon as we got back and the jet lag faded off, I had to make some myself. Since it has become a kind of rarity, I guess it is best if it is on our blog too.
What is rose milk?
The gorgeous, pale pink, milk-based drink is a gentle lightly sweetened drink popular in summer. With the juicy crunchy basil seeds added, this summer drink is a popular one for the heat and humidity of the tropics. With flavours of extract of rose and the same as its fragrance, the cold, frothy milk drink is a relief from the heat. The drink Bandung in Malaysia and Thai Nom Yen are all versions of the same. However in this recipe today we have not used the rose syrup that gets utilized in most recipes, rather have gone in to create a natural alternate with fresh rose flower petals.
Ingredients to make the rose milk
Milk : boiled and chilled milk is what we use traditionally for this recipe. However, over a period of time, I find Evaporated milk gives a full-bodied thick frothy milk moustache-making consistency. You can use half-and-half or low-fat milk too. Rose petals: nothing beats that fresh rose petal that gets blended in. Use known sources of pesticides free fresh rose petals or edible grade dried ones. The actual variety that we look for with its fragrance is the panneer rose, the one from which rose water is extracted. Make sure your source is from the edible roses as there are plenty that is just ornamental. Rose water: since the rose petals may not be fragrant enough, edible-grade rose water is required. If you have plenty of rose petals you can avoid using this. Red food colour: the pink colour is characteristic of this drink. A small drop or two of natural red food colour will do the job. You can use natural dried beet powder in its place too. Sweetener: is totally optional. Use honey or sugar to flavour if needed. Since the milk in Australia is much sweeter, I have not used any here. Sweet basil seeds: this is the exciting part of this drink. Basil seeds are small black seeds often sold in Indian spice aisles as Sabja. This when added to water swells into small jelly globes. They add a lovely touch to the drink and also promote gut health. These are not chia seeds, however, if you cannot get there you can use some chia here.
How to make this drink?
Soak the basil seeds in about 3 times water. Once you gather the ingredients it is as simple as blending them together all except the basil seeds. Once frothy pour into tall glasses and top with the bloomed basil seeds. Check the recipe card below for detailed instructions and exact measurements. YOu can pin the same from th recipe card on to your board if saving for later.
With the juicy crunchy basil seeds added, this summer drink is a popular one for the heat and humidity of the tropics. With flavours of extract of rose and the same as its fragrance, the cold, frothy milk drink is a relief from the heat.
Keyword Lunch recipes, no cook recipes,, summer recipes
Prep Time 10minutes
Servings 2people
Equipment
blender
measuring cups and spoons
Glasses tll slender ones
Ingredients
2cupsmilkchilled
10-15Rose petals
1pinchRed food couloror dried beet powder
1tspRose essence
sweeteneroptional
for the topping
1tbspsweet basil seeds
1/4cupdrinking water
Instructions
Soak the basil seeds to bloom.
Set this aside while you prepare for the rose shake.
Into the blender add all the other ingredients and sweetenerif required.
Blend smooth for 2 minutes till it is frothy.
Pour this into tall glasses.
Top with the bloomed sweet basil (sabja) seeds
Notes
The basil seeds when added initially will sink to the bottom. Then they will slowly rise up to the top for a few hours.
Can this be a vegan drink?
It is a milk-based drink, however, using soy or almond milk gives a delicious vegan pink milk without a huge change in flavour. In fact, I love to use soy milk as my choice for the vegan version. The rest of the ingredients are the same.
Make ahead and storage
The freshly blended rose milk is certainly frothy. However, it is an easy drink to make and store in the refrigerator. It stays good for upto 3 days with regular milk and about 7 days with Evaporated milk. Keep it in a sealed bottle or a small covered pitcher to have on hot days. You can mix in the basil seeds too. They stay at the bottom, so stir well before pouring out the drink for yourself.
If you have spent your childhood in the tropics, I am sure you would have also had a version of this. Pink milk as it is fondly called us now revived for me. Try out this caffeine-free, afternoon pick-up and rate us using the star system below. Share in the comments your childhood experiences with the easy thirst quencher. Subscribe to us for new recipes or visit us often. Enjoy your glass while I get some more.
Here is a curry you can make in under 30 minutes! Lamb is literally what we make most Sundays. This time H bought home ground lamb. It got me thinking, how can I make this extra delicious? I tried something new, and it tasted great. Give it a try. I combined ground lamb with homemade bread crumbs, eggs, fresh coriander, pepper, onions, ginger garlic and green chilies, made meatballs, shallow
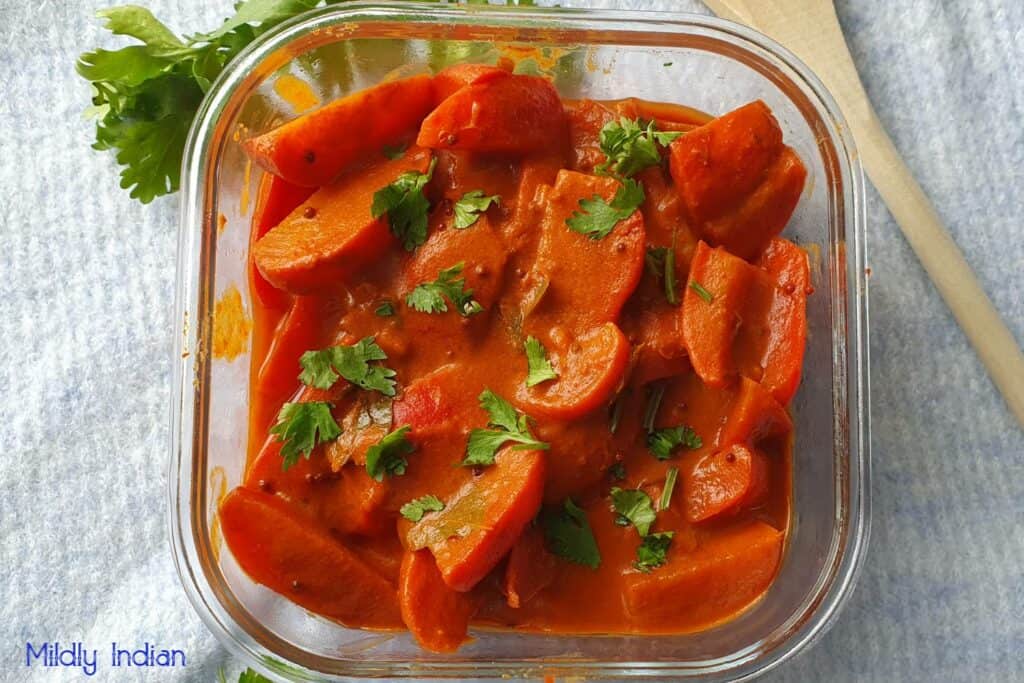
I was recently watching the Megan and Harry series on Netflix. There was one particular part I actually liked. The friends’ idea for the new year is to set a word. My instant reaction to that was wow, that’s profound. Rather than having a resolution that you drop off after a few days, finding a word that is adding meaning to you in multiple ways sounded far better. Guess what word I am choosing…after a bit of thought! Imperfect that is my word. As we evolve this year I will share with you how we are taking it forward. For now, we are starting with imperfect produce. We have imperfect radishes that we are using to make this lesser-known South Indian style preparation.
Prepping the radishes
Radishes or Raphanus sativus, come in long cylinder ones or small round varieties. They have red or white skin. Inside they can be white, variegated or watermelon colour. I choose the small round red varieties to make this dish. The skin is red here and the flesh white. To prep, these, wash them thoroughly especially if they are not in perfect shape. I use a toothbrush to get rid of the mud in the folds. remove the leaves (don’t discard make mullangi keerai poriyal) and trim the root. Now slice the radishes into wedges. Save a few radishes to make our much-loved Radish pear salad with tahini dresssing.
Ingredients to make puli mullangi
Red radishes: prep the radishes as per the notes above. These radishes are crunchy and have a slightly stronger peppery flavour than daikon. Thus goes nicely with the spices added. If you are looking for a low food map option make it with daikon as this has been tested.
Sambhar powder: the archetypal curry powder for anything South Indian is the Sambhar podi. It works for this one too imparting the classic mix of heat from the chillies, smokiness from the coriander seeds and complexity from the fenugreek.
Tamarind extract: a thick extract of tamarind is the souring agent in this puli mullangi. This along with the salt and the sambhar podi forms that thick sauce that coats the red radish wedges.
Tempering: spices most South Indian dishes start or layer on with a spice-infused oil. This is created by crackling mustard seeds, fenugreek seeds, curry leaves and red chillies in sesame seed oil. Seasoning: to balance the flavours salt is needed. My mum swears by crystalline salt in anything she wants to keep for a while. This is not the pink rock salt but clusters of sea salt that are not powdered. The flavour this imparts minutely changes depending on the other minerals in it. For acutely trained tastebuds like hers, these are important.
Puli mullangi is a lesser-known classic South Indian dish that pairs well with steamed rice meals.
Course Pickles, Side Dish
Cuisine gluten free, Indian, One pot, South indian
Keyword curry recipes, Indian vegetarian dinner, Pickle recipes
Prep Time 15minutes
Cook Time 25minutes
Servings 4people
Author mildlyindian
Equipment
Kadai
Cutting board
Knife
measuring cups and spoons
Ingredients
10 -15mediumradishesred salad variety
1/2cuptamarind extract
2-3tbspSambhar powder
salt to taste
For tempering
2tbspSesame oil
1tspmustard seeds
1/4tspfenugreek seeds
1-2dry red chillies
10curry leaves
Instructions
Wash and clean the radishes.
Slice them into wedges, Set them aside till needed.
Into the kadai or deep wok add the oil and mustard seeds.
Set on medium heat and as the mustard crackers add the fenugreek seeds.
When it turns aromatic add the red chillies ( break it in half for the heat) along with curry leaves and saute for a minute.
To this add the radishes and saute them for about 5-6 minutes.
Now add the thick tamarind extract, sambhar powder, salt and turmeric powder and mix it all well.
Cover and cook for 7-10 minutes, till the radishes release water and are fork tender.
Open the lid and mix to coat the gravy on the wedges.
Once the gravy thickens and coats the radishes well, the puli mullangi is ready.
Taste test and adjust salt.
Garnish with coriander leaves if using immediately.
Serving ideas for the radish in tamarind sauce
The puli mullangi is kind of a spicy side dish. You could pair it with a South Indian thali meal. For a simpler platter, I would choose keerai molagutal and puli mullangi with cooked millet. Fill up a wrap with some cooked beans, stir-fried kalonji rice and pieces for puli mullangi spicy filling wrapped burrito lunch on the go.
Meal prep and saving for later.
The puli mullangi will stay well in the refrigerator for up to a week. In freezer-safe containers, they stay well for up to 3 months. The radishes do go a bit limp but taste fantastic even upon thawing. Save in smaller portions so you thaw only what is needed.
Stay connected
This new year share with us what you think you will be doing. Stay subscribed to see how we are going with our word. Connect with us (instagram or facebook) as we plan to travel a bit more and share new locations and experiences with you.
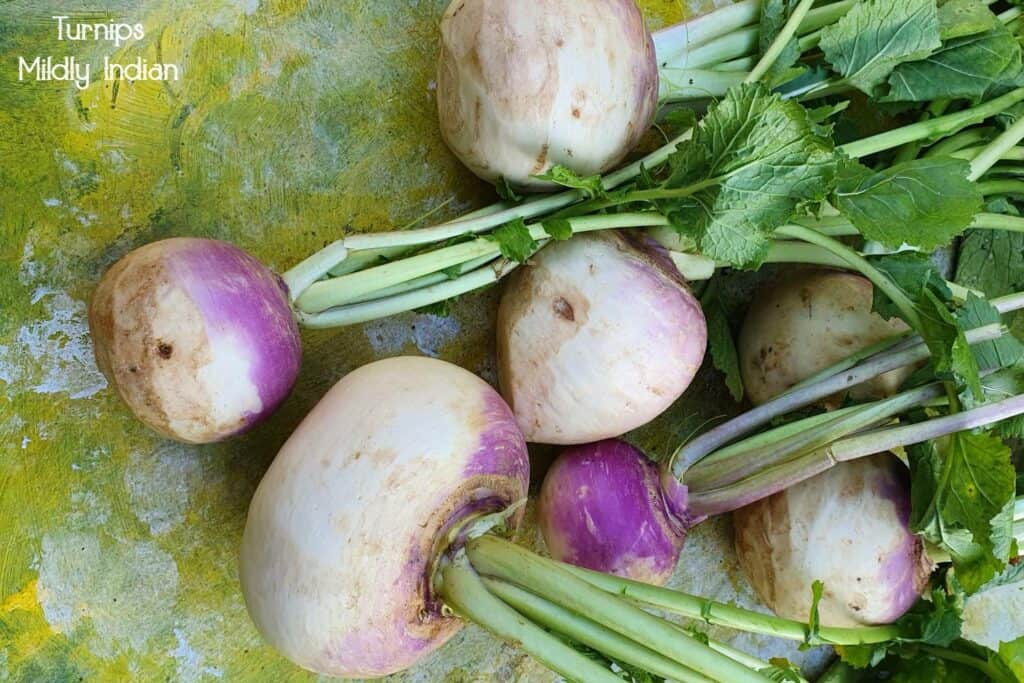
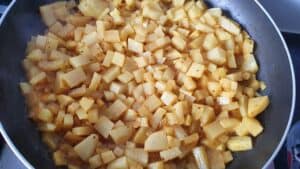
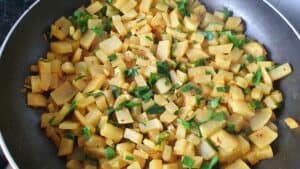
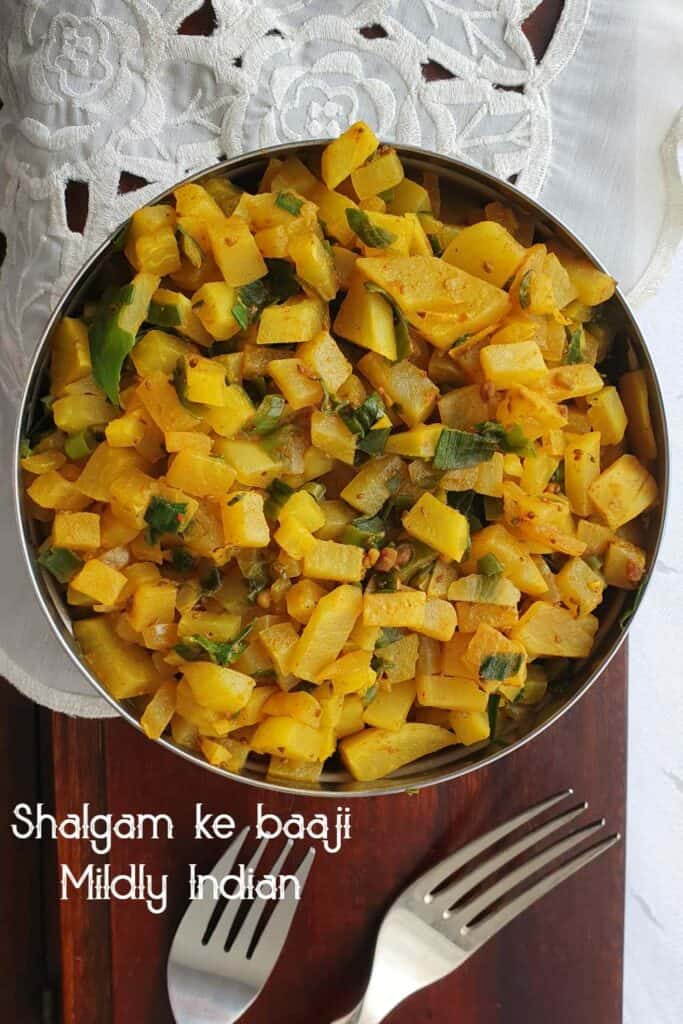
Once we had gotten through some soup recipes last week, the taste buds needed a gentle wake-up. Yet we are not up to the stage where stronger curries and foods can take over and run as a usual week. That will need a bit more time and getting back up to. Meanwhile, we have some veggies in the fridge that need to be used up. Here is a very easy shalgam ke baaji recipe made with fresh turnips. This dry turnip curry is vegan, gluten-free and free of nuts and coconut. Try out the shalgam ke baaji with fresh rotis and salad.
Understanding Turnips
There were two turnips I picked up with my grocery list. Turnips or neep are tap root vegetables with pale white skin or a green /pink top. They resemble beetroot in shape. Both the leaves and the bulbous root are edible. A fresh batch of spring turnips is delicious as salads similar to radishes. However, as the season progresses, I prefer cooking them to bring out the sweet flavour. To use the root, peel them and separate them from the greens. Chop up into pieces or wedges and proceed with your recipe.
What do turnips taste like?
Though the turnips look a lot like white beetroot, they taste a lot closer to radishes. Raw turnips have a characteristic crunch and a mustard green-like flavour. This flavour vanishes upon cooking replacing it with a mellow sweet flavour.
Turnips in Indian cooking
Turnips are not alien to Indian cuisine and are called shalgam. Typically this is grown in colder regions where you will find it more popular in cuisine than in the hot humid regions. Turnips in curry, stirfry or grated as a salad. Today’s recipe is a semi-dry preparation called shalgam ke baaji.
Masalas and ingredients for this baaji
Shalgam/ turnips- Fresh turnip roots that are peeled and diced are the ones that are needed to make this turnip dry curry. A peeler will work to get the peel off n then dice the flesh. You can use the turnip greens in this recipe. Wash and clean the leaves. Strip them off the stalk and chop them to add along with the diced root.
Onion- a small bit of onion sauteed adds so much flavour to this dish. I have used half a small white onion. If you have shallots, use that for extra flavour.
Spices – two levels of flavour are created in this simple recipe. One at first by tempering the fenugreek seeds and the carom seeds. For the second layer of flavour, salt, turmeric powder, roasted cumin powder and curry powder ( like Ken’s) is all you need. This curry powder can be sambhar powder, rasam powder, garam masala or Kitchen king masala.
The recipe card below gives the step-by-step details to make this recipe. Pin it onto your board from here for later use.
Peel the turnips and chip them into small pieces or strips.
Chop the spring onions and set aside till needed.
Chop the onion and set it aside till needed.
Into the frying pan, add the oil, carom seeds and fenugreek seeds.
Once the seeds crackle add the chopped onions and saute well.
To this add the chopped turnips and saute well.
Add the red chilli powder, turmeric powder, roasted cumin seeds curry powder.
Mix well, sprinkle water and cover and cook.
Remove and check if fork tender.
Add the spring onions mix well and cover and cook for another two minutes.
Once it is cooked mix well.
Remove into serving dish and the dish is ready to serve.
Putting together a meal
Shalgam ke baaji on a cooler night with a couple of phulkas sounds like home. Leftovers find themselves comfortably hidden in a curry bun or a sandwich for lunch the next day. These are the easiest ways I have tried with the turnip dry curry. As we were unwell, we had it with payaru kanji.
Meal prep and saving the leftovers.
Usually, I prep and chop the turnips on the weekend to help my day at work. The prepared baaji will stay well for 3 to 4 days in the fridge. I have never frozen this shalgam ki baaji. If you have success with this please let us know in the comments.
Stay connected
Shalgham ki baaji is a very basic side dish recipe, best enjoyed warm. When you make this, write a comment with a rating. Share this recipe with friends and family who may also enjoy some turnips.
We have added this post to the A-Z recipe challenge, ingredients in Hindi. Shalgam or turnips are one among the many ingredients which start with S.
Stay connected by Instagram, Twitter or Facebook to know what new we have been cooking. Stay safe and see you in the next post.
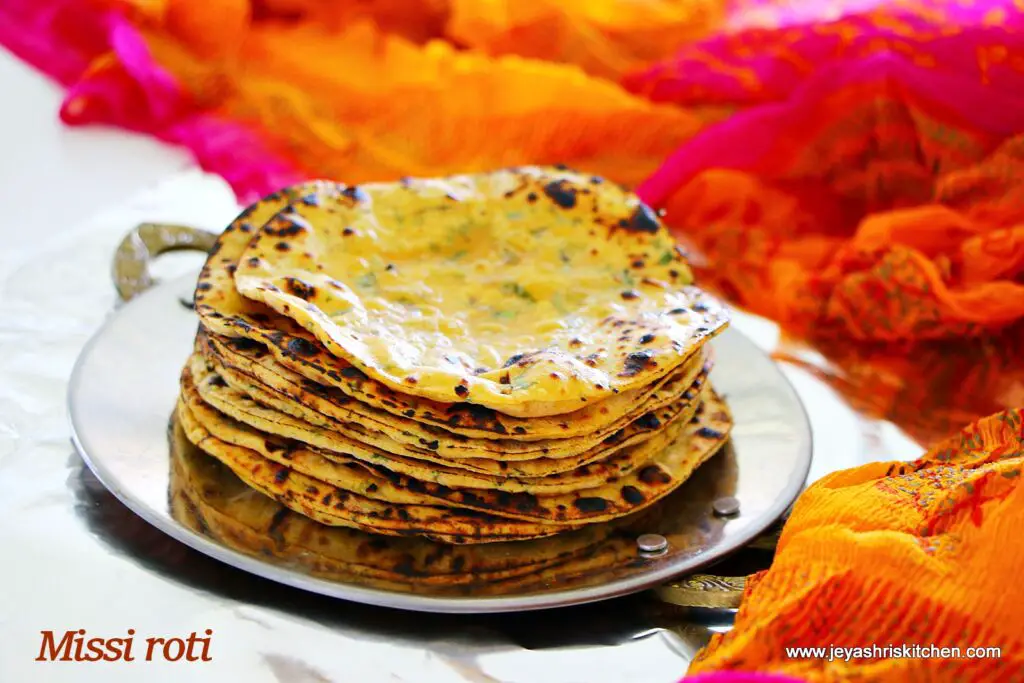
Missi roti recipe – A popular Punjabi roti recipe with a combination of gram flour, whole wheat flour, and spices. No onion no garlic Missi roti recipe with full video and step-by-step pictures.
Next to naan and Tandoori roti, missi roti is a popular Indian flatbread. It is a very popular dish in Punjabi and Rajasthani cuisine. Usually, we make Indian flatbread with whole wheat flour and the Naan is made using plain flour. This one is a mix of whole wheat flour and gram flour, also called kadalai maavu in Tamil and besan in Hindi.
We can pair this with any North Indian-style gravy or a simple dal. I tasted missi rotis in dhabas when we did a road trip from Delhi to Haridwar a few years back. Also, I tasted this in Jaipur many years back. They serve mini missi rotis, smeared with a generous dollop of butter on the top. It comes out soft but personally I feel, it should be served hot. I have posted a video on methi missi roti recipe in Jeyashris kitchen.
Popular Indian flatbread using whole wheat flour and gram flour
Course Dinner, Lunch, Main Course
Cuisine Indian
Keyword Indian flatbread, North indian recipe
Prep Time 30minutes
Cook Time 20minutes
Total Time 50minutes
Servings 10small rotis
Author Jeyashri suresh
Ingredients
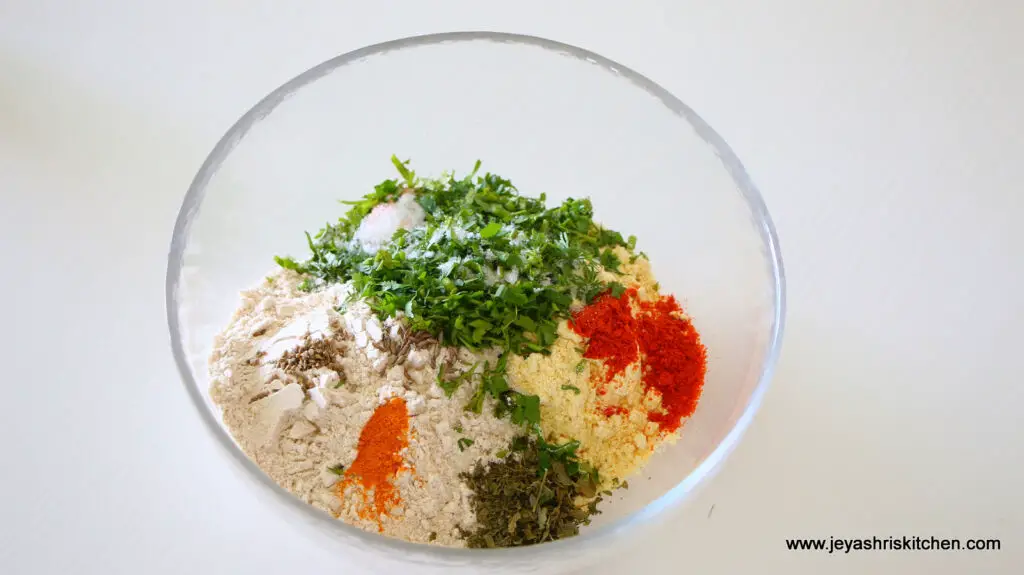
¾cupgram flour | besan| kadalaimaavu
½cupwhole wheat flour
1tspcumin seeds
¼tspajwain seeds | omam
1tspred chili powder
¼tspturmeric powder
1tspkasoori methi
3tbspcoriander leaves
Salt as needed
1tspoil
Water to knead the dough
Butter or ghee to spread on the roti
Instructions
In a bowl add the gram flour, wheat flour, cumin seeds, ajwain, red chili powder, turmeric powder, kasoori methi, coriander leaves an salt.
Mix well and add water little by little and make a smooth dough.
Keep this covered for 10 minutes
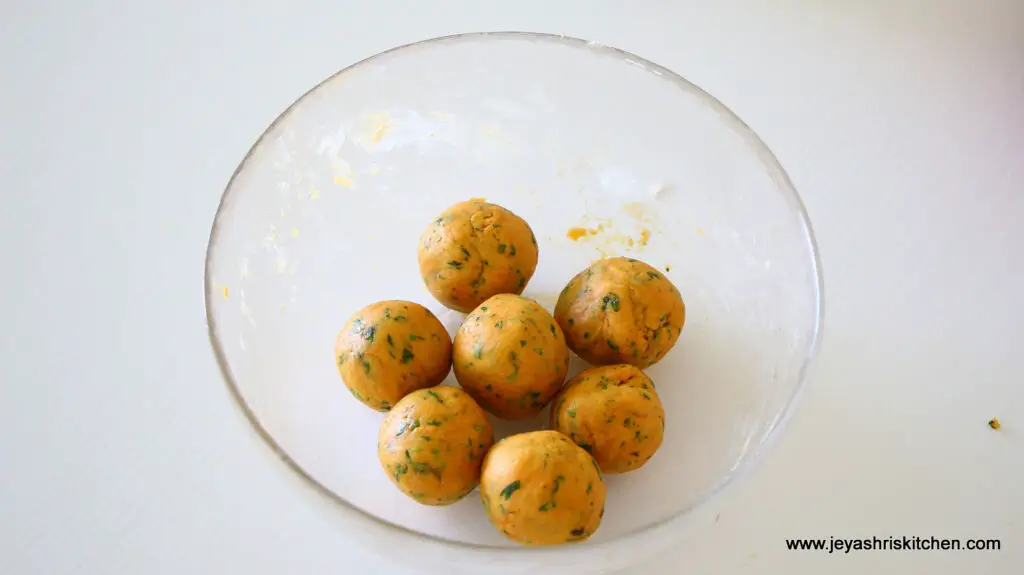
Make equal lemon sized balls.
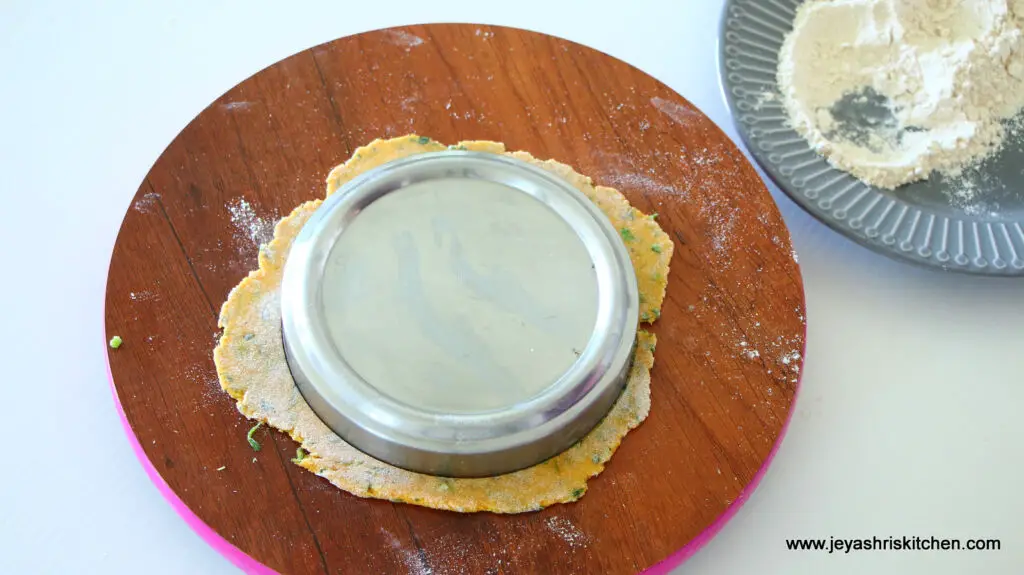
Take one dough ball and dust it with dry atta. You can use rice flour as well.
Roll this into a roti.
I used a lid to make into a perfect round as the edges were cracked. This is very common while making roti using gluten free flour.
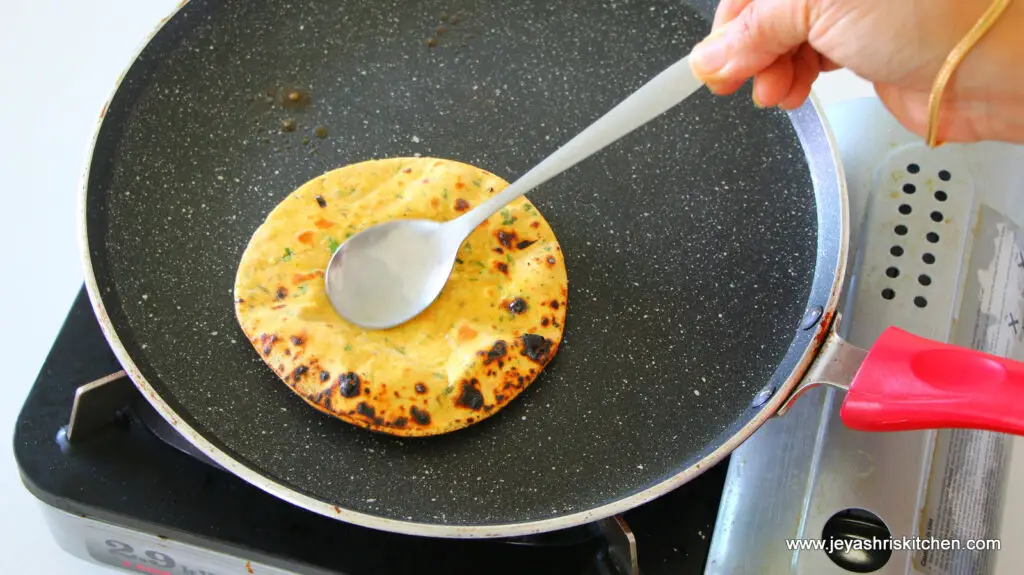
Place the rolled roti on a hot tawa.
Cook on both sides.
Take out and show it on open flame for 2-3 seconds.
This step is to give a dhaba style tandoor touch.
Apply butter on both sides.
Serve hot.
Repeat the same for the rest of the dough.
Missi roti tastes well with simple dal or any paneer sabzi.
Video
Notes
1. Finely chopped onion can be added to the dough.2. You can adjust the spices according to your taste.3. Finely chopped green chili can be added instead of red chili powder.4. Missi roti can be made gluten-free also, in that case, knead the dough with hot water.
In a bowl add the gram flour, wheat flour, cumin seeds, ajwain, red chili powder, turmeric powder, kasoori methi, coriander leaves an salt.
Mix well and add water little by little and make a smooth dough.
Add 1 tsp of oil and spread it over.
Keep this covered for 10 minutes
Make equal lemon sized balls.
Take one dough ball and dust it with dry atta. You can use rice flour as well.
Roll this into a roti.
I used a lid to make into a perfect round as the edges were cracked. This is very common while making roti using gluten free flour.
Place the rolled roti on a hot tawa.
Cook on both sides.
Take out and show it on open flame for 2-3 seconds.
This step is to give a dhaba style tandoor touch.
Apply butter on both sides.
Serve hot.
Repeat the same for the rest of the dough.
Missi roti tastes well with simple dal or any paneer sabzi.
Andhra’s most popular and healthy breakfast recipe, Pesarattu along with Allam pachadi i.e Ginger chutney is one of my favourite recipes with Green gram/ Mung beans. I try to make it at least once in two weeks. In Tamil, we call it as Pacha payaru dosai. Though I make it regularly at home, I have never shared the recipe in my blog.
People fondly call this Pesarattu as MLA Pesarattu as it is popular in the MLA head quarters in Hyderabad. Usually this Pesarattu is stuffed with plain rava upma and served with spicy and tangy Ginger chutney. Some people also spread onion, carrot and green chilli mixture over the dosa instead of stuffing upma in it.
Today I have shared a very simple recipe without any stuffing or topping as we like it that way. We simply need a tangy Allam pachadi to go with it. Basically Green gram is high in fibre and low in calories. So this Pesarattu dosa recipe would be ideal for people looking for weight loss. It also makes less bloating and gas when compared with other legumes. So anyone can easily consume it without any worries.
Ok, lets see how to make this Andhra special Pesarattu recipe with step by step pictures.
Pesarattu recipe - Andhra style Pesarattu recipe with rice
Pesarattu recipe - Andhra style pesarattu recipe with rice
Chopped onion, green chilli and carrot - for topping
HOW TO MAKE ANDHRA STYLE PESARATTU RECIPE
Wash and soak green gram along with rice for 4 to 6 hours.
Grind to a smooth or slightly coarse paste adding cumin seeds, green chilli and ginger.
Transfer to a bowl. Add salt and mix well.
Heat a dosa tawa. Spread the dosa thin or thick.
Drizzle oil or ghee. Cook the dosa till its crispy and well cooked.
No need to flip it. Flip the dosa and cook if you make it thick.
Serve with Allam pachadi / Ginger chutney.
METHOD - STEP BY STEP PICTURES
Wash and soak green gram for 4 to 6 hours. Grind it adding green chilli, ginger and cumin seeds to a smooth paste.
Transfer to a vessel. Add required salt and mix well. Check for batter consistency. Add water if needed.
Heat dosa tawa. Spread a ladleful of batter. Make it thin or thick as you like. Cook the dosa in low to medium flame till its cooked well. Drizzle oil or ghee around the Pesarattu.
Cook till the bottom turns light golden brown. No need to flip the other side if you want crispy dosa else you can flip and cook for few more minutes.
For variations, you can spread finely chopped onion and carrot all over the Pesarattu, flip and cook the other side.
Serve hot with Ginger chutney / Allam pachadi.
Enjoy !
Note
I grind the batter smooth. If you like, you can grind it slightly coarse.
Adjust the quantity of green chilli as per your taste.
Make this healthy and tasty Green gram dosa / Pesarattu and enjoy with Allam pachadi / Ginger chutney !
If you are looking for the easiest vegetable side dish, this healthy veggie stir-fry with mushrooms and zucchini is the one you should bank upon! This is super quick to make and pairs fantastic with any meat of your choice this holiday season! Why I love this Veggie Stir-Fry Since the time I started mindful eating, […]
Let’s welcome the sunny summer with this refreshing and hearty grilled chicken breast recipe! Load it up with your favorite fresh summer veggies and this will become your go-to meal in no time! Grilling meat and veggies is my most favorite type of cooking not only because of its ease of preparation, but also because I […]