❌

Reading view

There are new articles available, click to refresh the page.

Chai Tiramisu Cake (Chaimisu!)

By: Richa

Chai tiramisu cake has a delicious, moist, chai-infused cake with layers of cardamom cream dusted with a cocoa-chai topping. It is an absolutely fabulous fusion dessert perfect for Diwali or any special occasion! (soy-free with gluten-free or nut-free option)

slice of chai tiramisu cake on a plate with a fork

We’re actually making a super quick cake for this chai tiramisu, instead of using ladyfingers. The rich, creamy textures of the cake and cardamom cream give you the decadence of tiramisu without any eggs or dairy needed.

You can make this with vegan ladyfingers, if you can find those, or you can use vegan cake rusks. Cake rusks are like plain biscotti available in Indian stores, and they work well as a substitute for ladyfingers. Just soak them in the chai, and use them for layering. Or, you can make this simple cake with just a few ingredients.

chai tiramisu cake before slicing

I heard you about wanting a cake that used a cream topping that didn’t need a freezer to set. The cardamom cream for this chai tiramisu cake sets up thick and spreadable at room temperature, no freezer needed.

Whether you make the cake from scratch or use one of the substitutions, this incredibly delicious chai tiramisu is a hit at any dinner party. It also freezes well, so you can make it ahead. Just thaw it overnight in the fridge.

slice of chai tiramisu cake on a plate with a fork taking a bite

Why You’ll Love Chai Tiramisu

  • quick, easy, moist, delicious cake soaked in flavorful milk chai
  • rich, decadent cardamom cream that sets up with no freezer needed
  • cocoa-chai sprinkle on top for extra flavor
  • soy-free with gluten free or nut-free options

Continue reading: Chai Tiramisu Cake (Chaimisu!)

The post Chai Tiramisu Cake (Chaimisu!) appeared first on Vegan Richa.

Creamy Tortellini Soup (30 Minutes!)

By: Richa

Pillowy tortellini and a velvety tomato-cream broth, enriched with my easy homemade sausage spice mix. Bursting with bold Italian flavors and ready in just 30 minutes, it’s your new favorite irresistible soup.

bowl of tortellini soup with a spoon and a side of bakery bread

I got some almond ricotta–stuffed tortellini, so I decided to make an amazing soup with it. This is a hearty, delicious, and easy tortellini soup recipe. It uses the usual suspects of an Italian-flavored soup: aromatics, carrot, celery, Italian herbs, and vegan sausage. Those flavors pair up with the tortellini, tomato purΓ©e, and some non-dairy cream.Β 

It turns out absolutely delicious.

pan of tortellini soup with a ladle in it

I make this spice mix which adds all the flavor of sausage to whatever plant based protein you choose. This spice mix combines smoked paprika, fennel seeds, garlic powder, black pepper, oregano, and pepper flakes, and it’s just so versatile and flavorful!

First make the spice mix, and then decide which protein you want to use for the sausage. You can use vegan sausage, lentils, walnuts, pecans, chickpeas, crumbled tofu, chopped up soaked soy curls, seitan, or whatever else you like.Β 

spoon taking a bite of tortellini soup

Cook your protein of choice with some garlic and the spice mix, then add all the aromatics. Fold in the tomato sauce, tortellini, and some stock, then add non-dairy cream at the end. The tortellini cooks up in the same pan with the rest of the soup.

The soup comes together within 30 minutes in just 1 pan, and is creamy and satisfying!

bowls of creamy tortellini soup on a wooden table

Why You’ll Love Tortellini Soup

  • super easy 1-pot meal ready in 30 minutes
  • creamy, tomatoey broth with sausagey flavors and tender, cheesy tortellini
  • super versatile! Use whatever plant-based protein you like!
  • Easily made gluten-free, soy-free, and/or nut-free.

Continue reading: Creamy Tortellini Soup (30 Minutes!)

The post Creamy Tortellini Soup (30 Minutes!) appeared first on Vegan Richa.

Viral Tiramisu Chia Pudding for Weight Loss Friendly Breakfast | How to Make Tiramisu Chia Pudding

By: Priyanka

Being a daily consumer of chia seeds, I had to try this viral Tiramisu chia pudding to see if it’s worth all the hype at all! So I tried it and, lo behold, it is so damn good that I have to now repeat it frequently!

If you ask me to name one dessert among the universe of all desserts that I can have without thinking twice then that has to be a classic Italian Tiramisu!

But yes, that will be in a parallel universe where I wouldn’t worry about consuming excess calories that come free of cost with the delicious taste of a generous serving of Tiramisu!

With all that love and affection towards Tiramisu, I also jumped into the bandwagon of a spin-off of Tiramisu made with the cult favorite of all fitness enthusiasts these days!

Chia seeds! So here I present my version of the viral Tiramisu chia pudding!

What is Tiramisu chia pudding?

If you love to watch cooking/recipe videos, I am sure you have come across this viral recipe in your feed many times already!

Just in case this is something new to you and I have the privilege to introduce you to this current social trend, then let me decode it for ya!

First, let’s see what Tiramisu is and then we can figure out its connection with the Tiramisu chia pudding!

A classic Tiramisu has multiple layers of classic lady finger biscotti soaked in freshly brewed coffee with alternating thick layers of whipped up mascarpone cheese in between two layers of lady fingers.

The final layer of mascarpone is dusted with a generous amount of cocoa powder. Then the assembled Tiramisu is chilled in the refrigerator overnight to set things up.

This also allows the flavors of coffee and cocoa to mingle with each other resulting into a mind-blowing no-bake dessert making you fall in love with it instantly!

The post Viral Tiramisu Chia Pudding for Weight Loss Friendly Breakfast | How to Make Tiramisu Chia Pudding first appeared on Flavor Quotient.

Tiramisu-Chia-Pudding-FQ-2-7023

JalapeΓ±o Popper Cheese BallΒ 

By: Richa

This vegan jalapeΓ±o popper cheese ball is super easy: no soaking or blending required! Just 10 minutes of prep time, and it’s ready in about 30 minutes. Perfect for parties with veggies or crackers. (Gluten free, soy free option)

jalapeno popper cheese ball with scoops taken out, so you can see the inside texture

Five reasons you should make this jalapeΓ±o popper cheese ball:

  1. No soaking the nuts overnight.
  2. No blending the nuts.
  3. No straining a blended mixture.
  4. Just 10 minutes of active time in the kitchen.
  5. Uses just a few everyday ingredients.
jalapeno popper cheese ball on a serving tray with crackers and veggies

It is just mind-blowingly delicious for the small amount of effort this recipe needs. You just make this flavor mixture that’s like a jalapeΓ±o dip with non-dairy yogurt, some brine from pickled jalapeΓ±os, and some spices. Then, mix in some almond flour and fresh and pickled jalapeΓ±os to create a dough. Shape it into a ball, and bake. That’s it!

Baking this vegan cheese ball helps the flavors meld together and takes a little bit of the bite out of the jalapeΓ±os. It just enhances the overall flavor and texture. The result is this fantastically delicious vegan cheese ball to serve with some crackers, veggies, cruditΓ©s, or however else you like.Β 

hand serving some jalapeΓ±o popper cheese ball onto a cracker

This is also such a versatile vegan cheese ball. There are lots of fun ways to serve it! You can make sandwiches with it by spreading it on some bread, and pairing it with some fresh tomatoes or other veggies or some crisp tofu. Or add dollops of this mixture to salads.

It also works great in mini quesadillas! Just spread some of the jalapeΓ±o popper cheese ball onto small tortillas with some grilled veggies, fold them over, and cook until crisp in the oven or on the stovetop.Β  If you’re going to use it to make quesadillas, you don’t even need to bake the cheese ball, because cooking the quesadillas will cook the cheese mixture then.

jalapeno popper cheese ball in the baking pan after baking

Continue reading: JalapeΓ±o Popper Cheese BallΒ 

The post JalapeΓ±o Popper Cheese BallΒ  appeared first on Vegan Richa.

Smoky Cajun Veggies & Smashed White Beans (All on One Sheet-Pan)

By: Richa

Crispy smashed white beans and Cajun veggies roasted on one sheet pan, then tossed in a creamy, tangy chipotle-lime dressing. A versatile meal you can serve in bowls, tacos, or wraps.

cajun sheet pan beans veggies in a bowl

This is a super easy and absolutely delicious meal that comes together fairly quickly. You just chop up all of the vegetables and add them to a pan. Smash the beans using a bowl, and add them to the pan as well. Add some spices, oil, and lime juice, toss well, and then bake until the veggies are tender and the beans are lightly crisp.

Meanwhile, you make this creamy, delicious, spicy, lightly sweet, and tangy dressing. It goes amazingly well over these roasted veggies. I mean, this is a dressing you can use on any salad, wraps. burritos, or any which way. It’s just fantastic with all of that smoky chipotle spice flavor, the tang from the lime juice, the creaminess from the non-dairy yogurt, and some cheesiness from the nutritional yeast. It’s just fantastic.

tortilla stuffed with cajun sheet pan beans veggies

You can serve this roasted bean and veggie mixture as a bowl, in wraps, stuffed into pita bread, or over a baked potato or rice. There are so many ways to serve this! Do let me know in the comments how you served it as well, because I love hearing from you guys, and many times you surprise me with the creative ways you serve the recipes.

You want the beans to be sort of lightly flattened but not entirely smashed. You’re just trying to increase the surface area, so they can bake up nice and crispy in the oven.

spoon taking a bite of cajun sheet pan beans veggies

If you don’t want to smash them, that’s fine, too. Just add them directly to the veggies on the sheet pan and bake. The beans on the edges will still get crisp. If you want all of the unsmashed beans to get crisp and act like croutons, then bake them on a separate sheet so that they crisp up nicely.

This dish is spicy, smoky, creamy, and tangy. It’s just an amazing blend of flavors! It has protein from the beans, nutritional yeast, and yogurt.Β  You can up the protein by adding hemp seeds into the dressing or as a topping.

close-up of cajun sheet pan beans veggies in a bowl

Why You’ll Love these Smashed Bean Veggie Bowl

  • easy meal all cooks on one large or two small sheet pans
  • amazing textures from crispy smashed beans, tender roasted veggies, and creamy dressing
  • incredible tangy, smoky, savory, slightly sweet flavors
  • versatile! Serve as wraps, in pita, in bowls, or over rice, baked potato, or quinoa
  • naturally gluten-free, soy-free, and nut-free

Continue reading: Smoky Cajun Veggies & Smashed White Beans (All on One Sheet-Pan)

The post Smoky Cajun Veggies & Smashed White Beans (All on One Sheet-Pan) appeared first on Vegan Richa.

Cilantro Mint Chutney White Beans over Crispy Tostadas (no-cook! Papri Chaat inspired)

By: Richa

Indian Chaat meets Tostadas! Cilantro mint lime chutney marinated beans on crunchy tostadas with sweet maple lime sauce and cooling yogurt, are an Indian fusion dish that’s a perfect starter, snack, or even entree! No cook (Options for soy-free nut-free gluten-free)

close-up of chutney bean tostadas on the cutting board

These no-cook tostadas use canned beans, prepared tostadas, and lots of delicious sauces – no cooking needed! The only cooking you’d need to do is if you are making your tostadas from tortillas. Prepared tostadas are readily available in most grocery stores.

I wanted to make a fun dish with beans, and I took inspiration from chaat, which is a family of Indian snacks or street food characterized by these awesome combinations of different textures and flavors. Especially papri chaat which has crisp crackers paired with mashed potatoes or chickpeas or both and chutneys, sauces and yogurt for a fantastic salad like hearty nachos if you will. Many chaat recipes have crispy, spicy, sweet, and tangy all together. They’re great as snacks or can be a refreshing meal.

marinating white beans and veggies in green chutney

I took inspiration from those flavors and textures. Usually, I make this chickpea potato chaat with small crackers, where you take some cooked chickpeas and cooked potatoes, toss them with some spices and chutneys, and layer them with yogurt, more chutneys, and some chopped crunchy veggies.

I turned that dish into this tostada, where we take crispy tostadas and make marinated beans that are soaked in a delicious green chutney, instead of chickpeas, along with cucumber and onion. We top the tostadas with these beans and then add a good drizzle of seasoned non-dairy yogurt and this sweet, tangy, maple-lime sauce to bring all of those flavors together. It’s absolutely fantastic and delicious! The maple lime sauce is a sub for tamarind date chutney. If you have tamarind chutney, use that for more Indian chaat flavor.
Try more Indian salads- Mango Zucchini chickpea Indian spiced oil salad and my Kachumber Salad !

chutney white bean tostadas on a wooden cutting board

This recipe is very versatile. If you want to control the heat, use less of the green chili, and choose a milder chili.Β  If you don’t have tostadas, you can make your own! Those instructions are in the recipe notes. If you don’t like cilantro, you can make a mint chutney with more mint leaves instead of the cilantro.

Chutney bean tostadas are just fabulously crispy, zesty, refreshing, and hearty. They are a perfect summer meal!

all of the chutney bean tostadas components ready to assemble

Why You’ll Love Chutney Bean Tostadas

  • perfect warm weather meal or snack – no cooking required!
  • incredible combination of flavors and textures! marinated beans, sweet and savory chutneys, creamy cooling cumin yogurt drizzle, on crunchy tostadas
  • soy-free and nut-free with easy gluten-free option

Continue reading: Cilantro Mint Chutney White Beans over Crispy Tostadas (no-cook! Papri Chaat inspired)

The post Cilantro Mint Chutney White Beans over Crispy Tostadas (no-cook! Papri Chaat inspired) appeared first on Vegan Richa.

Sheet Pan Veggies and Beans with Lemon Yogurt Sauce

By: Richa

High protein and fiber. Mix everything right in the pan meal, this Sheet pan roasted veggies and beans with Creamy Lemon Yogurt sauce, has amazing flavor and texture! Wrap it, bowl it, swipe with bread! So good! Gluten-free, options for soyfree, Nutfree

sheet pan veggies and beans over creamy lemon yogurt sauce on a white plate

This is an easy, refreshing, spring and summer meal that you can put together within minutes. You make this amazingly refreshing lemon yogurt sauce and pair it with savory roasted veggies and crispy, crunchy beans that have been tossed in spices like paprika, coriander, black pepper, and garlic. They are crisp on the outside and tender on the inside.

The warm veggies and the cooling yogurt sauce are just fabulous together.

sheet pan veggies and beans over creamy lemon yogurt sauce on a white plate with bread for dipping

This is a veggie-heavy recipe rich in fiber, with over 14 grams per serving. It contains 15 to 25 grams of protein per serving, depending on the garnishes and non-dairy yogurt used. The protein in these sheet pan roasted vegetables comes from the beans, yogurt, sesame or hemp seeds, and even the vegetables. For an even more filling meal, serve with whole grain flatbread, pita, or naan.

You can pair them with the sauce in any way you like. You can put the sauce on a plate, top it with the roasted veggies, then top with some seeds and sprouts and a good squeeze of lemon juice.Β 

making a wrap from sheet pan veggies and beans

Or make a wrap with pita bread or naan bread. Just warm the bread, add the yogurt sauce, the roasted veggies, some more sauce, sprouts, cucumber, and a squeeze of lemon, then serve.

Sheet pan veggies and beans are absolutely delicious any which way you serve it. You can even make small tacos out of it!

Why You’ll Love Sheet Pan Veggies and Beans

  • super easy 1-pan meal celebrates delicious spring and summer veggies
  • tender-crisp roasted vegetables with crunchy roasted white beans
  • creamy, vibrant, 1-bowl lemon yogurt sauce
  • naturally gluten-free, soy-free, and nut-free

Continue reading: Sheet Pan Veggies and Beans with Lemon Yogurt Sauce

The post Sheet Pan Veggies and Beans with Lemon Yogurt Sauce appeared first on Vegan Richa.

Tofu Majestic (Vegan Chicken Majestic)

By: Richa

Tofu majestic is a vegan version of the popular South Indian starter, chicken majestic. Spicy, crispy tofu in a thick, spicy sauce is an absolutely delicious starter or side! You can easily control the heat, if you don’t like your food too spicy. (Options for gluten-free, soy-free, and nut-free)

tofu majestic in a bowl with rice

Chicken majestic is pretty popular in restaurants in the state of Andhra Pradesh, and especially in the city of Hyderabad. It is a spicy, crispy chicken dish that is usually fried or pan-fried and tossed in a thick, delicious, spicy sauce.Β It has elements from indo Chinese cuisine and the combination with South Indian flavors makes it a finger licking can’t stop good appetizer!

It is served as-is as a starter with a side of chutneys or a side salad. You can also add it to wraps or serve with rice. It is absolutely mindblowingly delectable and delicious. The tofu is crisped with some cornstarch and rice flour and some spices. Then tossed in a thick sauce to coat. If you want to keep these crisp, toss and serve immediately!

tofu majestic in a bowl with laccha onions

Tofu majestic is definitely hot with 4 heat elements in it, there’s green chilies, Kashmiri chili powder, black pepper and sambal oelek! It can get hotter depending on the green chilies that you use. To manage the heat, use milder green chilies and use less of the black pepper and Kashmiri chili powder.

I like to serve this with a side salad of onion and cucumber. It’s kind of like quick pickled onion with Indian spices called laccha pyaza. See the recipe notes for instructions for making the crispy, vibrant laccha onions. You can also serve with chutneys of choice or a creamy dip on the side to mellow the heat.

tofu majestic in the pan after cooking in the sauce

Why You’ll Love Tofu Majestic

  • flavorful, crunchy, battered tofu in a thick, spicy sauce
  • bake or pan fry the tofu
  • versatile! Serve on its own, with chutney or creamy dipping sauce, with a fresh salad, or as wraps
  • easy to make gluten-free, nut-free, and even soy-free.

Continue reading: Tofu Majestic (Vegan Chicken Majestic)

The post Tofu Majestic (Vegan Chicken Majestic) appeared first on Vegan Richa.

Gochujang Tacos with Yum Sauce Slaw

By: Richa

Super delicious gochujang tacos with creamy, crunchy yum sauce slaw are incredibly easy to make without a ton of ingredients. Crispy gochujang tofu, creamy gochujang slaw dressing, sweet spicy maple gochujang drizzle! Triple gochujang!

close-up of gochujang tacos

These tacos! They celebrate gochujang in a way you’ve never experienced! Crispy gochujang tofu! Creamy gochujang sauce for the slaw and for dressing! And a sweet spicy gochujang glaze to finish! Triple gochujang.

These tacos are super delicious and amazing! They come together fairly quickly and use many same ingredients in the different components of the taco. Despite that, there’s so much overall texture and flavor that they’re fabulous to whip up and enjoy on any weekday or on the weekend.

I love to make this tofu. It’s just super flavorful. You’ll want to double or triple the tofu recipe, so you’ll have leftover tofu handy to use in salads, wraps, sandwiches, bowls, etc. throughout the week.

bite shot of a gochujang taco

Gochujang tacos are very simple to make. We take some tofu and marinate it in a gochujang, ginger-garlic, soy, and maple mixture, and then bake it.

Meanwhile, make the crunchy, creamy slaw. We make a quick, creamy dressing using gochujang again along with some lime juice, maple syrup, and non-dairy yogurt or vegan mayo. You use that dressing to make the slaw and to dress the tacos later on, so you don’t have to make multiple dressings.

gochujang tacos on a piece of parchment paper

I usually like to finish it off with a gochujang-maple drizzle. You don’t have to do this, but it adds some extra heat and a flavor punchβ€”so definitely try to make that one as well.

These tacos are fantastic when the slaw is fresh and crunchy, the tofu is spicy and chewy and crisp! The creamy dressing adds richness, and the gochujang drizzle adds sweet heat. The pickled jalapeΓ±os bring a tangy heat that ties it all together.

Why You’ll Love Gochujang Tacos

  • crispy gochujang tofu with creamy, spicy, crunchy slaw in warm tortillas
  • simple ingredients – slaw and tacos use the same sauce!
  • versatile! Use the tofu to make tacos or to top salads or bowl meals or in sandwiches or wraps!
  • naturally nut-free with gluten-free and soy-free options

Continue reading: Gochujang Tacos with Yum Sauce Slaw

The post Gochujang Tacos with Yum Sauce Slaw appeared first on Vegan Richa.

Eggless Chocolate Muffins | Sinfully Decadent Dark Chocolate Muffins without Eggs

By: Priyanka

If you are looking for the absolutely perfect eggless chocolate muffins recipe with a no-fail guarantee then this is it! I can vouch for these decadent chocolate muffins which are made without any eggs yet turned out super-moist with a melt-in-mouth texture!

Eggless baking was not my forte, but after I found this eggless chocolate muffins recipe on YouTube on this beautiful channel and tried it twice, things have changed for good!

I am seriously amazed how moist and tender these eggless chocolate muffins turned out and with that bitter-sweet taste of dark chocolate, these are real mood-boosters!

If you think that eggless muffins or cakes do not rise enough, this recipe will prove you wrong! These eggless chocolate muffins rose like a dream, making a super-fluffy & beautifully soft internal texture.

Why are these Eggless chocolate muffins special?

Since the time I have started a β€˜no-sugar’ (or β€˜low-sugar’ to be more realistic!) diet, I have minimized the frequency of baking cakes or any desserts for that matter!

Otherwise how would you be able to resist the home-baked sweets which are just too good to not eat!

But on a fine morning I started craving for something deep dark chocolatey which is not too sweet but has that bakery style texture. And it was too strong a craving!

So I started searching for that dreamy chocolatey bite and these eggless chocolate muffins appeared with all their glory! And it was simply impossible to resist not making them immediately!

After ages I baked these sinfully decadent chocolate muffins which turned out exactly how I desired and relished them with all my soul!

At the same time, I had to remain mindful of my weight loss journey where I have put in a lot of hard work and as you know too much of these can instantly add extra pounds on your scale!

Hence I had to keep a check on my craving for these goodies; so I distributed half of them among my neighbors (hopefully they liked them as much as we did!).

This way I could enjoy my home-baked eggless chocolate muffins without overdoing them way too much! Absolute win-win!

The post Eggless Chocolate Muffins | Sinfully Decadent Dark Chocolate Muffins without Eggs first appeared on Flavor Quotient.

Eggless-Chocolate-Muffins-FQ-2-1

Labneh Balls

labneh balls wrapped in herbs and marinated in extra virgin olive oil

Labneh Balls recipe, you’re in for a treat! These creamy, tangy, and flavorful cheese balls are a staple in Levantine and Middle Eastern cuisine.

β€œYou’ve tried hummus-now meet its cooler,Β roll‑ableΒ cousin! Watch these tangy labneh balls go from plain yogurt to mezze magic in a snap. πŸ§€βœ¨β€

Made from strained yogurt, Labneh is a versatile dairy product that can be used as a spread, dip, or in this case, formed into delectable balls. Whether you’re hosting a gathering or just looking for a fun and easy snack.

TL;DR

Strain salted yogurt 48‑72β€―h β†’ roll into 1‑inch balls β†’ air‑dry 12β€―h β†’ coat with za’atar & herbs β†’ submerge in good oliveβ€―oil. Keep chilled up to 1β€―month (or shelf‑stable 2β€―weeks if pH ≀ 4.4). Eat on mezze platters, salads, or toasts!

Why Should You Make Labneh Balls?

  • High‑protein, budget‑friendly:uses plain yogurt.
  • Make‑ahead: 10β€―min hands‑on, keeps for weeks.
  • Versatile flavour canvas: swap herbs & spices.
  • Bariatric‑diet & Weight‑Watchers‑friendlyΒ (2β€―points per ball).
  • Naturally gluten‑free & vegetarianΒ (easy vegan option below).

Ingredients You’ll Need

To get started, here’s what you’ll need:

  • Yogurt: Thick, full-fat yogurt.
  • Olive oil: For preserving and flavor
  • Salt: To taste
  • Za’atar: A popular Middle Eastern spice blend
  • Sumac: A tangy, lemony spice
  • Beetroot powder: For a vibrant color and earthy flavor
  • Pistachios: Finely chopped, for coating
  • Cheesecloth or a tea towel: For straining the yogurt

Ingredient notes & smart substitutions

  • For Yogurt you can use Full‑fat Greek = quickest, but any unflavoured yogurt works. ForΒ vegan labneh ballsΒ use thick coconut yogurt + Β½β€―tsp agar in the oil.
  • Fine sea saltΒ (1β€―tsp): Essential for whey drainage & safe preserving.
  • Extra‑virgin oliveβ€―oil(2–3β€―cups): Choose a fruity oil; mustΒ fully coverΒ the balls.
  • Coating mix: Classic:Β za’atar, dried mint, Aleppo pepper. Try smoked paprika + garlic, dukkah, crushed pink peppercorns, or everything‑bagel seasoning.
  • Optional flavour boosters: Lemon zest curls, dried rose petals, chilli flakes, roasted garlic cloves in the jar.

Step‑by‑step: From yogurt tub to bite‑size cheese balls

1. Strain – 48 to 72β€―hours

  1. Stir salt into the yogurt.
  2. Line a sieve with a double layer of cheesecloth; place over deep bowl.
  3. Pour yogurt in, knot the cloth, and refrigerate 48β€―h (60β€―h for ultra‑firm). Discard or save whey for smoothies.

2. Roll & air‑dry

  1. Unwrap thick labneh; it should resemble cream cheese.
  2. Lightly oil your palms and roll into balls.
  3. Arrange on parchment; let air‑dry for 40 minutes.

3. Coat & marinate – ready to eat after 24β€―hours

  1. Roll each ball in chosen herb/spice mix.
  2. Pack into sterilised glass jar, layering flavour extras.
  3. Pour oliveβ€―oil until balls areΒ completely submergedΒ (no peaks above oil).
  4. Seal and chill in fridge for 24β€―hrs for flavours to meld.

Food‑safety & storage

  • TargetΒ pH ≀ 4.4Β (yogurt already ~4.0).
  • UseΒ sterilised jarsΒ (10β€―min boiling water bath).
  • Keep submerged in oil to exclude oxygen; storeΒ refrigerated up to 4β€―weeks.
  • For counter‑top gifting: add Β½β€―Tbsp white‑wine vinegar per cup oil β†’ shelf‑stable 14β€―days <β€―23β€―Β°C.
  • Freeze?Β Yes! place balls on tray to freeze, transfer to bag (oil becomes grainy so freeze without oil).

Hint: Be Patient while straining, because the longer you strain the yogurt, the firmer your Labneh Balls will be. For a thicker consistency, aim for at least 48 hours of straining.

Variations You Can Try

  • Herbed Version: Mix finely chopped fresh herbs like dill, parsley, or chives directly into the Labneh before forming the balls.
  • Spicy Version: Add a pinch of cayenne pepper or crushed red pepper flakes to the Labneh for a spicy kick.
  • Zesty Version: Add grated lemon or lime zest to the Labneh for a refreshing, citrusy flavor.
Labneh Balls

How to Store and Reheat

  • Storing: Labneh Balls can be stored in the refrigerator for up to two weeks, as long as they’re submerged in olive oil. This method not only preserves them but also allows the flavors to deepen over time.
  • Reheating: If you prefer your Labneh Balls warm, you can lightly warm them in the microwave or oven, but be careful not to melt them. They’re best enjoyed at room temperature.

Top Tip

For the best flavor and texture, let the Labneh Balls marinate in extra virgin olive oil for at least a few hours before serving. If the spice mixtures don’t stick well, lightly coat the them in olive oil before rolling them in the spices for a better adherence.

Serving ideas

  • Build aΒ mezze platterΒ with hummus, muhammara & olives.
  • Smash ontoΒ sourdough toastΒ with roasted tomatoes.
  • Crumble overΒ roasted veggies or grain bowls.
  • Skewer with cherry tomatoes & basil for aΒ picnic appetiser.
  • Add to officeΒ snack boxesβ€”pair with cucumber sticks for a 10‑g protein nibble.

FAQs about the Labneh Balls Recipe

How long do Labneh Balls last?

When stored properly in olive oil, they can last up to two weeks in the fridge.

What’s the best way to serve Labneh Balls?

Serve them with warm pita, crackers, or veggies. They’re also great for topping salads or adding to a cheese board.

Can I make Labneh Balls with non-dairy yogurt?

Yes, you can use non-dairy yogurt, such as coconut or almond yogurt, to make dairy-free Labneh Balls. Just ensure it’s thick enough to strain.

What can I do with the leftover olive oil?

The olive oil used to preserve Labneh Balls is infused with flavor and can be used in salad dressings, marinades, or drizzled over roasted vegetables.

Can I freeze labneh balls?

Yes! you can freeze the rolled balls on a tray, then bag. When you want to serve, thaw overnight, coat & jar in fresh oil.

Is labneh healthier than cream cheese?

Labneh provides double the protein, gut‑friendly cultures, and around 40β€―% fewer calories per ounce.

Shanklish vs labneh balls?

Shanklish is aged, often coated in za’atar and left to dry into a firm cheese. Labneh balls are fresh and spreadable.

What yogurt works best?

Full‑fat Greek gives quickest drainage, but plain whole‑milk yogurt tastes creamiest. Avoid flavoured or low‑fat (watery).

More Such Recipes

Watch Video

If You like this recipe and made it Please rate the recipe. It helps us to reach more people. For the Latest updates Subscribe toΒ Rekha’s Whatsapp. You can follow me onΒ Instagram,Β Facebook,Β Youtube,Β PinterestΒ for more food inspirations.

Labneh Balls in Olive Oil
Print

Labneh Balls

Learn how to make easy Labneh Balls with hung yogurt, Za’atar, Pistachios, and Sumac. A perfect Middle Eastern snack or appetizer!
Course Appetizer, Snack
Cuisine Levantine, Middle Eastern
Keyword Labneh Balls, Shanklish, yogurt recipe
Prep Time 15 minutes
Draining time 1 day
Total Time 10 minutes
Servings 6
Calories 81kcal

Equipment

  • 1 Cheesecloth or a tea towel: For straining the yogurt

Ingredients

  • 2 cup Yogurt full-fat yogurt
  • 1 tbsp Olive oil
  • 1 tsp Salt
  • 1 tsp Za’atar
  • 1 tsp Sumac: lemony spice
  • 1 tsp Beetroot powder
  • 1 tbsp Pistachios for coating

Instructions

  • Wrap 2 cups of full-fat yogurt in a cheesecloth or tea towel and let it strain overnight in the refrigerator.
  • After straining, transfer the thickened yogurt to a bowl. Lightly oil your palms and form small balls, about the size of a golf ball.
  • Chill the yogurt balls in the refrigerator for a few hours if possible, or use them immediately.
  • Set up plates with your desired spice mixtures, such as Za’atar with finely chopped pistachios and Sumac with beetroot powder.
  • Roll each Labneh Ball in the spice mixture of your choice, being gentle to avoid breaking them.
  • If the spices don’t stick well, lightly coat the Labneh Balls with olive oil before rolling them in the spice mixtures.
  • For a unique flavor, experiment by rolling some Labneh Balls in both spice mixtures.
  • Place the coated Labneh Balls in a jar and cover them with extra virgin olive oil to enhance flavor and preserve them.
  • Let the Labneh Balls marinate in the olive oil for at least a few hours to deepen the flavors.
  • Serve the Labneh Balls with pita bread, crackers, or fresh veggies, or add them to a cheese board or salad.

Video

Nutrition

Calories: 81kcal | Carbohydrates: 4g | Protein: 3g | Fat: 6g | Saturated Fat: 2g | Polyunsaturated Fat: 1g | Monounsaturated Fat: 3g | Cholesterol: 11mg | Sodium: 433mg | Potassium: 147mg | Fiber: 0.1g | Sugar: 4g | Vitamin A: 91IU | Vitamin C: 1mg | Calcium: 106mg | Iron: 0.1mg

πŸ’Ύ

---------------------Follow Rekha Kakkar on BLOG: https://mytastycurry.comINSTAGRAM: https://www.instagram.com/rekhakakkar

Mor milagai vattal | Yogurt cured chillies

Mor milagai vattal

Till the covid lock downs came i never realised my food tastes really good coz amma send the bases needed for the nice meal. So the sambhar podi, rasam podi, vattals and vadams needed to make a south Indian meal all were perfect as amma made them. This lack of skill really was a big gap that I couldn’t help learning to bridge. With ammas guidance vattals were the first try, then the sago vadams and then slowly trickier ones like mor milagai. This year as I was making some of these recipes I remembered to take images of mormiliagi to share with you.

What is mor milagai?

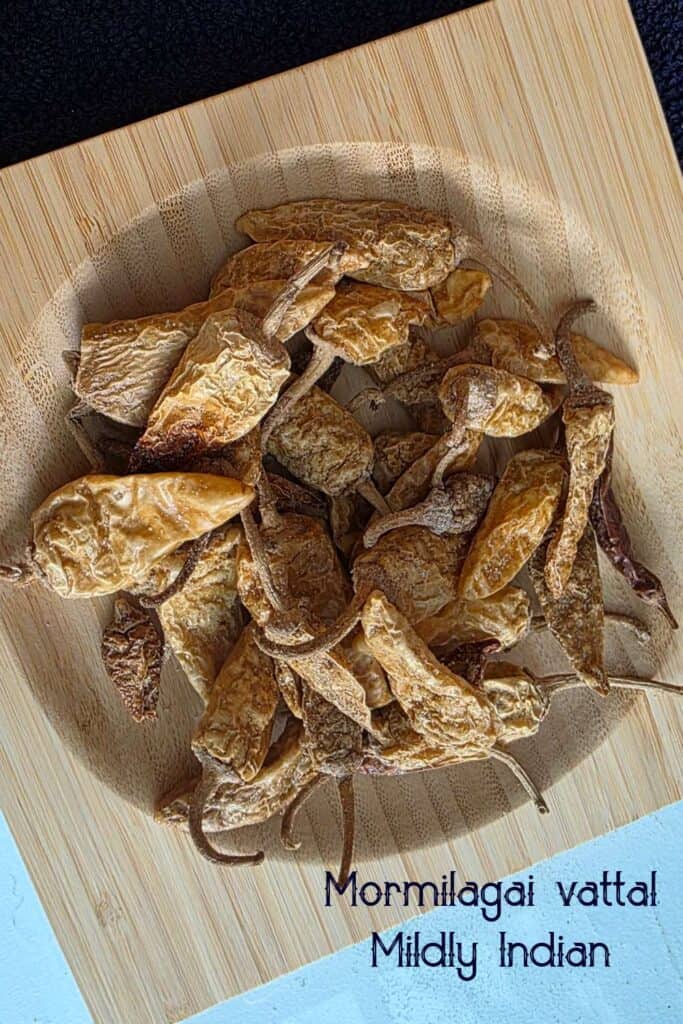
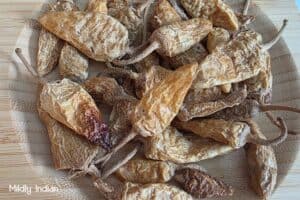
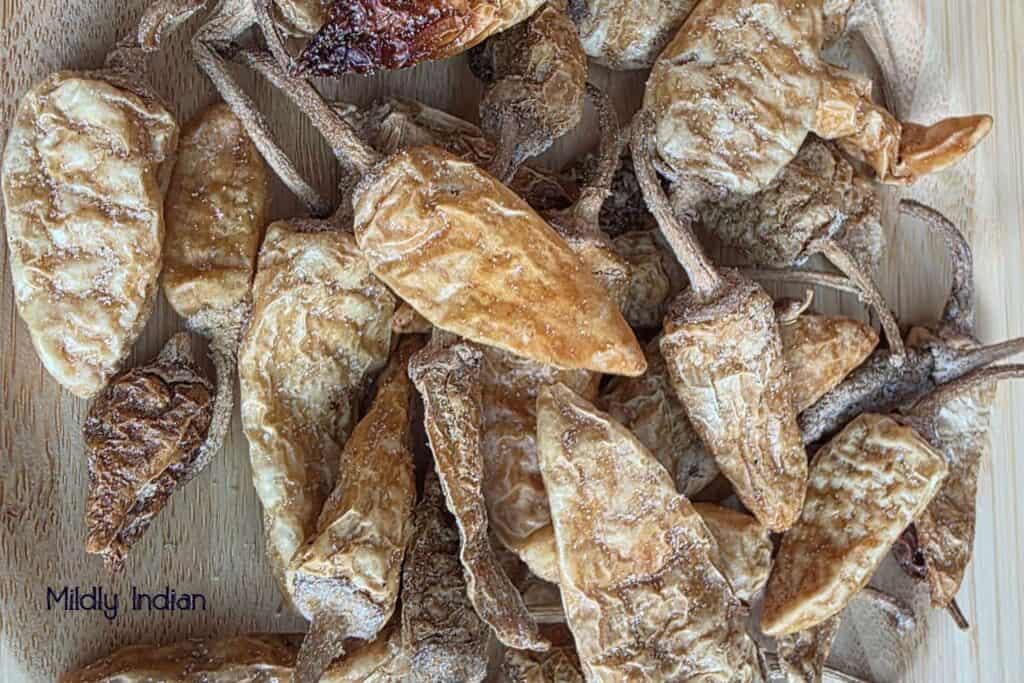
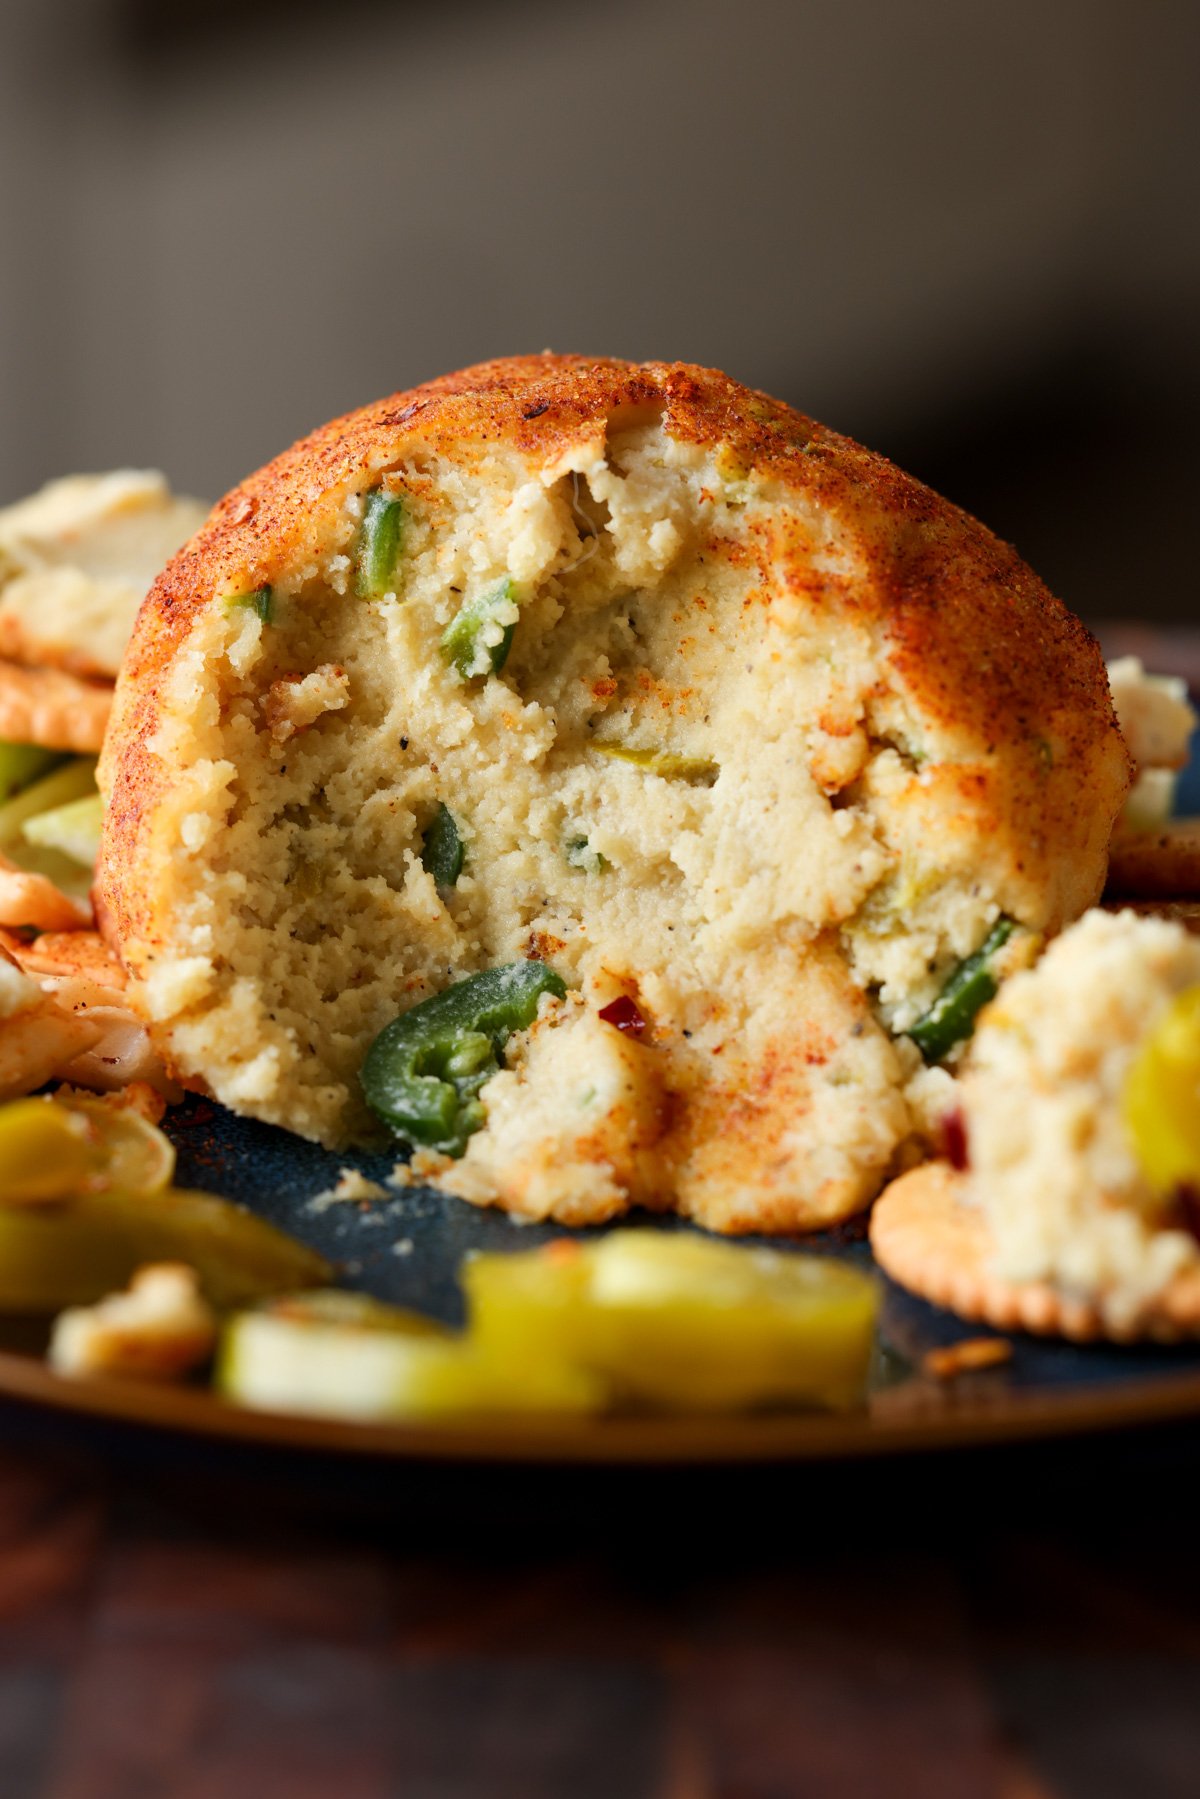
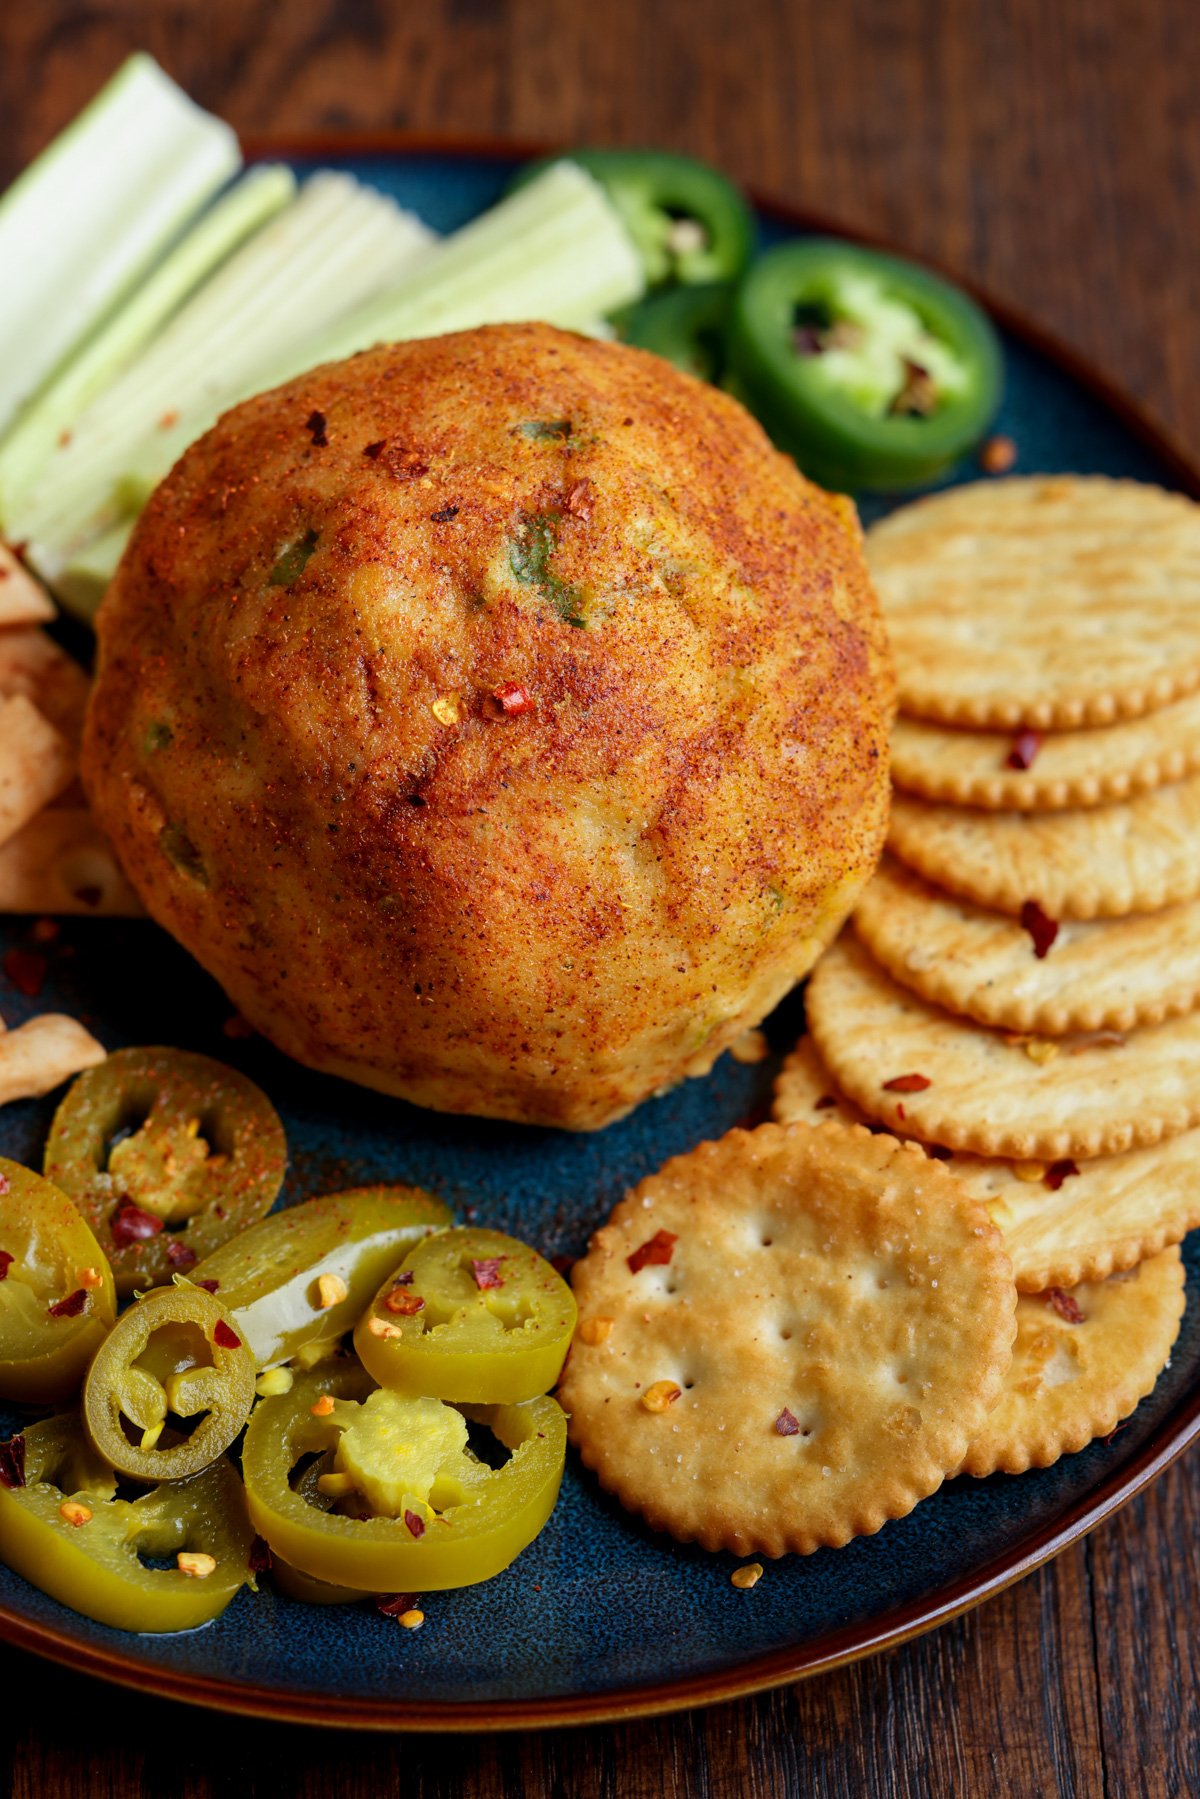
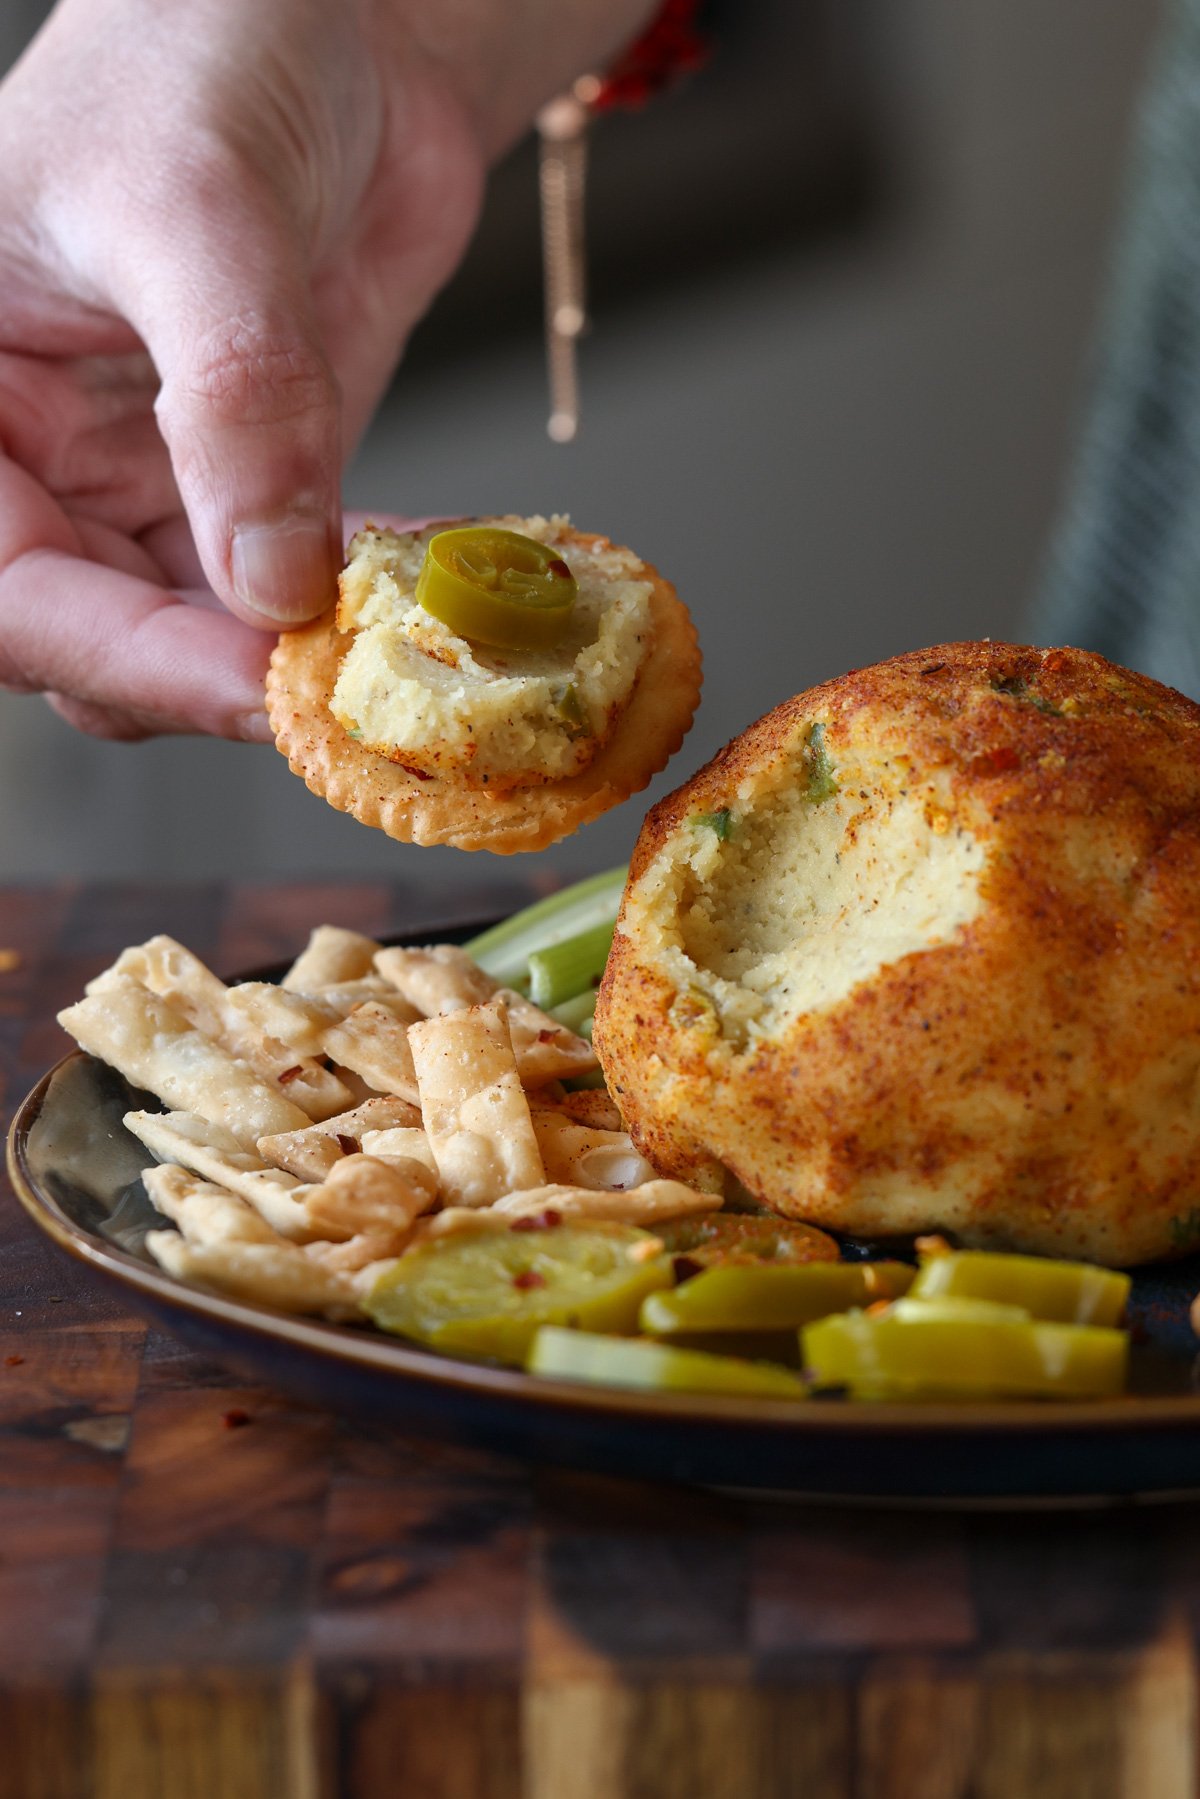
Sundried chilli pickle made in south Indian homes and served with lunch or dinner. These chillies literally are translated as buttermilk chillies. The chillies are marinated in traditional buttermilk. This infuses the flavours of the yogurt, tenderises it and reduces the heat of the chillies. The marinated chillies are sundried and the stored. To add to a meal, these are deep fried.

Ingredients to make mor milagai

The mor milagai vattal doesn’t require much, just three ingredients.

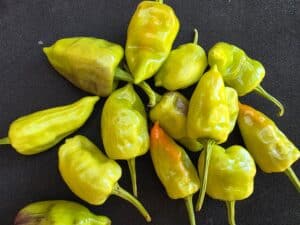
Chillies: green chillies are the main ingredient of this recipe. Ideally slight plump but spicy chillies are used for the recipe. However, you can use jalapeno or Serrano peppers too to make this recipe.Β  Slightly plump thin walled chillies are the best as they dry fast and are delicious.

Traditional yogurt :natural set yogurt is what makes this recipe best. Ideally slightly sour yogurt is preferred as it makes the chillies less intense after marinating. Churn the yogurt with a bit of water to aid in the marination.

Salt: crystal salt or table salt is best to use here. You don’t need anything fancy.

yogurt cured chilli

Let’s make yogurt cured chilli

This is probably the part that is going to test your patience and bit.

  • Wash and clean the chillies and pat them down with a kitchen towel.
  • Trim the stalks with a scissors so you a centimeter above the stalk.
  • Slit the chillies and set them aside.
  • In a jar mix together yogurt water and salt.
  • Shake it up till it becomes evenly incorporated.
  • Soak the slit chillies in this mix. Shake up the mix well and leave it overnight to soak.
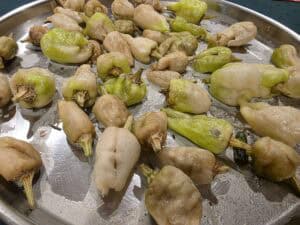
  • Drain the chillies the next day morning and dry the chillies in sun. Place the remain liquid in fridge.
  • In the evening, place the partially dried chillies back in the buttermilk solution.
  • Dry them again the next day.
  • This process repeats t0 about 3 to 4 days till the buttermilk milk mix is almost over. And the chillies semi dry.
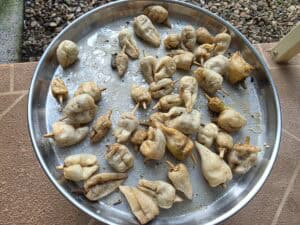
  • For the next couple of days, sun dry the chillies till they are crisp.
  • Once well dried, store in air tight bottles.
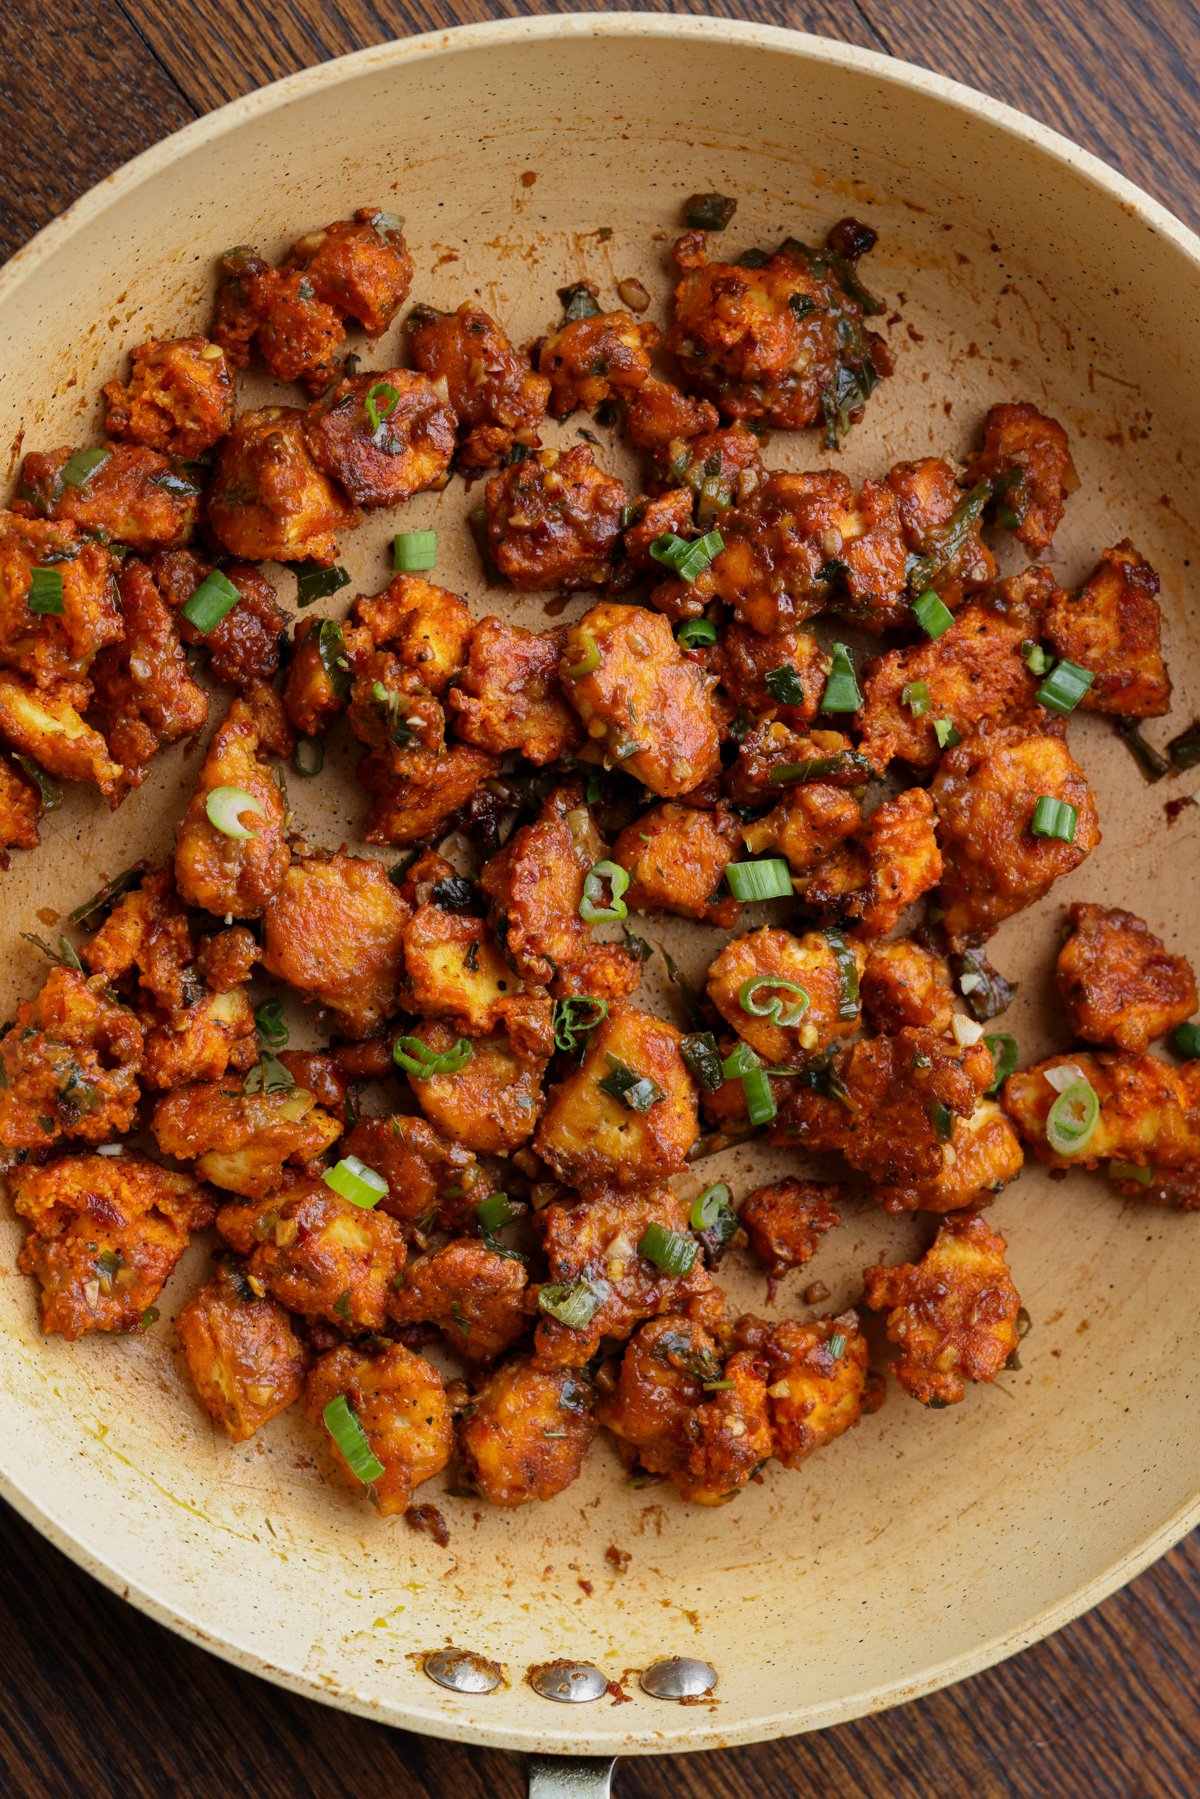
  • To deep fry, heat oil in a small wok. Once the oil is hot or sizzles when a small piece of the chilli is dropped in it, place 3 to 4 chillies at a time and roast till it us crispy.
  • Drain from the oil and the chillies are ready for your meal.

Storing the sundried chillies

Sun dried vattals and vadams are best stored in a dry box with a tight lid and away from moisture. When removing some for use, ensure your hands are dry. In about 3 to 4 months it is best to sun the vattal again so it remains crisp and moisture free.

How to use the mor milagai vattal?

Once the yogurt cured chillies are completely dry, you can prep fry them in hot oil as needed for the meals. Alternatively you can airfry them too.

Serving ideas for mor milagai

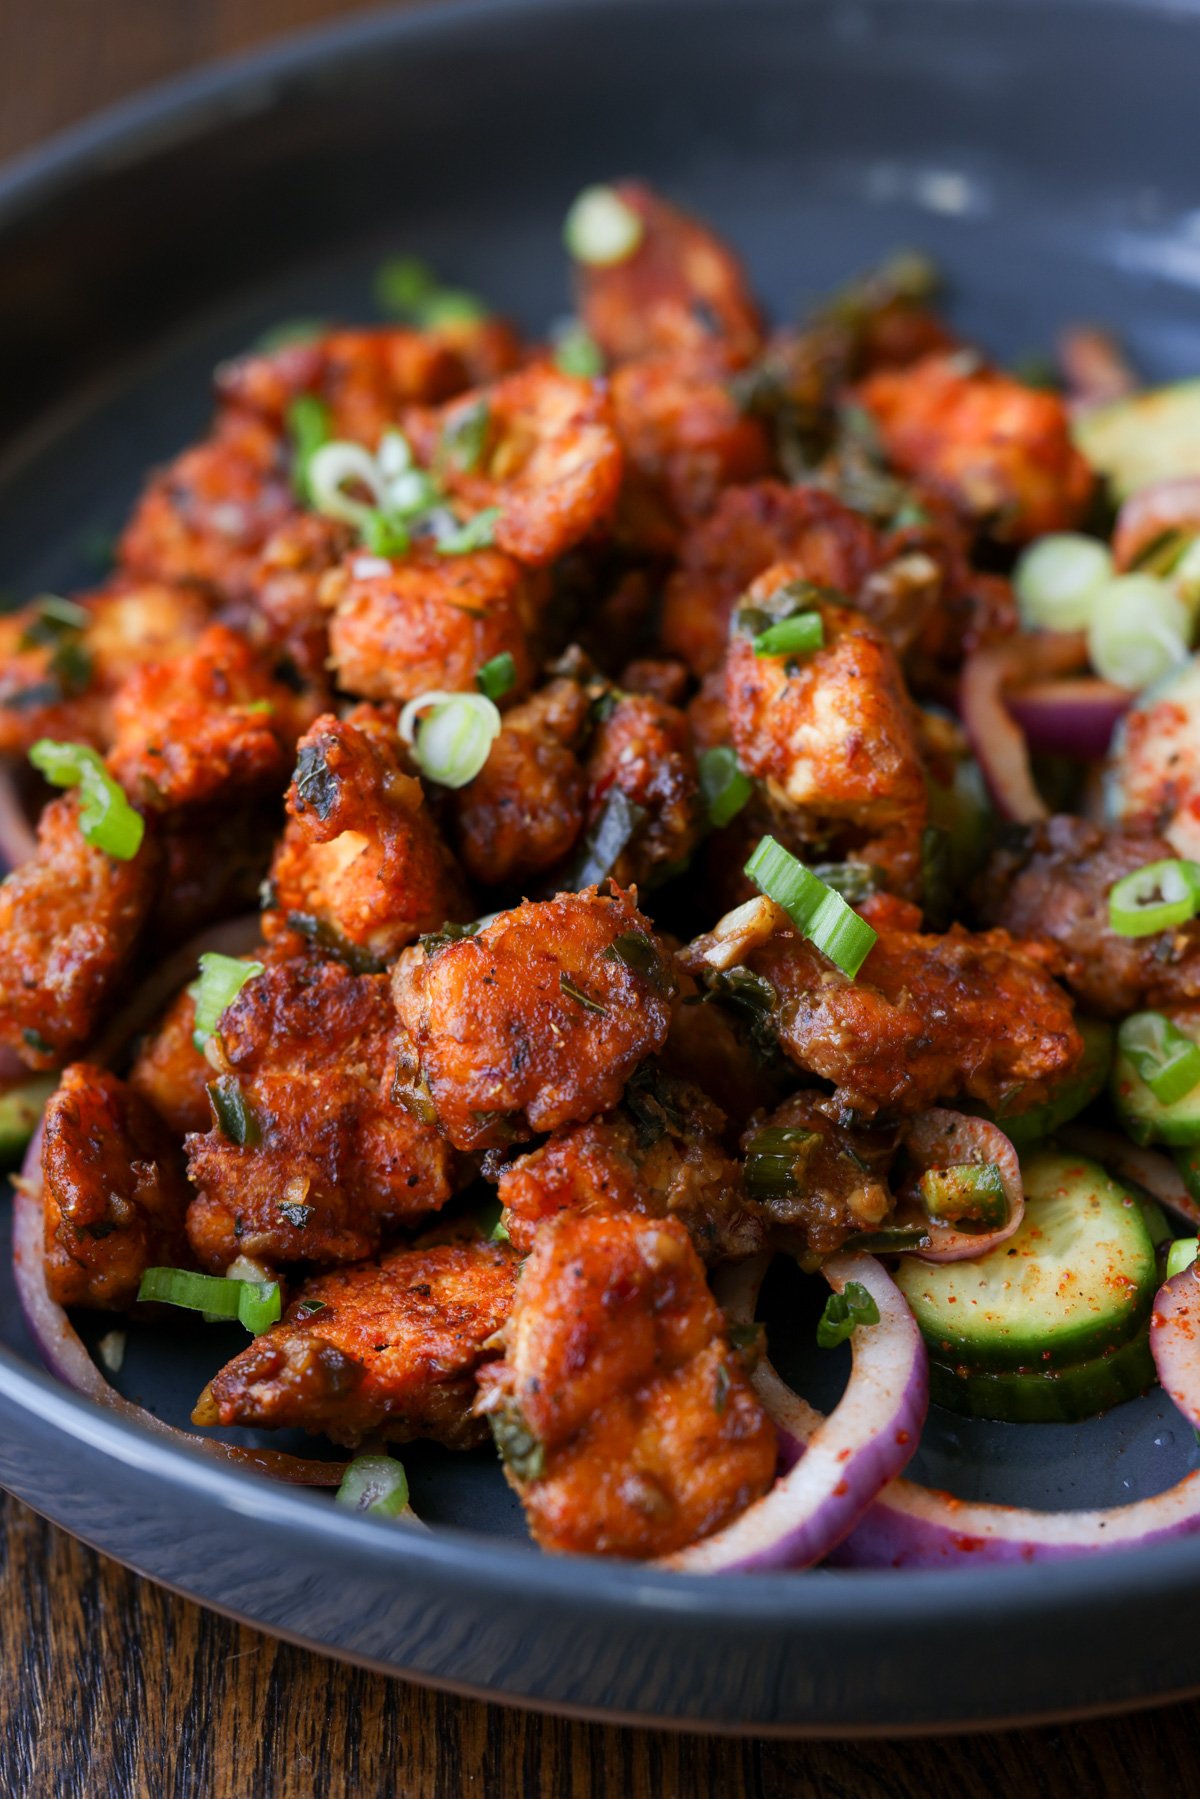
Fried mor milagai can be served with papads in any South Indian meal. Commonly paired with Thair saadam, koozhu , or ulundhu saadam, it provides a crunch and a heat kick to these nutrients dense lunches.
The mor milagai vattal is a perfect addition to the South Indian tempering when making poriyal too as it is slightly less pungent than the dried red chillies.

Print

Mor milagai vattal

Yogurt cured chiiles that are sun dried and stored to be fried as a condiment for lunch.
Course Pickles, Preserves, Traditional
Cuisine Indian, South indian
Keyword Fermented foods, summer recipes, sun dried recipe
Prep Time 10 minutes
soaking and drying time 7 days
Servings 0

Ingredients

  • 1 cup Green chillies plump ones
  • 1 cup buttermilk traditional ( cultured )
  • 1 tbsp Rock salt

Instructions

  • Wash and pat dry the chillies.
  • Slice the stalk about a centimeter above each chilli
  • Slit the chillies and set them aside till the soaking mixture is ready.
  • Into a clean bottle add the butter milk and salt and shake together till the salt dissolves well.
  • Add the prepared chillies into the mix and shake well.
  • Let this soak over night or for up to 24 hours.
  • Remove the chillies and spread on a plate.
  • Sun dry for the day.
  • In the evening, place the chillies back in the marinating butter milk mix.
  • Remove from the mix and dry again in sun.
  • Repeat this process for 3 to 4 days.
  • The sundry the chillies, till they are completely dry and crispy.
  • Store this in an airtightbox till needed.

For using the chillies

  • Deep fry a few chillies in hot oil. Drain when the colour changes and the chillies stop sizzling.
  • Drain the chillies from the oil and serve with meals.

Other sundried vattals from our blogΒ 

Sago fryums

Lotus root vattal

Mango vattalΒ 

Kumbalanga vattalΒ 

Stay connected

Mor milagai vattal is a traditional South Indian recipe that few make at home. It is not hard, but a slow task so keep up the patience and try atleast once.Β  Let us know in the discussion below how your batch turned out with our recipe. Share the idea with friends and family.

Pin this for later

Stay subscribed and see you in the next post.

mor milagai vattal

5 benefits of eating yogurt everyday in summer

By: admin

Benefits of Yogurt in summer

Eating yogurt every day during the summer can provide numerous benefits for your health, particularly in the hot weather. Yogurt is a versatile and nutritious food that offers a variety of advantages, and incorporating it into your daily diet can help keep you cool, hydrated, and nourished. In this article, we will explore five key benefits of consuming yogurt during the summer, focusing on its role in promoting good health, managing diabetes, assisting with weight loss, aiding digestion, and supporting a strong immune system.

Β 

benefits of yogurt in summer

Benefits of consuming yogurt in summer:

1. Good for Health:
Yogurt is often considered a superfood due to its impressive nutrient profile. It is a great source of protein, calcium, potassium, magnesium, and B vitamins, all of which are essential for the body’s overall functioning. Calcium, for instance, is crucial for maintaining strong bones and teeth and reducing the risk of osteoporosis. Other minerals like potassium and magnesium help regulate blood pressure and support proper muscle function.

Furthermore, yogurt contains live active cultures, known as probiotics, which are beneficial bacteria that promote a healthy gut microbiome. These probiotics enhance digestion, strengthen the immune system, and may even improve mental health. Regularly consuming yogurt helps maintain a balanced gut flora, which is crucial for optimal overall health.

2. Good for Diabetes Management:
For individuals with diabetes or those at risk of developing the condition, yogurt can be a valuable addition to their diet. Yogurt has a low glycemic index, meaning it does not cause a rapid spike in blood sugar levels. This makes it a suitable choice for individuals looking to manage their blood sugar levels effectively.

Additionally, yogurt’s high protein content helps regulate blood sugar and insulin levels, promoting stable energy levels throughout the day. Research has shown that incorporating yogurt into a healthy diet can improve insulin sensitivity, making it easier to maintain healthy blood sugar levels and potentially reducing the risk of developing type 2 diabetes.

Β 

3. Good for Weight Loss:
Maintaining a healthy weight is often a concern during the summer when warmer weather encourages us to shed excess pounds. Yogurt can be a helpful ally in weight loss or weight management plans. Its high protein content helps increase satiety and reduce feelings of hunger, making it an excellent snack or addition to meals for those trying to control their calorie intake.

Studies have demonstrated that incorporating yogurt into a balanced diet can lead to greater weight loss and reductions in body fat compared to diets that exclude it. Moreover, yogurt’s probiotics may also play a role in weight management by influencing the gut microbiome, affecting metabolism, inflammation, and weight regulation.

yogurt
yogurt

4. Good for Digestion:
During the summer, it is common to experience digestive issues due to changes in diet, travel, or simply indulging in more rich and heavy foods. Yogurt can help alleviate these problems and keep your digestive system functioning smoothly.

Yogurt’s probiotics, such as Lactobacillus and Bifidobacterium, help restore and maintain a healthy balance of bacteria in the gut. This can be particularly beneficial for individuals with conditions like irritable bowel syndrome (IBS) or inflammatory bowel disease (IBD) who often struggle with digestive issues. Consuming yogurt regularly can help improve symptoms such as bloating, gas, and diarrhea, making it an ideal food for promoting good digestive health during the summer.

Β 

5. Good for a Strong Immune System:
Finally, consuming yogurt every day can help strengthen your immune system, which is essential for fighting off infections and staying healthy, especially during the summer months. The probiotics in yogurt promote the growth and activity of beneficial bacteria in the gut, which helps support the immune system’s function.

Studies have suggested that the probiotics in yogurt can potentially reduce the risk of respiratory tract infections, minimize the duration and severity of the common cold, and even enhance the effectiveness of certain vaccines. By regularly consuming yogurt, you can provide your body with a natural boost to help maintain a strong immune system.

In conclusion, eating yogurt everyday during the summer offers several key benefits for both your physical and mental health. Its nutrient profile, probiotic content, and various other advantages contribute to overall well-being, diabetes management, weight loss, digestive health, and a strengthened immune system. By making yogurt a part of your daily routine, you can enjoy a refreshing and nutritious food that supports your health goals throughout the summer and beyond.

Do you know? Including raw paneer in your diet can help you in several ways. Read the full blog here. Also, have a look at Our Paneer Cutlets Recipe.

Hope you liked this blog. Please share your reviews with us in the comments below. Your suggestions are always welcome. Do not forget to share your food pictures with us on our Instagram page usingΒ @aromaofkΒ orΒ #aromaofk

<p>The post 5 benefits of eating yogurt everyday in summer first appeared on Aroma of Kitchen.</p>

Boondi Ka Raita

Boondi Ka Raita is a delicious and easy to make side dish which compliments any meal. Boondi ka raita is a yogurt based Indian condiment. Raita is an integral part of Indian cuisine.

This recipe will serve 4.

Prep Time: 5 minutes

Cook time: 5 minutes

Boondi Ka Raita Recipe by ManjulaIngredients:

  • 1 cup boondi, boondies you can buy in indian grocery stores or use the recipe I have for sweet boondi just do not soak them in syrup.
  • 1-1/2 cups yogurt
  • 1/2 teaspoon Salt
  • 1/2 teaspoon Black salt
  • 1/2 teaspoon roasted cumin seed powder
  • 1/4 teaspoon red chili powder
  • About 1 table spoon mint leaves chopped
  • Few mint leaves to garnish

Method

  1. Soak boondi in the warm water for about 10 minutes.
  2. Lightly squeeze the boondies in your palms, don’t mash them.
  3. whisk the yogurt in a bowl. If yogurt if too thick add water as needed. Yogurt should be the consistency of pancake or dosa batter.
  4. Add all the spices salt, black salt cumin seed powder, chili powder, and chopped mint leaves mix it well.
  5. Add the boondi and mix.
  6. Garnish boondi raita with mint leaves.

Boondi raita can be served cold or at room temperature. I especially like boondi rita with aloo Β paratha or with Urad Dal Puri.

Originally posted 2016-06-22 20:47:19.

The post Boondi Ka Raita appeared first on Manjula's Kitchen.

Vegan French Onion Dip

By: Richa

Lovers of French Onion Soup will LOVE this Vegan French Onion Dip – aka the vegan dip to beat all vegan dips! Caramelized onions mixed with a tofu base make for delectable caramelized onion dip for parties and gameday!Β overhead shot of a bowl with vegan caramelized onion dip served with crackers and carrots

Here’s the vegan party snack to beat all party snacks! Vegan French Onion Dip – lovers of my vegan French Onion Soup will LOVE this dip made with homemade caramelized onions.

Now, caramelizing onions can be incredibly tedious and requires watching the pan for half an hour. In this Instant Pot French Onion Dip recipe, the caramelization part is completely hands-off! We let the onions slowly caramelize in your Instant Pot.Β  And the best thing – there’s zero risk of burnt onions in the end. You can make the caramelized onion on stove top or bake them. See recipe notes for instructions.

This restaurant-style dip pairs perfectly with fresh veggie sticks, breadsticks, or your favorite homemade or store-bought crackers for easy entertaining.

a bowl with vegan French Onion Dip served surrounded with vegetables and crackers

Using my fool-proof method, the onions will cook at low heat and caramelize and get perfectly jammy and delicious! If you love how these turn out and want to use these for more recipes than just French Onion Dip, you can use these over hummus/ avodado toast or cream cheese toasts, add them to top your favorite pasta, etc.

French onion dips usually require cream cheese and/or yogurt as a base. In this vegan version, we blitz silken tofy with dairy-free yogurt.

More vegan Dips and appetizers:

Β Spinach Artichoke Dip Recipe 30 Mins!

Β Pizza Dip with Vegan Mozzarella Cream Herbed Mushrooms

Thai Layered Dip.

Jalapeno popper dipΒ 

Firecracker Tofu wingsΒ 

Nashville baked cauliflower

Continue reading: Vegan French Onion Dip

The post Vegan French Onion Dip appeared first on Vegan Richa.

Watermelon Berries Popsicles

Summer time and Popsicles are inseparable. Simple joys of life is what I say! AΒ sense of happiness, coolness, liveliness, and all that goodness bundled on a stick! Not to mention all the pleasing colors and flavors (of your choice) will definitely bring out the happy child in you. As summer holidays kicks in this season, what better way to start treating kids than a healthy fruity popsicle(s)? You may see many such colorful additions on my blog this season.

I am not an ice cream or a popsicle person (yes call me weirdo :)), but I take immense pleasure when I watch people enjoy it! Though these days I have taken aΒ liking for eating GodivaΒ and Magnums iceΒ cream bars a lot!


My kid is a crazy fan of popsicles. Any day better than other calorie loaded sweet treats. So thought of kickstarting it with watermelon berries popsicles. Watermelons have become synonymous with summer and picnics, and for a good reason. Their refreshing quality and sweet taste help to combat the heat and also provide a guilt-free, low maintenance dessert for kids and adults alike to enjoy. One of the easiest treats one can make for their kids :)

So here we go to check the recipe:

Ingredients:

  • 2 cups watermelon roughly chopped
  • 2 tbsp yogurt (dahi)*Β 
  • 1/2 cup berries (took black and blue berries half and half)
  • 2 tbsp honey (or add 1 tbsp sugar as per your taste)*

Preparation:

  • Blend all the ingredients together. (pour it over a sieve to take out any coarseness or seeds)
  • Fill 3/4th of the popsicle mold.
  • Add 4-5 wholeΒ blueberries in the molds.
  • Freeze it for aΒ couple of hours till it is set and ready to eat.Β 

njoY!! happY cookinG!!

notes:* adjust theΒ quantity of honey(sugar) depending on how sweet you want and also theΒ sweetness of fruits that you are using. You can also substitute any ice cream in place of yogurt.

Health Benefits:Β WatermelonΒ is considered as a nutrient dense food, a food that provides a high amount of vitamins, minerals and antioxidants for a low amount ofΒ calories. Watermelon, because of its water and fiber content, helps to prevent constipation and promote regularity for a healthy digestive tract. Made up of 92% water and full of important electrolytes, watermelon is a great snack to have on hand during the hot summer months to prevent dehydration.


Blueberries are believed to contain the highest antioxidant capacity of all commonly consumed fruits and vegetables. Low in calorie and high in nutrients, who doesn't want that in this diet conscious era:) They are so good for our health that just add it in your cereals, pancakes or just munch on it! But get it in your system :)

So sit back and enjoy this yumilicious treat guilt free!

Papad ki Sabji


Perfect curry to make when you have no veggies left in your fridge :) All you need is tomatoes, yogurt and papad as main ingredients. A delectable curry will be ready in no time. It is a famous Rajasthani dish, most of us know about it and yes, it is cooked in 10 different ways:) I have tried making it both ways, with and without onions and I like it better with no onions. My husband enjoys this papad ki sabji a lot more than I do actually :) so this curry is here to stay in my household. It goes well with khoba roti or any other paratha or simply with the plain rice.

Making papad (thin, fried accompaniment) is a summer affair and I am sure every kid of my generation must have spent their few days of summer vacation helping out their moms and aunts in rolling, spreading, drying papads in the backyard or on the terrace under the scorching heat and then having a cold beverage like lemon sherbet or sol kadi to cool themselves. :) Real fun days it used to be :)

Let us check out the recipe.
Ingredients:
  • 4 big papads dry roasted or fried or done in microwave*
  • 2 tomatoes
  • 2-3 green chillies
  • 1 inch ginger
  • 1 tbsp oil
  • 1/2 cup curds/yogurt room temperature
  • 1/2 cup water
  • 1 tsp cumin seeds (jeera)
  • pinch of asafoetida (hing)
  • 1 tbsp kasuri methi (dry fenugreek leaves)
  • 1/2 tsp chilli powder
  • 1 tsp coriander powder
  • 1/2 tsp garam masala
  • salt to taste
  • handful of cilantro chopped


Preparation:
  • In a blender, grind tomatoes, chillies and ginger, keep aside.
  • In a wide mouth pan, heat oil, add cumin seeds till they splutter, add hing, kasuri methi and saute for a minute or so.
  • Add tomato mixture along with the chilli pwd, coriander pwd and garam masala.
  • Mix everything and let it cook till oil separates from the tomato gravy.
  • Now sim the gas and add whisked yogurt plus water slowly while you keep stirring the gravy, else it will curdle in the gravy. Bring it to a boil, add salt as per taste.
  • Now take the fried/roasted papads, make med-small pieces and slowly add to the gravy. Cover and cook for a couple of more minutes till the papads soak in the gravy.
  • Your gravy is ready. Serve it with kobha roti or with rice.
Notes:* Papads can be roasted or fried anyway you want. You can also add raw papad cut in pieces and cook till done.

njoY!! happY cookinG!!

recipe adapted from nisha madhulika's website.

papad
fried papad

Health Benefits: This curry is made with tomatoes and yogurt as aΒ base with little spices. The debate that tomato is a fruit or vegetable is still on :), nonetheless, it is considered as a superfood. It is rich in antioxidants. It has lycopene which helps in fighting chronic diseases and helps in delivering other health benefits. It is an excellent source of Vit C, potassium and cholene. Yogurt is no. 1 probiotic food. It is known to be helpful in digestion and is a good source of calcium. Papad is mainly made from peeled black flour (protein), it is seasoned and consumed in either fried, roasted or deep fry form.

Ways to use Yogurt in Indian recipe

Table of content

  • Everything you need to know about yogurt
  • Nutrition
  • When is yogurt good for you?
  • Fast facts about yogurt
  • Types of Yogurts
  • What are the most significant health advantages of yogurt?
  • Indian Recipes With Yogurt Or Curd
  • Conclusion

Everything you need to know about yogurt

Using a yogurt culture, milk is fermented to create yogurt, a dairy product. It offers calcium and protein and may improve the balance of good bacteria in the intestines.

Depending on the type of yogurt consumed, there are a number of health advantages, such as defense against osteoporosis, relief from irritable bowel syndrome, and support for digestion.

Β 

Nutrition

Yogurt is a delicious and healthy supplement to any diet. There are numerous varieties of yogurt, and some are healthier than others. Yogurt comes in a variety of varieties with various amounts of nutritional value. You can contact Corriander Leaf to get to know about the nutrition in yogurt or dahi.Β 

When is yogurt good for you?

  • Yogurt consumption may or may not be a healthy choice, depending on who is drinking it and what sort.
  • Yogurt contains significant amounts of protein, calcium, vitamins, living cultures, and probiotics, which can enhance the gut flora.
  • These might safeguard teeth, bones, and the digestive system.
  • Low-fat yogurt can be a useful source of protein when trying to reduce weight.
  • Probiotics may help to boost the immune system.

Fast facts about yogurt

  • Milk is fermented with a yogurt culture to create yogurt.
  • Examples of health benefits include supporting bone health and enhancing digestion.
  • Probiotics, which are living, active bacteria found in some yogurts, can support gut health.
  • The health advantages of heat-treated yogurt are diminished since the products lack live microorganisms. For instance, raisins with yogurt on them.
  • Yogurt contains calcium, riboflavin, potassium, magnesium, vitamins B6 and B12, and calcium. The amounts vary depending on the type.

Types of Yogurts

1.β€œTraditional” Yogurt

By adding microorganisms to milk, yogurt is made and thickened, giving it its well-known tart flavor. In order to stop curds from developing, milk is heated. The mixture is then chilled before adding bacterial culture. Probiotics, which are live, active microorganisms found in most yogurt, support gut and intestinal health. Although it is less thick than other yogurt options because it is still too thick to swallow.

2. Greek Yogurt

This is strained to eliminate the liquid and whey after the yogurt base has been made, giving it a thicker consistency than regular yogurt. Greek yogurt is a well-liked alternative to sauces used in savory foods because of its potent sour flavor. (Did you know that ricotta cheese consists of the liquid and whey extracted from Greek yogurt?)

3. Australian Yogurt

Australian yogurt is unstrained, just like regular yogurt. Greek yogurt is thicker than standard yogurt but has a creamier texture. Since it is cooked more slowly and for a longer period of time than regular yogurt.

4. French Yogurt

Instead of being created in a large vat and then divided into containers, French-style yogurt is cultured in the individual-sized containers it is served in. It is much like conventional yogurt, but it is less sweet than other yogurts and has a smooth, creamy texture.

5. Skyr/Icelandic Yogurt

Greek yogurt is notably thinner and less tart than Icelandic yogurt, or Skyr. There is disagreement over whether Skyr belongs in the category of yogurt varieties. It may be claimed that it is cheese because of the way the process causes curds to form. Skyr is promoted as Icelandic yogurt in the United States because, whatever it is properly called, it is eaten like yogurt. Skyr is one of the thickest yogurts on the market since it has been strained four times.

6. Lactose-free Yogurt

There is yogurt available without lactose, even if yogurt with live, active cultures is already a suitable option for those who are lactose intolerant. A unique enzyme that breaks down the lactose in milk is available in the lactose-free yogurt. Your body does not feel the discomfort of lactose intolerance in the absence of this lactose. Because the lactose has only been broken down outside of your body, it still tastes like regular yogurt.

7. Drinkable Yogurt

There are many alternatives available for drinkable yogurts, not just in terms of flavors. However they come in a variety of consistency levels, from a thinner consistency more like skim milk to a thicker consistency more akin to classic yogurt. Additionally, you can decide whether you want to savor a sour or sweet yogurt. When traveling or on the go, this sort of yogurt is a terrific option for a healthy snack.

Yogurt in Indian recipe

What are the most significant health advantages of yogurt?

1. It may help reduce the risk of Type 2 diabetes.

According to study, yogurt may assist people from developing Type 2 diabetes. Feller claims that yogurt β€œcontains unique properties, such as its lactic acid bacteria concentration, which may alter gut microbiota and have a possible function in lowering glycemic variability,” or the sharp fluctuations in a person’s blood sugar levels. Naturally, it’s important to remember that the yogurt you choose shouldn’t contain sugar; otherwise, you won’t be able to take advantage of this benefit.

2. It's good for bone health.

Regular, plain yogurt has 415 milligrams of calcium per eighth-ounce serving, which is crucial for strong bones. By increasing bone density, calcium aids in maintaining bone strength, according to Castillo. This can serve as an osteoporosis defense. Calcium is also necessary for vascular contraction, muscular function, nerve transmission, and cellular signaling, according to Modell. Yogurt’s high-quality protein helps maintain healthy bones and builds muscle.

3. It's good for heart health.

Want to consume foods that are heart-healthy? Take a yogurt spoon and dig in. However a study that showed frequent consumption of fermented dairy products like yogurt (approximately two servings per week) can help minimize the risk of cardiovascular disease by lowering blood pressure over the long term.

4. It's good for your gut.

According to Modell, probiotics found in yogurt, particularly the dairy variety, help your immune system and β€œenhance digestive health by maintaining levels of β€˜good bacteria’ in the gut.” Castillo adds that this beneficial bacteria also lessens irritable bowel syndrome symptoms and aids in the breakdown of lactose. This will benefit not only your digestive system but also your brain. There is a significant link between gut health and brain health, according to scientific studies. Thus, regular yogurt consumption can benefit both mood and cognitive function. Also connect to Corriander leaf and we will inform you about the additional benefits of yogurt.

Read more:Β Top 10 Indian Food With Low Calories

Indian Recipes With Yogurt Or Curd

1. Low-Fat Dahi Chicken

The dahi chicken recipe is flavorful and low in fat. Furthermore, it’s easy to make. Chicken pieces can be simply marinated in a curd marinade and left to rest for around 30 minutes. Once you add your onions and tomatoes, you can fry them in masala.

2. Dahi Aloo

This gravy side dish pairs beautifully with plain chapatis or hot, steaming rice. The dinner, which includes curd-cooked potatoes, is simple, quick, and delicious. On those leisurely days, you may prepare this meal in about 20 minutes.

3. Dahi Bhindi

It is a well-known Hyderabadi dish. Curd can be helpful while making dahi bhindi, a straightforward and speedy curry preparation that has a smooth and creamy texture. When you eat this sabzi, the spicy curd (dahi) gravy absorbs into it, making it juicy.

4. Kadai Paneer

This delicious and delectable dish is not only simple to prepare but also a favorite of paneer lovers. You can quickly prepare this dahi kadai paneer when you have visitors over because it only takes 30 minutes to prepare.

5. Chicken Yoghurt Curry

This is a recipe that all chicken fans will like devouring with roti or chawal and will taste fantastic. However the dahi in it adds a calming taste to the dish’s robust masala flavor. Chutney is an additional option that you have with it.

Conclusion

Corriander leaf advises you choosing yogurt brands that have undergone scientific investigation if you’re buying it for your health. However, to help communities get the most out of this potentially crucial meal, scientists have called for more thorough research and legislation on yogurt’s nutritional value and commercialization.

The post Ways to use Yogurt in Indian recipe appeared first on The Corriander Leaf.

❌