❌

Reading view

There are new articles available, click to refresh the page.

How To Design 3D Printed Pins that Won’t Break

[Slant 3D] has a useful video explaining some thoughtful CAD techniques for designing 3D printed pins that don’t break and the concepts can be extended to similar features.

Sure, one can make pins stronger simply by upping infill density or increasing the number of perimeters, but those depend on having access to the slicer settings. If someone else is printing a part, that part’s designer has no actual control over these things. So how can one ensure sturdier pins without relying on specific print settings? [Slant 3D] covers two approaches.

The first approach includes making a pin thick, making it short (less leverage for stress), and adding a fillet to the sharp corner where the pin meets the rest of the part. Why? Because a rounded corner spreads stress out, compared to a sharp corner.

Microfeatures can ensure increased strength in a way that doesn’t depend on slicer settings.

Those are general best practices, but there’s even more that can be done with microfeatures. TheseΒ are used to get increased strength as a side effect of how a 3D printer actually works when making a part.

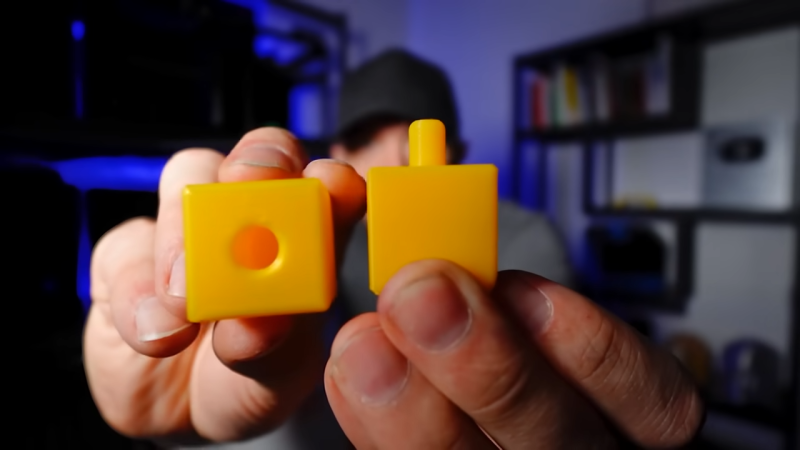
One type of microfeature is to give the pin a bunch of little cutouts, making the cross-section look like a gear instead of a circle. The little cutouts don’t affect how the pin works, but increase the surface area of each layer, making the part stronger.

A denser infill increases strength, too. Again, instead of relying on slicer settings, one can use microfeatures for a similar result. Small slots extending down through the pin (and going into the part itself) don’t affect how the part works, but make the part sturdier. Because of how filament-based 3D printing works, these sorts of features are more or less β€œfree” and don’t rely on specific printer or slicer settings.

[Slant 3D] frequently shares design tips like this, often focused on designing parts that are easier and more reliable to print. For example, while printers are great at generating useful support structures, sometimes it’s better and easier in the long run to just design supports directly into the part.

Stack n’ Rack Your Hardware With the HomeRacker Project

Things are cooler when rack-mounted, and [KellerLab] aims to make that all far more accessible with the HomeRacker, a modular and 3D-printable rack building system designed to let you rack-mount to your heart’s content. While it can handle big things, it seems especially applicable to tasks like mounting one’s home network equipment and Raspberry Pi machines.

A rack is a great place for those Raspberry Pi servers and home networking equipment, but it can also handle bigger jobs.

The basic system (or core) consists of three different parts: supports, connectors, and lock pins. The supports are the main structural bars, the connectors mostly go at the corners, and the lock pins ensure everything stays put. The nominal sizing is a 15 mm x 15 mm profile for the supports, with lengths being a multiple of 15 mm.

All is designed with 3D printing in mind, and requires no tools to assemble or disassemble. There are design elements we really appreciate, like how parts are printed at an angle, which improves strength while eliminating the need for supports. The lock pins (and the slots into which they go) are designed so that they are effective and will neither rattle nor fall out.

But the core system is just the foundation. There’s plenty of modularity and expansions to handle whatever one may need, from Gridfinity shelves and drawers to various faceplates and other modules. There are some example applications available from [KellerLab]’s HomeRacker models page, like CD shelf, under-desk drawer, or filament rack.

[KellerLab] welcomes any collaboration, so check out the GitHub repository for CAD references and design files.

One last point to make about the value of printing objects like this at an angle: not only can the resulting layer lines provide better strength and reduce or eliminate the need for supports, but printing at an angle can help hide layer lines.

❌