Reading view

There are new articles available, click to refresh the page.

Vegan Chicken 555 Appetizer

By: Richa

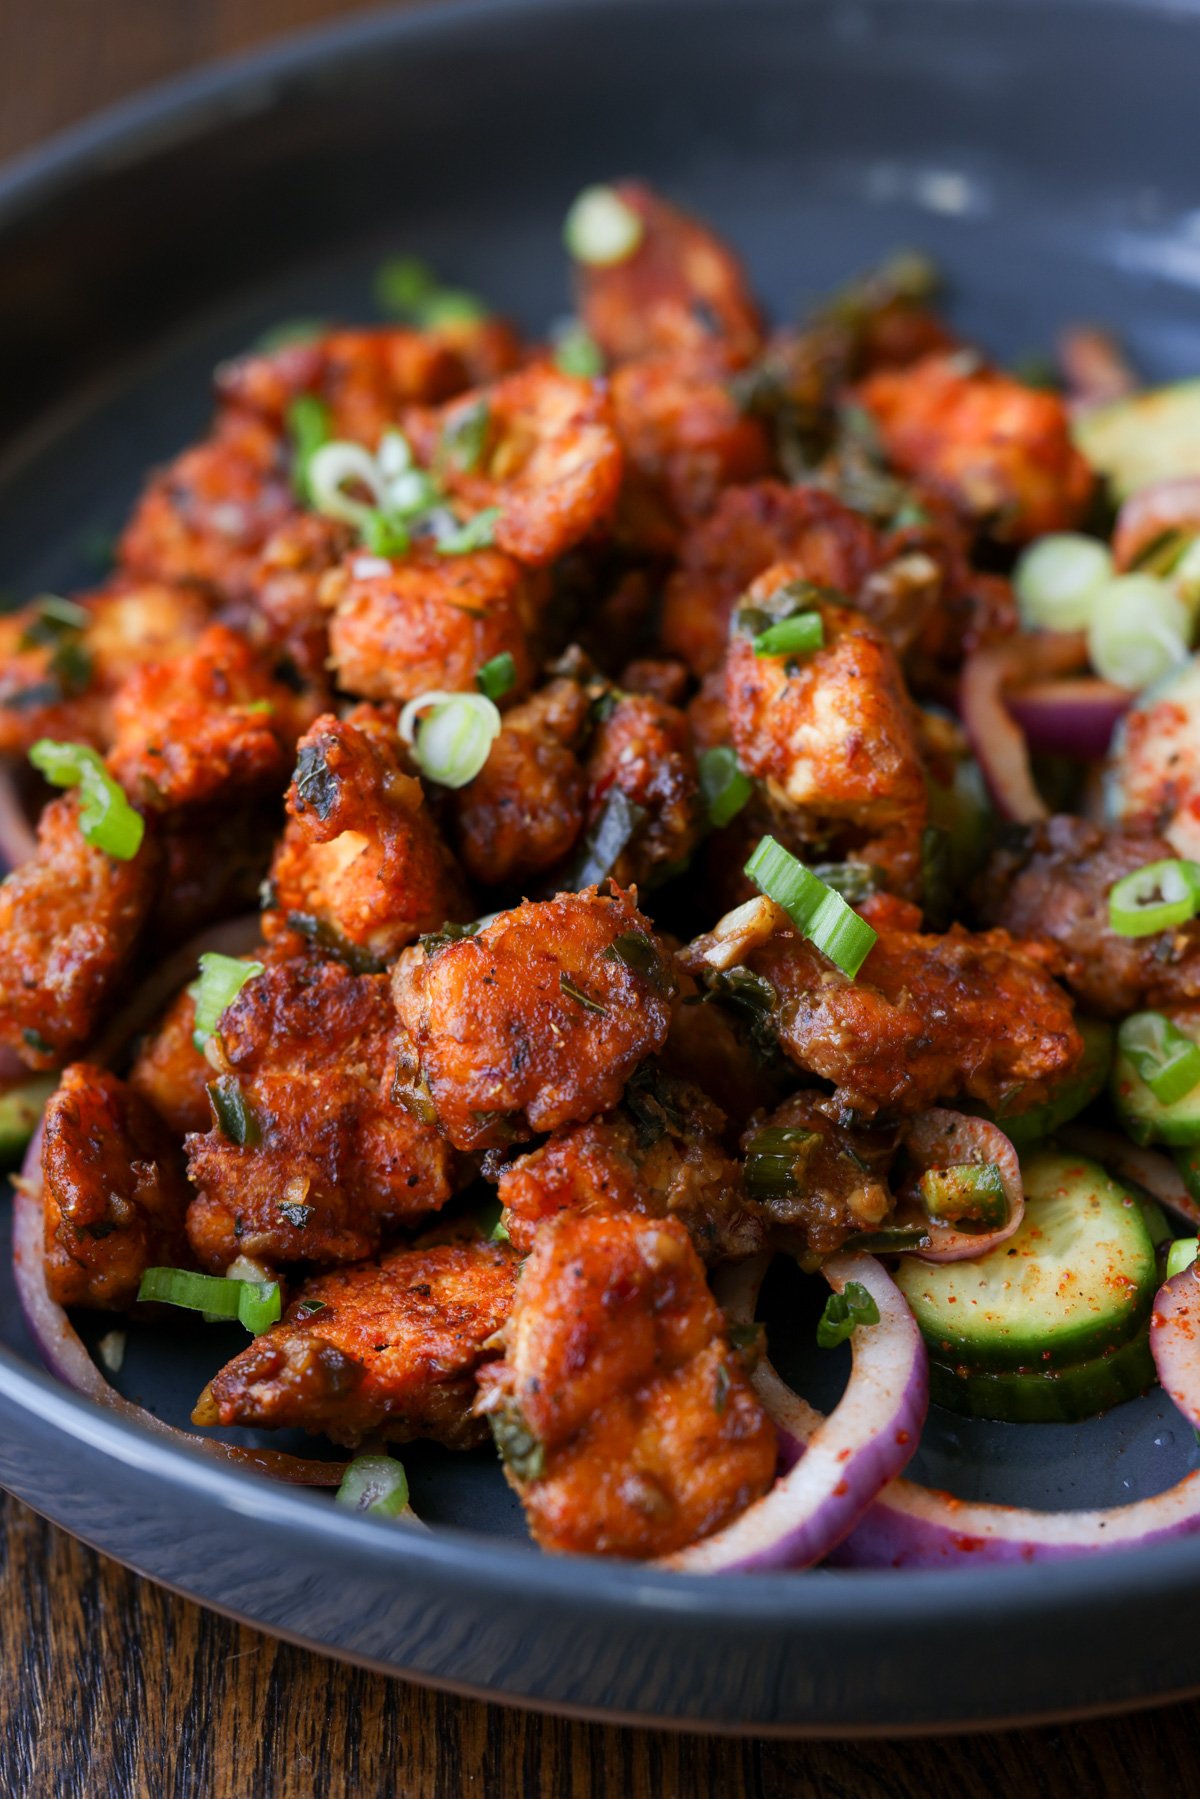
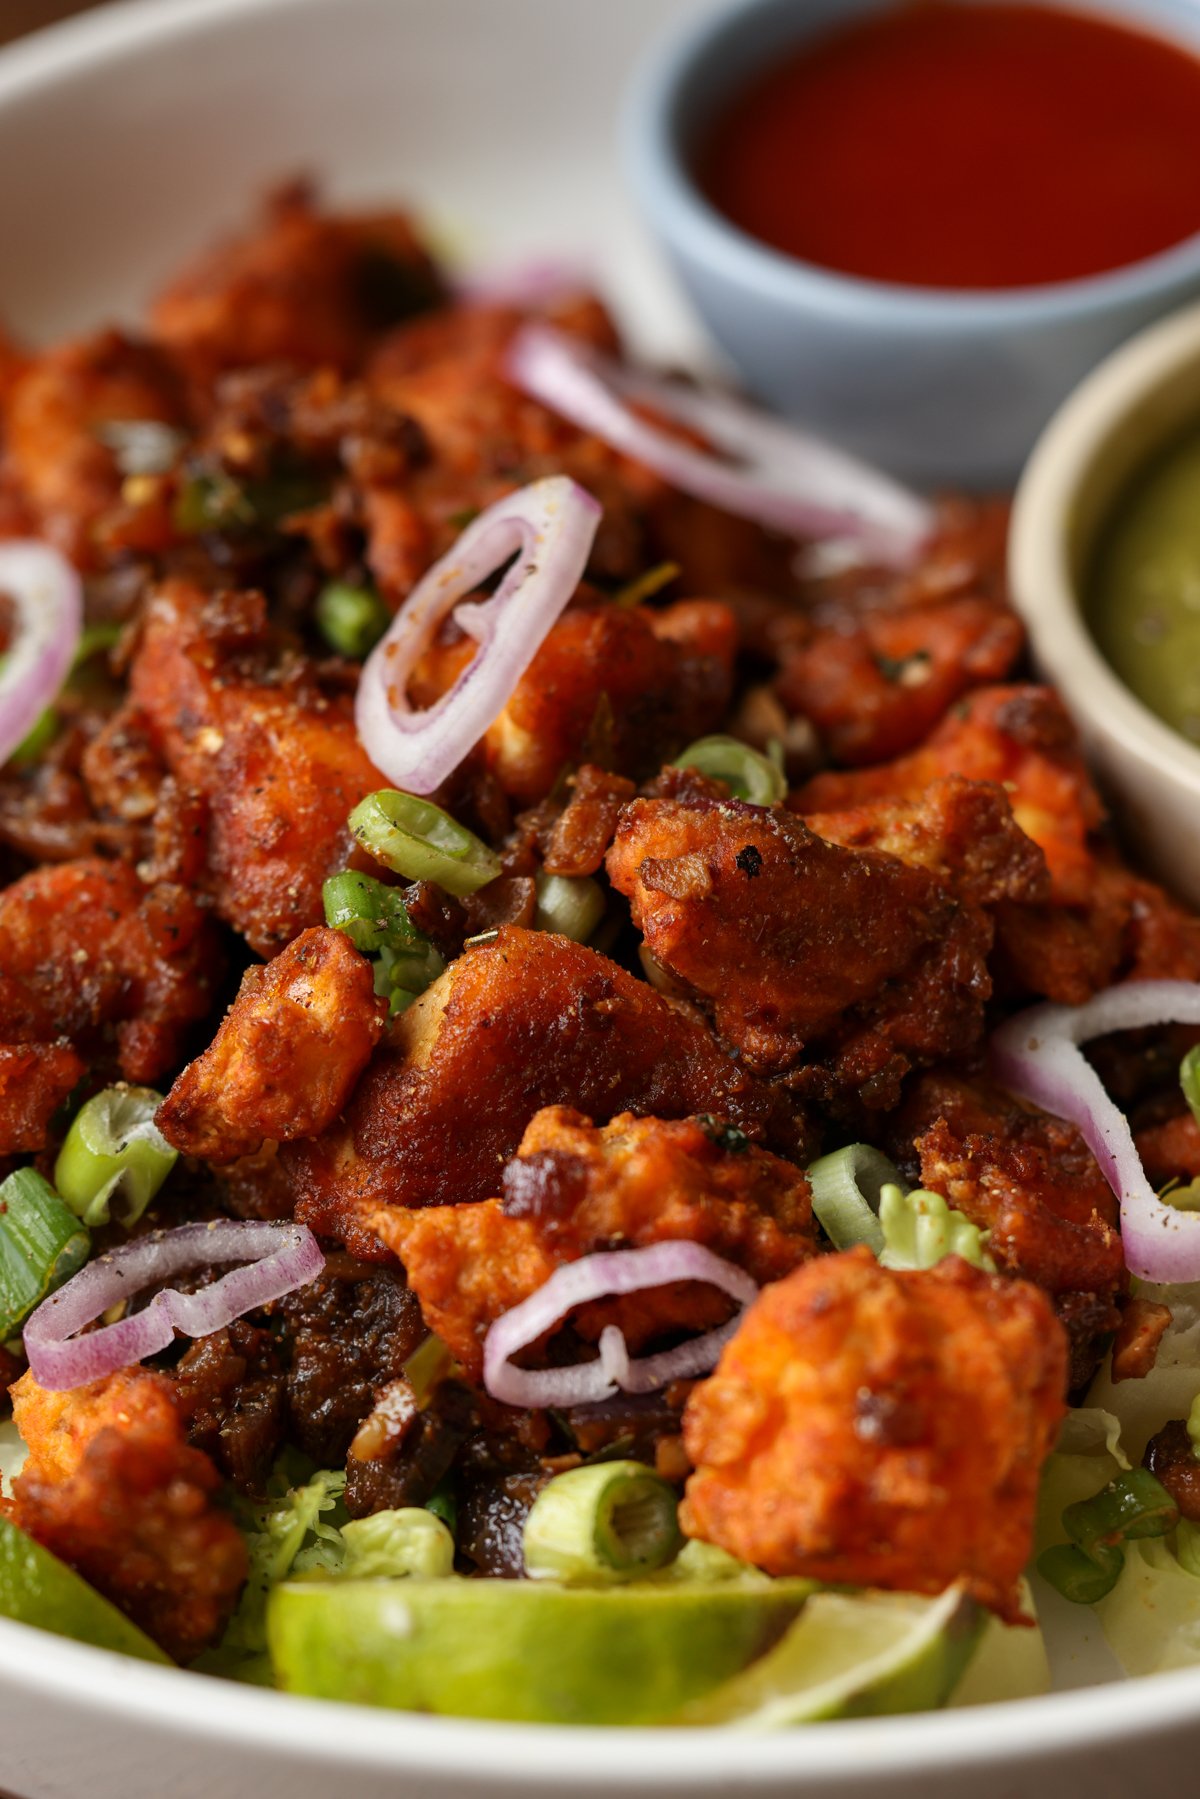
Vegan Chicken 555 reimagines a beloved South Indian street-style appetizer. Crisp golden tofu is coated in a richly spiced sauce infused with fennel, ginger, garlic, coriander, and peppers,  and enough heat to make you reach for seconds (and maybe a cold drink).  gluten free, nut free. soy free option.

vegan chicken 555 on a plate with chutneys for dipping

This is another one in my series creating vegan versions of these amazing, meat-heavy, regional Indian appetizers. There’s just so much variety in all of these super delicious snacks and appetizers, and sometimes you don’t find those flavors and that spice in the vegetarian appetizers.

You can use this recipe with tofu, soy curls, chickpea tofu, chickpeas, or vegetables, like cauliflower. Basically, you coat your protein or vegetables of choice with this amazing, flavorful batter, and either pan fry or bake it. 

piece of tofu 555 dipped in cilantro mint chutney

Then, we make this easy, spicy, and delicious sauce mixture. It’s kind of a dry sauce, and you toss the crisped tofu “chicken” in it. Oh my god, it’s so incredibly delicious and also pretty spicy!

You can adjust the spice level to your preference. There are four kinds of chilies in this tofu 555: Kashmiri chili powder in the batter, and green chilies, cayenne, and red pepper flakes in the sauce. To get the flavor with less heat, reduce any or all of those. The combination of peppers adds a ton of flavor, so you definitely want to use some of each, even if you don’t use the full amounts. You can use a milder green chili to manage the heat, too,  if you prefer.

close-up of vegan chicken 555 on a plate

Basically, adjust the heat based on your preference, but definitely try this vegan chicken 555. It’s just so fabulously delicious!

Tofu 555 is great on its own or in crunchy salads with juicy fruits like apples, pears, or mangoes, or with roasted or fresh vegetables. A cucumber salad with a simple lime, salt, and pepper dressing also pairs wonderfully with this Indian appetizer. Or, you can make wraps with lettuce, creamy dressing, and fresh green chilis or pickled jalapeños. 

No matter how you serve it, you have got to try vegan chicken 555!

wrap made with veggies and vegan chicken 555

Why You’ll Love Chicken 555

  • crispy tofu in thick, spicy sauce with flavors of fennel, ginger, garlic, coriander, and 4 kinds of peppers
  • easily adjust the heat to your preference
  • use your plant based protein or use veggies of choice.
  • naturally gluten-free and nut-free with easy soy-free option

More Indian Appetizers and Snacks

Continue reading: Vegan Chicken 555 Appetizer

The post Vegan Chicken 555 Appetizer appeared first on Vegan Richa.

Indo-Chinese Crispy Tofu Manchurian (1-pan, 30 minutes)

By: Richa

Sticky, crispy, ginger- and garlic-packed tofu Manchurian is an easy and delicious meal over rice, quinoa, noodles, or lettuce wraps. This popular Indo-chinese sauce has a sweet heat that is absolutely addictive! (nut-free with gluten-free and soy-free options)

tofu Manchurian in the pan after coating the tofu in the sauce

Manchurian sauce is one of the most popular Indo-Chinese sauces, and it’s one of my favorites. You can use it in many different ways to make a variety of dishes. You can find it on restaurant menus paired with crispy fried chicken, crispy cauliflower, or fried veggie balls coated in the thick, sticky sauce. 

This sauce is absolutely delicious, and it has tons of ginger and garlic, so be ready to chop up a lot of both.

close-up of tofu Manchurian in a bowl with rice

You can also make a thinner version of Manchurian sauce to pair with rice, very saucy veggie balls, crispy chicken, or noodles. I have a couple of different ways to use Manchurian sauce on the blog that use these variations.

Today, let’s make tofu Manchurian. We toss tofu in rice flour and cornstarch to make a really crispy coating, then pan-fry it until it gets an amazing crunch. We make the Manchurian sauce in the same pan, then toss the crispy tofu in it right before serving, so it keeps that satisfying crunch. 

Top your tofu Manchurian it with green onions, and serve it with rice, quinoa, noodles, or lettuce wraps. Or enjoy it as a starter on its own!

fork taking a bite of tofu Manchurian

Why You’ll Love Tofu Manchurian

  • crispy tofu in sticky-sweet ginger-garlic Manchurian sauce
  • 1-pan dish ready in about 30 minutes
  • flexible! Serve as a starter or over rice, grains, noodles, or in lettuce wraps.
  • naturally nut-free with easy gluten-free and soy-free options

Continue reading: Indo-Chinese Crispy Tofu Manchurian (1-pan, 30 minutes)

The post Indo-Chinese Crispy Tofu Manchurian (1-pan, 30 minutes) appeared first on Vegan Richa.

Tofu Majestic (Vegan Chicken Majestic)

By: Richa

Tofu majestic is a vegan version of the popular South Indian starter, chicken majestic. Spicy, crispy tofu in a thick, spicy sauce is an absolutely delicious starter or side! You can easily control the heat, if you don’t like your food too spicy. (Options for gluten-free, soy-free, and nut-free)

tofu majestic in a bowl with rice

Chicken majestic is pretty popular in restaurants in the state of Andhra Pradesh, and especially in the city of Hyderabad. It is a spicy, crispy chicken dish that is usually fried or pan-fried and tossed in a thick, delicious, spicy sauce. It has elements from indo Chinese cuisine and the combination with South Indian flavors makes it a finger licking can’t stop good appetizer!

It is served as-is as a starter with a side of chutneys or a side salad. You can also add it to wraps or serve with rice. It is absolutely mindblowingly delectable and delicious. The tofu is crisped with some cornstarch and rice flour and some spices. Then tossed in a thick sauce to coat. If you want to keep these crisp, toss and serve immediately!

tofu majestic in a bowl with laccha onions

Tofu majestic is definitely hot with 4 heat elements in it, there’s green chilies, Kashmiri chili powder, black pepper and sambal oelek! It can get hotter depending on the green chilies that you use. To manage the heat, use milder green chilies and use less of the black pepper and Kashmiri chili powder.

I like to serve this with a side salad of onion and cucumber. It’s kind of like quick pickled onion with Indian spices called laccha pyaza. See the recipe notes for instructions for making the crispy, vibrant laccha onions. You can also serve with chutneys of choice or a creamy dip on the side to mellow the heat.

tofu majestic in the pan after cooking in the sauce

Why You’ll Love Tofu Majestic

  • flavorful, crunchy, battered tofu in a thick, spicy sauce
  • bake or pan fry the tofu
  • versatile! Serve on its own, with chutney or creamy dipping sauce, with a fresh salad, or as wraps
  • easy to make gluten-free, nut-free, and even soy-free.

Continue reading: Tofu Majestic (Vegan Chicken Majestic)

The post Tofu Majestic (Vegan Chicken Majestic) appeared first on Vegan Richa.

Tofu Koliwada (Indian Spicy Crispy Tofu) with Cilantro-Mint Chutney

By: Richa

Tofu Koliwada is a plant-based version of the popular regional Indian appetizer. It’s like a tofu nugget with tons of fiery heat and so delicious served with green chutney or other of choice. It’s super delicious, crispy and packs flavor! (gluten free and nut-free with soy-free options)

dipping a piece of tofu Koliwada into the mint chutney

I’ve been veganizing a bunch of decadent, meat-based Indian curries on the blog for a while, and I decided to switch gears. I wanted to explore these regional Indian starters and appetizers, which are just so flavorful —especially some of the meat-based ones. They’re pretty wild, with a lot of different sauces, flavors, and spices.

So welcome to veganizing some amazing appetizers! Let’s start with this delectable koliwada.

Koliwada is a popular crispy appetizer in Indian restaurants, especially around Mumbai city. It’s usually made with prawns ,is fried, and has a signature flavor. It originated with influences from Mumbai coastal cuisine and Punjabi cuisine.

The story goes that a man had moved down to an area close to Mumbai near Koliwada and created this dish, which became super popular.

tofu Koliwada on a serving plate

Koliwada is usually made with prawns, shrimp, or chicken, but we’re using tofu. If you don’t want to use tofu, you can use an alternate protein of your choice.

It is usually served with a green chutney that is slightly different than the usual. It has onion tomato and tamarind and is vibrant and spicy sour with a hint of sweet!

bowl of mint chutney

Basically, all of the flavor is in the batter, the spices. It’s kind of like tofu nuggets or crispy fried chicken, but Indian, with tons and tons of heat. Serve it with the vibrant cilantro-mint chutney listed below or with Schezwan chutney, tamarind chutney, or mango chutney.

close-up tofu Koliwada with mint chutney on the side

Why You’ll Love Koliwada

  • crispy, super spicy tofu with adjustable heat
  • delicious as a side or make it a meal by adding to a wrap or salad
  • incredible mint chutney for dipping comes together in the blender
  • versatile recipe – use dry coating or a batter, bake or pan fry!
  • naturally gluten-free and nut-free with soy-free options

Continue reading: Tofu Koliwada (Indian Spicy Crispy Tofu) with Cilantro-Mint Chutney

The post Tofu Koliwada (Indian Spicy Crispy Tofu) with Cilantro-Mint Chutney appeared first on Vegan Richa.

Chakli (soft and mildly crunchy)


 Chakli (also known as chakkuli or chakali) is a very staple savory tea time snack found in most of the Indian households. When it comes to making chakli, there are numerous recipes out there. Previously I updated my blog with a recipe that called for crunchy chakli and this recipe calls for a more softer and crunchy chaklis. This is our home recipe. You gotta try it to believe it :)

My favorite kind is soft and crunchy chakli mixed with lots of spice. But now I appreciate less spicy kind too :) Ingredient phutani(dalia) that is used in this recipe is delicious in taste, nutritious and can be digested easily. It is commonly mixed with sugar and distributed to the devotees in temples as God's offering.
Getting the spirals right(it is a big deal:)) while you press on the dough using a chakli press maker, surely gives you a kick and cheap thrills :) If it won't come out neatly (or breaks) please don't overreact like a hindi serial mother-in-law hehe... absolutely don't worry, I do have few tips up my sleeve which is mentioned in the notes below.


The first time you make it right, that moment, that satisfaction, that simple pleasures of life are not to be forgotten! :) (at least in my case) I cannot thank the techno-era we live in where I can simply share my kitchen achievements/stories, mishaps, success any darn thing with my mom, sister or a friend instantly.

Let us take a look at the Chakli recipe,

Ingredients:
  • 1 cup rice flour 
  • 1/4th cup roasted gram dal (also known as dalia, phutani) 
  • 1 tsp chilly powder, (more if you like spicy) 
  • 1/2 tsp turmeric (haldi) 
  • 1/2 tsp cumin seeds (jeera) 
  • 2 tsp sesame seeds (til) 
  • 1/2 tsp coriander powder (dhania pwd) 
  • 1/2 tsp cumin powder 
  • 2-3 tbsp butter at room temperature 
  • salt as per taste 
  • 1/2 - 3/4th cup approx. water (to knead the dough) 
  • oil to fry 


Preparation:
  • Mix all the above ingredients except water and mix everything with your fingers. 
  • Then slowly add water little by little and make a chapati/roti like dough. Keep aside for 20-30 min, covered.
  • Take some portion of the chakli dough, knead it some more and place it in the chakli press, start making spirals on a newspaper sheet or wax paper. 
  • Heat oil in a kadai, once the oil is hot bring the flame to med. Slowly slide the chaklis in the kadai using piece of wax paper or slide it on plain spatula and transfer slowly in the hot oil and fry nicely till it is brown on all sides on med-low flame. 
  • Take it out and place on the paper towel to absorb the extra oil. Nice soft and mild crispy chaklis are ready. 
  • Let it cool down completely before you store it in an airtight container. 

njoY!! happY  fryinG!! :)

Notes:* Always fry chakli on low-medium flame. If you see that the spirals are breaking while making chakli, try to work with little dough at a time, knead it well, add couple drops of water, knead well and place it in the chakli press. It works for me that way. If your dough is too soft, add little all-purpose flour and knead well before you start making the spirals. If still it isn't working just directly add the spirals in the oil (carefully) and fry. Spirals or no spirals, snack is yummy anyways! :)


Health Benefits:


Roasted gram dal (dalia) is high in fiber and helps to lower cholesterol. It also has a very low hypoglycemic index, which is important for those with diabetes. Chana dal is a helpful source of zinc, folate, calcium and protein. It is low in fat and most of it is polyunsaturated. 

Instant Ragi Dosa – how to make Instant Ragi Dosa, Finger Millet Dosa

how to make Instant Ragi Dosa ?

Finger Millet is a nutritious grain which is staple food in most of the South India. This Ragi Dosa also know as Finger Millet Dosa and Nachni Dosa. Instant ragi dosa made with homemade sprouted ragi flour is a healthy breakfast/Dinner for babies, toddlers and kids. Lets see how to prepare Instant Ragi Dosa with simple steps

Ingredients:

  • Ragi flour – 1 cup
  • Water to mix ragi flour
  • Salt to taste

For seasoning:

  • Oil – 3 spoons
  • Mustard seeds – ½ tea spoon
  • Chana dal – 1 spoon
  • Big Onion – 1 (finely chopped)
  • Red chilli – 1 no
  • Curry leaves – 1 sprig

Steps to cook instant ragi dosa:

  1. Take a bowl add one cup of ragi flour, required salt then mix well and keep it aside.
  2. Turn on the stove. place a fry pan when it is heated add oil, after one minute add mustard seeds when it is splutters add chana dal fry for a second.
  3. Now add finely chopped onion fry till it become transparent, then add red chilli and curry leaves then fry for a minute then switch off the stove.
  4. Next take a ragi mixture in bowl add these fried item into ragi flour.
  5. This is time to add required water in to ragi flour then mix well.
  6. Ragi dosa batter should be in not thick and not thin consistency.
  7. Switch on the stove place a dosa tawa, when it is heated sprinkle some water and pour the instant ragi dosa batter and make dosa.
  8. Turn other side and cooked well both sides of ragi dosa.
  9. Healthy, easy and instant ragi dosa is ready to serve.
  10. Serve this ragi dosa with tomato chutney and coconut chutney etc.,
  11. More millet recipes from Famous Indian Recipes | kambu curd rice | Varagu Arisi Ven Pongal | Ragi murukku recipe | varagu rice dosa | Ragi vada |

Tips:

  • Here I used simple method to cook easy and healthy ragi dosa version and anyone can try it.
  • We can also prepare ragi dosa with curd. but i tried instant ragi dosa without curd.
  • Some people like to have ragi dosa with rice flour. Here i shared instant ragi dosa without rice flour. Even some people trying ragi dosa with urad dal.

Ragi dosa health benefits

  • Loaded with Calcium
  • Helps in Controlling Diabetes
  • Reverts Skin Ageing
  • Battles Anemia
  • Relaxes the Body
  • Helps in Weight Loss

The post Instant Ragi Dosa – how to make Instant Ragi Dosa, Finger Millet Dosa appeared first on Famous Indian Recipes.

Vella Seedai /Innipu Cheedai - Janmashtami Special

 Vella Seedai or sweet jaggery fritter balls are an essential prasad /offering made for Gokulashtami/ Krishna jayanthi to celebrate the birth of Lord Krishna .

We make two types of seedai; Uppu seedai (savory)  and Vella seedai (sweet) along with various other favorites of Lord Krishna to be offered on the special day when we all rejoice and celebrate lord Krishna's birth .

To know how we celebrate Krishna Jayanthy in a typical Tambrahm (Tamil Brahmin) house hold head over to my post, Krishna Jayanthy Celebrations where you can also find link to all the special recipes we make for the big festival .


Making seedai is an art and requires a little expertise and caution while making it . With practice we can easily master this and become a pro .

I am giving all tips and tricks to make a fail proof seedai so that even beginners and newbies can make it with an ease . These tips are applicable for flours which are either home made or store bought. 

Traditionally rice flour and udad dhall flour at prepared at home for purpose of maintaining hygiene and quality but now a days we get good quality ready made flours so we can use that even. 

In this recipe, I have used store brought rice flour and  udad dhall flour to make the recipe, thus making it easy for working women and those who are pressed for time.   

Points to keep in mind 

  • Roast the rice flour in a dry pan until it feels warm. The flour should be roasted just until you can feel the warmth no need for the flour to change color . Sieve the flour well through a sieve once it cools down.
  • Roast the udad dhall flour the same way and sieve it. If you are unable to find ready made udad dhall flour,  take 1 cup of udad dhall and dry roast in a pan until it turn crisp ,cool it and then blend into a fine powder using the blender . Sieve it to get a really fine powder without any grits . 
  • Melt the jaggery in hot water and strain it to remove any impurities .
  • Sieving the flours and jaggery syrup is very important as even a small particle or grit can cause the seedais to burst in the oil .

To know how to make Uppu Seedai and also on how to roast the flours check the video link below 


Ingredients 

1 cup rice flour 
1tbsp udad dhall flour /Ulutham maav
1/2  cup grated jaggery + 3/4 cup water to melt it
1/2 tsp white sesame seeds / yellu 
2 tsp grated coconut  (optional)
Pinch of cardamom powder
Oil to deep fry 
1 tbsp unsalted butter/ ghee at room temperature 

Method

  • Take a wide mixing bowl and add the sieved rice flour and udad dhall flour along with the sesame seeds and grated coconut. 
  • Meanwhile, heat the melted jaggery in a pan and let it come to a rolling bowl.we donot need ant string consistency.  When the jaggery is boiling add in the cardamom powder to this.
  • Pour this hot jaggery syrup over the flours and mix it gently with a spoon so that the syrup gets incorporated well with the flours.
  • Now add the melted butter and gently with your hands knead a soft and pliable dough.most of the times the jaggery syrup is enough to knead the dough but incase if you feel the dough is dry , sprinkle some warm water and knead until its firm but soft.  Cover with a damp cloth and let it rest for 30 mins.
  • Heat oil in a kadai and start rolling small balls from the dough . The balls must be crack free and the same time not rolled very tight. 
  • If you roll it tight there is a chance of the seedais bursting in oil . Grease your palms with ghee while you begin to roll the balls .
  • When the oil is heated, reduce flame to medium and first drop one ball into the oil . It must not disintegrate in the oil. Incase it disintegrates means the moisture content is more . To fix this ,sprinkle some rice flour and knead the dough again until the dough feels dry and firm . Donot panic. 
  • Once the dough is of righr consistency, drop the balls into the oil carefully and fry on medium flame by occasionally splashing oil over the seedais,this will prevent the seedais from bursting. 
  • Fry until the oil stops hissing and the seedais have turn nice and brown. You can see cracks on the seedais once they are fried. This indicates that the seedais are perfectly done both from the inside and outside.
  • Carefully take it off from the hot oil and let them cool completely before you can store in a dry container. 

Pin it up


❌