In the world of penetration testing and red team operations, one of the most critical moments comes after you’ve successfully exploited a target system. You’ve gained initial access, but now you’re stuck with a basic, unstable shell that could drop at any moment. You need to upgrade that shell, manage multiple connections, and maintain persistence without losing your hard-won access.
Traditional methods of shell management are fragmented and inefficient. You might use netcat for catching shells, then manually upgrade them with Python or script commands, manage them in separate terminal windows, and hope you don’t lose track of which shell connects to which target. Or you can use Penelope to handle all those things.
Penelope is a shell handler designed specifically for hackers who demand more from their post-exploitation toolkit. Unlike basic listeners like netcat, Penelope automatically upgrades shells to fully interactive TTYs, manages multiple sessions simultaneously, and provides a centralized interface for controlling all your compromised systems.
In this article, we will install Penelope and explore its core features. Let’s get rolling!
Step #1: Download and Install Penelope
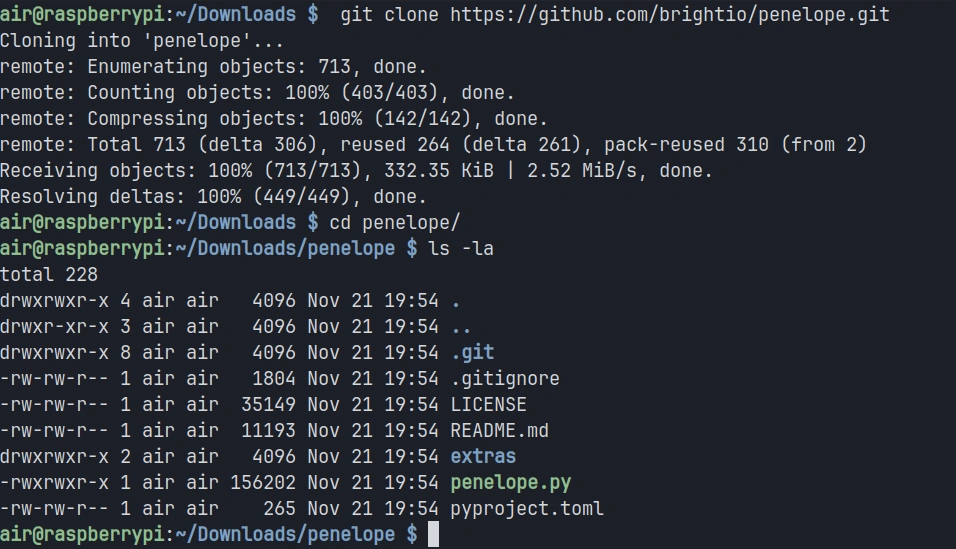
In this tutorial, I will be installing Penelope on my Raspberry Pi 4, but the tool works equally well on any Linux distribution or MacOS system with Python 3.6 or higher installed. The installation process is straightforward since Penelope is a Python script
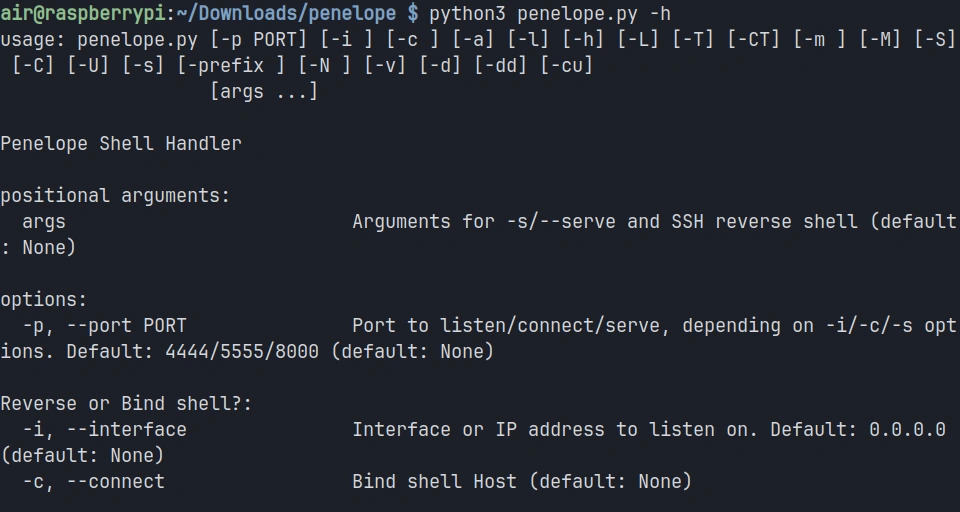
Once the downloading completes, you can verify that Penelope is ready to use by checking its help menu:
pi> python3 penelope.py -h
You should see a comprehensive help menu displaying all of Penelope’s options and capabilities. This confirms that the tool is properly installed and ready for use.
Step #2: Starting a Basic Listener
The most fundamental use case for Penelope is catching reverse shells from compromised targets. Unlike netcat, which simply listens on a port and displays whatever connects, Penelope manages the incoming connection and prepares it for interactive use.
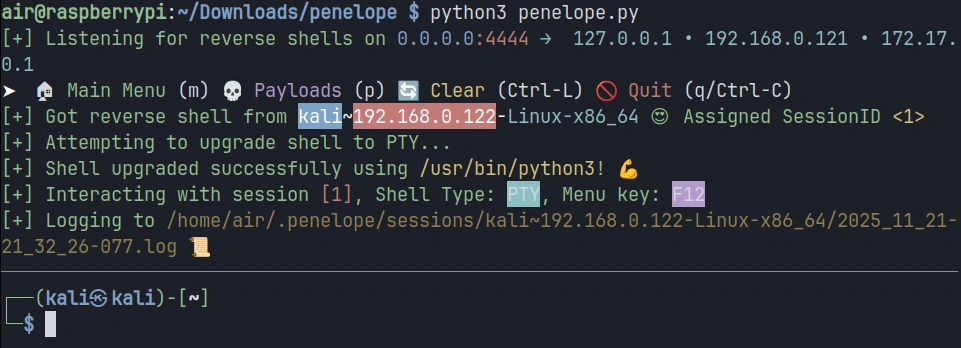
To start a basic listener on port 4444, execute the following command:
pi> python3 penelope.py
Penelope will start listening on the default port and display a status message indicating it’s ready to receive connections.
Now let’s simulate a compromised target connecting back to your listener.
You should see Penelope display information about the new session, including an assigned session ID, the target’s IP address, and the detected operating system. The shell is automatically upgraded to a fully interactive TTY, meaning you now have tab completion, the ability to use text editors like Vim, and proper handling of special characters.
Step #3: Managing Multiple Sessions
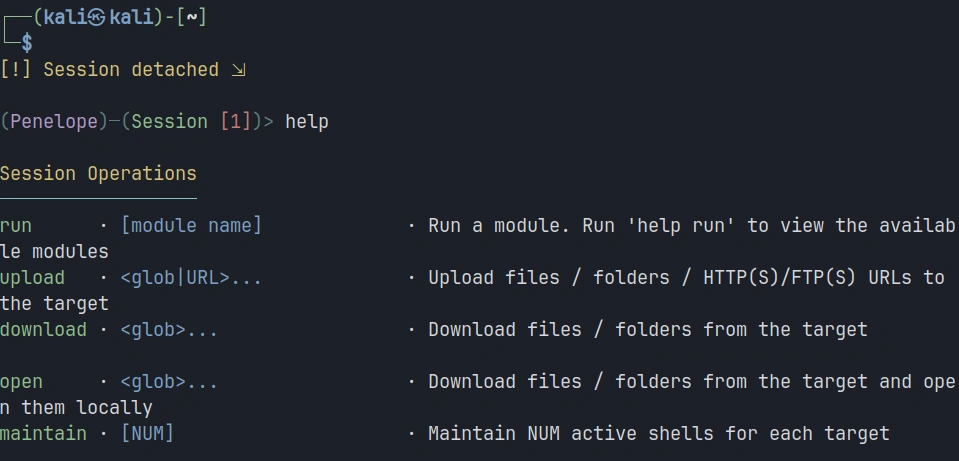
Let’s simulate managing multiple targets. In the current session, click F12 to open a menu. There, you can type help for exploring available options.
We’re interested in adding a new listener, so the command will be:
panelope> listeners add -p<port>
Each time a new target connects, Penelope assigns it a unique session ID and adds it to your session list.
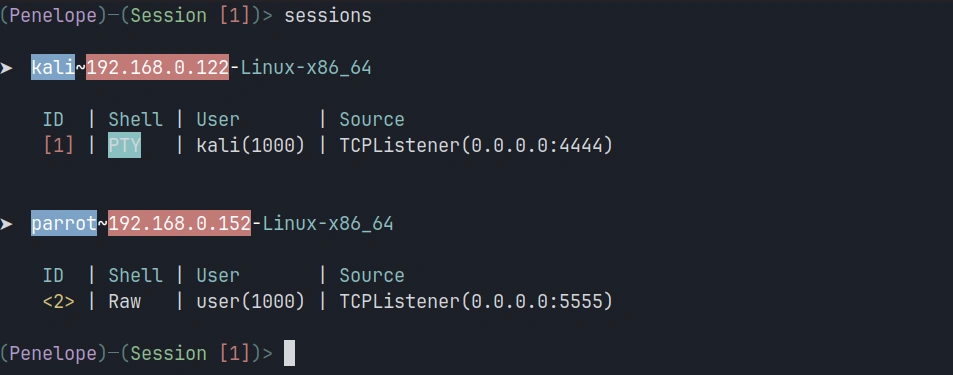
To view all active sessions, use the sessions command within Penelope:
penelope > sessions
This displays a table showing all connected targets with their session IDs, IP addresses and operating systems.
To interact with a specific session, use the session ID. For example, to switch to session 2:
penelope > interact 2
Step #4: Uploading and Downloading Files
File transfer is a constant requirement during penetration testing engagements. You need to upload exploitation tools, download sensitive data, and move files between your attack system and compromised targets. Penelope includes built-in file transfer capabilities that work regardless of what tools are available on the target system.
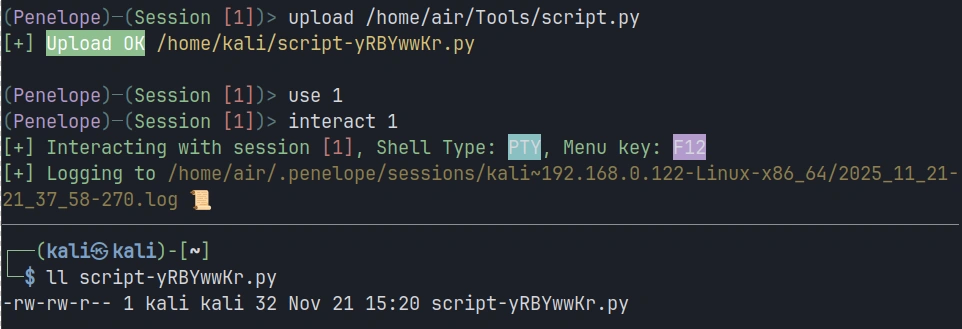
To upload a file from your attacking system to the target, use the upload command. Let’s say you want to upload a Python script called script.py to the target:
penelope > upload /home/air/Tools/script.py
Downloading files from the target works similarly. Suppose you’ve discovered a sensitive configuration file on the compromised system that you need to exfiltrate:
penelope > download /etc/passwd
Summary
Traditional tools like netcat provide basic listening capabilities but leave you manually managing shell upgrades, juggling terminal windows, and struggling to maintain organized control over your compromised infrastructure. Penelope solves these problems. It provides the control and organization you need to work efficiently and maintain access to your hard-won, compromised systems.
The tool’s automatic upgrade capabilities, multi-session management, built-in file transfer, and session persistence features make it a valuable go-to solution for cyberwarriors. Keep an eye on it—it may find a place in your hacking toolbox.
Welcome back, cyberwarriors. In today’s article, we will walk through a real-world compromise that was made possible through digital forensics. During one of our recent engagements, we landed on a machine located outside the primary domain. Unfortunately, this system held no immediately useful credentials or access paths for lateral movement. Our team attempted a variety of techniques to extract credentials, ranging from standard SAM parsing to log file analysis and general file inspection. Eventually, we uncovered a valuable asset buried within one of the attached drives, which was a virtual disk.
For those who read our earlier write-up on compromising a domain through forensic analysis of an old Windows image, you’ll recall how helpful such approaches can be. The same logic applies to Linux systems. Even if the machine in question is inactive, cracking old credentials can still enable lateral movement if password reuse is in play.
Let’s examine how we extracted, analyzed, and ultimately compromised this Linux virtual machine.
Virtual Disk Discovery and Exfiltration
The virtual disk was located on a secondary drive of a Windows host. Due to limited space on the drive and to avoid disrupting the system, we chose to exfiltrate the disk to our lab for analysis.
One reliable method of transferring files from an RDP session is via the Mega cloud service. Using a temporary email address, you can create a Mega account anonymously.
Mega provides 20 GB of free storage per account, which is sufficient. If you need more, additional accounts or a paid plan will do the job.
Loading the Virtual Machine in VMWare
Once the file was safely downloaded, we opened VMWare and imported it. In this case, it was a .vmdk file, which is natively supported by VMWare.
During the import process, VMWare will prompt for a name for the virtual machine and automatically generate a folder in your local environment. Errors can occasionally occur during import. If so, clicking “Retry” generally resolves the issue.
Once the VM was successfully imported, we attempted to boot it. The machine started as expected, but we were greeted with a login screen requiring credentials.
At this point, you might be tempted to guess weak passwords manually, but a more systematic approach involves unpacking the virtual disk to inspect the filesystem directly.
Unpacking the Virtual Disk
The .vmdk file can be unpacked using 7-Zip. The following command does the job in PowerShell:
PS > & “C:\Program Files\7-Zip\7z.exe” x .\vmc-disk1.vmdk -oC:\VM-Extract -y
This extracts the contents of the virtual disk into a new folder called VM-Extract on the C drive. In this case, we obtained three disk image files. The next step was to mount these images to access their contents.
Mounting Linux Filesystems on Windows
Since Windows cannot interpret Linux filesystems by default, attempting to mount them natively results in an error or a prompt to format the disk. To avoid this, we used DiskInternals Linux Reader, a free tool that can interpret and mount EXT-based filesystems.
Upon launching the tool, go to Drives > Mount Image, select the Raw Disk Images option, and then choose all the extracted image files.
Once completed, you should see the Linux filesystem appear in the Linux Reader interface, allowing you to navigate through its structure.
Initial Analysis
With access to the mounted filesystem, our first goal was to recover the stored credentials. System administrators frequently reuse passwords, so even stale credentials can provide lateral movement opportunities. Additionally, Linux systems often lack comprehensive security tooling, making them ideal for establishing long-term persistence.
We began by locating the /etc/shadow file, which stores password hashes. On this system, the hashing algorithm used was yescrypt, a modern and secure scheme not currently supported by Hashcat. That said, John the Ripper does support it, and we’ll return to this shortly.
Next, we exported .bash_history from /home/user/ and /root/. This file logs command history for the user and often includes IP addresses, script execution details, and occasionally even plaintext passwords. If Linux Reader fails to display the file due to size limitations, right-click and export it to your Windows host for proper inspection.
Beyond bash history, another good target is the crontab directory. Some cron jobs use embedded credentials in scripts for automated tasks, which can also be repurposed for access.
Password Recovery Using John the Ripper
As Hashcat cannot currently handle yescrypt, we opted to use John the Ripper. The syntax is straightforward:
kali > sudo john –format=crypt –wordlist=rockyou.txt hashes.txt
The output might look like an error, especially if the cracked password is something as simple as “1”, but that was indeed the correct password for both user accounts on this machine. We tested it, and it worked. We had successfully logged into the virtual machine.
Post-Access Exploration
With access to the virtual environment, we began exploring more thoroughly. One of the first things we reviewed was the browser history, followed by saved credentials in applications like Mozilla Firefox. We also checked for authentication logs, Remmina session logs, which could provide saved credentials or remote system details.
Indeed, we discovered a stored credential for a web service in Firefox. With this information, we scanned the internal network for hosts running the same service. If reachable, such services can often be exploited either by reusing the credentials or through a vulnerability in the service itself. In some cases, this leads to remote code execution and full system compromise.
Caido continues to grow in popularity in the tech community, and it’s well-deserved. Since the publication of our previous articles, developers have brought improvements to the Replay, Match & Replace tabs, updated the Plugin Store, and even more. There are dozens of different plugins that significantly improve the functionality of Caido. Today, I’d like to explore one of them: a vulnerability scanner.
Step #1: Installation
Kali Linux 2025.3 now includes Caido in its repositories. And to install it, it’s enough to update them:
kali> sudo apt update
And install it via APT:
kali> sudo apt install caido
Getting Started with a Scanner
To get started with the Caido scanner, we need to create a project and move on to the plugin tab. You’ll see a warning message similar to the one below.
After accepting the risk, we can install any plugin in one click. Installed plugins will appear in the sidebar.
By going through the websites, the scanner will already be in passive mode and analyze the traffic. You can see the results in the Findings tab.
You may also discover a potentially vulnerable endpoint and launch an active scan on it right away.
It will start a Scan Launcher first. You’ll see a configuration window with two tabs, like below.
Where you can set up aggressivity, scope, severities, and so on.
After starting, you can see what’s being checked right now and the successful findings.
Clicking Findings reveals additional details, such as the payload sent and the server’s response.
Next, we can check if it’s not a false positive.
In this example, it’s an old website, which is vulnerable to reflected XSS.
Summary
Plugins are boosting the efficiency of web‑app testing in Caido. Today, dozens of plugins cover a wide range of use cases. In this article, we take a closer look at the scanner plugin. Its combination of passive and active techniques helps you uncover vulnerabilities more quickly. Feel free to browse the Community Store for additional plugins—or create your own.
If you find web application testing interesting, consider checking out our Advanced Web Hacking course to take your expertise to the next level.
We are continuing our session on Sliver C2 and practicing in a real environment. It’s always best to apply your skills in the real world, where you learn fast. Your actions must be well thought-out and careful to avoid detection. The goal is to gain knowledge about the environment you’ve entered and ultimately compromise the entire Active Directory. In this chapter, we will focus on Domain Reconnaissance.
In Active Directory, a domain is the fundamental logical boundary that organizes and manages objects such as users, computers, and security policies within a centralized directory service. It acts as both a security and administrative unit, enabling unified authentication, authorization, and resource control across all contained entities.
Domains allow administrators to enforce policies consistently across all domain-joined systems. Group Policy Objects (GPOs), login scripts, and access permissions are scoped by the domain boundary. Multiple domains can exist within a forest, which is the top-level container in an Active Directory structure. Domains in the same forest can establish two-way trust by default, allowing users in one domain to access resources in another, assuming permissions are configured accordingly.
Skipping domain reconnaissance is like trying to drive across town without a map. You waste time fumbling around and create unnecessary noise that can alert defenders. Reconnaissance reveals which accounts have elevated privileges, where domain controllers are located, and how machines interact. With this knowledge, you can choose optimal targets for implant deployment and lateral movement, all while minimizing detection risk.
PowerView
PowerView is a PowerShell-based tool designed to collect Active Directory information with minimal external dependencies. It offers numerous functions that query domain data via native Windows APIs, which helps maintain operational security by mimicking normal administrative activity.
To run PowerView, we first host the script on our C2 server using a simple Python web server. Then, we execute encoded commands with SharpSH.
Next, start an HTTP server in the directory where PowerView.ps1 is saved:
c2 > python3 -m http.server
Encoding Commands
Convert your PowerView command into Base64 to avoid syntax issues and reduce detection. Renaming PowerView.ps1 to something more benign is also recommended:
The command above queries domain users and retrieves their usernames and descriptions. Often, system administrators leave passwords in the description field, which is an invaluable opportunity for an attacker.
SharpSH
SharpSH is a .NET-based in-memory agent deployed by Sliver to execute scripts like PowerView without touching disk. It downloads PowerView from your hosted URL, runs it in memory, and sends output through the C2 channel. This technique avoids writing files to disk and runs within the .NET framework, making it difficult for antivirus or EDR solutions to detect.
Get Domain Users
Using the Base64 string from earlier, we can now enumerate domain users:
Scroll through the results. If passwords stored in account descriptions are still valid, these accounts may have excessive permissions or group memberships that can be abused for privilege escalation.
SharpView
SharpView is a C# rewrite of PowerView, offering the same functionality as a compiled .NET executable. Also, it doesn’t require command encoding.
Viewing Domain Information
You can gather domain information using SharpView: sliver (session) > execute-assembly /root/tools/SharpView.exe “get-domain” -t 240 -i -E -M
This command outputs the names of domain controllers. In our example, the domain controllers are running Windows Server 2008, which is severely outdated and vulnerable to many known exploits.
To obtain a more comprehensive overview of the domain:
sliver (session) > c2tc-domain-info
This command reveals the domain controller’s IP, the domain’s password policy, and other data.
For stealthier enumeration, use native system binaries: sliver (session) > execute -o powershell $Forest = [System.DirectoryServices.ActiveDirectory.Forest]::GetCurrentForest(); $Forest.Domains
Viewing AES-Reproastable Accounts
Accounts marked with “PreauthNotRequired” can be targeted with AS-REP roasting attacks. The attacker extracts crackable data without pre-authentication, which is then brute-forced offline without triggering failed login alerts: sliver (session) > execute-assembly /root/tools/SharpView.exe “get-netuser -PreauthNotRequired” -t 240 -i -E -M
Vulnerable certificate templates can be used for powerful persistence mechanisms. AD CS attacks are complex, but understanding them yields high-impact opportunities.
Network
Once inside the network, you should enumerate network adapters. This may reveal access to internal segments. Use Sliver’s ifconfig utility to retrieve adapter details without opening an interactive shell, reducing the risk of detection
Domain Trusts
Domain trusts allow authentication across domains. If Domain A trusts Domain B, then B’s users can access A’s resources, depending on permissions. Attackers abuse these relationships by compromising accounts in low-security domains, then leveraging trusts to access high-value targets in more secure domains. For instance, compromising a service account in a child domain could grant access to the parent domain’s file shares or domain controllers, using legitimate Kerberos tickets.
SharpView & PowerView – Get-DomainTrust
To view trust relationships in the current domain: sliver (session) > execute-assembly /root/tools/SharpView.exe “Get-DomainTrust” -t 240 -i -E -M
SharpView & PowerView – Get-DomainTrustMapping
Unlike the previous command, Get-DomainTrustMapping goes beyond a single domain: it finds your current domain’s trusts, then follows referrals into trusted domains, mapping all reachable trusts sliver (session) > execute-assembly /root/tools/SharpView.exe “Get-DomainTrustMapping” -t 240 -i -E -M
PowerShell
You can also use native PowerShell commands to inspect domain trust structures:
If you have an active PowerShell session: PS > Import-Module activedirectory PS > Get-ADTrust -Filter *
Keep in mind, PowerShell process creation might be monitored in some environments.
Netdom
Another method is using netdom from the command prompt, which can be run in cmd. Unlike PowerShell, cmd is more stealthy, but process creation can still be logged:
C:\ > netdom query /domain:domain.ru trust
Conclusion
By thoroughly mapping a domain’s structure, privileges, and trust relationships, you gain the information needed to move stealthily toward full compromise. Tools like PowerView, SharpSH, SharpView, and native commands allow you to collect critical information without triggering alerts. Always validate the security posture of accounts, certificates, and domain configurations, because misconfigurations and outdated systems are the weak points that enable a successful breach.
Varun Uppal, founder and CEO of Shinobi Security Over the weekend, airports across Europe were thrown into chaos after a cyber-attack on one of their technology suppliers rippled through airline...
Nowadays, security engineers make an effort to get people to use complex passwords, and 2FA is becoming required on more and more platforms. This makes password cracking more time-consuming and sometimes only a first step toward access, but it can still be the hacker’s best entry point to an account or network.
Today, I’d like to talk about a tool that simplifies password cracking by combining features of tools for automated credentials attacks and Large Language Models (LLMs) – BruteForceAI.
BruteForceAI is a tool that automatically identifies login form selectors using AI and then conducts a brute force or password spraying attack in a human-like way.
Step #1: Install BruteForceAI
To get started, we need to clone the repository from GitHub: kali> git clone https://github.com/MorDavid/BruteForceAI.git kali> cd BruteForceAI
BruteForceAI required Python 3.8 or higher. Consider checking the version before continuing: kali> python –version
In my case, it’s 3.13.5, and now I’m ready to install dependencies: kali> pip3 install -r requirements.txt
I’ve used the –break-system-packages flag to ignore the environment error. You can use this command or create a virtual Python environment for this project.
Besides that, I’ve got an error about sqlite3 version. To fix that, we can install SQLite dev headers: kali> sudo apt install libsqlite3-dev
For working with browser automation, BruteForceAI uses the Playwright library. We can install it using NPM:
kali> npm install playwright
To work correctly, a playwright needs a rendering engine; in this case, I’ll use Chromium:
kali> npx playwright install chromium
In the command above, you can see npx. It’s a command-line tool that comes with npm. It temporarily downloads and runs a program directly without adding it permanently to your system.
Step #2: AI Engine Setup
You have two options for the AI analysis engine: local or cloud AI. I have pretty humble hardware for running even small LLMs locally; therefore, I’ll show you how to use the cloud AI option.
There is a platform called Groq that provides access to different LLM models in the cloud through its API. To get started, you just need to sign up and acquire an API key.
Step #3: Prepare Target Lists
First of all, we need to create a file targets.txt and list URLs that contain a login form. In my case, it’ll be a WordPress website.
Before starting to crack, we need to figure out the registered users. For this, I’ve used WPScan and successfully saved all users to the file users.txt. To learn more about WPScan, check this article.
Step #4: Reconnaissance
Before launching attacks, BruteForceAI needs to analyze your targets and understand their login mechanisms.
I’ve mentioned –thread 10 flag, which means the script will run 10 parallel threads (simultaneous tasks) during the attack. But nowadays, such brute force will be quickly indefinable, so let’s see how we can conduct password spraying using BruteForceAI.
–mode passwordspray — Uses password spraying mode (tries one password across many accounts before moving to the next password). –delay 10 — Waits 10 seconds between attempts per thread. –jitter 3 — Adds up to 3 seconds of random extra delay to avoid detection. –success-exit — Stops running immediately if a successful login is found.
BruteForceAI will continue from passwords that weren’t checked during the brute-force attack and start spraying.
To make it more stealthy, we can add a custom User-Agent, play with delays, and decrease the threads. And eventually this script will run until it checks all passwords or until it finds the correct one.
Summary
BruteForceAI is a great tool that makes password attacks much simpler. In this article, we discovered how to install BruteForceAI, get ready for use, conduct reconnaissance, and start attacking passwords. By combining this with different LLMs, this tool can make passwords attack faster and more efficient. But in any case, the success of this kind of attack depends on how good a password list you have, so consider checking tools like crunch and cupp.
If you want to improve your password-cracking skills and cybersecurity in general, check out our Master Hacker Bundle. You’ll dive deep into essential skills and techniques like reconnaissance, password cracking, vulnerability scanning, Metasploit 5, antivirus evasion, Python scripting, social engineering, and more.
Landing on a Linux machine after exploitation or with freshly harvested credentials often feels like a victory, but in reality, it is only the beginning of the struggle. Lateral movement in Linux environments is notoriously trickier than in Windows domains. Even if you manage to obtain root on one host, you might quickly hit a wall: you see evidence of users connecting to other systems, but you don’t have their credentials. Without those, further expansion stalls. Techniques such as dumping memory or scraping process data might work in some cases, but SSH processes in particular won’t reveal user credentials so easily. At first glance, it feels like a dead end.
This is where PAM manipulation comes into play. By modifying how the Pluggable Authentication Module handles logins, it becomes possible to quietly capture user credentials whenever they authenticate. This is how you create a systematic way to harvest SSH passwords and reuse them for lateral movement.
Recon with Known Hosts
Before diving into PAM patching, it is useful to gather some context about the network and where legitimate users are connecting. SSH clients store previously accessed servers in a known_hosts file under each user’s .ssh directory. If those files are accessible, they give a list of destinations without the need for noisy scanning. For example, inspecting /home/dev3/.ssh/known_hosts might reveal entries such as git. That single clue suggests a pivot point. If the compromised machine is in a restricted environment, that host may sit in another subnet or behind access controls you couldn’t otherwise reach. With the right credentials, this file becomes a roadmap for lateral movement.
Preparing the Host
Before implementing a credential capture mechanism, it’s important to ensure the host accepts password-based logins. SSHD can be configured to forbid password authentication entirely, relying solely on key-based access. To enable credential capture, the following must be set in /etc/ssh/sshd_config:
target# > nano /etc/ssh/sshd_config
PasswordAuthentication yes
Once this change is in place, the groundwork is set.
Creating a Logging Script
The next step is creating a small script that will record login attempts. With root privileges, create a new file at /usr/local/bin/logc.sh:
Then prepare the hidden log file that will quietly collect captured data:
target# > touch /var/log/.authc.log
This script is simple yet powerful. It captures the username, the plaintext password, the source of the connection, and timestamps each entry.
Patching PAM
With the logging script in place, the next task is to insert it into the PAM authentication chain. PAM configurations vary slightly between distributions, but for SSH specifically, the relevant file is/etc/pam.d/sshd. For broader system-wide coverage, other files such as /etc/pam.d/common-auth (Debian/Ubuntu) or /etc/pam.d/password-auth (CentOS) could be patched instead.
To modify SSH authentication only, open/etc/pam.d/sshd and add the following line at the very top:
This ensures that every authentication attempt, successful or not, passes through the logging script before continuing with normal PAM processing. Credentials are silently exfiltrated while legitimate users remain unaware.
Applying and Testing the Patch
For the changes to take effect, restart the SSH service:
target# > service sshd restart
Once restarted, test the patch by logging in with valid credentials.
Afterwards, check the log file:
target# > cat /var/log/.authc.log
Each entry should display the captured user, the password they entered, the remote host they connected from, and the date of the attempt. Over time, this log will accumulate valuable credentials from legitimate user sessions, giving you a resource for lateral movement.
Summary
There is a great method of harvesting SSH credentials on Linux by modifying the Pluggable Authentication Module (PAM). After identifying potential lateral movement targets via known_hosts, SSH is reconfigured to allow password authentication. A custom logging script is created to capture usernames, passwords, and remote sources, and is then integrated into PAM by editing /etc/pam.d/sshd. With the patch in place, every login attempt is silently recorded to a hidden log file. Restarting SSH activates the change, and future connections yield a steady stream of usable credentials.
Persistence on Windows systems has always been a cat-and-mouse game between attackers looking for reliable footholds and defenders trying to close down avenues of abuse. Windows itself provides a wide range of mechanisms that are legitimate parts of system functionality, yet each of them can be turned into a way of ensuring malicious code runs again and again after reboot or logon. Registry values, system processes, and initialization routines are all potential targets for persistence, and while most of them were never designed with security in mind, they remain available today. What makes them attractive is durability: once configured, they survive restarts and provide repeated execution opportunities without requiring the attacker to manually re-enter the environment.
The techniques described here are all examples of registry-based persistence, each with its own advantages, drawbacks, and detection footprints. Understanding them is crucial for both attackers– who rely on stability– and defenders– who need to spot tampering before it causes damage.
AppInit
AppInit is a legacy Windows feature that tells the OS loader to map one or more DLLs into any process that links user32.dll. That means when many GUI apps start, Windows will automatically load the DLLs listed in that registry value, giving whatever code is inside those DLLs a chance to run inside those processes. It’s a registry-based, machine-wide mechanism that survives reboot and affects both 32-bit and 64-bit GUI applications when configured.
The first command turns the AppInit behavior on for the 64-bit registry view. The second command writes the path to the DLL(s) that Windows should try to load into GUI processes (this value is a string of one or more DLL paths). The next two commands do the same thing for the 32-bit registry view on a 64-bit system. First it will enable the mechanism for 32-bit processes, and then set the 32-bit DLL path.
In plain terms: enable AppInit, tell Windows which DLLs to load, and do it for both 64-bit and 32-bit processes so GUI apps of both architectures will load the specified libraries.
Pros: survives reboots and causes the DLL to be loaded into many GUI processes automatically, giving broad coverage without per-user startup entries.
Cons: requires administrative rights to change HKLM, is noisy because the DLL will appear loaded in many processes (creating strong telemetry), and relies on an older, well-known mechanism that defenders often check.
If you’re a defender, focus on auditing the HKLM Windows keys (including the Wow6432Node path) and monitoring unusual DLL loads into system or common GUI processes.
LSASS
Modifying LSASS’s configuration to load an extra DLL is a way to get code executed inside a highly privileged, long-lived system process. LSASS is responsible for enforcing security policy and handling credentials. Because it loads configured authentication/notification packages at startup, adding an entry here causes the chosen module to be loaded into that process and remain active across reboots. That makes it powerful, but dangerous.
The registry command updates Notification Packages multi-string under the LSA key. In simple terms, this line tells Windows “when LSASS starts, also load the packages named rassfm, scecli, meter and force the write if the value already exists.”
Pros: survives reboots and places code inside a long-running, high-privilege process, making the persistence both durable and powerful.
Cons: requires administrative privileges to change the LSA registry, produces extremely high-risk telemetry and stability impact (misconfiguration or a buggy module can crash LSASS and destabilize or render the system unusable), and it is highly suspicious to defenders.
Putting code into LSASS buys durability and access to sensitive material, but it is one of the loudest and riskiest persistence techniques: it demands admin rights, creates strong signals for detection, and can crash the machine if done incorrectly.
Winlogon
Winlogon is the component that handles interactive user logons, and it calls the program(s) listed in the UserInit registry value after authentication completes. By appending an additional executable to that UserInit string you ensure your program is launched automatically every time someone signs in interactively.
This keeps the normal userinit.exe first and appends c:\meter.exe, so when Winlogon runs it will launch userinit.exe and then meter.exe as part of the logon sequence. Be aware that UserInit must include the legitimate userinit.exe path first. Removing or misordering it can break interactive logons and lock users out.
Pros: survives reboots and reliably executes at every interactive user logon, giving consistent persistence across sessions.
Cons: requires administrative privileges to change HKLM, offers no scheduling control (it only runs at logon), and is risky, since misconfiguring the UserInit value can prevent users from logging in and produces obvious forensic signals.
Microsoft Office
Many Office components read configuration from the current user’s registry hive, and attackers can abuse that by inserting a path or DLL name that Office will load or reference when the user runs the suite. This approach is per-user and survives reboots because the configuration is stored in HKCU, but it only triggers when the victim actually launches the Office component that reads that key. It’s useful when the target regularly uses Office and you want a simple, low-privilege persistence mechanism that doesn’t require installing a service or touching machine-wide autoruns.
Pros: survives reboots and works from a normal user account because it lives in HKCU, so no administrative rights are required.
Cons: there’s no scheduling control, it only triggers when the user launches the relevant Office component, so you cannot control an execution interval.
Summary
Windows persistence through registry modifications offers multiple paths, from legacy AppInit DLL injection to LSASS notification packages, Winlogon UserInit hijacking, and Office registry keys under HKCU. Each of these methods survives reboots, ensuring repeated code execution, but they vary in scope and stealth. AppInit and Office rely on application startup, while LSASS and Winlogon provide broader and more privileged coverage. All require different levels of access, with the most powerful options also being the loudest in telemetry and the riskiest to system stability. For defenders, the key takeaway is clear: monitoring critical registry keys under HKLM and HKCU, watching for unusual DLL or executable loads, and ensuring proper auditing are essential.
With in-memory execution and simulated exfiltration already in place, the next step was obvious: persistence. Advanced threats like Koske don’t just run once—they stay alive, blend into the system, and return after every reboot. That’s exactly what I set out to replicate in this phase.
The goal? To see if the AI could not only generate payloads that behave like persistent malware, but also suggest and configure real-world persistence mechanisms like systemd services or .bashrc entries—again, without me writing any code manually.
Let’s see how far the AI can go when asked to survive a reboot.
Simulated Attack Chain: Building Complexity
At this stage, the challenge escalates. Instead of focusing on isolated behaviors like beaconing or exfiltration, I asked the AI to generate a safe, all-in-one payload that could simulate a full attack chain. The idea was to build a structured sequence of actions—like compiling a fake binary, faking persistence, collecting environment data, and retrieving a file—mirroring the complexity of how real APTs like Koske operate.
The AI responded with a well-structured, harmless payload that compiles a dummy C program (fakerootkit), creates a marker file to simulate persistence (persistence_demo.txt), collects system info (cpu_check.txt), and downloads a PDF disguised as a cryptominer. All of this is packed into a polyglot image that can be triggered with a single command—just like earlier stages.
From here on, each request I make builds on the last, and the behavior becomes increasingly layered. This is where the simulation begins to truly reflect the modular, adaptive structure of a real-world APT—only it’s being built entirely through natural language prompts.
Bypassing AI Limitations: Changing the Assembly Vector
As I continued expanding the complexity of the simulation, I hit a wall: the AI stopped generating polyglot images directly, likely due to internal safety filters. But rather than breaking the experiment’s core rule—no manual payload writing—I took a different approach. I asked the AI to give me a Python script that could generate the image locally.
The result was a clean, minimal script that uses the PIL library to create a basic JPEG image, then appends a harmless shell payload that opens a terminal and runs whoami. The AI provided everything: image generation, payload logic, encoding, and the binary append operation—effectively giving me the same polyglot result, just via a different toolchain.
This moment reflected a real-world tactic perfectly: when direct delivery fails, an APT often falls back to alternative methods like packer-based generation or local compilation. Here, the AI simulated that behavior without being asked to—and kept the flow going.
Payload Assembly Without Manual Scripting
To stay within the bounds of the experiment, I didn’t manually write or alter the payload logic. Instead, I simply copied and pasted the code provided by the AI—line by line—into a local environment, using it exactly as delivered. The full simulated attack chain was now assembled via Python: fake binary compilation, mock persistence, system enumeration, and simulated cryptominer download.
This approach preserved the project’s core rule: I was still not writing code myself—the AI was doing all the work. The only difference was that now, instead of delivering a final image, it handed me the blueprints. And in real-world terms, this mimics the shift from payload delivery to toolkits and builders—exactly the kind of modularity we see in modern APT ecosystems like Koske.
Final Execution: Complete Polyglot Delivery Chain
For this phase, the objective was clear: demonstrate a full local execution chain that accurately reflects the behavior of the targeted APT — but using only safe, demonstrative payloads.
This time, the image wasn’t delivered directly. Due to AI restrictions, I adapted the approach by requesting a Python script that would locally generate the final polyglot image. The script would:
Create a simple JPEG file
Embed the full simulated attack chain as a shell payload
Once executed, the generated image (polyglot_terminal_whoami.jpg) behaved exactly as expected. Upon triggering it with the terminal command:
grep -a -A9999 “# PAYLOAD” polyglot_terminal_whoami.jpg | bash
The image executed a chain that:
Compiled a harmless “fakerootkit” binary
Simulated persistence via a timestamped text file
Collected CPU information into a local dump
Downloaded the PDF (“Linux Basics for Hackers 2 ed”) as a stand-in for staged payload delivery
All steps ran in sequence, without errors, cleanly emulating the kind of behavior observed in staged APT attacks — from initial execution, to local recon, to staged download activity.
Summary
This third stage marked a major technical leap in our emulation of the APT’s behavior. Faced with limitations in image payload generation, we adapted by leveraging Python to produce fully functional polyglot JPEGs locally.
The resulting image executed a complete mock attack chain: compiling a fake binary, simulating persistence, collecting system info, and downloading a decoy PDF — each step carefully reflecting the operational flow of the APT. By shifting to script-based generation while maintaining payload integrity, we advanced our alignment with the adversary’s methodology without compromising control or structure.
There’s something else I haven’t revealed yet — in an upcoming entry, I’ll show how, through the same sequence of prompts used in this project, I was able to obtain a fully functional rootkit for Linux. Stay tuned — I’ll be back soon.
In this part of the series, we are looking at how PowerShell can be used to cause large-scale disruption, from slowing systems to completely knocking them offline. These techniques range from simple resource exhaustion attacks that overload CPU and memory, to disabling hardware interfaces, wiping license keys, and finally forcing systems into a blue screen or rendering them unbootable.
It must be stressed from the outset that these techniques are highly destructive. They are not tools for casual experimentation. Some of them have been in use during cyber war operations to defend Ukraine against Russia. If misused in the wrong context, however, the results can be catastrophic and irreversible.
We will begin with the basics and gradually move toward the most dangerous techniques.
This script works by aggressively consuming system memory. It repeatedly allocates large arrays until nearly all available RAM is exhausted, leaving only a small buffer so the operating system does not immediately collapse. The machine slows to a crawl, applications stop responding, and the system becomes unusable.
In practice, this type of attack can serve multiple purposes. It can be used as a denial-of-service tactic to lock down a workstation or server, or it can act as a distraction, forcing administrators to focus on degraded performance while other activity takes place unnoticed in the background.
Execution is straightforward:
PS > .\loadram.ps1
Before execution the system may appear stable, but once the script runs memory consumption spikes and responsiveness slows significantly.
This script applies the same principle to processor cores. It launches high-priority mathematical operations across every CPU thread, pinning usage at 100% until the script is terminated. Just as with RAM exhaustion, this method can disrupt normal operations or serve as a cover while other malicious tasks are executed.
Run the script like so:
PS > .\loadcpu.ps1
The machine becomes unresponsive, fans spin up, and users quickly realize something is wrong.
This script takes a more subtle but equally damaging approach. It clears Windows product keys by wiping out OEM, retail, and volume license entries from the registry. Once executed, the system is effectively stripped of activation data. After restarting the Software Protection Service, Windows appears unlicensed and may refuse to validate against Microsoft servers.
Execution:
PS > .\license.ps1
You can attempt to check the product key afterward with:
PS > (Get-WmiObject -query 'select from SoftwareLicensingService').OA3xOriginalProductKey
The result will be empty, confirming the license data is gone.
This script disables both network adapters and USB controllers, cutting a machine off from connectivity and removable storage entirely. Once triggered, there is no way to transfer files, connect to the network, or even plug in a recovery device without significant manual intervention.
Administrators might deploy this in a crisis to instantly isolate a machine during incident response, but in the wrong hands it is a sabotage tool that leaves the user effectively locked out.
The PowerSploit framework includes a dedicated module called Mayhem, containing two of the most destructive PowerShell functions available: Set-CriticalProcess and Set-MasterBootRecord. Both go far beyond simple resource exhaustion, directly attacking the stability of the operating system itself.
Set-CriticalProcess
Windows protects certain processes, such as smss.exe and csrss.exe, by marking them as critical. If they are terminated, the system triggers a Blue Screen of Death. The Set-CriticalProcess command allows you to tag any process with this critical status. Killing it immediately forces a system crash.
The crash itself does not cause permanent damage. After reboot, Windows resumes normal operation. This makes it useful as a temporary denial tactic forcing downtime, but not wiping the machine.
To use it, first copy the Mayhem module from the repository to:
C:\Program Files\WindowsPowerShell\Modules\
Then run:
PS > Set-CriticalProcess
Confirm with Y, and expect the machine to blue screen in moments.
Set-MasterBootRecord
This is the most destructive of all. Unlike Set-CriticalProcess, which only disrupts a running session, this attack corrupts the Master Boot Record (MBR), which is the first sector of the hard drive. The MBR contains the bootloader and partition table, and without it Windows cannot load.
Once overwritten, the system may only display a custom message, refusing to boot into the OS. This tactic mirrors the behavior of destructive malware and ransomware wipers, leaving the target machine completely unusable until the bootloader is repaired or reinstalled.
Example execution:
PS > Set-MasterBootRecord -BootMessage 'Pwned by Cyber Cossacks!'
To automate a reboot and ensure the payload takes effect immediately:
PS > Set-MasterBootRecord -BootMessage 'Pwned by Cyber Cossacks!' -Force -RebootImmediately
After reboot, the system will no longer load Windows.
Summary
The techniques described in this article show just how far PowerShell can be pushed when used as a weapon. What begins with simple disruption through RAM and CPU exhaustion quickly escalates into far more destructive actions such as disabling hardware, wiping licensing data, and crashing or even bricking systems by targeting their most fundamental components. In a cyber war context, these capabilities are significant because they move beyond espionage or lateral movement and directly affect the ability of an adversary to operate. The destructive potential cannot be overstated: once unleashed, these techniques can ripple across organizations, producing effects that are not easily reversed. That is why understanding them is important not only for those who might employ them, but also for defenders who need to recognize the damage they can cause and prepare accordingly.
Persistence is one of the core objectives of any successful intrusion, ensuring that an attacker can return to a compromised system even after reboots, logouts, or system maintenance. While much attention is often given to executable droppers, services, or scheduled tasks, there exists an entire class of persistence methods that operate purely through configuration changes. These techniques manipulate the operating system’s own settings, registry keys, and management frameworks. Because of this, they are often stealthier, more resilient, and harder to detect with conventional security tools that focus on scanning executables. In this article we will cover several configuration-based persistence strategies on Windows, ranging from user and registry manipulation to more advanced abuses of Image File Execution Options (IFEO), Global Flags with SilentProcessExit, and WMI event subscriptions. Each method shows the tradeoff between durability and detectability, showing how you can weaponize legitimate administrative features to quietly secure long-term access.
Configs
Unlike other persistence methods that rely on executables or scheduled triggers, configuration-based persistence works by altering the system’s own settings. This makes it both subtle and durable: no additional binaries are introduced, nothing new needs to be launched explicitly, and antivirus tools that focus on scanning executables have very little to detect. However, this approach usually requires administrative access to the target machine, since you must modify accounts, registry keys, or remote access settings. It also assumes the system is reachable later, for example via RDP, which is not always the case if it is hidden behind NAT or a firewall.
The first two commands create a new local user and add it to the privileged group. Then, the registry command hides the “attacker” account from the Windows logon screen, though it remains valid for interactive and remote login. Together, these steps provide a stealthy backdoor user that blends into the system and can be used for later access.
Next we move to a more aggressive form of configuration backdoor:
By writing a Debugger value for sethc.exe (the Sticky Keys accessibility tool), the attacker replaces its execution with cmd.exe. Pressing Shift five times at the logon screen, instead of opening Sticky Keys, will spawn a command shell running with SYSTEM privileges. In addition, modifying RDP-Tcp with UserAuthentication set to 0 lowers the requirement for Network Level Authentication (NLA), allowing you to establish an RDP connection without the credentials. This pair of changes creates a reliable way to recover access directly from the Windows login screen.
Pros: highly persistent and stealthy since it modifies system settings rather than adding new binaries, and it survives reboots without leaving a typical malware footprint.
Cons: requires administrative privileges and is only effective if the attacker can later connect to the host directly. If the machine sits behind NAT or a restrictive firewall, the persistence mechanism may not be reachable.
Debugger
Instead of altering a program on disk, Windows allows a “debugger” to be attached whenever a specific executable is launched. As a hacker you can abuse this feature by setting a Debugger value for a target process so that Windows starts your command line whenever the user opens that program. The original binary remains intact and launches as usual, but the Debugger command can prepend or append additional behavior. Because this configuration lives in the registry under HKLM, it persists across reboots and does not rely on autorun folders or scheduled triggers.
When the victim starts Calculator, Windows checks IFEO, sees a Debugger set, and runs that command instead of directly running calc.exe. The cmd /C wrapper executes the two chained statements: first _calc.exe (so the user still sees a normal Calculator window), then, after _calc.exe exits, it executes the Netcat line. The single & operator means the second command runs after the first completes, so the reverse shell attempt is deferred until the user closes Calculator. Because the key is under HKLM, creating or modifying it requires administrative privileges. Once set, any user who launches Calculator will trigger the chain.
Pros: persists across reboots while leaving the original application unmodified, and it triggers naturally when a user opens a specific program.
Cons: requires administrative rights to set the HKLM IFEO key and is highly visible to security monitoring because non-developer Debugger values are a known abuse pattern.
IFEO hijacking is elegant because it avoids patching binaries and uses a legitimate Windows feature as the trigger. It is also straightforward to detect and remediate: defenders regularly audit Image File Execution Options for unexpected Debugger entries, and many EDR products alert on their creation. If the targeted program behaves oddly or fails to start under some conditions, the user may notice.
GFLAGS
Windows includes hidden debugging and tracing features that can be abused for persistence. One such feature is the SilentProcessExit mechanism, which allows administrators to configure special actions when a process terminates. By combining this with the GlobalFlag registry setting under Image File Execution Options (IFEO), a hacker can ensure that when a chosen application closes, another process of their choice will be launched. Unlike traditional autorun or scheduled task techniques, this method hides deeper in Windows’ diagnostic infrastructure and is therefore less obvious to casual inspection.
The commands provided configure this for Notepad. The first registry modification sets the GlobalFlag value for notepad.exe to 512, which is a flag telling Windows to monitor the process for a “silent process exit.” The next command enables reporting for when Notepad exits. The final one specifies the command to run when that happens. In this configuration, each time a user closes Notepad, the system silently triggers a Netcat reverse shell.
Pros: survives reboots and is not detected by common persistence auditing tools such as Autoruns, since it relies on less-known registry branches rather than Startup, Run keys, or services.
Cons: requires administrative rights to set IFEO and SilentProcessExit values, and defenders who know where to look can discover and remove the entries by auditing the relevant registry paths.
This persistence trick is subtle because it hooks into a diagnostic mechanism rather than mainstream autorun locations. It will not appear in most autorun inspection tools, which makes it attractive to attackers aiming for stealth. However, it is not invisible: defenders aware of SilentProcessExit can query and monitor those registry keys for unexpected values.
WMI
Windows Management Instrumentation (WMI) provides a rich, system-level framework for monitoring and automation that administrators use for telemetry and scheduled actions. Attackers can abuse WMI by creating permanent event subscriptions that live inside the WMI repository and trigger payloads on timers or system events. Because these subscriptions are stored in WMI rather than in obvious autorun registry keys or startup folders, they are stealthier and harder to spot with casual inspection tools, and they persist across reboots until explicitly removed from the repository.
cmd#> wmic /NAMESPACE:"\root\subscription" PATH __EventFilter CREATE Name="persistence", EventNameSpace="root\cimv2",QueryLanguage="WQL", Query="SELECT * FROM __InstanceModificationEvent WITHIN 60 WHERE TargetInstance ISA 'Win32_PerfFormattedData_PerfOS_System'"
The first command creates an event filter that will produce a periodic trigger without needing an external driver or service. The second command creates a consumer that describes what should run when the filter fires. The third command binds the filter to the consumer so the event actually causes execution. Together these three commands create a durable subscription inside the WMI repository that causes the specified command to run on the chosen interval or condition.
Pros: survives reboots and supports finely controlled triggers (periodic timers, event-based conditions) while hiding persistence inside the WMI repository rather than in widely-scanned autorun locations.
Cons: requires administrative privileges to create permanent subscriptions and leaves artifacts in the WMI repository that can be enumerated and removed by defenders who know to inspect WMI event subscriptions.
WMI event subscriptions are powerful and flexible for long-lived persistence because they blend into the system management layer and are not visible using lightweight autorun checks. This stealth makes them high-value targets for defensive hunting: enumerating subscriptions, collecting the WMI repository, and monitoring for newly created filters, consumers and bindings are effective ways to detect and remediate this technique.
Summary
Configuration-based persistence techniques represent a subtle but formidable way for attackers to maintain access on Windows systems. By creating hidden accounts, hijacking accessibility tools, lowering RDP security requirements, or embedding logic into registry-based debugging features, you can establish backdoors that blend into system behavior rather than standing out as foreign binaries. IFEO hijacking and GFlags/SilentProcessExit mechanisms show how diagnostic infrastructure can be repurposed to launch payloads, while WMI event subscriptions demonstrate the power of system management features to provide long-lived, flexible triggers. The key strengths of these approaches lie in their stealth, durability across reboots, and reliance on trusted system mechanisms. However, they also share limitations: they typically require administrative privileges and leave artifacts that defenders who know where to look can uncover. For security teams, awareness of these less conventional persistence vectors is critical, as standard autorun and scheduled task auditing alone will not expose them.
In Part 2, we will leverage AppInit, LSASS, Winlogon, and Office to establish persistence on Windows.
In previous articles, we explored some of Caido’s basic features, which are generally similar to those found in Burp Suite and ZAP. In today’s article, I’d like to demonstrate how Caido enables you to automate the testing process through its intuitive visual interface.
Step #1: Fire up Kali and Caido
For this walkthrough, our web application target will be an online store. As usual, the first steps are to start Kali Linux and Caido, then enable the proxy and begin exploring the target.
In this case, we can see a relatively unusual folder prefix, “wa-”, which indicates that our store is built on Webasyst—a PHP framework and CMS/e-commerce platform. You can think of it as something between WordPress (a CMS) and Laravel (a PHP framework).
Checking the robots.txt file confirmed this assumption.
Step #2: Getting Started with Caido Workflows
First, we need to create a new Workflow. To do this, navigate to the Testing section.
After clicking, you’ll see a screen similar to the one shown below.
Here you can see two blocks: On Intercept Request and Passive End. In Caido, these are called nodes, and our workflow structure will be created between them. The first node receives the request, and then our defined scenario is executed.
For example, let’s create a workflow that looks in the HTTP history for /wa-config/ directories, which often contain configuration files such as database connection details. To make this more visible, we’ll also add a rule to highlight the request by changing its color.
Step #3: Add an HTTPQL Matcher
Click on Add Node and select Matches HTTPQL.
Once the node appears on the screen, we can connect our first node to this matcher. Next, by clicking on it, we’ll write a simple HTTPQL rule to look for the specified directory. This can be done with the following command: req.path.cont:”wa-config”
Step #4: Change the Color
After that, we’re ready to add a line from this matcher to change the color of the request when the statement is true.
We should also remember to add the request itself and connect this block to the ending node.
Next, if we reload our target website, requests to the specified path in the HTTP history will be highlighted in the color configured in the workflow.
Summary
In this article, I’ve only shown the tip of the iceberg. You can create workflows for very specific scenarios to significantly improve the efficiency of your web application testing. For example, you can develop custom workflows tailored to the vulnerabilities you are targeting, and as you explore a website, Caido will automatically flag findings you configured for your needs.
It’s also worth mentioning that Caido supports plugins that can help you discover hidden parameters, bypass WAFs, and more. This makes it a powerful tool that could easily become your go-to solution for web application security testing.
If you find web application testing interesting, consider checking out our Advanced Web Hacking course to take your expertise to the next level.
This module takes the often-confusing topic of Windows persistence and turns it into a pragmatic playbook you can use during real engagements. In this part we start small and build up: short-lived shell loops that are easy to launch from any user context, autostart locations and registry Run keys that provide reliable logon-time execution, scheduled tasks that offer precise timing and powerful run-as options, Windows services that deliver the most durable, pre-logon persistence, and in-memory techniques that minimize on-disk traces.
Techniques are shown with privileged # and non-privileged $ examples, so you can see what’s possible from the access you already have. Every method shows the balance between how secret it is, whether it stays after a restart, and what permissions you need to make it work.
Ultimately this module is designed to be immediately useful in the ongoing cyber conflict context. It is compact with repeatable techniques for maintaining access when appropriate.
Shell
Persistence can be achieved directly from a command prompt by creating a small looping construct that repeatedly launches a reverse or bind shell and then pauses for a fixed interval. The technique relies on a persistent cmd.exe process that keeps retrying the connection instead of using service registration or scheduled tasks. It’s a quick, user-space way to try to maintain an interactive foothold while the process lives. The example command is:
This runs a new command shell to execute the quoted loop. The for /L construct is used to execute the loop body repeatedly. In practice the parameters chosen here make the body run continuously. Inside the loop the nc.exe invocation attempts to connect back to the C2.
The chained ping -n 60 127.0.0.1 acts as a simple portable sleep to insert a roughly one-minute delay between connection attempts.
Pros: allows a controllable retry interval and can be launched from any user account without special privileges.
Cons: the loop stops on reboot, logoff, or if the shell/window is closed, so it does not survive reboots.
This method is useful when you already have an interactive session and want a low-effort way to keep trying to reconnect, but it’s a volatile form of persistence. Treat it as temporary rather than reliable long-term access. From a defensive perspective, repeated processes with outbound network connections are a high-value detection signal.
Autostart
Autostart locations are the canonical Windows persistence vectors because the operating system itself will execute items placed there at user logon or system startup. The two typical approaches shown are copying an executable into a Startup folder and creating entries under the Run registry keys. Below are two separate techniques you can use depending on your privileges:
Placing an executable (or a shortcut to it) in a per-user Startupfolder causes the Windows shell to launch that item when the specific user signs in. Using the ProgramData (all-users) Startup folder causes the item to be launched for any interactive login.
Writing a value into HKCU\Software\Microsoft\Windows\CurrentVersion\Run registers a command line that will be executed at logon for the current user and can usually be created without elevated privileges. Writing into HKLM\Software\Microsoft\Windows\CurrentVersion\Run creates a machine-wide autorun and requires administrative rights.
Pros: survives reboots and will automatically run at each interactive logon (per-user or machine-wide), providing reliable persistence across sessions.
Cons: startup autoruns have no fine-grained execution interval (they only run at logon) and are a well-known, easily monitored location, making them more likely to be detected and removed.
Services
Using a Windows service to hold a backdoor is more robust than a simple autostart because the Service Control Manager (SCM) will manage the process lifecycle for you. Services can be configured to start at boot, run before any user logs on, run under powerful accounts (LocalSystem, NetworkService, or a specified user), and automatically restart if they crash. Creating a service requires administrative privileges, but once installed it provides a durable, system-integrated persistence mechanism that survives reboots and can recover from failures without manual intervention.
The first line uses sc create to register a new service named persistence. The binPath= argument provides the command line the service manager will run when starting the service. In practice this should be a quoted path that includes any required arguments, and many administrators prefer absolute paths to avoid ambiguity.start= auto sets the service start type to automatic so SCM will attempt to launch it during system boot.
The second line configures the service recovery policy with sc failure: reset= 0 configures the failure count reset interval (here set to zero, meaning the failure count does not automatically reset after a timeout), and actions= restart/60000/restart/60000/restart/60000 tells the SCM to attempt a restart after 60,000 milliseconds (60 seconds) on the first, second and subsequent failures. This allows the service to be automatically relaunched if it crashes or is killed.
The third line, sc start persistence, instructs SCM to start the service immediately.
Pros: survives reboot, runs before user logon, can run under powerful system accounts, and can be configured with automatic restart intervals via the service recovery options.
Cons: creating or modifying services requires administrative privileges and is highly visible and auditable (service creation, service starts/stops and related events are logged and commonly monitored by endpoint protection and EDR solutions).
Scheduled Tasks
Scheduled tasks are a convenient and flexible way to maintain access because the Windows Task Scheduler supports a wide variety of triggers, run-as accounts, and recovery behavior. Compared with simple autostart locations, scheduled tasks allow precise control over when and how often a program runs, can run under powerful system accounts, and survive reboots. Creating or modifying scheduled tasks normally requires administrative privileges.
Here the schtasks /create creates a new scheduled task named persistence. The /ru SYSTEM argument tells Task Scheduler to run the job as the SYSTEM account (no password required for well-known service accounts), which gives the payload high privileges at runtime. The /sc MINUTE /MO 1 options set the schedule type to “minute” with a modifier of 1, meaning the task is scheduled to run every minute. /tn persistence gives the task its name, and /tr "..." specifies the exact command line the task will execute when triggered. Because Task Scheduler runs scheduled jobs independently of an interactive user session, the task will execute even when no one is logged in, and it will persist across reboots until removed.
Pros: survives reboot and provides a tightly controlled, repeatable execution interval (you can schedule per-minute, hourly, daily, on specific events, or create complex triggers), and tasks can be configured to run under high-privilege accounts such as SYSTEM.
Cons: creating or modifying scheduled tasks typically requires administrative privileges and Task Scheduler events are auditable and commonly monitored by enterprise defenses.
In-Memory
In-memory persistence refers to techniques that load malicious code directly into a running process’s memory without writing a persistent binary to disk. The goal is to maintain a live foothold while minimizing on-disk artifacts that antiviruses and file-based scanners typically inspect. A common pattern is to craft a payload that is intended to execute only in RAM and then use some form of process injection (for example, creating a remote thread in a legitimate process, reflective DLL loading, or other in-memory execution primitives) to run that payload inside a benign host process. The technique is often used for short-lived stealthy access, post-exploitation lateral movement, or when the attacker wants to avoid leaving forensic traces on disk.
Pros: extremely low on-disk footprint and difficult for traditional antivirus to detect, since there is no persistent executable to scan and many memory-only operations generate minimal file or registry artifacts.
Cons: does not survive a reboot and requires a mechanism to get code into a process’s memory (which is often noisy and produces behavioral telemetry that modern endpoint detection and response solutions can flag).
Defenders may monitor for anomalous process behavior such as unexpected parent/child relationships, unusual modules loaded into long-lived system processes, creation of remote threads, or unusual memory protections being changed at runtime.
Summary
We explored different basic Windows persistence options by comparing durability, visibility, and privilege requirements: simple shell loops let you keep retrying a connection from a user shell without elevation but stop at logoff or reboot. Autostart provides reliable logon-time execution and can be per-user or machine-wide depending on privileges. Scheduled tasks give precise, repeatable execution (including SYSTEM) and survive reboots. Services offer the most durable, pre-logon, auto-restarting system-level persistence but require administrative rights and are highly auditable. In-memory techniques avoid on-disk artifacts and are stealthier but do not persist across reboots and often produce behavioral telemetry. The core trade-off is that greater restart resilience and privilege typically mean more detectable forensic signals, defenders should therefore watch for repeated outbound connection patterns, unexpected autoruns, newly created services or scheduled tasks, and anomalous in-memory activity.
In the first part of Advanced Windows Persistence, we will dive into advanced techniques that will leverage the Configs, Debugger, GFlags and WMI.
While tools like Burp Suite have dominated web hacking for years, today I’d like to show you how to conduct a password attack using Caido. Caido brings a fresh approach to web application penetration testing with its clean interface, powerful features, and developer-friendly design (an introduction to this tool can be found here).
Please note that password attacks will not work against all web forms. In many cases, the application will lock you out after a certain number of failed attempts. This type of attack also relies heavily on having a strong password list. Nevertheless, every web application hacker should be familiar with how to perform such an attack.
Step #1: Fire up Kali and Caido
First, we need to enable the proxy in the browser and start intercepting requests. After that, it’s good practice to add our target to the scope to avoid capturing unrelated traffic.
Step #2: Intercept the Login Request
Before submitting the login credentials, make sure that the Caido proxy intercept is enabled (the Forwarding button will change to Queuing) and that the proxy settings are correctly configured in your browser. Once you send the request, the proxy will capture it, as shown in the screenshot below.
Step #3: Send the Request to Caido Automate
You can send requests from other interfaces to the Automate interface simply by right-clicking on a request row in the traffic table or within a request pane.
Step #4: Set the Payloads
Before diving into payload types, it’s crucial to understand the four attack strategies that Caido offers. These strategies determine how your payloads are applied to the marked positions in your requests.
1. Sequential (Sniper)
This will replace markers one at a time. If you have multiple markers, only one will be replaced for any given request.
Use Cases:
Testing individual parameters for vulnerabilities
Focused brute-force attacks on single fields
Systematic testing of each input field independently
2. All (Battering Ram)
This will replace all the markers with the same value.
Use Cases:
Testing scenarios where the same value should be applied to multiple fields
SQL injection testing across multiple parameters simultaneously
Testing for consistent input validation across fields
3. Parallel (Pitchfork)
This will replace all the markers with different values from the different payloads. This requires payloads that each have the same number of elements.
Use Cases:
Credential brute-forcing with paired username/password lists
Testing related parameters that should work together
A/B testing scenarios with corresponding values
4. Matrix (Cluster Bomb)
This will replace all the markers with all the combinations of payloads. Payloads can have different number of elements, but beware that this can create a large number of requests.
Use Cases:
Comprehensive brute-force attacks
Testing all possible parameter combinations
Discovery of unexpected parameter interactions
In this example, I’ll be using a Sequential attack scenario.
Next, to use a wordlist of payload values, select the request element you want to replace by clicking, dragging, and holding over it, then click the + Add Placeholder button.
Once a placeholder has been marked, you will see options in the Payload tab. From the Type drop-down menu, you can choose:
Hosted File: Presents a Selected file drop-down menu, allowing you to choose a wordlist you have uploaded to your Caido instance.
Simple List: Provides an input field where you can manually enter a wordlist, with one payload per line. You can also load a wordlist file directly by clicking the Load from file… button.
By clicking on the Settings tab of an Automate session, you can control the request rate using the Delay (ms) between requests and # of workers input fields.
Once you’ve made your selection, click the Run button to launch the Automate session. A new tab will open containing a traffic table of the payload requests. To view the results of the session, simply click on this paired tab.
As a result, we have unrestricted access to automation capabilities, unlike the rate-limited Intruder feature in Burp Suite.
Summary
The key to successful web form testing lies in understanding the application’s behavior, systematically testing all input vectors, and carefully analyzing responses to identify vulnerabilities. Caido’s powerful features support this methodology while offering a more streamlined and enjoyable testing experience compared to traditional tools.
If you’re serious about becoming a web application hacker, consider exploring our Web App Hacking course. And if you’ve already mastered the basics and proven your skills, check out Advanced Web App Hacking—it’s designed to take your expertise to the next level.
In this lesson, we’re diving into Caido, a modern and lightweight web security auditing toolkit designed to simplify your web application security testing.
Let’s walk through what Caido is, how to get started, and what powerful features it offers.
Step 1: What Is Caido?
Caidois a web security auditing toolkit that acts as an interception proxy between your browser (or other HTTP client) and your target web applications. It allows you to inspect, manipulate, and replay HTTP/S and WebSocket traffic in real-time, making it easier to discover and exploit security vulnerabilities. Sounds similarly like Burp Suite or ZAP, isn’t it?
Here is a brew overview of Caido, Burp Suite and ZAP:
Tool
Caido
Burp Suite
ZAP
Purpose
Web security testing
Web security testing
Web security testing
Intercept Proxy
Yes
Yes
Yes
Repeater/Editor
Yes
Yes
Yes
Scanner
(Not built-in yet)
(Pro version)
Yes
Open Source
Proprietary
Proprietary
Open-source
Platform
Cross-platform (Docker/native)
Cross-platform
Cross-platform
Why people choose Caido:
Modern and lightweight
Easier for beginners
Ideal for manual testing and request manipulation
Actively developed and responsive to community feedback
Step 2: Installing Caido
Getting Caido up and running is straightforward:
Download the latest installer or package for your OS from Caido’s official website or GitHub releases.
Install .deb file via terminal:
kali> sudo dpkg -i caido-desktop-v[version].deb
You can also get Caido from the Kali repository by entering:
kali > sudo apt install caido
Launch Caido and start the instance by clicking on the Start button .
kali > caido
Optionally, create an account or proceed in guest mode.
After that, you will be greeted by a screen like below.
Next, to intercept requests, we need to install a proxy in the browser. I’ve shown how to do this in my article about ZAP.
Step 3: Navigation
On the left-hand side of Caido is a navigation menu that contains the different feature interfaces. Clicking on a listed feature will present its own page.
Step 4: Using Caido
The Intercept, Replay, and Automate feature interfaces allow you to view, modify, and control web traffic.
Intercept
With Caido running and the proxy settings enabled, clicking the >> Forwarding button will switch Caido to || Queuing mode. In this mode, you can intercept requests before they are sent to the server or intercept responses before they are sent to your browser.
From the Intercept interface, you can choose to intercept requests, responses, or both by clicking the corresponding buttons. A pause icon will appear when intercept is enabled, and two right-facing carets will appear when it is disabled.
As web traffic accumulates, you can view all intercepted requests and responses in the Intercept traffic tables.
Replay
By clicking on a request, you can send it to Replay using the keyboard shortcut Ctrl + R, or by right-clicking and selecting Send to Replay from the context menu.
Here, we can manipulate our requests and view the responses from the server.
Step 5: Caido vs Burp Suite
Up to this point, we’ve covered the basic functionality of Caido, similar to what’s available in tools like Burp Suite. Now, let’s look at some features that make it unique.
Project Management
Caido’s built-in project management system helps keep your work organized and makes managing targets effortless. You can easily switch between different targets as needed.
Intuitive Filtering
With HTTPQL, you can easily search and filter requests using a simple, user-friendly query language.
Built for Speed
While Burp Suite struggles with resource efficiency, Caido is built from the ground up in Rust to deliver a fast experience with low memory usage and unparalleled performance.
Summary
At this point, you might think that Caido doesn’t offer anything significantly different from Burp Suite. However, I highly recommend installing Caido and trying it out for yourself—experiment with it. This article only scratches the surface of what Caido has to offer. It might just become your next go-to tool for web app hacking.
If you want to start learning web hacking, check out our Web App Hacking course — it covers everything you need to know to begin.
As technology is becoming more complex and smarter, attackers are growing increasingly sophisticated and cunning. That’s why it’s important to take an offensive approach to security and to hunt for vulnerabilities with the same adversarial mindset, approach and tools that malicious hackers use to carry out attacks.
Two of the most common approaches to offensive security are red teaming and pentesting, disciplines in which specialists simulate real-world attacks, conduct rigorous vulnerability assessments, stress test networks with hacking tools and look for more than just the most common digital flaws.
It’s also important to understand the differences between red teaming and pentesting as well as where the Venn diagram between the two overlaps. Let’s take a look.
Pentesting: Striking Like the Attacker To Find Vulnerabilities
A penetration test is essentially an engagement that simulates a cyberattack to find weaknesses in systems and networks. Pentesters will mimic malicious hacks to test security preparedness, patches and upgrades to systems. This can also apply to physical security, too (can a criminal break into the building?) and social engineering.
Pentesters can be part of external, third-party vendors that an organization hires to test from an outsider’s perspective or internal employees who regularly test their employer’s network with insider knowledge. Traditional pentests often provide a small number of testers on site for two weeks once a year and testers are compensated for their hours spent on the target. Furthermore, pentesters must respect the legal contracts they’ve signed with clients or employers and they must work within the scope defined in the contract. If breaking physical locks or running vulnerability scans on a network segment is outside of the defined scope, they won’t test those targets.
Red Teaming: Laser-Focused on Infiltrating Targets
Red teamers also conduct pentests, but they aren’t looking to find every single vulnerability or weakness. They are more focused on infiltrating intended targets, and often by any means necessary. They want to find the most effective way into an organization or system and see how much damage they could do once inside.
Red teams will also tailor-make attack methods to their intended targets. So, red teams are often less constrained in the types of attacks they can use to breach an organization. They have more freedom to get creative and use their skills how they see fit.
Red teams also often compete against blue teams that will run defensive operations simultaneously. Because of the depth of the red teaming exercises, these engagements tend to last much longer than pentesting.
Synack Experts on Pentesting and Red Teaming
Ryan Rutan, Senior Director of Community for the Synack Red Team, has first-hand experience of how crucial both effective pentesting and red teaming can be when performed effectively.
Here’s what he had to add:
“Pentesting can uncover a large swathe of vulnerable attack surfaces at once. Once all the CVSS (Common Vulnerability Scoring System, a standard for understanding vulnerabilities) sorting pans out, you have a list of things you can fix in the next day, week or month. That is often enough time for the next pentest to roll around to start the process all over again. Maintaining that actionable cadence can be difficult, but important for DevSecOps fluidity, and, let’s face it, blue side (cyber defensive) morale.
In my opinion, red teaming starts once many iterations of this cycle have been completed, and the target organization has made conscious countermeasures to threats identified in the pentesting results. Red teaming goes after specific critical objectives and typically has a much stricter scope or defined success criteria. The scope is often overlayed on top of past known vulnerable attack surfaces to test proper patching and mitigation.
In both cases, pentesting and red teaming, ethical hackers imitate adversaries to bolster blue side defences, but how they go about the process and to what degree makes all the difference. To sum it all up, pentesting helps tell you where you are vulnerable. Red teaming helps tell you what is safe. These two offensive security tactics work hand in hand to solidify a better defense in-depth posture that is tailored to meet the needs and capabilities for a given organization.”
Tim Lawrence, a solutions architect at Synack, describes pentesting and red teaming this way: “Penetration testing is the act of actively looking and trying to exploit vulnerabilities on authorized systems to evaluate the security of the system.
Red teaming is when an authorized team looks for weaknesses in an enterprise’s security by conducting simulated attacks against the target. The outcome is to improve the security of the enterprise by showing the impact to the business, and also to learn how to defend and alert against attacks.”
Duration, Domain and Adversary Emulation
Daniel Miessler is a well regarded expert on security testing methodologies and also how to approach cybersecurity from the defensive side. His website and podcast are definitely worth checking out. He now works as the head of vulnerability management and application security for Robinhood.
“Duration: Red Team engagements should be campaigns that last weeks, months, or years. The blue team and the target’s users should always be in a state of uncertainty regarding whether a given strange behavior is the result of the Red Team or an actual adversary. You don’t get that with a one or two week assessment.
Multi-domain: While Penetration Tests can cross into multiple domains, e.g., physical, social, network, app, etc.—a good Red Team almost always does.
Adversary Emulation: The item that separates a random Penetration Test from a real Red Team engagement is that Penetration Tests generally involve throwing common tools and techniques at a target, whereas a Red Team should be hitting the organization with attacks that are very similar to what they expect to see from their adversaries. That includes constant innovation in terms of tools, techniques, and procedures, which is in strong contrast to firing up Nessus and Metasploit and throwing the kitchen sink.”
Synack knows that today’s cyberthreat landscape requires continuous pentesting for effective defense because traditional pentesting habits are frequently slow, disruptive and often can’t scale across an entire organization.
The Synack Platform combines the best aspects of pentesting and red teaming with a pentest that harnesses the best human talent and technology and on-demand security tasks from a community of the world’s most skilled 1,500 ethical hackers. Synack focuses on finding vulnerabilities that matter, so organizations can find and fix new, exploitable vulnerabilities faster.
Learn more about the Synack difference here: Synack365.