Android network traffic interception is a process of capturing and analyzing network traffic that is transmitted or received by an Android device. This can be useful for various purposes, including debugging network issues, monitoring network activity, and identifying security vulnerabilities.
There are several ways to intercept Android network traffic, each with benefits and limitations. Here are some standard methods I used to capture android network traffic
1. Using a proxy tool: A proxy tool is software that sits between the Android device and the internet, allowing you to intercept and modify the traffic passing through it. Some popular proxy tools for Android include Burp Suite, Fiddler, and Charles. These tools are usually used by developers and security professionals to test an application's security or debug network issues.
2. Using a packet capture tool: Packet capture tools allow you to capture and view the raw network traffic transmitted or received by the Android device. Some popular packet capture tools for Android include WireShark and tcpdump. These tools are often used by network administrators and security professionals to troubleshoot network issues and monitor network activity
3. Using a VPN: A virtual private network (VPN) is a service that encrypts and tunnels your internet traffic through a secure server. Using a VPN, you can intercept and analyze the traffic transmitted or received by the Android device.
In this article, you will learn how to capture android app traffic using Wireshark without any physical connection.
As a Malware Researcher, I have experienced that some android malware is heavily obfuscated, and we cannot use them on emulators. In that case, we must use that malware on the physical device. The Network Interception thing is that we have to pay a closer look, so I used Wireshark to study the behaviour of the Command and Control servers.
I Will show you the exact process I used to remotely capture mobile traffic using Wireshark.
Requirements
Physical Android Device
Remote PCAP Android App
Wireshark
Physical Device Setup
No setup is required to start, but you must install the Remote PCAP Android App.
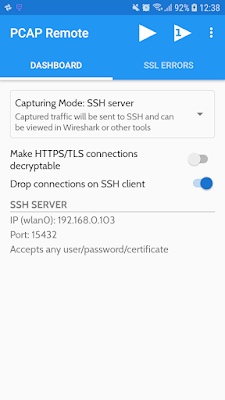
PCAP Remote is a non-root network sniffer app that allows you to debug and analyze
Android traffic on your desktop PC using the app's built-in SSH server. It uses the VPN service to do the Job.
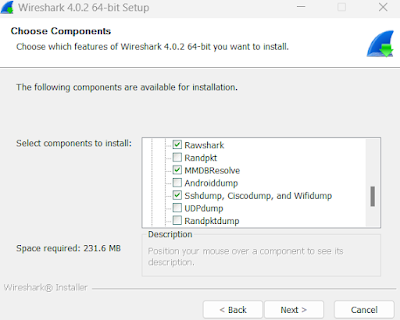
While Installing, you have to install the SSH Dump from the Components.
After that, You have to Open Wireshark and click on the SSH Capture settings icon, configure the IP address you will get from the PCAP Remote's Network interfaces, configure the port, and use any username and password for authentication.
Now you are all set. Click on save and double-click on the SSH Capture. You will notice Wireshark started capturing the traffic.
Conclusion
Hope you guys learnt how to capture android network traffic with Wireshark remotely, you can use USB dump, and there are many other methods available to do the job.
In this blog post will discuss everything you need to know as an Android app penetration tester. Whether you are a Bug bounty hunter, a working cyber security professional, or a random security researcher, this blog will surely benefit you.
I will simplify everything in this tutorial so that you do not struggle while setting up your Android Pentesting lab. I wish no one should face the same issues which I faced earlier. That's why I put my hard work here to give you a clear picture so you can start quickly.
Having a developer background, I Know how to build Android Mobile applications using Java, Kotlin, Flutter, and React Native. I am also good at Building web applications, having good knowledge of frontend and backend, along with OWASP knowledge for Both Web and Android apps. I will share my knowledge through this blog.
Without wasting your valuable time, let me tell you the resources and tools you should have before jumping into Android app pentesting. Also, there are some frequently asked questions you have to know.
Table of Contents
Frequently Asked Questions
Is Programming Knowledge required for Android Pentesting?
Sometimes Yes, having knowledge of Java helps you understand the application better
How much Java/Kotlin Knowledge is needed?
You don't have to be a super coder, but having basic knowledge of android app development is a plus
How much time will it take to learn Android Pentesting
It depends on you, and your past experience of Pentesting, Bug Bounty Knowledge
Setting up Android App Pentesting Environment
I will use Windows to set up the android Pentesting lab. You can follow the same steps to install those tools on Linux since the tools are cross-platform.
Required Tools
Burp Suite
VirtualBox
Android Emulator
ADB
Jadx GUI
Python
apktool
apkleaks
Frida
Objection
There are no limitations when it comes to pentesting tools, I personally use these tools, and there are some advanced tools, which we will discuss in another blog post.
Note: If you try to Run Android Emulators inside Virtual machines, then it won't work. When I was new to Android pen testing, I used to do the same but later realised and Switched all my tools to my Primary machine.
Android app pentesting tools
Burp Suite
Burp Suite is a must-have tool for hackers. In case you don't know what Burp Suite is, Burp suite is a proxy between client and server.
VirtualBox is a virtualization software used to install and use multiple operating systems inside your primary machine; in our case, we will use Genymotion to install Android Emulators.
Genymotion offers Android Emulators. You can test as many as for free. The limit is that it is free for personal use; again, they provide cross-platform software.
Jadx is a tool to convert Dex files to java source code. We will use this tool to decompile the apk file and read its source code up to a certain level.
How to intercept Android app traffic in Burp Suite
In this section, we will set up the Burp suite to intercept the android app's traffic. Note that if you choose an android emulator for android version 6, it is easy to install the burp suite's CA certificate. You can still install burp CA on android 7 and above.
Configure Burp Suite Proxy
Open Burp Suite
Go to the Proxy tab, then Options, then Click on Add.
Make these settings and bind to port 8080 (You can choose any)
And tick on All Interfaces and save
Configure Proxy settings on Android
Now its time to configure the proxy on your Android; before that, we will find our local machine's IP and configure that IP on your Android Emulator's Wifi Proxy
To Find the IP address on your Local Machine
Open any terminal and type:
ipconfig
(or ifconfig for Linux)
Now Open Android Emulator's Wifi settings, and you will notice that the device is connected to a network, now long click or right-click on the network, and then you will see the options, click on Modify Network.
Now click Advanced, and configure the IP address and port.
Note: For some emulators, there is another way to achieve this. In the emulator's settings, you will find the settings to change the proxy settings of the device
Configure CA certificate on up to Android 6
Now we have to configure a CA certificate
Open any Browser, visit htttp://burp
and download the file, rename the file cacert.der to cacert.cer
Now open Settings, then Security, then Install from SD Card.
Now Choose the file, and you are asked to enter a name for the certificate. You can give any name and then click Ok.
Now you are ready to intercept the traffic of your android emulator. Now open Burp suite, and you will see the traffic in the proxy section.
Installing CA cert on Android devices above Android 6
on android version 7, you need root access to install the CA certificate on your device,
if you are on Windows, then you need gitbash or WSL to continue
Export the CA cert from Burp, and save the file as cacert.der
then type the commands
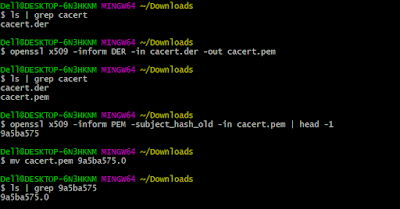
openssl x509 -inform DER -in cacert.der -out cacert.pem
We will use openssl to convert the der file to pem, generate a self-signed certificate, then move the file to Emulator's and install it.
openssl x509 -inform PEM -subject_hash_old -in cacert.pem | head -1
You will get a hash. Now you have to rename the perm file with this hash.0
mv cacert.pem 9a5ba575.0
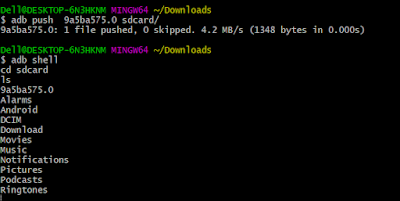
Now move the file to the android emulator's sdcard
It requires root to move the certificate to /system/etc/security/cacerts
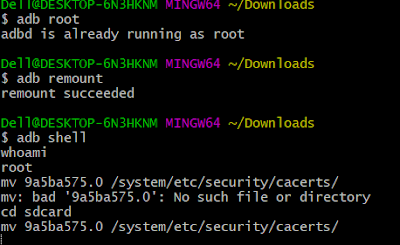
For that, we will log in to adb as the root
adb root
then
adb remount
now open adb shell, goto sdcard
cd sdcard
Now move the file to /system/etc/security/cacerts
mv 9a5ba575.0 /system/etc/security/cacerts/
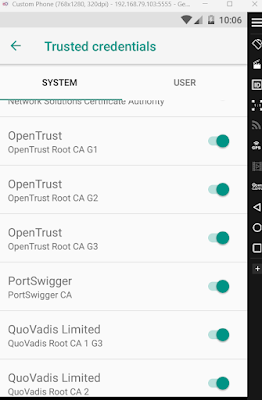
Now, In the device Settings, Security, Encryption, and Trusted Credentials, you will see PortSwigger's CA certificate.
Conclusion
Android application penetration testing is a broader topic and cannot be covered in a single blog post, and we have to discuss many android pentesting frameworks. We will be publishing several blog posts to cover all of them.