With time we all get better at what we do as we practice more and the same goes with cooking! This restaurant style shahi paneer is one such example which I aced over time and now it turns out supremely addictive every time!
If you stumbled upon my blog to know how to cook restaurant style shahi paneer at home, then firstly I thank you for clicking on my link!
Secondly, if the pictures of my shahi paneer are generating any iota of doubt in your mind that this one doesn’t look homemade, then I would humbly request you to trust me on this!
This gorgeous shahi paneer is absolutely made at home from scratch and yours will also turn out exactly the same once you follow this fail-proof recipe!
What is Shahi Paneer?
As the name suggests, shahi paneer is a special occasion dish to celebrate something special on a special day!
This is one of the most frequently ordered dishes in any classic Indian restaurant and is immensely loved by almost all vegetarians thanks to the delicious taste of its gravy!
The silky richness of the shahi paneer gravy justifies its name and once you try it at any good Indian restaurant you won’t be able to wait to make it at home!
I am sure you have had your fair share of chilli paneer till date if you are an Indian because this is one such Indo-Chinese dish that all Indians love to devour irrespective of them being a strict vegetarian or a meat-lover!
Let’s make the crowd favorite chilli paneer at home and bring the restaurant vibes in, what’s say?
When my better half suggested making this recipe, to be honest, I was a bit sceptical! That’s simply because I lost one critical cooking skill which is typically used in this recipe!
Wondering what the heck I am talking about? Let’s find out!
If you have been following me for a long time, you would have surely noticed how my recipes have evolved over time.
This blog has always been a place where I share what I and my family eat in our regular life; so you may have noticed that my recipes here have taken a turn into the skinnier side since the last couple of years.
Since we have been consuming low-fat & low-cal recipes off late, that’s what I share with you all and that’s exactly why & how I lost one of the key cooking skills i.e. deep frying!
Still confused and thinking how losing this skill is related to this recipe of restaurant style chilli paneer? Read on to know more!
Pidikarunai Kizhangu belongs to the Yam/Jimmikand family and is native to southern India especially Tamil Nadu .
Also known as Pidi Karanai or karunai kizhangu it is often mistaken with arbi /taro root ,but both are entirely different .
Elephant foot yam is known as Senai kizhangu or simply Senai /Chenai.
Pidi karunai is used in a variety of recipes like masiyal (gravy type) , stir fry , sambar, kootu etc
Pidi karunai is small in size as compared to the regular yam /suran that is commonly used.
Kai Pidi in Tamil is a measure to denote "a fistful" and as this vegetable fits within the size of one's fist it is called as Pidi karunai .
The flesh inside is starchy, and has a slightly slimy texture when cooked. It has a mild earthy flavor . Pidi Karunai has a tendency to cause mild itchiness to some, hence we always need to cook it in tamarind water to reduce the itchy property .
Health benefits of Pidi karunai
Rich in dietary fibre
Low glycemic index.
Rich in potassium ,Vit B and C
Pidikaranai masiyal is a very traditional Tambrahm recipe ,so obviously it is devoid onions, garlic and other strong spices .
Every home will have their own slight variations in preparing this masiyal .Some use tamarind pulp to cook the masiyal while some recipes just use a dash of lime juice while serving.
I was introduced to Pidikarunai masiyal only after my marriage and that was when I first saw this vegetable. In Bangalore, this vegetable is still a rarity but with the growing Quick commerce and Dark storage concept, we do get to relish Pidi karunai 3 to 4 times a year .
If you are in Tamil Nadu or happen to visit, you can definitely buy these from the local vegetable vendors .In Mumbai , Matunga market stores this vegetable around Sankrant for a few weeks .
Preparation Time - 30 mins Cooking Time - 45 mins Complexity - medium Serves - 3 to 4
Ingredients
500gm pidikarunai 2 green chillies Finely chopped ginger 1/2 cup tamarind extract 1/2 tsp sambar powder 1 tsp oil 1/2 tsp mustard seeds 1 tsp udad dhall 2 dry red chillies Few curry leaves Pinch of asafoetida
Method
Soak the pidikarunai in water for 10-15 mins and scrub it clean to clear the mud off it .
Add the cleaned Pidikarunai in a pressure cooker with sufficient water ,turmeric and a small piece of tamarind.
Pressure cook for 3 whistles and open it after the pressure releases .
You may immerse the pressure cooked pidikarunai in a bowl of water .This step makes the peeling of pidikarunai easy.
Peel the skin of the pidikarunai and mash it well with a masher or using back of a ladle .
To the mashed pidikarunai, add salt, sambar powder , turmeric and the tamarind extract. Mix it well and keep aside .
In a kadai,add oil and once heated,temper it with mustard ,udad dhall,curry leaves, ginger,green chillies and red chillies.
Add the pidikarunai mixture to the tempering, 1/2 cup of water and cook until the raw flavor of tamarind is lost.
You can adjust the consistency by adding water if you feel it is too thick. Also,adjust the spice and salt level based on your liking .
Delicious pidikarunai masiyal is ready to be served .
You can mix it with rice and hot ghee and eat it with some roasted papads and curry.
Keerai is the Tamil name for Green Leafy vegetables in general . Spinach is known as palak keerai , fenugreek is known as Vendhiya Keerai , Amaranthus is known as Arai Keerai , Dill Leaves is known as Soi Keerai ,Drumstick leaves as Murunga keerai so on and so forth.
We all know how healthy and beneficial is the inclusion of greens in our daily diet . So pls do make it a point to include greens as a part of diet atleast once or twice a week . Of course please exercise caution and consult your Doctor if greens need to be avoided due to underlying medical conditions.
Keerai kootu has been my childhood favorite and I would eat this almost everyday as a little girl . The mild sweetness from the cooked moong dal blends well with the coconut jeera paste and cooked palak and the final tempering of mustard in coconut oil simply elevates the flavor profile of the kootu. You can pair it with some delicious sambar rice or mix this kootu with some steamed rice and ghee and enjoy as is. You can use any variety of keerai for this kootu,but I personally love palak. I don't like Methi in kootu as it imparts a slightly bitter taste to the kootu which puts me off.
The green Leafy vegetables need to be cleaned very well before using. There may be a chance of lot of weeds or some rotten leaves hidden in the bunch . I am sharing a detailed video on how to clean the green Leafy vegetables at ease. If the stems are tender,I chop them finely and use it too while making the kootu.
If you are a lover of exotic greens, then Baby Bokchoy and Shitaake stir fry by Preethi will be the best choice. I was paired with Preethi for August's Theme of Leafy Greens theme suggested by Seema of Mildly Indian.
A simple lunch platter of keerai kootu, jeera pepper rasam and beetroot curry with fried papads. (Pic updated on Nov 5th 2024)
Preparation Time - 15 mins Cooking Time - 20 mins Serves - 2 to 3
Complexity - easy
Ingredients
2 small bunch spinach/palak 1.5 cup cooked moong dhall 1/4 cup grated coconut 1tsp jeera 1/2 tsp pepper 2 to 3 dry red chillies / 1 tsp red chilli powder 2 tsp coconut oil 1 tsp mustard seeds 1/2 tsp udad dhall Pinch of asafoetida Salt as needed
Method
Clean and wash the spinach bunch well . Finely chop the palak and cook it well . No need to pressure cook .you can cook it in regular open pot until the raw flavor is lost. Use a heavy bottomed pan always.
Grind the coconut, jeera ,pepper, red chillies to a fine paste with sufficient water.
Once the palak is cooked, add this coconut paste,bring it to a rolling boil and then add the cooked moong dhall .
Ensure the cooking is on medium flame and you are stirring constantly to avoid burning . Moong dhall and coconut paste will stick to the pan very quickly.
Once the kootu reaches a rolling boil,turn off and prepare a tempering of mustard, udad dhall and asafoetida in coconut oil and pour it over the kootu . Relish the kootu with rice and papads.
KARUVEPPILAI KUZHAMBU
This month is full of Poojas and festivals traditionally followed by huge spreads of festive food . This is the time when people who follow different types of health diets tend to enjoy their cheat meals to their heart's content . The sudden change in eating routine may cause certain gastrointestinal issues later. Karuveppilai Kuzhambu - a spicy and tangy curry leaf gravy - is a remedial dish to avoid such issues and also to set right the system.
INGREDIENTS
Curry leaves - 2 cups tightly packed ( washed and patted dry )
Coriander seeds - 1 tbsp
Bengal gram dal - 1 tbsp
Split black gram dal - 1 tsp
Red chillies - 3 ( broken )
Cumin seeds - 1 tsp
Asafoetida - 1 pinch
Tamarind - a marble size ball ( Soaked in warm water )
Salt - 1 tsp
Sesame oil - 1 tsp
Ghee or oil ( for seasoning ) -1/2 tsp
Mustard seeds - 1 pinch METHOD
1. Heat oil in a pan and add the dals , coriander seeds , broken red chillies , cumin seeds and asafoetida and roast till the ingredients emanate a pleasant aroma.
2. Add curry leaves and saute till the leaves wilt.
3. Allow the ingredients to cool down and grind them together in a mixer .
4. Add the soaked tamarind and one glass of water to the ground mixture and once again blend together in the mixer.
5. Pour back the curry leaf and spice liquid into the pan .
6. Add salt and cook till it thickens into a Kuzhambu / gravy. ( The gravy should not be too thick like chutney nor too runny like soup.)
7. Splutter mustard seeds in 1/2 tsp of ghee or oil and pour it over the Kuzhambu / gravy.
Enjoy the flavoursome Karuveppilai Kuzhambu / Curry Leaves Gravy with a morsel of steaming hot rice at the beginning of a meal.
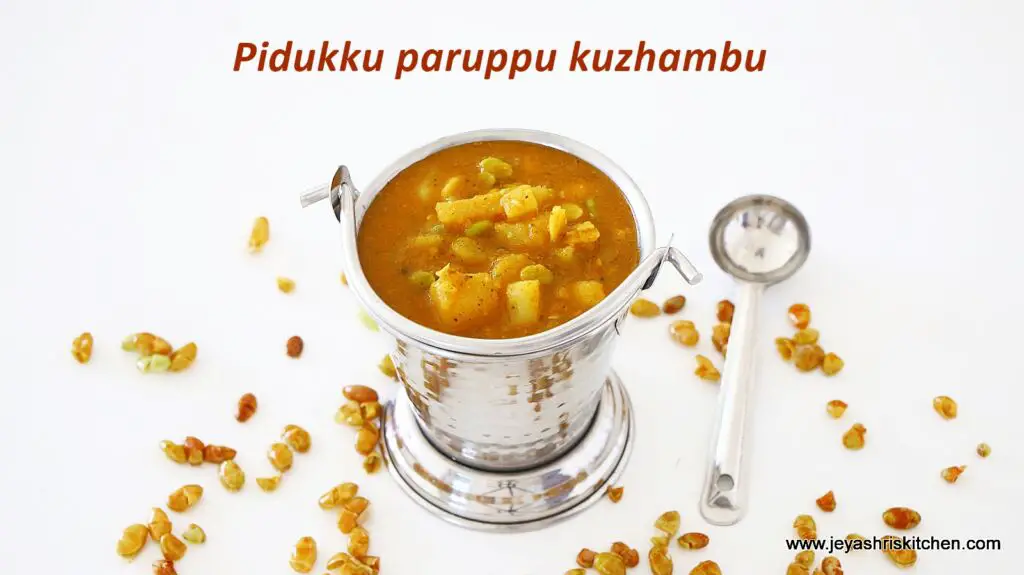
Pidukku paruppu kuzhambu – Mochai kottai kuzhambu recipe – No tamarind added kuzhambu recipe – Fresh lilva beas gravy – Avarekalu saaru recipe – with full video and step-by-step pictures.
Fresh mochai | pacha mochai | Hyacinth beans |Surti papdi | Avarekalu is a winter vegetable. We get this during the Pongal festival season. We add this in out Pongal ezhukari kootu. Apart from that we make Mochai curry, mochai vatha kuzhambu and many more. My amma makes a variety of kootu using this. Since mochai iteself is a legume, we don’t add any other dal to this kootu. It’s a traditional recipe, we call it Pidukku paruppu kootu.
I got a small batch of fresh mochai from my recent India trip. I was thrilled to see the fresh produce in the market and got a batch of it before leaving. I thought I will make an interesting mochai rice recipe but my mom and sister were insisting me to try the pidukku paruppu kootu. Also my sister shared a pidukku paruppu kuzhambu too.
Siince I had limited stock of this legume, I decided to try the kuzhambu. This is a no tamarind gravy with the addition of onion and garlic. If you don’t find fresh mochai in your place, soak the dried mochai overnight and proceed with the recipe.
Pidukku means pressing out, we are basically soaking the fresh mochai and taking out the skin. It is little consuming but it is worth the taste. I added potato in this recipe, since I don’t have enough mochai with me. You can add 2 cups of mochai and omit the potatoes too.
Fresh Hyacinth beans gravy – South Indian mochai kuzhambu
Course Lunch
Cuisine Indian
Keyword kuzhambu recipes, South indian gravy
Prep Time 20minutes
Cook Time 25minutes
Soaking Time 5hours
Total Time 5hours45minutes
Servings 4
Author Jeyashri suresh
Ingredients
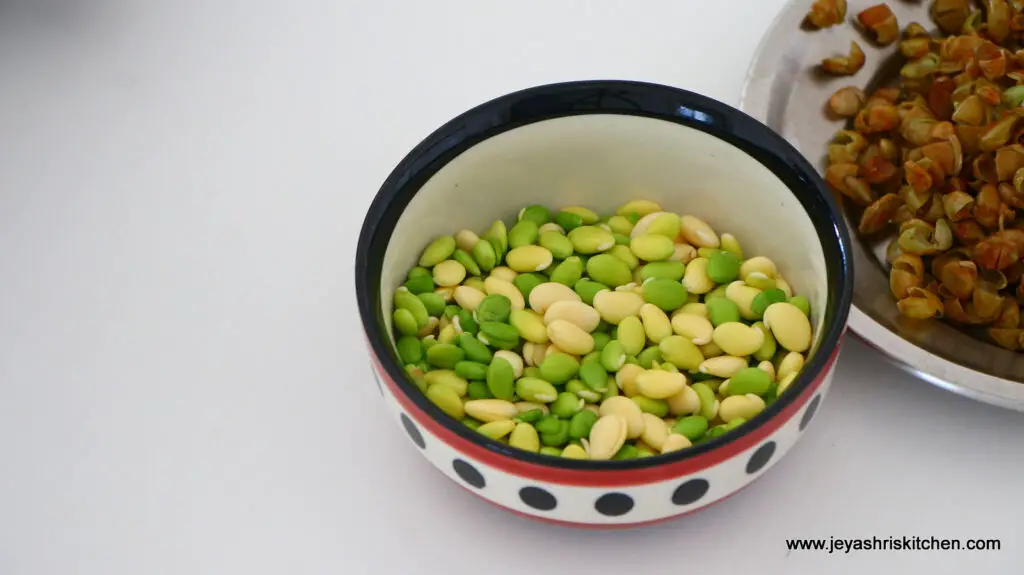
1cupfresh mochai | field beans | lilva beans
1medium sized potatooptional
Salt as needed
½tspturmeric powder
2tspoil
1tspmustard seeds
Few curry leaves
1cupwater
To roast and grind
3tspoil
1onion
7-8small garlic cloves
1tspcumin seeds
½tspwhole black pepper
Little coriander leaves
3tbspcoconut
1tspred chili powder
1tspcoriander powder
Instructions
Peel the mochai and soak it for 5 hours or overnight.
If using dried mochai, soak it overnight.
Press it and take out the outer skin. It will come out easily.
Keep it aside.
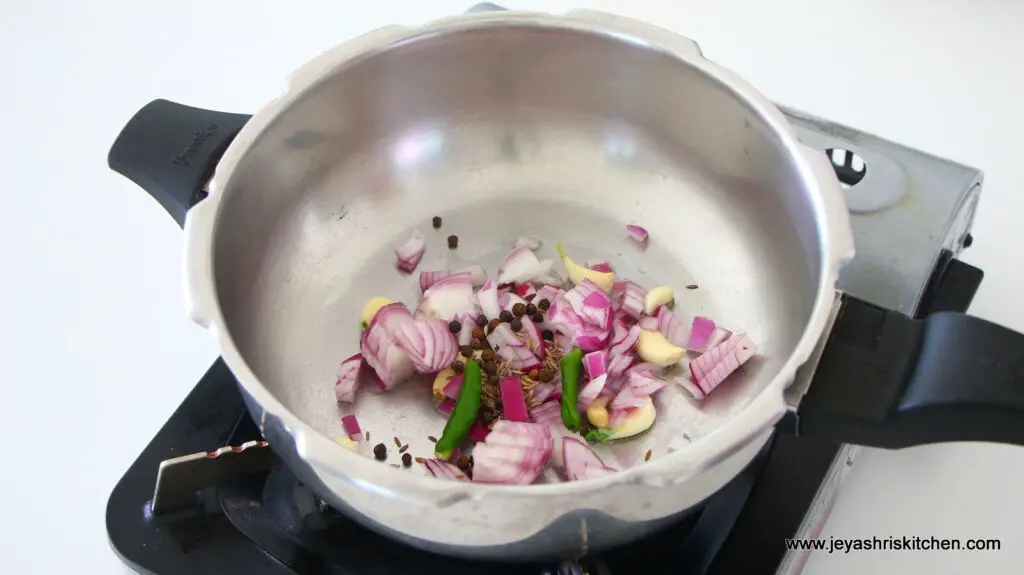
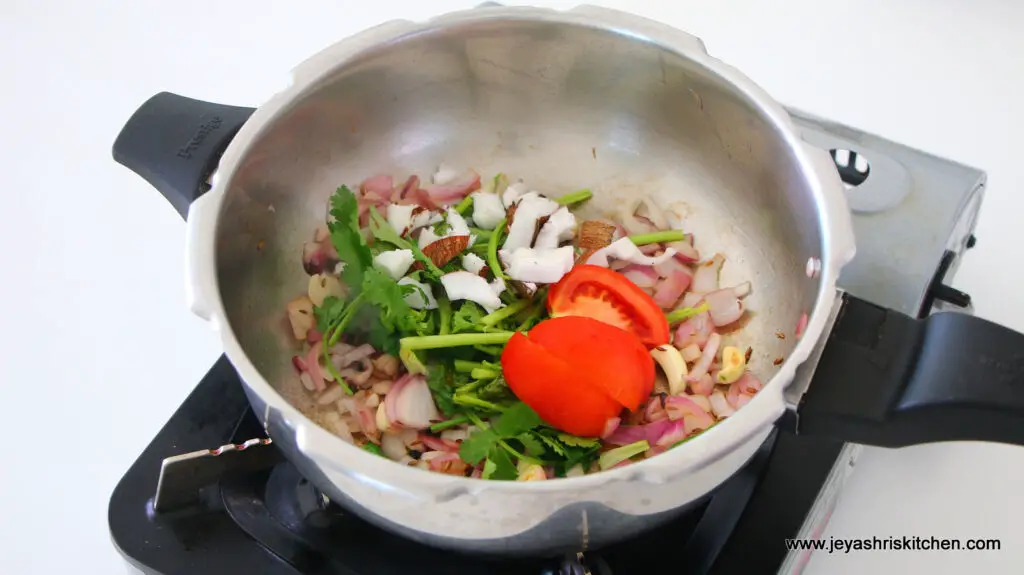
In a pressure cooker, add 3 tsp of oil and add 1 chopped onion, 7-8 small garlic cloves, 1 tsp cumin seeds and ½ tsp whole pepper. You can add 2-3 cloves and a tiny piece of cinnamon too.
Saute for 2 minutes.
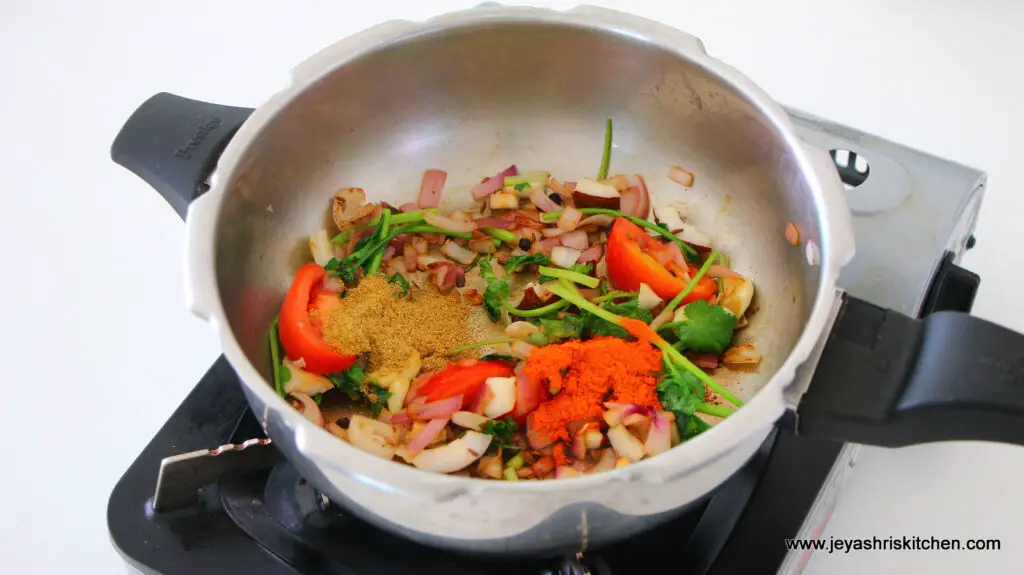
Now add the coriander leaves, tomato and coconut.
Cook for 2-3 minutes and add the red chili powder and coriander powder.
Switch off the flame.
Cool and grind this into a fine paste.
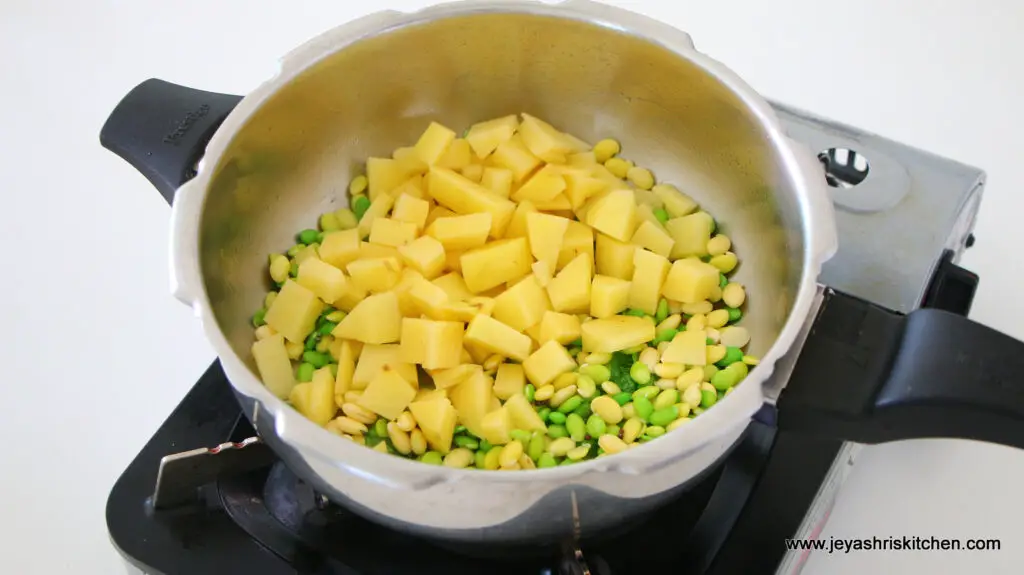
In the pressure cooker add 2 tsp of oil and add 1 tsp mustard seeds and few curry leaves.
Once the mustard splutters, add the mochai and saute for a minute.
Add the peeled and cubed potato to this and saute for a minute.
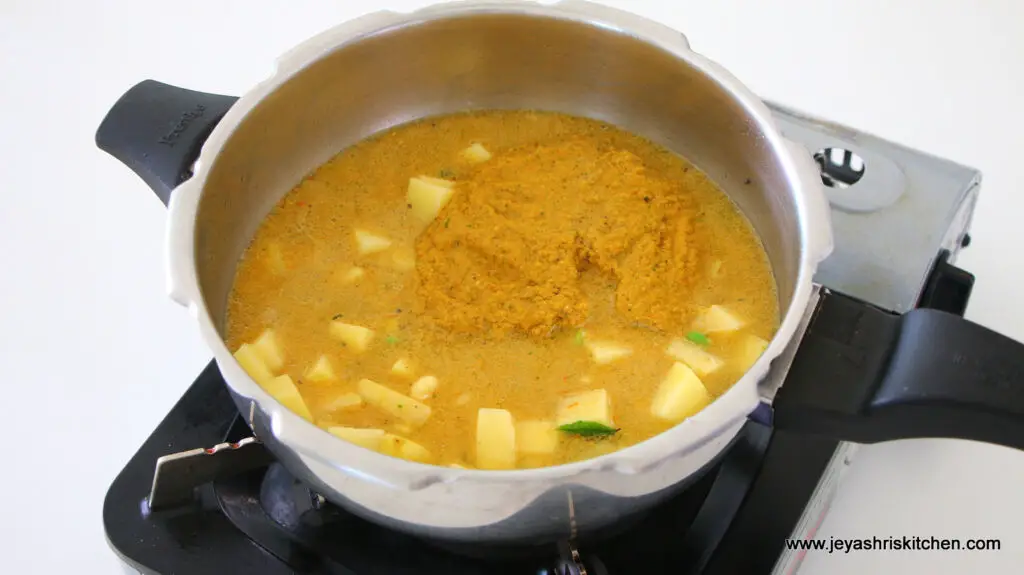
Now add in the ground paste, ½ tsp turmeric powder and salt.
Mix well and add 1 cup of water to this.
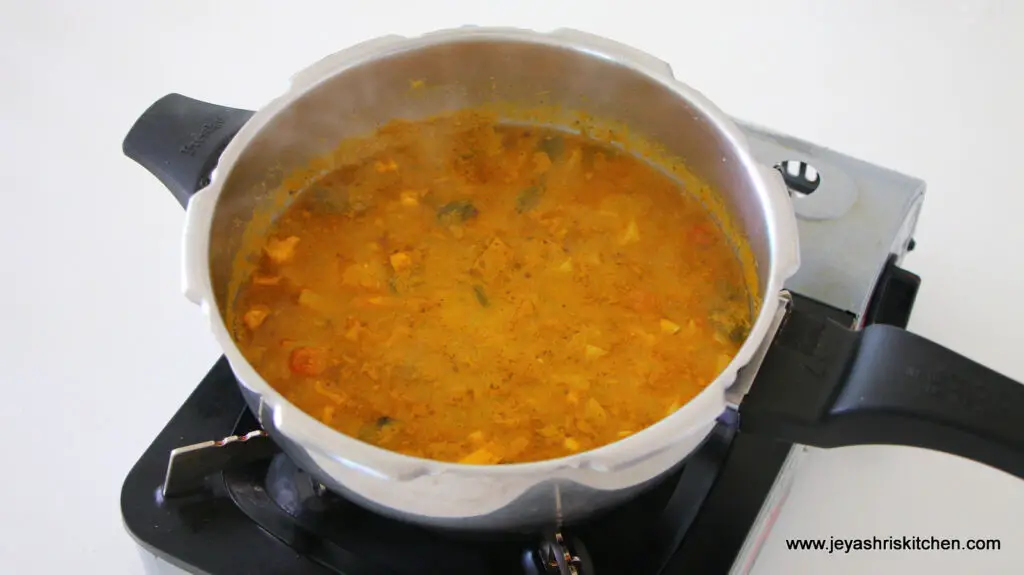
Pressure cook for 2 whistles and switch off the stove.
Once the pressure releases naturally, open the cooker.
Mix well.
Pidikku paruppu kuzhambu is ready.
Serve with hot rice and a simple papad.
Video
Notes
1. You can add 1 more cup of mochai and omit the potatoes.2. This no tamarind pidikku paruppu kuzhambu pairs well with chapati and dosai too.
Peel the mochai and soak it for 5 hours or overnight.
If using dried mochai, soak it overnight.
Press it and take out the outer skin. It will come out easily.
Keep it aside.
In a pressure cooker, add 3 tsp of oil and add 1 chopped onion, 7-8 small garlic cloves, 1 tsp cumin seeds and ½ tsp whole pepper. You can add 2-3 cloves and a tiny piece of cinnamon too.
Saute for 2 minutes.
Now add the coriander leaves, tomato and coconut.
Cook for 2-3 minutes and add the red chili powder and coriander powder.
Switch off the flame.
Cool and grind this into a fine paste.
In the pressure cooker add 2 tsp of oil and add 1 tsp mustard seeds and few curry leaves.
Once the mustard splutters, add the mochai and saute for a minute.
Add the peeled and cubed potato to this and saute for a minute.
Now add in the ground paste, ½ tsp turmeric powder and salt.
Mix well and add 1 cup of water to this.
Pressure cook for 2 whistles and switch off the stove.
Once the pressure releases naturally, open the cooker.
Mix well.
Pidikku paruppu kuzhambu is ready.
Serve with hot rice and a simple papad.
You can add 1 more cup of mochai and omit the potatoes.
This no tamarind pidikku paruppu kuzhambu pairs well with chapati and dosai too.