Pumpkin & potato are tempered with nigella seeds and slow-cooked in mustard oil for a dish that heroes the pumpkin’s sweetness.
Calling all home cooks looking for quick and healthy weekday/weeknight meal ideas – add this pumpkin & potato in mustard oil dish to your repertoire! It’s the kind that comes together in a jiffy, requires just one spice (coz salt and turmeric powder are MUSTS and don’t count) and pairs well with rice or Indian bread of choice.
The Pumpkin & Potato in Mustard Oil is a version of the Kumdo’r Chechki, a traditional Bengali side dish wherein the pumpkin is grated or (extremely) thinly sliced and slowly cooked in its own juices. It’s the kind of dish that celebrates the natural flavours of the vegetable. If you’d like to try a traditional chechki, head over to the recipe for Mulo Chechki (provided radishes are in season).
Tips to remember for the Pumpkin & Potato in Mustard Oil
Julienne the vegetables and try to maintain consistency in size; this helps all the food cook evenly.
Remember to add the pumpkin later, as it cooks faster than potatoes.
You can make this without the potato; just increase the amount of pumpkin.
Always use double the amount of pumpkin as it reduces when cooked.
Do let me know if you try this recipe! Leave a comment and don’t forget to tag me on Instagram at from.the.corner.table and hashtag it #fromthecornertable. I’d love to see it
For regular updates on recipes, recommendations on things to read and watch and ramblings that make sense, subscribe to the newsletter – you’ll find the form in the sidebar if viewing on a screen and at the bottom if viewing on the phone. Since spamming or flooding your inbox is a huge no for me, these newsletters go out only when I’ve put up a new post or sometimes, once in a month only.
Pumpkin & Potato in Mustard Oil
Pumpkin & potato are tempered with nigella seeds and slow-cooked in mustard oil for a dish that heroes the pumpkin’s sweetness.
200 grams Pumpkin
100 grams Potato
1 medium Onion
1 Green chilli
1 tablespoon Mustard oil
¼ teaspoon Nigella seeds
Salt (to taste)
¼ teaspoon Turmeric Powder
Peel and slice/julienne the pumpkin, potato and onion; keep them in separate bowls/plates.
In a kadhai/deep pan, heat mustard oil.
Once the oil is hot, add nigella seeds and green chilli.
Let the nigella seeds splutter.
Add the onion and potato; cover and cook on low flame for 2-3 minutes.
Add the pumpkin, turmeric powder and salt to taste.
Cover with a tight lid and let the vegetables cook in steam and moisture until the potato is cooked.
Stir frequently to prevent the vegetables from sticking to the bottom of the vessel.
Serve hot with roti/paratha or as a side dish with rice and dal.
Pumpkin & potato are tempered with nigella seeds and slow-cooked in mustard oil for a dish that heroes the pumpkin’s sweetness.
Calling all home cooks looking for quick and healthy weekday/weeknight meal ideas – add this pumpkin & potato in mustard oil dish to your repertoire! It’s the kind that comes together in a jiffy, requires just one spice (coz salt and turmeric powder are MUSTS and don’t count) and pairs well with rice or Indian bread of choice.
The Pumpkin & Potato in Mustard Oil is a version of the Kumdo’r Chechki, a traditional Bengali side dish wherein the pumpkin is grated or (extremely) thinly sliced and slowly cooked in its own juices. It’s the kind of dish that celebrates the natural flavours of the vegetable. If you’d like to try a traditional chechki, head over to the recipe for Mulo Chechki (provided radishes are in season).
Tips to remember for the Pumpkin & Potato in Mustard Oil
Julienne the vegetables and try to maintain consistency in size; this helps all the food cook evenly.
Remember to add the pumpkin later, as it cooks faster than potatoes.
You can make this without the potato; just increase the amount of pumpkin.
Always use double the amount of pumpkin as it reduces when cooked.
Do let me know if you try this recipe! Leave a comment and don’t forget to tag me on Instagram at from.the.corner.table and hashtag it #fromthecornertable. I’d love to see it
For regular updates on recipes, recommendations on things to read and watch and ramblings that make sense, subscribe to the newsletter – you’ll find the form in the sidebar if viewing on a screen and at the bottom if viewing on the phone. Since spamming or flooding your inbox is a huge no for me, these newsletters go out only when I’ve put up a new post or sometimes, once in a month only.
Pumpkin & Potato in Mustard Oil
Pumpkin & potato are tempered with nigella seeds and slow-cooked in mustard oil for a dish that heroes the pumpkin’s sweetness.
200 grams Pumpkin
100 grams Potato
1 medium Onion
1 Green chilli
1 tablespoon Mustard oil
¼ teaspoon Nigella seeds
Salt (to taste)
¼ teaspoon Turmeric Powder
Peel and slice/julienne the pumpkin, potato and onion; keep them in separate bowls/plates.
In a kadhai/deep pan, heat mustard oil.
Once the oil is hot, add nigella seeds and green chilli.
Let the nigella seeds splutter.
Add the onion and potato; cover and cook on low flame for 2-3 minutes.
Add the pumpkin, turmeric powder and salt to taste.
Cover with a tight lid and let the vegetables cook in steam and moisture until the potato is cooked.
Stir frequently to prevent the vegetables from sticking to the bottom of the vessel.
Serve hot with roti/paratha or as a side dish with rice and dal.
Gobi 65 is a popular Indian appetizer or snack made with cauliflower florets coated in a spicy batter and deep-fried. It is a vegetarian version of the famous Chicken 65 dish and is just as delicious and flavorful.
Gobi 65 is made by first blanching the cauliflower florets in boiling water for a few minutes. Blanching helps to soften the cauliflower and make it easier to coat in the batter. A mixture of flour, spices, and herbs is combined and seasoned with salt and pepper to make the batter. The cauliflower florets are then coated in batter and fried until they turn crispy and golden brown.
Gobi 65 is typically served hot with a chutney or sauce. This dish is often eaten as an appetizer or snack but can also be served as a side dish.
Variations of Gobi 65
There are numerous ways to prepare for Gobi 65. Some popular variations include:
Gobi Manchurian: This dish features Gobi 65, coated in a delectable sweet and sour sauce.
Gobi 65 Pizza: This delicious meal consists of a pizza crust generously layered with Gobi 65, tomato sauce, cheese, and toppings of your preference.
Gobi 65 Wrap: This delectable dish features a tortilla filled with scrumptious gobi 65, flavorful chutney, and your preferred vegetables.
Gobi 65 Salad: This meal consists of gobi 65, lettuce, tomatoes, cucumbers, and your preferred dressing.
Gobi 65 is a delicious and versatile dish that can be enjoyed in many ways. So next time you’re looking for a flavorful and satisfying snack or appetizer, be sure to give the Gobi 65 a try. Now let us see how to prepare this recipe.
Enjoy the video of Gobi 65. Subscribe for more videos.
Blanch the cauliflower florets with a tsp of salt in boiling water for 2-3 minutes, or until they are slightly softened. Drain and set aside.
In a large bowl, combine the all-purpose flour, rice flour, corn flour, turmeric powder, red chili powder, garam masala, coriander powder, salt, black pepper, lemon juice, ginger garlic paste and a tbsp of oil. I forgot to show adding ginger garlic paste in the video. So do add ginger garlic paste. Do not skip it.
Add the water little by little to the dry ingredients and whisk until the batter is smooth. The batter should be neither too thick nor too thin.
Add the cauliflower florets to the batter and toss to coat. Keep it refrigerated for at least 30 mins.
Heat the oil in a deep pan over medium heat.
Fry the cauliflower florets in batches for 3-4 minutes per batch, or until golden brown and crispy. Drain the fried cauliflower florets on paper towels.
Fry green chili, curry leaves until it crackles and mix with fried cauliflower. Serve hot with your favorite chutney or sauce.
Recipe Notes
Use fresh cauliflower florets. Frozen cauliflower florets will not work as well, as they will not be as crispy.
Make sure the batter is not too thick or too thin. The Gobi 65 will not be crispy if the batter is too thick. The Gobi 65 will not hold its shape if the batter is too thin.
Deep-fry the gobi 65 in small batches. Frying in small batches will help to ensure that the gobi 65 cooks evenly and does not burn.
Serve the Gobi 65 hot with your favourite chutney or sauce.
Crispy Gobi 65 is ready to relish.
If you found this post helpful, please consider sharing it with your friends and followers on Facebook, Twitter, or Google+. You can do so by clicking the buttons below the post. Your support would be greatly appreciated and will keep me motivated. Thank you!
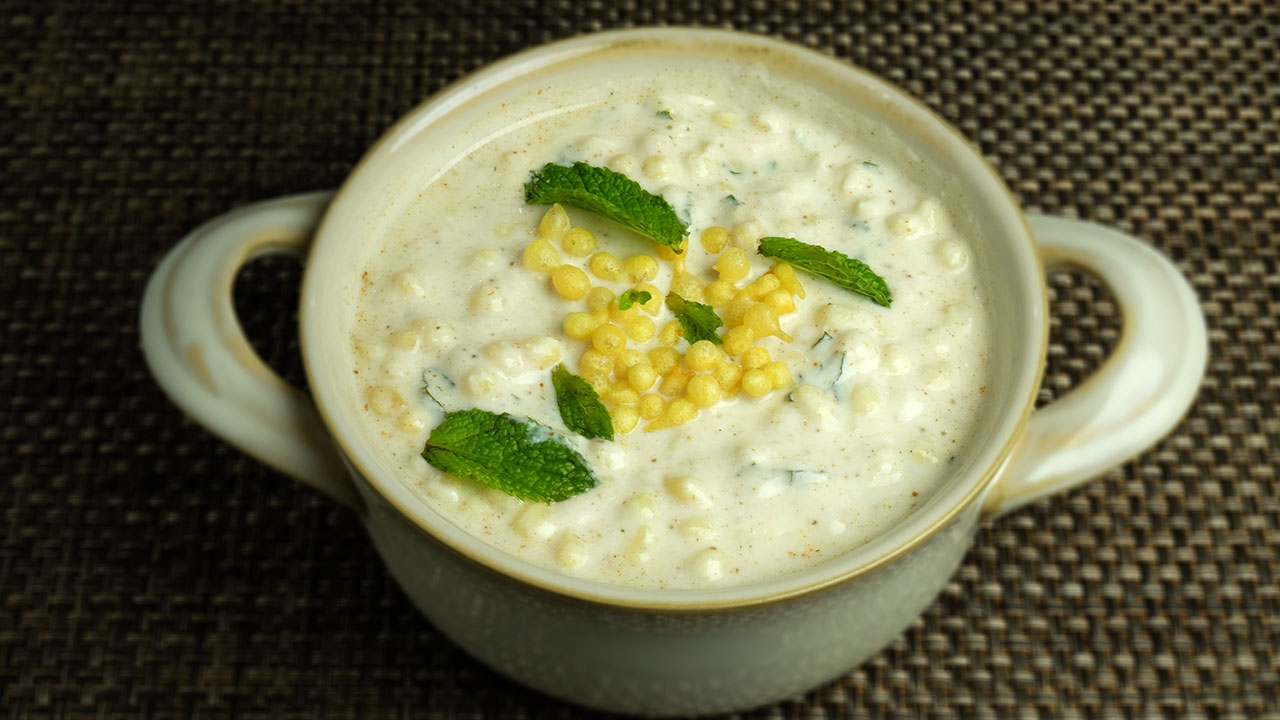
Boondi Ka Raita is a delicious and easy to make side dish which compliments any meal. Boondi ka raita is a yogurt based Indian condiment. Raita is an integral part of Indian cuisine.
This recipe will serve 4.
Prep Time: 5 minutes
Cook time: 5 minutes
Ingredients:
1 cup boondi, boondies you can buy in indian grocery stores or use the recipe I have for sweet boondi just do not soak them in syrup.
1-1/2 cups yogurt
1/2 teaspoon Salt
1/2 teaspoon Black salt
1/2 teaspoon roasted cumin seed powder
1/4 teaspoon red chili powder
About 1 table spoon mint leaves chopped
Few mint leaves to garnish
Method
Soak boondi in the warm water for about 10 minutes.
Lightly squeeze the boondies in your palms, don’t mash them.
whisk the yogurt in a bowl. If yogurt if too thick add water as needed. Yogurt should be the consistency of pancake or dosa batter.
Add all the spices salt, black salt cumin seed powder, chili powder, and chopped mint leaves mix it well.
Add the boondi and mix.
Garnish boondi raita with mint leaves.
Boondi raita can be served cold or at room temperature. I especially like boondi rita with aloo paratha or with Urad Dal Puri.
Who doesn't enjoy a delicious lightly spiced flavorful coconut based egg curry? Egg is one quintessential breakfast food loaded with proteins- liked and consumed by all - good thing being a lot of vegetarians also consume it and are known as Eggetarians 😆 Eggs are the most nutritious food on the planet! There is no doubt about it! On top of everything else, they are also cheap, easy to prepare, go with almost any food and taste awesome.
Egg Curry from coastal southern regions of India is made using garam masala and coconut as its main ingredients. I have tried hard to get that exact taste like my mom's, but its tough 😊 I am close to it and have made my peace with it. ✊
I feel restless when I dont have eggs in my refrigerator. I have to stock it up as soon as I see around dozen left. Boiled eggs, scrambled eggs, puffs, egg burji, omelettes, french toast, cakes etc- thats how Eggs are consumed in a healthy and regular basis in my household. It comes to my rescue when I am short on meat at home or for that matter even veggies. There used to be this famous jingle in India- Sunday ho Ya Monday Roz Kaho Ande 🥚 ... a good one indeed :)
Back home Eggs are treated like a second class citizen 😂. No kidding, when I am chatting with my Mom and if I ask her- "what did you cook for dinner?" There is a sigh in her tone when she says.. just made some egg curry- followed by WHY that decision was made ---like didn't have time to get chicken OR no good variety of fresh fish was available in the market OR due to bad weather she was not able to go get fresh veggies etc etc. So you see what I am saying- justification on why egg curry was made ... 😛
Where as for me here - Egg curry day is like a celebration :) My son is thrilled as he is an ardent and loyal fan of eggs. My husband is neutral - he doesn't enjoy coconut curries so much ...yeh go figure 🙄 ! and Me- full focus on getting the curry taste right just like my Mom's... so its a fun affair.
As a kid, my sister and Mom loved full boiled eggs in the curry whereas me and my Dad loved fresh broken eggs in the curry. Till this date that has not changed. Separate 2 broken eggs always go in my funky-licious Egg Curry/Anda Curry!
I do not know anyone around me that dislikes eggs. I have a cousin who couldn't eat it due to allergies and I used to feel so bad for her. While growing up my younger cousins gang loved my version of Plain Omelette. My mom and aunts used to make us omelette loaded with onion/tomatoes/veggies which most of them did not like it then 😁 The same ones that we relish like crazy on Cruises now- 😎
Anyways, Lets get started with the recipe:
Please feel free to modify ingredient quantity as per your taste for spiciness and thickness of curry!
Ingredients:
4 boiled eggs + 2 fresh eggs
3 tbsp oil
1 big onion finely chopped
1 tomato chopped
1 tsp each ginger and garlic paste
salt as per taste
Masala Paste:
5 cloves
1 cardamom
3-4 black pepper
1/2 inch cinnamon
1/4th tsp cumin seeds (jeera)
1/4th tsp sesame seeds
1/4th tsp poppy seeds
3 tsp coriander seeds
7-8 red dry chillies [adjust as per your taste]
1/2 cup grated coconut + 3 tsp dry grated coconut
handful of cilantro leaves
1/4th tsp turmeric
Preparation:
Roast ingredients from 1-9 in a tsp of oil for few minutes till its fragrant and put it in a blender.
In the same pan roast coconut till it is slight brown in color on low heat and then add it to the blender. Add turmeric , cilantro and make a paste by adding water sparingly. Keep aside.
In a wide mouth utensil heat oil, add finely chopped onions and saute till light brown. Add ginger garlic paste and saute further till the raw smell goes away. Add tomatoes and cook till everything comes together.
Now pour the ground masala paste and mix everything nicely. Bring it to a boil. Let it simmer for few minutes. Adjust water and add salt.
Add the boiled eggs in the curry. You can lightly score the eggs from top to bottom with a knife or you can even lightly roast it in oil with garam masala powder [or chili pwd and turmeric pwd] before adding to the curry, or cut in halves and slide it in the curry- choice is yours!
Once the curry starts to simmer again - slowly break the remaining 2 fresh eggs and slide it in the curry. Leave it alone for 5-8 mins on low-med flame till the eggs are done. You can give it a light handed stir in between.
Enjoy it with rotis or just plain rice or jeera rice. It super yum!
njoY! happY cookinG!!
Your feedback is important to me. If you have tried any recipes from Pinch of Swad, feel free to share with us.
Incredibly nutritious food! In fact, eggs are pretty much the perfect food. They contain a little bit of almost every nutrient you need. Whole eggs are among the most nutritious foods on the planet, containing a little bit of almost every nutrient you need. Omega-3 enriched and/or pastured eggs are even healthier. Eggs are high in cholesterol, but eating eggs does not adversely affect cholesterol in the blood for the majority of people. Eating eggs consistently leads to elevated levels of HDL (the "good") cholesterol, which is linked to a lower risk of many diseases. Eggs are among the best dietary sources of choline, a nutrient that is incredibly important but most people aren’t getting enough of.
Kabab or Kebab has a nice ring to it, it brings a smile on my face whenever someone utters that word. My mind starts getting images of get-togethers, fun with friends, with some beer or wine in the vicinity(yaasss), jamming sessions, or a fancy restaurant, sometimes dhaba style restaurants too :) etc. etc. So in short, this dish brings happiness to me. It is served as an appetizer mostly during parties and get together's!
Of course, one shouldn't stop at that, make it at home, in your kitchen whenever you feel like :)
I call it a 'Happy Side Dish'
It is a cloudy rainy day today in my town and I was craving for some chatpata (spicy peppery) snack. Had some minced chicken in the fridge, thought of making these chapli kebabs. Very easy to make, use the spices on hand, make patties and fry it in the oil!
Chapli kebab is a Pashtun-style minced kebab, usually made from ground beef or mutton with various spices in the shape of a patty. It originates from Peshawar in Northwest Pakistan and is also known as the Peshawari kebab.
The chapli kebab is a popular barbecue and street food in parts of Northern India, Pakistan, as well as in eastern Afghanistan. It can be served and eaten hot with naan bread, rice, or in burgers and sandwiches such as a Bun kebab or stuff in Pita Bread. Or just have as an appetizer with chutney dip, sliced onions and lemon wedges on the side.
Can't wait to dig in, every time I make something like this!
Here is the recipe for Chapli Kababs,
Ingredients:
1 16 0z minced chicken pkt (or get chicken thigh or breast and grind using the blender)
1 med size onion chopped finely
2 tomatoes chopped finely (squeeze the water out)- I used cherry tomatoes :)
2-3 green chilies chopped
1 tsp ginger garlic paste
1/2- 1tsp chili powder flakes (if you don't have, take dry red chili and crush it)
salt to taste
1/2 tsp pepper powder
1 tbsp coriander seeds crushed in a mortar n pestle ( coarse coriander seeds pwd, a must step in chapli kababs)
1 cardamom crushed
2 cloves crushed
1 egg
2 tbsp whole wheat flour ( optional, if your mixture gets little soggy, add this)
Oil to fry
Deep fried chapli kababs
Shallow fried Chapli Kebab
Preparation:
Take a mixing bowl, add all the ingredients except oil. Patties mixture should be dry enough.
Take a bowl of water at the side to dip your hands, while making patties.
Heat a pan with little oil in it. You can either deep fry it, which will taste awesome or shallow fry it(I like it this way)
Take a small portion of the meat mixture and make patties by flattening it, you can give any shape you want. Traditionally it is given an oval shape.
Place in on the hot pan, it should sizzle. Let it cook for 3 minutes. Then flip and again cook for another 3 minutes or till done. Cook on medium flame.
Strain it out and place on the paper towel to absorb extra oil.
Health Benefits:
Chicken is one of the best non-vegetarian sources of protein. It is lean meat, which means that it contains more amount of proteins and less amount of fat. Apart from protein, chicken is rich in several minerals like phosphorus and calcium, that helps keeps bones in mint condition. Also, it has selenium which has been known to cut a risk of arthritis.Chicken has two nutrients that are great for reducing stress – tryptophan and Vitamin B5. It boosts immunity (remember how we eat chicken noodle soup when we are sick?) and promotes good heart health as it is rich in vitamin B6, plays an important role in preventing a heart attack. so I say YAY to chicken!
Shepuchi bhaji is a well known Maharashtrian dish. Very popular food amongst villagers and farmers. It falls under the category of either you Love it or Hate it, more or less like Karela (bitter gourd). It has a cult followers of its own if you ask me heheh and I am one of them. I can polish off my plate when I get served these cult vegetable curries like karela, shepu(dill), bitter beans etc. My husband is just the opposite, he doesn't like it at all. One other reason I look forward to make it as I make it once in a while :)
It is used as a herb in western countries. Dill has been used for culinary and medicinal purposes for hundreds of years.Apart from giving a strong, tangy, appetizing flavor and taste, it possesses plenty of medicinal properties. It is very good for health and has a pretty green color on it. Used these days for garnish, flavoring and for styling food plates to present on Internet handles, it is has multipurpose value- so Dill ain't going anywhere soon :)
I have enjoyed it so much while growing up- eating it with jowar bhakri or rice bhakri elevates its taste 10 folds more. I sill get all nostalgic when I visit my hometown in Belgaum and step into our family friends home, that aroma always lingers in their house. Have you ever experienced that? Every house has its own typical aroma and energy around it.
Anyways coming back to Shepu- my moms fav dish is shepu Idlis...well that is one thing which I am not a great fan of maybe because we add loads of jaggery in it... my tastebuds go crazy where ever it finds spice. Even now when I visit home there is a list of things that I want from my moms kitchen and Shepuchi, methichi bhajis are one of them. I am actually drooling as I am writing this as its dinner time and I cant wait to get my hands on it :)
Lets check the simple recipe:
Ingredients:
2 bunch of Dill leaves (about 21/2 cups of chopped dill)
4-5 garlic pods chopped (large in size)
3 green chillies slit
1 onion med size chopped
1/4th cup toor dal soaked for 30 mins (or split yellow moong dal)
1 tbsp grated coconut for garnish
1/4th tsp jaggery
3 tbsp oil
salt to taste
Preparation:
Clean and wash Dill leaves for a couple of times. It is usually muddy by the roots, so clean it nicely.
Chop the leaves and keep aside.
Soak the toor dal in little water for about 30 minutes and drain the water.
Heat oil in a pan, then add garlic, saute for a few seconds. Add onions and chillies, saute and let it cook till onions are translucent.
Add toor dal and mix it well, add 2 tbsp water and cook it covered for 5-6 minutes.
Now add the dill leaves, salt, jaggery and mix everything nicely. Close the lid and let it cook for another 5-6 minutes. Do not add water. It gets cooked in the steam that gets generated. If need be then add very little water.
Garnish with grated coconut and serve hot with roti, yogurt, rice etc
Njoy cooKing!
Health Benefits:
Dill is packed with micronutrients that provide health benefits. It is a good vitamin A intake that helps you to maintain healthy vision, skin, immune function, growth, and reproductive health. You'll also get a significant boost of vitamin C, an important antioxidant that helps your body to resist infection. Dill is also a good source of fiber, folate (important for cell division and production of DNA), calcium for healthy bones, riboflavin for cell function and development, manganese, and iron.
Dill has been used for centuries in traditional Asian and Ayurvedic medicine. Currently, people use dill for certain medicinal purposes, including: Gastrointestinal disorders Loss of appetite, Kidney disease, Flatulence, Fever and colds, Cough, Bronchitis, Urinary tract disorders, Hemorrhoids, Insomnia and other sleep disorders.
Getting back to blogging after a short break, feels so good to be back in my comfort zone :)
It was Monday, Presidents day a long weekend in USA. Had a busy rest of the weekend having too much fun! Thought of lazying around while cleaning up the house and at sharp 11:08am had a craving to eat pav bhaji after my eyes wandered on the potato bag in the pantry :) Got lucky as I had all the ingredients in the fridge except pav (Indian bread). After begging for 5 minutes to my Pati-dev who thinks weekends are his right to be a couch potato, sent him off to the store to get the pav while I geared myself to make some YUMM-O street food.
This dish is a big hit at my house and relished amongst my friends. I got this recipe from a Juhu beach vendor in Mumbai on Youtube some years back. Can't go wrong, right? I have customized the recipe just a little bit as per my convenience. I was actually surprised to see couple of ingredients that went into it like kasoori methi and hing. Well, it only adds more great flavors to say the least.
Another huge USP of this dish, can add as many variety of vegetables you want and kids will not even know :) because potatoes overpowers the rest of the clan :)- So yes, Moms can go YAY!!
Pav Bhaji was invented as a midnight dish by street food vendors, made with all the leftover vegetables from the day, mashed up together, with loads of added spice, and butter. Bhaji is the Marathi word for a vegetable dish, and pav probably comes from the Portuguese word for bread.
All I can say is try it and see if you like it.
Ingredients: For the Bhaji:
2 big potatoes boiled, peeled and mashed lightly
4-5 ripe tomatoes chopped ( if not sour enough, add extra tbsp of tomato paste)
1 capsicum chopped
10 flowerets of cauliflower (roughly chopped)
1 small carrot chopped (optional)
1/2 cup peas boiled
1 1/2 tsp ginger garlic paste
1 tsp Kashmiri chili pwd (to give more color than spiciness)
2 tbsp butter
1/4th tsp turmeric pwd
1- 2 tbsp pav bhaji masala (everest or mtr)
handful chopped cilantro leaves
1 tbsp fenugreek leaves
pinch asafetida
2 tbsp of oil
food color orange 1 pinch ( if you want that gorgeous color :))
To Fry the Pav:
Butter
Cilantro leaves
Prepared Pav Bhaji
Garnish Ingredients:
Chopped onion
Sev
Lemon pieces
Dallop of butter on it
6 Pav (store bought for now) Minimum 2 Pav each person to relish all that goodness of buttery bhaji :)
Preparation:
In a non stick pan, heat oil, add capsicum, cauliflower, (carrots if using it) and quickly saute it for 2 to 3 minutes.
Add ginger garlic paste and let it cook for little bit more till the raw smell goes away. Add asafetida, kasoori methi and cook for a minute.
Now add chopped tomatoes and saute it for couple of minutes. You can add 1 tbsp butter now and let it cook till you see some oil coming out from the corners. Stir in between.
Add masalas - turmeric pwd, chilli pwd and pav bhaji masala, salt mix everything together quickly.
Add boiled potatoes and with a masher, start mashing everything together. Add water little by little till you get the consistency of thickness/thinness you want. It is always semi thick. Potatoes basically absorb water.
Taste it and see if it needs adjustment, if your tomatoes are not sour enough, add lemon juice.
Add food color if you want.
Let it cook on sim flame for about 7-8 minutes. Keep stirring in between and add water as you like. Add another tbsp of butter :)
Garnish it with Cilantro and switch off the gas.
How to fry the Pav just before serving:
Cut the Pav in the centre and semi open it.
On a frying pan, add butter, as it sizzles add bhaji, cilantro and place the pav face down and cook for few sec. Drizzle some butter or oil on top and serve hot.
How to Serve Pav Bhaji:
Serve good amount of bhaji in a compartmented plate, chopped onion, cilantro and lemon slices on one end, you can add onions, sev and butter on top of the hot bhaji, and masala fresh pav on the other side.
Trust me, eating is much easier than writing how to serve Pav Bhaji :):) (joke)
Due to the increased interest in foods that are low-carb or low-glycemic index, the potato has unjustly earned a bad reputation. Potatoes consumed in simple roasted, grilled, boiled, steamed manner with little or no oil/butter is very healthy and nutritious for health.
It is loaded with calcium, phosphorus, zinc, magnesium, iron that helps in having strong bones.
It has vitamin B6 which supports heart health.
Choline is a very important and versatile nutrient in potatoes that helps with sleep, muscle movement, learning and memory.
There are various versions of stuffed brinjal recipes. This is one of the easiest and yummiest recipe you can find anywhere which is based out of Maharashtra. I grew up eating stuffed brinjal cooked in coconut base curry, but that recipe some other time. I simply love this sabjiyon ka raja (king of vegetables) Baingan/Brinjal/Eggplant in any form, be it fried, baked, fire roasted, grilled, in lasagna, rice or in curry. This spicy preparation will send you drooling, guaranteed!
Ingredients:
8 medium sized brinjals
1 big onion chopped
1 tbsp chilli powder
1 tsp garam masala
2 pod garlic chopped (optional)
1 inch ginger chopped (optional)
1/2 cup peanuts roasted and powdered
1/2 tsp jaggery (or brown sugar)
salt as per taste
1/2 tsp tamarind pulp
1 tsp mustard seeds
10 curry leaves (optional)
2-3 tbsp oil
cilantro for garnish
2 cups water (or more)
Preparation:
Slit the brinjals in 4 parts keeping the stalk intact. Soak it in salt and tamarind water for 30 minutes.
In the meantime make a mixture of chopped onions, peanut powder, chilly powder, garam masala, ginger garlic, salt.
Drain the water from brinjals and stuff it with this onion mixture. Keep the remaining onion mixture aside.
In a wide non-stick pan, heat oil, add mustard seeds, once it splutters add curry leaves and the remaining onion mixture and saute it for few minutes.
Now slowly add the stuffed brinjal and let it slightly roast on all sides, for a couple of minutes on each side.
Now add 1 cup water and close the lid, let it cook for 8-10 minutes on low-med heat. Add jaggery and tamarind pulp. Now very gently turn brinjals over and let it cook till done. Last few minutes cook uncovered. Curry thickens, adjust water and spices accordingly. Garnish with cilantro and serve hot with bhakri, roti or paratha. It's finger licking good!
njoY!! happY cookinG!! Health Benefits: King of vegetables, better provide some royal benefits :) It helps in iron production in our body, keeps chronic diseases at bay, helps quit smoking(who knew?), has good amount of vitamin C and is effective as antiviral and antibacterial source, helps to have healthy strong hair, keeps the skin soft and supple, prevents skin cancer etc. Research on eggplant has focused on an anthocyanin phytonutrient found in eggplant skin called nasunin. Nasunin is a potent antioxidant that has been shown to protect cell membranes from damage.
Flattened rice, commonly known as poha, is rice which is flattened into flat, light, dry flakes originating from the Indian subcontinent. These flakes of rice swell when added to liquid, whether hot or cold. The thickness of the flakes varies between almost translucently thin to thick Poha and used in varieties of Indian dishes. It is called by different names in different regions, such as Avalakki (ಅವಲಕ್ಕಿ) in Kannada, Atukulu in Telugu, Aval in Tamil & Malayalam, Poha in Hindi.
Avalakki Rasayana/Sihi Avalakki/Sweet Poha is a famous dish from Karnataka, usually prepared during festivals to offer as a Prashad to Lord during Tulasi festival or Krishna Janmashtami. Poha/Aval is Lord Krishna’s favorite food, so avalakki kayi bella is prepared for his offerings. Avalakki Rasayana is a very simple dish, involves no cooking, so could be a great energy dish for ones who are fasting for festivals.
Red Poha vs White Poha! How to use RED POHA?
“Red Poha”
Most Indians kickstart their day with Poha for breakfast. So why not try your breakfast with healthy Poha. A healthier variation to the everyday pohais the red poha, which is made from red rice. Moreover, unlike white rice, red rice doesn’t undergo excessive processing, and as such the other bran layer remains intact. Red poha is slightly coarser in texture as compared to white poha. Red poha can be used pretty much the same way as white poha. You need to rinse the poha 2-3 times and soak it in water first, for at least 10 minutes, so that it softens and then use in many dishes such as salads or stir fry with other vegetables and spices or use in cutlets. This rasayana recipe calls for Red Poha, but you could still use white Poha. It is really about making a healthier choice.
I Usually prepare rasayana as a side dish whenever I make avalakki oggarane (which is the spicy version of poha) for breakfast. Great to pack it in a lunch box too. This Rasayana is a mixture of Red Poha, Jaggery, Coconut, Banana, and Cardamom powder. I call this recipe as 5-ingredient Rasayana that could be prepared within 5-mins.
We had a lot of jackfruits this summer and was finding ways to use in recipes. So thought why not dump into sweet Poha dish and trust me, it tasted so good and made an awesome combination with banana and Poha. Make sure to use only ripe Banana and Jackfruit for this recipe. Jackfruit is purely optional, skip if unavailable. Make this simple no-cook yummy rasayana for breakfast or pack it for lunch box.
Red Poha Rasayana | ಬಾಳೆಹಣ್ಣು-ಹಲಸಿನಹಣ್ಣು ಅವಲಕ್ಕಿ ರಸಾಯನ | Festival Recipe | Avalakki Kayi Bella | Sweet Poha/Aval with banana-jackfruit
Avalakki Rasayana is a very simple, tasty no-cook dish, prepared as a prashad for festivals or even everyday breakfast. 5-ingredient Rasayana!! in 5-mins!!
Course Breakfast, Side Dish
Cuisine Indian
Keyword Red Poha, Sweet Poha
Prep Time 5minutes
Cook Time 0minutes
Poha soak time 10minutes
Servings 4
Author KaviRuchi
Ingredients
1cupRed Pohaflattened rice
1Bananafinely chopped
¼cupFresh Coconutgrated
4-5Jackfruitthin strips-Optional
1TbspJaggery Powderadd more/less as per taste
⅛tspCardamom Powderelaichi powder
Instructions
PREPARATION:
Rinse 1 cup thick Red Poha/Flattened Rice 2-3 times and soak in water for 10 mins. Skip Soaking if using thin Poha flakes.
Tear or cup Jackfruit into thin strips and set aside.
Finely chop 1 ripe banana into small pieces and set aside.
METHOD:
Strain the soaked Poha and add in a mixing bowl.
Add 1 Tbsp Jaggery(or more as per taste), chopped Banana, Chopped Jackfruit and grated coconut.
Add a dash of Cardamom Powder and give a good mix.
After a few mins, jaggery melts and blends well with the poha. Add ¼ cup milk if you feel it still dry.
5-ingredient Rasayana is ready in 5-mins! Serve this Rasayana as a side-dish with spicy poha(Avalakki Oggaranfor breakfast.
Healthy & Tasty Sweet Poha is Ready to Relish!!
Video
Notes
Many variations can be made to this dish,
Red Poha can be replaced with white Poha too.
Add more or less of jaggery as per taste. You could also replace with sugar or add half Jaggery and half sugar. You could also add a spoonful of honey.
Jackfruit is optional. Add only if available for the season. Traditional Rasayana is done just with banana.
Roast few finely chopped cashews and almonds in ghee, along with dry grapes and add to Rasayana.
No need Soaking if using thin flakes of Poha. The juice from the sugar/Jaggery and banana is sufficient enough to make it soft.
Eggs ? are a very good source of inexpensive, high-quality protein and are considered to be one of the most nutritious foods in the world. Eggs are such a versatile food, goes well with any vegetable and enhances the taste of any dish with it. If you are bored of normal egg bhurji try it with an add-on veggie to it, for a more healthy and tasty version.
Broccoli Egg Bhurji is nothing but a combination of scrambled eggs and broccoli. Broccoli with egg is an awesome combination, makes a drool-worthy side-dish, filling and protein-rich food, good to go with steamed rice and rasam or chapatis/roti/bread. As broccoli needs less cook time, this side dish can be prepared in mins. This could be a quick breakfast recipe and also a perfect dish for the lunch box.
Broccoli ? is an edible green plant from the cabbage family whose large flowering head and stalk are eaten as a vegetable. Every part of broccoli, the stalk, small leaves, and florets are edible. Usually, broccoli is sautéed, steamed, roasted, or grilled. Broccoli is a healthy addition to your diet whether cooked or raw.
Broccoli is a nutritional powerhouse full of vitamins, minerals, fiber, and antioxidants. We all automatically think of citrus fruits when it comes to vitamin C, but did you know that broccoli provides an excellent source of vitamin C, a nutrient known to support healthy immune response. Broccoli is also a good source of vitamin k and calcium, two vital nutrients for maintaining strong and healthy bones. Broccoli is definitely a nutrient-rich vegetable that may enhance your health in a variety of ways.
Like all vegetables, broccoli has many different varieties. Regular Broccoli has a slightly bitter flavor compared to baby broccoli(Broccolini), which has more mild, with a sweet, earthy taste. And while regular Broccoli can be eaten raw, Broccolini is best when cooked. Today I am using regular Broccoli for making this bhurji.
My kids are not a big fan of broccoli. I somehow wanted to incorporate more broccoli in our diet. Luckily this method worked for me. Kids loved this combination of broccoli ? egg ?and I have no hard time giving broccoli to my kids. They even love it for their lunch box. It a great way to add this nutritious veggie to our diet, by making it more healthy, tasty and delicious. We like this bhurji as simple as in the recipe. But you could add spices like garam masala, crushed garlic, and chili powder to enhance the flavor.
Do give a try. Broccoli Bhurji is Egg-stremely delicious!!!!
HOW TO MAKE BROCCOLI BHURJI STEP BY STEP:
Ingredients for making Broccoli Bhurji…
1.Cut the broccoli florets as small possible, to tiny florets(4 cups) and set aside.
2. Finely chop 1 onion and slit 5-6 green chilis.
3. Heat 1 Tbsp oil in a pan/kadai, add in 1 tsp chana dal and ½ tsp jeera/cumin. Sauté until chana is light brown.
4. Next, add the chopped onion, slit green chili and 1 spring curry leaves. Sauté until onions turn translucent.
5. Add 4 cups broccoli florets and salt as needed, give a stir and add ¼ cup water. Close lid and cook on med-high flame for about 3 mins.
6. Once broccoli is cooked, yet crispy(do not overcook), push broccoli to sides of the pan, break 4 eggs in between and sprinkle salt and pepper.
7. Continuously stir the egg mixture until thickens. Once the egg is almost cooked, mix with the whole broccoli mixture and sauté for a min.
8. Once done, switch off the flame and serve hot with roti/chapathi or as a side dish for steamed rice and rasam.
Healthy & Tasty Broccoli stir-fry is Ready to Relish!!
Broccoli Egg Bhurji is a classic combination of scrambled eggs and broccoli, a simple yet filling side-dish and protein-rich food, good to go with steamed rice and rasam or chapatis/roti/bread. This can be a quick breakfast recipe and also a perfect dish for the lunch box. Egg-stremely delicious!!
Course Side Dish
Cuisine Indian
Keyword broccoli, stir fry
Prep Time 5minutes
Cook Time 5minutes
Servings 4
Author KaviRuchi
Ingredients
4cupsBroccolicut into small florets
4Eggs
1Onionfinely chopped
5-6Green Chilislitted
1Spring Curry Leaves
½tspJeera/Cumin
1tspChana Dal
1TbspOil
Salt & Pepperto taste
Instructions
PREPARATION:
Cut the broccoli florets as small possible, to tiny florets and set aside.
Finely chop 1 onion and slit 5-6 green chilis.
METHOD:
Heat oil in a pan/kadai, add in chana dal and jeera. Sauté until chana is light brown.
Next add the chopped onion, green chili and curry leaves. Sauté until onions turn translucent.
Add broccoli florets and salt, give a stir and add ¼ cup water. Close lid and cook on med-high flame for about 3 mins.
Once broccoli is cooked, yet crispy(do not overcook), push broccoli to sides of the pan, break eggs in between and sprinkle salt and pepper.
Continuously stir the egg mixture until thickens. Once the egg is almost cooked, mix with the whole broccoli mixture and sauté for a min.
Once done, switch off the flame and serve hot with roti/chapathi or as a side dish for steamed rice and rasam.
Healthy & Tasty Broccoli stir-fry is Ready to Relish!!
Notes
Add more or less of the green chilis mentioned in the recipe, according to spice level required.
Broccoli cooks very fast in mins, so do not overcook as it will turn mushy. Tastes best when crunchy with its shape retained.
Broccoli is finely chopped for faster cooking and bhurji is tastier with tiny florets and scrambled eggs.
You could also add spices like garam masala, crushed garlic, and chili powder to enhance the flavor.
Corn Salad ?is a perfect summer dish for picnics or BBQs. A simple, easy to make, deliciously irresistible salad. Its an amazing combination of corn, cucumber, apple, carrot, sprouted moong bean and a special dressing to make it refreshing and flavorful. This combination of fruits-veggies makes one healthy-nutritious side-dish and I bet one cannot resist after one bit. This definitely is a crowd-pleasing salad for parties or potlucks, that would disappear fast!
Corn Salad is packed full of nutritious ingredients. The main ingredient for this salad is SWEET CORN – a grain that is super rich in fiber, vitamins, minerals, and antioxidants. Corn is an excellent addition to a healthy diet.
Should I use fresh or frozen corn for this salad?
Both work great! Use any as per availability for the season.
If using fresh corn cob?, make sure to remove husks and silky threads. Boil in a large pot of water for about 10-12 mins. remove corn kernels from the cob using a knife or corn stripper. Fresh corn is ready to use for salad.
If using frozen corn, add the frozen corn to a microwave-safe bowl and add very little water and microwave for 1-2 mins. Increase the time based on the quantity of corn. Strain water and frozen corn is ready to use for salad.
“Ingredients for Corn Salad”
Next addition is a fruit that keeps the doctor away. Yes, it is APPLE! ? Tastes delicious as a stand-alone snack or works great in salads, pies, smoothies, and salsas, too. Apples rarely disappoint. Finely chop and add to your salad(do not peel). Every part of the apple is edible and nutritious. Wash the apple thoroughly before using, to remove the wax coating. I usually keep the skin on for apple because peeling can remove most of the fruit’s fiber, vitamin C and iron so try to consume this juicy delight with the skin on.
Another addition is CUCUMBERS ?that are low in calories but high in many important vitamins and minerals. The crunchy cucumber is the best summer coolers in this salad, keeps you hydrated and makes the salad so refreshingly good.
You all are aware of how good a CARROT ?is for eye health. It not only adds a distinct taste and bright color to salad and also gives a sweet mild flavor to the salad. Grate and add carrot as needed for your salad.
Not to forget MUNG BEANS in this salad, that are a high source of nutrients, full of protein to help you keep fuller for longer. They have crisp flavor when sprouted and also sprouted grains are claimed to be higher in nutrients and more easily digestible than unsprouted varieties. I always make sprouted grains every week and store in the refrigerator, to use in curries and salads.
If you would like to know how to sprout grains check out HOW TO SPROUT GRAINS. The same procedure works pretty well for mung beans too. Adding sprouted grain to this salad makes it more nutritious and healthy salad.
Dress your salad with good taste!
The key ingredient is the simple, flavorful dressing with olive oil, lime juice salt, and pepper. This salad is a pack of flavors (salt, sour, sweet, hot) to soothe your taste buds.
Make this tasty and healthy corn salad today. Eat Better! Feel Better!!
Corn Apple Salad | ಆರೋಗ್ಯಪೂರ್ಣ ಕಾರ್ನ್ ಸಲಾಡ್ | Sprouted Moong and Corn Salad | Healthy Summer Salad
A healthy food, for a wealthy mood! Corn Salad is a perfect summer dish, simple, easy to make and deliciously irresistible side-dish.
Course Salad
Keyword corn salad
Prep Time 10minutes
Cook Time 10minutes
Servings 5
Author KaviRuchi
Ingredients
For Salad:
2cupsSweet Cornfrozen/fresh
1Applefinely chopped
1Cucumberfinely chopped
1smallCarrotgrated
1cupSprouted Mung Beans
¼cupPomegranate Arils
For Dressing:
1TbspExtra-Virgin Olive oil
Juice of 1 Lime/Lemon
½tspSalt
¼tspBlack Pepper
Instructions
PREPARATION:
If using fresh corn, boil 2 corn cobs for 10-12 mins and remove kernels from cob; set aside.
If using frozen corn, Microwave the 2 cups corn in little water, for about 1-2 mins, strain water; set aside.
Finely chop 1 apple and 1 cucumber. Grate a carrot and set aside.
To prepare the dressing, take a small bowl and whisk together 1 Tbsp extra virgin olive oil, juice of 1 lime, ½ tsp salt, and ¼ tsp pepper.
METHOD:
In a large bowl add in 2 cups sweet corn, 1 cup finely chopped apple, 1 cup finely chopped cucumber, 1 cup sprouted mung beans, 1 cup grated carrot.
Pour in the prepared dressing on top and toss all the ingredients to coat well.
Garnish with Pomegranate arils and serve.
The Delicious Corn Salad is Ready to Relish!!
Video
Notes
Any combination works well for this salad. Skip any veggie or try your own combination of veggies and fruits.
This recipe calls for sprouted mung beans which have to be prepared ahead of time. You could still skip it, if unavailable at the time of making this salad. Salad will have added on health benefits with sprouted grains, but still tastes delicious with or without it.
This Salad can be made up to a day ahead of time and stored in the refrigerator, helping the flavors to incorporate well and serve chilled.
Tried this Recipe?
I’d love to hear from you!Please share your food photo with hashtag #kaviruchi on Facebook or Instagram so I can see it and others can enjoy it too!
Staying in Seattle you get used to graying weather in winter months every single day. I mean literally every day. And this gloomy weather makes me crave more spicy foods and this dish tops the quick-cooking foods. Alugadda ellipaya Karam or Garlicky Potato fry is a quick and easy stir-fry served as a side dish.
This Telangana Style Potato Roast is a gluten-free, vegan, spicy side dish. It gets ready in under 15 minutes and makes a perfect winter dish to cook on busy weekdays. The reason why I say it’s perfect for winters is the generous usage of garlic, as garlic is considered warming food. Warming foods produce more heat in your body and keep your body warm enough to endure the chilly winter. Hence we include warming foods like sesame seeds, garlic, ginger, chilies, etc in our diet.
What makes this Alugadda ellipaya karam special ?
Telangana regional cuisine is all about spice and garlic, and this dish just depicts the true flavors of this beautiful cuisine. Alugadda is a potato in the Telangana Telugu dialect and ellipaya karam refers to garlic spice. We eat lots of garlic and we make this special garlic spice Ellipaya karam every winter to have it in our daily meals. Some people call this dish Alugadda fry, vellulli alugadda vepudu or Alugadda vepudu. You can also call it Garlicky Potato Roast, Potato Stir-Fry, Aloo Fry, or crispy Indian potatoes.
In this recipe, potatoes are tossed in basic Indian spices and quick-roasted in the pan on high flame till they turn golden and crispy! Oh Yum! writing this I’m salivating already. There was a time in my life, I used to carry only potato fry and rice in my lunchbox every single day during my schooling days. That’s how much I love this dish and I promise once you try this, you’re going to love it. Also, contrary to many beliefs, potatoes are a source of good carbs when consumed in moderation! So do include this Alugadda ellipaya karam in your weekly menu!
Checkout more vegetarian sides and curries from my blog
Alugadda ellipaya karam is a quick and easy potato stir fry, loaded with garlic and Indian spices making a best side for Indian meals.
Course Side Dish
Cuisine Telangana, Telugu
Keyword Side dish, vegan, Vegetarian
Prep Time 8 minutesminutes
Cook Time 12 minutesminutes
Servings 3Servings
Author Shravani Abhishek
Ingredients
4noPotatoesmedium size
2tspRed chili powder
Saltto taste
½tspTurmeric powder
8clovesGarlicsmall size, coarsely crushed with cumin seeds
½tspMustard seeds
½ + ½tspCumin seeds
1sprigCurry leaves
2tbspDesiccated coconut
Instructions
Let's prep the potatoes
Wash and peel the potatoes. Chop the potatoes into medium size cubes.
Add the chopped potatoes to a bowl of water to get rid of excess starch.
Peel the garlic cloves and coarsely crush them with ½ tsp cumin seeds in a mortar & pestle.
Let's start making Alugadda ellipaya karam
Heat a well-seasoned cast-iron or nonstick skillet, add oil and once it's hot add mustard seeds, cumin seeds and let them crackle.
Add curry leaves and let them crisp up. Now add the chopped potatoes and on high flame toss it well.
Sprinkle turmeric powder and salt. Toss the potatoes to the coat the spices and cook on high flame for 3 mor min.
Add the coarsely crushed garlic cloves with cumin seeds and toss the potatoes.
Keep the flame high and toss it regularly and roast it till the potatoes start crisping up and turning nice and golden brown.
Now add in red chili powder and give it a good toss.
Finally add in desiccated coconut / grated dry coconut and coat the potatoes.
Turn off the heat and serve hot alugadda ellipaya karam with rice and dal/rasam of your choice.
Notes
You can add ground coriander/dhaniya powder and garam masala for additional flavor.
If you’ve tried this recipe, please share your valuable feedback in the comments below. Also, you can Tag your photo and share it with #mycurryveda on Instagram @mycurryveda or on Facebook. Also follow @taste.of.telangana on Instagram for more traditional recipes, culture, and stories.
SALLA MIRAPAKAYALU, also known as buttermilk/curd chilies is one of the most loved pantry items from South Indian Kitchens. Now buttermilk chilies don’t refer to some kind of chilies, but it’s a preservation process. Mildly spicy chilies are slit and soaked in buttermilk, and then sun-dried during the day. This process is repeated for about a week until the chilies absorb as much buttermilk cure as possible and the chilies are dried to a crisp by the sun.
During this preservation process, the chilies develop a tangy, yogurty, salty, and slightly cheesy flavor. These flavor packed Buttermilk chilies make a great accompaniment with mild dishes like Curd rice, Dal rice, Sambar rice, etc. But hey your options aren’t just limited to that, you can add these buttermilk chilies to the tempering. Imagine the ton of flavor it would impart in tempering of chutneys or raita and Dal tadka.
The sign of a perfectly made Salla mirapakaya is that when you break a fried one it should crumble easily. Less spicy, little salty, and tangy is the perfect definition for this Salla mirapakayalu. I know that the process seems a little intimidating for beginners, but trust me this is one of the easiest processes you could ever make.
A tradition of making sun-dried vegetables
When Summer is here, then begins the tradition of making of Wadiyalu/Papads/fryums. And apart from that we also Sun-dry vegetables, fruits, seeds which have been in our culinary tradition for ages. When there is an excess of produce, our ancestors came up with ways to utilize them smartly. So that they come in handy on a rainy day.
They are equally healthy as the process which they undergo like pickling, drying, marinating, and curing which makes it even more delicious. The tiring scenarios of the womenfolk in the scorching Sun bring out the best goodies in their pantry. These sun-dried goodies appear out of nowhere during mealtime.
More avatars of these SALLA MIRAPAKAYALU / Buttermilk chilies
These yogurt/curd/buttermilk-soaked chilies are inseparable from the menu of South Indian Cuisine mainly because of their spicy taste. Now call these buttermilk chilies or we Telugu people call it Oora Mirapakayalu, majjiga mirapakayalu, uppu mirapakayalu. Mor milagai in Tamil, Sandige menasu in Kannada, Dahi Mirchi in Hindi, Dahi ke mirchiyaan in Dakhani, Mahi mircha in Chhattisgarh region and Takla mirsang in Konkan region. The beauty of diverse cuisines across India, one dish with many names.
With diverse cuisines across India, these buttermilk chilies come in various flavors across the country. Some stuff the chilies with spices like carom seeds, fenugreek powder, etc. And they add another layer of flavor profile to these chilies.
Checkout more traditional Indian recipes from my blog.
A delicious crisp chili preserve marinated in sour curd for few days and sun dried to crisp.
Course condiments, Papads
Cuisine Telugu
Keyword Papads, Sun-dried
Author Shravani Abhishek
Ingredients
250gmsGreen chiliesMildly spicy ones
2cupsSour curd
4tspSalt
1cupWater
Instructions
Wash and slit the green chillies and keep it aside.
250 gms Green chilies
Pour the sour curd in a wide container. Add salt, and water and whisk it.
2 cups Sour curd, 4 tsp Salt, 1 cup Water
Now add in slit green chilies to the buttermilk mixture. Cover the container and let it sit for 2-3 days.Note : Just give a shake and stir once a day.
On the fourth day, strain the buttermilk from chillies using a slotted spoon, place them in a plate and dry in the sun.
At night put back all the green chillies in the reserved buttermilk and cover them.
And then repeat the above two steps for next two days. Later discard the buttermilk mixture.
Later dry the chillies in the sun for 7 days.
These well dried chillies can be stored in an airtight container and can be deep fried before eating with rice.
Frying the SALLA MIRAPAKAYALU
Heat oil in a pan, add the sundried salla mirapakayalu/buttermilk chilies to the oil.
Fry for 10 secs and place them on a paper towel.
Serve the fried salla mirapakayalu/buttermilk chilies with curd rice or dal rice. You can add the chilies to tadka/tempering too.
Notes
The salt in the buttermilk should be on heavy side, as that's what helps the chilies in preservation.
You can place these buttermilk chilies in a ziploc and place it in freezer to keep them fresh for longer time.
If you’ve tried this recipe, please share your valuable feedback in the comments below. Also you can Tag your photo and share it with #mycurryveda on Instagram @mycurryveda or on Facebook .
Pumpkin & potato are tempered with nigella seeds and slow-cooked in mustard oil for a dish that heroes the pumpkin’s sweetness. Calling all home cooks looking for quick and healthy weekday/weeknight meal ideas – add this pumpkin & potato in mustard oil dish to your repertoire! It’s the kind that comes together in a jiffy, requires just one spice (coz salt and…
Who doesn’t love the potato salad served as a side at home or in restaurants? We all tend to have huge helpings at the eat as much as you like buffets!! However, a lot Read More ...
Kumbakonam Kadappa is a traditional recipe from the region of Tanjore. It is a flavourful and delicious side dish that goes well with idli, dosa, poori, and chapati. Kadappa is mainly made of moong dal and potato as the base ingredient.
In most South Indian restaurants, breakfast is served with sambar, chutney, and podi as the accompaniment. But in Kumbakonam, in most restaurants and hotels, breakfast is served with this kadappa. The preparation of this kadappa is precisely like the potato kurma we prepare, with the added flavor of moong dal.
If you have boiled moong dal and potato, you can make this recipe in just 15 mins. Kadappa is neither sambar nor kurma. It is a combination of both, as it uses both dal and ground coconut paste. If you want this to be served with idli and dosa, keep the kadappa watery consistency. If you want this to be served with poori or chapati, the gravy should be thick. Now let us see how to prepare this recipe.
Enjoy the video of Kumbakonam Kadappa. Subscribe for more videos.
Kumbakonam Kadappa Recipe | Idli Dosa Poori Chapati Side Dish
Kumbakonam kadappa is a delicious side dish for breakfast.
Dry roast moong dal in a pan until it turns aromatic and golden brown. Wash it thoroughly, transfer it to a pressure cooker, and add enough water. Along with this, add a medium size potato and pressure cook it for three whistles.
Once done, mash the moong dal and set it aside. Mash the potato into chunks. Please do not make it into a paste. Set it aside.
Add all the ingredients under "To grind" in a mixer. Add water and grind to a smooth paste.
Heat a pan and add oil. Once the oil gets heated, add cinnamon sticks, cloves, and fennel seeds and let it crackle.
Now add onion and curry leaves. Saute until the onion turns translucent. Then add tomatoes and a little salt. Saute until tomatoes turn mushy.
Now add turmeric powder and saute for a min. Add ground coconut paste, adjust the water consistency, and add mashed moong dal and salt. Close the lid and cook for 10-15 mins.
Then mash and add the potatoes. Keep the potatoes a little bit chunky. Please do not make it to a smooth paste. Now cook the kurma for another 5 mins.
For idli and dosa, keep kadappa slightly watery. For poori and chapathi, keep kadappa thick consistency. Once done, garnish with coriander leaves. Serve hot with idli or dosa.
Recipe Notes
Use only the specified amount of masala while grinding coconut, or it will overpower the taste of kadappa.
We use only green chilies in this kadappa. So increase or decrease green chilies according to your taste.
This kadappa goes well with idli, dosa, poori, and chapathi.
Delicious Kumbakonam kadappa is ready to relish.
If you found this post useful, I would love it if you pin it or share it with your Facebook fans, Twitter followers, or Google+ circles today. All it takes is a simple click on the “pin it,” “like,” “share,” “tweet,” or Google+ buttons below the post. It will keep me motivated. Thank you!
Pesto pasta with homemade basil pesto could be the best thing to make this summer! Sometimes your heart craves for simple meals and this pesto pasta is the best thing you can offer! If I have to point out one best thing I learnt thanks to my food blogging then it would be undisputedly basil […]


 I’d love to hear from you! Please share your food photo with hashtag #kaviruchi on


