These decadently delicious chocolate lava cookies use my soft, chewy, almond flour cookie dough and a flowy, chocolate ganache filling that oozes out when you break them in half! (gluten-free and soy-free with nut-free options)
It’s cookie season, and I wanted to make a decadent, chocolatey cookie. And what better idea than to convert molten lava cake into cookie form!
My motto is that baking should be super easy and flexible, so that even if you make a few measuring errors, things still turn out great. Nobody has time to whip up butter and sugar and all that, so I use my trusty almond flour cookie dough, which works every time.
To make this simple dough, you just add all the dry ingredients to a bowl, mix really well, add some melted coconut oil and maple syrup, mix again, and that’s it! You have a dough!
For this recipe, we’ll add cocoa powder to make a chocolate cookie dough. Then, we make a molten chocolate “lava bomb,” which is a melted chocolate ganache that goes inside the cookie. As the cookie bakes, it spreads and traps the chocolate ganache inside. When you break it open, it’s oozy, melty, and so delicious.
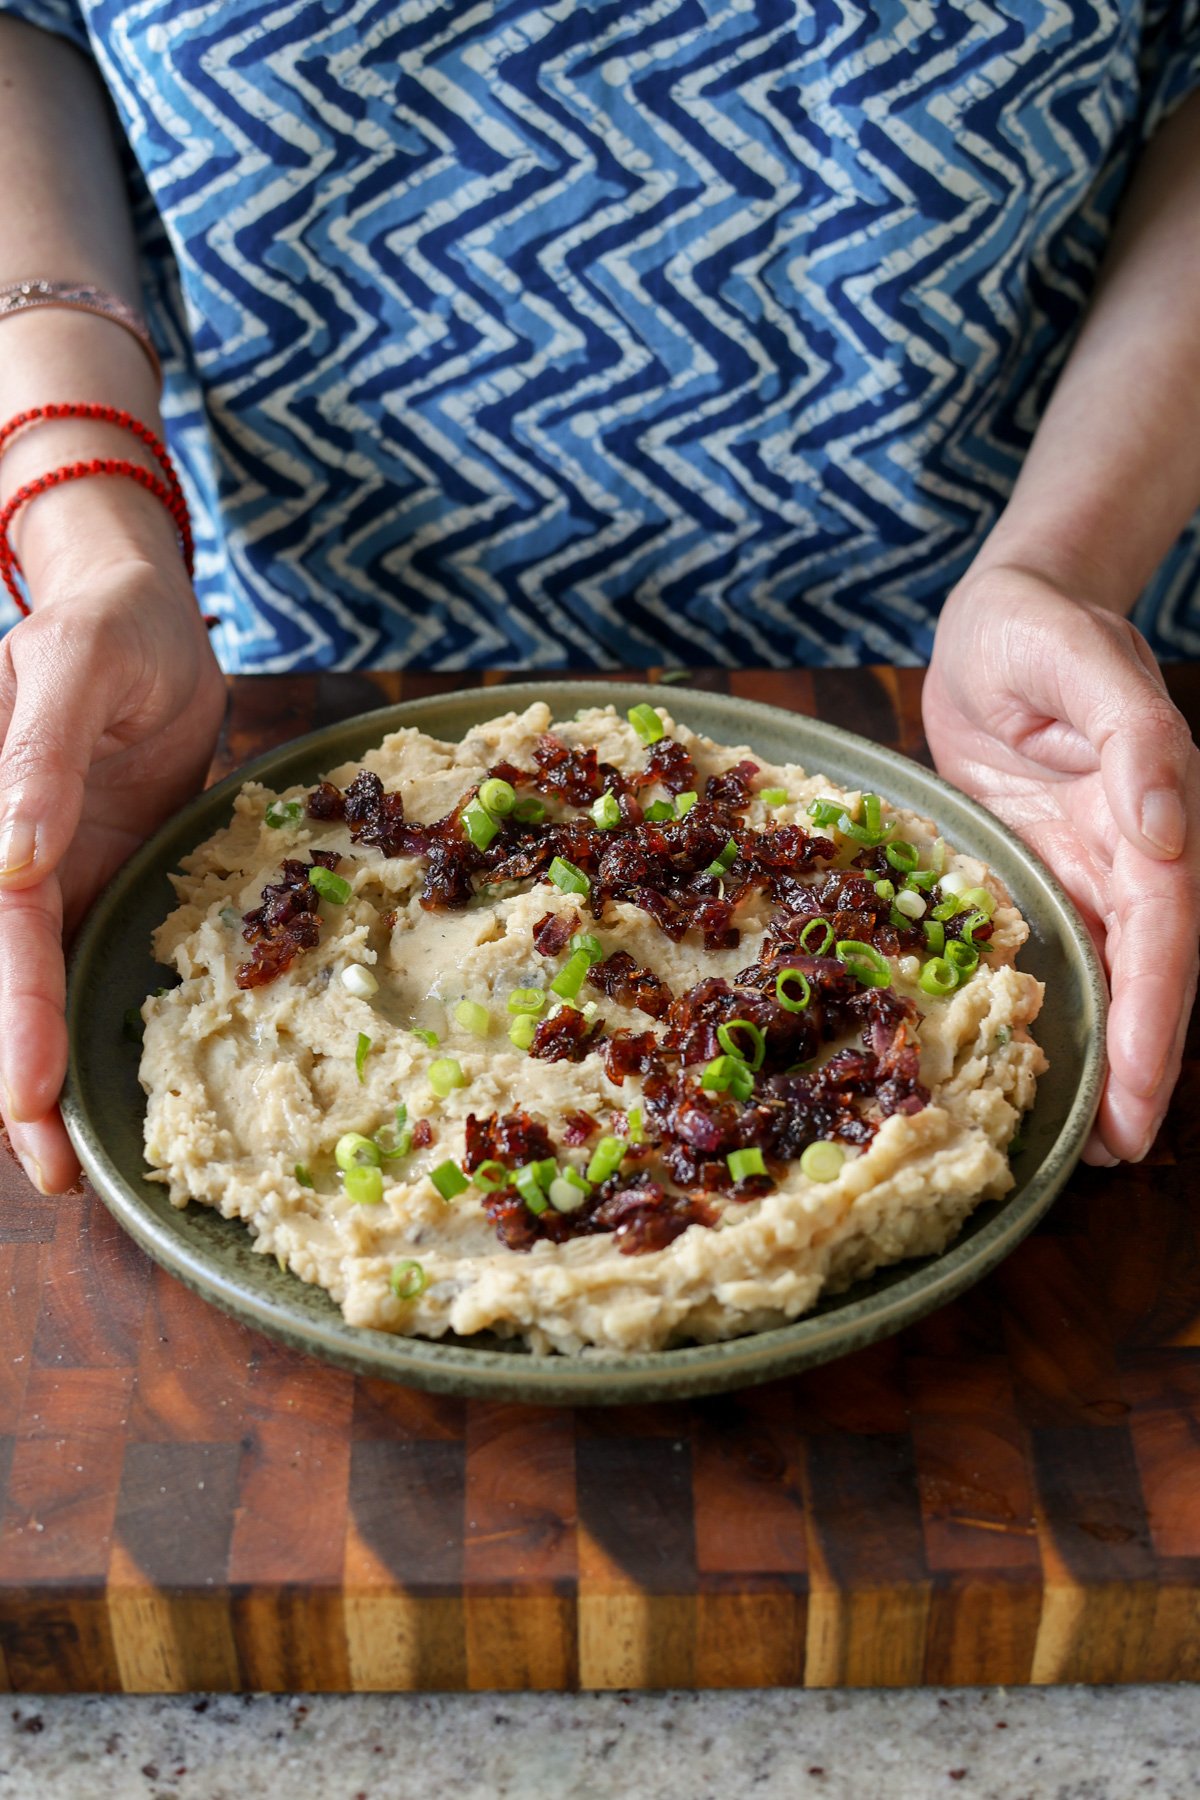
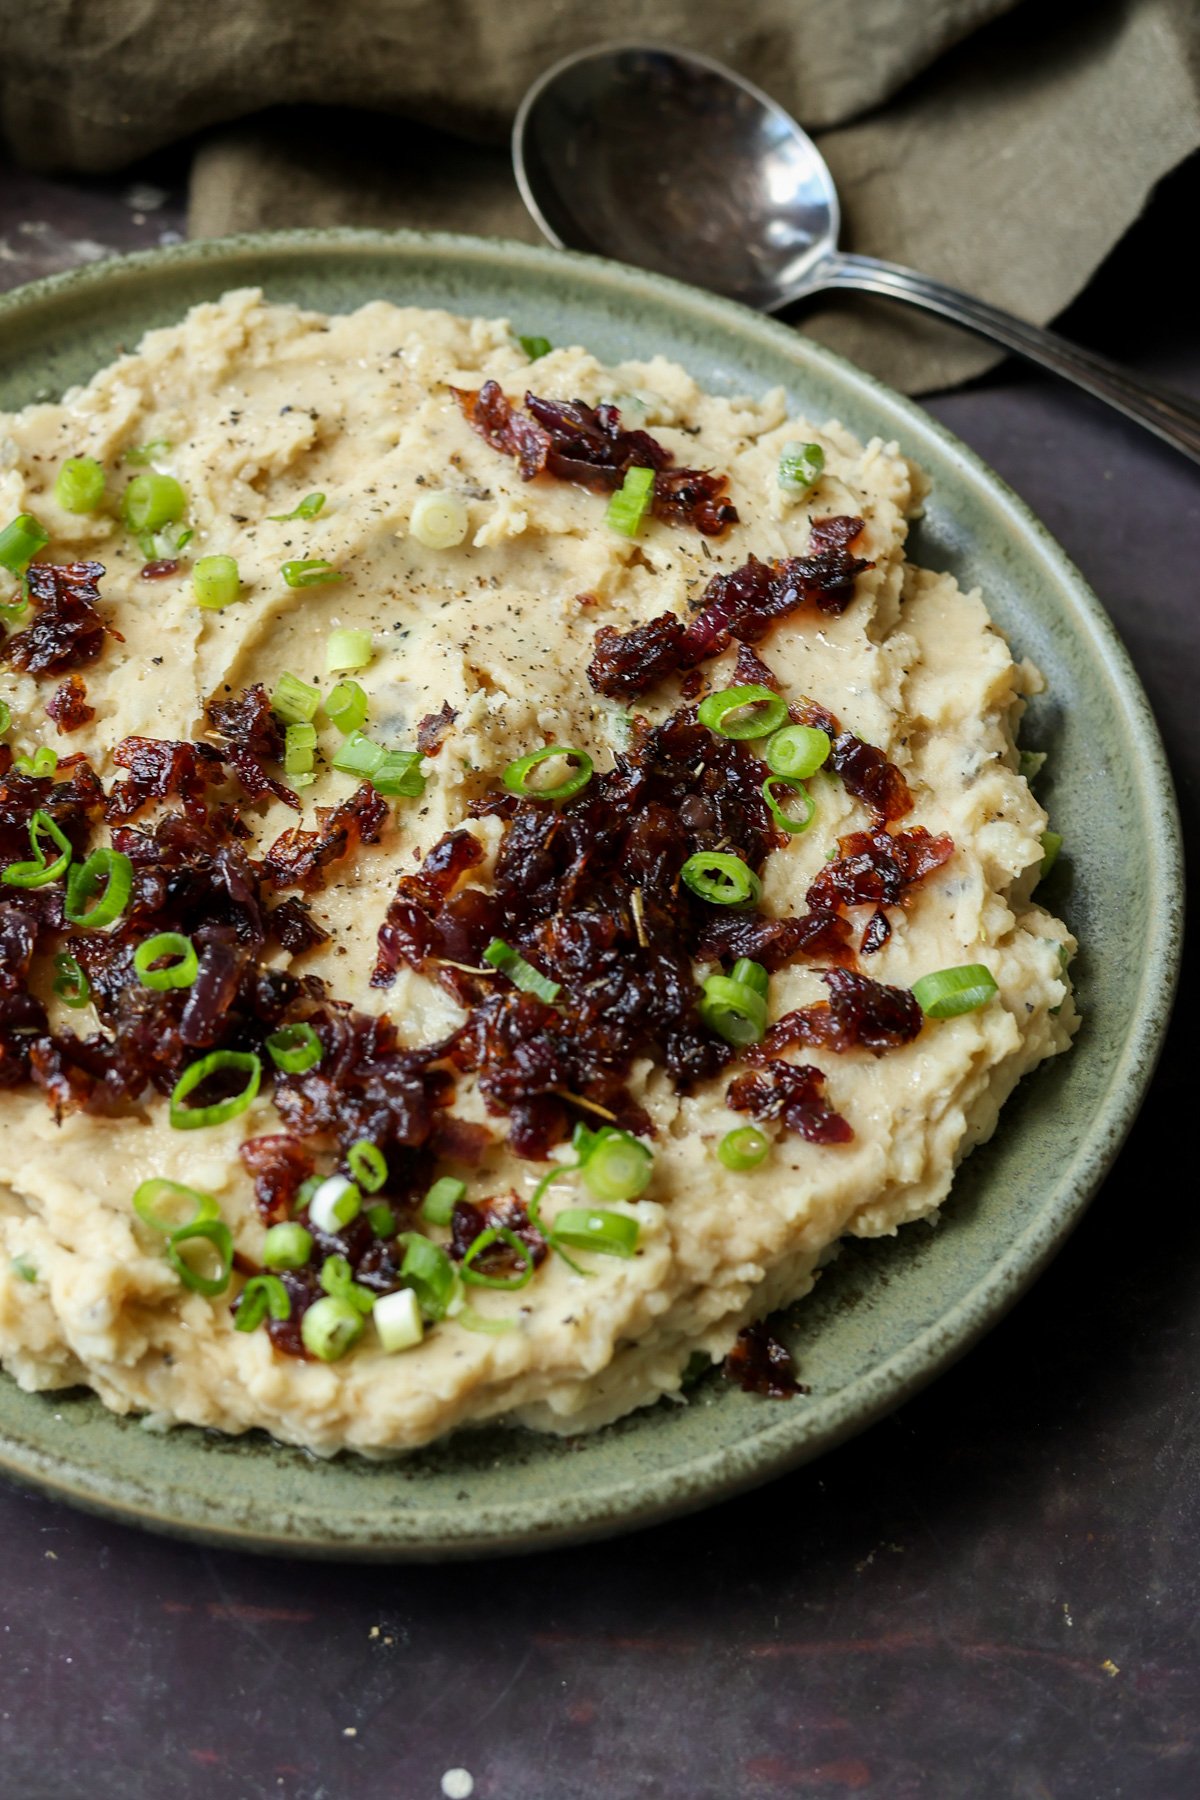
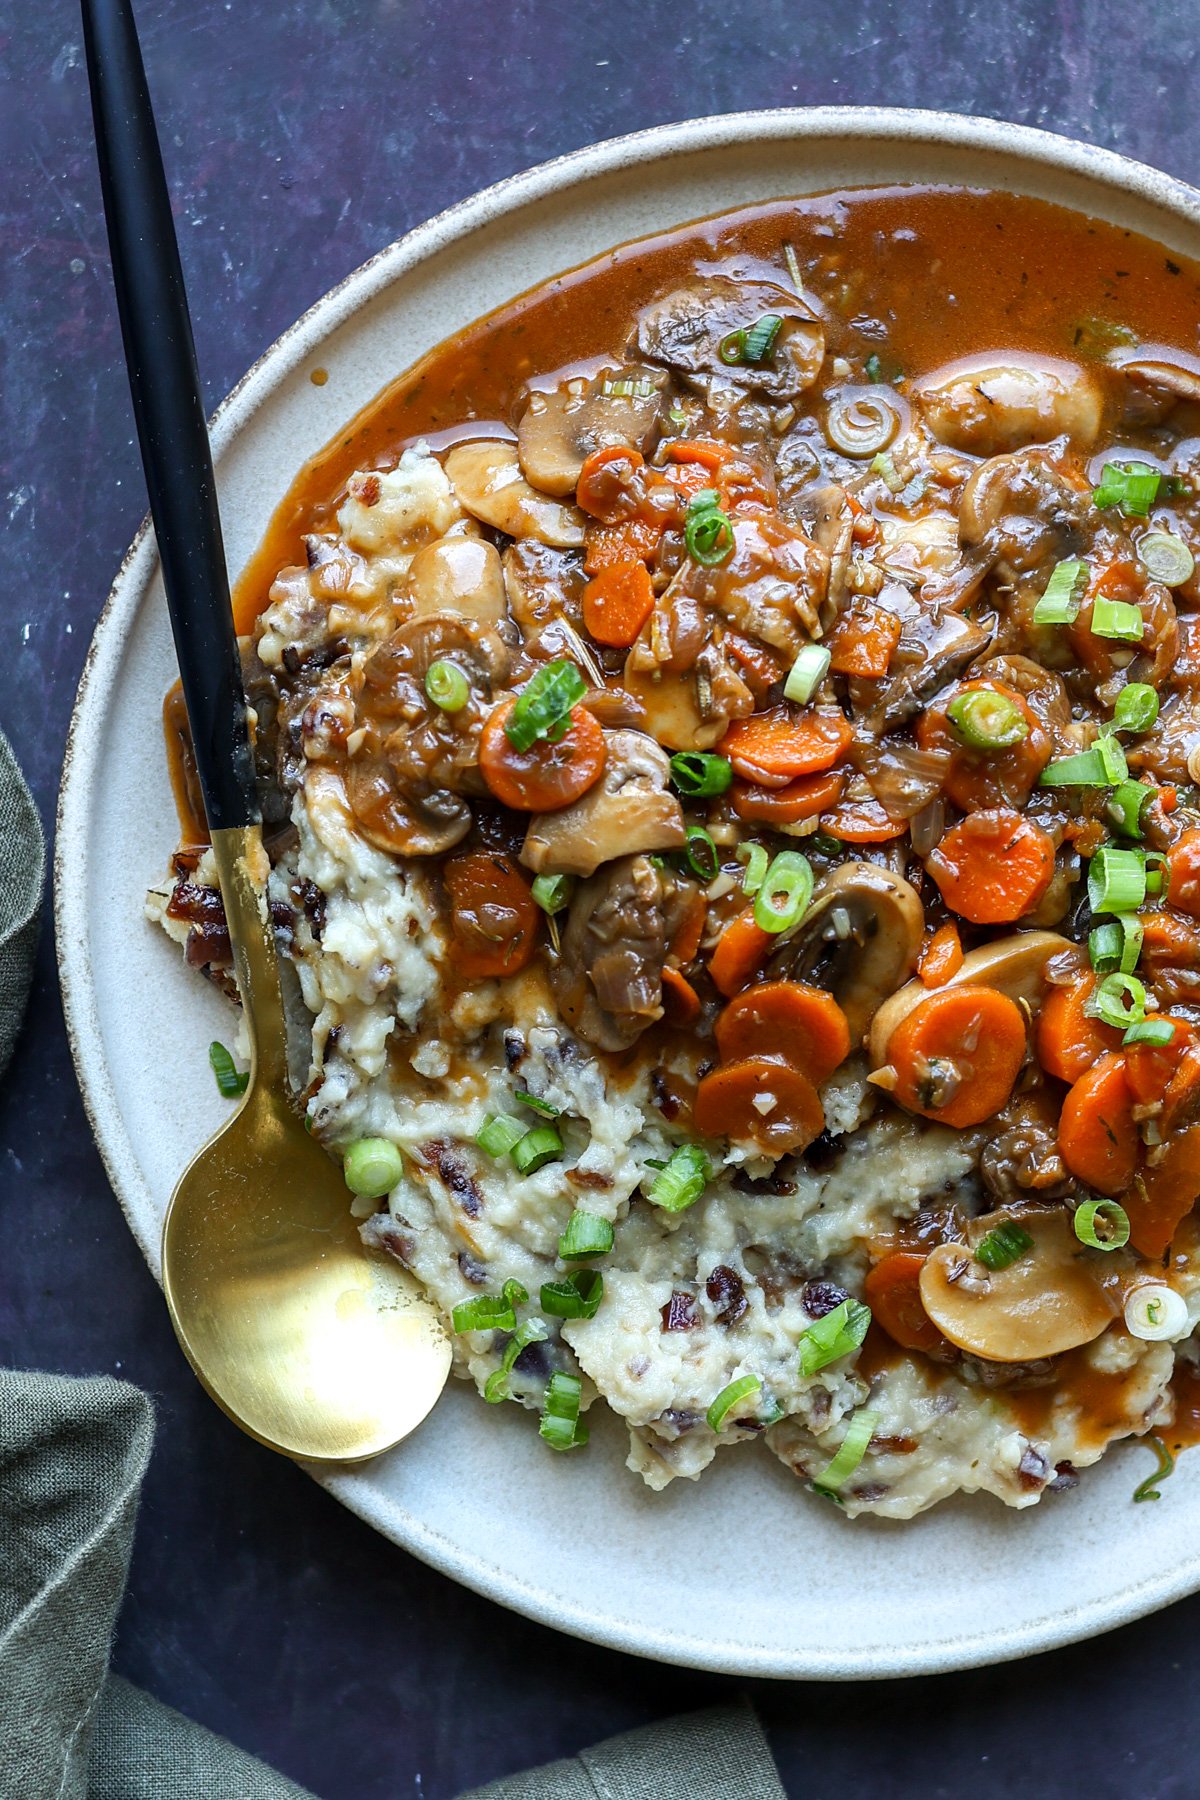
Creamy, rich, and deeply savory, these mashed potatoes get a flavor upgrade with caramelized onions and a secret boost of plant-based protein from pureed white beans. The result is velvety, buttery comfort in every bite. A side that’s perfect for holidays or weeknights alike. (Gluten-free, nut-free, with a soy-free option.)
Everyone loves potatoes in every form, especially mashed potatoes around the holiday season. They’re a fixture at every meal, and we’re going to level them up times two.
This recipe levels up the flavor with caramelized onions, garlic, and herbs that add an amazing flavor to these mashed potatoes. And we’re going to add some pureed white beans for extra protein and heartiness.
You’ll get protein from the beans, nutritional yeast, and non-dairy milk. You can add even more protein by serving it with crispy lentils or tofu bacon bits.
No matter how you serve caramelized onion mashed potatoes they’re rich, hearty, and perfect for any holiday table or cozy dinner. Served here with my mushroom bourguignon.
Why You’ll Love Caramelized Onion Mashed Potatoes
creamy mashed potatoes
savory caramelized onion topping
sneaky protein
delicious holiday side dish
naturally gluten-free and nut-free with easy soy-free option
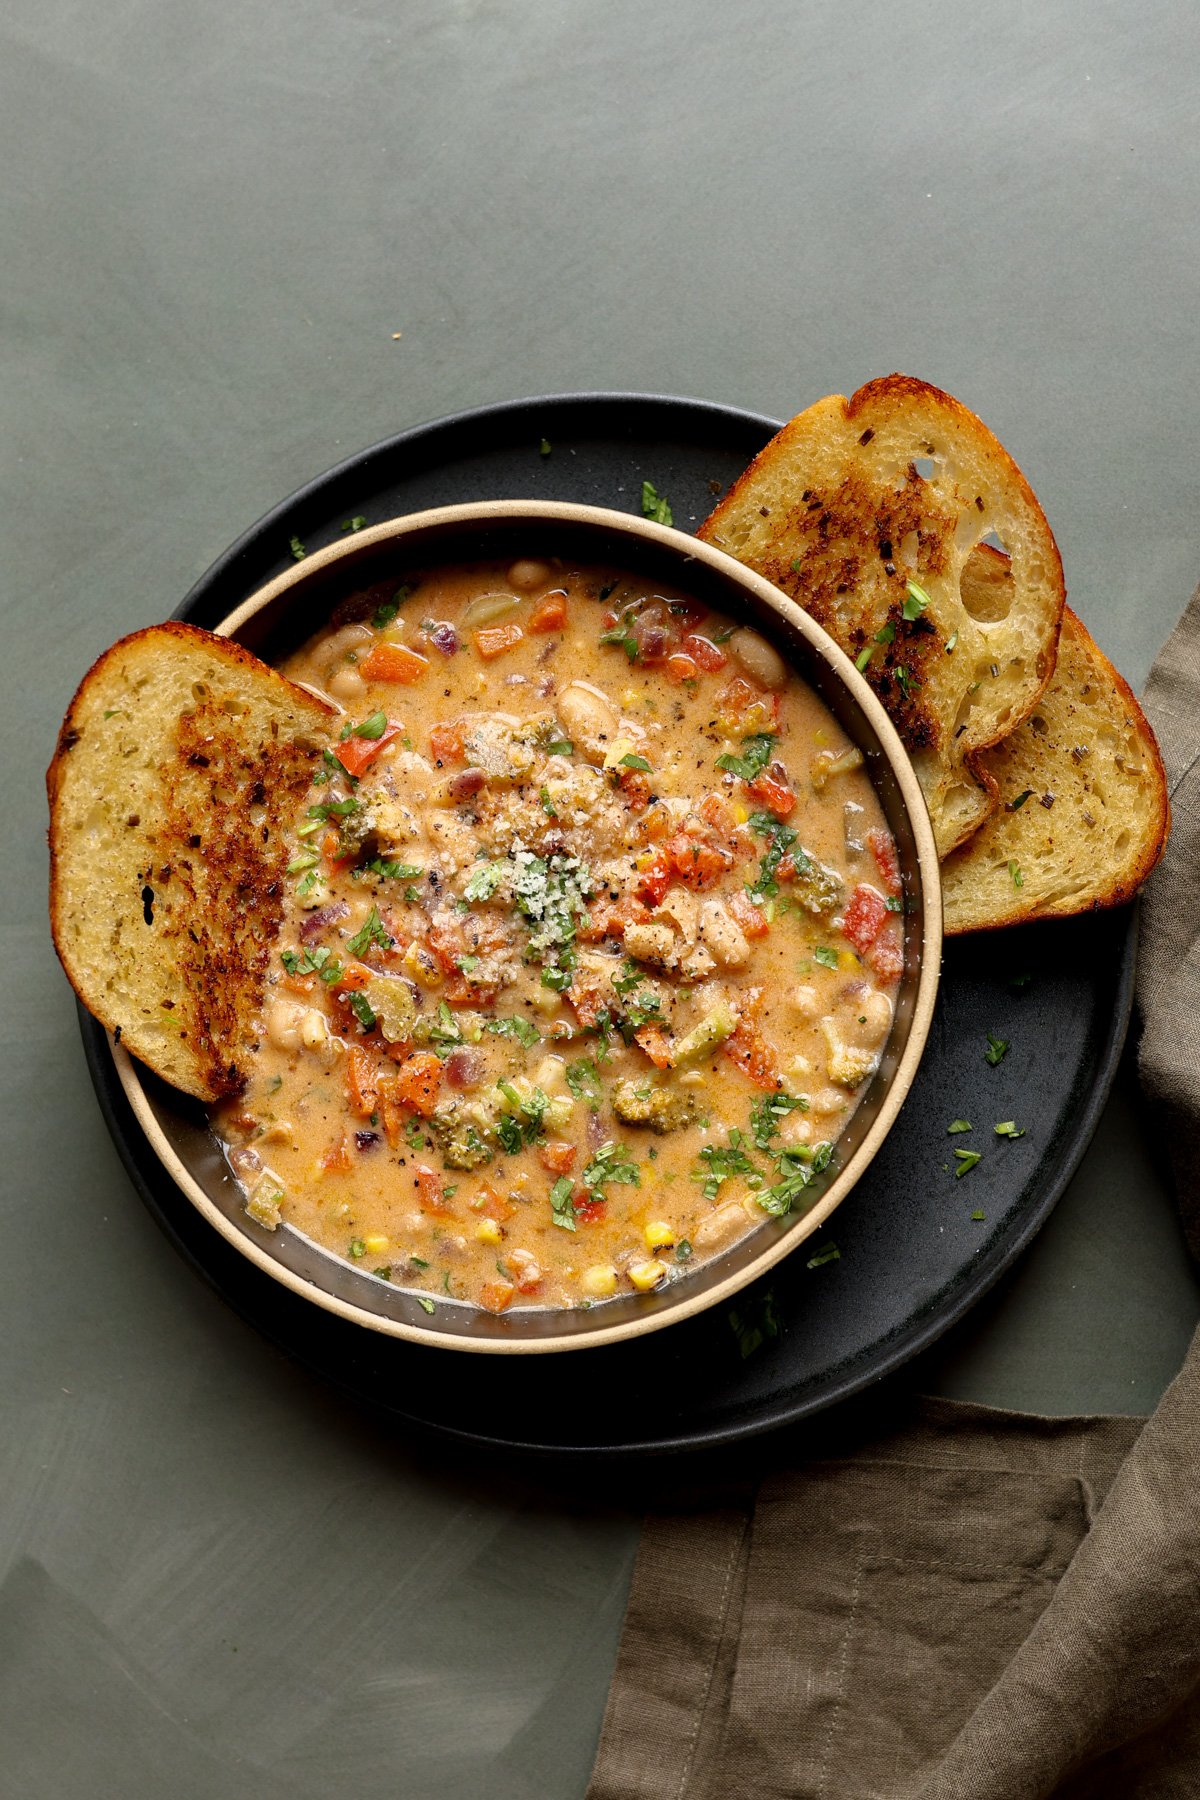
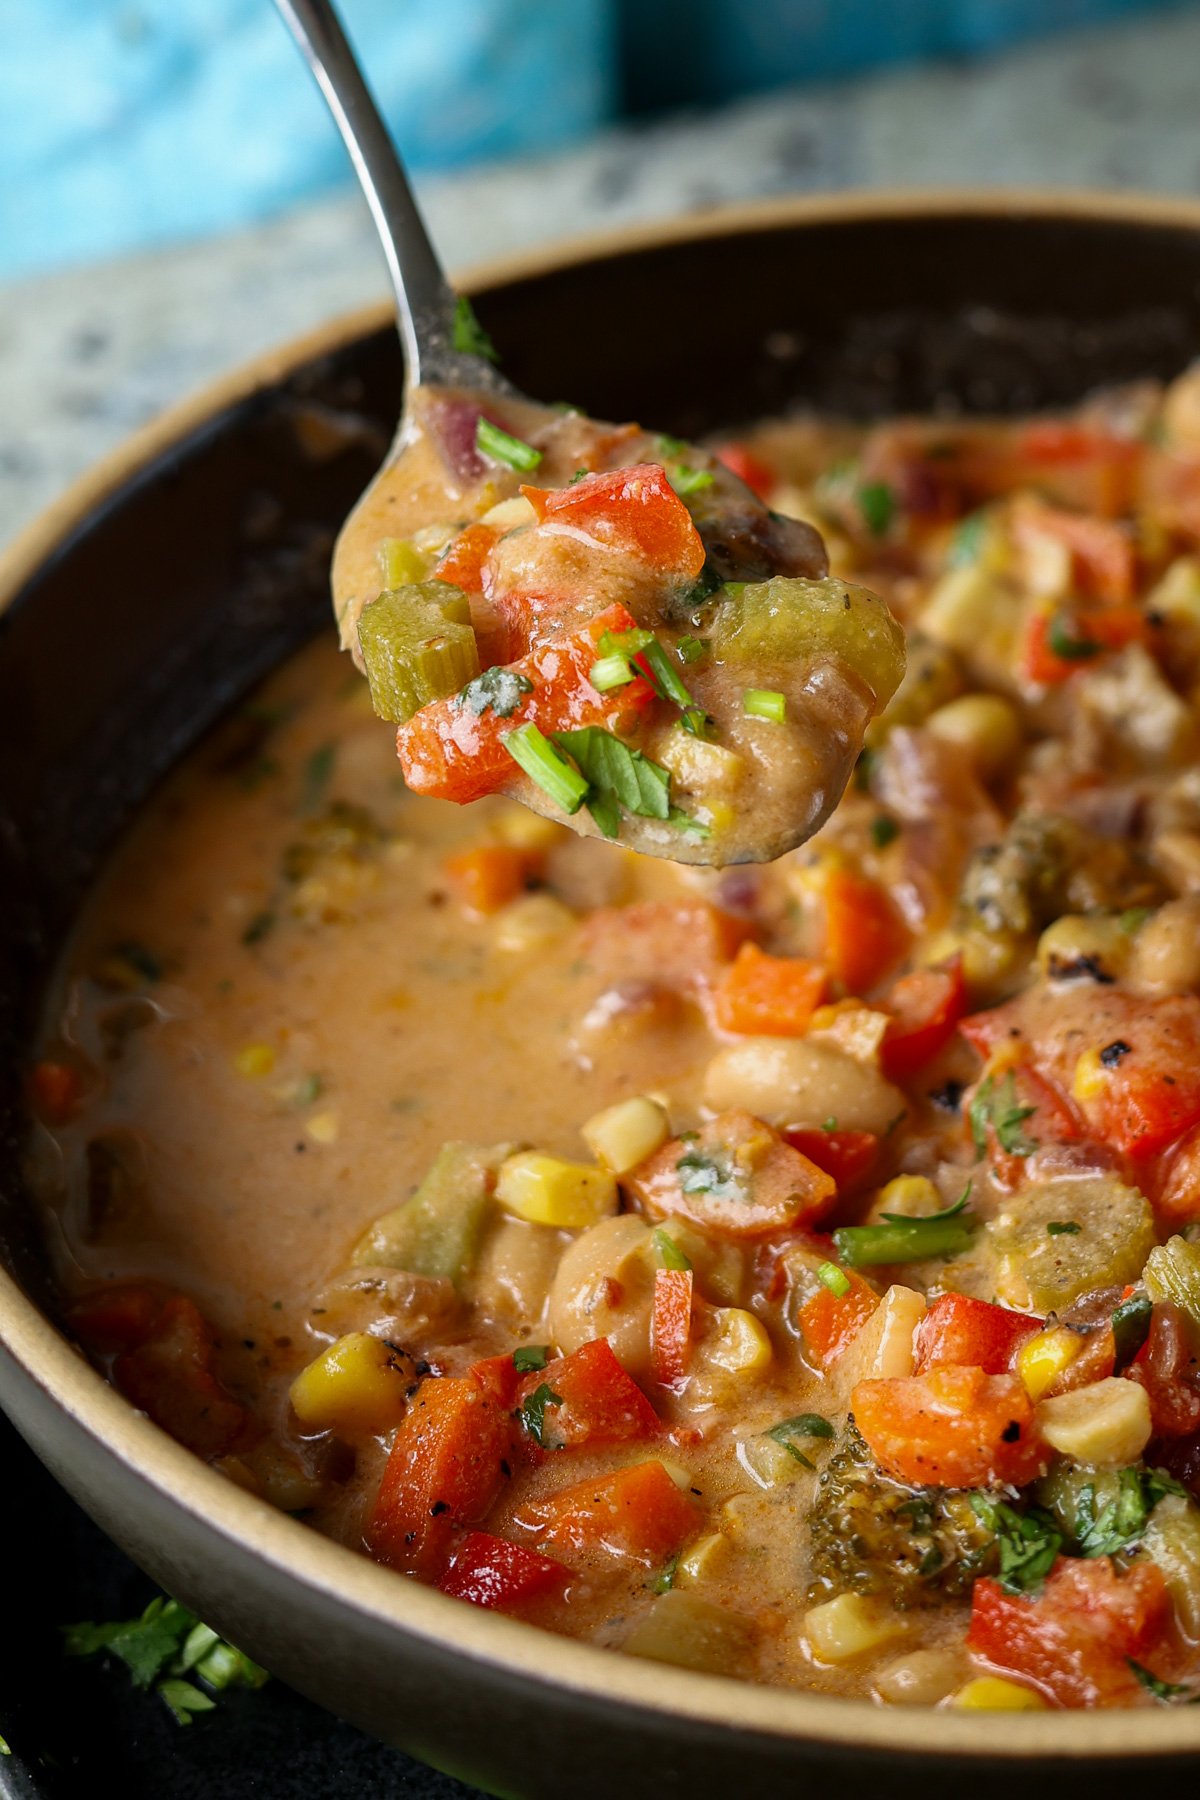
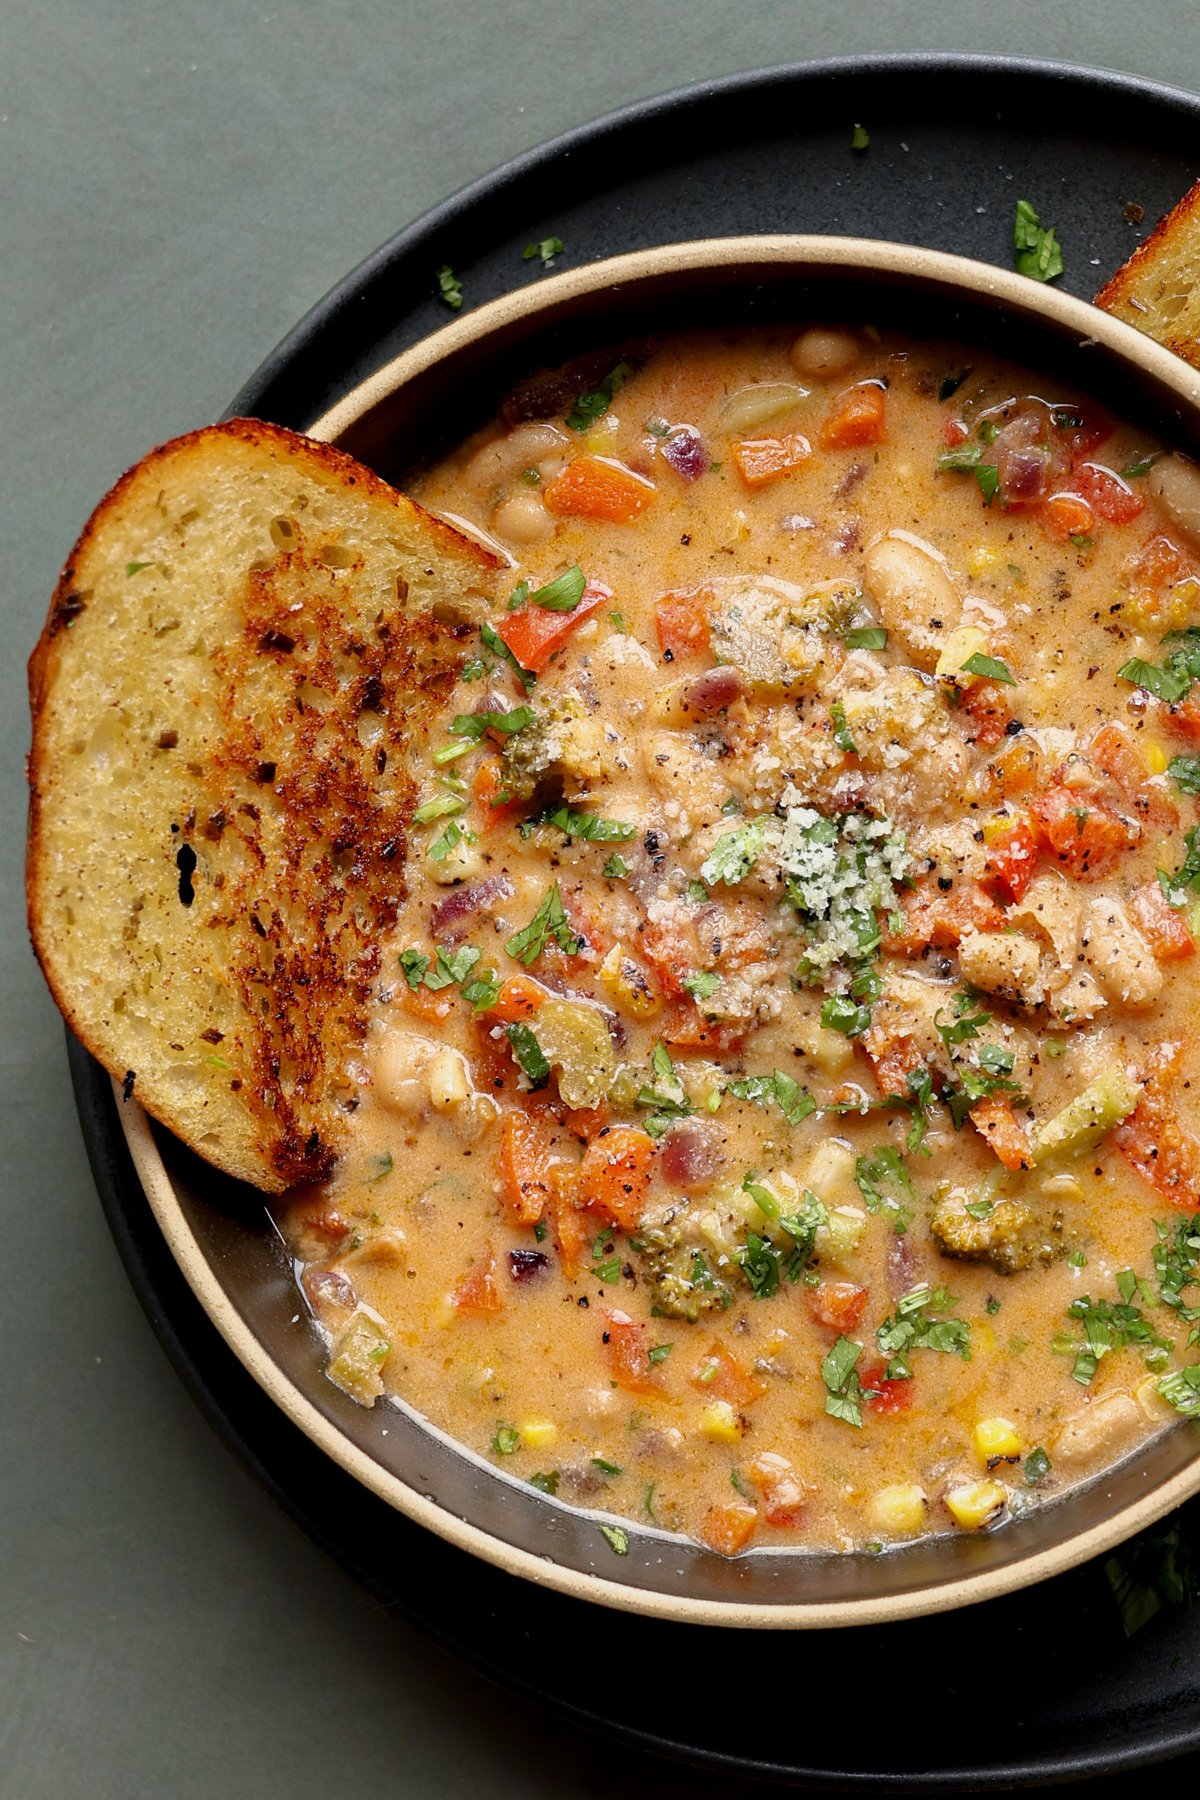
Lemon white bean soup is a creamy, vibrant one pot meal that’s perfect for busy weeknights. It’s hearty, filling, and uses simple, budget-friendly ingredients. (gluten-free with soy-free and nut-free options)
It’s soup season, and I am loving all the creamy, hearty, and budget-friendly soups — and this lemony white bean soup fits exactly into that category. It’s packed with tons of veggies, beans, and protein.
The best part about this lemon white bean soup is that it’s flexible to your flavor profile. You can easily adjust the flavors and ingredients based on what you have on hand. It’s vibrant, lemony, and perfect for the whole family!
The soup gets its protein from beans, cashews or tofu, nutritional yeast, and the veggies. You also blend up some of the beans into a puree to create that creamy texture along with either cashews or tofu. You can even omit the cashews and tofu, if you need to, and use just the beans for the creamy base.
This creamy lemon white bean soup is wholesome, flexible, and easy to make. The perfect go-to for cozy soup season!!
Why You’ll Love Lemon White Bean Soup
creamy, vibrant soup with tons of veggies and protein
versatile recipe! Adjust seasoning and proteins to your taste.
40-minute, 1-pot meal
naturally gluten-free with easy soy-free and nut-free options
If you love idlis and dosas but want to make them a little more nourishing, this Ragi Idli Dosa Batter is the perfect place to start; simple, healthy, and absolutely delicious.
Starting your day with a plate of soft idlis or crispy dosas fresh off the pan is 100% guarantee of a wonderful day ahead. This Ragi Idli Dosa Batter recipe will only add a lil more to the same joy. It’s packed with all the wholesome goodness of finger millet that gives the idlis and dosas a little health and flavor boost.
If you’ve loved our Idli Dosa Batter recipe before, this version will feel like the healthier cousin that’s just as easy to make. Ragi, or finger millet, is rich in calcium, iron, and fibre, making every bite nourishing and satisfying.
This Ragi Idli Dosa batter recipe calls for simple, pantry-staple ingredients. Here’s everything you’ll need:
Ragi (Finger Millet): The star of this recipe. Gives the batter its earthy flavour and a big nutritional boost with calcium, iron, and fibre.
Idli Rice: The base of the batter. I have used idli rice, basically parboiled short grain rice, as its higher starch content delivers great results. But any short grain rice variety such as sona masoori or kollam will work in a pinch too.
Urad Dal: Makes the batter light, creamy, and airy.
Poha (Flattened Rice): Keeps the batter light and helps make crisp dosas.
Fenugreek Seeds (Methi): Aids the fermentation process and adds to the taste too. A little goes a long way.
Ice cubes/Ice cold water: To prevent the batter from heating up when grinding.
What is Ragi & What Are The Benefits of Ragi?
Ragi is also known as finger millet and it is a nutritious gluten-free cereal grain rich in fiber, protein, calcium, and iron. Because of its high fibre content and low glycaemic index, benefits of ragi include aiding digestion, promoting bone health, managing weight and blood sugar, and improving your skin and hair.
How to Make Idli Dosa Batter
The process of making idli dosa batter takes about 20 minutes over a day. Yes thats all!! Here’s the timeline that you can follow.
DAY 1 (Morning) – Washing and Soaking
In the morning, you need to wash and soak the ragi, rice and lentils. While it’s a pretty straightforward process, here are some tips I find helpful:
When washing the ragi, rice and lentils, rub them between your fingers as you wash, and rinse in clean water 3-4 times till the water starts running almost clean. Doing so helps get rid of dust, impurities, and excess starch from the rice.
Soak the ragi, rice and lentils in clean water. They should be completely submerged and have at least an inch of water over them. Soaking the lentils makes it easy to grind and makes the batter nice and fluffy which is very essential for the texture.
DAY 1 (Evening) – Grinding, Fermenting
In the evening, it’s time to grind the ragi, rice and lentils to make the batter. To do so:
Drain the excess water, transfer to a mixer jar, and grind. Using a mixer grinder can heat up the batter, which affects the flavour. Use ice cold water to prevent overheating and maintain the desired temperature.
The consistency should be such that it leaves a thick coat on the back of a spoon and falls in a ribbon like consistency when poured with a ladle. The ground batter should feel very slightly gritty between your fingers.
Pour the batter into a bowl that’s large enough so that there is room for the batter to rise. Mix the batter with clean hands as shown in the video – this is an important step as it helps in the fermentation so please don’t skip it.
Cover the bowl and set aside to ferment. Leave it in a warm, dry place away from direct sunlight to ferment. Fermentation takes anywhere between 12-24 hours depending on the humidity and temperature at your place. The warmer it is, the faster it’ll ferment.
DAY 2 (Morning) – Using or Storing
The next morning or after, the batter should have increased by almost 1.5 times, and that’s how you know it’s fermented and ready for use. If you follow the exact measurements of this recipe, you should have approx 1.75 litres (6-7 cups) of idli and dosa batter -1 cup batter makes 6-7 idlis or 4-6 dosas depending on the size.
How To Tell If The Batter Is Fermented
The batter will expand and almost double in size as it ferments.
When you mix the batter, you should be able to see tiny air bubbles in the batter (watch the video to see how fermented batter looks). It should look and feel frothy and airy
The batter should smell mildly yeasty or sour
If the batter smells very sour or smells bad, then it may have over fermented or gone bad. Unfortunately, there’s no coming back from this, so make sure the batter doesn’t get over fermented!
Which is The Best Blender to Grind Ragi Dosa Batter
If you make idlis and dosas frequently, I highly recommend using an electrical wet grinder which produces a light, fluffy batter without heating it up. The disadvantage is that they take up more counter space and are quite big and bulky.
Richa Recommends
I use a blender and mixer grinder at home and my favourite is the Sujata Dynamix Mixer Grinder. The disadvantage of using a mixer grinder is that it heats up the batter as it grinds, which is not ideal. To keep the batter from heating up, I use ice cold water while grinding.
Frequently Asked Questions
Is ragi dosa healthier than regular dosa?
Yes, it is! Ragi is packed with calcium, iron, and fibre, which makes it more nutrient-dense than traditional rice-based dosa. It’s also gluten-free and helps keep you fuller for longer.
Can I make ragi dosa without fermenting the batter?
Technically, yes. You can make an instant version by adding curd and a pinch of baking soda to the batter. However, fermenting naturally gives it a softer texture, better flavour, and that classic dosa rise.
Why didn’t my batter ferment properly?
Fermentation depends on warmth. If your kitchen is too cold, keep the bowl near a warm appliance or wrap it in a thick towel. You can also preheat your oven for a minute, switch it off, and let the batter rest inside overnight.
Can I use ragi flour instead of whole ragi?
Yes, but the texture will be slightly different. Whole ragi grains give a more natural, slightly coarse texture. If using flour, mix it with urad dal and rice batter for better consistency.
Top Tips to make the best Ragi Idlis & Dosas
Add salt later: Only salt the portion you plan to use immediately. This keeps the rest of the batter from turning too sour while stored.
Soak everything well: Give the ragi, rice, and dal enough time to soak. This helps them grind smoothly and ensures the batter ferments properly.
Use cold water while grinding: Adding ice cubes or chilled water prevents the batter from heating up, which can slow down fermentation and affect flavour.
Mix with your hands: Don’t skip this step! Mixing the batter by hand helps kickstart fermentation and gives the batter that light, airy texture.
Watch the consistency: The batter should be thick but pourable, it should coat the back of a spoon and fall in ribbons when lifted.
How to Make Ragi Idlis
Step 1: Once your batter has fermented and doubled in volume, take the portion you’ll use and add ½ teaspoon salt just before steaming.
Step 2: Grease your idli plate with a little oil (or ghee), which helps the idlis demould easily.
Step 3: Pour the batter into the molds, filling them just shy of the rim (the batter will rise a little more during cooking).
Step 4: Steam on medium heat for about 10 minutes until a toothpick inserted in the centre comes out clean. Over-steaming makes ragi idlis dry.
Step 5: Let the idlis rest in the steamer for 2 minutes with the lid on, then cool for another 2-3 minutes before removing them gently with a spoon.
Tip: If the batter is slightly sour, skip adding sugar at this stage. If it tastes flat, a tiny pinch of sugar helps the idlis rise better and improve flavour.
How to Make Ragi Dosas
Step 1: Using chilled batter helps you spread the dosa thin and crisp. So make sure it’s either cold or room temperature, avoid using hot temperature batter.
Step 2: Heat your non-stick pan or seasoned cast iron tawa until water droplets sizzle and evaporate instantly. That’s your cue.
Step 3: Pour a ladle of batter onto the centre of the pan and spread in circular motion (for a thin dosa) or keep thicker for soft-roast style. Drizzle a teaspoon of oil or ghee around the edges.
Step 4: For a crisp edge keep heat on medium-high, cook for 30 seconds with lid, then another minute uncovered. For a softer version: cook on medium heat, cover for 30 seconds, then finish without flipping.Step 5: Flip once and cook for 30 seconds if you prefer it both sides roasted; otherwise, keep it single-sided for maximum crisp.
Tip: Serve immediately with chutney or sambar. Do not wait, as ragi dosas lose their crispness if left too long.
Equipments To Make Ragi Idlis & Dosas
For Idlis: You can make idlis in an idli stand in a regular Idli steamer. Alternatively, you can also place the idli stand inside a pressure cooker without using the whistle. If you don’t have an Idli stand – no worries! You can make idlis in greased steel tumblers that can withstand high heat!
For Dosas: A well-seasoned cast iron tawa or pan is the best for making dosas. A cast iron tawa will last you a lifetime, but keep it exclusively for making dosas and uttapams. A non-stick tawa is an easier alternative. I prefer the cast iron tawa because it heats up evenly, it stays hot for longer and the dosas come out extra crispy. Non-stick pans tend to overheat faster and spreading the dosas can become difficult after a while.
Recipes with Ragi Idli Dosa Batter
Dhokla
Idli
Dosa
Appe / Paniyaram
Mysore Masala
Uttapam
Dosa Waffle
Schezwan Idli Fry
Storage Tips
Fridge: Store unsalted ragi idli dosa batter in a clean, airtight container for up to 3–4 days. When ready to use, take out only what you need and add salt before making idlis or dosas.
Freezer: The batter can be frozen for up to a month. Portion it into smaller airtight containers or silicone trays so you can thaw just what you need. Let it defrost overnight in the fridge before using.
Room Temperature: Once fermented, avoid leaving the batter out for more than a few hours. Warm weather can cause it to over-ferment and turn too sour.
Serving Ideas
This ragi idli dosa batter gives you endless breakfast (or dinner) options, it’s light, wholesome, and goes beautifully with a variety of sides. Here are some ideas to get you started:
Recipes to try:Idli, Ragi Dosa, Appe / Paniyaram, Mysore Masala Dosa, Dosa Waffles etc.
With Coconut Chutney: A classic combo that never fails. Try our Coconut Chutney for that perfect creamy, nutty balance.
With Sambar: Pair your hot idlis or crisp dosas with a bowl of Homemade Sambar for a hearty, protein-packed meal.
With Tomato Chutney: Add a tangy twist with Tomato Chutney, it’s slightly spicy and brightens up every bite.
Ragi Idli Dosa Batter is now one of the regular recipes that has become part of my kitchen. It’s wholesome, light, and gives you that comfort of a homemade South Indian breakfast, but with a healthy twist.
If you’re already a fan of classic Idli Dosa Batter, this version is the perfect next step. Tried it out? Tag me on Instagram @my_foodstory, I’d love to see your breakfast table!
Wash & soak ragi, idli rice, urad dal, poha, fenugreek seeds in enough water in a bowl so that there is at least an inch of extra water over the rice and dal. Soak for 8 hours.
Day 1 evening
Once the grains have soaked for 8 hours, drain the excess water from the bowl.
Grind till almost smooth with approx. 1 cup of water and 4-5 ice cubes in a mixer grinder. Add additional water if required. The consistency should be such that it can leave a thick coat on the back of a spoon and falls in a ribbon like consistency when poured with a ladle. The ground batter should feel very slightly gritty between your fingers.
Pour the batter into a bowl that’s large enough so that there is room for the batter to rise. Mix the batter with clean hands as shown in the video – this is an important step as it helps in the fermentation, so please don’t skip it.
Cover the bowl and set aside to ferment. Leave it in a warm, dry place away from direct sunlight to ferment. Fermentation takes anywhere between 12-24 hours depending on the humidity and temperature at your place. The warmer it is, the faster it’ll ferment.
Day 2 – morning
Once fermented, the batter should have become almost 1 ½ times its size with a slight dome shape and a wrinkle, bubbly layer on top. You should be able to smell a little sourness in the batter. This smell means it has fermented. If it is too sour, it has fermented too much! You can use a spoon to check the batter – the texture should be frothy with air bubbles.
Take out 2 cups of batter in a bowl, add ½ teaspoon of salt and make idlis, dosa etc.
Making Idlis
Heat water in an idli steamer and bring to a boil. Grease the idli plate with oil or ghee so its easier to demould the idlis.
Only once the water in the steamer comes to a roaring boil, pour batter into the idli mould and fill them up almost to the top (as shown in the video)
Place the idli mould in the steamer and steam on medium for 10 minutes till the idlis are cooked. To check doneness, insert a toothpick in the centre of idlis and it should come out clean.
Let the idlis rest in the steamer for 2 minutes, then take it out and let it cool for another 2-3 minutes. Use a spoon or butter knife to demould idlis from the idli plate.
Making dosas
Take 1 cup of batter in a bowl, add ⅛ teaspoon salt, ⅛ teaspoon sugar and mix well.
Heat a non-stick pan or seasoned cast iron dosa tawa over medium heat. Once hot, reduce the heat to low & pour one ladle of dosa batter and pour in the center of the tawa. Spread by using the back of the ladle, moving it in concentric circles to form a big round dosa.
Increase the heat to medium, drizzle a spoon of oil or ghee around the edges and in the center, cover with lid & cook for 30 seconds.
Remove the lid and let this roast for 1-2 minutes till golden brown on medium. Flip it over and roast for 30 seconds. Flip it back, fold and serve hot.
Follow the same steps for making the rest of the dosas.
Video
Notes
Ice cubes are added to avoid the batter from getting too hot while grinding.
Batter should be thick & fall in ribbons without being too runny.
Salt to be added to the quantity of batter you are using to avoid the batter getting too sour.
If you are not using all of the batter, store the remaining unsalted batter in an air tight container in the fridge for up to 3 days or freeze the batter for up to a month.
Do not over steam the idlis as they become dry & hard.
Demoulding idlis easier, if they are cooled for a few minutes.
To check if the pan is hot enough to make dosa, sprinkle a few drops of water over the tawa & if it is ready, it should sizzle.
For best results, dosa should be fried on medium heat.
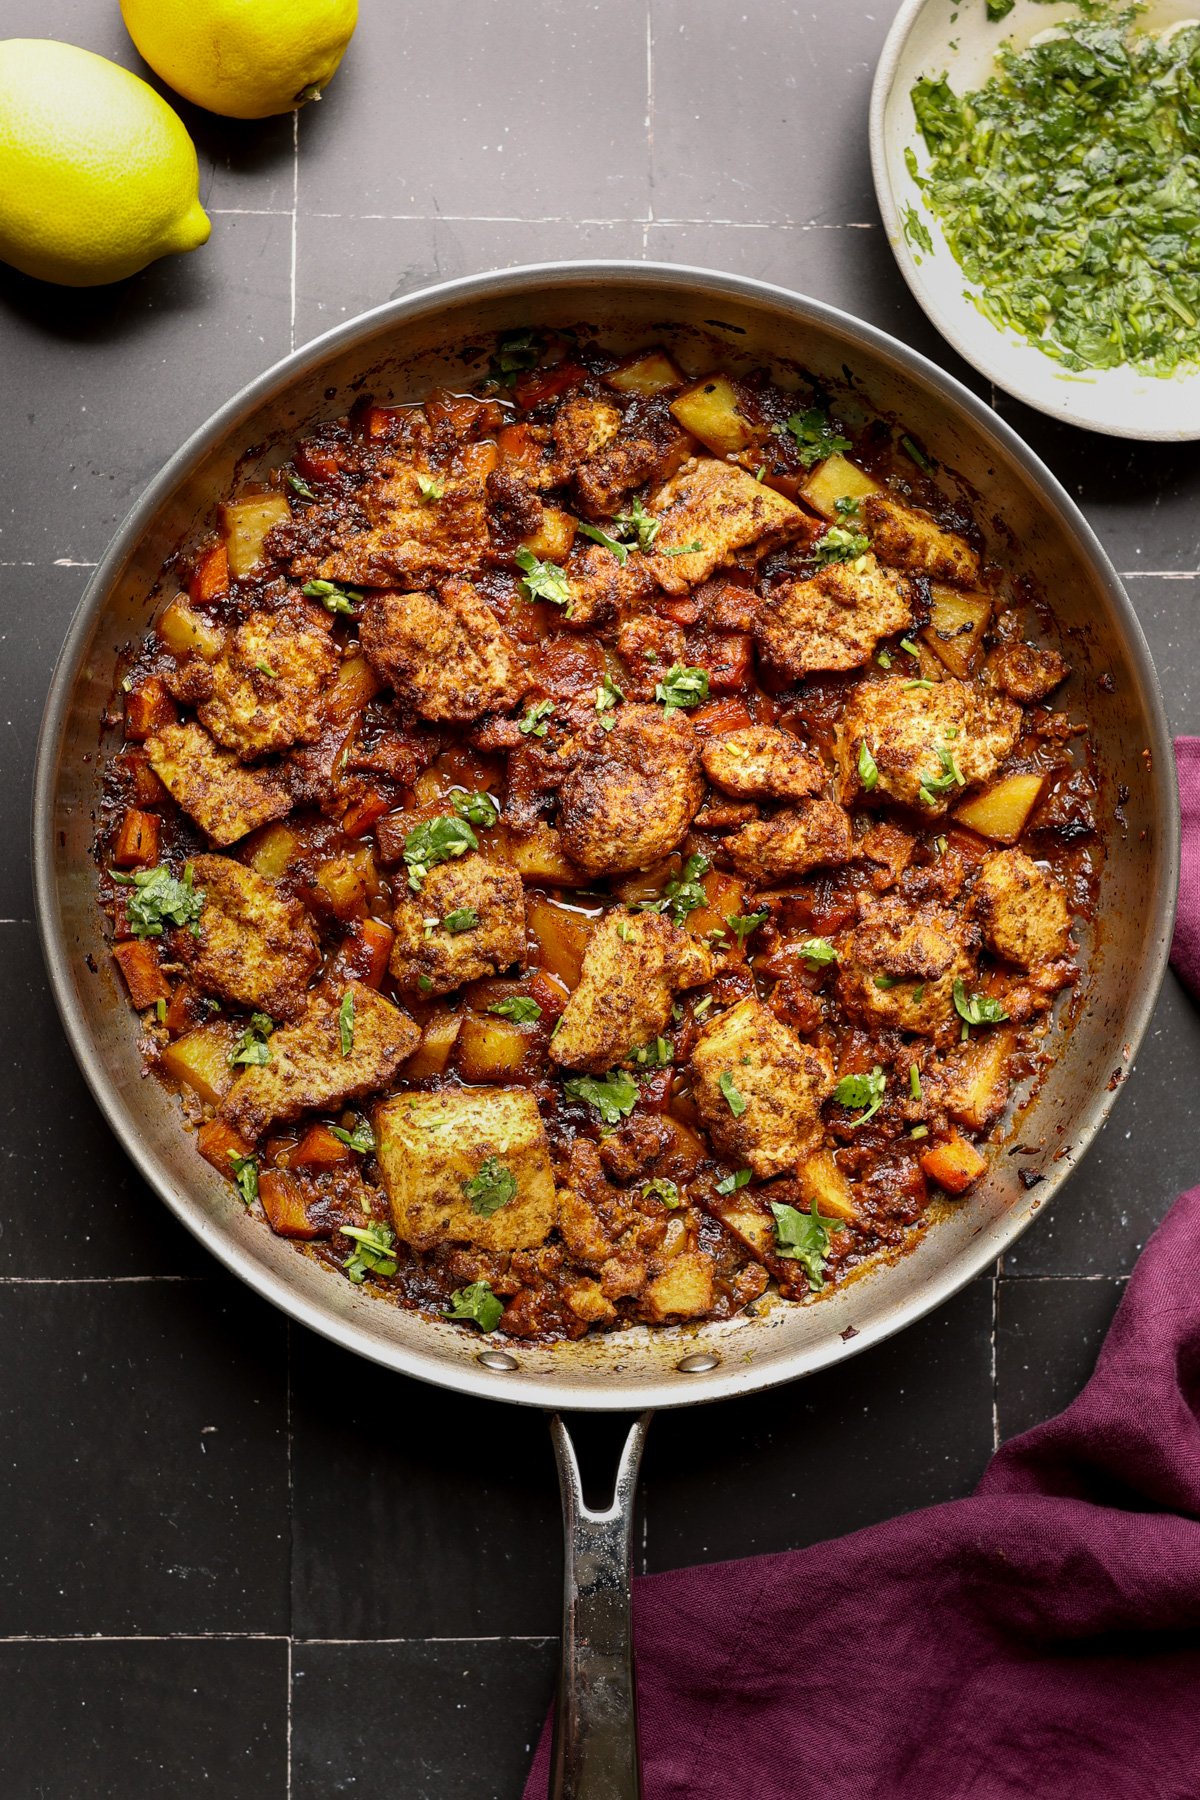
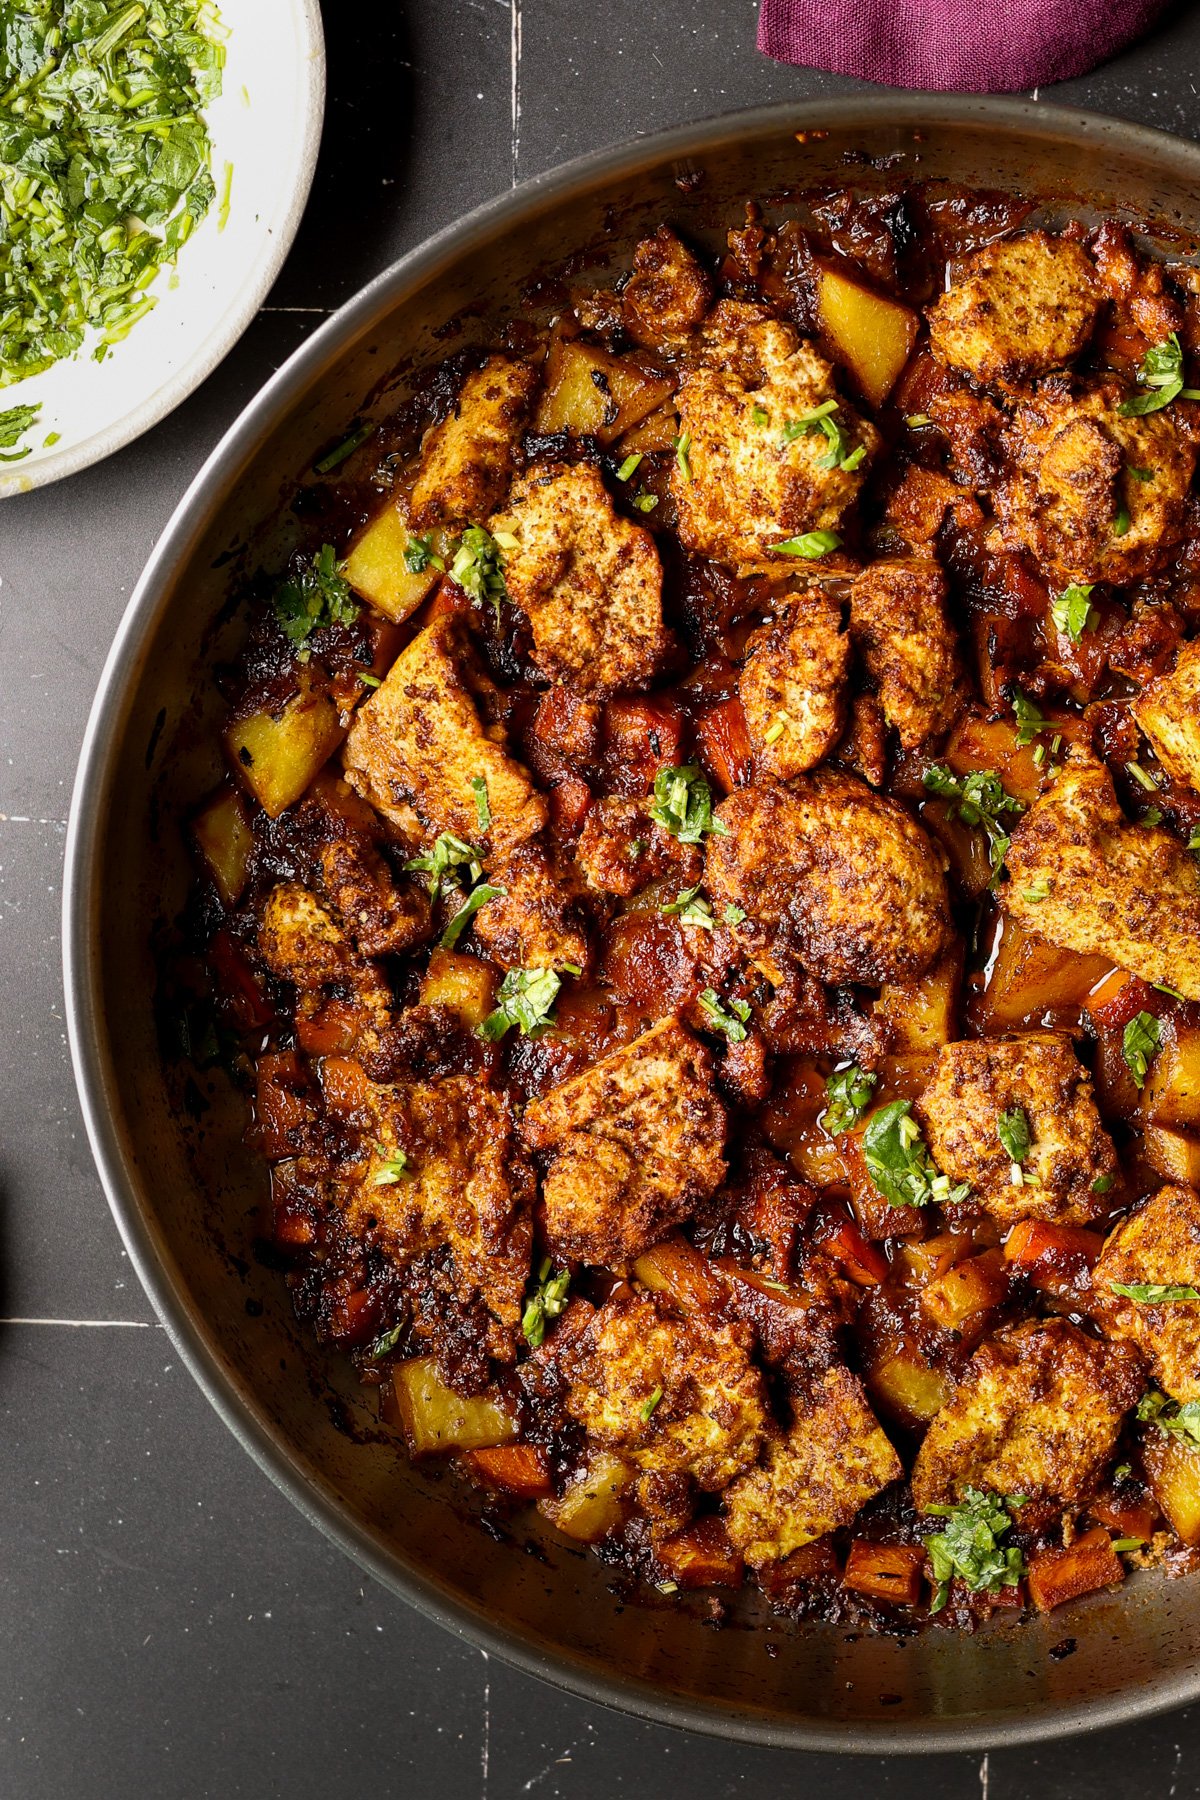
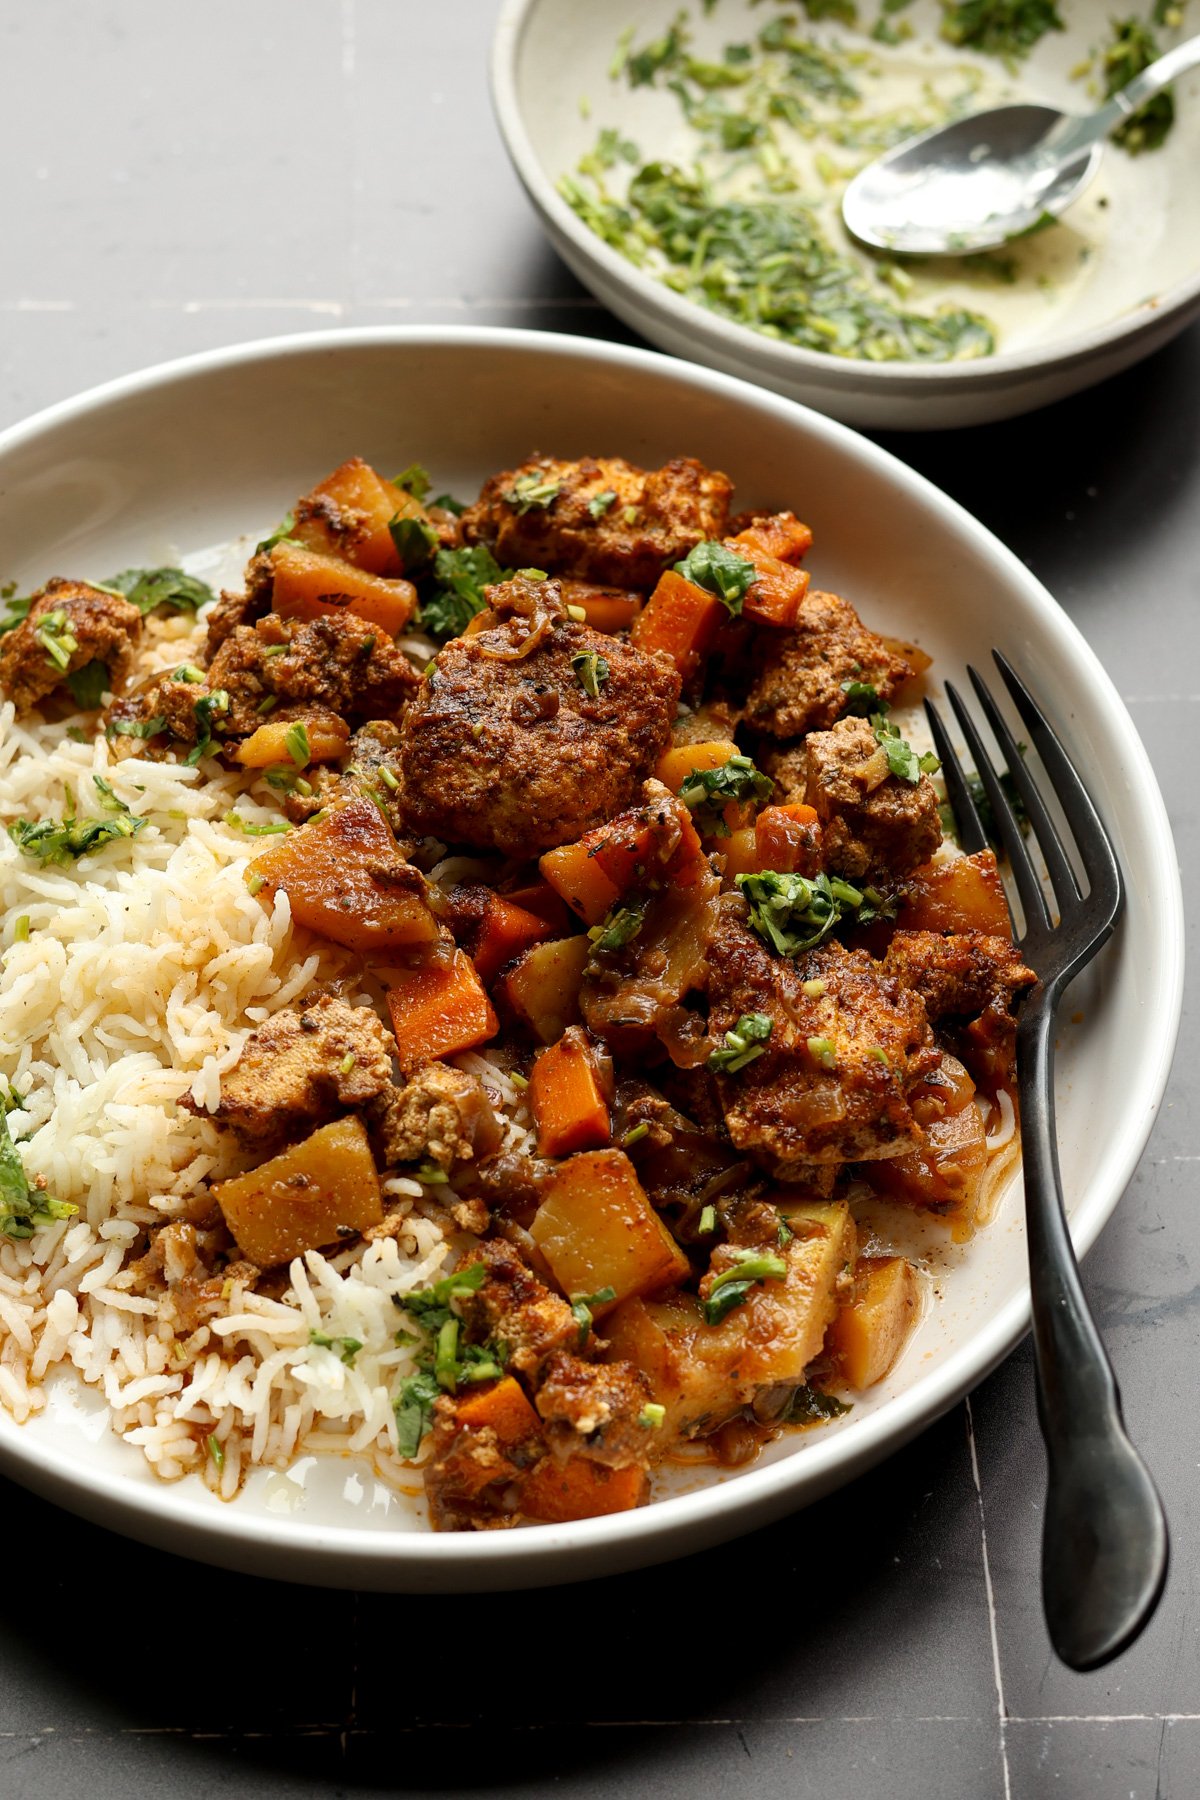
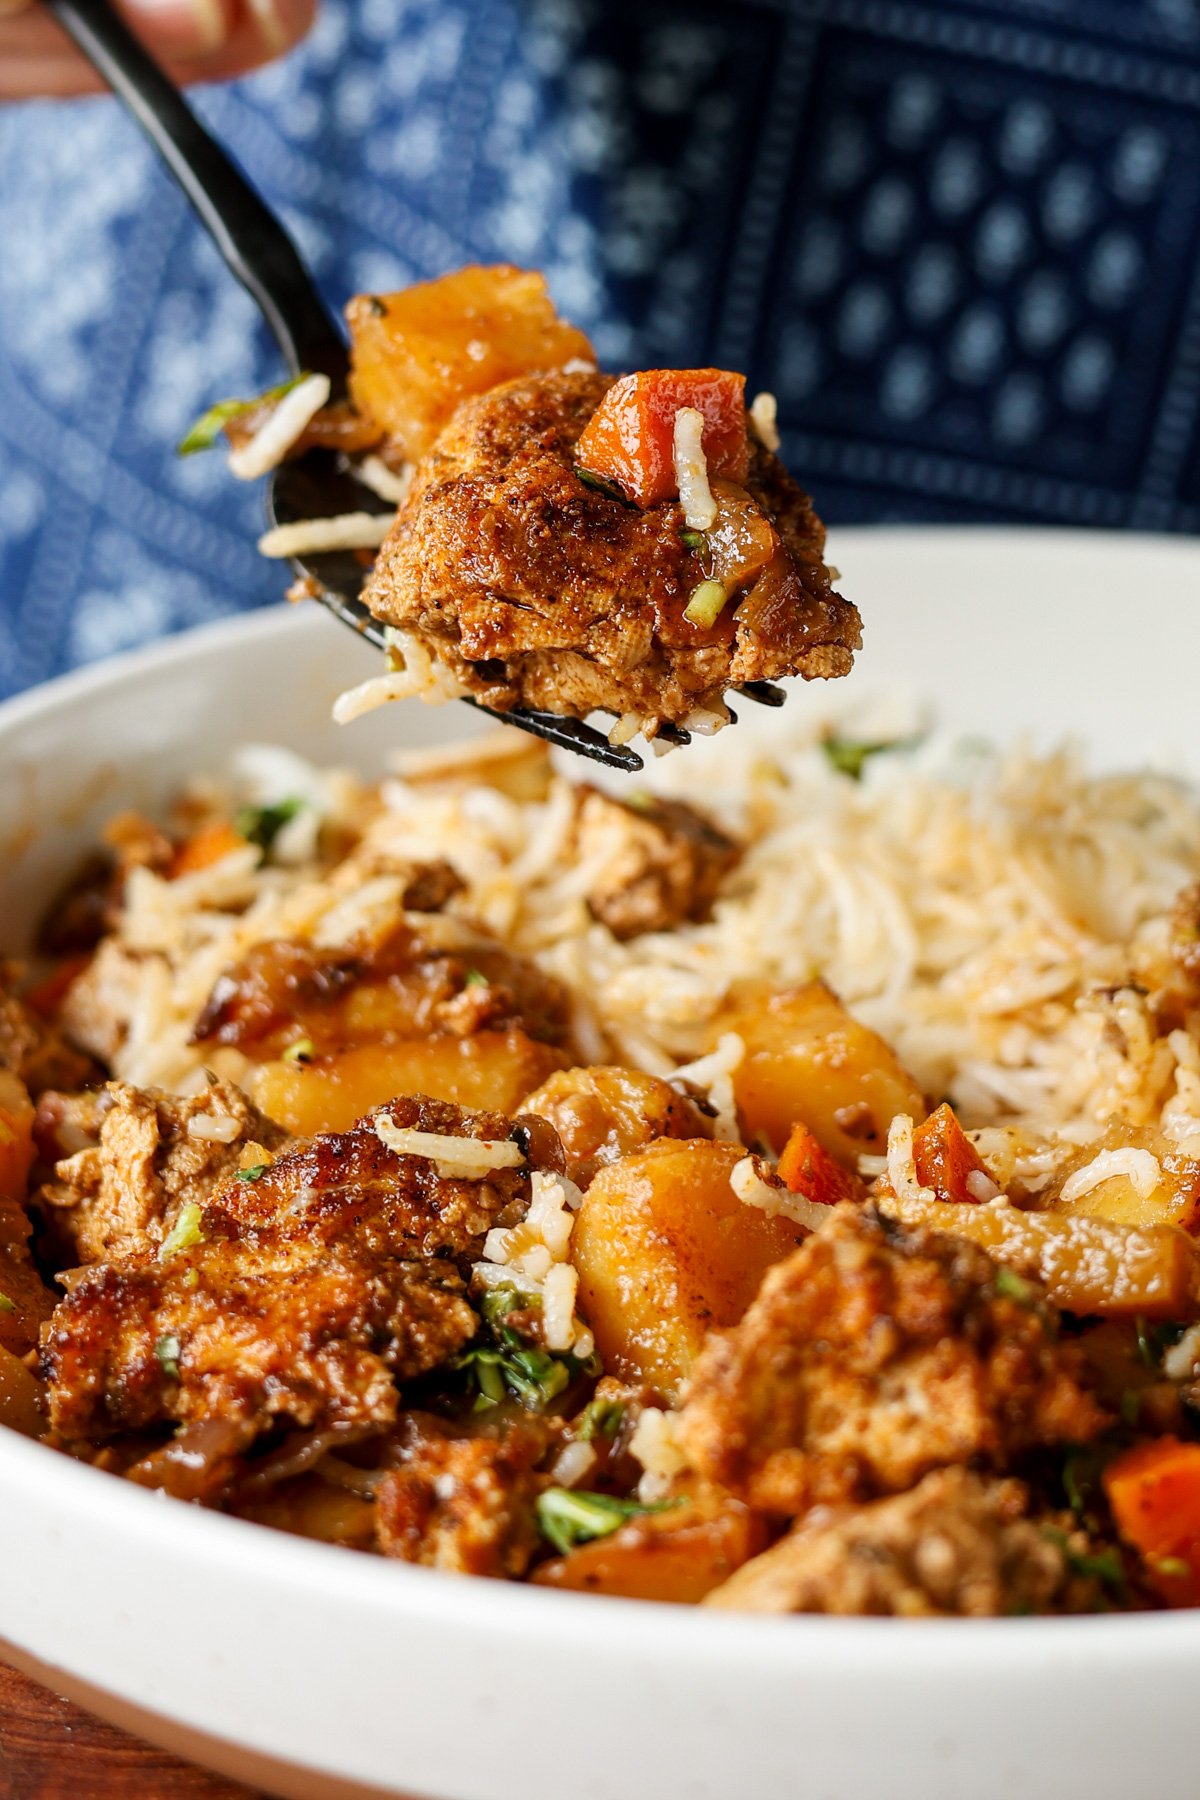
Spice-Rubbed Braised Tofu with Vegetables in a Savory Umami Sauce. A unique delicious holiday entree that all cooks in one pan! (gluten-free and nut-free with soy-free options)
I wanted to make a vegan braised meat-style dish for the holidays, so I came up with this one-skillet meal that’s rich, hearty, and incredibly flavorful. It features an amazing, aromatic spice rub that smells so meaty you’ll be surprised it’s entirely plant-based. The spice rub coats tofu that’s been frozen, thawed, and pressed, giving it a dense, chewy texture perfect for braising.
The base for the braise starts with crisped-up potatoes and carrots. After searing the vegetables, we make a deeply flavorful sauce with caramelized onions, lots of aromatics, and fresh herbs, and flavor boosters.
The tofu and vegetables braise together in this sauce, allowing the tofu to absorb all that flavor while developing a slightly crispy top and a tender, chicken-like interior.
We use an oven-safe pan to start the dish on the stovetop and finish it in the oven, where the vegetables become perfectly tender and the tofu gets a gorgeous golden top.
It’s fantastic served with rice, couscous, mashed potatoes or other mashed vegetables, bean purée, some crusty bakery bread, or a side salad.
A simple herb sauce adds a bright, fresh contrast, but you can enjoy it on its own, too. It’s full of amazing flavors with or without. The herb sauce just bumps up the flavor even more.
Why You’ll Love Braised Tofu and Vegetables
1-pan entree that’s perfect for the holiday table
flavorful braised vegetables in caramelized onion sauce
big pieces of crisp, herb-rubbed tofu
naturally gluten-free and nut-free with easy soy-free option
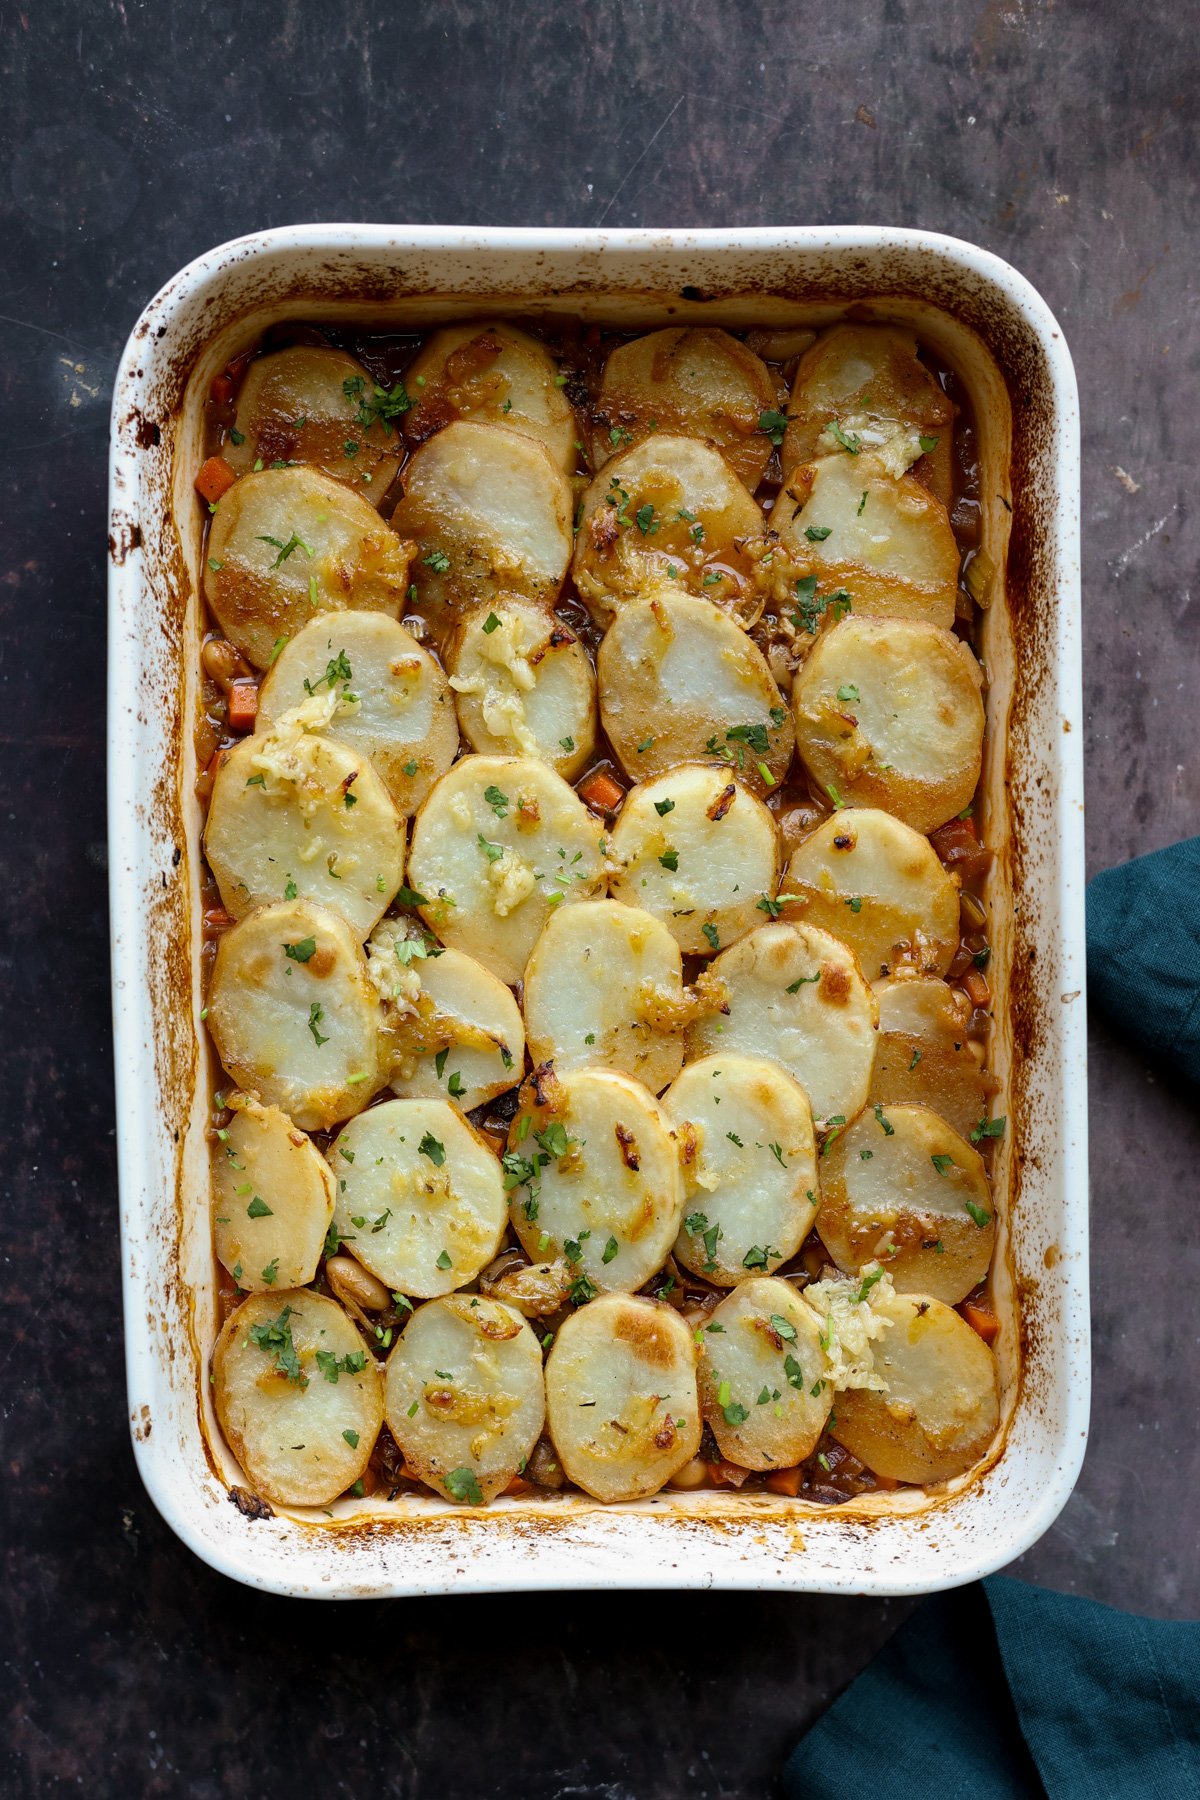
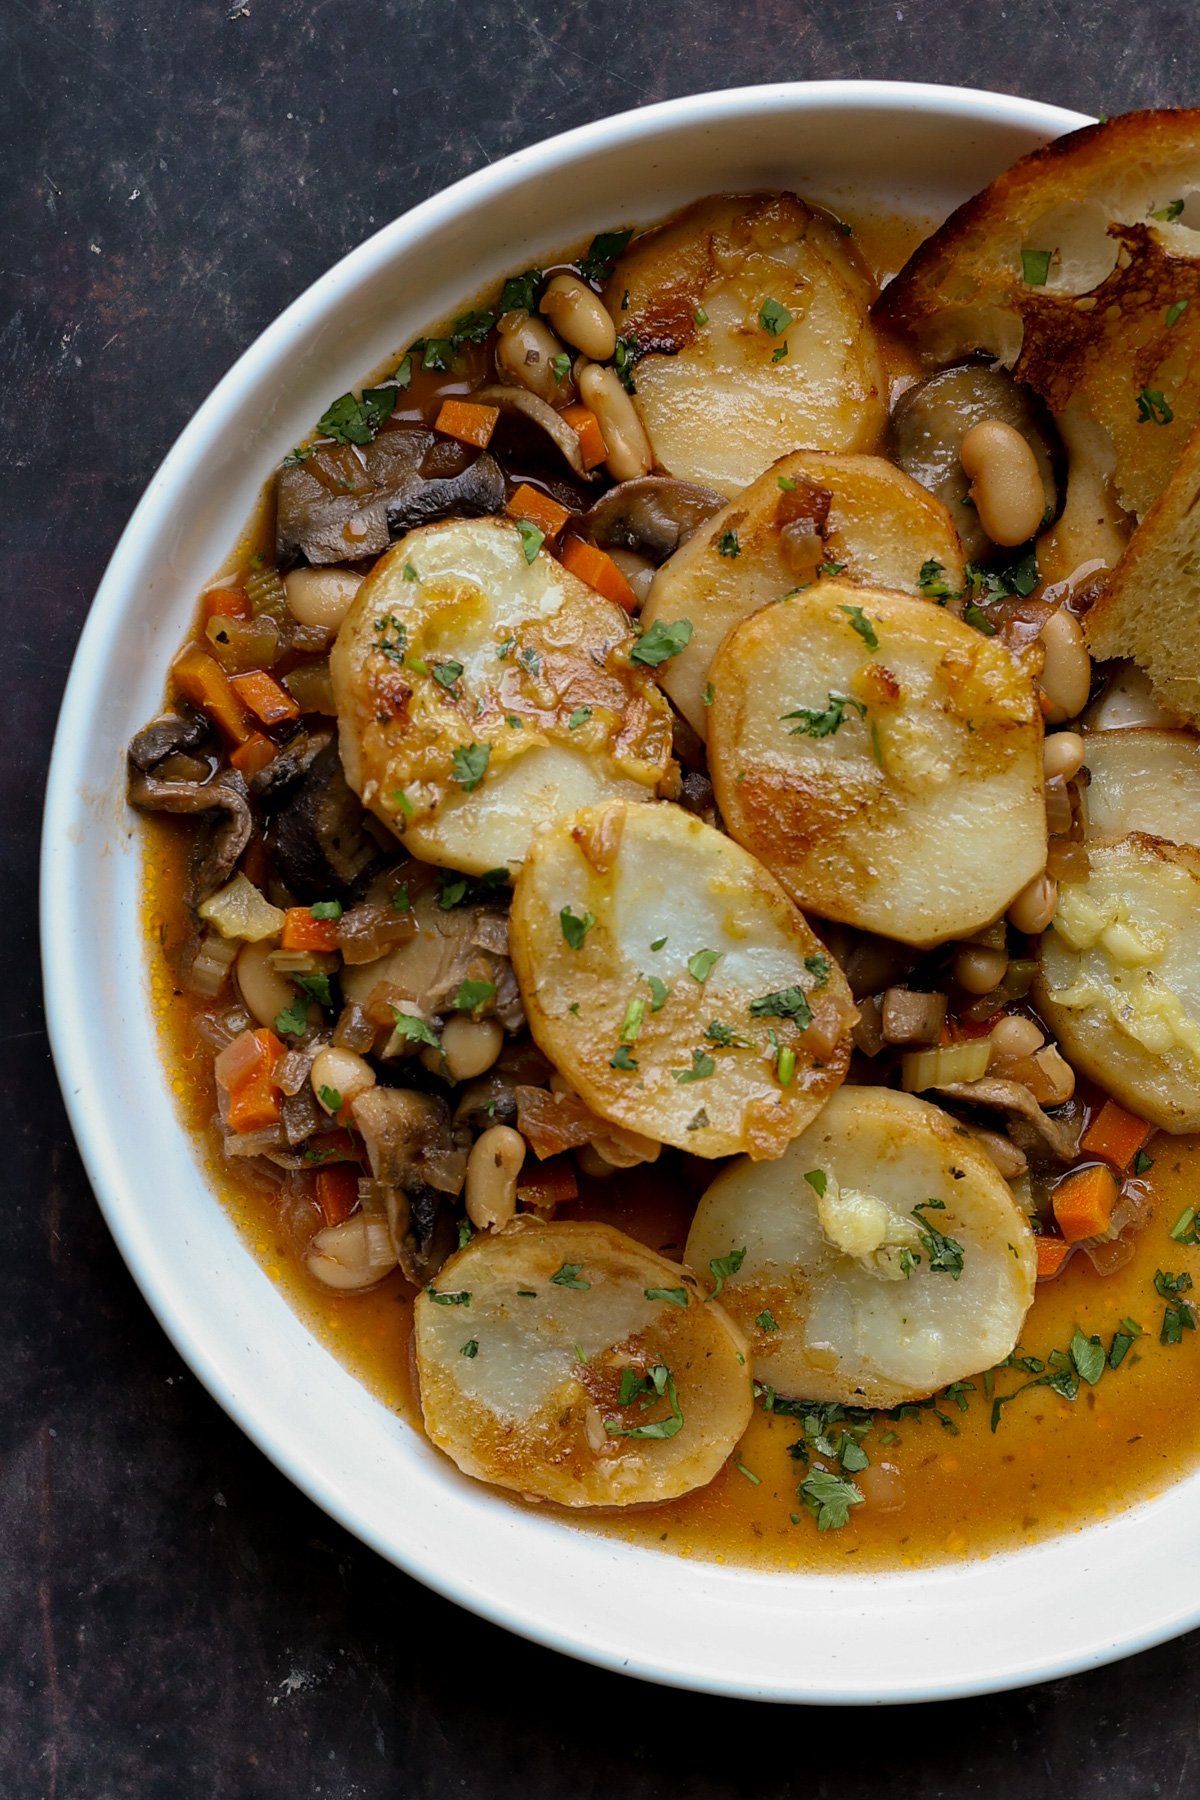
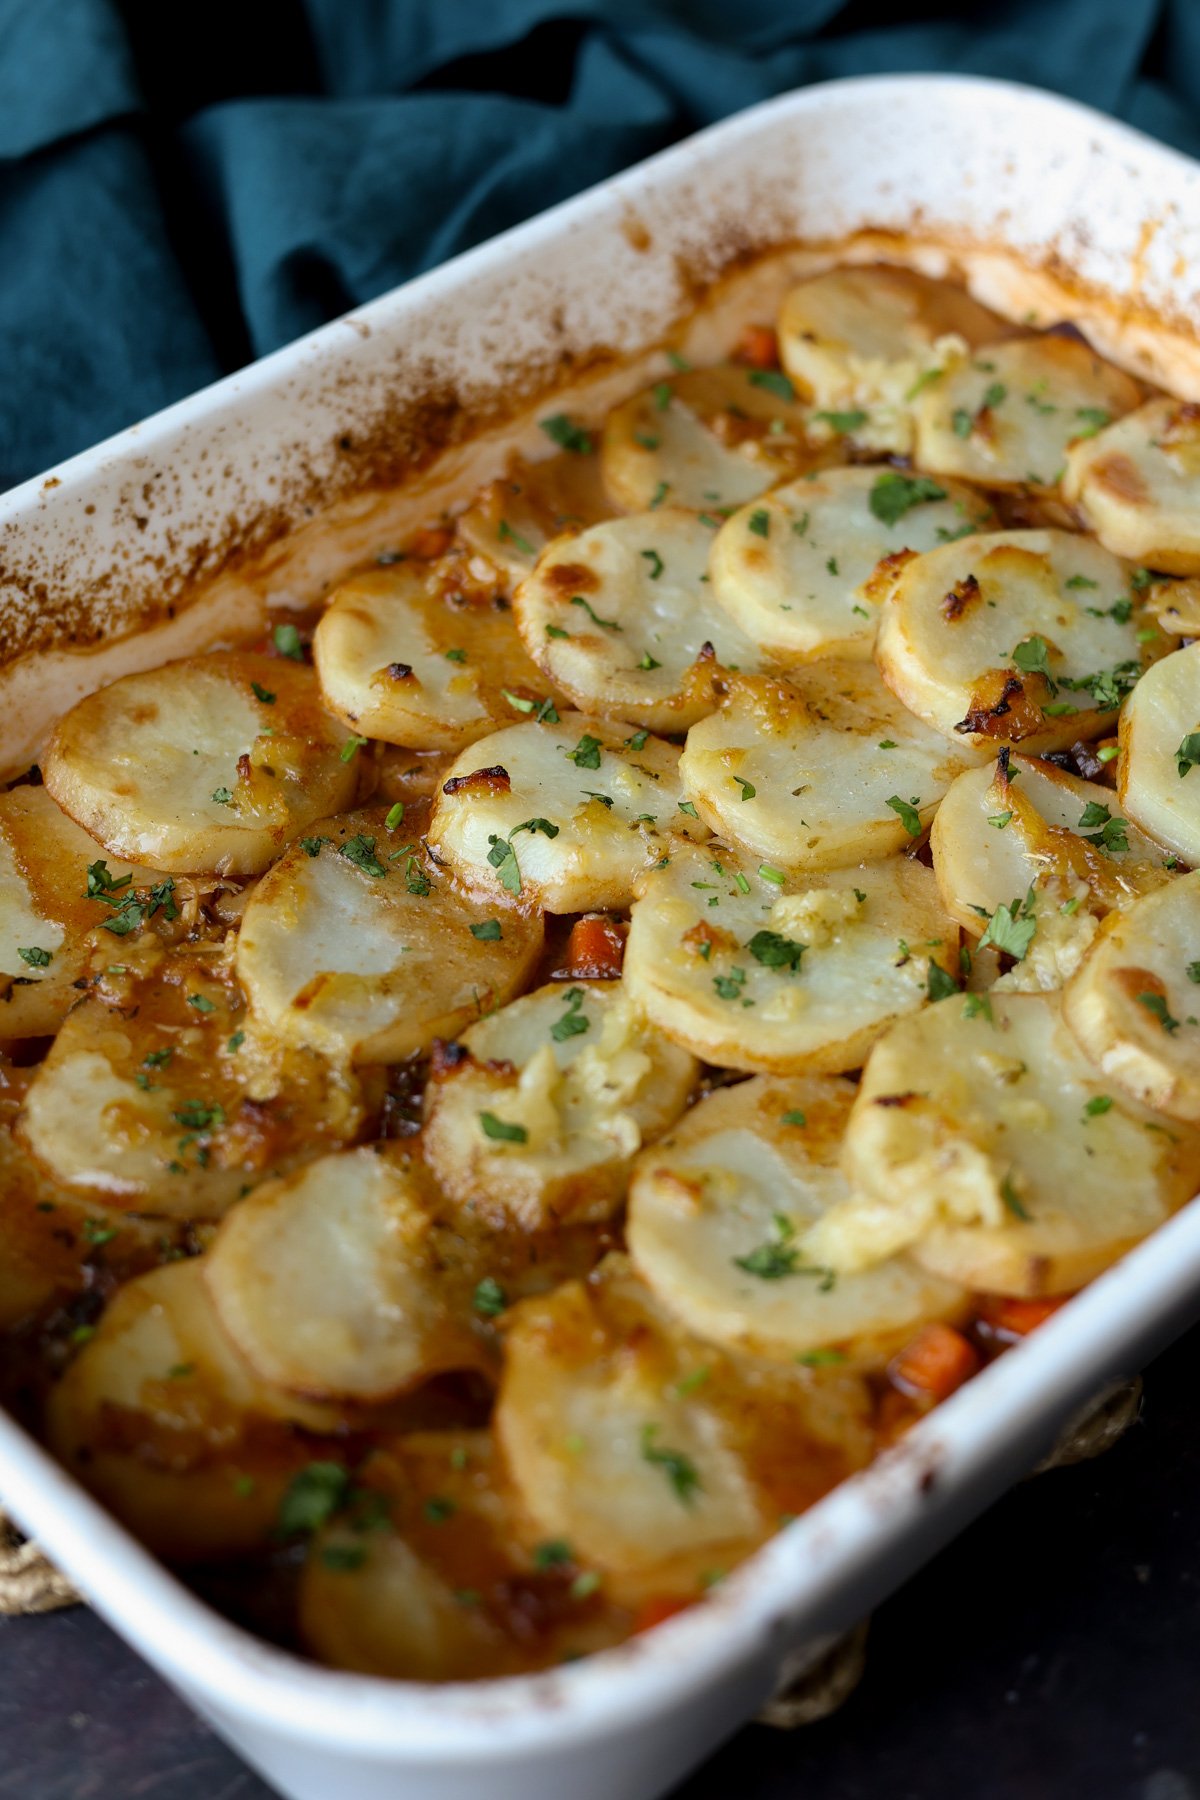
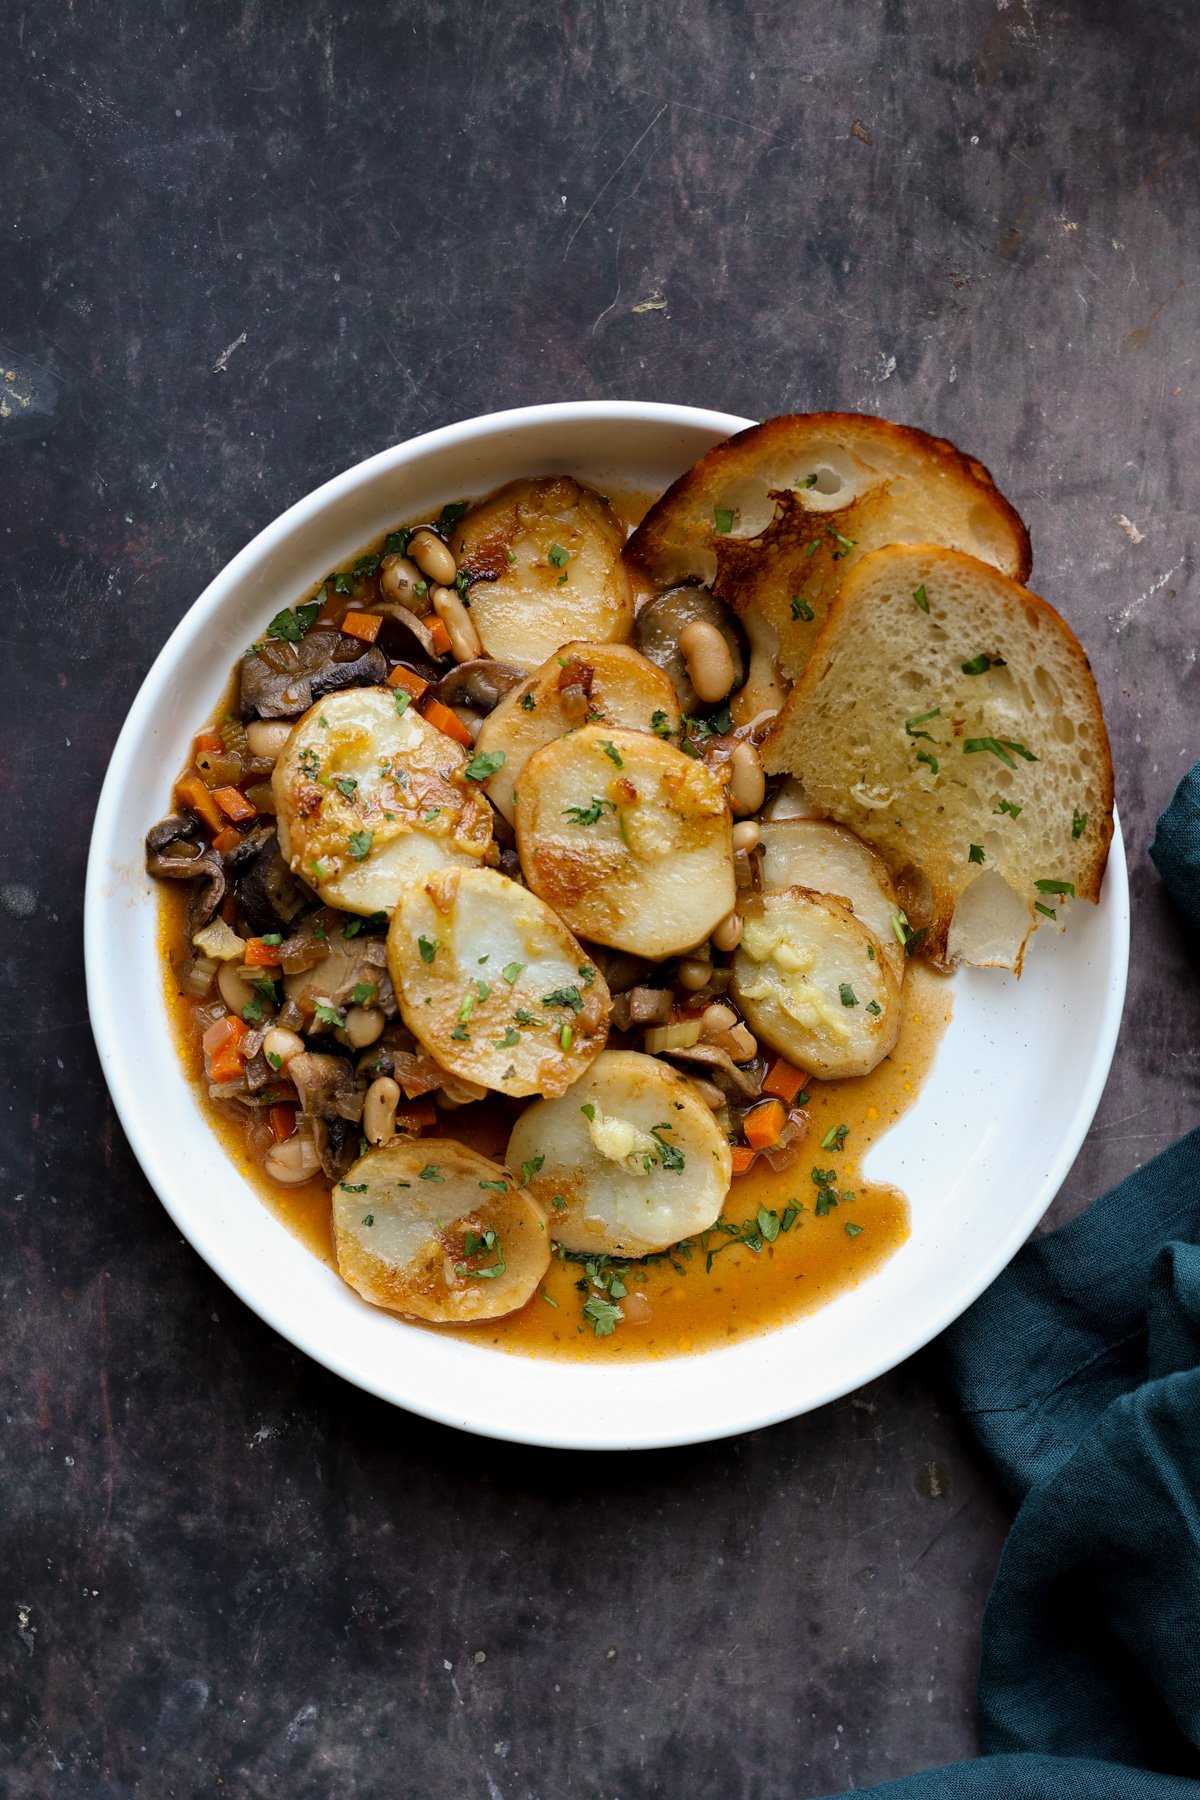
A cozy, hands-off, no sauté mushroom potato casserole that needs just 1 pan. Layers of rich mushroom gravy with beans and veggies, layered with crisp garlic herb potatoes that take only minutes to put together as the oven does all the work. (gluten-free with soy-free and nut-free options)
It’s fall, and it’s time for some comfort food. And what’s more comforting than this casserole, which has a stewy mushroom gravy with beans and veggies, topped with potatoes smothered in garlic butter? There are lots of fall herbs, like fresh thyme and sage, and it all comes together really quickly.
This is a super easy one-pan casserole. No need to sauté or stand around the kitchen for long periods of time cooking the onions and mushrooms. Everything goes right into the baking dish, and the oven does all the work.
Once the mushroom and onions are cooked, add the beans, herbs and stew ingredients and top them with some sliced potato and bake, and thats it. You get all the fall flavors and a dish that reminds of mashed potatoes and mushroom bourguignon w/o all the work.
It’s comforting, stewy, and perfect for a fall dinner with your family, served with a side salad, garlicky dinner rolls, or some crusty bakery bread. Or serve it however else you like!
Why You’ll Love Mushroom Potato Casserole
cozy, hearty, stewy beans and veggies in a rich, mushroom gravy
1-pan oven recipe, no standing at the stove!
very little active cooking time
No cooking the aromatics and potato separately
naturally nut-free with easy gluten-free and soy-free options
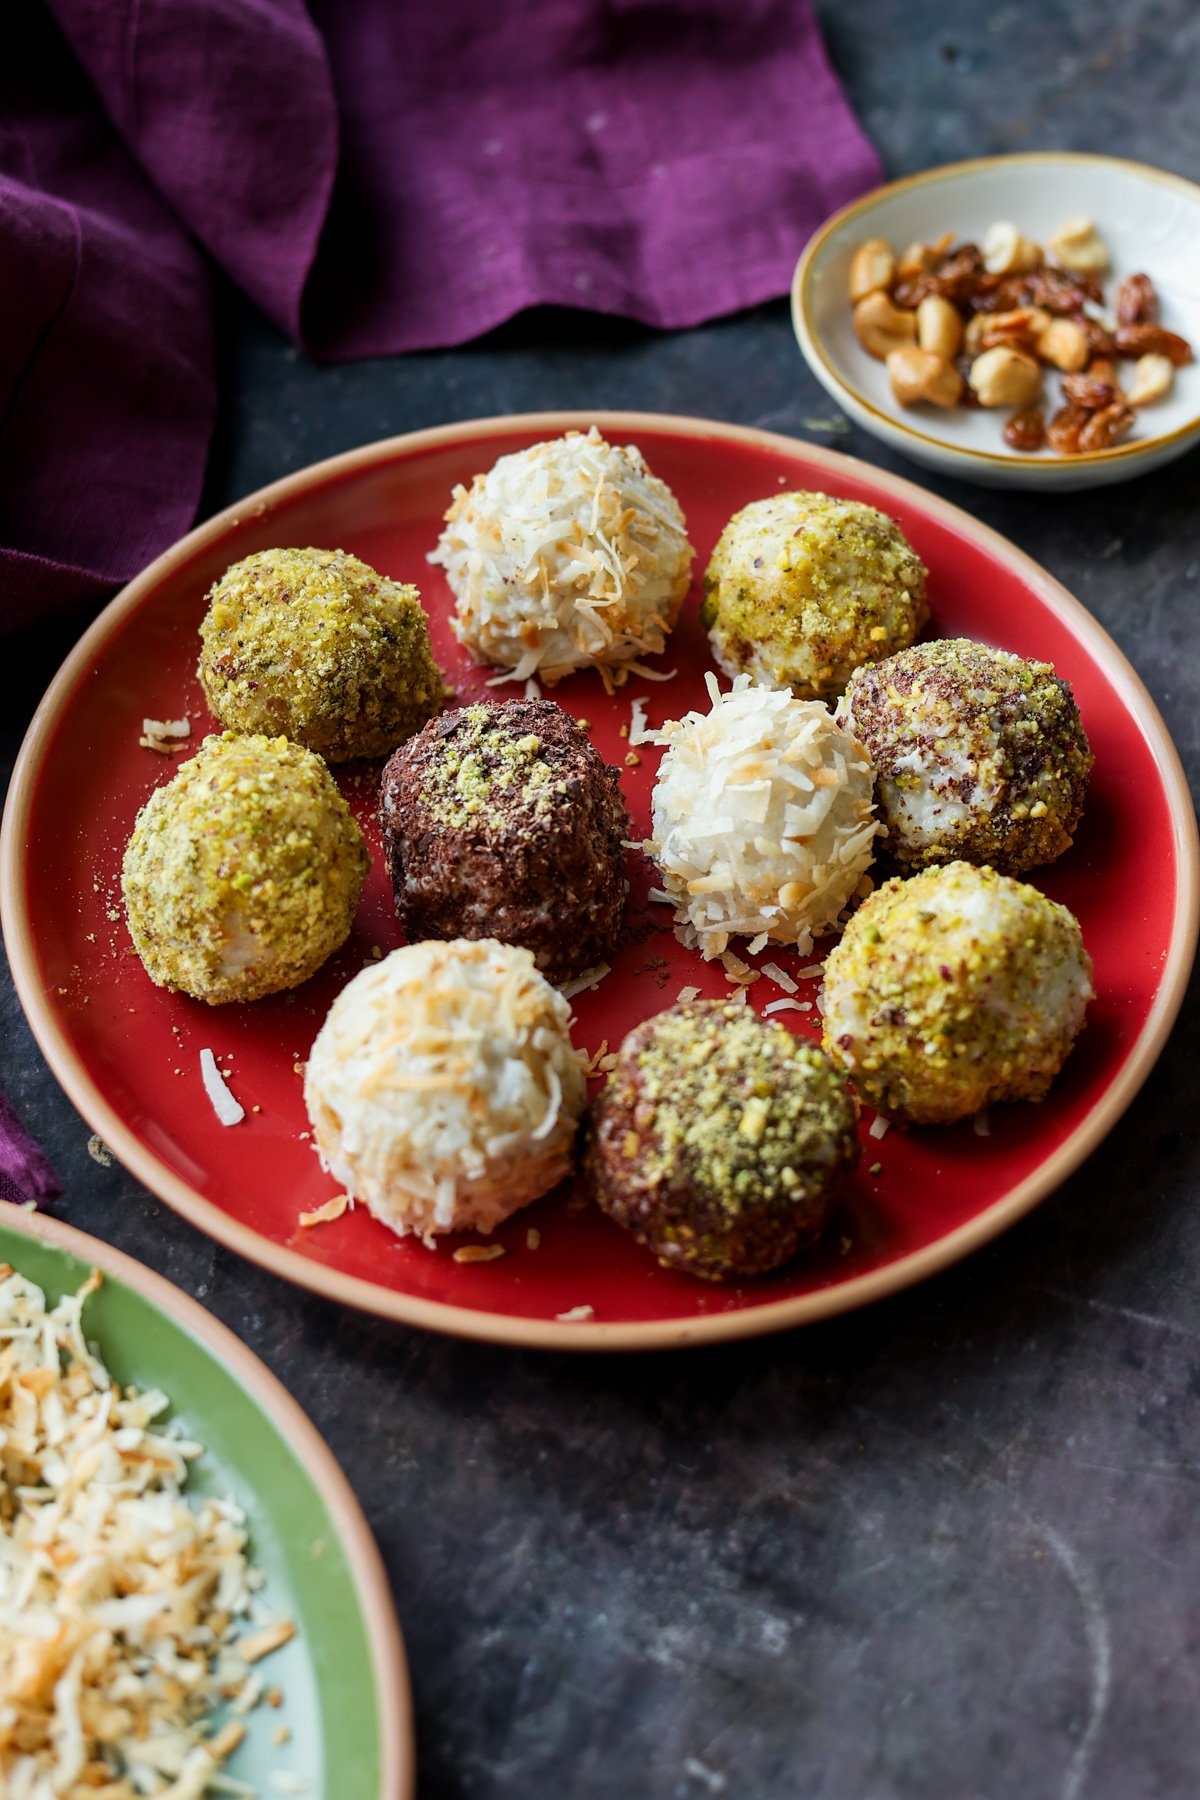
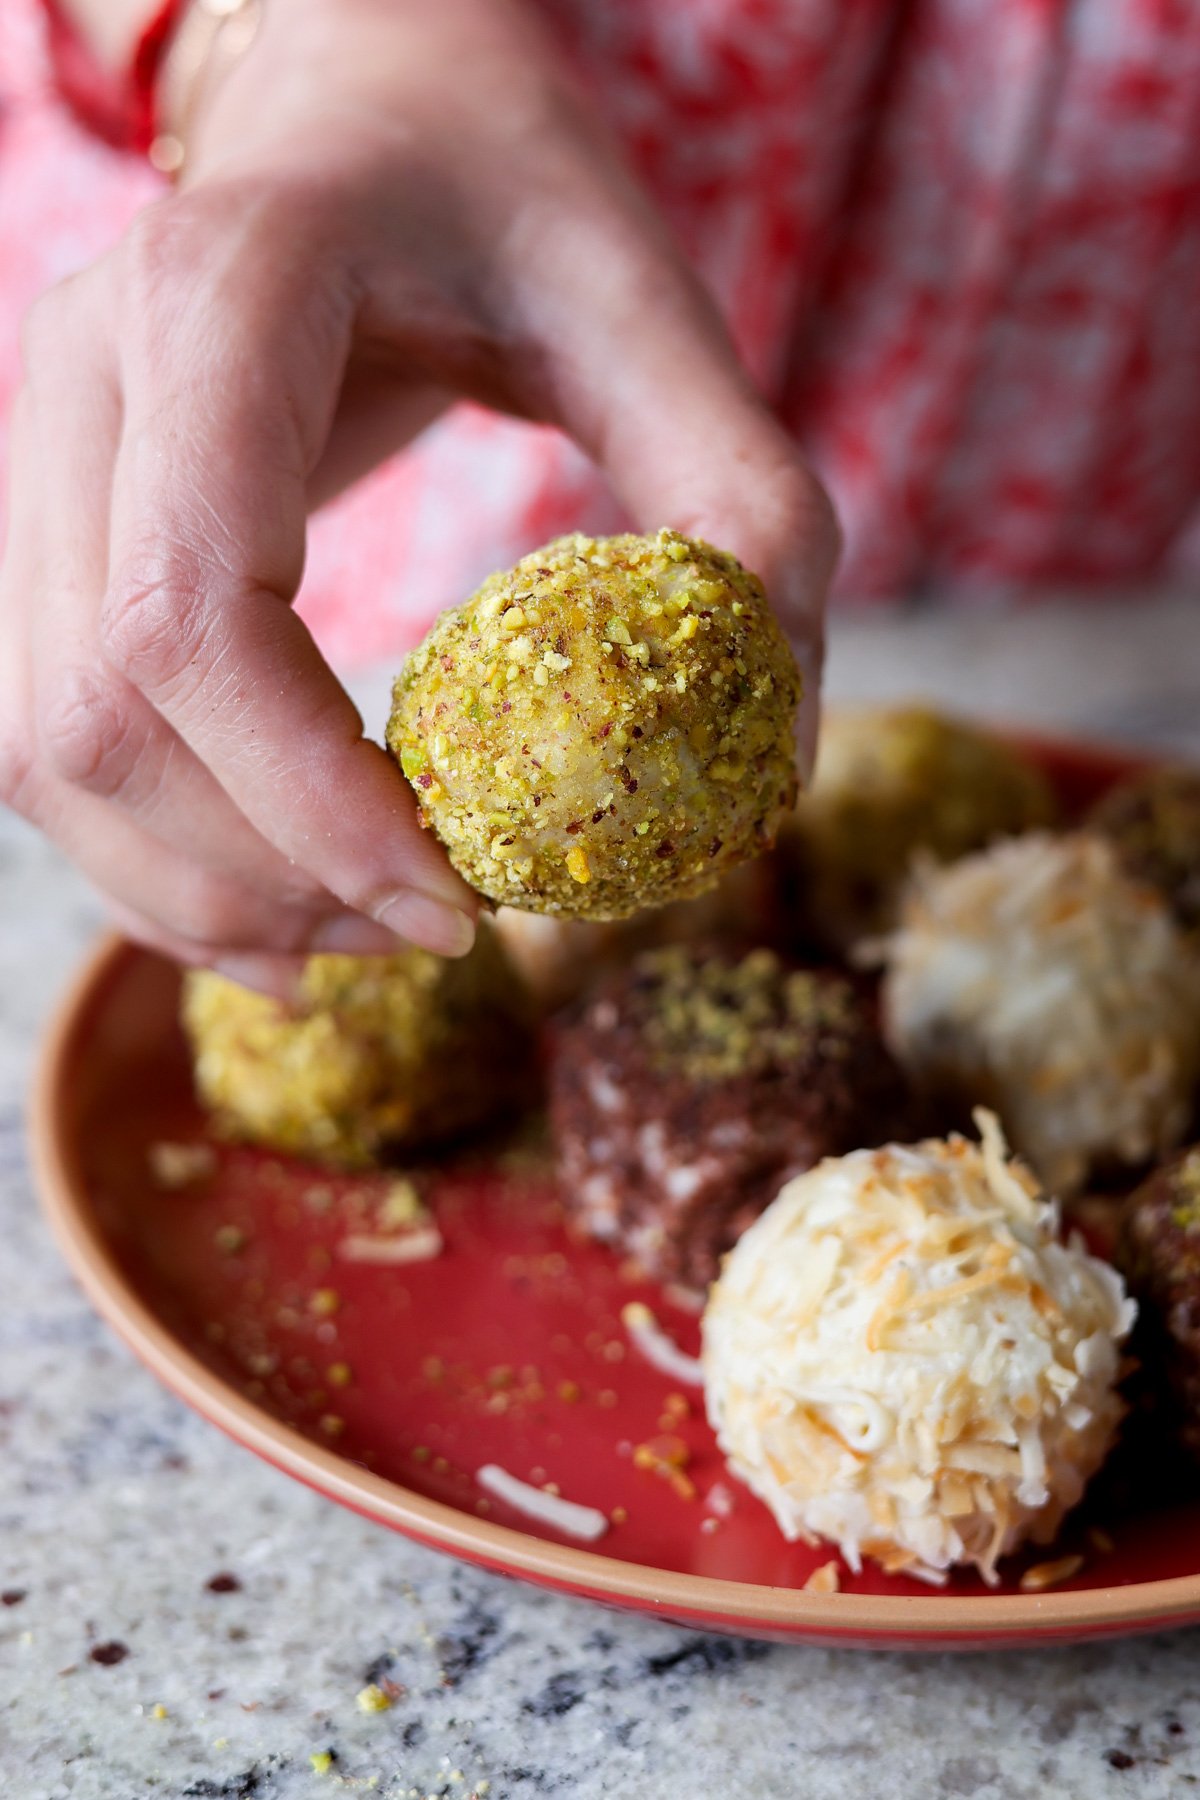
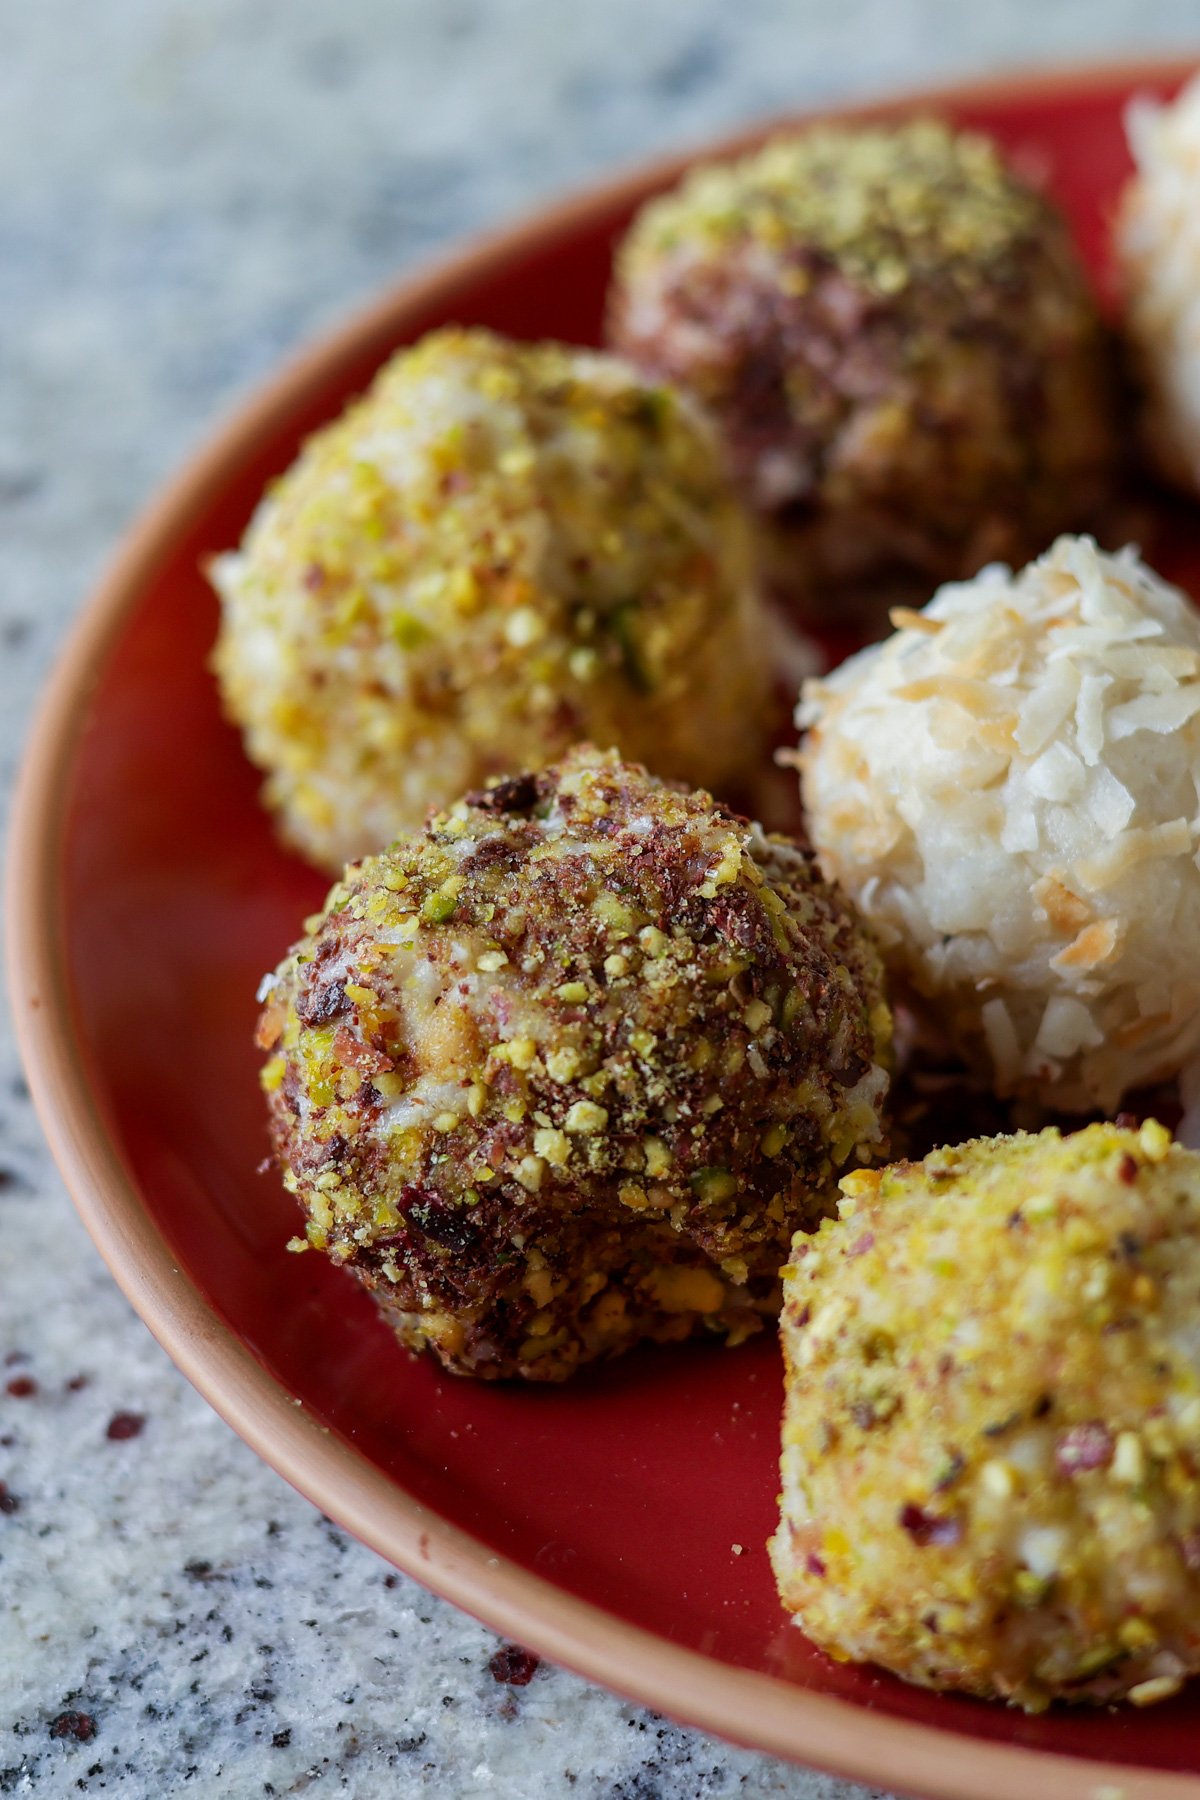
Creamy rich Indian rice pudding rolled into balls and coated in various toppings to make a perfect dessert that’s a hit at any dinner party. These kheer ladoos (rice pudding truffles) have an amazing texture and cardamom flavor! (gluten-free and soy-free)
These are an easy dessert for any festive season or for Diwali. I made this decadent rice pudding flavored with cardamom, which is basically Punjabi kheer.
Then, I mix it with some cashew cream, chill it, scoop it into balls, and roll them in different toppings like pistachios, cocoa powder, almond slivers, rose petals, melted chocolate, toasted coconut, or anything else you like.
Ladoo are basically Indian truffles, and these are flavored with cardamom for a simple yet delicious dessert.
You can change up the flavor with things like cinnamon or vanilla, and you can play around with toppings and mix-ins to make all kinds of delicious variations! For extra decadent rice pudding truffles, melt some chocolate with a little bit of coconut oil in a double boiler, then coat them in the melted chocolate.
Kheer ladoo are great to serve either as a snack or dessert. They don’t need extra bowls or spoons, and they’re already portioned. You can also make them ahead of time, so you won’t have as much cooking to do on the day of your dinner party.
Why You’ll Love Kheer Ladoo
creamy truffles scented with cardamom
easy, make-ahead dessert perfect for Diwali or any dinner party
versatile! Add mix-ins and toppings of choice to make these your own
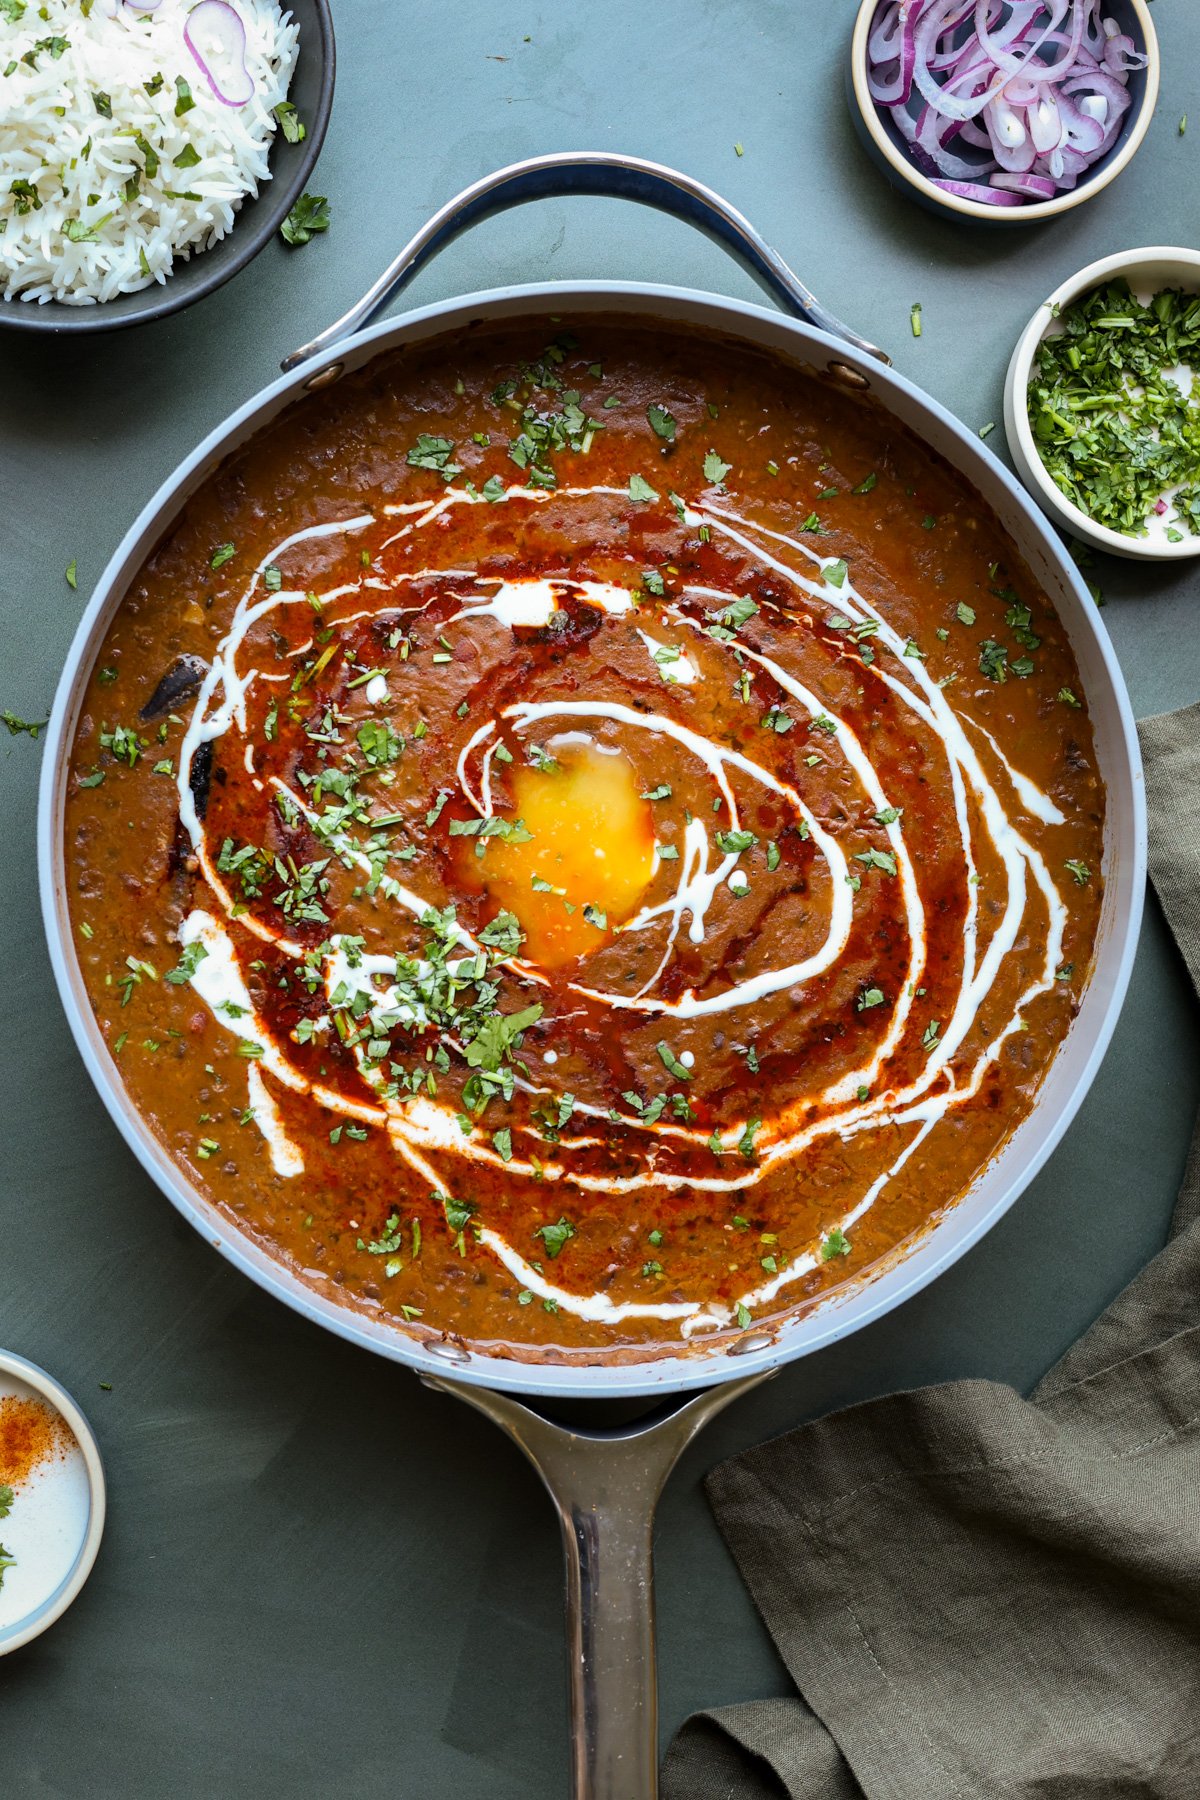
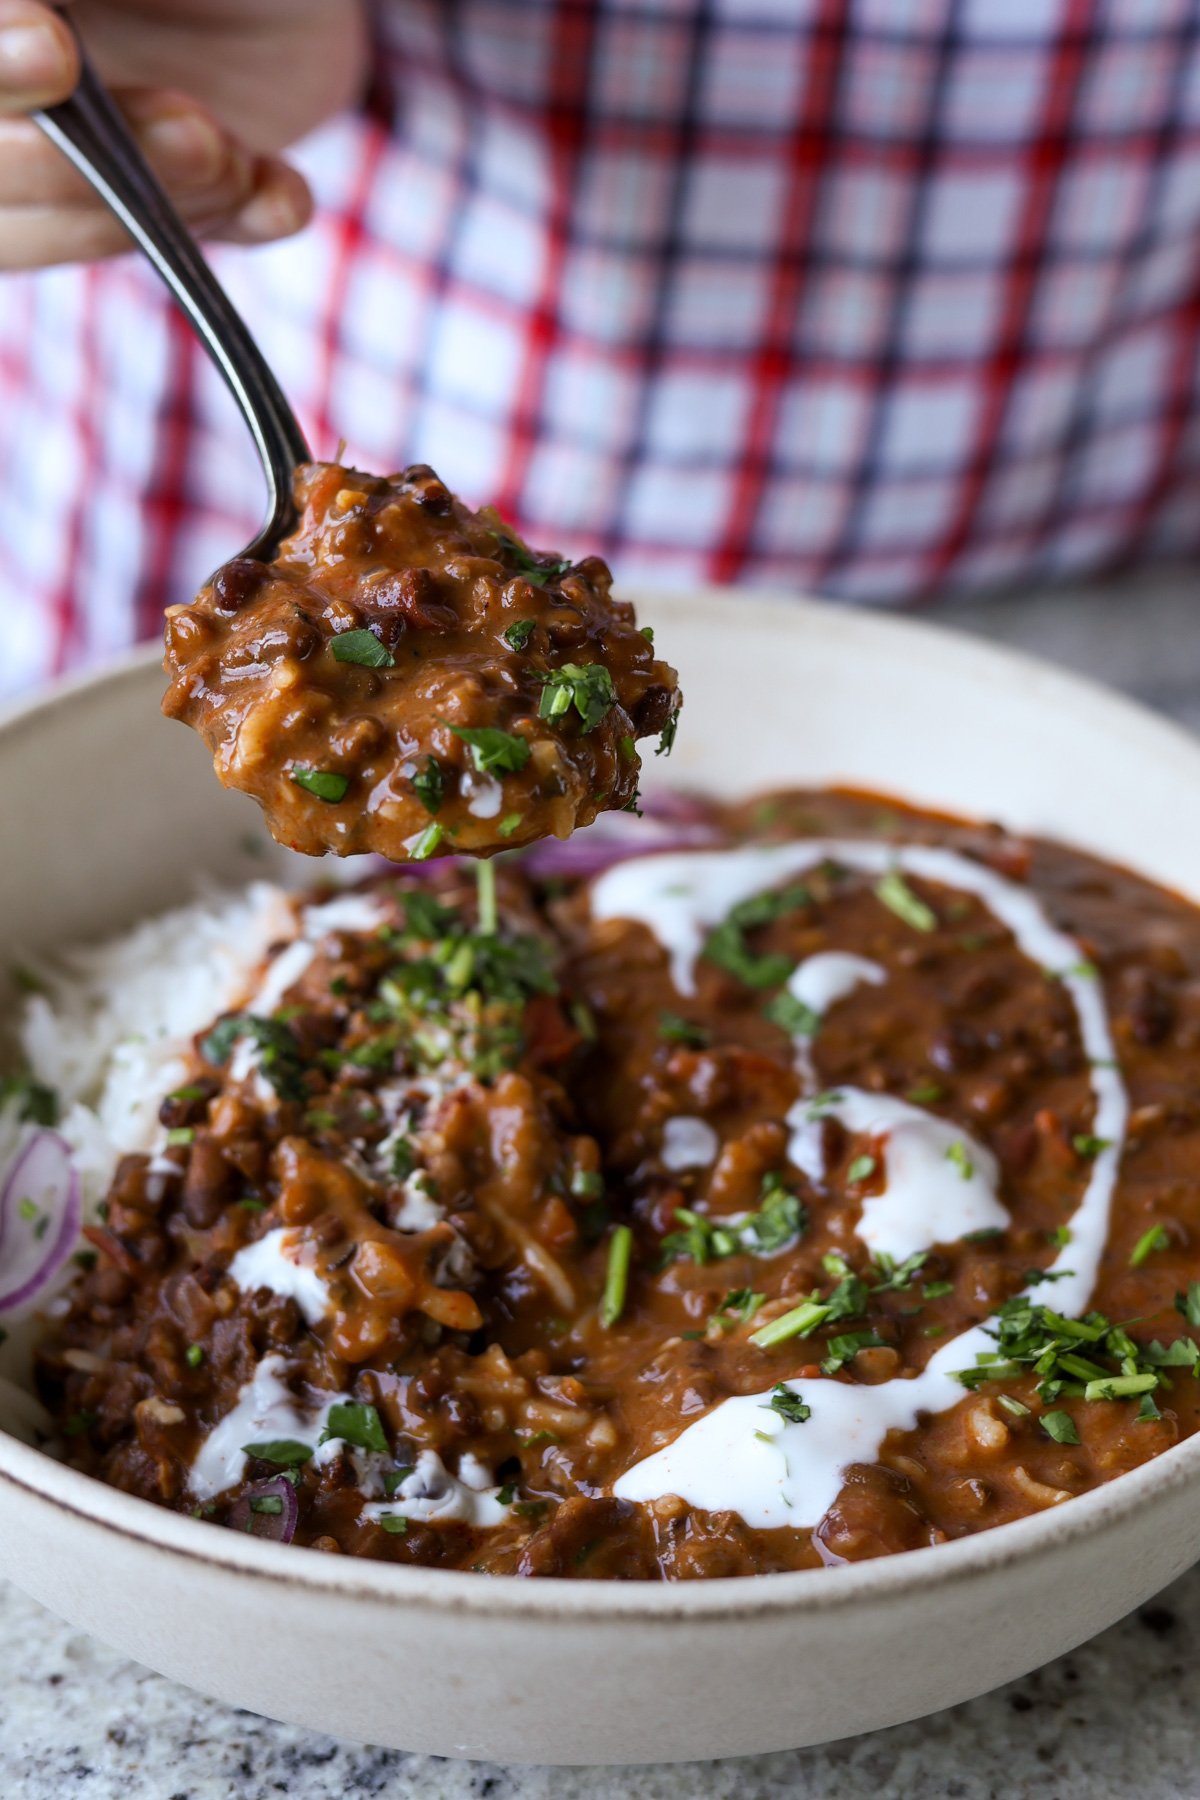
Dal Makhani is one of the most ordered Indian dish in restaurants. You can make authentic, buttery, rich dal makhani at home. It’s just as good as the restaurant version! Black gram and kidney beans are simmered in a creamy spiced sauce and is perfect for special occasions or a great dinner. With Instant Pot and Sauce pan instructions. (gluten-free, soy-free, nut-free, oil-free option).
Love ordering Dal Makhani at restaurants? You’ll love this homemade version even more! This is adapted from my home-style dal makhani that’s on the blog and in my books. The difference is that this version has more spices, including some whole spices, which create more layers of flavor.
This version of dal makhani is a little bit more involved than my home-style version. It has both a base sauce and a spiced oil. This levels up the flavor and adds a smoky, creamy flavor, like restaurants usually serve. There’s also a lot more Kashmiri chili powder in this version compared to the home-style one.
The home-style recipe is quicker and still delicious, but this one takes it up another couple of notches, simmering the beans in a deeply-flavored sauce.
Makhani means both “butter” and “like butter,” and the dish is called dal makhani, both because of the butter content and the creamy, buttery texture of the dal. The goal is to cook the beans long enough that they become soft and almost break down into the sauce, thickening it and creating a smooth consistency. For the right texture, I prefer to use a pressure cooker / instant pot, but you can also cook it in a saucepan. I included both methods in the recipe.
After cooking the beans, we make a delicious sauce with whole spices, aromatics, and ground spices, then add the cooked beans to it. Then, we prepare a spice oil with toasted fenugreek leaves, Kashmiri chili, smoked paprika, and a smoky burnt cinnamon stick. Burning the cinnamon stick for just half a second before adding it to give the dal its smoky restaurant-style flavor.
Traditionally, restaurants achieve this smoky flavor by using food-grade charcoal. They place a piece of hot charcoal in a bowl with oil, which immediately smokes. Then, they nestle the bowl inside the dal pot and cover the pan for 10 to 15 minutes. If you don’t want to use charcoal or burnt cinnamon, liquid smoke can also work.
Why You’ll Love Dal Makhani
creamy, buttery dal with two kinds of beans
deep flavor from the sauce and the spice oil, no dairy needed!
flexible! Cook the beans in the Instant Pot or on the stovetop
naturally gluten-free, soy-free, and nut-free with an oil-free option
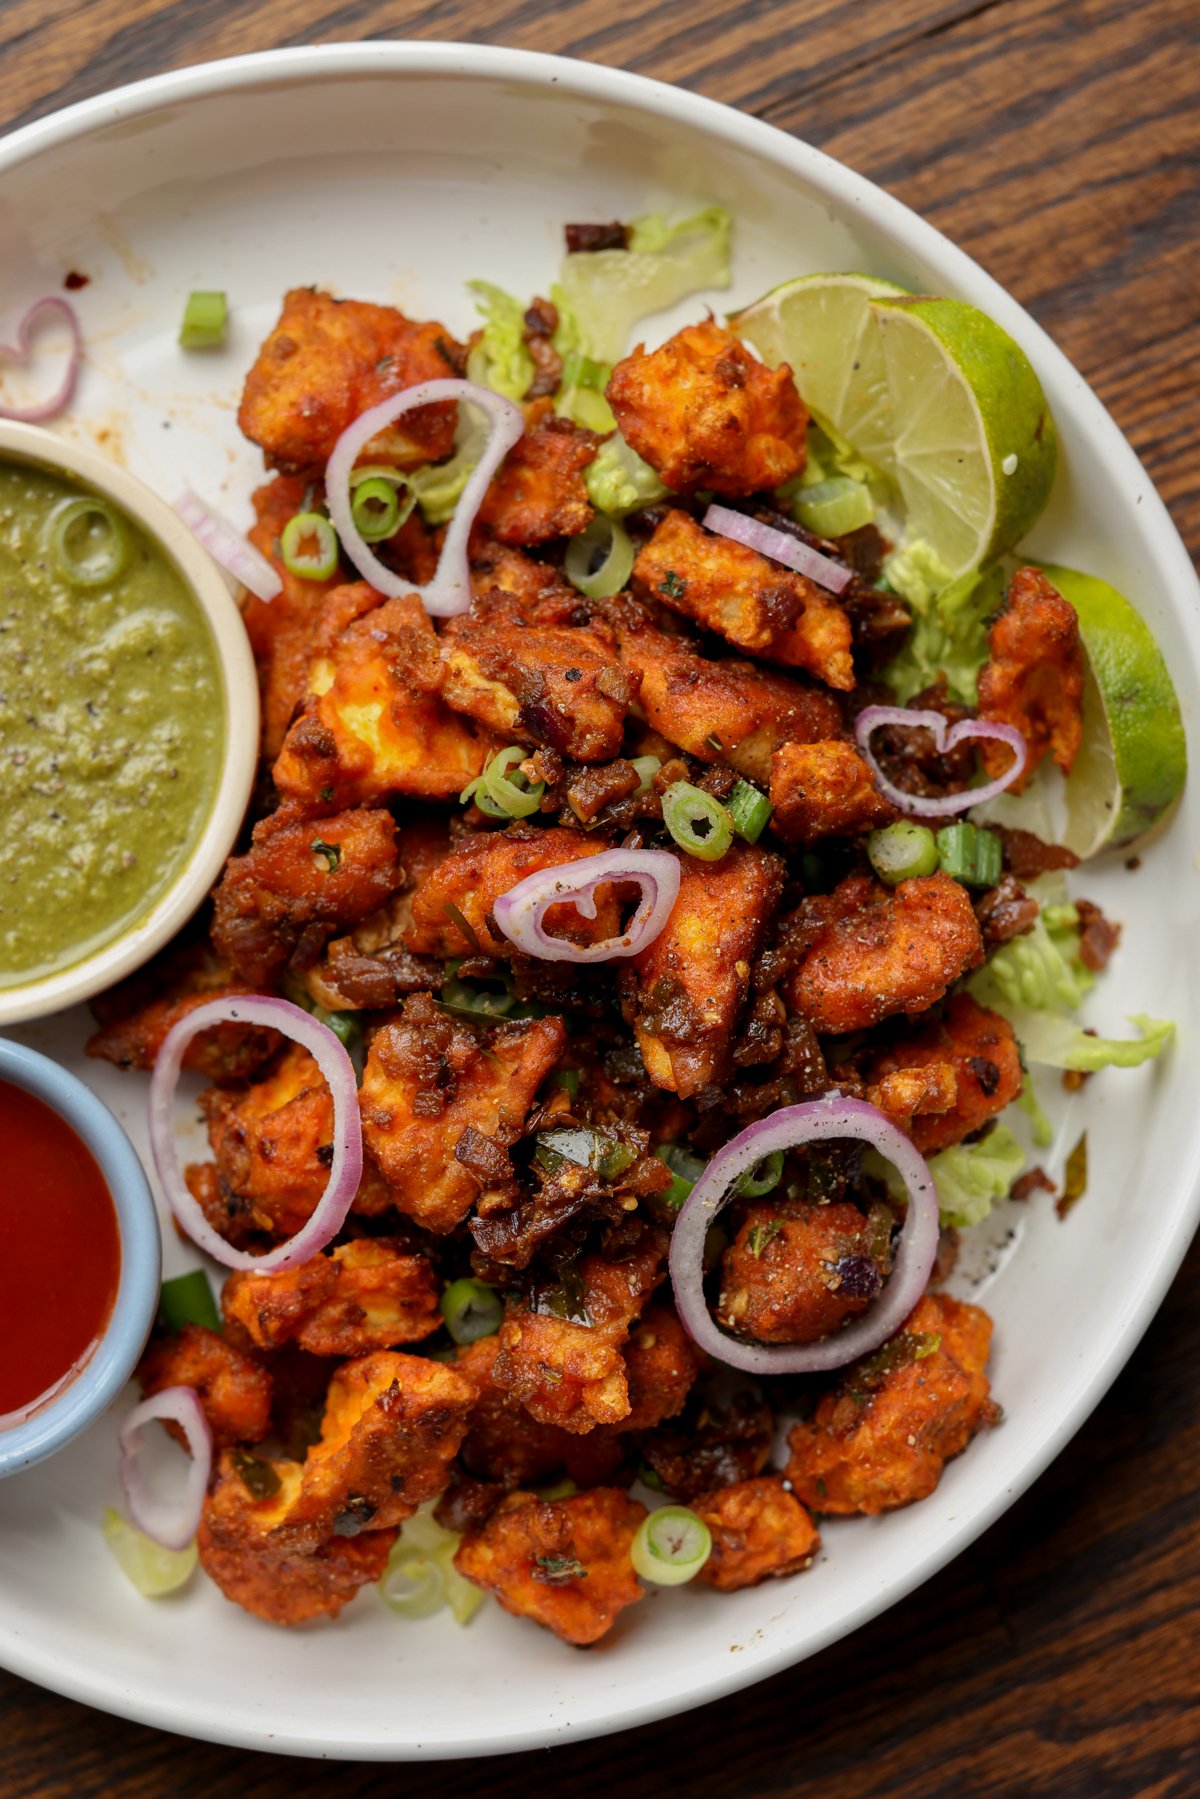
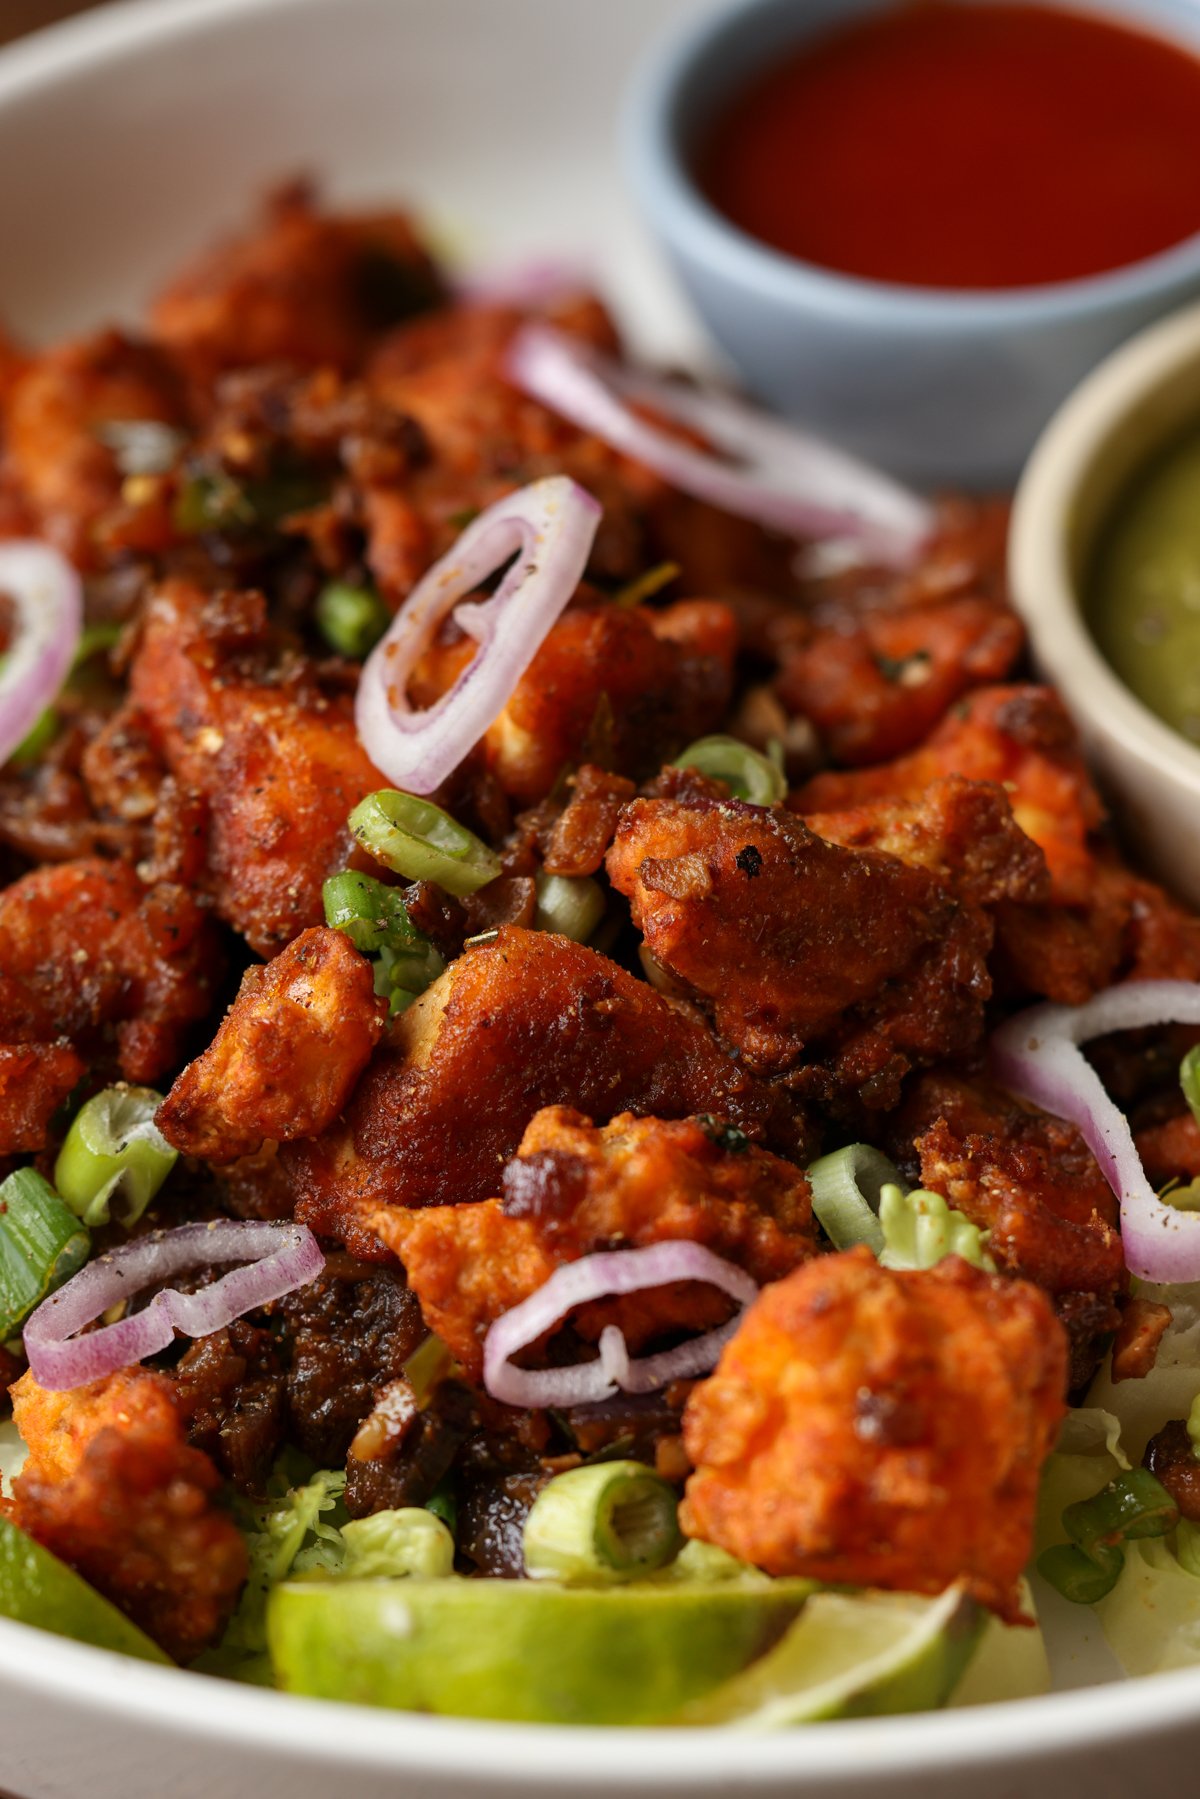
Vegan Chicken 555 reimagines a beloved South Indian street-style appetizer. Crisp golden tofu is coated in a richly spiced sauce infused with fennel, ginger, garlic, coriander, and peppers, and enough heat to make you reach for seconds (and maybe a cold drink). gluten free, nut free. soy free option.
This is another one in my series creating vegan versions of these amazing, meat-heavy, regional Indian appetizers. There’s just so much variety in all of these super delicious snacks and appetizers, and sometimes you don’t find those flavors and that spice in the vegetarian appetizers.
You can use this recipe with tofu, soy curls, chickpea tofu, chickpeas, or vegetables, like cauliflower. Basically, you coat your protein or vegetables of choice with this amazing, flavorful batter, and either pan fry or bake it.
Then, we make this easy, spicy, and delicious sauce mixture. It’s kind of a dry sauce, and you toss the crisped tofu “chicken” in it. Oh my god, it’s so incredibly delicious and also pretty spicy!
You can adjust the spice level to your preference. There are four kinds of chilies in this tofu 555: Kashmiri chili powder in the batter, and green chilies, cayenne, and red pepper flakes in the sauce. To get the flavor with less heat, reduce any or all of those. The combination of peppers adds a ton of flavor, so you definitely want to use some of each, even if you don’t use the full amounts. You can use a milder green chili to manage the heat, too, if you prefer.
Basically, adjust the heat based on your preference, but definitely try this vegan chicken 555. It’s just so fabulously delicious!
Tofu 555 is great on its own or in crunchy salads with juicy fruits like apples, pears, or mangoes, or with roasted or fresh vegetables. A cucumber salad with a simple lime, salt, and pepper dressing also pairs wonderfully with this Indian appetizer. Or, you can make wraps with lettuce, creamy dressing, and fresh green chilis or pickled jalapeños.
No matter how you serve it, you have got to try vegan chicken 555!
Why You’ll Love Chicken 555
crispy tofu in thick, spicy sauce with flavors of fennel, ginger, garlic, coriander, and 4 kinds of peppers
easily adjust the heat to your preference
use your plant based protein or use veggies of choice.
naturally gluten-free and nut-free with easy soy-free option
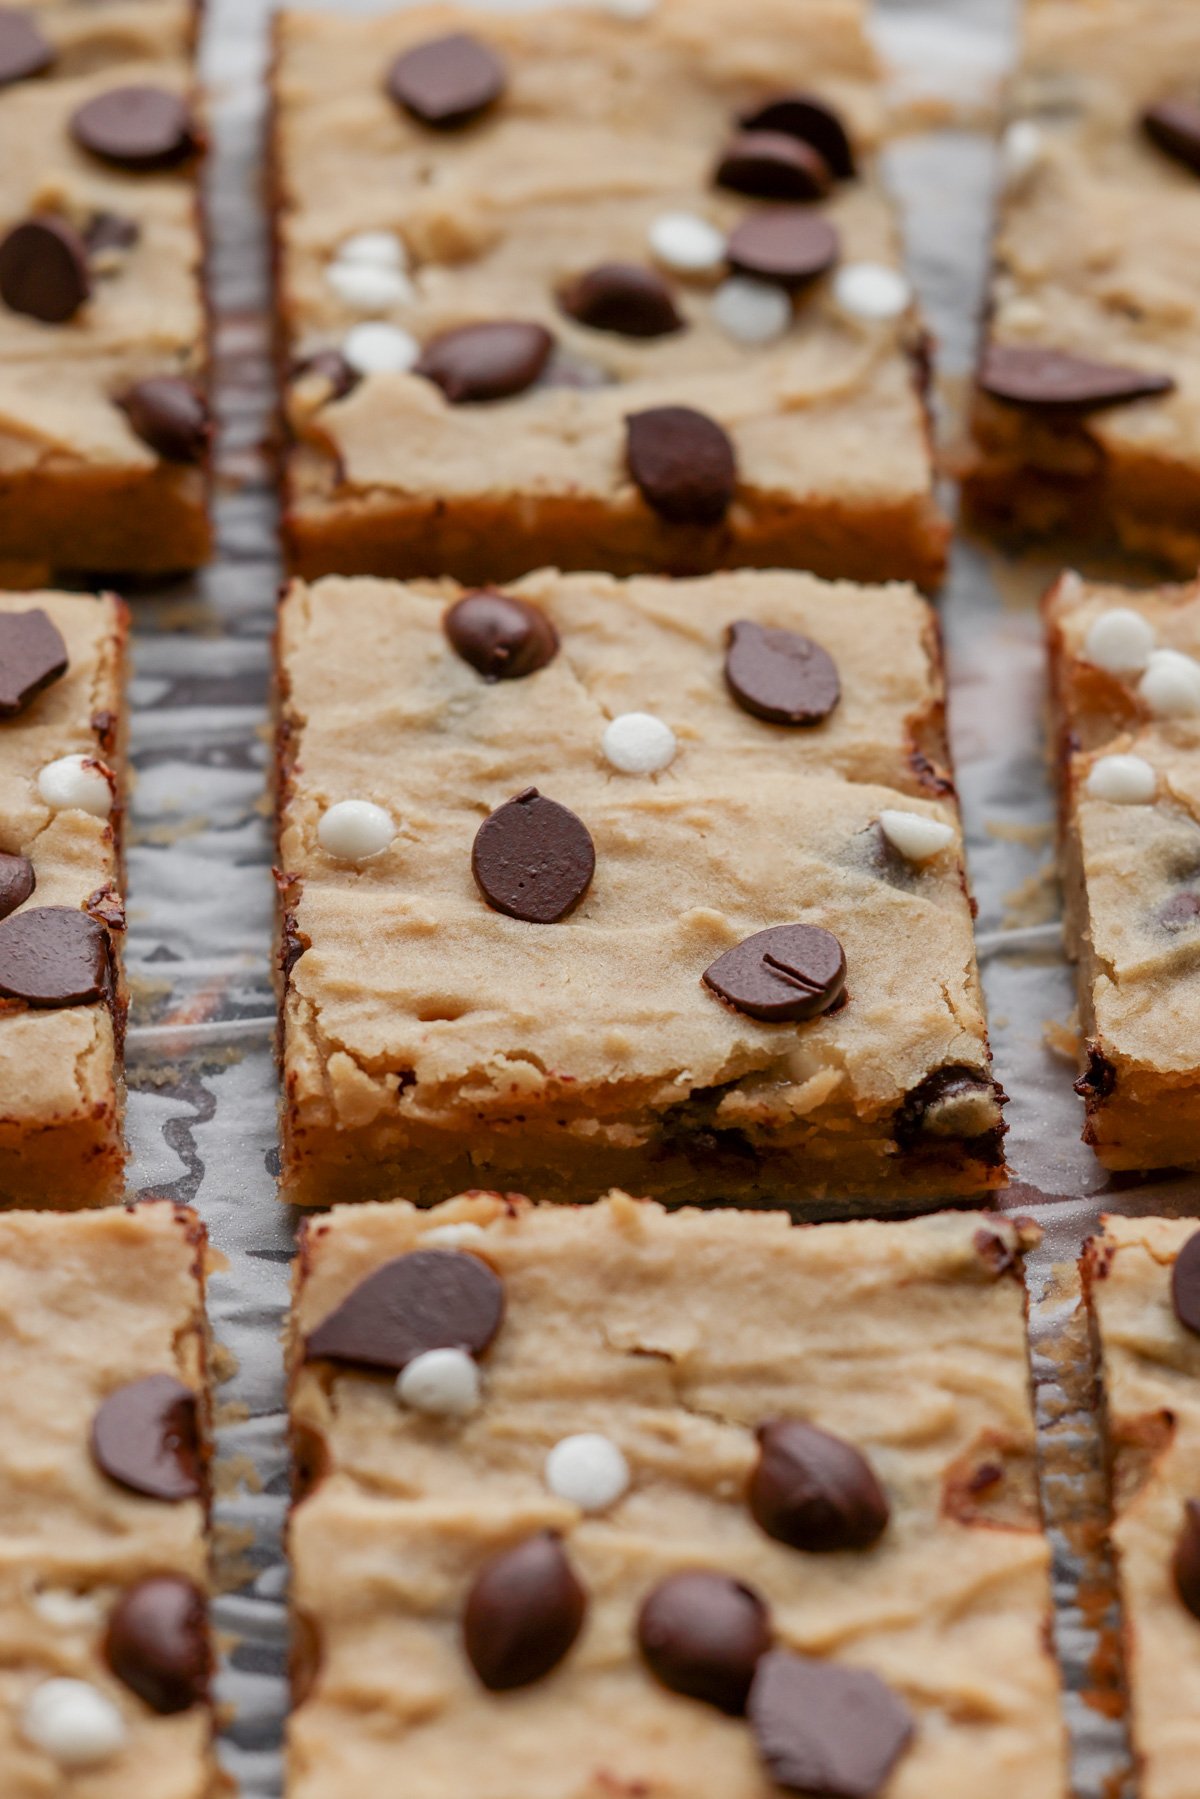
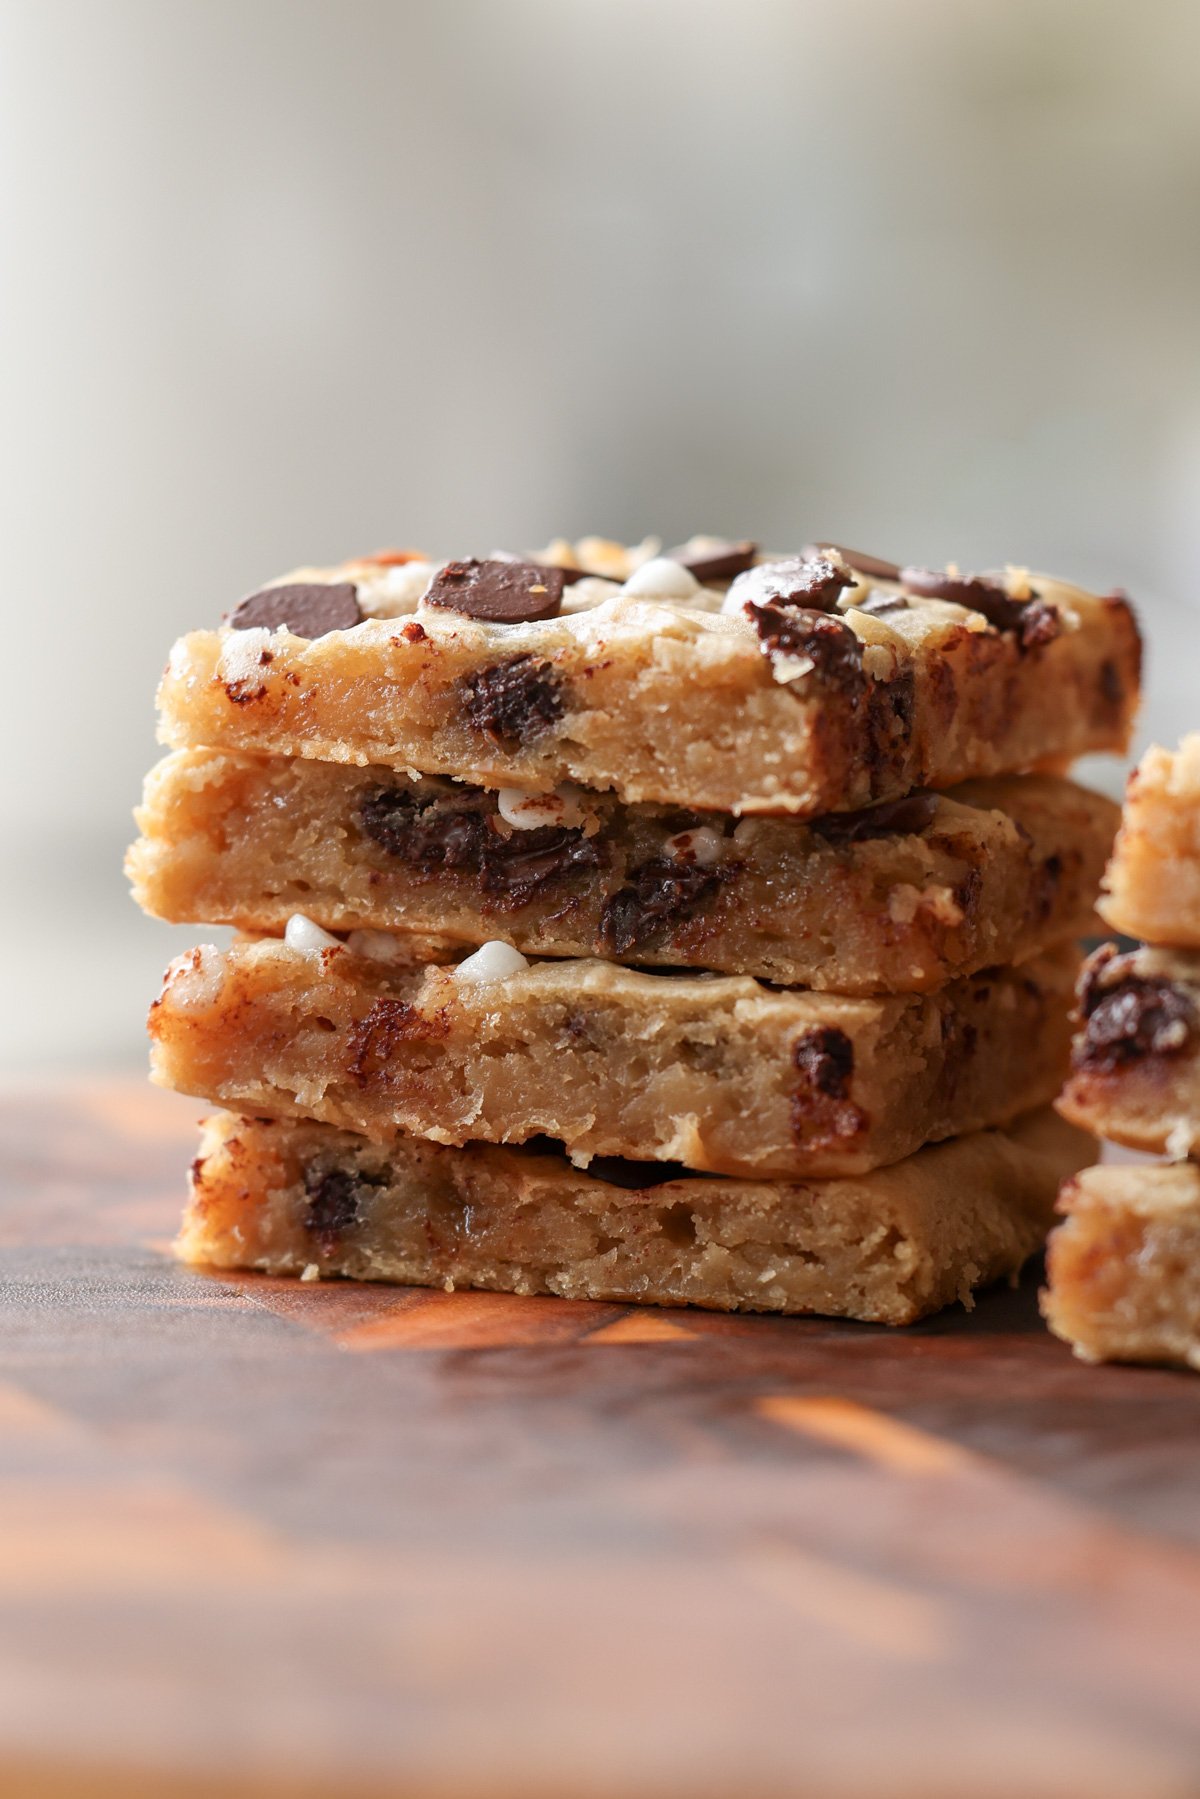
There are just so many ways to use all these legumes, so I decided to try using white beans. Chickpeas can sometimes be a little bit more grainy and gritty, even when you blend them That’s because chickpeas have thicker skin. The texture of the bean is also a bit more gritty compared to creamy white beans, so white beans actually are a great option to use in dessert recipes instead of chickpeas.
I made these blondies with white beans and tahini. Usually, I add some kind of nut butter to my brownies or cookie pies. I wanted to keep this recipe nut-free, so I’m using tahini here. But if you don’t want to use tahini, you can just add some smooth almond butter or peanut butter.
It’s a super simple recipe with just a few ingredients. Just add everything to a blender or a food processor, blend, then transfer to a baking pan. Add your chocolate chips and chunks if you want, and bake. That’s it!
These are amazing and super easy, and you’re going to want to make them again and again.
Why You’ll Love White Bean Blondies
super easy – you make the batter in the blender!
lots of protein and fiber from the beans and tahini
versatile! Make it with chocolate chips or use the snickerdoodle variation
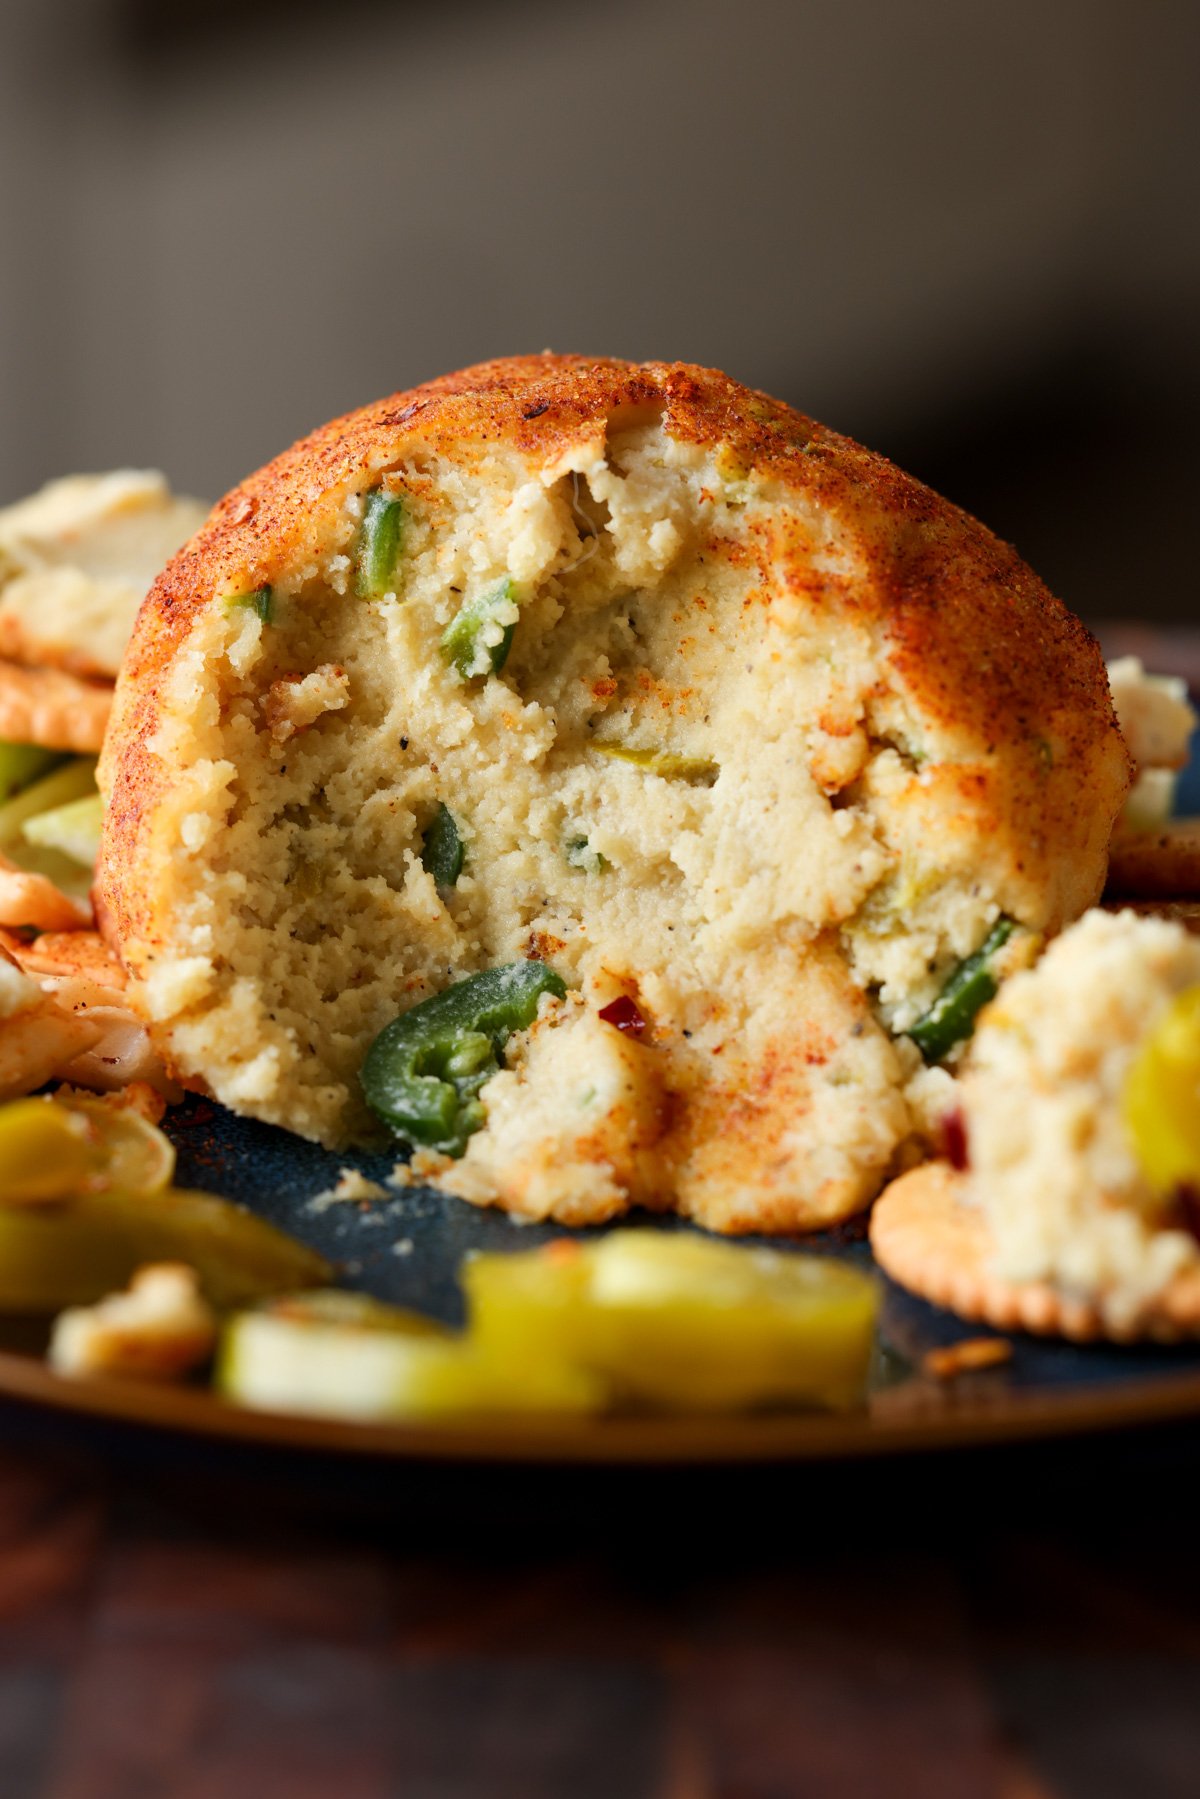
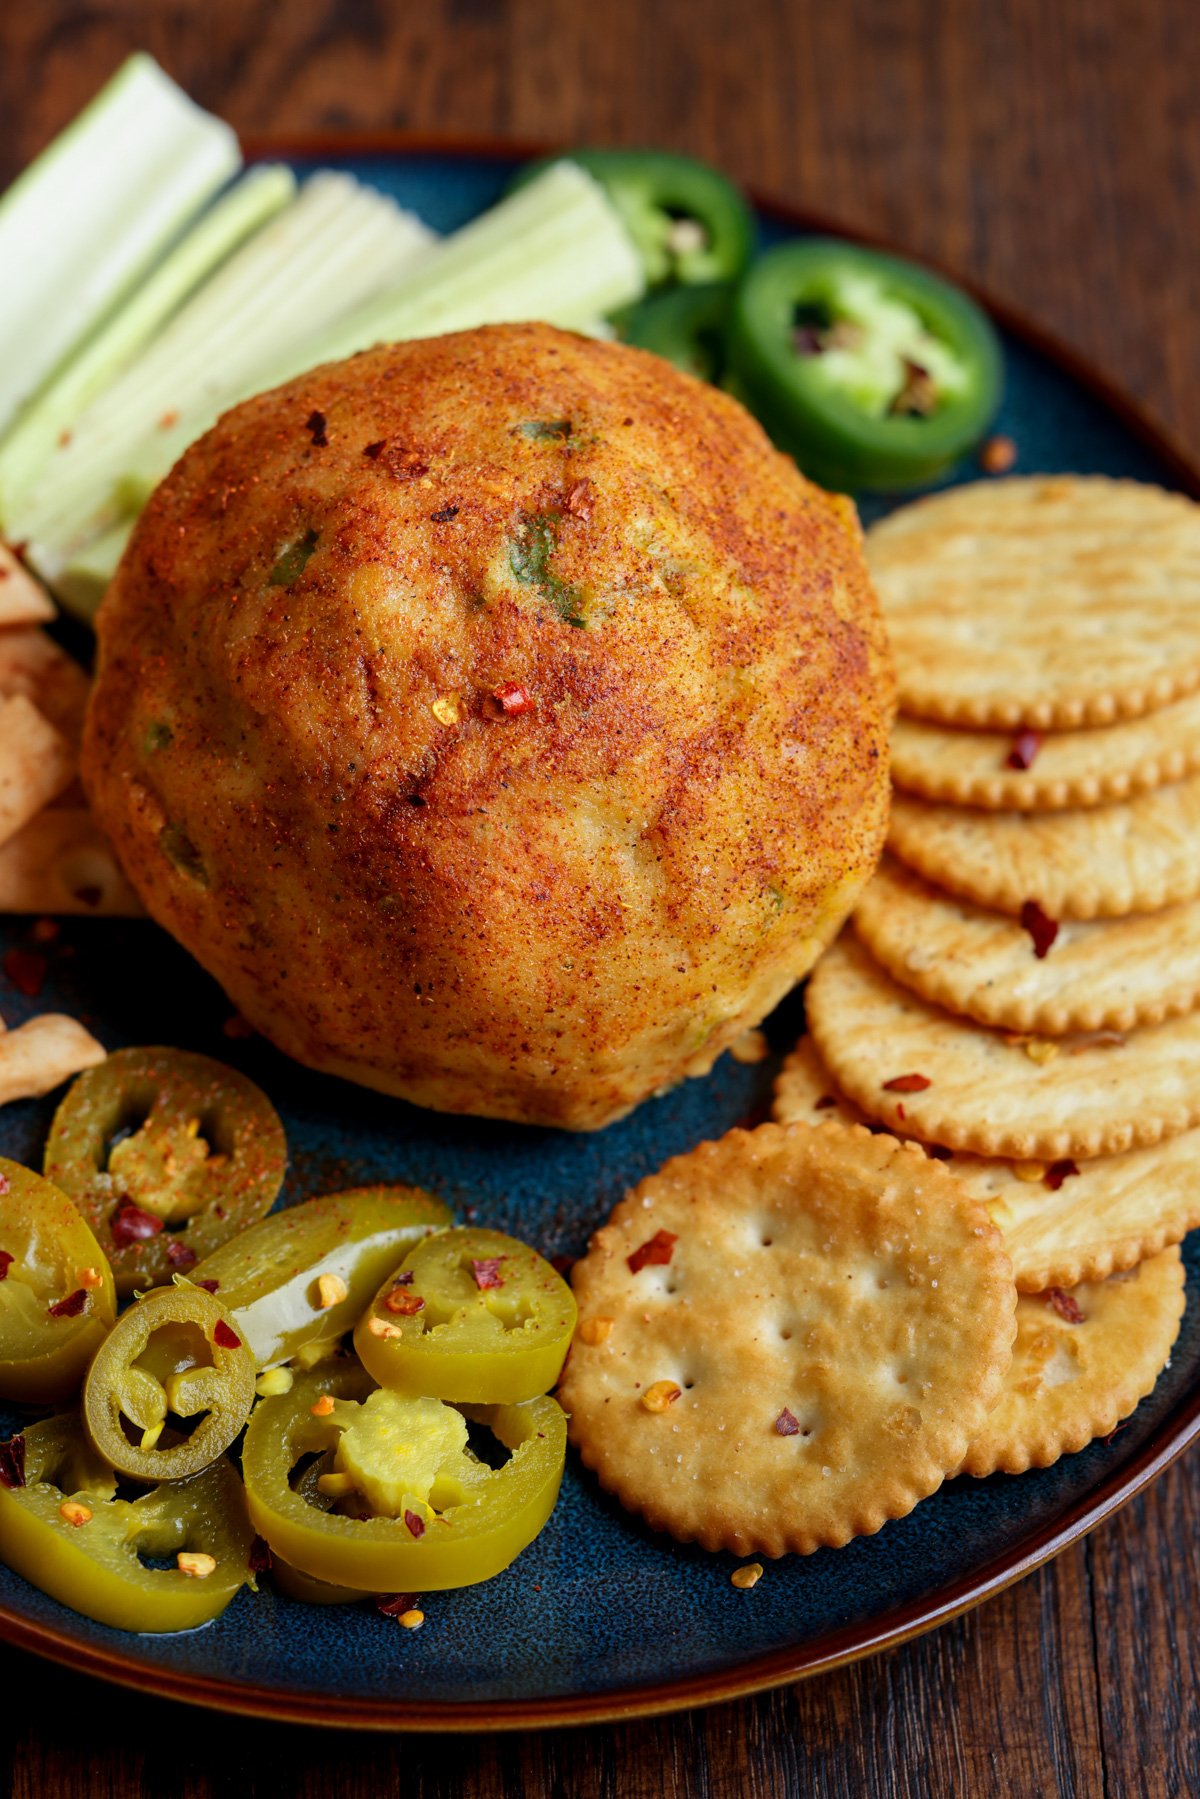
This vegan jalapeño popper cheese ball is super easy: no soaking or blending required! Just 10 minutes of prep time, and it’s ready in about 30 minutes. Perfect for parties with veggies or crackers. (Gluten free, soy free option)
Five reasons you should make this jalapeño popper cheese ball:
No soaking the nuts overnight.
No blending the nuts.
No straining a blended mixture.
Just 10 minutes of active time in the kitchen.
Uses just a few everyday ingredients.
It is just mind-blowingly delicious for the small amount of effort this recipe needs. You just make this flavor mixture that’s like a jalapeño dip with non-dairy yogurt, some brine from pickled jalapeños, and some spices. Then, mix in some almond flour and fresh and pickled jalapeños to create a dough. Shape it into a ball, and bake. That’s it!
Baking this vegan cheese ball helps the flavors meld together and takes a little bit of the bite out of the jalapeños. It just enhances the overall flavor and texture. The result is this fantastically delicious vegan cheese ball to serve with some crackers, veggies, crudités, or however else you like.
This is also such a versatile vegan cheese ball. There are lots of fun ways to serve it! You can make sandwiches with it by spreading it on some bread, and pairing it with some fresh tomatoes or other veggies or some crisp tofu. Or add dollops of this mixture to salads.
It also works great in mini quesadillas! Just spread some of the jalapeño popper cheese ball onto small tortillas with some grilled veggies, fold them over, and cook until crisp in the oven or on the stovetop. If you’re going to use it to make quesadillas, you don’t even need to bake the cheese ball, because cooking the quesadillas will cook the cheese mixture then.
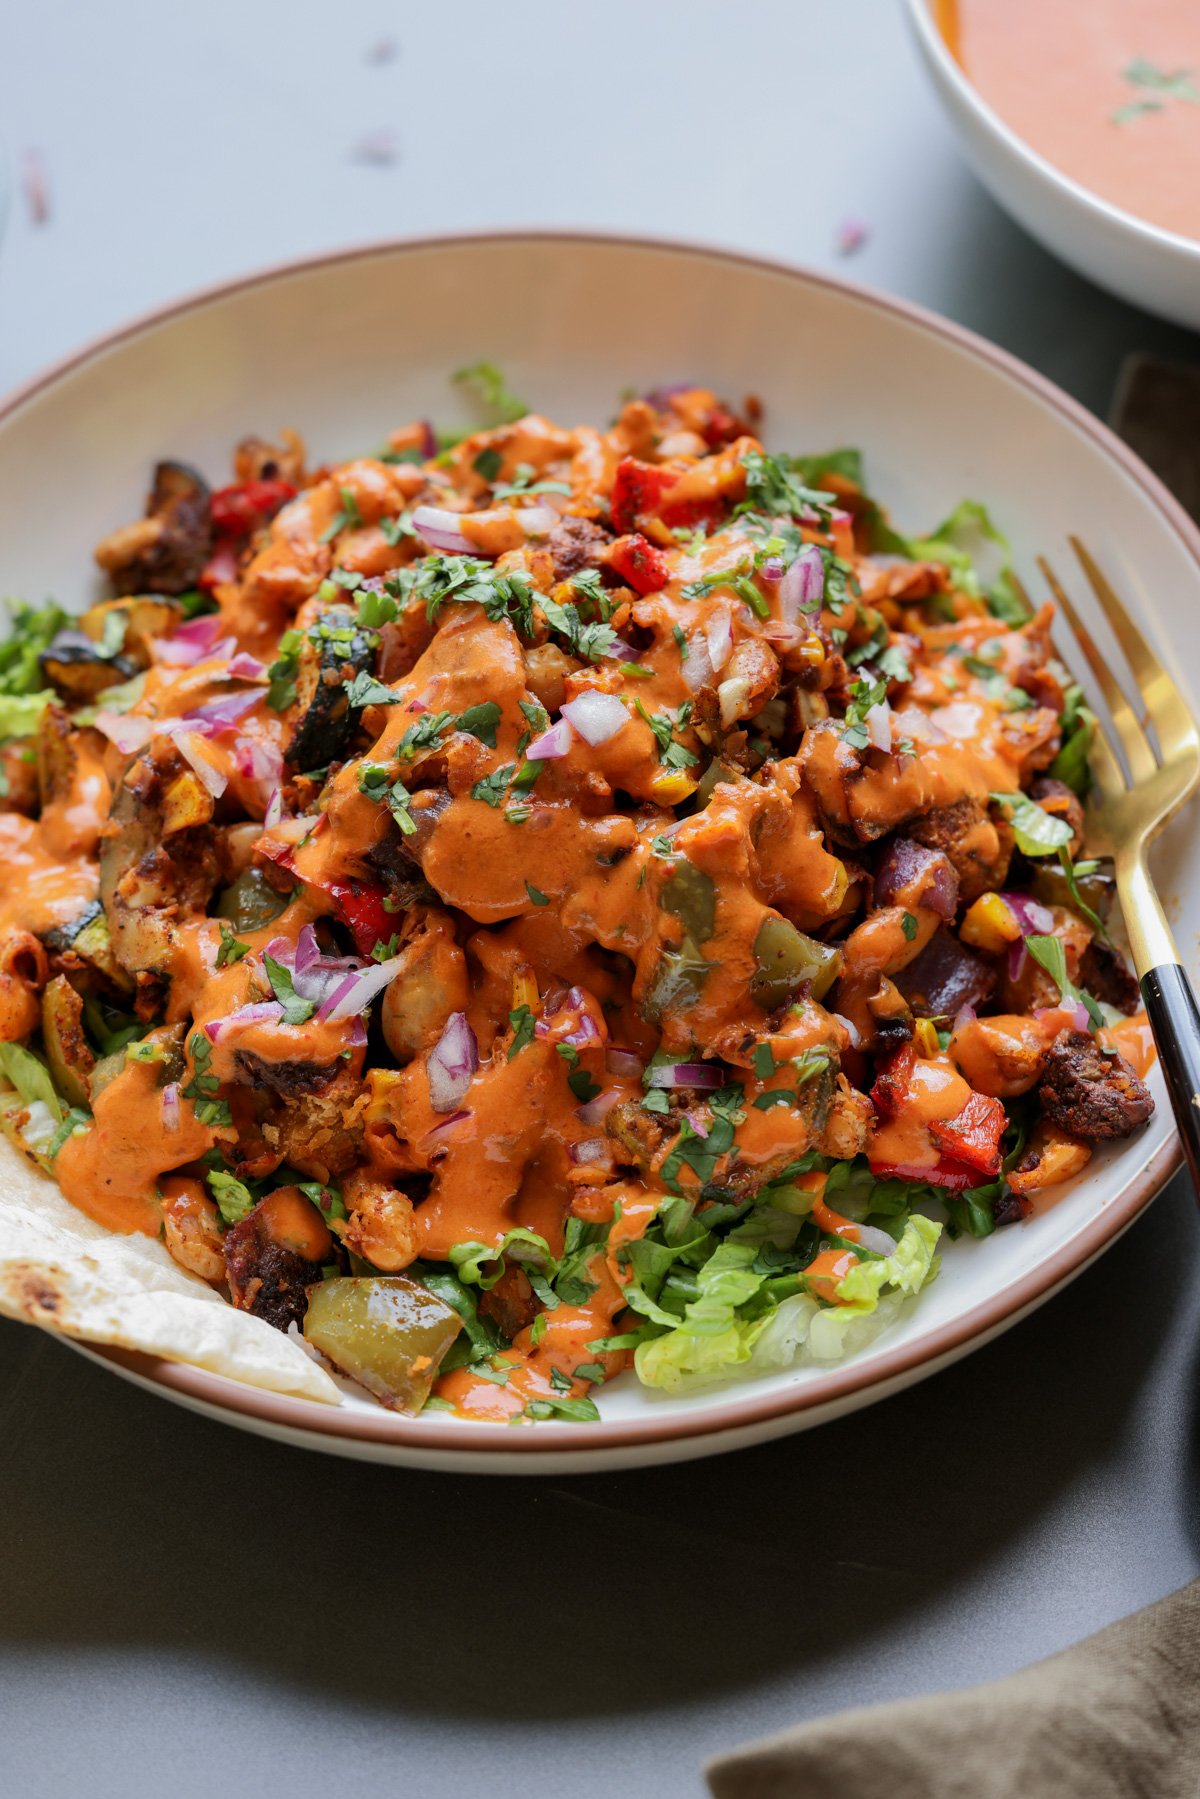
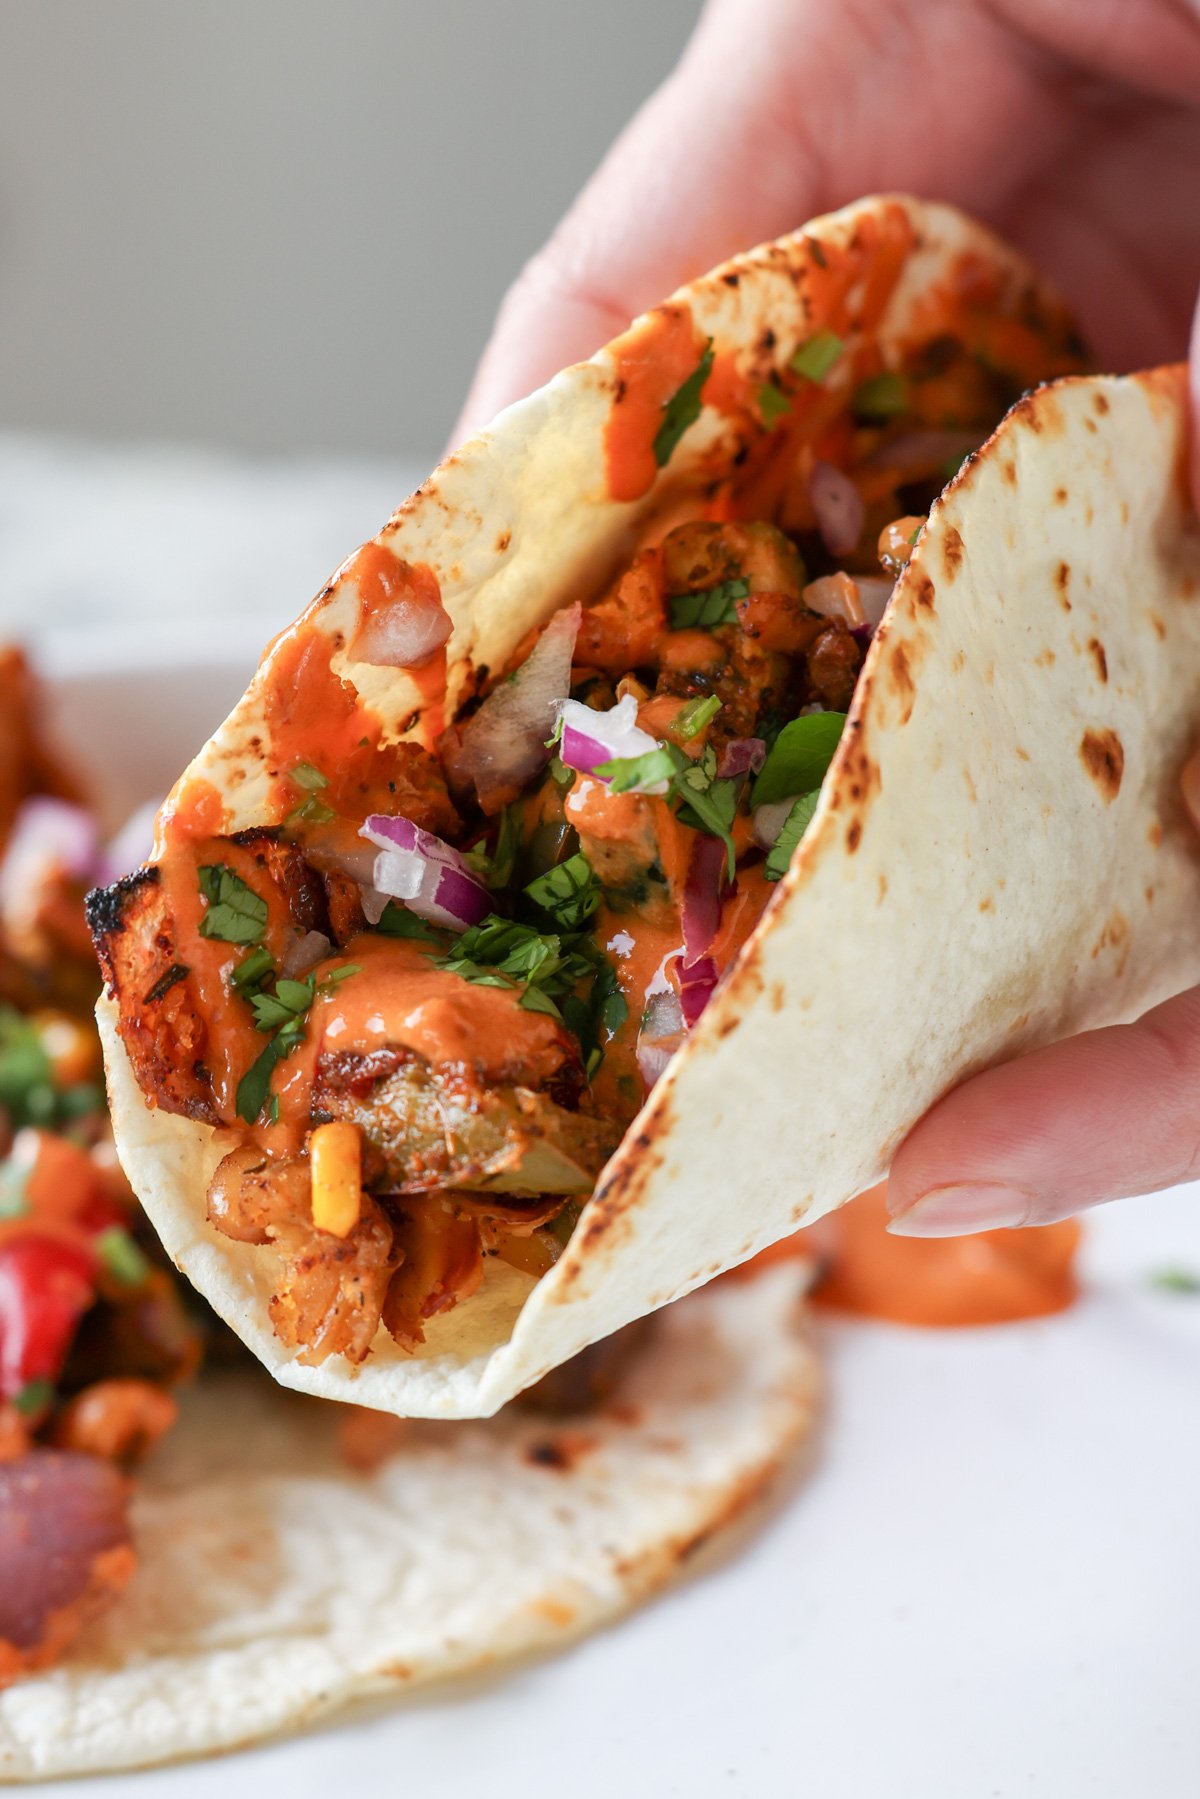
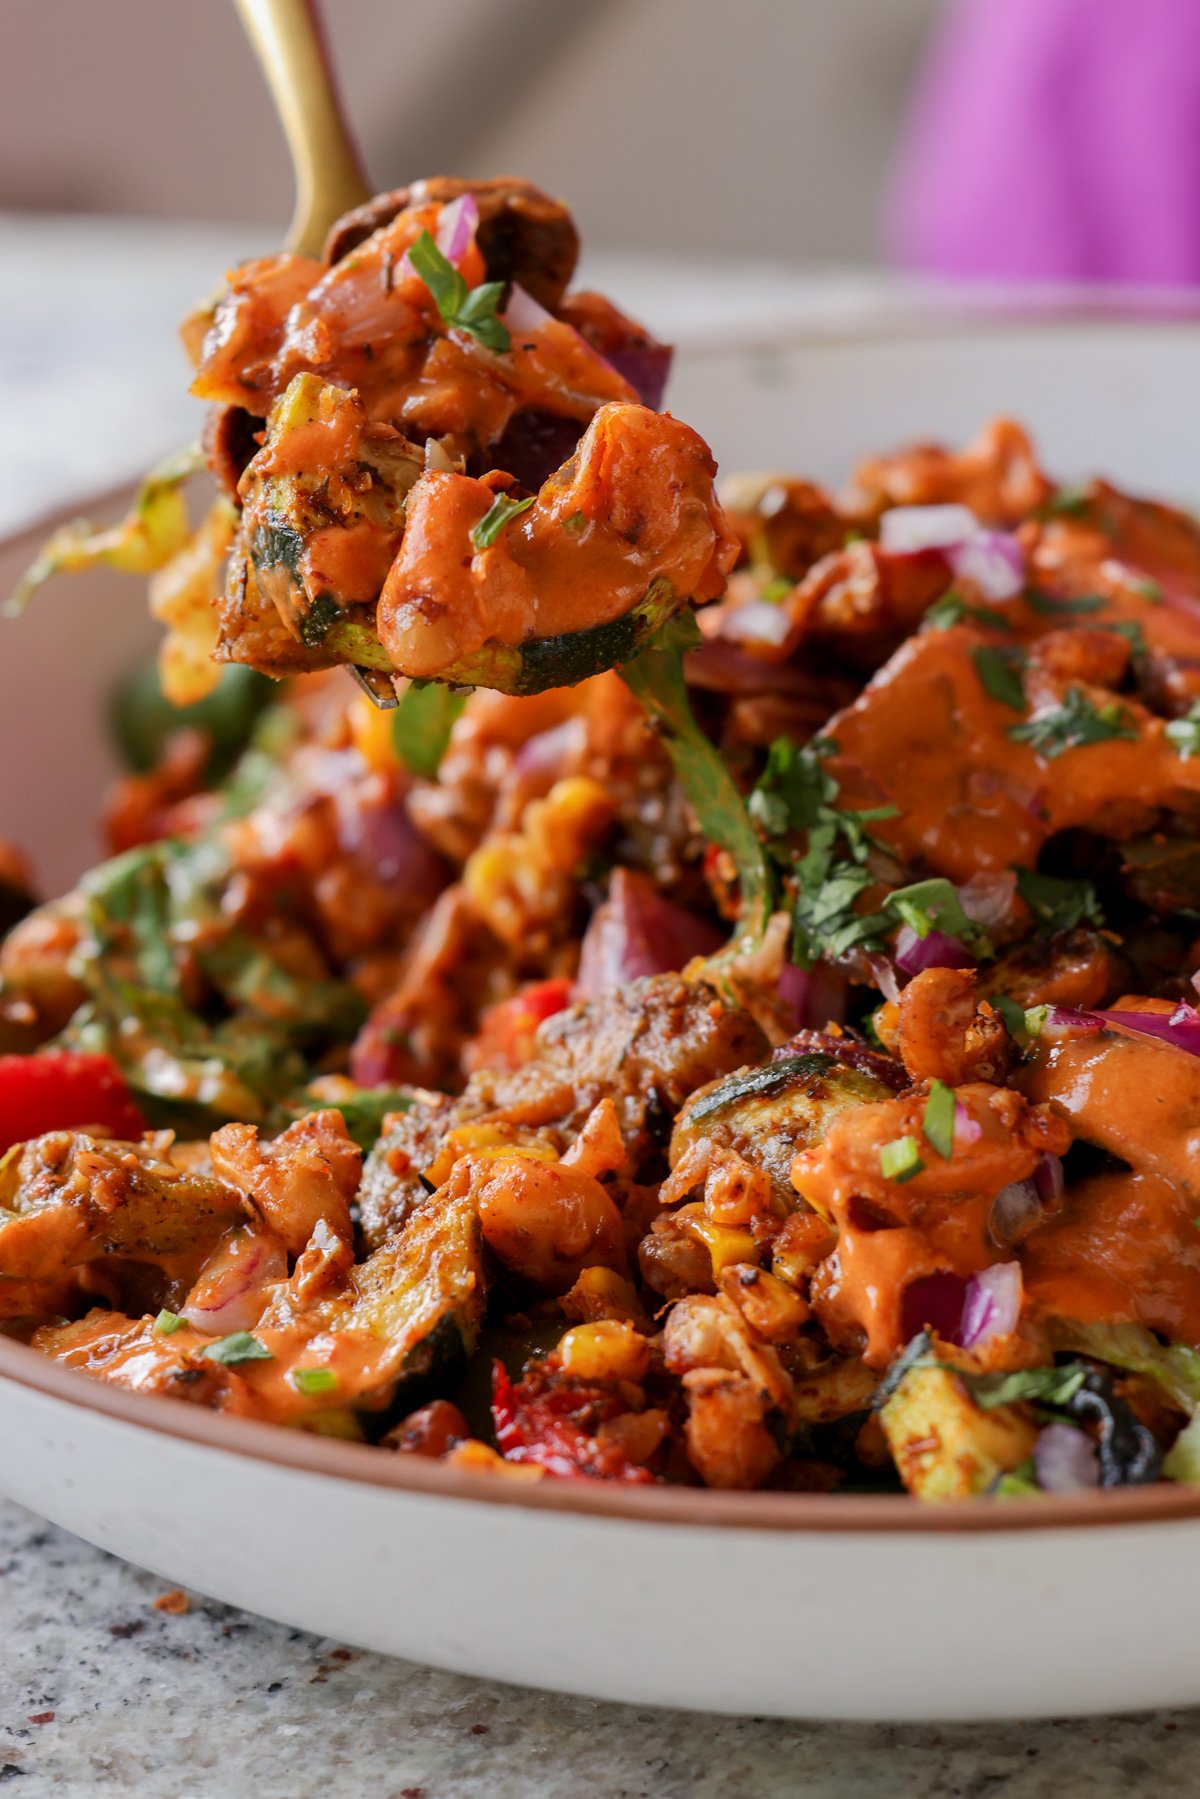
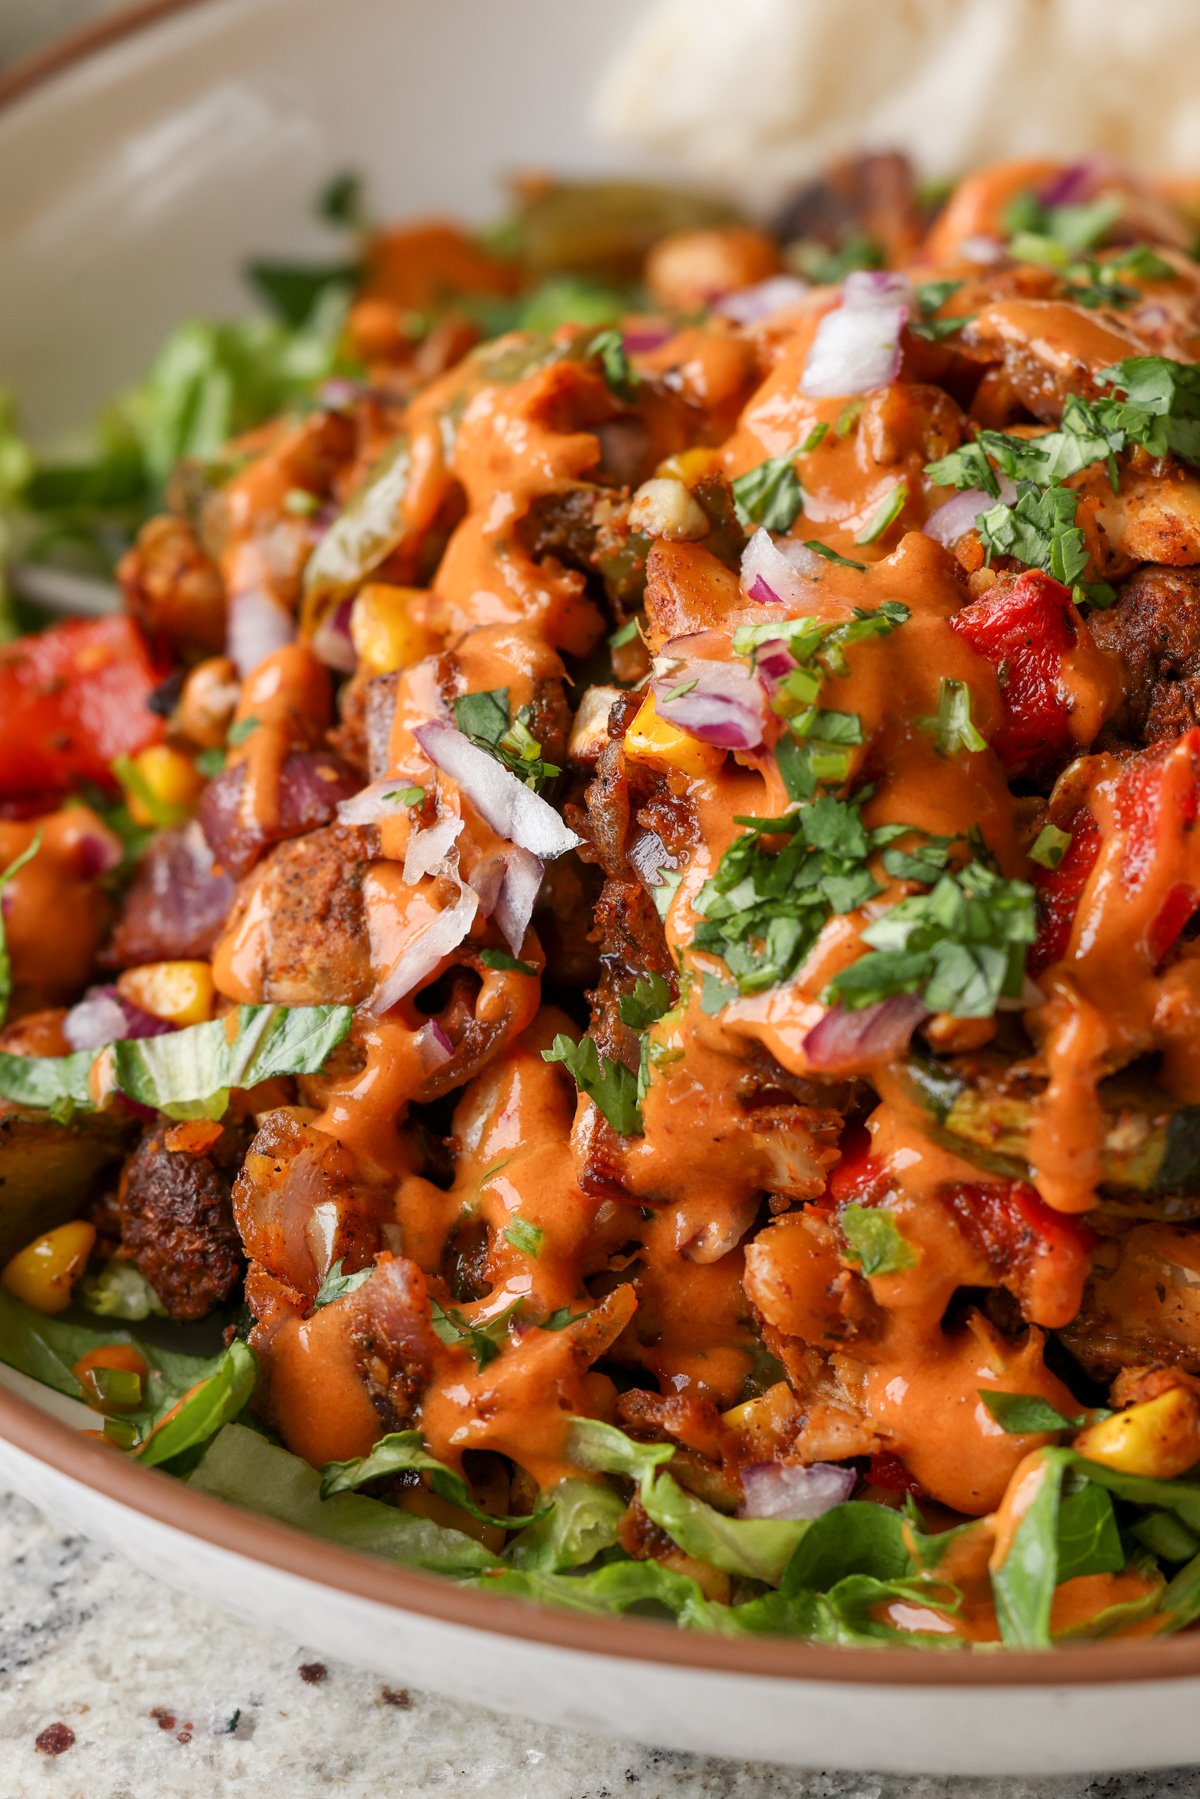
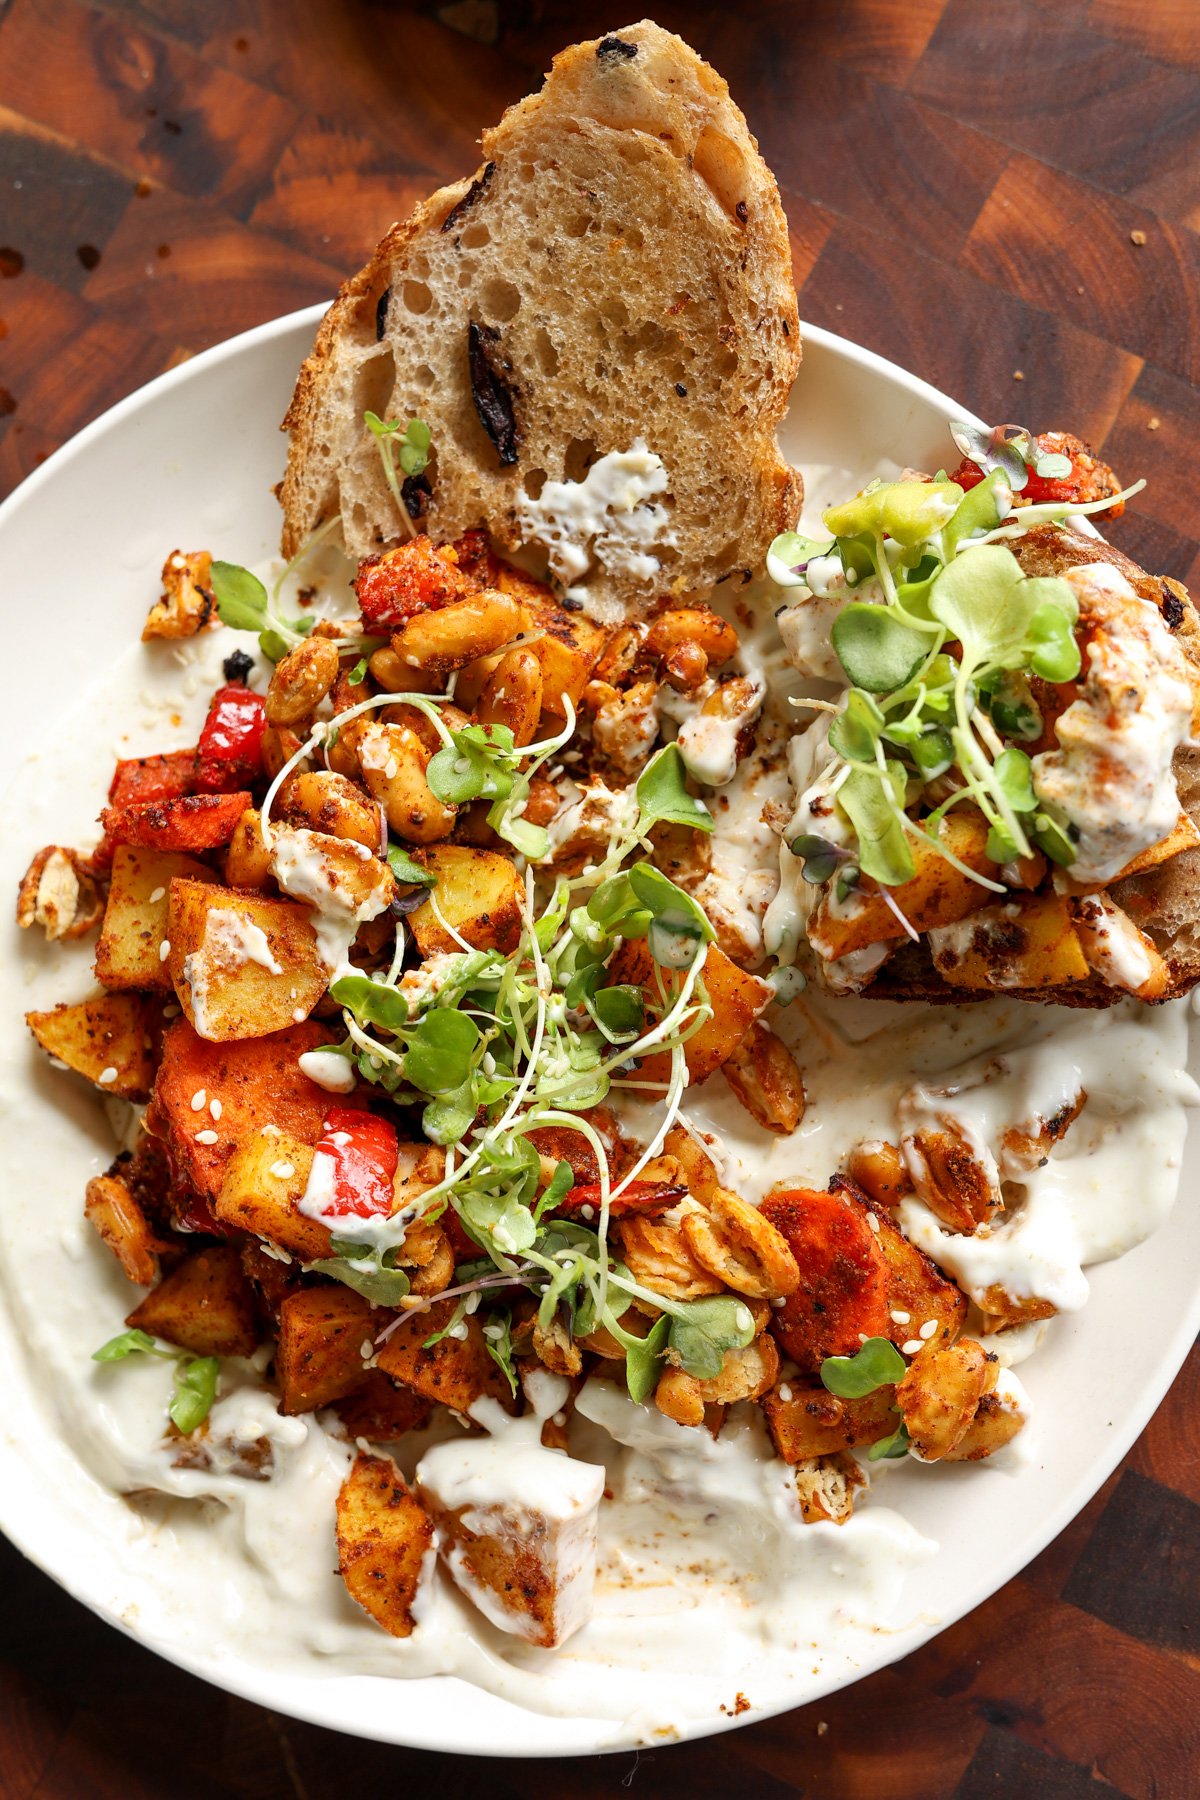
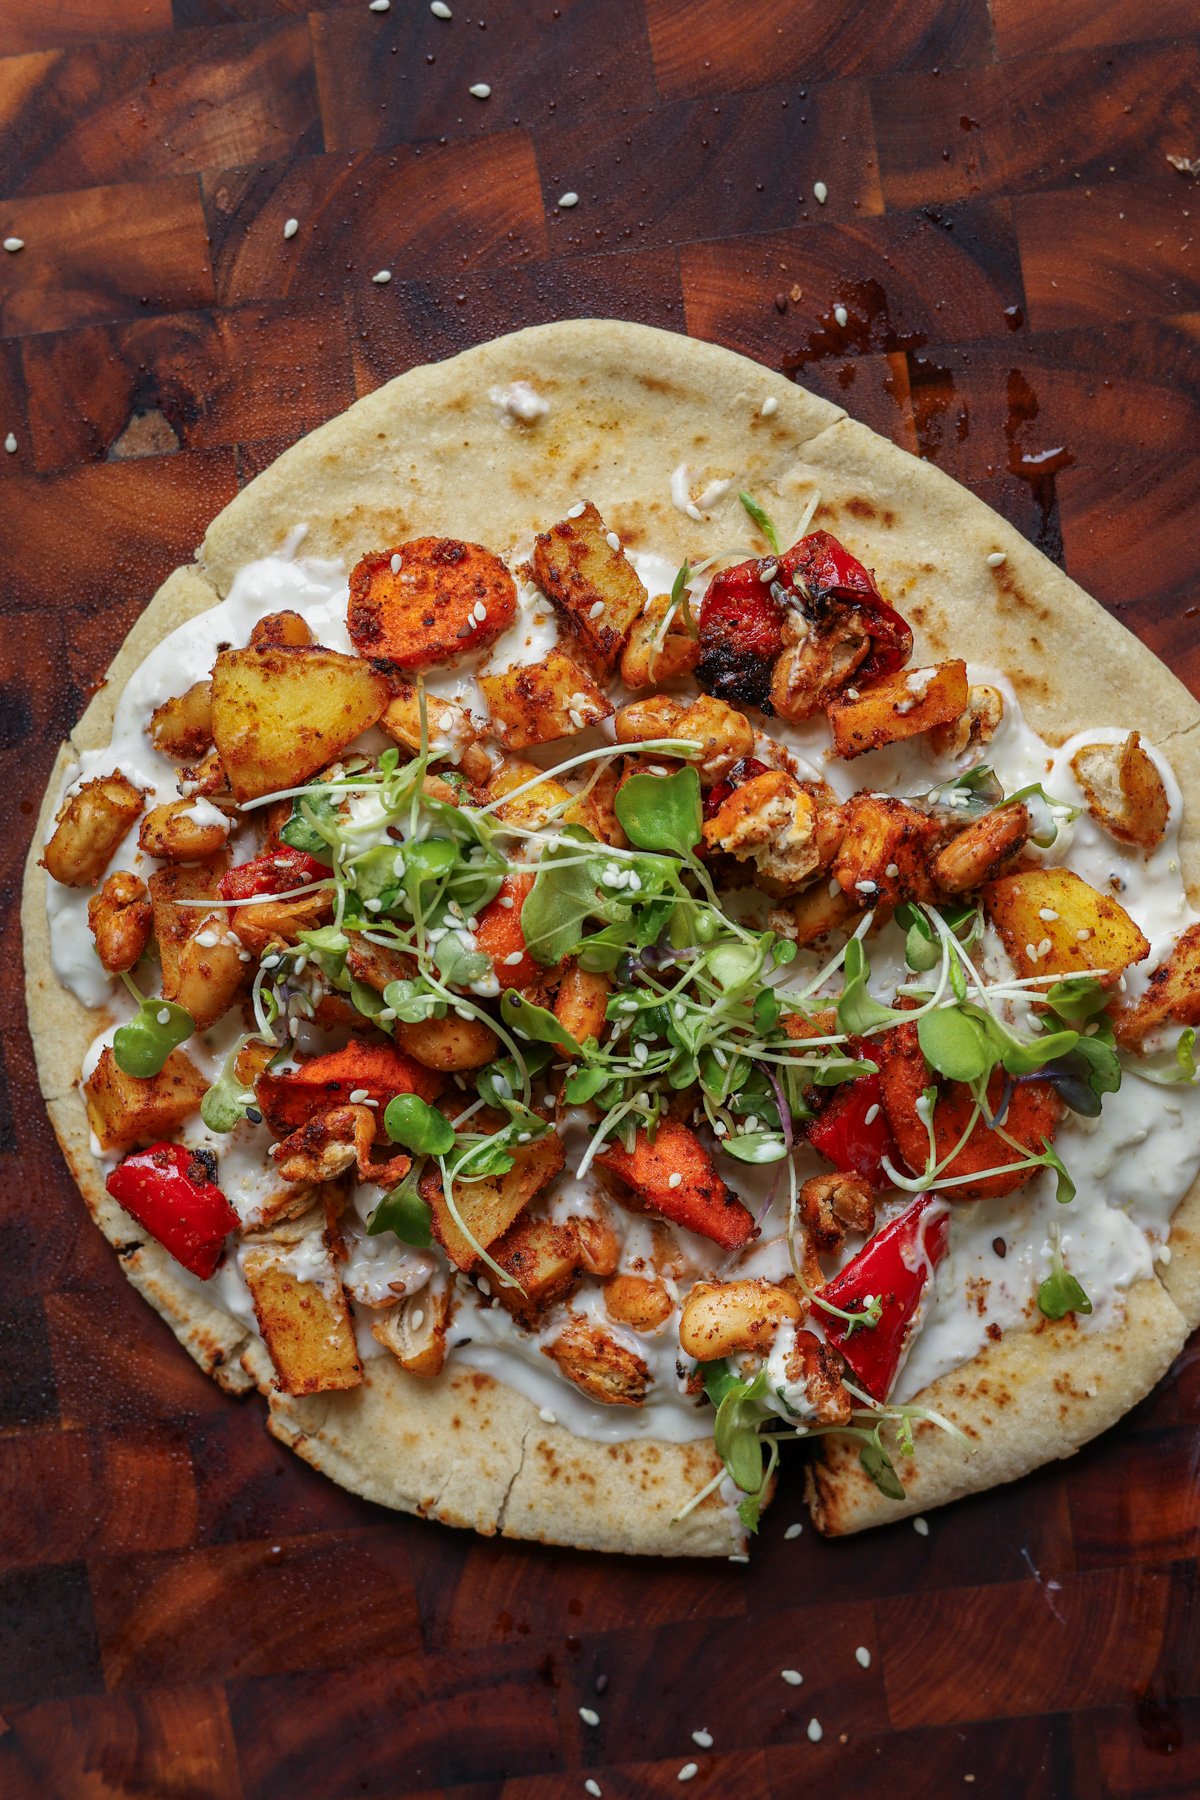
Crispy smashed white beans and Cajun veggies roasted on one sheet pan, then tossed in a creamy, tangy chipotle-lime dressing. A versatile meal you can serve in bowls, tacos, or wraps.
This is a super easy and absolutely delicious meal that comes together fairly quickly. You just chop up all of the vegetables and add them to a pan. Smash the beans using a bowl, and add them to the pan as well. Add some spices, oil, and lime juice, toss well, and then bake until the veggies are tender and the beans are lightly crisp.
Meanwhile, you make this creamy, delicious, spicy, lightly sweet, and tangy dressing. It goes amazingly well over these roasted veggies. I mean, this is a dressing you can use on any salad, wraps. burritos, or any which way. It’s just fantastic with all of that smoky chipotle spice flavor, the tang from the lime juice, the creaminess from the non-dairy yogurt, and some cheesiness from the nutritional yeast. It’s just fantastic.
You can serve this roasted bean and veggie mixture as a bowl, in wraps, stuffed into pita bread, or over a baked potato or rice. There are so many ways to serve this! Do let me know in the comments how you served it as well, because I love hearing from you guys, and many times you surprise me with the creative ways you serve the recipes.
You want the beans to be sort of lightly flattened but not entirely smashed. You’re just trying to increase the surface area, so they can bake up nice and crispy in the oven.
If you don’t want to smash them, that’s fine, too. Just add them directly to the veggies on the sheet pan and bake. The beans on the edges will still get crisp. If you want all of the unsmashed beans to get crisp and act like croutons, then bake them on a separate sheet so that they crisp up nicely.
This dish is spicy, smoky, creamy, and tangy. It’s just an amazing blend of flavors! It has protein from the beans, nutritional yeast, and yogurt. You can up the protein by adding hemp seeds into the dressing or as a topping.
Why You’ll Love these Smashed Bean Veggie Bowl
easy meal all cooks on one large or two small sheet pans
amazing textures from crispy smashed beans, tender roasted veggies, and creamy dressing
Vegan Dark Chocolate Chickpea Pudding ... adding protein to desserts is often not very difficult if you just stretch your imagination a little! Dessert for breakfast or breakfast for dessert, these desserts made with chickpeas will win your heart.
Eggless Strawberry Mousse ... this is the simplest, most delicious fuss free mousse you'll ever make. This dessert is light, it's flavourful and bursting with the sweet tang of the seasons best strawberries. It also requires very few ingredients and it has great body. It's a beautiful dessert for Mother's Day 🌸!
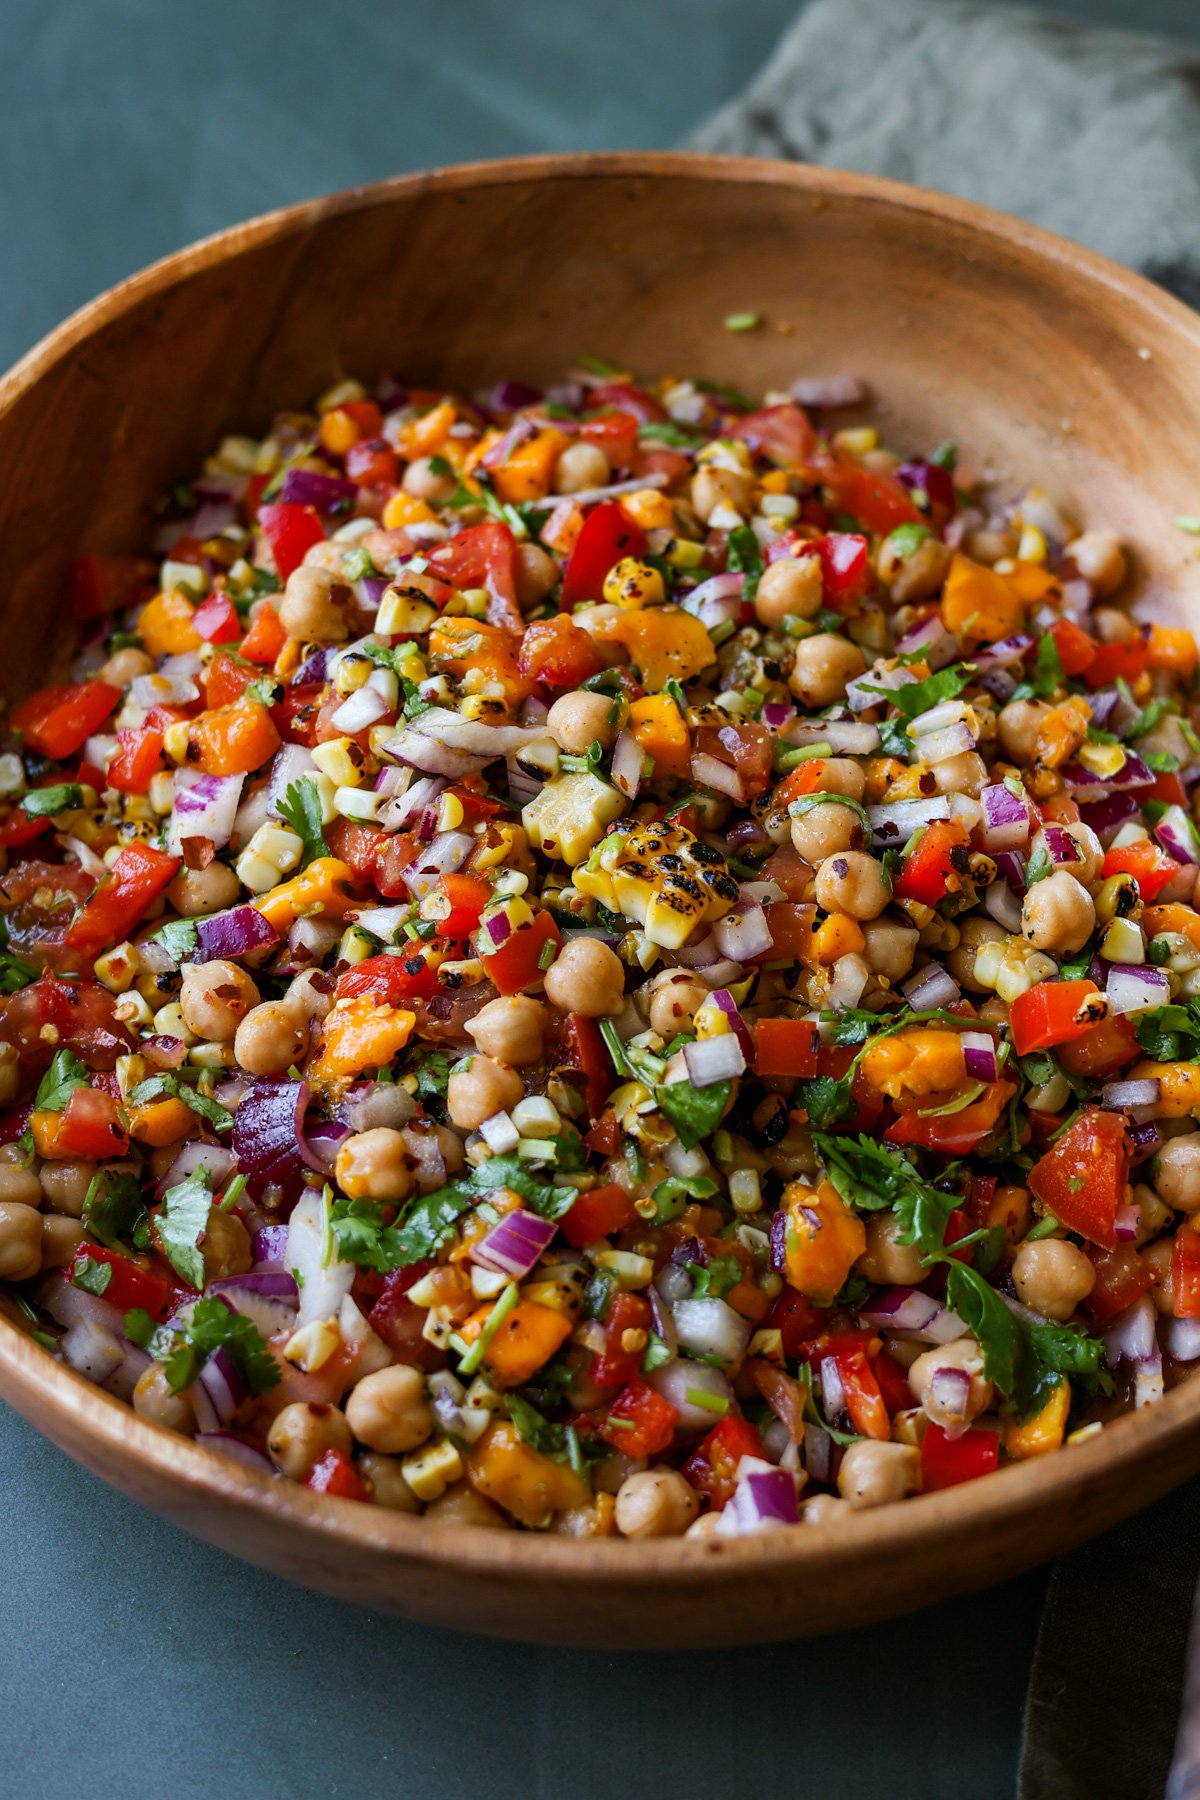
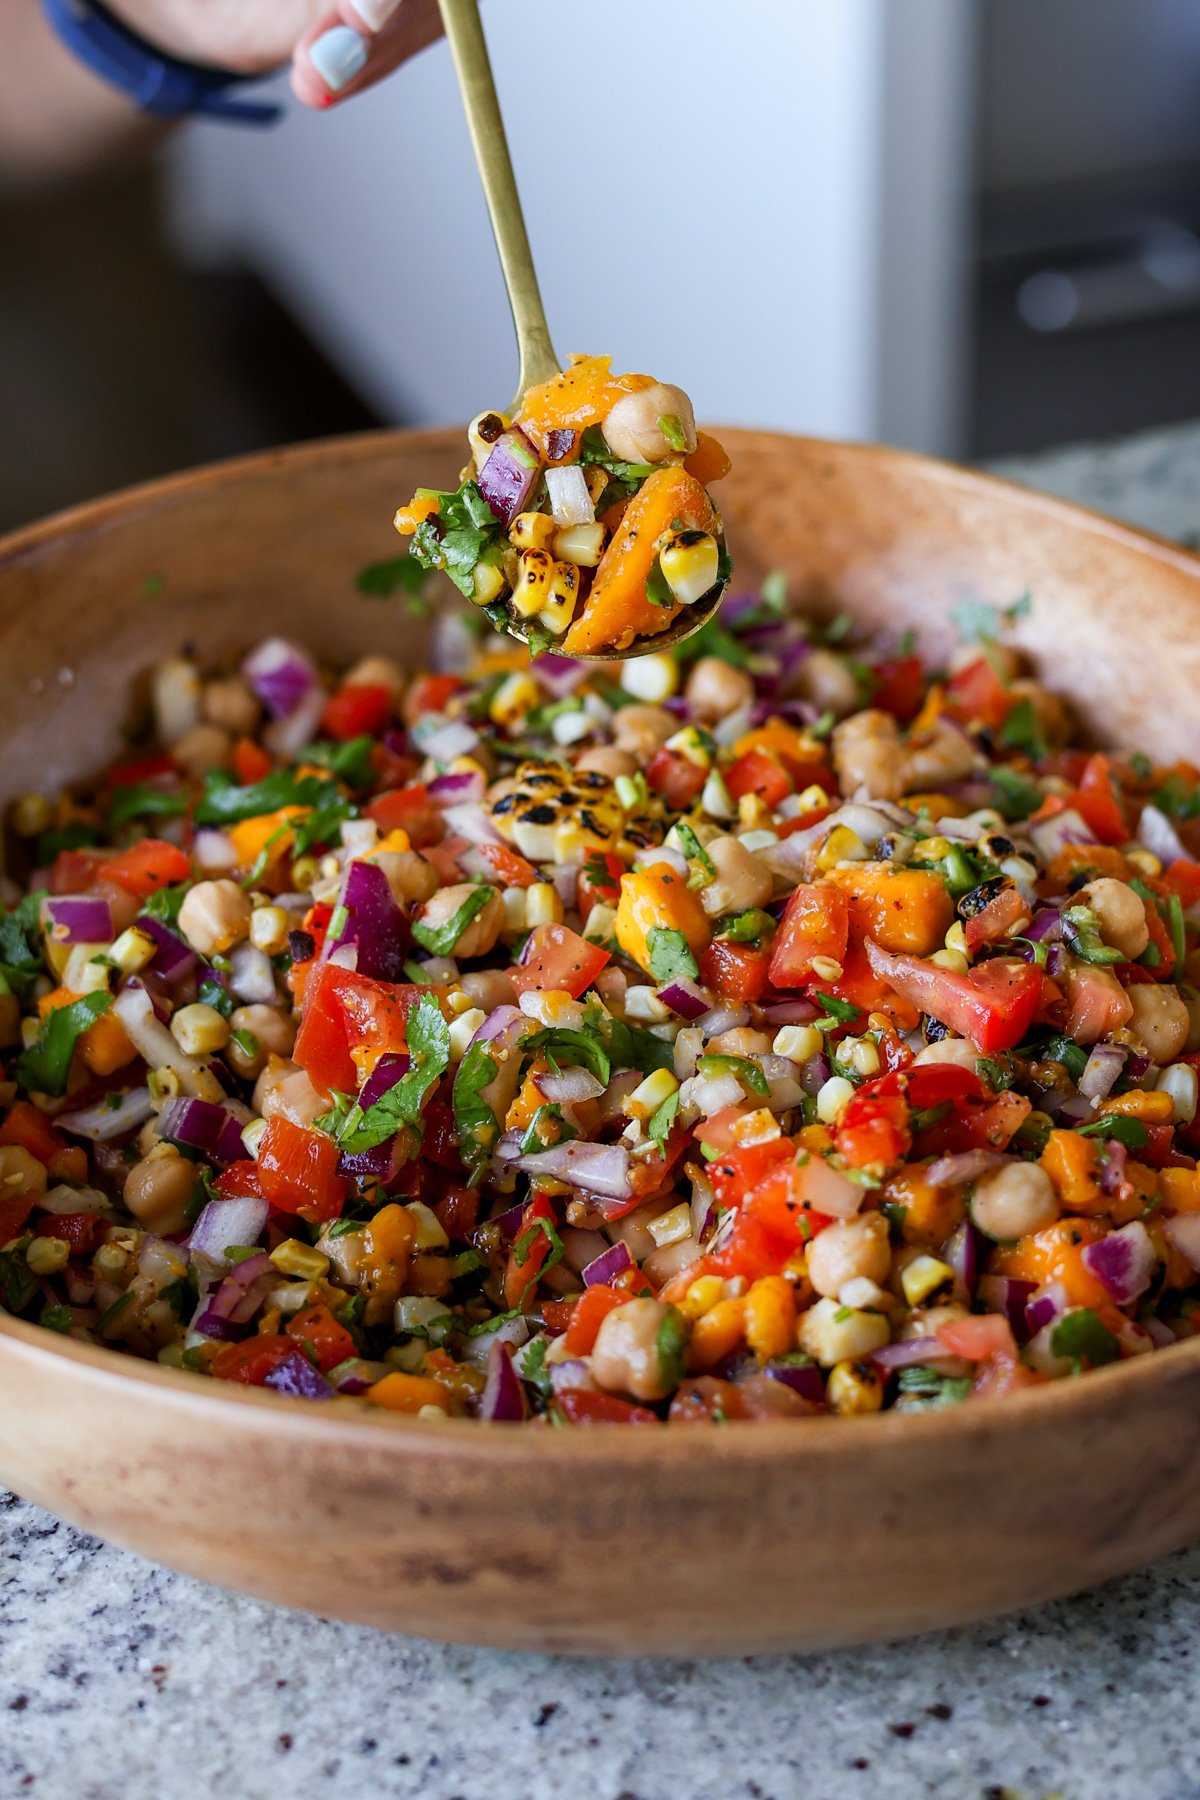
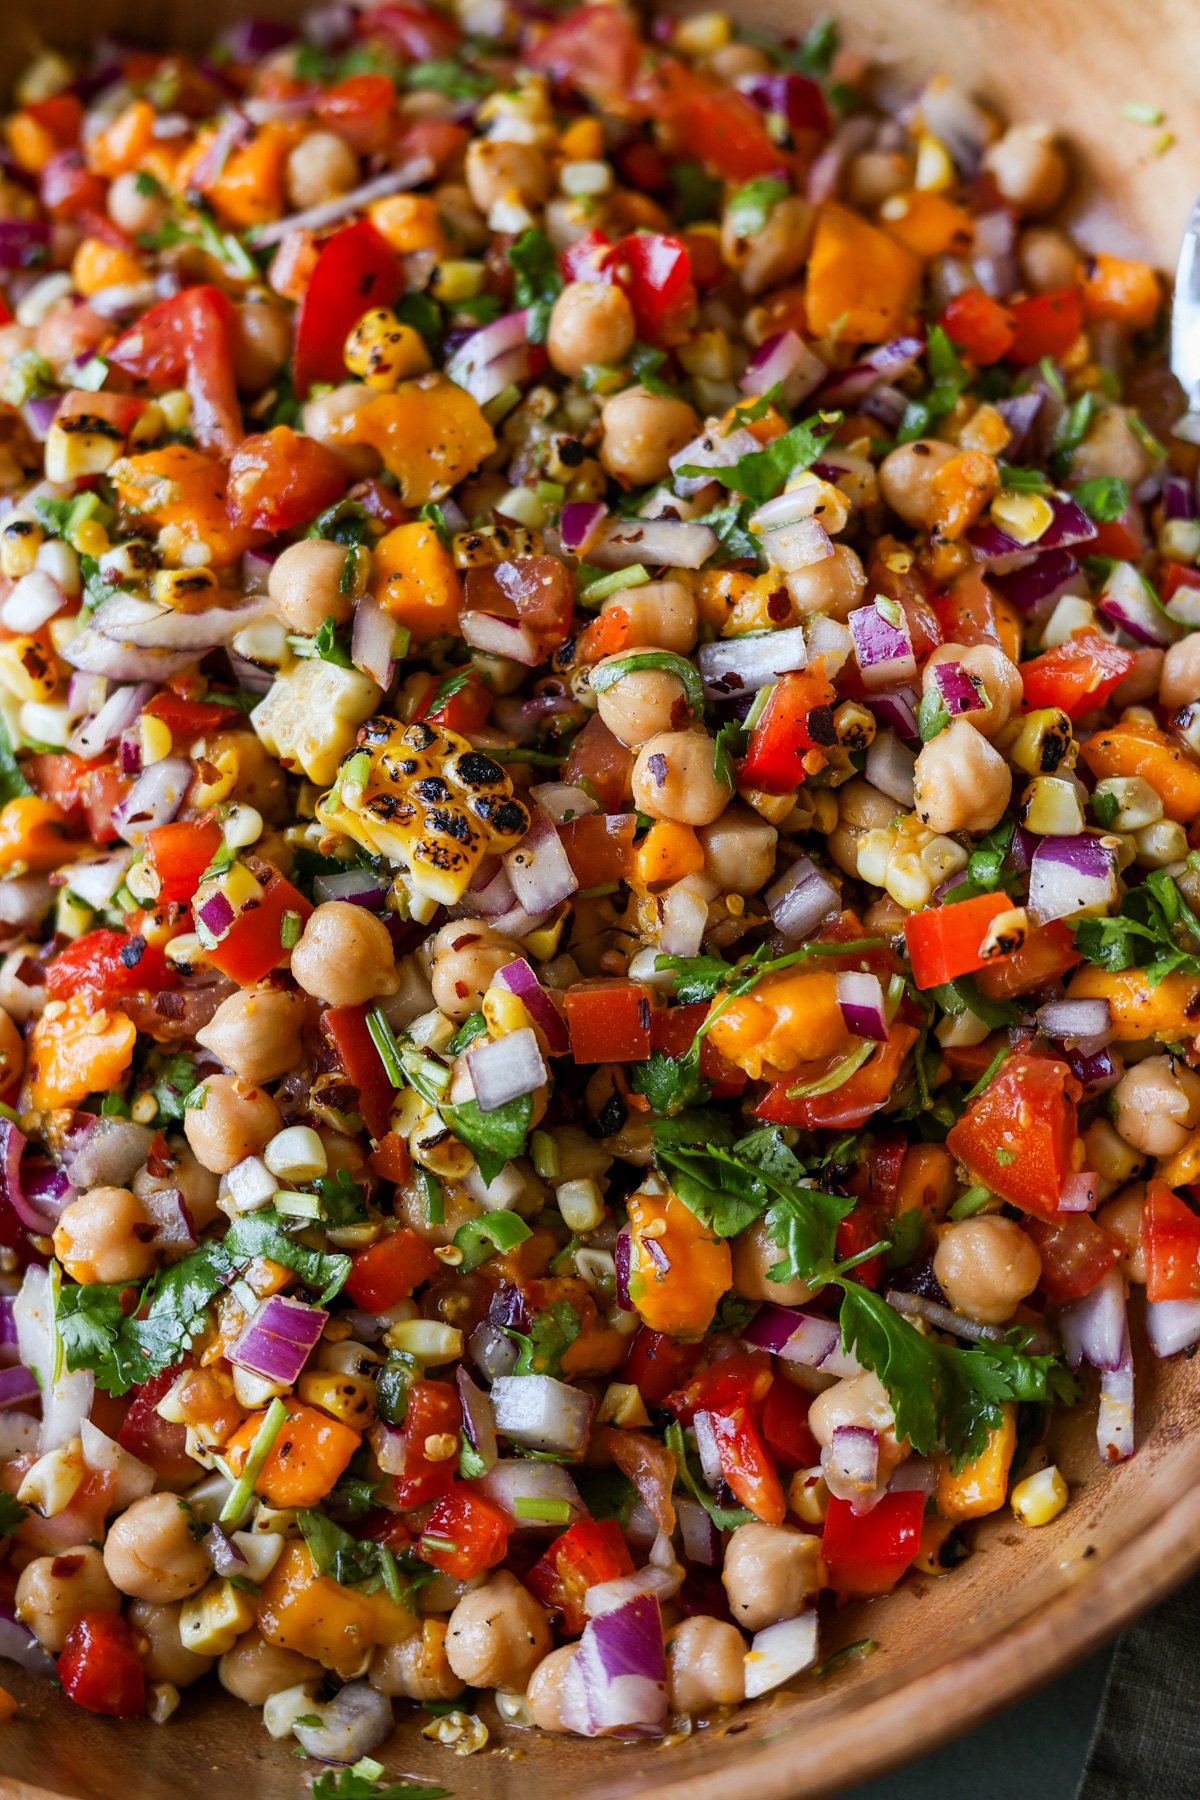
This hearty bean salad features chickpeas, sweet mango, fresh veggies, and sweet roasted corn in a cumin lime toasted chili oil dressing. Mango chickpea salad is a perfect, one-bowl summer lunch! (gluten-free, soy-free, nut-free, oil-free option)
I wanted to make a quick salad that was hearty and not very salad-like. That means not too many leafy greens, because my niece doesn’t like to eat those, but she loves chickpeas. That worked out really well because we added some lime, cumin, and cayenne to give it that Indian chaat-style flavor profile.
This salad is perfect for making the most of ripe, summer mangos and fresh corn on the cob.
It turned out magnificent as is, and then we leveled it up by toasting some red pepper flakes in oil, creating a spiced oil that brought everything together. If you want to make it oil-free, just omit the oil and add the red pepper flakes directly, but the oil definitely adds a nice, smoky, spicy flavor to the salad.
There are three types of heat in this salad:
green chilies
cayenne
red pepper flakes.
You can adjust the heat by using milder green chilies and reducing the amount of cayenne and red pepper flakes to your preference.
Serve this mango chickpea salad with pita chips, Indian papri/crackers or toasted pita bread for dipping.
Why You’ll Love Mango Chickpea Salad
easy, 1-bowl salad
sweet mango, earthy chickpeas, fresh veggies, and sweet, roasted corn
delicious cumin-lime dressing and red pepper spice oil bring out the flavors
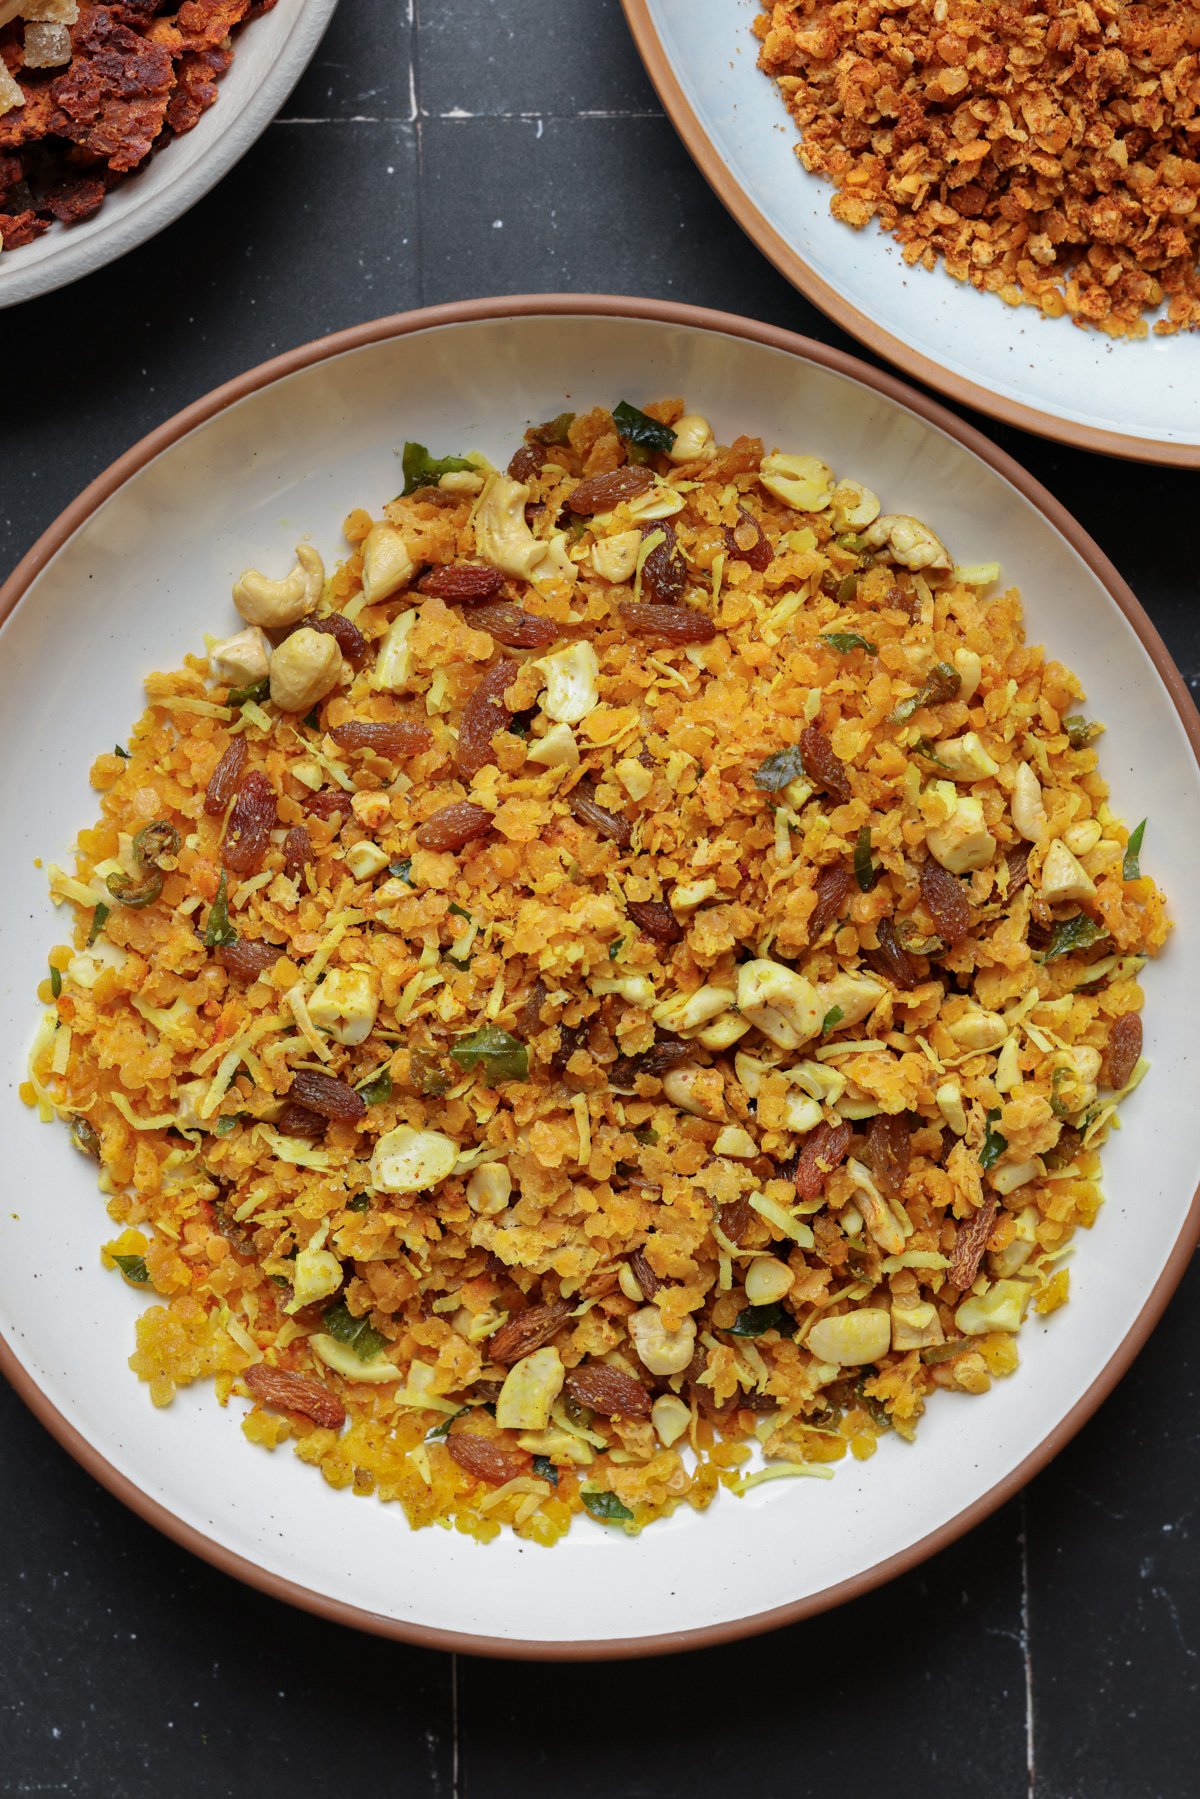
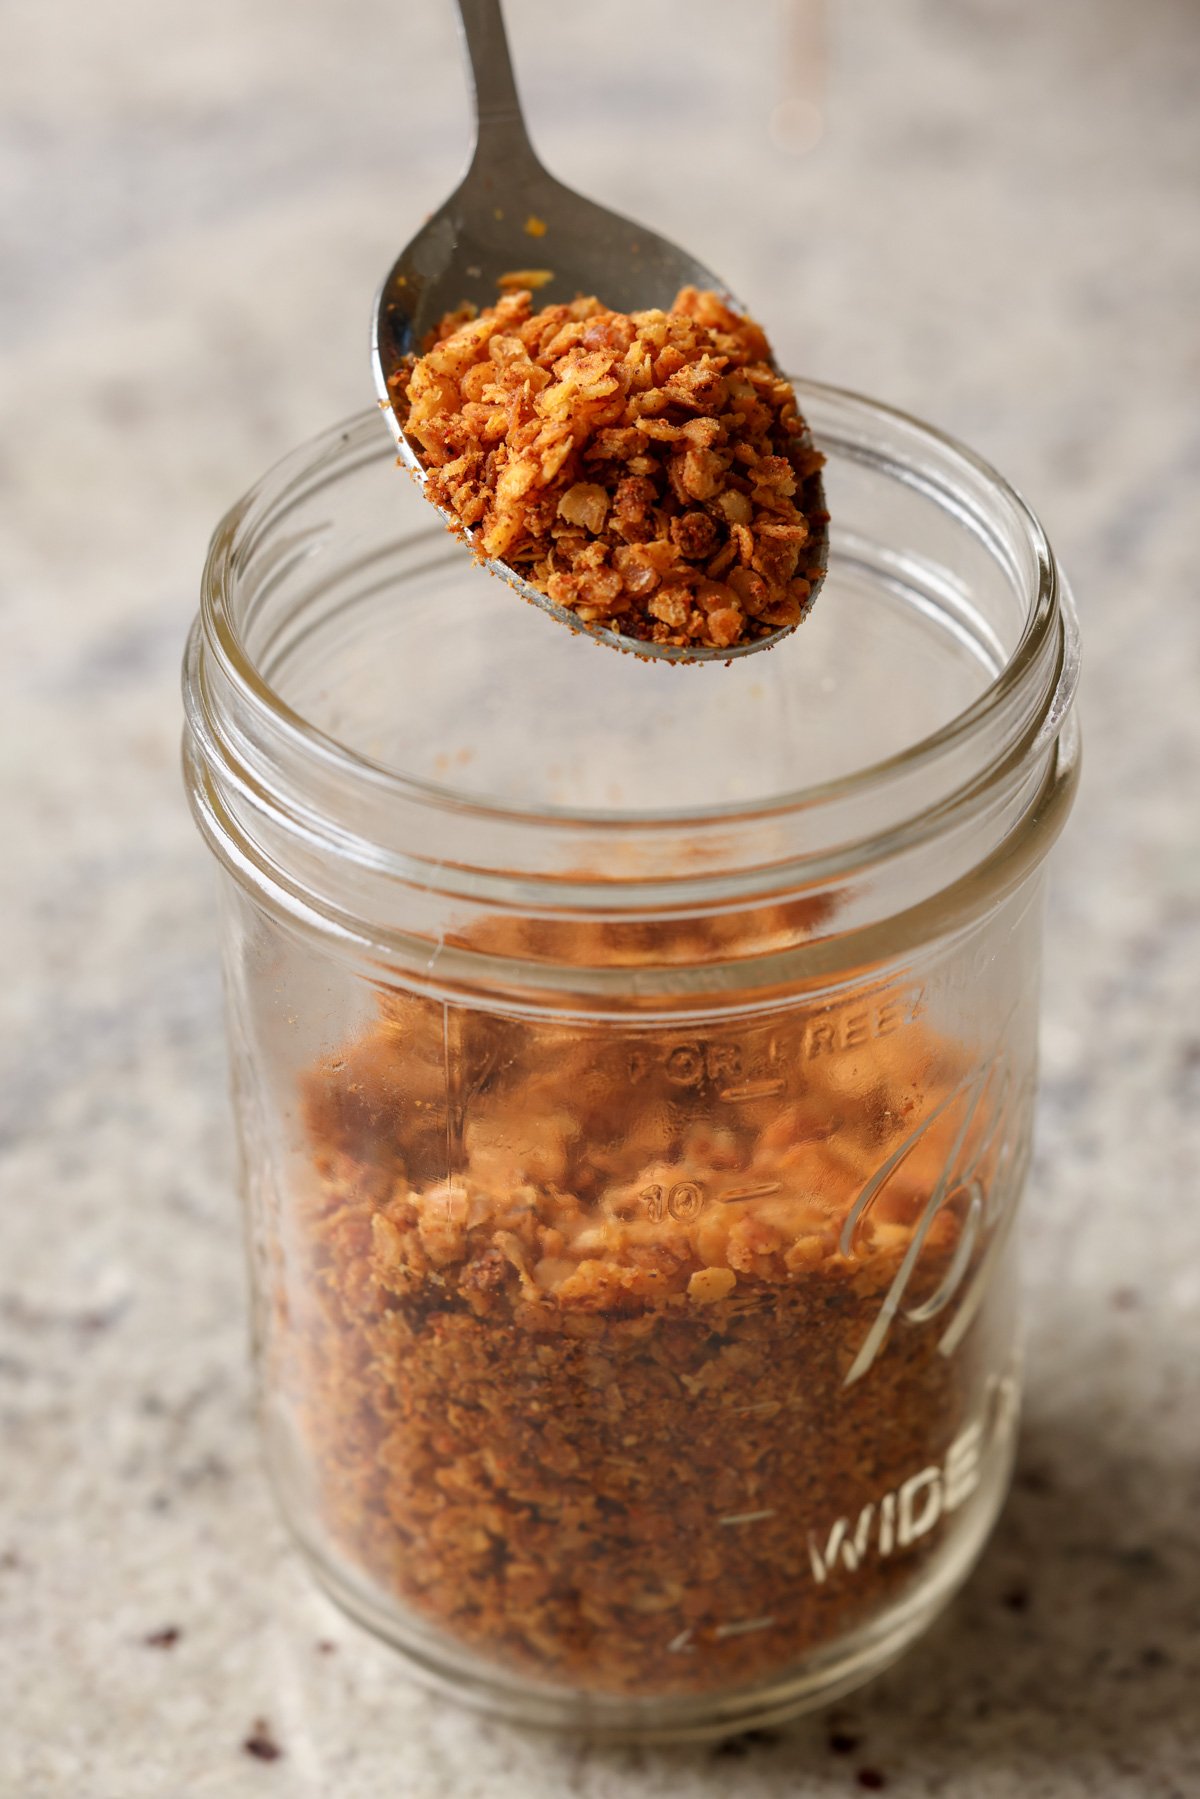
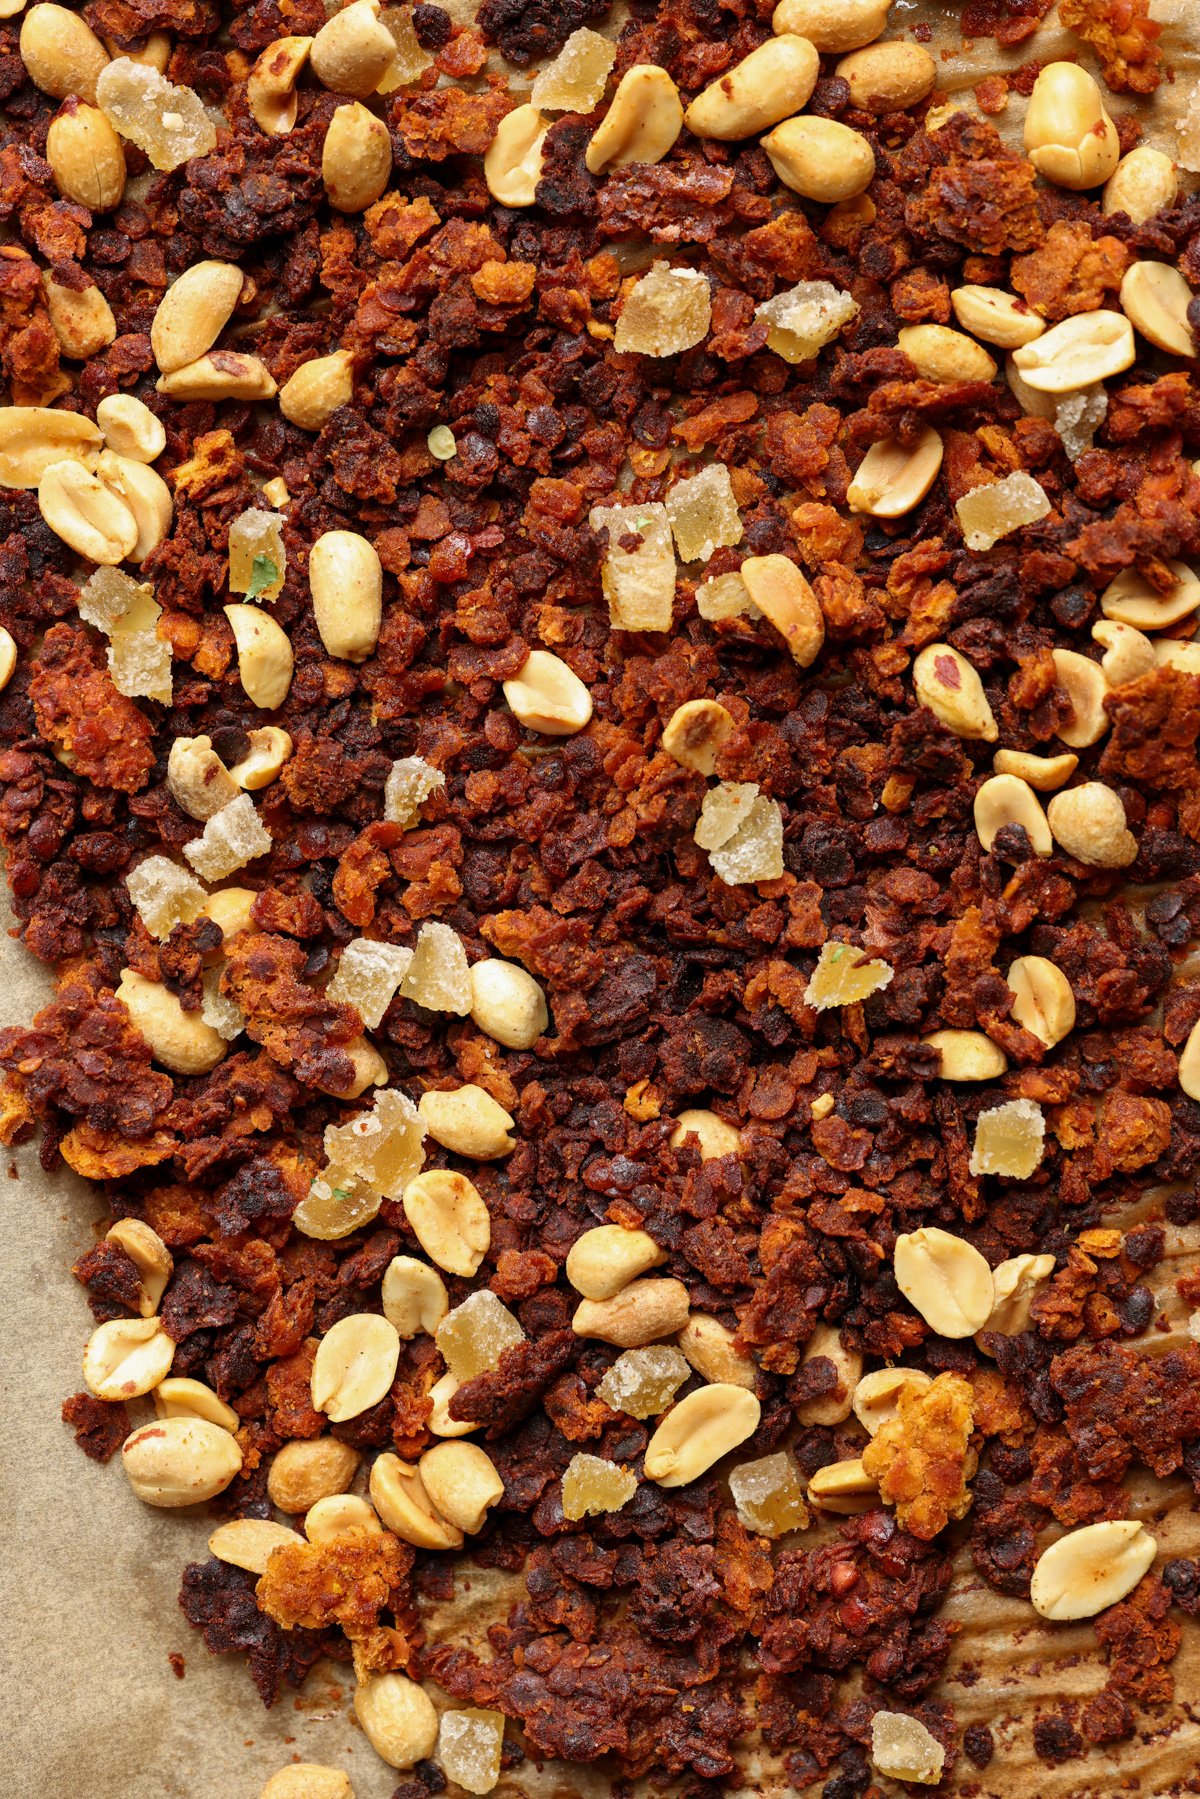
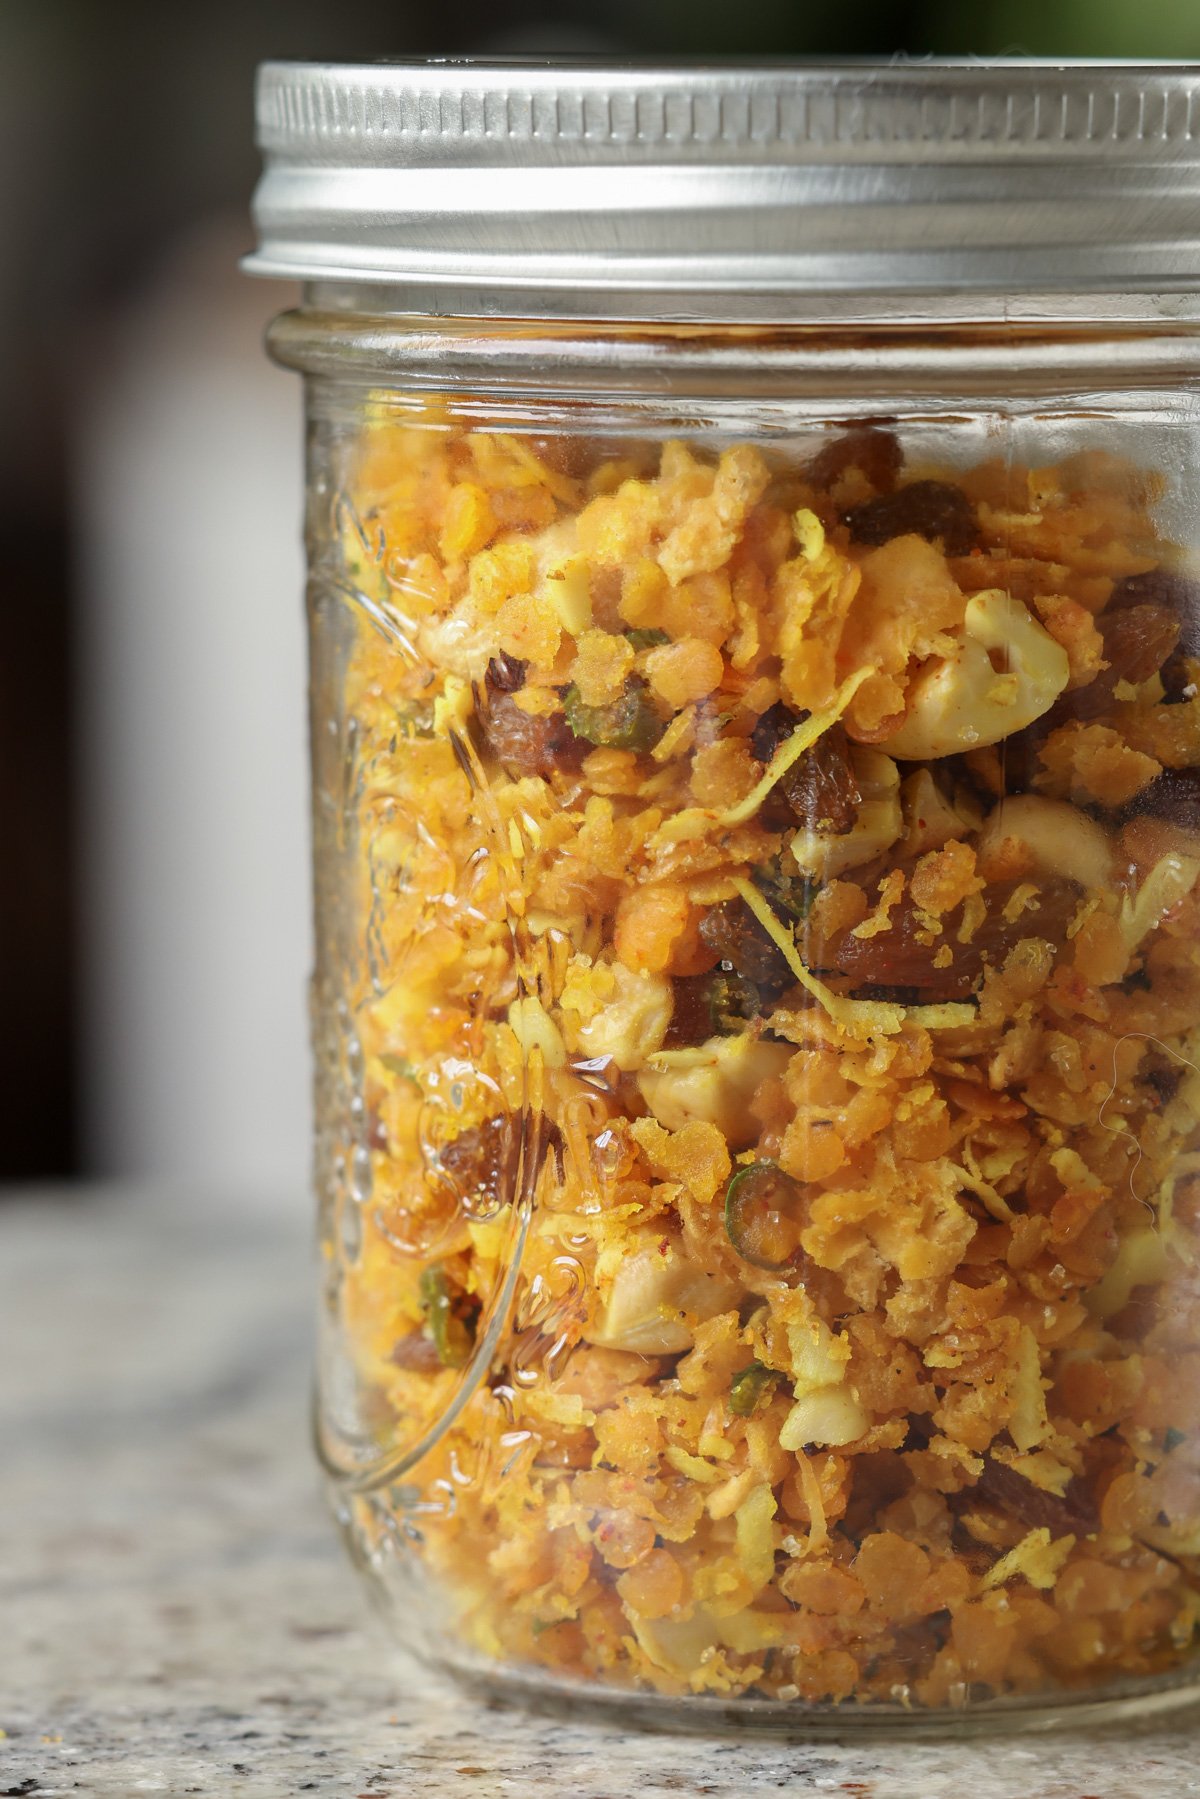
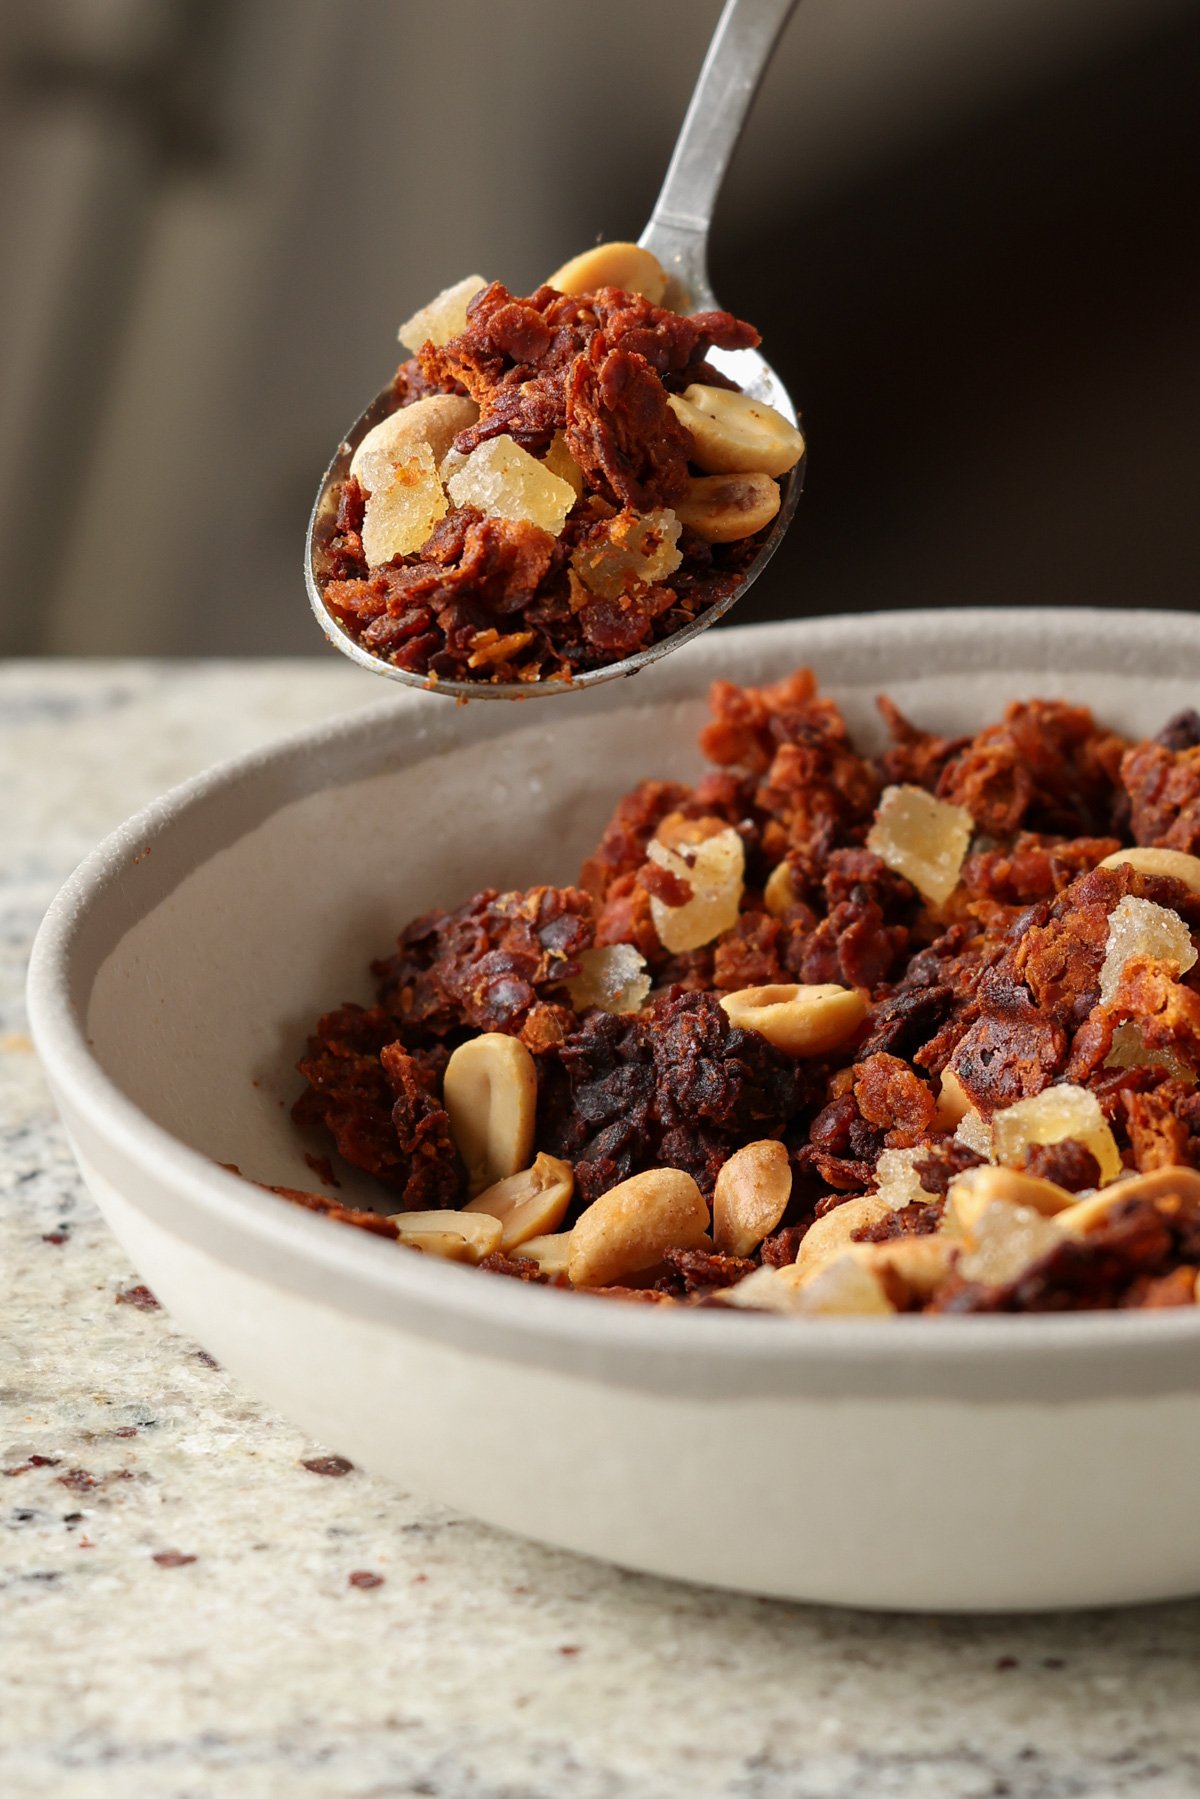
Lentil trail mix is a super delicious snack, and here I will show you three ways to make it! Peanut gochujang, Indian Chivda, Doritos Nacho flavor! This high protein, savory granola is easy and fun to make and a perfect breakfast or snack. (16 grams of protein and fiber per serving!)
When I shared my red lentil granola recipe, quite a few of you asked for a savory version, and today I’m sharing three different ways to make savory lentil granola/trail mix! Make all three flavors of this delicious lentil trail mix, or triple your favorite flavoring and make one big batch.
Why three ways? Because I just couldn’t decide between these amazing flavors: Indian-spiced, peanut gochujang, and nacho spice. So, I decided to let you choose for yourself!
This trail mix/savory granola recipe uses split red lentils (aka masoor dal) as the base. You cook the red lentils on the stovetop until they are just al dente, and they roast up to be light and crisp in the oven with your seasonings of choice.
The result is a protein-packed snack that is absolutely full of flavor, no matter which seasoning mix you choose! A serving of this trail mix has around 16 grams of protein and 16 grams of fiber. You can amp up the protein even more by folding in hemp seeds into the granola once it has finished roasting.
The Indian-spiced lentils are inspired by Indian chivda, which usually uses rice flakes or other flaked or puffed grains. It is spicy savory with some balancing sweet from raisins or dates and is fantastically delicious!
For the nacho spiced savory lentil trail mix, a took inspiration from my nacho cheese granola bars. It’s your favorite snacking chip in crisp trail mix form! you can adjust it to your flavor preference. Add more cayenne for more heat or more nutritional yeast for more cheesiness.
If you love gochujang, definitely try the peanut gochujang lentil trail mix which has an amazing savory-spicy flavor with a hint of sweetness. It pairs so well with the crunchy peanuts! Comment below on which one will you try first!
Why You’ll Love Lentil Trail Mix
protein- and fiber-packed breakfast or snack with 16 grams each of protein and fiber per serving!
make all three flavors or choose from 3 amazing flavors: Indian-spiced, peanut gochujang, or nacho cheese
deep flavors and incredible textures
naturally gluten-free with soy-free and nut-free options included
Crispy on the outside, soft on the inside, these appe are going to be your snack-time best friend.
Appe, paddu, paniyaram whatever you call it, is one of those recipes that feels like a reward for planning ahead. If you’ve got some idli or dosa batter in the fridge, you’re already halfway to golden, crispy, soft-in-the-middle deliciousness. These little rounds are comfort food, South Indian-style.
I’ve been making appe for years, usually as a quick breakfast or something fun to sneak into lunchboxes. They’re great plain, but also super versatile if you want to throw in veggies, spices, or even cheese. One batch never lasts long at our place!
Here’s what you’ll need to make a basic batch of appe using idli or dosa batter:
Idli/Dosa Batter: Fermented batter works best, slightly sour and fluffy, it gives appe their signature light texture.
Veggies (optional): Finely chopped onions, carrots, capsicum, or grated coconut are great add-ins.
Tempering (optional but recommended): Mustard seeds, curry leaves, chopped green chillies, and ginger sautéed in oil for extra flavor.
Oil: Just a few drops per mold in the appe pan for crisp, golden edges.
How to make Appe
Prep the Batter: Use fermented idli/dosa batter straight from the fridge or bring it to room temperature. Stir in salt if not already added. (Here’s the recipe or scroll down to the recipe card)
Add-ins (Optional): Mix in your chopped veggies or a quick tempering to boost flavor.
Heat the Appe Pan: Grease each mold with a drop of oil and heat on medium.
Cook the Appe: Spoon batter into each mold and cook covered for 2–3 minutes until the edges firm up. Flip and cook uncovered till golden and crisp on both sides.
Richa’s Top Tips For The Best Appes
Use well-fermented batter: The slight sourness and airy texture from a properly fermented idli or dosa batter is what gives appe their signature fluffiness inside and crisp edges outside.
Rest the batter (if straight from fridge): Cold batter can yield dense appe. Let it sit at room temperature for 20–30 minutes before cooking to get that light, airy texture.
Grease the pan well: Add a few drops of oil to each cavity of the appe pan before spooning in the batter. This helps create a golden crust and makes flipping easier.
Cook covered first, then crisp: Cover the pan while the first side cooks to help the batter steam and puff up. Once flipped, cook uncovered to crisp up the outsides.
Consistency of the batter: The ideal batter consistency for appe is medium to medium-thick, similar to idli batter or pancake batter. It should be thick enough to hold its shape when dropped into the appe pan but still pourable.
Frequently Asked Questions
What is the difference between appam and paniyaram?
Appam is a lacy, bowl-shaped fermented rice pancake, typically soft and spongy in the centre. Paniyaram (or appe) are bite-sized dumplings made from the same idli/dosa batter, but cooked in an appe pan with a crispy crust and soft inside.
Why are my appe sticky on the inside?
This usually happens when the batter is too thick or hasn’t come to room temperature before cooking. Another reason could be undercooking—make sure to cook covered first, then flip and crisp up the other side.
Can I make appe without a paniyaram/appe pan?
The appe pan really does help achieve the right shape and texture, but if you don’t have one, you can try using a mini muffin tray in the oven (though they won’t be quite the same!).
Can I store leftover appe?
Yes! Store them in an airtight container in the fridge for up to 2 days. Reheat in a pan or air fryer to bring back some of the crispiness.
Can I make this with readymade idli dosa batter?
You can, but the taste and texture is so much better when you use homemade dosa batter.
Are appe healthy?
Yes! they’re made from fermented rice and lentil batter, which boosts nutrient absorption and gut health, and since they’re pan-cooked with minimal oil, they’re light and easy to digest too.
Which Appe Pan is Better – Cast Iron or Non-Stick?
Choosing between a cast iron and non-stick appe pan depends on your cooking style and comfort level. Cast iron pans are a traditional choice, they heat evenly and give the appes a beautiful, crispy crust. Plus, cooking in cast iron adds a bit of iron to your diet naturally. But they do need regular seasoning and care to maintain their non-stick properties.
On the other hand, non-stick appe pans are beginner-friendly and super convenient. They require less oil, are easier to clean, and are great when you’re short on time or cooking for kids. Just be sure to use soft utensils and avoid high heat to extend the life of the coating.
If you’re just starting out, go for a good-quality non-stick pan. But if you’re up for a little extra effort and love that rustic crisp, a cast iron pan is totally worth it.
Storage Tips
Refrigeration: Let the appe cool completely before storing. Keep them in an airtight container in the fridge for 2 days.
Freezing: Appe can be frozen too! Lay them out on a tray, freeze, then transfer to a ziplock bag. Reheat directly from frozen in the appe pan or air fryer.
Reheating: To retain the texture, warm them in an appe pan, air fryer, or oven, not the microwave, which can make them rubbery.
Serving Ideas
These little bites are super versatile and pair beautifully with all kinds of chutneys and sides.
Dip them in classic Coconut Chutney for a traditional South Indian combo.
Serve with Green Chutney if you’re leaning into North Indian flavours.
Create a breakfast thali withIdlis, Sambar, and appe for a hearty start to your day.
Snack on them with a side of Peanut Chutney, a creamy, nutty dip that’s incredibly satisfying.
Pack them into a lunchbox with Lemon Rice or Tamarind Rice for a fun and fuss-free meal.
For a South Indian brunch twist, serve them alongside Veggie Upma and chutneys for a mix of textures and flavours.
Customisation Ideas
Spice it up: Add chopped green chillies, crushed pepper, or a spoonful of podi (gunpowder) to the batter.
Veggie-packed: Finely chopped onions, grated carrots, capsicum, cabbage, or even spinach can be added directly into the batter.
Cheesy twist: Stuff a tiny cube of cheese or grated mozzarella in the centre for a surprise melty bite.
South Indian masala style: Stir in a tadka of mustard seeds, curry leaves, and urad dal into the batter before cooking.
Sweet version: Add jaggery, mashed banana, and a hint of cardamom to the idli batter and cook as usual (It’s great for kids)
I am going to share the recipes of all these dishes along with an easy one-pot sambar and coconut chutney over the next 11 days. So make sure to tune in!
Did You Know
Appe (or paniyaram) is a popular South Indian snack that goes by many names across regions. It’s called paddu in Karnataka, ponganalu in Andhra Pradesh, and kuzhi paniyaram in Tamil Nadu. Traditionally made in cast iron appe pans over a wood fire, this snack has been adapted in modern kitchens using non-stick or even electric appe makers. Despite its humble look, it’s a versatile dish that reflects how South Indian food uses the same base ingredients (like fermented rice and lentils) in totally different, creative ways.
If you’ve got idli or dosa batter at home, appe is honestly one of the easiest and most rewarding snacks you can whip up. Whether you keep them plain and classic or jazz them up with fillings and dips, they always deliver on flavour and comfort. Plus, they’re ideal for everything from breakfast to tea-time to school lunchboxes.
Ready to try them? Tag me on Instagram @my_foodstory, I’d love to see what mix-ins you add or what you pair them with.
2-3tablespoonssunflower oil or any neutral flavored oil
Instructions
Prepping appe batter mix
Take the idli dosa batter in a bowl. Add capsicum, carrots, onions, ginger, green chilli, curry leaves, salt, sugar and give a good mix.
Tempering
Heat oil in a pan, add mustard seeds, cumin seeds and once they crackle, add chana dal, urad dal & roast on low heat for a few seconds till the dals turn light golden. Add the tempering to the appe batter and mix well.
Making Appe
Heat appe pan & add a few drops of oil to each cavity. Using a spoon or ladle, pour the batter to fill the cavities almost to the top (as shown in the video). Cover with a lid and cook on low for 1-2 minutes until the base is firm and golden.
Using a skewer or spatula, turn over each appe and cook the other side without covering the pan. Cook on low to medium for 2-3 minutes on this side till they are golden and crisp from the outside. Remove and serve.
Repeat the same steps to make the rest of the appe.
Video
Notes
Add oil to the appe cavity before making the appe as it avoids the appe sticking to the pan & also helps in roasting them well.
Do not over fill the cavities as appe rise when cooked
Appe taste best when they are hot and fresh off the pan
High protein and fiber. Mix everything right in the pan meal, this Sheet pan roasted veggies and beans with Creamy Lemon Yogurt sauce, has amazing flavor and texture! Wrap it, bowl it, swipe with bread! So good! Gluten-free, options for soyfree, Nutfree
This is an easy, refreshing, spring and summer meal that you can put together within minutes. You make this amazingly refreshing lemon yogurt sauce and pair it with savory roasted veggies and crispy, crunchy beans that have been tossed in spices like paprika, coriander, black pepper, and garlic. They are crisp on the outside and tender on the inside.
The warm veggies and the cooling yogurt sauce are just fabulous together.
This is a veggie-heavy recipe rich in fiber, with over 14 grams per serving. It contains 15 to 25 grams of protein per serving, depending on the garnishes and non-dairy yogurt used. The protein in these sheet pan roasted vegetables comes from the beans, yogurt, sesame or hemp seeds, and even the vegetables. For an even more filling meal, serve with whole grain flatbread, pita, or naan.
You can pair them with the sauce in any way you like. You can put the sauce on a plate, top it with the roasted veggies, then top with some seeds and sprouts and a good squeeze of lemon juice.
Or make a wrap with pita bread or naan bread. Just warm the bread, add the yogurt sauce, the roasted veggies, some more sauce, sprouts, cucumber, and a squeeze of lemon, then serve.
Sheet pan veggies and beans are absolutely delicious any which way you serve it. You can even make small tacos out of it!
Why You’ll Love Sheet Pan Veggies and Beans
super easy 1-pan meal celebrates delicious spring and summer veggies
tender-crisp roasted vegetables with crunchy roasted white beans
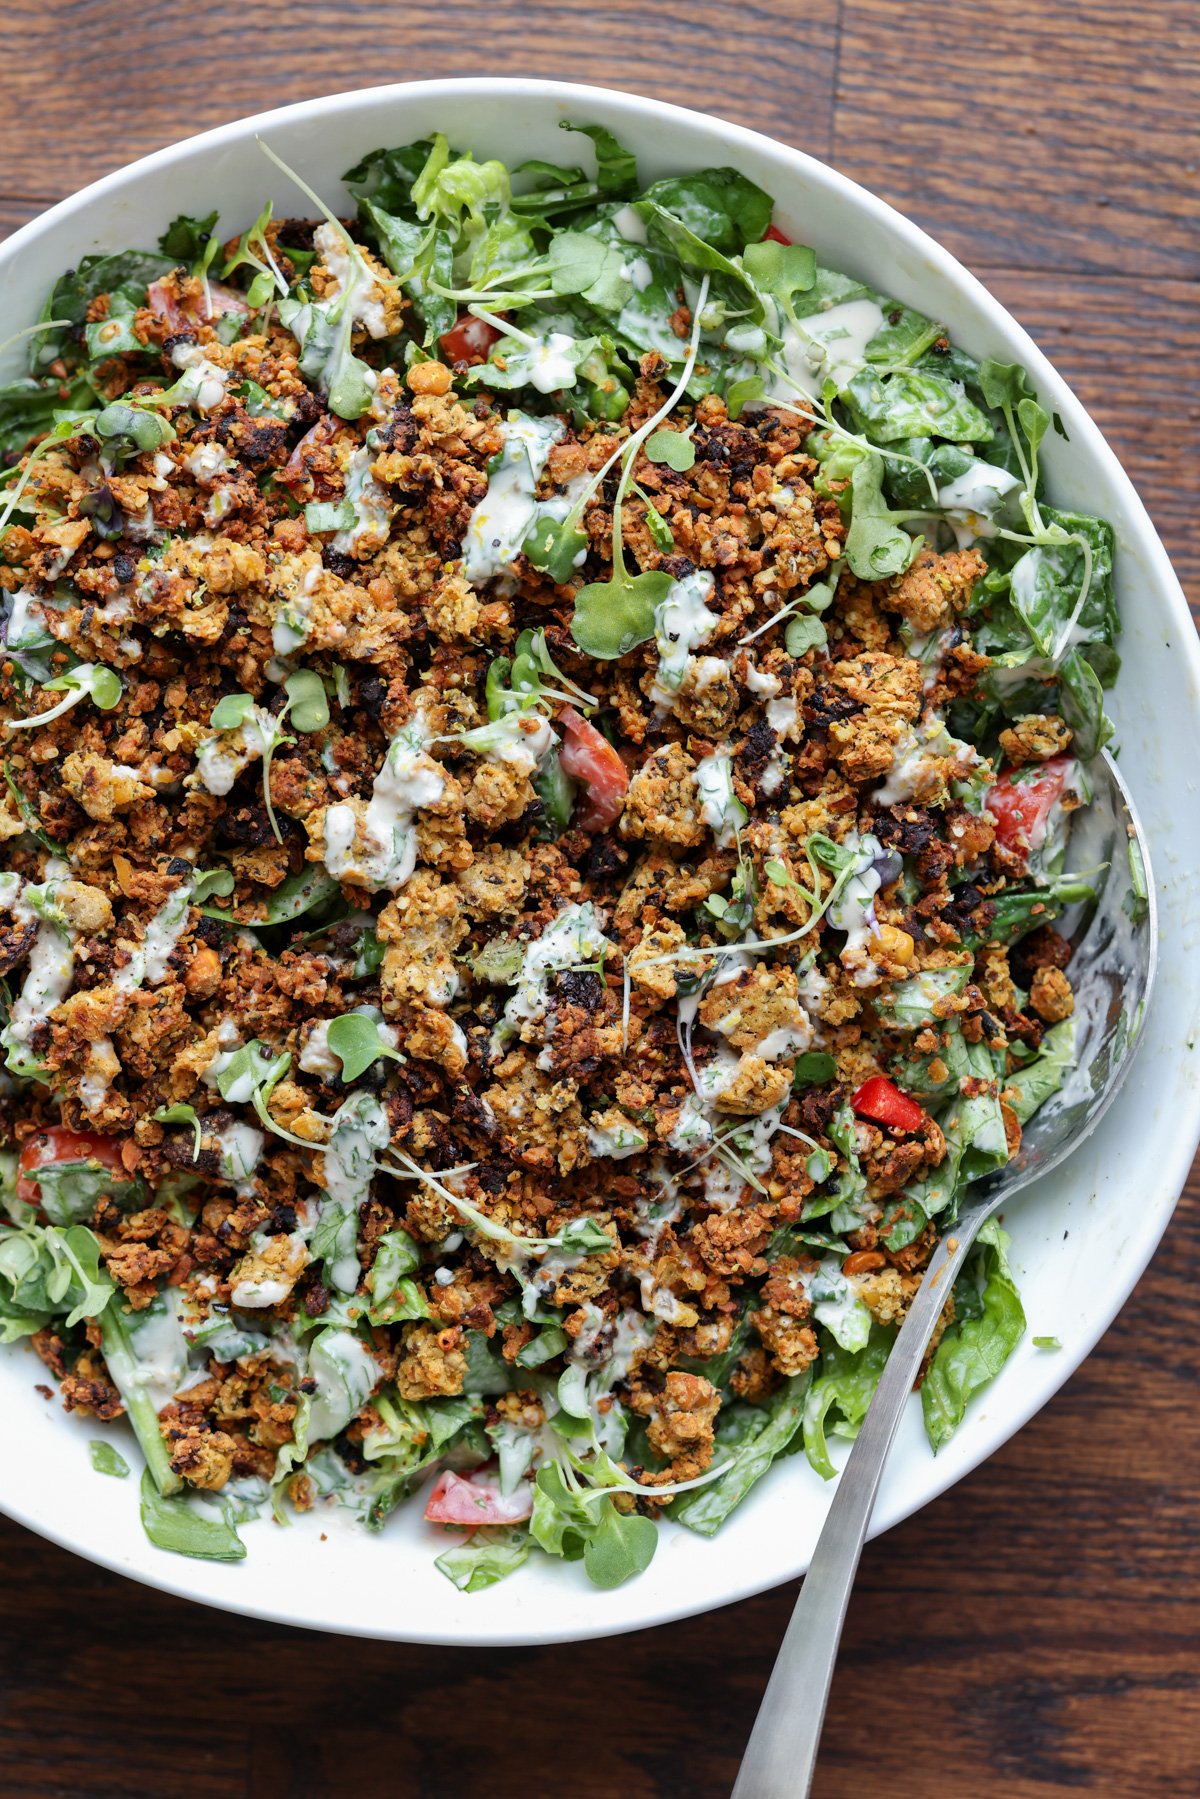
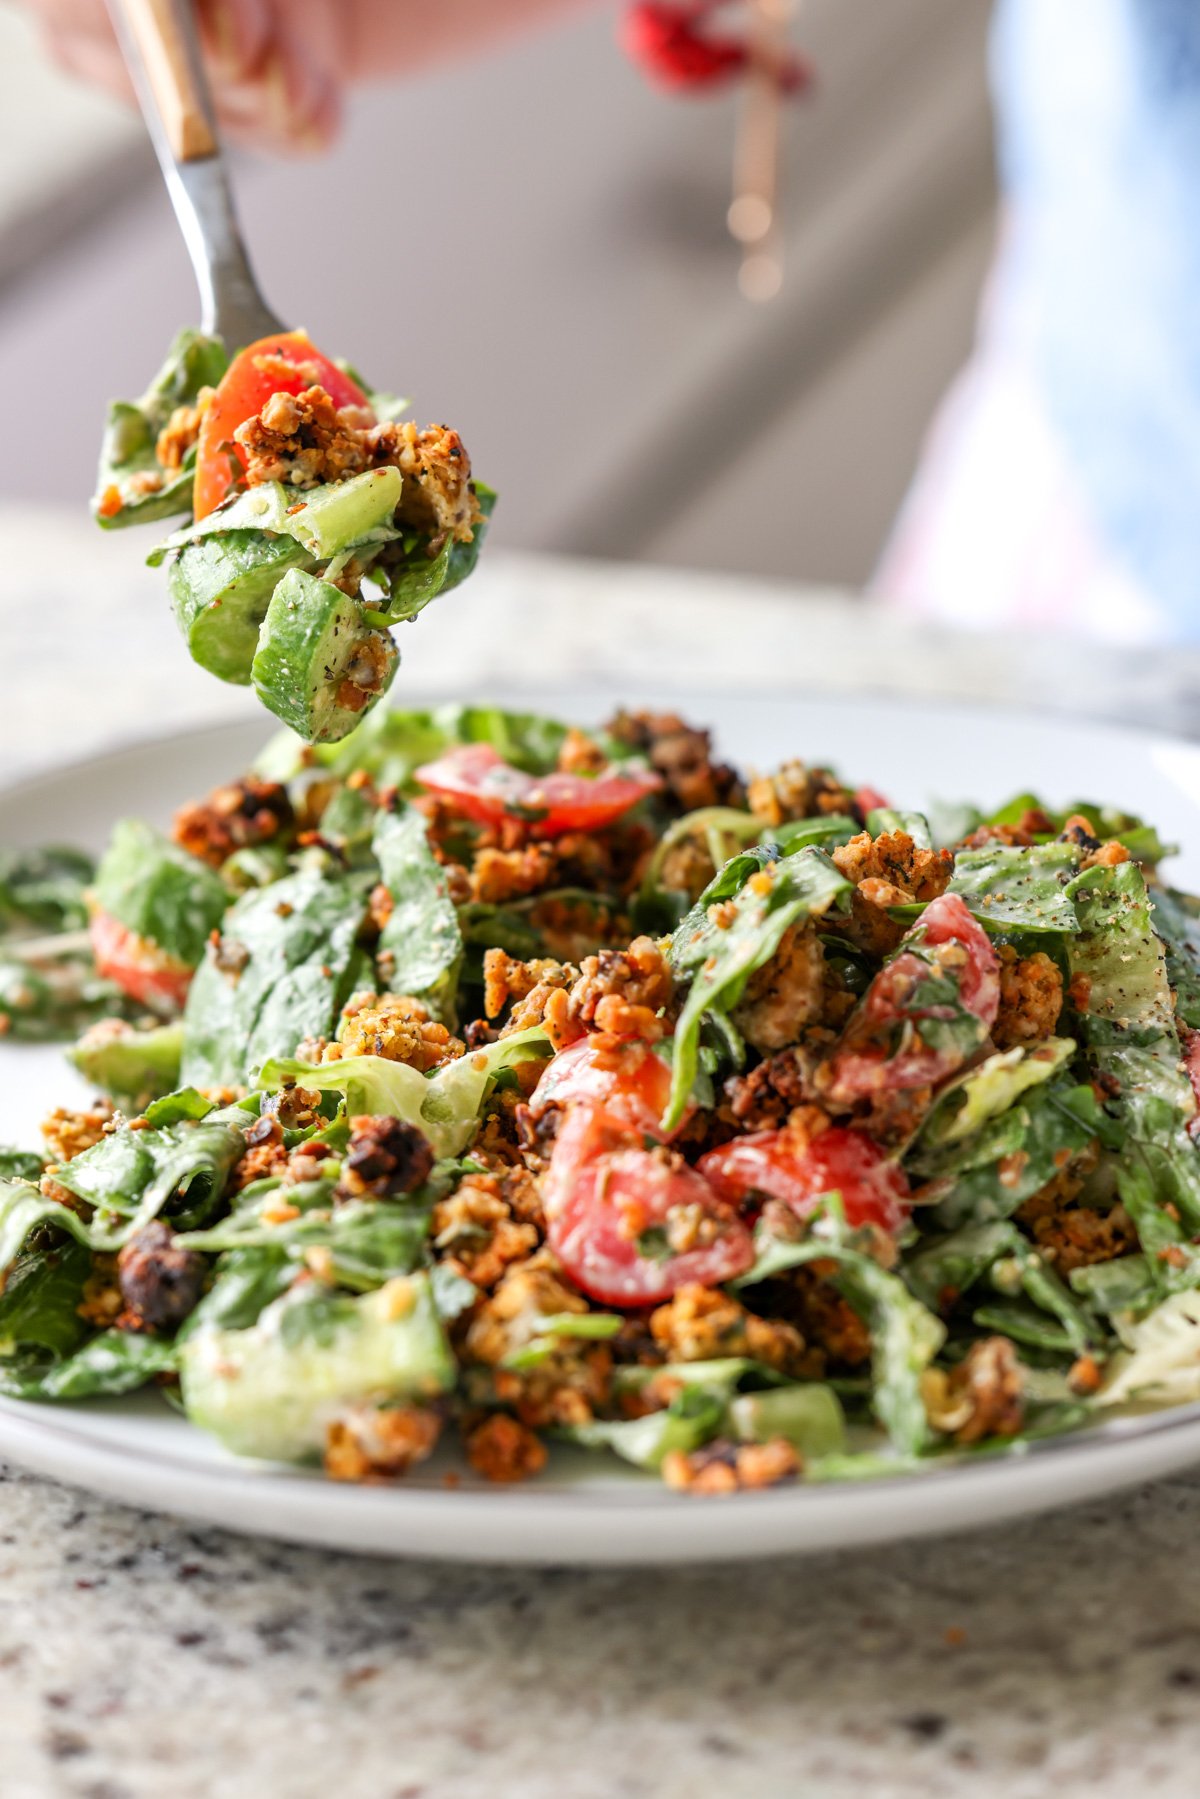
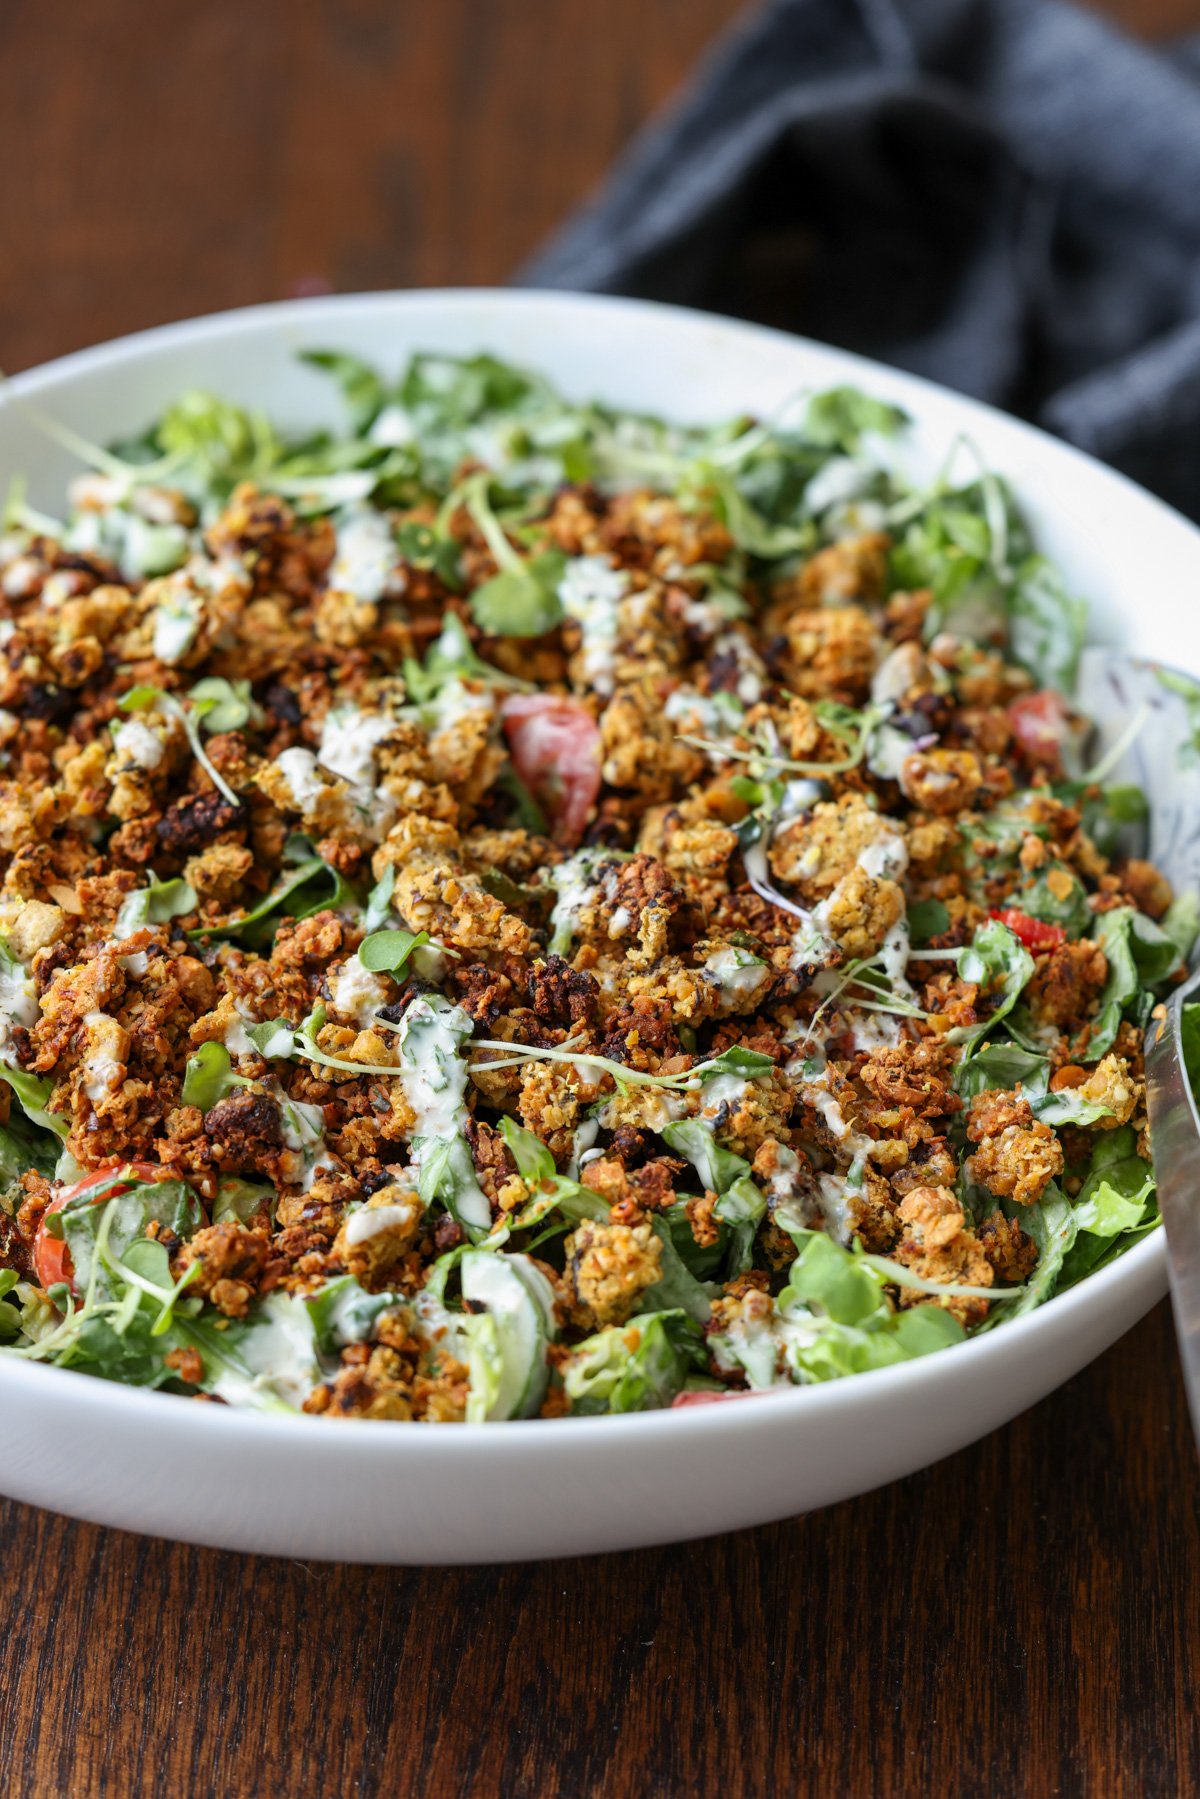
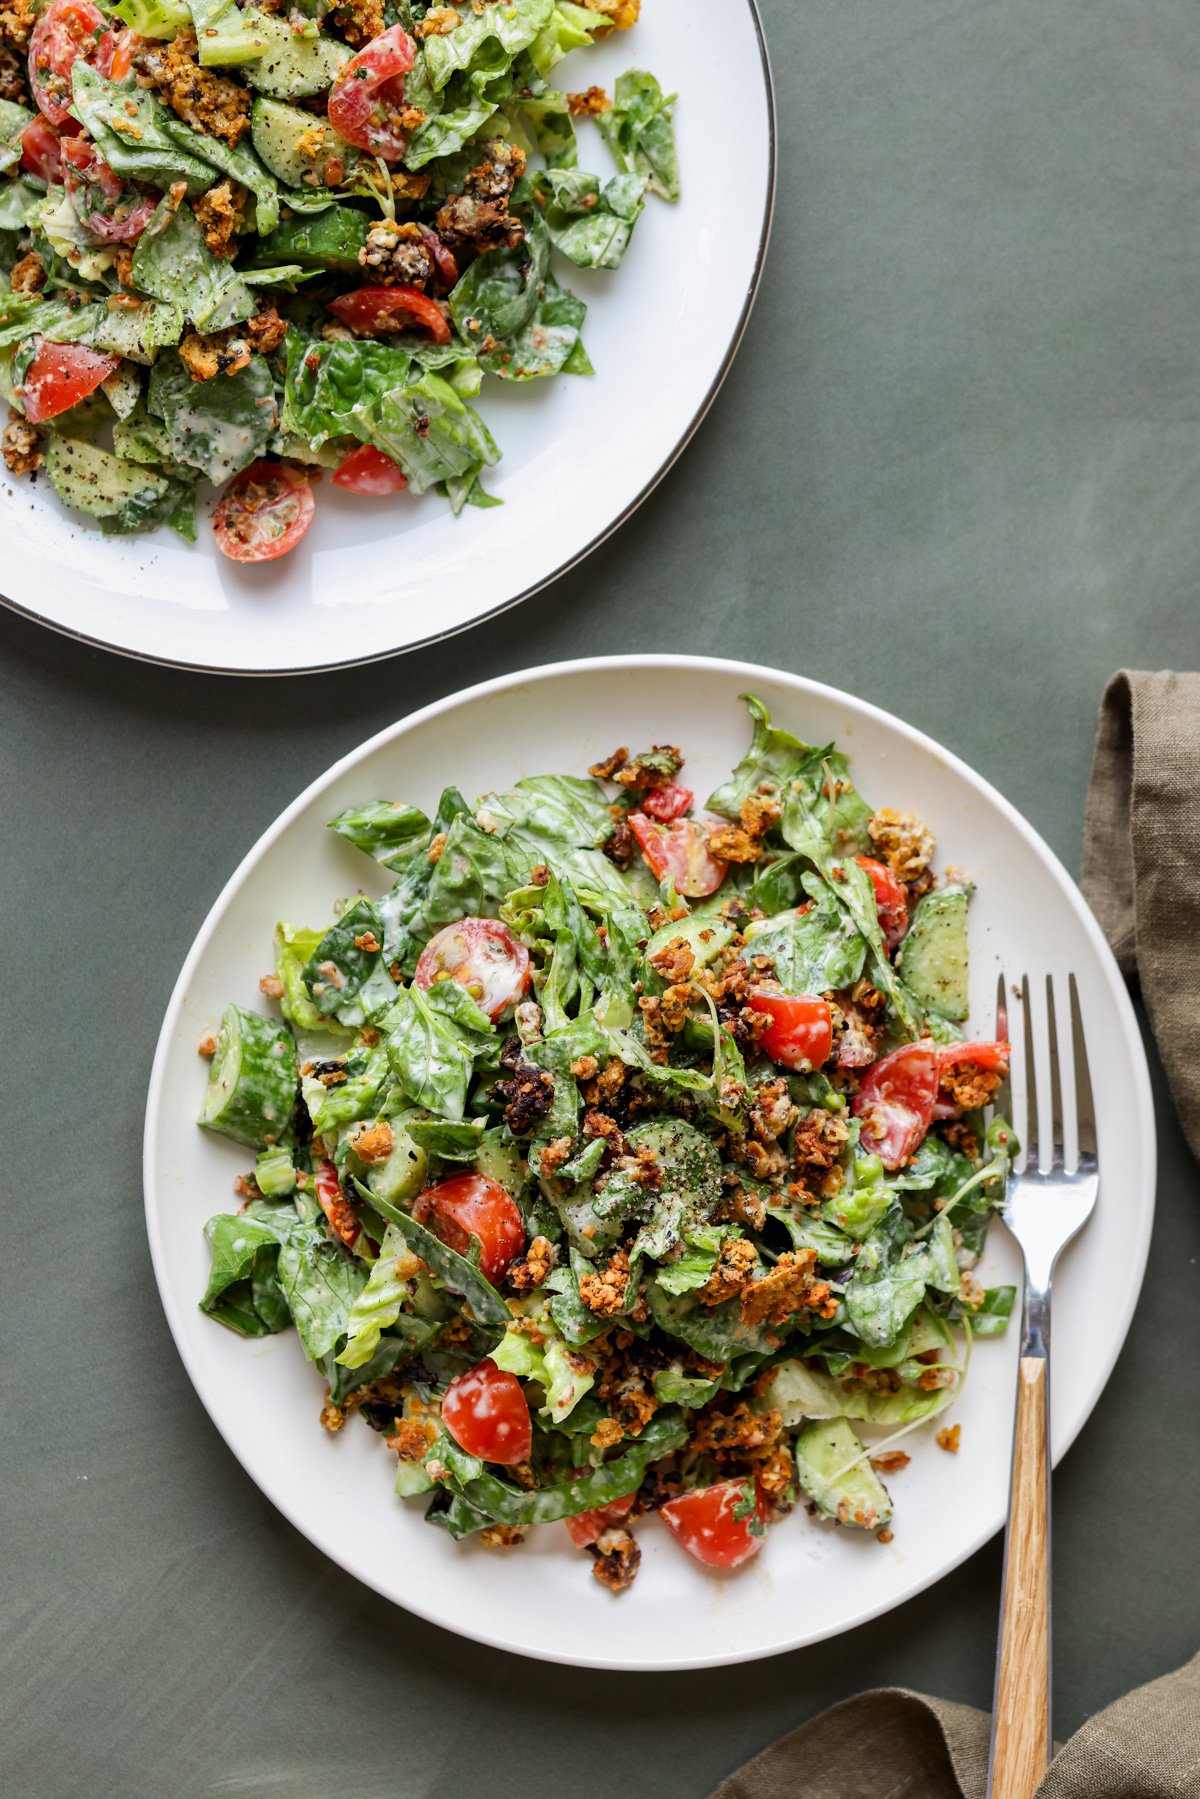
A fully loaded, flavor packed, protein rich summer spinach salad with an umami-packed crisp chickpea hemp seed olive crumble, nutrient dense greens, and creamy, vibrant tahini lemon dressing. A perfect hot weather dinner. (23g protein and 15g fiber per serving, (gluten-free, soy-free, nut-free, high protein)
This is a fantastically hearty summer spinach salad. It has so many textures and flavors, and it has 80 grams of protein for the entire salad. That’s 20 grams of protein per serving. For a salad!
There is protein from the chickpeas, from the hemp seeds, and from the nutritional yeast in the chickpea crumble. There’s also protein from the tahini in the dressing, the non-dairy yogurt (depending on the brand), as well as a little protein from the greens that you use in the salad. You can amp up the protein even more by sprinkling it with some hemp seeds before serving or adding some of my tofu bacon bits, or other high protein toppings.
The salad has this creamy texture from the dressing, the crunch from the fresh veggies, and crispiness from the chickpea crumbles, which we bake until they’re crispy-crunchy. The umami comes from the olives and the sun-dried tomato, and the refreshing, fresh flavor comes from lemon zest, the cucumbers, and any other crunchy veggies and greens.
It’s just a fabulous combination of flavors and textures. The combination of tahini and yogurt helps mellow tahini’s strong flavor and makes for a rich, creamy dressing.
Why You’ll Love this Summer Spinach Salad
incredible combination of flavors and textures! Crunchy veggies, creamy dressing, and savory, crisp chickpea-olive crumble.
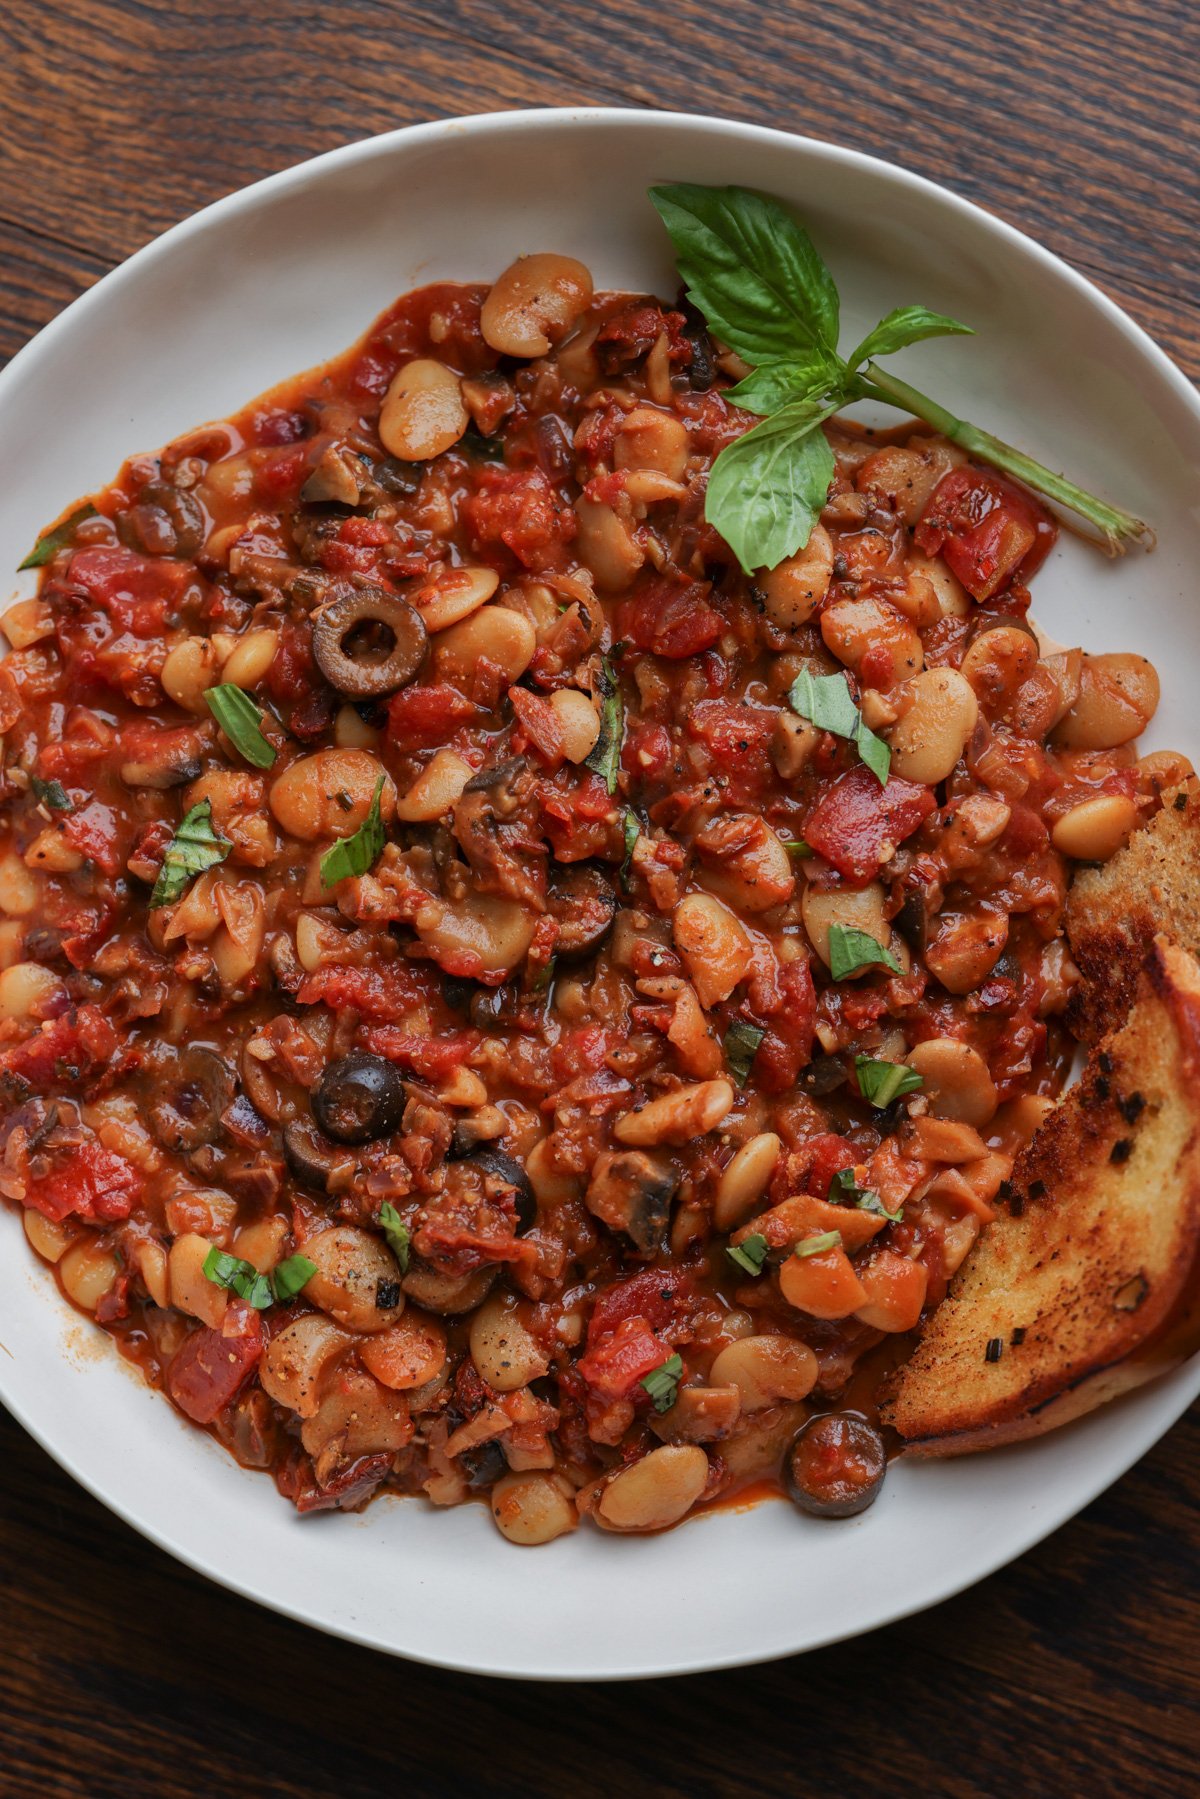
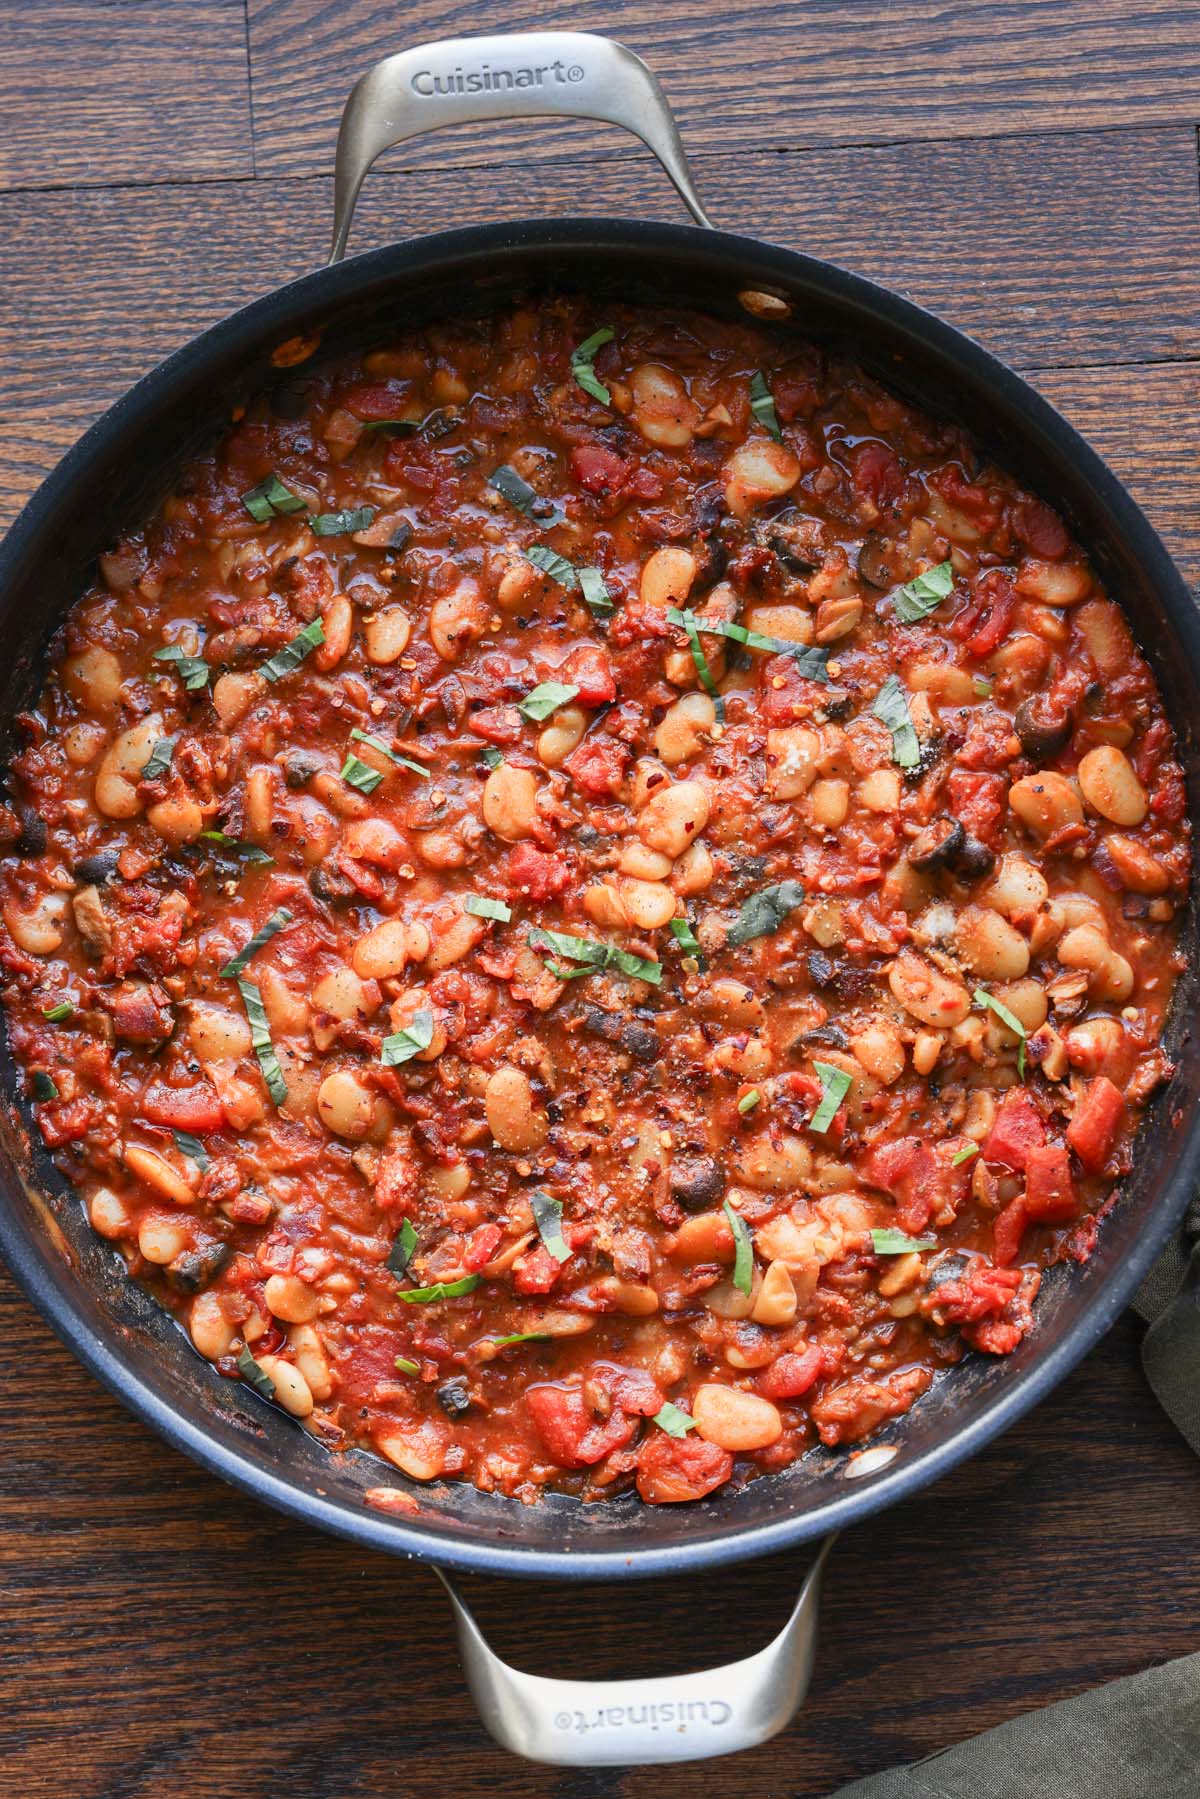
Umami-packed puttanesca sauce pairs beautifully with hearty butter beans! Puttanesca beans are a versatile, 1-pot meal that is absolutely full of flavor. Gluten-free Nutfree soyfree
I loved the incredible sauce that I made with my orzo puttanesca, so I decided to add some butter beans to it to make it into a one-pot bean dish. This is a fantastic and delicious pot of beans!
The puttanesca sauce has umami from the mushrooms, the sun-dried tomatoes, and the olives or capers, and it is just so flavorful. It also has Italian herbs and is slightly spicy from the red pepper flakes. All in all, it has a fantastic flavor profile.
Then you add some butter beans to that amazing sauce and simmer them together to meld the flavors. There’s protein and fiber from the butter beans, and it’s just a hearty and delicious stewy bean dish that you can serve with some garlic bread, sourdough or naan. You can also serve it over cooked pasta or a baked potato.
However you dish it up, it’s just fabulously delicious.
Puttanesca beans are also flexible! Use whichever ingredients you have on hand. There are different ways to add that umami using sun-dried tomatoes, olives, and capers. Even if you have two of those instead of three, it will still taste amazing.
If you can’t find butter beans, use other beans, like cannellini beans, other white beans, or use chickpeas. Or add some cooked lentils into the sauce to make it more like a puttanesca bolognese!
Why You’ll Love Puttanesca Beans
super easy 1-pot 30 minute meal
packed with protein, fiber, veggies, and FLAVOR!
umami-filled, tomato-based sauce with tender butter beans
versatile! Serve with bread to dip or over pasta or a baked potato