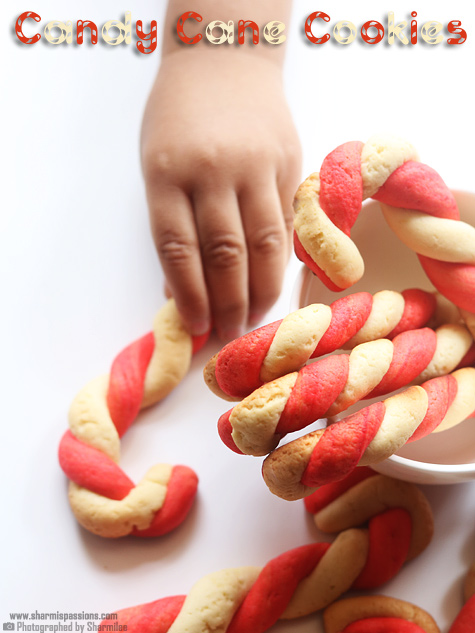
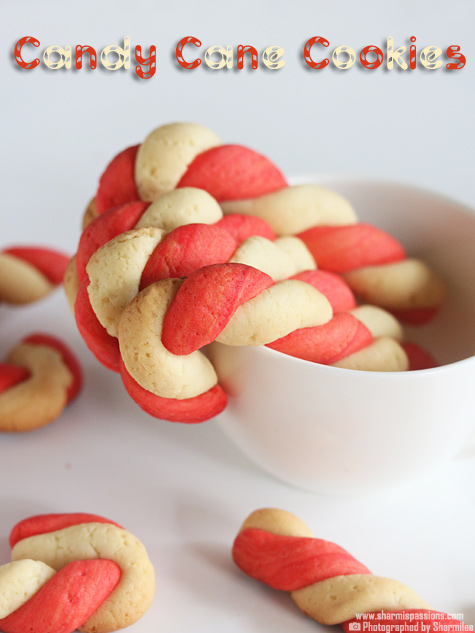
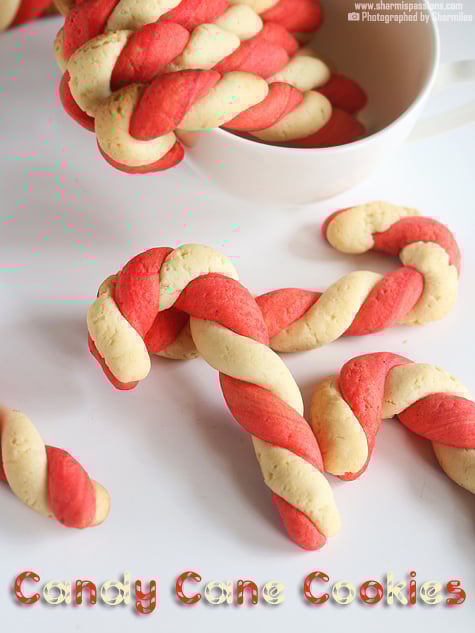
Candy Cane Cookies are cookies that are a colorful treat especially for Christmas season. Candy Cane Cookies hone our baking skills and makes us move from novice to an expert in baking. These have a soft with a light crisp texture. The twisted red-white shape looks really cute on a plate. These taste mildly sweet and buttery, so it goes well with milk or tea. Kids get really excited seeing the candy cane shape and the bright colors.
This recipe is usually made winter holiday, but you can make it any time for little mood lift. The dough is easy to work with. Twisting the two colors together feels relaxing once you get hang of it. It's a good recipe to practice shaping cookies if you are still learning.
[feast_advanced_jump_to]
About Candy Cane Cookies
Candy Cane Cookies are festive cookies made with butter sugar dough. One half of the dough is colored to make stripes. The texture is soft inside with gentle crunch at the edges. The mild vanilla flavor mixes well with butter. The cookies are shaped into canes by rolling two colored ropes and twisting them. This makes pretty swirl.
You can change the color using gel or powdered colors. Some people like adding almond essence or peppermint for different taste. The plain vanilla version is simple and nice for everyday snacks. The red twist makes them look festive without extra work. It goes good with coffee, milk, or hot chocolate
The dough is flexible. You can refrigerate it to make shaping easier. If the ropes feel very soft, chilling helps. You can make mini or longer canes depending how you roll the dough. The same base dough can be used for sugar cookies too. This is a must try recipe and you will enjoy making it again and again.
I usually bake these in small batches. The cookies spread a bit and gets even color when baked slowly. It's a perfect for making on parties and get-togethers. It was fun shaping these cookies, I loved to do it and mittu was awed seeing these cookies.She insisted to take it to school for her snacks.
I asked amma to shoot a video using my mobile just to show how to shape the candy cane cookies, hope its useful do check it out.
Video
Candy Cane Cookies Ingredients
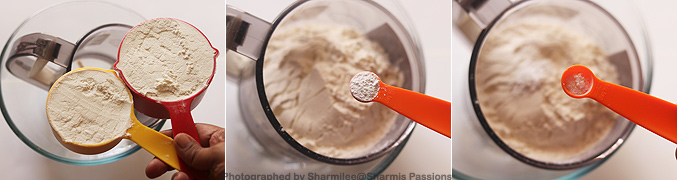
All purpose flour / maida - I just used this as base, it gives smooth texture to cookies. You can mix little wheat flour also but maida keeps them soft.
Chilled butter - I use this for richness and it helps dough hold shape. You can use salted butter also but reduce small pinch of salt.
Powdered sugar - I added this for sweetness as it mixes easily with butter. You can use cane sugar but powdered sugar makes dough smoother.
Egg - I used this to bind and make cookies soft inside. You can replace with milk but texture change little.
Vanilla essence - I have used this for flavor and smell. You can add peppermint essence also if want festive touch.
Baking powder - I have added as it gives softness to the cookies. It helps bake evenly.
Red food color - I have added liquid red color to get bright the stripe. Gel color also works for stronger shade.
Why This Recipe Works
It is easy to shape and uses simple pantry ingredients.
This recipe gives soft cookies that stay light and buttery.
You can color and shape the dough in many ways based on your liking.
It is beginner-friendly and helps improve shaping skills.
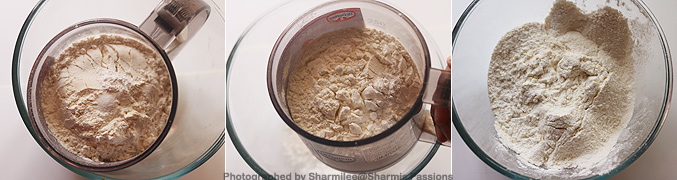
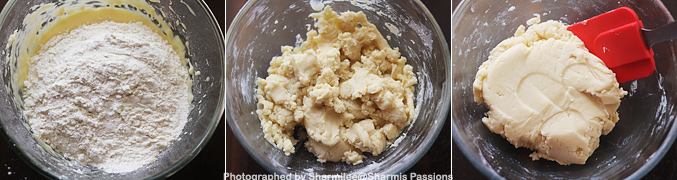
1.Measure and add flour to a sieve, then add baking powder and salt.
2.Sieve it well for even mixing.
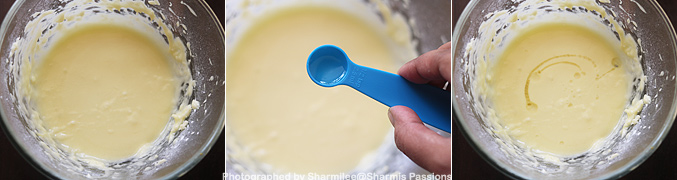
3.Now in another mixing bowl, add butter and powdered sugar. Cream together butter and sugar.
4.Whisk it well until creamy, I used electric handmixer. Then add an egg.
5.Whisk it for a minute, then add vanilla essence or any essence of your choice
6.Now add flour mixture, combine and gather to form a soft dough.
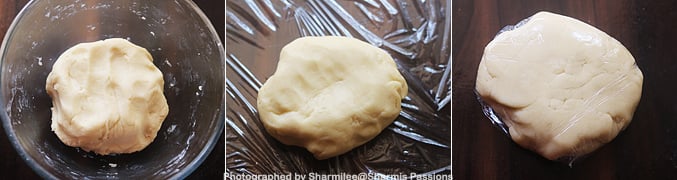
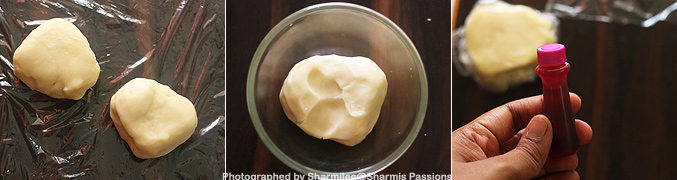
7.Now your basic cookie dough is ready. Cling wrap it and refrigerate. I took half of this dough for this candy cane cookies and used the other half for sugar cookies.
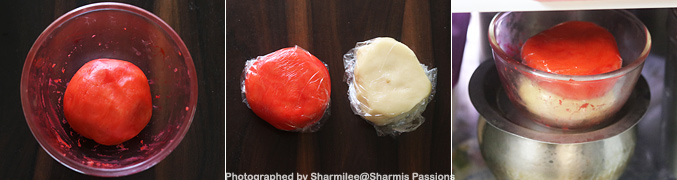
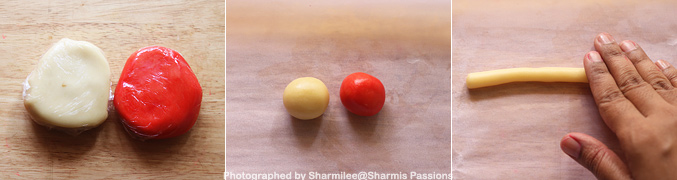
8.Divide the dough into 2. Take one portion add red food color, I used red rose liquid food color.
9.Mix well so that the color is even in the dough. Cling wrap both the dough separately and refrigerate at least for 20 minutes.
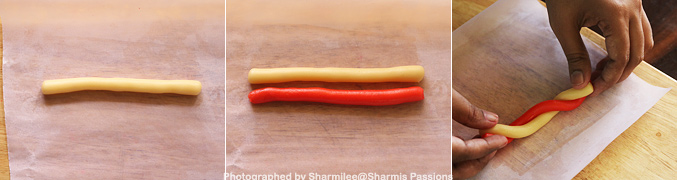
10.Now take the dough out pinch small pebble sized ball from each color. Now first take the plain color dough. Roll it with your fingers like this.
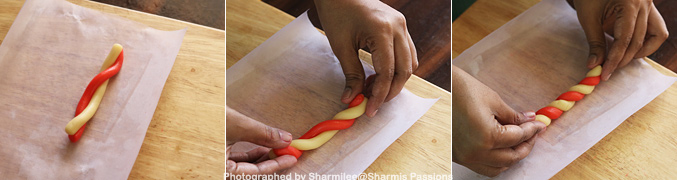
11.Repeat the same for red color too. Place both the ropes side by side, close to each other then twist and turn.
12.Twist and turn like this to get a spiral. Check out the video demonstration to get a clear idea. While you do this, preheat oven at 180 deg C for 10 minutes.
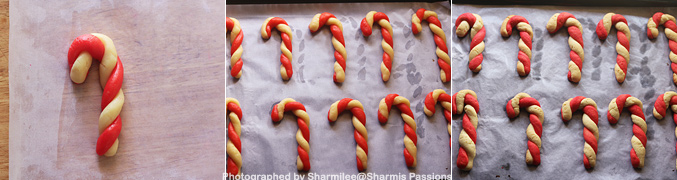
13.Bend one side to form cane shape.Repeat the process until the entire dough is finished. Arrange it in a baking tray with butter paper. Bake in preheated oven at 180 deg C for 10-12 minutes or until the edges start to brown.
Cool down completely then store in a clean airtight box.
Expert Tips
Chilling the dough - I chill the dough before shaping, sometimes I chill in between too so ropes don't break.
Shaping the ropes - do not not press too hard while rolling, gentle rolling gives smooth ropes and nice twists.
Baking time - I keep eye on cookies, as soon edges start turning light golden, overbaking makes them hard fast.
Color mixing - I usually mix color well in one half of dough so red looks even when twisted.
Cookie size - I make thin ropes because they puff little, thinner ones keep shape neat.
Serving and Storage
Serve them with warm milk, tea or even pack them for gifting. This recipe goes good for dessert tables or small snack boxes. Store the cookies in airtight box once it cooled fully. It stays fresh for around a week at room temperature. If they soften later, you can warm for a minute to refresh.
FAQS
1.Can I skip the egg?
Yes you can, replace with little milk but the cookies might be slightly less soft.
2.Why did my ropes break while twisting?
Mostly the dough was too warm, refrigerate it for few minutes and try again.
3.Can I add gel food color?
Yes you can, gel gives a brighter color with very little quantity.
4.How to keep the cane shape intact?
You should chill the shaped cookies before baking, it helps them hold shape better.
5.Can I make this cookie ahead?
You can make the cookies and store them ahead. It stays well for a week .
If you have any more questions about this Candy Cane Cookies Recipe do mail me at sharmispassions@gmail.com. In addition, follow me on Instagram, Facebook, Pinterest, Youtube and Twitter .
Tried this Candy Cane Cookies Recipe? Do let me know how you liked it. Also tag us on Instagram @sharmispassions and hash tag it on #sharmispassions.
Candy Cane Cookies are colourful, tasty cookies made by blending flour, butter, sugar to a dough, colored & twisted in cane shape and baking it. Candy Cane Cookies hone our baking skills and makes us move from novice to an expert in baking. Candy Cane Cookies are anytime snack commonly made for Christmas.
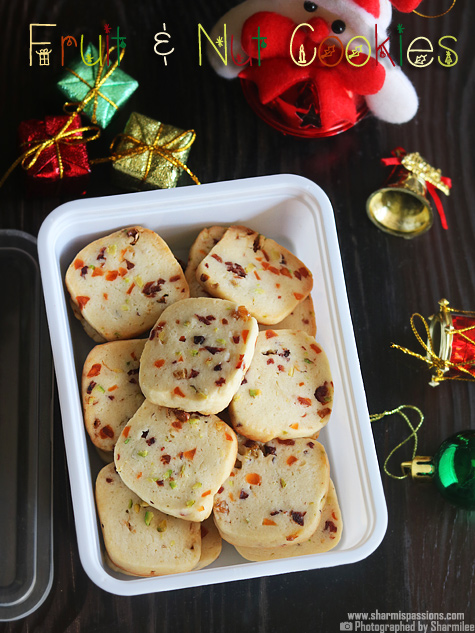
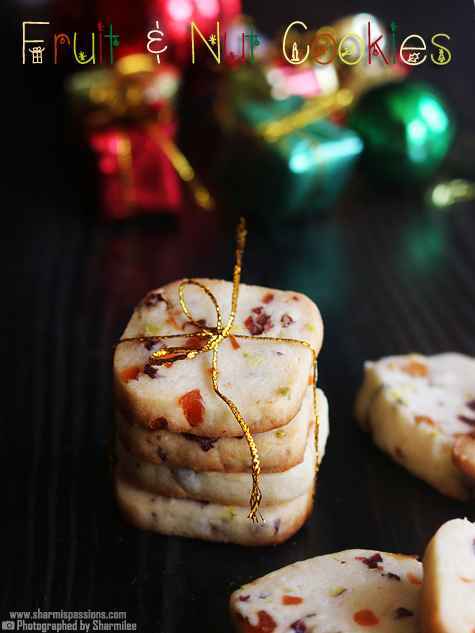
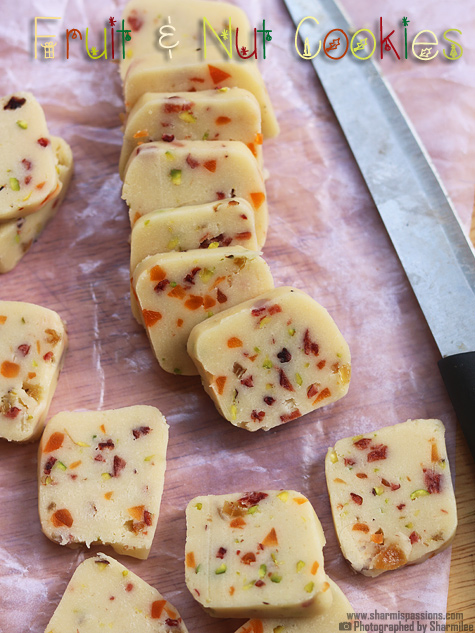
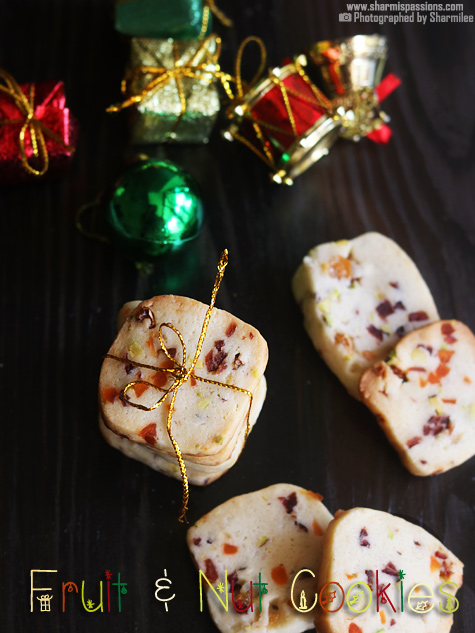
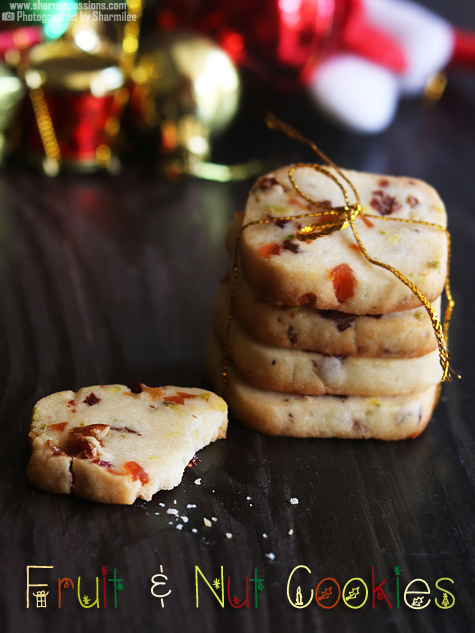
Fruit and Nut Cookies are colorful little treats, soft inside and little crisp at the edges. They full of chopped nuts and dried fruits, makes every bite feel bit special. It tastes really good with tea or even cold milk. These cookies are nice anytime snack, specially during Christmas or some special occasions.
You can make this cookie when you want something that looks fancy but easy to bake at home. The mix of fruits and nuts adds both flavor and texture, so feels like every bite have little surprises. It is a cookie that fills eyes, heart and tummy all together. It's a must try recipe to munch on.
[feast_advanced_jump_to]
About Fruit & Nut Cookies
Fruit and Nut Cookies are eggless buttery cookies made using dry fruits & nuts with flour, butter & sugar. The dough is soft and smooth, after baking the cookies comes out little crisp at edges and soft inside. You can either make them small or slightly bigger, both ways they tastes really good.
The dried fruits cranberries, apricots and grapes give tangy sweet taste, and pistachios and other nuts gives mild crunch. The flour and butter base gives gentle richness without making it too heavy. You can also add your favorite nuts or dried fruits depends on what you have at home.
These cookies are very versatile and can be made ahead because dough keeps well in fridge. The log method is nice because you can slice as need and bake fresh cookies every time. You can also roll small balls and bake them directly if want quick cookies.
I usually make these when friends come over because they look colorful and little fancy. They also makes nice small gifts in jars or tiny boxes, and everyone just loves them.
These fruit and nut cookies are so buttery and flavourful with the crunch in nuts and dry fruits that we loved it so much, it resembled and tasted like the karachi biscuits a lot.
Fruit and Nut Cookies Ingredients
All purpose flour / maida - I have used this for soft cookie base, it gives smooth dough. I sometimes use wheat flour but cookies will be slightly denser.
Butter - I used room temperature butter for smooth, creamy dough. I sometimes use homemade or store-bought, salted or unsalted with small adjustments in salt.
Powdered sugar - I used this for sweetness and smooth mixing. I sometimes replace with brown sugar but the color will change slightly.
Vanilla essence - I add this for flavor and smell, gives a gentle aroma. I sometimes use almond or any essence of choice.
Dried cranberries - I have used these for tangy sweetness and little chewiness. I sometimes use any dried fruit like cherries also.
Dry grapes / raisins - I add these for small bursts of sweetness, chopped for even mix. I skip if I want less sweet.
Pistachios - I have used these for crunch and color, finely chopped works best. I sometimes replace with almonds or cashews.
Apricots - I add these for slight tangy taste, finely chopped. I sometimes use dates or figs also.
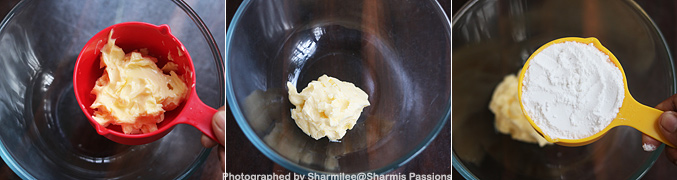
1.Measure and take butter in a mixing bowl, add powdered sugar to it.
2.Whisk it well,I used my hand whisk, you can use electric mixer too. Whisk it until creamy and fluffy.
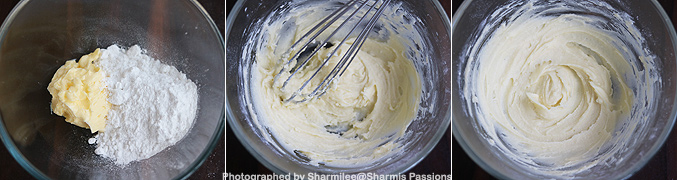
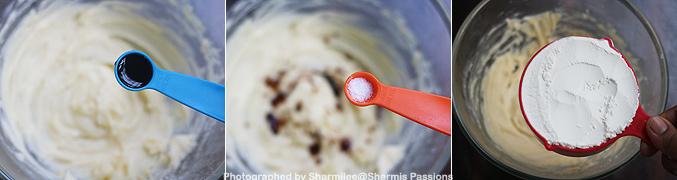
3.Now add vanilla essence and salt. Finally add in the flour
4.Mix with a spatula to form a dough.
5.Now use your hands to roll into a ball, cling wrap it and refrigerate it.
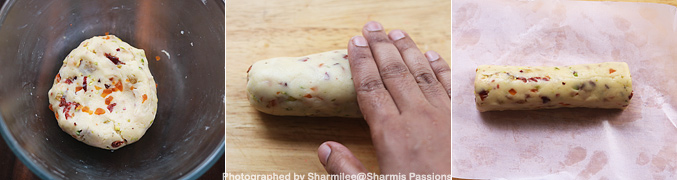
6.I used half of the dough for this cookie. Chop the dry fruits and nuts. Now half portion of the prepared dough add the dry fruits and nuts.
7.Mix it well so that the dry fruits and nuts are evenly distributed. Now shape it into a log,place it on a butter paper.
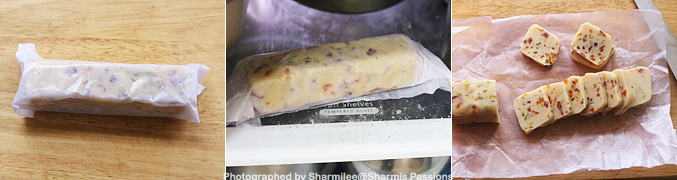
8.Wrap it well, refrigerate it for at least 1 hour. Slice the log. Preheat the oven at 180 deg C for 10 minutes.
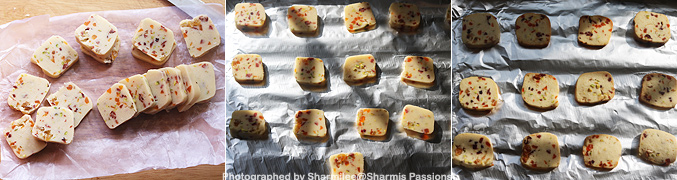
9.Slice it not too thick or too thin. Transfer it to a baking tray lined with aluminium foil.Bake in preheated oven for 10-12 minutes or until the edges turn golden.
Cool down then store in airtight container.
Expert Tips
Chilling the dough - I make sure to chill the log before slicing, it helps get neat cookie shapes. I sometimes chill in between if the dough feels soft.
Cookie slicing - I try not slice too thick or too thin, otherwise baking time change. I usually use sharp knife for even slices.
Baking time - I keep eye on edges, they turn golden first. I don't overbake, cookies gets crisp after cooling.
Mixing fruits & nuts - I usually fold them gentle after making dough, ensures even distribution. I sometimes press few extra nuts on top for looks.
Storage - I store in airtight box once cooled completely, keeps well for weeks in fridge. I sometimes separate layers with butter paper if storing long.
Serving and Storage
Serve them with tea, coffee or cold milk, they taste lovely anytime. This goes well as a small festive treat in jars or gift boxes. Store leftover cookies in airtight container once cooled. They stay fresh for weeks in fridge and can be enjoyed later as snack.
FAQS
1.Can I use other dry fruits?
Yes you can, use whatever you like or have at home, all will taste nice.
2.Why did my cookies become soft after baking?
It is normal, cookies get crisp after cooling. Don't over bake.
3.Can I make the dough ahead?
Yes you can keep it in fridge for 2-3 weeks and slice fresh when needed.
4.Can I add nuts directly with flour?
Yes you can, sometimes I do that, works fine too.
5.Do I need to slice logs evenly?
Try to, so that cookies bake evenly, otherwise some will be soft or over baked.
If you have any more questions about this Fruit & Nut Cookies Recipe do mail me at sharmispassions@gmail.com. In addition, follow me on Instagram, Facebook, Pinterest, Youtube and Twitter .
Tried this Fruit & Nut Cookies Recipe? Do let me know how you liked it. Also tag us on Instagram @sharmispassions and hash tag it on #sharmispassions.
Fruit and Nut Cookies are colorful little treats, soft inside and little crisp at the edges. They full of chopped nuts and dried fruits, makes every bite feel bit special. It tastes really good with tea or even cold milk. These cookies are nice anytime snack, specially during Christmas or some special occasions.
Measure and take butter in a mixing bowl, add powdered sugar to it.
Whisk it well, I used my hand whisk, you can use electric mixer too. Whisk it until creamy and fluffy.
Now add vanilla essence and salt. Finally add in the flour.
Mix with a spatula to form a dough.
Now use your hands to roll into a ball, cling wrap it and refrigerate it.
I used half of the dough for this cookie. Chop the dry fruits and nuts. Now half portion of the prepared dough add the dry fruits and nuts.
Mix it well so that the dry fruits and nuts are evenly distributed.
Now shape it into a log, place it on a butter paper.
Wrap it well, refrigerate it for atleast 1 hour. Slice the log.
Preheat the oven at 180 deg C for 10 minutes.
Slice it not too thick or too thin.
Transfer it to a baking tray lined with aluminum foil.
Bake in preheated oven for 10-12 minutes or until the edges turn golden.
Cool down then store Fruit & Nut Cookies in airtight container.
Notes
Chilling the dough - I make sure to chill the log before slicing, it helps get neat cookie shapes. I sometimes chill in between if the dough feels soft.
Cookie slicing - I try not slice too thick or too thin, otherwise baking time change. I usually use sharp knife for even slices.
Baking time - I keep eye on edges, they turn golden first. I don't overbake, cookies gets crisp after cooling.
Mixing fruits & nuts - I usually fold them gentle after making dough, ensures even distribution. I sometimes press few extra nuts on top for looks.
Storage - I store in airtight box once cooled completely, keeps well for weeks in fridge. I sometimes separate layers with butter paper if storing long.
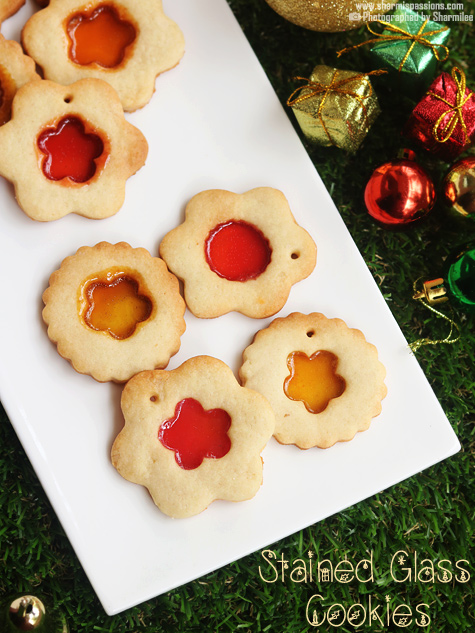
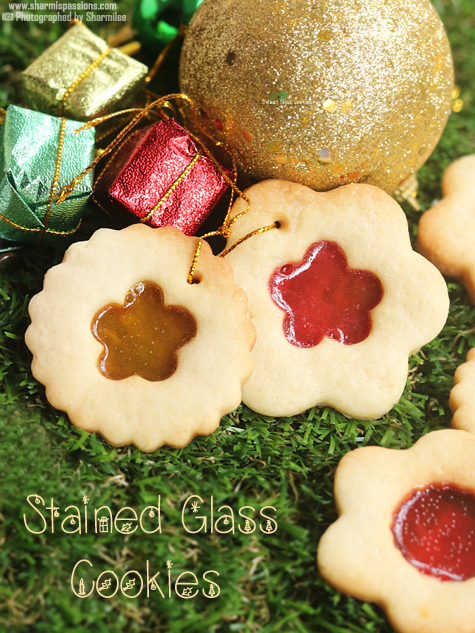
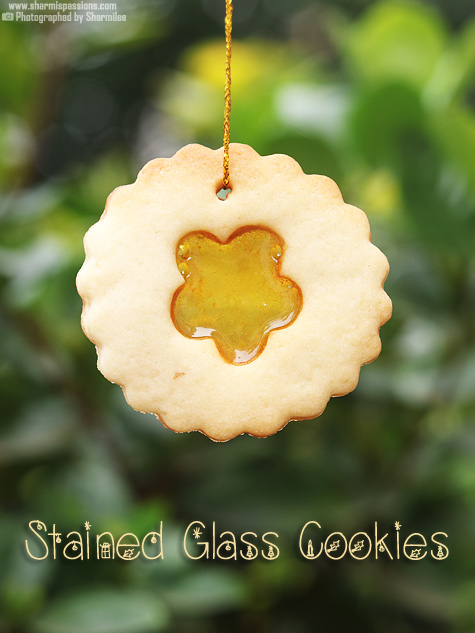
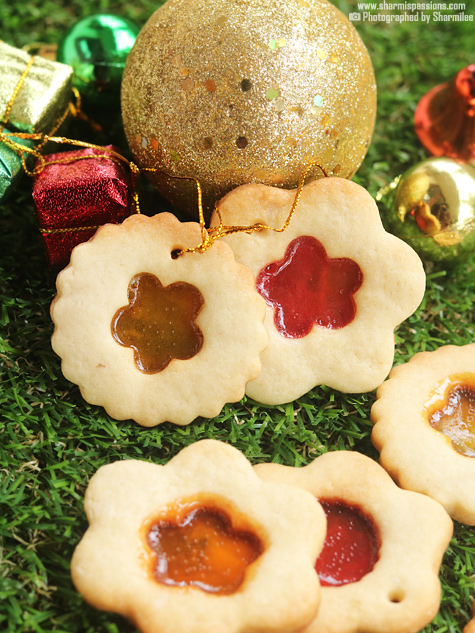
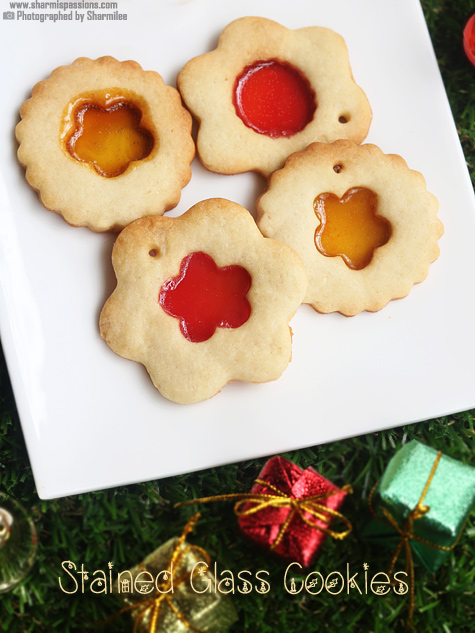
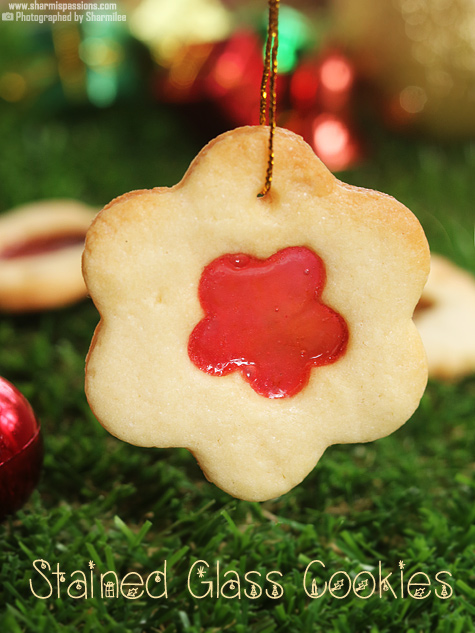
Stained Glass Cookies are such a cute and colorful treat, and sometimes I feel they look too pretty so you almost feel bad to bite into them. These come out slightly crisp at the edges with a soft bite inside, and that melted candy in the center gives the real glass like effect which kids get super excited about. Stained Glass Cookies are treat to eyes, heart & tummy and any time wonder snack. Stained Glass Cookies are a must try at home for its taste & for the joy of baking!
The best thing is the dough doesn't need any fancy steps or extra effort. The crushed candies melt nicely while baking and then set into a shiny centre once cooled. It goes so well with tea and also works like a sweet little edible gift. You can even hang them like ornaments if you poke a hole before baking.
[feast_advanced_jump_to]
About Stained Glass Cookies
Stained Glass Cookies are basically butter cookies made with a small cut out in the middle which we fill with crushed hard candies. Kids like it mainly for the colors and the glass effect. The vanilla in this recipe gives a nice bakery kind of feel and mixes well with the buttery dough. The dough also holds its shape pretty well since I usually chill it before rolling out.
This recipe uses a simple dough made using maida, powdered sugar and butter, so the flavor stays mild and sweet. I have used colored candies based on the theme, but you can mix any shades you want, each batch looks different and that's the fun part. Kids love helping with crushing the candies and filling the centres too.
You can go with any shapes like stars, flowers, hearts or whatever cutters you have. You just need one big cutter and one small cutter for the hollow part. The candies bubble slightly while baking and settle down beautifully after cooling. Sometimes I mix two candy colors for swirl patterns.
Stained Glass Cookies is a dream come true for me. Yes I had been eyeing these cookies for the past 2 years and this year somehow gained confidence and tried it.The hard candies are crushed to fill in the center holes and while baking it spread out giving the cookies a glossy look. I clicked the cookies to hearts content and loved these clicks too, I couldn't take my eyes off, aren't they looking pretty?!
I usually bake these during holidays or family get-togethers as it brightens up the whole box and tastes really nice with a warm drink too.
Stained Glass Cookies Ingredients
Maida / all purpose flour - I have used this as the base for the dough. It gives smooth texture and holds shape well. You can replace half with wheat flour but cookie turns slightly dense.
Butter - This gives softness and flavor. I used room temperature butter so it mixes easily. Homemade butter also works.
Powdered sugar - I added powdered sugar for sweetness and also to make dough come together softly. Fine sugar works but powdered gives smoother dough.
Vanilla essence - This gives a light flavor and bakery smell. You can skip if you prefer plain buttery taste.
Hard colored candies - These form the stained glass centre. Use any brand or mix colors for fun patterns.
Why This Recipe Works
It is very simple dough and easy even for beginners.
Cookies look colorful and pretty without much hard work.
You can choose any shape or candy color according to your theme.
Centres turn crisp after cooling and taste so good.
You can prepare the dough earlier and bake whenever needed.
1.Measure and take butter in a mixing bowl, add powdered sugar to it
2.Whisk it well, I used my hand whisk, you can use electric mixer too. Whisk it until creamy and fluffy.
3.Now add vanilla essence and salt. Finally add in the flour
4.Mix with a spatula to form a dough.
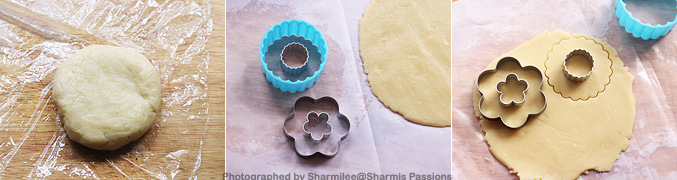
5.Now use your hands to roll into a ball, cling wrap it and refrigerate it
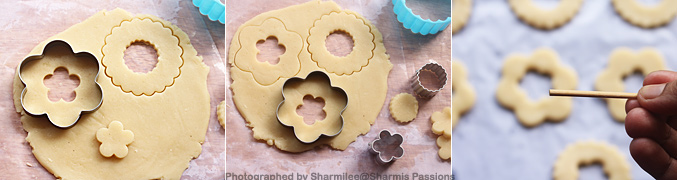
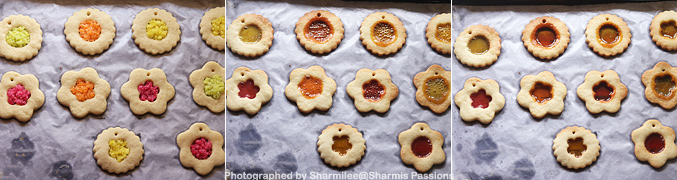
6.I used only half of the dough for this cookie. Take your cookie cutters, you need a bigger one and a smaller one like this. Roll out the dough slightly thin. Cut out using the cookie cutters.
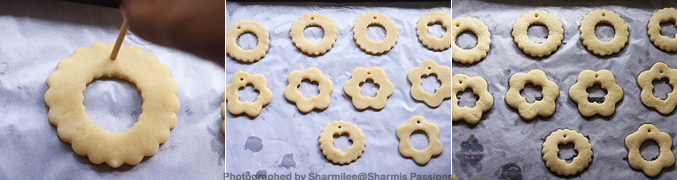
7.Remove the smaller flower.Now arrange it in a baking tray with parchment paper.Take a stick or toothpick. While you do this, Preheat oven at 180 deg C for 10 minutes.
8.Prick holes a the top of each cookies, incase you want to hang these cookies for decoration.Slice the log. Keep the baking temperature for 12 minutes. Bake the cookies for the first 9 minutes.
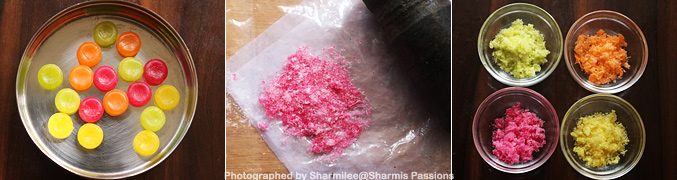
9.Take your candies, crush each color separately and keep it ready.
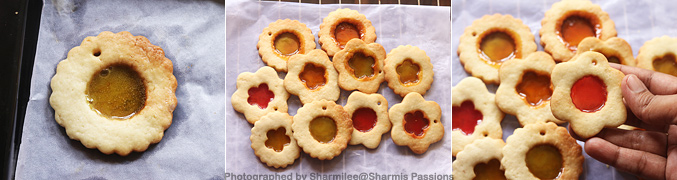
10.Now fill the holes with crushed candies,Bake for the remaining 3 minutes until it bubbles up. Let it cool down for few minutes.
11.Carefully remove the cookies and cool down in wirerack.
Cool down then store.
Expert Tips
Chilling the dough - I make sure to chill well. I usually keep it for a while so cookies don't spread.
Crushing candies - I always crush just before filling. Don't crush too early, they turn sticky later.
Baking time - Bake cookies first without candies, and then add candy later so it doesn't burn.
Thickness - I prefer thin and even thickness so roll slightly thin. If too thick, candy may not melt evenly in centre.
Cooling - Let the cookies cool fully. The centers harden only after cooling. And don't touch the center immediately since it will be hot.
Serving and Storage
Serve the cookies with milk, tea or even hot chocolate. They look nice on festive plates or packed in small gift boxes also. Store the leftover cookies in a airtight box only after it cools down completely. It will stays fresh for almost a week when kept in room temperature.
FAQS
1.Can I skip chilling the dough?
You can skip, but the cookies may spread out and lose shape. Chilling makes it behave better while baking.
2.Why did my cookie centre look dull?
Sometimes the candy just needed few extra seconds in the heat, or maybe it was crushed too fine, so it didn't shine much.
3.Can I make the dough ahead?
Yes, the dough stays fine in the fridge for around 2-3 weeks, so you can prepare earlier also if you want.
4.What if the candy overflows?
That usually means the centre got a bit over-filled. Just reduce the candy a little next time.
5.Can I bake the candy along with the cookie?
You can, but it might get overcooked and lose color. Adding it in the last minutes gives better finish and texture.
If you have any more questions about this Stained Glass Cookies Recipe do mail me at sharmispassions@gmail.com. In addition, follow me on Instagram, Facebook, Pinterest, Youtube and Twitter .
Tried this Stained Glass Cookies Recipe? Do let me know how you liked it. Also tag us on Instagram @sharmispassions and hash tag it on #sharmispassions.
Stained Glass Cookies are such a cute and colorful treat, and sometimes I feel they look too pretty so you almost feel bad to bite into them. These come out slightly crisp at the edges with a soft bite inside, and that melted candy in the center gives the real glass like effect which kids get super excited about. Stained Glass Cookies are treat to eyes, heart & tummy and any time wonder snack. Stained Glass Cookies are a must try at home for its taste & for the joy of baking!
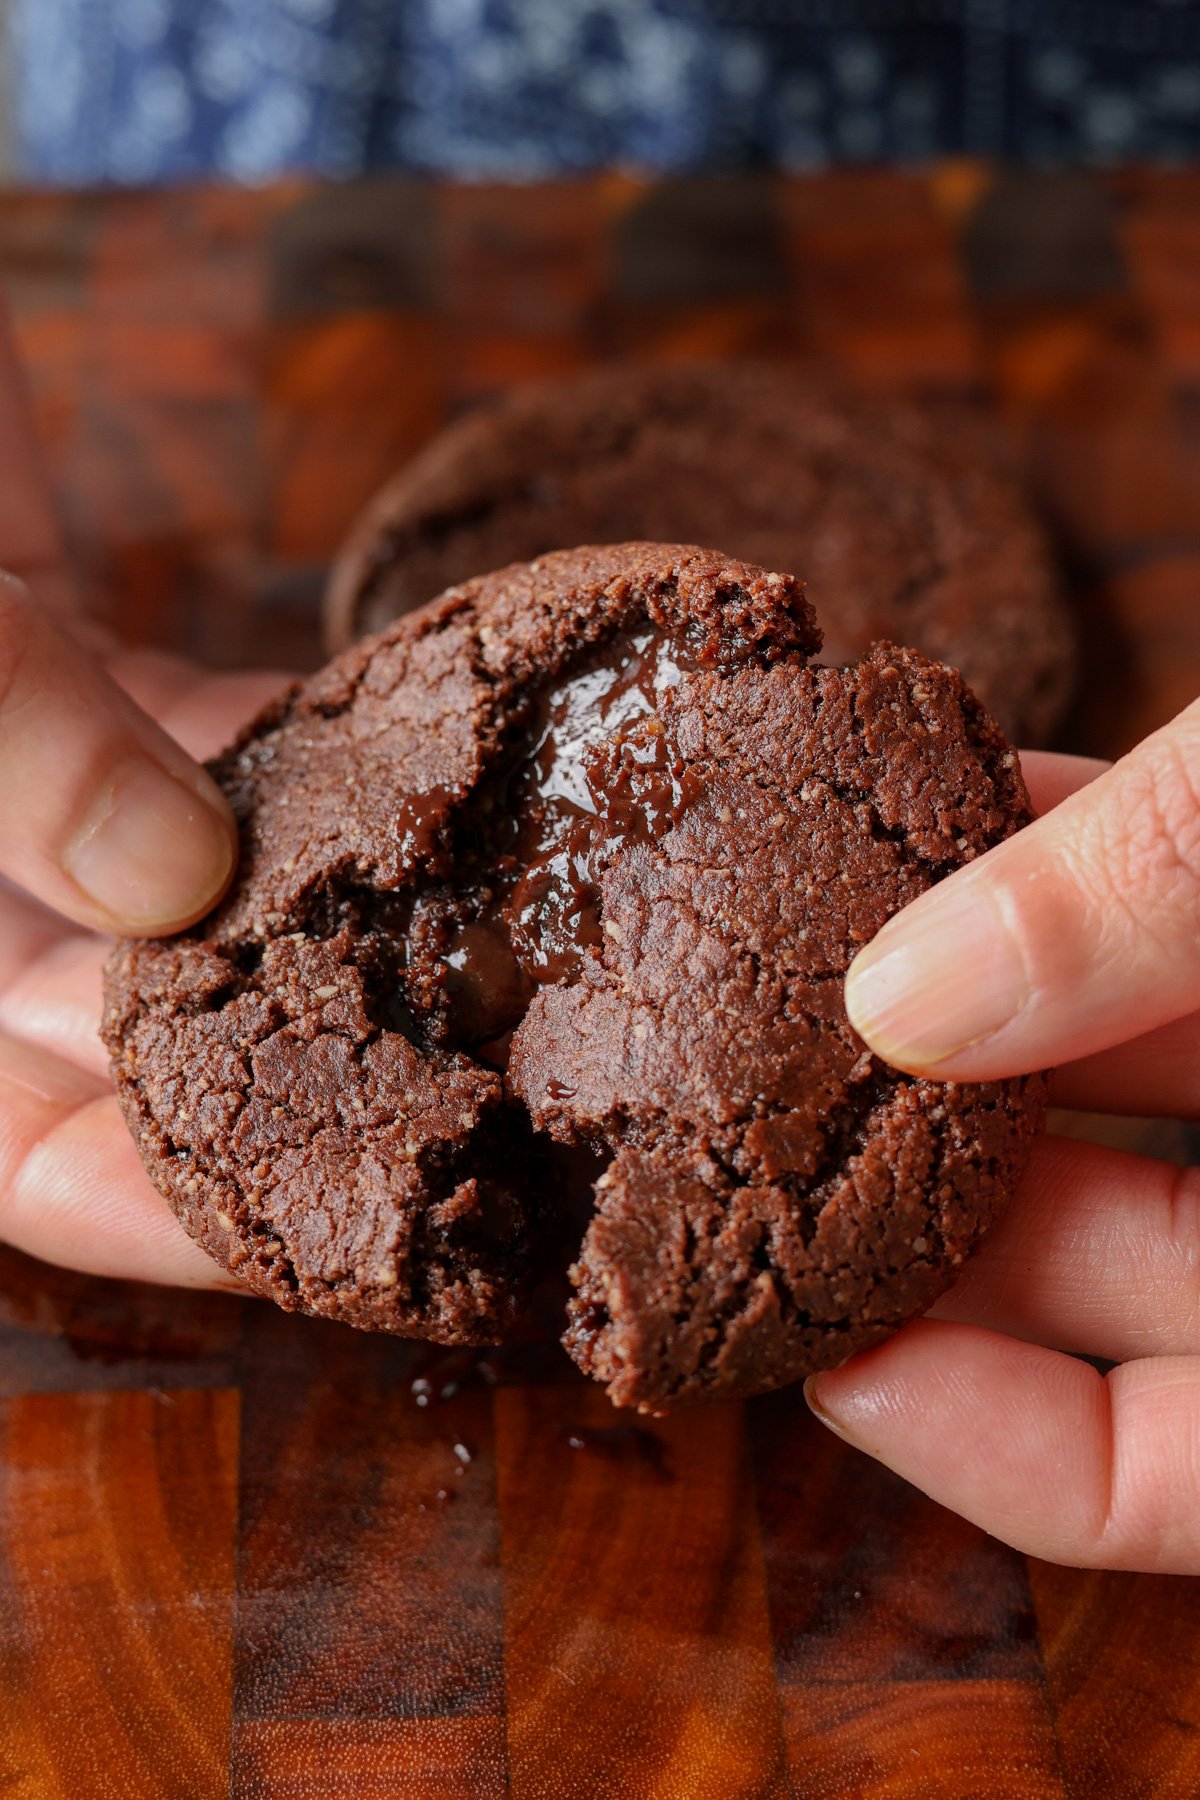
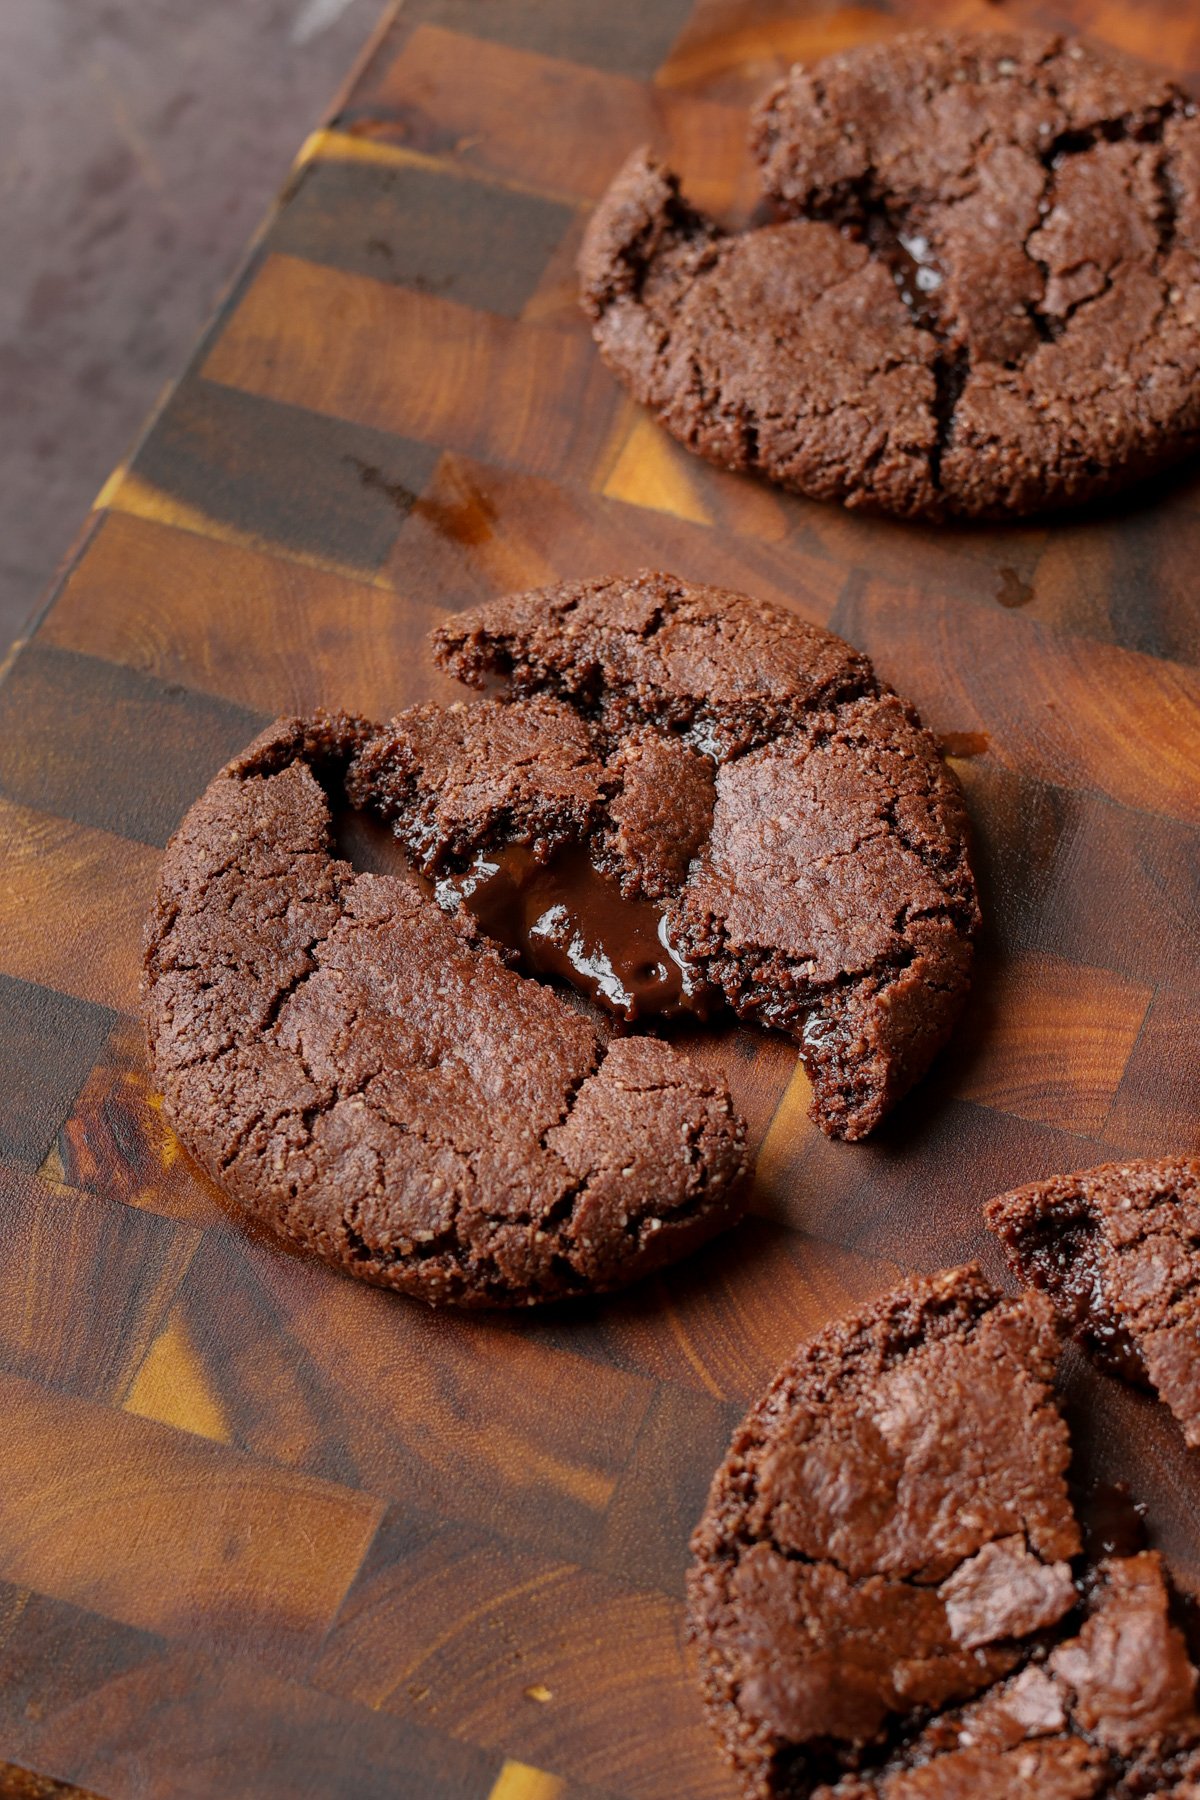
These decadently delicious chocolate lava cookies use my soft, chewy, almond flour cookie dough and a flowy, chocolate ganache filling that oozes out when you break them in half! (gluten-free and soy-free with nut-free options)
It’s cookie season, and I wanted to make a decadent, chocolatey cookie. And what better idea than to convert molten lava cake into cookie form!
My motto is that baking should be super easy and flexible, so that even if you make a few measuring errors, things still turn out great. Nobody has time to whip up butter and sugar and all that, so I use my trusty almond flour cookie dough, which works every time.
To make this simple dough, you just add all the dry ingredients to a bowl, mix really well, add some melted coconut oil and maple syrup, mix again, and that’s it! You have a dough!
For this recipe, we’ll add cocoa powder to make a chocolate cookie dough. Then, we make a molten chocolate “lava bomb,” which is a melted chocolate ganache that goes inside the cookie. As the cookie bakes, it spreads and traps the chocolate ganache inside. When you break it open, it’s oozy, melty, and so delicious.
Welcome to the time of the year when the high energy of summer has begun to wind down and we’re settling into the more relaxed rhythms of fall. When the sun is hot and outdoor activities are high, it’s a good time for uplifting sativa strains that match your social calendar full of events where you want to feel energized, happy and upbeat. But now that things are calming down before winter, the strains you’re choosing can start to reflect the new season.
Hybrid strains provide a nice balance between the floaty, cerebral high of sativas and the calming, body high from indica strains. They’re usually great to smoke any time of day, though some people may prefer to hold off on strains with heavier indica effects until the end of the day or another time when they can relax into the experience. If you’re looking for some new strains to try out while the leaves turn from green, take a look at the list below for some suggestions on where to start.
This potent strain is good for anyone looking to experience the deeply calming effects of an indica strain along with the euphoria of a sativa at the same time. Prepare to feel relaxed and maybe a little sleepy along with a mood boost that will keep you pleasantly serene after just a few puffs.
The effects of this heavy hitter come on quick and intense with a mellow but energizing buzz that can lift even the lowest of spirits. It can help relieve stress, depression and even ease body pain and inflammation. Opt for this strain when you want a focused-but-stoney high where you’ll feel uplifted, creative and chill.
OG Kush (hybrid) and Skywalker (indica) are responsible for the strong body high and anxiety busting buzz of Skywalker OG. Though this strain is good for taking the edge off of insomnia, it won’t knock you out or keep you couch locked. By helping your body and mind slowly unwind simultaneously, you’ll feel at ease without being drained of energy when you start coming down.
Though you will benefit from the light pain relieving properties of this strain with a controversial name, it’s really known for its high THC content that will leave you feeling super buzzed and blissful. Expect a clear-headed, cerebral high that might be followed by an uptick in your appetite and your mood.
For people who need deep relaxation but don’t want to feel worn out or lethargic, Dr. Who is a good choice for a buzz that won’t take you out of your comfort zone as long as you keep it moderate. It’s balanced genetics combine Timewreck (sativa) and Mad Scientist (indica) for a strong buzz that does wonders for pain, stress and nausea.
This quintessential Bay Area strain is both classic and common among smokers who can’t get enough of its rich flavor and sky high effects that come on immediately and linger for awhile. Be ready to feel pleasantly high and in good spirits. If you have a high tolerance, you may be able to still be productive, but not if your tasks require lots of concentration.
Unlike some of the other strains that kick in fast and strong, this slow-building strain starts off mellow before pleasantly sweeping you away into a serene, zen-like high. Try this strain if you need some assistance melting away the stress from demanding schedule, want to decompress after a long day or need some relief from body pain.
Like the name suggests, this citrusy strain tastes and smells like orange sherbert and tastes almost like an orange creamsicle with a bit of skunkiness. This is a good choice for anyone who wants a sharp, concentrated high that won’t make them feel wiry or distract them during a busy day full of things to do.
This is a simple recipe that omits baking time, flour, white sugar and brown sugar which can be found in traditional oatmeal raisin cookie recipes. The floral and overly sweet Sugar Babe strain adds a dimension of taste to this cookie that keeps your mouth wanting more. This is the perfect oatmeal raisin cookie to satisfy your sweet tooth and will come with a little less guilt.
Mise en place:
• 10 golden dates
• 3/4 cup rolled oats that have been submerged in water overnight and then drained
Step 1: In a food processor, add the almonds and cashews, then blend until it forms a moist crumbly mixture.
Step 2: Add the oats, butter, cinnamon and vanilla extract, then process again until well combined. Dice the golden dates and add them to the food processor. Process until the entire mixture becomes uniform and well blended. This mixture will be very sticky like cookie dough when you are finished processing.
Step 3: Add the raisins into the dough mixture and gently fold them into the dough with a spoon until evenly distributed.
Step 4: Divide the dough into 10 cookies. Gently pat each divided dough section with your hands and shape into a cookie.
Step 5: Place this cookie on a lined sheet pan with parchment paper and place in the fridge for 25 minutes or until set. Keep refrigerated to store and pull the cookies out as needed. Enjoy!
Dosage:
If Sugar Babe THC content tests around 15 percent, 15 percent of 1,000 mg would be 150 mg. Sub the number of your THC percentage and do the math to figure out your desired dosage per tablespoon for your cannabutter. Then take the dosage per two tablespoons and divide it by 10 cookies to get your milligram dosage per serving.
Strain Substitution:
I would recommend any strains whose terpenes match the sweet, syrupy, floral taste of Sugar Babe. Vanilla Kush and Cotton Candy would be excellent choices. Be creative, follow your nose/taste buds, and have fun with it!
The contentious issue of how to buy or sell marijuana social equity licenses is being pressed by a specific instance in Illinois involving Cookies-branded cannabis stores.
Fruitcake cookies are a delicious twist on the classic christmas fruit cake. Studded with delicious dried fruit and nuts, this recipe is perfect for your holiday dessert menu and the best Christmas cookies!
These festive fruitcake cookies are light and chewy, loaded with rum soaked dry fruits and chopped nuts. You can feel the taste of juicy plumpy dry fruits and crunchy nuts in each blissful bite with a flavorful blend of sweet, nutty, and a hint of rum.
Another one ticks off my bucket list. Finally I could make it this time with the leftover rum soaked dry fruits I had after making my favorite holiday fruit cake. Everything you love about christmas fruit cake is made in cookie form with this very easy recipe!
They make the perfect addition to your holiday cookie platter and a welcome addition to the holiday table! A flavorful fruitcake cookies that is perfect for the holidays.
Fruitcake cookies are fun and easy recipe which comes together in just a few simple steps. They are easy to put together during the busy holiday season.
I have used rum soaked dry fruits. But feel free to swap it with just dry fruits or you can soak the dry fruits in orange juice couple of hours ahead of preparation time.
INGREDIENTS TO MAKE FRUITCAKE COOKIES
This section explains what all ingredients are used in making the fruitcake cookies, how to use or choose certain ingredients and substitution options. For measurements, see the recipe card below.
These are the ingredients you’ll need to make this fruitcake cookies.
FLOUR– All purpose flour is the best flour to use in this recipe. This keeps the cookies light and fluffy and not too dense.
BAKING POWDER AND BAKING SODA– They acts as a leavener, which means it helps the cookies rise.
SALT– To enhance the taste and balance out the sweetness.
BUTTER– Used soft unsalted butter. Butter lends richness and moisture. Be sure to bring it to room temperature before starting the recipe.
SUGAR– Used powdered granulated sugar. You can use both granulated sugar and light brown sugar which creates a fluffy, soft texture that makes these cookies perfectly chewy.
GINGER EXTRACT– Used fresh ginger extract. Ginger extract is used to spice the cake and add lovely aroma and taste to the cake.
CINNAMON POWDER– Cinnamon adds warmth and spicy flavor.
VANILLA FLAVOR– Vanilla extract is better than using artificial vanilla for the best flavor.
ORANGE JUICE– Orange juice add moisture and act as a binder, which means they help hold the cookie dough together. SUBSTITUTE – You can use one large egg at room temperature for best results. The eggs serve as a binder for the batter which makes these cookies chewy and moist.
DRIED FRUIT– The recipe calls for rum soaked dry fruits. I have used a combination of dates, yellow raisins, black raisins, cherries, cranberries and blue berries. You are free to mix and match the type of dry fruit to your liking, not necessarily confined to the one mentioned here.
ORANGE ZEST– For the extra flavor and zing
NUTS– This recipe calls for mixed nuts, a mixture of almond, cashew, pistachio and walnut. Feel free to choose a mixture of your favorites! I recommend using raw, unsalted nuts.
CANDIED FRUIT- The recipe uses tutti frutti which is candied raw papaya. You can use any candied fruits to your liking and availability.
HOW TO MAKE FRUITCAKE COOKIES
This section shows how to make fruitcake cookies with step-by-step photos and details about the technique with video tutorial. For full ingredients measurements, see the recipe card below.
I made a simple video of this fruitcake cookies recipe for my readers which I have shared below. Please do watch to know how I made this delicious recipe. If you liked the video please do SUBSCRIBE to my channel if you haven’t yet. Also like, share and comment on it! It will mean a lot to me and really motivate me to come up and shoot more videos for my readers. As always I’m looking forward to your feedback!
Fruitcake Cookies Video Tutorial
STEP BY STEP PICTORIAL INSTRUCTIONS TO MAKE FRUITCAKE COOKIES
Preheat the oven to 180° C (350°F). Line baking tray with parchment paper or simply grease it with butter or oil.
Take 100 grams granulated sugar and grind them into a fine powder
In a mixing bowl whisk together soft butter and powdered sugar until combined.
Add in ginger extract and vanilla extract and whist until smooth and fluffy, about 2 minutes.
Sieve in the flour, cinnamon powder, baking powder, baking soda and salt. Sift them and mix until combined.
Add in the orange juice and mix.
Add in the soaked dry fruits, orange zest, tutti fruitti (candied fruit) and mixed nuts. Mix the ingredients together to form a soft mixture.
Scoop a tablespoon of the cookie dough and place on the prepared baking sheets about 1 to 2 inches apart.
Bake in the preheated oven @180° C for 20 to 25 minutes both filaments (rods) switched on or until the cookies are set and the bottoms and edges are very lightly browned and crisp.
Remove and cool on the baking sheet for about 5 to 10 minutes before removing to a wire rack to cool completely. Store the cookies in an airtight container and enjoy.
NOTES * You may use whole wheat flour if you don’t want to use refined flour. * If using the egg in the recipe skip the baking soda. * You can use 50/50 ratio of granulated sugar and brown sugar. * I have used spice like ginger extract and cinnamon powder but you may use store bought spice mix. * For alcohol free cookies simply use your preferred dried fruits or you may soak the dry fruits in orange juice a couple of hours or overnight.
Fruitcake cookies are a delicious twist on the classic christmas fruit cake. Studded with delicious dried fruit and nuts, this recipe is perfect for your holiday dessert menu and the best Christmas cookies!
Preheat the oven to 180° C (350°F). Line baking tray with parchment paper or simply grease it with butter or oil.
Take 100 grams granulated sugar and grind them into a fine powder
In a mixing bowl whisk together soft butter and powdered sugar until combined.
Add in ginger extract and vanilla extract and whist until smooth and fluffy, about 2 minutes.
Sieve in the flour, cinnamon powder, baking powder, baking soda and salt. Sift them and mix until combined.
Add in the orange juice and mix.
Add in the soaked dry fruits, orange zest, tutti fruitti (candied fruit) and mixed nuts. Mix the ingredients together to form a soft mixture.
Scoop a tablespoon of the cookie dough and place on the prepared baking sheets about 1 to 2 inches apart.
Bake in the preheated oven @180° C for 20 to 25 minutes both filaments (rods) switched on or until the cookies are set and the bottoms and edges are very lightly browned and crisp.
Remove and cool on the baking sheet for about 5 to 10 minutes before removing to a wire rack to cool completely.
Store the cookies in airtight container and enjoy.
Video
Notes
You may use whole wheat flour if you don't want to use refined flour.
If using egg in the recipe skip the baking soda.
You can use 50/50 ratio of granulated sugar and brown sugar.
I have used spice like ginger extract and cinnamon powder but you may use store bought spice mix.
For alcohol free cookies simply use your preferred dried fruits or you may soak the dry fruits in orange juice couple of hours or overnight.
FREQUENTLY ASKED QUESTIONS
HOW TO STORE LEFTOVER COOKIES? Fruitcake cookies can be kept in an airtight container at room temperature for up to 1 week. The cookies stays good for weeks in the refrigerator. The cookies can also be frozen in a freezer-safe container for up to 3 months. I suggest cling wrapping the cookies individually and place them in airtight container or freezer ziplock bag and freeze them. Allow to thaw at room temperature before serving or heat up in the oven for few seconds.
CAN I SKIP THE ALCOHOL? Yes! If you want alcohol free cookies you can simply use dry fruits and candied fruits. You can also soak the dry fruits in orange juice for a few hours or overnight. You can also add a teaspoon of rum extract in addition to the vanilla extract to get a similar flavor without the alcohol. If you want a more traditional fruit cake flavor use 2-3 tablespoons alcohol or use alcohol soaked dry fruits
WHAT DO I SERVE WITH THIS? They are delicious on their own or paired with a glass of cold milk, cold coffee, hot chocolate, hot coffee, or tea.
Well, if you make this fruitcake cookies recipe I’ll be glad if you take out some time and rate the recipe and leave a feedback in the comments box below. You can also snap a photo and tag Akum Raj Jamir on Facebook and akumrajjamir on Instagram with hashtag #atmykitchen. I would love to see your creations.
Thank you so much for stopping by my blog. I hope you liked the recipe. Your valuable feedbacks are always welcome, I love hearing from you guys and always do my best to respond to each and every one of you.
When you visit almost any website, you’ll see a pop-up asking you to accept, decline, or customize the cookies it collects. Sometimes, it just tells you that cookies are in use by default. We randomly checked 647 websites, and 563 of them displayed cookie notifications. Most of the time, users don’t even pause to think about what’s really behind the banner asking them to accept or decline cookies.
We owe cookie warnings to the adoption of new laws and regulations, such as GDPR, that govern the collection of user information and protection of personal data. By adjusting your cookie settings, you can minimize the amount of information collected about your online activity. For example, you can decline to collect and store third-party cookies. These often aren’t necessary for a website to function and are mainly used for marketing and analytics. This article explains what cookies are, the different types, how they work, and why websites need to warn you about them. We’ll also dive into sensitive cookies that hold the Session ID, the types of attacks that target them, and ways for both developers and users to protect themselves.
What are browser cookies?
Cookies are text files with bits of data that a web server sends to your browser when you visit a website. The browser saves this data on your device and sends it back to the server with every future request you make to that site. This is how the website identifies you and makes your experience smoother.
Let’s take a closer look at what kind of data can end up in a cookie.
First, there’s information about your actions on the site and session parameters: clicks, pages you’ve visited, how long you were on the site, your language, region, items you’ve added to your shopping cart, profile settings (like a theme), and more. This also includes data about your device: the model, operating system, and browser type.
Your sign-in credentials and security tokens are also collected to identify you and make it easier for you to sign in. Although it’s not recommended to store this kind of information in cookies, it can happen, for example, when you check the “Remember me” box. Security tokens can become vulnerable if they are placed in cookies that are accessible to JS scripts.
Another important type of information stored in cookies that can be dangerous if it falls into the wrong hands is the Session ID: a unique code assigned to you when you visit a website. This is the main target of session hijacking attacks because it allows an attacker to impersonate the user. We’ll talk more about this type of attack later. It’s worth noting that a Session ID can be stored in cookies, or it can even be written directly into the URL of the page if the user has disabled cookies.
Example of a Session ID as displayed in the Firefox browser’s developer panel
Example of a Session ID as seen in a URL address: example.org/?account.php?osCsid=dawnodpasb<...>abdisoa.
Besides the information mentioned above, cookies can also hold some of your primary personal data, such as your phone number, address, or even bank card details. They can also inadvertently store confidential company information that you’ve entered on a website, including client details, project information, and internal documents.
Many of these data types are considered sensitive. This means if they are exposed to the wrong people, they could harm you or your organization. While things like your device type and what pages you visited aren’t typically considered confidential, they still create a detailed profile of you. This information could be used by attackers for phishing scams or even blackmail.
Main types of cookies
Cookies by storage time
Cookies are generally classified based on how long they are stored. They come in two main varieties: temporary and persistent.
Temporary, or session cookies, are used during a visit to a website and deleted as soon as you leave. They save you from having to sign in every time you navigate to a new page on the same site or to re-select your language and region settings. During a single session, these values are stored in a cookie because they ensure uninterrupted access to your account and proper functioning of the site’s features for registered users. Additionally, temporary cookies include things like entries in order forms and pages you visited. This information can end up in persistent cookies if you select options like “Remember my choice” or “Save settings”. It’s important to note that session cookies won’t get deleted if you have your browser set to automatically restore your previous session (load previously opened tabs). In this case, the system considers all your activity on that site as one session.
Persistent cookies, unlike temporary ones, stick around even after you leave the site. The website owner sets an expiration date for them, typically up to a year. You can, however, delete them at any time by clearing your browser’s cookies. These cookies are often used to store sign-in credentials, phone numbers, addresses, or payment details. They’re also used for advertising to determine your preferences. Sensitive persistent cookies often have a special attribute HttpOnly. This prevents your browser from accessing their contents, so the data is sent directly to the server every time you visit the site.
Notably, depending on your actions on the website, credentials may be stored in either temporary or persistent cookies. For example, when you simply navigate a site, your username and password might be stored in session cookies. But if you check the “Remember me” box, those same details will be saved in persistent cookies instead.
Cookies by source
Based on the source, cookies are either first-party or third-party. The former are created and stored by the website, and the latter, by other websites. Let’s take a closer look at these cookie types.
First-party cookies are generally used to make the site function properly and to identify you as a user. However, they can also perform an analytics or marketing function. When this is the case, they are often considered optional – more on this later – unless their purpose is to track your behavior during a specific session.
Third-party cookies are created by websites that the one you’re visiting is talking to. The most common use for these is advertising banners. For example, a company that places a banner ad on the site can use a third-party cookie to track your behavior: how many times you click on the ad and so on. These cookies are also used by analytics services like Google Analytics or Yandex Metrica.
Social media cookies are another type of cookies that fits into this category. These are set by widgets and buttons, such as “Share” or “Like”. They handle any interactions with social media platforms, so they might store your sign-in credentials and user settings to make those interactions faster.
Cookies by importance
Another way to categorize cookies is by dividing them into required and optional.
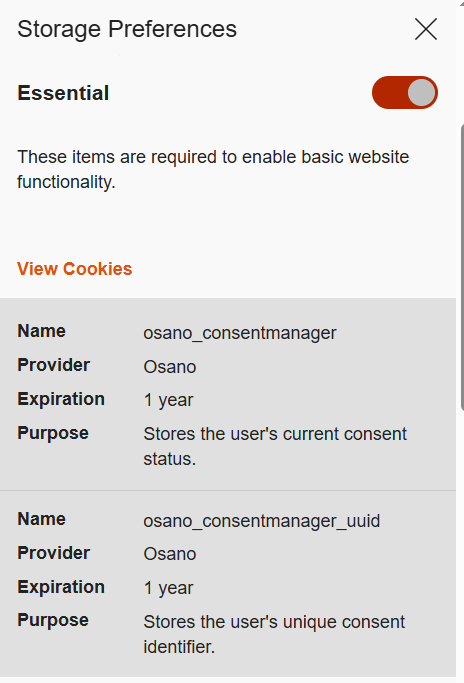
Required or essential cookies are necessary for the website’s basic functions or to provide the service you’ve specifically asked for. This includes temporary cookies that track your activity during a single visit. It also includes security cookies, such as identification cookies, which the website uses to recognize you and spot any fraudulent activity. Notably, cookies that store your consent to save cookies may also be considered essential if determined by the website owner, since they are necessary to ensure the resource complies with your chosen privacy settings.
The need to use essential cookies is primarily relevant for websites that have a complex structure and a variety of widgets. Think of an e-commerce site that needs a shopping cart and a payment system, or a photo app that has to save images to your device.
A key piece of data stored in required cookies is the above-mentioned Session ID, which helps the site identify you. If you don’t allow this ID to be saved in a cookie, some websites will put it directly in the page’s URL instead. This is a much riskier practice because URLs aren’t encrypted. They’re also visible to analytics services, tracking tools, and even other users on the same network as you, which makes them vulnerable to cross-site scripting (XSS) attacks. This is a major reason why many sites won’t let you disable required cookies for your own security.
Example of required cookies on the Osano CMP website
Optional cookies are the ones that track your online behavior for marketing, analytics, and performance. This category includes third-party cookies created by social media platforms, as well as performance cookies that help the website run faster and balance the load across servers. For instance, these cookies can track broken links to improve a website’s overall speed and reliability.
Essentially, most optional cookies are third-party cookies that aren’t critical for the site to function. However, the category can also include some first-party cookies for things like site analytics or collecting information about your preferences to show you personalized content.
While these cookies generally don’t store your personal information in readable form, the data they collect can still be used by analytics tools to build a detailed profile of you with enough identifying information. For example, by analyzing which sites you visit, companies can make educated guesses about your age, health, location, and much more.
A major concern is that optional cookies can sometimes capture sensitive information from autofill forms, such as your name, home address, or even bank card details. This is exactly why many websites now give you the choice to accept or decline the collection of this data.
Special types of cookies
Let’s also highlight special subtypes of cookies managed with the help of two similar technologies that enable non-standard storage and retrieval methods.
A supercookie is a tracking technology that embeds cookies into website headers and stores them in non-standard locations, such as HTML5 local storage, browser plugin storage, or browser cache. Because they’re not in the usual spot, simply clearing your browser’s history and cookies won’t get rid of them.
Supercookies are used for personalizing ads and collecting analytical data about the user (for example, by internet service providers). From a privacy standpoint, supercookies are a major concern. They’re a persistent and hard-to-control tracking mechanism that can monitor your activity without your consent, which makes it tough to opt out.
Another unusual tracking method is Evercookie, a type of zombie cookie. Evercookies can be recovered with JavaScript even after being deleted. The recovery process relies on the unique user identifier (if available), as well as traces of cookies stored across all possible browser storage locations.
How cookie use is regulated
The collection and management of cookies are governed by different laws around the world. Let’s review the key standards from global practices.
General Data Protection Regulation (GDPR) and ePrivacy Directive (Cookie Law) in the European Union.
Under EU law, essential cookies don’t require user consent. This has created a loophole for some websites. You might click “Reject All”, but that button might only refuse non-essential cookies, allowing others to still be collected.
Lei Geral de Proteção de Dados Pessoais (LGPD) in Brazil.
This law regulates the collection, processing, and storage of user data within Brazil. It is largely inspired by the principles of GDPR and, similarly, requires free, unequivocal, and clear consent from users for the use of their personal data. However, LGPD classifies a broader range of information as personal data, including biometric and genetic data. It is important to note that compliance with GDPR does not automatically mean compliance with LGPD, and vice versa.
California Consumer Privacy Act (CCPA) in the United States.
The CCPA considers cookies a form of personal information. This means their collection and storage must follow certain rules. For example, any California resident has the right to stop cross-site cookie tracking to prevent their personal data from being sold. Service providers are required to give users choices about what data is collected and how it’s used.
The UK’s Privacy and Electronic Communications Regulations (PECR, or EC Directive) are similar to the Cookie Law.
PECR states that websites and apps can only save information on a user’s device in two situations: when it’s absolutely necessary for the site to work or provide a service, or when the user has given their explicit consent to this.
Federal Law No. 152-FZ “On Personal Data” in Russia.
The law broadly defines personal data as any information that directly or indirectly relates to an individual. Since cookies can fall under this definition, they can be regulated by this law. This means websites must get explicit consent from users to process their data.
In Russia, website owners must inform users about the use of technical cookies, but they don’t need to get consent to collect this information. For all other types of cookies, user consent is required. Often, the user gives this consent automatically when they first visit the site, as it’s stated in the default cookie warning.
Some sites use a banner or a pop-up window to ask for consent, and some even let users choose exactly which cookies they’re willing to store on their device.
Beyond these laws, website owners create their own rules for using first-party cookies. Similarly, third-party cookies are managed by the owners of third-party services, such as Google Analytics. These parties decide what kind of information goes into the cookies and how it’s formatted. They also determine the cookies’ lifespan and security settings. To understand why these settings are so important, let’s look at a few ways malicious actors can attack one of the most critical types of cookies: those that contain a Session ID.
Session hijacking methods
As discussed above, cookies containing a Session ID are extremely sensitive. They are a prime target for cybercriminals. In real-world attacks, different methods for stealing a Session ID have been documented. This is a practice known as session hijacking. Below, we’ll look at a few types of session hijacking.
Session sniffing
One method for stealing cookies with a Session ID is session sniffing, which involves intercepting traffic between the user and the website. This threat is a concern for websites that use the open HTTP protocol instead of HTTPS, which encrypts traffic. With HTTP, cookies are transmitted in plain text within the headers of HTTP requests, which makes them vulnerable to interception.
Attacks targeting unencrypted HTTP traffic mostly happen on public Wi-Fi networks, especially those without a password and strong security protocols like WPA2 or WPA3. These protocols use AES encryption to protect traffic on Wi-Fi networks, with WPA3 currently being the most secure version. While WPA2/WPA3 protection limits the ability to intercept HTTP traffic, only implementing HTTPS can truly protect against session sniffing.
This method of stealing Session ID cookies is fairly rare today, as most websites now use HTTPS encryption. The popularity of this type of attack, however, was a major reason for the mass shift to using HTTPS for all connections during a user’s session, known as HTTPS everywhere.
Cross-site scripting (XSS)
Cross-site scripting (XSS) exploits vulnerabilities in a website’s code to inject a malicious script, often written in JavaScript, onto its webpages. This script then runs whenever a victim visits the site. Here’s how an XSS attack works: an attacker finds a vulnerability in the source code of the target website that allows them to inject a malicious script. For example, the script might be hidden in a URL parameter or a comment on the page. When the user opens the infected page, the script executes in their browser and gains access to the site’s data, including the cookies that contain the Session ID.
Session fixation
In a session fixation attack, the attacker tricks your browser into using a pre-determined Session ID. Thus, the attacker prepares the ground for intercepting session data after the victim visits the website and performs authentication.
Here’s how it goes down. The attacker visits a website and gets a valid, but unauthenticated, Session ID from the server. They then trick you into using that specific Session ID. A common way to do this is by sending you a link with the Session ID already embedded in the URL, like this: http://example.com/?SESSIONID=ATTACKER_ID. When you click the link and sign in, the website links the attacker’s Session ID to your authenticated session. The attacker can then use the hijacked Session ID to take over your account.
Modern, well-configured websites are much less vulnerable to session fixation than XSS-like attacks because most current web frameworks automatically change the user’s Session ID after they sign in. However, the very existence of this Session ID exploitation attack highlights how crucial it is for websites to securely manage the entire lifecycle of the user session, especially at the moment of sign-in.
Cross-site request forgery (CSRF)
Unlike session fixation or sniffing attacks, cross-site request forgery (CSRF or XSRF) leverages the website’s trust in your browser. The attacker forces your browser, without your knowledge, to perform an unwanted action on a website where you’re signed in – like changing your password or deleting data.
For this type of attack, the attacker creates a malicious webpage or an email message with a harmful link, piece of HTML code, or script. This code contains a request to a vulnerable website. You open the page or email message, and your browser automatically sends the hidden request to the target site. The request includes the malicious action and all the necessary (for example, temporary) cookies for that site. Because the website sees the valid cookies, it treats the request as a legitimate one and executes it.
Variants of the man-in-the-middle (MitM) attack
A man-in-the-middle (MitM) attack is when a cybercriminal not only snoops on but also redirects all the victim’s traffic through their own systems, thus gaining the ability to both read and alter the data being transmitted. Examples of these attacks include DNS spoofing or the creation of fake Wi-Fi hotspots that look legitimate. In an MitM attack, the attacker becomes the middleman between you and the website, which gives them the ability to intercept data, such as cookies containing the Session ID.
Websites using the older HTTP protocol are especially vulnerable to MitM attacks. However, sites using the more secure HTTPS protocol are not entirely safe either. Malicious actors can try to trick your browser with a fake SSL/TLS certificate. Your browser is designed to warn you about suspicious invalid certificates, but if you ignore that warning, the attacker can decrypt your traffic. Cybercriminals can also use a technique called SSL stripping to force your connection to switch from HTTPS to HTTP.
Predictable Session IDs
Cybercriminals don’t always have to steal your Session ID – sometimes they can just guess it. They can figure out your Session ID if it’s created according to a predictable pattern with weak, non-cryptographic characters. For example, a Session ID may contain your IP address or consecutive numbers, and a weak algorithm that uses easily predictable random sequences may be used to generate it.
To carry out this type of attack, the malicious actor will collect a sufficient number of Session ID examples. They analyze the pattern to figure out the algorithm used to create the IDs, then apply that knowledge to predicting your current or next Session ID.
Cookie tossing
This attack method exploits the browser’s handling of cookies set by subdomains of a single domain. If a malicious actor takes control of a subdomain, they can try to manipulate higher-level cookies, in particular the Session ID. For example, if a cookie is set for sub.domain.com with the Domain attribute set to .domain.com, that cookie will also be valid for the entire domain.
This lets the attacker “toss” their own malicious cookies with the same names as the main domain’s cookies, such as Session_id. When your browser sends a request to the main server, it includes all the relevant cookies it has. The server might mistakenly process the hacker’s Session ID, giving them access to your user session. This can work even if you never visited the compromised subdomain yourself. In some cases, sending invalid cookies can also cause errors on the server.
How to protect yourself and your users
The primary responsibility for cookie security rests with website developers. Modern ready-made web frameworks generally provide built-in defenses, but every developer should understand the specifics of cookie configuration and the risks of a careless approach. To counter the threats we’ve discussed, here are some key recommendations.
Recommendations for web developers
All traffic between the client and server must be encrypted at the network connection and data exchange level. We strongly recommend using HTTPS and enforcing automatic redirect from HTTP to HTTPS. For an extra layer of protection, developers should use the HTTP Strict Transport Security (HSTS) header, which forces the browser to always use HTTPS. This makes it much harder, and sometimes impossible, for attackers to slip into your traffic to perform session sniffing, MitM, or cookie tossing attacks.
It must be mentioned that the use of HTTPS is insufficient protection against XSS attacks. HTTPS encrypts data during transmission, while an XSS script executes directly in the user’s browser within the HTTPS session. So, it’s up to the website owner to implement protection against XSS attacks. To stop malicious scripts from getting in, developers need to follow secure coding practices:
Validate and sanitize user input data.
Implement mandatory data encoding (escaping) when rendering content on the page – this way, the browser will not interpret malicious code as part of the page and will not execute it.
Use the HttpOnly flag to protect cookie files from being accessed by the browser.
Use the Content Security Policy (CSP) standard to control code sources. It allows monitoring which scripts and other content sources are permitted to execute and load on the website.
For attacks like session fixation, a key defense is to force the server to generate a new Session ID right after the user successfully signs in. The website developer must invalidate the old, potentially compromised Session ID and create a new one that the attacker doesn’t know.
An extra layer of protection involves checking cookie attributes. To ensure protection, it is necessary to check for the presence of specific flags (and set them if they are missing): Secure and HttpOnly. The Secure flag ensures that cookies are transmitted over an HTTPS connection, while HttpOnly prevents access to them from the browser, for example through scripts, helping protect sensitive data from malicious code. Having these attributes can help protect against session sniffing, MitM, cookie tossing, and XSS.
Pay attention to another security attribute, SameSite, which can restrict cookie transmission. Set it to Lax or Strict for all cookies to ensure they are sent only to trusted web addresses during cross-site requests and to protect against CSRF attacks. Another common strategy against CSRF attacks is to use a unique, randomly generated CSRF token for each user session. This token is sent to the user’s browser and must be included in every HTTP request that performs an action on your site. The site then checks to make sure the token is present and correct. If it’s missing or doesn’t match the expected value, the request is rejected as a potential threat. This is important because if the Session ID is compromised, the attacker may attempt to replace the CSRF token.
To protect against an attack where a cybercriminal tries to guess the user’s Session ID, you need to make sure these IDs are truly random and impossible to predict. We recommend using a cryptographically secure random number generator that utilizes powerful algorithms to create hard-to-predict IDs. Additional protection for the Session ID can be ensured by forcing its regeneration after the user authenticates on the web resource.
The most effective way to prevent a cookie tossing attack is to use cookies with the __Host- prefix. These cookies can only be set on the same domain that the request originates from and cannot have a Domain attribute specified. This guarantees that a cookie set by the main domain can’t be overwritten by a subdomain.
Finally, it’s crucial to perform regular security checks on all your subdomains. This includes monitoring for inactive or outdated DNS records that could be hijacked by an attacker. We also recommend ensuring that any user-generated content is securely isolated on its own subdomain. User-generated data must be stored and managed in a way that prevents it from compromising the security of the main domain.
As mentioned above, if cookies are disabled, the Session ID can sometimes get exposed in the website URL. To prevent this, website developers must embed this ID into essential cookies that cannot be declined.
Many modern web development frameworks have built-in security features that can stop most of the attack types described above. These features make managing cookies much safer and easier for developers. Some of the best practices include regular rotation of the Session ID after the user signs in, use of the Secure and HttpOnly flags, limiting the session lifetime, binding it to the client’s IP address, User-Agent string, and other parameters, as well as generating unique CSRF tokens.
There are other ways to store user data that are both more secure and better for performance than cookies.
Depending on the website’s needs, developers can use different tools, like the Web Storage API (which includes localStorage and sessionStorage), IndexedDB, and other options. When using an API, data isn’t sent to the server with every single request, which saves resources and makes the website perform better.
Another exciting alternative is the server-side approach. With this method, only the Session ID is stored on the client side, while all the other data stays on the server. This is even more secure than storing data with the help of APIs because private information is never exposed on the client side.
Tips for users
Staying vigilant and attentive is a big part of protecting yourself from cookie hijacking and other malicious manipulations.
Always make sure the website you are visiting is using HTTPS. You can check this by looking at the beginning of the website address in the browser address bar. Some browsers let the user view additional website security details. For example, in Google Chrome, you can click the icon right before the address.
This will show you if the “Connection is secure” and the “Certificate is valid”. If these details are missing or data is being sent over HTTP, we recommend maximum caution when visiting the website and, whenever possible, avoiding entering any personal information, as the site does not meet basic security standards.
When browsing the web, always pay attention to any security warnings your browser gives you, especially about suspicious or invalid certificates. Seeing one of these warnings might be a sign of an MitM attack. If you see a security warning, it’s best to stop what you’re doing and leave that website right away. Many browsers implement certificate verification and other security features, so it is important to install browser updates promptly – this replaces outdated and compromised certificates.
We also recommend regularly clearing your browser data (cookies and cache). This can help get rid of outdated or potentially compromised Session IDs.
Always use two-factor authentication wherever it’s available. This makes it much harder for a malicious actor to access your account, even if your Session ID is exposed.
When a site asks for your consent to use cookies, the safest option is to refuse all non-essential ones, but we’ll reiterate that sometimes, clicking “Reject cookies” only means declining the optional ones. If this option is unavailable, we recommend reviewing the settings to only accept the strictly necessary cookies. Some websites offer this directly in the pop-up cookie consent notification, while others provide it in advanced settings.
The universal recommendation to avoid clicking suspicious links is especially relevant in the context of preventing Session ID theft. As mentioned above, suspicious links can be used in what’s known as session fixation attacks. Carefully check the URL: if it contains parameters you do not understand, we recommend copying the link into the address bar manually and removing the parameters before loading the page. Long strings of characters in the parameters of a legitimate URL may turn out to be an attacker’s Session ID. Deleting it renders the link safe. While you’re at it, always check the domain name to make sure you’re not falling for a phishing scam.
In addition, we advise extreme caution when connecting to public Wi-Fi networks. Man-in-the-middle attacks often happen through open networks or rogue Wi-Fi hotspots. If you need to use a public network, never do it without a virtual private network (VPN), which encrypts your data and makes it nearly impossible for anyone to snoop on your activity.
Thekua or Thokwa, also known as Thikari/ Tikri and Kajoor/ Khajuria, is a deep fried sweet from the Indian state of Bihar. It is also made in Uttar Pradesh, West Bengal and the Therai region of Nepal. The Dogri Rutt or Roth of Jammu is a version of this. Thekua is typically made as a ritual offering on the third day of Chhath Puja, a festival dedicated to the Sun God and his consort. It is also made for other festivals including Teej Puja, Navrathri and Savitri Puja. Thekua looks a bit like a patterned/ moulded cookie and is also made and served as a tea time snack. It should be crisp and crunchy on the outside and soft on the inside.
It is believed that the name Thekua is derived from the old name for it which is Thokna. Thokna or Thoka Hua (hence Thokua or Thekua) which means “to hammer”. This comes from the dough being pressed hard onto wooden moulds to create the charateristic pattern on Thekuas.
I discovered Thekua purely by chance. I was looking online for Sandesh moulds when Thekua moulds came up as well. A discussion with my food loving niece ended up with her sending me some Saancha, as Thekua moulds are known locally. A friend also send me one. Thekua moulds are made in wood with patterns cut into them. The Thekua dough is pressed onto the moulds to decorate it with patterns before deep frying.
Chhath Puja is celebrated a little after Diwali. So I thought why not make Thekua this year for Diwali. Thekua are made from a dough of whole wheat flour (atta), sugar or jaggery syrup, ghee and cardamom. Chopped cashewnut and coconut bits, sometimes dried fruit like raisins all add flavour. The dough is shaped into flat rounds, pressed onto decorative Thekua moulds, and deep fried till brown. They become crisp when the cool down and keep for upto a month stored in airtight containers.
Thekua are typically crisp on the outside and softer on the inside, almost like a cookie. This recipe will give you crispy and crunchy exterior with a soft interior, which to me is perfect for a cookie. Thekua should have uneven cracked edges which gives them a rustic appearance. This happens because they’re made from a stiffish dough. The rough edges also make them crisp once the dough rounds are deep fried.
If you don’t have “Sancha” or Thekua moulds, you can still make them. You can use other things to create the pattern on Thekua. A drinking glass with a patterned base, the ends of a metal whisk, the tines of a fork, a cookie cutter, the pattern on a grater, a toothpick or even your fingers can create a design or pattern on the dough. They can be made plain as well.
Thekua can be eaten with tea or coffee or just as a snack. The truly Indian way is to dip it in spicy Indian pickles before eating it.
A festive deep fried whole wheat and jaggery crisp moulded cookie like sweet from the Indian state of Bihar.
Prep Time 1 hourhour
Cook Time 30 minutesminutes
Resting Time 15 minutesminutes
Servings 1batch
Ingredients
3/4 to 1cupcrumbled jaggery
2cupswhole wheat flouratta
1/4cupfine semolinachiroti rava
1/2cupfresh grated coconut or thin coconut bits
1/4cupfinely chopped cashewnuts
5 to 6pod cardamompowdered
2tspcrushed saunffennel seeds
1/4cupmelted ghee
Oil for deep frying
Instructions
Put the crumbled jaggery and about 1/8 cup water in a pan. Stir, on medium heat’ till the jaggery dissolves completely. Strain out impurities, if any, and let it cool.
Put all the remaining ingredients, except the oil for deep frying, in a large bowl. Using your fingers, mix everything till it comes together resembling breadcrumbs. When you press the mixture tightly in your fist, it should be firm and solid, not crumbly.
Slowly add the cooled liquid jaggery to this mixture and knead to a firm stiff-ish dough. Cover with a muslin cloth or tea towel and let it rest for 10 to 15 minutes.
Pinch off roughly walnut sized pieces of dough and roll into balls. Press each ball flat on a thekua mould. The shaped dough round will have cracked uneven edges and should be about the 1/8 to 1/4 th inch thick. If you don’t have a mould, flatten the balls and decorate by pressing the dough rounds with the tines of a fork a fork. Do not flatten the rounds any thinner.
Heat the oi for deep frying then turn down the heat to medium. Fry the dough rounds in small batches, on both sides low to medium heat, but not on high heat. The Thekuas need to be slow fried so they’re cooked well through and area reddish brown in colour.
They will still be a little soft when done but turn crisp on cooling down. Let them cool completely before storing them in airtight containers.
If you are looking for the absolutely perfect eggless chocolate muffins recipe with a no-fail guarantee then this is it! I can vouch for these decadent chocolate muffins which are made without any eggs yet turned out super-moist with a melt-in-mouth texture!
Eggless baking was not my forte, but after I found this eggless chocolate muffins recipe on YouTube on this beautiful channel and tried it twice, things have changed for good!
I am seriously amazed how moist and tender these eggless chocolate muffins turned out and with that bitter-sweet taste of dark chocolate, these are real mood-boosters!
If you think that eggless muffins or cakes do not rise enough, this recipe will prove you wrong! These eggless chocolate muffins rose like a dream, making a super-fluffy & beautifully soft internal texture.
Why are these Eggless chocolate muffins special?
Since the time I have started a ‘no-sugar’ (or ‘low-sugar’ to be more realistic!) diet, I have minimized the frequency of baking cakes or any desserts for that matter!
Otherwise how would you be able to resist the home-baked sweets which are just too good to not eat!
But on a fine morning I started craving for something deep dark chocolatey which is not too sweet but has that bakery style texture. And it was too strong a craving!
So I started searching for that dreamy chocolatey bite and these eggless chocolate muffins appeared with all their glory! And it was simply impossible to resist not making them immediately!
After ages I baked these sinfully decadent chocolate muffins which turned out exactly how I desired and relished them with all my soul!
At the same time, I had to remain mindful of my weight loss journey where I have put in a lot of hard work and as you know too much of these can instantly add extra pounds on your scale!
Hence I had to keep a check on my craving for these goodies; so I distributed half of them among my neighbors (hopefully they liked them as much as we did!).
This way I could enjoy my home-baked eggless chocolate muffins without overdoing them way too much! Absolute win-win!
Peanut Butter Blossom Cookies – Soft, chewy, delicious, and classic peanut butter cookies topped with a rich Hershey chocolate kiss. They’re the perfect addition to your cookie trays! What are peanut butter blossom cookies? Peanut Butter Blossom Cookies are a classic Christmas cookie made with creamy peanut butter, brown sugar, and Hershey’s kisses. These are...
Molasses Crinkle Cookies – Classic, rich, soft, chewy and delicious Christmas cookies with the warm flavors of molasses and spices. They’re an irresistible addition to any holiday cookie tray. What are molasses crinkle cookies? Molasses crinkles are rich, cozy and delicious old-fashioned holiday cookies with a soft center and crispy powdered sugar outer layer. These...
Potato Chip Cookies – Buttery, delicate, and delicious, sweet cookies studded with crunchy, salty potato chips. A perfect old-fashioned cookie recipe for the holiday season! What are potato chip cookies? Potato chip cookies are old-fashioned sweet and salty cookies made with just a handful of ingredients. They are buttery, delicate, and irresistibly delicious with a...
Monster Cookies – Soft, chewy and delicious cookies loaded with peanut butter, oats, chocolate chips, and colorful M&Ms. They’re perfect for the holiday season! What are monster cookies? Monster cookies are a type of soft, chewy, thick, chunky cookies packed with flavor in every bite. They are a cross between peanut butter cookies and oatmeal...
Funfetti Snowball Cookies – These colorful snowball cookies are bright, buttery, delicate, delicious, with a crunch of sprinkles in every bite. They’re the perfect addition to your Christmas cookie tray! What are funfetti snowball cookies? Funfetti refers to a colorful and festive style of baked goods that uses rainbow sprinkles into the batter or dough....
Baci di Dama – Delicate, delicious, buttery, and classic Italian cookies made with ground hazelnuts and sandwiched together with a layer of silky chocolate filling. They’re a perfect addition to your Christmas cookie trays! What are baci di dama? Baci di Dama are a traditional Italian cookies that originated from Piedmont region in northern Italy....