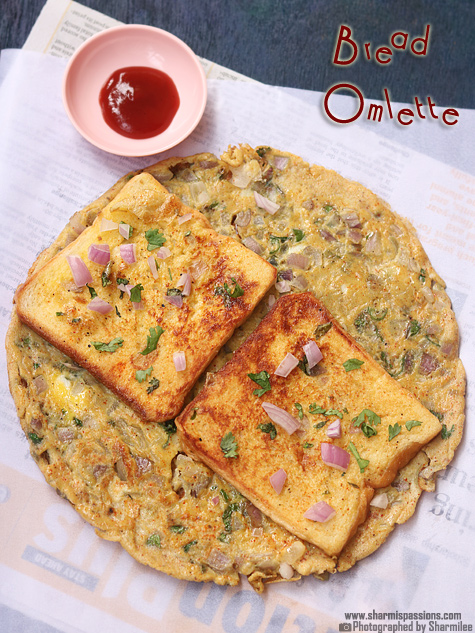
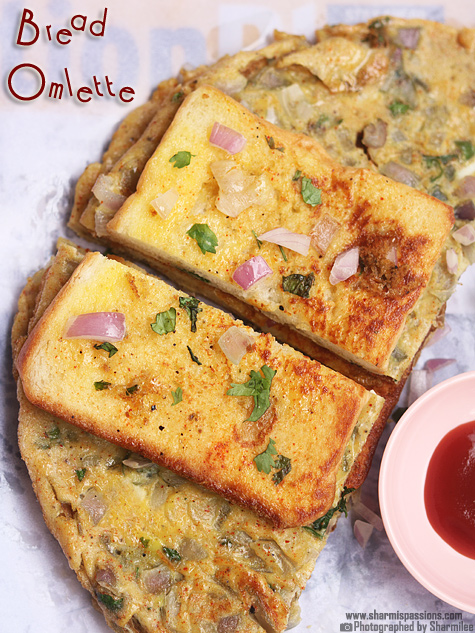
❌

Reading view

There are new articles available, click to refresh the page.

Bread Omelette

Bread Omelette is basically toasted bread covered with a simple spiced egg mix, and the flavors come together nicely when it gets toasted until golden on both sides. This dish has soft eggs and slightly crisp bread, so the texture itself feels satisfying. The spices are mild making it an ideal breakfast recipe. Bread and eggs are a winning combo and this one is no exception.

bread omelette served with tomato sauce

Bread Omelette is one of those easy breakfast dishes I end up making when I want something filling but really don't have much time to think what to cook. I mostly make this for a quick breakfast or even sometimes for evening snack, especially when someone wants something warm and tasty immediately.

[feast_advanced_jump_to]

About Bread Omelette

Bread Omelette is one of the oldest street-style snacks you will find in many places, and each shop has its own variations. The base idea is simple where eggs are beaten with onions, green chilies and spices, bread slices are dipped into this and cooked together. The bread absorbs the egg mixture and you get a soft inside and light toasted outside.

Bread Omelette always reminds me of train journeys as I love bread omlette served in the Indian Railways and should admit I look forward to day train journeys just for the sake of this dish. I make it when hungry in between meals or when we want a quick breakfast. It always turns out quite satisfying.

The taste also depends on how you like your omelette to be. Some people add more onion to make it bit crunchy, some keep it plain with only spices. The heat from pepper and chili gives a nice lift and the coriander leaves adds that fresh touch.

There are many ways people make this. You can toast the bread first and then sandwich the omelette, add little cheese on top, or even mix small pieces of capsicum or tomato into the egg. You can also make a bigger one by joining few bread slices like they do in shops. Each version has its own nice taste.

bread omelette served with tomato sauce

Bread Omelette Ingredients

  • Bread slices - I used white bread, you can use wheat bread or milk bread also, both works almost the same.
  • Eggs - I added two eggs as it gives enough mixture to cover the bread properly and keeps the omelette soft and fluffy. You can add one more egg if you feel it is coming bit thin.
  • Red chilli powder - I am using this for giving small spicy taste and little color. You can adjust it how much heat you want.
  • Garam masala - I added a pinch mainly for flavor, it blends well with onion and egg. You can skip also if you like very simple taste.
  • Turmeric powder - I used just a tiny pinch, it gives warm color and light earthy taste, and the omelette looks more bright too.
  • Pepper powder - I added this for heat which suits egg recipes very well. If you like pepper flavor more, you can add a bit extra also.
  • Onion - I used finely chopped onion as it gives small crunch and mild sweetness once cooked.
  • Green chilli - I added one green chilli for extra heat. You can skip if making for kids or if you don't want too much spice.
  • Coriander leaves - I have used little chopped coriander for fresh smell and flavor. It makes the omelette feel more light.
  • Oil - I used to cook the omelette and toast the bread even. You can use ghee also if you want richer taste.

Similar Recipes

How to make Bread Omelette Step by Step

1.Break open 2 eggs in a mixing bowl, then add all the spice powders along with required salt. Then add chopped onion.

how to make bread omelette step1

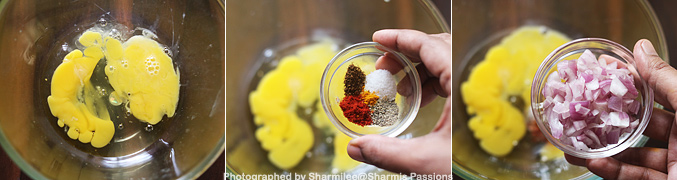
2.Add finely chopped green chilies and coriander leaves to it. Mix it well with a spoon. Beat it for few seconds.

how to make bread omelette step2

3.Heat a pan with oil,when it is hot - pour the egg mixture on it. Tilt it so that the egg mixture is even on all the edges.

how to make bread omelette step3

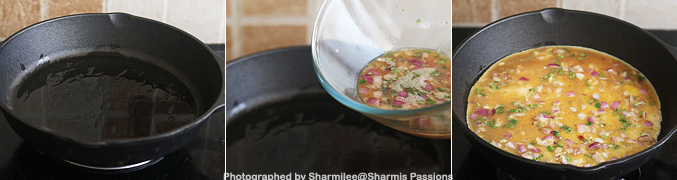
4.Take a bread slice dip in the egg then flip over and place it. Repeat this for the other egg too. So the dipped side should come on top. Drizzle oil.

how to make bread omelette step4

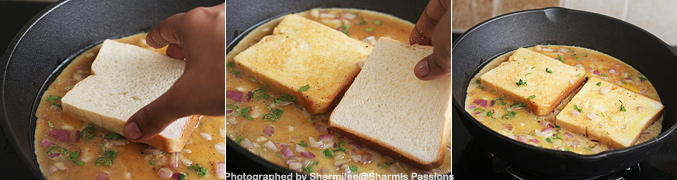
5.Once it gets cooked on one side, flip over to other side, press it with the ladle. Cook for 2 minutes then flip over and serve.
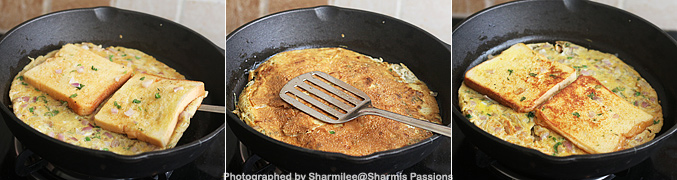
how to make bread omelette step5

Serve hot!

bread omelette served with tomato sauce

Expert Tips

  • Beat well - First beat the eggs for few seconds so they become light and mix evenly with onions and spices.
  • Cook on medium flame - I have seen cooking on medium flame makes the omelette cook properly without burning the bread edges.
  • Flip slowly -Flip the omelette gently because the egg mixture will be soft at first and may tear if done fast.
  • Add extra pepper - I have tried adding little more pepper sometimes, and it gives a strong nice flavor which suits bread omelette well.
  • Cheese option - I sometimes place a small cheese slice on top, and it melts inside making the whole omelette more filling and tasty.

Serving and Storage

Serve this hot with chopped onions, coriander leaves or even little ketchup if you prefer. It goes well with tea or even as a quick meal by itself. This recipe tastes best served immediately. I don't recommend storing leftovers.

FAQS

1.Can I add in vegetables?

Yes you can add small pieces of capsicum or tomato also.

2.Can I skip green chil4lies?

Yes you can leave it out if you want a milder omelette.

3.Will cheese taste good in this?

Yes cheese melts well and makes it richer.

4.Can I make without onions?

You can make plain omelette too, but onions add good flavor.

5.Which bread works best?

Any regular bread works, but slightly firm slices toast better.

bread omelette served with tomato sauce

If you have any more questions about this Bread Omelette Recipe do mail me at sharmispassions@gmail.com. In addition, follow me on Instagram,Β Facebook,Β PinterestΒ ,YoutubeΒ andΒ TwitterΒ .

Tried this Bread Omelette Recipe? Do let me know how you liked it. Also tag us on Instagram @sharmispassions and hash tag it on #sharmispassions.

πŸ“– Recipe Card

30844725996 54eb93b4a5 o
Print

Bread Omelette Recipe | Bread Omlet Recipe

Bread Omelette is basically toasted bread covered with a simple spiced egg mix, and the flavors come together nicely when it gets toasted until golden on both sides. This dish has soft eggs and slightly crisp bread, so the texture itself feels satisfying. The spices are mild making it an ideal breakfast recipe. Bread and eggs are a winning combo and this one is no exception.
Course Breakfast, Snack
Cuisine American, Chinese, French, Indo Chinese, Italian, Mediterranean
Keyword 30 mins recipes, bread, bread recipes, egg recipes, recipes, sandwich, sandwich recipes, street food
Prep Time 15 minutes
Cook Time 10 minutes
Total Time 25 minutes
Servings 1
Calories 350kcal
Author Sharmilee J

Ingredients

Instructions

  • Break open 2 eggs in a mixing bowl, then add all the spice powders along with required salt. Then add chopped onion.
  • Add finely chopped green chillies and coriander leaves to it. Mix it well with a spoon. Beat it for few seconds.
  • Heat a pan with oil, when it is hot - pour the egg mixture on it. Tilt it so that the egg mixture is even on all the edges.
  • Take a bread slice dip in the egg then flip over and place it. Repeat this for the other egg too. So the dipped side should come on top. Drizzle oil.
  • Once it gets cooked on one side, flip over to other side, press it with the ladle. Cook for 2mins then flip over and serve.
  • Serve Bread Omelette hot with chopped raw onions and coriander leaves.

Notes

  • Beat well - First beat the eggs for few seconds so they become light and mix evenly with onions and spices.
  • Cook on medium flame - I have seen cooking on medium flame makes the omelette cook properly without burning the bread edges.
  • Flip slowly -Flip the omelette gently because the egg mixture will be soft at first and may tear if done fast.
  • Add extra pepper - I have tried adding little more pepper sometimes, and it gives a strong nice flavor which suits bread omelette well.
  • Cheese option - I sometimes place a small cheese slice on top, and it melts inside making the whole omelette more filling and tasty.

Nutrition

Serving: 150g | Calories: 350kcal | Carbohydrates: 35g | Protein: 18g | Fat: 15g | Saturated Fat: 4g | Polyunsaturated Fat: 4g | Monounsaturated Fat: 6g | Trans Fat: 0.1g | Cholesterol: 327mg | Sodium: 558mg | Potassium: 289mg | Fiber: 5g | Sugar: 7g | Vitamin A: 995IU | Vitamin C: 9mg | Calcium: 133mg | Iron: 4mg

The post Bread Omelette appeared first on Sharmis Passions.

Koozh Vadam Recipe | Koozh Vathal Recipe

Koozh Vadam is a crunchy and tasty South Indian style fryums made with rice batter. It is sun dried and stored, then fried whenever needed. It is a popular traditional side dish that is usually had along with sambar, rasam or even curd rice. Kids love it as a snack too because it is so light and crispy.

koozh vadam in a glass jar

The recipe is made by cooking rice batter along with sago and spices, spreading thin on cloth or plastic sheet, drying under hot sun for few days and then deep frying. The result is a crisp and airy vadam that almost melts in mouth. It is very simple once you get the method right, and storing them makes it easy to serve anytime with meals.

[feast_advanced_jump_to]

About Koozh Vadam

Koozh Vadam is one of the oldest style vadams prepared in South Indian homes during summer time. Families make them in big batches and store for months to use as a side dish. The main base is rice and sago which makes the texture light and crunchy after frying. The taste is very mild with little spice from green chillies and nice aroma from jeera.

Traditionally these vadams are dried under the scorching summer sun which makes them perfect crispy. If the drying is not done properly then the vadams turn chewy instead of crunchy. That is why many households prepare it in peak summer days. The batter thickens on cooling, so timing and stirring also matters to get good shaped vadams.

koozh vadam fried

The texture is very light and crisp, it does not feel oily when fried properly. Jeera gives the typical flavor and the rice base makes it puff up nicely in oil. Kids usually enjoy munching them as snack, while for elders it is more of a side dish with meals. It is also a nice option on days when there is less vegetables at home.

I tried making these in small batch as it was my first attempt, and it came out quite good. It dried in two days because the sun was strong, and the vadams fried really well. It is quite satisfying to make homemade vadams and stock them in airtight jar for later use.

dried koozh vadam

Koozh Vadam Ingredients

  • Raw rice - I have used regular raw rice, soak and grind to make the base batter. It gives the body and crispness for the vadam. You can use any raw rice you have.
  • Sago - Adding sago makes the vadam extra light and gives small bubble like texture. You can use nylon sago or regular, both works.
  • Water - Water is used to cook the rice batter and bring it to right consistency. You can adjust a little depending on rice type.
  • Green chillies - Ground green chillies gives the mild spice kick in the vadam. You can reduce or increase as per your liking.
  • Jeera - Jeera adds nice aroma and tiny bites when you eat fried vadam, also helps in digestion.
  • Roasted jeera powder - This gives extra flavor and makes the vadam more aromatic. If not available you can skip.

Why This Recipe Works

  • This recipe is a traditional one that uses very simple pantry ingredients.
  • It is a crunchy and light snack that goes well as side dish or even as evening bite.
  • You can make in big batch during summer and store for months, it stays good.
  • The combination of rice and sago gives perfect airy crispness after frying.
  • It is a recipe that brings back homely feel and is fun to make together in family.

Similar Recipes

How to make Koozh Vadam Step by Step

1.Measure the ingredients and keep it ready. Soak it at least for 4 hours. Mix both and rinse it well and drain water. Add it to mixer along with green chili.

how to make koozh vadam step1

2.Grind it to a smooth paste, you will see full sago here and there that is ok. Heat water in a pan.

how to make koozh vadam step2

3.When it starts to boil add the rice mixture. Keep the flame in low, stir with a whisk to avoid lumps. Keep stirring, it will start to thicken.

how to make koozh vadam step3

4.Cook till it comes together. When it starts to turn slightly transparent and thick add salt, jeera and roasted jeera powder, cook for few more mins until its thick. Switch off.

how to make koozh vadam step4

5.Let it cool down. Then take a star press, fill the press with dough and start pressing.

how to make koozh vadam step5

6.Do this till the entire mixture finishes. Press it horizontally, don't worry if it doesn't come as continuous lines, anyways we are going to break it later. Dry it in hot sun till there is no moisture. When it starts to turn crisp at the edges start peeling and turn to other side. Once the other side is also dried, transfer to a wide tray and let it dry. Let it dry like this in daylight at least for 3 days. I dried it for 3 days.

how to make koozh vadam step6

7.Then Β store in a clean container and use it as and when needed. Heat oil in a kadai. Heat oil in a kadai. Fry till it puffs up completely and is slightly golden in color.

how to make koozh vadam step7

Serve it with any variety rice of your choice or have it as such

koozh vadam fried

Expert Tips

  • Cooking batter - Keep the flame low when cooking rice batter, keep stirring else lumps will form. I usually stand near and keep mixing.
  • Drying - Sun drying is very important, I have dried for 2 full days and it turned crispy. If the sun is less, dry for more days.
  • Testing - Always test fry 1 vadam before storing. If it is chewy, it means not dried enough. Keep it back for more drying.
  • Oil heat - Oil should be really hot. I drop one vadam to test, if it raises immediately then the oil is ready.
  • Storing - Store in clean airtight jar after vadams are fully dry and fried ones are cooled. This keeps them fresh longer.

Serving and Storage

Serve Koozh Vadam with curd rice, sambar rice or rasam rice. It also goes well as crunchy snack with tea time. Store the sun dried vadams in airtight jar and fry whenever needed. Once fried, you can keep in box and finish same day for best crisp taste.

FAQS

1.Can I skip sago?

Yes, you can skip sago but the texture will be little dense compared to the light version.

2.How many days should I dry vadam?

It depends on sunlight, usually 2-3 days in strong sun is enough.

3.Can I dry vadam inside home?

Not really, it needs good hot sun to dry properly, else it will turn chewy.

4.Why my vadams are chewy after frying?

It means they are not dried fully. Keep drying for one more day.

5.How long can I store vadam?

Sun dried vadams stays good in airtight jar for many months, fry only in small batch as needed.

koozh vadam fried

If you have any more questions about this Koozh Vadam Recipe do mail me at sharmispassions@gmail.com. In addition, follow me on Instagram, Facebook,Β  Pinterest, Youtube andΒ TwitterΒ .

Tried this Koozh Vadam Recipe ? Do let me know how you liked it. Also tag us on Instagram @sharmispassions and hash tag it on #sharmispassions.

πŸ“– Recipe Card

26469390213 8d9c4d3a44 o
Print

Koozh Vadam Recipe | Koozh Vathal Recipe

Koozh Vadam is a crunchy and tasty South Indian style fryums made with rice batter. It is sun dried and stored, then fried whenever needed. It is a popular traditional side dish that is usually had along with sambar, rasam or even curd rice. Kids love it as a snack too because it is so light and crispy.
Course Side Dish
Cuisine Indian
Keyword Kerala Meal Sidedish, Kids Lunch Box, kids lunch box recipes, kids lunchbox, kids lunchbox menu, lunch box menu, lunch box recipes, lunch recipes, lunchbox recipes, meals, recipes, vadam recipes
Cook Time 15 minutes
Drying Time 3 days
Total Time 3 days 15 minutes
Servings 1 cup
Calories 106kcal
Author Sharmilee J

Ingredients

  • 1 cup raw rice
  • ΒΌ cup sago
  • 4 cups water
  • 3 green chilli
  • 1 teaspoon jeera
  • ΒΌ teaspoon roasted jeera powder
  • salt to taste

Notes

  • Cooking batter - Keep the flame low when cooking rice batter, keep stirring else lumps will form. I usually stand near and keep mixing.
  • Drying - Sun drying is very important, I have dried for 2 full days and it turned crispy. If the sun is less, dry for more days.
  • Testing - Always test fry 1 vadam before storing. If it is chewy, it means not dried enough. Keep it back for more drying.
  • Oil heat - Oil should be really hot. I drop one vadam to test, if it raises immediately then the oil is ready.
  • Storing - Store in clean airtight jar after vadams are fully dry and fried ones are cooled. This keeps them fresh longer.

Nutrition

Serving: 50g | Calories: 106kcal | Carbohydrates: 23g | Protein: 2g | Fat: 0.2g | Saturated Fat: 0.05g | Polyunsaturated Fat: 0.1g | Monounsaturated Fat: 0.1g | Sodium: 70mg | Potassium: 32mg | Fiber: 1g | Sugar: 1g | Vitamin A: 4IU | Vitamin C: 2mg | Calcium: 13mg | Iron: 0.4mg

The post Koozh Vadam Recipe | Koozh Vathal Recipe appeared first on Sharmis Passions.

❌